PRODUCT INSTRUCTIONS
|
|
|
- James Dennis
- 5 years ago
- Views:
Transcription

: Honda Pioneer 1000-5 2015-17 KIT CONTENTS: Digital gauge 700700 QTY 1 Power connector harness fused 700701 QTY 1 Temperature sensor")
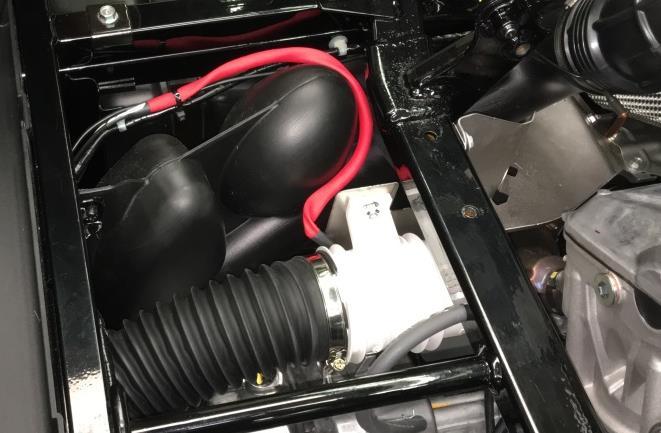
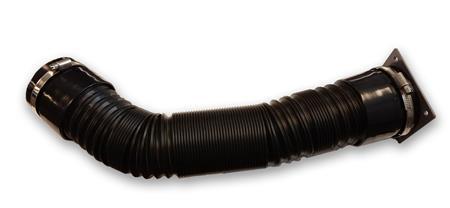
1 PRODUCT INSTRUCTIONS Thank you for purchasing genuine Design Engineering, Inc. products. Be sure to always wear the proper safety equipment when installing any DEI product. Design Engineering Inc. WILL NOT BE HELD LIABLE FOR IMPROPER INSTALLATION OR USE OF THIS PRODUCT. Please follow all instructions provided. If you are unsure of any installation procedure, please contact a certified Powersports technician. DESCRIPTION: Auxiliary Fan Kit PART NUMBER: APPLICATION(s): Honda Pioneer KIT CONTENTS: Digital gauge QTY 1 Power connector harness fused QTY 1 Temperature sensor - fin type QTY 1 Temp sensor wire extension 7ft QTY 1 Fan power wire extension 8ft QTY 1 Fan assembly QTY 1 Fan mounting bracket QTY 1 Fan mounting hardware kit QTY 1 Flex hose with couplers QTY 1 Hose clamp inv QTY 2 Exit duct plate QTY 1 Plastic rivets HDW-102 QTY 4 Cable ties 11 HDW-119 QTY 4 TOOLS NEEDED: Flat screw driver, 8mm, 10mm Socket, 5mm allen, Panel tool (optional), ¼ drill bit, sharp knife or cutting tool, 3 hole saw. OVERVIEW: This auxiliary fan kit is designed to help evacuate hot air from the engine compartment on the Honda Pioneer SxS. Vehicle Disassembly: 1. Remove main bottom seat cushion and raise rear cargo bed. (Latch release) 2. Using a 10mm socket remove main back rest cushion, (5 bolts). Fig.1 3. Remove the center plastic body panel between the seat cushions. (10 rivets) Use a panel tool or screw driver to pry the center rivet stake upward, releasing the rivet tension. Fig. 2, Fig Remove the small rubber mat under the seat cushion. (driver s side) Fig Remove front hood to access the battery area. 6. Remove small access panel on drive tunnel (Two 5mm Allen bolts) Initial Wiring: 7. Tie the temp sensor wire extension and fan power wire together using tape. 8. Feed the wires starting from the under hood battery area down through the drive shaft tunnel to the under seat area. Use the small access panel to help reach. Fig. 4, Fig. 5 Fig. 2


2 Fig. 3 Fig. 4 Fig Mount the temperature sensor probe using the supplied zip tie to the air intake and connect to extension wire. Fig. 6 Fan Install: 10. Remove the existing heat shield retaining bolt and mount the fan bracket using the supplied M6x20 bolt and washer. Fig Mark the drill location on the stock heat shield using the lower mounting hole on the bracket. Fig Rotate the bracket away and drill the second mounting hole using a 1/4" drill bit. Fig Insert the supplied M6x20 bolt, washer and locknut into the lower hole and tighten. 14. Mount the fan unit to the bracket using the supplied M6x20 bolts and locknuts. Fig Note: Fan Orientation, be sure to mount the housing with the fan blades facing the engine. The flow arrow stamped on the housing should be facing away from the engine. 16. Line up the duct plate beside the drive shaft and make a drill mark in the center, and ¼ rivet holes. Fig.11, Fig Remove the duct plate and using a 3" hole saw, drill a hole in the skid plate along with the four ¼ rivet holes. Fig Mount the duct exit plate to the bottom skidplate using the supplied plastic rivets. 19. Mount the flex hose to the fan and duct exit, using the couplers and hose clamps. Leave the hose clamps loose. Fig Tighten hose clamps on the flex hose couplers. 21. Plug fan in and secure wiring using supplied cable ties. See image for suggested wire routing. Fig. 15 Mounting the digital gauge: 22. There are several mounting possibilities on the dash board. Fig Once you have selected the location cut a 37.5mm x 25mm rectangle. Route the power wire, fan and temp sensor wires to this area. Powering the Fan: 24. Option 1. Mount the supplied power harness directly to the battery terminals, Red Positive, Black Negative. Option 2. Use a Posi-Tap (not
 under the")


3 Fig. 6 included) and tap directly into the ACC1 lead (black and White wire) under the fuse box. This will only power the fan when the ignition key is turned to the on position. 25. Plug the three wire harness leads into the digital gauge and gently snap the unit into the dash. 26. Reinstall body panels and seat cushions. 27. See separate supplied instructions for digital controller operation. Optional parts to consider: Part# Heat Shield Kit Front Seat Mark the location on the stock heat shield using the lower hole on the fan bracket for alignment. Fig. 7 Fig. 8 Fig. 9 Fig. 10 Fig. 11 Fig. 12


4 Fig. 13 Fig. 14 Fig. 15 Fig. 16


5 Fig. 17 Fig. 18 Fig. 19 INS-2016 Rev For additional installation tips and videos visit: deipowersports.com D e s i g n E n g i n e e r i n g, I n c. 604 Moore Rd Avon Lake, Ohio deipowersports.com
LGT-306L / LB Club Car Precedent LED Light Bar Bumper Kit Installation Instructions
 LGT-306L / LB Club Car Precedent LED Light Bar Bumper Kit Installation Instructions Caution: Please read through the instructions carefully. Before starting this project, remove the system s positive and
Part Number: TCA-712SE
 Date: 09.04.2013 TOYOTA CAMRY SE 2012-14 LED DRL Part Number: TCA-712SE Kit Contents Item # Quantity Reqd. Description 1 2 DRL s bezels w/led DRL 2 1 Driver Box 3 1 Harness bag 4 1 User s card 5 1 Cushion
GENUINE PARTS INSTALLATION INSTRUCTIONS
 GENUINE PARTS INSTALLATION INSTRUCTIONS DESCRIPTION: APPLICATION: PART NUMBER(S) REQUIRED FOR INSTALLATION: Dual Rear Seat USB Charge Port Kit Titan T99Q7 6LB0A (Excluding Single Ca T98Q7 5ZW2A (Metal
LGT-312L E-Z-Go TXT Light Bar Bumper Kit Installation Instructions
 LGT-312L E-Z-Go TXT 2014+ Light Bar Bumper Kit Installation Instructions Caution: Please read through the instructions carefully. Before starting this project, remove the system s positive and negative
Air Conditioner for M915 A0/A1 Truck
 RD-2-4530-0 Air Conditioner for M915 A0/A1 Truck INSTALLATION INSTRUCTIONS Install refrigerant compressor per instructions provided with compressor mount kit. CAUTION: Edges of sheet metal can be sharp!
Accessory Fuse Block. Please read this entire manual before proceeding with installation.
 Accessory Fuse Block Please read this entire manual before proceeding with installation. Kit Components: (1) Fuse Block Assembly (1) Harness (1) Positive power cable (1) Negative power cable (5) Pigtails
SCION FRS FOG LIGHTS. Part Number: SFR-313
 Part Number: SFR-313 Kit Contents Item # Quantity Reqd. Description 1 2 Light Housings 2 2 Fog Light bezels 3 1 Harness bag 4 1 User s card 5 1 Switch 6 1 Fuse jumper Hardware Bag Contents Item # Quantity
CAMRY STRIP LED DRL TOYOTA Part Number: Accessory Code: LDRS10. PIO / DIO Rev. A 02/26/13. Doc
 Doc. 02.126.00 TOYOTA CAMRY PIO / DIO Rev. A 2013-02/26/13 STRIP LED DRL Part Number: 00016-32280 Accessory Code: LDRS10 Conflicts - Only works on Camry SE Kit Contents Item # Quantity Reqd. Description
TOYOTA TACOMA LED DRL. Part Number: TTA-712
 Part Number: TTA-712 Kit Contents Item # Quantity Reqd. Description 1 2 DRL s bezels w/led DRL 2 1 Driver Box 3 1 Harness bag 4 1 User s card 5 1 Switch Hardware Bag Contents Item # Quantity Reqd. Description
Part Number: SFR-713. Hardware Bag Contents. General Applicability All models. Conflicts - Fog Lights. Date: SCION FRS LED DRL
 Date: 01.30.2014 SCION FRS 2013-2015 LED DRL Part Number: SFR-713 Kit Contents Item # Quantity Reqd. Description 1 2 DRL s bezels w/led DRL 2 1 Driver Box 3 1 Harness bag 4 1 User s card 5 1 Switch Hardware
Part Number: TAV-713 TOYOTA AVALON LED DRL
 Part Number: TAV-713 Kit Contents Item # Quantity Reqd. Description 1 2 DRL s bezels w/led DRL 2 1 Driver Box 3 1 Harness bag 4 1 User s card 5 1 Cushion pad 6 1 Switch 7 2 Drill Jigs Hardware Bag Contents
GENUINE PARTS INSTALLATION INSTRUCTIONS
 GENUINE PARTS INSTALLATION INSTRUCTIONS 1. 2. 3. 4. DESCRIPTION: Accent light Kit APPLICATION: Versa (2012) PART NUMBER: 999F3 AW008 - Universal Accent Lighting Kit. KIT CONTENTS: Item QTY Description
INSTALLATION INSTRUCTIONS
 INSTALLATION INSTRUCTIONS Accessory S P/N 08V67-SJC-101 Application 2012 RIDGELINE Publications No. AII 12006 Issue Date NOV 2011 PARTS LIST Back-up sensor harness 3 Wire ties with small clips (2 Not used)
Setting the World s Performance Standards
 Setting the World s Performance Standards 743 East Iona Road, Idaho Falls, ID 83401, (208) 529-0244 Fax (208) 529-9000 Forced Air Hot Air Elimination Kit (Bed Fan Kit) For 800 RZR-4 P/N 67-165 Kit Contents:
GENUINE PARTS INSTALLATION INSTRUCTIONS
 GENUINE PARTS INSTALLATION INSTRUCTIONS 1. 2. 3. DESCRIPTION: APPLICATION: PART NUMBER: Accent light Kit Cube (MY2013+) 999F3 AW000 - Universal Accent Lighting Kit. 4. KIT CONTENTS: Item QTY Description
GN-3A Polaris General SSV Works 3 Speaker Audio Kit
 GN-3A Polaris General SSV Works 3 Speaker Audio Kit pg 2 Disassembly, Wire and Amplifier Plate Installation pg 9 Glovebox Subwoofer Installation pg 17 Kick Panel Speakers Installation pg 21 MRB3 and Dash
Part Number: TTA-712. Hardware Bag Contents. General Applicability All models
 Date: 09.30.2013 TOYOTA TACOMA 2012-15 LED DRL Part Number: TTA-712 Kit Contents Item # Quantity Reqd. Description 1 2 DRL s bezels w/led DRL 2 1 Driver Box 3 1 Harness bag 4 1 User s card 5 1 Switch Hardware
INSTALLATION INSTRUCTIONS
 INSTALLATION INSTRUCTIONS Accessory S P/N 08V67-SJC-101 Application 2010 RIDGELINE Publications No. AII 42117 Issue Date AUG 2009 PARTS LIST Back-up sensor harness 3 Wire ties with small clip (2 Not used)
INSTALLATION INSTRUCTIONS
 INSTALLATION INSTRUCTIONS Accessory Application Publications No. All 12035 SYSTEM 2012 RIDGELINE Issue Date NOV 2011 PARTS LIST Security System Attachment Kit: P/N 08E55-SJC-101 Flange bolt Unit bracket
RESPA -CF/CFX Installation Kit for Komatsu D475A-5E0
 Sy-Klone part number: REV3K13 Installation Time: 7 to 8 hours Purpose: RESPA systems preclean and filter air through integrated Gideon power precleaning technology. Filtration is provided by a MERV 16
TOYOTA TACOMA LED DRL Black-Out
 TOYOTA TACOMA 2013 - LED DRL Black-Out Part Number: 00016-35021 Accessory Code: LDBO10 Conflicts - Fog Lights Kit Contents Item # Quantity Reqd. Description 1 2 DRL Housing 2 1 Driver Box 3 1 Harness bag
1963 GEN IV SUREFIT VINTAGE AIR CONDITIONING INSTALLATION
 by Randy Irwin 1963 GEN IV SUREFIT VINTAGE AIR CONDITIONING INSTALLATION Randy Irwin - Technical Writer Randy has been involved in the Chevy parts business for over 30 years. He is a wizard at creating,
GENUINE PARTS INSTALLATION INSTRUCTIONS
 GENUINE PARTS INSTALLATION INSTRUCTIONS 1. 2. 3. 4. DESCRIPTION: Accent light Kit APPLICATION: R42H (2011) PART NUMBER: 999F3 AW000 - Universal Accent Lighting Kit. KIT CONTENTS: Item QTY Description Service
INSTALLATION INSTRUCTIONS
 INSTALLATION INSTRUCTIONS Accessory Application Publications No. AII 22903-22963 ODYSSEY Issue Date MAY 2002 PARTS LIST Subwoofer Kit: P/N 08A39-EP7-100 Subwoofer 2 Cushion tapes 8 Wire ties (1 not used)
Tusk UTV Horn & Signal Kit Installation Instructions
 Tusk UTV Horn & Signal Kit Installation Instructions The Tusk UTV signal kit is designed to be a simple way to provide front and rear turn signals, license plate mount with light, horn, and rearview mirrors
pg 2 Disassembly, Wire and Amplifier Plate Installation pg 9 Glovebox Subwoofer Installation pg 13 Kick Panel Speakers Installation
 RZ3-5KRC RZR XP1000 & 2015+ RZR900 with Ride Command SSV Works 5 Speaker Audio Kit pg 2 Disassembly, Wire and Amplifier Plate Installation pg 9 Glovebox Subwoofer Installation pg 13 Kick Panel Speakers
GENUINE PARTS INSTALLATION INSTRUCTIONS
 GENUINE PARTS INSTALLATION INSTRUCTIONS 1. 2. 3. 4. DESCRIPTION: Security Light Kit APPLICATION: Altima Sedan (2013+) PART NUMBER: 999F4 AX010 - Universal Security Lighting Kit. KIT CONTENTS: Item QTY
Part Number: TAV-713. Kit Contents Item # Quantity Reqd. Description 1 2 DRL s bezels w/led DRL. Hardware Bag Contents.
 Date: 09.04.2013 TOYOTA AVALON 2013 - LED DRL Part Number: TAV-713 Kit Contents Item # Quantity Reqd. Description 1 2 DRL s bezels w/led DRL 2 1 Driver Box 3 1 Harness bag 4 1 User s card 5 1 Cushion pad
Conflicts - Fog Lights
 TOYOTA CAMRY 2013 - BLACKOUT LED DRL Part Number: 00016-32270 Accessory Code: LDBO10 Conflicts - Fog Lights Kit Contents Item # Quantity Reqd. Description 1 2 DRL Housing 2 2 DRL s bezels 3 1 Driver Box
TOYOTA TACOMA XSP-X LED DRL. Part Number: Accessory Code: LDRL10
 TOYOTA TACOMA 2013 - XSP-X LED DRL Part Number: 00016-35230 Accessory Code: LDRL10 Conflicts -None Kit Contents Item # Quantity Reqd. Description 1 2 LED DRL 2 1 Driver Box 3 1 Harness bag 4 Hardware Bag
Revised 10/23/2015 Page 2 of 10
 1.Remove the gauge, side panels, hood and headlight. Remove the air box from the throttle bodies then remove the seat and gas tank. 2.Carefully remove temp sensor from air box using a small pick or screw
INSTALLATION INSTRUCTIONS
 INSTALLATION INSTRUCTIONS Accessory Application 2011 RDX Publications No. BII 43544 Issue Date JULY 2010 PARTS LIST 2 Bolts, 12 x 40 mm Trailer Hitch Kit P/N 08L92-STK-200A Trailer hitch Hitch pin Hitch
Adjustable Light Kits E-Z-Go TXT All Models Installation Instructions
 Adjustable Light Kits E-Z-Go TXT All Models 1996-2013 Installation Instructions Caution: Please read through the instructions carefully. Before starting this project, remove the system s positive and negative
INSTALLATION INSTRUCTIONS
 INSTALLATION INSTRUCTIONS Accessory Application Publications No. AII 26031 2004 ODYSSEY Issue Date AUG 2003 NOTE: You cannot install the subwoofer in a vehicle equipped with both an under seat Navigation
LGT-311L Bumper LED Light Kit EZ-Go RXV Installation Instructions
 LGT-311L Bumper LED Light Kit EZ-Go RXV Installation Instructions Caution: Please read through the instructions carefully. Before starting this project, remove the system s positive and negative connections
GENUINE PARTS INSTALLATION INSTRUCTIONS
 GENUINE PARTS INSTALLATION INSTRUCTIONS DESCRIPTION: APPLICATION: PART NUMBER: Electronic Tailgate Lock Kit Nissan Titan 999M2-W3005 KIT CONTENTS: Item Qty. Part Description Service Part Number A 1 Electronic
Part Number: T4R-2N1. Hardware Bag Contents. General Applicability Models with factory fog light. Conflicts -
 Date: 07.30.2015 TOYOTA TUNDRA 2014-2016 LED Fog Light & DRL 2 in 1 Part Number: T4R-2N1 Kit Contents Item # Quantity Reqd. Description 1 2 DRL + Fog Light Housing 2 1 Driver Box 3 1 Harness bag 4 1 User
OIL COOLER KIT INSTALLATION INSTRUCTIONS PART NUMBER D E92 335is (N54 engine) with BMW M-Technic bumper and with stock oil cooler
 with BMW M-Technic bumper and with stock oil cooler") OIL COOLER KIT INSTALLATION INSTRUCTIONS PART NUMBER D570-0923 APPLICATION: 2011 E92 335is (N54 engine) with BMW M-Technic bumper and with stock oil cooler Congratulations for being selective enough to
OIL COOLER KIT INSTALLATION INSTRUCTIONS PART NUMBER D570-0923 APPLICATION: 2011 E92 335is (N54 engine) with BMW M-Technic bumper and with stock oil cooler Congratulations for being selective enough to
GENUINE PARTS INSTALLATION INSTRUCTIONS
 GENUINE PARTS INSTALLATION INSTRUCTIONS 1. 2. 3. 4. DESCRIPTION: Accent light Kit APPLICATION: Infiniti JX (2013) PART NUMBER: 999F3 YY000 - Universal Accent Lighting Kit. KIT CONTENTS: Item QTY Description
INSTALLATION INSTRUCTIONS
 INSTALLATION INSTRUCTIONS Accessory Application 2010 RDX Publications No. BII 41807 Issue Date JULY 2009 PARTS LIST 2 Bolts, 12 x 40 mm Trailer Hitch Kit P/N 08L92-STK-200A Trailer hitch Hitch pin Ball
GENUINE PARTS INSTALLATION INSTRUCTIONS
 GENUINE PARTS INSTALLATION INSTRUCTIONS DESCRIPTION: APPLICATION: PART NUMBER: KIT CONTENTS: Illuminated Kick Plate Maxima (Applicable ONLY to U.S. Market Vehicles with Build Date June 2012 or later) 999G6
Model 377, 379, 386, 388, Sleeper no window
 Installation Manual Model 377, 379, 386, 388, 389 63 Sleeper no window 2390 Blackhawk Road P.O. Box 6007 Rockford, IL 61125 www.nitesystem.com 1-866-204-8570 NITE Plus Installation Procedures 1-2 Table
INSTALLATION MANUAL P2068. Level of Difficulty. Parts List. Product Image. Notes and Maintenance. Tools Required. Easy
 INSTALLATION MANUAL P2068 Parts List 1 Grille guard 1 Driver / left frame mounting bracket 1 Passenger / right frame mounting bracket 1 Driver / left top mounting bracket 1 Passenger / right top mounting
Assembly Instructions
 Assembly Instructions Part Number Description Model Approx. Assembly Time 99994-0903 Windshield Wiper Kit Mule SX 1 Hour WARNING Improper installation of this accessory could result in an accident causing
INSTALLATION INSTRUCTIONS
 INSTALLATION INSTRUCTIONS Accessory Application Publications No. P/N 08L92-S0X-100 ODYSSEY AII 22049 Issue Date AUG 2000 PARTS LIST Trailer hitch Receiver cover 2 Small wire ties (1 not used) Ball mount
2015+ F-150 Active Exhaust Kit Installation Instructions P/N: (1117-5E292LITE)
") 2015+ F-150 Active Exhaust Kit Installation Instructions P/N: 422104 (1117-5E292LITE) 39555 Schoolcraft Rd, Plymouth MI, 48170 800.59.ROUSH 2015+ Ford F-150 Active Exhaust Kit Installation Instructions
2015+ F-150 Active Exhaust Kit Installation Instructions P/N: 422104 (1117-5E292LITE) 39555 Schoolcraft Rd, Plymouth MI, 48170 800.59.ROUSH 2015+ Ford F-150 Active Exhaust Kit Installation Instructions
INSTALLATION INSTRUCTIONS
 INSTALLATION INSTRUCTIONS Part# 22-2719 Complete Mounting System for Dual Viair Compressors For the most up-to-date instructions please visit www.updownair.com www.updownair.com 833-226-4863 I M P O R
GENUINE PARTS INSTALLATION INSTRUCTIONS
 GENUINE PARTS INSTALLATION INSTRUCTIONS 1. 2. 3. 4. DESCRIPTION: APPLICATION: PART NUMBER: KIT CONTENTS: Security light Kit Maxima 999F4 AX009 - Universal Security Lighting Kit. Item QTY Description Service
Installation MKIV Headlight Housings with Fog Lamps (Procedures apply to both MKIV Jetta and Golf)
") Page 1 This tutorial is provided as a courtesy by ECS Tuning. Service Procedure Installation Proper service and repair procedures are vital to the safe, reliable operation of all motor vehicles as well
Page 1 This tutorial is provided as a courtesy by ECS Tuning. Service Procedure Installation Proper service and repair procedures are vital to the safe, reliable operation of all motor vehicles as well
Part Number: STC-501. Hardware Bag Contents. General Applicability. Conflicts. Date: SCION tc LED DRL in FOG LIGHT HOUSING
 Date: 09.30.2013 SCION tc 2011-2013 LED DRL in FOG LIGHT HOUSING Part Number: STC-501 Kit Contents Item # Quantity Reqd. Description 1 2 LED DRL housings 2 2 Bezels 3 1 Driver Box 4 1 Harness bag 5 1 User
INSTALLATION INSTRUCTIONS
 INSTALLATION INSTRUCTIONS Accessory Application Publications No. AII 27336 ODYSSEY Issue Date SEP 2004 PARTS LIST 15 Black wire ties Backup Sensor Attachment Kit P/N 08V67-SHJ-100A Backup sensor control
INSTALLATION INSTRUCTIONS
 INSTALLATION INSTRUCTIONS Accessory Application Publications No. SYSTEM 2005 ACCORD All 27511 (DX, LX) 2-AND 4-DOOR Issue Date AUG 2004 PARTS LIST Security System Attachment (LX): P/N 08E55-SDA-100A Unit
Toyota 4RUNNER With/MR Overhead Video
 Toyota 4RUNNER With/MR 2010-10.2 Overhead Video Part Number: 00016-00110; Fit Kit-00110-14, Beige 00016-00120; Fit Kit-00120-14, Gray Accessory Code: ED7 Conflicts: Vehicles without a sunroof Kit Contents:
INSTALLATION INSTRUCTIONS
 INSTALLATION INSTRUCTIONS Accessory Application Publications No. AII 26042-26353 XM INTERFACE ODYSSEY EXCEPT EX-L WITH NAVI/RES Issue Date FEB 2004 PARTS LIST 8 Wire ties XM Radio Attachment P/N 08B15-S0X-100
INSTALLATION INSTRUCTIONS
 INSTALLATION INSTRUCTIONS Accessory Application Publications No. BII 37518 2008 RDX Issue Date JUL 2007 PARTS LIST 10 Plain washers, 12 mm Trailer Hitch Kit P/N 08L92-STK-200 Trailer hitch 6 Lock washers,
Toggle Button Kit. Installation Instructions
 Toggle Button Kit Installation Instructions Thank you for choosing the Double Apex Toggle Button kit. If you have any questions about the installation please do not hesitate to email us at support@doubleapex.co.
Installation Instructions for Lingenfelter GM 2500 Suburban & Yukon XL Auxiliary Fan System (with AC clutch controlled fan output)
") Installation Instructions for Lingenfelter 2007-2013 GM 2500 Suburban & Yukon XL Auxiliary Fan System (with AC clutch controlled fan output) PN L300080607 Revision - 1.1 Lingenfelter Performance Engineering
Installation Instructions for Lingenfelter 2007-2013 GM 2500 Suburban & Yukon XL Auxiliary Fan System (with AC clutch controlled fan output) PN L300080607 Revision - 1.1 Lingenfelter Performance Engineering
RANGER 900 POWER STEERING KIT
 RANGER 900 POWER STEERING KIT P/N 2880083 APPLICATION MY14 AND NEWER RANGER XP 900 MODELS IMPORTANT It is strongly recommended that this kit be installed by an authorized Polaris dealer. NOTE Use of this
INSTALLATION INSTRUCTIONS
 INSTALLATION INSTRUCTIONS Accessory Application Publications No. AII 25876 2004 PILOT (LX only) Issue Date AUG 2003 The subwoofer cannot be installed on a vehicle equipped with a navigation unit. Subwoofer
IT IS IMPORTANT THAT YOU OBTAIN THE CORRECT INFORMATION FOR YOUR VEHICLE, OR DAMAGE TO THE WIRING SYSTEM COULD OCCUR.
 Instructions for Universal Harness PRINT THESE INSTUCTIONS Gentex Mirror Installation Instructions Provided by www.rearviewautomirrors.com These instructions have been prepared to provide you with details
Conflicts Note: Toyota Tacoma 2015 LED Bed Lights Preparation. Part Number: Accessory Code: BU1000
 Toyota Tacoma 2015 LED Bed Lights Preparation Part Number: 00016-34089 Accessory Code: BU1000 Conflicts Note: Kit Contents Item # Quantity Reqd. Description 1 1 Hardware Kit 2 1 Driver s Side LED assembly
ROUSH Active IO Exhaust. Installation Instructions P/N: (R LITE) Fastback GT Convertible GT V8
 Fastback GT Convertible GT V8") Installation Instructions P/N: 422128 (R1318-5231LITE) Fastback GT Convertible GT V8 39555 Schoolcraft Rd, Plymouth MI, 48170 800.59.ROUSH ROUSH Active IO Exhaust Installation Instructions P/N: 422128
Installation Instructions P/N: 422128 (R1318-5231LITE) Fastback GT Convertible GT V8 39555 Schoolcraft Rd, Plymouth MI, 48170 800.59.ROUSH ROUSH Active IO Exhaust Installation Instructions P/N: 422128
TOYOTA RAV4/HV INTERIOR LIGHT KIT Preparation
 Preparation Part Number: PT413-42130 Kit Contents Item # Quantity Reqd. Description 1 1 Wire Harness 2 3 Hardware Bag Contents Item # Quantity Reqd. Description 1 20 Cable Tie 2 2 Scotchlok 3 2 Foam Pad
TOYOTA SIENNA LED DRL Black-Out
 TOYOTA SIENNA 2013 - LED DRL Black-Out Part Number: 00016-08021 Accessory Code: LDBO10 Conflicts - Fog Lights Kit Contents Item # Quantity Reqd. Description 1 2 DRL Housing 2 2 DRL s bezels 3 1 Driver
Conflicts: Vehicles with a sunroof
 Toyota 4Runner Non/MR 2010-10.2 Overhead Video Part Number: 00016-00110; Fit Kit -00110-15, Beige 00016-00120; Fit Kit -00120-15, Gray Accessory Code: ED6 Conflicts: Vehicles with a sunroof Kit Contents:
TOYOTA PRIUS V LED DRL Black-Out
 TOYOTA PRIUS V 2012 - LED DRL Black-Out Part Number: 00016-47021 Accessory Code:LDBO10 Conflicts Fog Lights Kit Contents Item # Quantity Reqd. Description 1 2 DRL Housing 2 2 DRL s bezels 3 1 Driver Box
Installation Instructions PowerBoard Automatic Retracting Running Board
 Installation Instructions PowerBoard Automatic Retracting Running Board Vehicle Application Dodge Ram Quad Cab Pickup 2002-2008 : 75101-15 Dodge Ram Mega Cab Pickup 2006-2009 : 75118-15 www.bestop.com
INSTALLATION INSTRUCTIONS
 INSTALLATION INSTRUCTIONS Part# 22-7810 Jeep JK/JKU ARB Mounting Kit 2007-2018.5 For the most up to date instructions please visit www.updownair.com www.updownair.com 833 226 4863 IMPORTANT INFORMATION
Installation Instructions PowerBoard Automatic Retracting Running Board
 Installation Instructions PowerBoard Automatic Retracting Running Board Vehicle Application Dodge Ram Quad Cab Pickup 2002-2008 : 75101-15 Dodge Ram Quad Cab Pickup, 2500 / 3500 / HD 2003-2009 : 75101-15
OIL COOLER KIT INSTALLATION INSTRUCTIONS PART NUMBER D E92 335i/xi (N55 engine) with BMW Standard bumper and with stock oil cooler
 with BMW Standard bumper and with stock oil cooler") OIL COOLER KIT INSTALLATION INSTRUCTIONS PART NUMBER D570-0924 APPLICATION: 2011-12 E92 335i/xi (N55 engine) with BMW Standard bumper and with stock oil cooler Congratulations for being selective enough
OIL COOLER KIT INSTALLATION INSTRUCTIONS PART NUMBER D570-0924 APPLICATION: 2011-12 E92 335i/xi (N55 engine) with BMW Standard bumper and with stock oil cooler Congratulations for being selective enough
RANGER MIDSIZE WINCH KIT
 RANGER MIDSIZE WINCH KIT P/N 2881669 APPLICATION ALL MY RANGER 400; MY11 AND NEWER RANGER 500 EXCEPT CREW BEFORE YOU BEGIN Read these instructions thoroughly and make sure all parts and tools are accounted
OIL COOLER KIT INSTALLATION INSTRUCTIONS PART NUMBER D
 OIL COOLER KIT INSTALLATION INSTRUCTIONS PART NUMBER D570-0904 APPLICATION: 2011-2012 E90 335i/xi (N55 engine) with BMW standard bumper and with stock oil cooler Congratulations for being selective enough
2016 HONDA 1000 Pioneer PN 3102 Turn signal / horn kit rev nc
 2016 Honda 1000 Pioneer STOP - THIS KIT IS DESIGNED SPECIFICALLY FOR 2016 HONDA 1000 PIONEER IF YOUR MACHINE IS NOT THIS MODEL DO NOT PROCEED. THIS KIT DOES NOT WORK ON THE PIONEER 500 nor 700 S. Contact
TOYOTA TACOMA Part Number: TTA-BGB16-DRL TTA-BGP16-DRL
 TOYOTA TACOMA 2016-17 Date: 10.29.2016 Billet Grille w/led DRL Part Number: TTA-BGB16-DRL TTA-BGP16-DRL Kit Contents Item # Quantity Reqd. Description 1 2 LED DRL 2 1 Driver Box 3 1 Switch 4 1 User Card
INSTALLATION INSTRUCTIONS HIDDEN WINCH MOUNTING KIT No for Chevrolet & GMC Trucks (for Warn Winches M6000, M8000, XD9000 & HS9500 only)
") INSTALLATION INSTRUCTIONS HIDDEN WINCH MOUNTING KIT No. 61770 for Chevrolet & GMC Trucks (for Warn Winches M6000, M8000, XD9000 & HS9500 only) Warn Light Bar 61090 and many other grille guards can be mounted
INSTALLATION INSTRUCTIONS HIDDEN WINCH MOUNTING KIT No. 61770 for Chevrolet & GMC Trucks (for Warn Winches M6000, M8000, XD9000 & HS9500 only) Warn Light Bar 61090 and many other grille guards can be mounted
INSTALLATION INSTRUCTIONS
 INSTALLATION INSTRUCTIONS Accessory Application Publications No. BII 31129 REARVIEW CAMERA 2006 RL Issue Date OCT 2005 PARTS LIST Attachment Kit P/N: 08B21-SJA-B00 Template Rear camera trim 6-Pin connector
Depress each tab as you pull the bezel off. The bezels are tight. L.H. shown.
 2013-2014 Ford Mustang V6 & Boss 302 Lower Valance Fog Light Kit Parts List: Quantity: Tool List: Fog light & bulb with bracket 2 Flat head & Phillips screwdriver Black bezels 2 Ratchet & Socket set OR
INSTALLATION INSTRUCTIONS PART NUMBER AEM C (GUN METAL GRAY FINISH)
") Equipped with AEM Dryflow Filter No Oil Required! INSTALLATION INSTRUCTIONS PART NUMBER AEM-21-805C (GUN METAL GRAY FINISH) 2016.5-17 CHEVROLET CRUZE 1.4T ITEM NO. PART NUMBER DESCRIPTION QTY. 1 21-2038DK
Equipped with AEM Dryflow Filter No Oil Required! INSTALLATION INSTRUCTIONS PART NUMBER AEM-21-805C (GUN METAL GRAY FINISH) 2016.5-17 CHEVROLET CRUZE 1.4T ITEM NO. PART NUMBER DESCRIPTION QTY. 1 21-2038DK
Toggle Button Kit. Installation Instructions MK5 / MK6 Golf, MK5 Jetta
 Toggle Button Kit Installation Instructions MK5 / MK6 Golf, MK5 Jetta Thank you for choosing the Double Apex Toggle Button kit. If you have any questions about the installation please do not hesitate to
INSTALLATION GUIDE. AV8900H Dual Multimedia Headrest Replacement System
 INSTALLATION GUIDE AV8900H Dual Multimedia Headrest Replacement System NOTICE OF INTENDED INSTALLATION AND USE AV8900H VIDEO PRODUCTS ARE NOT INTENDED FOR VIEWING BY THE DRIVER, AND ARE TO BE INSTALLED
OIL COOLER KIT INSTALLATION INSTRUCTIONS PART NUMBER D
 OIL COOLER KIT INSTALLATION INSTRUCTIONS PART NUMBER D570-0907 APPLICATION: 2011-12 E90 335i/xi (N55 engine) with BMW M-Technic bumper and without stock oil cooler Congratulations for being selective enough
GENUINE ACCESSORIES INSTALLATION INSTRUCTIONS
 GENUINE ACCESSORIES INSTALLATION INSTRUCTIONS PART NUMBERS: APPLICABLE MODELS: 0000-89-G14A (PORT) Electrochromic Mirror Kit w/ Compass/Temp/HomeLink 2004 Mazda 3 0000-8C-G14A (PDC) KIT CONTENTS: ITEM
Brake and Tail Light Kit Workman 1100/2100 and Twister Utility Vehicles
 Form No. 5-90 Brake and Tail Light Kit Workman 00/00 and Twister Utility Vehicles Part No. 0 6697 Installation Instructions Important Before installing this kit, you must have Wiring kit number 99 79 installed
APPROXIMATE ASSEMBLY TIME (R&R): 45 minutes -1-
: 45 minutes -1-") PLOW ANGLE CONTROL KIT P/N 2879224 Application For use with the Glacier Pro Plow System P/N 2879103 on the below listed models MY09 and newer full size Ranger 500, 700 & 800 models MY13 and newer Ranger
PLOW ANGLE CONTROL KIT P/N 2879224 Application For use with the Glacier Pro Plow System P/N 2879103 on the below listed models MY09 and newer full size Ranger 500, 700 & 800 models MY13 and newer Ranger
Hayes TrailTrac Kit Installation Guidelines Polaris Rush / Pro-R / Indy
 Models: 2010-2014 Polaris Rush / Pro-R / Indy Packing List 1 Electronic Control Unit (ECU) 1 ECU Velcro, 3 inch 1 Switch face plate 1 Switch face plate adhesive 1 Switch 1 Wiring harness 1 Fully pre-filled
INSTALLATION INSTRUCTIONS
 INSTALLATION INSTRUCTIONS Accessory Application Publications No. P/N 08E49-S2A-100 2004 S2000 AII 26325 Issue Date OCT 2003 PARTS LIST Hood switch harness TOOLS AND SUPPLIES REQUIRED #2 Phillips screwdriver
TOYOTA TACOMA FOG LIGHT
 TOYOTA TACOMA 2012 - FOG LIGHT Part Number: 00016-35220 Accessory Code: LF10 Conflicts - Factory Fog Lights Kit Contents Item # Quantity Reqd. Description 1 2 Fog Lamps 2 1 Hardware bag 3 1 Switch Assembly
PHASE 3 POWERSPORTS AUDIO KIT RZR POLARIS. pg 2 Disassembly, Wire and Amplifier Plate Installation. pg 9 Glovebox Subwoofer Installation
 POLARIS RZR PHASE 3 POWERSPORTS AUDIO KIT pg 2 Disassembly, Wire and Amplifier Plate Installation pg 9 Glovebox Subwoofer Installation pg 13 Kick Panel Speakers Installation pg 25 MRB3 and Dash Kit Installation
YARIS 4-DOOR 2007 INTERIOR LIGHT UPGRADE
 Document # 3999 4/26/06 4-DOOR 2007 INTERIOR LIGHT UPGRADE Preparation Part Number: 00016-52060 Code: IL1 Kit Contents Item # Quantity Reqd. Description 1 1 12 Light Guide 2 1 7 Light Guide 3 1 Hardware
INSTALLATION INSTRUCTIONS
 INSTALLATION INSTRUCTIONS Accessory Application Publication No. MII 15249 WINCH MOUNT KIT P/N 08L70-HL3-A41 SXS700/M4/M2 Issue Date September 2015 PARTS LIST No. Description Qty (1) Winch bracket 1 (2)
Part Number: T4R-2N1. Hardware Bag Contents. General Applicability Models with factory fog light
 11/10/16 TOYOTA CAMRY 2012-2014 2 in 1 LED UPGRADE KIT Part Number: T4R-2N1 Kit Contents Item # Quantity Reqd. Description 1 2 DRL + Fog Light Housing 2 1 Driver Box 3 1 Harness bag 4 1 User s card 5 1
Revised 10/22/2014 Page 2 of?
 1.Remove side panels, hood, seat, fuel tank, and 2.Remove stock air box, remove fuel line muffler. Save exhaust springs and rubber muffler mounts for turbo bracket. Sand back surface flat for mounting.
GENUINE PARTS INSTALLATION INSTRUCTIONS
 GENUINE PARTS INSTALLATION INSTRUCTIONS 1. 2. 3. 4. DESCRIPTION: APPLICATION: PART NUMBER: KIT CONTENTS: Accent light Kit Pathfinder 999F3 XZ000 - Accent Lighting Kit. Item QTY Description Service Part
GENUINE PARTS INSTALLATION INSTRUCTIONS
 GENUINE PARTS INSTALLATION INSTRUCTIONS 1. 2. 3. 4. DESCRIPTION: Security Light Kit APPLICATION: Altima Coupe and Sedan (2011+) PART NUMBER: 999F4 AX008 - Universal Security Lighting Kit. KIT CONTENTS:
Polaris Axys Sidekick Installation Instructions
 2016-2017 Polaris Axys Sidekick Installation Instructions 1. Remove hood and side panels. 2. Remove fasteners and slide console back. 3. Remove belt and driven clutch. 4. Remove clutch cover/ oil-tank
TOYOTA FJ CRUISER 2007 AUXILIARY LIGHTS Preparation
 TOYOTA FJ CRUISER 2007 AUXILIARY LIGHTS Preparation Part Number: PT297-35061 Kit Contents Item # Quantity Reqd. Description 1 2 Driving Lamp Assembly 2 1 Switch Harness 3 1 Lamp Harness 4 2 Stone Shield
GENUINE PARTS INSTALLATION INSTRUCTIONS
 GENUINE PRTS INSTLLTION INSTRUCTIONS 1. DESCRIPTION: Nissan Portable Navigation 2. PPLICTION: Rogue 2008 3. PRT NUMBER: Portable Navigation Device (PND) main kit (999Q5 KU000) PND housing (999Q5 GU00)
INSTALLATION INSTRUCTIONS FUEL SURGE TANK KIT
 INSTALLATION INSTRUCTIONS FUEL SURGE TANK KIT BMW E46 3-Series, Excl Convertible Document: 19-0056 Support: info@radiumauto.com Relieve fuel pressure in vehicle before beginingthe installation. Disconnect
PHASE 3 POWERSPORTS AUDIO KIT MAVERICK X3 CAN-AM. pg 3 Disassembly, Wire and Amplifier Plate Installation. pg 11 Dash Kit Installation
 CAN-AM MAVERICK X3 PHASE 3 POWERSPORTS AUDIO KIT pg 3 Disassembly, Wire and Amplifier Plate Installation pg 11 Dash Kit Installation pg 15 Underseat Subwoofer Installation pg 19 Dash Speaker Pods Installation
ATTENTION. Custom Dynamics UTV Turn Signal Kit Installation Instructions
 Custom Dynamics UTV Kit Installation Instructions We thank you for purchasing the Custom Dynamics UTV LED Kit. Our products utilize the latest technology and high quality components to ensure you the most