PULLDOZER Scraper Pan Operator s & Assembly Manual. Last Updated: July 27, 2017
|
|
|
- Malcolm Weaver
- 5 years ago
- Views:
Transcription

1 1220 Scraper Pan Operator s & Assembly Manual Last Updated: July 27, 2017 Bridgeview Manufacturing Inc. P.O. Box 4 Gerald, Saskatchewan, Canada S0A 1B0 Phone: Fax: bmi@sasktel.net 1


2 BRIDGEVIEW MANUFACTURING INC. Your Authorized Dealer Your Serial Number The serial number is located on the front left side corner of the bowl. (S/N PD1200 & up) The serial number is located on the left wall panel of the machine (S/N PD1199 & down) 1
3 TABLE OF CONTENTS 1 INTRODUCTION Safety Precautions Recognize Safety Information Power Requirements: Hydraulic Systems: Transportation Dimensions Lights and Marking Safety Locks Operation and Features Operating Scraper unit Operating Guidelines Loading the Scraper Preparing the Tractor Loading Specifications Table Attaching Scraper to Tractor Disconnecting the Scraper from Tractor Top Loading Push Loading Overload Conditions Material Density Table Hydraulics Adjustments Implement Swivel Hitch Front Hose Holder Cutting Depth Indicator Sequence Apron and Ejector Valve Spindle offset Ejector Clearance Specification Maintenance & Lubrication Wheel and Tires Greasing Cutting Edge Wear UHMW Plate/Bar Wear Parts Book Swivel Hitch Assembly Main Hitch Assembly Bowl Assembly Bowl-Hitch Assembly Front Add-Ons Apron Safety Latch & Lift Cylinder Pin
4 4.3.4 Tube Cover Assembly Cutting Edges Rear Components Assembly Wheel Assembly Ejector Assembly Apron Assembly Replacement Bushings Hydraulic Cylinders Assembly Decals Hydraulic Components Hydraulic Schematic Electrical Components Light Wiring Schematic Bolt Torque Values Troubleshooting NOTES
5 1 INTRODUCTION Thank you for purchasing your new Pulldozer 1220 from Bridgeview Manufacturing. With the proper operation and service as outlined in this manual, the Pulldozer will provide you with years of trouble free operation. The Pulldozer 1220 is a 20-yard scraper, specially suited for moving material fast with an agricultural scraper equipped tractor. An optional GPS Tower is available, for more accurate depth control. A cutting depth indicator comes standard to provide accurate depth control. The values on the decal indicate inches. A standard hydraulic accumulator is installed on the machine to reduce the shock load on the tractor and provide a much smoother ride. A sequencing valve comes standard to reduce the amount of tractor remotes needed to operate the Pulldozer This is a complete safety, operation, and parts manual for the Pulldozer. The manual covers in detail how to use your new machine safely and effectively. The procedures outlined in this manual should be followed to ensure safe operation and longevity of your machine. The parts and assembly manual covers all parts you may need to order in case of accident or breakdown and how to install them. Please read completely through this manual before beginning operation of your new machine. 4
6 1.1 Safety Precautions The following safety precautions MUST be followed to ensure the safe operation of the Pulldozer Tow at speeds not exceeding 31 miles/hour (50 km/h) when unloaded. Slow down for hills, curves, rough area, and in advance of braking to prevent loss of control and possible injury or death. Tow at speeds not exceeding 10 miles/hour (16 km/h) when loaded. Slow down for hills, curves, rough area, and in advance of braking to prevent loss of control and possible injury or death. Read and follow the Highway Transport section before towing on public roads. Always turn off tractor, ensure parking brake is applied before leaving the operating platform, and remove key when working on machine Always leave scraper bowl on the ground when not operating. Always leave apron and ejector hydraulic cylinders, when not operating, in the de-stroked position. Stand clear of the Pulldozer 1220 while in operation. Do not stand near inside the Pulldozer 1220 during opening or closing. Beware of pinch points at all articulating joints. Support Raised Equipment when working on machine Be Aware of loading material density Do Not over load scraper and tractor design limits 5


7 1.1.1 Recognize Safety Information This is a pinch point symbol. When you see this symbol on your machine or in this manual, be aware of the potential for personal injury. 6

8 1.1.2 Power Requirements: The Pulldozer is designed to utilize the pulling power of a large four-wheel-drive tractor. The following table shows the recommended drawbar horsepower required to pull a Pulldozer Pulling with too large a tractor risks damaging the machine, while too small a tractor risks overloading and damaging the tractor. Horsepower 20 Yard Scraper HP Call Before You Dig: Every time you dig in the ground, wherever it may be, THERE IS DANGER BELOW! You run the risk of loss of life or damage to property if you hit any of the many buried cables, conduits, gas or oil pipelines and/or other underground facilities that serve our cities, towns, and rural areas. Contact the nearest ONECALL (Call Before You Dig) services for optimal diligence towards preventing damage to underground infrastructure. Canada Province Number Website British Columbia Alberta Saskatchewan Manitoba Ontario Quebec United States All states TransCanada Pipelines Canada United States

9 1.1.3 Hydraulic Systems: Hydraulic systems store considerable energy. They are used to: lift and change the position of attachments operate hydraulic motors assist in steering and braking Leaks from hydraulic systems are a serious hazard because of the high pressure and temperature of the fluid contained in the system. Even fine jets of hydraulic fluid can burn or pierce skin and tissue. Workers should: Never inspect hydraulic hoses with bare hands; Wear long sleeves, heavy gloves and safety glasses when checking for leaks; Follow the instructions (blade to be on the ground and no pressure in hydraulic lines during maintenance) because the specific procedures for servicing these systems are very important for one's safety. Where appropriate, a properly qualified and certified mechanic should perform repairs and maintenance. Work should not be performed under raised hydraulic equipment. If air has been allowed to enter hydraulic hoses or cylinders, bleed hydraulic system by cycling all hydraulic circuits several times before use. If there is a failure in the hydraulic system, unsupported raised equipment could suddenly lower, causing serious personal injury or death. 8
10 1.2 Transportation When transporting the Pulldozer 1220 on public roads there are a number of safety precautions that must be takin to ensure safety to everyone on the road Dimensions Pulldozer 1220 Transport Width 12 Transport Height 12 Transport Length 32 9 Transport Weight (Gross) 28,000 lbs. Transport Weight (Tongue) 7,200 lbs. Ensure that road restrictions do not prohibit these dimensions, and that the towing vehicle and hitch are properly rated for the weight (both gross and tongue). DO NOT EXCEED 31 mph (50 km/h) DURING TRANSPORT. 9

11 1.2.2 Lights and Marking The Pulldozer 1220 comes standard with a light kit for better visibility. The lights can be plugged into the standard 7-pin round trailer plug on a tractor. The lights function as flashing amber lights, with solid red tail lights. Ensure that they are functioning properly before towing. Ensure that the SMV (Slow Moving Vehicle) sign is in place and visible. 10


12 1.2.3 Safety Locks Ensure that all the safety locks and pins are ON in the right position when working on machine. This will prevent injury to personal working on the machine. Apron safety latch swing when apron hydraulic cylinders are fully stroked Lift Cylinder Safety Lock Put safety pin in when lift cylinders are near fully stroked 11
13 2 Operation and Features 2.1 Operating Scraper unit NOTE: Most tractor manufacturers recommend loading speed of 4 mph (6.44 km/h) or above. NOTE: Max oil pressure allowed into the scraper unit is 3,000 psi. If tractor has capability of applying more pressure there stands a possibility of blowing hydraulic hoses, hydraulic cylinder seals, etc. The minimum oil pressure needed to run the scraper unit is 2,200 psi. The minimum hydraulic flow needed to run the scraper is 25 GPM Operating Guidelines 1. Load in 6 th gear or above and target 1900 rpm. 2. Do not shift gears when loading 3. Do not turn when loading 4. Activate differential lock before loading and turn off before transporting 5. Reduce speed when haul roads are rough 6. Do not level ground with apron closed a. If one wishes to level the ground, raise the apron and position the ejector roughly a foot back from the cutting edge 7. Set scrapers cutting edge on the ground when top loading 8. Maintain speeds above 4.4 mph (7.08 km/h) when push loading 9. Maintain tractor wheel hub torque per Operator s Manual 10. Maintain scraper hardware torque per Operator s Manual 11. Complete daily inspections on tractor and scraper Loading the Scraper 1. Load in the lowest gear although high enough to stall the tractor without spinning the tires. On loose sand this will be a higher gear, on clay it will be a lower gear 2. Operate at full throttle 3. While loading, use the sound of the engine as a reference of how deep the scraper is cutting a. A full scraper load can be achieved by listening to the sound of the engine and adjusting the depth of cut to keep the engine working at full power 12
14 4. Apron positioning when loading is critical. Have the apron a foot or two open, from the closed position, so the loose material entering the bowl can rest on the apron and enter the bowl more quickly. a. Ejectors scrapers generally load best with the apron partially closed as the scraper reaches 2/3 to ¾ capacity. 5. When top loading the scraper make sure to remove the GPS tower to avoid damage. 2.2 Preparing the Tractor Scraper applications potentially have the power to overload tractors beyond design limits and can affect tractor reliability. Scraper tractors require specifications for ballasts, wheel air pressure, hitch adapter, and tires that differ from typical agricultural applications. Model Capacity (yd 3 ) Loading Specifications Table Scraper Weight (lbs.) Total Weight (lbs.) a Tongue Split Empty Vertical Hitch Load (lbs.) Loaded Vertical Hitch Load (lbs.) Tractor (HP) Pulldozer (15.29 m 3 ) 28,000 (12,700 kg) 78,000 (35,380 kg) 26% (Empty) 28% (Loaded) 7,280 (3,303 kg) a Material Density 2,500 lbs./cu. Yd. (See table below for material density s) 21,840 (9,906 kg)

15 2.3 Attaching Scraper to Tractor NOTE: Tractor must have minimum of two hydraulic remotes for a single scraper hookup. Working pressure for 1220 Pulldozer are from 2,200 psi to 3,000 psi 1. Install the quick attach drawbar on the tractor 2. Back tractor into position, within six inches of the scraper s hitch 3. Connect the hydraulic hoses from the scraper to the tractor a. Scraper Hose #1 (Lift Cylinder Base End) Tractor Hydraulic Remote #1 b. Scraper Hose #2 (Lift Cylinder Shaft End) Tractor Hydraulic Remote #2 c. Scraper Hose #3 (Apron & Ejector Cylinder Base End) Tractor Hydraulic Remote #3 d. Scraper Hose #4 (Apron & Ejector Cylinder Shaft End) Tractor Hydraulic Remote #4 4. Install 7-pin electrical plug to tractor 14
 9. Lower scraper hitch onto tractor quick attach drawbar (E) 10. Push the locking handle (A) to the down position 11.")
 6. Drive forward to clear drawbar or quick hitch (G) 7.")
16 5. Remove the secondary lock pin (B) from the drawbar or quick attach hitch 6. Lift the locking handle (A) 7. Raise or lower scraper until its tongue matches the drawbar of the tractor (C) 8. Back up tractor until tractor hitch is directly underneath the scraper hitch (D) 9. Lower scraper hitch onto tractor quick attach drawbar (E) 10. Push the locking handle (A) to the down position 11. Insert the secondary locking pin (B) 2.4 Disconnecting the Scraper from Tractor 1. Park on level ground 2. Remove locking pin (B) 3. Push locking handle forward (A) 4. Reinsert locking pin to hold hitch in open position 5. Lift scraper until the hitch is higher than the rear quick hitch (F) 6. Drive forward to clear drawbar or quick hitch (G) 7. Lower scraper tongue to the ground/stand (H) 8. Depressurize all hydraulic remotes 9. Disconnect hoses and wire harness 15
17 2.5 Top Loading Top loading can be an efficient way of loading in certain circumstances. Caution must be taken when top loading to prevent frame and cylinder stress. REMOVE GPS Tower to avoid collision or damage to machine. Top loading can cause two known overloading scenarios: Hitch, Tongue, Frame, and Cylinder Stress - THE SCRAPER OPERATOR MUST LOWER the scraper to the ground in such the blades/cutting-edge rests firmly on the ground. This will relieve the shock or spike pressure when material is dropped into the scraper. Make sure tractor is in park or set brake. Exceeding Scraper Capacity Top loading material can overload the scraper when the weight per cubic yard surpasses the scraper capacity. This is especially true when loading wet material, which is heavier. To avoid this overload condition, DO NOT fill above struck level when top loading. See chart below on material density and section 2.10 for struck level 2.6 Push Loading Push loading can come in handy in certain conditions. When push loading maintain speeds above 4.4 mph (7.08 km/h). Make sure you are pushing inline (parallel) with the loading scraper unit to prevent damage and failure to scraper unit. 2.7 Overload Conditions The warranty of this product applies to only defects in material and workmanship and does not cover parts that fail because of poor maintenance or improper use. Failures due to overload conditions are NOT covered. MAKE SURE you know the material you are going to be loading then determine to how full you can load the scraper before overloading both the scraper and tractor. Table Material Density below shows densities of common material. See Table Loading Specifications for design limits 16
18 Some Scraper overload conditions are: Push loading or assist loading Transporting scraper at high speeds over rough terrain Leveling terrain with the apron closed Pulling a scraper by a tractor above the horsepower rating Top loading scraper with lift cylinders in raised position Jamming or jack knifing the tractor and scraper Not properly torqueing the bolts as specified in Operator s Manual When top loading, do not fill past struck capacity Packing top loaded material with excavator bucket Unloading rock into the scraper bowl Overloading scraper with dense material Overloading tractor design limits Material Density Table Material Density (lb./cu. yd.) Wood Chips 700 Peat, Dry 750 Peat, Wet 1,170 Cinders 950 Topsoil 1,600 Coal 1,780 Caliche 2,100 Earth, Loam 2,100 Earth, Dry 2,550 Earth, Wet 2,700 Shale 2,250 Sand, Dry 2,400 Sand, Moist 2,850 Sand, Wet 3,100 Sand and Gravel, Dry 2,900 Sand and Gravel, Wet 3,400 Clay, Dry 2,500 Clay, Wet 2,800 Limestone, broken or crushed Rock, Granite, Blasted and Broken 2,600 2,800 17

19 2.8 Hydraulics There are two sets of hydraulic hoses to connect to the tractor. Each hose has a number marker to identify its function. They should be connected at best convenience for the tractor's controls. Note that hoses are paired in 2 s and the following table shows the operation when pushing oil into the hose with the smaller number out of the pairs. Hose Marker Standard 2-Remote 1 and 2 Raises Scraper 3 and 4 Opens Apron, Pushes Ejector Forward 2.9 Adjustments Implement Swivel Hitch Make sure that the hitch height is adjusted to match your tractor s particular drawbar height. Holes Used Drawbar Height (inches) 1, 2, 3, 4, 5, 6, 7, and , 3, 4, 5, 6, 7, 8, and , 4, 5, 6, 7, 8, 9, and


20 2.9.2 Front Hose Holder Adjust hose holder to accommodate your tractor. Make sure hydraulic hoses are out of the way of any pinch points. (S/N PD1200 & up) (S/N PD1199 & down) 19

21 2.9.3 Cutting Depth Indicator The Pulldozer 1220 is equipped (standard) with a cutting depth indicator. The values on the decal represent inches. This gives the operator a sense of knowledge on how deep the cutting edges is piercing the material. To properly set the height indicator needle (28258 in section Front Add-Ons) you must be on level ground. Put cutting edge on ground, not penetrating earth just resting, then center the needle between the 0 section by loosening the two 3/8 x 1-1/4 bolts and 3/8 nylon lock nuts. Adjust accordingly then tighten up hardware. 20

22 2.9.4 Sequence Apron and Ejector Valve The scrapers sequence valve blocks (x2), which includes the ejector valve sequence cartridge and apron sequence valve cartridge, is used to control two hydraulic circuits with one hydraulic remote. The scraper should be empty for adjusting sequence valve cartridge. The valves may need to be adjusted for different tractor flow/pressure combinations for proper function of the apron and ejector. When introducing oil into number 3 hydraulic hose the apron will fully open then the ejector shall push forward (pushing dirt out of the bowl). When introducing oil into the number 4 hydraulic hose the ejector shall retract then the apron will fully close. If the operation of this procedure differs refer to below procedures. Max oil pressure allowed into the scraper unit is 3,000 psi. If tractor has capability of applying more pressure there stands a possibility of blowing hydraulic hoses, hydraulic cylinder seals, etc. The minimum oil pressure needed to run the scraper unit is 2,500 psi. The minimum hydraulic flow needed to run the scraper is 25 GPM. Left Hand Side Sequence Valve Cartridge Procedure: 1. Loosen lock nut (9/16 ) on sequence valve cartridge 2. Activate tractor hydraulic remote 3. Turn set screw (4 mm) clockwise until apron opens (rises), before the ejector cylinder proceeds to open. 4. Turn the set screw an additional ¼ turn clockwise and tighten lock nut (9/16 ) 21
23 Right Hand Side Sequence Valve Cartridge Procedure: 1. Loosen lock nut (9/16 ) on sequence valve cartridge 2. Activate tractor hydraulic remote 3. Turn set screw (4 mm) counter-clockwise until apron holds in a raised position while ejector cylinder is being retracted 4. Turn the set screw an additional ¼ turn counter-clockwise and tighten lock nut (9/16 ) Spindle offset The scraper spindle is equipped with two holes. One for a narrow stance (11 from outside tire to outside tire) and one for wide stance (11 4 from outside tire to outside tire) Ejector Clearance The rollers are on a cam shaft to make it adjustable to increase or decrease the clearance between the ejector and bowl floor. To adjust do the following steps below: (See illustration on next page) 1. Loosen the clamp bolt (A) 2. To allow for clearance between ejector and the bowl floor, rotate roller shaft (B) clockwise. (opposite rotation on opposite roller) 3. To decrease clearance between ejector and bowl floor, rotate roller shaft (B) counter-clockwise. (opposite rotation on opposite roller) 4. Once done adjusting clearance, tighten clamp bolt (A) 5. Repeat steps 1 thru 4 to adjust the other floor roller. 6. Start the tractor engine and move the ejector forward and backwards. 22
24 7. Shut tractor off and re-check clearance. Repeat adjustment procedure if necessary Specification Machine 1220 Pulldozer Operation Scraping Width 11 Bowl Struck (level with bowl) 14 yards Bowl Heaped 20 yards Max Depth of Cut 8 Transport Width 12 Height 12 Length 32 Weight (Total) 28,000 lbs. Weight (Tongue) 7,200 lbs. Min Ground Clearance 15 Tires Size 875/65R29 Pressure 80 psi Wheel Nut Torque 650 ft-lb 23
25 3. Maintenance & Lubrication General maintenance of your Pulldozer 1220 scraper should be done on a regular basis. This includes checking all bolts to ensure they are tight, ensuring all joints are properly greased, and that all moving parts are functioning correctly. Before servicing the machine, block the wheels, shut the tractor off, set the bowl on the ground, and remove the tractor key. If working under the machine, block the machine up for a safe and secure working area. Before the scraping season, a full inspection of the scraper should be done, ensuring that the wheel hubs are tight and fully greased, any broken blades replaced, and no hydraulic leaks are present. After 10 hours of work, all bolts and nuts should be checked and tightened if necessary After every 10 hours of work, all grease zerks should be greased After 50 hours of work, all bolts should be rechecked and tightened if necessary. Check wheel bearings and adjust if necessary After 300 hours of work, clean and repack wheel bearings. If necessary, replace cutting edges, worn pins, etc. 3.1 Wheel and Tires Maintaining proper tire pressure will help to alleviate puncture problems on rough terrain. Check tires for wear and tear on a regular basis. Tire Size 875/65R29 Tire Pressure 80 psi Wheel Dry Bolt Torque 650 ft-lb Warranty does not cover damaged rims and hubs due to loose wheel bots. The tire manufacturer covers tire warranty. See your local tire dealer for service and replacement. 24
26 3.2 Greasing The Pulldozer 1220 scraper is fitted with a number of grease zerks. It is important that these locations be lubricated as per the maintenance schedule. Location QTY A Swivel Hitch Point A 2 B Swivel Hitch Point B 1 C Swivel Hitch Point C 2 D Swivel Hitch Point D 2 E Swivel Hitch Point E 2 F Swivel Hitch Point F 4 G Swivel Hitch Point G 2 H Lift Pivot 2 Timeline 10 hours 25
27 M Location QTY Timeline I Lift Cylinder (Base End) 2 J Lift Cylinder (Shaft End) 2 10 hours K Apron Cylinder (Shaft End) 2 L Ejector Cylinder (Shaft End) 1 50 hours M Wheel Hub hours 26
28 3.3 Cutting Edge Wear It is very important to keep your machine in optimal working condition, if not your efficiency and productivity drops off substantially. Keeping your blades in working condition decreases the load on the tractor. Different types of blades operate better in different conditions. Picking the right blade for the job increases productivity. Straight blades operate better in loose/sandy conditions because there is less force needed to penetrate the material due to the serration. Serrated blades operate better in clay/dirt conditions because it takes less force to penetrate the material. We offer a stinger configuration, as shown below: 27

29 3.4 UHMW Plate/Bar Wear It is very important to service your abrasion bars/plates (UHMW). Check to see if there is significant wear on them, if so replace. Service them every 100 hours. Item # Description ID # Qty 1 Ejector Abrasion Bar (LH) Ejector Abrasion Bar (RH) Ejector Abrasion Plate A Ejector Abrasion Plate B
30 4 Parts Book The following diagrams show the part numbers for ordering any replacement parts on a Pulldozer Some components may not look exactly as shown. Quantities are listed for as shown, and some components are optional. The diagrams should be referenced to find the part number, and order quantities should be based on what is required, not necessarily by the quantity on the table. Left and right as used in the parts book is as viewed from the rear of the scraper looking in the direction of travel. Parts Book Sections Section Description 4.1 Swivel Hitch 4.2 Main Hitch Yard Bowl Yard Ejector Yard Apron 29
31 4.1 Swivel Hitch Assembly (S/N PD1200 & up) Swivel Hitch Assembly Description ID # QTY Description ID # QTY 1 Front Scraper Hitch Pin Cover B Scraper Adapter Pin A Middle Scraper Hitch Pin B Back Scraper Hitch Pin C Abrasion Plate A Bolt, 3/8 x ¾ Abrasion Plate B Grease Zerk, 1/8 NPT, Abrasion Plate C Grease Zerk, 1/8 NPT Abrasion Plate D Grease Zerk, ¼-28, A9 Middle Hitch Scraper Plate Grease Zerk, ¼ Pin Cover A
32 (S/N PD1199 & down) Swivel Hitch Assembly Description ID # QTY Description ID # QTY 1 Front Scraper Hitch Grease Zerk, 1/8 NPT Scraper Adapter Grease Zerk, ¼-28, Middle Scraper Hitch Hose Holder Plate A Back Scraper Hitch Hose Holder Arm Abrasion Plate A Hose Adjustment Arm Abrasion Plate B Hose Holder Swivel Abrasion Plate C Hose Holder Bar Abrasion Plate D Nylon Lock Nut, ½ A9 Middle Hitch Scraper Plate Bolt, ½ x 3-1/ Pin Cover A Hitch Pin Pin Cover B Hair Pin Pin A Bolt, ½ x 1-3/ Pin B Cotter Pin, 3/16 x Pin C Grease Zerk, ¼ Bolt, 3/8 x ¾ Cotter Pin, ¼ x Grease Zerk, 1/8 NPT,
33 4.2 Main Hitch Assembly (S/N PD1200 & up) Main Hitch Assembly Description ID # QT Description ID # QTY 1 Main Hitch Y 1 16 Bolt, 1 x 6-1/ Rear Accumulator Strap Nylon Lock Nut, 3/ Accumulator Strap Flat Washer, 3/ Accumulator Cable Clamp Pin Cover C Bolt, ½ x 1-1/ Plastic Bushing A Flat Washer, ½ Pin D Nylon Lock Nut, ½ Bolt, 3/8 x ¾ Hose Holder Chain A9 Nylon Lock Nut, Hex Nut, 5/ Bolt, 5/16 x 2-1/ Bolt, ½ x 2-1/ Plastic Hose Clamp Clamp Cover Plate Rubber Strap Turnbuckle Bolt, 3/8 x 1-1/ Locking Pin Hose Holder Arm Lift Cylinder Safety Pin Grease Tube Bolt, 5/16 x See Hydraulic Cylinders Assembly for lift cylinder installation 32
34 (S/N PD1199 & down) Main Hitch Assembly Description ID # QTY Description ID # QTY 1 Main Hitch Plastic Hose Clamp Rear Accumulator Strap Rubber Strap Accumulator Strap Bolt, 3/8 x 1-1/ Accumulator Bolt, 5/16 x Pin Cover C Grease Tube Plastic Bushing A Bolt, 1 x 6-1/ Pin D Nylon Lock Nut, 2/ Bolt, 3/8 x ¾ Flat Washer, 3/ A9 Nylon Lock Nut, Cable Clamp Hose Clamp Cover Plate Grease Zerk, ¼ See Hydraulic Cylinders Assembly for lift cylinder installation 33
35 4.3 Bowl Assembly 34
36 4.3.1 Bowl-Hitch Assembly Bowl-Hitch Assembly Description ID # QTY Description ID # QTY 1 20 Yard Bowl Lift Pivot Pin Pin Cover D Bolt, 3/8 x ¾
37 4.3.2 Front Add-Ons (S/N PD1200 & up) Front Add-Ons Assembly Description ID # QTY Description ID # QTY 1 GPS Tower Nylon Lock Nut, ½ Height Indicator Needle Bolt, ¼ x ¾ Grease Zerk, 1/8 NPT Flat Washer, ¼ Bolt, 3/8 x 1-1/ Serrated Flange Nut, ¼ Nylon Lock Nut, 3/ Operator Manual Box Flat Washer, 3/ Serial Number Plate Bulkhead Fitting Pop Rivet, 1/8 x ½ Bolt, ½ x 1-1/
38 (S/N PD1199 & down) Front Add-Ons Assembly Description ID # QTY Description ID # QTY 1 Right Hitch Pivot Protector Plate Bulkhead Fitting Left Hitch Pivot Protector Plate Bolt, ½ x 1-1/ (Manual Plate) 3 GPS Tower Nylon Lock Nut, ½ Height Indicator Needle Bolt, ¼ x ¾ Grease Zerk, 1/8 NPT Flat Washer, ¼ Bolt, 3/8 x 1-1/ Serrated Flange Nut, ¼ Nylon Lock Nut, 3/ Operator Manual Box Flat Washer, 3/
39 4.3.3 Apron Safety Latch & Lift Cylinder Pin Apron Safety Latch & Lift Cylinder Pin Assembly Description ID # QTY Description ID # QTY 1 Apron Safety Cylinder Stopper 2 Front Hydraulic Hose Bulkhead Plate See Hydraulic Cylinders Assembly for lift cylinder installation Pin E Bolt, 3/8 x ¾ Pin Cover C Rubber Grommet Plastic Bushing A Cotter Pin, ¼ x 1-1/ Apron Safety Cylinder Stopper Pin 38
40 4.3.4 Tube Cover Assembly 39
41 (S/N PD1200 & up) Tube Cover Assembly Description ID # QTY Description ID # QTY 1 Hydraulic Bulkhead Plate Quick Release Pin Front Right Hand Tube Cover Screw, #10 x ½ Rear Side Tube Cover Nylon Lock Nut, 3/ Rear Access Panel Bolt, 3/8 x 3-1/ Valve Block Bracket Rubber Grommet Pin Cover E Junction Box Plastic Bushing B Bolt, 5/16 x 1-1/ Pin F Nylon Lock Nut, 5/ Bolt, 3/8 x ¾ Valve Block See Hydraulic Cylinders Assembly for apron cylinder installation 40
42 (S/N PD1199 & down) 41
43 Tube Cover Assembly Description ID # QTY Description ID # QTY 1 Hydraulic Bulkhead Plate Screw, #10 x ½ Front Right Hand Tube Cover Nylon Lock Nut, 3/ Rear Side Tube Cover Bolt, 3/8 x 3-1/ Rear Access Panel Rubber Grommet Valve Block Bracket Junction Box Pin Cover E Bolt, 5/16 x 1-1/ Plastic Bushing B Nylon Lock Nut, 5/ Pin F Serial Number Plate Bolt, 3/8 x ¾ Valve Block Quick Release Pin See Hydraulic Cylinders Assembly for apron cylinder installation 42
44 4.3.5 Cutting Edges Cutting Edge Assembly Description ID # QTY Description ID # QTY 1 Side Router Bit Plow Hex Nut, 1 (S/N PD1200 & up) End Cutting Blade (Serrated) Plow Hex Nut, 1 (S/N PD1199 & down) Center Cutting Blade (Serrated) Bolt Gr.8, 1 x 2-1/ Plow Bolt, 1 x 2-1/2 (S/N PD1200 & up) 4 Plow Bolt, 1 x 2-1/2 (S/N PD1199 & down)
45 4.3.6 Rear Components Assembly (S/N PD1200 & up) Rear Components Assembly Description ID # QTY Description ID # QTY 1 Rear Top Tube Cover Red LED Ejector Cylinder Access Plate LED Light Grommet Pin Cover E Amber LED Pin H Bolt, ½ x Bolt, 3/8 x ¾ Flat Washer, ½ See Hydraulic Cylinders Assembly for ejector cylinder installation 44
46 (S/N PD1199 & down) Rear Components Assembly Description ID # QTY Description ID # QTY 1 Rear Top Tube Cover Red LED Ejector Cylinder Access Plate LED Light Grommet Pin Cover E Amber LED Pin H Bolt, ½ x ¾ Bolt, 3/8 x ¾ See Hydraulic Cylinders Assembly for ejector cylinder installation 45
47 4.3.7 Wheel Assembly Wheel Assembly Description ID # QTY Description ID # QTY 1 Hub, Spindle, and Nuts Bolt, ¾ x x 27 5 Piece Rim Stover Lock Nut, ¾ /65R29 Tire - 2 ** See 3.1 Wheels and Tires for wheel nuts torque # NOTE: See local tire dealership for replacement or tires Quantities are per assembly as shown. Left side shown. 46
48 4.4 Ejector Assembly (S/N PD1200 & up) Ejector Assembly Description ID # QTY Description ID # QTY 1 Ejector Hex Nut, ¾ Pin Cover C Bolt, ¾ x 1-1/ Plastic Bushing A Bolt, ¾ x Ejector Abrasion Bar (LH) Bolt, ½ x 2-1/ Ejector Abrasion Bar (RH) Bolt, 3/8 x 2-1/ Ejector Abrasion Plate A Roller Shaft Ejector Abrasion Plate B Roller Pin G Roller Washer Bolt, 3/8 x ¾ Roller Spacer TBA 2 10 Nylon Lock Nut, 3/ See Hydraulic Cylinders Assembly for ejector cylinder installation 47
49 (S/N PD1199 & down) Ejector Assembly Description ID # QTY Description ID # QTY 1 Ejector Bolt, 3/8 x ¾ Pin Cover C Nylon Lock Nut, 3/ Plastic Bushing A Roller Bearing Ejector Abrasion Bar (LH) Bolt Gr.8, ¾ x 3-3/ Ejector Abrasion Bar (RH) Nylon Lock Nut, ¾ Ejector Abrasion Plate A Bolt, ½ x 2-1/ Ejector Abrasion Plate B Bolt, 3/8 x 2-1/ Pin G See Hydraulic Cylinders Assembly for ejector cylinder installation 48
50 4.5 Apron Assembly Apron Assembly Description ID # QTY Description ID # QTY 1 Apron Pin G Pin Cover C Bolt, 3/8 x ¾ Apron Pin Cover Bolt, ½ x 1-1/4 (S/N PD1200 & up) 4 Plastic Bushing A Bolt, 3/8 x 1-1/4 (S/N PD1199 & down) Apron Pin Grease Zerk, ¼ See Hydraulic Cylinders Assembly for apron cylinder installation 49
51 4.6 Replacement Bushings Replacement Bushings Description ID # QTY Description ID # QTY 1 Front Scraper Hitch Hardened Bushing Hardened Bushing Main Hitch Hardened Bushing Hardened Bushing Middle Scraper Hitch Bowl Hardened Bushing Hardened Bushing Hardened Bushing Hardened Bushing Back Scraper Hitch
52 4.7 Hydraulic Cylinders Assembly Hydraulic Cylinder Assembly Description ID # QTY Description ID # QTY 1 Apron Cylinder Ejector Cylinder Lift Cylinder (S/N PD1200 & up) Lift Cylinder (S/N PD1199 & down) Spring Bushing


53 4.8 Decals 52

54 53 PULLDOZER
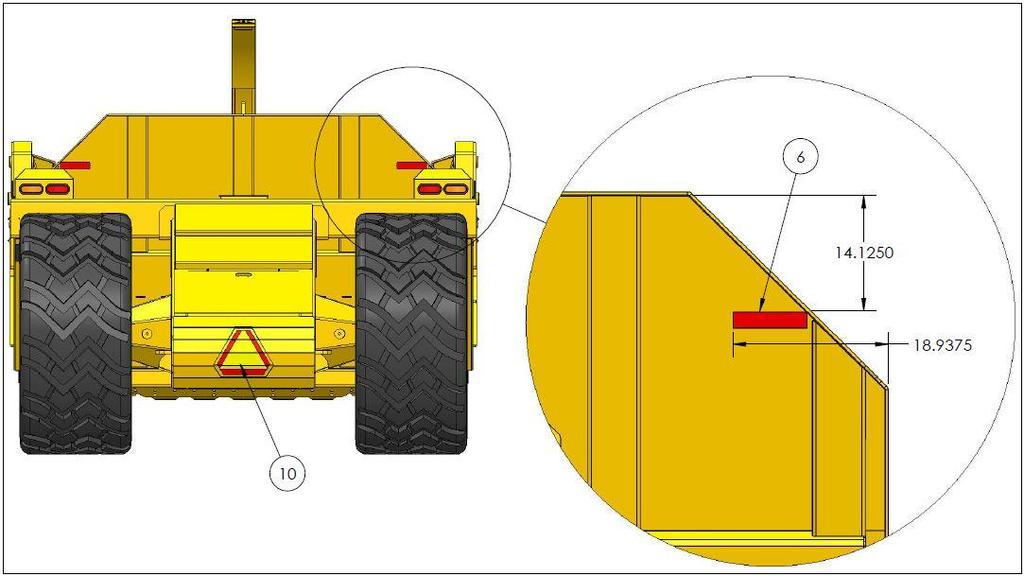
55 Decal Assembly Description ID # QTY Description ID # QTY 1 Left Hand Hitch Decal Red Reflector Right Hand Hitch Decal Wheel Torque Reminder Bowl 1220 Decal Yellow Reflector Bowl Gradient Decal Height Indicator Decal Pinch Point Decal SMV Sign Decal
56 4.9 Hydraulic Components Hydraulic Schematic (S/N PD1200 & up) 55
57 (S/N PD1199 & down) 56
58 57 PULLDOZER
59 - Cylinders are identical, just distinguishing orientation PULLDOZER 58
60 59 PULLDOZER
61 60 PULLDOZER
62 4.10 Electrical Components Light Wiring Schematic 61
63 - ASSEMBLY IS NOW COMPLETE - 62

64 5. Bolt Torque Values 63

65 64 PULLDOZER
66 6. Troubleshooting The following is a list of some operational problems which may be encountered in the use of scrapers. NOTE: As the operator gets more familiar with the techniques of using scraper, some of the following problems will disappear. Each operator will develop his or her own techniques of scraper operation over time. Symptom Problem Solution Tractor stalls Load scraper in lower gear Raise scraper to reduce cutting depth Tractor Tires spin Load scraper in higher gear Raise Scraper to reduce cutting depth Load scraper in lower gear Scraper gouges Raises scraper to reduce cutting when loading depth Scraper will not load properly Slow hydraulic pressure from low flow, low pressure, or foamy oil Tractor is not getting maximum tractor from all tires Cutting edge not biting Cutting edge biting too much Scraper loads slowly Scraper load size is not satisfactory or full after loading Check hydraulic oil level. Refer to tractor operator manual. Check hydraulic oil filter(s) for clogging. Refer to tractor operator manual Adjust hydraulic oil flow through hydraulic remotes. Refer to tractor operator manual Increase engine RPM s Service hydraulic system. Refer to tractor operator manual Refer to tractor s operator manual for scraper tractor ballast recommendation Check blades for wear, reverse the blades or replace if needed Lower scraper to increase cutting depth Raise scraper to reduce cutting depth Refer to operators manual for different blade configuration to increase loading ability In a deep cut situation, load scraper going downhill when possible Alternate cut patters left to right, so that a ridge left behind by the frost 65
67 Scraper will not load properly Uneven or rough cut and fill areas Ejector or lift and lowering problems Apron and ejector cylinders moving at same time Scraper load size is not satisfactory or full after loading Scraper is duck walking or wash boarding bit or stinger can be centered by a following load Lower center section of cutting edge into the frost bit or stinger position Cutting edge may be worn, reverse or replace the cutting edge Refer to tractor s operator manual for scraper tractor ballast recommendations. Cut deeper at slower speeds Check tire air pressure Lower or replace routers Start the cut deeper Loading heavy on Check tire air pressure one side Load in a straight path Rough fill areas Eject material at grade or within 6 inches (15.24 cm) above the ground Check hydraulic quick-couplers Check hydraulic cylinders for leakage Cylinders won t Check hydraulic remote setting for move hydraulic flow, in tractor. Refer to tractor operator manual Check safety stops to make sure they are not in place Apron and ejector cylinder not in sequence Refer to section Sequence Apron and Ejector Valve for instructions 66
68 NOTES 67
BALE KING VR483. Hay Rake. Operator's & Parts Manual. Last Updated: April 27, Bridgeview Manufacturing Inc.
 BALE KING VR483 Hay Rake Operator's & Parts Manual Last Updated: April 27, 2015 P.O. Box 4 Gerald, Saskatchewan, Canada S0A 1B0 Phone: 1-306-745-2711 Fax: 1-306-745-3364 Email: bmi@sasktel.net www.bridgeviewmanufacturing.com
VR482 Hay Rake OPERATOR & PARTS MANUAL. Last Updated: May 12, 2014
 VR482 Hay Rake OPERATOR & PARTS MANUAL Last Updated: May 12, 2014 Bridgeview Manufacturing Inc. P.O. Box 4 Gerald, SK S0A 1B0 (306) 745-2711 www.bridgeviewmanufacturing.com bmi@sasktel.net Your Authorized
PULLDOZER TRANSFORMER
 PULLDOZER TRANSFORMER 1850 1850XL Operator, Assembly & Parts Manual Last Updated: August 28, 2018 Bridgeview Manufacturing Inc. P.O. Box 4 Gerald, Saskatchewan, Canada S0A 1B0 Phone: 1-306-745-2711 Fax:
PULLDOZER TRANSFORMER
 PULLDOZER TRANSFORMER 1850 1850XL Operator, Assembly & Parts Manual Last Updated: July 20, 2017 Bridgeview Manufacturing Inc. P.O. Box 4 Gerald, Saskatchewan, Canada S0A 1B0 Phone: 1-306-745-2711 Fax:
PULLDOZER TRANSFORMER
 PULLDOZER TRANSFORMER 2450 2450XL Operator, Assembly & Parts Manual Last Updated: July 19, 2018 Bridgeview Manufacturing Inc. P.O. Box 4 Gerald, Saskatchewan, Canada S0A 1B0 Phone: 1-306-745-2711 Fax:
PULLDOZER TRANSFORMER
 PULLDOZER TRANSFORMER 1870 1870XL Operator, Assembly & Parts Manual Last Updated: December 6, 2018 Bridgeview Manufacturing Inc. P.O. Box 4 Gerald, Saskatchewan, Canada S0A 1B0 Phone: 1-306-745-2711 Fax:
BALE KING GT40 Grain Feeder Operator's & Parts Manual Last Update: November 20, 2014 Bridgeview Manufacturing Inc - 1 -
 BALE KING GT40 Grain Feeder Operator's & Parts Manual Last Update: November 20, 2014 Bridgeview Manufacturing Inc - 1 - Your Authorized Dealer: Your Serial Number: The Serial Number is located on the tank.
PULLDOZER 1800/1800XL/2400/2400XL
 PULLDOZER 1800/1800XL/2400/2400XL Assembly and Parts Manual Bridgeview Manufacturing Inc. P.O. Box 4 Gerald, SK S0A 1B0 (306) 745-2711 www.bridgeviewmanufacturing.com bmi@sasktel.net 2 1. Component Information
Part Number Published 08/ Series Blade. 181 Series Blade
 141 SERIES 181 SERIES Published 08/15 Part Number 50076192 141 Series Blade 181 Series Blade To the Owner/Operator/Dealer All implements with moving parts are potentially hazardous. There is no substitute
E-JECT SYSTEMS PRODUCT LINE E-JECT SYSTEMS PRODUCT LINE
 E-JECT SYSTEMS PRODUCT LINE E-JECT SYSTEMS PRODUCT LINE DD030707 WORLD CLASS EARTHMOVING EQUIPMENT E-Ject Systems manufactures several different models of pull scrapers, disk harrows, sheepsfoot rollers,
Service & Operation Manual. H619 Pulled Scraper
 Service & Operation Manual H619 Pulled Scraper Forward Humdinger Equipment LTD. is committed to your satisfaction with our products and services. Please review this manual and learn your product. This
HOW TO ORDER PARTS: Unless this is done, we cannot provide prompt service or assure shipment of the correct parts.
 How to Order Parts HOW TO ORDER PARTS: IMPORTANT Parts must be ordered through your local authorized ASHLAND dealer. Be sure to state MODEL and SERIAL NUMBER of your machine, PART NUMBER, DESCRIPTION and
SAFETY. Hitchpole, centre frame 1. Centre frame wheels & roller 3. Centre & wing frames 5. Wing frame wheels & roller 9.
 MANUAL Hitchpole, centre frame 1 Centre frame wheels & roller 3 Centre & wing frames Wing frame wheels & roller 9 Hydraulics 11 Clearance lights 13 Operations 1 Safety, warranty 1 SAFETY Industrial Drive,
General Information. Assembly Instructions. Dual Marker Option
 Installation Instructions 12 Center Pivot Hitch Used with: 12 Center Pivot Hitch General Information! When you see this symbol, the subsequent instructions and warnings are serious - follow without exception.
Tube-Line Techno-Bale 960. Operator's Manual
 Tube-Line Techno-Bale 960 Operator's Manual One- Year Manufacturer's Warranty For Normal Use With The Exception Of Tires If the Equipment does not function properly, or if a piece is defective due to a
OPERATOR'S MANUAL 304 Row Mulcher
 OPERATOR'S MANUAL 0 Row Mulcher PUBLICATION DATE: // Millcreek Manufacturing Company Reservoir Road Honey Brook PA MILLCREEK PART# 0 WARNING: DO NOT assemble, operate, or maintain this equipment without
OPERATOR S MANUAL REPAIR PARTS CATALOG. Models: SCP-51 & SCP-71 SCP-52 & SCP-72 SCP-91 & SCP-111 SCP-92 & SCP-112 BRILLION FARM EQUIPMENT
 OPERATOR S MANUAL REPAIR PARTS CATALOG Subsoil Chisel Plow Models: SCP-51 & SCP-71 SCP-52 & SCP-72 SCP-91 & SCP-111 SCP-92 & SCP-112 IMPORTANT! Repairs cannot be purchased retail direct from factory. Order
RITE WAY MFG. CO. LTD. P.O.
 CO. LTD. P.O. Box 328 Imperial, Saskatchewan Canada, S0G 2J0 Ph: (306) 963-280 Fax: (306) 963-2660 Web Site: www.ritewaymfg.com E-mail: info@ritewaymfg.com Table of Contents SPECIFICATIONS... WARNING...2
Operator s Manual. Go Galvanized! YOU'RE ALWAYS AHEAD...WITH A MODERN BEHIND.
 SUMMER 2008 C2 tilting grader blade Operator s Manual YOU'RE ALWAYS AHEAD...WITH A MODERN BEHIND. 003-5336 003-5342 003-5531 003-5544 P.O. Box 790 Beaumont, Tx 77704 409.833.2665 1.800.231.8198 Fax: 409.726.8333
MidCap Rake MCR8 MCR10 MCR12
 MidCap Rake MCR8 MCR10 MCR12 Operator s Manual Counter Balance Valves for Steady Single Side Raking Model MCR8 3 Collection width Settings Individual Spring Adjustment THIS MANUAL MUST BE READ AND UNDERSTOOD
B-DM-6 Diamond Master Operation & Parts Manual Model no.: B-DM-6
 B-DM-6 Diamond Master Operation & Parts Manual Model no.: B-DM-6 TABLE OF CONTENTS 01 Cover Page 02 Table of Contents 03 Warranty 04 Diamond Master Information & Basic Maintenance 05 Adjustment of Tools
Post Driver Attachment
 Attachment (Shown with Optional Power Cell Rotator) Models - 600, 850 Safety Instructions This safety alert symbol indicates important safety messages in this manual. When you see this symbol, carefully
610 BUSHEL MANURE SPREADER
 610 BUSHEL MANURE SPREADER RODA MANUFACTURING 1008 LOCUST ST. HULL, IA. 51239 Art s-way Manufacturing 712-439-2366 Co., Inc. Hwy 9 West - PO Box 288 WWW.RODAMFG.COM Armstrong, IA. 50514 U.S.A 2 INTRODUCTION
Wheel Horse. 44 Snowthrower. for 5xi Lawn and Garden Tractors. Model No & Up. Operator s Manual
 FORM NO. 8 Rev A Wheel Horse Snowthrower for 5xi Lawn and Garden Tractors Model No. 7966 890050 & Up Operator s Manual IMPORTANT: Read this manual, and your tractor manual, carefully. They contain information
Opera.
 Diamond Master Model no.: B DM 66 Opera ation & Parts Manual GORDON BANNERMANN LIMITED T: (416) 247 7875 F: (416)) 247 6540 www.sportsturfmagic..com Page 2 Table of Contents Cover Page 1 Table of Contents
B&W Trailer Hitches 1216 Hawaii Road / PO Box 186 Humboldt, KS P: F:
 B&W Trailer Hitches 1216 Hawaii Road / PO Box 186 Humboldt, KS 66748 P:620.473.3664 F:620.869.9031 NOTE: We recommend reading instructions before beginning the installation. Ford OEM Mount System Slider
Agri-Fab OWNERS MANUAL. Model No " ROUGH CUT TRAILMOWER. CAUTION: Read Rules for Safe Operation and Instructions Carefully
 Agri-Fab OWNERS MANUAL Model No. 45-0362 CAUTION: Read Rules for Safe Operation and Instructions Carefully Safety Assembly Operation Maintenance Parts 42" ROUGH CUT TRAILMOWER NOTE: Your mower deck will
THE TRACTOR AND/OR LOADER (IF EQUIPPED)
") THE TRACTOR AND/OR LOADER (IF EQUIPPED) Read the tractor and/or loader operator s manual to learn how to operate your tractor and/or loader safely. Failure to do so could result in serious injury or death
THE TRACTOR AND/OR LOADER (IF EQUIPPED) Read the tractor and/or loader operator s manual to learn how to operate your tractor and/or loader safely. Failure to do so could result in serious injury or death
Operator s Manual. Go Galvanized! YOU'RE ALWAYS AHEAD...WITH A MODERN BEHIND.
 SUMMER 2008 rock & landscape rake Operator s Manual 003-7445 003-7450 003-7460 003-7440 003-7445 003-7450 YOU'RE ALWAYS AHEAD...WITH A MODERN BEHIND. P.O. Box 790 Beaumont, Tx 77704 409.833.2665 1.800.231.8198
Operating and Assembly Manual
 Model 1080 Operating and Assembly Manual Midwest Equipment Manufacturing, Inc. 5225 Serum Plant Road Thorntown, IN 46071 08-02-16 SAFETY RULES Remember, any power equipment can cause injury if operated
B&W Trailer Hitches 1216 Hawaii Road / PO Box 186 Humboldt, KS P: F:
 B&W Trailer Hitches 1216 Hawaii Road / PO Box 186 Humboldt, KS 66748 P:620.473.3664 F:620.473.3766 NOTE: We recommend reading instructions before beginning the installation. GM OEM Mount System Slider
Walker Loader Bucket OPERATOR S AND PARTS MANUAL
 Walker Loader Bucket OPERATOR S AND PARTS MANUAL Please Read and Save These Instructions For Safety, Read all Safety and Operation Instructions Prior To Operating Machine P/N 6690 TABLE OF CONTENTS Introduction
Agri-Fab OWNERS MANUAL. Model No " ROUGH CUT TRAILMOWER. CAUTION: Read Rules for Safe Operation and Instructions Carefully
 Agri-Fab OWNERS MANUAL Model No. 45-03071 45-0361 CAUTION: Read Rules for Safe Operation and Instructions Carefully Safety Assembly Operation Maintenance Parts 42" ROUGH CUT TRAILMOWER the fastest way
<THESE INSTRUCTIONS MUST BE GIVEN TO THE END USER> B&W Trailer Hitches 1216 Hawaii Road / PO Box 186 Humboldt, KS P: F:
 B&W Trailer Hitches 26 Hawaii Road / PO Box 86 Humboldt, KS 6678 P:620.73.366 F:620.869.903 Ford OEM Mount System Installation Instructions 20,000 LBS.
OPERATOR'S MANUAL & PARTS CATALOG 12 TON RUNNING GEAR
 Unverferth Grain Handling Systems OPERATOR'S MANUAL & PARTS CATALOG 1 TON RUNNING GEAR Model RGE- Unverferth Manufacturing Co., Inc. Box 7 Kalida, OH 8 Part No. 00 PH: 1-- FAX: 1--8 www.unverferth.com
4200 & 6200 Owner s Manual & Parts Book
 00 & 00 Owner s Manual & Parts Book Purchase Date Serial Number Model Number Tractor Model PN: - Dealer Date --0 Description Page To The Owner & Maintenance Safety Precautions & Torque Specifications Skid
Contents. TS220 Features
 TS220 Towed Scraper Scraper Bowl Capacity Heaped 18 m 3 23.5 yd 3 Width of Cut, to Router Bits 3480 mm 11 ft 5 in Rated Load 25 580 kg 56,400 lb Capacity Struck 13 m 3 17 yd 3 Depth of Cut max 262 mm 10.3
HIGH RISE POWER ANGLE KIT
 HIGH RISE POWER ANGLE KIT P/N 33-0100 OWNER S MANUAL Application HIGH RISE PUSH TUBE 33-0000 & 34-0000 ATTENTION DEALER: CUSTOMER MUST RECEIVE A COPY OF THIS MANUAL AT THE TIME OF SALE. Before you begin,
Model 3770 WARNING. Failure to comply with the safety information in these instructions could result in serious injury or death.
 B&W Trailer Hitches 1216 Hawaii Road / PO Box 186 Humboldt, KS 66748 P:620.473.3664 See Limited Lifetime Warranty at F:620.869.9031 bwtrailerhitches.com/warranty NOTE: We recommend reading instructions
<THESE INSTRUCTIONS MUST BE GIVEN TO THE END USER> B&W Trailer Hitches 1216 Hawaii Road / PO Box 186 Humboldt, KS P: F:
 B&W Trailer Hitches 26 Hawaii Road / PO Box 86 Humboldt, KS 6678 P:620.73.366 F:620.869.903 RAM OEM Mount System Installation Instructions 25,000 LBS.
<THESE INSTRUCTIONS MUST BE GIVEN TO THE END USER> B&W Trailer Hitches 1216 Hawaii Road / PO Box 186 Humboldt, KS P: F:
 B&W Trailer Hitches 26 Hawaii Road / PO Box 86 Humboldt, KS 66748 P:620.473.3664 F:620.869.903 Ford OEM Mount System Installation Instructions 20,000
Boring Unit Sitework Systems Attachment
 FORM NO. 6 Boring Unit Sitework Systems Attachment Model No. 0 89000 & Up Operator s Manual English (CE) Contents Page Introduction................................. Safety......................................
B&W Trailer Hitches 1216 Hawaii Road / PO Box 186 Humboldt, KS P: F: " Split Lock Washers 8
 B&W Trailer Hitches 1216 Hawaii Road / PO Box 186 Humboldt, KS 66748 P:620.473.3664 F:620.869.9031 NOTE: We recommend reading instructions before beginning the installation. Companion Slider Hitch Installation
Multi-Ject Aerator Model no.: BA-400 Operation & Parts Manual
 Multi-Ject Aerator Model no.: BA-400 Operation & Parts Manual P a g e 2 Table of Contents Cover Page 1 Table of Contents 2 Welcome to Bannerman 3 Warranty 4 Work Safety 5 Three Point Hitch Attachment Procedure
B-BP-4 BALLPARK 4 GROOMER
 B-BP-4 BALLPARK 4 GROOMER TABLE OF CONTENTS 01 Ballpark 4 Cover Page 02 Table of Contents 03 Warranty 04 General Information & Tool Functions 05 Tool Adjustments & Basic Maintenance 06 How to Use the Ballpark
Model 858-RH. Operating and Assembly Manual. Palmor Products Inc Serum Plant Road Thorntown, IN 46071
 Model 5-RH Operating and Assembly Manual Palmor Products Inc. 55 Serum Plant Road Thorntown, IN 6071 3/31/015 SAFETY RULES Remember, any power equipment can cause injury if operated improperly or if the
! CAUTION! ! WARNING!
 Assembly Instructions! 24- and 30-Foot, No-Till Flat Fold Marker Option Used with: 2N-2410 and 2N-3010 Drills 2N-2420 and 2N-3020 Drills When you see this symbol, the subsequent instructions and warnings
Tube-Line Techno-Bale 980
 Tube-Line Techno-Bale 980 Operator's Manual 28287 (05/05/11) 2 One- Year Manufacturer's Warranty For Normal Use With The Exception Of Tires If the equipment does not function properly, or if a manufacturing
2. PREPARATION 1. SAFETY 3. FRAME 4. TRANSMISSION 5. DRIVE 6. ROW UNIT 7. OPTIONAL EQUIPMENT Monosem Inc.
 TABLE OF CONTENTS 1. SAFETY 2. PREPARATION 3. FRAME 4. TRANSMISSION 5. DRIVE 6. ROW UNIT 7. OPTIONAL EQUIPMENT For the initial preparation of the planter, lubricate the planter and row units. Make sure
Illustrated Parts List I HDC 1000 ( ) Repair Parts Manual
 Repair Parts Manual") Illustrated Parts List 2008-01 I0807212 531 03 10-07 HDC 1000 (45-01714-669) Repair Parts Manual owners manual Model No. 45-01714-669 10 CU. FT. CART CAUTION: Read Rules for Safe Operation and Instructions
Illustrated Parts List 2008-01 I0807212 531 03 10-07 HDC 1000 (45-01714-669) Repair Parts Manual owners manual Model No. 45-01714-669 10 CU. FT. CART CAUTION: Read Rules for Safe Operation and Instructions
Table of Contents WARN INDUSTRIES PAGE A1
 INSTALLATION INSTRUCTIONS AND OPERATORS GUIDE ProVantage Bucket Conversion Kit Part Number: 84133 (50 ), 83133 (54 ) and 85133 (60 ) Application: Front Mount Plow* * Not recommended for use with Center
450 & Slant Top Owner s Manual & Parts Book
 0 & 0 - Slant Top Owner s Manual & Parts Book Purchase Date Serial Number Model Number Tractor Model PN: - Dealer Date -- Contents Description Page To The Owner & Maintenance Safety Precautions & Torque
TRACK EXTENSION KIT P/N OWNER S MANUAL ATTENTION DEALER: CUSTOMER MUST RECEIVE A COPY OF THIS MANUAL AT THE TIME OF SALE.
 TRACK EXTENSION KIT P/N 33-0300 OWNER S MANUAL Application PLOW PUSH TUBE NO. 33-0000, 33-0070, 34-0000, 34-0070 ATTENTION DEALER: CUSTOMER MUST RECEIVE A COPY OF THIS MANUAL AT THE TIME OF SALE. Before
<THESE INSTRUCTIONS MUST BE GIVEN TO THE END USER> B&W
 B&W Trailer Hitches 26 Hawaii Road / PO Box 86 Humboldt, KS 6678 P:620.73.366 F:620.869.903 GM Puck Mount System Installation Instructions 20,000 LBS.
STOP. 44" High Speed Sweeper. Operator's Manual. Model No Safety Assembly Operation Maintenance Parts
 Operator's Manual STOP 44" High Speed Sweeper Model No. 486.029 DO NOT RETURN TO STORE For Missing Parts or Assembly Questions Call 1-866-576-8388 CAUTION: Before using this product, read this manual and
! CAUTION! ! WARNING!
 Assembly Instructions! 3N-3010P, No-Till Flat Fold Marker Option Used with: 3N-3010P Drills When you see this symbol, the subsequent instructions and warnings are serious - follow without exception. Your
I-130 XL PARTS MANUAL Introduced 4/01/01
 I-130 XL PARTS MANUAL Introduced 4/01/01 Ashland Industries Inc. Hwy. 13 South P.O. Box 717 Ashland, WI. 54806 877-634-4622 Toll Free - phone 715-682-4622 phone 715-682-9717 fax www.ashlandind.com MODEL
25 BUSHEL MANURE SPREADER
 25 BUSHEL MANURE SPREADER RODA MANUFACTURING 338 MAIN ST. HULL, IA. 51239 Art s-way Manufacturing 712-439-2366 Co., Inc. Hwy 9 West - PO Box 288 WWW.RODAMFG.COM Armstrong, IA. 50514 U.S.A 2 INTRODUCTION
Model 35 PARTS MANUAL
 Model 35 PARTS MANUAL Version 3-2007 Ashland Industries Inc. 1115 Rail Drive P.O. Box 717 Ashland, WI. 54806 Ph: 877-634-4622 Toll Free Ph: 715-682-4622 Fx: 715-682-9717 www.ashlandind.com Model 35 Scraper
Trailer Assembly Guide Model MMT5X GVWR All Steel Trailer
 DETAIL K2 INC. 1080 Clay Ave., Unit #2 Burlington Ont. L7L 0A1 1-888-277-6960 Trailer Assembly Guide Model MMT5X7 2050 GVWR All Steel Trailer 7.5 ft. (229 cm) Utility Trailer MMT5X7 man v.160328 STEP 1
Model 3400 ATTENTION: WARNING
 B&W Trailer Hitches 1216 Hawaii Road / PO Box 186 Humboldt, KS 66748 P:620.473.3664 F:620.473.3766 NOTE: We recommend reading instructions before beginning the installation. Companion Slider Hitch Installation
Read the owner s manual completely before you use the trailer.
 OWNER S MANUAL Read the owner s manual completely before you use the trailer. MODEL MPT-581ATV IMPORTANT SAFETY CHECK LIST PLEASE NOTE: Trailers are not generally used every day. A trailer may sit for
ALL MOUNT UNIVERSAL ATV PLOW MOUNT KIT P/N ASSEMBLY / OWNERS MANUAL. Application PLOW PUSH FRAME NO , or
 ALL MOUNT UNIVERSAL ATV PLOW MOUNT KIT P/N 15-0050 ASSEMBLY / OWNERS MANUAL Application PLOW PUSH FRAME NO. 15-0070, 33-0000 or 33-0070 Before you begin, please read these instructions and check to be
Smart-Till. Models ST101, ST151, ST203, and ST303. HCC, inc st Avenue Mendota, IL
 Owners Manual Smart-Till Models ST101, ST151, ST203, and ST303 HCC, inc. 1501 1st Avenue Mendota, IL 61342 815-539-9371 www.hccincorporated.com C-1159 May 2010 Safety Most work related accidents are caused
AG PRODUCTS, LTD. YOU RE ALWAYS AHEAD... WITH A MODERN BEHIND.
 SUMMER 2016 BADGER DISC HARROW Operator s Manual 011-1156 011-1166 001-1501 001-1501-1 011-1167 001-1501-2 001-1501-3 011-1176 001-1501-4 011-1177 MODERN AG PRODUCTS, LTD. YOU RE ALWAYS AHEAD... WITH A
<THESE INSTRUCTIONS MUST BE GIVEN TO THE END USER> B&W
 B&W Trailer Hitches 1216 Hawaii Rd / PO Box 186 Humboldt, KS 66748 P:620.473.3664 F:620.869.9031 Turnoverball Gooseneck Hitch Installation Instructions
Trencher Dingo Attachment
 Form No. 3326-453 Trencher Dingo Attachment Model No. 22459 2000000 & Up Operator s Manual English (CE) Contents Page Introduction................................ 2 Safety.....................................
Model 452-DIC/DH. Operating and Assembly Manual
 . Model 452-DIC/DH Operating and Assembly Manual Palmor Products Inc. 5225 Serum Plant Road Thorntown, IN 46071 02-14-12 SAFETY RULES Remember, any power equipment can cause injury if operated improperly
BUCKET SWEEPER OPERATORS & PARTS MANUAL 2852 & 3174 SERIES
 OM628 BUCKET SWEEPER OPERATORS & PARTS MANUAL 2852 & 3174 SERIES MODEL 12002-5 FOOT WIDE X 24 INCH DIAMETER (SKID-STEER) MODEL 12004-6 FOOT WIDE X 24 INCH DIAMETER (SKID-STEER) MODEL 12017-6 FOOT WIDE
2. PREPARATION 1. SAFETY 3. FRAME 4. TRANSMISSION 5. DRIVE 6. ROW UNIT 7. OPTIONAL EQUIPMENT
 TABLE OF CONTENTS 1. SAFETY 2. PREPARATION 3. FRAME 4. TRANSMISSION 5. DRIVE 6. ROW UNIT 7. OPTIONAL EQUIPMENT For the initial preparation of the planter, lubricate the planter and row units. Make sure
Operating and Assembly Manual
 Model 455-IC/PRO/H Operating and Assembly Manual Midwest Equipment Manufacturing, Inc. 5225 Serum Plant Road Thorntown, IN 46071 03-08-12 SAFETY RULES Remember, any power equipment can cause injury if
Owner s Manual This Manual Must Be Read Before Operating The Equipment
 Owner s Manual This Manual Must Be Read Before Operating The Equipment MS4500 Serial No. 140410300001MS4500 and higher Madison Heights, Michigan 48071 866-5-TURFEX www.turfexproducts.com CUSTOMER COPY
BXR6200 Super Ride 20K 5 th Wheel Hitch
 Super Ride 20K 5 th Wheel Hitch Please read these in their entirety prior to installing or operating this equipment. This hitch is rated to 20,000 lbs. Gross Towing Weight and 5,000 lbs. Tongue Weight!
OPERATOR S MANUAL REPAIR PARTS CATALOG. with ONE & TWO SHANKS BRILLION FARM EQUIPMENT
 OPERATOR S MANUAL REPAIR PARTS CATALOG Subsoil Chisel Plow with ONE & TWO SHANKS MODELS: SCP-1 SCP-2 IMPORTANT! Repairs cannot be purchased retail direct from factory. Order through your Brillion dealer.
Backhoe for Dingo Compact Utility Loaders
 Form No. 50-5 Backhoe for Dingo Compact Utility Loaders Model No. 60 000000 & Up Operator s Manual Original Instructions (EN/GB) Contents Page Introduction................................. Safety......................................
Operating and Assembly Manual
 Model 470-/H/PRO/IC Operating and Assembly Manual Midwest Equipment Manufacturing, Inc. 5225 Serum Plant Road Thorntown, IN 46071 11-11-11 SAFETY RULES Remember, any power equipment can cause injury if
SAE STANDARD BOLT ASSEMBLY NUMBER 60020_IR4 INSTALLATION AND OPERATIONS MANUAL
 SAE STANDARD BOLT ASSEMBLY NUMBER 60020_IR4 INSTALLATION AND OPERATIONS MANUAL CONTENTS Important! Read Carefully... 1 Safety and Warnings... 2 Warning Rotating Equipment Hazard... 2 Warning Pinch Point
Operating and Assembly Manual
 Model 380/385-IC/385-LH Operating and Assembly Manual Midwest Equipment Manufacturing, Inc. 5225 Serum Plant Road Thorntown, IN 46071 2-0916 SAFETY RULES Remember, any power equipment can cause injury
I-110 PARTS MANUAL Updated 3/21/01
 I-110 PARTS MANUAL Updated 3/21/01 Ashland Industries Inc. Hwy. 13 South P.O. Box 717 Ashland, WI. 54806 877-634-4622 Toll Free - phone 715-682-4622 phone 715-682-9717 fax www.ashlandind.com MODEL I-100,
Operating and Assembly Manual
 Model 455-IC/PRO/H Operating and Assembly Manual Palmor Products Inc. 5225 Serum Plant Road Thorntown, IN 46071 03-08-12 SAFETY RULES Remember, any power equipment can cause injury if operated improperly
RW 1200 ROCK WINDROWER. Table of Contents
 RITE WAY MFG. CO. LTD. P.O. Box 328 Imperial, Saskatchewan Canada, S0G 2J0 Ph: (306) 963-2180 Fax: (306) 963-2660 Web Site: www.ritewaymfg.com E-mail: info@ritewaymfg.com RW 1200 ROCK WINDROWER Table of
Model ET 5000W Operation and Service Manual
 Model ET 5000W Operation and Service Manual Patented 5/16 BALL Load Capacity: 5000 lbs The ET 5000W ESCALATE TRAILER offers ground level roll-on loading and roll-off unloading of equipment with non-tilting
Multi-Purpose Tool Sitework Systems Attachment
 FORM NO. 22 648 Multi-Purpose Tool Sitework Systems Attachment Model No. 2242 89000 & Up Operator s Manual English (CE) Contents Page Introduction................................. 2 Safety......................................
Hydraulic Angling Ditching Bucket owner s manual. Read before operating. Important safety and operation instructions inside.
 EXB-HADC HYDRAULIC ANGLING DITCHING BUCKET Hydraulic Angling Ditching Bucket owner s manual. Read before operating. Important safety and operation instructions inside. CRAIG MANUFACTURING LTD. 96 McLean
Pull-Type Digger-Inverters
 Pull-Type Digger-Inverters ADI-836PT, 838PT, 840PT, ADI-1236PT Addendum MAN138 Read this manual before using this product. Failure to follow the instructions and safety precautions in this manual can result
INSTALLATION / OPERATING INSTRUCTIONS Reese Elite Series FIFTH WHEEL SLIDER HITCH
 INSTALLATION / OPERATING INSTRUCTIONS Reese Elite Series FIFTH WHEEL SLIDER HITCH DEALER/INSTALLER: (1) Provide this Manual to end user. (2) Physically demonstrate hitching and unhitching procedures in
Wheel Horse. 48 Snow Blade. Model No & Up. Operator s Manual
 FORM NO. 8 8 Wheel Horse 8 Snow Blade for Classic Graden Tractors Model No. 7950 890000 & Up Operator s Manual IMPORTANT: Read this manual carefully. It contains information about your safety and the safety
KONGSKILDE 9200 DF Vertical Tillage - Assembly/Parts
 KONGSKILDE 9200 DF Vertical Tillage - Assembly/Parts Kongskilde 9200 *Model may not be exactly as shown. Kongskilde reserves the right to make changes to product designs and specifications without notice
Installation Instructions
 Equipment Required: Wrenches: 9/16, 3/4, 1-1/8 Drill Bits: 11/32 Torque Wrench capable of reading 260 ft-lbs. Installation Instructions IN DEALERS: Please give these instructions to your customer. Do Not
Model 560 Model 580. Operating and Assembly Manual. Midwest Equipment Mfg Serum Plant Road Thorntown, IN 46071
 Model 560 Model 580 Operating and Assembly Manual Midwest Equipment Mfg. 5225 Serum Plant Road Thorntown, IN 46071 10/14/2018 SAFETY RULES Remember, any power equipment can cause injury if operated improperly
Installation Instructions
 Equipment Required: Installation Instructions Fastener Kit: F Wrenches: 8mm, 13mm, 3/4, 15/16 Drill Bits: 1/4 Other Tools: Drill, Reciprocating Saw, File WARNING: Under no circumstances do we recommend
Maintenance and Repair
 Maintenance and Repair WARNING ALWAYS shut off the engine, remove key from ignition, make sure the engine is cool, and disconnect the spark plug and positive battery terminal from the battery before cleaning,
By: Bale King Bale processor OPERATOR & PARTS MANUAL (NORTH-AMERICA)
") By: Bale King 6100 Bale processor OPERATOR & PARTS MANUAL WWW.BRIDGEVIEWMANUFACTURING.COM (NORTH-AMERICA) BRIDGEVIEW MANUFACTURING INC P.O BOX 4, HWY 22 GERALD, SASK. S0A 1B0 CANADA Ph: 306-745-2711 Fax:
By: Bale King 6100 Bale processor OPERATOR & PARTS MANUAL WWW.BRIDGEVIEWMANUFACTURING.COM (NORTH-AMERICA) BRIDGEVIEW MANUFACTURING INC P.O BOX 4, HWY 22 GERALD, SASK. S0A 1B0 CANADA Ph: 306-745-2711 Fax:
MODEL 2400 RAISED BED PLASTIC MULCH LAYER OPERATING MANUAL
 MODEL 2400 RAISED BED PLASTIC MULCH LAYER OPERATING MANUAL Rain-Flo Irrigation 929 Reading Road East Earl, Pa 17519 PH: 717-445-3000 Table Of Contents Bed Height... 7 Cover Disk... 9 Dirt Shield.... 9
BXR7200 Super Ride 20K 5 th Wheel Hitch
 BXR7200 Super Ride 20K 5 th Wheel Hitch Please read these in their entirety prior to installing or operating this equipment. This hitch is rated to 20,000 lbs. Gross Towing Weight and 5,000 lbs. Tongue
I-150-SP PARTS MANUAL
 Quality Equipment since 1953 I-150-SP PARTS MANUAL Revised 9/22/00 Ashland Industries Inc. Hwy. 13 South P.O. Box 717 Ashland, WI. 54806 877-634-4622 Toll Free - phone 715-682-4622 phone 715-682-9717 fax
ROTARY TILLER. Operation, Service & Parts Manual For "AS" Series. FORM: ASTillerBook.QXD
 ROTARY TILLER Operation, Service & Parts Manual For "AS" Series FORM: ASTillerBook.QXD April 2002 TABLE OF CONTENTS Preparation......................................1 Assembly Instructions.............................2
Operator s/parts Manual
 Operator s/parts Manual 3-Point Solid Stand Drills Pull Hitch Package Manufacturing, Inc. P.O. Box 5060 Salina, Kansas 67402-5060! Read the operator s manual entirely. When you see this symbol, the subsequent
Installation Instructions
 Equipment Required: Fastener Kit: F Wrenches: 3/4, 15/16, 10mm, 18mm Drill Bits: 1/4 Other Tools: Drill, Reciprocating saw 9465/9475 HIDE-A-GOOSE HITCH INSTALLATION All Fasteners Typical, Both Sides WARNING:
John Deere TLS TLS Tractors MANUAL
 John Deere 600-00 6-6 TLS - TLS Tractors MANUAL 00 John Deere 600-00 6-6 TLS - TLS Tractors Blade, pivot frame Hydraulics Tractor fit-up, mounting Operation, maintenance Previous hydraulic system Attachments