Deltec 3000 and Deltec Micro 3100 Large Volume Infusion Pumps Modular Infusion System
|
|
|
- Felix Robertson
- 6 years ago
- Views:
Transcription

1 Deltec 3000 and Deltec Micro 3100 Large Volume Infusion Pumps Modular Infusion System Operator s Manual
2 Published by Smiths Medical MD, Inc. All possible care has been taken in the preparation of this publication, but Smiths Medical accepts no liability for any inaccuracies that may be found. Smiths Medical reserves the right to make changes without notice both to this publication and to the product which it describes Smiths Medical family of companies. All rights reserved. No part of this publication may be reproduced, transmitted, transcribed, or stored in a retrieval system or translated into any human or computer language in any form or by any means without the prior permission of Smiths Medical. Smiths Medical MD, Inc Grey Fox Road, St. Paul, MN U.S.A. Registered in England. Company number Trademarks and acknowledgements: Deltec is a trademark of the Smiths Medical family of companies. The symbol indicates that it is registered in the U.S. Patent and Trademark office and certain other countries. The products described are covered by one or more of the following Patent Nos.: U.S , , , , U.K , FRANCE All other trademarks are acknowledged as the property of their respective owners.
3 Smiths Medical Warnings and Cautions Warnings Warnings tell you about dangerous conditions, that could lead to death or serious injury to the user or patient, that can occur if you do not obey all of the instructions in this manual. 1. WARNING: You should ensure that the performance offered by the pump is fit for the intended purpose. Failure to do so may result in compromised function of the product, patient injury or user injury. 2. WARNING: Do not use a faulty pump. If the pump detects a fault when it is first turned on, or if it develops a fault during operation then a continuous system alarm sounds. The pump must be referred to a suitably qualified technician or returned to Smiths Medical in order to have the fault rectified. 3. WARNING: Before using the pump, it should be inspected for physical damage. The pump should not be used if damage is evident, and should be returned to service personnel for repair before being returned to use. Failure to do so may result in compromised function of the product, patient injury or user injury. 4. WARNING: Do not use the pump if you detect any cracks, chips and loose or bent parts, or if the buttons do not move in and out freely when they are pressed. Failure to do so could cause inadvertent disconnection of the pumps. 5. WARNING: To avoid possible malfunction of the pump, do not expose the pump to X- rays, gamma rays or ionizing radiation, or to the RF interference or strong electric/magnetic fields emitted (for example) by diathermy equipment or mobile telephones. If the pump is used in the presence of, or in combination with Magnetic Resonance Imaging (MRI) machines it must be protected from the magnetic field emitted by such equipment. Malfunction of the pump can cause incorrect infusion or loss of infusion resulting in patient injury or death. 6. WARNING: Do not push or pull on the pumps, or the IV pole may tip over or the pumps fall to the floor. Do not try to remove modular connected pumps from the IV pole whilst they are joined together. Either of these could cause the administration set to separate from the fluid container thus spilling the medication, or the pumps themselves could be damaged. 7. WARNING: Correct entry of data is essential in order to ensure that the intended infusion is performed. Before confirming any displayed data when setting up an infusion, you should ensure that it is correct. Failure to do so may result in compromised function of the product, patient injury or user injury. 8. WARNING: Dose-rate calculation requires care in entering data. Refer to specific product drug labelling for information on appropriate administration techniques and dosages. Entering incorrect data may result in patient injury or death. 9. WARNING: When delivering drugs in the epidural space, use only those medications specifically indicated for epidural use. Epidural administration of other drugs could result in serious patient injury or death. 10. WARNING: The use of administration sets incorporating injection sites could lead to an improper or inappropriate infusion resulting in serious patient injury or death. 11. WARNING: Failure to clearly identify the pump and administration sets could lead to an improper or inappropriate infusion resulting in serious patient injury or death. 12. WARNING: Remove any air to prevent air embolism. The presence of air within the infusion can result in complications resulting in patient injury or death. 13. WARNING: To avoid over infusion, do not prime the infusion line when the admini-stration set is connected to the patient. Over infusion can result in patient injury or death. 14. WARNING: The Occlusion alarm level must be checked before starting an infusion to ensure that it is appropriate for the infusion. Failure to do so may result in an unacceptably slow time to Occlusion alarm, resulting in patient injury or death. 15. WARNING: Prior to starting an infusion, inspect the fluid path for a closed clamp or any other obstructions or restriction. Failure to do so may result in the infusion not being delivered correctly, resulting in patient injury or death. 16. WARNING: If using a blood pressure cuff above the patient s venipuncture site take extra care in setting the Occlusion alarm pressures. Failure to do so may result in unnecessary Occlusion alarms, resulting in patient injury or death. 17. WARNING: The Occlusion detection system measures downline pressure in the administration set, but does not detect infiltration. In accordance with local protocol, you must periodically inspect the patient s infusion site for signs of infiltration. Failure to do so may result in an unacceptably slow time to Occlusion resulting in patient injury or death. Large Volume Infusion Pumps
4 Warnings and Cautions Smiths Medical 18. WARNING: If an Occlusion alarm occurs, immediately clamp the line to the patient. Then inspect the fluid pathway to determine what has caused the obstruction. An unintentional bolus of medication can result in patient injury or death. 19. WARNING: Do not run parallel infusion lines below the pump. Delivering a Secondary infusion means running a second line above the pump. Failure to do so may result in an inaccurate delivery of medication, resulting in patient injury or death. 20. WARNING: Check the Secondary set carefully, since an occlusion above the pump on the Secondary line could cause the Primary fluid to be delivered instead of the Secondary infusion. Administering the wrong medication may cause serious patient injury or death. 21. WARNING: The Secondary volume to be infused must match the amount of fluid in the secondary container. Primary flow resumes when the secondary container is empty. If the volumes do not correspond, the wrong infusion may be delivered which could cause serious patient injury or death. 22. WARNING: Delivery rate for secondary medication must not exceed 300 ml/hr, or fluid may be delivered from both primary and secondary container causing delayed delivery of secondary medication and unintended mixing of fluids. Failure to do so may result in patient injury or death. 23. WARNING: Correct management of battery charging, as described in this documentation is essential to ensure that the pump can operate on battery for the time specified. Failure to do so may result in compromised function of the product or patient injury. 24. WARNING: If a backup alarm sounds, the pump should be immediately removed from the patient and sent to be repaired by a Smiths Medical qualified technician. Failure to do so may cause patient injury or death. 25. WARNING: Failure to use the power cord retainer means that the pump may be accidentally or erroneously disconnected from the mains. Although there is a battery backup in case this happens, the battery may not be charged sufficiently. Consequently, there is a risk of the pump not functioning which could lead to patient injury or death. 26. WARNING: Do not open the pump housing. Refer all service faults only to qualified technical personnel. Opening the pump housing may cause electric shock leading to patient or user injury or death. 27. WARNING: When the pump is carrying out an infusion, to ensure that electrical safety is maintained, only items of equipment that conform to EN60950 are to be connected to the RS232 connector situated at the back of the pump, otherwise patient safety may be compromised. 28. WARNING: Use only Smiths Medical administration sets with this product. Failure to do so may result in compromised system accuracy leading to complications resulting in patient injury or death. 29. WARNING: Ensure that there is no clamp or other obstruction in the administration set above the pump. If the line is obstructed, there will be no flow of fluid and air back to the Primary fluid reservoir. In this case the pump cannot eliminate the air from the line above the pump and a pressure build-up may cause fluid leakage. Failure to observe this warning could lead to serious injury or death. 30. WARNING: Always wait for a count of at least 6 seconds after opening the pump door before closing it again. Opening the pump door and then closing the door immediately could cause the delivery of an unintended bolus to the patient, resulting in patient injury or death. 31. WARNING: Where the integrity of the AC mains cord or the installation arrangement may create an electrical hazard, the pump should be operated from battery power for reasons of electrical safety. Failure to do so may result in compromised function of the product or patient injury. 32. WARNING: The use of the power cord and a data cable other than those listed in the Electromagnetic emissions declaration may result in increased emissions or decreased immunity of the pump. 33. WARNING: The pump should not be used adjacent to or stacked with other equipment. If adjacent or stacked use is necessary, the user should verify normal operation of the pump in the configuration in which it is to be used. Large Volume Infusion Pumps
5 Smiths Medical Warnings and Cautions Cautions Cautions tell you about dangerous conditions that can occur and cause damage to the pump if you do not obey all of the instructions in this manual. 1. CAUTION: Refer all service, repair and calibrations only to qualified technical personnel. Unauthorised modifications to the pump must not be carried out. 2. CAUTION: Do not autoclave, steam sterilize, ETO sterilise or subject the pump to temperatures in excess of 55 C (131 F). Excessive temperatures may cause damage to the pump. 3. CAUTION: To prevent serious damage to the pump it must not be immersed in any liquids or exposed to strong organic solvents. Wipe off spills immediately. Do not allow fluid or residues to remain on the pump. Additionally, the pump is not designed to allow it to be sterilised. Failure to observe these cautions may cause internal damage to the pump. 4. CAUTION: Carry out periodic cleaning following the detailed instructions in this manual. Use only the recommended cleaning agents cleaning agents. 5. CAUTION: When turning the pump on, if screens similar to those illustrated are not displayed, do not use the pump, and send the pump to authorised service personnel. 6. CAUTION: Only carry the pump by the handle. Failure to do so may result in damage to the pump, or the pump may be dropped which could cause internal damage to the pump. 7. CAUTION: The backlight has a limited life and may, if used constantly, cause the light to dim. Eventually the message display may then need to be replaced. To preserve the life of the message display, you should only turn on the Message Display Light as described here if it is specifically required. Misuse of this feature could lead to both battery and LCD depletion. 8. CAUTION: The data retention time is expected to be in excess of 2 years, however as this is dependant on a lithium cell contained within the electronic memory module, the data retention time may be reduced for pumps whose date of manufacture is greater than 5 years ago. Large Volume Infusion Pumps
6 Warnings and Cautions Smiths Medical Large Volume Infusion Pumps
7 Smiths Medical Contents Contents New features of version 0.71 software...v Chapter 1 - Introduction Introduction to the Deltec Model 3000 and Deltec Micro 3100 Large Volume Infusion Pumps Device Use Indications for use Product literature Epidural administration Pump features Chapter 2 - Operating the pump Introduction Who should read this chapter What this chapter covers Front of the pump Indicators and displays Programming keys Rear of the pump Connecting the pumps to an IV pole Switching the pump on and off Switching on Switching off Using the pump on battery Sounds on the Volumetric Audio alarm Quiet Pump mode Alarms and computer control Types of infusion Primary Primary and Secondary Primary and Bolus Ending a Secondary infusion Large Volume Infusion Pump Operator s Manual i
8 Contents Smiths Medical The effect of Options settings on infusions Infusing with Rate and VTBI limits enabled Setting up a Primary Infusion Prepare the solution Prime the administration set - Example Load the cassette into the pump Setting the Occlusion Alarm Primary infusion Setup During the infusion If the infusion will not start running Infusion information displays Running Rate Change (Rate titration) Security on the pump Display the Drug Label Stop the infusion If an occlusion is detected Change the Occlusion alarm setting Ending the Primary infusion KVO infusion About Secondary Infusions Setting up a Secondary infusion Lower the Primary solution container Prime the Secondary administration set Connect the Secondary to the Primary administration set About the Secondary Volume to be Infused Program the Secondary infusion Secondary infusion - Bolus enabled Running a Bolus infusion Ending a Secondary infusion Ending a Bolus infusion Checking infusion totals Total Volume infused Primary totals Secondary totals Bolus totals Re-running infusions at the same rate ii Large Volume Infusion Pump Operator s Manual
9 Smiths Medical Contents Chapter 3 - Options Introduction Options available Using options Standard Message Time Remaining Message Display Light Turning the light on and off Battery Test Using the Battery Test option Quick Rate Change Performing Quick Rate Changes Rate Taper To enter Rate Taper To exit Rate Taper To program a Rate Taper by Total Time To program a Rate Taper by Maximum Rate Using the End Early feature Resuming, restarting or reprogramming the Rate Taper Programming or reprogramming the Rate Taper with Limits set Volume Over Time (VOT) To use Volume Over Time Dose-Rate Calculation Dose-Rate Calculation Recovery To enter or exit Dose-Rate Calculation Dose-Rate Calculation steps Dose-Rate Calculation programming example Changing the dosing rate without stopping the infusion Changing the infusion rate without stopping the infusion Dose or rate change alarms Programming or reprogramming Dose-Rate Calculation with Limits set Setting Rate and VTBI limits Minimum and Maximum Infusion Rates To set the minimum and maximum infusion rate Maximum VTBI Large Volume Infusion Pump Operator s Manual iii
10 Contents Smiths Medical To set the maximum infusion volume Programming and running infusions with limits KVO rate Setting a KVO rate Drug Label Drug Library Checking the current drug label Selecting a new drug label Clearing the drug label Chapter 4 - Troubleshooting Introduction What s in this chapter Who should read this chapter Handling problems with the pump Pump will not switch on Pump Messages Programming Messages with alarms Warning Messages with alarms Warning Messages with no alarms Instrument Care Service/Warranty Service... S/W - 1 Technical Assistance... S/W - 1 Limited Warranty... S/W - 2 Specifications/Standards Specifications...S - 1 Standards...S - 9 Trumpet curves...s - 10 Appendix Nurse-Call Feature... A - 1 Index iv Large Volume Infusion Pump Operator s Manual
11 Smiths Medical Contents New features of version 0.71 software New Options The information in this section is intended for technicians and clinicians already familiar with earlier versions of the Deltec Model 3000 and Deltec Micro 3100 Large Volume Infusion Pumps. It summarises the changes to the pump that appear with version 0.71 of the pump software: new menu, new options, new features that the menu and options provide. To find out the software version of a particular pump, check the instructions label on the right side of the pump. If there are more than eight options listed, then the software version is 0.71 or later. For information on configuring the pump, see the Technical User Manual, and for more detailed technical information, obtain a copy of the Volumetric Service Manual. New Menu A Technician Menu has been introduced, to simplify the configuration of each pump. Some of the items on the Technician Menu affect how the pump behaves; others control the options that appear to the pump user when they press the Options button to show the Options menu. The configurable items on the new Technician Menu are shown on page 12 of the Technical User Manual. If the Technician Menu settings are left at their factory defaults, the pump behaves as the previous version of the pump. The new options (and some of the previous options) can be enabled on the Technician Menu. This means that they can appear when appropriate, but can be disabled if not required. On the instruction label on the pump, Options numbered 1 to 8 are the ones that appeared in previous versions of the pump software. The additional new options shown on the label are: Primary infusion Minimum Primary infusion Maximum Primary Max Volume to be infused Secondary/Bolus Minimum Secondary/Bolus Maximum Secondary/Bolus Max Volume to be infused KVO Rate Drug Library to allow selection and display of a drug label. New features The new menu and new options in version 0.71 software provide a number of new features. These fall into the following broad areas: Infusion mode features Safety features Display features Servicing features. Infusion mode features Using the Technician Menu, the pump can be configured: to stop at the end of a Secondary infusion, or to continue infusing and automatically switch to the programmed Primary rate; Large Volume Infusion Pump Operator s Manual v
12 Contents Smiths Medical to allow a Bolus infusion to be programmed where the volume infused is deducted from the primary infusion volume to be infused; to highlight this feature, the key previously called Secondary is now called Secondary/ Bolus to allow the user to set a KVO rate for an infusion, or remain at the default rate configured for the particular pump; to use the Occlusion Alarm level specified for an infusion, or remain at the configured default alarm level; to allow access to a previously programmed Dose-Rate Calculation infusion when the pump is switched on (Dose-Rate Calculation recovery), or display the standard messages. Safety features a timeout safety feature has been added. This means that when messages are not actioned within the timeout period, for example setting a value, the pump reverts to the previous display. safety keypad lockout, this feature is only activated when operating the pump on AC power. It allows the user to lockout the keypad after setting the pump up for use, so that it can be ready for infusion at a later time. Configurable safety features that can be controlled on the Technician Menu are: automatic keypad lock after one minute, to prevent malicious tampering, and increase patient safety; preset rate and VTBI limits, so that Infusion Rate and Volume to be Infused are limited to a suitable range; this prevents values being programmed accidentally which are inappropriate for infusions in particular environments (such as epidural infusions, or paediatric applications). Display features configured parameters are shown on the Message Display when the pump is switched on. Configurable display features that can be controlled on the Technician Menu are: the backlight may be activated when the keypad is touched, or kept on permanently; one of 30 preset drug labels may be selected and viewed as required during an infusion; the display of micrograms (when programming an infusion using doserate calculation) can be shown as μg or mcg ; the time display may include the suffix GMT, or the suffix can be suppressed if it is not appropriate. Servicing features On the Technician Menu, the pump can be programmed with a pump ID to suit the hospital protocol, and a service due date: the ID, for example the serial number of the pump, or an alphanumeric pump name, is displayed each time the pump is turned on; when a Service Date is set, the date is displayed each time the pump is switched on. An alarm sounds when the date is reached. vi Large Volume Infusion Pump Operator s Manual
13 Introduction Chapter 1
14 Smiths Medical Introduction Introduction to the Deltec Large Volume Infusion Pumps Deltec Large Volume Infusion Pumps are designed for use in infusion therapy in both venous and arterial infusions. They offer both standard and optional features bringing accurate fluid delivery to the patient. This makes them ideal for use in general care, home care, and intensive/critical care areas. Two models of large volume pump are available: the Deltec Model 3000 and Deltec Micro 3100 pumps are very similar in design. The differences are in colour, graphics and in the maximum rate and volume to be infused that can be programmed for an infusion. The main features of the pumps are described starting on page 1-3. For full Device Use Federal (USA) law restricts this device to sale by or on the order of a physician or licensed practitioner. details on the differences between the 3000 and 3100, see the Specification section at the end of this manual. The Deltec Model 3000 is designed for use in all areas, as it can be programmed with an infusion rate of up to 999 millilitres per hour, and a maximum volume to be infused of 9999 millilitres. The Deltec Micro 3100 is designed for use in paediatric/neonatal environments and for fluid restricted patients. It can only be programmed with an infusion rate below 100 millilitres per hour, and the maximum volume to be infused is millilitres. Note: There are software updates which are controlled by the pump software revision. If differences in software revisions affect the way the pump operates, those differences will be specially called out in this manual (if unsure, see service manual to determine software revision). Note: If one year has elapsed between the issue date of this manual and product use, contact Smiths Medical to see if a later revision of this manual is available. Note: Read the entire contents of this manual carefully before using the pump. Volumetric Infusion Pump Operator s Manual 1 1
15 Introduction Smiths Medical Indications for Use The Deltec Model 3000 and Deltec Micro 3100 large volume infusion pumps are intended for use in IV Therapy in both venous and arterial infusions. The Model 3000 and Micro 3100 pumps may also be used for epidural administration. They offer both standard and optional features making them ideal for use in general care, home care and intensive/critical care areas. assure accurate, smoth fluid delivery to the patient in a variety of healthcare settings. Model 3000 offers macro and micro delivery rates and volume to be infused options. The Micro 3100 offers micro-only delivery for paediatric, neonatal and fluid restricted patients. Dose-Rate pumps are also ideal for use in operating theatres. Alarm and alert messages help the user maintain consistent IV therapy. The pumps are designed to Product literature A copy of the Operator s Manual and the Technical User Manual is supplied with every pump. The following manuals are applicable to the Volumetric Infusion Pumps with Version 0.71 software. The manual part numbers are listed in Chapter 9 Illustrated Parts List of the Technical Service Manual. Technical User Manual, part number Technical Service Manual, part number The Operator Manuals for Version 0.67 and earlier software are listed in the first section of Chapter 9 Illustrated Parts List of the Technical Service Manual. 1 2 Volumetric Infusion Pump Operator s Manual
16 Smiths Medical Introduction Epidural administration Both the Deltec Model 3000 and Deltec Micro 3100 pumps may be used for epidural administration. Anaesthetics Epidural administration of anaesthetics is limited to short-term (not to exceed 96 hours) infusion, with indwelling catheters specifically indicated for short-term delivery of anaesthetic drugs. Analgesics Epidural administration of analgesics is limited to use with indwelling catheters that are specifically indicated for short or long term delivery of analgesic drugs. To prevent infusion of drugs not indicated for epidural use and to avoid inappropriate delivery rates when using the pump for epidural applications: use the pump s Maximum Rate option, to set a maximum infusion rate of 20 ml/h on a pump to be used for epidural administration. This feature is described fully in Chapter 3, Options; do not use IV administration sets which contain injection sites; differentiate the pump and IV set being used for epidural delivery from those being used for other routes of administration. A yellow Epidural Label Set for the Deltec Large Volume Infusion Pump (part number TPF-00306) is available from Smiths Medical. The labels should be stuck on the front, top and sides of the pump to help staff to identify a pump that is dedicated to epidural application. WARNING: When delivering drugs in the epidural space, use only those medications specifically indicated for epidural use. Epidural administration of other drugs could result in serious patient injury or death. WARNING: The use of administration sets incorporating injection sites could lead to an improper or inappropriate infusion resulting in serious patient injury or death. WARNING: Failure to clearly identify the pump and administration sets could lead to an improper or inappropriate infusion resulting in serious patient injury or death. Volumetric Infusion Pump Operator s Manual 1 3
17 Introduction Smiths Medical Pump features The main features of the Deltec Model 3000 and Deltec Micro 3100 Large Volume Infusion pumps are listed below: Easy to use features The pumps have been designed to be easy to use: they are easy to set up and operate, yet with all the advanced features typically associated with the more complicated infusion systems; they have a straightforward keypad and an easy-to-read message display; the unique air-in-line removal system allows clearing of bubbles in the line by simply opening and closing the door: air is prevented from going beyond the cassette; this increases patient safety, minimises the risk of infection and saves operator time; they can be used at the bedside or as transportable equipment; using the internal battery which also switches in automatically if the pump is being used on mains power and this is interrupted. Use of administration sets The pumps can only be used with Smiths Medical administration sets. These administration sets have the following features: all Smiths Medical administration sets incorporate a safety clip to prevent accidental free flow when the administration set is removed from the pump; when used with Smiths Medical blood administration sets the pumps deliver blood and blood products without significant haemolysis of red blood cells. Infusion mode features accurate (± 2%) fluid delivery; the pumps can be configured to stop at the end of a Secondary infusion, or automatically switch to infuse at the programmed Primary rate; a Bolus infusion may be programmed so that the volume infused is deducted from the primary infusion volume to be infused; KVO rate may be specified for an infusion, or remain at the default rate for a particular pump; the pumps offer a quick rate change feature for complete titration capability; automatic delivery of a secondary medication (if a secondary infusion has been set up). Safety features The pumps have been designed with a high emphasis on safety: there is an optional automatic keypad lock which prevents inadvertent operation and increases patient safety; the keypad can also be locked manually at any time; a pump may be configured so that its Infusion Rate and Volume to be Infused are limited to a suitable range; this prevents values being entered accidentally which are inappropriate for infusions in particular environments (such as epidural infusions). the pumps have indicators that are lit to show if they are running on battery or mains; 1 4 Volumetric Infusion Pump Operator s Manual
18 Smiths Medical Introduction when using the battery, a test is performed on power-up and the level is shown on the display; manual testing is also available; the pumps have an RS232 interface allowing connection to a computer for external monitoring. Display features Apart from the standard display, pumps can be configured to show extra information, either as a standard message display or by pressing a key to toggle the display. Standard displays are: the volume infused in the current infusion; the infusion rate; the Volume to be Infused in the remainder of the infusion. Additionally: the rate and volume to be infused displays are automatically adjusted to make them easy to read in any light; the time remaining in the present infusion may be viewed; the total volume of fluid delivered to your patient since the totaliser was last cleared to be viewed; also displayed with the total volume is the total time (hours and minutes) that the pump has been in use since the totaliser was last cleared; WARNING: When the pump is carrying out an infusion, to ensure that electrical safety is maintained, only items of equipment that conform to EN60950 are to be connected to the RS232 connector situated at the back of the pump, otherwise patient safety may be compromised. Using configurable displays: the backlight may be activated when the keypad is touched, or kept on permanently; optionally, one of 30 preset drug labels may be selected and viewed as required during an infusion. Occlusion Pressure features These features increase safety in infusing fluid, particularly in critical care areas such as neonatal and paediatric care: when setting occlusion alarms, three standard occlusion alarm settings between 100 and 500 mmhg can be made; see the Specification section at the end of this manual for full details of the occlusion alarm values; the occlusion pressure alarm setting when the pump switches on is configurable; you can change the setting for a particular infusion using the Occlusion Alarm Setting key; when an occlusion alarm sounds, the pumping mechanism backs off to reduce downline back pressure and bolus potential (bolus potential is approximately 0.3 ml regardless of the rate and the administration set used); when an occlusion is detected, the pump does not give an occlusion alarm immediately, but only alarms if the occlusion pressure continues to exceed the occlusion threshold for up to 10 seconds; however, if such temporary occlusions persist, then the occlusion alarm is generated; this helps to avoid nuisance occlusions. Volumetric Infusion Pump Operator s Manual 1 5
19 Introduction Smiths Medical Special infusion features The pumps have a number of special infusion options: a Volume over time option allows the user to set the volume to be infused and total time for the infusion, the pump automatically calculating the infusion rate; a Dose-rate calculation option which allows automatic calculation of the infusion rate by entering infusion dose; patient weight (kg or lbs); drug amount in fluid container (in MG, Gm or mcg units), and volume of fluid in the container, in ml; a Rate Tapering option allows automatic tapering of the infusion rate (either up or down) for administration of IV nutrition. Multiple use features When multiple infusion lines are required, two or three pumps can be fitted together: modular side rails and hooks mean that one, two, or three pumps may be connected to a single IV pole; this provides space saving; the modular connection system has a safety feature which ensures that the first pump must be correctly attached to an IV pole before the second and third pumps can be connected. Servicing features The pumps have been designed with a number of features for Biomedical engineers: a Service Due Indicator, allows a service date to be set, which is displayed on power-up with an alarm; special menus are provided to aid in testing, troubleshooting and service; the last 200 events are recorded and available on these menus; downloading of the pump history is possible using the RS232 port with a special optional kit (part no ). Together with the ability to configure the pump using the Technician Menu, these features offers greater management flexibility. Instructions for using these functions appear in the Technical User Guide and the Deltec Large Volume Infusion Pumps Service Manual. Optional features Some pumps are optionally fitted with a Nurse-Call Feature which allows a pump to be connected to a hospital nurse call system and signal alarms occurring in the pump. Note: This feature is not available in all countries. CAUTION: The data retention time is expected to be in excess of 2 years, however as this is dependant on a lithium cell contained within the electronic memory module, the data retention time may be reduced for pumps whose date of manufacture is greater than 5 years ago. 1 6 Volumetric Infusion Pump Operator s Manual
20 Operating the pump Chapter 2
21 Smiths Medical Operating the pump Introduction This chapter introduces the Deltec Large Volume Infusion pumps. It explains all the terminology that you should understand, and the techniques that you use to operate the pump. Who should read this chapter This chapter is aimed at all users who have been trained in how to use the Volumetric pump. It is not designed to be used as a self-teach manual, but should be used to reinforce the best-practice techniques demonstrated during training sessions. What this chapter covers These sections describe physical aspects of the Deltec Large Volume Infusion pumps.: front of the pump - indicators and displays front of the pump - programming keys rear of the pump attaching the pump to an IV pole switching the pump on and off using the pump on battery sounds on the pump. These sections explain how to program an infusion: types of infusion setting up a Primary infusion about Secondary infusions running a Bolus infusion. This chapter does not cover the types of infusion that may be run if the pump has optional features enabled. These are described in Chapter 3, Options. Large Volume Infusion Pump Operator s Manual 2 1
22 Operating the pump Smiths Medical Front of a Deltec 3000 series pump Indicators and displays Dimensions (including pole clamp) Height 28 cm (11 inches), Width 21.5 cm (8.6 inches), Depth 23.5 cm (9.45 inches). Weight 5 kg (11 pounds). 2 2 Large Volume Infusion Pump Operator s Manual
23 Smiths Medical Operating the pump Programming keys Large Volume Infusion Pump Operator s Manual 2 3
24 Operating the pump Smiths Medical Rear of the pump 2 4 Large Volume Infusion Pump Operator s Manual
25 Smiths Medical Operating the pump Connecting the pumps to an IV pole In use, Smiths Medical recommend that the pump should be connected to a suitably balanced IV pole using the pole clamp as illustrated in the diagram on the opposite page. The diameter of the pole must be between 1.2 cm and 3.8 cm (0.5 and 1.5 inches). To provide maximum stability when using the modular connection system, ideally, the IV pole should have 6 wheels and a low centre of gravity. The base diameter should be 56 cm (22 inches). This diagram shows how three pumps may be connected together using the Volumetric s modular connection system Attaching a single pump to an IV pole To attach the pump to a suitably balanced IV pole: 1. Loosen the screw on the pole clamp. 2. Hold the pump by the handle and slip the arms of the pole clamp onto the pole. 3. Tighten the screw on the pole clamp to firmly attach the pump to the pole. Attaching more than one pump to an IV pole When multiple infusion lines are required, you can connect up to three pumps to a single pole using the hooks and rails that make up the modular connection system. As all pumps have connectors on both sides, you can use any one as the centre, left, or right pump. Inspecting the modular connections Before connecting the pumps, you must check that the modular connection parts are all in good condition: 1. Carefully inspect the modular connection system for damage, including cracks, chips, loose or bent parts. 2. Press the disconnect buttons several times to make certain that the buttons move in and out freely. WARNING: Do not use the pump if you detect any cracks, chips and loose or bent parts, or if the buttons do not move in and out freely when they are pressed. Failure to do so could cause inadvertent disconnection of the pumps. Large Volume Infusion Pump Operator s Manual 2 5
26 Operating the pump Smiths Medical How to connect pumps together Once you have inspected the modular connection system as described in the previous section, connect the pumps as follows: 1. Clamp the first pump to the IV pole. This is now the centre pump. Note: As you tighten the screw on the pole clamp, you automatically adjust the modular connection hook and disconnect button. Once the pump is securely attached to the pole, the hook is in the correct position to allow you to connect further pumps. 2. Take the second pump, grasping it by the handle and hold it so that the modular connector rails are directly above or below the connector rails of the centre pump. 3. Engage the edges of the modular connector rails and slide the second pump up or down until it is connected to the centre pump. When the connection is secure, you hear a distinct click. 4. Before releasing the handle of the second pump, double-check that the connection is secure by moving the pump up and down and exerting pressure on the top of the pump. To attach a third pump to the other side of the first pump, repeat steps 2, 3 and 4. Note: If the connection is loose, or the pumps seem to wobble, disconnect then carefully reconnect them, making sure both edges of the modular connectors engage. Do not use pumps where the connection is loose, but return them to a suitably qualified technician for repair. Moving an IV pole with pumps connected If you need to move the IV pole once the pumps are attached, always ensure that you grasp the IV pole with one hand and steady the pumps with the other hand if necessary. Disconnecting modular connected pumps You must always disconnect modular connected pumps one by one before removing the centre mounted pump from the IV pole. Disconnect the left and right hand pumps from the centre mounted pump as follows: 1. Grasp handle of pump to be removed. 2. Lift the pump slightly. 3. Press the disconnect button and slide the pump up or down to disconnect from the centre pump. 4. Place the pump in a location where it will not be damaged. WARNING: Do not push or pull on the pumps, or the IV pole may tip over or the pumps fall to the floor. Do not try to remove modular connected pumps from the IV pole whilst they are joined together. Either of these could cause the administration set to separate from the fluid container thus spilling the medication, or the pumps themselves could be damaged. 2 6 Large Volume Infusion Pump Operator s Manual
27 Smiths Medical Operating the pump Switching the pump on and off Before switching the pump on, visually check for any cracks on the case, or damage to any part of the pump or its connectors. Plug the AC mains cord into an AC mains supply if possible. If necessary, the pump can be run on its internal batteries, see Using the pump on batteries, later in this chapter. Switching on To switch on the pump you can do either of the following: press the On/Off key open the front door by lifting the latch. Note: If the pump is switched off and connnected to AC power and the saftey keypad lockout feature is active, the pump cannot be switched on via the keypad, see Safety keypad lockout, page Switch on in Quiet Pump mode If you want to use the pump without any key clicks and also suppress the non-insistent alarms, you can switch on in quiet pump mode: 1. Press the Silence key and keep it pressed down. 2. Press the On/Off key. Note: Quiet Pump operation is cancelled when you turn off the pump. Message Display at Switch on The messages displayed when you switch on the pump depend on which features have been enabled on the pump and whether or not it is connected to the AC mains supply. If all the pump options have been enabled, the pump displays messages to provide you with the following information about itself: Pump Identifier Drug Label Primary Min Rate and Max Rate Primary Max VTBI Battery gauge (displayed only if the pump is disconnected from the AC mains supply) Service due date. After switching on When the pump has completed its self tests, it is ready for you to program, load a cassette (see page 2-18), or start an infusion. You see a screen something like this: Self test When you switch it on, the pump carries out a series of tests to ensure that all components are functioning correctly. If any electrical or mechanical problems are detected, or if any potential problems are detected, then a message is displayed and the alarm sounds. See Chapter 4, Troubleshooting for more details on handling alarms. Large Volume Infusion Pump Operator s Manual 2 7
28 Operating the pump Smiths Medical Switching off For safety reasons, the front door must be properly closed and any infusion must be on Hold before you switch off the pump. If the pump is running an infusion, press the Hold key; if the front door of the pump is open, close it with the latch; then press the On/Off key. Using the pump on battery The pump contains an internal rechargeable battery. However, in everyday use, the pump should be connected by its cord to a suitable AC mains supply, if one is available. The battery is then kept fully charged, and will continue to be charged whilst the pump is infusing. The pump automatically uses the battery: if you switch on whilst the power cord is unplugged, or if the AC power fails whilst the pump is operating. Switching on using the battery When you switch on the pump, if it is being powered by internal battery: you need to hold down the On/Off key to turn the pump on. If the pump is operating on the AC mains supply, it switches on instantaneously when you touch the On/Off key; there is a short pause whilst the pump carries out the Battery Test and displays the Battery Gauge screen to indicate the current battery capacity: Note: The battery is always tested when the pump is switched on, even though the Battery Gauge is not displayed during Dose-Rate Calculation, DRC Recovery or Rate Taper infusion start up. Testing the battery At any time when operating on battery, you can check the battery capacity by carrying out the Battery Test described in Chapter 3, Options. Operating using the battery During operation of the pump on battery: the yellow Battery indicator is lit the Message Display light turns off if the pump is left on Hold, unless you have set the Backlight on option, described in Chapter 3, Options. Low battery When you switch on the pump, and during operation, the pump warns you when the battery capacity is low. If you see the yellow Battery indicator flashing whilst the pump is infusing, you should plug the power cord into the AC mains supply as soon as possible. 2 8 Large Volume Infusion Pump Operator s Manual
29 Smiths Medical Operating the pump Low battery alarms When approximately one hour of operation remains, the pump sounds an alarm and displays this message: If you see this message, plug the power cord into the AC mains supply as soon as possible. If you decide that you must continue to use the pump on battery, another alarm sounds approximately half an hour before it is fully discharged. This message is displayed: It is essential that the pump is plugged into the AC mains supply at this point. Recharging the battery To charge the battery, plug the power cord into the AC mains supply. It takes approximately 10 hours to recharge a completely depleted battery. Capacity A new, fully charged battery will operate the pump for approximately 6 hours at 100 ml/h (99.9 ml/h on Micro 505). The battery may discharge more quickly if the battery has aged and is in a poor condition even though it was recently charged. Pump in storage You should connect the pump to the AC mains supply to charge the battery every three months, even when the pump is not in service. This helps to maintain the life of the battery. WARNING: Correct management of battery charging, as described in this documentation is essential to ensure that the pump can operate on battery for the time specified. Failure to do so may result in compromised function of the product or patient injury. WARNING: Where the integrity of the AC mains cord or the installation arrangement may create an electrical hazard, the pump should be operated from battery power for reasons of electrical safety. Failure to do so may result in compromised function of the product or patient injury. CAUTION: The data retention time is expected to be in excess of 2 years,however as this is dependant on a lithium cell contained within the electronic memory module, the data retention time may be reduced for pumps whose date of manufacture is greater than 5 years ago. Large Volume Infusion Pump Operator s Manual 2 9
30 Operating the pump Smiths Medical Sounds on the Volumetric The Volumetric pump makes a click sound as you press each key. It also sounds an audio alarm to alert you to a condition that requires attention on the pump: either an insistent (three-tone) or non-insistent (two-tone) alarm. The click and non-insistent alarm do not sound if the pump is switched on in Quiet Pump mode. See next page. As a further safety feature, the Deltec Large Volume Infusion pumps emits a high-pitched system alarm to indicate a problem requiring the attention of a Smiths Medical qualified technician. Audio alarm When the Deltec Large Volume Infusion pump requires attention, it uses an audio alarm to indicate that there is a problem. Whilst sounding the alarm, it also displays a message to explain the problem. A full list of all the alarm messages, their possible causes and how to solve the problem is explained in Chapter 4, Troubleshooting. This section explains the different types of alarm sounds made by the pump. You may hear three types of alarm from Deltec Large Volume Infusion pumps: insistent non-insistent continuous (backup alarm). Insistent alarm This type of alarm indicates that fluid delivery has stopped, or cannot be started. It alerts you to a condition that must be corrected before the infusion can be started, or continued, for example if an occlusion is detected. The insistent audio alarm consists of three tones: two high-pitched and one lowpitched, repeated at two-second intervals. To silence an insistent alarm, press the Silence or Hold key. The alarm will recur unless you correct the problem as described in Chapter 4, Troubleshooting. This chapter describes each alarm, its cause and action to take. Non-insistent alarm This type of alarm alerts you to a condition that needs attention, but has not caused the infusion to stop. For example, you hear a non-insistent alarm if the pump is running on batteries and the batteries are low, or if the infusion has switched to a KVO rate. The non-insistent audio alarm consists of two tones, one high-pitched and one lowpitched, repeated at two-second intervals. To silence this type of alarm: press the Silence or Run key to silence the alarm without stopping fluid delivery; press the Hold key to silence the alarm and stop fluid delivery. Note: In Quiet Pump mode, there is no audio alert for certain non-insistent alarms. See the next page for more details Large Volume Infusion Pump Operator s Manual
31 Smiths Medical Operating the pump Continuous - backup alarm In addition to the insistent and non-insistent operational alarms, the Deltec Large Volume Infusion pump has a fail-safe backup alarm system. This has a distinctive highpitched tone: should the audio alarm system fail, then the pump sounds the backup alarm, with a 1.5 second pause between alarm tones; should an electromechanical system failure occur, the pump sounds the backup alarm continuously. If you hear the backup alarm sounding, you should immediately remove the pump from the patient and have it repaired by a Smiths Medical qualified technician. Quiet Pump mode In some circumstances, it may be desirable to operate the Deltec Large Volume Infusion pump without the associated sounds. For safety reasons, you cannot turn off the insistent or continuous alarms, but if necessary you can operate the pump without the key-press click sound and certain non-insistent alarms. This is called a Quiet Pump infusion. To run a Quiet Pump infusion: 1. Ensure that the pump is turned off. 2. Press Silence and keep it held down. 3. Turn on the pump with On/Off. The keypad click and non-insistent alarm sound is now off. The pump remains in Quiet Pump mode until you switch off and then on again. Silent alarms in Quiet Pump mode When running the pump in Quiet Pump mode, certain alarms associated with a Secondary infusion are silent. The alarm is silent in the following circumstances: when the pump automatically switches from Secondary to Primary when the Secondary infusion is complete; when you program the Secondary infusion, but press the Primary key then the Run key without running the Secondary infusion; when you press Run to start the Secondary infusion with the Volume to be Infused set to zero. Alarms and computer control If a pump is being run under computer control, you can silence it from the computer. However, you must resolve the problem causing the alarm on the pump. WARNING: If a backup alarm sounds, the pump should be immediately removed from the patient and sent to be repaired by a Smiths Medical qualified technician. Failure to do so may cause patient injury or death. Large Volume Infusion Pump Operator s Manual 2 11
32 Operating the pump Smiths Medical Types of infusion Hospital protocols dictate how the Primary, Secondary and / or Bolus features are used, and the pump should be configured to conform with these protocols. This section summarises the typical use of these features of the pump. Using the pump, you may carry out: a Primary infusion a Primary and a Secondary infusion a Primary and a Bolus infusion. Primary For a Primary infusion, you set up the pump to deliver solution from a single container. This diagram shows an example of how a pump looks when set up for a Primary infusion using a Standard administration set ( ). The pump s Volume to be Infused Display shows the remaining Volume to be Infused and on its Message Display the pump shows the total infused so far. For full details on how to set up a Primary infusion: see Setting up a Primary Infusion, page Large Volume Infusion Pump Operator s Manual
33 Smiths Medical Operating the pump Primary and Secondary For a Primary and a Secondary infusion, two containers are used: one to deliver the Primary infusion, for example, a hydration solution; a second to deliver an additional infusion, for example an antibiotic dose; this is sometimes called a piggyback infusion. The pump keeps separate totals for the Primary and Secondary infusions: the total infused in the Secondary infusion is not deducted from the Primary Volume to be Infused. The pump can be configured to work in one of two ways at the end of the Secondary infusion: see Ending a Secondary infusion, over the page. For full details on how to set up a Secondary infusion: first follow the steps in Setting up a Primary Infusion, page 2-19; then see About Secondary Infusions, page Secondary infusion with Bolus enabled The pump can be configured, using the Technician Menu, to offer a Bolus infusion as an alternative to the Secondary infusion. If the Bolus feature is enabled, you can: run a Secondary infusion, where the volume infused is not deducted from the Primary Volume to be Infused or run a Bolus infusion, where the volume infused is deducted from the Primary Volume to be Infused. Primary Secondary Large Volume Infusion Pump Operator s Manual 2 13
34 Operating the pump Smiths Medical Primary and Bolus With the pump configured to offer the Bolus feature, you can carry out a Bolus infusion as an alternative to the Secondary infusion. A Bolus infusion may be administered at a different rate, with the volume to be infused entered separately to the Primary volume, just as for a Secondary infusion. However, for a Bolus infusion, the Volume infused is deducted from the Primary Volume to be Infused. At the end of the Bolus, the pump reverts to the Primary infusion at the previously programmed Primary rate. The Secondary Stop feature, if enabled has no effect at the end of a Bolus. When the Bolus feature is configured, each time you press the Secondary/Bolus key, the Message Display shows: At this point, you would press 3 to enter Rate and Volume to be Infused for the Bolus, or to view the totals for the Bolus infusion. For full details on how to administer a bolus infusion, see Running a Bolus Infusion on page Ending a Secondary infusion The Secondary Stop feature in the Technician Menu controls how the pump works when the Secondary infusion is complete. With Secondary Stop disabled, the pump automatically reverts to the Primary infusion at the previously programmed rate, so that there is a continuous flow. When the Primary infusion starts a noninsistent alarm sounds. With Secondary Stop enabled, the pump stops and sounds an alarm until you manually silence it and start the Primary infusion Large Volume Infusion Pump Operator s Manual
35 Smiths Medical Operating the pump The effect of Options settings on infusions Some of the Options settings can affect the way you program the infusion, what you can do during the infusion, or the way the pump behaves. For example, if the pump has the appropriate Options enabled on the Technician menu, you may choose to: turn on the Message Display backlight set the KVO rate select a Drug Label program a Dose-Rate Calculation, Volume Over Time or Rate Taper infusion. However, the settings which may most affect the way you program an infusion are Rate and VTBI limits. Such limits restrict the values you can use during an infusion and their use is described below. If you need to make any changes to these Options settings, you must do so before programming the infusion. See Chapter 3, Options for full details. Infusing with Rate and VTBI limits enabled If the features for setting limits are enabled on the Technician Menu, the limit values can be set or examined using the Options key. They can be set independently for Primary and Secondary infusions and may not all be enabled. If Primary Rate or VTBI limits are enabled, you can also see the settings displayed after the pump is switched on. When limits are enabled, you cannot run an infusion with a Rate or Volume to be infused set outside the limits. Also, you cannot change the rate while running to go outside the limits. If you try to do this, or if you program a value outside the limits and then press the Run key, you see the message: Wherever possible check or set the limits before you program the infusion, especially if you might have to give a Secondary infusion or a Bolus. The easiest way to check Primary infusion settings is to look at the message display when you switch the pump on. To check Secondary infusion settings, you must use the Options key. Setting limits is described in Setting Rate and VTBI limits on page 3-29 in Chapter 3, Options. Limits are enabled and set for a safety purpose (for example, where the pump is used for Epidural administration). If you are likely to be in a situation where you have to give an infusion in an emergency, ensure that when a pump is switched off, the limits are left with safe value settings. Large Volume Infusion Pump Operator s Manual 2 15
36 Operating the pump Smiths Medical Setting up a Primary Infusion To set up and run a Primary infusion the main steps are: attach the pump to the IV pole, described on page 2-5; set the Options for the infusion if appropriate, particularly Rate or VTBI Limits if they are enabled as described on page 2-15; prepare the solution; prime the administration set; load the administration set into the pump; program the infusion; start the infusion. Prepare the solution Using an aseptic technique, prepare the solution container and prime the administration set following the instructions provided with the set. As a guide: 1. Remove the solution container from its packaging and remove the cap from the fluid outlet. 2. Remove the administration set from its packaging and close the roller clamp. 3. Remove the cap from the spike on the administration set and insert the spike into the fluid outlet on the solution container. 4. Hang the container with the administration set on the IV pole and ensure that the container is the correct height above the pump. Height of solution container above the pump If necessary, adjust the height of the pole so that the bottom of the solution container is between 15 cm and 30 cm (between 6 inches and 12 inches) above the top of the pump On Model 3000, 30 cm (12 inches) may be required for rates over 500 ml/h. On both Model 3000 and Micro 3100, 30 cm (12 inches) may be required when using thick solutions and/or 60 drops/ml sets. Note: A thick solution in this case may be certain cytotoxic agents, lipid-based fluids and other viscous solutions, for example Total Parenteral Nutrition. WARNING: Correct entry of data is essential in order to ensure that the intended infusion is performed. Before confirming any displayed data when setting up an infusion, you should ensure that it is correct. Failure to do so may result in compromised function of the product, patient injury or user injury Large Volume Infusion Pump Operator s Manual
37 Smiths Medical Operating the pump Prime the administration set - Example You must always follow the Instructions for Use that accompany the administration set to be primed. This section shows an example to explain the basic priming steps to be carried out on an administration set without a bi-directional check valve, filter, injection site or c-clamp. 1. Squeeze the drip chamber and fill until it is at least one third full. The drip chamber may fill completely during loading and/or an infusion. This will not adversely affect the fluid delivery or the operation of the pump. 2. Hold the cassette inverted, so that the roller clamp is above the cassette, as shown here. 3. Slowly open the roller clamp to allow the solution to flow through and prime the cassette and the line. You can control the flow by moving the roller clamp as necessary. 4. When the entire set is primed, close the roller clamp. With the solution container hanging on the IV pole and the administration set spike inserted into the container, prime the administration set as follows: WARNING: Remove any air to prevent air embolism. The presence of air within the infusion can result in complications resulting in patient injury or death. WARNING: Use only Smiths Medical administration sets with this product. Failure to do so may result in compromised system accuracy leading to complications resulting in patient injury or death. WARNING: Always wait for a count of at least 6 seconds after opening the pump door before closing it again. Opening the pump door and then closing the door immediately could cause the delivery of an unintended bolus to the patient, resulting in patient injury or death. WARNING: To avoid over infusion, do not prime the infusion line when the administration set is connected to the patient. Over infusion can result in patient injury or death. Large Volume Infusion Pump Operator s Manual 2 17
38 Operating the pump Smiths Medical Load the cassette into the pump With the administration set primed and the solution container hanging on the IV pole, you can load the cassette into the pump as follows: 4. The safety clip on the administration set is marked with arrows to indicate the correct direction for insertion. The pump is marked with a diagram showing the position of the safety clip slot. Slide the safety clip up to the base of the cassette and push it fully inward, into its slot. 5. Ensure that there are no obstructions in the administration set above the pump, then close the door, pushing the latch into place. The pump will force any air in the cassette back up the line where it will be dispersed into the Primary reservoir Open the door of the pump by raising the latch. With the flat side of the cassette towards you, and the roller clamp below the cassette, match the four holes in the corners of the cassette with the four metal pins inside the pump. Press the cassette into place and run your finger down the cassette to ensure that it is flat and correctly fitted. WARNING: Ensure that there is no clamp or other obstruction in the administration set above the pump. If the line is obstructed, there will be no flow of fluid and air back to the Primary fluid reservoir. In this case the pump cannot eliminate the air from the line above the pump and a pressure build-up may cause fluid leakage. Failure to observe this warning could lead to serious injury or death. Setting the Occlusion Alarm When you switch the pump on, the Occlusion Alarm setting is always the same, and is defined by the Technician Menu configuration setting. Before an infusion, always check, and if necessary, change the setting to suit the infusion by pressing the Occlusion Alarm Setting key. Continue pressing the key until you see the setting you want. Never use a Low setting with high infusion rates. For full details, see Change the Occlusion Alarm setting, on page See the Specification section at the end of this manual for details on the pressure values for High, Medium and Low settings. WARNING: The Occlusion alarm level must be checked before starting an infusion to ensure that it is appropriate for the infusion. Failure to do so may result in an unacceptably slow time to Occlusion alarm, resulting in patient injury or death Large Volume Infusion Pump Operator s Manual
39 Smiths Medical Operating the pump Primary infusion setup Once the solution is ready and the cassette is loaded into place in the pump, check that the Primary indicator is lit. If not, press the Primary key If Min and Max Rates and Max VTBI are enabled on the pump, ensure they are appropriate for the infusion by pressing the Options key. To find out more see page If the infusion is for a new patient, or if you need to clear the totals for this patient, press Total Volume then press *. 3. Press the Occlusion Alarm Setting key to display the current setting and continue pressing if necessary to set an appropriate level. 4. Press the Rate key then use the keypad to enter the infusion rate in ml/h. 5. Press the Volume to be Infused key then use the keypad to enter the volume in ml. Ensure that the Rate and Volume to be infused are correct for this Primary infusion then open the roller clamp. Inspect the fluid path for restrictions, a closed clamp, or any other upstream obstructions. 6. Press the Run key to start the infusion. WARNING: The Occlusion alarm level must be checked before starting an infusion to ensure that it is appropriate for the infusion. Failure to do so may result in an unacceptably slow time to Occlusion alarm, resulting in patient injury or death. WARNING: Prior to starting an infusion, inspect the fluid path for a closed clamp or any other obstructions or restriction. Failure to do so may result in the infusion not being delivered correctly, resulting in patient injury or death. Large Volume Infusion Pump Operator s Manual 2 19
40 Operating the pump Smiths Medical During the infusion This section explains the main activities you may want to carry out once you have started the infusion. When the infusion is running, you can: see the progress of the infusion from the information shown on the different displays on the pump; change the infusion rate; lock the keypad to provide security on the pump; display the drug label (if this feature is enabled); stop the infusion. If you press Hold to stop the infusion, you can: change the occlusion alarm setting (see page 2-24); set up and start a Secondary infusion (see page 2-26). If the infusion will not start running This will only occur if you have one or more of the following features enabled on the Technician menu: Min and Max Rate; Max VTBI. If you have entered a rate which is outside the set limits, or a VTBI which is greater than the maximum, when you press Run you see the message: 3. Check the prescription. 4. Check the Min and Max Rate and Max VTBI settings by pressing the Options key until each is displayed. 5. Make corrections as necessary. 6. Press Run to start the infusion. and an alarm sounds. The Rate or VTBI display also changes to the one used before you programmed the infusion. If this happens, you should: 1. Silence the alarm. 2. Check the Rate or VTBI display to see which has changed to find out which limit has been exceeded Large Volume Infusion Pump Operator s Manual
41 Smiths Medical Operating the pump Infusion information displays Message Display The Message Display starts at zero and counts up in ml to show the volume infused so far, for example: Rate display and Pumping indicator The Rate display shows the infusion rate. The Pumping indicator is a horizontal line located at left of the Rate display. The indicator moves to show that the solution is being infused. The speed of the Pumping indicator is approximately proportional to the infusion rate. Volume to be Infused display The Volume to be Infused display initially shows the programmed volume. During the infusion, it counts down to show the volume remaining for this infusion. Original volume to be infused To find out the original programmed Volume to be Infused, add the amount in the Volume to be Infused display to the amount in the Message Display. Running Rate Change (Rate titration) Whilst the pump is running, you can change the infusion rate. For example, you may need to adjust the initial rate once the infusion is established. You can also stop the infusion and then change the rate, but the ability to change without stopping the delivery of the solution is especially important with some drugs, for example, vasoactive drugs. You can carry out a running rate change on Primary or Secondary infusions. Once the infusion has started, to enter a running rate change: 1. Press Rate. 2. Enter the new rate using the numeric keypad. 3. Press Run within 10 seconds. If you do not complete the rate change within 10 seconds, an alarm sounds and the rate reverts to the previous running rate, followed by a message to tell you the change has not been completed. If rate limits are enabled, and you enter a rate that is outside those set, an alarm sounds and you see: The pump continues at the previous rate. Silence the alarm and check the current settings using the Options key. If you need to change the rate limit, you must first put the pump on hold. Large Volume Infusion Pump Operator s Manual 2 21
42 Operating the pump Smiths Medical Security on the pump To prevent any tampering with the keypad during the infusion, there are two ways to secure the keypad: manual locking automatic locking. Manual keypad locking This safety feature is always available on the pump, whether or not the automatic keypad locking feature is enabled. To lock the keypad during an infusion, press the grey Keypad lock button on the rear of the pump. The Message Display confirms that the keypad is locked: If you touch any of the keys on the keypad once it is locked, the pump re-displays the message. Safety keypad lockout The saftey keypad lockout is only active when operating the pump on AC power. It allows the user to lockout the keypad, so that after setting up the pump for use, it is ready for infusion at a later time. To set the saftey keypad lockout, switch the pump off and connect to an AC power supply. Then press the keypad lock button once. If you now attempt to switch the pump on, the keypad is locked out and the pump inactive. The pump can only be switched on by: pressing the keypad lock once and then switching the pump on using the On/Off key or by opening the door. If the AC power supply is removed during the lockout, the feature is abandoned, pressing the On/Off key switches the pump on. If the AC power is removed and reconnected without any user interface with the pump, the lockout remains active. When the pump is used on battery power this feature is inactive. Automatic keypad locking Before starting the infusion, you can enable the Autolock Keypad feature in the Technician Menu. With Autolock Keypad enabled, the keypad locks automatically if you leave the pump untouched for one minute. If you touch a key, the Message Display reminds you that the keypad has been locked: Unlocking the keypad To unlock the keypad once it is locked, press the grey Keypad lock button on the rear of the pump: for a manually locked keypad, press the button once; for an automatically locked keypad, press the button twice. To silence alarm with keypad locked If the pump is sounding an alarm whilst the keypad is locked, you must: first unlock the keypad with the button on the rear of the pump, then press the Silence key Large Volume Infusion Pump Operator s Manual
43 Smiths Medical Operating the pump Display the Drug Label The pump may be configured, in the Technician Menu, to display the Drug List. If the Drug List is enabled, you can display the Drug Label that was last selected using the Options key. To display the Drug label on the Message Display for two seconds: press the * key. For more information on Drug Labels, see Chapter 3, Options. Stop the infusion To stop the infusion at any time: press the Hold key. If an occlusion is detected If an occlusion is detected, the Run light remains lit, but the P umping indicator stops. The pump does not give an occlusion alarm immediately, but only alarms if the occlusion pressure continues to exceed the occlusion threshold for 10 seconds. This helps to avoid nuisance occlusions. If an occlusion alarm occurs If an occlusion alarm occurs, immediately clamp the line to the patient. Then inspect the fluid pathway to determine what has caused the obstruction. However, the pump monitors any temporary occlusions, and if such occlusions persist, then the occlusion alarm is generated. If an occlusion is detected when the occlusion alarm is set to Low, the pump alarms immediately. WARNING: If an occlusion alarm occurs, immediately clamp the line to the patient. Then inspect the fluid pathway to determine what has caused the obstruction. An unintentional bolus of medication can result in patient injury or death. Large Volume Infusion Pump Operator s Manual 2 23
44 Operating the pump Smiths Medical Change the Occlusion alarm setting You can check the current occlusion alarm setting when an infusion is running if you press the Occlusion Alarm Setting key. You can change the setting if you first put the infusion on Hold, see steps in opposite column. When you switch the pump on, the Occlusion Alarm setting is always the same, and is defined by the Technician Menu configuration setting. You should set the alarm to be appropriate for the infusion before pressing Run. The occlusion alarm setting determines the amount of back pressure allowed before the pump alarms. There are three possible settings: Low, Medium or High. When an occlusion alarm occurs, the pumping mechanism backs off to reduce down-line pressure and bolus potential (bolus potential is approximately 0.3 ml regardless of the rate and the administration set used). not selected an appropriate Occlusion Alarm Setting for the infusion. If this is the case, you may want to change the Occlusion Alarm Setting. To change the Occlusion Alarm Setting during an infusion, whether or not an alarm has occurred: 1. Press Hold to silence the alarm if necessary, and stop the infusion. 2. Press the Occlusion Alarm Setting key once to display the current setting. 3. Press the Occlusion Alarm Setting key repeatedly to display the available settings. 4. When the correct setting is displayed, press Run. Note: A thick solution may be certain cytotoxic agents, lipid-based fluids and other viscous solutions, for example Total Parenteral Nutrition. Whilst the pump is infusing, particularly at higher infusion rates, or with thick solutions (see Note opposite), or with small diameter cannulas, you may see the following alarm message: Approximate Occlusion alarm settings Low 2 psi, 103 mmhg, 13.5 kpa Medium 5 psi, 259 mmhg, 34.5 kpa High 10 psi, 517 mmhg, 68.9 kpa If there is no obvious reason for the alarm, the message may occur because you have WARNING: If using a blood pressure cuff above the patient s venipuncture site take extra care in setting the Occlusion alarm pressures. Failure to do so may result in unnecessary Occlusion alarms, resulting in patient injury or death. WARNING: The Occlusion detection system measures downline back pressure in the administration set, but does not detect infiltration. In accordance with local protocol, you must periodically inspect the patient s infusion site for signs of infiltration. Failure to do so may result in an unacceptably slow time to Occlusion resulting in patient injury or death Large Volume Infusion Pump Operator s Manual
45 Smiths Medical Operating the pump Ending the Primary infusion The pump warns you that the infusion is complete when the Primary Volume to be Infused reaches zero. At this moment, the pump sounds a twotone alarm. You can decide to: silence the alarm and stop the infusion - press the Hold key silence the alarm and continue to infuse at the KVO Rate - press the Silence key (see details below). KVO infusion If you press Silence to stop the alarm, the pump continues to infuse at the KVO (Keep Vein Open) rate. The KVO rate is shown on the Rate display. Depending on how the pump is configured, the KVO rate may be: the default KVO rate of 3.0 ml/h, the programmed infusion rate if that was less than 3.0 ml/h; the KVO rate specified for this pump, see Specifying a different KVO Rate, below. The Message Display shows KVO, as well as the combined Primary and KVO volume infused, for example: Specifying a different KVO rate If the KVO Rate Entry option has been enabled in the Technician Menu, you can use the Options key to specify a KVO rate, before you start the infusion. When you set the KVO rate you can go to a maximum of 10 ml/h (on a 500 pump) or 3mL/h (on a 505 pump) or the Max Primary Rate if one is also enabled and set below these limits. If the programmed infusion rate is less than the set KVO rate, when the pump goes into KVO, it will continue pumping at the programmed lower rate. For full details on how to set the KVO rate, see Chapter 3, Options. The pump continues to infuse at the KVO rate. After six minutes, the two tone alarm sounds again, as a reminder that the KVO infusion is still running. You can decide to: silence the alarm and stop the infusion - press the Hold key silence the alarm and continue to infuse at the KVO Rate - press the Silence key. Large Volume Infusion Pump Operator s Manual 2 25
46 Operating the pump Smiths Medical About Secondary infusions The pump has the facility for you to set up and run a Secondary infusion, for example, to: administer a dose of antibiotics to a patient who is already receiving a Primary infusion; administer a loading dose of a drug, of a different concentration of the same drug as in the Primary container. You use the Secondary/Bolus key to program a Secondary infusion. The Secondary volume infused is kept as a separate total. It is not deducted from the Primary Volume to be Infused. Once you have started an infusion from the Secondary set, the solution from the Secondary container takes precedence over the Primary infusion. For details on Setting up a Secondary infusion To set up a Secondary infusion, you need a means of combining a Primary and Secondary infusion. This may be the combined Primary/ Secondary (8C-6200) IV Administration set from Smiths Medical, product code Alternatively, use an administration set with an injection site or Y-site (as shown here) plus a Secondary Administration set (not shown). what happens if the Volume to be Infused is less than the contents of the Secondary container, see page Secondary Rate and VTBI limits may be set if enabled in the Technician menu. See page 2-15 for more details. Bolus feature enabled If the Bolus feature has been enabled in the Technician Menu, you can use the Secondary/Bolus key to: run a Secondary infusion, where the volume infused is not deducted from the Primary Volume to be Infused; or alternatively, run a Bolus infusion, where the volume infused is deducted from the Primary Volume to be Infused. The basic steps for setting up a Secondary infusion are described in the following sections: lower the Primary solution container; prime the Secondary administration set; connect the Secondary to the Primary administration set; program the Secondary infusion (with or without the Bolus feature enabled); start the infusion. WARNING: Delivery rate for secondary medication must not exceed 300 ml/hr, or fluid may be delivered from both primary and secondary container causing delayed delivery of secondary medication and unintended mixing of fluids. Failure to do so may result in patient injury or death Large Volume Infusion Pump Operator s Manual
47 Smiths Medical Operating the pump Lower the Primary solution container Open the packaging around the Secondary administration set and find the hanger that looks something like this: This should lower the Primary container by approximately 20 cm (eight inches). Make sure that the drip chamber on the Primary container is still at least 15 cm (six inches) above the pump. Take the Primary container from the IV pole and use the hanger to suspend it from the IV pole. Prime the Secondary administration set You must always follow the Instructions for Use that accompany the particular administration set to be primed. Each set contains specific priming instructions, and also gives details of any warnings concerning the use of the administration set. WARNING: Do not run parallel infusion lines below the pump. Delivering a Secondary infusion means running a second line above the pump. Failure to do so may result in an inaccurate delivery of medication, resulting in patient injury or death. Large Volume Infusion Pump Operator s Manual 2 27
48 Operating the pump Smiths Medical Connect the Secondary to the Primary administration set If you are using the combined Primary/ Secondary (8C-6200) IV Administration set from Smiths Medical, product code , follow its accompanying Instructions for Use. If you are using a separate Primary and Secondary set, then go through the following steps. 1. Insert the needle from the Secondary set into the injection site on the Primary set. 2. Keep the Secondary clamps closed until you are ready to start the Secondary infusion. 3. Check that the roller clamp below the pump is closed, and go on to program the Secondary infusion. The position of the two solution containers and administration sets is shown on the diagram on page About the Secondary Volume to be Infused Because the Secondary container hangs on the IV pole at a higher level than the Primary, the entire contents of the Secondary container may be infused at the end of the Secondary infusion. This can happen even though the Secondary Volume to be Infused is zero. On a pump where Secondary Stop is not enabled in the Technician Menu, you must ensure that the amount that you enter as the Secondary Volume to be Infused is equal to the volume of fluid in the Secondary container. If the Secondary Stop feature is enabled, the pump stops infusing and sounds an alarm when the Secondary infusion is complete and the Secondary Volume to be Infused has been delivered. You can then clamp the Secondary set to prevent any more fluid from being infused from the Secondary container. WARNING: Check the Secondary set carefully, since an occlusion above the pump on the Secondary line could cause the Primary fluid to be delivered instead of the Secondary infusion. Administering the wrong medication may cause serious patient injury or death. WARNING: The Secondary volume to be infused must match the amount of fluid in the Secondary container. Primary flow resumes when the Secondary container is empty. If the volumes do not correspond, the wrong infusion may be delivered which could cause serious patient injury or death Large Volume Infusion Pump Operator s Manual
49 Smiths Medical Operating the pump Program the Secondary infusion This section describes how to program the Secondary infusion on a pump where the Bolus feature is disabled on the Technician Menu. 1. Press the Hold key if the pump is running. If Secondary Min and Max Rates and Max Secondary VTBI are enabled on the pump, ensure that they are appropriate for the infusion by pressing the Options key. To find out more see page Press the Secondary/Bolus key. The yellow Secondary indicator is lit. 3. The Message Display shows the volume from the previous Secondary infusion. 4. The Rate Display shows the last rate used for a Secondary infusion. Press the Rate key and enter the rate for the Secondary infusion, in ml/h. 5. Press the Volume to be Infused key and enter the Secondary volume in ml. This should normally match the volume in the Secondary container. 6. Verify that the rate and volume to be infused settings are correctly displayed. Open the roller clamp on the Secondary administration set 7. Press the Run key to start the Secondary infusion. The Message Display shows the volume infused. When the infusion is complete, see Ending a Secondary infusion on page Large Volume Infusion Pump Operator s Manual 2 29
50 Operating the pump Smiths Medical Secondary infusion - Bolus enabled This section shows the different screens and the additional step for a Secondary infusion with the Bolus feature enabled on the Technician Menu. 1. Press the Hold key if the pump is running. 2. If Secondary Min and Max Rates and Max Secondary VTBI are enabled on the pump, ensure that they are appropriate for the infusion by pressing the Options key. To find out more see page Press the Secondary/Bolus key. With the Bolus feature is enabled, the Message Display tells you to press 1 for Secondary or 3 for Bolus. 4. To enter the Secondary rate, press 1. The Message Display shows the volume of the previous Secondary or Bolus infusion. The yellow Secondary indicator is lit. 5. Press the Rate key and enter the Secondary infusion rate in ml/h. 6. Press the Volume to be Infused key to clear the display, and enter the Secondary volume in ml. This should normally match the volume in the Secondary container. 7. Verify that the rate and volume to be infused settings are correctly displayed. Open the roller clamp on the Secondary administration set. 8. Press the Run key to start the Secondary infusion. The Message Display shows the volume infused. When the infusion is complete, see Ending a Secondary infusion on page Large Volume Infusion Pump Operator s Manual
51 Smiths Medical Operating the pump Running a Bolus infusion This section shows how to administer a Bolus with the Bolus feature enabled on the pump on the Technician Menu. 1. Press the Hold key if the pump is running. 2. If Secondary Min and Max Rates and Max Secondary VTBI are enabled on the pump, ensure that they are appropriate for the infusion by pressing the Options key. To find out more see page Press the Secondary/Bolus key. When the Bolus feature is enabled, the Message Display tells you to press 1 for Secondary or 3 for Bolus. 4. To enter the Bolus rate, press 3. The Message Display shows the volume of the previous Secondary or Bolus infusion. The yellow Secondary indicator is lit. 5. Press the Rate key and enter the Bolus rate in ml/h. 6. Press the Volume to be Infused key to clear the display, and enter the Bolus volume in ml. 7. Verify that the rate and volume to be infused settings are correctly displayed for the Bolus. 8. Press the Run key to start the Bolus infusion. The Message Display shows the Bolus volume infused so far. The volume infused is deducted from the Primary Volume to be Infused. When the infusion is complete, see Ending a Secondary or Bolus infusion on the next page. Large Volume Infusion Pump Operator s Manual 2 31
52 Operating the pump Smiths Medical Ending a Secondary infusion The pump is configured to work in one of two ways when the Secondary infusion is complete, depending on the Secondary Stop setting in the Technician Menu. With Secondary Stop disabled on the Technician Menu, the pump: sounds a non-insistent alarm twice, and then reverts to the Primary infusion, running at the previously programmed Primary rate. Alternatively, if Secondary Stop is enabled on the Technician Menu, the pump: stops the at the end of the Secondary infusion (is put on Hold) and sounds an insistent alarm, displays the message: Restarting Primary infusion If Secondary Stop is enabled on the pump, you restart the Primary infusion as follows: 1. Press the Silence key. 2. Press the Primary key. 3. Press Run. Ending a Bolus infusion At the end of a Bolus infusion, the pump sounds a non-insistent alarm twice. It then reverts to the Primary infusion, running at the previously programmed Primary rate. The Secondary Stop feature does not have any effect on a Bolus infusion Large Volume Infusion Pump Operator s Manual
53 Smiths Medical Operating the pump Checking infusion totals Before, during or after an infusion, you can check the fluid volumes that have been infused, and the volumes remaining to be infused. The pump can display the following totals: Total volume infused Primary totals Secondary totals Bolus totals Total Volume infused To view the combined total volume of all fluid infused by the pump since the total was last cleared, for example to check the fluid balance for a patient: press the Total Volume key. If the pump is running an infusion, the total volume is displayed on the Message Display as follows: The total volume includes the volumes from any of the following types of infusion: Primary Secondary Bolus KVO Rate Taper Dose-Rate Calculation. The Message Display also shows the total hours and minutes that the pump has been in use since the display was last cleared (higher than 99 hours reads 100+hrs). Clearing the Total Volume To clear the Total Volume on the pump, for example to reset the pump before programming an infusion for a new patient: press Hold to stop the infusion, if the pump is infusing, press Total Volume. The Message Display shows the total volume as in this example: press * to reset the Total Volume and Time to zero. Large Volume Infusion Pump Operator s Manual 2 33
54 Operating the pump Smiths Medical Primary totals Whilst a Primary infusion is running, the Message and Volume to be Infused Displays show the volumes for the Primary infusion. Volume infused so far During an infusion, the Message Display counts up to show the volume infused so far, for example: Volume to be Infused The Volume to be Infused display counts down to show the remaining volume to be infused for this infusion, for example: At the end of an infusion, the Volume to be Infused is zero. Secondary totals Whilst a Secondary infusion is running, the Message and Volume to be Infused Displays show the volumes for the Secondary infusion. To view Secondary volumes after completing a Secondary infusion: 1. Press the Secondary/Bolus key. 2. If the Bolus feature is enabled, press 1 to choose the Secondary volume. 3. The Message Display shows the infused volume for the Secondary infusion as shown in this example: The Volume to be Infused display shows the volume remaining for the Secondary infusion. The Secondary volumes are kept separate from the Primary totals. To view the combined infusion volume press Total Volume. Bolus totals If you have carried out a Bolus infusion, you can view the volumes as follows: 1. Press the Secondary/Bolus key. 2. Press 3 to choose the Bolus volume. 3. The Message Display shows the infused volume for the Bolus infusion as shown in this example: The Bolus volumes affect the Primary infusion volumes. The volume that was infused as a Bolus is added to the Primary infusion volume infused figure and deducted from the Primary infusion Volume to be Infused figure Large Volume Infusion Pump Operator s Manual
55 Smiths Medical Operating the pump Re-running infusions at the same rate When an infusion is complete, you may want to repeat it with the same Rate and VTBI values. The Rate is still displayed but you need to bring back the previous VTBI. You can either bring back the VTBI and start the infusion immediately, or bring back the VTBI to check it before you start the infusion. To bring back the VTBI and start the infusion immediately: 1. Press the Volume to be Infused key TWO TIMES. The VTBI is not displayed at this point. 2. Press the Run key. When you press Run, the VTBI value for the previous infusion is displayed and the infusion starts immediately. Alternatively, to bring back the VTBI, to check it before you start the infusion: 1. Press the Volume to be Infused key TWO TIMES. 2. Press the Hold key. 3. When you press Hold, the VTBI value for the previous infusion is displayed but the infusion does not start. 4. To start the infusion, press the Run key. Note: You can also bring back the previous VTBI if you press the Volume to be Infused key TWO TIMES and then wait for 10 seconds. Large Volume Infusion Pump Operator s Manual 2 35
56 Operating the pump Smiths Medical 2 36 Large Volume Infusion Pump Operator s Manual
57 Options Chapter 3
58 Smiths Medical Options Introduction This chapter describes the Options that are available for the Deltec Large Volume Infusion pump. Some of the optional features allow the pump to meet the requirements of special clinical situations. The Options available for the Deltec Large Volume Infusion pump are listed on the Start-up instruction label on the side of the pump. If your pump does not display the Option you require, return the pump to your Biomedical department to have the feature enabled by a suitably trained person. Options 1, 2 and 4 are always available on the pump, and cannot be disabled. The other Options listed below can be enabled or disabled by a suitably trained person, using the Technician Menu (see the Technical User Manual). Do not use any of the Options without correct training. Options available The first options are: 1. Standard Message 2. Time Remaining 3. Message Display Light (Backlight) 4. Battery Test The Backlight and all options after Battery Test only appear in the Option menu if they have been enabled in the Technician Menu. 5. Quick Rate Change 6. Rate Taper 7. Volume Over Time 8. Dose-Rate Calculation The pump can be programmed with Minimum and Maximum infusion rates and Maximum VTBI to limit the Primary and Secondary/Bolus Rate and Volume to be WARNING: Before confirming any displayed data, the user should ensure that it is correct. Failure to do so may result in compromised function of the product, patient injury or user injury. Infused values. These are provided by the following options: Min Rate Max Rate Max VTBI Min S/B Rate Max S/B Rate Max S/B VTBI The final two options appear if they have been enabled in the Technician Menu: KVO Rate Drug List You can go directly to options with numbers against them using the Fast access method described on the next page. WARNING: Correct entry of data is essential in order to ensure that the intended infusion is performed. Before confirming any displayed data when setting up an infusion, you should ensure that it is correct. Failure to do so may result in compromised function of the product, patient injury or user injury. Large Volume Infusion Pump Operator s Manual 3 1
59 Options Smiths Medical Using options There are two ways to select an Option: sequential access to view all available options; fast access to take you to directly to an option. You use fast access, as described below, using a number from 1 to 8 for the numbered options in the list on the previous page. The numbers are also shown in the Options list on the Start up label on the right hand side of the pump. Viewing sequentially To view each available Option, press the Options key. Each time you press, it will take you to the next available option. After the final option, the next screen is the Standard Message Display. If you press the Option key again at the Standard Message, you re-display the Options. Options without a number in the list on the previous page can only be viewed by using this method. Fast Access To go directly to one of the numbered items, first press the Options key and then its number on the numeric keypad, using the one shown in the list on the previous page or on the side of the pump. For example, if you press the Options key and then numeric key 4 you are taken directly to the option to test the battery. If a numbered option has been disabled, nothing will happen. Press the Options key again to see the next available option. Values in the Message Display When you see a Message Display where you need to change, enter or confirm a numerical value, the previous setting will flash (even if no value previously been entered). You can either enter a new value, or accept the existing value by pressing the * key or by pressing the Options key again to move onto the next option. To enter a new value use the numeric keypad when the value is flashing and then press the * key. If you make a mistake, do not press the Options key, wait a few seconds and the value will flash again. You can enter a value whenever the value is flashing. It will flash again even though you have pressed the * key. If you press the Options key without first pressing *, any changes you make are discarded. Using Options while infusing If you press the Options key while running a standard infusion, then the options where you enter values (such as rate limits) display the current values, but will not allow you to change them. Backlight and Quick Rate change options can be activated. Options for programming other special types of infusions (Dose-Rate calculation, Rate Taper and Volume over Time) will tell you to place the pump on Hold. To leave Options When you have entered a value or set an option, use the Options key to move to the next Option, or start programming the pump by pressing an active key, for example, Rate, Occlusion Alarm Setting or Volume to be Infused. 3 2 Large Volume Infusion Pump Operator s Manual
60 Smiths Medical Options 1. Standard Message The Standard Message refers to the pump s normally displayed message when an alternative option is not selected. The Standard Message display is similar to the screen below: 2. Time Remaining This option displays the time remaining until completion of the current infusion. To use the time remaining display press the Options key and then press numeric key 2, or press the Options key until the Message Display shows: If the pump is on hold, the time remaining is displayed until another active key is pressed. If the pump is running, time remaining is displayed for 5 seconds. The time remaining is displayed and relates to the operating mode the pump is running in: Primary, Secondary, Bolus, Rate Taper or Dose-Rate Calculation (if enabled). Large Volume Infusion Pump Operator s Manual 3 3
61 Options Smiths Medical 3. Message Display Light The Message Display has a backlight that normally turns off one minute after the pump begins running, or if the pump is left on Hold while using battery power. It turns on automatically with any keypress, or if the alarm sounds. This option, if enabled on the Technician Menu, allows you to keep the Message Display s backlight on constantly whilst the pump is in use. Battery operation and backlight use When using the pump on battery power, the backlight normally turns off after one minute. If you turn the light on as described here, the backlight remains on constantly, until you turn the option (or the pump) off. You may need to monitor the battery capacity if you keep the light on, as the light uses the battery power. Turning the light on and off To turn the light on Press the Options key then press numeric key 3, or repeatedly press the Options key until the Message Display shows the following: To turn the light off Press the Options key, then press key 3, or press the Options key until the Message Display shows the following: Press the * key to keep the light on. The light will remain on until the pump is turned off, or until it is returned to normal operation. Press the * key to turn the backlight display off. CAUTION: The backlight has a limited life and may, if used constantly, cause the light to dim. Eventually the message display may then need to be replaced. To preserve the life of the message display, you should only turn on the Message Display Light as described here if it is specifically required. Misuse of this feature could lead to both battery and LCD depletion. 3 4 Large Volume Infusion Pump Operator s Manual
62 Smiths Medical Options 4. Battery Test The battery is automatically tested as part of the power on sequence, if the pump is disconnected from the AC mains supply when it is switched on. The Battery Gauge is displayed to indicate the approximate battery capacity, unless the pump is in Dose- Rate Calculation Recovery or Rate Taper mode. Using the Battery Test option The Battery Test option can only be used if the AC cord is disconnected from the AC mains supply and the pump is on Hold. If the pump is disconnected from the AC mains supply whilst it is infusing, it continues to infuse and automatically switches to use the internal battery. In this case, you may use the Battery Test Option described here to test the battery. This way, you can find out the approximate battery capacity, without switching off the pump. 1. Press Hold and ensure that the pump is disconnected from the AC mains supply. 2. Press the Options key and then press numeric key 4, or press the Options key until the Message Display shows the Battery Test screen. 3. Press the * key to start the Battery Test. This would indicate a battery approximately half charged. The pump measures the battery voltage. After 5 seconds it displays a Battery Gauge showing the approximate battery capacity. WARNING: Correct management of battery charging, as described in the documentation, is essential to ensure that the pump can operate on batteries for the time specified. Failure to do so may result in compromised function of the product or patient injury. Large Volume Infusion Pump Operator s Manual 3 5
63 Options Smiths Medical This indicates a fully charged battery. 4. A fully charged battery in good condition will power the pump for approximately 6 hours at 100 ml/h (99.9 ml/h on Micro 3100). When the test is complete, you can press Run to restart the infusion. If the battery capacity is low, you must connect the pump to the AC mains supply to recharge the battery. For further information on batteries see Chapter 2, Operating the pump, or Specifications. 3 6 Large Volume Infusion Pump Operator s Manual
64 Smiths Medical Options 5. Quick Rate Change The Quick Rate Change option, if enabled, allows you to change the infusion rate with single presses of the keypad while the pump is running. The option applies while the pump is running or when on hold, but changes cannot be made when the pump is in Rate Taper, Volume Over Time or Dose- Rate Calculation. The Quick Rate Change is automatically discontinued when the pump is turned off. The next time the pump is turned on it will display the Standard Message display. Any rate limits which are set will apply. The pump will alarm if you try to set a rate outside the limits. Performing Quick Rate Changes 1. Press the Options key and then press numeric key 5, or press the Options key until the Rate Change message appears. 2. Press the * key to begin changing the rate. The Message Display shows this screen for 10 seconds. 3. Change the rate: press the 1 key to decrease the infusion rate by 1 ml/h, or to decrease by 0.1 ml/h if the original rate was set in 10ths ml/h, or press the 3 key to increase the infusion rate by 1 ml/h, or to increase by 0.1 ml/h if the original rate was set in 10ths ml/h. 4. After 10 seconds the Message Display changes to show the volume infused so far. The arrows are displayed as a reminder that the Quick Rate Change option is still selected. You can repeat step 3 as required. 5. When you have finished with Quick Rate Change, to exit and redisplay the Standard Message: press the Options key to display this screen, then press *. Large Volume Infusion Pump Operator s Manual 3 7
65 Options Smiths Medical 6. Rate Taper This option, if enabled, allows automatic tapering of the infusion rate, either up or down for the administration of Total Parenteral Nutrition ( TPN). Rate taper is programmed by setting four infusion variables. 1. Volume 2. Total time or Maximum rate 3. Taper up time 4. Taper down time The pump then makes the necessary calculations and performs the rate changes at the required times. A Rate Taper infusion can be repeated exactly as the previous infusion, or changes can be made if the volume or time requirements vary from one infusion to another. This option cannot be used while the Quick Rate Change, Volume Over Time setup, or Dose-Rate Calculation is in use. If the pump is switched off whilst in Rate taper mode, and not connected to the AC mains supply when it is switched on again, the automatic battery test is carried out, but the Battery Gauge is not displayed. If the battery is low, the alarm sounds and a warning message is displayed. Neither the primary or secondary indicator lights are lit when in Rate Taper. The diagram below shows a typical Rate Taper infusion and the four programming variables that must be set. 3 8 Large Volume Infusion Pump Operator s Manual
66 Smiths Medical Options Rate and volume limits The highest allowable infusion rate in Rate Taper is 400 ml/h (99.9 ml/h on Micro 3100). The highest allowable volume to be infused in Rate Taper is 4400 ml (999.9 ml on Micro 3100). Any limits set with options (such as Rate or VTBI limits) will apply. You will be able to program Rate Taper as normally, but you will be prevented from running the infusion. For more details, see page Rounding in rate steps If a rate step calculates to less than 1 ml/h it always appears in the display as 10ths. At 1 ml/h and higher the pump may calculate a rate step and deliver in 10ths, however the display will show a rate which is rounded to the nearest whole number. Entering hours and minutes When programming by total time, for a total time of less than 10 hours, enter 0 before the hours digit (for example 09h, 00min). The highest allowed number of minutes is 59. For 60 minutes or higher, enter the time as hours, or hours and minutes. To enter Rate Taper To program an infusion using the Rate Taper option, the pump must be on hold. 1. Press the Options key, then press numeric key 6, or press the Options key until you see this screen. 2. Press the * key then follow the steps given to program by total time on page 3-10, or maximum rate on page To exit Rate Taper To end a Rate Taper infusion, you must use the Option key to exit the Rate Taper and return to the standard operation: 1. Press the Hold key and then press the Options key repeatedly until you see this screen. 2. Press the * key to return to the Standard Message Display. Large Volume Infusion Pump Operator s Manual 3 9
67 Options Smiths Medical To program a Rate Taper by Total Time If you need to select the exact total time for the Rate Taper delivery, you should choose the Total Time Rate Taper method. In this example for Total Time we have chosen the following values to program: a volume of 1500 ml to be infused over a time period of 9 hours and 30 minutes; taper up for 1 hour; taper down for 45 minutes. 1. Press the Options key and numeric key 6 or press the Options key repeatedly until the Message Display shows the Rate Taper option, then press the * key to begin. 2. Enter the volume to be infused. If an error is made while entering the new volume, press the Volume to be Infused key and re-enter the correct setting (or alternatively press the Volume to be Infused key twice to return to previous setting). When the correct volume is displayed press the * key. 3. Press numeric key 1 to select total time. 4. Enter the hours and minutes required to complete the infusion. Enter the leading zero as shown in this example for numbers less than 10. If you make an error while entering the time, press any number key repeatedly until the first number in the hour value is flashing, then enter the correct time Large Volume Infusion Pump Operator s Manual
68 Smiths Medical Options When the infusion time is correct press the * key. Enter the hours and minutes for the taper up period (enter zero hours and minutes if you do not want to taper up). When the correct Taper up time period is entered press the * key. Enter the hours and minutes for the taper down period (enter zero hours and minutes if you do not want to taper down). When the correct Taper down time period is entered press the * key. The pump calculates the maximum rate that is required to complete the Rate Taper infusion within the specified time period. If the maximum rate is correct for the patient press the * key. If you need to change the maximum rate, press the * key twice to take you back to step 2 and adjust the program (a longer total time may be required). If * was pressed and this display appears, then you need to review the program you have set. You will have to adjust to the volume, time and/or maximum rate value. Press the * key. This takes you back to step 2 to review the program values. 8. If ready to start the Rate Taper infusion, press the Run key or press the * key to review your settings. If you pressed the * key to review the settings the display will take you through steps 2 to 8 again. If you pressed the 9. Run key the Rate Taper infusion will start. The display will count up the volume infused from zero. Large Volume Infusion Pump Operator s Manual 3 11
69 Options Smiths Medical To program a Rate Taper by Maximum Rate If you want to set the maximum rate at which the pump delivers the Rate Taper infusion, choose the Maximum Rate taper method. In this example for maximum rate we have chosen the following values to program: a volume of 1950 ml to be infused at a maximum rate of 225 ml/h, taper up time for 1 hour and 30 minutes, taper down time for 30 minutes. 1. Press the Options key and numeric key 6 or press the Options key repeatedly until the Message Display shows the Rate Taper option, then press the * key to program your settings. 2. Enter the volume to be infused. If an error is made while entering the new volume, press the Volume to be Infused key and re-enter the correct setting (or alternatively press the Volume to be Infused key twice to return to previous setting). When the correct volume is entered press the * key. 3. Press numeric key 2 to select maximum rate. 4. Enter the maximum rate at which the infusion should be run. If an error is made while entering the maximum rate, press the Rate key and re-enter the correct value (or alternatively press the Rate key twice to recall the previous setting). When the correct maximum rate is entered, press the * key Large Volume Infusion Pump Operator s Manual
70 Smiths Medical Options Enter the hours and minutes for the taper up period (enter zero hours and minutes if you do not want to taper up). When the correct Taper up time period is entered press the * key. Enter the hours and minutes for the taper down period (enter zero hours and minutes if you do not want to taper down). When the correct Taper down time period is entered press the * key. 7. The pump calculates the length of time in hours and minutes required to complete the infusion with the maximum rate entered. If the total time is correct press the * key. If you need to change the total time, press the * key twice to take you back to step 2, and adjust the program (a higher or lower maximum rate may be required). 8. If * was pressed and this display appears, then you need to review the program you have set. You will have to adjust to the volume, time and/or maximum rate value. Press the * key. This takes you back to step 2 again to review the program values. If ready to start the Rate Taper infusion press the Run key or press the * key to review your settings. If you pressed the * key to review the settings the display will take you through steps 2 to 8 again. If you pressed the 9. Run key the Rate Taper infusion will start. The display will count up the volume infused from 0. Large Volume Infusion Pump Operator s Manual 3 13
71 Options Smiths Medical Using the End Early feature If it is necessary for a patient s Rate Taper infusion to end earlier than planned, this feature provides an alternative to stopping the pump abruptly when it is infusing at a high flow rate. If the infusion ends early, the patient does not receive the full infusion as initially programmed. 1. With the Rate Taper infusion running press the Hold key. 2. Press the Options key twice to view the time remaining for the Rate Taper. 3. Press the Options key again to access the end early display. This shows the actual time remaining or 30 minutes, whichever is less. If the displayed time is acceptable for the infusion rate to taper down, press the * key. If you need to change the time displayed any number of minutes from 01 to 99 can be entered. Press the * key when the correct time is displayed. 4. Press the Run key to start tapering down immediately. 5. If the early feature is not required then press the * key to continue the Rate Taper program as originally programmed. If the pump is on hold press the Run key to continue the infusion. When the rate has tapered down over the set length of time, the pump alarms then continues to infuse at the KVO rate Large Volume Infusion Pump Operator s Manual
72 Smiths Medical Options Resuming, restarting or reprogramming the Rate Taper If the pump is turned off when Rate Taper is selected, the current Rate Taper program is stored in memory. You can use this feature of the pump to set up a program ready for later use. When the pump is turned on again, the Message Display depends on whether or not the Rate Taper has been run. Rate Taper programmed but not run When the pump is turned on again, if the Rate Taper was programmed but not run, the Message Display shows: Either: press Run to start the infusion using the pre-programmed settings, or press * to review or reprogram the settings. Rate Taper run but not completed When the pump is turned on again, if the Rate Taper was programmed and Run, but not completed, the Message Display shows: Repeat a completed Rate Taper After completing a Rate Taper program you can repeat the program (from its beginning): 1. Press the Volume to be Infused key twice. The previous volume to be infused appears in the display. 2. Press the Run key to start the infusion using the previous values. Modify previous Rate Taper volume If you need to repeat a Rate Taper program but need to change the Volume: 1. Press the Volume to be Infused key and enter the new volume. The total time and/or the maximum rate changes automatically. 2. Check that the correct volume is displayed then press the Run key to start the infusion. Modify other Rate Taper values If you need to change any other programmed Rate Taper values: total time, maximum rate, taper up time, or taper down time, you must press the Options key and follow the steps for either programming Total time or Maximum rate in this chapter. Press the Run key to resume the infusion, or press the Options key then press * to review or reprogram the Rate Taper settings. Any limits set with options (such as Rate or VTBI limits) will apply. You will be able to program Rate Taper as normal, but you will be prevented from running the infusion. For more details, see page Large Volume Infusion Pump Operator s Manual 3 15
73 Options Smiths Medical Programming or reprogramming the Rate Taper with Limits set If any limits are set for the Primary Rate or Max VTBI, then these will apply when you program the Rate Taper or if you modify a program. Setting limits is described on page Before you enter Rate Taper It is worthwhile checking what values are set for Min and Max Primary Rate limits and for Max VTBI before you enter Rate Taper. If they are inappropriate for the prescription, you can then adjust them and not have the Rate Taper infusion halt as described below. If you program outside the limits The pump tests whether the entered or calculated values are within the limits when you press Run. This also applies if you change values as described on the previous page. If the pump detects that the calculated rate is outside the limits, or the VTBI is too high, then the alarm sounds and the Message Display shows this warning: Note: This happens when the calculated rate is valid, but not acceptable because of the VTBI or infusion rate limits set on the pump. It is not the same as the cannot infuse message displayed because the rate calculation is invalid. To silence alarm and leave Rate Taper If you see the Preset Limits message when you are programming or reprogramming a Rate Taper infusion, Press the Silence key to silence the alarm. The pump automatically leaves Rate Taper and displays the Standard Message: This is so that you can use the Options key to check and if appropriate, adjust the preset limits, which you cannot do when you are in Rate Taper. Troubleshooting Preset Limits error in Rate Taper program To find out why the Rate Taper program exceeds the limits, check the following: 1. Check the prescription volume against the Maximum VTBI limit and adjust the limit if it is incompatible with the prescription. 2. If the prescription requires that you enter a Maximum Rate, check this against the Max Rate limit setting. 3. If the VTBI or Rate limits are acceptable, note all limits that are set by using the Options key. Re-enter Rate Taper and check if you have made a mistake in programming the prescription. 4. Step through the program, look at the calculated values and compare them to the limits Large Volume Infusion Pump Operator s Manual
74 Smiths Medical Options 7. Volume Over Time (VOT) This option, if enabled in the Technician Menu, allows you to set up an infusion using the volume to be infused and the total time (with the pump automatically calculating the infusion rate). It can be used with either Primary, Secondary or Bolus infusions. Note: If rate limits are enabled and set, you may be restricted in the values you enter. Always use the Options key to check any limits before you enter the mode. See page 3-30 for more details. Rounding up calculated rates If the calculated rate is 99.9 ml/h or less the rate will be rounded to the nearest 0.1 of a ml/h. On the Model 500 pump, if the calculated rate is greater than 100 ml/h, the rate will be rounded to the nearest 1 ml/h. Volume and time value rates If the selected volume and time values calculate a rate which must be rounded, the pump calculates a revised time appropriate to the rounded rate. For example, if the volume entered is 14 ml and the time entered is 8 hours, the actual rate calculated will be 1.75, and then rounded to 1.8. The time then automatically changes to 7 hours, 47 minutes and the following display appears: To enter Volume Over Time With the pump on hold press the Options key then press numeric key 7, or press the Options key until the Volume Over Time option appears. To exit Volume Over Time To exit Volume Over Time when programming the volume or time, press the Options key. The following Message Display appears: Press the Options key to exit or press * to continue setting Volume Over Time. When the pump is switched off, Volume Over Time is cancelled. When next switched on, the pump resumes normal operation. Minimum and maximum infusion time Infusion time is entered as hours and minutes. Minimum infusion time: 00 hrs 01 min Maximum infusion time: 48 hrs 00 min Press the * key to accept time. For time less than 10 hours, enter 0 before the hours digit (for example 09 h 00 m). The highest number of minutes that you can enter is 59. Times of 60 minutes or higher must be entered as hours, or hours and minutes. Large Volume Infusion Pump Operator s Manual 3 17
75 Options Smiths Medical To use Volume Over Time With the pump on hold, press the Options key then press numeric key 7, or press the Options key until the Volume Over Time option appears. Press the * key to set the program. Enter the volume to be infused. When the correct volume is displayed press the * key. If an incorrect value has been entered press the Volume to be Infused key and re-enter the volume. Enter the total infusion time in hours and minutes. If you make an error while entering a time value, press any numeric key until the first hour digit is flashing, then enter the correct time value. To start entering values again from step 2, press the Volume to be Infused key. When the correct time is displayed press the * key. 4. Press the Run key to start the infusion, or press the * key to review the settings. 5. When you press Run the Message Display shows the Standard Message. When the infusion is completed, the pump sounds an alarm, and continues to infuse at the KVO rate until you press Hold. Cannot infuse If you see this message when you press Run, then you have entered a time/volume combination that resulted in an invalid rate. 1. Press the * key to return to step 2 and enter the correct volume and time values. 2. Press the * key, then press Run Large Volume Infusion Pump Operator s Manual
76 Smiths Medical Options 8. Dose-Rate Calculation This option, if enabled in the Technician Menu, allows the automatic calculation of the infusion rate when the following parameters are set: dosing rate (for example mcg/min or mcg/kg/min), patient weight in kg or lbs (if required in dose mode selected), drug amount in fluid container (MG = milligrams, Gm = grams, mcg = micrograms, or units), volume of fluid in container (ml). Dose-Rate Calculation can be used with the pump on hold or while running. It is only available for a Primary infusion. When in Dose-Rate Calculation mode, all values for the current infusion are stored when the pump is switched off. During a Dose-Rate Calculation infusion, if the Drug List feature is enabled, you can press * twice to view the selected Drug Label. Minimum/Maximum Rate or VTBI limits set in Options apply to a Dose-Rate Calculation program. For more details, see page μg may be displayed instead of mcg in Dose-Rate Calculation displays, see the Technical User Manual. Dose-Rate Calculation Recovery Dose-Rate Calculation Recovery is an additional feature which can only be enabled in the Technician Menu. It enables you to set up a Dose-Rate Calculation program for later use. To use Dose-Rate Calculation Recovery: 1. Program the Dose-Rate Calculation infusion, see page Press Run then Hold. Switch off the pump. When it is next switched on, the pump displays: You can: press Run to restart the previous Dose- Rate Calculation infusion, or press * to review the dose-rate prescription, or enter new values for an infusion, or press Options then * to leave Dose-Rate Calculation and return to the Standard Message display. Note: When you switch on the pump with DRC Recovery enabled, no information screens are displayed in the self test. However, if there is a problem, such as low battery, a warning message is displayed with an alarm sounding. WARNING: Correct entry of data is essential in order to ensure that the intended infusion is performed. Before confirming any displayed data when setting up an infusion, you should ensure that it is correct. Failure to do so may result in compromised function of the product, patient injury or user injury. WARNING: Dose-rate calculation requires care in entering data. Refer to specific product drug labelling for information on appropriate administration techniques and dosages. Entering incorrect data may result in patient injury or death. Large Volume Infusion Pump Operator s Manual 3 19
77 Options Smiths Medical To enter or exit Dose-Rate Calculation To enter Dose-Rate Calculation To enter the Dose-Rate Calculation display press Options and numeric key 8, or press the Options key until you see the following screen. To exit Dose-Rate Calculation To exit Dose-Rate Calculation, press the Options key until you see the following screen: Press the * key to program the infusion. Press the * key to return to the Standard Message display. Dose-Rate Calculation steps This section looks at each Dose-Rate Calculation step in programming order. Programming the dosing rate Programming the body weight Programming the drug amount Programming the volume. A complete programming example is described on page Programming the dosing rate When you enter the Dose-Rate Calculation option, you see a display similar to the following asking you to confirm the current dosing rate: You can confirm the current rate by pressing *, or: change the dosing rate mode, or enter a new value for the dosing rate. Changing the dosing rate mode The pump can be configured in the Technician Menu to display either μg or mcg (micrograms). To change the dosing rate mode (that is the rate units), 1. Press Options to display this screen: 2. Press * until the screen shows the dosing rate mode you want to use for the infusion. Dosing rate modes available The following dosing rate modes are available: mcg/kg/min (micrograms/kilogram/ minute), mcg/min (micrograms/minute), MG/min (milligrams/minute), MG/hour (milligrams/hour), units/hr (units/hour), MG/kg/hr (milligrams/kilogram/hour), mcg/kg/hr (micrograms/kilogram/hour), MG/kg/min (milligrams/kilogram/ minute), units/kg/hr (units/kilogram/hour) Large Volume Infusion Pump Operator s Manual
78 Smiths Medical Options Enter new value for the dosing rate When you have the mode you want to use on the screen, enter the value for the dosing rate from the keypad. The screen changes to show that you are entering a value and not selecting the mode, as if you had just entered Dose-Rate Calculation. Press * when you have done so. When you enter values, the precision with which you can enter them depends on the range: 0.01 to in increments of 0.01, 0.1 to in increments of 0.1, 1 to 9999 in increments of 1. If you have chosen one of the following modes using patient weight (mcg/kg/ min, MG/kg/hr, mcg/kg/hr, MG/kg/min or units/kg/hr), you are next asked to enter it as described in Programming the patient weight below. For dosing rate modes without the patient weight, you are next asked to enter it as described in Programming the drug amount, opposite. Programming the patient weight The Patient s body weight follows the dosing rate entry for the following dosing rate modes: mcg/kg/min, MG/kg/hr, mcg/kg/hr, MG/kg/min, units/kg/hr. You need to enter the patient weight when you see a display similar to the following: Press the Options key to change the weight measurement from kg to lbs or lbs to kg. The pump recalculates any value entered into the new weight units. If you press the Options key a second time by mistake, you are taken back to the beginning of programming. Just press * to get back to entering and confirming the patient weight. Enter the patient weight from the keypad. When entering the weight, the precision depends on the units you are using. See the Specification at the end of the manual for the increments for each weight unit. Press * to set the weight and move on to the drug amount. Programming the drug amount The drug amount entry follows the dosing rate entry or the patient weight (if a dosing rate involving weight is selected). When you are asked to enter the drug amount display, you will see a display similar to the follwing: If you need to change from MG drug/bag (in this example), press the Options key to enter the change sceen: Press the * key repeatedly to display g, MG and mcg. When the display is correct, enter the drug amount value from the keypad. Large Volume Infusion Pump Operator s Manual 3 21
79 Options Smiths Medical When entering the amount, the precision depends on the units you are using. See the Specification at the end of the manual for the increments for each range. When the dosing rate mode selected requires units input, only units/bag appears in the Message Display. Once you have entered the drug amount, you are next asked to enter the volume of the bag. This is used with the drug amount to calculate the drug concentration. Programming the volume When you enter the volume display, you see a display similar to the folowing: For the range of volumes that can be entered, see the section on Primary and Secondary infusion in the Specifications at the end of this manual. Enter the number of millilitres in the fluid container. This must be the volume when the bag is full. It is used to calculate the concentration. When the setup is complete When the programming steps for the Dose- Rate Calculation infusion are completed, the display shows that the infusion is ready to run or be reviewed: As well as the Message Display which shows the volume infused and the dosing rate, the programmed volume to be infused appears in the Volume display and the calculated infusion rate appears in the Rate display. Calculated infusion rates may be rounded up as follows: below 100 ml/h, rounded to the nearest 0.1 ml/h, above 100 ml/h, rounded to the nearest 1 ml/h. The pump also back-calculates and displays the actual dosing rate being delivered if rounding has occurred. Changing the volume to be infused If you do not want the whole bag to be infused, you can change the volume to be infused if the pump is on Hold and the Message Display shows: or when the infusion has been started and then stopped: You will need to review if an invalid rate is calculated and the Message Display shows: To alter the volume: press the Volume to be Infused key enter the new volume to be infused press Run. Note: Changing the Volume to be infused does not affect the programmed dosing rate or the calculated infusion rate Large Volume Infusion Pump Operator s Manual
80 Smiths Medical Options If you do not enter any values when programming, but accept each previous value by pressing * at every option, the VTBI may not be correct for the infusion. Set it to an appropriate value before running the infusion. Changing it will not affect the calculated rate. Programming the pump using a fixed infusion rate Once you have completed the programming steps for the Dose-Rate Calculation infusion, you can change the infusion rate instead of accepting the calculated infusion rate. When the Message Display hows: press the Rate key and enter the desired rate, then press the Run key. The pump will then back-calculate the dosing rate based on the new infusion rate that you have entered. Dose-Rate Calculation programming example In this example we have chosen the following values to program: dosing rate - 5 mcg/kg/min patient weight 73 kg drug amount in fluid container mg volume of fluid in container ml This example includes patient weight. Step 5 is not necessary if you program without it To enter Dose-Rate Calculation press Options then numeric key 8, or press Options until you see this screen. Press the * key to enter the dosing rate display. You can either accept the dosing rate or enter a new dosing rate. If you need to change the dosing rate mode press the Options key. Press the * key until the required mode is displayed, as described in Programming the dosing rate on page Enter the dosing rate value, then press the * key. Large Volume Infusion Pump Operator s Manual 3 23
81 Options Smiths Medical 5. In this example, because the dosing rate mode chosen is mcg/kg/min, the patient weight screen is displayed, as described in Programming the patient weight on page The weight is displayed in either kgs or lbs. Changing the weight measurement is described in Programming the patient weight on page Either accept the patient weight that is currently shown by pressing *, or enter the new weight of 73 then press the * key. The next message asks for the drug amount in the bag. If you need to change the entry type, see Programming the drug amount on page Enter the correct drug amount in the bag and press the * key. 7. Next enter the fluid volume of the bag and press the * key. 8. Before you start the infusion it is good practice to review your settings. Press the * key to review the program and make any necessary changes. Note: You may also need to review if the pump finds that the values you have entered are incompatible. When your program is correct press 9. Run. As well as the Message Display, which shows the volume infused and the dosing rate, the programmed Volume to be Infused appears in the Volume display and the calculated infusion rate appears in the Rate display Large Volume Infusion Pump Operator s Manual
82 Smiths Medical Options Changing the dosing rate without stopping the infusion The pump allows you to change the dosing rate (thus altering the infusion rate) without stopping the infusion To change the dosing rate without stopping the infusion, press the * key. The current dosing rate displayed in the Message Display starts flashing, and the infusion Rate display goes blank. However, the pump continues to infuse at the original rate. Enter the new dosing rate value using the keypad. Within 10 seconds of entering the new dose, press the Run key. If a warning appears in the Message Display and the pump alarms, refer to Dose or rate change alarms on page The pump calculates the new dosing rate and new infusion rate. The new dosing rate is now displayed in the Message Display and the new infusion rate in the rate display. The pump is now infusing at the new rate. If a warning appears in the Message Display and alarms, refer to Dose or Rate change alarms on page If the calculated rate is rounded up the pump will back-calculate and display the actual dosing rate being infused. Large Volume Infusion Pump Operator s Manual 3 25
83 Options Smiths Medical Changing the infusion rate without stopping the infusion The pump allows the infusion rate to be changed (thus altering the dosing rate) without stopping the infusion. 1. To change the infusion rate without stopping an infusion, press the Rate key The current dosing rate displayed in the Message Display and the infusion Rate display goes blank. However the pump continues to infuse at the original rate. Enter the new infusion rate using the keypad. Within 10 seconds of entering the new rate, press the Run key. If a warning appears in the Message Display and the pump alarms, refer to Dose or rate change alarms on page The pump calculates the new dosing rate. The new dosing rate is now displayed in the Message Display and the new infusion rate in the rate display. The pump is now infusing at the new rate. If a warning appears in the Message Display and alarms, refer to the next page Dose or rate change alarms Large Volume Infusion Pump Operator s Manual
84 Smiths Medical Options Dose or rate change alarms Dose or rate change not completed within 10 seconds If the new dosing rate or infusion rate is entered, but the Run key is not pressed within 10 seconds, or if another function key is pressed, the new rate is discarded and the Message Display reverts to the previous values, a non-insistent alarm sounds and one of the following displays appear: Dose or Rate change not accepted If the dosing rate or infusion rate is changed, but the resultant calculated rate is incorrect, the displays revert to their previous values, the non-insistent alarm sounds, and one of the following displays appear: Press the Silence key to silence the alarm. Press the Silence key to silence the alarm. The pump now continues infusing at the old rate. If you still need to change the dosing rate press the * key to take you back to step 1 of Changing the dosing rate without stopping the infusion on page 3-25 or Changing the infusion rate without stopping the infusion on page The pump now continues infusing at the old rate. If you still need to make a change, press the * key to take you back to step 1 of Changing the dosing rate without stopping the infusion on page 3-25 or Changing the infusion rate without stopping the infusion on page Check values you want to change before entering them to ensure that they will result in a valid calculated rate/dose. Large Volume Infusion Pump Operator s Manual 3 27
85 Options Smiths Medical Programming or reprogramming Dose-Rate Calculation with Limits set If any Limits are set for the Primary Rate or Max VTBI, then these will apply when you program the Dose-Rate Calculation or if you modify a program. Setting limits is described on page Before you enter Dose-Rate Calculation It is worthwhile checking what values are set for Min and Max Primary Rate limits and for Max VTBI before you enter Dose-Rate Calculation. If they are inappropriate for the prescription, you can adjust them and not have the infusion halt as described below. If you program outside the limits The pump tests whether the entered or calculated values are within the limits when you press Run. If the pump detects that the calculated rate is outside the limits, or the VTBI is too high, then the alarm sounds and the Message Display shows: Note: This happens when the cal-culated rate is valid, but is outside the VTBI or infusion rate limits set on the pump. It is not the same as the cannot infuse message displayed if the calculation is invalid. and displays the Standard Message: This is so that you can use the Options key to check and if appropriate, adjust the preset limits, which you cannot do when you are in Dose-Rate Calculation. Troubleshooting Limits in a DRC program To find out why the Dose-Rate Calculation program exceeds the limits, check the following: 1. Check the prescription volume (the volume in the bag) against the VTBI limit and adjust the limit if it is incompatible with the prescription. 2. The rate calculated will remain in the LED display when you are taken out of Dose- Rate Calculation. Check this against the Rate limit setting. 3. Check the value for the VTBI since you may have accepted all values for a previous Dose-Rate calculation program and this will not have updated the VTBI from the bag volume. 4. If the VTBI or Rate limits are acceptable, note all limits that are set by using the Options key. Re-enter Dose-Rate Calculation and check if you have made a mistake in programming the prescription. To silence alarm and leave DRC If you see the Preset Limits message when you are programming or reprogramming a Dose-Rate Calculation infusion, Press the Silence key to silence the alarm. The pump automatically leaves Dose-Rate Calculation If you change the rate while running If you change the rate (either the dosing rate or the pump infusion rate) while running, and exceed the limits, then press Run, the pump alarms but continues at the programmed rate Large Volume Infusion Pump Operator s Manual
86 Smiths Medical Options 9. Setting Rate and VTBI limits You can limit the infusion Rates and VTBI (volume to be infused) values for each pump. When you set up an infusion, the pump rejects a Rate or VTBI value that is not within the Minimum/Maximum rate limits, or is greater than the maximum VTBI. For example, you should set a maximum rate on a pump that is intended for use in an Epidural application, or set a maximum VTBI on a pump to be used in a neonatal environment. Setting rate limits is also called Rate Capping. Rate Taper, Volume Over Time and Dose-Rate Calculation are also affected by limit settings. The following Options are used to limit the infusion rates and volumes to be infused on the pump: For Primary infusions: Min Rate, Max Rate, Max VTBI. For Secondary or Bolus infusions: Min S/B Rate, Max S/B Rate, Max S/B VTBI. To define the ranges, the items must be enabled on the Technician Menu, and then set using the Options key. See page 3-32 for more details on how limits affect programming an infusion. The instructions on the following pages explain how to set values for the (Primary) Minimum and Maximum Rate and Maximum VTBI. Once you have understood how to change these values, you will find that you can set the Secondary/Bolus minimum and maximum rates in the same way. Minimum and Maximum Infusion Rates If the Primary Min Rate and Max Rate are enabled in the Technician Menu, their current settings are displayed when you switch on the pump. If the defaults have not been changed (on a Model 500), the screen looks like this: Entering rates Rates must be entered as whole numbers: they cannot include a decimal point. If the Min Rate is set to zero, there is no lower limit. The Max Rate may be set to 999 (on a Model 500) or 99 (on a Micro 505). The Secondary/Bolus Maximum and Minimum rates are not displayed when you switch on the pump, even if they are enabled and set. Unless the display includes S/B, the rate being changed is always the Primary. Large Volume Infusion Pump Operator s Manual 3 29
87 Options Smiths Medical To set the minimum and maximum infusion rate If the Options are enabled, you can change either or both values. This section explains how to change both values. 1. Press the Options key repeatedly until you see the Minimum Rate display. The current minimum infusion rate flashes, showing that you can change this value. 2. Enter a new rate, using the numeric keypad, then press the * key to confirm. If it is correct, to leave the rate unchanged, just press *. If the pump finds that the rate is invalid, the number continues to flash, so you should repeat this step. 3. With the value for Min Rate static, press the Options key to display the flashing Maximum Primary rate. 4. Enter a new rate then press * to set the value. Just press * if you want to leave the maximum rate unchanged. You can now do one of the following: press the Options key once to move on to the next Option; press the Options key repeatedly to move through all the Options that have been enabled on the pump. You can stop when the Standard Message is displayed on the screen, indicating that the pump is ready to be programmed, or carry on until you reach the Min Rate screen again, where you can make further changes; turn the pump off then on again, to see the new primary minimum and maximum values in the messages displayed in the power up sequence Large Volume Infusion Pump Operator s Manual
88 Smiths Medical Options Maximum VTBI This Option is to limit the volume that may be programmed for a single infusion. The Max VTBI is 9999 (on a Model 500) or 999 (on a Micro 505), There is no lower limit for the VTBI. If the Primary Maximum VTBI is enabled, the current setting is displayed when you switch on the pump. If the default has not been changed, (on a Model 500) the screen looks like this: The Max Secondary/Bolus VTBI is not displayed, even if it is enabled. The example here shows how to set the Maximum VTBI for the Primary infusion. The process is the same for setting the Maximum VTBI for the Secondary/Bolus infusion. To set the maximum infusion volume 1. Press the Options key repeatedly until you see the Max VTBI display. The current maximum VTBI flashes, showing that you can change this value. 2. Enter a new VTBI, using the numeric keypad, then press the * key to confirm. If it is correct, to leave the VTBI unchanged, just press *. If the pump finds that the rate is invalid, the number continues to flash, so you should repeat this step. 3. Press the Options key to take you to the next option. Large Volume Infusion Pump Operator s Manual 3 31
89 Options Smiths Medical Programming and running infusions with limits If limits are set and you try to run an infusion, the pump will prevent you from running with a rate or VTBI value entered outside the limits. This includes special infusion modes such as Volume over Time, Rate Taper and Dose-Rate calculation. In the latter two infusion modes, the pump behaves in a slightly different way. For Rate Taper, instructions on programming with limits set are described on page For Dose-Rate Calculation, instructions on programming with limits set are described on page If you change rates while running or put the pump on hold and change the volume, the limits are checked when you press Run. The pump continues to infuse at the previous rate when an error is detected during a rate change while running. Rate limit settings also affect Quick Rate changes. When the pump detects a value which is outside the set limits it sounds an alarm and the Message Display shows: Silence the alarm and enter a value which is valid for the limits. The previous value is restored to the LED display. If are using Quick Rate change, and try to move outside the rate limits, the pump will alarm with the limits exceeded message, and the rate LED will show the limit setting. If you are changing the rate while the pump is running, the infusion will continue at the limit rate Large Volume Infusion Pump Operator s Manual
90 Smiths Medical Options 10. KVO rate The pump automatically switches to a KVO infusion when the programmed infusion ends. The default rate for KVO is 3.0 ml/h, or the programmed infusion rate if that was less than 3.0 ml/h. The KVO option, if enabled in the Technician Menu, allows you to set a different KVO rate. The pump remembers the value entered as described here, and uses it as the KVO rate. You cannot set the KVO rate to zero. The range for the KVO rate must be within the following limits: to 10.0 ml/h Micro to 3.0 ml/h. When you set the KVO rate, if the Max Primary Rate is also enabled and set below these limits, then that will define the maximum KVO value you can enter. If the programmed infusion rate is less than the set KVO rate, when the pump goes into KVO, it will continue pumping at the programmed lower rate. KVO rates cannot be changed when an infusion is running, but if you press the Options key, the current setting is displayed. Setting a KVO rate 1. Press the Options key until you see the KVO rate display. The current value flashes, showing that you can enter a new value. 2. Enter the new KVO Rate using the numeric keypad, then press * to confirm. If the rate is correct, press Options to move on to the next Option. In the unusual situation that the rate you enter is not accepted, then the Max Primary Rate limits are set below the value you wish to enter. The Min Primary Rate does not affect the KVO entry. Large Volume Infusion Pump Operator s Manual 3 33
91 Options Smiths Medical 11. Drug Label The Drug List feature, if enabled in the Technician Menu, allows you to use the Options key to select a drug label from a predefined list that is stored in the pump. When the Drug List is enabled, the selected drug label is displayed for two seconds when you switch on the pump, for example: If no drug label has been selected, the screen is shown like this: The selected Drug Label is displayed for two seconds if you press * when the pump is on hold, or infusing. If you press the Options key when an infusion is running, you will also see the current label, but will not be able to change it. Drug Library This is a complete alphabetical list of the drug labels retained in the pump s memory. Due to the number of characters that the pump can display some of the drug names have been shortened or abbreviated. The drug label provides a visual reminder of the name of the drug, but it does not control any pump features. It is your responsibility to ensure that the correct drug name is selected. Acetylcysteine Alfentanil Aminophylline Carboplatin Cisplatin Cyclophosphamide Dextrose Dextrose/Saline Dobutamine Dopamine Doxapram Doxorubicin Droperidol Epidural Fentanyl/Bupiv Fluorouracil Hartmanns Heparin Morphine Nitroglycerine Nitroprusside Oxytocin Propofol Prostaglandin Remifentanil Ritodrine Ropivacaine Saline Syntocinon TPN 3 34 Large Volume Infusion Pump Operator s Manual
92 Smiths Medical Options Checking the current drug label Switch the pump off and then on, or Press * when the pump is on hold, or infusing. Selecting a new drug label 1. Press Hold if the pump is infusing. 2. Press the Options key until you see the Drug Label display. It shows the name of the drug that is currently stored in the pump. 3. Press * to change the drug. 4. To select the drug label, press the 1 key to scroll down through the list, or the 3 key to scroll up through the list. 5. When the required drug label is displayed, press the * key to confirm the name. 6. This display shows that the selected drug is now stored in the pump as the Drug Label. Press the Options key to take you to the next option. 7. When you see the Standard Message Display, press * to show the Drug Label for two seconds. Large Volume Infusion Pump Operator s Manual 3 35
93 Options Smiths Medical Clearing the drug label 1. Press Hold if the pump is infusing. 2. Press the Options key until you see the Drug Label display. 3. Press * to display this screen. 4. Press * to clear the label and display this screen. Press the 5. Options key repeatedly to return to the Standard Message Display Large Volume Infusion Pump Operator s Manual
94 Troubleshooting Chapter 4
95 Smiths Medical Troubleshooting Introduction This chapter covers all the error messages and alarms, displayed by the Deltec Large Volume Infusion Pump, that notify you of any operating problem. If you cannot solve the problem after reading this chapter, the pump should be inspected and repaired by a suitably qualified technician, or returned to Smiths Medical at the address on the back cover of this Instruction Manual, in order to have the fault rectified. What s in this chapter The chapter contains two sections: warning messages with alarms, divided into Continuous (backup) alarm, Insistent alarms and Non-insistent alarms; warning messages with no alarms. The chapter lists the possible causes and recommended action to take for each of the warning messages. The chapter does not contain details of the Deltec Large Volume Infusion Pump s System errors or warnings that indicate a problem that can only be solved by the Biomedical engineering department, or by returning to the distributor/factory. These are described in the Deltec Large Volume Infusion Pumps Service Manual. Who should read this chapter You should read this chapter to find out how to solve any problems that arise whilst you are using the Deltec Large Volume Infusion Pump. You are likely to be in one of the following groups: Biomedical engineering department, needing to find out what alarms may arise during the normal operation of the pump People being trained, who have access to the Operator s Manual as additional training material People who have been trained, who need a concise summary to remind them of the Deltec Large Volume Infusion Pump s alarms and a description of what to do if the pump sounds an alarm. Large Volume Infusion Pump Operator s Manual 4 1
96 Troubleshooting Smiths Medical Handling problems with the pump Most problems in using the pump are signalled by alarms whose accompanying messages are described in the rest of this manual. You should also use your experience in using the pump to take action if the pump behaves as if it is faulty. Follow the warnings and cautions on this page to take appropriate action to send the pump to a suitably qualified technician for checking. Pump will not switch on If the pump does not switch on when the On/Off key is pressed when connected to an AC power supply. Check that the keypad lockout feature is not active, see Safety keypad lockout, page CAUTION: Refer all service repair and calibrations only to qualified technical personnel. Unauthorised modifications to the pump must not be carried out. WARNING: You should ensure that the performance offered by the pump is fit for the intended purpose. Failure to do so may result in compromised function of the product, patient injury or user injury. WARNING: Do not use a faulty pump. If the pump detects a fault when it is first turned on, or if it develops a fault during operation then a continuous system alarm sounds. The pump must be referred to a suitably qualified technician or returned to Smiths Medical in order to have the fault rectified. WARNING: Before using the pump, it should be inspected for physical damage. The pump should not be used if damage is evident, and should be returned to service personnel for repair before being returned to use. Failure to do so may result in compromised function of the product, patient injury or user injury. WARNING: Do not open the pump housing. Refer all service faults only to qualified technical personnel. Opening the pump housing may cause electric shock leading to patient or user injury or death. 4 2 LargeVolume Infusion Pump Operator s Manual
97 Smiths Medical Troubleshooting Pump Messages Messages are divided into those where an alarm sounds and those which just display a message. Programming Messages with alarms Message display Possible causes Action Rate or VTBI limits have been set and you are trying to program a value outside these limits. or You have entered a Bolus VTBI greater than the Primary VTBI. Correct the value or change the limits if appropriate. Correct the value. Warning Messages with alarms Continuous (back up) alarms When a continuous alarm occurs, the pump automatically stops the fluid delivery. Message display Possible causes Action Electrical or mechanical problem. Potential pump problem detected. Do not use. Pump needs to be repaired by a qualified technician or returned to Smiths Medical. Turn pump off, then on. If alarm persists, remove pump from use. Pump needs to be repaired by a suitably qualified technician or returned to Smiths Medical. Large Volume Infusion Pump Operator s Manual 4 3
98 Troubleshooting Smiths Medical Insistent alarms (pump stops infusing) Message display Possible causes Action Air detected in the cassette. or, Cassette loaded backwards. To remove air: 1. Ensure that the line above the pump is not obstructed between the pump and the primary reservoir. 2. Close the lower roller clamp. 3. Open the door latch. 4. Wait briefly for the cassette to fill. 5. Slowly close the door latch. 6. Repeat if necessary. Make sure cassette is properly loaded (flat side out, pillow side in). Battery is depleted. AC power cord must be plugged in to continue infusion. Tubing safety clip is not correctly loaded. Door was opened while the pump was running. Problem detected above the pump as the door was being closed. To load the safety clip: 1. Close lower roller clamp. 2. Open the door. 3. Place safety clip in the slot. 4. Close the door. 5. Open the lower roller clamp. Always press the Hold key and close the roller clamp before opening the door. To restart the infusion: 1. Press Silence. 2. Close the door. 3. Press Run. 1. Open the door. 2. Check clamps and tubing for any restrictions 3. Reload cassette if necessary. 4. Close the door. 4 4 LargeVolume Infusion Pump Operator s Manual
99 Smiths Medical Troubleshooting Insistent alarms (continued) Message display Possible causes Action Insufficient flow from the container to the pump. Pressure below pump exceeds the Occlusion Alarm Setting. Pump is on hold for 2 minutes with the door closed, or 6 minutes with the door open. Secondary/Bolus infusion ended and Secondary Stop has been enabled on the Technician Menu. 1. If the fluid container is empty, replace it. 2. Raise the height of the fluid container so that the bottom of the drip chamber is cm (6 to 12 inches) above the top of the pump. 3. Open the upper clamp if closed, remove any restriction to the upper tubing. 4. Replace the admin set if there is damage to the spike or other admin set problem. Open the lower roller clamp, remove any restriction to the lower tubing. Change the Occlusion Alarm Setting if not appropriate for infusion. Verify patient catheter is patent. Press the Silence or Hold key to silence the alarm. Press the Run key to start the infusion, or turn the pump off if not in use. Press the Silence or Hold key to silence the alarm. Press the Primary key Press Run to start the Primary infusion. Note: In Medium or High occlusion alarm settings, when downline pressure exceeds the alarm threshold, the motor pauses, the Run key remains lit and the Pumping indicator stops. If within 10 seconds the pressure drops back below the threshold, pumping resumes and the alarm does not sound (if pressure remains high, the alarm sounds). If repeated pressure spikes occur, causing the pump to enter this filtering mode for a total of 30 seconds, measured over the last 4 minutes that the pump was infusing, the alarm sounds. Occlusions detected in the Low occlusion alarm setting cause an immediate alarm. Large Volume Infusion Pump Operator s Manual 4 5
100 Troubleshooting Smiths Medical Non-insistent alarms (pump continues to infuse) Message display Possible causes Action Dose-rate calculation program setup started with the pump running; dosing parameters not completed Running dosing rate change was attempted, but not properly completed. The entered dose or calculated rate is incorrect. The infusion is complete and the pump has switched to KVO rate. Battery nearly depleted (1/2 hour or less remains). Infusion rate change was attempted, while running but not completed. Secondary infusion was programmed but the Primary was run. Press the Silence or Run to silence the alarm, if necessary re-enter the Doserate calculation program setup. Press the Silence or Run key to silence the alarm. Re-enter the running dose change, see Chapter 3 Options. Press the Silence or Run key to silence the alarm. Re-enter the parameters. Press the Silence or Run key to silence the alarm and continue the KVO delivery. The pump re-alarms every 6 mins. or press the Hold key to silence the alarm and stop infusing. Plug in the AC power cord, if possible, or Press the Silence or Run key to silence the alarm for 6 minutes and continue running the infusion. Press the Silence or Run key to silence the alarm. Re-enter the running rate change, see Chapter 2 Operating the pump. Press Hold then Secondary key, Re-enter the VTBI and Rate. Press the Run key. 4 6 LargeVolume Infusion Pump Operator s Manual
101 Smiths Medical Troubleshooting Warning Messages with no alarms Message display Possible causes Action Keypad Lock/unlock button on rear of the pump has been pressed. Press the Keypad Lock/unlock button on the rear of the pump to unlock the keypad. Keypad Auto lock button has been enabled. Press the Keypad Lock/unlock button on the rear of the pump, twice to unlock the keypad. Note: The keypad will automatically lock 1 minute after the last key is pressed. Quick rate change option has been selected See Chapter 3 Options The Rate taper option has been selected. See Chapter 3 Options The rate taper program or volume over time program cannot be infused as entered. Infusion values must be changed, see Chapter 3 Options, Programming a rate taper or Programming volume over time. Dose-rate calculation program cannot be infused as entered. The infusion values must be changed, see Chapter 3 Options, Programming dose rate calculation). Large Volume Infusion Pump Operator s Manual 4 7
102 Troubleshooting Smiths Medical Instrument Care Periodic cleaning of the pump housing and inside surface of the door is recommended. Unplug the power cord and use a sponge or cloth lightly dampened with a solution of warm water and a mild, non-staining disinfectant/cleaner. Do not use cleaning agents which could damage the outer pump housing. Periodic cleaning The pump may require periodic cleaning. This section lists recommended cleaning agents and describes the recommended procedure for cleaning the pump. Recommended cleaning agents Use any of these cleaning agents as directed in Cleaning procedure and precautions on the following pages. Soap It is recommended that only soap and water solutions are used to clean the outer surface of the pump. These solutions have little disinfecting and sterilising properties. Quaternary ammonia salt-based solutions Quaternary ammonia salt-based solutions are typically liquid concentrates mixed with water. They are used for routine wipe-down to clean and disinfect with no adverse effects. Alcohol solutions It is recommended that only 70% concentrations of isopropyl or ethyl alcohol in water be used in cleaning and disinfecting the pumps. Solutions of methyl alcohol should never be used when cleaning the pumps. Bleach solutions Bleach solutions diluted to 1 part bleach to 10 parts water (approximately 0.5% solution) may be effectively used for routine wipe-down of the pumps with no adverse effects. Care should be taken to use only the concentration recommended (1/10) as adverse effects to the pumps may occur. Phenol based solutions Phenol based solutions are routinely used to clean and disinfect. They are available in various forms such as liquid concentrate and aerosol sprays. Long-term use of concentrates could have harmful effects on the pumps unless used in exactly the dilution strength (in water) specified in the manufacturer s labelling. CAUTION: Do not autoclave, steam sterilise, ETO sterilise or subject the pump to temperatures in excess of 45 C (113 F). Excessive temperatures may cause damage to the pump. CAUTION: To prevent serious damage to the pump it must not be immersed in any liquids or exposed to strong organic solvents. Wipe off spills immediately. Do not allow fluid or residues to remain on the pump. Additionally, the pump is not designed to allow it to be sterilised. Failure to observe these cautions may cause internal damage to the pump. CAUTION: Carry out periodic cleaning following the detailed instructions in this manual. Use only the recommended cleaning agents cleaning agents. 4 8 LargeVolume Infusion Pump Operator s Manual
103 Smiths Medical Troubleshooting Cleaning agents NOT recommended for use Activated dealdehydes Activated dealdehydes are used to disinfect and sterilise medical instruments by immersing them in these solutions. As immersion is required for these cleaning products to be effective, it is not recommended that they are used on the pumps. Alcohol solutions Solutions of methyl alcohol should not be used to clean the pumps. Synthetic detergent with emulsifiers These cleaning agents are commonly used for routine wipe-down to clean and disinfect. Long-term use could have adverse effects on the pumps and are not recommended. Iodine-based solutions Products such as Betadine and Wescadine are commonly used as microbial skin preparations. Long-term use of these products could have adverse effects on the pumps. Turpene-based solutions Products which contain Turpenes may also have adverse effects on the pumps if used over a period of time. Cleaning procedure and precautions The following cleaning procedures must be followed when cleaning and disinfecting the pumps: Unplug the power cord before cleaning to prevent any electric shock hazard. Apply all solutions indirectly using a damp cloth. Wring out any excess fluid from the sponge or cloth before wiping the pump or power cord. Open the door to clean the cassette housing, the inside surface of the door and the door latch. Wipe damp spills away immediately to avoid any sticky build-up. Precautions Observe these precautions when cleaning and disinfecting the pumps: DO NOT immerse the pumps in any liquids. DO NOT apply solutions with a trigger sprayer or under a direct stream or shower, as this will produce too much surface moisture on the pump. This may have a harmful effect on the electronic system. DO NOT use steel wool, metallic bristle brushes, plastic abrasive scouring pads, metal spatulas, or other metallic cleaning utensils as these will scratch the pump housing. Chemical decontamination procedures Hospital protocol may require all the pumps used in treatment of hepatitis, AIDS, or quarantined patients to undergo special disinfection procedures. Such procedures are likely to include prolonged (10 minutes or more) contact with disinfecting agents. Special care must be taken to avoid excess solution invading the pump s internal components. The solutions given previously as not recommended for use should be especially avoided during all decontamination procedures. The Service Manual contains information on which cleaning agents may or may not be used, and how to perform cleaning. Large Volume Infusion Pump Operator s Manual 4 9
104 Troubleshooting Smiths Medical 4 10 LargeVolume Infusion Pump Operator s Manual
105 Service/Warranty
106 Smiths Medical Service/Warranty Service If a Smiths Medical Infusion Device fails to perform as specified in this manual, and the cause cannot be determined and corrected, do not use the Infusion Device. Refer it to a Smiths Medical qualified technician for proper service. Unauthorized service of the Infusion Device voids the warranty. For service information refer to the Limited Warranty. Technical Assistance If you have comments or questions concerning the operation of the Deltec 3000 and Deltec Micro 3100 Large Volume Infusion Pumps, please call this number: Our staff is available to help clinicians twenty-four hours a day with the programming and operation of the Deltec 3000 and Deltec Micro 3100 Large Volume Infusion Pumps. Smiths Medical MD, Inc Grey Fox Road, St Paul, Minnesota U.S.A. Note: The information and procedures presented in this section apply only to products sold in the U.S. For information regarding products sold outside the U.S. contact your sales representative. CAUTION: The device may only be repaired by authorized persons, qualified by Smiths Medical. Large Volume Infusion Pumps Operator s Manual S/W 1
107 Service/Warranty Smiths Medical Limited Warranty Smiths Medical MD, Inc. (the Manufacturer ) warrants to the Original Purchaser That the Deltec Model 3000 or Deltec Micro 3100 Large Volume Infusion Pump (the Pump ), not including accessories shall be free from defects in materials and workmanship under normal use, if used in accordance with this Operator s Manual, for a period of one (1) year from the actual date of sale to the Original Purchaser. THERE ARE NO OTHER WARRANTIES. Conditions, procedures and limitations The following conditions, procedures and limitations apply to the Manufacturer s obligation under this warranty: A. Parties Covered by this Warranty: This warranty extends only to the original purchaser of the Pump. This warranty does not extend to subsequent purchasers. The original purchaser may be a patient, medical personnel, a hospital, or institution which purchases the Pump for treatment of patients. The Original Purchaser should retain the invoice or sales receipt as proof as to actual date of purchase. B. Warranty Performance Procedure: Notice of the claimed defect must be made in writing or by telephone to the Manufacturer as follows: Customer Service Department, Smiths Medical MD, Inc Grey Fox Road, St Paul, Minnesota U.S.A Notice to the Manufacturer must include date of purchase, model and serial number and a description of the claimed defect in sufficient detail to allow the Manufacturer to determine and facilitate any repairs which may be necessary. AUTHORIZATION MUST BE OBTAINED PRIOR TO RETURNING THE PUMP. If authorised, the Pump must be properly and carefully packaged and returned to the Manufacturer, postage prepaid. Any loss or damage during shipment is at the risk of the sender. S/W 2 Large Volume Infusion Pumps Operator s Manual
108 Smiths Medical Service/Warranty C. Conditions of Warranty: The warranty is void if the Pump has been: 1) repaired by someone other than the Manufacturer or its authorized agent; 2) altered so that its stability or reliability is affected; 3) misued; or, 4) damaged by negligence or accident. Misuse includes, but is not limited to, use not in compliance with the Operator s Manual or use with nonapproved accessories. The Pump is a sealed unit, and the fact that the seal has been broken will be considered conclusive evidence that the Puump has been altered or misuesed. Removal or damage to the Pump s sericl number will invalidate this warranty. D. Limitations and Exclusions: Repair or replacement of the Pump or any component part thereof is the EXCLUSIVE remedy orrered by the Manufacturer. The following exclusions and limitations shall apply: 1) No agent, representative or employee of the Manufacturer has authority to bind the Manufacturer to any representation or warranty, expressed or implied. 2) THERE IS NO WARRANTY OF MERCHANTABILITY OR FITNESS OR USE OF THE PUMP FOR ANY PARTICULAR PURPOSE. 3) The Pump must be used under the supervision of medical personnel whose skill and judgement determine the suitablility of the Pump for any particular medical treatment. 4) All recommendations, information and descriptive literature supplied by the Manufacturer or its agents are believed to be accurate and reliable, but do not constitute warranties. The manufaturer disclaims responsibility for the suitability of the Pump for any particular medical treatment or for any medical complications resulting from the use of the Pump. The Manufacturer shall not be responsible for any incidental damages or consequential damages to property, loss of profits, or loss of use caused by any defect or malfunction of the Pump. This warranty gives the Original Purchaser specific legal rights and the Original Purchaser may have other legal rights which may vary from state to state. This warranty does not cover normal wear and tear and maintenance items, and specifically excludes batterise, administration sets, extension sets or any other accessory items or equipment used with the Pump. Subject to the conditions of and upon compliance with this Limited Warranty, the Manufacturer will repair or replace at its option without charge (except for a minimal charge for postage and handling) any Pump (not including accessories) which is defective if a claim is made during such one-year period. Large Volume Infusion Pumps Operator s Manual S/W 3
109 Service/Warranty Smiths Medical S/W 4 Large Volume Infusion Pumps Operator s Manual
110 Specifications/ Standards
111 Smiths Medical Specification Specifications General Weight Dimensions 5 kg (11 pounds). including pole clamp Height 28 cm (11 inches). Width 21.5 cm (8.6 inches). Depth 23.5 cm (9.45 inches). Temperature Operating 18 to 40 C (64 to 104 F) Transportation -25 to +55 C (-13 to 131 F). and Storage Relative humidity Operating 30% to 75% (non-condensing). Transportation 30% to 75% (non-condensing). and Storage Pressure range Operating 50 kpa to 106 kpa Transportation 19 kpa to 106 kpa and Storage Free flow protection The pump mechanism operates the safety clip on the administration set. Head-height From bottom of drip chamber to top of pump Model 3000 Micro cm (6 ins) minimum for flow rates <500 ml/h 30 cm (12 ins) minimum for flow rates >500 ml/h 30 cm (12 ins) when using 60 drops/ml sets 30 cm (12 ins) when using thick solutions* 15 cm (6 ins) minimum 30 cm (12 ins) when using 60 drops/ml sets 30 cm (12 ins) when using thick solutions* * certain cytotoxic agents, lipid-based fluids and other viscous solutions, for example Total Parenteral Nutrition. Self test Dual microprocessors independently test each other. Large Volume Infusion Pumps S 1
112 Specification Smiths Medical Maximum over infusion Air detect system Accuracy Accuracy measurement equipment Test solution Testing conditions Model 500 Micro 505 Under a single-fault condition, the maximum over infusion which may occur is 12.5% over the selected flow rate. Larger inaccuracies are detected by the pump, and cause the pump to stop infusing and to alarm. Air bubbles are detected by electronic opto-encoder detection device (with self-checking sensors) located on cassette housing. ± 2% of displayed rate and volume to be infused. The quoted accuracy is ±2% for a long-term infusion. Below rates of 1 ml/h this accuracy may not be achieved for a short-term infusion. During the total infusion time the accuracy averages out (see trumpet curves in this chapter). 50 ml glass measurement burette graduated in 0.1 ml increments and traceable to National Institute of Standards and Technology or appropriate international standards bureau. Sterile water or normal saline at room temperature (70 F ±5 /21 C ±3 ). Smiths Medical standard (primary), 20 drops/ml, non-checkvalve administration set ( ). Fluid level in the solution container 46 cm (18 inches) above top of the pump, rate set at 999 ml/h and volume to be infused of 49 ml. Fluid level in the solution container 46 cm (18 inches) above top of the pump, rate set at 99.9 ml/h and volume to be infused of 25.0 ml. S 2 Large Volume Infusion Pumps
113 Smiths Medical Specification Power AC power supply Battery type Battery operating time Battery recharge time Leakage current Lithium cell Internally configured for either V AC, 200 ma, 50/60 Hz. or, V AC, 80 ma, 50/60 Hz. Rechargeable, sealed lead-acid, 12 Volt, 1.3 Ah. 6 hours at 100 ml/h (99.9 ml/h on Micro 3100), with approximately 1/2 hour warning of discharged battery. Approximately 10 hours, depending on the operating conditions. The batteries will be charging during an infusion. 100 to 120 V less than 20 microamps ungrounded or, 220 to 240 V less than 50 microamps ungrounded This is measured between the ground stud and the earth protective prong of the AC mains connector. A lithium cell is contained within the electronic memory. The data retention time is expected to be in excess of 2 years, however it may be reduced for pumps whose date of manufacture is greater than 5 years. Over-current protection Voltage AC line fuse Thermal fuse Battery fuse 100 to 120 V 200 ma amp 220 to 240 V 2 x 80 ma amp Note: All fuses are time delay fuses Large Volume Infusion Pumps S 3
114 Specification Smiths Medical Primary and Secondary Infusions: Rate range Model 3000 Range Increment 0.1 to 99.9 ml/h 1 to 999 ml/h 0.1 ml/h 1 ml/h Micro 3100 Range Increment 0.1 to 99.9 ml/h 0.1 ml/h Volume to be infused Model 3000 Range Increment 0.1 to ml 1 to 9999 ml 0.1 ml 1 ml Micro 3100 Range Increment 0.1 to ml 0.1 ml Rate Taper Infusions: Rate range Model 3000 Range Increment 0.1 to 99.9 ml/h 1 to 400 ml/h 0.1 ml/h 1 ml/h Micro 3100 Range Increment 0.1 to 99.9 ml/h 0.1 ml/h Volume to be infused Model 3000 Range Increment 0.1 to ml 1 to 4400 ml 0.1 ml 1 ml Micro 3100 Range Increment 0.1 to ml 0.1 ml Time range Model 3000 & Micro 3100 Range Increment 0 to 59 minutes 0 to 48 hours 1 minute 1 hour S 4 Large Volume Infusion Pumps
115 Smiths Medical Specification Volume Over Time Infusions: Rate range Model 3000 Range Increment 0.1 to 99.9 ml/h 1 to 999 ml/h 0.1 ml/h 1 ml/h Micro 3100 Range Increment 0.1 to 99.9 ml/h 0.1 ml/h Volume to be infused range Model 3000 Range Increment 0.1 to 99.9 ml 1 to 9999 ml 0.1 ml 1 ml Micro 3100 Range Increment 0.1 to 99.9 ml 1 to 999 ml 0.1 ml 1 ml Time range Model 3000 & Micro 3100 Range Increment 0 to 59 minutes 0 to 48 hours 1 minute 1 hour Dose-Rate Calculation Infusions: Dose range Range 0.01 to to to 9999 Increment Body weight range Units Range Increment Kilograms (kg) 0.10 to kg 0.1 to 453 kg 0.01 kg 0.1 kg Pounds (lbs) 0.22 to lbs 0.2 to 999 lbs 0.01 lbs 0.1 lb. Large Volume Infusion Pumps S 5
116 Specification Smiths Medical Drug amount modes/range Mode Range Increment MG drug/bag 0.01 to to to Gm drug/bag 0.01 to to to 999 mcg drug/bag 0.01 to to to 9999 units/bag 0.01 to to to Rate range Model 3000 Range Increment 0.1 to 99.9 ml/h 1 to 999 ml/h 0.1 ml/h 1 ml/h Micro 3100 Range Increment 0.1 to 99.9 ml/h 0.1 ml/h Volume to be infused range Model 3000 Range Increment 0.1 to ml 1 to 9999 ml 0.1 ml/h 1 ml/h Micro 3100 Range Increment 0.1 to ml 0.1 ml/h Bolus rate range Model 3000 Range Increment 0.1 to 99.9 ml 1 to 999 ml 0.1 ml/h 1 ml/h Micro 3100 Range Increment 0.1 to 99.9 ml 0.1 ml/h S 6 Large Volume Infusion Pumps
117 Smiths Medical Specification Occlusion sensing Alarm levels (approximate values) Pressure units Low Medium High mmhg 103 mmhg 259 mmhg 517 mmhg psi 2 psi 5 psi 10 psi kpa 13.5 kpa 34.5 kpa 68.9 kpa Time to occlusion Maximum (measured +25%) delay times for activation of the Occlusion below pump alarm: Rate Low setting maximum time to alarm High setting maximum time to alarm 1 ml/h 11 min, 5 sec. 1 hour, 10 min. 25 ml/h 15 sec. 2 min, 35 sec. KVO rate Default KVO rate 3.0 ml/h, or at the programmed rate if set at less than these values. Configurable KVO rates Model 3000 Micro to 10.0 ml/h 0.1 to 3.0 ml/h Accessories For a complete list of Administration Sets, please contact Smiths Medical or your local distributor. Large Volume Infusion Pumps S 7
118 Specification Smiths Medical Symbols used on the pump Front panel symbols Battery is charging/mains power applied. Audio alarm silence button. Side panel symbols Use pump only in upright position. Rear panel symbols Attention: consult accompanying documents. Data input/output. CF Application (cardiac floating) Audio alarm volume control. Alternating current. Nurse call option (only if option is fitted) Inside battery door symbols Attention: dangerous voltages, risk of electric shock if the housing is opened. Equipotential point. Internal battery. Disposal (EU Countries) Collect Separately: This product contains electronic and other components (such as batteries) that may contain materials which, if disposed of with general household waste, could be damaging to the environment. In accordance with Directive 2002/96/EC Waste Electrical and Electronic Equipment, Smiths Medical requires that residents of the European Union return this product for proper disposal at the end of its useful life. For information on how to return the product for disposal, refer to: recycle/index.html Disposal (other Countries) When disposing of the pump, its batteries or any of its accessories, ensure that any negative impact on the environment is minimised. Contact your local waste disposal service and use local recycling or disposal schemes. Separate any other parts of the equipment where arrangements can be made for their recovery; either by recycling or energy recovery. The main batteries are potentially harmful and will require separate disposal according to manufacturer s instructions or local regulations. Note: If applicable, EU, national or local regulations concerning waste disposal must take precedence over the above advice. Recycle. S 8 Large Volume Infusion Pumps
119 Smiths Medical Specification Standards Electrical Safety Classified as Internally Powered Equipment Class 1, Type CF (Cardiac Floating) insulation on all inputs. Standards EN , EN , EN Fluid Ingress Protection IPX 1 Drip proof Disposal See previous page Patents USA GB France Large Volume Infusion Pumps S 9
120 Specification Smiths Medical Performance charts The following graphs are designed to show flow accuracy of the infusion system plotted against given time periods. The curves were developed while testing the Model 3000 using a Smiths Medical Standard Adult Set, administration set. The curves for the Micro 3100 are identical since both pumps have the same pumping mechanism. The trumpet curve represents the worst case rate error in any given observation window over the whole infusion period. These trumpet curves were prepared according to the requirements of EN/IEC S 10 Large Volume Infusion Pumps
121 Smiths Medical Specification Large Volume Infusion Pumps S 11
122 Specification Smiths Medical S 12 Large Volume Infusion Pumps
123 Appendix
124 Smiths Medical Appendix Nurse-Call Feature Some pumps are fitted with a Nurse- Call feature which makes these pumps compatible with most existing hospital nurse-call systems. A Smiths Medical pump equipped with the nurse-call feature may be connected to the hospital s system by inserting a 0.25 inch system plug into the Nurse-Call Connector (see illustration, below) on the pump s rear panel. Once connected, any activation of the pump s various audio alarms also activates the hospital nurse-call system. Note: This feature is not available in all countries. Symbol Definitions: Nurse-Call Attention - consult accompanying documents Large Volume Infusion Pump Operator s Manual A - 1
125 Appendix Smiths Medical A - 2 Large Volume Infusion Pump Operator s Manual
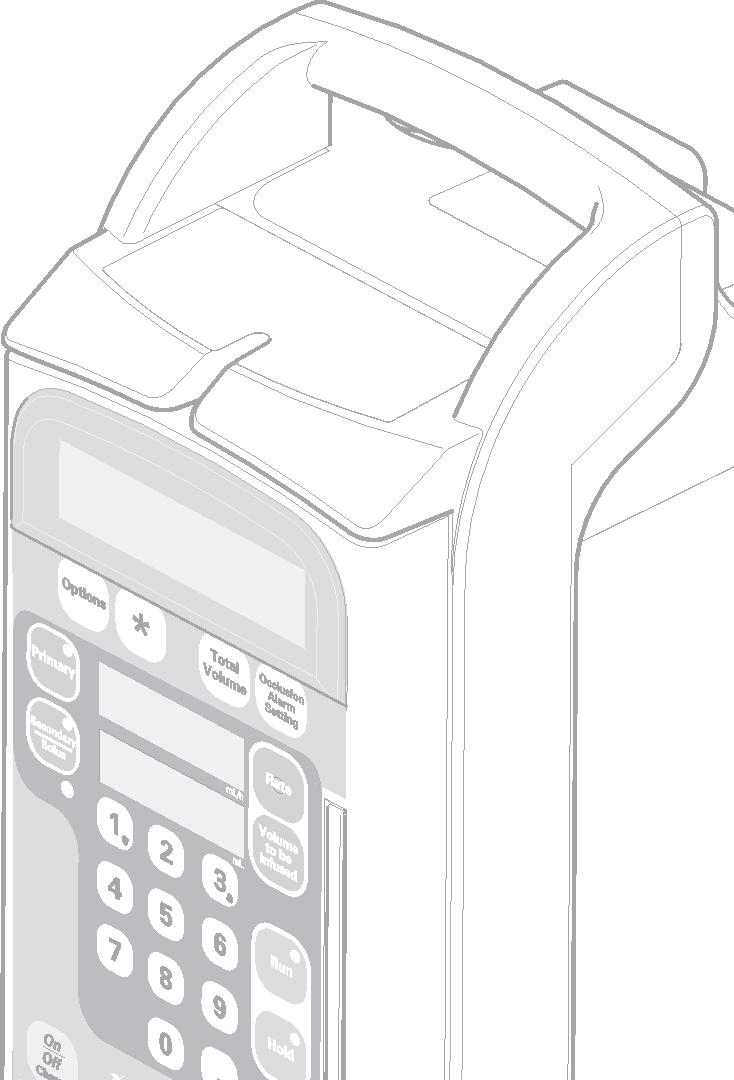
126 Index
CADD -Solis VIP Ambulatory Infusion Pump Model 2120
 CADD -Solis VIP Ambulatory Infusion Pump Model 2120 Clinician Guide Contents I Description of the CADD -Solis VIP Pump... 4 Indications... 4 Pump Diagram... 5 Pump Descriptions... 5 Keypad... 6 I Pump
Quick Reference Guide
 Quick Reference Guide 3 Spike Set Cassette Inflow Connector Cassette Outflow Connector Return Line Latch Handle Patient Line Air Trap Keypad Cassette Customer Service Toll Free: 1-866-944-9992 Office:
Nimbus Flex Ambulatory Infusion Pump
 Nimbus Flex Ambulatory Infusion Pump Patient Manual Continuous Mode Infusions (Software Version v5.1.1) Read this entire manual prior to operating the Nimbus Ambulatory Infusion Pump. Failure to follow
Ambulatory. Infusion. Pumps
 PATIENT INFORMATION PCA Patient Controlled Analgesia Delivery Mode Model 6100 and 6101 Ambulatory Infusion Pumps Table of Contents Introduction... 1 Warnings... 2 Cautions... 4 CADD-Prizm Pump (Diagram)...
OPERATOR S MANUAL. Ambulatory Infusion Pump Model 6300 PATIENT CONTROLLED ANALGESIA
 OPERATOR S MANUAL CADD-Legacy PCA Ambulatory Infusion Pump Model 6300 PATIENT CONTROLLED ANALGESIA This Operator s Manual is for clinician use only. Read the entire Operator s Manual before operating the
BodyGuardTM 323. BodyGuard 323 Multi-Therapy Ambulatory Infusion Pump. Patient Guide
 BodyGuardTM 323 BodyGuard 323 Multi-Therapy Ambulatory Infusion Pump Patient Guide How to Use This Booklet This booklet gives you information about how to use your BodyGuard 323 infusion pump. It supplements
MOOG Medical Devices Group Curlin 6000 Series Ambulatory Infusion Pump PATIENT GUIDE
 MOOG Medical Devices Group Curlin 6000 Series Ambulatory Infusion Pump PATIENT GUIDE TABLE OF CONTENTS Introduction...2 Important keys...2 Installing/Changing the Batteries...3 Preparing Your Therapy...4
Patient s Manual for Using Nimbus Ambulatory Pump for Continuous Peripheral Nerve Block Application
 Patient s Manual for Using Nimbus Ambulatory Pump for Continuous Peripheral Nerve Block Application PCA Mode Infusions (Software Version v2.1.3) Read this entire Manual prior to operating the Nimbus Ambulatory
Syringe Driver Introduction. Christine Hull & Anita Webb Staff Nurses, Hospice in the Home 2015
 Syringe Driver Introduction Christine Hull & Anita Webb Staff Nurses, Hospice in the Home 2015 Aims and Objectives To gain an understanding of using the McKinleyT34 syringe driver. To review knowledge
Intermittent Delivery Mode
 Intermittent Delivery Mode CADD -Solis VIP Ambulatory Infusion Pump Model 2120 Patient Information Guide Your Clinician s: Name: Phone Number: Instructions: Pump placement during bathing/showering: Pump
CADD-Legacy 1 Ambulatory Infusion Pump Model 6400
 OPERATOR S MANUAL CADD-Legacy 1 Ambulatory Infusion Pump Model 6400 CONTINUOUS DELIVERY This online version differs from the printed version. Certain information that is not intended for patients has been
CADD-TPN. Model 5700 Operator s Manual. Deltec. Ambulatory Infusion System. SIMS Deltec, Inc., St. Paul, MN U.S.A.
 CADD-TPN Ambulatory Infusion System Model 5700 Operator s Manual Deltec SIMS Deltec, Inc., St. Paul, MN 55112 U.S.A. This manual pertains only to the Deltec CADD-TPN, Model 5700, ambulatory infusion system.
CADD-PCA. Model 5800R Operator s Manual. Deltec. Ambulatory Infusion Pump. SIMS Deltec, Inc., St. Paul, MN U.S.A.
 CADD-PCA Ambulatory Infusion Pump Model 5800R Operator s Manual Deltec SIMS Deltec, Inc., St. Paul, MN 55112 U.S.A. i This manual pertains only to the Deltec CADD-PCA, Model 5800R, infusion pump. The issue
Accumate 2300 Volumetric Infusion Pump
 Accumate 2300 Volumetric Infusion Pump Operating Manual www.wooyoungmed.com Log o Important This Operating Manual is for clinician use only. Do not permit patients to have access to this Operating Manual.
NIKI T34 pump. Knowing your way around the NIKI T34 pump
 NIKI T34 pump Knowing your way around the NIKI T34 pump 2. Display Screen 3. Barrel clamp 4. Collar & Plunger Sensors 5. LED Indicator 1. Info Key 9. Up & Down arrow keys 8. YES (START)/ NO(STOP) keys
CADD-Prizm PCS II. Operator's Manual. Ambulatory Infusion Pump. Model 6101
 x CADD-Prizm PCS II Ambulatory Infusion Pump Model 6101 Operator's Manual s This manual concerns only the CADD-Prizm PCS II (Pain Control System) Model 6101 Ambulatory Infusion Pump. This pump can be
BODYGUARD 595 REGIONAL ANALGESIA INFUSION PUMP
 BODYGUARD 595 REGIONAL ANALGESIA INFUSION PUMP The BodyGuard 595 Regional Analgesia Infusion Pump is a dedicated, colourcoded pain management system for enhanced recovery wound infiltration and nerve blocks,
BodyGuard 121 Twins Infusion System Operator Manual
 BodyGuard 121 Twins Infusion System Operator Manual 0344 Manufacturer: Caesarea Medical Electronics GmbH. 23 Staufenburg st. 72805 Lichtenstein, Germany +800-323-575-00 E-mail: Sales@cme-infusion.com www.cme-infusion.com
BODYGUARD 323 AMBULATORY INFUSION PUMP
 BODYGUARD 323 AMBULATORY INFUSION PUMP The BodyGuard 323 Ambulatory Infusion Pump is a multi-therapy pump suitable for the hospital and homecare environments with three programmable modes (TPN, continuous
Unit 2, Rivington View Business Park, Station Road, Blackrod, Bolton BL6 5BN Tel: +44(0)
") The P900 enteral syringe pump has been designed to deliver small s of enteral feeds, accurately and safely, using enteral syringes, but cannot be used with IV syringes Unit 2, Rivington View Business Park,
The P900 enteral syringe pump has been designed to deliver small s of enteral feeds, accurately and safely, using enteral syringes, but cannot be used with IV syringes Unit 2, Rivington View Business Park,
CADD-Solis Infusion Pump
 Introduction CADD-Solis Infusion Pump Information for Parents Your child has been started on an infusion using the CADD-Solis pump. Your nurse specialist will have explained the reasons for starting the
Baxter 6201 and 6301 Tips to Avoid Nuisance Alarms Call x 335 for troubleshooting assistance.
 P a g e 1 Baxter 6201 and 6301 Tips to Avoid Nuisance Alarms Call 1-708-449-7600 x 335 for troubleshooting assistance. Tip #1: To Ensure Door is Closed Correctly You should hear 2 clicks when closing the
BodyGuard 323 Infusion Pump System Operator Manual
 . BodyGuard 323 Infusion ump System Operator Manual 0344 Manufacturer: Caesarea Medical Electronics Ltd. European address: Staufenburgstr. 23 Lichtenstein.O.B. 1248 Lichtenstein 72805 Germany International
Quickdraw. Model 2400 Series. Operating Instructions & Maintenance Manual. Clearing The Airway Is Our #1 Priority
 Quickdraw Model 2400 Series Clearing The Airway Is Our #1 Priority Operating Instructions & Maintenance Manual, INC. 11064 Randall Street Sun Valley, CA 91352 USA www.sscor.com Email: marketing@sscor.com
FreeGo. pump. Training Manual. Freedom for life
 FreeGo pump Training Manual Freedom for life Contents Section 1 Set-up What you need Set up the FreeGo pump table top stand 2 Preparation Prepare the FreeGo pump Plug in and turn on Page 1 2 3 4 3 The
BodyGuard 323 Infusion Pump System Operator Manual
 . BodyGuard 323 Infusion ump System Operator Manual 0473 Manufacturer: USA Headquarters: Caesarea Medical Electronics Ltd. CME America, LLC European headquarters: 14998 W. 6 th Avenue, Unit 830 Staufenburgstr.
Syringe Infusion Solutions
 Syringe Infusion Solutions Caesarea Medical Electronics T34 Deliver Syringe Infusion Anywhere rovide complete small-dose infusion therapy safely and economically wherever your patients receive care. The
Syringe Infusion Solutions
 Syringe Infusion Solutions Caesarea Medical Electronics T34 Deliver Syringe Infusion Anywhere rovide complete small-dose infusion therapy safely and economically wherever your patients receive care. The
Operator s Manual. spectrum 35700BAX & 35700ABB. Generation 2 Operating System Pump Operating Software v6.05 For Use with MDL Editor v6.2.
 spectrum Operator s Manual 35700BAX & 35700ABB Generation 2 Operating System Pump Operating Software v6.05 For Use with MDL Editor v6.2.4 41018-6.05/6.2.4 Rev H November 29, 2012 SIGMA 711 Park Avenue
Sentinel Enteral Feeding Pump. Model: S-1000-SI. Operating Manual
 Sentinel Enteral Feeding Pump Model: S-1000-SI Operating Manual CONTENTS 1. Introduction.. 2 2. Control Panel 5 3. Operating Instructions.. 6 4. Indicators and Alarms.. 9 5. Maintenance.. 10 6. Troubleshooting
Stealth Power i-tilt
 Power Tilts OWNERS MANUAL Stealth Power i-tilt User Manual and Maintenance Guide for Stealth s i-tilt Customer Satisfaction 1.0 Stealth Products strives for 100% customer satisfaction. Your complete satisfaction
CADD-1. Model 5100 HFX Operator s Manual. Note: Colors are Black and Cyan (as second color) Deltec. Ambulatory Infusion Pump
 Deltec. Ambulatory Infusion Pump") Note: Colors are Black and Cyan (as second color) CADD-1 Ambulatory Infusion Pump Model 5100 HFX Operator s Manual Deltec SIMS Deltec, Inc., St. Paul, MN 55112 U.S.A. i This manual pertains only to the
Note: Colors are Black and Cyan (as second color) CADD-1 Ambulatory Infusion Pump Model 5100 HFX Operator s Manual Deltec SIMS Deltec, Inc., St. Paul, MN 55112 U.S.A. i This manual pertains only to the
SR7 Micro-infusion Syringe Pump. Contents
 Contents Introduction 2 A. About this manual.2 B. Manufacturer s Responsibility.2 C. Warranty 3 D. Unpacking and Accessories.. 3 E. General Safety...3 1.Overview.. 7 2.Operating Principle....7 3.Technical
Model 2310 Series. Operating Instructions & Maintenance Manual. Clearing The Airway Is Our #1 Priority
 VX-2 Model 2310 Series Clearing The Airway Is Our #1 Priority Operating Instructions & Maintenance Manual, INC. 11064 Randall Street Sun Valley, CA 91352 USA www.sscor.com Email: marketing@sscor.com techsupport@sscor.com
ENGLISH SAFETY INSTRUCTIONS. Recommendations for safe operation. Operator safety. General warnings
 Safety and use instructions LifeSpeed iq TM - 3-phase chargers ENGLISH SAFETY INSTRUCTIONS GOALS OF THIS MANUAL This manual is aimed at any authorized personnel wanting to use a 3-phase LifeSpeed iq TM
Atlas ESR and ESR + Equivalent Series Resistance and Capacitance Meter. Model ESR60/ESR70. Designed and manufactured with pride in the UK.
 GB60/70-9 Atlas ESR and ESR + Equivalent Series Resistance and Capacitance Meter Model ESR60/ESR70 Designed and manufactured with pride in the UK User Guide Peak Electronic Design Limited 2004/2016 In
Atlas ESR. User Guide. Capacitance and Equivalent Series Resistance Meter. Model ESR60 (Enhanced)
") Atlas ESR Capacitance and Equivalent Series Resistance Meter Model ESR60 (Enhanced) User Guide Peak Electronic Design Limited 2004/2008 In the interests of development, information in this guide is subject
Atlas ESR Capacitance and Equivalent Series Resistance Meter Model ESR60 (Enhanced) User Guide Peak Electronic Design Limited 2004/2008 In the interests of development, information in this guide is subject
Multi Therapy Solutions
 Multi Therapy Solutions Caesarea Medical Electronics BodyGuard 323 Color Vision Advanced Multi Therapy Infusion ump Join the frontline of infusion therapy with BodyGuard 323 Color Vision, the latest multi-purpose
OPERATOR TROUBLESHOOTING GUIDE
 OPERATOR TROUBLESHOOTING GUIDE ABOUT THE TROUBLESHOOTING GUIDE This document is provided for the use of qualified operator installers. The installer should familiarize themselves with this guide Options
Dedicated, ambulatory nerve block and wound infiltration treatment
 Dedicated, ambulatory nerve block and wound infiltration treatment The BodyGuard 595 TM Regional Analgesia Infusion Pump is specially designed and colour coded for safe and effective nerve block and wound
GENERAL INFORMATION. H-1649, H-1650, H-1651 H-1653, H-1654 Easy-Count. uline.com. that may hurt accuracy:
 π H-1649, H-1650, H-1651 H-1653, H-1654 Easy-Count counting scale 1-800-295-5510 uline.com 1-800-295-5510 GENERAL INFORMATION Avoid placing the scale in locations that may hurt accuracy: 1. Temperature
1. Connect the Tester to the L300 FS Cuff plug holes. See Figure Figure 11-1: Tester connected to the L300 FS Cuff.
 Troubleshooting 11 Using the Tester The Tester is used to troubleshoot if there is a disconnection in one of the FS Cuffs or a faulty RF Stim Unit. The Tester provides audio feedback when connected to
Components. Options Accessory Harness USB Charger. Quick Connector. Hook & Loop / Cable-ties. RFID Antenna. Module. Main Harness.
 SRX SERIES Table of Contents - Components - Planning The Install - Mounting - Switched Power - Attach Accessory Harness - Plug In Module - Back-Up Battery - Remote Encoding - 2-Way RFID Remote User Instructions
Pain Management Solutions
 ain Management Solutions Caesarea Medical Electronics BodyGuard 595 Color Vision Multi-Use ain Manager The BodyGuard 595 Color Vision pain manger infusion pump is specially designed for departments needing
CADD Ambulatory Infusion Systems
 CADD Ambulatory Infusion Systems Ordering Information CADD Tubing Sets with Flow Stop Free-Flow Protection CADD Extension Sets CADD Pumps and PharmGuard Software CADD Pump Accessories CADD Ambulatory Tubing
DCell Suction. Model DM Operating Instructions & Maintenance Manual. Clearing The Airway Is Our #1 Priority
 DCell Suction Model DM10-001 Clearing The Airway Is Our #1 Priority Operating Instructions & Maintenance Manual, INC. 11064 Randall Street Sun Valley, CA 91352 USA www.sscor.com Email: marketing@sscor.com
WIRELESS BLOCKAGE MONITOR OPERATOR S MANUAL
 WIRELESS BLOCKAGE MONITOR OPERATOR S MANUAL FOR TECHNICAL SUPPORT: TELEPHONE: (701) 356-9222 E-MAIL: support@intelligentag.com Wireless Blockage Monitor Operator s Guide 2011 2012 Intelligent Agricultural
BATTERY CHARGER RS-1000 Instruction Manual
 BATTERY CHARGER RS-1000 Instruction Manual BEFORE USING OUR BATTERY CHARGER RS1000, READ IN DETAILS ALL INSTRUCTIONS CONTAINED IN THIS MANUAL. KEEP THIS MANUAL IN A SAFE PLACE AS YOU MAY NEED TO USE IT
User s Manual. Automatic Switch-Mode Battery Charger
 User s Manual Automatic Switch-Mode Battery Charger IMPORTANT Read, understand, and follow these safety rules and operating instructions before using this battery charger. Only authorized and trained service
Ambulatory Syringe Pump Operation Manual
 McKinley T34 Ambulatory Syringe Pump Operation Manual IMPORTANT NOTICE: McKinley strongly recommends that this manual is read by every user of the T34 syringe Pump and that they comprehensively understand
ITA / ITB - AS / AP / AP SERIES Electronic Table Top Weighing Balance
 TM ITA / ITB - AS / AP / AP SERIES Electronic Table Top Weighing Balance Scale Users Guide ISHTAA SCALES INC., INDIA www.ishtaascales.com 14 Content 1. Technical Data... 1 2. Installation... 2 3. Controls
OPERATIONS MANUAL M-520. Please take the time to read these instructions before starting to use the scales. Page 1
 OPERATIONS MANUAL M-520 Please take the time to read these instructions before starting to use the scales Page 1 Contents Power supply 3 Specifications 3 Maintenance and general care 3 Key functions 4
Roll Up Door Operator
 INSTRUCTIONS & OWNERS MANUAL Roll Up Door Operator 2 INDEX Preparation before installation 4. Terms and definitions 5. Pictures & names of parts 6. Mounting the weight bar 7. Installing the operator 7.
SI AT A22. English. Printed: Doc-Nr: PUB / / 000 / 01
 SI AT A22 English 1 Information about the documentation 1.1 About this documentation Read this documentation before initial operation or use. This is a prerequisite for safe, trouble-free handling and
Operator Manual of Guangzhou Huaxi Medical Technology Co., Ltd. JORVET INFUSION PUMP J1060 OPERATOR MANUAL
 Operator Manual of Guangzhou Huaxi Medical Technology Co., Ltd. JORVET INFUSION PUMP J1060 OPERATOR MANUAL Please read manual before operating your JorVet Infusion Pump Jorgensen Laboratories 1450 N. Van
Wireless Tire Pressure and Temperature Monitoring System Instruction Manual Model #: TM Cap Sensors
 Wireless Tire Pressure and Temperature Monitoring System Instruction Manual Model #: TM-510 510 Cap Sensors Thank you for purchasing the TST Tire Pressure Monitoring System. With minimal care, your new
Multi Therapy Solutions
 Multi Therapy Solutions Caesarea Medical Electronics BodyGuard 323 Color Vision Advanced Multi Therapy Infusion ump Join the frontline of infusion therapy with BodyGuard 323 Color Vision, the latest multi-purpose
TRITON ERROR CODES ERROR CODE MODEL SERIES DESCRIPTION RESOLUTION
 0 8100, 9100, 9600, 9610, 9615, 9640, No errors 9650, 9700, 9710, 9705, 9750, RL5000 (SDD),RL5000 (TDM), RT2000, 9800, MAKO, SuperScrip 1 9615 Unsolicited note channel 1 2 9615 Unsolicited note channel
For detailed instructions, specifications, warnings, warranties, and additional information on operating the CADD -Solis ambulatory infusion pump,
 X s For detailed instructions, specifications, warnings, warranties, and additional information on operating the CADD -Solis ambulatory infusion pump, please refer to the manuals supplied with the product.
04979, 04980, 04981, 04982, 04983, 04984, 39054, 39055, 39056, 39057, 39225, 81459,
 Hydraulic Bottle Jacks 04979, 04980, 04981, 04982, 04983, 04984, 39054, 39055, 39056, 39057, 39225, 81459, 82132. These instructions accompanying the product are the original instructions. This document
Product Guide: Series III Pump Control Board Set (RoHS)
") revised 04/08/10 Description: The Series III Pump Control Board Set provides motor drive and pump control for a wide assortment of pumps from Scientific Systems, Inc. The assembly consists of two circuit
revised 04/08/10 Description: The Series III Pump Control Board Set provides motor drive and pump control for a wide assortment of pumps from Scientific Systems, Inc. The assembly consists of two circuit
Fuel Level FL1. FL1 - User s manual. Rev Revision#2.0, 28/11/2014 For firmware version 1.2
 Fuel Level FL1 Revision#2.0, 28/11/2014 For firmware version 1.2 FL1 - User s manual Page intentionally left blank SECTIONS MECHANICAL INSTALLATION ELECTRICAL INSTALLATION OPERATING INSTRUCTIONS INSTRUMENT
S&C Vista Underground Distribution Switchgear
 S&C Vista Underground Distribution Switchgear Pad-Mounted, Vault-Mounted, and UnderCover Styles Instructions For Installation and Operation of Portable Motor Operator TABLE OF CONTENTS Section Page Section
CADD Ambulatory Infusion Systems
 CADD Ambulatory Infusion Systems Ordering Information CADD Tubing Sets with Flow Stop Free-Flow Protection CADD Extension Sets PharmGuard Software CADD Pump Accessories CADD Ambulatory Tubing Sets with
O p e r a t o r ' s M a n u a l
 Operator's Manual Ipump Pain Management System Operator s Manual Appendix A Product Code: 2L3107 2L3107K Software Versions: 2.03.00 Note: Before operating this pump, the user should carefully read this
Dräger INTERLOCK XT User Manual Version 3.2
 Dräger INTERLOCK XT User Manual Version 3.2 Table of Contents 1. For your safety... 3 2. Copyright and legal disclaimer.... 3 3. Overview... 4 4. Do s and Don ts of Interlock Use... 4 5. Breath Test at
2 TONNE TROLLEY JACK
 2 TONNE TROLLEY JACK 61829 IMPORTANT: Please read these instructions carefully to ensure the safe and effective use of this product and save these instructions for future reference. This manual has been
Wireless Tire Pressure and Temperature Monitoring System Instruction Manual Model #: TM-507 SCE 507 Commercial Cap Sensors with Monochrome Display
 Wireless Tire Pressure and Temperature Monitoring System Instruction Manual Model #: TM-507 SCE 507 Commercial Cap Sensors with Monochrome Display Thank you for purchasing the TST Tire Pressure Monitoring
Pivotell Advance Automatic Pill Dispenser Instructions
 Pivotell Advance Automatic Pill Dispenser Instructions Note: When opening for the first time, the lid is unlocked. The key and battery case securing screw can be found inside the dispenser. V11 102016
Pain Management Solutions
 ain Management Solutions Caesarea Medical Electronics BodyGuard 595 Color Vision Multi-Use ain Manager The BodyGuard 595 Color Vision pain manger infusion pump is specially designed for departments needing
Spray Height Controller
 Spray Height Controller UC5 SERVICE MANUAL 2012 Printed in Canada Copyright 2012 by NORAC Systems International Inc. Reorder P/N: UC5 SERVICE MANUAL 2012 Rev B NOTICE: NORAC Systems International Inc.
EVO TM 200 AND EVO TM 400 LCD DISPLAY INSTALLATION GUIDE
 EVO TM 200 AND EVO TM 400 LCD DISPLAY INSTALLATION GUIDE The information in this publication is provided for reference only. While every effort has been made to ensure the reliability and accuracy of the
IVAC Syringe Pumps. Models P7000, P6000, TIVA, TCI & TIVA. Technical Service Manual
 IVAC Syringe Pumps Models P7000, P6000, TIVA, TCI & TIVA Technical Service Manual This manual has been prepared for use by qualified service personnel only. Cardinal Health cannot accept any liability
SI AT A22. English. Printed: Doc-Nr: PUB / / 000 / 03
 SI AT A22 English 1 Information about the documentation 1.1 About this documentation Read this documentation before initial operation or use. This is a prerequisite for safe, trouble-free handling and
Lafayette Manual Muscle Test System
 MAN087 Model 01165 Model 01165 Lafayette Manual Muscle Test System Fax: (765) 423-4111. www.lafayetteinstrument.com. info@lafayetteinstrument.com Lafayette Manual Muscle Test System Table of Contents Features
Table of Contents 1. INTRODUCTION GENERAL INFORMATION-ABOUT OBDII/EOBD PRODUCT DESCRIPTIONS OPERATIONS...11
 Table of Contents 1. INTRODUCTION...1 2. GENERAL INFORMATION-ABOUT OBDII/EOBD...1 2.1 ON-BOARD DIAGNOSTICS (OBD) II...1 2.2 DIAGNOSTIC TROUBLE CODES (DTCS)...2 2.3 LOCATION OF THE DATA LINK CONNECTOR (DLC)...3
Radiation Safety Requirements for the Use of Non-Medical X- Ray.
 290-5-22-.06 Radiation Safety Requirements for the Use of Non-Medical X- Ray. (1) Purpose. This section establishes the requirements for the non-healing arts use of x- rays. (2) Scope. This section applies
FLEXIFLO Companion. Enteral Nutrition Pump OPERATING MANUAL
 FLEXIFLO Companion Enteral Nutrition Pump OPERATING MANUAL TABLE OF CONTENTS PAGE PUMP CHARACTERISTICS Pump Characteristics 3 Pediatric Use 3 Precautions 3 Illustrations 4-5 Control Dial Settings 6 Visual
1. INTRODUCTION AND SYSTEM DESCRIPTION BLOCK DIAGRAM GENERAL INFORMATION GLOSSARY... 7
 TABLE OF CONTENTS 1. INTRODUCTION AND SYSTEM DESCRIPTION... 4 2. BLOCK DIAGRAM... 4 3. GENERAL INFORMATION... 5 3.1 The Significance of Water Consumption... 5 3.2 Ground Service... 6 3.3 Summary... 6 4.
PORTAGAUGE 4 USER MANUAL
 PORTAGAUGE 4 USER MANUAL Contents 1. Introduction and Key Features 1.1 What does the Portagauge do? 1.2 The Portagauge 4 1.21 The Portagauge 4 Unit and Measuring Screen 1.22 The Portagauge 4 Definition
FORD MONDEO Quick Reference Guide
 FORD MONDEO Quick Reference Guide About This Quick Reference Guide We have created this guide to help you get to know certain features of your vehicle. It only contains basic instructions to get you started
Locks LOCKING AND UNLOCKING. Automatic unlocking. Interior door handles and door locking levers. Master lock and unlock switches. Drive-away locking
 Locks LOCKING AND UNLOCKING Locking and unlocking the vehicle using the Smart Key, is explained earlier in this handbook. See USING THE SMART KEY (page 14). Locking and unlocking the vehicle using the
3 Phase Smart Controller
 3 Phase Smart Controller Installation and Owner s Manual STP-SCIII 208-230 VAC, 60Hz, 120 Volt Coil Franklin Fueling 3760 Marsh Rd. Madison WI 53718 USA Tel: +1 608 838 8786 800 225 9787 Fax: +1 608 838
Going home with a CADD Pump - Chemotherapy Medication
 Going home with a CADD Pump - Chemotherapy Medication The CADD pump is used to give medications such as chemotherapy into your vein. The pump can run either all the time (continuous) or regular (intermittent)
TIMER INTERFACE USER MANUAL
 TIMER INTERFACE USER MANUAL Premium Efficiency Two-Speed Motor with Integrated Timer Formerly A. O. Smith Electrical Products Company A Regal Beloit Company COPYRIGHT Copyright 2011, Regal Beloit EPC,
ZoneTouch V2 Zone Control System Installation Manual
 ZoneTouch V2 Zone Control System Installation Manual www.polyaire.com.au 2014 Polyaire Pty Ltd TABLE OF CONTENTS 1) Application 2 2) Features 2 3) Components 3 4) Configuration 4 5) Pre-Installation 6
Riding Your Halo Go Before You Begin Safety Alerts
 HALO GOTM Before You Begin---------------------01 Riding Your Halo Go-----------07-10 Main Components-------------------02 Safety Alerts--------------------------11 Charging Your Batteries------------03
Eickemeyer Operating Manual Syringe Pump "Advanced"
 Eickemeyer Contents Operating Manual Syringe Pump "Advanced" Chapter Page No. Rev.No.0.01 This manual has been compiled to users of the Syringe Pump in Installation, operation & routine maintenance. 1.
Guide for Primary Injection Testing WL Circuit Breakers. Document No. : 11-C
 s Guide for Primary Injection Testing WL Circuit Breakers Document No. : 11-C-9036-00 Before Beginning... Qualified Person Siemens type WL circuit breakers should only be only be operated, inspected, and
Inverter / Charger Accessory for Steca Solarix PLI Phase / Parallel Kit. Installation and operating instructions Z01 17.
 Inverter / Charger Accessory for Steca Solarix PLI 5000-48 3-Phase / Parallel Kit Installation and operating instructions GB Z01 17.31 Table of Contents About this Manual... 2 Purpose... 2 Scope... 2 Keywords
SmarTire TPMS Maintenance Hand Tool. Revision User Manual
 SmarTire TPMS Maintenance Hand Tool Revision 1.04 User Manual Page 2 Table of Contents FCC Compliance Label... 4 User Interface Illustration... 4 Introduction... 5 Testing Tire Sensors... 5 Main Menu...
TRIPS AND FAULT FINDING
 WWW.SDS.LTD.UK 0117 9381800 Trips and Fault Finding Chapter 6 6-1 TRIPS AND FAULT FINDING Trips What Happens when a Trip Occurs When a trip occurs, the drive s power stage is immediately disabled causing
c-go 24V/6A 24V/8A 24V/12A
 c-go 24V/6A 24V/8A 24V/12A Battery charger GB Instruction manual 1 Index 1. Product description... 2 2. Safety advices... 3 3. Quick start guide... 4 4. Operation... 4 5. Problem solving... 6 6. Specifications...
nual k Voltage Stabilizer N) manual New Brunswick Voltage Stabilizer Operating manual
 manual New Brunswick Voltage Stabilizer Operating manual") nual k Voltage Stabilizer N) manual New Brunswick Voltage Stabilizer Operating manual Copyright Copyright 2014 Eppendorf AG, Germany. No part of this publication may be reproduced without the prior permission
nual k Voltage Stabilizer N) manual New Brunswick Voltage Stabilizer Operating manual Copyright Copyright 2014 Eppendorf AG, Germany. No part of this publication may be reproduced without the prior permission
1. Disclaimer Warnings Introduction Display and Commands... 5
 1. Disclaimer... 1 2. Warnings... 2 2.1. Welding... 2 3. Introduction... 3 4. Display and Commands... 5 4.1. Status Display on LCD... 5 4.1.1. Control Mode... 6 4.1.2. Bowl Mode... 6 4.1.3. Engine Mode...
ECONOMISER SERIES E2T USER MANUAL
 TURBO S.R.L. Electronic Control Systems for Dust Collectors e-mail: info@turbocontrols.it web: www.turbocontrols.it TEL. ++39 (0)362 574024 FAX ++39 (0)362 574092 ECONOMISER SERIES E2T USER MANUAL 24/06/2014
DMG200. Digital Micron Gauge. 99 Washington Street Melrose, MA Phone Toll Free
 DMG200 Digital Micron Gauge 99 Washington Street Melrose, MA 02176 Phone 781-665-1400 Toll Free 1-800-517-8431 Visit us at www.testequipmentdepot.com Parts Diagram 2 LCD Display Item A B C Main Numeric
D Dräger Alcotest 3000 Breath Alcohol Measuring Device
 D Dräger Alcotest 3000 Breath Alcohol Measuring Device Instructions for Use ST-14138-2008_sw.eps Table of Contents For Your Safety....................................... 3 Intended Use..........................................
Interactive Whiteboard. User Guide. Before operating the unit, please read this manual thoroughly, and retain it for future reference
 User Guide Before operating the unit, please read this manual thoroughly, and retain it for future reference Notice 1. When disconnecting the display from an electrical outlet, the plug must be pulled
CADD Amulatory Ambulatory Infusion Systems CADD. Ordering Information. CADD Tubing Sets with Flow Stop Free-Flow Protection.
 CADD Amulatory Ambulatory Infusion Systems Ordering Information CADD Tubing Sets with Flow Stop Free-Flow Protection CADD Extension Sets PharmGuard Software CADD Pump Accessories CADD Ambulatory Tubing