BodyGuard 323 Infusion Pump System Operator Manual
|
|
|
- Nathan Sullivan
- 5 years ago
- Views:
Transcription

1 . BodyGuard 323 Infusion ump System Operator Manual 0473 Manufacturer: USA Headquarters: Caesarea Medical Electronics Ltd. CME America, LLC European headquarters: W. 6 th Avenue, Unit 830 Staufenburgstr. 23.o.b Golden, Colorado Lichtenstein Germany hone: International Toll Free: USA 24-Hour Service: Sales@cme-infusion.com EDITION March 2009 Ref.: XC

2 NOTE: To assure proper use of the BodyGuard, Caesarea Medical Electronics Ltd. urges all users to read this manual carefully, become familiar with the procedures and system functions and follow all recommendations. Using the pump with air in line detector off may cause an embolism resulting death or paralysis. Switching the air detector off is not recommended and should be used only when absolutely necessary. lease contact your technician in order to enable the air sensor if disabled with no need. When Air Sensor is OFF Use administration set with Hydrophobic filter (which expels air from the administration set). The use of any other set can cause severe danger to patient and is strictly forbidden. U.S.A. federal law restricts this device to sale by or on the order of a physician. BodyGuard Operator Manual 2
3 Table of Contents 1- Introduction...5 Overview...5 Button Descriptions and Functions...5 BodyGuard ump with Door Open...8 The Charger...9 System Safety Checks...10 ump Accuracy Symbols, Warnings and Cautions System Symbols...15 Terms Used In Manual...16 Intended Use...16 Warnings...16 Cautions Installation and Set up Unpacking...19 Charging the ump Operation Before Operating the ump...21 ump Operation Test...21 Air in Line Alarm Test...22 Down Occlusion Alarm Test...22 Door Open Alarm Test...23 Battery Test...24 Charger Indicator Test...24 Dedicated BodyGuard Administration Sets...25 The BodyValve...25 The BodySet...26 Loading the Administration Set...29 riming the Line...30 rime In Continuous, Intermittent, TN Modes...30 rime In CA Mode...31 rime Operation After Air In Line Alarm...32 Operation steps...33 ump Mounted on IV ole...33 ortable Connection...33 rogramming...34 Changing Current rogram Using Level 1 Code...35 Changing Current rogram Short Way...35 Continuous Infusion...36 Intermittent Infusion...41 rogram Delay Steps rotocol...48 TN Infusion...50 CA Infusion...53 Setting ressure Default For Down Occlusion...64 BodyGuard Operator Manual 3
4 Lock Mode...66 How To Lock...66 Info Mode...68 Review Set up...70 Change Set up Alarm Conditions and Troubleshooting Alarm Condition...73 Troubleshooting Specifications Service and Maintenance Cleaning...78 Storage...78 Service...78 Battery Operation...79 LIMITED WARRANTY Index BodyGuard Operator Manual 4
5 1-Introduction 1- Introduction Overview The BodyGuard System provides the following features: Small, light and compact pump. Multiple rograms: Continuous Infusion Rate: 0.1 to 1200 ml/hr Volume: 0.1 to 99.9 ml in 0.1ml increments or 1 to 9999 ml in 1ml increments Secondary Infusion (iggy) programmable with the same infusion rate and volume capabilities as the primary continuous infusion. Intermittent A set dose delivered in set intervals. Between Intervals the pump will keep vain open (KVO Mode). TN CA 25 Steps Total arenteral Nutrition Rate Taper program with programmable up and down times. atient Control Analgesia: Continuous delivery plus /or programmed boluses. Bolus Volume: ml Clinician Bolus Volume: ml Bolus Rate: ml/h Operator can design a specific protocol for drug delivery which contains up to 25 steps. Infusion Rate: 0.1 to 1200 ml/hr Volume: up to 9999ml, for each step Accumulated Volume for all steps up to 10 liters. Highly accurate fluid delivery Operated with a custom safe administration set Rechargeable internal lithium-ion battery ` Battery charged in a pole mount charging cradle or with an A/C adaptor Free flow protection valve standard on every CME administration set Quiet operation Used for ambulatory care in a carrying pouch or mounted on an IV pole BodyGuard Operator Manual 5
6 1-Introduction Front of BodyGuard Infusion ump Display Screen Displays pump and infusion status Displays programming choices and instructions 2. Up Arrow Scrolls up through options 3. START/ OK Starts infusion Confirms selection and setting 4. STO/NO Stops infusion Silences an alarm condition ause priming Zeroes the displayed value during programming Erases the last digit during programming Returns to previous screen BodyGuard Operator Manual 6
7 1-Introduction 5. RIME/IGGY ressing rime/iggy key during data setting: Enables riming procedure. A graph appears on the display screen showing the priming volume with the current value increasing until reaching the set volume. ressing rime/iggy key during Continuous program operation: Enables Secondary (iggy) Infusion. ressing rime/iggy key during CA program operation: Enables bolus procedure. 6. ower ON/OFF Turn the system ON by pressing and holding the button until the Self-Test screen appears. Turn the system OFF by pressing and holding the button until the graph is black and a beep is generated. 7. Operation LED Green Indicator Lights during system Self-Test An intermittent green light indicates infusion delivery Red Indicator Indicates an alarm state with a continuous red light Lights when the pump is in a stand-by mode during programming 8. INFO Supplies information about the pump and its programs (see Info Mode chapter). ressing continuously locks and unlocks the keypad to prevent accidental or deliberate change to pump operation. 9. Down Arrow Scrolls down through options 10. Numeric Keys Enters numeric parameters during programming BodyGuard Operator Manual 7

8 1-Introduction BodyGuard ump with Door Open # Area Function 1. Latch Holder Holds the door closed when latch is in vertical position. 2. ressure Sensor Detects downstream tubing restriction and occlusion. Alarm level can be adjusted to suit patient needs. 3. Keyway Guides the IV line 4. ressing late Connected to the door by two springs 5. ump Door Covers the pressing plate 6. Air sensor Front Ultrasonic air detector, which is mounted on the front housing. 7. Air sensor - Door Mounted on the door 8. Flow Direction Shows direction of pump operation BodyGuard Operator Manual 8

9 1-Introduction The Charger 1 2 # Area Function 1. Charger Display Displays major pump messages and operation values. 2. Release Handle ush to release the pump from the Charger. BodyGuard Operator Manual 9
10 1-Introduction System Safety Checks The following details outline the safety checks designed into the BodyGuard infusion system, to minimize the possibility of under or over infusions. Free Flow rotection The system s customized IV lines are equipped with a check valve that prevents free flow towards the patient when the IV line is not attached to the pump. In addition, the valve serves as an anti sipohn valve, preventing fluids from going from the patient to the tubing. When the pump is attached to the IV line and delivering fluid, the pressure delivered by the pump opens the valve. Air-in-Line Accumulation To improve the detection of air in the IV line, the BodyGuard 323 Infusion system utilizes an air-in-line accumulation system in addition to the standard single bubble detection. This feature monitors the volume of air that passes through the IV line by accumulating the volume of individual bubbles over any 15 minutes period. This limit is not configurable. Although an individual bubble may not exceed the preprogrammed threshold, if the cumulative volume of smaller bubbles exceeds 1ml over a period of 15 minutes an air-in-line alarm is initiated. This accumulation feature is particularly useful with infusions for patients who are highly sensitive to air (i.e. infants, neonates, children) or when infusing products that create significant volumes of small air bubbles. BodyGuard Operator Manual 10

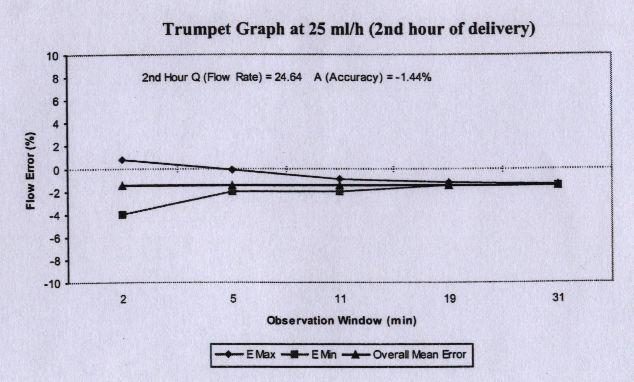
11 1-Introduction ump Accuracy The following graphs and curves were derived from testing described in IEC Testing was performed under normal conditions at room temperature (72 0 F). Any deviations from normal conditions and room temperature may cause changes in the accuracy of the pump. Start-up Curves The Start-up curves represent continuous flow versus operating time for two hours from the start of the infusion. They exhibit the delay in onset of delivery due to mechanical compliance and provide a visual representation of uniformity. Trumpet curves are derived from the second hour of this data. Tests performed according to IEC standard. Trumpet and Flow Rate With the BodyGuard, as with all infusion systems, the action of the pumping mechanism and variations cause short term fluctuations in rate accuracy. The following curves show typical performance of the system in two ways: 1. The accuracy of fluid delivery over various time periods is measured (trumpet curves). 2. The delay in onset of fluid flow when infusion commences (start up curves). Trumpet curves are named for their characteristic shape. They display discrete data averaged over particular time periods or Observation windows, not continuous data versus operating time. Over long observation windows, short-term fluctuation has little effect on accuracy as represented by the flat part of the curve. As the observation window is reduced, short-term fluctuations have greater effects as represented by the mouth of the trumpet. BodyGuard Operator Manual 11


12 1-Introduction Knowledge of system accuracy over various observation windows may be of interest when certain drugs are being administered. Short-term fluctuations in rate accuracy may have clinical impact depending on the shelf life of the drug being infused and the degree of inter-vascular integration. The clinical effect cannot be determined from the trumpet curves alone. BodyGuard Operator Manual 12

13 1-Introduction BodyGuard Operator Manual 13

14 1-Introduction BodyGuard Operator Manual 14
15 2-Symbols, Warnings and Cautions 2 Symbols, Warnings and Cautions System Symbols The following symbols are used on the BodyGuard Infusion System and components. Labels on the system or statements in this manual proceeded by any of the following words and/or symbols are of special significance and are intended to help you to operate the pump in a safe and successful manner. Attention, consult accompanying Instructions CSA mark 0473 CE mark indicates conformance to Medical Device Directive 93/42/EEC The use of single-use disposable components on more than one patient is a biological hazard. Do not reuse single-use disposable components. Type CF applied part Date of Manufacture Serial Number Expiry Date of disposable LOT STERILE EO Lot Number Sterilized with Ethylene Oxide BodyGuard Operator Manual 15
16 2-Symbols, Warnings and Cautions Terms Used In Manual Warning: Indicates that the information is a warning. Warnings advise you of circumstances that could result in injury or death to the patient or operator. Read and understand this manual and all warnings completely before operating the BodyGuard Infusion System. Caution: Indicates that the information is a caution. Cautions advise you of circumstances that could result in damage to the device. Read and understand this manual and all cautions completely before operating the BodyGuard Infusion System. NOTE: Indicates that the information that follows is additional important information or a tip that will help you operating the BodyGuard Infusion System. Intended Use The BodyGuard infusion ump system is designed for infusion of medications or fluids requiring continuous or intermittent delivery at precisely-controlled infusion rates through clinically acceptable routes of administration, including intravenous, subcutaneous, percutaneous, intra-arterial, epidural, enteral, in close proximity to nerves, and into an intraoperative site (soft tissue/body cavity/surgical wound site). The system is intended for patients who require maintenance medications, analgesics, CA therapy, parenteral and enteral nutrition fluids, chemotherapeutic agents and general fluids therapy in hospital and home care environments. Warnings To avoid possible personal injury or loss of life, observe the following: Read the entire Operation s Manual before using the pump, since the text includes important precautions. The maximum volume that may be infused under SINGLE FAULT CONDITION is 0.1 ml. Voltage present on internal components may cause severe shock or death upon contact. Disconnect the charger from AC power prior to opening the casing. Only authorized service personnel should open the pump cover. Blown fuses could cause a fire hazard. Replace blown fuses on the charger only with fuses of the same type and rating (see fuse values on the charger CB). The equipment is not suitable for use in the presence of flammable anestheticair/oxygen/nitrous oxide mixture. Do not use the system in the presence of these gases. Make sure the pump is attached securely to the charger, which is connected snugly to an IV pole. A kinked or occluded IV line may impair the operation of the pump and the accuracy of the infusion. Before operation, verify that the IV line is not kinked or occluded. BodyGuard Operator Manual 16
17 2-Symbols, Warnings and Cautions The BodyGuard should be operated only with BodyGuard tubing sets. Use of administration sets other than manufacturer-produced BodyGuard tubing set may impair the operation of the pump and the accuracy of an infusion. Drugs must not be administered to the epidural space unless the drugs are indicated for this purpose and are administered in accordance with the indications included in the manufacturer s package insert accompanying the drugs. Epidural administration of drugs other than those indicated for epidural use could result in serious injury to the patient. Any adjustments, maintenance, or repair of the uncovered pump may impair the operation of the BodyGuard Infusion System and/or the accuracy of the infusion. Only CME authorized technicians should perform any adjustments, maintenance, or repair of the uncovered pump. Any adjustments, maintenance, or repair of the uncovered pump while connected to the power should be avoided. The BodyGuard Infusion System should be operated within a temperature range of 15 C (50 F) to 45 C (115 F) and at up to 85% humidity. Operating the pump at temperatures and/or humidity other than within this range may affect accuracy. Unsafe operation may result from using improper accessories. Use only accessories and options designed for this system and supplied by manufacturer. The BodyGuard tubing sets should not be use for blood, blood products or nitroglycerin administration. Battery charging is enabled as long as the charger cord is connected to AC power and the pump is in the charger. Switching the pump off does not disconnect it from AC power. To disconnect from AC power, remove the charger cord from AC power. To disconnect pump from AC power, remove it from the charger. Dropping the BodyGuard Infusion System could cause damage to components. If the pump is dropped, return the pump for inspection by qualified service personnel. Use aseptic technique. atient infection may result from the use of non-sterile components. Maintain sterility of all disposable components and do not re-use single use IV sets. When operating the pump in CA mode with a rate of 0.0 ml/hr there is a hazard of blood clot formation. Connect saline infusion in parallel to avoid this problem. Do not operate the pump near high-energy radio-frequency emitting equipment, such as electro-surgical cauterizing equipment. False alarm signals may occur. Watch your fingers / nails when opening and closing the pump door. BodyGuard Operator Manual 17
18 2-Symbols, Warnings and Cautions Cautions To avoid possible damage to the equipment, observe the following: Leaving the battery in a discharged state for a long period of time may damage the battery. Connect the pump to the AC power via the charger whenever possible to recharge the battery. Do not store the pump with the battery fully depleted. Xylene, acetone or similar solvents could cause damage to components. Do not clean the pump with these chemicals. Clean solution spills on the pump immediately. Use a damp cloth or sponge. A mild detergent may be used. Wipe thoroughly with a dry cloth. Immersing the BodyGuard Infusion pump into liquid could cause damage to components. Do not immerse the pump into any type of liquid. Battery damage could occur if left in a temperature warmer than 50 0 C. Notes Boluses will be infused up to the full volume that is requested unless the user stops the bolus manually by pressing. This is true even when the volume infused is less than the specified Hour Limit for Volume (e.g. 4 Hr Limit) at the beginning of a bolus and goes over the limit during the bolus. In CA program the pump will not enter KVO mode even if the limit volume was exceeded. The pump is programmed to complete the bolus and than enter KVO. Before starting a program verify that the battery is charged by verifying that the battery led is green and the battery indicator is full. While charging the battery always verify that the battery led is on (red or green). BodyGuard Operator Manual 18
19 3- Installation and Set up 3 Installation and Set up Unpacking 1. Carefully remove the pump and Charger from the box. 2. Make sure no items were damaged during shipment 3. Make sure you have the following items: BodyGuard Infusion ump Charging Cradle with ower Cord or Battery Charging Cable Rechargeable Battery ack Operation Manual Disposable Battery ack (optional) CA bolus cable (optional) 9V Battery compartment (optional) Extended life L-Ion battery (optional) External battery charger (optional) If any items are missing or damaged, contact your BodyGuard supplier. BodyGuard Operator Manual 19

20 3- Installation and Set up Charging the ump NOTE: The pump is protected against overcharging. In order to keep your battery fully charged, connect the pump to the mains via the Charger whenever possible. Be sure that the battery is fully charged at all times. Warning: If the battery is removed during operation while pump is not connected to a charger connected to mains, the pump will turn off. 1. Connect the charger unit to AC power and verify that the AC indicator is lit. 2. ut the pump into the charger (top first) until it clicks into place.. 3. The battery is charging when the red battery LED on the front of the charger is lit. The battery is fully charged when the battery LED symbol turns green. 4. Remove the pump from the charger by pressing the release button (located next to the LED indicators on the charger) and lift the pump out of the charger bottom first. Caution: Leaving the battery discharged for a long period of time may damage the battery. BodyGuard Operator Manual 20
21 4 - Operation 4 Operation Before Operating the ump Before attaching the system to a patient, run the following tests to verify that all indicators and alarms work properly. When an alarm is activated the following occurs: An alarm message appears on the display An audible alarm sounds Infusion ceases The LED changes from green to red NOTE: All tests should be performed in the Continuous program. ump Operation Test 1. Click the pump into a Charger connected to AC power. Verify that the CHARGE indicator is on (on charger). 2. Insert a BodySet/MicroSet administration set and close the door. ress the door until a click is heard. NOTE: For instructions on how to load and prime an administration set refer to sections Loading the Administration Set & riming the Line. 3. ress until the Self-Test screen appears. If air sensor is off, press to confirm. 4. The program selected and its status are displayed. During the Self-Test a long beep will be heard. This procedure verifies that the pump s acoustic and visual features are working properly. After self test is completed, the display will show the last rate setting. 5. ress to prime the IV line. Warning: Ensure the set is not connected to a patient!! RIME Disconnect atient ress OK to Start 6. Enter the Volume of fluid required to prime the set and press to begin priming procedure. You may stop priming at any time by pressing. rime Vol ml ress OK to Continue 7. The display screen will show a graph indicating the prime operation. RIME 5 ml 0 5 BodyGuard Operator Manual 21
22 4 - Operation 8. When priming is completed, wait 2 minutes without pressing any key. After two minutes the screen displays ump Unattended and an alarm will sound. ress to ump Unattended ress OK to Start silence the alarm again or to exit alarm condition. Air in Line Alarm Test 1. Insert a BodySet administration set and close the door. ress the door until a click is heard. NOTE: For instructions on how to load and prime an administration set refer to sections Loading the Administration Set & riming the Line. 2. ress until the Self-Test Screen appears. If air sensor is off, press to confirm. lease contact your technician in order to enable the air sensor if disabled with no need. 3. The pump displays the program selected and its status. The display will automatically change to display the last rate setting. 4. Change the infusion mode to Continuous (See Change Set up Section for instructions). Set the infusion rate at 500ml/hr, using the Numeric keypad and press confirm setting. to Rate 500 ml/h ress OK to Continue 5. Set Volume at 20 ml and press to start operation. Volume 20 ml/h ress OK to Continue 6. Allow an air bubble greater than 10 mm to enter into the administration set. 7. Air in line alarm will be activated as soon as the air bubble enters the set segment located behind the pump door. ress to turn the alarm off. Down Occlusion Alarm Test 1. Insert a BodySet administration set and close the door. ress the door until a click is heard. 2. Make sure room temperature is o C Air /Up Occlusion ress STO to Mute NOTE: For instructions on how to load and prime an administration set refer to sections Loading the Administration Set & riming the Line. 3. ress until the Self-Test screen appears. If air sensor is off, press to confirm. lease contact your technician in order to enable the air sensor if disabled with no need. 4. The pump displays the program selected and its status. The display will automatically change to display the last rate setting. 5. Change the infusion mode to Continuous (See Change Set up Section for instructions). Set the infusion rate at 500 ml/hr using the Numeric keypad and press. Rate 500 ml/h ress OK to Continue BodyGuard Operator Manual 22
23 4 - Operation 6. Set Volume at 20 ml and press to start operation. Volume 20 ml ress OK to Continue 7. Wait 5 minutes and than connect a pressure gauge at a distance of 1 meter from the exit of the pump. lace both the pump and the pressure gauge at the same level (on a table) 8. Wait another 5 minutes and occlude the IV line downstream of the pump (between the pump and the pressure gauge). 9. The Down Occlusion alarm occurs at the time and rates listed below (time is measured from actual occlusion time to alarm, with accuracy of +30% -20%): 500 ml/h up to 20 seconds 60 ml/hr up to 1 minute 1 ml/hr up to 80 minutes 0.1 ml/hr up to 11 hours NOTE: The pressure threshold can be changed to suit patient need (refer to section on changing the current default ressure Limit). 10. Depending upon the set flow rate and pressure threshold, the Down Occlusion alarm will be activated. Down Occlusion ress STO to Mute 11. ress to mute the alarm. Door Open Alarm Test 1. Insert a BodySet into the pump and close the door. ress the door until a click is heard. NOTE: For instructions on how to load and prime an administration set refer to sections Loading the Administration Set & riming the Line. 2. ress until the Self-Test screen appears. If air sensor is off, press to confirm. lease contact your technician in order to enable the air sensor if disabled with no need. 3. The pump displays the program selected and its status. The display will automatically change to display the last rate setting. 4. Change the infusion mode to Continuous (See Change Set up Section for instructions). Set the infusion rate at 500ml/hr using the Numeric keypad and press. 5. Set Volume at 20 ml press to start operation. 6. Open the pump door. 7. Door Open alarm will be activated at once. Rate Volume Door Open Close Door 500 ml/h ress OK to Continue 20 ml ress OK to Continue 8. Close the door and press. BodyGuard Operator Manual 23
24 4 - Operation Battery Test 1. Insert a BodySet /Microset administration set into the pump. ress the door until a click is heard. NOTE: For instructions on how to load and prime an administration set refer to sections Loading the Administration Set & riming the Line. 2. Take the pump out of the charger. 3. ress until the Self-Test screen appears. If air sensor is off, press to confirm. lease contact your technician in order to enable the air sensor if disabled with no need. 4. The pump displays the program selected and its status. The display will automatically change to display the last rate setting. 5. Change the infusion mode to Continuous (See Change Set up Section for instructions). Set the infusion rate at 1200 ml/hr using the Numeric keypad and press. 6. Set Volume at 9999 ml and press to start operation. 7. Wait untill pump displays low battery message Rate 1200 ml/h ress OK to Continue Volume 9999 ml ress OK to Continue Low Battery Connect to Charger 8. ress to turn the pump off. 9. Connect the pump to a charger. 10. Verify the red icon of battery is lit (on the charger). 11. Verify the red battery turns green after a minimum of 2 hours. Charger Indicator Test 1. Click the pump into the charger and connect the Charger to mains. Disconnect the power cord from the AC power outlet. 2. Verify that the CHARGE indicator is OFF. 3. Connect the power cord to the AC power outlet. Verify that the CHARGE indicator is ON. BodyGuard Operator Manual 24
25 4 - Operation Dedicated BodyGuard Administration Sets The BodyGuard Infusion System should be operated only with BodySet or MicroSet dedicated Infusion sets. Warning: Do not operate the BodyGuard Infusion System with any administration set, other than the BodySet / MicroSet. The BodySet / MicroSet Infusion Sets are equipped with a free flow protection valve, to prevent a gravity free flow hazard. Using a different set may essentially change the delivering rate and expose the patient to a free flow rate. Warning: Using the pump with air in line detector off may cause an embolism resulting death or paralysis. Switching the air detector off is not recommended and should be used only when absolutely necessary. lease contact your technician in order to enable the air sensor if disabled with no need. When Air Sensor is OFF Use administration set with Hydrophobic filter (which expels air from the administration set). The use of any other set can cause severe danger to patient and is strictly forbidden. The BodyValve The Anti-Free Flow valve, BodyValve, enhances pump functioning by: reventing free-flow in the event the set is detached from the pump. reventing back-flow (reflux) in the event several infusion pumps are connected simultaneously to the same patient. reventing free-flow in the event of a mechanical malfunction. reventing pump operation if the set has been loaded incorrectly. Warning: Replace the administration set every 24 hours to lessen the incidence of bacteria formation. Warning: Disposables must be compatible with the medicine delivered. Warning: atient or operator injury may result if package is opened or damaged, or if damaged components are used. Visually inspect contents and package before each use. Warning: Air embolization can cause death or serious injury to the patient. Do not connect a patient to the BodyGuard Infusion ump until all trapped air has been cleared from the fluid path. Carefully read the instructions for loading. uncturing set components may cause air embolism. Warning: Drugs must not be administered to the epidural space unless the drugs are indicated for this purpose and are administered in accordance with the indications included in the manufacture s package insert accompanying the drugs. Epidural administration of drugs other than those indicated for epidural use could result in serious injury to the patient. Warning: For epidural administration of drugs use MicroSet only. Caution: Component damage may occur if not installed properly. Assure all connections are secure; do not overtighten. This will help minimize leaks, disconnection and component damage. BodyGuard Operator Manual 25

26 4 - Operation The BodySet Macrobore # Area Function 1 Luer Female Cap Keeps the set sterile 2 Luer Female Connects the administration set to solution bag 3. Slide Clamp Can be used to occlude the tube 4. Key Locates the tube in the correct flow direction 5. Administration Tubing VC 3 x 4.1 mm. Transfers the solution 6. Y Connector Used to add drugs by syringe 7. BodyValve With Cap Anti free-flow valve 8. Valve Cap Keeps the set sterile BodyGuard Operator Manual 26
27 4 - Operation BodySet with Drip Chamber # Area Function 1 Spike With Cap Connects the administration set to solution bag 2 Drip Chamber Displays infused drops from the administration bag to the patient 3. Slide Clamp Can be used to occlude the tube 4. Key Locates the tube in the correct flow direction 5. Administration Tubing 3 x 4.1 mm Transfers the solution 6. Y Connector Used to add drugs by syringe 7. BodyValve With Cap Anti free-flow valve The set can be configured with our without the Y connector. BodyGuard Operator Manual 27

28 4 - Operation The BodySet Microbore # Area Function 1 BodySet Spike Connects the administration set to solution bag 2 Spike Cap Keeps the set sterile 3. Administration Tubing 1.5 x 3 mm Transfers the solution 4. Slide Clamp Can be used to occlude the tube 5. Administration Tubing 3 x 4.1 mm umping segment 6. Key Locates the tube in the correct flow direction 7. BodyValve Anti free- flow valve 8. Valve Cap Keeps the set sterile BodyGuard Operator Manual 28

29 4 - Operation Loading the Administration Set NOTE: Follow the instructions supplied with the individual administration set. Warning: Use of any administration set, other than the BodySet/MicroSet, may impair the operation of the pump and the accuracy of the Infusion. 1. Lift the door latch (on the right side of the door) to open the BodyGuard pump door and remove the administration set from the sterile packaging leaving the end caps on the line. Connect the line to the medication bag. 2. Hold the section of tubing with the key (small plastic block) and make sure the flow direction is in line with the flow direction arrows inside the pump door. 3. Insert the IV tubing into the pump by placing the key into the keyway as shown by the arrow in diagram 1. Insert the tubing from left to right, and avoid stretching or pulling the tubing. Check that the key located on the tube is located in its correct position in the tubing guide. NOTE: The IV key can only be fitted into the key space one way. If you are having trouble fitting it do not force it in. Try to turn the line around to ensure you have correctly lined up with the direction of flow. 4. Ensure that the distal flow valve is on the right hand side of the pump. 5. Close the pump door until the catch clicks. NOTE: Ensure that the tubing is inserted completely into the pumping channel. Warning: Use aseptic technique. atient infection may result from the use of non-sterile components. Maintain sterility of all disposable components and use only once single use consumables marked. BodyGuard Operator Manual 29
30 4 - Operation riming the Line NOTE: The BodySet administration set contains a one-way check valve. Therefore, the lines cannot be primed using gravity and must be primed using the BodyGuard pump priming function. When manual priming is required, use an administration set with a special manual priming valve. rime function is used: 1. Before starting a program 2. After air in line alarm Warning: Always disconnect IV tubing from patient before starting priming procedure. NOTE: The default priming flow rate is 600 ml/hr. During priming, the air in line alarm is disabled. rime In Continuous, Intermittent, TN & 25 Steps Modes NOTE: Access to the priming procedure in CA mode is different from all other programs. For detailed instructions, refer to CA Operation section. Warning: Using the pump with air in line detector off may cause an embolism resulting death or paralysis. Switching the air detector off is not recommended and should be used only when absolutely necessary. lease contact your technician in order to enable the air sensor if disabled with no need. When Air Sensor is OFF Use administration set with Hydrophobic filter (which expels air from the administration set). The use of any other set can cause severe danger to patient and is strictly forbidden. 1. Turn on the BodyGuard ump, by pressing until the Self-Test screen appears. If air sensor is off, press to confirm. 2. When the display screen shows the existing programmed rate press once. RIME Disconnect atient ress OK to Start Warning: Ensure the set is not connected to the patient!! 3. Enter the Volume of fluid required to prime the set and press to begin priming procedure. You may stop priming rime Vol ml ress OK to continue at any time by pressing. 4. The display screen will show a graph indicating the prime operation. RIME 5 ml Once the priming is completed, the display will change back to the previous screen the pump was in before priming. If more priming is needed, repeat procedure. 6. Make sure that all air is removed from the IV line before connecting to the patient. BodyGuard Operator Manual 30
31 4 - Operation rime In CA Mode 1. Turn on the BodyGuard ump, by pressing until the Self-Test screen appears. If air sensor is off, press to confirm. Warning: Using the pump with air in line detector off may cause an embolism resulting death or paralysis. Switching the air detector off is not recommended and should be used only when absolutely necessary. lease contact your technician in order to enable the air sensor if disabled with no need. When Air Sensor is OFF Use administration set with Hydrophobic filter (which expels air from the administration set). The use of any other set can cause severe danger to patient and is strictly forbidden. 2. When the CA menu displays, select rime and press to confirm. 3. ress OK to program priming procedure. C A rime rogram infusion Clinician Bolus rime Disconnect patient ress OK to Start Warning: Ensure the set is not connected to the patient!! 4. Enter the volume to prime the set and press to begin priming procedure. You may stop priming at any time by pressing. rime Vol ml ress OK to continue 5. The display screen will show a graph indicating the prime operation. rime 5 ml Once the priming is completed, the display will change back to the previous screen the pump was in before priming. If more priming is needed, repeat procedure. Make sure that all air is removed from the IV line before connecting to the patient. BodyGuard Operator Manual 31
32 4 - Operation rime Operation After Air In Line Alarm 1. ress to mute the alarm. 2. Disconnect IV tubing from patient. 3. ress once. rime Disconnect patient ress OK to Start Warning: Ensure the set is not connected to the patient!! 4. Enter the volume to prime the set and press to begin priming procedure. You may stop priming at any time by pressing. rime Vol ml ress OK to Continue 5. The display screen will show a graph indicating the prime operation. RIME 4 ml When priming is completed make certain that all air is removed from the IV line. 7. Connect IV line to the patient and press to resume program. BodyGuard Operator Manual 32
33 4 - Operation Operation steps The following are the steps for starting the infusion procedure. For detailed instructions regarding each step, refer to the relevant sections in the Operation chapter. ump Mounted on IV ole 1. Connect the Bodyset/MicroSet to the medication bag. Mount the bag on an IV pole. 2. Click the pump into the Charger. Mount the Charger on an IV pole. 3. Connect the Charger via a standard power cord to a grounded AC outlet. 4. Open the door of the pump and load the administration set into the pump s tubing guide. 5. Turn on the BodyGuard ump, by pressing until the Self-Test screen appears. Warning: Using the pump with air in line detector off may cause an embolism resulting death or paralysis. Switching the air detector off is not recommended and should be used only when absolutely necessary. lease contact your technician in order to enable the air sensor if disabled with no need. When Air Sensor is OFF Use administration set with Hydrophobic filter (which expels air from the administration set). The use of any other set can cause severe danger to patient and is strictly forbidden. 6. The program and status will appear on the display followed by the last rate setting. 7. rime the administration set. Warning: Make sure patient is not connected to the pump during priming!! 8. Set the required program and continue as described for every program setting. Warning: Verify that infusion is proceeding normally before leaving the pump unattended. ortable Connection 1. Connect the Bodyset/MicroSet to the medication bag. 2. Open the door of the pump and load the administration set into the pump s tubing guide. 3. Turn on the BodyGuard ump, by pressing until the Self-Test screen appears. Warning: Using the pump with air in line detector off may cause an embolism resulting death or paralysis. Switching the air detector off is not recommended and should be used only when absolutely necessary. lease contact your technician in order to enable the air sensor if disabled with no need. When Air Sensor is OFF Use administration set with Hydrophobic filter (which expels air from the administration set). The use of any other set can cause severe danger to patient and is strictly forbidden. 4. rime the administration set. Warning: Make sure patient is not connected to the pump during priming!! 5. Set the required program and continue as described for every program setting. Warning: Verify that infusion is proceeding normally before inserting the bag and pump into the carrying bag. BodyGuard Operator Manual 33
34 4 - Operation rogramming The BodyGuard infusion System features five different programming options: Continuous rogram Rate: 0.1 to 100 ml/hr in 0.1 ml increments, and 100 to 1200 ml/hr in 1 ml increments Total Volume to be Infused: 0.1 to 9999 ml rogram as Rate Over Volume or Volume Over Time Secondary Infusion (iggy) Rate: 0.1 to 100 ml/hr in 0.1 ml increments, and 100 to 1200 ml/hr in 1 ml increments Secondary Infusion (iggy) Volume: 0.1 to 9999 ml Intermittent rogram Used for setting a dose protocol at set intervals from 0.1 to 100 ml/hr in 0.1 ml increments, and 100 to 1200 ml/hr in 1 ml increments Volume: 0.1 to 9999 ml Interval Time: 0:01 minute to 20:00 hours 25 Steps rogram Used for setting specific protocol that contains up to 25 steps Rate: 0.1 to 100 ml/hr in 0.1 ml increments, and 100 to 1200 ml/hr in 1 ml increments Volume: 0.1 to 9999 ml for each step Accumulated volume for all steps is up to ten liters TN rogram Used for Total arenteral Nutrition Volume: 1 to 9999 ml The program has a taper up/taper down pattern. The parameters to be set are: Total Volume, Time Up, Time Down and Total Time. The pump will calculate the ramping infusion rates. CA rogram Used for CA applications. Combines basal rate and pre-programmed boluses Rate: 0.0 to 100 ml/hr in 0.1 ml increments Volume: 0.1 to 1000 ml Bolus Volume: 0 to 25 ml Bolus Rate: 0.1 to 100 ml/hr in 0.1 ml increments, and 100 to 1200 ml/hr in 1 ml increments Clinician Bolus Volume: ml Keep Vein Open Mode The BodyGuard Infusion System uses a Keep Vein Open (KVO) mode that can run at the end of every program, if desired. KVO also runs during a delay before an Intermittent program and during Interval Time in the Intermittent program. The KVO rate can be set from 0.1 to 5 ml/hr. If the programmed infusion rate is lower than the KVO rate, the KVO will run at the programmed infusion rate. KVO during End rogram is limited to a volume of 5 ml. NOTE: To use the automatic KVO at the end of a protocol, make sure that the IV bag contains overfill beyond the volume to be infused. End rogram When a protocol has completed, an audible alarm will beep 4 times. To stop the alarm and enter a new program, press. If the stop key is not pressed before the 4 beep have concluded, KVO will begin when it is programmed to do so. BodyGuard Operator Manual 34
35 4 - Operation Changing Current rogram Using Level 1 Code 1. Turn on the BodyGuard ump, by pressing until the Self-Test screen appears. Warning: Using the pump with air in line detector off may cause an embolism resulting death or paralysis. Switching the air detector off is not recommended and should be used only when absolutely necessary. lease contact your technician in order to enable the air sensor if disabled with no need. When Air Sensor is OFF Use administration set with Hydrophobic filter (which expels air from the administration set). The use of any other set can cause severe danger to patient and is strictly forbidden. 2. When a programming screen or infusion summary is displayed, press twice. 3. Scroll to "Change Set up" option. ress. 4. Scroll to "More " and press. 5. Enter Change Set up Level 1 code, using the numeric keyboard and press. 6. Scroll down to "Select rogram" option and press. 7. Scroll to the required program and press. Volume Infused Review Set up Change Set up Buzzer Level More Change Set up: Code Technician XXX ressure Default Select rogram riming Rate Select rogram: CONTINUOUS TN 8. Scroll to "Restart ump" and ress to restart the pump. NOTE: The selected program will remain in the pump s memory until changed by the operator. Changing Current rogram Short Way History art umprest ressure Default 1. Turn on the BodyGuard ump by pressing until the Self-Test screen appears. If air sensor is OFF, press to confirm. Warning: Using the pump with air in line detector off may cause an embolism resulting death or paralysis. Switching the air detector off is not recommended and should be used only when absolutely necessary. lease contact your technician in order to enable the air sensor if disabled with no need. When Air Sensor is OFF Use administration set with Hydrophobic filter (which expels air from the administration set). The use of any other set can cause severe danger to patient and is strictly forbidden. 2. Once the Self-Test is completed, immediately press and hold for two seconds. Select rogram: 3. Scroll to the required program and press. NOTE: CONTINUOUS If the current selected program is CA, the Short Cut option is not available. TN BodyGuard Operator Manual 35
36 4-Operation Continuous Infusion Continuous Infusion Rate Over Volume 1. Turn the pump ON by pressing and holding the until the Self-Test screen appears. Warning: Using the pump with air in line detector off may cause an embolism resulting death or paralysis. Switching the air detector off is not recommended and should be used only when absolutely necessary. lease contact your technician in order to enable the air sensor if disabled with no need. When Air Sensor is OFF Use administration set with Hydrophobic filter (which expels air from the administration set). The use of any other set can cause severe danger to patient and is strictly forbidden. 2. ump displays program name and status. The status is either "rogram" or "Locked" (for instruction regarding locking and unlocking the pump refer to Lock Mode section). When unlocked, press display.. Wait for the rate screen to NOTE: When pump is in rogram mode, all parameters can be adjusted. When pump is in lock out mode, parameters can be viewed, but cannot be changed. NOTE: If pump is not in Continuous rogram, refer to changing program section for instructions. NOTE: Whenever you decide to set a new program, follow instructions at the bottom of screen. NOTE: The screen will be blank upon initial setup. When returning to a program, the screen will display the last set program. C O N T C O N T Continuous rogram ress NO to Change Continuous LOCKED or 3. Rate Screen Do one of the following: ress to confirm the existing parameters. Rate ml/hr ress OK to continue Enter the desired Rate and press. 4. Volume Screen Do one of the following: ress to confirm the existing parameters. Volume ml/hr ress OK to continue Enter the desired Volume and press. 5. Accumulation Screen Do one of the following: ress start infusion. to confirm the existing parameters and C O N T Rate 25 ml/h Volume 200 ml ress OK to Start ress to go back to Rate screen. BodyGuard Operator Manual 36
37 4-Operation Continuous Infusion 6. ress to Start Infusion. C O N T Start Infusion? 7. During program operation, the pump displays the rate in which the program is operating. C O N T Rate 25 ml/h NOTE: If one of the values is changed during the programming mode, the pump will not recall the new value unless changes are confirmed by pressing. NOTE: If prime procedure is activated during data setting, the pump will return to the original (previous) screen once priming is completed. Rate Titration The pump allows rate titration during the Rate Over Volume rogram. To change the rate during the infusion: 1. Use numeric keypad to enter the new desired rate during operation and press within five seconds. The pump will briefly alarm and the infusion will resume at the adjusted rate. Rate 250 ml/h Adjust & ress OK NOTE: If the rate change is not confirmed within ten seconds, the pump will continue operation at the original rate and the display will return to the previous setting. 2. To stop the infusion press. To change the rate while in Stop mode: 1. ress any number on the keypad twice to return to the rate screen. 2. Adjust the rate and press. 3. Adjust the volume and press three times to restart infusion. NOTE: During programming you may backspace by using : ressing ressing ressing once clears the last entered digit. again clears the next number. when the value is empty displays the original value or the previous screen. BodyGuard Operator Manual 37
38 4-Operation Continuous Infusion Volume Over Time NOTE: Before operating the pump in Volume Over Time, make sure that you are in the Continuous rogram and that the IV bag contains an additional 5 ml of volume to be infused. This ensures adequate volume for KVO during End rogram. To set Volume Over Time, enable the time function by following the steps below: 1. ress twice. 2. Scroll to "Change Set up" option. ress. 3. Scroll to "More " and press. 4. Enter Change Set up Level 1 code, using the numeric keyboard and press. 5. Scroll to "Time Option" option. ress. Volume Infused Review Set up Change Set up Buzzer Level More Change Set up: Code Technician XXX Operation LED Time Option Delay Before Start 6. ress or, to turn Time Option ON. 7. ress twice. Warning: Using the pump with air in line detector off may cause an embolism resulting death or paralysis. Switching the air detector off is not recommended and should be used only when absolutely necessary. lease contact your technician in order to enable the air sensor if disabled with no need. When Air Sensor is OFF Use administration set with Hydrophobic filter (which expels air from the administration set). The use of any other set can cause severe danger to patient and is strictly forbidden. 8. Volume Screen Do one of the following: ress to confirm the existing parameters. Enter the desired volume using the numeric keypad and Bag Vol: 250 ml ress OK to Continue press. NOTE: The screen will be blank upon initial setup. 9. Infusion Time Screen Enter the desired total time using the numeric keypad (for example enter for two hours) and press. NOTE: First two digits represent hours and last two digits represent minutes. Total Time 02:00 ress OK to Continue BodyGuard Operator Manual 38
39 4-Operation Continuous Infusion 10. Rate Screen The pump calculates the rate based on the time and volume entered, and displays the rate on the screen. Do one of the following: ress ress to confirm the existing parameters. to go back to volume setting screen. C O N T Rate 125 ml/h ress OK to Continue Volume 250 ml Time 2:00 Rate 125ml /h ress OK to Start 11. During program operation, pump displays the rate at which the program is operating. NOTE: If one of the values is changed during the programming mode, the pump will not recall the new value unless changes are confirmed by pressing. NOTE: If prime procedure is activated during data setting, the pump will return to the original (previous) screen once priming is completed. NOTE: When required to stop infusion, press. Stop will be displayed on the screen. Stop mode is limited for two minutes. After two minutes, alarm will sound. ress to mute or to exit alarm condition. Resume or Repeat Infusion Unlocked When the pump is restarted in Continuous mode and is not locked, the pump will allow the user to confirm each of the parameters of the infusion. The Volume will be adjusted for the amount infused prior to turning off the pump. To reset the volume, use the numeric keypad to enter new volume. Locked 1. When the pump is turned OFF in the middle of an infusion, this screen will appear when the pump is turned back ON. 2. Do one of the following: C O N T Resume ress OK Repeat ress NO Resume: To resume this program exactly where it stopped, press screen is displayed. The volume remaining will be infused.. The accumulation Repeat: To restart the program at the beginning and or to set new parameters, press and follow the instructions on the pump BodyGuard Operator Manual 39
40 4-Operation Continuous Infusion Secondary Infusion (IGGY) During Continuous Operation To perform a secondary infusion during Continuous operation, complete the following steps. 1. ress once. 2. Enter Secondary Infusion Rate and press. 3. Enter Secondary Infusion Volume and press. I G Y I G Y Secondary Infusion iggy Rate ress OK key Secondary Infusion iggy Vol. ress OK to Start 0 ml/h ml 4. ump will beep once and resume the rimary Infusion when the Secondary Infusion is completed. NOTE: User can stop the Secondary Infusion at any time by pressing and turning the pump off. When the pump is turned back on, the pump will resume the rimary Infusion. NOTE: User can titrate the Secondary Infusion with the same method that is used for a primary continuous infusion. BodyGuard Operator Manual 40
41 4-Operation Intermittent Infusion Intermittent Infusion The Intermittent Infusion program is a special program which enables the design of a dose delivery protocol at set intervals. Each dose is given at a set time. The pump will Keep Vein Open between the doses. The infusion program continues until the total volume to be infused is delivered. Rate Over Volume 1. Turn the pump ON by pressing and holding the until the Self-Test screen appears. Warning: Using the pump with air in line detector off may cause an embolism resulting death or paralysis. Switching the air detector off is not recommended and should be used only when absolutely necessary. lease contact your technician in order to enable the air sensor if disabled with no need. When Air Sensor is OFF Use administration set with Hydrophobic filter (which expels air from the administration set). The use of any other set can cause severe danger to patient and is strictly forbidden. 2. ump displays program name and status. The status is either "rogram" or "Locked" (for instruction regarding locking and unlocking the pump refer to lock mode section). If pump is unocked, the Bag Volume screen will display after 2 seconds. I N T R I N T R Intermittent rogram ress NO to Change Intermittent LOCKED or NOTE: When pump is in rogram mode all parameters can be adjusted; When pump is in lock out mode, parameters can be viewed, but cannot be changed. NOTE: If pump is not already in Intermittent rogram, refer to Changing rogram section for instructions. NOTE: Whenever you decide to set a new program, follow instructions at the bottom of screen. NOTE: The screen will be blank upon initial setup. When returning to a program, the screen will display the last set program. 3. Bag Volume Screen Do one of the following: ress to confirm the existing parameters. Bag Vol: ml ress OK to Continue Enter the Bag Volume and press. 4. Dose Volume Screen Do one of the following: ress to confirm the existing parameters. Enter the Dose Volume and press. 5. Dose Rate Screen Do one of the following: ress to confirm the existing parameters Dose Vol: ml ress OK to Continue Dose Rate: ml/h ress OK to Continue Enter the Dose Rate and press. BodyGuard Operator Manual 41
42 4-Operation Intermittent Infusion 6. Interval Time Screen Do one of the following: ress to confirm the existing parameters Enter the time between the start of each dose and press Interval Time: : ress OK to Continue. NOTE: interval time is calculated from bolus start to next bolus start. 7. KVO Rate Screen Do one of the following: ress to confirm the existing parameters Enter the desired KVO rate (from 0.1 to 5 ml/h) and press KVO Rate: ml/h ress OK to Continue 8. Accumulation Screen Do one of the following: ress start infusion.. to confirm the existing parameters and I N T R Dose Rate 200 ml/h Dose Vol: 200 ml/h Interval 1:00 ress OK to Start ress to go back and adjust program parameters. 9. NOTE: If pump is in Delay Mode, enter Start Time (24 Hour Clock) and Start Date. For further information regarding the Delay Option, refer to Delay rogram section. ress to Start Infusion. I N T R Start Infusion? 10. During program operation, the pump displays the rate in which the program is operating. I N T R Rate 25 ml/h NOTE: If one of the values is changed during the programming mode, the pump will not recall the new value unless changes are confirmed by pressing. NOTE: If prime procedure is activated during data setting, the pump will return to the original (previous) screen once priming is completed. NOTE: Whenever required to stop infusion, press. Stop displays on the screen. Stop mode is limited for two minutes. After two minutes an audible alarm is sounded. ress again to mute the alarm. BodyGuard Operator Manual 42
43 4-Operation Intermittent Infusion Rate Titration The pump allows rate titration during the Intermittent rogram. To change the rate during the infusion: 1. Use numeric keypad to enter the new desired rate during operation and press within five seconds. The pump will briefly alarm and the infusion will resume at the adjusted rate. Rate 250 ml/h Adjust & ress OK NOTE: If pump is LOCKED, the Level 1 technician code must be entered to confirm the rate change. NOTE: Rate titration is allowed only during dose delivery and not during KVO between doses. NOTE: If the rate change is not confirmed within ten seconds, the pump will continue operation at the original rate and the display will return to the previous setting. 2. To stop the infusion press. To change the rate while in Stop mode: 1. ress any number on the keypad twice to return to the rate screen. 2. Adjust the rate and press. 3. Adjust all other parameters and press to restart infusion. NOTE: During programming, you may backspace by using : ressing ressing ressing once clears the last entered digit. again clears the next number. when the value is empty displays the original value or the previous screen. BodyGuard Operator Manual 43
44 4-Operation Intermittent Infusion Volume Over Time To program with Time and Volume instead of Rate and Volume, enable the Time Option function by following the steps below: 1. ress twice. 2. Scroll to "Change Set up" option. ress. 3. Scroll to "More " and press. 4. Enter Change Set up Level 1 code, using the numeric keyboard and press. 5. Scroll to "Time Option" option. ress. Buzzer Level More Change Set up: Volume Infused Review Set up Change Set up Code Technician XXX Operation LED Time Option Delay Before Start 6. ress or, to turn Time Option ON. 7. ress twice. 8. Bag Volume Screen Do one of the following: ress to confirm the existing parameters. Bag Vol: ml ress OK to Continue Enter the Bag Volume and press. 9. Dose Volume Screen Do one of the following: ress to confirm the existing parameters. Enter the Dose Volume and press. 10. Dose Time Screen Do one of the following: Enter the Dose Time and press. (To enter 30 minutes, press ) 11. Interval Time Screen Do one of the following: ress to confirm the existing parameters Enter the time between the start of each dose and press Dose Vol: ml ress OK to Continue Dose Time: : ress OK to Continue Interval Time: : ress OK to Continue. BodyGuard Operator Manual 44
45 4-Operation Intermittent Infusion 12. KVO Rate Screen Do one of the following: ress to confirm the existing parameters Enter the KVO Rate (from 0.1 to 5 ml/h) and press KVO Rate: ml/h ress OK to Continue 13. Accumulation Screen Do one of the following: ress start infusion.. to confirm the existing parameters and I N T R Dose Rate 200 ml/h Dose Vol: 200 ml/h Interval 1:00 ress OK to Start ress to go back and adjust program parameters. 14. NOTE: If pump is in Delay Mode, enter Start Time (24 Hour Clock) and Start Date. For further information regarding the Delay Option, refer to Delay rogram section. ress to Start Infusion. I N T R Start Infusion? 15. During program operation, the pump displays the rate in which the program is operating. I N T R Rate 25 ml/h Resume Infusion, Start New Bag, or Restart Infusion When an Intermittent infusion is unlocked and stopped and the pump is re-started, the user has the following options: (1) Resume: Resume the original infusion exactly where it left off (2) New Bag: Resume the original infusion with a new bag (3) Repeat: Repeat or re-program the infusion 1. Intermittent Restart Screen ress or to scroll to the appropriate selection and press. NOTE: If pump is Locked, the user will only have the Resume and New Bag options available. I N T R => Resume New Bag Repeat ress OK key 2. Resume New Bag Restart Screen Display shows a summary of the current infusion to be started. User can scroll through the details by pressing or. ress to start infusion. R E S U Dose Rate 100 ml/h Dose Vol 100 ml ause 5:00 ress OK to start BodyGuard Operator Manual 45
46 4-Operation Intermittent Infusion rogram Delay The option to Delay rogram Before Start can only be used in the Intermittent Mode. Turning the Delay Option ON 1. ress twice from STO or setting mode. If air sensor is off, please contact your technician in order to enable the air sensor if disabled. Using the pump with air in line detector off may cause an embolism resulting death or paralysis. Switching the air detector off is not recommended and should be used only when absolutely necessary. When Air Sensor is OFF Use administration set with Hydrophobic filter (which expels air from the administration set). The use of any other set can cause severe danger to patient and is strictly forbidden. 3. Scroll to "Change Set up" option and press. 4. Scroll to "More " and press. 5. Enter Change Set up level 1 code, using the numeric keyboard and press. 6. Scroll to "Delay Before Start" option and press. Volume Infused Review Set up Change Set up Buzzer Level More Change Set up: Code Technician XXX Time Option Delay Before Start Language 6. Turn delay option ON by pressing or. 7. ress and the screen displays Restart ump 8. ress to continue. Setting Delay Before Start After entering the program data, the pump enables delay setting (when Delay Before Start is turned ON). NOTE: The delay time is set according to a 24 hour clock. This means that hours are viewed as follows 10:00, 11:00, 12:00, 13:00, 14:00, 15:00 etc. NOTE: The pump automatically displays the current time and date. To start pump immediately, press to confirm the existing time and date and start infusion. NOTE: If the time and/or date automatically displayed by the pump are not correct, go to the Settings Menu and select Set Time & Date to reset the clock in the pump. BodyGuard Operator Manual 46
47 4-Operation Intermittent Infusion 1. Start Time Screen To change the Start Time, type the desired start time using the numeric keypad and press. To start pump D E L A Start Time : ress OK key immediately, do not change the time and press. NOTE: To start pump at 9:30 AM, enter To start the pump at 9:30 M, enter Start Date Screen To change the Start Date, type the desired start date using the numeric keypad and press. To start pump on the same day, do not change the date and press. D E L A Start Date / / ress OK key 3. KVO During Delay Screen During delay time, pump will operate in KVO mode. Time left will count down until 00:00 and will then automatically start the progrmamed infusion. During the delay, this screen will be displayed showing when the infusion will start. D E L A 4/ 8/ :05 Start Time 18:30 Start Date 04/08/05 ress OK to Start NOTE: After delay time, pump will beep once and infusion will start automatically. Turning ump Off In The Middle Of an Intermittent Infusion When the pump is turned OFF during an intermittent infusion, the internal clock in the pump will continue to monitor the timing of the infusion. If the pump is stopped during a dose, the user will be able to resume the dose if the infusion is resumed before one third of the interval time has elapsed. For example, if the interval is 4 hours, then the user can restart the infusion within 1 hour and 20 minutes of the interval time to receive the remainder of the dose. In this case, the pump will still resume the following dose at the scheduled time. If the user restarts the infusion after one third of the interval time has elapsed, then the user will not be receive the remainder of the dose. The pump will resume in the middle of the interval and receive KVO until the next dose is due. The purpose of this One Third rule is to allow the user to turn their pump off during a dose without changing the scheduled dose times. If the pump is turned off during a dose and not restarted until after the next scheduled does was scheduled, then the pump will start the next dose immediately followed by a complete interval. For example, if the patient restarts the infusion an hour past the scheduled dose time, then will receive a complete dose followed by a complete interval. If the pump is turned off during the interval period, the patient can restart the pump anytime before the next scheduled dose without impacting the timing of the delivery of the next dose. If the pump is not restarted until after the next scheduled does was scheduled, then the pump will start the next dose immediately followed by a complete interval. BodyGuard Operator Manual 47
48 4-Operation 25 Steps rotocol 25 Steps rotocol This protocol permits programming of up to twenty-five different steps. Each step has its own rate and volume. Step accumulation is limited to a Volume of ten (10) liters. rotocol steps are delivered sequentially until all steps are completed. NOTE: Before operating the pump in 25 Steps rotocol, make sure that the IV bag contains an additional 5 ml of total volume to be infused. This ensures adequate volume for KVO during End rogram. If Delay Before Start is set, you must include enough volume for the delay period, in addition to the 5 ml KVO volume. 1. Turn the pump on by pressing and holding the until the Self-Test screen appears. Warning: Using the pump with air in line detector off may cause an embolism resulting death or paralysis. Switching the air detector off is not recommended and should be used only when absolutely necessary. lease contact your technician in order to enable the air sensor if disabled with no need. When Air Sensor is OFF Use administration set with Hydrophobic filter (which expels air from the administration set). The use of any other set can cause severe danger to patient and is strictly forbidden. 2. ump displays program name and status. The status is either "Lock out" or "program" (for instruction regarding locking and unlocking the pump, refer to locking section). When the pump is unlocked, press to continue. NOTE: When pump is in rogram mode, all parameters can be adjusted; When pump is in lock out mode, parameters can be viewed, but cannot be changed. NOTE: If pump is not already in 25 Steps rotocol, refer to changing program section for instructions. NOTE: Whenever you decide to set a new program, follow instructions at the bottom of screen. NOTE: The screen will be blank upon initial setup. 3. Rate Screen Step 1 Do one of the following: ress to confirm the existing parameters. Enter the desired rate and press. S T E S T E 25 - Steps rogram ress NO to Change 25 - Steps LOCKED Step 1 Rate ml/h ress OK for Volume 4. Volume Screen Step 1 Do one of the following: ress to confirm the existing parameters. Step 1 Volume ml ress OK to Continue Enter the desired volume and press. BodyGuard Operator Manual 48
49 4-Operation 25 Steps rotocol 5. Rate Screen Step 2 ump displays the rate for step 2. Repeat directions as for step 1 and repeat until the required number of steps are entered. 6. After entering the last required step, press entering a rate. without This indicates that all data required for the protocol has been set. All programs following the last set program will be automatically cleared. NOTE: If pump is in Delay Mode, enter KVO rate. 7. Accumulation Screen Do one of the following: ress to confirm the existing parameters. Step 2 Rate ml/h ress OK for Volume Step 5 Rate ml/h ress OK for Volume Steps Total 5 Volume Total 500 ml ress OK to Start 8. ress to go back to rate setting screen. NOTE: If pump is in Delay Mode, enter Start Time (24 Hour Clock) and Start Date. For further information regarding the Delay Option, refer to Delay rogram section. ress to Start Infusion. S T E Start Infusion? 9 During program operation, the display identifies which step is currently running, and the rate. NOTE: If one of the values is changed during the programming mode, the pump will not recall the new value unless changes are confirmed by pressing. S T E Rate Step 1 of 5 25 ml/h If prime procedure is activated during data setting, the pump will return to the original (previous) screen once priming is completed. NOTE: Whenever required to stop infusion, press. Stop displays on the screen. Stop mode is limited for two minutes. After two minutes an audible alarm is sounded. ress again to mute the alarm. NOTE: During programming you may backspace by using. ressing ressing ressing once clears the last entered digit. again clears the next number. when the value is empty displays the original value or the previous screen. BodyGuard Operator Manual 49
50 4-Operation - TN CA infusion TN Infusion Total arenteral Nutrition - This mode delivers an infusion while automatically tapering up and down. The pattern of the program is a trapezoid. Rate TN Trapezoid rogram Max Rate T1 T2 T3 Time T1 = Time U T2= Time FLAT T3= Time DOWN On a TN rogram the operator may set the total volume which corresponds to the size of the bag to be infused, the total time, and the up and down time. rogram operation will start from 2 ml/h and will increase to the maximal rate. During the flat session (T2) the rate will not change. During the last part of the program (T3), the program will start to decrease the infusion rate according to the set taper down time. Up and down time can be set to zero. A TN program with up and down time set to zero, is continuous program. NOTE: Before operating the pump in TN program, make sure that the IV bag contains an additional 5 ml of total volume to be infused. This ensures adequate volume for KVO during End rogram. If Delay Before Start is set, you must include enough volume for the delay period in addition to the 5 ml KVO volume. 1. Turn the pump on by pressing and holding the until the Self-Test screen appears. Warning: Using the pump with air in line detector off may cause an embolism resulting death or paralysis. Switching the air detector off is not recommended and should be used only when absolutely necessary. lease contact your technician in order to enable the air sensor if disabled with no need. When Air Sensor is OFF Use administration set with Hydrophobic filter (which expels air from the administration set). The use of any other set can cause severe danger to patient and is strictly forbidden. 2. ump displays program name and status. The status is either "Lock out" or "rogram" (for instruction regarding locking and unlocking the pump refer to Lock Out section). When pump unlocked, press to continue. NOTE: When pump is in rogram mode, all parameters can be adjusted; When pump is in lock out mode parameters can be viewed, but cannot be changed. NOTE: If pump is not already in TN rogram, refer to changing program section for instructions. NOTE: Whenever you decide to set a new program, follow instructions at the bottom of screen. 3. Bag Volume Screen Do one of the following: ress to confirm the existing parameters. T N T N TN rogram ress NO to Change TN LOCKED Bag Vol: ml ress OK to Continue or Enter the desired volume and press. BodyGuard Operator Manual 50
51 4-Operation - TN CA infusion 4. Volume To Be Infused (TBI) Screen Do one of the following: ress to confirm the existing parameters. Enter the desired volume and press. 5. Total Time Screen The screen displays the last set time (total time for the program to run). ress to confirm the existing VolumeTBI ml ress OK to Continue Total Time : ress OK to Continue parameters or enter the desired time and press. NOTE: First two digits represent hours and last two digits represent minutes (for example, enter for 2 hours.). Use a point to move from hours to minutes. 6. Up Time Screen The screen displays the time for rate to taper up. ress to confirm the existing parameters or enter the Up Time : ress OK to Continue desired value (from 00:00 to 04:15 hours). ress. 7. Down Time Screen The screen displays the time for rate to taper down. ress to confirm the existing parameters or enter the Down Time : ress OK to Continue desired value (from 00:00 to 04:15 hours). ress. 8. KVO Rate Screen Do one of the following: ress to confirm the existing parameters KVO Rate: ml/h ress OK to Continue Enter the desired Interval Time and press. 9. Accumulation Screen The pump calculates the set data and displays the accumulation screen with the maximal rate for the program (to be infused during flat period). Do one of the following: ress to confirm parameters and start infusion or enter delay time, if applicable. For further information regarding delay option, refer to delay program section. T N Volume TBI 2000 ml/h Max Rate 55.1 ml/h ress OK to Start 10. ress ress to go back to volume setting screen. to start infusion. T N Start Infusion? 11. During program operation, pump displays the rate in which the program is operating and program direction (Up/Flat/Down). U Rate 4.1 ml/h BodyGuard Operator Manual 51
52 4-Operation - TN CA infusion Early Taper Down If the program must be interrupted early and the planned taper down time must commence immediately, do as follows: 1. ress continually (2 seconds) to stop the pump operation and display Taper Down screen. 2. Do one of the following: T N Taper Down 1:00 ress OK key ress to start the taper down process immediately with the existing parameters. Enter time for taper down, using the numeric keys, and press process. to start the taper down NOTE: If one of the values is changed during the programming mode, the pump will not recall the new value unless changes are confirmed by pressing. NOTE: If prime procedure is activated during data setting, the pump will return to the original (previous) screen once priming is completed. NOTE: Whenever required to stop infusion, press. Stop displays on the screen. Stop mode is limited for two minutes. After two minutes, an audible alarm is sounded. ress again to mute the alarm. NOTE: During programming you may backspace by using : ressing ressing ressing once clears the last entered digit. again clears the next number. when the value is empty displays the original value or the previous screen. Resume or Repeat Infusion 1. When the pump is turned OFF during an infusion, this screen will appear when the pump is turned back ON. 2. Do one of the following: T N Resume ress OK Repeat ress NO Resume: To resume this program exactly where it stopped, press screen is displayed. The volume remaining will be infused.. The accumulation Repeat: To restart the program at the beginning and or to set new parameters, press and follow the instructions on the pump BodyGuard Operator Manual 52
53 4-Operation - CA infusion CA Infusion atient Control Analgesia is a program used for patients who require IV pain management or epidural analgesia. ain management is undertaken by delivering a continuous basal rate, in combination with pre-programmed boluses. The pump will deliver only the boluses corresponding to the preset time intervals. All attempts to obtain a bolus are stored in the pump memory. The physician can read these statistics and adjust the settings as required. Warning: When operating the pump on CA program with a rate of 0.0 ml/h there is a hazard of blood clot forming. Connect saline infusion in parallel to avoid this problem. CA Menu Due to the sensitive nature of CA infusions, the BodyGuard 323 has a specific menu to enhance the user experience while programming CA infusions. The menu organizes the infusion information centrally while maintaining the same programming format as the other infusion modes on the pump. 1. Turn the pump on by pressing and holding the until the Self-Test screen appears. Warning: Using the pump with air in line detector off may cause an embolism resulting death or paralysis. Switching the air detector off is not recommended and should be used only when absolutely necessary. lease contact your technician in order to enable the air sensor if disabled with no need. When Air Sensor is OFF Use administration set with Hydrophobic filter (which expels air from the administration set). The use of any other set can cause severe danger to patient and is strictly forbidden. 2. ump displays program name and status. The status is either "ROGRAM" or "LOCKED" (for instruction regarding locking and unlocking the pump refer to Unlocking CA section). ress. If the pump is unlocked, the CA Menu will display. If the pump is locked, the CA Restart Menu will display (See Restart Infusion section if pump is locked) NOTE: The CA program automatically locks upon completion of programming. NOTE: If pump is not already in CA rogram refer to Changing rogram section for instructions. NOTE: Whenever you decide to set a new program, follow instructions at the bottom of screen. 3. CA Menu Screen The user interface in CA centers around the CA menu. From the CA menu, the user can select: i. rime rime Administration Set ii. rogram Infusion Enter infusion details iii. Clinician Bolus Infuse extra bolus iv. atient History View infusion history of patient v. Review Set up View pump settings vi. Change Set up Enables user to change pump settings and switch to other infusion modes. C A C A C A CA ROGRAM CA LOCKED rime rogram Infusion Clinician Bolus atient History Review Set up Change Set up or Use or to scroll through options. Select the required option by pressing. BodyGuard Operator Manual 53
54 4-Operation - CA infusion riming NOTE: riming is disabled during CA operation. Always prime the set before starting a program. Warning: Always disconnect IV tubing from patient before starting priming procedure. 1. Selecting the rime option from the CA menu, the screen will show the priming screen. C A rime rogram Infusion Clinician Bolus 2. ress OK to program priming procedure. RIME Disconnect atient ress OK to Start Warning: Ensure the set is not connected to the patient!! 3. Enter the volume to prime the set and press to begin priming procedure. You may stop priming at any time by pressing. rime Vol ml ress OK to Continue 4. The display screen will show a graph indicating the prime operation. RIME 5 ml Once the priming is completed, the display will change back to the previous screen the pump was in before priming. If more priming is needed, repeat procedure. rogram Infusion 1. CA Menu Screen Select rogram Infusion and press. 2. New atient Screen If programming a protocol for a new patient, select New atient by pressing. If the protocol is not for a new patient, press ressing will clear the volume that has been infused to the current patient. C A C A rime rogram Infusion Clinician Bolus View History Review Set up Change Set up New atient? ress OK or NO BodyGuard Operator Manual 54
55 4-Operation - CA infusion 3. Rate/Concentration Selection Screen To program Rate in Milliliters per Hour (ml/hr), press. To program Concentration in Milligrams per Milliliter ml/hr ress OK to Continue NO for Concentration (mg/ml), press once. To program Concentration in Micrograms per Milliliter (mµ/ml), press twice. 4. Rate or Concentration Screen Do one of the following: ress to confirm the existing parameters. C A Rate ml/h Adjust & press OK or Enter the desired rate or concentration and press. C A C A Concentration mg/ml Concentration micrograms/ml or NOTE: To change from Concentration back to Rate, enter 0 (zero) for Concentration and press. 5. Concentration Rate Screen (Only When rogramming by Concentration) Do one of the following: ress to confirm the existing parameters. Enter the desired rate or concentration and press. 6. Rate Titration Limit Screen Enter the maximum rate of titration that can be used in the current protocol and press. Rate can be ml/h, mg/h or mcg/h depending on program selected. 7. Bolus Screen Do one of the following (Bolus can be ml, mg, or mcg depending on the program selected): ress to confirm the existing parameters. Enter the desired bolus dose and press. 8. Bolus Titration Limit Screen Enter the maximum bolus dose that can be used in the current protocol and press. Bolus dose can be ml/h, mg/h or mcg/h depending on program selected. C A C A C A C A Rate mg/h Adjust & press OK Max Titration Rate Rate ml/h ress OK to Continue Bolus Vol. ml ress OK to Continue Maximum Bolus Dose ml ress OK key NOTE: If the Maximum Bolus Dose screen does not appear on the pump during programming, go to the Change Set up menu to activate Titration Bolus BodyGuard Operator Manual 55
56 4-Operation - CA infusion 9. Lock Time Screen The lock time is the amount of time between patient boluses. Do one of the following: ress to confirm the existing parameters. Enter the desired lock time in minutes and press. 10. Hour Limit Screen #1 As an additional safety precaution, user can program a volume limit over a certain amount of hours. User can set this limit for any amount of time between 1 (One) and 24 (Twenty-Four) hours, or can continue without setting a limit. The default setting is OFF, meaning there is no limit. Do one of the following: C A C A Lock Time min ress OK to Continue Hour Limit OFF ress OK to Continue ress to confirm the existing parameters. Enter the desired hours for the limit and press. 11. Hour Limit Screen #2 If an hour limit is entered in previous step, the next step will propt user to enter the maximum amount of volume to be infused over that timeframe. In the screen to the right, 4 (four) was entered in the previous step for the hour limit. Do one of the following (Limit can be ml, mg, or µg depending on the program selected): C A 4 H Limit ml ress OK to Continue ress to confirm the existing parameters. Enter the desired hours for the limit and press. 12. Bag Volume Screen Do one of the following: ress to confirm the existing parameters. Bag Vol. ml ress OK to Continue Enter the desired bolus volume and press. 13. Locking Screen The pump automatically locks before a CA infusion program can be completed. Do one of the following: ress to lock the CA program and proceed. ress to scroll through the programming again and review or adjust the program. C A Lock: ress OK Review: ress NO 14. Accumulation Screen The pump displays the accumulation screen with a summary the program entered. User can scroll through the entire program by pressing or. Bag Vol: 200 ml Volume Left 200 ml Infused 0 ml ress OK to Start Do one of the following: ress ress to confirm parameters and proceed.. to go back and adjust parameters. BodyGuard Operator Manual 56
57 4-Operation - CA infusion 15. ress to start infusion. C A Start Infusion? NOTE: User can confirm that pump is infusing by checking that the drips are displayed on the right side of the screen and that the LED light is blinking green. NOTE: To access the CA menu during operation, press once and then hold for 3 seconds. NOTE: LED indicator can be turned off in the main settings menu to save battery power. NOTE: The BodyGuard is capable of continuous infusion (basal) rates of up to 100 ml/h. However you may use the pump for the delivery of only one drug protocol and the maximum safe ceiling for this regime could be, for example, 30mlh. Users can fix a maximum rate that the pump can be set to in Change Set Up using the Technician Access Code to ensure other users cannot accidentally program the pump to deliver above this safe ceiling. See later section for Change Set Up. NOTE: The BodyGuard is capable of delivering the bolus dose at up to 1000ml/h. The default setting is 600ml/h designed to deliver any bolus as quickly as possible. Users can adjust this if they want the bolus to be delivered over a longer period in Change Set Up using the Technician Access code. Interpreting the Display Screen During CA Infusion Infusion Mode atient Controlled Bolus Volume Rate CA 2.5 ml/h Bolus 5 ml Infusion Mode The first line of the display indicates that the pump is in the CA infusion mode. rogrammed Infusion Rate (ml/hr or mg/ml) Battery Status Indicator Infusion Status Indicator Infusion Rate The second line of the display shows the current infusion rate. Depending on whether the user programmed the current protocol in mls or mgs, this will display the rate in either ml/h, mg/h or mcg/h. Bolus Volume The third line of the display shows the bolus volume for the current protocol. As with infusion rate, this will be displayed in mls, mgs or mcgs depending on how the current program is set up. Battery Status In the right hand margin, you can see the battery and infusion status indicator. The battery symbol will be visible when the pump is not connected to the mains charger. User can check the charge level by monitoring the black fill inside the symbol (i.e. completely black symbol indicates a fully charged battery). Infusion Status In the right hand margin, infusion status indicator shows drips moving down the screen when the pump is in operation. BodyGuard Operator Manual 57
58 4-Operation - CA infusion atient Activated Bolus A CA infusion can be programmed to allow the patient to request boluses of a specified volume within predetermined time intervals. The patient can request the bolus by one of the following two methods: 1. Using Bolus Cable ress the button on the end of the bolus cable. The bolus cable plugs into the side of the pump where a label reads Bolus 2. Using Keypad ress the button on the keypad. NOTE: User can stop bolus at any time by pressing NOTE: If patient requests more boluses than are allowed, the pump will display Bolus Locked and will track the amount of boluses have been requested. The bolus history can be reviewed by scrolling the Info Menu. See Using History Functions section of the manual Clinician Activated Bolus A Clinician Activated Bolus can be performed before starting the CA infusion or during the CA infusion. To infuse a Clinician Activated Bolus before starting the CA infusion, perform the following steps: 1. Selecting the rime option from the CA menu, the screen will show the priming screen. C A rogram Infusion Clinician Bolus atient History 2. Select "Clinician Bolus". Enter Level 2 Technician Code and press. B O L U Bolus Enter Code XXX ress OK key 3. Enter the volume of the Clinician Bolus and press to begin priming procedure. You may stop the bolus at any time by pressing. The Volume for the Bolus will be in ml, mg or µg depending on the settings of the existing protocol entered for the CA infusion. To change, go to rogram Infusion in the CA menu and follow the steps until the selection can be made for ml, mg or µg. C A C A C A Clinician Bolus Volume ress OK to Start Clinician Bolus Volume ress OK to Start Clinician Bolus Volume ress OK to Start ml mg mcg or or 4. The display screen will show a graph indicating the Bolus is being infused. The graphical bar displays the amount of the bolus to be infused (clear) and the amount infused (dark). Volume Once the bolus is completed, the display will change back to the CA menu. B O L U 5 ml BodyGuard Operator Manual 58
59 4-Operation - CA infusion User can stop bolus at any time by pressing Warning: Boluses will be infused up to the full volume that is requested unless the user stops the bolus manually by pressing. This is true even when the volume infused is less than the specified Hour Limit for Volume (e.g. 4 Hr Limit) at the beginning of a bolus and goes over the limit during the bolus. To infuse a Clinician Activated Bolus during a CA infusion, perform the following steps: 1. During operation, press and then press to stop the current infusion and initiate the Clinician Bolus. 2. Enter Level 2 Technician Code and press. B O L U Bolus Enter Code XXX ress OK key 3. Enter the volume of the Clinician Bolus and press to begin priming procedure. You may stop the bolus at any time by pressing. The Volume for the Bolus will be in ml, mg or µg depending on the settings of the existing protocol entered for the CA infusion. C A C A C A Clinician Bolus Volume ress OK to start Clinician Bolus Volume Clinician Bolus Volume ress OK to Start ml mg ress OK to Start mcg or or 4. The display screen will show a graph indicating the Bolus is being infused. The graphical bar displays the amount of the bolus to be infused (clear) and the amount infused (dark). Once the bolus is completed, the pump will resume the original CA infusion. User can stop bolus at any time by pressing B O L U Volume 5 ml BodyGuard Operator Manual 59
60 4-Operation - CA infusion End of Infusion, Restart Infusion, or Bag Change 1. End Infusion Screen Once the infusion had reached an end (pre-set volume was infused), an alarm sounds and display will show: 2. KVO Display The alarm will stop after 4 beeps. The pump will show the pre-set KVO rat. The alarm will sound again every 4 minutes until the user changes the bag or stops the pump. End Infusion ress STO for menu KVO 5 ml/h ress STO for menu 3. CA Restart Menu This screen displays when: (1) The pump is turned OFF and back ON in CA mode. (2) Infusion is stopped by pressing and holding. C A => Resume New Bag Menu ress OK key User can scroll through the following options by pressing or. Restart Starts infusion exactly where it left off previously. New Bag Restarts infusion exactly where it left off previously and updates bag volume to be equal to the bag volume originally programmed. Menu Brings user back to the CA Menu.When asked for a code, enter the Unlock (L2) Code. NOTE: If using an infusion set with drip chamber, change to a new infusion bag, but make sure that the drip chamber is half filled and there is no air in the administration set. If using an ambulatory IV, CA or Epidural set without a drip chamber, priming the line may be needed. Disconnect the set from patient before priming. Return to CA Menu 1. CA Restart Menu Scroll to Menu using and press. C A Resume New Bag => Menu ress OK key 2. Enter Level 1 Technician Code and press. C A Enter Code XXX ress OK key Titrating The Basal Rate During The Infusion To change Rate during the infusion, enter the new rate using the keypad and confirm the new rate by entering the Level 1 Code. The Rate can be increased up to the Max Titration Rate programmed into the specific infusion. BodyGuard Operator Manual 60


61 4-Operation - CA infusion Titrating The Bolus During The Infusion To change the Bolus during the infusion, press the INFO button seven times until you reach a screen showing the currently programmed Bolus in ml or mg. Use the keypad to enter the new Bolus and confirm the new Bolus by entering the Level 1 Code. The Bolus can be increased up to the Maximum Bolus Dose programmed into the specific infusion. Changing Lock Out Time During The Infusion 1. Stop the infusion by pressing. 2. Then press and hold until the screen appears allowing you to access the CA Menu. 3. Select Menu and enter the Level 2 code. 4. Once in the CA Menu, select rogram Infusion and follow the programming instructions to adjust the program. Be sure to tell the pump that there is NOT a New atient and the Bag Volume should NOT be reset. Safe Container for CA drugs As pain management therapies associated with dangerous drugs, special locking boxes were designed to enable locking the drug bag. Locking the bag enables the medical staff to leave the patient and the painkilling drug in a safe way. 100 ml. Container for ambulatory use The container of 100 ml. can be attached to the pump and locked at its back by a special key. A bag of 100 ml. should be inserted into the container prior to it being locked. A bolus cable is connected to the left side of the pump. It enables the user to get an additional bolus dosage, if required. There is an option to add a power supply connector, to enable operation on AC power and battery charging during program operation (while pump is locked in the safe container). 500 ml. Container The Container of 500 ml. can be attached to standard IV pole. There is an opening on the back of the container, to enable fastening the pump to the container. The administration set and the bolus cable outlets from the right side of the container, via an aperture. The user can add boluses, according to the setting of the program, by pressing twice on the bolus cable. In case of an alarm, the medical staff has to open the container in order to solve the problem that caused the alarm. To enable AC power connection, the container has an opening on its underside. BodyGuard Operator Manual 61
BodyGuard 323 Infusion Pump System Operator Manual
 . BodyGuard 323 Infusion ump System Operator Manual 0344 Manufacturer: Caesarea Medical Electronics Ltd. European address: Staufenburgstr. 23 Lichtenstein.O.B. 1248 Lichtenstein 72805 Germany International
BodyGuard 121 Twins Infusion System Operator Manual
 BodyGuard 121 Twins Infusion System Operator Manual 0344 Manufacturer: Caesarea Medical Electronics GmbH. 23 Staufenburg st. 72805 Lichtenstein, Germany +800-323-575-00 E-mail: Sales@cme-infusion.com www.cme-infusion.com
BodyGuardTM 323. BodyGuard 323 Multi-Therapy Ambulatory Infusion Pump. Patient Guide
 BodyGuardTM 323 BodyGuard 323 Multi-Therapy Ambulatory Infusion Pump Patient Guide How to Use This Booklet This booklet gives you information about how to use your BodyGuard 323 infusion pump. It supplements
Syringe Infusion Solutions
 Syringe Infusion Solutions Caesarea Medical Electronics T34 Deliver Syringe Infusion Anywhere rovide complete small-dose infusion therapy safely and economically wherever your patients receive care. The
Multi Therapy Solutions
 Multi Therapy Solutions Caesarea Medical Electronics BodyGuard 323 Color Vision Advanced Multi Therapy Infusion ump Join the frontline of infusion therapy with BodyGuard 323 Color Vision, the latest multi-purpose
Pain Management Solutions
 ain Management Solutions Caesarea Medical Electronics BodyGuard 595 Color Vision Multi-Use ain Manager The BodyGuard 595 Color Vision pain manger infusion pump is specially designed for departments needing
Multi Therapy Solutions
 Multi Therapy Solutions Caesarea Medical Electronics BodyGuard 323 Color Vision Advanced Multi Therapy Infusion ump Join the frontline of infusion therapy with BodyGuard 323 Color Vision, the latest multi-purpose
Syringe Infusion Solutions
 Syringe Infusion Solutions Caesarea Medical Electronics T34 Deliver Syringe Infusion Anywhere rovide complete small-dose infusion therapy safely and economically wherever your patients receive care. The
CADD -Solis VIP Ambulatory Infusion Pump Model 2120
 CADD -Solis VIP Ambulatory Infusion Pump Model 2120 Clinician Guide Contents I Description of the CADD -Solis VIP Pump... 4 Indications... 4 Pump Diagram... 5 Pump Descriptions... 5 Keypad... 6 I Pump
Quick Reference Guide
 Quick Reference Guide 3 Spike Set Cassette Inflow Connector Cassette Outflow Connector Return Line Latch Handle Patient Line Air Trap Keypad Cassette Customer Service Toll Free: 1-866-944-9992 Office:
BODYGUARD 595 REGIONAL ANALGESIA INFUSION PUMP
 BODYGUARD 595 REGIONAL ANALGESIA INFUSION PUMP The BodyGuard 595 Regional Analgesia Infusion Pump is a dedicated, colourcoded pain management system for enhanced recovery wound infiltration and nerve blocks,
Pain Management Solutions
 ain Management Solutions Caesarea Medical Electronics BodyGuard 595 Color Vision Multi-Use ain Manager The BodyGuard 595 Color Vision pain manger infusion pump is specially designed for departments needing
BODYGUARD 323 AMBULATORY INFUSION PUMP
 BODYGUARD 323 AMBULATORY INFUSION PUMP The BodyGuard 323 Ambulatory Infusion Pump is a multi-therapy pump suitable for the hospital and homecare environments with three programmable modes (TPN, continuous
MOOG Medical Devices Group Curlin 6000 Series Ambulatory Infusion Pump PATIENT GUIDE
 MOOG Medical Devices Group Curlin 6000 Series Ambulatory Infusion Pump PATIENT GUIDE TABLE OF CONTENTS Introduction...2 Important keys...2 Installing/Changing the Batteries...3 Preparing Your Therapy...4
Accumate 2300 Volumetric Infusion Pump
 Accumate 2300 Volumetric Infusion Pump Operating Manual www.wooyoungmed.com Log o Important This Operating Manual is for clinician use only. Do not permit patients to have access to this Operating Manual.
Ambulatory. Infusion. Pumps
 PATIENT INFORMATION PCA Patient Controlled Analgesia Delivery Mode Model 6100 and 6101 Ambulatory Infusion Pumps Table of Contents Introduction... 1 Warnings... 2 Cautions... 4 CADD-Prizm Pump (Diagram)...
Sentinel Enteral Feeding Pump. Model: S-1000-SI. Operating Manual
 Sentinel Enteral Feeding Pump Model: S-1000-SI Operating Manual CONTENTS 1. Introduction.. 2 2. Control Panel 5 3. Operating Instructions.. 6 4. Indicators and Alarms.. 9 5. Maintenance.. 10 6. Troubleshooting
Nimbus Flex Ambulatory Infusion Pump
 Nimbus Flex Ambulatory Infusion Pump Patient Manual Continuous Mode Infusions (Software Version v5.1.1) Read this entire manual prior to operating the Nimbus Ambulatory Infusion Pump. Failure to follow
NIKI T34 pump. Knowing your way around the NIKI T34 pump
 NIKI T34 pump Knowing your way around the NIKI T34 pump 2. Display Screen 3. Barrel clamp 4. Collar & Plunger Sensors 5. LED Indicator 1. Info Key 9. Up & Down arrow keys 8. YES (START)/ NO(STOP) keys
Quickdraw. Model 2400 Series. Operating Instructions & Maintenance Manual. Clearing The Airway Is Our #1 Priority
 Quickdraw Model 2400 Series Clearing The Airway Is Our #1 Priority Operating Instructions & Maintenance Manual, INC. 11064 Randall Street Sun Valley, CA 91352 USA www.sscor.com Email: marketing@sscor.com
OPERATOR S MANUAL. Ambulatory Infusion Pump Model 6300 PATIENT CONTROLLED ANALGESIA
 OPERATOR S MANUAL CADD-Legacy PCA Ambulatory Infusion Pump Model 6300 PATIENT CONTROLLED ANALGESIA This Operator s Manual is for clinician use only. Read the entire Operator s Manual before operating the
Baxter 6201 and 6301 Tips to Avoid Nuisance Alarms Call x 335 for troubleshooting assistance.
 P a g e 1 Baxter 6201 and 6301 Tips to Avoid Nuisance Alarms Call 1-708-449-7600 x 335 for troubleshooting assistance. Tip #1: To Ensure Door is Closed Correctly You should hear 2 clicks when closing the
Ambulatory Syringe Pump Operation Manual
 McKinley T34 Ambulatory Syringe Pump Operation Manual IMPORTANT NOTICE: McKinley strongly recommends that this manual is read by every user of the T34 syringe Pump and that they comprehensively understand
Unit 2, Rivington View Business Park, Station Road, Blackrod, Bolton BL6 5BN Tel: +44(0)
") The P900 enteral syringe pump has been designed to deliver small s of enteral feeds, accurately and safely, using enteral syringes, but cannot be used with IV syringes Unit 2, Rivington View Business Park,
The P900 enteral syringe pump has been designed to deliver small s of enteral feeds, accurately and safely, using enteral syringes, but cannot be used with IV syringes Unit 2, Rivington View Business Park,
CADD-Legacy 1 Ambulatory Infusion Pump Model 6400
 OPERATOR S MANUAL CADD-Legacy 1 Ambulatory Infusion Pump Model 6400 CONTINUOUS DELIVERY This online version differs from the printed version. Certain information that is not intended for patients has been
CADD-PCA. Model 5800R Operator s Manual. Deltec. Ambulatory Infusion Pump. SIMS Deltec, Inc., St. Paul, MN U.S.A.
 CADD-PCA Ambulatory Infusion Pump Model 5800R Operator s Manual Deltec SIMS Deltec, Inc., St. Paul, MN 55112 U.S.A. i This manual pertains only to the Deltec CADD-PCA, Model 5800R, infusion pump. The issue
Dedicated, ambulatory nerve block and wound infiltration treatment
 Dedicated, ambulatory nerve block and wound infiltration treatment The BodyGuard 595 TM Regional Analgesia Infusion Pump is specially designed and colour coded for safe and effective nerve block and wound
CADD-TPN. Model 5700 Operator s Manual. Deltec. Ambulatory Infusion System. SIMS Deltec, Inc., St. Paul, MN U.S.A.
 CADD-TPN Ambulatory Infusion System Model 5700 Operator s Manual Deltec SIMS Deltec, Inc., St. Paul, MN 55112 U.S.A. This manual pertains only to the Deltec CADD-TPN, Model 5700, ambulatory infusion system.
Intermittent Delivery Mode
 Intermittent Delivery Mode CADD -Solis VIP Ambulatory Infusion Pump Model 2120 Patient Information Guide Your Clinician s: Name: Phone Number: Instructions: Pump placement during bathing/showering: Pump
Syringe Driver Introduction. Christine Hull & Anita Webb Staff Nurses, Hospice in the Home 2015
 Syringe Driver Introduction Christine Hull & Anita Webb Staff Nurses, Hospice in the Home 2015 Aims and Objectives To gain an understanding of using the McKinleyT34 syringe driver. To review knowledge
Deltec 3000 and Deltec Micro 3100 Large Volume Infusion Pumps Modular Infusion System
 Deltec 3000 and Deltec Micro 3100 Large Volume Infusion Pumps Modular Infusion System Operator s Manual Published by Smiths Medical MD, Inc. All possible care has been taken in the preparation of this
O p e r a t o r ' s M a n u a l
 Operator's Manual Ipump Pain Management System Operator s Manual Appendix A Product Code: 2L3107 2L3107K Software Versions: 2.03.00 Note: Before operating this pump, the user should carefully read this
DCell Suction. Model DM Operating Instructions & Maintenance Manual. Clearing The Airway Is Our #1 Priority
 DCell Suction Model DM10-001 Clearing The Airway Is Our #1 Priority Operating Instructions & Maintenance Manual, INC. 11064 Randall Street Sun Valley, CA 91352 USA www.sscor.com Email: marketing@sscor.com
Companion. Enteral Pump. Operating Manual. For Enteral Use Only Not for IV Use
 Companion Enteral Pump Operating Manual For Enteral Use Only Not for IV Use CONTENTS Pump Characteristics................................................. 3 Indications for Use..................................................
Patient s Manual for Using Nimbus Ambulatory Pump for Continuous Peripheral Nerve Block Application
 Patient s Manual for Using Nimbus Ambulatory Pump for Continuous Peripheral Nerve Block Application PCA Mode Infusions (Software Version v2.1.3) Read this entire Manual prior to operating the Nimbus Ambulatory
Model 2310 Series. Operating Instructions & Maintenance Manual. Clearing The Airway Is Our #1 Priority
 VX-2 Model 2310 Series Clearing The Airway Is Our #1 Priority Operating Instructions & Maintenance Manual, INC. 11064 Randall Street Sun Valley, CA 91352 USA www.sscor.com Email: marketing@sscor.com techsupport@sscor.com
SR7 Micro-infusion Syringe Pump. Contents
 Contents Introduction 2 A. About this manual.2 B. Manufacturer s Responsibility.2 C. Warranty 3 D. Unpacking and Accessories.. 3 E. General Safety...3 1.Overview.. 7 2.Operating Principle....7 3.Technical
Operator Manual of Guangzhou Huaxi Medical Technology Co., Ltd. JORVET INFUSION PUMP J1060 OPERATOR MANUAL
 Operator Manual of Guangzhou Huaxi Medical Technology Co., Ltd. JORVET INFUSION PUMP J1060 OPERATOR MANUAL Please read manual before operating your JorVet Infusion Pump Jorgensen Laboratories 1450 N. Van
Operator s Manual. spectrum 35700BAX & 35700ABB. Generation 2 Operating System Pump Operating Software v6.05 For Use with MDL Editor v6.2.
 spectrum Operator s Manual 35700BAX & 35700ABB Generation 2 Operating System Pump Operating Software v6.05 For Use with MDL Editor v6.2.4 41018-6.05/6.2.4 Rev H November 29, 2012 SIGMA 711 Park Avenue
CADD-Solis Infusion Pump
 Introduction CADD-Solis Infusion Pump Information for Parents Your child has been started on an infusion using the CADD-Solis pump. Your nurse specialist will have explained the reasons for starting the
CRONO S-PID 50 Ambulatory infusion pump
 CRONO S-PID 50 Ambulatory infusion pump NEW MODEL USER GUIDE Canè S.p.A. Medical Technology Via Cuorgnè 42/a 10098 Rivoli (TO) Italy Tel.+39 011 9574872 - Fax +39 011 9598880 www.canespa.it - mailbox@canespa.it
LIST OF FIGURES... ii. LIST OF WARNINGS and CAUTIONS... iii CHAPTER 1 - GENERAL INFORMATION... 1 CHAPTER 2 - DIRECTIONS FOR USE...
 TABLE OF CONTENTS Page LIST OF FIGURES... ii LIST OF WARNINGS and CAUTIONS... iii CHAPTER 1 - GENERAL INFORMATION... 1 CHAPTER 2 - DIRECTIONS FOR USE... 2 Pump Features... 2 The Keypad... 4 The Display...
Power Inverter. User s Manual. Diamond Series CPD1200EILCD
 Power Inverter Diamond Series CPD1200EILCD User s Manual 2 TABLE OF CONTENTS 1 IMPORTANT SAFETY INSTRUCTIONS..4 2 INSTALLATION....5 2-1 Unpacking...5 2-2 Product Overview & Outlook..5 2-3 Power Requirements
Companion. Enteral Nutrition Pump. Operating Manual. For Enteral Use Only Not for IV Use NOTES. No Purchase No.
 NOTES No. 54748-Purchase No. 00084-Lease/Rent Companion Enteral Nutrition Pump Operating Manual #54748/00084 35691 LITHO IN USA For Enteral Use Only Not for IV Use Distributed by: Abbott Nutrition Abbott
SurePower TM II Battery Pack Guide
 TM SurePower TM II Battery Pack Guide? 1:00+ 2:00+ 3:00+ TM 9650-000840-01 Rev. B The issue date for the SurePower II Battery Pack Guide (REF 9650-000840-01 Rev. B) is December, 2012. If more than three
CADD-Prizm PCS II. Operator's Manual. Ambulatory Infusion Pump. Model 6101
 x CADD-Prizm PCS II Ambulatory Infusion Pump Model 6101 Operator's Manual s This manual concerns only the CADD-Prizm PCS II (Pain Control System) Model 6101 Ambulatory Infusion Pump. This pump can be
Solar Hybrid Power Generating System CPS1200EOH12SC CPS2200EOH24SC CPS3000EOH24SC. User s Manual K01-C
 Solar Hybrid Power Generating System CPS1200EOH12SC CPS2200EOH24SC CPS3000EOH24SC User s Manual K01-C000304-02 2 TABLE OF CONTENTS 1 IMPORTANT SAFETY INSTRUCTIONS..4 2 INSTALLATION....5 2-1 Unpacking...5
SurePower Battery Pack Guide
 ? SurePower Battery Pack Guide 9650-0536-01 Rev. B The issue date for the SurePower Battery Pack Guide (9650-0536-01 Rev. B) is September, 2010. If more than three years have elapsed since the issue date,
For detailed instructions, specifications, warnings, warranties, and additional information on operating the CADD -Solis ambulatory infusion pump,
 X s For detailed instructions, specifications, warnings, warranties, and additional information on operating the CADD -Solis ambulatory infusion pump, please refer to the manuals supplied with the product.
B-RAD Select USER MANUAL TABLE OF CONTENTS
 TABLE OF CONTENTS TABLE OF CONTENTS... 1 MANUAL REVISION HISTORY... 2 IMPORTANT SAFETY NOTICE... 3 1.0 General Information... 5 1.1 System Components... 5 1.2 Specifications... 5 1.2.1 Torque Ranges...
DIGITAL BATTERY TORQUE WRENCH (BC-RAD SELECT) USER GUIDE
 USER GUIDE") DIGITAL BATTERY TORQUE WRENCH (BC-RAD SELECT) USER GUIDE W.CHRISTIE (INDUSTRIAL) LTD CHRISTIE HOUSE, MEADOWBANK ROAD, ROTHERHAM, SOUTH YORKSHIRE, S61 2NF, UK T: +44(0)1709 550088 F: +44(0)1709 550030 E:
DIGITAL BATTERY TORQUE WRENCH (BC-RAD SELECT) USER GUIDE W.CHRISTIE (INDUSTRIAL) LTD CHRISTIE HOUSE, MEADOWBANK ROAD, ROTHERHAM, SOUTH YORKSHIRE, S61 2NF, UK T: +44(0)1709 550088 F: +44(0)1709 550030 E:
GENERAL INFORMATION. H-1649, H-1650, H-1651 H-1653, H-1654 Easy-Count. uline.com. that may hurt accuracy:
 π H-1649, H-1650, H-1651 H-1653, H-1654 Easy-Count counting scale 1-800-295-5510 uline.com 1-800-295-5510 GENERAL INFORMATION Avoid placing the scale in locations that may hurt accuracy: 1. Temperature
FLEXIFLO Companion. Enteral Nutrition Pump OPERATING MANUAL
 FLEXIFLO Companion Enteral Nutrition Pump OPERATING MANUAL TABLE OF CONTENTS PAGE PUMP CHARACTERISTICS Pump Characteristics 3 Pediatric Use 3 Precautions 3 Illustrations 4-5 Control Dial Settings 6 Visual
OPERATION AND MAINTENANCE INSTRUCTION MANUAL. AEU-707A & AEU-707AV2 Implant / Surgery Systems
 OPERATION AND MAINTENANCE INSTRUCTION MANUAL AEU-707A & AEU-707AV2 Implant / Surgery Systems TABLE OF CONTENTS: Introduction.........................1 Package Contents....................1 Setting Up the
User s Manual. Automatic Switch-Mode Battery Charger
 User s Manual Automatic Switch-Mode Battery Charger IMPORTANT Read, understand, and follow these safety rules and operating instructions before using this battery charger. Only authorized and trained service
Quick Guide. brite Advanced Retail scale
 Quick Guide brite Advanced Retail scale 2 METTLER TOLEDO Quick Guide brite Advanced Contents 1 Your new retail scale...4 1.1 Safety instructions...4 1.2 Further documents...4 1.3 Maintenance...4 1.4 Intended
FreeGo. pump. Training Manual. Freedom for life
 FreeGo pump Training Manual Freedom for life Contents Section 1 Set-up What you need Set up the FreeGo pump table top stand 2 Preparation Prepare the FreeGo pump Plug in and turn on Page 1 2 3 4 3 The
CADD Ambulatory Infusion Systems
 CADD Ambulatory Infusion Systems Ordering Information CADD Tubing Sets with Flow Stop Free-Flow Protection CADD Extension Sets CADD Pumps and PharmGuard Software CADD Pump Accessories CADD Ambulatory Tubing
Light / Vario Basal Mode
 MANUAL Infusion Pump PEGASUS LAB Light / Vario Basal Mode CONCEPT / 7-2-2006 Contents Page 1. Introduction 2 1.1 Intended use 2 1.2 Disposables and Accessories 2 1.3 Applications 3 2. Construction and
Cole-Parmer Pro-Spense
 Cole-Parmer Pro-Spense Portable Syringe Pump User s Manual Model #74905-44 Publication 5607-006-REV-A Contents Caution...2 Application Fields...2 Specifications...3 Operation Procedures: Keypad...4 Keypad
SI AT A22. English. Printed: Doc-Nr: PUB / / 000 / 01
 SI AT A22 English 1 Information about the documentation 1.1 About this documentation Read this documentation before initial operation or use. This is a prerequisite for safe, trouble-free handling and
Instructions For Use VATEA. Endodontic Irrigation Device
 Instructions For Use VATEA Endodontic Irrigation Device VATEA Irrigation System Instructions for use 1. Indications for use The VATEA system is intended to be attached to dental handpieces to deliver irrigation
CADD -Solis VIP Ambulatory Infusion Pump. Technical Manual Model 2120
 X CADD -Solis VIP Ambulatory Infusion Pump Technical Manual Model 2120 s The issue date of this Technical Manual is included on the back cover. In the event one year has elapsed between the issue date
Operator's Manual. Storage System. Ultrasound Probe Cabinet. Manufactured by:
 Storage System Ultrasound Probe Cabinet Operator's Manual Manufactured by: CIVCO Medical Solutions 102 First Street South Kalona, IA 52247 USA 319.248.6757 / 800.445.6741 WWW.CIVCO.COM Copyright 2018 All
4L PROVIDER MATERIALS
 PROVIDER MATERIALS 122-406 Getting Started 1. Read the Quick Start Guide and Operator s Manual. 2. Review the accessories. AC & DC Power Supplies 4-way Carry Case with Adjustable Straps Accessory Bag Cannula
OPERATION AND MAINTENANCE INSTRUCTION MANUAL. AEU-17B & AEU-17BV2 Implant / Surgery Systems
 OPERATION AND MAINTENANCE INSTRUCTION MANUAL AEU-17B & AEU-17BV2 Implant / Surgery Systems TABLE OF CONTENTS: Specifications........................i Introduction.........................1 Package Contents....................1
CADD Ambulatory Infusion Systems
 CADD Ambulatory Infusion Systems Ordering Information CADD Tubing Sets with Flow Stop Free-Flow Protection CADD Extension Sets PharmGuard Software CADD Pump Accessories CADD Ambulatory Tubing Sets with
CADD-1. Model 5100 HFX Operator s Manual. Note: Colors are Black and Cyan (as second color) Deltec. Ambulatory Infusion Pump
 Deltec. Ambulatory Infusion Pump") Note: Colors are Black and Cyan (as second color) CADD-1 Ambulatory Infusion Pump Model 5100 HFX Operator s Manual Deltec SIMS Deltec, Inc., St. Paul, MN 55112 U.S.A. i This manual pertains only to the
Note: Colors are Black and Cyan (as second color) CADD-1 Ambulatory Infusion Pump Model 5100 HFX Operator s Manual Deltec SIMS Deltec, Inc., St. Paul, MN 55112 U.S.A. i This manual pertains only to the
CRONO TWIN. Ambulatory infusion pump USER MANUAL
 CRONO TWIN Ambulatory infusion pump USER MANUAL CANÈ S.p.A. Medical Technology Via Cuorgnè 42/a 10098 Rivoli (TO) Italy Tel.+39 011 9574872 - Fax +39 011 9598880 www.canespa.it - mailbox@canespa.it Manual
Instruction for Use (IFU)
") Instruction for Use (IFU) QPORT1700 Rev. A5 February 2016 PROPRIETARY AND CONFIDENTIAL Copyright 2015 by Quality in Flow (QinFlow) Ltd. All rights reserved. No part of this manual may be reproduced or
Instruction for Use (IFU) QPORT1700 Rev. A5 February 2016 PROPRIETARY AND CONFIDENTIAL Copyright 2015 by Quality in Flow (QinFlow) Ltd. All rights reserved. No part of this manual may be reproduced or
SI AT A22. English. Printed: Doc-Nr: PUB / / 000 / 03
 SI AT A22 English 1 Information about the documentation 1.1 About this documentation Read this documentation before initial operation or use. This is a prerequisite for safe, trouble-free handling and
Going home with a CADD Pump - Chemotherapy Medication
 Going home with a CADD Pump - Chemotherapy Medication The CADD pump is used to give medications such as chemotherapy into your vein. The pump can run either all the time (continuous) or regular (intermittent)
c-go 24V/6A 24V/8A 24V/12A
 c-go 24V/6A 24V/8A 24V/12A Battery charger GB Instruction manual 1 Index 1. Product description... 2 2. Safety advices... 3 3. Quick start guide... 4 4. Operation... 4 5. Problem solving... 6 6. Specifications...
PRODUCT CODE: 2M8153, 2M8153K
 PRODUCT CODE: 2M8153, 2M8153K. Prior to using this pump, read this manual carefully to fully understand the pump s functionality and to ensure safe and proper operation. Warning There are risks associated
FLEXIFLO QUANTUM Enteral Pump
 FLEXIFLO QUANTUM Enteral Pump Operating Manual For Enteral Use Only Not for IV Use CONTENTS Pump Characteristics................................................ 3 Pediatric Use......................................................
D Dräger Alcotest 3000 Breath Alcohol Measuring Device
 D Dräger Alcotest 3000 Breath Alcohol Measuring Device Instructions for Use ST-14138-2008_sw.eps Table of Contents For Your Safety....................................... 3 Intended Use..........................................
6 Bay Battery Charger Operation Manual
 6 Bay Battery Charger Operation Manual Sunoptic Technologies 6018 Bowdendale Avenue Jacksonville, FL 32216 USA Customer Service: 904 737 7611 Toll Free 877 677 2832 EC REP RMS UK, Ltd. 28 Trinity Road
OPERATION AND MAINTENANCE INSTRUCTION MANUAL. AEU-707A & AEU-707AV2 Implant / Surgery Systems
 OPERATION AND MAINTENANCE INSTRUCTION MANUAL AEU-707A & AEU-707AV2 Implant / Surgery Systems TABLE OF CONTENTS: Introduction.........................1 Package Contents....................1 Setting Up the
CADD Amulatory Ambulatory Infusion Systems CADD. Ordering Information. CADD Tubing Sets with Flow Stop Free-Flow Protection.
 CADD Amulatory Ambulatory Infusion Systems Ordering Information CADD Tubing Sets with Flow Stop Free-Flow Protection CADD Extension Sets PharmGuard Software CADD Pump Accessories CADD Ambulatory Tubing
Medi-Temp III FW601 Blood/Fluid Warmer Operator s Manual/Service Manual P/N /04
 Medi-Temp III FW601 Blood/Fluid Warmer Operator s Manual/Service Manual P/N 12195-000 3/04 Table of Contents Sec Topic Page 1.0 Indications for Use... 1 2.0 Product Description... 2 3.0 Instructions for
Operating Manual. For Enteral Use Only Not for IV Use
 Operating Manual For Enteral Use Only Not for IV Use CONTENTS Pump Characteristics................................................. 3 Indications for Use..................................................
Model DS7060 Handrail Scale. User Manual
 Model DS7060 Handrail Scale User Manual Doran Scales, Inc. 1315 Paramount Pkwy Batavia, IL 60510 USA 1-800-264-4107 www.doranmedical.com MAN0302 Revision 0.0 TNW 2/20/2013 Section 1. Unpacking and Installation...
KeContact P20. User manual
 KeContact P20 User manual Comments to this manual In this manual you will find warnings against possible dangerous situations. The used symbols apply to the following meanings:!! WARNING! Indicates a potentially
ZOLL Base PowerCharger 4x4
 ZOLL Base PowerCharger 4x4 Operator s Manual CAUTION: DO NOT BLOCK VENTS OR PLACE ANYTHING ON TOP OF THE VENTS. HEAT DAMAGE MAY OCCUR Base PowerCharger TM 4x4 Part Number 9650-0054 Rev. G The revision
Wireless Tire Pressure and Temperature Monitoring System Instruction Manual Model #: TM Cap Sensors
 Wireless Tire Pressure and Temperature Monitoring System Instruction Manual Model #: TM-510 510 Cap Sensors Thank you for purchasing the TST Tire Pressure Monitoring System. With minimal care, your new
SAC SERIES CONTENTS TRIPLE-INTERVAL HIGH PRECISION COUNTING SCALE OPERATION MANUAL 1. INSTALLATION 2. SPECIFICATIONS
 CONTENTS SAC SERIES TRIPLE-INTERVAL HIGH PRECISION COUNTING SCALE 1. INSTALLATION 2. SPECIFICATIONS 2.1 GENERAL SPECIFICATIONS 2.2 MINIMUM PIECES, WEIGHT APPLIED & SAMPLE SIZE WEIGHT SPECIFICATIONS OPERATION
Eickemeyer Operating Manual Syringe Pump "Advanced"
 Eickemeyer Contents Operating Manual Syringe Pump "Advanced" Chapter Page No. Rev.No.0.01 This manual has been compiled to users of the Syringe Pump in Installation, operation & routine maintenance. 1.
KANGAROO JOEY Feeding Pump Instructions for use
 KANGAROO JOEY Feeding Pump Instructions for use Key points: 1. Wash your hands with antibacterial soap before handling your feeding tube and supplies. 2. If you have more than one catheter (example: feeding
User s Manual. Versaflo 200 Syringe Pump. For Veterinary Use Only
 User s Manual For Veterinary Use Only Versaflo 200 Syringe Pump Midmark Corporation 60 Vista Drive, Box 286 Versailles, OH 45380-0286 Customer Service and Technical Service TEL: 1-800-MIDMARK (1-800-643-6275)
INSTRUCTIONS EVIS EXERA XENON LIGHT SOURCE OLYMPUS CLV-160
 INSTRUCTIONS EVIS EXERA XENON LIGHT SOURCE OLYMPUS CLV-160 Contents Contents Labels and Symbols... 1 Important Information Please Read Before Use... 3 Intended use... 3 Instruction manual... 3 User qualifications...
OPERATING MANUAL POWER DRIVE SYSTEM. Cat. No RevH
 OPERATING MANUAL POWER DRIVE SYSTEM Cat. No. 400005 525-1300-00 RevH System components Symbol Definitions Qty Description Catalog Number 1 Power Drive System 300106 1 Controller 300108 1 Cutter Drive
BATTERY CHARGER RS-1000 Instruction Manual
 BATTERY CHARGER RS-1000 Instruction Manual BEFORE USING OUR BATTERY CHARGER RS1000, READ IN DETAILS ALL INSTRUCTIONS CONTAINED IN THIS MANUAL. KEEP THIS MANUAL IN A SAFE PLACE AS YOU MAY NEED TO USE IT
Operating instructions Platform/floor scales
 KERN & Sohn GmbH Ziegelei 1 D-72336 Balingen email: info@kern-sohn.com Phone: +49-[0]7433-9933-0 Fax: +49-[0]7433-9933-149 Internet: www.kern-sohn.com Operating instructions Platform/floor scales KERN
OPERATING MANUAL Digital Diesel Control Remote control panel for WhisperPower generator sets
 Art. nr. 40200261 OPERATING MANUAL Digital Diesel Control Remote control panel for WhisperPower generator sets WHISPERPOWER BV Kelvinlaan 82 9207 JB Drachten Netherlands Tel.: +31-512-571550 Fax.: +31-512-571599
USER MANUAL READ THIS MANUAL BEFORE OPERATING THIS DEVICE. SAVE THIS MANUAL FOR FUTURE REFERENCE. DEALER: THIS MANUAL MUST BE GIVEN TO THE END USER.
 Oxlife INDEPENDENCE INTRODUCTION PORTABLE OXYGEN CONCENTRATOR USER: USER MANUAL READ THIS MANUAL BEFORE OPERATING THIS DEVICE. SAVE THIS MANUAL FOR FUTURE REFERENCE. DEALER: THIS MANUAL MUST BE GIVEN TO
Valor 1000W Series Instruction Manual. Serie Valor 1000W Manual de Instrucciones. Série Valor 1000W Guide de I utilisateur
 Valor 1000W Series Instruction Manual Serie Valor 1000W Manual de Instrucciones Série Valor 1000W Guide de I utilisateur Serie Valor 1000W Bedienungsanleitung Serie Valor 1000W Manuale d instruzioni OHAUS
Endodontic Handpiece (GT) USER MANUAL
 USER MANUAL") Endodontic Handpiece (GT) USER MANUAL 1 USER MANUAL Read Instruction Before Use SECTION 1: General Introduction Cordless Endo Motor GT3 is a kind of endodontic micromotor to operate NI-Ti files, and it
Endodontic Handpiece (GT) USER MANUAL 1 USER MANUAL Read Instruction Before Use SECTION 1: General Introduction Cordless Endo Motor GT3 is a kind of endodontic micromotor to operate NI-Ti files, and it
S D ST215 TAFFOR. ST215 Temperature Programmer User Handbook.
 TAFFOR S D ST215 ST215 Temperature Programmer User Handbook www.staffordinstruments.co.uk See separate handbook for Installation Instructions Issue: 1.000 ST215 Copyright User Handbook 2014 Stafford Instruments
CeraControl. Temperature Programmer User Handbook.
 CeraControl Temperature Programmer User Handbook www.potterycrafts.co.uk See separate handbook for Installation Instructions Issue: 1.01 CeraControl Copyright User 2014 Handbook Potterycrafts Ltd. Date:
18VDC ESB6 Series Cordless Screwdrivers Operation Manual
 18VDC ESB6 Series Cordless Screwdrivers Screwdriver Models : ESB6-8, ESB6-12, ESB6-15, ESB6-22 CAUTION - Please read, understand, and follow all operating and safety instructions in this manual before