http: //
|
|
|
- Madlyn Townsend
- 5 years ago
- Views:
Transcription
1


2 Chapter 1, Serial Number Please read this user manual carefully, it contains instructions for the correct assembly of the model. Please refer to the web site for updates and other important information. VERY IMPORTANT In the Manual bag you will find a product card with your serial number. Please take a moment to register your kit online via our website: 153mm http: // It is extremely important that you take a moment to register your helicopter with us. This is the only way to ensure that you are properly informed about changes to your kit, such as upgrades, retrofits and other important developments. SAB Heli Division cannot be held responsible for issues arising with your model and will not provide support unless you register your serial number. 570mm The Serial number is also engraved in the Aluminum Main Plate. Thank you for your purchase, we hope you enjoy your new Goblin helicopter! SAB Heli Division INDEX 1 Serial Number 2 Important Notes 3 Components and Box 4 Tail System 5 Motor Page 1 6 Installation of Carbon Rod and Tail Fin 7 Installation of Swashplate Servos 8 Head Sytem 9 of the Main Module 10 Installation of ESC, FBL, RX Unit and Anti-Static System 11 Battery and Canopy 12 In flight 13 Maintenance 14 Spare Parts 135mm SPECIFICATIONS Main rotor diameter : 626mm (with 280mm Main Blades) Tail rotor diameter : 139mm (with 50mm Tail Blades) Weight including standard electronics: 735g (excluding batteries) COMPETITION SAB Direct Driver motor included SAB 60 A ESC Included Micro servos size ( Not Included ) Battery compartment: 34x42x75 mm
3 Chapter 2, Important Notes IMPORTANT NOTES *This radio controlled helicopter is not a toy. *This radio controlled helicopter can be very dangerous. *This radio controlled helicopter is a technically complex device which has to be built and handled very carefully. *This radio controlled helicopter must be built following these instructions. This manual provides the necessary information to correctly assemble the model. It is necessary to carefully follow all the instructions. *Inexperienced pilots must be monitored by expert pilots. *All operators must wear safety glasses and take appropriate safety precautions. *A radio controlled helicopter must only be used in open spaces without obstacles, and far enough from people to minimize the possibility of accidents or of injury to property or persons. *A radio controlled helicopter can behave in an unexpected manner, causing loss of control of the model, making it very dangerous. *Lack of care with assembly or maintenance can result in an unreliable and dangerous model. *Neither SAB Heli Division nor its agents have any control over the assembly, maintenance and use of this product. Therefore, no responsibility can be traced back to the manufacturer. You hereby agree to release SAB Heli Division from any responsibility or liability arising from the use of this product. SAFETY GUIDELINES *Fly only in areas dedicated to the use of model helicopters. *Follow all control procedures for the radio frequency system. *It is necessary that you know your radio system well. Check all functions of the transmitter before every flight. *The blades of the model rotate at a very high speed; be aware of the danger they pose and the damage they may cause. *Never fly in the vicinity of other people. DAMAGE LIMITS SAB HELI DIVISION SHALL NOT BE LIABLE FOR SPECIAL, INDIRECT OR CONSEQUENTIAL DAMAGES, LOSS OF PROFITS OR PRODUCTION OR COMMERCIAL LOSS IN ANY WAY CONNECTED WITH THE PRODUCT, WHETHER SUCH CLAIM IS BASED IN CONTRACT, WARRANTY, NEGLIGENCE, OR STRICT LIABILITY. Further, in no event shall the liability of SAB Heli Division exceed the individual price of the Product on which liability is asserted. As SAB Heli Division has no control over use, setup, final assembly, modification or misuse, no liability shall be assumed nor accepted for any resulting damage or injury. By the act of use, setup or assembly the user accepts all resulting liability. If you as the Purchaser or user are not prepared to accept the liability associated with the use of this Product, you are advised to return this Product immediately in new and unused condition to the place of purchase. Page 2
 This warranty is limited to the original Purchaser ( Purchaser ) and is not transferable.")

4 Chapter 2, Important Notes LIMITED WARRANTY. SAB Heli Division reserves the right to change or modify this warranty without notice and disclaims all other warranties, express or implied. (a) This warranty is limited to the original Purchaser ( Purchaser ) and is not transferable. REPLACEMENT AS PROVIDED UNDER THIS WARRANTY IS THE EXCLUSIVE REMEDY OF THE PURCHASER This warranty covers only those Products purchased from an authorized SAB Heli Division dealer. Third party transactions are not covered by this warranty. Proof of purchase is required for warranty claims. (b) Limitations- SAB HELI DIVISION MAKES NO WARRANTY OR REPRESENTATION, EXPRESS OR IMPLIED, ABOUT NONIFRINGEMENT, MERCHANTABILITY OR FITNESS FOR A PARTICULAR PURPOSE OF THE PRODUCT. THE PURCHASER ACKNOWLEDGES THAT THEY ALONE HAVE DETERMINED THAT THE PRODUCT WILL SUITABLY MEET THE REQUIREMENTS OF THE PURCHASER S INTENDED USE. (c) Purchaser Remedy- SAB Heli Division s sole obligation hereunder shall be that SAB Heli Division will, at its option, replace any Product determined by SAB Heli Division to be defective In the event of a defect, this is the Purchaser s exclusive remedy. Replacement decisions are at the sole discretion of SAB Heli Division. This warranty does not cover cosmetic damage or damage due to acts of God, accident, misuse, abuse, negligence, commercial use, or modification of or to any part of the Product. This warranty does not cover damage due to improper installation, operation, maintenance or attempted repair by anyone NOTES FOR ASSEMBLY Please refer to this manual for assembly instructions for this model. Follow the order of assembly indicated. The instructions are divided into chapters, which are structured in a way that each step is based on the work done in the previous step. Changing the order of assembly may result in additional or unnecessary steps. Use thread lockers and retaining compounds as indicated. In general, each bolt or screw that engages with a metal part requires thread lock. It is necessary to pay attention to the symbols listed below: Important Indicates that for this assembly phase you need materials that are in Bag xx. Use retaining compound ( SAB HA115-S ) Use Thread Locker Medium Strength ( SAB HA116-S) Use CA Glue Use Proper Lubricant Bag xx Page 3
. *1 tail rotor servo ( Micro size SAB DS12T). *6 channel radio control system on 2.4 GHz.")


 *Cyanoacrylate adhesive *Pitch Gauge (for set-up) *Soldering equipment (for motor wiring) ESC SUPPORT MAIN BLADES The")
5 Chapter 3, Components and Box ADDITIONAL COMPONENTS REQUIRED INSIDE THE BOX: *1 flybarless 3 axis control unit. *3 cyclic servos ( Micro size SAB DS12C). *1 tail rotor servo ( Micro size SAB DS12T). *6 channel radio control system on 2.4 GHz. *Batteries: 6S 1000/1250mAh ( eg SB128 or SB129 ). Main Box: Fuselage, Landing Gear, Main Blades, Carbon Rod, Blade Holder, ESC Support, Tail Fin, Box 1, Box 2, Manual, Product Card. Box 1: Motor & ESC. Box 2: Bags. MANUAL BLADE HOLDER PRODUCT CARD MAIN BOX TAIL FIN BOX 1 TOOLS, LUBRICANTS, ADHESIVES *Generic pliers. *Hexagonal Screw Driver, size 1.5, 2, 2.5mm. *4.5, 5, 5.5mm Socket wrench. *Medium threadlocker (eg. HA116-S) *Strong retaining compound (eg. HA115-S) *Spray lubricant (eg. Try-Flow Oil) *Grease ( eg. Microlube GL261) *Cyanoacrylate adhesive *Pitch Gauge (for set-up) *Soldering equipment (for motor wiring) ESC SUPPORT MAIN BLADES The assembly process is described in the following chapters. Each chapter provides you with the bag you will need for that chapter. This information is printed in RED color in the top corner of the page. BOX 2 Page 4

")
 Screw M2x5mm")


![3mm [H0794] eg: Microlube](/docs-images/81/83640099/images/6-10.jpg "GL261 Ball Bearing 3x 6x2mm")
 Ball Bearing 3x")

 Page 5 Tail")


")
 Note: Do")
6 Chapter 4, Tail System BAG 1 Tail Rotor Hub Tail Shaft (H0842-S) Tail Hub (H0771-S) Set Screw M3x4mm (HC500-S) Thrust Bearing 3x 6x2,8mm (HC448-S) Screw M2x5mm (HC002-S) Small ID Washer 2.5x 4.5x0.5mm Large ID (H0566-S) Shim 4.5x 5.9x0.3mm [H0794] eg: Microlube GL261 Ball Bearing 3x 6x2mm (HC487-S) Tail Blade Grip (H0798-S) Ball Bearing 3x 6x2mm (HC487-S) Tail Rotor Hub Tail Pitch Slider Flanged Bearing 4x 7x2.5mm (HC486-S) Page 5 Tail Pitch Slider (H0775-S) Tail Pitch Slider Screw M2x6mm (HC004-S) Bushing 2x 3 x 3mm [H0076] Screw M2x6mm (HC004-S) Note: S >> Left Side Uniball Arm (H0777-S) Note: S >> right Side Uniball M2x 4xH3 (H0789-S) Note: Do not over tighten, be careful to avoid stripping the plastic. Tail Pitch Slider Link eg: Microlube GL261

 Bell Crank")
 Bell Crank Support")
 Shims 2.1x 3.6x0.")
![2 [HC508] Tail Pin (H0781-S)](/docs-images/81/83640099/images/7-4.jpg "Screw M1.")
 Tail System Flanged")
 Right")


 Set Screw M2.")
 Note: The set screw")
7 Chapter 4, Tail System BAG 2 Tail Side Plate Screw M1.6x5mm (HC497-S) Flanged Bearing 3x 8x3mm (HC485-S) Bell Crank Lever Flanged Bearing 2x 5x2.5 (HC456-S) Bell Crank Support (H0778-S) Right Tail Plate (H0925-S) Shims 2.1x 3.6x0.2 [HC508] Tail Pin (H0781-S) Screw M1.6x5mm (HC497-S) Left Tail Plate (H0926-S) Tail System Flanged Bearing 3x 8x3mm (HC485-S) Tail Belt HTD 2M 850 (HC491-S) Right Tail Side Plate eg: Microlube GL261 Make sure the pitch slider can move very smooth on the tail shaft. Uniball M2x (H0789-S) Bushing 2x 3 x 3mm [H0076] Note: Do not over tighten, be careful to avoid stripping the plastic. 4xH3 Bell Crank Lever (H0797-S) Tail Pin (H0781-S) Set Screw M2.5x4mm (HC499-S) Tail Pulley (H S) Note: The set screw should align with the hole in the tail shaft. Bell Crank Lever Screw M2x12mm (HC014-S) Page 6
 (SAB DS12T: Frequency")

![Fuselage MiniComet Yellow/Red (H0919-S)[SG283]](/docs-images/81/83640099/images/8-5.jpg "Fuselage MiniComet Black/Red (H0921-S)[SG284] We")

 Red Standard Landing Gear")
 4xH3 Tail Servo Support (H0886-S) Screw")
8 Chapter 4, Tail System BAG 3 Tail Servo Tail Servo is a Micro size ( 12x23mm ) (SAB DS12T: Frequency 760ms/560hz) The distance between the axis and the ball must be between 9-10mm 9-10mm Tail Servo Fuselage MiniComet Yellow/Red (H0919-S)[SG283] Fuselage MiniComet Black/Red (H0921-S)[SG284] We suggest to use Hot Glue to keep the servo wire inside the fuselage. Socket Self Tapping Screw M2.2 x 6mm (HC490-S) SAB Tail Servo (HE019-S) 20mm SAB Servo Horn (HA065-S) Red Standard Landing Gear (H0924-S) Servo Screw (HA065-S) Page 7 Uniball M2x (H0789-S) 4xH3 Tail Servo Support (H0886-S) Screw M2.5x10mm (HC022-S)
")
![Double Sided Tape [HA118] Note:](/docs-images/81/83640099/images/9-4.jpg "Please allow plenty of time for the")


")
 Tail System")
9 Chapter 4, Tail System BAG 3 Tail Boom Tail Locking Element (H0910-S) Double Sided Tape [HA118] Note: Please allow plenty of time for the glue to cure before inserting the plastic ball link onto the threaded rod. Plastic Ball Link (H0779-S) Linkage M2x22mm [H0561] Carbon Rod 2x 3x376mm (HC512-S) Linkage M2x22mm [H0561] Plastic Ball Link (H0779-S) Screw M2x6mm (HC004-S) 10mm 10mm Screw M2x6mm (HC004-S) Tail System Aprox 416mm Page 8


.")
 COMPETITION SAB")
 Front Tail Pulley 76T")
10 Chapter 5, Motor BAG 4.1, BAG 4.2 Motor Before installing the motor, securely solder the connectors in place. (Connectors are included in the ESC bag ). Screw M2x5mm (HC002-S) Screw M2x5mm (HC002-S) COMPETITION SAB Motor (HE015-S) Main Plate (H0873-S) Front Tail Pulley 76T (H0820-S) Page 9 Button Head Cap Screw M2x4mm (HC001-S) Motor


")
")
 Tail")


11 Chapter 5, Motor BAG 4.3 Tail Belt Tensioner Flat Head Cap Screws M2.5x5mm (HC128-S) Finishing Washer M2.5 (H0255-S) Screws M2.5x8mm (HC020-S) FBL Support (H0927-S) Tail Belt Ilder...x2 Column Tail Belt Tensioner (H0872-S) Motor Tail Belt Ilder Tail Belt Ilder Carbon Rod Guide [H0909] Tail Belt Tensioner Flanged Bearing 4x 7x2.5mm (HC486-S) Screws M2.5x8mm (HC020-S) Page 10


12 Chapter 5, Motor BAG 4.4 Screw M2.5x20mm (HC034-S) Finishing Washer M2.5 (H0255-S) Motor BELT DIRECTION ( figure 2 ) IMPORTANT CAUTION! Observe the direction of rotation. Check that the belt is not twisted. TAIL BELT TENSION Page 11 * Loosen the main plate by loosening the 4 M2.5 screws. * Install the belt onto the front pulley in the correct direction of rotation (figure 1). * Rotate the tail drive several times by hand. * Pull the main plate front to increase belt tension. * Tighten the 4 M2.5 screws. * The belt must be very tight.


13 Chapter 6, Installation of Carbon Rod and Tail Fin eg: Microlube GL261 Carbon Rod Red Tail Fin (H0923-S) Page 12

 The linkage ball")
.")
 before installation of the servos")

 Uniball")


14 Chapter 7, Installation of Swashplate Servos BAG 5 INSTALLATION OF SWASHPLATE SERVOS The Cyclic servos are micro size. (SAB DS12C: Frequency 1520ms/333hz) The linkage ball must be positioned between 9/10 mm out on the servo arm (Figure 1). It is advisable to ensure alignment of the servo arms (and sub trim set) before installation of the servos in the model. Proceed with installation following the instructions below. SERVO ASSEMBLY 1, 2, 3 Servo Screw (HA065-S) Uniball M2x 4xH3 (H0789-S) 9-10mm SERVO SUPPORT ASSEMBLY Socket Self Tapping Screw M2.2x6mm (HC490-S) Front Servo Support (H0819-S) Note: Do not over tighten, be careful to avoid stripping the plastic. Back Servo Support [H0830] Servo Arm (HA065-S) Page 13 SAB Cylic Servo included in SG281 (HE018-S) FRONT Socket Self Tapping Screw M2.2x6mm (HC490-S) Socket Self Tapping Screw M2.2x6mm (HC490-S)


15 Chapter 7, Installation of Swashplate Servos BAG 5 Screw M2x8mm (HC008-S) Screw M2x6mm (HC004-S) Page 14

.")
 Main")


")
 Blade Grip")
 Oring 70")
 Blade")
 Add some")


![5mm [H0062] Thrust](/docs-images/81/83640099/images/16-18.jpg "Bearing 4x 9x4mm")
 Page 15 Blade")
16 Chapter 8, Head System BAG 6 Blade Grip Arm ( H0795-S ) Plastic Ball Link (H0779-S)...x2 Flanged Bearing 2x 5x2.5mm (HC456-S) Main Rotor Main Shaft eg: Microlube GL261 DFC Arm Aprox 25.5mm DFC Arm Blade Grip Arm (H0795-S) Screw M2x10mm (HC010-S) Spacer 4x 6,9x0,4mm (H0219-S) Blade Grip Main Hub Main Shaft (H0784-S) Oring 70 Shore (HC501-S) Main Spindle (H0792-S) Blade Grip...x2 Bearing 4x 9x2.5mm (HC403-S) Add some green retaining compount in this zone Main shaft Washer 7x 8,7 x 0.5mm [H0062] Thrust Bearing 4x 9x4mm (HC434-S) Screw M2x6mm (HC004-S) Page 15 Blade Grip Arm Blade Grip (H0785-S) Bearing 4x 9x2.5 (HC403-S) Large ID Small ID Screw M3x6mm (HC044-S)

 Swashplate")
")
")
 Start by")


 Swashplate eg:")
 Feeder")


17 Chapter 9, of the Main Module BAG 7 Bearing Support Ball Bearing 4.77x 12.7x4.99 (HC488-S) Swashplate Uniball M2x (H0789-S) 4xH3 Bearing Support (H0837-S) Ball Bearing 4.77x 12.7x4.99 (HC488-S) Reference pin (Included in H0789-S) Swashplate (H0788-S) Uniball M2x 4xH3 (H0789-S) Start by adding 3 shims to remove any Axial main shaft play. Check that all play has been removed, if required add or remove shims. Shim 5x 7x0.1mm (HC450-S) Swashplate eg: Microlube GL261 Main Rotor Feeder (H0839-S) Feeder Damper (Included in H0839-S) Press inside Set Screw M3x4mm (HC500-S) Bearing Support Note: The set screw should align with the hole in the main shaft. Page 16

 Note: It")


18 Chapter 9, of the Main Module BAG 7 Screw M3x10mm (HC056-S) Note: It is possible to insert the linkage using both sides. Servo Linkage (H0796-S) Servo Linkage (H0796-S) Be careful, do not pinch the wires. Aprox 20mm Page 17


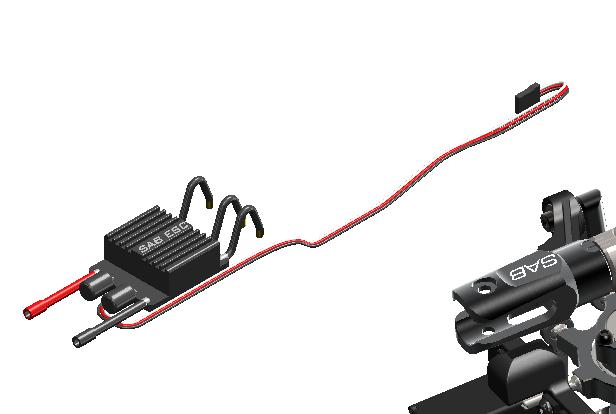

19 Chapter 10, Installation of ESC, FBL, RX Unit and Anti-Static System BAG 8 Screws M2.5x8mm (HC020-S) Finishing Washer M2.5 (H0255-S) Note: Optimize the length of the power cables in accord of the connector used. ESC Support (H0885-S) ESC Wire to RX Zip Tie Page 18


20 Chapter 10, Installation of ESC, FBL, RX Unit and Anti-Static System BAG 8 We suggest the use of a mini FBL system.this allows for easier wire routing considering the small size of this helicopter. Position 1 can be used to install the FBL unit.we recommend using some type of adhesive to ensure that the plugged connections to the receiver and FBL unit are secure. You can with care use a hot glue gun for this purpose. 1 Position 2 or 3 can be used to install your RX unit. Position 2 is generally used for Futaba RX and Spektrum satellite. Position 3 is generally used for Spektrum satellite. Figure 1 and 2 show some example of an installation. [HA035] 2 Fig. 1 3 Double Side Tape [HA035] Hole for Antena Fig. 2 Page 19


 Washer 1,6x 3,8x0,3mm Eyelet Lug 3 Anti-Static Column")
 Head Screw M2x5mm Eyelet Lug Head Screw M1.")

21 Chapter 10, Installation of ESC, FBL, RX Unit and Anti-Static System BAG 14 The use of the antistatic KIT is especially important when the RX unit is located in zone 1. If the RX unit is located in zone 2 and zone 3, the antistatic kit has never been used in our tests and everything worked without issues. Connecting the tail group to the Boom will tend to cancel this dangerous phenomenon. Please follow the assembly instructions: Make a 1.5mm hole in the boom and use a M2x5mm screw to keep the Eyelet Lug in position. Anti-Static 2 1 Bearing 3x 6x2.5mm (HC457-S) Washer 1,6x 3,8x0,3mm Eyelet Lug 3 Anti-Static Column (H0902-S) Head Screw M1.6x4mm (HC496-S) Head Screw M2x5mm Eyelet Lug Head Screw M1.6x5mm (HC497-S) After assembly, use a volt meter (if available) to check continuity between the main shaft and the small bearing on the tail belt. If you see continuity, your kit has been installed correctly. It is also advisable to use some type of anti-static spray or WD40 every 20 flights. This should be applied to the tail belt to maximize the effectiveness of the antistatic system. Page 20


 SAB Battery 6S 1050mAh [SB128]")
22 Chapter 11, Battery and Canopy BAG 9 BATTERY CANOPY / FUSELAGE The mini COMET canopy uses a magnetic locking system. Fit the canopy starting from the bottom pins. (See the picture bellow). To remove the canopy lift up one side fore time where indicated by RED arrow. Here you can see a demonstration video. Strap 205x16mm (HA044-S) SAB Velcro (HA045-S) SAB Battery 6S 1050mAh [SB128] 6S 1250mAh [SB129] Page 21


 Main Blade 280 (280TB) Nylon Nut M2.5 (HC200-S) Nylon Nut M2 (HC492-S) *Check the collective and cyclic pitch. For 3D flight, set about +/- 13. For Speed +15 /-11.")

23 OPERATIONS BEFORE FLIGHT * Check all wiring. Connectors must to be securely in position. * Set up the transmitter and the flybarless system with utmost care. * It is advisable to test the correct settings of the transmitter and flybarless system without main blades and tail blades fitted. * Set up the RPM of the main rotor. Please check follow table: ESC Set Up SAB ESC throttle ( gov. mode ) 60% 75% 85% Competition Motor (HE015 ) rpm *Set up the Main Rotor and Tail Rotor gain. Reference Gain Value 3D Flight Main rotor rpm 3500rpm 4500rpm 5000rpm Head Tail Reference Gain Value Speed Flight Main rotor rpm 5000rpm Head 35 Tail 30 Chapter 12, In Flight BAG 10, BAG 12 *Fit the main blades and tail blades. (Fig.1 and Fig.2) (Important, remove the 2 small protection transparent stickers attached on the main blades). Shoulder M2.5x15mm (HC031-S) Main Blade 280 (280TB) Nylon Nut M2.5 (HC200-S) Nylon Nut M2 (HC492-S) *Check the collective and cyclic pitch. For 3D flight, set about +/- 13. For Speed +15 /-11. *It is important to check the correct tracking of the main blades. *Perform the first flight at a low head speed, ( rpm) After this first flight, do a general check of the helicopter. Verify that all screws and bolts are correctly tightened. Tighten if necessary. IN FLIGHT It is very important to check the model thoroughly after the first 2-3 flights. Check all bolts, screws, belts, ball links, etc. If the model is making strange noises, this can be usually attributed to incorrect belt tensions. Check the belts again and tighten if necessary. Tail Blade 50 (H0828-S) Screws M2x12mm (HC014-S) Page 22


24 Chapter 13, Maintenance * On the Goblin MiniComet, some areas to look for wear include: - Tail belt - O-Ring Dampers * The most stressed bearings are definitely those on the tail shaft and the thrust bearings. Check them frequently. All other parts are not particularly subject to wear. * The lifespan of these components varies according to the type of flying. On average it is recommended to check these parts every 20 flights. In some instances, based on wear, these parts should be replaced every 100 flights. * Periodically lubricate the tail slider movement and its linkages as well as the swashplate movement and its linkages. * To ensure safety you should do a general inspection of the helicopter after each flight. You should check: - Proper belt tension - All screws and bolts remain tight. Page 23

 Washer Ø2.5xØ4.5 x 0.")
 Tail Arm")

 Plastic")


 - 2 x Tail Arm.")
 - 1 x Bell")


25 Chapter 14, Spare Parts Washer Ø7 x Ø8,7 x 0.5mm (H0062-S) Spacer Ø4 x Ø6,9 x 0,4mm (H0219-S) Washer Ø2.5xØ4.5 x 0.5mm (H0566-S) Tail Hub (H0771-S) Tail Pitch Slider (H0775-S) Tail Arm (H0777-S) - 4 x Washer Ø7 x Ø8,7 x 0.5mm. - 2 x Spacer Ø4 x Ø6,9 x 0,4mm x Washer Ø2.5xØ4.5 x 0.5mm. Bell Crank Support (H0778-S) Plastic Ball Link (H0779-S) Tail Pin (H0781-S) - 1 x Tail Hub. - 2 x Washer Ø2.5xØ4.5 x 0.5mm. - 2 x Socket Head Screw M2x5mm. - 1 x Set Screw M3x4mm. - 1 x Tail Pitch Slider Assembled. Tail Pulley 19T (H S) Main Shaft (H0784-S) - 2 x Tail Arm. - 2 x Bushing Ø2 x Ø3 x 3mm. Main Blade Grip (H0785-S) - 1 x Bell Crank Support. - 4 x M1.6x5mm. - 5 x Uniball Arm. - 2 x Tail Pin. - 1 x Tail Pulley 19T Assembled. - 1 x Set Screw M2.5x4mm. - 1 x Main Shaft. - 1 x Main Hub. - 1 x Main Blade Grip. - 1 x Ball Bearing Ø4xØ9x2.5mm. - 1 x Thrust Bearing Ø4xØ9x4mm. - 1 x M2x6mm. - 1 x M3x6mm. Page 24
 Uniball M2xØ4xH3 (H0789-S)")
 Blade Grip Arm Plastic")


 Tail Blade")
 Pulley 76T (H0820-S) Bearing")


26 Chapter 14, Spare Parts Swashplate (H0788-S) Uniball M2xØ4xH3 (H0789-S) Spindle (H0792-S) Shim Ø4.5xØ5.9x0.3 (H0794-S) Blade Grip Arm Plastic (H0795-S) Servo Linkage (H0796-S) - 1 x Swashplate SET. - 5 x Uniball M2xØ4xH x Uniball M2xØ3H x Spindle. - 2 x M3x6mm x Shim Ø4.5xØ5.9x0.3mm. - 1 x Blade Grip Arm Plastic. - 1 x DFC Arm. - 1 x Plastic Ball Link. - 2 x Flanged Bearing Ø2xØ5x x M2x8mm. - 1 x M2x5mm. - 3 x Servos Linkage. Bell Crank Clever (H0797-S) Tail Blade Grip (H0798-S) Front Servo Support (H0819-S) Pulley 76T (H0820-S) Bearing Support (H0837-S) Feeder (H0839-S) - 1 x Bell Crank Clever. - 1 x Bushing Ø2xØ3 x 3mm. - 1 x Uniball M2xØ4xH x Tail Pin. - 2 x Flanged Bearing Ø2xØ5x x M2x12mm. - 1 x Shim Ø2.1 x Ø3.6 x 0.2mm. Page 25-2 x Tail Blade Grip. - 4 x Bearing Ø3 x Ø6 x 2mm. - 2 x Thrust Bearing Ø3xØ6x2.8mm. - 2 x Shim Ø4.5xØ5.9x x Washer Ø2.5xØ4.5 x 0.5mm. - 2 x M2x5mm. - 1 x Front Servo Support. - 1 x Rear Servo Support - 2 x Socket Cap Screws M2x x Socket Cap Screws M2x x Pulley 76T. - 1 x Button Cap Screws M2x x Bearing Support. - 2 x Bearing Ø4.765xØ12.7x4.987mm. - 1 x Feeder. - 1 x Feeder Damper. - 1 x Set Screw M3x4mm.
 Main Plate (H0873-S)")
 Tail Locking Element Goblin")


 Canopy Yellow/Red Goblin Minicomet")
 Canopy Black/Red Goblin Minicomet")
 - 1 x Boom")
27 Chapter 14, Spare Parts Tail Shaft (H0842-S) Tail Belt Guide (H0872-S) Main Plate (H0873-S) ESC Support (H0885-S) Tail Servo Support (H0886-S) Tail Locking Element Goblin Minicomet (H0910-S) - 1 x Tail Shaft. - 1 x Set Screw M2.5x4mm. - 1 x Set Screw M3x4mm. - 2 x Tail Belt Support. - 2 x Tail Belt Ilder. - 1 x Carbon Rod Support. - 4 x Flanged Bearing 4x 7x2.5mm. - 2 x Head Cap Screw M2.5x x Flat Cap Screw M2.5x x Main Plate. - 2 x Nylon Nut M x ESC Support. - 2 x Finishing Washer M x Head Cap Screw M2.5x x Tail Servo Support. - 2 x Head Cap Screw M2.5x x Locking Element. - 2 x Double Side-Tape. - 4 x Head Cap Screw M2x x Washer 2.5x 4.5x0.5. Boom Yellow/Red Goblin Minicomet (H0919-S) Canopy Yellow/Red Goblin Minicomet (H0920-S) Boom Black/Red Goblin Minicomet (H0921-S) Canopy Black/Red Goblin Minicomet (H0922-S) Red Fin Minicomet (H0923-S) Red Landing Gear Minicomet (H0924-S) - 1 x Boom Yellow/Red. - 1 x Canopy Yellow/Red. - 1 x Boom Black/Red. - 1 x Canopy Black/Red. - 1 x Red Fin MiniComet. - 1 x Red Landing Gear. - 2 x Head Cap Screw M2.5x10. Page 26


![[280TB] Double](/docs-images/81/83640099/images/28-5.jpg "Side Tape")


")
![[HC001-S]](/docs-images/81/83640099/images/28-23.jpg "[HC002-S]")
![[HC004-S] - 1 x](/docs-images/81/83640099/images/28-25.jpg "36x100.")


28 Chapter 14, Spare Parts Tail Side Plate Minicomet (H0926-S) FBL Support (H0927-S) Tail Blade 50mm (H0828-S) Main Blade 280mm [280TB] Double Side Tape (HA035-S) Strap 205x16mm (HA044-S) - 1 x Left Side Plate. - 1 x Right Side Plate. - 2 x Flanged Bearing 3x 8x x PBL Support. - 2 x Finishing Washer M x Head Cap Screws M2.5x x Tail Blade 50mm. - 2 x Main Blade 280mm. - 2 x Double Side Tape 30x100x1mm. - 2 x Strap 205x16mm. Velcro Tape 36x100mm (HA045-S) Foam Blade Holder (HA062-S) Servo Horn (HA065-S) [HC001-S] [HC002-S] [HC004-S] - 1 x Velcro Tape 36x100. Page 27-1 x Foam Blade Holder. - 4 x Servo Horn. - 4 x Servo Screws. - 8 x Button Head Cap Screws M2x4mm. - 8 x Screws M2x5mm. - 8 x Screws M2x6mm.

![[HC014-S]](/docs-images/81/83640099/images/29-3.jpg "[HC020-S]")
![[HC022-S]](/docs-images/81/83640099/images/29-4.jpg "[HC031-S]")
![[HC033-S]](/docs-images/81/83640099/images/29-5.jpg "[HC044-S] - 8 x")


![[HC056-S]](/docs-images/81/83640099/images/29-11.jpg "[HC128-S]")
![[HC200-S]](/docs-images/81/83640099/images/29-12.jpg "[HC206-S]")
![[HC403-S]](/docs-images/81/83640099/images/29-16.jpg "[HC434-S]")
![[HC448-S] - 8 x](/docs-images/81/83640099/images/29-17.jpg "Screw M3x10mm.")


29 Chapter 14, Spare Parts [HC008-S] [HC014-S] [HC020-S] [HC022-S] [HC031-S] [HC033-S] [HC044-S] - 8 x Screws M2x8mm. - 8 x Screws M2x12mm. - 8 x Screws M2.5x8mm. - 8 x Screws M2.5x10mm. - 5 x Shoulder M2.5x x Shoulder M2.5x x Hex Nylon Nut M x Screw M3x6mm. [HC056-S] [HC128-S] [HC200-S] [HC206-S] [HC403-S] [HC434-S] [HC448-S] - 8 x Screw M3x10mm. - 8 x Flat Head Cap Screw M2.5x5mm x Nylon Nut M x Nylon Nut M x Ball Bearing Ø4xØ9x2.5mm. - 2 x Thrust Bearing Ø4xØ9x4mm. - 2 x Thrust Bearing Ø3xØ6x2,8mm. Page 28

![[HC485-S] [HC486-S]](/docs-images/81/83640099/images/30-2.jpg "[HC487-S] [HC488-S] - 8")


![[HC492-S] [HC497-S]](/docs-images/81/83640099/images/30-12.jpg "[HC499-S] [HC500-S] -")


30 Chapter 14, Spare Parts [HC450-S] [HC456-S] [HC485-S] [HC486-S] [HC487-S] [HC488-S] - 8 x Shims Ø5xØ7x0,1mm. - 4 x Flanged Bearing Ø2xØ5x2.5mm. - 4 x Flanged Bearing Ø3xØ8x3mm. - 2 x Flanged Bearing Ø4xØ7x2.5mm. - 4 x Ball Bearing Ø3xØ6x2mm. - 2 x Ball Bearing Ø4.765xØ12.7x [HC490-S] [HC491-S] [HC492-S] [HC497-S] [HC499-S] [HC500-S] - 10 x Socket Self Tapping Screw M2.2 x 6mm. Page 29-1 x Tail Belt HTD 2M 850mm. - 8 x Nylon Nut M x Screw M1.6x5mm. - 8 x Set Screws M2.5x x Set Screws M3x4.

![[HC501-S]](/docs-images/81/83640099/images/31-3.jpg "[HC502-S]")
![[HC504-S]](/docs-images/81/83640099/images/31-4.jpg "[HC508-S]")
![[HC512-S]](/docs-images/81/83640099/images/31-5.jpg "[HE014-S] - 4 x")


![[HE018-S]](/docs-images/81/83640099/images/31-15.jpg "[HE019-S]")
![[HE020-S]](/docs-images/81/83640099/images/31-17.jpg "[HE021-S]")
![[HE022-S] - 1 x](/docs-images/81/83640099/images/31-18.jpg "SAB Competition")


31 Chapter 14, Spare Parts [HC501-S] [HC502-S] [HC504-S] [HC508-S] [HC512-S] [HE014-S] - 4 x Damper 70 Shore. - 4 x Damper 90 Shore. - 2 x Motor Seeger. - 8 x Shims 2.1 x 3.6 x 0.2mm. - 1 x Carbon Rod Ø2xØ3x376mm. - 1 x Carbon Rod Guide. - 2 x Linkage M2x x Uniball Arm. - 1 x SAB Standard Motor. [HE015-S] [HE018-S] [HE019-S] [HE020-S] [HE021-S] [HE022-S] - 1 x SAB Competition Motor. - 1 x Cyclic Servo DS12C. - 1 x Tail Servo DS12T. - 1 x Gear Set Tail Servo DS12T. - 1 x Gear Set Cyclic Servo DS12C. - 1 x SAB ESC 60A V4. Page 30

32
GOBLIN 380 KYLE STACY EDITION
 GOBLIN 380 KYLE STACY EDITION - Carefully check your model before each flight to ensure it is airworthy. - Consider flying only in areas dedicated to the use of model helicopters. - Check and inspect the
Specifications ASSEMBLY INSTRUCTIONS
 ASSEMBLY INSTRUCTIONS Specifications Length : 6 mm Height : 218 mm Main Blade : 325 mm Main Rotor Diameter : 723 mm Tail Rotor Diameter : 150 mm Motor Pinion Gear : 16T (14T) Main Drive Gear : 150T Main
Manual LOGO 550 SE.
 Manual LOGO 550 SE www.mikado-heli.de Mikado Model Helicopters GmbH Friedrich-Klausing-Straße 14469 Potsdam Germany phone +49 (0)331 3749-0 fax +49 (0)331 3749-11 www.mikado-heli.de Mikado Model Helicopters
- Carefully check your model before each flight to ensure it is airworthy. - Consider flying only in areas dedicated to the use of model helicopters.
 1 - Carefully check your model before each flight to ensure it is airworthy. - Consider flying only in areas dedicated to the use of model helicopters. - Check and inspect the flying area to ensure it
Manual LOGO 600 SE.
 Manual LOGO 600 SE www.mikado-heli.de Mikado Model Helicopters GmbH Friedrich-Klausing-Straße 4469 Potsdam Germany phone +49 (0) 749-0 fax +49 (0) 749- www.mikado-heli.de Mikado Model Helicopters GmbH
INSTRUCTION MANUAL WARNING
 INSTRUCTION MANUAL WARNING Please make sure you read the entire instruction manual to become familiar with the features of your aircraft before operating. Failure to operate this product correctly can
SPARC! is distributed exclusively by Horizon Hobby, Inc.
 SPARC! is distributed exclusively by Horizon Hobby, Inc. 05 Fieldstone Road Champaign, IL 68 006 CHOKING HAZARD Small parts. Not for children under years. OWNER S MANUAL Keep these instructions for future
PITTS 12 R/C SPORT-SCALE AIRCRAFT ASSEMBLY AND INSTRUCTION MANUAL. Copyright Century UK Limited 2012
 PITTS 12 R/C SPORT-SCALE AIRCRAFT ASSEMBLY AND INSTRUCTION MANUAL 1 Warning: This radio controlled model is not a toy. It requires skill to fly and is not recommended for use by beginners. It should not
Manual GLOGO
 Manual GLOGO 690 www.mikado-heli.de Mikado Model Helicopters GmbH Graf-von-Schwerin-Str. 40 14469 Potsdam Germany phone +49 (0)331 3749-0 fax +49 (0)331 3749-11 www.mikado-heli.de Mikado Model Helicopters
51in Aerobatic Series Sukhoi SU-26M Almost-Ready-to-Fly. Instruction Manual. Specifications
 51in Aerobatic Series Sukhoi SU-26M Almost-Ready-to-Fly Instruction Manual Specifications Wingspan: 51.2 in (1300mm) Length: 51.2 in (1300mm) Wing Area: 581 sq in (37.5sq dm) Flying Weight: 3.5 lb (1600g)
YAK 54 Aerobatic Model Aircraft Assembly and Instruction Manual
 YAK 54 Aerobatic Model Aircraft Assembly and Instruction Manual Warning: This radio controlled model is not a toy. It requires skill to fly and is not recommended for the novice pilot. It should not be
LOGO 400 V-Stabi. Manual.
 Manual www.mikado-heli.de LOGO 400 V-Stabi Mikado Modellhubschrauber Friedrich-Klausing-Straße 2 14469 Potsdam Germany Phone +49 (0)331 23749-0 Fax +49 (0)331 23749-11 www.mikado-heli.de Mikado Modellhubschrauber,
Assembly and Operating Manual
 Dear customer, Assembly and Operating Manual The radio control system Glued joints, suitable adhesives Congratulations on your choice of a factory-assembled model aircraft from the SKYANGEL Hummingbird
Assembly and Operating Manual. SPECIFICATION Length inch (640mm) Wing Span inch (705mm) Flying Weight oz (330g)
 Wing Span inch (705mm) Flying Weight oz (330g)") Assembly and Operating Manual SPECIFICATION Length 25.19 inch (640mm) Wing Span 27.76 inch (705mm) Flying Weight 11.64 oz (330g) Dear customer, Assembly and Operating manual VIPER The Radio Control System
Assembly and Operating Manual SPECIFICATION Length 25.19 inch (640mm) Wing Span 27.76 inch (705mm) Flying Weight 11.64 oz (330g) Dear customer, Assembly and Operating manual VIPER The Radio Control System
INSTRUCTION MANUAL WARRANTY
 INSTRUCTION MANUAL Rotor Diameter: 23 in [588mm] Weight: 20.5 23 oz [580 650 g] Length: 25 in [630mm] Height: 9 in [225mm] Motor: 200W brushless, 28mm diameter Heli-Max guarantees this kit to be free from
Losi (LOSB9810) 2400mAh 11.1V LiPo Transmitter Battery for JR Z1, KoPropo Helios, and Other Radios of Similar Battery Configuration
 2400mAh 11.1V LiPo Transmitter Battery for JR Z1, KoPropo Helios, and Other Radios of Similar Battery Configuration") Losi (LOSB9810) 2400mAh 11.1V LiPo Transmitter Battery for JR Z1, KoPropo Helios, and Other Radios of Similar Battery Configuration Safety Precautions: User Manual 1. Read all safety precautions prior
Losi (LOSB9810) 2400mAh 11.1V LiPo Transmitter Battery for JR Z1, KoPropo Helios, and Other Radios of Similar Battery Configuration Safety Precautions: User Manual 1. Read all safety precautions prior
Assembly and operating instructions. Assembly and Operating Manual
 Assembly and operating instructions Assembly and Operating Manual Dear customer, Assembly and Operating Manual The radio control system Glued joints, suitable adhesives Congratulations on your choice of
Parts List. 7 Chronos. Version 1.1/2014
 Parts List 7 Chronos Version 1.1/2014 Copyright @Compass Model 2014 As we continue to improve our products, this part list may not reflect all recent product amendments. For more information, please refer
Index. Experience in handling and fl ying arc Helicopter are required in order to operate a LOGO 480. Minimum Age : 14 Years
 Manual Mikado Model Helicopters GmbH Graf-von-Schwerin-Str.40 14469 Potsdam Germany phone +49 (0)331 23749-0 fax +49 (0)331 23749-11 www.mikado-heli.de Mikado Model Helicopters GmbH 2016, V1.0023 Index
Assembly and Operating Manual
 Assembly and Operating Manual Dear customer, Congratulations on your choice of a factory-assembled model aircraft from the SKYANGEL Hummingbird range and thank you for placing your trust in us. Very little
SOXOS DB7. Words & Pictures: Raquel Bellot
 SOXOS DB7 Words & Pictures: Raquel Bellot The Soxos DB7, Swiss brand Heli Professional's flagship helicopter. Specifically, it started life as a Soxos 700 which was modified and updated by world champion
Assembly and operating instructions. Assembly and Operating Manual
 Assembly and operating instructions Assembly and Operating Manual Dear customer, Assembly and Operating Manual The radio control system Glued joints, suitable adhesives Congratulations on your choice of
450 scale fuselage A109 INSTRUCTION MANUAL. Produced By:
 450 scale fuselage A109 INSTRUCTION MANUAL Produced By: 1 TABLE OF CONTENTS Additional items required. Adhesives and building supplies.. Disclaimer Parts sheet.... Initial setup. Installing the mechanics..
H-King R/C scale model series. instruction manual
 H-King R/C scale model series instruction manual 1. Please read this manual carefully and follow the instructions of the manual before you use this products. SAFETY INSTRUCTIONS 2. Our airplane is not
Enter your and password then drag the car to the right.
 QUICK START MANUAL THANK YOU! Thank you for purchasing a Team Orion Brushless ESC based on HMX Technology. This ESC features some of the latest brushless technologies developed by our world championship
Ultimate EP. Before commencing assembly, please read these instructions thoroughly. I NSTRUCTI ON M ANUAL. Warning! This model is not a toy.
 I NSTRUCTI ON M ANUAL Before commencing assembly, please read these instructions thoroughly. Ultimate EP (GM05) Specifications Wing Span: 3.5 in / 85 mm Wing Area: 357 sq in / 3 sq dm Flying Weight: 4
8-3 MAIN ROTOR BLADE ATTACHMENT (BLADES NOT INCLUDED)
") 8-3 MAIN ROTOR BLADE ATTACHMENT (BLADES NOT INCLUDED) Two sets required Socket Head Bolt, 4 x 35 mm...2 pcs Hold the 4 mm Lock Nut while tightening using a Wiha 7 mm Nut Driver or equivalent. Lock Nut,
8-3 MAIN ROTOR BLADE ATTACHMENT (BLADES NOT INCLUDED) Two sets required Socket Head Bolt, 4 x 35 mm...2 pcs Hold the 4 mm Lock Nut while tightening using a Wiha 7 mm Nut Driver or equivalent. Lock Nut,
1/10 Competition Ready to Run Truck Little Orchard St. San Jose CA,
 1/10 Competition Ready to Run Truck RC4WD WWW.RC4WD.COM 1855 Little Orchard St. San Jose CA, 95125 E-mail: rcrock@rc4wd.com Check out Precautions To Prevent Serious Personal injury and/or property damage,
35MM Series Nano F15. Assembly and Operating Manual
 35MM Series 2011 Assembly and Operating Manual SPECIFICATION: Length: 21-3/5"(550mm) Wing Span: 15-3/5"(395mm) Flying Weight: 5-4/5oz (165g.) Nano F15 Dear customer, Congratulations on your choice of a
Instruction Manual book
 book ITEM CODE:BH 115. SPECIFICATION Wingspan : 6,000 mm 236,22 in. Length : 2,740 mm 107,87 in. Weight : 17.5kg 38.5Lbs. Radio : 08 channels. Servo : 07-08 HS-5685MH(HITEC) Battery : 2 Cells-Li-Po 7.4V
AVIATOR 25 ARF Almost Ready-to-Fly
 AVIATOR 25 ARF Almost Ready-to-Fly Instruction Manual Specifications Wingspan: 54.3 in (1380mm) Length: 45.2 in (1150mm) Wing Area: 438 sq in (34sq dm) Flying Weight: 3.8 b (1700g) Dear Customer, Congratulations
48in Sbach-342. Instruction Manual. Specifications
 48in Sbach-342 Instruction Manual Specifications Wingspan: 48in (1219mm) Length: 46in (1163mm) Wing Area: 471sq in (30.4sq dm) Flying Weight: 1.8-2.0lb (800-900g) Dear Customer, www.valuehobby.com/48in-s342-arf.html
SKYARTEC MOSQUITO 3D PRO
 SKYARTEC MOSQUITO 3D PRO Instruction & assembly manual Specifications: This micro R/C helicopter has the most advanced capabilities. 120 degree CCPM control, collective main and tail rotors, belt tail
700 scale fuselage MD500 INSTRUCTION MANUAL
 700 scale fuselage MD500 INSTRUCTION MANUAL Produced By: 1 TABLE OF CONTENTS Additional items required. Adhesives and building supplies.. Disclaimer Parts sheet.... Fuselage setup. Installing the mechanics..
INSTRUCTION MANUAL WARRANTY
 INSTRUCTION MANUAL Rotor Diameter: 27.5 in [700mm] Weight: 19 22 oz [580 760g] Length: 25.4 in [645mm] Height: 9 in [225mm] Motor: ElectriFly Ammo 28-45-2700kV (GPMG5215) Heli-Max guarantees this kit to
Operation Manual 3-Axis Stabilization System for Fixed Wing Model Aircraft
 Operation Manual -Axis Stabilization System for Fixed Wing Model Aircraft Table of Contents Introduction 2 Safety Instructions 2 Product Layout 2 HGXA Overview 2 LED Display Overview Specifications Features
Rear Sway Bar for XC90 ( ) 2.5T and T6 ipd mounting kit SBK42
 2.5T and T6 ipd mounting kit SBK42") Dedicated to improving vehicle fun, safety & performance Installation Instructions Rear Sway Bar for XC90 (2003-0) 2.5T and T6 ipd mounting kit SBK2 PI-298 08/06 Thank you for purchasing this anti-sway
Dedicated to improving vehicle fun, safety & performance Installation Instructions Rear Sway Bar for XC90 (2003-0) 2.5T and T6 ipd mounting kit SBK2 PI-298 08/06 Thank you for purchasing this anti-sway
Before commencing assembly, please read these instructions thoroughly.
 I NSTRUCTI ON M ANUAL Before commencing assembly, please read these instructions thoroughly. Specifications Wing Span: 33 in / 850 mm Wing Area: 299 sq in / 19.3 sq dm Flying Weight: 24 oz / 680 g Fuselage
Aviator Pro 120 ARF. Instruction Manual. Specifications
 Aviator Pro 120 ARF Instruction Manual Specifications Wingspan: 110 in (2800 mm) Length: 74 in (1870 mm) Wing Area: 1581sq in (102 sq dm) Weight: 11.4-13.4 lbs (5190-6100 g) Dear Customer, Congratulations
500 scale fuselage Airwolf INSTRUCTION MANUAL. Produced By:
 500 scale fuselage Airwolf INSTRUCTION MANUAL Produced By: 1 TABLE OF CONTENTS Additional items required. Adhesives and building supplies.. Disclaimer Parts sheet.... Initial setup. Installing the mechanics..
AC/DC Powered Peak Detection Fast Charger for 4- to 8-Cell Ni-Cd & Ni-MH Batteries
 AC/DC Powered Peak Detection Fast Charger for 4- to 8-Cell Ni-Cd & Ni-MH Batteries 2010 Horizon Hobby, Inc. 4105 Fieldstone Road Champaign, IL 61822 USA Dynamite products are distributed exclusively by
RIGGING THE FLIGHT CONTROLS
 RIGGING THE FLIGHT CONTROLS Rigging refers to the installation and adjustment of the rods that move flight surfaces in response to inputs from the controls of the helicopter. These rods are cut to length,
Specifications. Wingspan: 600mm (23-5/8") Length: 460mm (18-1/8") 3.7V 1S 300mAh LiPo (2 included) Coreless Direct Drive
 Length: 460mm (18-1/8) 3.7V 1S 300mAh LiPo (2 included) Coreless Direct Drive") Specifications Wingspan: 600mm (23-5/8") Length: 460mm (18-1/8") Flying Weight: 60g (2-1/8 oz.) Battery: 3.7V 1S 300mAh LiPo (2 included) Motor: Coreless Direct Drive Charger: USB 1S LiPo Charger Transmitter:
Specifications Wingspan: 600mm (23-5/8") Length: 460mm (18-1/8") Flying Weight: 60g (2-1/8 oz.) Battery: 3.7V 1S 300mAh LiPo (2 included) Motor: Coreless Direct Drive Charger: USB 1S LiPo Charger Transmitter:
Installation instructions
 Installation instructions Akrapovič System: Evolution and Optional Front Link Pipe Set for the Porsche Cayenne Turbo (type 958) Porsche Cayenne Turbo S (type 958) www.akrapovic.com Installation instructions
Instruction Manual. Wingspan in. (578mm) Wing Chord in. (190.5mm) Wing Area sq. in. Length
 Wing Chord in. (190.5mm) Wing Area sq. in. Length") Instruction Manual Wingspan 22.75 in. (578mm) Wing Chord 7.50 in. (190.5mm) Wing Area 75.5 sq. in. Length 13.75 in (349mm) Flying Weight 1.5 oz. (41 grams) Battery 1S 3.7V 150mAh LiPo 3-in-1 Board 2.4Ghz
Instruction Manual Wingspan 22.75 in. (578mm) Wing Chord 7.50 in. (190.5mm) Wing Area 75.5 sq. in. Length 13.75 in (349mm) Flying Weight 1.5 oz. (41 grams) Battery 1S 3.7V 150mAh LiPo 3-in-1 Board 2.4Ghz
Heliporter. Owner s Manual. 150 Series. by Paravion Technology, Inc.
 Heliporter by Paravion Technology, Inc. Owner s Manual 150 Series Introduction Congratulations, you have purchased one of the finest helicopter ground handling vehicles on the market today. We at Paravion
96in Super Decathlon ARF
 96in Super Decathlon ARF Instruction Manual Specifications Wingspan: 96in (2438mm) Length: 63.5 in (1614mm) Weight: Approx. 13lbs (6.5kg) 1 Dear Customer, Congratulations on your purchase of Super Decathlon
Manual LOGO 500.
 Manual LOGO 500 www.mikado-heli.de Mikado Modellhubschrauber Friedrich-Klausing-Straße 2 14469 Potsdam Germany phone +49 (0)331 23749-0 fax +49 (0)331 23749-11 www.mikado-heli.de Mikado Model Helicopters
INSTALL GUIDE Silverado/Sierra L/6.2L
 INSTALL GUIDE 2014-2017 Silverado/Sierra 1500 5.3L/6.2L TABLE OF CONTENTS 3 GETTING STARTED 3 PARTS LIST 4 INSTALLATION INSTRUCTIONS 4 REMOVING THE STOCK INTAKE ASSEMBLY 7 INSTALLING THE AIR FILTER 8 INSTALLING
Twister 3D Storm The Ultimate 3D Electric Helicopter
 The Ultimate 3D Electric Helicopter SPECIFICATIONS Main rotor diameter 720mm Tail rotor diameter..135mm Length..630mm Weight (without receiver & battery)....500g (17.5oz) CONTENTS 1...Assembled helicopter
Before commencing assembly, please read these instructions thoroughly.
 I NSTRUCTI ON M ANUAL Before commencing assembly, please read these instructions thoroughly. (GM034XM) Specifications Wing Span:28.7 in / 730 mm Wing Area:310 sq in / 20 sq dm Flying Weight:28.5 oz / 805
Newsletter. New Product Information New Design & Specification Miscellaneous July 10. Availability:
 The very high agility and the maximum power of the Titan X50 is, because of the optimum weight and the great main rotor head perfect. The result is a lot of fun in flying hard 3D. In addition the precision
Section 13. Tail Rotor Drive. RotorWay International A600 TALON Construction Manual. Section 13. Page A
 RotorWay International Page A Tail Rotor Drive Procedures covered in this section: Install driveshafts and gearboxes; install drive belt and tensioner; fabricate and install tail rotor pitch actuator arms;
Assembly instructions
 Assembly instructions Step up to Excellence with X-cell 2 Table of Contents Kit Introduction...4 R/C Helicopter Safety...4 Warning...4 General Guidelines...4 Academy of Model Aeronautics (AMA)...5 Kit
YAK-55M 1.8. Forget the rest - a YAK ist the best! Assembly instructions. Gernot
 YAK-55M 1.8 Assembly instructions Forget the rest - a YAK ist the best! Gernot Table of contents 1.Specifications (metric units)...2 2.Recommended Setups...2 3.Required tools and adhesives:...2 4.Warning...3
ASSEMBLY / OPERATION INSTRUCTIONS. Low Profile Motorcycle Dolly
 ASSEMBLY / OPERATION INSTRUCTIONS 1,500LB CAPACITY Low Profile Motorcycle Dolly Model: 03-CG1500-01(B1) WARNING BEFORE USE PLEASE READ ALL WARNINGS AND INSTRUCTIONS TO PREVENT SERIOUS INJURY Drop-Tail
5) The trailing arm should then pivot smoothly on the chassis. 6) Install the rear bolt. 7) Place one drop of blue Loctite
 The trailing arm should then pivot smoothly on the chassis. 6) Install the rear bolt. 7) Place one drop of blue Loctite") INSTALLATION INSTRUCTIONS 1301 / 1302 / 1305 / 1306 THANK YOU FOR CHOOSING HOTCHKIS PERFORMANCE PRODUCTS Removal of Stock Lower Trailing Arms 1) Place car on level surface. 2) Support rear of the car on
INSTALLATION INSTRUCTIONS 1301 / 1302 / 1305 / 1306 THANK YOU FOR CHOOSING HOTCHKIS PERFORMANCE PRODUCTS Removal of Stock Lower Trailing Arms 1) Place car on level surface. 2) Support rear of the car on
Specifications. 750mm (29.52 inches) 520mm (20.47 inches) 180 Brushed/Geared 10A Brushed. PASS (Pilot Assist Stability Software)
 520mm (20.47 inches) 180 Brushed/Geared 10A Brushed. PASS (Pilot Assist Stability Software)") Wingspan: Length: Flying Weight: Battery: Motor: ESC: Charger: Gyro: Transmitter: Specifications 750mm (29.52 inches) 520mm (20.47 inches) 210g (7.40 oz.) 7.4V 2S 500mAh LiPo 180 Brushed/Geared 10A Brushed
Wingspan: Length: Flying Weight: Battery: Motor: ESC: Charger: Gyro: Transmitter: Specifications 750mm (29.52 inches) 520mm (20.47 inches) 210g (7.40 oz.) 7.4V 2S 500mAh LiPo 180 Brushed/Geared 10A Brushed
Instruction Manual book
 book Item code:bh131 SPECIFICATION Wingspan : 3,000 mm 118.1 in. Length : 1,600 mm 62.99 in. Weight : 2.2 kg 4.84 Lbs. Radio : 05 channels. Servo : 06 mini servos. Electric Motor: BOOST 40 Battery : 3celIs
Single Post Caliper Brake VC500
 Single Post Caliper Brake VC500 1 In accordance with Nexen s established policy of constant product improvement, the specifications contained in this manual are subject to change without notice. Technical
Instruction Manual book
 Instruction Manual book ITEM CODE:BH118. SPECIFICATION Wingspan : 1,050 mm 41.34 inches. Length : 950mm 37.4 inches. Weight : 1 kg 2.2 lbs. Radio : 04 channels. Servo : 4 mini servos. Motor : KMS 2814/05
Heliporter. Owner s Manual. H250 Series. By Paravion Technology, Inc. Copyright 2017 Paravion Technology, Inc.
 By, Owner s Manual H250 Series Copyright 2017, Introduction Congratulations, you have purchased one of the finest helicopter ground handling vehicles on the market today. We at, have strived to engineer
3DX 450 ASE V3 COPYRIGHT. CONTENTS 2 Safety Note s 3...Hardware Identification 4...Assembly Instructions 5...Maintenance Main Rotor Assembly
 3DX 450 ASE V3 COPYRIGHT Instruction Manual Author: Per Backman Date: 10/30/2006 CONTENTS 2 Safety Note s 3...Hardware Identification 4...Assembly Instructions 5...Maintenance 6-8...Main Rotor Assembly
Blackjack 26 Brushless EP Catamaran Boat Owners Manual
 Blackjack 26 Brushless EP Catamaran Boat Owners Manual Specifications Hull Length...26.75 in (679mm) Beam...8.375 in (213mm) Motor... Water-cooled Hi-performance A3630-1500 Brushless Motor Radio System...Pro
Read all instructions before installing and using. Installer: This manual must be delivered to the end user.
 Installation Instructions Vacuum / Magnet Mount Kits IMPORTANT! Read all instructions before installing and using. Installer: This manual must be delivered to the end user.! WARNING! Failure to install
ASSEMBLY / OPERATION INSTRUCTIONS. Low Profile / Stand-Up Motorcycle Dolly
 ASSEMBLY / OPERATION INSTRUCTIONS 1,500LB CAPACITY Low Profile / Stand-Up Motorcycle Dolly Model: 03-CGPR1500-01(C) WARNING BEFORE USE PLEASE READ ALL WARNINGS AND INSTRUCTIONS TO PREVENT SERIOUS INJURY
Installation instructions
 Installation instructions Akrapovič Exhaust System: Slip-On for the Laborghini Gallardo 550-2 Coupe Laborghini Gallardo 560-4 Coupe / Spyder Laborghini Gallardo 570-4 Coupe / Spyder Congratulations on
E24-E28 M88 & S38 Mass Air Flow Conversion System Instruction Manual
 E24-E28 M88 & S38 Mass Air Flow Conversion System Instruction Manual Miller Performance Ltd. Tel 855.BMW.TUNER 2009 Abbotsford Way, Abbotsford BC, V2S 6Y5 Millerperformancecars.com Table of Contents: 1.
IMPORTANT READ ME FIRST
 IMPORTANT READ ME FIRST Thank you for purchasing your Kushlan Mixer. We hope that you will enjoy using it for many years to come. SHOULD YOU REQUIRE ANY SET-UP OR OPERATING ASSISTANCE WITH YOUR PRODUCT,
7.3L POWERSTROKE BANJO BOLT KIT Fits L Powerstroke Diesel. Installation Guide
 7.3L POWERSTROKE BANJO BOLT KIT Fits 94-03 7.3L Powerstroke Diesel Installation Guide INSPECT CONTENTS OF THIS KIT THOROUGHLY BEFORE STARTING THE INSTALLATION PROCESS! IF YOU FIND A PROBLEM WITH YOUR PACKAGE:
Very Fun & Easy NOTICE
 Very Fun & Easy NOTICE NOTICE All instructions, warranties and other collateral documents are subject to change at the sole discretion of our company. For up-to-date product literature, Visit our website
AVANT Aurora Ultimate 90
 2 AVANT Aurora Ultimate 90 Assembly Manual AVANT Aurora Ultimate 90 Assembly Manual V1.08 LIABILITY DISCLAIMER This kit is for a radio controlled (RC) helicopter. RC Helicopters are not toys. Moving parts
Model AS-RC3260 TV Cart. Rolling Cart for Audio Mount System & Flat Panel TVs
 Model AS-RC3260 TV Cart Rolling Cart for Audio Mount System & Flat Panel TVs GETTING STARTED Introduction Congratulations on the purchase of your new Helios AS-RC3260 Rolling Cart. For maximum benefit,
Instruction Manual book
 book ITEM CODE:BH 139 SPECIFICATION Wingspan : 1,450mm 57.09 in. Length : 1,140 mm 44.88 in. Weight : 3.3kg 7.26 Lbs. Radio : 05 channels. Servo : 07 mini servos+ 3servos Retracts (FUTABA S3170G) EDF:
ATV TRACK KIT. Operator s Manual Installation Instructions Service Instructions Replacement Parts List. Effective Date: October, 2012
 p/n 2258-642 ATV TRACK KIT Operator s Manual Installation Instructions Service Instructions Replacement Parts List Track Assembly Kits (p/n 1436-204) Mounting Assembly Kits (p/n 1436-205) 1436-815) Effective
Technical Support Line: (952) Fax Line: (952) Hanover Ave. Lakeville, MN
 Fax Line: (952) Hanover Ave. Lakeville, MN") Technical Support Line: (952) 985-5675 Fax Line: (952) 985-5679 21730 Hanover Ave. Lakeville, MN 55044 www.qa1.net INSTALLATION INSTRUCTIONS QA1 P/N CC104MU Camber Caster Plates 1994-2004 Mustang 5.0/4.6
Technical Support Line: (952) 985-5675 Fax Line: (952) 985-5679 21730 Hanover Ave. Lakeville, MN 55044 www.qa1.net INSTALLATION INSTRUCTIONS QA1 P/N CC104MU Camber Caster Plates 1994-2004 Mustang 5.0/4.6
20250 Module Installation Guide
 20250 Module Installation Guide 2013.5-2017 RAM 6.7L Cummins Up to 90HP Gain 1-3 MPG Fuel Savings AgDieselSolutions.com Adjustable switch connector Power +12 volts (Red wire) & Ground (Black wire) Injector
AGCO Conversion Manual a HEADSIGHT.COM
 AGCO 3300 Conversion Manual 09040404a HEADSIGHT.COM 574.546.5022 About Headsight Headsight Contact Info Headsight, Inc. 4845 3B Road Bremen, IN 46506 Phone: 574-546-5022 Fax: 574-546-5760 Email: info@headsight.com
Assembly and Operating Manual. 3D cap-232. Specification: *Length: 25-9/10"(655mm) *Wing Span: 29-3/5"(750mm) *Flying Weight: 15-9/10 oz (450g)
 *Wing Span: 29-3/5(750mm) *Flying Weight: 15-9/10 oz (450g)") Assembly and Operating Manual 3D cap-232 Specification: *Length: 25-9/10"(655mm) *Wing Span: 29-3/5"(750mm) *Flying Weight: 15-9/10 oz (450g) Dear customer, Congratulations on your choice of a factory-assembled
Assembly and Operating Manual 3D cap-232 Specification: *Length: 25-9/10"(655mm) *Wing Span: 29-3/5"(750mm) *Flying Weight: 15-9/10 oz (450g) Dear customer, Congratulations on your choice of a factory-assembled
Thank You. for purchasing an Edelbrock Nitrous Oxide Injection System. Please take the time to read and understand the following.
 Thank You. for purchasing an Edelbrock Nitrous Oxide Injection System. Nitrous Oxide injection is one of the most exciting performance enhancements for the dollar invested on the market today. With the
Bimini Top, Bimini Top Plus for Jeep Wrangler (YJ) Vehicles Items #141031XX and #143031XX
 Vehicles Items #141031XX and #143031XX") MT_YJ_BIMINI_INST_LTR_6.qxp_Layout 1 4/20/17 4:21 PM Page 1 Installation Instructions Bimini Top, Bimini Top Plus for 1987-1995 Jeep Wrangler (YJ) Vehicles Items #141031XX and #143031XX Bimini Top Plus
MT_YJ_BIMINI_INST_LTR_6.qxp_Layout 1 4/20/17 4:21 PM Page 1 Installation Instructions Bimini Top, Bimini Top Plus for 1987-1995 Jeep Wrangler (YJ) Vehicles Items #141031XX and #143031XX Bimini Top Plus
EZ-R7 T-Plug. Universal 7-Pin Heavy Duty Plug For Vehicles equipped with 7-Way Trailer Connectors. Installation Instructions and Product Warranty
 EZ-R7 T-Plug Universal 7-Pin Heavy Duty Plug For Vehicles equipped with 7-Way Trailer Connectors Installation Instructions and Product Warranty Professional Installation Required Thank you for purchasing
SHAW-BOX INSTRUCTIONS AND PARTS LIST SHAW-BOX RIGID MOUNT I-BEAM AND PATENTED TRACK TROLLEYS (PUSH & HAND GEARED - 1/2 THRU 15 TON RATED LOADS)
") SHAW-BOX INSTRUCTIONS AND PARTS LIST SHAW-BOX RIGID MOUNT I-BEAM AND PATENTED TRACK TROLLEYS (PUSH & HAND GEARED - 1/2 THRU 15 TON RATED LOADS) GENERAL SHAW-BOX Rigid Mount I-Beam Trolleys are designed
SHAW-BOX INSTRUCTIONS AND PARTS LIST SHAW-BOX RIGID MOUNT I-BEAM AND PATENTED TRACK TROLLEYS (PUSH & HAND GEARED - 1/2 THRU 15 TON RATED LOADS) GENERAL SHAW-BOX Rigid Mount I-Beam Trolleys are designed
25-Size Float Set. Assembly Manual
 25-Size Float Set Assembly Manual Table of Contents Introduction...2 Tools Required...2 Adhesives Required...3 Using the Manual...3 Replacement Parts...3 Limited Warranty Period...4 Limited Warranty &
Installation instructions
 Installation instructions Akrapovič Exhaust System: Slip-On for the Harley-Davidson Sportster *503145* www.akrapovic.com www.akrapovic.com Congratulations on purchasing an Akrapovič exhaust system. Please
Model AS-FM64 Wall Mount. Full Motion Television Wall Mount
 Model AS-FM64 Wall Mount Full Motion Television Wall Mount Getting Started Introduction Congratulations on the purchase of your new Audio Solutions AS-FM64 Television Wall Mount. For maximum benefit, please
Instruction Manual book
 Instruction Manual book Item code:bh133 SPECIFICATION Wingspan : 1,400 mm 55.12 in. Length : 1,350 mm 53.15 in. Weight : 3.7 kg 8.14 Lbs. Radio : 08-09 channels. Servo : 08-09 servos. EDF : Turingy SK3
Quadratec 2 Coil Spacer Lift Kit
 Quadratec 2 Coil Spacer Lift Kit Installation Manual: for 2007-Current Wrangler (JK) # 16400.0X42 PARTS LIST: JK 2 Front Coil Spacers - QTY 2 JK 2 Rear Coil Spacers - QTY 2 2 Front Bump Stop Spacers -
Pitts Challenger m (100cc) MANUAL
 MANUAL") Pitts Challenger 87 2.20m (100cc) MANUAL 1- Introduction: WELCOME TO THE PILOT-RC TEAM! Thank you for choosing a Pilot-Rc plane as your next model. We hope that you enjoy many successful and exhilarating
Pitts Challenger 87 2.20m (100cc) MANUAL 1- Introduction: WELCOME TO THE PILOT-RC TEAM! Thank you for choosing a Pilot-Rc plane as your next model. We hope that you enjoy many successful and exhilarating
Important Notes Note Recommended Equipment NOT included in kit
 Important Notes This helicopter is recommended for skilled intermediates and advanced RC helicopter flyers. Make sure to read and follow all the instructions in this manual, including all accessories.
Installation instructions
 Installation instructions Akrapovič Exhaust System: Evolution for the Ducati 1199 Panigale Ducati 1199 Panigale S Ducati 1199 Panigale R *503760* www.akrapovic.com www.akrapovic.com Congratulations on
IMPORTANT READ ME FIRST
 IMPORTANT READ ME FIRST Thank you for purchasing your Kushlan Mixer. We hope that you will enjoy using it for many years to come. SHOULD YOU REQUIRE ANY SET-UP OR OPERATING ASSISTANCE WITH YOUR PRODUCT,
szd-45 ogar Before commencing assembly, please read these instructions thoroughly. I NSTRUCTI ON M ANUAL Warning! This model is not a toy.
 I NSTRUCTI ON M ANUAL Before commencing assembly, please read these instructions thoroughly. szd-5 ogar Specifications Wing Span: 98.5 in / 2500 mm Wing Area: 667 sq in / 3 sq dm Flying Weight: 8 oz /
SPARC! is distributed exclusively by Horizon Hobby, Inc.
 SPARC! is distributed exclusively by Horizon Hobby, Inc. 4105 Fieldstone Road Champaign, IL 61822 2006 OWNER S MANUAL Keep these instructions for future reference as they contain important information.
Washington, DC U.S.A. SC-M150-00X Axial Flux, Permanent Magnet, DC Brushless Electric Motor Operating Manual Version 1.00
 Washington, DC U.S.A. SC-M150-00X Axial Flux, Permanent Magnet, DC Brushless Electric Motor Operating Manual Version 1.00 1 TABLE OF CONTENTS 1. SC-M150 MOTOR SERIES...3 2. ELECTRICAL CONNECTIONS...3 2.1
II Bagger/III Bagger Adjustable FLH/FLT Arms Installation Instructions
 II Bagger/III Bagger Adjustable FLH/FLT Arms Installation Instructions Thank you for a choosing a Supreme Legends USA product. Supreme Legends Adjustable Extended Bagger Arms are designed to give your
RECOMMENDED MOTOR AND BATTERY SET UP
 SPECIFICATION - Wingspan: 6000mm (236.2 in) - Length: 2873mm (113.1 in) - Flying weight: 14-18 kg - Wing area: 219.4 dm2 - Wing loading: 64g/dm2 - Wing type: HQ airfoils - Covering type: Genuine ORACOVER
Read this entire manual before operation begins.
 Read this entire manual before operation begins. Record below the following information which is located on the serial number data plate. Serial No. Model No. Date of Installation Contents Specifications.............
4105 Fieldstone Road Champaign, IL
 TM Sparc! is distributed exclusively by Horizon Hobby, Inc. 05 Fieldstone Road Champaign, IL 68 006 SPJ Hoverflash manual.indd 8/0/06 8:: AM TM TM OWNER S MANUAL Keep these instructions for future reference
Assembly Instructions
 TOOLS REQUIRED: _(2) 3/4 wrenches _7/16 wrench _3/8 wrench _5/16 allen wrench Display/work stand is for assembly procedure only. May be purchased separately. CONTENTS (PARTS & HARDWARE) _(1) Receiver tube