Fiber Optic / Pneumatic whips
|
|
|
- Rose Wheeler
- 5 years ago
- Views:
Transcription


1 Fiber Optic / Pneumatic whips I have seen several air cannons as well as several "air blasters" on the Internet. One idea really caught my eye. I have no idea where it originated, or even where I saw it first, but I will finish this version of it for the Hinton Haunted House, I don't know the name of this prop, so for the time being, it will be called the Pneumatic Whips prop. Air enters the female coupling at right and exits through the four brass ferrule fittings inserted into each "tee." I have attached a twelve inch length of vinyl tubing to each fitting. (See photo) The intent here is to use enough air to make the tubing whip around erratically. I found the page that inspired me. (...give credit where credit is due.) In the dark, this prop would be great. Visitors to the haunt could hear the air hissing through the hose, and feel the air blowing around ankle level. With soft black rubber tubing (which I plan to add after testing) this prop would be undetectable in a dark hallway. This is where Brian's creative genius came in. He suggested we find a way to add a light to each hose. The effect would resemble an angry, ankle-biting firefly. The plan is to trigger the air and light to activate with a momentary switch.
 would interfere with the necessary flexibility.")


2 How do we put a light at the end of a hose and still maintain the whipping effect? I guess that rules out LED's. The super bright variety would certainly be bright enough, but the wires (whether inside the tubing or out) would interfere with the necessary flexibility. We would never forget the safety issue either. A piece of hard plastic could possibly do some damage. We want to MIMIC the ankle-biting fireflies....so, how about fiber optics? As of May, 2002, I have only purchased the Fiber Optic Cable. I have not assembled the "lighting" part of this prop. I would, however, gladly recommend the source from which this cable was acquired: The Fiber Optic Store I went to this online store with absolutely no knowledge of Fiber Optics. After reading through their pages for about thirty minutes, I ordered some cable with great confidence. The product arrived quickly, and the company contacted me within a few days just to "check up" on things. Fiber Optic Pneumatic Whips Part 2 - Pneumatics This prop, as with most I've built, has been re-engineered. After initial testing, I discovered that the vinyl tubing I attached was rather stiff and did not produce the effect I sought. At left is a photo of Latex Rubber Tubing 1/8" I.D., 1/4" O.D., 1/16" Wall. And Clear Vinyl Tubing.170" I.D., 1/4" O.D. 1/32" Wall. I purchased this Latex Rubber Tubing from McMaster-Carr Supply Company. (Part # 5234 K41) This is perfect for this prop. It is supple and resilient, and the dimensions work well with the brass ferrule fittings already installed on the prop. The fittings I used were purchased at Home Depot. At left is a 1/4" n.p.t. - compression fitting. Center and right are the tubing insert and ferrule compression nut. These two components work together to provide a strong leak-free connection without crushing or otherwise distorting the tubing.


 but it does consume a considerable amount of air.")
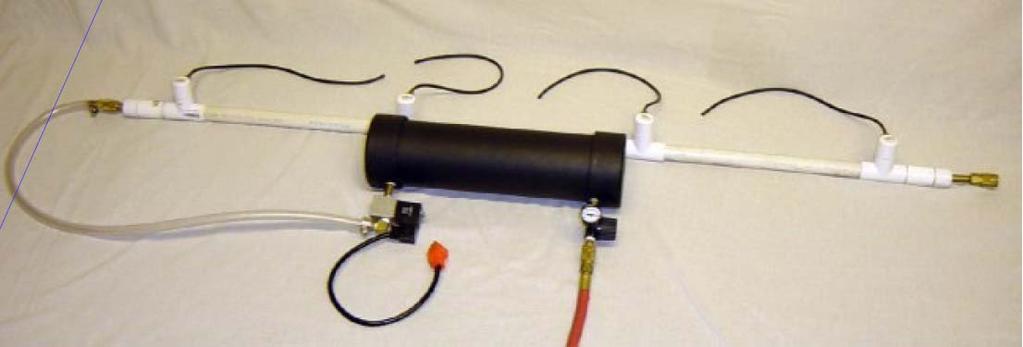
3 First drill a 7/16" hole through the 3/4" cap and the pipe inside. Then use a 1/4 n.p.t. (pipe thread) tap to create threads in the p.v.c. Pipe threads are tapered, so don't thread the tap in fully. Doing so will create a joint that is too large. The p.v.c. is soft enough that tapping the hole isn't really necessary, but it does make assembly easier. Next slide the compression nut over the tubing, making sure the threads face "out" With just a short length of tubing exposed, push the insert into the tubing. This is much easier if you moisten the insert first. Thread the 1/4" n.p.t. - compression fitting into the hole you tapped out earlier, then thread the new tubing assembly onto the compression fitting. That's about it for the "business end" of this project. The F.O.P.W. I built has four hoses, spaced 14" apart. At 60 p.s.i., these really whip around nicely. (15 p.s.i. each) but it does consume a considerable amount of air. Above is a photo of the completed Pneumatic portion of the Whips prop. Air enters the prop through the red hose (bottom right.)

4 A pressure gauge/regulator allows for precise control and monitoring of reservoir air pressure. (which will be approx. 60 p.s.i.) A pneumatic reservoir holds a large amount of air. This helps feed this props over-sized appetite. A solenoid valve (bottom center) will open with a prop controlling device (probably a momentary switch) I installed a quick connect fitting on each end of the 3/4" p.v.c. main line. I thought I would be able to connect 2 units creating a whipping prop nine feet long. Unfortunately, I doubt my air compressor will be able to supply sufficient air to run this device and the other pneumatic props I'll employ in the 2002 Haunted House. (if you're wondering, it's a 5 h.p., 25 gallon oil-free compressor.) Even though the new tubing's inner diameter is half the size, this device still draws a lot of air. One bit of advice... Make sure the solenoid valve you intend to use will supply enough air pressure/volume. I first used a skinner valve with 1/8" ports... Big Failure. Now I have an ARO valve with 1/4" ports... Works Great. Fiber Optic Pneumatic Whips Part 3 Fiber Optics So, you want to send light through a cable, ***any*** length, around corners, up or down grade? Well, this is the product for you. The inside wall of fiber optic cable acts like a mirror. Light is reflected along its entire length up to the point where the cable is cut, kinked, or otherwise terminated. You'll find many options when searching for fiber optic cable. New, surplus, used, and pre-assembled special cables are the most common. I elected to do business with the Fiber Optic Store. This website was quite helpful in deciding which product I would need. I bought single strand cable in a few different diameters. (.25 mm.,.5 mm.,.75 mm., and 1 mm.) Obviously, the larger diameter cable will appear brighter when lit, but I am also concerned with flexibility. Fiber Optic cable looks and behaves a lot like monofilament fishing line. I will be using four strands of.5 mm. cable in each length of tubing. That's right... IN each length... I considered fastening the fiber optic cable to the outside of each tube with narrow strips of (black) gaffers tape, or possibly painting a little bit of liquid latex over the cables.
 through the tubing. Bend the wire hard, then insert the fiber optic cable(s) through the bend.")
 then tape the cables to themselves.")

5 I believe running the cables inside the tubing will be better for two reasons. 1. I won't have to worry about the cables separating from the tubing. 2. Fiber optic cable is sort-of delicate. The tubing will protect the cable. As seen in the photo above, I forced a wire (guitar string) through the tubing. Bend the wire hard, then insert the fiber optic cable(s) through the bend. Remember to allow a little extra cable for this bend. Once you put a hard crease in fiber optic cable, the light will "stop" there. On the same topic - be sure to cut the cable "long." because splicing is out of the question. It's easy to cut off any excess. Completely tape the "loose" end. (If you don't, it could snag during pulling) then tape the cables to themselves. This is exactly like the "fishing" trick electricians use to feed wires through walls, floors, etc. Carefully pull the wire through the small hole in the latex tubing. Left to right: Single gang metal box...holds the light socket. Light socket from a motion detector light kit...holds the light bulb. Coffee Can...leak proof light box (except the lid) Bright Half of a cheap flashlight (bulb removed)...attach the cable to the light box. This did the job. It helped me test the different diameter fiber optic cables I bought. I also tried a few colored gel sheets. I quickly built an improved, smaller, and most Importantly - less visibly offensive - light box. Since this effect will be used with an event control timer, the pneumatic and lighting systems will only run for a short amount of time (about 3-4 seconds.) This will help conserve air, and I'll be able to startle a few guests in the same group (...cool...)
 60 watt light bulb 4\" p.v.c. thin-walled pipe 4\" p.v.c. cap flashlight cap (the part you un-screw to replace the batteries) flashlight lens and red gel sheet flashlight reflector with light bulb removed.")
 4\" p.v.c. cap. (2 for the socket mounting bolts, and one for the wire to power the light.) In the other (right) 4\" p.v.c. cap I drilled a hole large enough to accept the flashlight cap.")

6 Left to right: 4" p.v.c. cap light socket (standard incandescent light bulb -screw base) 60 watt light bulb 4" p.v.c. thin-walled pipe 4" p.v.c. cap flashlight cap (the part you un-screw to replace the batteries) flashlight lens and red gel sheet flashlight reflector with light bulb removed. I will use p.v.c. for this light box because the light bulb will only burn for a few seconds at a time. I would never run a light bulb continuously inside a p.v.c. housing. You'll need to drill three holes in the (left) 4" p.v.c. cap. (2 for the socket mounting bolts, and one for the wire to power the light.) In the other (right) 4" p.v.c. cap I drilled a hole large enough to accept the flashlight cap. (snug fit... remember - leak proof.) In this photo, you see the junction of the fiber optic cables and the light box. I taped the groups of cables together to make them easier to handle. The bundle fit loosely in the hole where the flashlight bulb was removed. Some hot glue or epoxy will work well to fill this gap.
 If you don't want to destroy an otherwise perfect two-dollar flashlight, you could certainly drill a small hole in the 4\" p.v.c. cap, and attach the fiber optic cables directly.")

7 I had to cut the flashlight handle. If not for this short section of handle, the reflector and lens would have to be glued to the cap. ( I want easy access to the colored gel sheet.) If you don't want to destroy an otherwise perfect two-dollar flashlight, you could certainly drill a small hole in the 4" p.v.c. cap, and attach the fiber optic cables directly. My plan here is to use the flashlight reflector to compensate for the amount of light lost to the colored gel sheet. I don't know if I was successful, but it made me happy. The 4" p.v.c. caps are semi-translucent when lit from the inside. A black paint job will fix that problem. Here is a photo of the finished "fiber optic" part of this project. (almost done.) Fiber Optic Pneumatic Whips Part 4 Assembly October 6, 2002 It's been interesting, getting to this point. What seemed like a simple, "fill in" type of startle prop has become a collection of experiments. As with nearly every Halloween prop I build, the completed version you see is the result of many "learning experiences." It's not often that things come together the first time.


 After the fiber optic cables were installed, I found the air pressure (previously 60 p.s.i.) wasn't quite enough.")
8 The Fiber Optics Pneumatic Whips prop has been fun, though. I gained some experience in many fields of home haunt prop design and construction. Here it is... the Vile Things "F.O.P.W." prop The finished assembly is everything mounted to a piece of 1/2 inch plywood. The only thing missing is the motion detection unit. (more info. below.) After the fiber optic cables were installed, I found the air pressure (previously 60 p.s.i.) wasn't quite enough. At 70 p.s.i., the effect is good. Above is a closer view of the pneumatic portion of the finished assembly.
 This box will provide power for the pneumatic and fiber optic portions of this prop simultaneously.")

9 Air will enter the reservoir through the pressure regulator at left. The solenoid valve at right will allow the air to escape. The single gang metal "handi-box" receives power from the effect timer (more info. below.) This box will provide power for the pneumatic and fiber optic portions of this prop simultaneously. In the photo above you can see the electronic parts and pieces. At left is the light box. Next is a spring-type speaker terminal. This will accept the signal from the motion detecting unit. The last component is a multi -outlet power strip. This power strip will always be "hot." I will be using a PET II timing module from Cowlacious Designs. This fantastic "Programmable Effect Timer" will allow for a delayed "on time," a timed "on," and a posteffect "off time." Since the Fiber Optic Pneumatic Whip prop uses a lot of air, I can now control how often it will fire, in the event someone figures out how to trigger the effect. Here is the Motion Detection system that will be used with the F.O.P.W.


 The aluminum linkage will allow me to mount the transmitter to the maze wall, accurately aim the beam of infrared light, then tighten all of the joints.")
10 I bought an Infrared Transmitter and Receiver Kit. I decided these kits would most likely live longer if installed in project boxes. To control things in the "real world," You'll need to add a relay to the output of the transmitter. The transmitter will activate the relay, and the relay will "switch" the voltage, current, etc. that you need. MCM Electronics sells this handy little kit. 6 amp SPDT Relay Card, item # Requires 12 VDC, 80 ma for operation. Input voltage is 3-12 VDC. 5 ma and up. This kit was designed for use with other kits. Here is an ***unfortunately necessary*** modification to the transmitter kit. I had to add a lens (magnifying glass) to the transmitter. The transmitter kit can be positioned within the housing to focus the beam of Infrared light on the receiver. The blue housing is a short piece of 4" thin walled p.v.c. pipe. It provides some degree of weather - proofing, and holds things together (like the transmitter kit, the 9 volt battery, and the lens.) The aluminum linkage will allow me to mount the transmitter to the maze wall, accurately aim the beam of infrared light, then tighten all of the joints. (wing nuts are your friend...) At left is a photo of the receiver enclosure. With everything mounted inside, all I have to do is plug in the 12 VDC power supply, and attach the relay in/out cable to the spring-type speaker terminals. These terminals are great for no-voltage connections.
11 The in/out cables run to the PET II on the finished F.O.P.W. That just about wraps it up. The Prop will be positioned behind a fabric wall. The latex tubing will pass through this false wall. The receiver will be mounted to the prop, and the transmitter will be mounted on the opposite wall of the hallway. When someone passes through the ("invisible") beam of infared light, the effect will run for five seconds. The prop cannot be re-triggered for 25 seconds, thanks to Cowlacous Designs PET II.
The Body Slinger
 http://www.scaryguys.com/slinger.htm The Body Slinger The body slinger is a nifty animation that looks like a benign corpse in a coffin until its triggered, then leaps almost straight up over your head!
Connecting the rear fog light on the A4 Jetta, while keeping the 5 Light Mod
 Connecting the rear fog light on the A4 Jetta, while keeping the 5 Light Mod DISCLAIMER: I'm human and make mistakes. If you spot one in this how to, tell me and I'll fix it This was done on my 99.5 Jetta.
*Some speedometers have these additional electronic connections. If yours does, then remove the smaller slotted screws shown.
 www.odometergears.com 1981-1985 240 Cable-Driven Speedometers (NOT for 1986 and later electronic units) http://www.davebarton.com/240-odometer-repair.html For this set of instructions below, I will not
Fabricating and Installing Headlight Relays. Mike Graham
 Fabricating and Installing Headlight Relays Mike Graham For some time I had been reading about the benefits of installing headlight relays. As I understand it, there are two principal benefits: the load
Tailgate Light Bar Installation by Flopster Feb 2015
 Tailgate Light Bar Installation by Flopster843 23 Feb 2015 If you ever looked at the rear of a 3rd generation Dodge Ram dually pickup truck, you'll notice that there is a light bar with 3 red marker lights
Page 1. File: Motolight caliper one-piece Harley Date: 8/15/2006
 Page 1 Harley-Davidson FL Caliper Mount Installation One-piece mounting brackets You should allow about two to three hours for installation. We suggest you use a well-lighted space for installation. PLEASE
Plumbing Part VI - Blowdown Valve Nelson Riedel Initial: 9/28/03 Last Revised: 04/24/2006
 Page 1 of 8 Plumbing Part VI - Blowdown Valve Nelson Riedel Nelson@NelsonsLocomotive.com Initial: 9/28/03 Last Revised: 0 When I started to think about the blowdown I realized that I'd never seen the actual
Shay - Painting The Trucks & Frames
 Shay - Painting The Trucks & Frames Nelson Riedel Nelson@NelsonsLocomotive.com Initial:2/23/04 Last Revised: 06/06/2004 Painting of the locomotive trucks and frame are described in this page. The tender
BMW E46 Convertible Hydraulic Line #23 Replacement Guide Created by taylor192 of E46Fanatics.com
 BMW E46 Convertible Hydraulic Line #23 Replacement Guide Created by taylor192 of E46Fanatics.com BMW E46 Line #23 Replacment Guide, page 1 of 23 Background: Line #23 runs from the valve block on the driver's
Introduction: Problem statement
 Introduction: Problem statement The goal of this project is to develop a catapult system that can be used to throw a squash ball the farthest distance and to be able to have some degree of accuracy with
PYRTE. Building The Front Axle, Fork and Steering
 PYRTE Building The Front Axle, Fork and Steering The front axle on this traction engine is a very simple affair, in that it is a rectangular steel rod, sat on edge, with a pivot in the centre, which is
Shay Plumbing VIII - Steam Turret & Associated Plumbing
 Shay Plumbing VIII - Steam Turret & Associated Plumbing Nelson Riedel Nelson@NelsonsLocomotive.com Initial: 11/24/03 Last Revised: 06/06/2004 Note: This page has been revised several times to reflect advice
W123 Transmission Vacuum Modulator Adjustment DIY - measure it the 'right' way
 W123 Transmission Vacuum Modulator Adjustment DIY - measure it the 'right' way Why do you need to do this?: You need to do this to properly check the internal hydraulic pressure of the transmission, either
Attached Images. Attached Images
 Results from May 9 th : I'm sorry to say... I should have stayed home!.. Well, actually I'm glad I went, but the day was NOT a success from a competitive standpoint. It's always risky to take an untested
Conversion of a Turnigy 9X to Hall effect sensors
 Conversion of a Turnigy 9X to Hall effect sensors Because English is not my mother language I kindly ask to be gracious. Unfortunately I had several times some problems with the low quality potentiometers
Projector39/Umnitza BMW Headlight & Re-Installation for E39s Predator Angel Eyes, and Lamin-X Installation
 Projector39/Umnitza BMW Headlight & Re-Installation for E39s Predator Angel Eyes, and Lamin-X Installation Now it is time to remove the headlights! Obviously you have to open the hood to do this. 100_3630.jpg
BMW 528i E39 Trunk Harness Repair
 My problems started when I got a false alarm about the trunk lid being open. It went away the next day, but then I noticed the trunk light was out. I checked the bulb and it was fine. After reading the
Air Compressor/Water Pump IV - Pilot Valve Stem, Test & Installation
 Page 1 of 8 Air Compressor/Water Pump Part IV Pilot Valve Stem, Test & Installation Nelson Riedel Nelson@NelsonsLocomotive.com Initial: 1/13/04 Last Revised: 0 Valve Test: I decided to test the steam valves
Solar Dock Post Lites
 12 Lumens Solar Dock Post Lites 8X brigthter and longer lasting than solar garden lights! The Solar Dock Lite v5 is a great way to light up your dock or pier. During the day the solar panel collects the
The Art of Halloween Haunting
 The Art of Halloween Haunting http://www.halloweenpropmaster.com/index.html I received a nice foam & latex upper torso devil with wings as a gift and have decided I would create a simple Hell Hole to display
BEAMER MODEL VDC Spotlight with joystick control panel MODEL VDC Spot/flood light with joystick control panel
 formerly a marinco.com product 502-2 installation & 503-2 instructions 502-2 24 VDC Spotlight with joystick control panel 502-3 24 VDC Spot/flood light with joystick control panel BEAMER MODEL 502-2 24
The N4YG DDS VFO and the Drake TR7
 The N4YG DDS VFO and the Drake TR7 Overview This document describes the installation of a N4YG DDS VFO into my Drake TR7 transceiver. The VFO is a terrific improvement over the original PTO and adds function
 Installing Seat Belts in my Tudor August 2009 My '29 Tudor was restored about 25 years ago by my brother-in-law. He restored it to close to original, but made a few changes that many will claim are for
Wine Glass Orchestra. Leah Buechley CSCI 7000 Things That Think
 Wine Glass Orchestra Leah Buechley CSCI 7000 Things That Think Abstract My wine glass orchestra project consists of three mechanical wine glass instruments coordinated with Crickets. The first automaton,
U-Score U-Score AAC Rank AAC Rank Vocabulary Vocabulary
 go 1 927 you 2 7600 i 3 4443 more 4 2160 help 5 659 it 6 9386 want 7 586 in 8 19004 that 9 10184 like 10 1810 what 11 2560 make 12 1264 is 13 10257 on 14 6674 out 15 2350 do 16 2102 here 17 655 eat 18
Днепр) Russian Motorcycle Carburetors Part 2B: PZ-24 and PZ-28 Carburetor Assembly and Jet Drilling
 Russian Motorcycle Carburetors Part 2B: PZ-24 and PZ-28 Carburetor Assembly and Jet Drilling") Ural (Урал( Урал) - Dnepr (Днепр( Днепр) Russian Motorcycle Carburetors Part 2B: PZ-24 and PZ-28 Carburetor Assembly and Jet Drilling (applies also to K-37 K and K-38 K carbs) Ernie Franke eafranke@tampabay.rr.com
Ural (Урал( Урал) - Dnepr (Днепр( Днепр) Russian Motorcycle Carburetors Part 2B: PZ-24 and PZ-28 Carburetor Assembly and Jet Drilling (applies also to K-37 K and K-38 K carbs) Ernie Franke eafranke@tampabay.rr.com
Restoring the Strategic Air & Space Museum s E-4B Model
 Restoring the Strategic Air & Space Museum s E-4B Model By Don Joy IPMS Fort Crook I received a request from the SASM (Strategic Air and Space Museum) to do a restoration of the model. They had a member
Affordable (and Powerful) lighting for the Rhoades Car
 lighting for the Rhoades Car") Affordable (and Powerful) lighting for the Rhoades Car Lord: it is time. The huge summer has gone by. Now overlap the sundials with your shadows, and on the meadows let the wind go free. In his poem Autumn
Affordable (and Powerful) lighting for the Rhoades Car Lord: it is time. The huge summer has gone by. Now overlap the sundials with your shadows, and on the meadows let the wind go free. In his poem Autumn
As stated, these are solely based off of how I like to do the Pre-Trip. I give my personal opinions as well as some helpful tips.
 Here are our sections: Engine Compartment Drivers Door Fuel Area Coupling System Trailer (Please note in the type of suspension your trailer has) Light Check In-Cab Inspection and Brake Tests You will
Converting an A to 12v and Adding Turn Signals Bill Lee
 Converting an A to 12v and Adding Turn Signals Bill Lee Bill@WRLee.com When I bought my 1929 Tudor, it had been restored about 20 years earlier. It had halogens and had been converted to 12v negative ground,
Improving the gearshift feel in an SW20.
 Improving the gearshift feel in an SW20. Part one In 3 parts. The SW20 gearshift can be often be greatly improved by eliminating play in the shift linkages, and this article covers three areas that need
Page 1. File: Motolight caliper one-piece Date: 8/14/2006
 Page 1 Caliper Mount Installation One-piece mounting brackets You should allow about two to three hours for installation. We suggest you use a well-lighted space for installation. PLEASE READ ALL THE INSTRUCTIONS.
HOW TO MAKE YOUR OWN BATTERIES
 HOW TO MAKE YOUR OWN BATTERIES 1 Page TABLE OF CONTENTS Introduction....3 Usage....4 Aluminum Can Batteries/Cells....8 A Long Lasting, Yet Powerful Battery....10 PVC Pipe Batteries...13 Lab Notes....17
BMW 528i E39 Sunroof Repair
 These instructions will help guide you through the repair process for broken sunroof control rails on an E39 chassis. Before I get started, I want to give a shout-out to a couple people who also posted
Bill Conkling July 2012
 Bill Conkling July 2012 Introduction: For any ham, there are moments that are priceless, like snagging that elusive rare DX station on a deserted island that hasn t been activated in 52 years. And certainly,
Disco 3 Clock Spring / Rotary Coupler replacement
 Disco 3 Clock Spring / Rotary Coupler replacement I recently had to change my Clock spring and thought some folks may find it helpful to see what it entailed. I did lots of reading around but couldn t
I N V E N T O R S M A N U A L
 INVENTOR S MANUAL INTRODUCTION ELECTRIC CITY KIT Welcome to the hi-tech world of Logiblocs! These instructions will tell you all you need to know to make a Door Alarm, Security Mat, Water Bleeper, Light
Peugeot 406 Coupe: Delocking your boot V.1 April 2005
 This is a first stab at a DIY guide to de-locking your 406 Coupe. It isn t a hard modification to do yourself, but you do need to be confident working on your cars electrics and removing and refitting
How I Fitted the Digital Temperature Guage... By T-Cut
 How I Fitted the Digital Temperature Guage... By T-Cut Here's one way to install the digital temperature gauge designed by Hans Schaaper. I decided to fit mine into the redundant slot above the CD-80 radio
We all put our heads together to try and determine what the facts were. They were as follows:
 VWvortex Forums > Eos > How to solve (or prevent) Eos Roof leaks As many of you know, I don t own an Eos. This makes it difficult to provide practical advice based on my own experience with the car, as
How to use the Multirotor Motor Performance Data Charts
 How to use the Multirotor Motor Performance Data Charts Here at Innov8tive Designs, we spend a lot of time testing all of the motors that we sell, and collect a large amount of data with a variety of propellers.
RAFIG IDLE TUNING PROCESS
 RAFIG IDLE TUNING PROCESS I decided to PDF this process and bring everything I found into one document as when I went to idle tune it was in bits and pieces so I have gathered SSpdmon s info and put it
Self-Concept. The total picture a person has of him/herself. It is a combination of:
 SELF CONCEPT Self-Concept The total picture a person has of him/herself. It is a combination of: traits values thoughts feelings that we have for ourselves (self-esteem) Self-Esteem Feelings you have for
Motion detector modification for use as a triggering device for the PET series.
 Cowlacious Designs How-To http://www.cowlacious.com/supportdocs/motion%20detector%20how-to.pdf Motion detector modification for use as a triggering device for the PET series. Cowlacious Designs, Computer
Volvo 1800 Dash Pad Replacement
 Volvo 1800 Dash Pad Replacement (courtesy of John Garden State Chapter Volvo Club America) Reupholstering the dash Well it has been some time since I have been online in the forum. Winter is a quite time
Day Tank Controller Design Details by David Lynn s/y Nine of Cups
 Day Tank Controller Design Details by David Lynn s/y Nine of Cups A day tank controller is a pretty simple device. It should sense when the level of fuel in the day tank drops to somewhere around ¼ full
Gearbox Assembly 101. Introduction. Before Beginning. By Mark Schutzer 4/13/06
 Gearbox Assembly 101 By Mark Schutzer 4/13/06 Introduction If you are planning to re-motor an old brass locomotive you may want to upgrade to a new gearbox at the same time. The early 60 s and 70 s gearboxes
Lincoln Mark VII T5 Swap Version submitted by 5.0 bird
 Lincoln Mark VII 1984-1989 T5 Swap Version 20070611 submitted by 5.0 bird I've decided to make an article to assist with the T5 swap for the 84-89 Mark VIIs, since I was just in there because my DOA didn't
DrVanos.com Stage II Installation Instructions. Tool rental is available with the purchase of a vanos kit *See website for more info*
 DrVanos.com Stage II Installation Instructions Special Tools Needed: Camshaft locking tool TDC Crank pin Sprocket turning tool Tool rental is available with the purchase of a vanos kit *See website for
Front Door Tweeter Cover Is Loose, Rattles, or Falls Off
 2 November 2011 Helping you fix it right the first time - every time Sandro Giordano Wins ASE Top 20 Award! Service tech Sandro Giordano s interest in mechanics began in his youth, when he took his father
AIRSTREAM LIFE'S (NEARLY) COMPLETE GUIDE TO AIRSTREAM MAINTENANCE BY RICH LUHR
 COMPLETE GUIDE TO AIRSTREAM MAINTENANCE BY RICH LUHR") Read Online and Download Ebook AIRSTREAM LIFE'S (NEARLY) COMPLETE GUIDE TO AIRSTREAM MAINTENANCE BY RICH LUHR DOWNLOAD EBOOK : Click link bellow and free register to download ebook: AIRSTREAM MAINTENANCE
Read Online and Download Ebook AIRSTREAM LIFE'S (NEARLY) COMPLETE GUIDE TO AIRSTREAM MAINTENANCE BY RICH LUHR DOWNLOAD EBOOK : Click link bellow and free register to download ebook: AIRSTREAM MAINTENANCE
THE BATTERY CHARGER OF RON PUGH
 THE BATTERY CHARGER OF RON PUGH THANKS IS DUE TO RON PUGH WHO HAS KINDLY SHARED THE CONSTRUCTION DETAILS OF HIS VERY SUCCESSFUL BATTERY CHARGER WHICH IS COP=13 WHEN OPERATING AT 24 VOLTS. IF YOU DECIDE
SHARK UPPER WINDSHIELD FRAME & WINDSHIELD REPLACEMENT. Text and Photos by TOM BENFORD
 Text and Photos by TOM BENFORD I purchased a fathom green 69 big-block tri-power T-top coupe with only 42,000 original miles on it recently. I'm the third owner of the car, and I got it for a very good
Tip: LED Lighting for the 3098 Locomotive and 4392 Coach Set Date: , ,
 Hi All, Over the past few months I have been working at a steady pace to install LED lighting in my passenger coaches. The coach lighting must have LED lights to reduce power consumption on the layout
Items Included in kit: FOLLOWING ARE THE BRAKE LINE RETROFIT KIT ITEMS
 Thank you for purchasing your RV-14 Brake and Fuel Line Kit. Please note that these directions are updated periodically as required and the current version will always be located on our website. These
Step #1 From your spool of 18 gauge primary wire, cut between 11 and 21 three inch strips of wire. You will only need 11 for the ROV, but it is good t
 How to make a ROV! Step #1 From your spool of 18 gauge primary wire, cut between 11 and 21 three inch strips of wire. You will only need 11 for the ROV, but it is good to have extras. Using the wire cutter,
There is hence three things you can do - add oil, adjust the temp that the clutch begins to engage, or do both.
 As most of you may be aware, I have been doing a lot of research lately on our cooling system in the 80's including the fact that we have a dead spot on the OEM temp gauge which prompted me to not rely
Toddler Activity Box
 SCHMIDT CONSULTING Toddler Activity Box Tom Schmidt 12/7/2016 tom@tschmidt.com http://www.tschmidt.com As a newly minted grandparent I wanted to build a toddler activity box. The box has electronic gizmos
Updated Automatic Bilge Pump Control By Allan Wing
 Updated Automatic Bilge Pump Control By Allan Wing Recently a club member had asked me to post an article describing an automatic bilge pump controller on our club web site. The controller was designed
Instructions to Improve SS Dash Gauge Cluster Lighting. By Paul Carreiro, Updated June 2nd, Introduction
 Page 1 Instructions to Improve SS Dash Gauge Cluster Lighting By Paul Carreiro, Updated June 2nd, 2004 Introduction One of the more common complaints from 4th Generation Monte Carlo SS owners is the dim
N-series Remote Port Modification
 N-series Remote Port Modification Introducing the Old Tractor Guy (totg) by Dan Allen (a.k.a. TheOldHokie) When I first acquired my 9N in the late 80's one of the first things I wanted to do with it was
A B C D E F. b.tools Required (supplied by others) 3/16" Drill Bit 3/8" Wrench Phillips Head Screwdriver
 3/16 Drill Bit 3/8 Wrench Phillips Head Screwdriver") Page 1 of 13 5E.1 Parts List a. Below Deck Automatic Retractable Security Cover Kit (1) Tube End Bearing Plate (A) (1) Rope Reel with Motor Attached (B) (1) Rope Reel Cover (C) (1) Cover Drum (1) Cover
Page 1 of 13 5E.1 Parts List a. Below Deck Automatic Retractable Security Cover Kit (1) Tube End Bearing Plate (A) (1) Rope Reel with Motor Attached (B) (1) Rope Reel Cover (C) (1) Cover Drum (1) Cover
Wooden Low-RPM Alternator
 Wooden Low-RPM Alternator After building the all wooden windmill I felt inspired to make a larger and sturdier version. The following page offers a brief description of building the alternator and testing
ABOUT S-TECH SWITCH SYSTEMS
 ABOUT S-TECH SWITCH SYSTEMS S-TECH Switch Systems are proudly engineered, developed, designed, manufactured and assembled in the USA. S-TECH was born trail riding at 10,000 feet at night for those who
THE TORQUE GENERATOR OF WILLIAM F. SKINNER
 THE TORQUE GENERATOR OF WILLIAM F. SKINNER IN 1939, WHICH WAS THE START OF WORLD WAR TWO, WILLIAM SKINNER OF MIAMI IN FLORIDA DEMONSTRATED HIS FIFTH-GENERATION SYSTEM WHICH WAS POWERED BY SPINNING WEIGHTS.
CADILLAC CTS & CTS-V: (HAYNES REPAIR MANUAL) BY EDITORS OF HAYNES MANUALS
 BY EDITORS OF HAYNES MANUALS") CADILLAC CTS & CTS-V: 2003-2012 (HAYNES REPAIR MANUAL) BY EDITORS OF HAYNES MANUALS DOWNLOAD EBOOK : CADILLAC CTS & CTS-V: 2003-2012 (HAYNES REPAIR Click link bellow and free register to download ebook:
CADILLAC CTS & CTS-V: 2003-2012 (HAYNES REPAIR MANUAL) BY EDITORS OF HAYNES MANUALS DOWNLOAD EBOOK : CADILLAC CTS & CTS-V: 2003-2012 (HAYNES REPAIR Click link bellow and free register to download ebook:
Rear Speaker replacement.
 Rear Speaker replacement. First off you need the right rear speakers. The easy bit is 6x9 and better than a 15W paper cone, the difficult bit is getting a mounting depth under 74mm. Or to be more precise,
Wiring checks below assume the vehicle is in reverse, secured so it won't roll, and key is on so backup lights are illuminated:
 Reverse Lockout Troubleshooting The way that the backup solenoid works is: When the backup lights are lit on your tow vehicle, 12 volt power should come down the blue wire through the trailer connector
Installation Instructions Dual Perimeter Plate Nitrous System (#82185)
") Installation Instructions Dual Perimeter Plate Nitrous System (#82185) Thank you for choosing ZEX. If at any time you have questions regarding this or any of our products, please call our ZEXTEK support
Installation Instructions Dual Perimeter Plate Nitrous System (#82185) Thank you for choosing ZEX. If at any time you have questions regarding this or any of our products, please call our ZEXTEK support
Shay Steam Brake Valve
 Shay Steam Brake Valve Nelson Riedel Nelson@NelsonsLocomotive.com Initial: 10/26/2003 Last Revised: 06/05/2004 Update 10/28/2003: The day after I published this page Mike Green from up in Ontario emailed
BIRD FEEDER ELECTRIC RETRIEVER CONTENTS
 BIRD FEEDER ELECTRIC RETRIEVER CONTENTS General Project Scope Features of the unit Repackaging Bird Feeder Retrieval Mechanism Feeder Pulley Electrical Circuit and Lightning Protection Electrical Installation
Triumph Street Triple VSM Grip Heater Install
 Triumph Street Triple VSM Grip Heater Install Introduction: With winter fast approaching and with painful memories of last winter riding with the club it was time to do something about getting some grip
4TH GEN SEATS IN A 3RD GEN TRUCK
 4TH GEN SEATS IN A 3RD GEN TRUCK by Flopster843 02 Oct 2016 If you drive a 3rd generation Dodge Ram truck, I am sure you have discovered that the OEM seats are not the greatest (Figure 1.) They are extremely
10 Critical Paint Meter Mistakes That Cost Unsuspecting Car Dealers A Fortune
 10 Critical Paint Meter Mistakes That Cost Unsuspecting Car Dealers A Fortune What You Learn In This Report Can Add $1,000's Of Additional Profit To Your Bottom Line...Every Month And Help You Avoid Disastrous
 Special Tools Needed: DrVanos.com Stage I Installation Instructions Camshaft locking tool TDC Crank pin Sprocket turning tool Tool rental is available with the purchase of a vanos kit *See website for
2007 Crown Victoria Police Interceptor (P71) Blend Door Actuator Replacement (If I did it, you can too.)
 Blend Door Actuator Replacement (If I did it, you can too.)") 2007 Crown Victoria Police Interceptor (P71) Blend Door Actuator Replacement (If I did it, you can too.) I'm not saying this is the only way, or even the right way, but it worked for me. First time I've
2007 Crown Victoria Police Interceptor (P71) Blend Door Actuator Replacement (If I did it, you can too.) I'm not saying this is the only way, or even the right way, but it worked for me. First time I've
Simple DIY Rev Switch Switch on or off anything at an adjustable engine rpm!
 Simple DIY Rev Switch Switch on or off anything at an adjustable engine rpm! By Julian Edgar So what about making it a general-purpose rev switch, able to switch pretty well any electrical loads? That
MGB V8 Roadster restoration project Report 138
 24th May 2017. FITTING THE CARPETS - continued I have included quite a lot of detail and photographs on the carpet and trim fitting, as it may help those who decide to do this job on their own car. The
Air Compressor/Water Pump III - Making the Steam Valves
 Page 1 of 14 Air Compressor/Water Pump Part III Making the Steam Valves Nelson Riedel Nelson@NelsonsLocomotive.com Initial: 1/09/04 Last Revised: 0 The cylinders pistons and water valves were completed
Cackle cure Kit Installation by Pete Cleveland (aka FTE) for Dino Fuel Alternatives
 for Dino Fuel Alternatives") Cackle cure Kit Installation by Pete Cleveland (aka F250_ @ FTE) for Dino Fuel Alternatives March 26, 2007 Test Vehicle: 2002 Ford F250 XLT, 7.3L PowerStroke TurboDiesel, 2WD, Crew Cab, SWB, SRW, 124,000
Cackle cure Kit Installation by Pete Cleveland (aka F250_ @ FTE) for Dino Fuel Alternatives March 26, 2007 Test Vehicle: 2002 Ford F250 XLT, 7.3L PowerStroke TurboDiesel, 2WD, Crew Cab, SWB, SRW, 124,000
10/12/2015 boostcontrol
 Boost Controller Updated May 14, 2002 Here is a boost controller that incorporates quick spool up, minimal spikes, and minimal hassle. You will merely have to clean it once in a while, or else put a tiny
This Document is property of Old New England Marine
 A lot of you folks out there seem to be tearing into carbs quite a bit. Before you choose to open up a carb, you really need to look at what's feeding the carb first, and that is the boats fuel system.
Installation and Construction Notes for EVSE4
 Installation and Construction Notes for EVSE4 You need to read and understand this if you want to build an EVSE that will be safe and need to pass a building inspectors review. Before beginning this process
J&M Mustang Adjustable Panhard Rod (05-09) - Installation Instructions
 - Installation Instructions") J&M Mustang Adjustable Panhard Rod (05-09) - Installation Instructions The below installation instructions work for the following products: J&M Mustang Adjustable Panhard Rod (05-09) Please read through
J&M Mustang Adjustable Panhard Rod (05-09) - Installation Instructions The below installation instructions work for the following products: J&M Mustang Adjustable Panhard Rod (05-09) Please read through
SAM-1 Fan Kit Installation Into HENG S Range Hood Model #R C David Jeffs June 2015
 SAM-1 Fan Kit Installation Into HENG S Range Hood Model #R0623500C David Jeffs June 2015 If you own an RV you probably have come to the same conclusion that I have. Everything related to an RV is plagued
BMW 2002 M42 Swap Notes-THIS IS NOT FINISHED
 BMW 2002 M42 Swap Notes-THIS IS NOT FINISHED This document is to help those that want to install an m42 into a BMW 2002. It is based around an e30 engine, trans, and wiring. You can use the e36 block/head/wiring
Ford F-150 Speaker Replacement Instructions
 Ford F-150 Speaker Replacement Instructions This article was downloaded from http://www.fordf150.net Be sure to go there to view and download the other how-to articles. Thanks to John Meyer for contributing
Rigid Base / Turntable Bed. Exploded side view of bottom rotating wood drive wheel, showing optics aligned to stop bracket.
 TURNTABLE INDEXER #617 for use with BOWSER and other, turntables by 246 W. Main St. Leola, PA 17540 (717) 661-7041 www.dallee.com OVERVIEW The TURNTABLE INDEXER unit has been made with simplicity of installation
Door Panel Removal & Window Stop Adjustment
 Door Panel Removal & Window Stop Adjustment By: Jeff Wolford Disclaimer: This is simply an article of how I fixed my car. I m not responsible if you break, scratch, or mess up anything following my example.
Bendix Hydroboost Repair
 Bendix Hydroboost Repair Report this image Pic 1 the leaky power piston seal... (probably master cyl too.) Pic 2 PS fluid after spider removal and MC actuator rod Pic 3 Removing the accumulator (note 1/8
Some tips and tricks I learned from getting clutch out of vehicle Skoda Octavia year 2000
 Some tips and tricks I learned from getting clutch out of vehicle Skoda Octavia year 2000 Last change 2013-Oct-11 I bought Haynes manual for a starter. That s something well worth it s cost I believe.
Mounting a Garmin to an R1150R Motorcycle
 Mountain a Garmin GPS on your BMW Motorcycle Introduction The following document will describe how I mounted my Garmin 1490T GPS unit to my motorcycle. Garmin makes a specific GPS unit (the Zumo) for motorcycles
Troubleshooting Guide for Limoss Systems
 Troubleshooting Guide for Limoss Systems NOTE: Limoss is a manufacturer and importer of linear actuators (motors) hand controls, power supplies, and cables for motion furniture. They are quickly becoming
Speakers and Motors. Three feet of magnet wire to make a coil (you can reuse any of the coils you made in the last lesson if you wish)
") Speakers and Motors We ve come a long way with this magnetism thing and hopefully you re feeling pretty good about how magnetism works and what it does. This lesson, we re going to use what we ve learned
Speakers and Motors We ve come a long way with this magnetism thing and hopefully you re feeling pretty good about how magnetism works and what it does. This lesson, we re going to use what we ve learned
13 October, 2014 Page 1
 13 October, 2014 In my second and last Helicycle I want to make everything better than the first one. That includes not only a transmission chip detector, but one for the tail rotor as well. The transmission
Azatrax MRX3 Grade Crossing Signal Controller Installation Guide
 Azatrax MRX3 Grade Crossing Signal Controller Installation Guide What it is: The MRX3 is a sophisticated controller that realistically operates model railroad / highway crossing signals. The MRX3 includes
what you need to do is hit the taper housing as hard as you can with your hammers AT THE SAME TIME and at a slight angle, what will happen is you
 first things first, get the car on axle stands and the wheels off. Open the bonnet to let more light through to the area in which you'll be working. The following guide shows the passenger side being done
17 KV 45MA Solid State Jacobs Ladder Kit Instructions
 17 KV 45MA Solid State Jacobs Ladder Kit Instructions by Physics Playground www.physicsplayground.com WARNING: Jacobs Ladders are high voltage devices that may be lethal if touched and produce very high
There was some debate whether or not there was a write up, with Pictures, for replacing the ignition switch.
 Replacing the Ignition Switch - Step by Step with Pictures. http://forums.audiworld.com/showthread.php?p=18927576 (Corey 02ALMSTT) (With updates/corrections by Dave F.) February 1, 2013 (I = Corey, mostly)
Headlamp Adjusters motorised conversion by: Ant (Banjo1981)
") Headlamp Adjusters motorised conversion by: Ant (Banjo1981) What you will need: E30 adjuster switch assembly E30 Headlight adjusters E36 Adjuster motors (pref with the plugs still attached) Variable resistor
Headlamp Adjusters motorised conversion by: Ant (Banjo1981) What you will need: E30 adjuster switch assembly E30 Headlight adjusters E36 Adjuster motors (pref with the plugs still attached) Variable resistor