A simple homemade Van de Graaff generator
|
|
|
- Tyler Fowler
- 6 years ago
- Views:
Transcription
1 A simple homemade Van de Graaff generator In the previous two projects, we stole high voltage from a television set to power our high voltage motors. In this project we will build a device that can generate 12,000 volts from an empty soda can and a rubber band. The device is called a Van de Graaff generator. Science museums and research facilities have large versions that generate potentials in the hundreds of thousands of volts. Ours is more modest, but is still capable of drawing 1/2 inch sparks from the soda can to my finger. The spark is harmless, and similar to the jolt you get from a doorknob after scuffing your feet on the carpet. To build the toy, you need: An empty soda can A small nail A rubber band, 1/4 inch by 3 or 4 inches A 5x20 millimeter GMA-Type electrical fuse (such as Radio Shack # ) A small DC motor (such as Radio Shack # ) A battery clip (Radio Shack # ) A battery holder (Radio Shack # ) A styrofoam cup (a paper cup will also work) A hot glue gun (or regular glue if you don't mind waiting) Two 6 inch long stranded electrical wires (such as from an extension cord) Two pieces of 3/4 inch PVC plumbing pipe, each about 2 or 3 inches long One 3/4 inch PVC coupler One 3/4 inch PVC T connector Some electrical tape A block of wood

2 That sounds like a lot of stuff, but take a look at the step-by-step photos below, and you will find that the whole project can easily be put together in an evening, once all the parts have been collected. We'll start at the bottom, and work our way up. Click on the image for a larger picture
3 The first thing to do is to cut a 2 to 3 inch long piece of 3/4 inch PVC pipe, and glue that to the wooden base. This piece will hold the generator up, and allow us to remove it to more easily replace the rubber band, or make adjustments. The PVC "T" connector will hold the small motor. The motor fits too loosely by itself, so we wrap paper or tape around it to make a snug fit. The shaft of the motor can be left bare, but the generator will work a little better if it is made fatter by wrapping tape around it, or (better) putting a plastic rod with a hole in the center onto the shaft to act as a pulley for the rubber band. Next, we drill a small hole in the side of the PVC "T" connector, just under the makeshift pulley on the motor. This hole will be used to hold the lower "brush", which is simply a bit of stranded wire frayed at the end, that is almost touching the rubber band on the pulley. As the photo shows, the stranded wire is held in place with some electrical tape, or some other tape or glue. The rubber band is now placed on the pulley, and allowed to hang out the top of the "T" connector.

4 Click on the image for a larger picture Next, cut another 3 or 4 inch piece of 3/4 inch PVC plumbing pipe. This will go into the top of the "T" connector, with the rubber band going up through it. Use the small nail to hold the rubber band in
5 place, as in the photo below. The length of the PVC pipe should be just enough to fit the rubber band. The rubber band should not be stretched too tightly, since the resulting friction would prevent the motor from turning properly, and increase wear on the parts.

6 Click on the image for a larger picture Cut the styrofoam cup about an inch from the bottom, and

7 carefully cut a 3/4 inch diameter hole in the center of the bottom of the cup. This hole should fit snugly onto the 3/4 inch PVC pipe. Click on the image for a larger picture
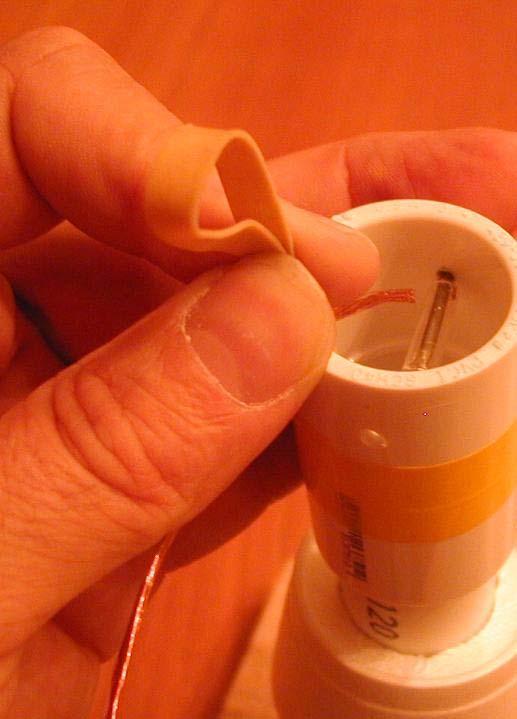
8 Now drill three holes near the top of the PVC union coupling. Two of these holes need to be diametrically opposite one another, since they will hold the small nail which will act as an axle for the rubber band. The third hole is between the other two, and it will hold the top "brush", which, like the bottom brush, will almost touch the rubber band. The top brush is taped to the PVC union coupler, and the coupler is placed on the 3/4 inch pipe, above the styrofoam cup collar. The rubber band is threaded through the coupler, and held in place with the small nail, as before. Bare the top brush (so it has no insulation) and twist it to keep the individual wires from coming apart. You can solder the free end if you like, but it is not necessary. The free end of the top brush will be curled up inside the empty soda can when we are done, and thus electrically connect the soda can to the top brush.

9 Click on the image for a larger picture
10 We need a small glass tube to act as both a low-friction top pulley, and as a "triboelectric" complement to the rubber band, to generate static electricity by rubbing. Glass is one of the best materials to rub against rubber to create electricity. We get the tube by taking apart a small electrical fuse. The metal ends of the fuse come off easily if heated with a soldering iron or a match. The solder inside them drips out when they come off, so be careful. The glass, the metal cap, and the molten solder are all quite hot, and will blister the skin if you touch them before they cool. Save the metal caps -- we will use them in a future project!

11 Click on the image for a larger picture The resulting glass tube has nice straight, even edges, which are "fire polished" for you, so there is no sharp glass, and no uneven edges to catch on the PVC and break the glass. The next step is a little tricky. The small nail is placed through one of the two holes in the PVC union coupler, and the small glass tube
12 is placed on the nail. Then the rubber band is placed on the glass tube, and the nail is then placed in the second hole. The rubber band is on the glass tube, which is free to rotate around the nail.
13
14 Now we glue the styrofoam collar in place on the PVC pipe. I like to use a hot glue gun for this, since the glue can be laid on thickly to stabilize the collar, and it sets quickly and does not dissolve the styrofoam.

15 Click on the image for a larger picture At this point we are ready for the empty soda can. Aluminum poptop cans are good for high voltage because they have nice rounded
16 edges, which minimizes "corona discharge". With a sharp knife, carefully cut out the top of the soda can. Leave the nice crimped edge, and cut close to the side of the can so as to leave very little in the way of sharp edges. You can smooth the cut edge by "stirring" the can with a metal tool like a screwdriver, pressing outward as you stir, to flatten the sharp edge. Tuck the free end of the top brush wire into the can, and invert the can over the top of the device, until it rests snugly on the styrofoam collar.

17 Click on the image for a larger picture The last step is to attach the batteries. I like to solder a battery clip

18 to the motor terminals, and then clip this onto either a nine-volt battery, or a battery holder for two AA size batteries. The nine-volt battery works, but it runs the motor too fast, making a lot of noise, and risking breakage of the glass tube. It does, however, make a slightly higher voltage, until the device breaks. Click on the image for a larger picture To use the Van de Graaff generator, simply clip the battery to the battery clip. If the brushes are very close to the ends of the rubber band, but not touching, you should be able to feel a spark from the soda can if you bring your finger close enough. It helps to hold
19 onto the free end of the bottom brush with the other hand while doing this.

20 Click on the image for a larger picture

21 To use our generator to power the Franklin's Bells we built in the previous section of the book, clip the bottom brush wire to one "bell", and attach a wire to the top of the generator, connecting it to the other "bell". The pop-top clapper of the Franklin's Bells should start jumping between the soda cans. It may need a little push to get started. Click on the image for a larger picture
22 How does it do that? You may have at one time rubbed a balloon on your hair, and then made the balloon stick to the wall. If you have never done this, try it! The Van de Graaff generator uses this trick and two others to generate the high voltage needed to make a spark. The first trick When the balloon made contact with your hair, the molecules of the rubber touched the molecules of the hair. When they touched, the molecules of the rubber attract electrons from the molecules of the hair. Then you take the balloon away from your hair, and some of those electrons stay with the balloon, giving it a negative charge. The extra electrons on the balloon repel the electrons in the wall, pushing them back from the surface. The surface of the wall is left with a positive charge, since there are fewer electrons than when it was neutral. The positive wall attracts the negative balloon with enough force to keep it stuck to the wall.
23 If you collected a bunch of different materials and touched them to one another, you could find out which ones were left negatively charged, and which were left positively charged. You could then take these pairs of objects, and put them in order in a list, from the most positive to the most negative. Such a list is called a Triboelectric Series. The prefix Tribo- means "to rub". The Triboelectric series Most positive (items at this end lose electrons) asbestos rabbit fur glass hair nylon wool silk paper cotton hard rubber synthetic rubber polyester styrofoam orlon saran polyurethane polyethylene polypropylene polyvinyl chloride (PVC pipe)
24 teflon silicone rubber Most negative (items at this end steal electrons) Our Van de Graaff generator uses a glass tube and a rubber band. The rubber band steals electrons from the glass tube, leaving the glass positively charged, and the rubber band negatively charged.
25
26 The second trick The triboelectric charging is the first trick. The second trick involves the wire brushes. When a metal object is brought near a charged object, something quite interesting happens. The charged object causes the electrons in the metal to move. If the object is charged negatively, it pushes the electrons away. If it is charged positively, it pulls the electrons towards it. Electrons are all negatively charged. Because like charges repel, and electrons are all the same charge, electrons will always try to get as far away from other electrons as possible. If the metal object has a sharp point on it, the electrons on the point are pushed by all of the other electrons in the rest of the object. So on a point, there are a lot of electrons pushing from the metal, but no electrons pushing from the air. If there are enough extra electrons on the metal, they can push some electrons off the point and into the air. The electrons land on the air molecules, making them negatively charged. The negatively charged air is repelled from the negatively charged metal, and a small wind of charged air blows away from the metal. This is called "corona discharge", because the dim light it gives off looks like a crown. The same thing happens in reverse if the metal has too few electrons (if it is positively charged). At the point, all of the positive charges in the metal pull all the electrons from the point, leaving it very highly charged. The air molecules that hit the metal point lose their electrons to the strong pull from the positive tip of the sharp point. The air molecules are now positive, and are repelled from the positive metal.
27 The third trick There is one more trick the Van de Graaff generator uses. After we understand the third trick, we will put all of the tricks together to see how the generator works. We said earlier that all electrons have the same charge, and so they all try to get as far from one another as possible. The third trick uses the soda can to take advantage of this feature of the electrons in an interesting way. If we give the soda can a charge of electrons, they will all try to get as far away from one another as possible. This has the effect of making all the electrons crowd to the outside of the can. Any electron on the inside of the can will feel the push from all the other electrons, and will move. But the electrons on the outside feel the push from the can, but they do not feel any push from the air around the can, which is not charged. This means that we can put electrons on the inside of the can, and they will be pulled away to the outside. We can keep adding as many electrons as we like to the inside of the can, and they will always be pulled to the outside. Putting all three tricks together So now let's look at the Van de Graaff generator with our three tricks in mind. The motor moves the rubber band around and around. The rubber band loops over the glass tube and steals the electrons from the glass. The rubber band is much bigger than the glass tube. The electrons stolen from the glass are distributed across the whole rubber band.
28 The glass, on the other hand, is small. The negative charges that are spead out over the rubber band are weak, compared to the positive charges that are all concentrated on the little glass tube. The strong positive charge on the glass attracts the electrons in the wire on the top brush. These electrons spray from the sharp points in the brush, and charge the air. The air is repelled from the wire, and attracted to the glass. But the charged air can't get to the glass, because the rubber band is in the way. The charged air molecules hit the rubber, and transfer the electrons to it. The rubber band travels down to the bottom brush. The electrons in the rubber push on the electrons in the wire of the bottom brush. The electrons are pushed out of the wire, and into whatever large object we have attached to the end of the wire, such as the earth, or a person. The sharp points of the bottom brush are now positive, and they pull the electrons off of any air molecules that touch them. These positively charged air molecules are repelled by the positively charged wire, and attracted to the electrons on the rubber band. When they hit the rubber, they get their electrons back, and the rubber and the air both lose their charge. The rubber band is now ready to go back up and steal more electrons from the glass tube. The top brush is connected to the inside of the soda can. It is positively charged, and so attracts electrons from the can. The positive charges in the can move away from one another (they are the same charge, so they repel, just like electrons). The positive charges collect on the outside of the can, leaving the neutral atoms of the can on the inside, where they are always ready to donate more electrons. The effect is to transfer electrons from the soda can into the ground, using the rubber band like a conveyor belt. It doesn't take very long for the soda can to lose so many electrons that it becomes 12,000 volts more positive than the ground. When the can gets very positive, it eventually has enough charge
29 to steal electrons from the air molecules that hit the can. This happens most at any sharp points on the can. If the can were a perfect sphere, it would be able to reach a higher voltage, since there would be no places where the charge was more concentrated than anywhere else. If the sphere were larger, an even higher voltage could be reached before it started stealing electrons from the air, because a larger sphere is not as "sharp" as a smaller one. The places on our soda can where the curves are the sharpest are where the charge accumulates the most, and where the electrons are stolen from the air. Air ionizes in an electric field of about 25,000 volts per inch. Ionized air conducts electricity like a wire does. You can see the ionized air conducting electricity, because it gets so hot it emits light. It is what we call a spark. Since our generator can draw sparks that are about a half inch long, we know we are generating about 12,500 volts. Some fun with the Van de Graaf generator One of the fun things to do with a Van de Graaff generator is to show how like charges repel.

30 We take a paper napkin, and cut thin strips of the lightweight paper. We then tape the ends of the paper together at one end, and tape that end onto the Van de Graaf generator. The effect will look somewhat like long hair cascading down the soda can. Now turn the Van de Graaff generator on. The thin strips of paper all get the same charge, and start to repel from one another. The effect is "hair raising". The strips start to stand out straight from the can, like the hair on the back of a scared cat.

31 Click on the image for an animated movie A high voltage ion motor
32 This motor is very simple to build, and goes together in a few minutes. All you need is two pieces of wire, the small metal cap from the fuse we took apart in the previous project, and some cellophane tape. The motor creates an ion wind that spins it around like a helicopter.

33 Click on the image for a larger picture First, take one piece of wire (a straightened paper clip will do), and cut the end at an angle so it is sharp. Bend the other end into a rough loop or triangle, so the wire will stand up with the sharp point facing straight up. A little tape will help hold it onto the table, or a block of wood.

34 Click on the image for a larger picture The armature (the part that spins) is made from the other piece of wire and the metal cap we saved when we took apart the fuse. Sharpen both ends of the wire by cutting the ends at a diagonal, like we did with the base wire. Bend the wire into an S shape. The pointed ends of the wire should point at 90 degrees from the center straight part of the wire.

35 Click on the image for a larger picture Attach the metal cap to the center of the wire with tape. Place the cap onto the pointed end of the base wire, and bend the S shaped ends of the armature wire down, so it will balance easily on the sharp end of the base wire. The armature should now spin freely if you tap it gently. Connect a source of high voltage to the base wire using an alligator clip or a wire. The high voltage source can be the Van de Graaff generator, or just a couple square feet of aluminum foil pressed against the front of your television set, as we did in earlier projects. As the high voltage is turned on, the armature will start to spin in the direction away from the sharp points. The Van de Graaff
36 generator may need a good ground, or a person holding onto the ground wire. The television will give the motor a good kick every time it is turned on or off, and turning it on and off every second will get it spinning quite rapidly. How does it do that? The motor works by ionizing the air, and then pushing against the ionized air. As we explained in the previous project, electric charges are concentrated by sharp points. The sharp poiints on the ends of the armature concentrate the charges so much that the air around the points becomes charged as well. Since the air has the same charge as the wire, the two repel one another. You can actually feel a small wind coming from the sharp point. As the wire pushes on the charged air, they both move away from one another. The air blows away, and the wire spins.
Bruce s Science workbench
 Baby Vandegraff Generator by Bruce Yeany 2001 https://www.youtube.com/watch?v=parq01q DKe4 http://www.instructables.com/id/van-de- Graaff-Electrostatic-High-Voltage- Generator/ https://www.youtube.com/watch?v=esz
How are lightning and the shock your brother gives you after rubbing his feet on the carpet the same and how are they different?
 Standard IV, Objective I Fifth Grade Compare and Contrast How are lightning and the shock your brother gives you after rubbing his feet on the carpet the same and how are they different? You re a thoughtful
Electrostatics Revision 4.0b
 Electrostatics Revision 4.0b Objective: This experiment allows you to investigate the production of static charge, charging by: induction and contact, the measurement of charge, grounding techniques and
Is it Magnetic? 1. Fill in each table. List things ATTRACTED by a magnet on the LEFT and things NOT ATTRACTED on the RIGHT.
 Is it Magnetic? 1. Fill in each table. List things ATTRACTED by a magnet on the LEFT and things NOT ATTRACTED on the RIGHT. MAGNETIC NON-MAGNETIC # Object Made from check # Object Made from check --- ------------
a) Understand the conditions for lighting a light bulb by connecting it to batteries with wires to make it illuminate.
 Understand the conditions for lighting a light bulb by connecting it to batteries with wires to make it illuminate.") This area deals with simple electric circuits and electromagnets. In this area, students learn about electricity for the first time and build an electromagnet and a simple circuit to compare the brightness
This area deals with simple electric circuits and electromagnets. In this area, students learn about electricity for the first time and build an electromagnet and a simple circuit to compare the brightness
Thank you for purchasing a kit from SparKIT. Your support is greatly appreciated.
 SparKIT Instructions Thank you for purchasing a kit from SparKIT. Your support is greatly appreciated. First of all we would like to go through a few basic precautions. 1. This kit includes small parts
Speakers and Motors. Three feet of magnet wire to make a coil (you can reuse any of the coils you made in the last lesson if you wish)
") Speakers and Motors We ve come a long way with this magnetism thing and hopefully you re feeling pretty good about how magnetism works and what it does. This lesson, we re going to use what we ve learned
Speakers and Motors We ve come a long way with this magnetism thing and hopefully you re feeling pretty good about how magnetism works and what it does. This lesson, we re going to use what we ve learned
Electricity MR. BANKS 8 TH GRADE SCIENCE
 Electricity MR. BANKS 8 TH GRADE SCIENCE Electric charges Atoms and molecules can have electrical charges. These are caused by electrons and protons. Electrons are negatively charged. Protons are positively
VAN DE GRAAFF GENERATORS - 400kV
 VAN DE GRAAFF GENERATORS - 400kV EM4133-101 220/240 V.AC. with earth. 50/60 Hz. 300mm diameter ball generates about 400kV DESCRIPTION: The I EC 300mm diameter Van De Graaff Generator is a modern, compact
Stirling Engine. What to Learn: A Stirling engine shows us how energy is converted and used to do work for us. Materials
 Stirling Engine Overview: The Stirling heat engine is very different from the engine in your car. When Robert Stirling invented the first Stirling engine in 1816, he thought it would be much more efficient
This LED flashtube kit covers models 400, 404, 500, 504, 600, 680 & 506.
 L.E.D. INSTRUCTIONS I D T S O T U B I R M O C R Y N A P Kit contains: This LED flashtube kit covers models 400, 404, 500, 504, 600, 680 & 506. For the power supply: 1-LED power supply circuit board, 2
Connecting the rear fog light on the A4 Jetta, while keeping the 5 Light Mod
 Connecting the rear fog light on the A4 Jetta, while keeping the 5 Light Mod DISCLAIMER: I'm human and make mistakes. If you spot one in this how to, tell me and I'll fix it This was done on my 99.5 Jetta.
Electricity. Chapter 20
 Electricity Chapter 20 Types of electric charge Protons + charge Electrons - charge SI unit of electric charge is the coulomb (C) Interactions between charges Like charges repel Opposite charges attract
How I installed new brake pads on my i with Sport Package (should be fine for other E39 s) By Robert B.
 By Robert B.") How I installed new brake pads on my 1999 528i with Sport Package (should be fine for other E39 s) How I installed new brake pads on my 1999 528i with Sport Package (should be fine for other E39 s) By
How I installed new brake pads on my 1999 528i with Sport Package (should be fine for other E39 s) How I installed new brake pads on my 1999 528i with Sport Package (should be fine for other E39 s) By
Kinetic Contraptions. Build a Hovercraft, Airboat, and More with a Hobby Motor. Curt Gabrielson
 Kinetic Contraptions Build a Hovercraft, Airboat, and More with a Hobby Motor Curt Gabrielson Contents Acknowledgments ix Introduction 1 Getting Started 5 Safety 9 Basic Circuitry 11 Mounting the Motor
Lakela nd H2 Low Speed Stator Coil Installation
 Lakela nd H2 Low Speed Stator Coil Installation Step 1: Place the stator assembly on a padded surface to protect the plastic signal generators, and orient it as shown in figure 1. The low speed coil is
Step #1 From your spool of 18 gauge primary wire, cut between 11 and 21 three inch strips of wire. You will only need 11 for the ROV, but it is good t
 How to make a ROV! Step #1 From your spool of 18 gauge primary wire, cut between 11 and 21 three inch strips of wire. You will only need 11 for the ROV, but it is good to have extras. Using the wire cutter,
Ford Racing BOSS 302 Engine Oil Cooler (11-14 GT)
") Tools needed: 14mm hex socket 7mm socket/wrench 8mm socket/wrench Ford Racing BOSS 302 Engine Oil Cooler (11-14 GT) 10mm socket (for airbox removal) ¾ inch or 19mm wrench Torque wrench Appropriate ratchets
Tools needed: 14mm hex socket 7mm socket/wrench 8mm socket/wrench Ford Racing BOSS 302 Engine Oil Cooler (11-14 GT) 10mm socket (for airbox removal) ¾ inch or 19mm wrench Torque wrench Appropriate ratchets
Re-Energy.ca - Solar Electricity - Build Your Own Solar Car
 Backgrounder Build Your Own Solar Car Back to Page 1 Build It! These step-by-step instructions provide you with a plan for making a basic solar car. If you can think of ways to improve the design of your
Unit 6: Electricity and Magnetism
 Objectives Unit 6: Electricity and Magnetism Identify the factors influencing the electric force between objects. Explain the interaction between charged and uncharged objects. Design, construct, and explain
Lightning Ball Tools Required: ø 2 ø 3,5 ø 4 Pencil. Drill. Ruler. Fretsaw. Handsaw with Metal Saw Blade. Hot Glue Gun.
 113.185 Tools Required: ø 2 ø 3,5 ø 4 Pencil Ruler Drill Fretsaw Handsaw with Metal Saw Blade Sandpaper Hot Glue Gun Soldering Iron Please note: The OPITEC handicraft packs are not toys in a typical off-the-shelf
Lesson Plan: Electricity and Magnetism (~100 minutes)
") Lesson Plan: Electricity and Magnetism (~100 minutes) Concepts 1. Electricity and magnetism are fundamentally related. 2. Just as electric charge produced an electric field, electric current produces a
Lesson Plan: Electricity and Magnetism (~100 minutes) Concepts 1. Electricity and magnetism are fundamentally related. 2. Just as electric charge produced an electric field, electric current produces a
Parts of an atom. Protons (P + ) Electrons (e - ) Neutrons. Have a positive electric charge. Have a negative electric charge
 Electrons (e - ) Neutrons. Have a positive electric charge. Have a negative electric charge") Electricity Parts of an atom Protons (P + ) Have a positive electric charge Electrons (e - ) Have a negative electric charge Neutrons Are neutral Have no charge Electric Charge In most atoms, the charges
Electricity Parts of an atom Protons (P + ) Have a positive electric charge Electrons (e - ) Have a negative electric charge Neutrons Are neutral Have no charge Electric Charge In most atoms, the charges
The Magazine For Slot Car Enthusiasts
 The Magazine For Slot Car Enthusiasts Building the Tomy Super G+ By Milt Surratt Tomy Super G+ slot cars have been around in the current form for about 12 years. Out of the package, the Tomy HO slot car
Physical Sciences (Energy and Matter) Objective: To determine what household items are good conductors of electricity. The purpose of this
 Objective: To determine what household items are good conductors of electricity. The purpose of this") Objective: To determine what household items are good conductors of electricity. The purpose of this investigation is to demonstrate an understanding of simple closed circuits as well as evaluate the electrical
Objective: To determine what household items are good conductors of electricity. The purpose of this investigation is to demonstrate an understanding of simple closed circuits as well as evaluate the electrical
Topic: Friction. Planes, Trains, and Automobiles. A Poppins Book Nook Science Experiment. My Name Is:
 Planes, Trains, and Automobiles A Poppins Book Nook Science Experiment Topic: Friction My Name Is: ---------------------------------------------------------------------------------------------------------
Contents. Preparing the motor Winding the rotating secondary Winding the primary... 8
 120732-130389 Propeller Clock Construction Notes Revision E, December 2, 2013 Contents Preparing the motor... 2 Winding the rotating secondary... 5 Winding the primary... 8 UltiProp Clock (Elektor Dec.
1464. Interior Installation. Cover Rear Seat Support Cut the vinyl to approximately the size of the rear seat support.
 Chapter 37 (Video Clip 37) - Interior Installation 1464. Interior Installation Cover Rear Seat Support 1465. Cut the vinyl to approximately the size of the rear seat support. 1466. Make a dry fit of the
Introduction to Electricity & Electrical Current
 Introduction to Electricity & Electrical Current Physical Science Georgia Performance Standards: SPS10a. Investigate static electricity in terms of friction, induction, and conduction. SPS10b. Explain
Chapter: Electricity
 Chapter 13 Table of Contents Chapter: Electricity Section 1: Electric Charge Section 2: Electric Current Section 3: Electrical Energy 1 Electric Charge Positive and Negative Charge Atoms contain particles
These instructions show how to build the Remote Controlled Fart machine Sound Kit.
 Remote Controlled Fart Machine Assembly Instructions These instructions show how to build the Remote Controlled Fart machine Sound Kit. Tools Required Drill with 7/64, 3/16, and ¼ drill bits. Holt melt
B, are made of %-in. strap iron. Armature
 # 6-32 HACK SCREWS operating on low-voltage a.c. from a bell transformer is shown in Figs. 1 and 3. The field coils A and B are two magnets from a buzzer or doorbell placed so that the windings run in
Peg-Harness installation instructions
 Peg-Harness installation instructions I know it s not the easiest thing to do, but PLEASE READ THESE INSTRUCTIONS COMPLETELY so you will understand what you are trying to accomplish before you start drilling
DIY Bi-Metallic Strip
 DIY Bi-Metallic Strip An introduction to the applications of thermal expansion and two-way switching. Written By: Mahaaveer BN 2018 Page 1 of 14 INTRODUCTION A bi-metallic strip is used to convert a temperature
Disconnect the negative battery cable!
 Understanding Mod-3 on a C90 With Wiring Diagrams By DrJones18LC I do not have a C90 at my disposal (or audio/video equipment for that matter) so I can't make a live step by step how-to on doing Mod-3.
The Starter motor. Student booklet
 The Starter motor Student booklet The Starter motor - INDEX - 2006-04-07-13:20 The Starter motor The starter motor is an electrical motor and the electric motor is all about magnets and magnetism: A motor
Triumph Street Triple VSM Grip Heater Install
 Triumph Street Triple VSM Grip Heater Install Introduction: With winter fast approaching and with painful memories of last winter riding with the club it was time to do something about getting some grip
Replace clutch and flywheel * (Volkswagen Sharan 2010-Present)
") Replace clutch and flywheel * (Volkswagen Sharan 2010-Present) *Caution! This instructions are created by random users and must be used as a reference only! Please, take all safety precautions, and if
Replace clutch and flywheel * (Volkswagen Sharan 2010-Present) *Caution! This instructions are created by random users and must be used as a reference only! Please, take all safety precautions, and if
HOW TO MAKE YOUR OWN BATTERIES
 HOW TO MAKE YOUR OWN BATTERIES 1 Page TABLE OF CONTENTS Introduction....3 Usage....4 Aluminum Can Batteries/Cells....8 A Long Lasting, Yet Powerful Battery....10 PVC Pipe Batteries...13 Lab Notes....17
Installation Directions for FINGER STICK and Blocker Plate
 Installation Directions for FINGER STICK and Blocker Plate What is a Finger Stick? A Finger Stick is a simple circuit that modifies the MAF signal on LLY and LBZ engines (not LB7 engines) to expected levels
Replacing MK4 Golf/Jetta radiator mounts in-car
 Replacing MK4 Golf/Jetta radiator mounts in-car This is a guide to replacing the radiator mounts in a MK4 Golf/Jetta. This involves moving the core support to the service position which allows you to do
Period 16 Activity Sheet: Motors and Generators
 Name Section Period 16 Activity Sheet: Motors and Generators Activity 16.1: How Are Electric Motors and Generators Related? a) Generators. 1) Attach a hand-cranked generator to a small motor and turn the
BeetleBot. The Simple Zippy Screw-Together Robot Kit! SKU: K JB. jb/
 BeetleBot The Simple Zippy Screw-Together Robot Kit! www.solarbotics.com 1-866-276-2687 SKU: K JB http://www.solarbotics.com/products/k_ jb/ Document Revision: January 05 2016 Shell Board 2 x Sensor Wires
X-Type w/ non-premium sound amplifier installation instructions
 X-Type w/ non-premium sound amplifier installation instructions 1. Pull radio from dash (see Radio Removal Instructions ) 2. Disconnect wiring harness from back of radio by pushing in tab on plug and pulling
4 Electric Circuits. TAKE A LOOK 2. Identify Below each switch, label the circuit as a closed circuit or an open circuit.
 CHAPTER 17 4 Electric Circuits SECTION Introduction to Electricity BEFORE YOU READ After you read this section, you should be able to answer these questions: What are the three main parts of a circuit?
Circuit Training. A Selection of Simple, Fun Electronic Projects using the Electricity Box provided with the Heather's Hut project
 Circuit Training A Selection of Simple, Fun Electronic Projects using the Electricity Box provided with the Heather's Hut project Contents Introduction... 3 Notes...3 1. Steady Hand Game... 5 2. Light
4TH GEN SEATS IN A 3RD GEN TRUCK
 4TH GEN SEATS IN A 3RD GEN TRUCK by Flopster843 02 Oct 2016 If you drive a 3rd generation Dodge Ram truck, I am sure you have discovered that the OEM seats are not the greatest (Figure 1.) They are extremely
CHECKLIST & COMPONENTS
 Eclipse Compact www.rollershuttercompany.com Tel 0800 6444121 55mm Roller Garage Doors CHECKLIST & COMPONENTS EQUIPMENT REQUIRED 2 x Step ladders or hop ups Spirit level Tape measure Power drill 10mm A/F
PRODUCT MANUAL Gecko Wireless 2 Zone LED Dimmer and Receiver
 Product Description The Gecko Wireless 2 Zone Wall LED Dimmer has been designed to bring light control easily. No wires or switch box locations are needed, just stick or mount the Gecko to any flat location
Regents Physics Summer Assignment. Physics: Balloon Car Lab
 Regents Physics Summer Assignment Name: Physics: Balloon Car Lab A rocket is simply a chamber filled with pressurized gas. A small opening called a nozzle allows the air to escape, causing thrust that
PRODUCT MANUAL Gecko Wireless One Zone LED Dimmer and Receiver
 Product Description The Gecko Wireless One Zone Wall LED Dimmer has been designed to bring light control easily. No wires or switch box locations are needed, just stick or mount the Gecko to any flat location
What is Electricity? Lesson one
 What is Electricity? Lesson one Static Electricity Static Electricity: an electrical charge that builds up on an object Most of the time, matter is electrically neutral. The same number of positive and
VANDERBILT STUDENT VOLUNTEERS FOR SCIENCE
 Electromagnetism Observation sheet Name VANDERBILT STUDENT VOLUNTEERS FOR SCIENCE http://studentorgs.vanderbilt.edu/vsvs Electromagnetism Spring 2016 (Adapted from Student Guide for Electric Snap Circuits
Magnetism and Electricity
 Magnetism and Electricity Way back in the first lesson of this magnetism block, we talked about the fact that magnetic fields are caused by electrons moving in the same direction. Up to this point, we
PINEWOOD DERBY PACK 98. Official District Rules and Tips
 PINEWOOD DERBY PACK 98 Official District Rules and Tips Dear Parents, Welcome to the world of Pinewood Derby. Your scout and you should make the car together as a project! It is not the intent that the
Lesson 2: Electrical Safety Ladders can become electrified if they come into contact with electric wires. Don't raise a ladder close to electric
 Lesson 2: Electrical Safety Ladders can become electrified if they come into contact with electric wires. Don't raise a ladder close to electric lines. Never touch hanging or broken wires. Don't trim trees
M661 Instruction Manual
 M661 Instruction Manual Please inspect your machine carefully upon receipt. Let us know immediately if you note any damage. -IMPORTANT NOTICE- THIS MACHINE IS NOT TO BE OPERATED BY ANYONE UNTIL HAVING
Electricity and Magnetism. Module 6
 Electricity and Magnetism Module 6 What is electricity? The collection or flow of electrons in the form of an electric charge What is static electricity? When two objects rub against each other electrons
Quick user guide for the DM dispenser
 Quick user guide for the DM dispenser READ FIRST! Use the shortest/thickest USB cable possible, if the screen dims too much during operation (to the point where it s hard to read the text) your cable or
How to build a Hydraulic Ram Pump By Seth Johnson Land To House Version 1.1
 Seth Johnson How to build a Hydraulic Ram Pump By Seth Johnson Land To House Version 1.1 History: A man named John Whitehurst first created the Hydraulic Ram Pump in 1772. That means that this ingenious
Electricity. Grade: 1 st grade Category: Physical Science NGSS: ETS1.A: Defining and Delimiting Engineering Problems
 Electricity Grade: 1 st grade Category: Physical Science NGSS: ETS1.A: Defining and Delimiting Engineering Problems Description: In this lesson, the students will learn that some objects need electricity
GVW AGM Auxiliary Battery Kit for Vanagon Westfalia Full Camper
 GVW-253-700AGM Auxiliary Battery Kit for 1983-1991 Vanagon Westfalia Full Camper The purpose of this kit is to add an Interstate SLA1161 as an auxiliary battery under the driver's seat of 1983 to 1991
Never fly a kite near power lines. Visit tampaelectric.com/safety to learn more about electrical safety.
 Conductors & Insulators Conductors/Insulators 1 Conductors and insulators are all around us. Those pictured here are easy to identify. Can you describe why each is either a conductor or an insulator? 2
GVW AGM Auxiliary Battery Kit for Air-cooled Westfalia Campers and all Vanagon NON-campers
 GVW-253-701AGM Auxiliary Battery Kit for 1980-1983 Air-cooled Westfalia Campers and all Vanagon NON-campers The purpose of this kit is to add an Interstate SLA1161 battery as an auxiliary battery under
Motions and Forces Propeller
 Motions and Forces Propeller Discovery Question What are the effects of friction on the motion of the propeller-driven cart? Introduction Thinking About the Question Materials Safety Trial I: Adding a
Understanding Electricity and Electrical Safety Teacher s Guide
 Understanding Electricity and Electrical Safety Teacher s Guide Note to Instructor: The activities and experiments in this booklet build on each other to develop a student s understanding of electricity
Electromagnets and Magnetic Forces. (All questions that you need to answer are in italics. Answer them all!)
") ame: Partner(s): 1118 section: Desk # Date: Electromagnets and Magnetic Forces (All questions that you need to answer are in italics. Answer them all!) Problem 1: The Magnetic Field of an Electromagnet
ame: Partner(s): 1118 section: Desk # Date: Electromagnets and Magnetic Forces (All questions that you need to answer are in italics. Answer them all!) Problem 1: The Magnetic Field of an Electromagnet
Assembly Instructions: Conventional Motor (Beakman's Motor Kit)
") Assembly Instructions: Conventional Motor (Beakman's Motor Kit) 1. Leave about 3" (7-8cm) and wind the wire 10-35 times around the AA battery. You do not have to be neat as some randomness does not affect
Assembly Instructions: Conventional Motor (Beakman's Motor Kit) 1. Leave about 3" (7-8cm) and wind the wire 10-35 times around the AA battery. You do not have to be neat as some randomness does not affect
MOUSETRAP VEHICLE 2012 CONSTRUCTION TIPS
 MOUSETRAP VEHICLE 2012 CONSTRUCTION TIPS Bro. Nigel Pratt bronigel@kellenberg.org 1 Dennis Papesh dpapesh@holyangels.cc Many Thanks Thank you to Bobby B. of Magsig Middle School and Patrick B. of Holy
The rod and the cloth both become charged as electrons move between them.
 1 polythene rod is rubbed with a cloth. polythene rod cloth The rod and the cloth both become charged as electrons move between them. The rod becomes negatively charged. Which diagram shows how the rod
Installing Custom Puddle Lamps 2009 Subaru Forester
 Installing Custom Puddle Lamps 2009 Subaru Forester By John Perkins This guide will assist you in installing a set of LED puddle lamps on a 2009 Subaru Forester. This is NOT using the $150 Subaru kit.
Electricity Merit Badge
 Electricity Merit Badge Class 2 - Magnetism 1 Classes Class 1 Basic Electricity (shared with the Electronics Merit Badge) Class 2 Magnetism Magnets & Compasses Electromagnets & Coils Solenoids & Electric
Driving Science Home
 Driving Science Home What makes a car go? The power of tension? The invisible force of magnets? The energy of fuel? Investigate how energy and the forces of motion get cars moving. Turn your house into
What is represented by this BrainBat?
 What is represented by this BrainBat? What is represented by this BrainBat? Hint: Say what you see. What is represented by this BrainBat? Hint: Say what you see. Answer: Octopi Electricity and Magnetism
Door Panel Removal & Window Stop Adjustment
 Door Panel Removal & Window Stop Adjustment By: Jeff Wolford Disclaimer: This is simply an article of how I fixed my car. I m not responsible if you break, scratch, or mess up anything following my example.
Prusa i3 Printer Assembly Guide
 Prusa i3 Printer Assembly Guide Special thanks to Carlos Sanchez and Miguel Sanchez for the graphics. All graphics captured from their great animation: http://www.carlos-sanchez.com/ Prusa3/ For copyright
2007 Crown Victoria Police Interceptor (P71) Blend Door Actuator Replacement (If I did it, you can too.)
 Blend Door Actuator Replacement (If I did it, you can too.)") 2007 Crown Victoria Police Interceptor (P71) Blend Door Actuator Replacement (If I did it, you can too.) I'm not saying this is the only way, or even the right way, but it worked for me. First time I've
2007 Crown Victoria Police Interceptor (P71) Blend Door Actuator Replacement (If I did it, you can too.) I'm not saying this is the only way, or even the right way, but it worked for me. First time I've
I.E.S. Cristo Del Socorro de Luanco. Magnetism
 Magnetism Magnetism is a force of attraction or repulsion that acts at a distance. It is due to a magnetic field, which is caused by moving electrically charged particles or is inherent in magnetic objects
Cable Car. Category: Physics: Balance & Center of Mass, Electricity and Magnetism, Force and Motion. Type: Make & Take.
 Cable Car Category: Physics: Balance & Center of Mass, Electricity and Magnetism, Force and Motion Type: Make & Take Rough Parts List: 1 Paperclip, large 2 Paperclips, small 1 Wood stick, 1 x 2 x 6 4 Electrical
4.2 Electrical Quantities
 For more awesome GSE and level resources, visit us at www.savemyexams.co.uk/ 4.2 Electrical Quantities Question Paper Level IGSE Subject Physics (625) Exam oard Topic Sub Topic ooklet ambridge International
Projector39/Umnitza BMW Headlight & Re-Installation for E39s Predator Angel Eyes, and Lamin-X Installation
 Projector39/Umnitza BMW Headlight & Re-Installation for E39s Predator Angel Eyes, and Lamin-X Installation Now it is time to remove the headlights! Obviously you have to open the hood to do this. 100_3630.jpg
Bill of Materials: Spinning top brushless DC motor PART NO
 Spinning top brushless DC motor PART NO. 2171006 The heart of this kit consists of a bifilar wound coil driven with two NPN transistors. While the circuit is easy, the coil will be tedious to wind since
UNIT 4 Electrical Applications
 UNIT 4 Electrical Applications Topic How do the sources used 4.1 to generate electrical energy compare? (Pages 244-51) Topic 4.1: How do the sources used to generate electrical energy compare? Topic 4.6:
I n s t r u c t i o n M a n u a l. Instruction Manual SPECIFICATION
 I n s t r u c t i o n M a n u a l Instruction Manual SPECIFICATION - Wingspan: 3200mm (125,9 in) - Length: 1650mm (64,9 in) - Flying weight: 3000gr 3200gr - Wing area: 64.5 dm2 - Wing loading: 46g/dm2
DMR 3005 WM ONE ZONE WIRELESS DIMMER RECEIVER
 E363518 DMR 3005 WM ONE ZONE WIRELESS DIMMER RECEIVER 20725 NE. 16 AVE. #A-33 MIAMI, FLORIDA 33179 Tel: (305) 652-2599 Fax: (305) 650-8812 www.lumiron.com Email: sales@lumiron.com 1 Benefits and Features
Tach-Drive Distributor Reconditioning Joe Fisher PDF prepared by Dave Zuberer Link to Thread on the Corvette Forum (C1-C2)
") Tach-Drive Distributor Reconditioning Joe Fisher PDF prepared by Dave Zuberer Link to Thread on the Corvette Forum (C1-C2) I just finished two Corvette tach-drive distributors. One was a 71 small block
Tach-Drive Distributor Reconditioning Joe Fisher PDF prepared by Dave Zuberer Link to Thread on the Corvette Forum (C1-C2) I just finished two Corvette tach-drive distributors. One was a 71 small block
DC disconnect. #4 AWG Negative wire
 90 ASSEMBLING A SOLAR GENERATOR Figure 11-3: Inverter Input Circuit DC disconnect #4 AWG Positive wire 75 amp fuse 12-volt deep cycle battery, 120 Ah 400 watt Inverter #4 AWG Negative wire So we should
FITTING OIL TEMP AND PRESSURE GUAGES
 FITTING OIL TEMP AND PRESSURE GUAGES this guide is of reference to fitting an oil temp and pressure sender/ sensor into a sandwich plate- not the sump plug temp sensor (although it wouldn't be much different
reflect energy: the ability to do work
 reflect Have you ever thought about how much we depend on electricity? Electricity is a form of energy that runs computers, appliances, and radios. Electricity lights our homes, schools, and office buildings.
Inside a typical car engine. Almost all cars today use a reciprocating internal combustion engine because this engine is:
 Tech Torque HOW PETROL ENGINES WORK The Basics The purpose of a gasoline car engine is to convert gasoline into motion so that your car can move. Currently the easiest way to create motion from gasoline
Fitting the Bell Auto Services (B-A-S) TDV6 EGR Blanking Kit to a 2006 model Discovery 3 TDV6 HSE
 TDV6 EGR Blanking Kit to a 2006 model Discovery 3 TDV6 HSE") Fitting the Bell Auto Services (B-A-S) TDV6 EGR Blanking Kit to a 2006 model Discovery 3 TDV6 HSE Before I describe how I did this, I must first thank other members of the Disco3.co.uk forum (namely J,moore
Fitting the Bell Auto Services (B-A-S) TDV6 EGR Blanking Kit to a 2006 model Discovery 3 TDV6 HSE Before I describe how I did this, I must first thank other members of the Disco3.co.uk forum (namely J,moore
HURST COMP STICK KIT 2008 and up DODGE CHALLENGER (with AUTO-STICK) Catalog # &
 Catalog # &") FORM 159 0402 03/09 HURST COMP STICK KIT 2008 and up DODGE CHALLENGER (with AUTO-STICK) Catalog #538 0402 & 538 0403 2009 by Hurst Perfomance Thank you for purchasing the Hurst Comp Stick Kit for your
FORM 159 0402 03/09 HURST COMP STICK KIT 2008 and up DODGE CHALLENGER (with AUTO-STICK) Catalog #538 0402 & 538 0403 2009 by Hurst Perfomance Thank you for purchasing the Hurst Comp Stick Kit for your
Installation Instructions for the Plug & Play Chrysler/Dodge/Jeep Remote Start Package w/mux T5
 v1.01 12/14/2102 Installation Instructions for the Plug & Play Chrysler/Dodge/Jeep Remote Start Package w/mux T5 Review the remote start installation manual for safety instructions! Overview Your kit consists
OGALE S ELECTRICITY KIT Learn with Fun!
 OGALE S ELECTRICITY KIT Learn with Fun! Dear students, Congratulations on getting this electricity kit!! With this box you will be making: Simple circuits with Motor, Siren, LEDs, fan, switches buzzer,
Prerequisites: Shop Manual (recommended) pages 3-9 through 3-13.
 pages 3-9 through 3-13.") Prerequisites: Order your gaskets average about $25.00 bucks X 2 so $50.00 4NK-11193-00-00 Obtain a shim kit (Should have several 265 and 270s) (Some dealers will exchange) Obtain a Valve Bucket Tool YM-33961
Prerequisites: Order your gaskets average about $25.00 bucks X 2 so $50.00 4NK-11193-00-00 Obtain a shim kit (Should have several 265 and 270s) (Some dealers will exchange) Obtain a Valve Bucket Tool YM-33961
Installation Instructions Table of Contents
 Installation Instructions Table of Contents Pre- Installation of Garage Storage Lift 2 Layout the Garage Storage Lift 3 Installing the strut Channels 3 Install the Drive Assembly 5 Install the Drive Shaft
iphone 5s Front Panel Replacement
 iphone 5s Front Panel Replacement Replace the cracked or broken screen on your iphone 5s. Note: DIY at your own risk. New beginner must be careful, screens got problems mostly due to wrong installation
Written By: Andrew Optimus Goldberg
 Remove the battery from your iphone 5. Written By: Andrew Optimus Goldberg ifixit CC BY-NC-SA www.ifixit.com Page 1 of 17 INTRODUCTION Bring life back to your iphone 5 with a new battery. If your battery
Written By: Sam Lionheart
 iphone 5s Battery Replacement Replace the battery in your iphone 5s. Written By: Sam Lionheart ifixit CC BY-NC-SA www.ifixit.com Page 1 of 23 INTRODUCTION Use this guide to bring life back to your iphone
Dual Trumpet Air Horn & Installation Instructions
 Dual Trumpet Air Horn 10106 & 10122 Installation Instructions Dual Trumpet Air Horn 10106 & 10122 Required For Installation and Not Included With This Horn: #10 Size Pan-head Mounting Screws (2) 8mm Bolt