BeetleBot. The Simple Zippy Screw-Together Robot Kit! SKU: K JB. jb/
|
|
|
- Bruno Hancock
- 6 years ago
- Views:
Transcription


1 BeetleBot The Simple Zippy Screw-Together Robot Kit! SKU: K JB jb/ Document Revision: January


2 Shell Board 2 x Sensor Wires Switch Spacer Main Board Decal Sheet Power Switch Harness 6 x Leg wires 1 x Double-sided Sticky Tape 2 x Switches Switch Harness 3 x 2-56 x 3/4 screws 3 x Nylon Spacers Tail Caster 2 x Motors 2 x 4-40 x 1/4 screws 4 x 2-56 x 3/8 screws 16 x 2-56 x 1/4 screws 2 x Motor Mounts Screwdriver 2 x Rubber Tires 2

3 3


4 Screwdriver - The Essentials: Just in case if you haven t used a screwdriver, here s some tips: Step 2: Use a comfortable grip that supports the end of the screwdriver handle in your palm. Feel free to remove the metal shirt-clippy thing so it feels better in your hand. Step 3: DO NOT hold it like this. It will be harder to aim your screwdriver. This grip is reserved only for repelling shark attacks. Righty-Tighty, Lefty-Loosey. To install screws, rotate the screwdriver clockwise. Turning it to the right means that if the screwdriver was laying on the table, turning it to the right make the screwdriver roll to the right. That s the way Dad taught it to me. Screwdriver tip: If you find it hard to screw the screws into the baseplate, back the screw out a bit, then screw it back in some more. 4


5 Step 1 - Preparing the laser cut baseplate: Let s start by making sure our baseplate is ready to go. Being laser-cut, there might be some small pieces that didn t fully clear out, so take a close look at each hole to make sure they are clear. If not, use your thumb to nudge the bits out. When you are sure all the holes are cleared out, peel off the protective paper mask. The little black bits can be thrown out. Step 1a: Press out any bit that might be stuck... Step 1b:...then peel off the protective paper. We ll show you what your project should look like at the end of each step. Not much here, but the baseplate with nice, clean holes! 5
, and the 1/4 is how long it is. Pick a side of the baseplate to call the top.")
6 Step 2 - Installing the Antennae: The antennae work with the switches to create the brains of your Beetlebot. Get your antennae and two of the 2-56 x 1/4 screws. Just so you know, 2 refers to the diameter size of bolt, 56 is the number of grooves (per inch), and the 1/4 is how long it is. Pick a side of the baseplate to call the top. Screw one antenna down to the hole shown in the picture below until the screw stops going in. Then back it out 1/4 of a turn so the antenna swivels loosely, but won t pop the S curve out of the slot. Add the other antenna to the other side. When you are done, you should have two floppy antennae mounted to your baseplate! X 2 This is the screw you need (full-size shown here) TOP 6 BOTTOM


7 Step 3 - Switch Installation: Nest the switch in behind the antenna and screw it in. Make sure the lever tab points forward, and install screws in from the other side (the bottom). Lever tab points forward! 3c: Hold the switch on the screws, and finish screwing both screws in. Make sure the switch tab points forward! Make sure the screws are going in properly, or else you will break the switch! TOP Switch detail 7 BOTTOM


8 Step 4 - Battery Packs: The battery packs are installed with 4 of the 2-56 x1/4 long screws. Mount the battery packs into the locations shown on the bottom, with the metal pins poking straight through to the top side. Battery leads poke through here TOP 8 BOTTOM

9 Step 5 - The Motor Mounts: The motor mounts are installed from the TOP SIDE of the baseplate. Install the mounts, each with two more of those wonderful 1/4 long screws we ve been using so far. Screw on the Motor Mounts from the TOP SIDE (the antennae were removed from the photos for a better view - don t remove them from yours!) TOP BOTTOM 9
.")


10 Step 6 - The Motors and Wheels: Your motors come with white nubs on the shaft. Push the rubber wheels over the nubs. Find your two motors and the double-sided sticky-tape ( DSST ). If you want, cut the DSST in half to make it fit the motor better. Find the PLUS SIGN on the back of the motor. You want to put the DSST on the same side of the motor that the plus is. Peel off the DSST protective tape, and stick it to the motor. Peel off the other piece of protective tape, and stick the motors on the motor mounts as shown below on the picture. Make the back of the motor align with the bend on the motor mount, so when you put it down, the Beetlebot sits on the two wheels and NOT the battery pack. TOP Plus signs! 6a: Push the rubber wheels onto the motor nubs 6b: Find the plus signs on the motors, and stick the DSST on the side nearest the plus 6c: Before you stick down the motor, find the plus signs, and match this photo. Then stick the motors onto the mounts! Note where plus sign is! Make it match! TOP BOTTOM 10


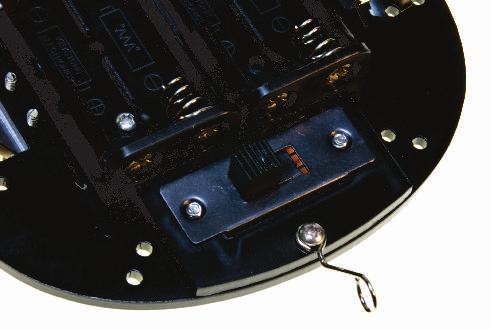
11 Step 7 - The Power Switch: The switch is too big and gets in the way if we mount it directly to the baseplate, so we have to put it on a spacer plate so it takes less space. Slip the switch wires through the spacer, and drop the whole works into the rectangular hole from the BOTTOM of the baseplate. Screw it all together with the two #4-40 x 1/4 long screws, installed form the top side. 7b: Mount the switch into the spacer 7c: Screw the switch in from the topside 7d: Finished installation, from bottomside TOP BOTTOM 11

12 TOP BOTTOM 12
13 Step 9 - Plugging in the Main Wire & Switch Harness: With the antenna switches, these wiring harnesses make up the smarts of the Beetlebot. Simply plug the wires into the positions shown. The plugs slide onto the switches easily, but will stay firm. If you are not sure if it is connected right, unplug it and replug it in again. It should stick a bit when you try to pull it out. The rest of the wire plugs fit in nice and smooth, with no sticking. Note: If you plug the harness in backwards, it will run backwards (cool, but wrong!) TOP BOTTOM 13
14 Step 10 - Initial Testing: You are now done with the technical assembly of your Beetlebot. Plug the batteries in, and see if it works. It should zoom forward until an antenna is pressed, which makes the motor on the opposite side go in reverse. Put it on the floor aimed at the wall. It should hit the wall, then turn away and keep going. :D Everything good? Yay! Do a happy dance, and go on with the final stages of assembly. Is it not working properly? Hrm. Let s check some things: Nothing working at all?! Make sure the batteries are in the right way around, and that the switch harness is plugged into the batteries. It s spinning on the spot?! Does it run forward by pressing one of the antenna? If so, then fix the reversed motor by swapping the motor lead connections.! Can t fix it by activating an antenna? Check if the antenna has slipped over or behind the metal lever on the switch. Is it spinning around one of the wheels (one wheel isn t doing anything)?! Check if the black wheel isn t stuck up against the motor itself. Slide it down the white nub so it rolls free again.! Check if the motor wires are connected by unplugging and plugging them back in again. If none of these steps solved your problem, it s time to start looking carefully at the solder connections between the motors and wires, and the wire connections to the plugs on the harnesses. If you can, you might have to find a soldering iron to fix problems like this. Or contact us, and we ll help you figure out the best solution for you! Contact us for help at support@solarbotics.com or toll free
15 Step 11 - Adding the Legs: What s a Beetle if it doesn t have legs? Find the 6 pieces of black wire, and follow these steps to add the legs. When installed, bend them in a beetle-like shape that doesn t rub the floor (which will slow it down). 11a: Insert the end of the wire in any leg hole 11b: Bend the wire over so it lays flat 11c: Keep bending the wire over the side 11d: Remove the leg from the hole 11e: Move it over to the other hole, and reinsert 11f: Bend the lower leg up to lock it into place TOP 15 BOTTOM
16 Step 12 - Stickers!: Stickers are fun - no doubt about it! Find the top plate, and get to work. Here s a map of where everything goes. Use the cover for ideas. Feel free to make changes and give your Beetlebot a custom look, then we ll put it all together! Eyes (center dot over screw holes) 2 - Left / Right Shells 3 - Eye dots (go on top of #1) 4 - Mouth (grin or smirk) 5 - Decorations 6 - Stars (just for fun!) Eyes / Tatoos 2 - Mouth (grin) 3 - Shell 4 - Main body 5 - Horns / ridges 6 - There is no #6 7 - Stick these on your nose. Or someplace. Have fun! 16


17 Step 13 - Final Assembly: Take your decorated shell, and get ready to install it to the baseplate. Le ts finally use those three long screws and the nylon spacers that look like a stubby piece of macaroni. Start by flattening down the battery pack pins, and tuck all the wires in towards the middle of the robot so they stay out of the way. Install a 3/4 screw through the top shell, and through a nylon spacer. Screw the top plate & spacer to the bottom shell, and repeat it for the other two mounting holes. Step 13a - Flatten down the battery pack pins Step 13b - Put a screw in through the top, and a spacer underneath Step 13c - Screw it in to the baseplate. Install shell mounting screws here Note how the antenna stays behind the screw & spacer TOP 17 BOTTOM
18 How it Works: The key to how the Beetlebot works is in the switches. They are not simple on/off switches - they are Single Pole / Double Throw switches, which means they make a connection to one wire or the other wire - there s no in between. The motors are connected from between the two battery packs to a switch. Depending on the switch, the other wire to the motor is connected to the + side of one pack, or the - side of the other pack. Since motors change direction when you reverse the power connections, this behavior lets the switch and two battery packs change the direction of the robot. The power switch has several wires because it disconnects both battery packs. If you disconnect only one wire, your BeetleBot will stop running forwards but will still run backwards. + - Pack-A Note how switch has moved Pack-B Push + - Pack-A Pack-B Power Switch BeetleBot Simplified Schematic BeetleBot Operational Schematic 18

19 Rubbing Tire Clear Tire Have fun with your BeetleBot - look online for other ways of building another one, and keep building. It s fun! 19


20 Enjoyed the BeetleBot? Want more? There are several more kits from Solarbotics for any skill level! Visit us online for more info and cool stuff: Toll Free: International: +1 (403) Fax: +1 (403) Made in Canada
Circuit Layout. Blk. Red. Use only the 2 outside pins
 Useless Machine As seen on: Saskview.com instructables.com/id/the-most-useless-machine/ makeprojects.com/project/the-most-useless-machine/91/1 www.solarbotics.com 1-866-276-2687 SKU: 60005 http://www.solarbotics.com/products/60005/
Useless Machine. GM3 Edition
 Useless Machine GM3 Edition Shown with peelable protective brown paper As seen on: Saskview.com instructables.com/id/the-most-useless-machine/ makeprojects.com/project/the-most-useless-machine/91/1 www.solarbotics.com
Useless Box Parts List
 GM3 Hinge Edition Want to make something Useless? It s not quite totally useless, especially if you like flipping switches. This machine will happily fix your attempts to turn it on. See the feature articles
DragonTail The DragonTail
 Mobile Robot Experimenter s Platform Have a robot experiment to do? Here s a solid platform to test your ideas on! Sturdy anodized aluminum chassis Acrylic front & top plate with Arduino-compatible mount
Connecting the rear fog light on the A4 Jetta, while keeping the 5 Light Mod
 Connecting the rear fog light on the A4 Jetta, while keeping the 5 Light Mod DISCLAIMER: I'm human and make mistakes. If you spot one in this how to, tell me and I'll fix it This was done on my 99.5 Jetta.
How I installed new brake pads on my i with Sport Package (should be fine for other E39 s) By Robert B.
 By Robert B.") How I installed new brake pads on my 1999 528i with Sport Package (should be fine for other E39 s) How I installed new brake pads on my 1999 528i with Sport Package (should be fine for other E39 s) By
How I installed new brake pads on my 1999 528i with Sport Package (should be fine for other E39 s) How I installed new brake pads on my 1999 528i with Sport Package (should be fine for other E39 s) By
Fanatec GT3RS V1 to GT3RS V2 Tutorial
 Fanatec GT3RS V1 to GT3RS V2 Tutorial by Roy Visser 1 How to update your Fanatec GT3RS V1 wheel to a GT3RS V2 wheel Welcome to this guided and detailed tutorial for upgrading your Fanatec GT3RS V1 wheel
Our goal is to make the install a breeze. Please read the entire guide before beginning.
 www.airkewld.com Page 1 of 6 IRS Axle Kit Install IRS Axle Kit Install Our goal is to make the install a breeze. Please read the entire guide before beginning. KITS SHOULD INCLUDE 2 - Control-arm mounting
RS-2 SINGLE ACTION REAR BUMPER WITH TIRE CARRIER INSTALL MANUAL FOR JEEP WRANGLER ALL MODELS.
 RS-2 SINGLE ACTION REAR BUMPER WITH TIRE CARRIER INSTALL MANUAL FOR 2007-2016 JEEP WRANGLER ALL MODELS. Rear Bumper Installation Instructions 1) Remove factory rear bumper, (this includes all tow hitch
Wiring Harness Relocation by Flopster Mar 2012
 Wiring Harness Relocation by Flopster843 21 Mar 2012 On my 2008 Ram, there is a gigantic blob of electrical wiring that Dodge decided to put between the engine and the brake master cylinder, just behind
Installing the Wireless Charging upgrade kit in a 2018 XT5 (Platinum version)
") Installing the Wireless Charging upgrade kit in a 2018 XT5 (Platinum version) September 2, 2018 Tools needed: Wireless charger upgrade kit Plastic trim tools 7 mm nut driver Background: I purchased the
Installing the Wireless Charging upgrade kit in a 2018 XT5 (Platinum version) September 2, 2018 Tools needed: Wireless charger upgrade kit Plastic trim tools 7 mm nut driver Background: I purchased the
Installation Directions for FINGER STICK and Blocker Plate
 Installation Directions for FINGER STICK and Blocker Plate What is a Finger Stick? A Finger Stick is a simple circuit that modifies the MAF signal on LLY and LBZ engines (not LB7 engines) to expected levels
These instructions show how to build the Remote Controlled Fart machine Sound Kit.
 Remote Controlled Fart Machine Assembly Instructions These instructions show how to build the Remote Controlled Fart machine Sound Kit. Tools Required Drill with 7/64, 3/16, and ¼ drill bits. Holt melt
Assembly Guide for RedBot with Shadow Chassis
 Page 1 of 32 Assembly Guide for RedBot with Shadow Chassis Introduction The SparkFun RedBot is a platform for teaching basic robotics and sensor integration! It is based on the SparkFun RedBoard and fully
Replacing MK4 Golf/Jetta radiator mounts in-car
 Replacing MK4 Golf/Jetta radiator mounts in-car This is a guide to replacing the radiator mounts in a MK4 Golf/Jetta. This involves moving the core support to the service position which allows you to do
DCX2496 Linear Power Supply mod by
 DCX2496 Linear Power Supply mod by Construction Guide Linear Power Supply for the DCX2496 Introduction. One of my more rewarding modifications to the DCX2496 was the replacement of the stock I/O board
For all Ram x4 Trucks, and all Ram x4 trucks.
 Dodge Off Road, LLC Specializing in Dodge Ram Solid-Axle 4x4 Suspension and Steering for Off Road Applications 855.9009.DOR sales@dodgeoffroad.com dodgeoffroad.com DODGE OFF ROAD 5 th GEN STEERING KIT
Here we have the old lock on an exterior door (note more than one door was used for this article- taking the best pictures of the group)
") Alarm lock T2 Part 1 of 4 Installations Eugene Hansen 2004 This is the first part of four, 1st we will install a T2 Trilogy, 2 nd replacing the batteries, 3 rd replacing the solenoid and finally 4 th reprogramming
Alarm lock T2 Part 1 of 4 Installations Eugene Hansen 2004 This is the first part of four, 1st we will install a T2 Trilogy, 2 nd replacing the batteries, 3 rd replacing the solenoid and finally 4 th reprogramming
M62 Alternator Removal / Replacement (Water Cooled)
") M62 Alternator Removal / Replacement (Water Cooled) Pre-Steps 1. Disconnect Battery Positive lead 2. Charge Your Battery with battery charger to full charge (So you new alternator wont have to work as
M62 Alternator Removal / Replacement (Water Cooled) Pre-Steps 1. Disconnect Battery Positive lead 2. Charge Your Battery with battery charger to full charge (So you new alternator wont have to work as
We thank you for purchasing a manual petcock conversion kit from Murphs!
 We thank you for purchasing a manual petcock conversion kit from Murphs! The first step is removing the gas tank from the bike. We suggest running the tank down to reserve before removal, both for the
PDC RETROFIT INSTALLATION By Kevin
 1 PDC RETROFIT INSTALLATION By Kevin Kshek369@hotmail.com 1 These instructions are intended to help those who chose to do this retrofit by showing you what you are in store for and to give you some instructions
Perfect Park 7000 Installation & Unloading Instructions Operating Manual
 Perfect Park 7000 Installation & Unloading Instructions Operating Manual 1) Always file a claim with the truck line if the lift has been damaged! (If you don t originally notice the damage, but find some
Right On Replicas, LLC Step-by-Step Review * Mack Fire Pumper 1:32 Scale Revell Model Kit # Review
 Right On Replicas, LLC Step-by-Step Review 20150915* Mack Fire Pumper 1:32 Scale Revell Model Kit #85-1945 Review The Mack CF600 Pumper is a familiar fire truck that is still widely used in firehouses
Troubleshooting Guide for Okin Systems
 Troubleshooting Guide for Okin Systems More lift chair manufacturers use the Okin electronics system than any other system today, mainly because they re quiet running and usually very dependable. There
Triumph Street Triple VSM Grip Heater Install
 Triumph Street Triple VSM Grip Heater Install Introduction: With winter fast approaching and with painful memories of last winter riding with the club it was time to do something about getting some grip
RZR 900 spring/shock installation
 RZR 900 spring/shock installation Thank you for purchasing the Shock Therapy Dual Rate Spring Kit for your RZR 900. Your item list: 2 Front upper coil springs, 2 Front lower coil springs, 2 Rear upper
Stand Alone Fog Lights Installation Instructions
 Tools Required: 1. Trim Removal tool or protected flat screwdriver 2. #2 Phillips Screwdriver 3. 10mm socket 4. 10mm wrench 5. 8mm or 5/16 socket 6. Adjustable Pliers 7. Electrical Tape WARNING!!! Disconnect
X-Type w/ non-premium sound amplifier installation instructions
 X-Type w/ non-premium sound amplifier installation instructions 1. Pull radio from dash (see Radio Removal Instructions ) 2. Disconnect wiring harness from back of radio by pushing in tab on plug and pulling
SB-GVS Shield v1.0. ! Ideal for servo & sensor accessories (Phidgets, Seeed Bricks)! Full break-out for all 12 digital lines & 6 analog lines 2
! Full break-out for all 12 digital lines & 6 analog lines 2") SB-GVS Shield v1.0 Arduino tm -Compatible Sensor Interface Connect up 18 peripherals to the popular Ground/Voltage/Signal interface. Got more? Use the IC-interface too! Build Time: 0mins Skill Level: Beginner
SB-GVS Shield v1.0 Arduino tm -Compatible Sensor Interface Connect up 18 peripherals to the popular Ground/Voltage/Signal interface. Got more? Use the IC-interface too! Build Time: 0mins Skill Level: Beginner
Simple Eurorack Row. Kit Builder's Guide. 4mspedals.com
 Simple Eurorack Row Kit Builder's Guide 4mspedals.com ' Simple Eurorack Row This guide is for building a single-row eurorack case with a power supply. When completed, the case is ready to accept eurorack
Door Panel Removal & Window Stop Adjustment
 Door Panel Removal & Window Stop Adjustment By: Jeff Wolford Disclaimer: This is simply an article of how I fixed my car. I m not responsible if you break, scratch, or mess up anything following my example.
Fitting the Bell Auto Services (B-A-S) TDV6 EGR Blanking Kit to a 2006 model Discovery 3 TDV6 HSE
 TDV6 EGR Blanking Kit to a 2006 model Discovery 3 TDV6 HSE") Fitting the Bell Auto Services (B-A-S) TDV6 EGR Blanking Kit to a 2006 model Discovery 3 TDV6 HSE Before I describe how I did this, I must first thank other members of the Disco3.co.uk forum (namely J,moore
Fitting the Bell Auto Services (B-A-S) TDV6 EGR Blanking Kit to a 2006 model Discovery 3 TDV6 HSE Before I describe how I did this, I must first thank other members of the Disco3.co.uk forum (namely J,moore
EZ-Glide Wheels Installation Patent Pending Revised 8/23/2011
 EZ-Glide Wheels Installation Patent Pending Revised 8/23/2011 Questions: Lakeside Quilt Co. Jack Boersma Toll Free (888) 361-4806 www.lovetoquilt.com Cell (406) 270-4715 sales@lovetoquilt.com Toll Free
Adjusting Carbs For Re-Jetting (Procedure written for an Intruder 1500 LC) NEWLY UPDATED: APRIL 2003
 NEWLY UPDATED: APRIL 2003") SECTION ONE: Get Prepared - Tools Adjusting Carbs For Re-Jetting (Procedure written for an Intruder 1500 LC) NEWLY UPDATED: APRIL 2003 Courtesy of: Half-Crazy Get a manual impact driver (the kind you hit
SECTION ONE: Get Prepared - Tools Adjusting Carbs For Re-Jetting (Procedure written for an Intruder 1500 LC) NEWLY UPDATED: APRIL 2003 Courtesy of: Half-Crazy Get a manual impact driver (the kind you hit
PORSCHE V r Valve Timing Instructions. Copyright 2009 Written by Mike Frye Edited my Adam G.
 PORSCHE 928 32V r Valve Timing Instructions Copyright 2009 Written by Mike Frye Edited my Adam G. Sections: Overview.3 Disclaimer/warnings/things to watch for 4 Terms and naming conventions used in this
Install: Part A. First things first: Running the wiring for the Neo-Pod
 Install: Part A First things first: Running the wiring for the Neo-Pod These instructions follow installation of #31649KL Neo-Pod (the fully loaded version with amp, sub, etc.) in a factory Wrangler sound
An Actual Driving Lesson Learning to drive an automatic car
 An Actual Driving Lesson Learning to drive an automatic car Where are the controls that I might have to use in my driving: Knowing where the controls are, and being able to locate and use them without
Optima K Badge Removal & Installation Tutorial
 P.1 2014-2015 BADGE INSTALLATION & REMOVAL HOOD, TRUNK, AND STEERING WHEEL ***Modification to the rear K Badge emblem of 2011-2013 Optima models as directed in this tutorial is not necessary*** Tools and
Circuit 1: Closed Circuit A closed circuit is a complete circuit that allows current to flow.
 Paper Circuits Gather the following materials: Paper Circuit video tutorials 4 pieces of copper conductive tape (each will be cut into 18 pieces) 5 LEDs (3mm) 1 coin cell battery (3V) 1 binder clip (optional)
Rebuilding the Power Steering Pump for a 2007 Honda Accord 4CYL
 Rebuilding the Power Steering Pump for a 2007 Honda Accord 4CYL Disclaimer: I have benefited greatly from others who have taken the time to post auto repair videos/tutorials online. To try and return the
DODGE OFF ROAD T-STYLE STEERING KIT INSTALLATION INSTRUCTIONS
 Dodge Off Road, LLC Specializing in Dodge Ram Solid-Axle 4x4 Suspension and Steering for Off Road Applications 855.9009.DOR sales@dodgeoffroad.com dodgeoffroad.com DODGE OFF ROAD T-STYLE STEERING KIT INSTALLATION
Bachmann Spectrum Peter Witt in HO
 Bachmann Spectrum Peter Witt in HO By Bob Dietrich This is my impression of an unpainted Peter Witt from Bachmann Spectrum. The packaging of the car was impressive a large red box with a clear cover showing
OEM Cruise Control Installation in GMC/Chevy NBS trucks
 OEM Cruise Control Installation in 99-02 GMC/Chevy NBS trucks May 2008 ~ Rampage_Rick Having just installed factory cruise control in my 00 Sierra, I thought I d share the fun. I followed the steps outlined
TONY S TECH REPORT. Basic Training
 TONY S TECH REPORT (Great Articles! Collect Them All! Trade them with your friends!) Basic Training OK YOU MAGGOTS!! Line up, shut up, and listen good. I don t want any of you gettin killed because you
DIY Bi-Metallic Strip
 DIY Bi-Metallic Strip An introduction to the applications of thermal expansion and two-way switching. Written By: Mahaaveer BN 2018 Page 1 of 14 INTRODUCTION A bi-metallic strip is used to convert a temperature
JEEP JK4 STEP SLIDER INSTALLATION BD-SS-100-JK4
 JEEP JK4 STEP SLIDER INSTALLATION BD-SS-100-JK4 PARTS LIST QTY DESCRIPTION 1 Drivers Side Slider Assembly 1 Passenger Side Slider Assembly 1 Wiring Harness and Fuse 1 Double Sided Sticky Squares and Alcohol
Installing AMP-wiring in a New Beetle
 Installing AMP-wiring in a New Beetle Vehicle used: New Beetle 2.0i Type 9C (1999) Used set of cables: Dietz 35mm² power cable, double shielded Dietz chinch cable ( 35mm² Professional Line ) First of all:
SMART LAB PUTTING TOGETHER THE
 PUTTING TOGETHER THE SMART LAB INSTALLING THE SPRINGS The cardboard workbench with all the holes punched in it will form the base to the many cool circuits that you will build. The first step in transforming
Peg-Harness installation instructions
 Peg-Harness installation instructions I know it s not the easiest thing to do, but PLEASE READ THESE INSTRUCTIONS COMPLETELY so you will understand what you are trying to accomplish before you start drilling
STEP #1: Remove the wheels from the truck. There are (6) 21mm lug nuts holding each wheel on... Remember Lefty Loosy, Righty Tighty.
 21mm lug nuts holding each wheel on... Remember Lefty Loosy, Righty Tighty.") - CustomTacos.com Page 1 of 36 How-To: Toytec Lift Install Read all of these install instructions prior to installing Toytec's suspension lift. I cannot be held responsible for any damages or personal
- CustomTacos.com Page 1 of 36 How-To: Toytec Lift Install Read all of these install instructions prior to installing Toytec's suspension lift. I cannot be held responsible for any damages or personal
Installation Instructions Supertop NX Twill
 Installation Instructions Supertop NX Twill Vehicle Application: Jeep Wrangler Unlimited 2007-current Part Number 54823 Installation Tips Before you begin installing your new Supertop NX Twill, please
RockyHydro. System Assembly Info Packet
 RockyHydro System Assembly Info Packet RockyHydro sells a wide degree of micro-hydro components for various kits. Our customers enjoy the benefit of being able to carefully match a turbine and generator
Remove the 3-11mm nuts holding mirror on. Don t drop the nuts!
 2005-2012 Ford Mustang Puddle Lamp Kit Parts List: Quantity: Tool List: LED Lamps 2 Flat head screwdriver Seals 2 Ratchet & Socket set OR Nuts 2 Adjustable Wrench Wiring harness 1 Drill & 11/16 th bit
Contents. Preparing the motor Winding the rotating secondary Winding the primary... 8
 120732-130389 Propeller Clock Construction Notes Revision E, December 2, 2013 Contents Preparing the motor... 2 Winding the rotating secondary... 5 Winding the primary... 8 UltiProp Clock (Elektor Dec.
STAY ON TRACK WITH THIS LINE FOLLOW BUGGY WITH :MOVE LINE FOLLOW BOARD FOR BBC MICRO:BIT
 STAY ON TRACK WITH THIS LINE FOLLOW BUGGY WITH :MOVE LINE FOLLOW BOARD FOR BBC MICRO:BIT BUILD INSTRUCTIONS LIST OF FIXINGS M3 BOLTS M3 NUTS STANDOFFS 6mm x12 x4 x4 10mm x4 x12 12mm x2 30mm x2 20mm M-F
2. With the rear door open remove pull-style clip from the passenger side just below the door latch.
 LoD Offroad FJ Cruiser Rear Bumper with Tire Carrier Installation Instructions 1. Begin with removing factory spare from the rear door. 2. With the rear door open remove pull-style clip from the passenger
Mini EV Prize Solar Car Kit
 Mini EV Prize Solar Car Kit Each Kit includes 2 x Solar Panels 8 x Wheels 4 x 50mm, 4 x 40mm 2 x Axels (short & long) & 4 x Axel Collars 1 x Motor - F18 & 3D printed mount 2 x Large Spur Gear 60T & 48T
Ignition Timing - Honda 180-Degree Twins
 Ignition Timing - Honda 180-Degree Twins First thing to do is make a quick test light - I used a 12 volt indicator bulb from a speedo. Test leads with alligator clips make hookup easy... The point plate
 Page 1 of 7 www.ducati.com/ MODIFICATIONS >> Kuryakyn Grips Installation Feedback - Ads by Google Here is the pictoral on the Kury grips installation By CeeAre Parts required: - Kuryakyn KU 6240 Universal
Check next page for step by step with pictures
 WARNING These following pages are instruction for C5 CE stripes; however, it is the same method applying vinyl. Please spend time reading thru these pages. At the end, it is your C6 GM full racing stripe
Trouble Shooting Guide for Hubbell Systems
 Trouble Shooting Guide for Hubbell Systems NOTE: Hubbell Special Products discontinued operations in 2008, so there is a very limited number of repair parts available for motor repair. In some ways, this
2000 Mr2 Spyder Seat Cover Replacement Project
 2000 Mr2 Spyder Seat Cover Replacement Project Tool List: Plastic Trim Tool, Hog Ring Pliers, Medium or Heavy Duty Wire Cutters, 12mm socket, 14mm Socket, Ratchet, Extension, Flat Head Screwdriver & Gloves
CARE AND FEEDING OF YOUR XJ GAS CAP
 CARE AND FEEDING OF YOUR XJ GAS CAP Do you smell gas even when the cap is latched shut? Does your tank not want to drain even with the petcock set to prime? Does your key not want to turn in the lock?
2007 Crown Victoria Police Interceptor (P71) Blend Door Actuator Replacement (If I did it, you can too.)
 Blend Door Actuator Replacement (If I did it, you can too.)") 2007 Crown Victoria Police Interceptor (P71) Blend Door Actuator Replacement (If I did it, you can too.) I'm not saying this is the only way, or even the right way, but it worked for me. First time I've
2007 Crown Victoria Police Interceptor (P71) Blend Door Actuator Replacement (If I did it, you can too.) I'm not saying this is the only way, or even the right way, but it worked for me. First time I've
J&M Mustang Adjustable Panhard Rod (05-09) - Installation Instructions
 - Installation Instructions") J&M Mustang Adjustable Panhard Rod (05-09) - Installation Instructions The below installation instructions work for the following products: J&M Mustang Adjustable Panhard Rod (05-09) Please read through
J&M Mustang Adjustable Panhard Rod (05-09) - Installation Instructions The below installation instructions work for the following products: J&M Mustang Adjustable Panhard Rod (05-09) Please read through
How to stick a 3.4L engine into your Boxster.
 How to stick a 3.4L engine into your Boxster. When I purchased my 99 Boxster in January, it was already equipped with a TPC supercharger setup. While fun and a great improvement over the rather anemic
Fitting Radio Control to a Mamod Boulton
 Fitting Radio Control to a Mamod Boulton How To Fit Radio Control To A Mamod Boulton using FlySky Equipment I assume that you already have a Mamod Boulton and have fitted rechargeable AA batteries instead
LUGGAGE RACK MG TD with Original Steel Wheels. Installation Instructions. Step 1
 Created on 7/7/2003 8:34:00 PM by Michael Grant Last Revised 2/2/2008 1:55:00 PM Page 1 of 14 1 2 3 243-705 LUGGAGE RACK MG TD with Original Steel Wheels If your TD has been converted to wire wheels, please
Fitting Instructions For The TDV6 EGR Blanking Kit To A 2006 Model Discovery 3 TDV6 GHSE
 Part Number DA1112 Fitting Instructions For The TDV6 EGR Blanking Kit To A 2006 Model Discovery 3 TDV6 GHSE You do this modification at your own risk. Britpart won t be held responsible for what is written
WARNING These following pages are instruction for C5 CE stripes; however, it is the same method applying vinyl. Please spend time to read thru these
 WARNING These following pages are instruction for C5 CE stripes; however, it is the same method applying vinyl. Please spend time to read thru these pages. At the end, it is your C5/C6 ME stripes' instruction.
Installing LED lights in a Hypercharger By Keith Edwards Joker s Wild! (Wildjokr)
") Installing LED lights in a Hypercharger By Keith Edwards Joker s Wild! (Wildjokr) THINGS YOU WILL NEED: A Hypercharger (duh!) LEDs (The ones I got were from Benny Bryant at Fantasies on Wheels in Sylacauga,
Installing LED lights in a Hypercharger By Keith Edwards Joker s Wild! (Wildjokr) THINGS YOU WILL NEED: A Hypercharger (duh!) LEDs (The ones I got were from Benny Bryant at Fantasies on Wheels in Sylacauga,
Ford Racing BOSS 302 Engine Oil Cooler (11-14 GT)
") Tools needed: 14mm hex socket 7mm socket/wrench 8mm socket/wrench Ford Racing BOSS 302 Engine Oil Cooler (11-14 GT) 10mm socket (for airbox removal) ¾ inch or 19mm wrench Torque wrench Appropriate ratchets
Tools needed: 14mm hex socket 7mm socket/wrench 8mm socket/wrench Ford Racing BOSS 302 Engine Oil Cooler (11-14 GT) 10mm socket (for airbox removal) ¾ inch or 19mm wrench Torque wrench Appropriate ratchets
Stirling Engine. What to Learn: A Stirling engine shows us how energy is converted and used to do work for us. Materials
 Stirling Engine Overview: The Stirling heat engine is very different from the engine in your car. When Robert Stirling invented the first Stirling engine in 1816, he thought it would be much more efficient
An Actual Driving Lesson. Learning to drive a manual car
 An Actual Driving Lesson Learning to drive a manual car Where are the controls that I might have to use in my driving: Knowing where the controls are, and being able to locate and use them without looking
GruvenParts.com BRASS GM Power Folding Mirror Gear Replacement Instructions. Updated 8/25/2017 Additional Pictures / Tips Posted!
 Page 1 GruvenParts.com BRASS GM Power Folding Mirror Gear Replacement Instructions Updated 8/25/2017 Additional Pictures / Tips Posted! ** Latest Design is uses an ALL BRASS SPUR GEAR!!! ** ** If you don
Troubleshooting Guide for Limoss Systems
 Troubleshooting Guide for Limoss Systems NOTE: Limoss is a manufacturer and importer of linear actuators (motors) hand controls, power supplies, and cables for motion furniture. They are quickly becoming
Ford F-150 Speaker Replacement Instructions
 Ford F-150 Speaker Replacement Instructions This article was downloaded from http://www.fordf150.net Be sure to go there to view and download the other how-to articles. Thanks to John Meyer for contributing
Z-Truck (Vertical Moving) Z-truck Flag. Y-Truck (Horizontal Moving) FIGURE 1: VIEW OF THE Z-TRUCK. Flexshaft Assembly
 Z-truck Flag. Y-Truck (Horizontal Moving) FIGURE 1: VIEW OF THE Z-TRUCK. Flexshaft Assembly") Checking and Replacing the AC Motor To remove and replace the AC Motor you will need the following tools: #2 Phillips screwdriver (magnetic tip preferred) Removing the AC Motor 1. Ready the machine by
Checking and Replacing the AC Motor To remove and replace the AC Motor you will need the following tools: #2 Phillips screwdriver (magnetic tip preferred) Removing the AC Motor 1. Ready the machine by
Learning to Set-Up Your Warrior Drive Belt Arizona Warrior (Rev4) BEFORE GETTING STARTED
 BEFORE GETTING STARTED") BEFORE GETTING STARTED 1. A noise one guy calls 'howling' is the same noise another guy calls 'squealing' so unless you are both hearing the noise with your own ears its better to not assume a drive belt
BEFORE GETTING STARTED 1. A noise one guy calls 'howling' is the same noise another guy calls 'squealing' so unless you are both hearing the noise with your own ears its better to not assume a drive belt
Speakers and Motors. Three feet of magnet wire to make a coil (you can reuse any of the coils you made in the last lesson if you wish)
") Speakers and Motors We ve come a long way with this magnetism thing and hopefully you re feeling pretty good about how magnetism works and what it does. This lesson, we re going to use what we ve learned
Speakers and Motors We ve come a long way with this magnetism thing and hopefully you re feeling pretty good about how magnetism works and what it does. This lesson, we re going to use what we ve learned
RedlineGoods Tacoma Installation Manual
 RedlineGoods 2016+ Tacoma Installation Manual AUTOMATIC SHIFT BOOT AND EBRAKE BOOT Press down on the factory shift boot collar to disconnect it from the shift knob. Unscrew shift knob Pull up on the rear
Lab 4: Robot Assembly
 E11: Autonomous Vehicles Lab 4: Robot Assembly In this lab, you ll put together your very own robot! You should have a Mudduino and a chassis, as well as your kit of parts. Now it s time to put them all
PLEASE READ THESE INSTRUCTIONSFULLY BEFORE STARTING TO ASSEMBLE YOUR DIDICAR PLEASE PAY SPECIAL ATTENTION TO THE NOTES AND HINTS
 PLEASE READ THESE INSTRUCTIONSFULLY BEFORE STARTING TO ASSEMBLE YOUR DIDICAR PLEASE PAY SPECIAL ATTENTION TO THE NOTES AND HINTS ASSEMBLY INSTRUCTIONS Parts List iv) i) v) ii) iiib) iiia) vii) i) Car Body
DODGE RAM 2500
 81234007 2014-2015 DODGE RAM 2500 Congratulations - your new LevelTow Helper Springs are quality products capable of improving the handling and comfort of your vehicle. As with all products, proper installation
Southwest Windpower Instruction Sheet AIR-X Circuit Replacement Kit
 Southwest Windpower Instruction Sheet AIR-X Circuit Replacement Kit Tools Required 5 / 32 Hex key 5 / 16 Hex key 7 / 64 Hex key Standard screwdriver Pair of external snap ring pliers Rubber mallet Hammer
Door panel removal F07 5 GT
 Things needed Decent plastic trim removal tools Torx 30 Spare door clips 07147145753 I got away with a set of 5 but if I did it again I d be cautious and get 10. From prior experience if they are damaged
Evo X Walbro 450 Pump System
 Evo X Walbro 450 Pump System Installation Guide Please contact us at sales@wtftuned.com with any additional questions Tools required: 8 mm socket and wrench, needle-nose pliers, razor, drill w/ 5/64 bit,
Installation Instructions Jeep CJ-7
 Retrofit Steering Column Installation Instructions 1976-86 Jeep CJ-7 For Part # s 1520800010, 152800020, 1520800051 www.ididitinc.com 610 S. Maumee St., Tecumseh, MI 49286 (517) 424-0577 (517) 424-7293
Prusa i3 Printer Assembly Guide
 Prusa i3 Printer Assembly Guide Special thanks to Carlos Sanchez and Miguel Sanchez for the graphics. All graphics captured from their great animation: http://www.carlos-sanchez.com/ Prusa3/ For copyright
LoD Offroad. Jeep JK Rear Bumper with Tire Carrier Installation Instructions
 LoD Offroad Jeep JK Rear Bumper with Tire Carrier Installation Instructions Please read through the instructions before beginning any part of the installation process. Packaging List: 1-Rear Bumper 1-Tire
Bachmann GWR Earl (Dukedog) EM Finescale Conversion
 EM Finescale Conversion") Bachmann GWR Earl (Dukedog) EM Finescale Conversion Before you start, it is a good idea to have some small containers or snap top poly bags to put screws and components in for safe keeping...much better
Bachmann GWR Earl (Dukedog) EM Finescale Conversion Before you start, it is a good idea to have some small containers or snap top poly bags to put screws and components in for safe keeping...much better
PLEASE READ THROUGH THE WHOLE WRITE UP BEFORE ACTUALLY USING IT!!!!
 JDM power folding mirror switch install into stock USDM harness. By: Greg L., Zeke21 on twinturbo.net PLEASE READ THROUGH THE WHOLE WRITE UP BEFORE ACTUALLY USING IT!!!! This is how I was able to get the
Tusk Pannier Racks. Instructions and information KLR
 1 Tusk Pannier Racks Instructions and information KLR650 2008 + Congratulations on your purchase of the Tusk Pannier Racks. These racks are made to handle extreme adventure riding, but work great for the
Build your own THUNDERBIRD 2
 PACK 01 STAGE PAGE 01 Nose assembly and Elevator Car rear wheels 3 02 Cockpit interior and Elevator Car 1 completion 7 03 Missile launcher and Thunderbird 4 11 04 Nose assembly and the Tracy brothers 15
We will be upgrading from the factory, paper-cone disgrace to an Infinity Kappa 62.9i:
 In order to fully round out your stereo upgrade, the factory rear speakers must go. This is another easy job to tackle, but the fitment of the package tray and being hunched over in the rear glass area
I N V E N T O R S M A N U A L
 INVENTOR S MANUAL INTRODUCTION ELECTRIC CITY KIT Welcome to the hi-tech world of Logiblocs! These instructions will tell you all you need to know to make a Door Alarm, Security Mat, Water Bleeper, Light
LoD Offroad. Jeep JK Door Linked Rear Bumper with Tire Carrier Installation Instructions
 LoD Offroad Jeep JK Door Linked Rear Bumper with Tire Carrier Installation Instructions Please read through the instructions before beginning any part of the installation process. Packaging List: 1-Rear
Current Range Rover Sport STRUT Collection Installation Manual
 2014 - Current Range Rover Sport STRUT Collection Installation Manual 1 1. Removing Main Grille and Lower Fascia 1.1 Run a line of low tack masking tape across the front of the bumper below the grille
SunFlower Helicopter Rocket LUNAR Build Session: 9/25/08 By Tom Desmarais
 SunFlower Helicopter Rocket LUNAR Build Session: 9/25/08 By Tom Desmarais Contents of Kit: A. 3 1/16 x1 x11 basswood rotors B. 3 1/16 x2 x2 basswood fins C. 3 1/16 x5/16 x1/2 basswood hold spacer D. 3
WARNING: the engine does not come with oil in it. Please fill the oil before starting. The 200cc hardknock requires 9/10 of a quart of oil.
 WARNING: the engine does not come with oil in it. Please fill the oil before starting. The 200cc hardknock requires 9/10 of a quart of oil. Things needed for assembly. -2 tubes of blue loc-tite. I don