Weistec M157 WMI System
|
|
|
- Luke Jenkins
- 6 years ago
- Views:
Transcription

1 Weistec M157 WMI System Installation Guide E E63 4matic(S) CLS CLS63 4matic(S) S63 AMG (Without ABC Suspension) This product is legal in California for racing vehicles only and should never be used upon a highway. This product is legal solely for vehicles used in competition which may never be used upon a public road or highway
2 WARNING! THE WEISTEC WMI/ASV SYSTEM IS DESIGNED AROUND THE USE OF A MAXIMUM CONCENTRATION OF 50% METHONAL MIXED WITH DISTILLED WATER ONLY. METHANOL IS A TOXIC AND HIGHLY FLAMMABLE CHEMICAL. 100% METHANOL EASILY IGNITES AND BURNS VIGOROUSLY WITH AN ALMOST UNDETECTABLE FLAME. METHANOL CAN BE ABSORBED THROUGH THE SKIN AND EVEN SMALL AMOUNTS CAN CAUSE BLINDNESS OR EVEN DEATH. USING THIS FLUID AT HIGH PRESSURES WITHOUT DILUTION, IN AN UNDER-HOOD ENVIRONMENT WITH NYLON LINES AND PUSH-TO-CONNECT FITTINGS IS VERY UNSAFE. GREATER THAN 50% CONCENTRATION OF METHANOL WILL PROVIDE LITTLE TO NO ADVANTAGE AND WILL CAUSE SAFETY ISSUES NOTE: WEISTEC ENGINEERING HOLDS NO RESPONSIBILITY FOR ANY ENGINE DAMAGE OR PERSONAL INJURY THAT RESULTS FROM THE MISUSE OF THIS PRODUCT, INCLUDING BUT NOT LIMITED TO INJURY OR DEATH CAUSED BY THE MISHANDLING OF METHANOL 1
3 WARNING! IF YOU ARE NOT EXPERIENCED IN THE AREA OF AUTOMOTIVE MECHANICS, WE STRONGLY URGE THAT YOU REFER THIS INSTALLATION TO A CERTIFIED INSTALLER OR TECHNICIAN. Improper installation and/or adjustment of this product can result in major engine/vehicle damage! Only an experienced tuner or technician should make adjustments 2

4 WEISTEC M157 WMI System Thank you for your purchase of the Weistec M157 WMI/ASV System for your Mercedes 63 AMG equipped with the M157 Engine. We appreciate your business, and we know you will enjoy your product. For your benefit, please read the following instructions completely and thoroughly before attempting to install the Upgrade. Many questions we have received from customers about the installation of our products that could have been easily solved by information listed in the accompanying installation guide. We want you to enjoy the product in its fully functional state, and reading this tutorial is the first step to getting you on your way to a more powerful AMG. PLEASE NOTE THAT IF YOU HAVE ANY AFTERMARKET POWERTRAIN PARTS ALREADY INSTALLED ON YOUR VEHICLE, YOU MUST RETURN THE CAR TO STOCK STATUS THIS INCLUDES PULLEYS, PROGRAMMING, ETC. THE CAR WILL NOT FUNCTION AND PARTS MAY NOT FIT PROPERLY IF OTHER AFTERMARKET PARTS ARE INSTALLED. Again, thank you for choosing Weistec Engineering! 3
5 Table of Contents I. Tools Required... 6 II. MAP Adapter Installation... 7 III. Charge Pipes IV. Tank Installation V. Tank Wiring and Plumbing VI. Controller Installation VII. Controller and Nozzle Adjustment

 LED for interior *Viewed from Wire Side of")
6 INSTALLATION Diagram Controller is NOT waterproof and should be mounted by the cabin air filter or fuse box, away from the engine and water Optional (low fluid) LED for interior *Viewed from Wire Side of Connector 5
7 I. Tools Required Hydraulic Jack Service lift 1/4 Drive Ratchet 12" Long 1/4" Drive Extension Metric Deep Socket Set Metric Open End Wrench Set 8mm Ratcheting Wrench 3/8 Drive Ratchet Torx Socket Set External Torx Socket Set Flat Head Screw Driver Wire Cutter Crimping Pliers Wire Stripper Pushpin Removal Tool 6mm Drive Hex Bit 8mm Drive Hex Bit Mechanics Rags Crimp Style clamp tool Drill Torque Wrench 6
8 II. MAP Adapter Installation Parts Call Out 1. Null 2. Engine covers 3. Engine air intake duct 4. Air filter housing 5. Foam fuel injector covers 6. Refrigerant line 7. Bulkhead 8. Fuel line 9. Fuel distributor 10. Heater shutoff valve 11. Purge line 12. Coolant hose 13. Coolant hose 14. Vacuum line 15. Coolant hose 16. Coolant hose 17. Coolant hose 18. Oil cooling lines 19. Vent line 20. Cooling air lines 20L. Cooling air line 20R. Cooling air line 21. Radiator 22. Cold air intake 23. Radiator cross member 24. Torsion bar linkage 25. Stabilizer bar 26. Brake caliper 27. Suspension strut 28. Transmission 29. Wiring harness 30. Steering coupling 31. Front axle carrier 31a. Screw/bolt 32. Electrical line 33. Bracket 34. Cross strut 7

9 35. Bracket 36. Diagonal struts 37. Supporting struts 38. M13/5. Coolant circulation pump 39. Refrigerant line 40. Low-temperature circuit coolant expansion reservoir 41. Coolant line 42. Coolant hose 43. Coolant line 44. Coolant hose 45. Coolant expansion reservoir high temperature cooling system A80. Intelligent servo module for DIRECT SELECT M42. Electric transmission oil pump Y58/1. Purging switchover valve 8
10 9
11 10
12 11
13 12
14 1. Turn front wheels straight ahead and secure steering wheel 2. Put transmission in neutral and release parking brake 3. Disconnect ground from battery 4. Secure vehicle on a lift IF PROPER MERCEDES PROCEDURE IS NOT FOLLOWED, THE VEHICLE MAY BE PERMANENTLY DAMAGED AND/OR MAY FALL OFF THE LIFT 5. Remove lower engine compartment paneling 6. Remove engine covers 7. Remove front section of the upper engine cover 8. Drain coolant from intercooler system 9. Remove both intake ducts 10. Remove air boxes 11. Remove cold air intake 12. Remove ECU 13. Unbolt harness from intake manifold 14. Lift up harness to gain access to the MAP sensor 15. Unplug MAP sensor 16. Remove the screw holding the MAP sensor to the intake manifold and remove the sensor 17. Install Weistec MAP Adapter in the intake manifold 18. Connect Map Adapter to the MAP Block using a section of the supplied ¼ plastic line 13

15 III. Charge Pipes Parts call out Charge Air Ducts 1. Nuts 1l. Nuts 1r. Nuts 2. Lower charge air ducts 2l. Lower charge air duct on the left 2r. Lower charge air duct on the right 3. Null 4. Air cleaner housing 5. Charge air cooler 14
16 15
17 1. Detach vacuum hose for boost pressure control valve on turbocharger with exhaust manifold (1) 2. Remove charge air ducts by: a. Loosen clamp between upper charge air duct (1l, 1r) and air filter housing (4) b. Loosen clamp between upper charge air duct (1l, 1r) and turbocharger c. Remove screw/bolt for upper charge air duct (1l, 1r) on cylinder head cover d. Remove upper charge air duct (1l, 1r) e. Remove air filter housing (4) f. Detach engine oil cooling oil lines from oil filter hosing and bracket on engine and lay to the side outside the working area g. Loosen clamp between lower charge air duct (2l, 2r) and charge air cooler (6) h. Loosen clamp between lower charger air duct (2l, 2r) and turbocharger i. Remove screw/bolts for right lower charge air duct (2r) from cylinder head j. Remove screw/bolts for lower charge air duct on the left (2l) from cylinder head and oil filter housing k. Remove lower charge air duct (2l, 2r) l. Check boot and rubber seal for cracks or damage and replace if necessary m. Check clamps for damage and replace as necessary 3. Install Weistec Charge Pipes in reverse order of step 2. Be sure to have the pipes installed loosely to allow for adjustment of the T silicone coupler for the Weistec ASV. 4. Once all adjustments are done and the pipes and ASV are positioned and fitting properly, proceed with tightening all the clamps and mounting hardware per reverse order of step 2 5. Connect each Weistec Injector to the supplied Tee Fitting using small sections of the supplied ¼ plastic hose. Be sure to route the hoses so that there are no kinks and they are away from any moving parts 6. Connect the Weistec ASV to the MAP Block using a section of the supplied ¼ plastic hose. Route the hose through the engine valley and under where the ECU sits. 16
18 IV. Tank Installation 1. Open trunk and remove spare tire cover 2. Remove the spare tire and tool kit 3. Position the tank in the spare tire well where you will be mounting it. It is recommended that the pump face the back of the car 4. Mark where the 4 bolt holes need to be drilled for the 2 mounting brackets 5. Remove the tank and drill the 4 holes 6. Bolt the tank in place using the supplied bracket hardware 17
19 18
20 V. Tank Wiring and Plumbing 1. Begin by locating the supplied 20ft section of ¼ plastic hose and 16-4 Service Cord 2. Place both in the trunk 3. Press one end of the ¼ hose into the outlet of the pump 4. Wire the 16-4 Service Cord to the pump and the tank level sensor a. Black to Black wire on pump b. Red to Red wire on pump c. White to one wire on the level sensor (polarity does not matter) d. Green to remaining wire on the level sensor (polarity does not matter) 5. Find a suitable location to drill a hole through the spare tire well large enough to fit the wire harness and ¼ plastic hose 6. Route the harness and hose through the hole. 7. Once out of the spare tire well, route the harness and hose up and over the rear Subframe and differential on the right side of the vehicle (for Left Hand Drive Vehicles). Be sure to avoid tight turns that kink the plastic hose. Use zip ties to keep the harness and hose away from moving parts 8. Route the harness and hose between the body and the right side plastic under tray to the front of the vehicle and then up into the engine bay where the cabin filter is located. 9. Route ¼ Plastic Line to the Tee Fitting 19
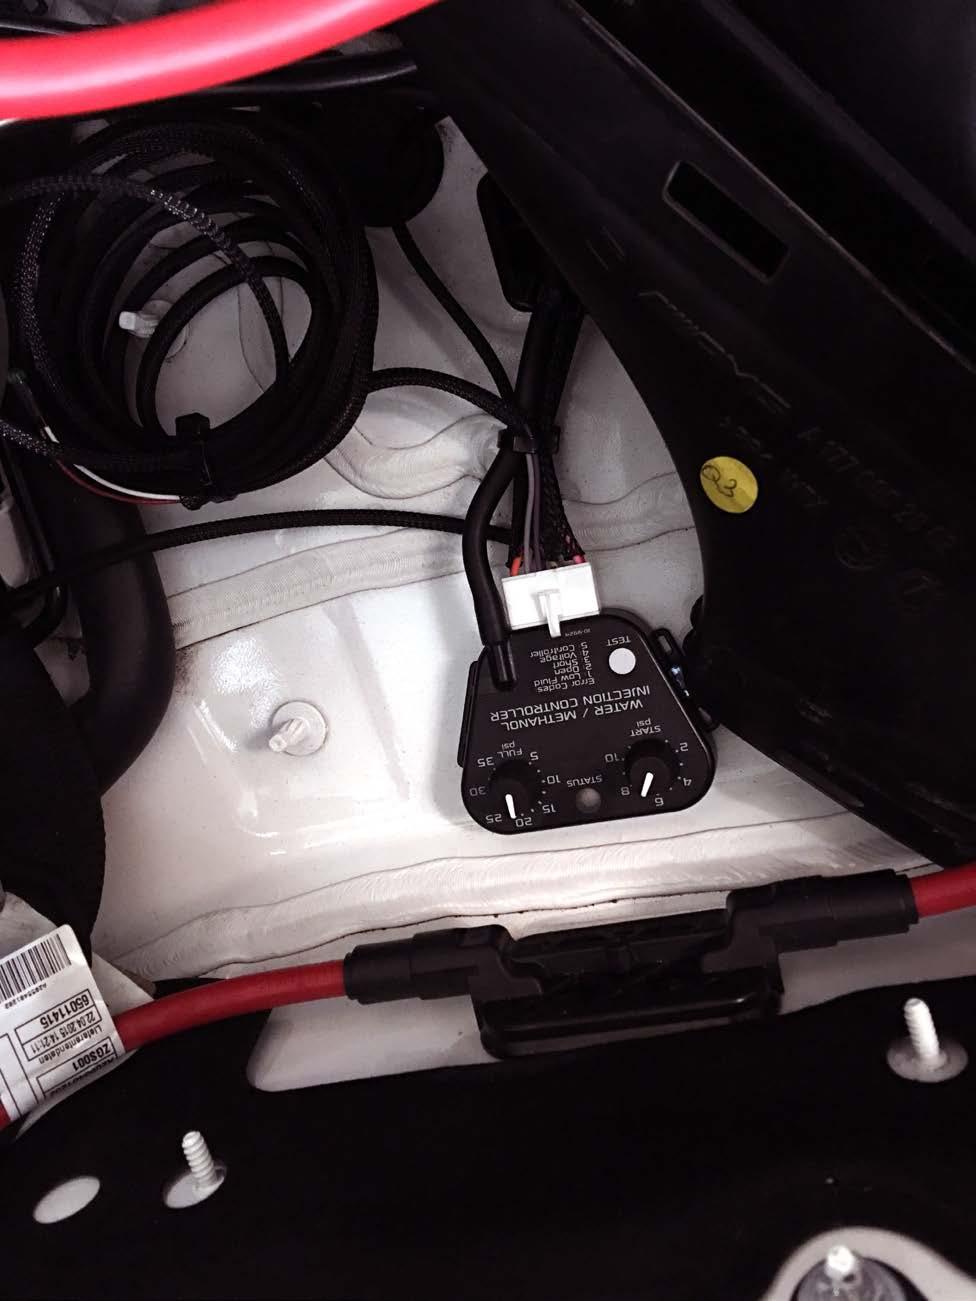
21 VI. Controller Installation 1. Find a suitable location and mount the Injection Controller 2. Reference included wiring diagram 3. The Injection Controller is wired to the following a. Ground (black wire) b. 12V (red wire) c. Ignition/arm switch (yellow wire) d. Indicator LED (violet +, gray -) e. Pump (pink +, orange -) f. Tank Level Sensor (white +, brown -) g. The green wire, yellow and brown/white wire on the harness will not be used 4. On the supplied Controller harness, ground the black wire 5. Connect the red wire to a 12V source 6. Connect the yellow wire to an ignition source. 7. The pump and tank level sensor wires will be wired to the 16-4 Service Cord a. Pink Wire to Red Wire on 16-4 Service Cord b. Orange Wire to Black Wire on 16-4 Service Cord c. White Wire to White Wire on 16-4 Service Cord d. Brown Wire to Green Wire on 16-4 Service Cord 8. The Indicator LED can be installed either in the engine bay, or somewhere visible inside the passenger cabin a. Violet Wire to + wire on LED b. Gray Wire to Wire on LED 9. Connect the boost port on the Controller to an open port on the MAP Block Pump/Tank Flush After all wires are hooked up, add water to the tank and, with the hose pointed into a container, press and hold the TEST push button on the controller module. The TEST button can be used to test the system. The pump speed will gradually increase from zero to full speed within 3 seconds and then remain full for another 3 seconds before stopping. Repeat the TEST button procedure until you are sure the system is free of any debris that may have been in the lines or tank. Drain the water out of the tank and refer to the next section on installing the nozzle. 20
22 21
23 VII. Controller and Nozzle Adjustment 1. The Weistec Injectors are shipped with the smallest nozzles installed. As more power is made, it will be necessary to replace the nozzles with the provided larger nozzles a. Stock Turbos Smallest nozzles recommended b. W.3 Turbos Medium nozzles recommended c. W.4 Turbos Medium nozzles recommended. Large Nozzles can be used but may require custom tuning. d. It is possible to use different size nozzles in each injector to fine tune injection amount when having the vehicle custom tuned 2. The Injection Controller has two adjustment knobs. One for start pressure and one for full pressure. a. Recommended Start Pressure is 5psi b. Recommended Full pressure is i. Stock Turbos - 16psi ii. W.3 Turbos - 17psi iii. W.4 Turbos 18psi 3. Fine adjustment of start and full pressures can be performed on a dyno by an experienced tuner. Fluid Compatibility Under NO circumstances should any hydrocarbon based fuel ever be used with this system. Water and methanol are the ONLY fluids to be used 22
24 Thank you from Weistec Engineering! Always enjoy the added horsepower and torque of the Weistec M157 WMI/ASV responsibly. Use best judgment when driving, and remember to have fun! NOTES: 23
Weistec M177 WMI System
 Weistec M177 WMI System Installation Guide 2015+ C63(S) Sedan 2016+ C63(S) Coupe This product is legal in California for racing vehicles only and should never be used upon a highway. This product is legal
Weistec True Downpipes
 Weistec True Downpipes Installation Guide, W212, W218, AWD 2014+ E63 2014+ CLS63 WARNING! IF YOU ARE NOT EXPERIENCED IN THE AREA OF AUTOMOTIVE MECHANICS, WE STRONGLY URGE THAT YOU REFER THIS INSTALLATION
Weistec M113K Supercharger System Installation Guide
 Weistec M113K Supercharger System Installation Guide WARNING! DO NOT HAVE YOUR ECU REPROGRAMMED ANYWHERE BUT AT WEISTEC FOR THIS SUPERCHARGER. THE AMG 55 USES AN ELECTRONIC THROTTLE CONTROL (ETC), WHICH
P/N Water/Methanol Injection V2 Standard Controller Internal MAP with 35psi Max STOP!
 Instruction Manual P/N 30-3304 Water/Methanol Injection V2 Standard Controller Internal MAP with 35psi Max STOP! THIS PRODUCT HAS LEGAL RESTRICTIONS. READ THIS BEFORE INSTALLING/USING! THIS PRODUCT MAY
P/N Water/Methanol Injection V2 1-Gallon Tank With Conductive Fluid Level Sensor* STOP!
 Instruction Manual P/N 30-3325 Water/Methanol Injection V2 1-Gallon Tank With Conductive Fluid Level Sensor* STOP! THIS PRODUCT HAS LEGAL RESTRICTIONS. READ THIS BEFORE INSTALLING/USING! THIS PRODUCT MAY
SL63 Weistec M156 Supercharger System Installation Guide Stage 1 / Stage 2
 SL63 Weistec M156 Supercharger System Installation Guide Stage 1 / Stage 2 WARNING! DO NOT HAVE YOUR ECU REPROGRAMMED ANYWHERE BUT AT WEISTEC FOR THIS SUPERCHARGER. THE AMG 63 USES AN ELECTRONIC THROTTLE
CLS63 Weistec M156 Supercharger System Installation Guide Stage 1 / Stage 2
 CLS63 Weistec M156 Supercharger System Installation Guide Stage 1 / Stage 2 WARNING! DO NOT HAVE YOUR ECU REPROGRAMMED ANYWHERE BUT AT WEISTEC FOR THIS SUPERCHARGER. THE AMG 63 USES AN ELECTRONIC THROTTLE
P/N Water/Methanol Injection V2 Nozzle Kit Includes T-Fitting, Hose, 250cc, 500cc, & 1000cc Jets STOP!
 Instruction Manual P/N 30-3312 Water/Methanol Injection V2 Nozzle Kit Includes T-Fitting, Hose, 250cc, 500cc, & 1000cc Jets STOP! THIS PRODUCT HAS LEGAL RESTRICTIONS. READ THIS BEFORE INSTALLING/USING!
Internal MAP Water/Methanol Injection Kit (No Tank) ,
 ,") Internal MAP Water/Methanol Injection Kit (No Tank) 30-3302, 30-3303 WARNING: Improper installation and/or adjustment of this product can result in major engine/vehicle damage! Use of this injection system
Internal MAP Water/Methanol Injection Kit (No Tank) 30-3302, 30-3303 WARNING: Improper installation and/or adjustment of this product can result in major engine/vehicle damage! Use of this injection system
COBB 3-Port Electronic Boost Control Solenoid
 COBB 3-Port Electronic Boost Control Solenoid MazdaSpeed3/Mazdaspeed6 Congratulations on your purchase of the COBB Tuning 3-Port Electronic Boost Control Solenoid. The following instructions will assist
Installation Instructions for P/N Universal Water/Methanol Injection Kit (without Tank)
") Installation Instructions for P/N 30-3002 Universal Water/Methanol Injection Kit (without Tank) WARNING: This installation is not for the electrically or mechanically challenged! Use this system with EXTREME
Installation Instructions for P/N 30-3002 Universal Water/Methanol Injection Kit (without Tank) WARNING: This installation is not for the electrically or mechanically challenged! Use this system with EXTREME
Procharger Stage II Intercooled Supercharger System (11-14 GT)
") Procharger Stage II Intercooled Supercharger System (11-14 GT) Installation Time: Approximately one day. Installed on 2012 Mustang GT 5.0/Manual Required Tools 3/8 Socket Set (Standard and Metric) 1/2
Procharger Stage II Intercooled Supercharger System (11-14 GT) Installation Time: Approximately one day. Installed on 2012 Mustang GT 5.0/Manual Required Tools 3/8 Socket Set (Standard and Metric) 1/2
SLS825 Weistec Supercharger System Installation Guide
 SLS825 Weistec Supercharger System Installation Guide 2010-Present SLS AMG (Gullwing and Roadster) 2014 SLS Black Series WARNING! DO NOT HAVE YOUR ECU REPROGRAMMED ANYWHERE BUT AT WEISTEC FOR THIS SUPERCHARGER.
Internal MAP Water/Methanol Injection Controller ,
 Internal MAP Water/Methanol Injection Controller 30-3304, 30-3306 WARNING: Improper installation and/or adjustment of this product can result in major engine/vehicle damage! Use of this injection system
SALEEN SPEEDLAB BOOST AND WATER TEMPERATURE GAUGE POD KIT
 = SALEEN SPEEDLAB BOOST AND WATER TEMPERATURE GAUGE POD KIT INSTALLATION MANUAL: 2005-09 Mustang 4.6L 3V P/N: 10-8002-C12000B KIT P/N: 10-2903-B11511* Saleen Performance, Inc. 1225 East Maple Rd. Troy,
Performance Inlet Manifold
 Performance Inlet Manifold Tools needed (some tools not required on some models): 13mm Combination Wrench Flat Blade Screwdriver T30 Torx Driver T25 Torx Driver 10mm Combination Wrench and/or Socket with
Part Number cc/min Water/Methanol Injection Flow Gauge
 Part Number 30-5141 500 cc/min Water/Methanol Injection Flow Gauge Figure 1. Wiring Schematic This product is legal in California for racing vehicles only and should never be used on public highways. AEM
Mercedes E63/CLS AMG Carbon Turbo Intake System Instructions
 Mercedes E63/CLS AMG Carbon Turbo Intake System Instructions The goal of Alpha Performance is to provide the highest quality, best performing products available. By utilizing research and development,
Huron Speed Products Twin Turbo Install Gen 2 CTS-V (09-15)
") Huron Speed Products Twin Turbo Install Gen 2 CTS-V (09-15) The following install guide is simply that, a guide to help you with installation. It is by no means the exact method to perform installation,
Huron Speed Products Twin Turbo Install Gen 2 CTS-V (09-15) The following install guide is simply that, a guide to help you with installation. It is by no means the exact method to perform installation,
C63 Weistec M156 Supercharger System Installation Guide Stage 3
 C63 Weistec M156 Supercharger System Installation Guide Stage 3 WARNING! DO NOT HAVE YOUR ECU REPROGRAMMED ANYWHERE BUT AT WEISTEC FOR THIS SUPERCHARGER. THE AMG 63 USES AN ELECTRONIC THROTTLE CONTROL
CLK63 (Black Series) Weistec M156 Supercharger System Installation Guide Stage 3
 Weistec M156 Supercharger System Installation Guide Stage 3") CLK63 (Black Series) Weistec M156 Supercharger System Installation Guide Stage 3 WARNING! DO NOT HAVE YOUR ECU REPROGRAMMED ANYWHERE BUT AT WEISTEC FOR THIS SUPERCHARGER. THE AMG 63 USES AN ELECTRONIC
CLK63 (Black Series) Weistec M156 Supercharger System Installation Guide Stage 3 WARNING! DO NOT HAVE YOUR ECU REPROGRAMMED ANYWHERE BUT AT WEISTEC FOR THIS SUPERCHARGER. THE AMG 63 USES AN ELECTRONIC
Installation Instructions for P/N HD Water Injection Kit with 5 Gallon Tank
 Installation Instructions for P/N 30-3111 HD Water Injection Kit with 5 Gallon Tank 2001-2010 6.6L Duramax Diesel Chevrolet Silverado HD: GMC Sierra HD; Chevrolet Kodiak ; GMC Topkick Hummer H-1 Alpha;
Volvo P1 Air Intake. ELEVATE Turbo Intake Pipe. MAF Sensor. Inlet Manifold. Air Filter Housing. ECU Cover
 Volvo P1 Air Intake Tools needed: 13mm Combination Wrench Flat Blade Screwdriver T30 Torx Driver T25 Torx Driver 8mm Combination Wrench and/or Socket with Ratchet 10mm Combination Wrench and/or Socket
Industrial Injections Compound Turbo Installation For 6.7L Scorpion
 Industrial Injections Compound Turbo Installation For 6.7L Scorpion Step 1: Whenever you are doing an installation the first thing you should do is unhook the batteries to avoid arcing. You will need an
P/N Water/Methanol Injection Kit V2 Standard Controller - Internal MAP 1-Gallon Tank STOP!
 Instruction Manual P/N 30-3300 Water/Methanol Injection Kit V2 Standard Controller - Internal MAP 1-Gallon Tank STOP! THIS PRODUCT HAS LEGAL RESTRICTIONS. READ THIS BEFORE INSTALLING/USING! THIS PRODUCT
Installation Instructions for / Universal Water/Methanol Injection Kit
 Installation Instructions for 30-3000 / 30-3001 Universal Water/Methanol Injection Kit WARNING: This installation is not for the electrically or mechanically challenged! Use this system with EXTREME caution!
TABLE OF CONTENTS PARTS LIST
 TROUBLESHOOTING: Note: You will have a check engine light and/or other problems unless using this product with a compatible ECM calibration. H&S Motorsports provides compatible calibrations for H&S Performance
advanced FLOW engineering Instruction Manual P/N: Make: Can-AM Model: Maverick Year: Engine: 1000cc
 advanced FLOW engineering Instruction Manual P/N: 85-80066 Make: Can-AM Model: Maverick Year: 2013-2016 Engine: 1000cc Please read the entire instruction manual before proceeding. Ensure all components
TOP FEED FUEL RAIL KIT for WRX
 TOP FEED FUEL RAIL KIT for 2002-14 WRX Thank you for purchasing this PERRIN product for your car! Installation of this product should only be performed by persons experienced with installation of aftermarket
Air Oil Separator for WRX
 Air Oil Separator for 2015+ WRX 2018-06-05 Thank you for purchasing this PERRIN product for your car! Installation of this product should only be performed by persons experienced with installation of aftermarket
CHALLENGER TWIN TURBO SYSTEM INSTALLATION INSTRUCTIONS
 CHALLENGER TWIN TURBO SYSTEM INSTALLATION INSTRUCTIONS 1 Verify contents of kits with supplied packing list 1) Unhook the battery. 2) Remove wheel wells & front fascia of vehicle. 3) Remove the catalytic
Rotated Tuner Kit for Garrett GT Turbos
 Rotated Tuner Kit for Garrett GT Turbos 031411 Thank you for purchasing the PERRIN performance rotated turbo kit. Installation of this turbo should only be performed by persons experienced in the installation
Depress each tab as you pull the bezel off. The bezels are tight. L.H. shown.
 2013-2014 Ford Mustang V6 & Boss 302 Lower Valance Fog Light Kit Parts List: Quantity: Tool List: Fog light & bulb with bracket 2 Flat head & Phillips screwdriver Black bezels 2 Ratchet & Socket set OR
Part number SP1305. Maintaining your Cold air intake system: Tools required:
 Part number SP1305 2000-03 Honda S2000 4 cyl. 2.0L 2004-06 Honda S2000 4 cyl. 2.2L 1-2 piece cold air intake 1-3 Injen filter (#1014) 1-2 3/4 x 3 silicone step hose (#3040) 1-3 straight hose (#3044) 1-
Huron Speed Products Twin Turbo Install Gen 2 CTS-V (09-15)
") Huron Speed Products Twin Turbo Install Gen 2 CTS-V (09-15) 1 2 Remove two bolts in trunk cover with 8mm socket. Pull up on cover to remove. Unscrew net tie down on side cover where battery is located
Huron Speed Products Twin Turbo Install Gen 2 CTS-V (09-15) 1 2 Remove two bolts in trunk cover with 8mm socket. Pull up on cover to remove. Unscrew net tie down on side cover where battery is located
05-18 DODGE CHRYSLER CHALLENGER CHARGER 300 MAGNUM
 05-18 DODGE CHRYSLER CHALLENGER CHARGER 300 MAGNUM IMPORTANT! WARRANTY AND INSTALLATION INSTRUCTIONS Please Forward All Information to Consumer Be sure to review the enclosed instructions prior to beginning
2016+ NISSAN TITAN XD
 PARTS LIST AND PARTS INCLUDED 1PC MISHIMOTO INTERCOOLER 2PC SILICONE BOOTS WITH DURACORE TECHNOLOGY 4PC CONSTANT-TENSION T-BOLT CLAMPS 2PC ALUMINUM SPACERS MOUNTING HARDWARE CAUTION Never work on the cooling
COBB 3-Port Electronic Boost Control Solenoid
 COBB 3-Port Electronic Boost Control Solenoid Mitsubishi Evolution X / Ralliart Congratulations on your purchase of the COBB Tuning 3-Port Electronic Boost Control Solenoid. The following instructions
Instant Chat off the main page of Or simply call our tech team at
 FRONT MOUNT INTERCOOLER 2015+ WRX 2017-07-07 Thank you for purchasing this PERRIN product for your car! Installation of this product should only be performed by persons experienced with installation of
7B1210 COBB BMW N54 Charge Pipe
 7B1210 COBB BMW N54 Charge Pipe Installation Instructions Congratulations on your purchase of the COBB BMW N54 Charge Pipe for your BMW. The following instructions will assist you through your installation
IAG Competition Series Air / Oil Separator (AOS) For 2017 STI
 For 2017 STI") P IAG Competition Series Air / Oil Separator (AOS) For 2017 STI Part# IAG-ENG-7251 Tools Required: Ratchet, torque wrench, extensions, needle nose pliers, hose cutter, snips/scissors, flat head screw driver,
P IAG Competition Series Air / Oil Separator (AOS) For 2017 STI Part# IAG-ENG-7251 Tools Required: Ratchet, torque wrench, extensions, needle nose pliers, hose cutter, snips/scissors, flat head screw driver,
BBK Intake Manifold Kit ( L) - Installation Instructions
 - Installation Instructions") BBK Intake Manifold Kit (86-93 5.0L) - Installation Instructions The below installation instructions work for the following products: BBK Intake Manifold Kit (86-93 5.0L) Please read through the instructions
BBK Intake Manifold Kit (86-93 5.0L) - Installation Instructions The below installation instructions work for the following products: BBK Intake Manifold Kit (86-93 5.0L) Please read through the instructions
05-08 GT. Hellion Power Systems Mustang Kit Instructions
 Hellion Power Systems 05-08 Mustang Kit Instructions 1. Disconnect Battery 2. Drain Radiator, keep fluid for re-installation. 3. Remove air box and inlethoses. 6. Next, underneath, punch oil pan for turbo
2010+ Audi B8 S4/S5 3.0T S-FLO Intake Kit INSTALLATION GUIDE FOR RACING USE ONLY
 INSTALLATION GUIDE 2010+ Audi B8 S4/S5 3.0T S-FLO Intake Kit FOR RACING USE ONLY Congratulations on your purchase of the AWE Tuning S-FLO Intake for the 2010+ Audi B8 S4 and B8 S5 3.0T. Exquisite build
2010+ VW Mk6 2.0T Vent Boost Gauge Kit INSTALLATION GUIDE
 INSTALLATION GUIDE 2010+ VW Mk6 2.0T Vent Boost Gauge Kit Congratulations on your purchase of the AWE Tuning Vent Boost Gauge Kit for the 2010+ VW Mk6 2.0T. Exquisite build quality with industry leading
Instant Chat off the main page of Or simply call our tech team at
 02-07 WRX/STI Air Oil Separator for Top Mounted Intercooler Setups 2013-02- 27 Thank you for purchasing this PERRIN product for your car! Installation of this product should only be performed by persons
8 Zip Tie Zip Tie 1 Union Fitting 1 ½ ½ Union Reducer Fitting Union 1 5/8 ½ (For Plastic Intake Manifold Vehicles)
") P IAG Street Series Air / Oil Separator (AOS) For 2017 STI Part# IAG-ENG-7151 Tools Required: Ratchet, torque wrench, extensions, needle nose pliers, hose cutter, snips/scissors, flat head screw driver,
P IAG Street Series Air / Oil Separator (AOS) For 2017 STI Part# IAG-ENG-7151 Tools Required: Ratchet, torque wrench, extensions, needle nose pliers, hose cutter, snips/scissors, flat head screw driver,
03-04 Mach 1. Hellion Power Systems Mach 1 Kit Instructions
 Hellion Power Systems 03-04 Mach 1 Kit Instructions Part 1 Hellion recommends that the front suspension system be installed either by trained professionals or by 5.Remove rack bolts K-Member Installation
JBR MAZDASPEED
 Page1 james Barone Racing Aftermarket Parts and Accessories JBR 2007 2009 MAZDASPEED 3 Front Mount Intercooler Piping Kit Installation Instructions for TR8 Intercooler Tooling: o Jack, Jack Stands, Ramps
1963 GEN IV SUREFIT VINTAGE AIR CONDITIONING INSTALLATION
 by Randy Irwin 1963 GEN IV SUREFIT VINTAGE AIR CONDITIONING INSTALLATION Randy Irwin - Technical Writer Randy has been involved in the Chevy parts business for over 30 years. He is a wizard at creating,
IAG Competition Series Air / Oil Separator (AOS) For WRX
 For WRX") P IAG Competition Series Air / Oil Separator (AOS) For 2015-16 WRX Part# IAG-ENG-7252 Tools Required: Ratchet, torque wrench, extensions, needle nose pliers, hose cutter, snips/scissors, flat head screw
P IAG Competition Series Air / Oil Separator (AOS) For 2015-16 WRX Part# IAG-ENG-7252 Tools Required: Ratchet, torque wrench, extensions, needle nose pliers, hose cutter, snips/scissors, flat head screw
Ford 6.7 EGR Delete Kit
 Fits: 2011 12 Powerstroke 6.7L Read instructions thoroughly before proceeding! ***This kit may void factory warranty please check with manufacturer.*** ***This kit is intended for off road use only.***
L Intake Manifold Part #
 86-93 5.0L Intake Manifold Part #5001-5002 I N S T A L L A T I O N I N S T R U C T I O N S Supplied Materials Bottom cover, Upper manifold, Lower manifold, Plenum cover plate, 1501 Throttle body (comes
Instant Chat off the main page of Or simply call our tech team at
 08+ Rotated Tuner Kit for Garrett GT Turbos 2016-11-03 Thank you for purchasing this PERRIN product for your car! Installation of this product should only be performed by persons experienced with installation
Weistec CLK Black Series SUSPENSION
 Weistec CLK Black Series SUSPENSION Rear Suspension Bushing Upgrade Installation Guide 1 Thank you for your purchase of the Weistec CLK Black Series Rear Suspension Bushing Upgrade for the 2008 Mercedes
2015+ SUBARU STI FRONT-MOUNT INTERCOOLER PARTS LIST AND INSTALLATION GUIDE INSTALL DIFFICULTY DISCLAIMER CAUTION INSTALL PROCEDURE TOOLS NEEDED
 PARTS LIST AND PARTS INCLUDED 1PC ALUMINUM INTAKE PIPE 1PC BAR-AND-PLATE INTERCOOLER 1PC STEEL CRASH BAR W/ MOUNTING HARDWARE 2PC HOT-SIDE INTERCOOLER PIPES 2PC COLD-SIDE INTERCOOLER PIPES 1PC BPV FLANGE
4. Remove (4) 10mm and (1) 7mm bolt that holds fascia at front corners, on each side
 10mm and (1) 7mm bolt that holds fascia at front corners, on each side") 2010 Camaro LS3 1. Disconnect battery ground 2. Remove front wheels 3. Remove (5) push pins and (5) #20 torx screws on inner front wheel well liners and remove liners on each side 4. Remove (4) 10mm and
2010 Camaro LS3 1. Disconnect battery ground 2. Remove front wheels 3. Remove (5) push pins and (5) #20 torx screws on inner front wheel well liners and remove liners on each side 4. Remove (4) 10mm and
Multi-Input Water/Methanol Injection Harness
 Multi-Input Water/Methanol Injection Harness 30-3324 WARNING: Improper installation and/or adjustment of this product can result in major engine/vehicle damage! Use of this injection system requires proper
Air Oil Separator for WRX/STI Top Mounted Intercooler Setups
 Air Oil Separator for 02-07 WRX/STI Top Mounted Intercooler Setups 2018-02-26 Thank you for purchasing this PERRIN product for your car! Installation of this product should only be performed by persons
Installation Instructions - ECS Tuning Vent Pod Vacuum/Boost Gauge Kit
 Installation Instructions - ECS Tuning Vent Pod Vacuum/Boost Gauge Kit This tutorial is provided as a courtesy by ECS Tuning. Part Number for Audi B6 A4 (2002-2004) Proper service and repair procedures
INSTALL MANUAL D o d g e 1 2 v 6 B T A PLEASE READ ALL INSTRUCTIONS BEFORE INSTALLATION.
 PN#1045310 12V Dodge Twin Turbo Kit (I-00273) 1 INSTALL MANUAL BD Twin Turbo Kit 1994-1 9 9 8 D o d g e 1 2 v 6 B T A Part# 1045310 PLEASE READ ALL INSTRUCTIONS BEFORE INSTALLATION. * Picture as shown
3 October 2016 PN# V Dodge Twin Turbo Kit (I-00274) ½ D o d g e 2 4 v I S B
 ½ D o d g e 2 4 v I S B") 3 October 2016 PN#1045320 24V Dodge Twin Turbo Kit (I-00274) 1 DOWNLOAD ENHANCED INSTALL MANUALS AT dieselperformance.com BD Twin Turbo Kit 1998½- 2 0 0 2 D o d g e 2 4 v I S B Part# 1045320 PLEASE READ
3 October 2016 PN#1045320 24V Dodge Twin Turbo Kit (I-00274) 1 DOWNLOAD ENHANCED INSTALL MANUALS AT dieselperformance.com BD Twin Turbo Kit 1998½- 2 0 0 2 D o d g e 2 4 v I S B Part# 1045320 PLEASE READ
Step 6: Remove and save the MAP sensor for later use. Step 7: Remove the passenger side intercooler pipe and the EGR intake manifold.
 LBZ Twin kit Install Step 1: Disconnect both batteries. Step 2: Drain coolant and oil also remove passenger side inner fender. Step 3: Remove intake box and piping. (Remove and save the MAF sensor in the
INSTALLATION MANUAL
 315000 INSTALLATION MANUAL EGR & Cooler Race Kit for 2015+ 6.7L Ford Powerstroke WARNING ONLY install this kit if you are using a tuner that disables the EGR sensors & circuit system. Any product that
Part Number SP BMW 335i BMW135i 3.0L Twin Turbo L6
 This kit is equipped with the Injen/AMSOIL Ea nanofiber dry filters, Ea nanofiber filters do not require oil. Part Number SP1125 2007-09 BMW 335i 2008-09 BMW 3.0L Twin Turbo L6 1-2 piece air intake system
Pump Gas Instructions for Polaris And 800 Models. Important Information before Installing This System:
 Pump Gas Instructions for Polaris 600 700 And 800 Models Important Information before Installing This System: Before you begin your turbo install, read through these instructions to determine if you are
KIT CONTENTS. Multimeter or test light Wire crimpers or soldering equipment. Wire terminals & connectors 10A inline fuse
 RUSSELL FORD 5.0L COMPLETE EFI PLUMBING KIT INSTALLATION INSTRUCTIONS Please study these instructions carefully before installing your new complete fuel system kit. If you have any questions, please call
How to: Install a Ford EcoBoost F150 Intercooler
 How to: Install a 2015+ Ford EcoBoost F150 Intercooler This article documents the installation of our Full-Race 2015+ F150 Ecoboost Intercooler / CAC Upgrade Kit. The addition of a high performance air-to-air
Part number RD1306. Maintaining your Cold air intake system: Tools required:
 Part number RD1306 06-07 Honda S2000 4 cyl. 2.2L 1-2 piece cold air intake 1-3 Injen filter (#1014) 1-2 3/4 x 3 silicone step hose (#3040) 1-3 straight hose (#3044) 4- Power-bands.362.048 (#4004) 1-1525
2013 Kia Optima L4-2.0L Turbo
 1 of 13 5/29/2016 11:34 AM 2013 Kia Optima L4-2.0L Turbo Vehicle» Engine, Cooling and Exhaust» Engine» Service and Repair» Removal and Replacement Removal CAUTION: Use fender covers to avoid damaging painted
EXPANSION TANK PARTS LIST AND INSTALLATION GUIDE
 PARTS LIST AND INSTALLATION GUIDE PARTS LIST 2 PC APPLICATION-SPECIFIC MOUNTING BRACKETS 2 PC BLACK, ANODIZED 6061 ALUMINUM CATCH CANS 4 PC SILICONE HOSES 4 PC PLASTIC BARBED FITTINGS 4 PC WORM-GEAR CLAMPS
Slingshot Rotrex Supercharger Kit
 Slingshot Rotrex Supercharger Kit This supercharger kit improves on the Slingshot by forcing more dense air into the engine and creating more power. Installation time of the supercharger depends on you
INSTALLATION INSTRUCTIONS. Upgrade Front Intercooler 2001 Early 2006 Chevrolet / GMC Duramax P/N 2-486
 INSTALLATION INSTRUCTIONS Upgrade Front Intercooler 2001 Early 2006 Chevrolet / GMC Duramax P/N 2-486 Turbonetics, Inc. * 2255 Agate Court * Simi Valley, CA * 805-581-0333 * TurboneticsInc.com READ THIS
Kit Part Number:
 Equipped with AEM DRYFLOW Filter No oil required! Kit Part Number: 21-568 2005-2006 Scion TC 2.4L *Legal in California only for racing vehicles which may never be used upon a highway. 2009, Advanced Engine
IAG Street Series Air / Oil Separator (AOS) For WRX
 For WRX") P IAG Street Series Air / Oil Separator (AOS) For 2015-16 WRX Part# IAG-ENG-7152 Tools Required: Ratchet, torque wrench, extensions, needle nose pliers, hose cutter, snips/scissors, flat head screw driver,
P IAG Street Series Air / Oil Separator (AOS) For 2015-16 WRX Part# IAG-ENG-7152 Tools Required: Ratchet, torque wrench, extensions, needle nose pliers, hose cutter, snips/scissors, flat head screw driver,
Turner M50 Manifold Adapter Install. April 26, 2012
 April 26, 2012 Models: 1996-99 E36 328i/M3; 1997-98 E39 528i, 1997-98 Z3 2.8, 1998-2000 MZ3 S52 Product(s): Turner M50 Manifold Adapter Kit Subject: Installation Guidelines and Tips This guide will aid
Accessory Fuse Block. Please read this entire manual before proceeding with installation.
 Accessory Fuse Block Please read this entire manual before proceeding with installation. Kit Components: (1) Fuse Block Assembly (1) Harness (1) Positive power cable (1) Negative power cable (5) Pigtails
Installation Instructions General Motors 8.1 Sequential Vapor Injection (S.V.I.) System 7500/6500 Series Trucks model year.
 System 7500/6500 Series Trucks model year.") Installation Instructions General Motors 8.1 Sequential Vapor Injection (S.V.I.) System 7500/6500 Series Trucks 2003-2005 model year. Technocarb Equipment (2004) Ltd. 4-30435 Progressive Way Abbotsford,
Installation Instructions General Motors 8.1 Sequential Vapor Injection (S.V.I.) System 7500/6500 Series Trucks 2003-2005 model year. Technocarb Equipment (2004) Ltd. 4-30435 Progressive Way Abbotsford,
7C1550 COBB Tuning R35 GT-R Silicone Hose Kit Install Instructions
 7C1550 COBB Tuning R35 GT-R Silicone Hose Kit Install Instructions Nissan GT-R (R35) Silicone Hose Kit Congratulations on your purchase of the COBB GT-R Silicone Hose Kit for your Nissan GT-R. The following
Wrenches: ⅞, 8mm, 10mm, 13mm, 19mm P. allen, Other: Electrical Tape
 IAG Street Series Air / Oil Separator (AOS) For 2008-14 STI Part# IAG-ENG-7100 Tools Required: Ratchet, torque wrench, extensions, needle nose pliers, hose cutter, snips/scissors, flat head screw driver,
99-04 GT. Hellion Power Systems Mustang GT Kit Instructions
 Hellion Power Systems 99-04 Mustang GT Kit Instructions Part 1 Hellion recommends that the front suspension system be installed either by trained professionals or by 5.Remove rack bolts K-Member Installation
FULL LENGTH HEADERS/ CATTED HEAD PIPES
 INSTALLATION INSTRUCTIONS INS232 2016-2018 CAMARO 6.2L V8 FULL LENGTH HEADERS/ CATTED HEAD PIPES Part #4044 and 40440 Special Tools required: 10mm, 12mm, 13mm, 15mm Socket and Wrenches, Pliers, Saw, Welder
MAZDASPEED3 Intercooler Instructions
 MAZDASPEED3 Intercooler Instructions Congratulations on your purchase of the COBB Tuning Front Mount Intercooler System for your 2007-2009 Mazdaspeed3. The following instructions should assist you through
2017+ L5P Duramax 3 ½ Down Pipe & EGR Fix Kit
 2017+ L5P Duramax 3 ½ Down Pipe & EGR Fix Kit Covers installation of PN s: WCF100630, WCF100829 Note: This Kit is for off road competition use only! Off Road Competition Use Tuning & Exhaust System is
Subaru Front Mount Intercooler Kit STI Subaru Front Mount Intercooler Kit STI
 Subaru Front Mount Intercooler Kit STI 2008-2014 715500 Subaru Front Mount Intercooler Kit STI 2008-2014 Congratulations on your purchase of the Subaru Front Mount Intercooler Kit STI 2008-2014. The following
Scion FR-S ZN6. GTX2867R Gen2 (Internal Wastegate) Installation Instructions GPP P/N #
 Installation Instructions GPP P/N #") TURBO KIT Scion FR-S ZN6 Subaru BRZ ZC6 GTX2867R Gen2 (Internal Wastegate) Installation Instructions GPP P/N # 11518000 Vehicle Type Chassis Code Engine Code Transmission Model Year Scion FR-S DBA-ZN6
TURBO KIT Scion FR-S ZN6 Subaru BRZ ZC6 GTX2867R Gen2 (Internal Wastegate) Installation Instructions GPP P/N # 11518000 Vehicle Type Chassis Code Engine Code Transmission Model Year Scion FR-S DBA-ZN6
Ford 6.0L Powerstoke Regulated Fuel Return
 Ford 6.0L Powerstoke Regulated Fuel Return ! WARNING REGARDING EMISSIONS LAWS Not legal for sale or use on pollution-controlled motor vehicles anywhere in the United States. Legal ONLY for off-road competition
IAG Street Series Air / Oil Separator (AOS) For WRX & WRX STI
 For WRX & WRX STI") IAG Street Series Air / Oil Separator (AOS) For 2006-07 WRX & 2004-07 WRX STI Part# IAG-ENG-7100 Tools Required: Ratchet, torque wrench, extensions, needle nose pliers, hose cutter, snips/scissors, flat
IAG Street Series Air / Oil Separator (AOS) For 2006-07 WRX & 2004-07 WRX STI Part# IAG-ENG-7100 Tools Required: Ratchet, torque wrench, extensions, needle nose pliers, hose cutter, snips/scissors, flat
2015+ dodge charger dedicated fuel system
 This Nitrous Outlet Dedicated Fuel System is designed specifically for the 2015+ Dodge Charger. If you need any assistance during installation or if you have questions about this item, call our Tech Help
Thank you for purchasing the Craven Speed FlexPod Complete Gauge Pod Kit For R56, R58, R59, R60 with Refresh Engines (2011+)
") Thank you for purchasing the Craven Speed FlexPod Complete Gauge Pod Kit For R56, R58, R59, R60 with Refresh Engines (2011+) Before You Start Please read instructions completely before installing. These
Thank you for purchasing the Craven Speed FlexPod Complete Gauge Pod Kit For R56, R58, R59, R60 with Refresh Engines (2011+) Before You Start Please read instructions completely before installing. These
Part# PLEASE READ ALL INSTRUCTIONS BEFORE INSTALLATION.
 16 November 2009 HPCR Dodge Twin Turbo Kit #1045430 1 BD Twin Turbo R700 Kit 2003-2007 Dodge HPCR ISBe Installation Instructions Part# 1045430 PLEASE READ ALL INSTRUCTIONS BEFORE INSTALLATION. UNLESS AN
COLD AIR INTAKE SYSTEM
 COLD AIR INTAKE SYSTEM Installation Instructions for: Part Number 21-491 2005-2008 Mazda 6i 2.3L NON-PZEV Do not install a bypass valve on this intake system! ADVANCED ENGINE MANAGEMENT INC. 2205 126 TH
Instant Chat off the main page of Or simply call our tech team at
 Subaru WRX/STI Air Oil Separator for Front Mounted Intercooler Setups 2013-02- 22 Thank you for purchasing this PERRIN product for your car! Installation of this product should only be performed by persons
PowerFlo 20 Parts List/Assembly Instructions/Users Guide ***PLEASE READ ALL INSTRUCTIONS CAREFULLY AND THOROUGHLY***
 PowerFlo 20 Parts List/Assembly Instructions/Users Guide ***PLEASE READ ALL INSTRUCTIONS CAREFULLY AND THOROUGHLY*** Owners Manual (Please check to make sure to locate all parts before assembly.) 11/12/2008
IAG Street Series Air / Oil Separator (AOS) For WRX
 For WRX") IAG Street Series Air / Oil Separator (AOS) For 2008-14 WRX Part# IAG-ENG-7100 Tools Required: Ratchet, extensions, needle nose pliers, hose cutter, snips/scissors, flat head screw driver, hose clamping
IAG Street Series Air / Oil Separator (AOS) For 2008-14 WRX Part# IAG-ENG-7100 Tools Required: Ratchet, extensions, needle nose pliers, hose cutter, snips/scissors, flat head screw driver, hose clamping
Cooling system components, removing and installing
 19-1 Cooling system components, removing and installing Note: When the engine is warm the cooling system is under pressure. If necessary release pressure before starting repair work. Hoses are secured
Installation Manual v1.0: Twin CP3 Fuel Injection Kit Dodge 5.9L
 Installation Manual v1.0: Twin CP3 Fuel Injection Kit 2004.5-2007 Dodge 5.9L Figure 1 - Full Kit Photo 25 Figure 2 - Hardware Kit Please read all instructions before installation. This kit is not emissions
Installation Instructions
 2011-2013 LML DURAMAX COMPOUND-ADD 2011-2015 LML A Duramax TURBO KIT Add INSTALL A Turbo INSTRUCTIONS Compound Kit Installation Instructions 1-800-955-0476 - www.industrialinjection.com - info@industrialinjection.com
Dodge 24v ISB
 1 BD KILLER B SINGLE TURBO KIT 1994-2002 Dodge 24v ISB Part #: 1045163 PLEASE READ ALL INSTRUCTIONS BEFORE INSTALLATION UNLESS AN EO# IS LISTED, THIS PRODUCT IS LEGAL IN CALIFORNIA FOR RACING VEHICLES
Installation Instructions - ECS Tuning Vent Pod Vacuum/Boost Gauge Kit
 Installation Instructions - ECS Tuning Vent Pod Vacuum/Boost Gauge Kit This tutorial is provided as a courtesy by ECS Tuning. Part Number for (2005-2008) Proper service and repair procedures are vital