IMPORTANT. These are included with your VW Baja Bug. These are items you will need to run your VW Bug. ONYX 6C 7.2V 2000MAH NIMH STICK DTXC2035
|
|
|
- Gwen Russell
- 6 years ago
- Views:
Transcription
1


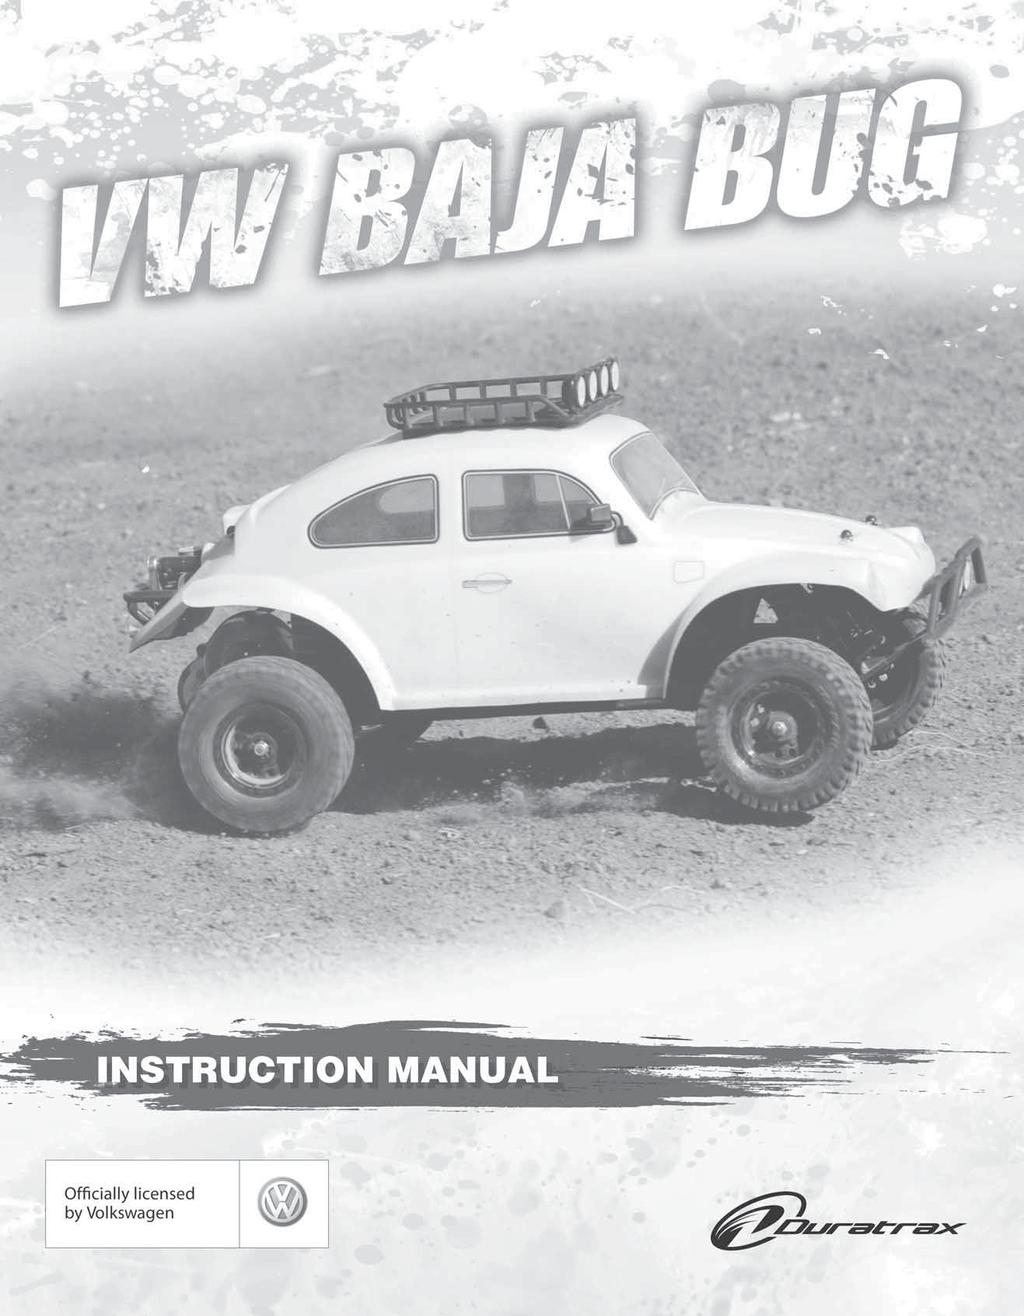
2 These are included with your VW Baja Bug. Chassis Body Transmitter Receiver Antenna Tube Instruction Manual Replacement Parts Guide IMPORTANT These are items you will need to run your VW Bug. ONYX 6C 7.2V 2000MAH NIMH TICK DTXC2035 ONYX 100 AC/DC PEAK CHARGER DTXP4190 AA BATTERIE (x4) 2
3 AFETY PRECAUTION: WARRANTY: Duratrax guarantees this kit to be free from defects in both material and workmanship at the date of purchase. Duratrax will warranty this kit for 90 days after the purchase date. Duratrax will repair or replace, at no charge, the incorrectly made part. Make sure you save the receipt or invoice you were given when you bought your model! It is your proof of purchase and we must see it before we can honor the warranty. Further, Duratrax reserves the right to change or modify this warranty without notice. In that Duratrax has no control over the fi nal user assembly or material used for fi nal user assembly, no liability shall be assumed nor accepted for any damage resulting from the use by the user of the fi nal user-assembled product. By the act of using the user-assembled product, the user accepts all resulting liability. To return your VW Baja Bug for repairs covered under warranty you should send your Baja Bug to: Hobby ervices 3002 N. Apollo Drive uite 1 Champaign, Illinois Attn: ervice Department Phone: (217) :00 am-5:00 pm Central Time M-F hobbyservices@hobbico.com If the buyer is not prepared to accept the liability associated with the use of this product, the buyer is advised to return this kit immediately in new and unused condition to the place of purchase. When the safety precautions are followed, the VW Baja Bug will provide years of enjoyment. Use care and good sense at all times when operating this radio controlled Baja Bug. Failure to use this vehicle in a safe, sensible manner can result in injury or damage to property. You and you alone must insure that the instructions are carefully followed and all safety precautions are obeyed. Do not operate the VW Baja Bug near people. pectators should be behind the driver or at a safe distance away from the vehicle. Make sure to read the instructions with the battery and charger before charging. Do not leave any charger unattended during charging. If the battery or charger become hot at any time, disconnect the battery from the charger immediately! Failure to do so may cause permanent damage to the charger and battery and may cause bodily harm. The VW Baja Bug features waterproof electronics allowing you to run in almost any conditions. However, to achieve long life, avoid immersing completely in water. After you are finished running, make sure that the electronics are dry to help avoid corrosion. Always turn on the transmitter before turning on the electronic speed control. Before turning on your radio, check to make sure that no one else is running on the same frequency as your VW Baja Bug. HELPFUL HINT: Avoid working over a deep pile carpet. If you drop a small part or screw, it may be diffi cult to fi nd. Place a mat or towel over your work area. This will prevent parts from rolling off and will protect the work surface. Avoid running the Baja Bug in cold weather. The plastic and metal parts can become brittle at low temperatures. In addition, grease and oil become thick, causing premature wear and poor performance. PECIFICATION AND DECRIPTION CHANGE: All pictures, descriptions and specifi cations found in this instruction manual are subject to change without notice. Duratrax maintains no responsibility for inadvertent errors in this manual. Visit Duratrax.com for the latest updates and information for your model. TRE-TECH PART GUARANTEE: We have engineered the VW Baja Bug to take the rough and tumble abuse that makes R/C fun. We are so confident of the quality and durability of the tress-tech plastic parts that we will replace any tress-tech plastic part you break during the first 12 months you own the Baja Bug. Just send in the part to us and we will send you a FREE replacement. Please see the VW Baja Bug parts list for the items covered under the tress-tech guarantee. To receive your free replacement part please send the following to the Hobby ervices address listed above. 1. The broken part must be included. 2. The part number and description of the broken part. 3. Copy of your dated invoice or purchase receipt. 4. Your name, phone number and shipping address. REPAIR ERVICE: Repair service is available anytime. After the 90 day warranty, you can still have your VW Baja Bug repaired for a small charge by the experts at Duratrax s authorized repair facility, Hobby ervices. To speed up the repair process, please follow the instructions listed below. 1. Under most circumstances return the ENTIRE vehicle. The exception would be sending in a tress-tech part. ee the instruction under the tress-tech Guarantee. 2. Make sure the transmitter is turned off, and all of the batteries are removed. 3. end written instructions which include: a list of all items returned, a THOROUGH explanation of the problem, the service needed and your phone number during the day. If you expect the repair to be covered under warranty, be sure to include a proof of date of purchase (your store receipt or purchase invoice). 4. end to Hobby ervices at the address shown. When shipping your item(s) to us, we recommend that you insure it and use a company that offers a tracking service (such as Federal Express Ground or UP Ground). Our staff will carefully inspect your item and notify you of their fi ndings, at which time you will be notifi ed of your options for return, repair, or replacement. Please note that items sent back unrepaired will still carry a service charge and return shipping. Hobby ervices accepts Visa and Mastercard, or you can send in a check. Additionally we can return the item C.O.D., but additional charges apply. IMPORTANT 082E 3
4 TRANMITTER PREPARATION Battery Tray Door + AA BATTERIE x FINIHING RECEIVER ANTENNA INTALLATION DO NOT CUT THE ANTENNA WIRE! 4
5 FINIHING 6-CELL BATTERY INTALLATION RADIO YTEM CHECK Your radio system s transmitter and receiver are preset at the factory. If your radio system needs to be rebound: 1. Remove the radio box lid. 2. Turn on the transmitter and receiver. 3. Carefully press the bind button on the top of the receiver and hold it down until the L.E.D. is lit solid green. The L.E.D. indicate the receiver s status. Red: No signal being received. Blinking Green: Receiver is detecting a signal from a transmitter it is not bound to. olid Green: Working, the receiver is detecting a signal from the transmitter it is bound to. 5 LED
 ET UP Connect the battery pack to the EC. Turn on the Tx, and then the EC.")
6 RADIO YTEM CHECK (TEERING) teering ervo Reverse witch teering Trim Throttle Trim On/Off 2.4 GHz ALWAY CHECK THE RADIO OPERATION BEFORE EACH RUN! Throttle/EC Reverse witch Reverse Forward FINIHING ELECTRONIC PEED CONTROL (EC) ET UP Connect the battery pack to the EC. Turn on the Tx, and then the EC. Do not touch the throttle trigger for 2-3 seconds. The print 2 sets up automatically. The green light will fl ash and then glow steady. Ready to use! Never use more than a 6-cell, 7.2 volt NiMH battery pack, 7.4V 2 LiPo or 6.6 volt LiFe battery. Do not attempt to connect the battery pack to the EC in reverse, as permanent damage to the EC could result. Never cut or splice the EC input wires. Do not connect a battery to the receiver s (Rx) battery slot. The Rx receives power through the EC itself which plugs into the Rx s throttle channel slot. Always disconnect the battery pack from the EC when not in use. Be careful not to touch the heat sink as it can become very hot. The print 2 Plus features a Low voltage cut-off. This means the EC will cut power to the motor to protect LiPo packs from over discharging. NOTE: The print 2 has built-in circuitry to sense an excessive heating condition caused by current overload. If the EC overheats, it will automatically shut down, as indicated by fl ashing red and green LEDs. This is to protect all onboard components and prevent permanent damage from occurring. The EC can again be used once the internal temperature returns to an acceptable level. Reset by cycling the power. 6
7 EC TROUBLEHOOTING GUIDE: IF YOUR EC DOE NOT WORK Problem: Motor and/or steering servo are dead. Recharge dead batteries. Check for faulty power connections. Check for a damaged connection between EC and Rx. Internal damage. Unit may require service. ee Repair ervice on page 3. EC WORK BUT OTHER PROBLEM EXIT Problem: teering servo works but motor is dead. Motor brushes are dirty or the motor is bad. Clean with a motor spray (such as Duratrax Power hot, DTXC2458) and re-oil the bushings or replace the motor. Check for faulty motor connections. Battery not fully charged. Problem: Overheated motor or hot power plugs. Motor is geared too high. Change to a lower gear setup. Binding in the vehicle s drivetrain. Check to make sure nothing is interfering with the model s drivetrain. Problem: Motor runs backwards but forward LEDs are on. Motor is wired backwards. wap the motor wires. Problem: Motor runs backwards and the reverse LED is on when forward command is given. Move the Tx throttle reversing switch to the opposite position, and reset EC. Problem: Model runs properly, then motor goes dead. The built-in thermal protection may be automatically shutting down the EC due to overheating conditions. Check for binding drivetrain, bad motor or incorrect gear ratio. Adjust gear mesh, replace motor or change gear ratio. Allow the EC to cool and try again. MAINTENANCE TIP: Before Each Run 1. Check to make sure that all screws are tight and there are not any screws missing. 2. Check to make sure that the transmitter batteries are not low. 3. Check to make sure that all of the moving parts move freely and do not bind. 4. Check for broken or damaged parts. Replace any broken or damaged parts before using. Running the Baja Bug with broken or damaged parts could result in damage to other parts. 5. Check to make sure that the receiver and speed control are still properly secured to the chassis. 6. Check to make sure that all wires are properly connected. 7. IMPORTANT! Check the slipper clutch setting. The VW Baja Bug transmission is equipped with a slipper clutch. When properly adjusted the slipper clutch will help to extend the life of the transmission by providing a point that slips when the kit encounters bumps and jolts that would otherwise transfer strain to the internal gears. Although there is no perfect setting for every situation, following the recommended procedure on page 9 will provide a good starting point. Final adjustments will need to be made with the kit on the actual surface it will be running on. After Each Run 1. Clean any large globs of dirt, mud or debris from the chassis and moving parts. 2. Disconnect and remove the battery. 3. Check for any broken or damaged parts. This way parts may be replaced before the next run. After Every 10 Runs 1. Check the servo saver for proper operation by grasping the servo arm and linkage and turning one of the front tires left and right. If the wheels turn without moving the linkages and servo arm, then the unit is operating properly. If the linkage and servo arm move, loosen the knurled adjustment nut on the left side servo saver shaft. If the servo saver becomes clogged with dirt, it may not work properly which could cause servo or linkage damage. The servo saver needs to be disassembled, cleaned and readjusted. To safely adjust the servo saver, loosen the knurled aluminum collar on the left side steering post completely. Then reinstall 1-1/2 turns onto the post. Retest the servo saver as described above. Adjust the servo saver tighter or looser if needed. 2. Check to make sure that the bearings are free of dirt and debris and roll smoothly. 3. Check the shocks for oil leakage. If the shocks have leaked any shock fl uid out, you should properly refi ll the shocks for best performance. 4. Check for proper gear mesh between the spur gear and the pinion gear. TUNING 7


8 TUNING GUIDE: When tuning the VW Baja Bug make sure that you have equal length shocks, camber rods and steering rods on both sides (left and right). They do not have to be the same front to rear. WHEEL BAE Front Long Middle hort CATER Caster refers to the angle which the kingpin is at in relation to the surface when viewed from the side. 0 of caster means that the kingpin is straight up and down. The VW Baja Bug comes stock with 30 of caster and is not adjustable. Two washers in front One washer either side Two washers in rear Wheel base is the distance from the center of the front wheel to the center of the rear wheel. Lengthening the wheel base increases steering, but decreases rear traction as a result of increased weight distribution to the front wheels. Decreasing the wheel base will increase rear traction, but decrease steering. CAMBER LINK PLACEMENT CAMBER TUNING Camber refers to the angle at which the tire and wheel ride in relation to the ground when viewed from the front or rear. Negative camber is when the tire and wheel lean inward and positive camber is when the tire and wheel lean outward. Typically you want 0 to 2 of negative camber. Never put in positive camber. Make sure that both sides have equal amounts of camber by keeping the camber turnbuckles equal in length. FRONT TOE-IN AND TOE-OUT Toe-in and toe-out refer to the angle which the tire is at when viewed from above. Toe-in increases stability under acceleration. However, toe-in also decreases steering when entering a corner. Toe-out will increase steering into corners, but will decrease the overall stability during acceleration. The front typically is set-up with 0 to -2 of toe-in. 8 The camber link placement affects the traction and handling on rough tracks. Using a long mounting position will increase traction but decrease stability. hortening the link will increase stability, but decrease traction. HOCK OIL AND HOCK PRING Many different combinations can be used between the shock oils and shock springs. ome basic guidelines are that if the rear end is stiff, the Baja Bug will have more steering and less rear traction. tiffening the front shocks will result in less steering and more rear traction. Duratrax offers different rate (stiffness) springs to suit most running conditions. The springs are color coded for easy identification: Front Rear ilver (Extra oft) DTXC9261 DTXC9260 White (oft) DTXC9232 DTXC9237 Yellow (Medium) DTXC9230 DTXC9235 Green (Hard) DTXC9231 DTXC9236 Green (Hard/Progressive) Included Included Thinner shock oil will make the shocks react faster, but makes the Baja Bug less stable and may cause the Baja Bug to bottom out over large jumps. Thicker shock oil makes the Baja Bug smoother over large jumps and in straights, but less reactive over rough sections. We have filled the shocks with 30 weight shock oil, which is a good choice for most driving conditions.
9 FRONT HOCK ADJUTMENT Top hock Outer Positions: More teering, Faster uspension Reaction Inner Mount Positions: More low peed teering Top hock Inner Positions: lower teering, moother Over Bumps Outer Mount Positions: More High peed teering Moving the tops of the shocks out will increase steering and produce quicker suspension reaction, but will result in slower steering reaction. Mounting the bottoms of the shocks in the inside hole of the arms will give more slow speed steering but will take away some high speed steering. REAR HOCK ADJUTMENT Top hock Outer Positions: More teering, More Control Over Bumps Top hock Inner Positions: More Rear Grip, moother Over Bumps CLEANING TIP The VW Baja Bug is fun to drive through the dirt and mud. When it comes time to clean the chassis, here are a few tips: 1. Remove the EC, motor, receiver and steering servo. Wipe down using a slightly damp cloth. 2. Remove the wheels and wash with water. A small scrub brush works well. 3. Rinse off the body and chassis with water. 4. Wipe dry thoroughly. 5. Relubricate the wheel bearings and servo saver. TIP: To keep the metal parts from rusting, spray lightly with WD Reassemble making sure all parts move free. LIPPER CLUTCH ADJUTMENT IMPORTANT! To protect the transmission gears, it is imperative that the slipper is properly set. If too tight, or locked, gear damage will occur. lipper Adjustment Nut Tighten Nut: Less lip Loosen Nut: More lip Inner Mount Positions: Less teering, moother Over Bumps Outer Mount Positions: More teering, Less Control Over Bumps Moving the tops of the shocks in will result in more traction in the corners and greater smoothness over the bumps. Moving the tops of the shocks out will give the Baja Bug more steering and enable it to handle large jumps better Tighten the slipper adjustment nut all the way down. 2. Loosen the adjustment nut two full turns. 3. et the kit on the work surface and try to rotate the spur gear by hand. It should be hard to turn with both the rear wheels resting on your work surface. 4. If it turns easily the slipper adjustment nut needs to be tighter. Tighten the adjustment nut 1/8th of a turn and try to rotate the spur gear again. 5. If the gear will not turn, then the slipper is too tight. Loosen the adjustment nut 1/8th of a turn and try to rotate the spur gear again. 6. For the fi nal adjustment use a fully charged pack to run the Baja Bug. Place the Baja Bug on the surface it will be run on and give it a short 1-2 second burst of full throttle. When adjusted correctly it should slip for 1-2 feet without the tires breaking loose. If the tires do break loose, the slipper will need to be set looser. If it slips for more than the recommended 1-2 feet, it is set too loose and will need to be set tighter. 7. Repeat each step as needed to get the desired setting. TUNING
10 MAINTENANCE GUIDE: The following section is provided to help you with maintenance and repairs to your VW Baja Bug. Pay extra attention to the notes and tips for proper assembly. J C 57 J C 49 Bulkhead, Bulkhead Brace, Front uspension Arm, Front hock Tower, Front Bumper 1. Attach the front bulkhead (51) to the chassis (1) using the bulkhead hinge pin (103). 2. ecure the bulkhead hinge pin in place using the 3mm set screw (K). 3. Attach and secure the front suspension arms (38,39) to the front bulkhead using the front inner hinge pins (104). 4. ecure the front inner hinge pins (104) with the 2.5mm e-clips (). 5. Attach the front shock tower (49) to the front bulkhead using four 3x10mm round head screws (C). 6. ecure the front body mount bracket (57) to the shock tower using two 3x10mm round head screws (C). 7. Attach the front bumper light bar (115) to the front bumper/ skid plate (2) using two 3x6mm pan head screws (J). 8. Attach the front bumper/skid plate to the front bulkhead using four 4-40x5/16" fl at head screws (B). 9. Attach the front body mount posts (130) to the front body mount bracket (57) using two 3x6mm pan head screws (J) K C Front Knuckle Arm, Hub Carrier, Axle 1. Attach the front hub carriers (28) to the front suspension arms (38,39) using the front outer hinge pins (95). 2. ecure the hinge pins with two 2mm e-clips (R). 3. Install the front axles (91) into the knuckle arms (24,25). 4. Install two spacers (Y) onto each kingpin (94). 5. Insert the knuckle arms into the front hub carriers and then secure them in place with the kingpins. Note: The spacers go on the top of the hub carriers. 6. ecure the kingpins in place using 2mm e-clips (R). 7. Install the short ball studs () into the inner holes of the knuckle arms. 2 B J 91 Y 24 R R 95 R 94 MAINTENANCE R 39 Y Y R 91 R 10 25
11 100 teering ervo aver Assembly 1. Insert the short servo saver post (99) into the right side brass bushing (105). 2. Install two short ball studs () into the right servo saver (46) in the holes shown. 3. Insert a plastic bushing (48) into each end of the right servo saver. Make sure the bushings are fully seated. 4. lide the assembled right half onto the short servo saver post (99). 5. Install two short ball studs () into the lower left servo saver (44) in the holes shown. 6. Insert the threaded aluminum servo saver hub (101) into the bottom of the lower left servo saver. Note: The aluminum servo saver hub is designed to key into the bottom of the lower left servo saver. Make sure that the hex in the hub fully seats in the servo saver. 7. Install a ball stud () into the upper left servo saver (45). 8. lide the upper left servo saver onto the hub. The upper and lower left servo savers are designed to key together. 9. Place the servo saver spring (98) on top of the two left servo savers. 10. ecure the left side servo saver assembly together with the servo saver adjustment collar (102). Note: The servo saver adjustment collar is machined on one side for the servo saver spring to fit into. Make sure this side goes down against the servo saver spring. The servo saver spring will need to be properly adjusted once the entire servo saver assembly has been installed. 11. Insert a plastic bushing (47) into each end of the left side servo saver assembly. Again, make sure the bushings are fully seated. 12. Install the long servo saver post (100) into the left side brass bushing (105). 13. lide the assembled left servo saver assembly onto the servo saver post. 14. Attach the left and right servo savers together with the one piece molded link (43) E E E E B B ervo, ervo Brace, Front Brace 1. Attach the steering servo mounts (6) to the front of the servo mounting lugs using two 3x8mm /T screws (L). 2. Install a short ball stud () into the steering servo horn (8). 3. Install the steering servo horn onto the servo with a 2.6x8mm /T screw (T). Note: Make sure the transmitter, steering servo and servo horn are properly centered before securing the servo horn to the servo. 4. ecure the servo to the chassis with two 4-40x5/16" fl at head screws (B). 5. Attach the servo brace (56) to the chassis by installing two 3x10mm screws (C) into the two rear holes. 6. Connect the servo horn to the servo saver assembly using the adjustable steering servo link (5,90). 7. Install two brass bushings (105) into the underside of the front brace (52). Note: The brass bushings may need to be slightly tapped into place. The bushings must be fully seated. 8. Install the front brace onto the servo brace and servo saver assembly. Make sure the servo saver posts insert into the bushings in the front brace. ecure the front brace with four 3x20mm screws (E) into the chassis and two 4-40x5/16" flat head screws (B) into the bulkhead. 52 C L 56 L C ervo B T ervo aver Posts MAINTENANCE B 11
12 Rear hock Tower, Rear Transmission Plate, Rear Bulkhead, Rear uspension Arm 1. Attach the rear chassis plate (41) to the chassis (1) using four 3x10mm round head screws (C). 2. Attach the rear suspension arms (36,37) to the rear chassis plate using the inner rear hinge pins (97). 3. ecure the front of the inner rear hinge pins in place using two 2.5mm e-clips (). 4. Install the rear body mount posts (129) into the body mount bracket (57). ecure each post using a 3x6mm pan head screw (J). ecure the complete body mount assembly to the rear shock tower (40) using two 3x10mm round head screws (C). 5. Install the rear shock tower (40) and transmission brace (42) onto the chassis using four 3x12mm round head screws (D). Note: Make sure the screws pass through the shock tower, chassis and into the transmission brace. 6. Install two long ball studs (30) into the appropriate holes in the transmission brace. Note: The stock setting is the lower inner holes. Make sure that the ball studs are in the same hole location on both sides. U 129 J U C J C D C MAINTENANCE Rear Hub, Rear Axles 1. Install two 5x10mm bearings (108) in both of the rear hubs (26,27). 2. Install a short ball stud () into the center hole on the front of the rear hubs. 3. Place one 3mm plastic spacer (58) on each side of the rear hubs. ecure the rear hubs to the rear suspension arms (36,37) with the 3mm outer rear hinge pins (107). 4. ecure the outer rear hinge pins with 2.5mm e-clips (). 5. Install the rear axles (9) through the bearings in the hubs. 6. Install a rear axle pin (128) into each of the rear axles. 7. Install one joint spring (22) into each of the axles. 8. Install a dogbone (79) into each of the axles
13 Pin Hole X X X Keyed ection Bearing Mount X Pin Hole Differential 1. Place one of the 10x16mm bearings (110) on the bearing mounts on the diff gear case (18) and the diff gear case cover (12). 2. Install the outdrives (10) through the diff gear case and the gear cover, and install the pins (11) into their holes. 3. Align the keyed section of the large planetary gears (13) on the spring pins that are now installed in the outdrives. 4. Center the diff cross pin B (19) through the opening in the diff cross pin A (15) and install one small planetary gear (14) onto each end of both diff cross pins. 5. Place the planetary gear and diff shaft assembly into the diff gear case. 6. Place a small amount of gear grease on the planetary gears that were installed in the large diff half. Rotate the gears to spread the grease evenly. There should be enough to evenly coat each tooth of all the gears. Add or remove grease as needed. 7. Install the diff gear case cover into the diff gear case and secure it with the four 2x6mm fl at head screws (X). 8. Install one dogbone spring (22) into each open end of the outdrives. D G G P G P 108 P Differential Gearbox Note: When installing the bearings, make sure they are fully seated. If the bearings are not fully seated the gearbox halves may not properly fit together or may cause binding. 1. Install the 5x10mm bearings (108) into the upper holes of the left and right gearbox halves (20, 21). 2. Install the top shaft (83) into the 5x10mm bearing that was just installed into the left gearbox half. 3. Install a 5x10mm bearing (108) into each side of the idler gear (17). 4. Install the idler gear shaft (89) into the idler gear bearings. 5. Install the idler gear into the left gearbox half. 6. Install the assembled differential into the bottom hole in the left gearbox half. 7. Install the two gearbox halves together. Make sure they seat together properly. 8. ecure the two halves together with the 3x12mm round head screw (D). 9. Install the 2x10mm spring pin (116) into the top shaft. 10. Install the gearbox dust cover (7) onto the right side gear box half (21). 11. Install the motor plate (96) on the side of the gearbox and attach it with the three 3x26mm round head screws (G) and 3mm spring washers (P). MAINTENANCE 13
. 2. Place the slipper pad (64) and outer slipper plate (85) onto the top shaft. Make sure the slipper pad is properly centered between the two plates. 3.")
14 lipper Clutch 1. Install the inner slipper plate (84) onto the top shaft (83). Make sure the notch in the inner slipper plate keys onto the 2x10 spring pin (116). 2. Place the slipper pad (64) and outer slipper plate (85) onto the top shaft. Make sure the slipper pad is properly centered between the two plates. 3. Install the slipper bushing (86) into the spur gear (16). 4. lide the spur gear onto the top shaft and secure it to the outer slipper plate using two 3x6mm screws (J) and two 3mm spring washers (P). 5. lide a 3mm fl at washer (Q), 3mm brass washer (W), and then another 3mm washer onto the top shaft. 6. Install the slipper spring (87), a 3mm washer, and then the 3mm lock nut (O). Refer to page 9 for adjusting the slipper. Motor Installation 1. Install one 3mm spring washer (P) onto each of the 3x8mm motor mount screws (H). 2. Align the mounting holes in the motor with the mounting holes in the motor plate, and secure the motor with the two 3x8mm screws. Note: Do not fully tighten the 3x8mm screw at this time. 3. Install the pinion gear (80), tooth side out, onto the motor shaft. 4. Rotate the pinion gear on the motor shaft until the set screw hole is aligned with fl at area of the motor shaft. 5. ecure the pinion to the motor shaft with the 3x3mm set screw (K). Motor Mounting Holes Flat Area Motor Plate Mounting Holes P H P K H 80 Gear Mesh 1. etting the proper mesh between the spur and pinion gears is important. Improper mesh can result in damage to the spur and pinion gears, shorter run times and can make the motor run hot. Although setting the mesh correctly can be tedious, the process can be simplifi ed with the aid of a simple scrap of standard note book paper. 2. Place the scrap paper between the pinion and spur gear. lide the motor forward so the pinion teeth mesh with the spur gears with the piece of paper pinched tight between them. 3. Tighten the motor screws to hold the motor in place, and slowly rotate the gears until the paper is pushed out from between the gears. 4. Rock the spur gear back and forth with light pressure. The gear should be able to move a small amount (about 1/4 of the size of one of the gear teeth) without moving the pinion. 5. If the spur moves more than the recommended amount the gear mesh is too loose. Loosen the motor mount screws and move the motor closer to the spur gear. 6. If the spur moves less than the recommended amount the gear mesh is too tight. Loosen the motor mount screws and move the motor away from the spur gear. Once the gear mesh is correct, tighten down the motor screws and re-check the mesh to be sure it did not change as the motor screws were tightened. After every few runs it is a good idea to re-check the gear mesh and make sure the motor screws are still tight. MAINTENANCE Motor crew Pinion Motor Back Looser Mesh Motor crew Motor Forward Tighter Mesh pur 14
15 (Front) 76 (Rear) (Front) 69 (Rear) (Front) 71 (Rear) hock Assembly 1. Install a 2.5mm e-clip () onto the groove on the shock shafts (68,69) closest to the center of the shaft. 2. Place the shock piston (4) on top of the 2.5mm e-clip. 3. ecure the shock piston in place with a 2.5mm e-clip in the groove closest to the end of the shaft. 4. Install a shock O-ring (114), a shock seal spacer (35), and then another shock O-ring (114) into the shock seal holder in the bottom of the shock body (75,76). ecure all of the parts in the shock seal holder using the shock seal retainer (33). 5. Install the shock shaft assembly into the shock body. 6. Fill the shock with fl uid. Install the shock diaphragm (34), the shock cap (78) and the shock cap ring (78). 7. While tightening the shock cap down, work the shock shaft and piston up and down to help remove any air and excess oil that may be trapped in the shock. 8. Thread the shock ball end (31) onto the end of the shock shaft. Note: To hold the shock shaft, use needle nose pliers with a piece of cloth (to protect the shaft). 9. Install the shock ball (106) in the shock end. 10. Install the upper spring clamp (122) and spring (70,71). 11. ecure the shock spring in place with the lower spring clamp (32). MAINTENANCE 15

16 2011 Hobbico, Inc. All rights reserved. DTXD36xxMNL
IMPORTANT SAFETY PRECAUTIONS: HELPFUL HINTS: These are included with your Evader EXT2.4.
 www.duratrax.com These are included with your Evader EXT2.4. Chassis Body Transmitter 7.2V 1500mAh NiMH Battery 7.2V Charger AA Batteries (8) Receiver Antenna Tube Instruction Manual Replacement Parts
ASSEMBLY AND OPERATION MANUAL
 AEMBLY AND OPERATION MANUAL www.duratrax.com ITEM INCLUDED The following items are included with your Evader EXT. Chassis Body Body Clips (Qty 4) Transmitter Transmitter Antenna Receiver Antenna Tube Decal
ASSEMBLY AND OPERATION MANUAL
 AEMBLY AND OPERATION MANUAL www.duratrax.com ITEM INCLUDED The following items are included with your Evader EXT2 Chassis Body Body Clips (Qty 4) Transmitter Transmitter Antenna Receiver Antenna Tube Decal
ASSEMBLY AND OPERATION MANUAL
 ASSEMBLY AND OPERATION MANUAL www.duratrax.com ITEMS INCLUDED The following items are included with your Vendetta Rally. Chassis Transmitter Body Decal Sheet Instruction Manual Exploded View/Parts Listing
INCLUDED TOOLS REQUIRED TOOLS ITEMS REQUIRED FOR OPERATION. 6-Cell Battery DTXC2054. Onyx 200 Peak Charger DTXP4200. Charge Adapter DTXC2209
 Ready to Run 1/5-Scale Brushless EP Motorcycle INCLUDED TOOLS 2mm Wrench Cleaning Brush REQUIRED TOOLS Needle Nose Pliers DTXR0300 Phillips Screwdriver DTXR0124 Flat Blade Screwdriver DTXR0102 Threadlocker
PREBUIL UILT ASSEMBLY AND OPERATION MANUAL
 PREBUIL UILT Length: 15.2" [385mm] Width: 13" [330mm] Height: 5.8" [147mm] Weight: 3.3 lb [1500g] Wheelbase: 11.6" [295mm] Technical Support Information For technical assistance, contact: DuraTrax Product
These are included with your Brushless Evader. IMPORTANT. These are items you will need to run your Brushless Evader.
 www.duratrax.com These are included with your Brushless Evader. Chassis Body Transmitter Decal heet Receiver Antenna Tube Instruction Manual Replacement Parts Guide IMPORTANT The receiver in this car will
ASSEMBLY AND OPERATION MANUAL
 Length: 28.1" [715mm] Width: 16.5" [420mm] Height: 11" [279mm] Weight: 18.8 lb [8.5kg] Wheelbase: 18.6" [472mm] Technical Support Information For technical assistance, contact: DuraTrax Product Support
ASSEMBLY AND OPERATION MANUAL
 Length: 9.5" [240mm] Width: 7.4" [185mm] Height: 4.7" [120mm] Ground Clearance: 1.25" [32mm] Weight: 25 oz [725g] approx. running weight with battery/motor/esc Technical Support Information For technical
ASSEMBLY AND OPERATION MANUAL
 Weight: 1lb 14oz Length: 17.25" [435mm] Width: 8" [205mm] Height: 4.5" [115mm] Wheelbase: 10.5" [265mm] Motor: 20 Turn Photon Speed Radio: 2 channel surface frequency Technical Support Information For
Sportwerks Raven RTR Assembly and Operation Manual
 Sportwerks Raven RTR Assembly and Operation Manual Specifications: Scale.............. 1/10 Length............. 16 in (406mm) Front Track.......... 12.75 in (324mm) Rear Track.......... 12.5 in (318mm)
ASSOCIATED 1:10 SCALE ELECTRIC BUGGY INSTRUCTION MANUAL FOR THE TEAM ASSOCIATED RC10B Associated Electrics, Inc. RS-1
 ASSOCIATED 1:10 SCALE ELECTRIC BUGGY INSTRUCTION MANUAL FOR THE TEAM ASSOCIATED RC10B4 TT RS-1 2003-2006 Associated Electrics, Inc. FINAL ADJUSTMENTS RADIO ADJUSTMENTS Use the following
ASSEMBLY AND OPERATION MANUAL
 ASSEMBLY AND OPERATION MANUAL www.duratrax.com ITEMS INCLUDED The following items are included with your Raze ST. Chassis Body Body Clips (Qty 4) Decal Sheet Transmitter Transmitter Antenna Receiver Antenna
POWER TRUCK XGX 3 PACKING LIST INSTRUCTION MANUAL
 XGX 3 POWER TRUCK INSTRUCTION MANUAL 14 PARTS - SERVICE - REPAIRS OPEN Mon - Fri 9 am-6 pm... Sat 10 am-3 pm (EST) Distributed and serviced by: Extreme RC by RSI... Ferndale, MI 48220 Phone: (586) 757-1336
OWNER'S MANUAL 2000 & ROAR National Champion
 2000 & 2001 ROAR National Champion OWNER'S MANUAL Carefully read through all instructions to familiarize yourself with the parts, construction techniques, and tuning tips outlined in this manual. Being
 ASSEMBLY Y AND OPERATION MANUAL AL www.duratrax.com www.warheadmt.com YOU WILL NEED SPARE GLOW PLUGS DTXG3005 AFTER RUN OIL HCAP3000 FUEL FILLER BOTTLE DTXP0150 20% O DONNELL FUEL DTXP0720 WRENCH DTXR1170
ASSEMBLY AND OPERATION MANUAL
 TM Length: 16.5" [435mm] Width: 7.7" [195mm] Height: 4.6" [115mm] Weight: 3.1 lb [1.4kg] Wheelbase: 10.1" [255mm] Technical Support Information For technical assistance, contact: DuraTrax Product Support
2-SPEED TRANSMISSION CON- VERSION FOR THE MAXIMUM BX, MT, ST
 2-SPEED TRANSMISSION CON- VERSION FOR THE MAXIMUM BX, MT, ST 2) Remove the engine by unscrewing the four 4 x 12mm engine mounting screws. Disconnect the throttle rod from the carburetor by rotating the
OWNER'S MANUAL Magnolia Ave., Chino, CA phone: (909) fax: (909)
 fax: (909)") OWNER'S MANUAL Carefully read through all instructions to familiarize yourself with the parts, construction techniques, and tuning tips outlined in this manual. Being able to grasp the overall design of
OWNER'S MANUAL Carefully read through all instructions to familiarize yourself with the parts, construction techniques, and tuning tips outlined in this manual. Being able to grasp the overall design of
along with standard XT2 Instruction Manual and also XT2 18 Supplementary Sheet.
 Use this XT2 Dirt Conversion Supplementary Sheet along with standard XT2 Instruction Manual and also XT2 18 Supplementary Sheet. Parts included in Bag 8: 303141 SHIM 3x5x1.0MM (10) 322111 XT2 COMPOSITE
ASSEMBLY INSTRUCTIONS
 TM ASSEMBLY INSTRUCTIONS i Every dream has a beginning and an end. This one just happened to start out in the O Donnell family garage back in 1980. Young Steve O Donnell wasn t satisfi ed with the mediocre
ROLL CENTER You can adjust the front and rear roll centers of the XB8 by changing the mounting locations of various components.
 Your XRAY XB8 luxury nitro buggy is a top competition, precision racing machine that features multiple adjustments that allow you to set up for any track condition. The XB8 includes innovative set-up features
Bag 1. Bag 1. Center Pivot. Center Pivot
 8 00734 01901 5 Center Pivot Bag 1 3374 - Center Pivot Socket 4019 - Alum Pivot ball 3254-2-56 Button Head *Note - Sometimes it is helpful to slightly over-tighten the top clamp screws, then work the ball
ASSEMBLY INSTRUCTIONS
 TM ASSEMBLY INSTRUCTIONS i Every dream has a beginning and an end. This one just happened to start out in the O Donnell family garage back in 1980. Young Steve O Donnell wasn t satisfi ed with the mediocre
ABC HOBBY ORIGINAL RADIO CONTROL CAR
 ABC HOBBY ORIGINAL RADIO CONTROL CAR Instruction Manual Study the instructions thoroughly before assembly. FRONT WHEEL DRIVE NEW STYLE STRUT SUSPENSION BATHTUB CHASSIS 4 BEVEL GEAR DIFFERENTIAL FULL ADJUSTABLE
TOWC Universal Drive Shaft Set...15,16 x2pcs. TOWC Engine Mount...98 x1pc. TOWC Dogbone (Rear)...19 x1pc
...19 x1pc") Replacement Parts Stock # Description Included DTXC5...5x0mm Bearing...x2pcs DTXC5...x6mm Bearing...x2pcs DTXC6...mm Bearing...x2pcs TOWC6032...Air Filter Set...02,03,0,05 xpc TOWC600...Rear Axle... xpc
Replacement Parts Stock # Description Included DTXC5...5x0mm Bearing...x2pcs DTXC5...x6mm Bearing...x2pcs DTXC6...mm Bearing...x2pcs TOWC6032...Air Filter Set...02,03,0,05 xpc TOWC600...Rear Axle... xpc
RJS2021 LTO SPORT OVAL RACER LESS ELECTRICS
 RJS2021 LTO SPORT OVAL RACER LESS ELECTRICS THANKS FOR BUYING THE RJ SPEED 1/10 LTO SPORT KIT FOR OVAL RACING. THE ASSEMBLY WILL NOT BE DIFFICULT IF YOU READ THE TEXT, LOOK AT THE PICTURES, AND THE EXPLODED
New Generation Rear Wheel Drive
 New Generation Rear Wheel Drive ABC HOBBY ORIGINAL RADIO CONTROL CAR Instruction Manual Study the instructions thoroughly before assembly. REAR 2 WHEEL DRIVE REAR MOUNTED MOTOR BELT DRIVE DOUBLE DECK CHASSIS
2007 Losi, A Division of Horizon Hobby Inc.
 Operation Manual Thank you for choosing the Mini-Slider from Losi. This guide contains the basic instructions for operating your new Mini-Slider. While the Mini-Slider is great for first-time R/C drivers,
Assembly Manual. 1/10th Formula 1 Car
 Assembly Manual 1/10th Formula 1 Car Center Pivot Bag 1 3374 - Center Pivot Socket 40194 - Hard Anodized Alum Pivot ball 3254-2-56 *Note - Sometimes it is helpful to slightly over-tighten the top clamp
J & D Machine / Hyperdrive / MSA 3711 Moon Bend Rd. Chapel Hill, TN 37034
 J & D Machine / Hyperdrive / MSA 3711 Moon Bend Rd. Chapel Hill, TN 37034 www.hyperdriveracing.com 1 You now own a state of the art 1/10 scale oval race car. The Hyperdrive Assault has gone through months
Make these adjustments before racing
 FINAL ADJUSTMENTS ADJUSTING CAMBER To set the camber we recommend using our supplied #1719 camber/rear toe-in gauge. When adjusting camber you need to have the car ready to run with no body. Make these
Shown with optional GFR-1017R Body Posts. J & D Machine / Hyperdrive / MSA 3711 Moon Bend Rd. Chapel Hill, TN
 Shown with optional GFR-1017R Body Posts J & D Machine / Hyperdrive / MSA 3711 Moon Bend Rd. Chapel Hill, TN 37034 www.hyperdriveracing.com 1 You now own a state of the art 1/10 scale oval race car. The
ACTUAL SIZE (WHEN PRINTED AT 100%) 2x14MM FLAT HEAD SCREW. 2.5x8MM FLAT HEAD SCREW. 2.5x8MM SOCKET HEAD SCREW. 2.5x14MM SOCKET HEAD CAP SCREW
 2x14MM FLAT HEAD SCREW. 2.5x8MM FLAT HEAD SCREW. 2.5x8MM SOCKET HEAD SCREW. 2.5x14MM SOCKET HEAD CAP SCREW") RUSLSS ASSMLY AND MAINTNANC UID LPFUL INTS Avoid working over a deep pile carpet. If you drop a small part or screw, it may be diffi cult to fi nd. Place a mat or towel over your work area. This will prevent
RUSLSS ASSMLY AND MAINTNANC UID LPFUL INTS Avoid working over a deep pile carpet. If you drop a small part or screw, it may be diffi cult to fi nd. Place a mat or towel over your work area. This will prevent
ASSEMBLY AND MAINTENANCE GUIDE
 AMLY AND MAINTNANC UID LPFUL INT Avoid working over a deep pile carpet. If you drop a small part or screw, it may be diffi cult to fi nd. Place a mat or towel over your work area. This will prevent parts
#0980 Intimidator 7 Direct Drive Racing Kit
 #0980 Intimidator 7 Direct Drive Racing Kit 1 Thank you for purchasing the Intimidator 7! Within this kit you will find a race winning car with over 30 years of Custom Works design and quality. The latest
DIFFERENTIAL STEERING RACK
 BAG-A DIFFERENTIAL (2 Sets) +Driver Cap Screw Diff Ball Nylon Nut Thrust Washer Thrust Ball Diff Joint Cup A Allen Wrench 850 Bearing Diff Ring Diff Spring Nylon Nut 850 Bearing Diff Ring Diff Ball Ball
Assembly Manual. 1/10th World GT car
 Assembly Manual 1/10th World GT car Center Pivot Bag 1 3374 - Center Pivot Socket 40194 - Hard Anodized Alum Pivot ball 3254-2-56 Button Head *Note - Sometimes it is helpful to slightly over-tighten the
.050 Allen key 1.5mm Allen key 1/16 Allen key 5/64 Allen key 3/32 Allen key Turnbuckle & 3/16 wrench
 1 Thank you for purchasing the Outlaw 4 Sprint Car! The Outlaw sprint car platform has been developed for loose dirt buggy tire racing. In this kit you will find the 4 th evolution of the car which features
ASSEMBLY AND MAINTENANCE GUIDE. 2x14MM FLAT HEAD SCREW. 2.5x8MM FLAT HEAD SCREW. 2.5x8MM SOCKET HEAD SCREW. 2.5x14MM SOCKET HEAD CAP SCREW
 SSMLY ND MINTNNC UID LPFUL INTS void working over a deep pile carpet. If you drop a small part or screw, it may be diffi cult to fi nd. Place a mat or towel over your work area. This will prevent parts
:: Additional Features Your new TC6 comes unassembled and requires the following items for completion. (refer to catalog section for suggestions):
:") 8/10 2 :: Introduction Thank you for purchasing this Team Associated product. This assembly manual contains instructions and tips for building and maintaining your new RC10TC6. Please take a moment to
8/10 2 :: Introduction Thank you for purchasing this Team Associated product. This assembly manual contains instructions and tips for building and maintaining your new RC10TC6. Please take a moment to
ASSEMBLY AND OPERATION MANUAL
 TM ASSEMBLY AND OPERATION MANUAL Warranty DuraTrax will warranty this kit for 90 days after the purchase date from defects in materials or workmanship. DuraTrax will either repair or replace, at no charge,
RHINO SUSPENSION SYSTEM INSTALLATION INSTRUCTIONS
 PARTS INCLUDED: 2 FRONT UPPER A-ARMS 2 FRONT LOWER A-ARMS 2 UNI-BALL JOINTS 2 UNI-BALL JOINT STUDS 2 UNI-BALL JOINT CAPS 2 RETAINING RINGS 1 FRONT SHOCK ASSEM. 2 DELRON STEERING STOPS 2 SHOCK MOUNT SPACERS
TP02C. 1:10 Scale Radio Controlled Electric Powered 2WD Racing Buggy. Dimensions. Length 410mm Width 250mm Height 150mm
 TP02C 1:10 Scale Radio Controlled Electric Powered 2WD Racing Buggy Dimensions Length 410mm Width 250mm Height 150mm Transmitter Preparation Power Switch Antenna 27MHzTransmitter Crystal T 27MHz ON Extend
FTX Banzai RTR Brushed 2.4GHz 4WD Drift Car
 FTX Banzai-Manual_Banzai 11/12/2013 16:12 Page 1 FTX Banzai-Manual_Banzai 11/12/2013 16:12 Page 2 FTX Banzai RTR Brushed 2.4GHz 4WD Drift Car Congratulations on your purchase of the FTX Banzai electric
ASSEMBLY AND MAINTENANCE GUIDE
 SSMLY ND MINTNNC UID LPFUL INTS void working over a deep pile carpet. If you drop a small part or screw, it may be diffi cult to fi nd. Place a mat or towel over your work area. This will prevent parts
3.0 Tuning Tips. To Shut Off the Engine: Use the included pipe plug or simply bump the flywheel with a wrench or plastic handled tool.
 TM 8IGHT 3.0 Tuning Tips Before you start making changes on your 8IGHT 3.0 Off-Road Racing buggy, you need to make a few decisions. First of all, tires, and how they are setup, have a tremendous impact
Bigfoot (Model ) Parts List
 Parts List") Parts shown in bold are optional accessories. Part categories and individual part listings are arranged alphabetically. Bigfoot (Model 36084-1) Parts List Bearings & Bushings 4607 Ball bearings (5x11x4mm)
Parts shown in bold are optional accessories. Part categories and individual part listings are arranged alphabetically. Bigfoot (Model 36084-1) Parts List Bearings & Bushings 4607 Ball bearings (5x11x4mm)
Rustler 4X4 (Model ) Parts List
 Parts List") Parts shown in bold are optional accessories. Part categories and individual part listings are arranged alphabetically. Rustler 4X4 (Model 67064-1) Parts List Bearings & Bushings 4607 Ball bearings (5x11x4mm)
Parts shown in bold are optional accessories. Part categories and individual part listings are arranged alphabetically. Rustler 4X4 (Model 67064-1) Parts List Bearings & Bushings 4607 Ball bearings (5x11x4mm)
RJS2020 SPORT 3.2 1/10 PAN CAR KIT LESS ELECTRICS
 RJS2020 SPORT 3.2 1/10 PAN CAR KIT LESS ELECTRICS THANKS FOR BUYING THE RJ SPEED 1/10 SPORT 3.2 KIT. THE ASSEMBLY WILL NOT BE DIFFICULT IF YOU READ THE TEXT, LOOK AT THE PICTURES, AND THE EXPLODED VIEW
LENGTH WIDTH HEIGHT WHEELBASE WHEEL DIA. WHEEL WIDTH GROUND CLEARANCE
 RTR Hobby Grade Four Wheel Drive Splash-resistent Metal Diff. FUN-AFFORDABLE If you do not use it for any extended period of time (e.g. during storage), disconnect and remove the rechargeable batteries
A7741 Truggy Wheel, Yellow
 STEP H-01 Tire Mounting BAG H 1 2 A7780B XTT Tire, Blue Truggy Foam Insert Only sold with Tires A7741 Truggy Wheel, Yellow STEP H-02 Tire Gluing The Tires need to be glued to the wheels. This can be done
X-Maxx (Model ) Parts List
 Parts List") X-Maxx (Model 77076-4) Parts List Parts shown in bold are optional accessories. Part categories and individual part listings are arranged alphabetically. Prices are shown in US Dollars. Bearings & Bushings
X-Maxx (Model 77076-4) Parts List Parts shown in bold are optional accessories. Part categories and individual part listings are arranged alphabetically. Prices are shown in US Dollars. Bearings & Bushings
indicates Stress-Tech part
 ELAEENT AT tock # escription TX3301... hoton peed 2 otor...119 x1pc TX6160... Antenna Tube et...124 x5pcs TX6172... ront Axle...91 x2pcs TX6179... ear Axle et...9,123 x2pcs TX61 T.. Ball up et... x14pcs
OPERATING INSTRUCTIONS
 OPERATING INSTRUCTIONS Baja Bullet ESC Features: Forward, Brake & Reverse Micro Processor Control Input Voltage: 6V - 12V Frequency: 3Khz Continuous Current: 20Amps BEC Cutoff: 5V/2Amps Temperature Cutoff:
AC/DC LIPO CHARGER INSTRUCTION MANUAL
 DTXP4195 AC/DC LIPO CHARGER INSTRUCTION MANUAL The Onyx 150 AC/DC LiPo balancing charger is the perfect entry-level LiPo charger for modelers using up to 3S LiPo batteries. Inexpensive and very easy to
ASSEMBLY AND OPERATION MANUAL
 TM Length: 17-3/4" [450mm] Width: 12-5/8" [320mm] Height: 4-15/16" [125mm] Weight: 5lbs 6oz Wheelbase: 11-7/16" [290mm] Radio: 2 channel surface frequency Engine: Velocity.17 ASSEMBLY AND OPERATION MANUAL
RECOMMENDED TOOLS INCLUDED EQUIPMENT PRECAUTIONS
 Thank you for purchasing Pro-Line s Ambush Mini Scale Crawler! For Over 30 years, Pro-Line has designed and manufactured the best RC products in the world. This crawler has been developed from the ground
BIND ST-TRIM TH-TRIM ST-D/R
 4 4 4 4 BIND ST-TRIM TH-TRIM ST-D/R 1. Put the battery in the car. 2. Install the battery. 3. Turn on the transmitter. Connect firmly. 4. Turn on the electronic speed controller. ON OFF AX80084 UV Joint
ASSEMBLY AND OPERATION MANUAL
 ASSEMBLY AND OPERATION MANUAL Warranty DuraTrax will warranty this kit for 90 days after the purchase date from defects in materials or workmanship. DuraTrax will either repair or replace, at no charge,
Stampede (Model ) Parts List
 Parts List") Parts shown in bold are optional accessories. Part categories and individual part listings are arranged alphabetically. Stampede (Model 36054-1) Parts List Bearings & Bushings 4607 Ball bearings (5x11x4mm)
Parts shown in bold are optional accessories. Part categories and individual part listings are arranged alphabetically. Stampede (Model 36054-1) Parts List Bearings & Bushings 4607 Ball bearings (5x11x4mm)
BEFORE YOU START. XRAY Europe K Výstavisku 6992, Trenčín Slovakia EUROPE. XRAY USA RC America, 2030 Century Center Blvd #15 Irving, TX USA
 BEFORE YOU START The X12 is a high-quality, 1/12-pan car intended for persons aged 16 years and older with previous experience building and operating RC model racing cars. This is not a toy; it is a precision
ACTUAL SIZE (WHEN PRINTED AT 100%) 2x14MM FLAT HEAD SCREW. 2.5x8MM FLAT HEAD SCREW. 2.5x8MM SOCKET HEAD SCREW. 2.5x14MM SOCKET HEAD CAP SCREW
 2x14MM FLAT HEAD SCREW. 2.5x8MM FLAT HEAD SCREW. 2.5x8MM SOCKET HEAD SCREW. 2.5x14MM SOCKET HEAD CAP SCREW") ASSMLY AND MAINTNANC UID LPFUL INTS Avoid working over a deep pile carpet. If you drop a small part or screw, it may be diffi cult to fi nd. Place a mat or towel over your work area. This will prevent
ASSMLY AND MAINTNANC UID LPFUL INTS Avoid working over a deep pile carpet. If you drop a small part or screw, it may be diffi cult to fi nd. Place a mat or towel over your work area. This will prevent
BAG F STEP F-01 STEP F-02 STEP F-03. Front and Rear Clip Installation
 q STEP F-01 BAG F Front and Rear Clip Installation The Servo Link installed in Step B-03 was set to an approximate length. The correct length will vary depending on the type of servo used, the radio settings,
FRONT SUSPENSION GROUP 33A 33A-1 CONTENTS GENERAL DESCRIPTION... 33A-2 FRONT SUSPENSION DIAGNOSIS. 33A-3 LOWER ARM... 33A-13 SPECIAL TOOLS...
 33A-1 GROUP 33A FRONT SUSPENSION CONTENTS GENERAL DESCRIPTION......... 33A-2 DIAGNOSIS. 33A-3 INTRODUCTION TO DIAGNOSIS........................ 33A-3 DIAGNOSIS TROUBLESHOOTING STRATEGY...... 33A-3 SYMPTOM
FRONT SUSPENSION GROUP CONTENTS GENERAL INFORMATION FASTENER TIGHTENING SPECIFICATIONS GENERAL SPECIFICATIONS...
 33-1 GROUP 33 FRONT SUSPENSION CONTENTS GENERAL INFORMATION 33-2 FASTENER TIGHTENING SPECIFICATIONS 33-2 GENERAL SPECIFICATIONS 33-3 SERVICE SPECIFICATIONS 33-3 DIAGNOSIS 33-4 INTRODUCTION TO DIAGNOSIS
Stampede (Model ) Parts List
 Parts List") Stampede (Model 36054-1) Parts List Parts shown in bold are optional accessories. Part categories and individual part listings are arranged alphabetically. Prices are shown in US Dollars. Bearings & Bushings
Stampede (Model 36054-1) Parts List Parts shown in bold are optional accessories. Part categories and individual part listings are arranged alphabetically. Prices are shown in US Dollars. Bearings & Bushings
The Chameleon Trac II Patent Pending M-Series User s Manual
 The Chameleon Trac II Patent Pending M-Series User s Manual YOU MAY ALSO VIEW OUR GENERAL OPERATION VIDEO ONLINE AT: www.marionbrush.com Please read entire manual prior to using this system. Page 1 The
2103 NITRO RAIL DRAGSTER KIT
 203 NITRO RAIL DRAGSTER KIT THANKS FOR BUYING RJ SPEED S NITRO DRAG KIT. IT IS A LITEWEIGHT CAR MADE FOR STRAIGHT LINE DRAG RACING AND CAN BE BROKEN IF RUN INTO SOLID OBJECTS AT HIGH SPEED. YOU WILL NEED
Telluride 4X4 (Model ) Parts List
 Parts List") Telluride 4X4 (Model 67044-1) Parts List Parts shown in bold are optional accessories. Part categories and individual part listings are arranged alphabetically. Prices are shown in US Dollars. Bearings
Telluride 4X4 (Model 67044-1) Parts List Parts shown in bold are optional accessories. Part categories and individual part listings are arranged alphabetically. Prices are shown in US Dollars. Bearings
ASSEMBLY AND OPERATION MANUAL
 TM ASSEMBLY AND OPERATION MANUAL Warranty DuraTrax will warranty this kit for 90 days after the purchase date from defects in materials or workmanship. DuraTrax will either repair or replace, at no charge,
Contents. # HUDY Caster Clip Remover Tool. # HUDY Chassis Balancing Tool. # HUDY 3mm Turnbuckle Tool
 Contents Introduction 2 Radio Adjustments 3 Speed Control (ESC) Adjustments 3 Connecting the Motor 3 Motor Gearing 3 Rollout 5 Differential Adjustment 5 Tightening the Differentials 6 Loosening the Differentials
The following items are needed to install your Speed Kit. Phillips head screw driver 3/16" nut driver 1.5mm hex wrench
 BRUSHLESS SPEED KIT INSTALLATION INSTRUCTIONS REQUIRED TOOLS The following items are needed to install your Speed Kit. Phillips head screw driver 3/16" nut driver 1.5mm hex wrench 1. REMOVE STEERING LINKAGE
Use this NT Supplementary Instruction Sheet along with the standard NT1 Instruction Manual included in the kit.
 INSTRUCTION MANUAL SUPPLEMENTARY SHEET Use this NT1 2013 Supplementary Instruction Sheet along with the standard NT1 Instruction Manual included in the kit. New and Improved Parts All of these parts are
ASSOCIATED 1:10 SCALE GT MANUAL
 ASSOCIATED 0 SCALE GT MANUAL INSTRUCTION MANUAL FOR THE RC10GT GAS TRUCKS #7060, 7061, 7067, 7068, & 7090 ASSOCIATED S RC10GT-- 3 TIMES NORRCA WORLD CUP CHAMPION! 200 Thank you for purchasing this Team
GROUP 33A 33A-1 CONTENTS GENERAL DESCRIPTION... 33A-2 FRONT SUSPENSION DIAGNOSIS. 33A-3 LOWER ARM... 33A-13 SPECIAL TOOLS... 33A-5
 33A-1 GROUP 33A CONTENTS GENERAL DESCRIPTION 33A-2 DIAGNOSIS 33A-3 INTRODUCTION TO FRONT SUSPENSION DIAGNOSIS 33A-3 DIAGNOSIS TROUBLESHOOTING STRATEGY 33A-3 SYMPTOM CHART 33A-3 SYMPTOM PROCEDURES 33A-3
ASSEMBLY AND MAINTENANCE GUIDE. 2x10MM FLAT HEAD SCREW. 2x14MM FLAT HEAD SCREW. 2.5x8MM FLAT HEAD SCREW. 2.5x8MM SOCKET HEAD SCREW
 RUL AMLY AND MAINTNANC UID LPFUL INT Avoid working over a deep pile carpet. If you drop a small part or screw, it may be diffi cult to fi nd. Place a mat or towel over your work area. This will prevent
General Building Tips: A Good Dealer Is Extremely Important!! 1 Additional Items Needed For Operation. Tools Supplied
 Owner s Manual Thank you for choosing the Team Magic E4JR. The E4JR includes a large selection of the important specialty parts when compared to the previous versions. Before you start building your new
Rustler (Model ) Parts List
 Parts List") Parts shown in bold are optional accessories. Part categories and individual part listings are arranged alphabetically. Rustler (Model 37054-1) Parts List Bearings & Bushings 4607 Ball bearings (5x11x4mm)
Parts shown in bold are optional accessories. Part categories and individual part listings are arranged alphabetically. Rustler (Model 37054-1) Parts List Bearings & Bushings 4607 Ball bearings (5x11x4mm)
SUSPENSION 2-1 SUSPENSION TABLE OF CONTENTS
 XJ SUSPENSION 2-1 SUSPENSION TABLE OF CONTENTS page ALIGNMENT... 1 FRONT SUSPENSION... 7 page REAR SUSPENSION... 16 ALIGNMENT TABLE OF CONTENTS page AND WHEEL ALIGNMENT...1 DIAGNOSIS AND TESTING SUSPENSION
When You Want To Go Fast. Instruction Manual Part # 500,501 Jato Sportsman Nitro Funny Car Kit
 When You Want To Go Fast Instruction Manual Part # 500,501 Jato Sportsman Nitro Funny Car Kit If Our Name is On It, Rest Assured It's The Worlds Finest Read The Instruction Page 1 Here are "Tips and Tricks"
PLEASE READ INSTRUCTIONS CAREFULLY BEFORE ASSEMBLING THIS MODEL. KEEP THIS MANUAL FOR PARTS NUMBERS WHEN ORDERING.
 INSTRUCTION MANUAL PLEASE READ INSTRUCTIONS CAREFULLY BEFORE ASSEMBLING THIS MODEL. KEEP THIS MANUAL FOR PARTS NUMBERS WHEN ORDERING. REQUIRED FOR OPERATION THINGS NEEDED You will need to buy a few items
ASSEMBLY AND OPERATION MANUAL
 ASSEMBLY AND OPERATION MANUAL Warranty DuraTrax will warranty this kit for 90 days after the purchase date from defects in materials or workmanship. DuraTrax will either repair or replace, at no charge,
Slash: TQ 2.4GHz radio (Model 58024) Parts List Parts shown in bold are optional accessories. Part categories and individual part listings are arrange
 Parts List Parts shown in bold are optional accessories. Part categories and individual part listings are arrange") Slash: TQ 2.4GHz radio (Model 58024) Parts List Parts shown in bold are optional accessories. Part categories and individual part listings are arranged alphabetically. Prices are shown in US Dollars. Bearings
Slash: TQ 2.4GHz radio (Model 58024) Parts List Parts shown in bold are optional accessories. Part categories and individual part listings are arranged alphabetically. Prices are shown in US Dollars. Bearings
BEFORE YOU START CUSTOMER SUPPORT
 BEFORE YOU START The X10 is a high-quality, 1/10-pan car intended for persons aged 16 years and older with previous experience building and operating RC model racing cars. This is not a toy; it is a precision
OPERATING INSTRUCTIONS & ASSEMBLY MANUAL
 NICAD (Ni-Cd) - This term stands for rechargeable, nickel cadmium batteries. These batteries are most economical and can be recharged up to 500 times. FREQUENCY BAND - The FREQUENCY band is the radio frequency
Slash (Model 58024) Parts List
 Parts List") Parts shown in bold are optional accessories. Part categories and individual part listings are arranged alphabetically. Slash (Model 58024) Parts List Bearings & Bushings 4607 Ball bearings (5x11x4mm)
Parts shown in bold are optional accessories. Part categories and individual part listings are arranged alphabetically. Slash (Model 58024) Parts List Bearings & Bushings 4607 Ball bearings (5x11x4mm)
BEFORE YOU START. XRAY USA RCAmerica, 167 Turtle Creek Boulevard Suite C Dallas, Texas 75207, USA
 BEFORE YOU START The X12 is a high-quality, 1/12-pan car intended for persons aged 16 years and older with previous experience building and operating RC model racing cars. This is not a toy; it is a precision
7207 FRONT BULKHEAD, nylon FRONT BULKHEAD ALUMINUM SUPPORT HINGE PIN, inner, with clips, 1.675" pr GT RACING FRONT
 RC10GT & RTR GT MC 9 McCOY GLOW PLUG 1 3.9 2661 CLUTCH NUT CLIPS 6.7 3216 WASHER, #4 12 1.00 3719 NYLON WIRE TIES, 6" heavy duty 12 2.00 3720 NYLON TIES, 8", light duty for receiver 12 2.00 3721 SELF-TAPPING
INSTRUCTION MANUAL INSTRUCTION MANUAL
 INSTRUCTION MANUAL INSTRUCTION MANUAL Thank you for purchasing Pro-Line s PRO-Fusion SC 4 4! For Over 35 years, Pro-Line has designed and manufactured the best RC products in the world. This 1:10 scale
WARNING! Hard anodized, PTFE-coated shocks. Hard anodized, PTFE-coated MIP CVD's.
 200 Thank you for purchasing this Team Associated product. This manual contains steps and instructions you will use to set up your gas truck. Please read this entire manual before attempting to start your
ASSOCIATED 1:10 SCALE T3 MANUAL
 ASSOCIATED 0 SCALE T3 MANUAL INSTRUCTION MANUAL FOR THE RC10T3 ELECTRIC TRUCKS #7003, 7009, 7010, 7013, 7038, 7048 ASSOCIATED S RC10T3 TRUCK-- READER S CHOICE OF THE YEAR TIMES! Radio Control Car Action
1/10 Competition Ready to Run Truck Little Orchard St. San Jose CA,
 1/10 Competition Ready to Run Truck RC4WD WWW.RC4WD.COM 1855 Little Orchard St. San Jose CA, 95125 E-mail: rcrock@rc4wd.com Check out Precautions To Prevent Serious Personal injury and/or property damage,
KSKT RACING PRODUCTS
 KSKT RACING PRODUCTS ''KSK-B'' SPEC RACING CHASSIS ASSEMBLY INSTRUCTIONS 'The Leader in SK Racing' 1 CHASSIS KIT FEATURES Black Carbon Fiber Chassis Components 2.5 mm Thick Main Chassis Battery mounting
for the B3 Sport kit #9013
 All kit versions include: 2.40:1 transmission for effortless power handling. Molded composite chassis for better rigidity and Lexan B3 racing body. Quadra-symmetric suspension for greater stability and
2030 OUTLAW SPRINTER HARDWARE I.D. BUTTON HD. CAP SCREW BAG H1 CHASSIS KIT BAG H3 HARDWARE BAG L2 REAR AXLE PARTS BAG L4 FRONT TIRES
 THANKS FOR BUYING THE RJ SPEED OUTLAW SPRINTER KIT. IT IS COMPLETE LESS ELECTRICS, AND MADE FOR CARPET OR PAVEMENT RACING. IT REQUIRES A 540 OR 550 SIZE MOTOR, 4 OR 6 CELL BATTERY PACK, TWO CHANNEL RADIO
Scan courtesy of Vintagelosi.com
 r l OWNER'S MANUAL Scan courtesy of Vintagelosi.com Carefully read through all instructions to familiarize yourself with the parts, construction, techniques, and tuning tips outlined in this manual, Being
Rustler (Model ) Parts List
 Parts List") Rustler (Model 37054-1) Parts List Parts shown in bold are optional accessories. Part categories and individual part listings are arranged alphabetically. Prices are shown in US Dollars. Bearings & Bushings
Rustler (Model 37054-1) Parts List Parts shown in bold are optional accessories. Part categories and individual part listings are arranged alphabetically. Prices are shown in US Dollars. Bearings & Bushings
Pan Car Setup and Troubleshooting
 Pan Car Setup and Troubleshooting Problems can come up in the midst of competition. Either the car is not handling properly on the track or there are problems with equipment. Troubleshooting problems should
CALIFORNIA TRIMMER MOWER MAINTENANCE MANUAL
 CALIFORNIA TRIMMER MOWER MAINTENANCE MANUAL 2 Table of Contents Section 1: General Information Page Handle Assembly Instructions 4 Maintenance All Models 6 Oil Change Procedures All Models 9 Height Adjustment