MY-CUE VIM. Video in Motion for MyLink/CUE NTV-KIT495 BHM 06/28/17 NTV-DOC181
|
|
|
- Suzanna Johns
- 6 years ago
- Views:
Transcription


1 3950 NW 120 th Ave, Coral Springs, FL TEL FAX MY-CUE VIM Video in Motion for MyLink/CUE NTV-KIT495 BHM

 Green 10 Ground (-) Black 11 Output 1 (ACC OUT) White 18 GMLAN (to VEHICLE) Purple Preliminary Note Wire side Remaining")

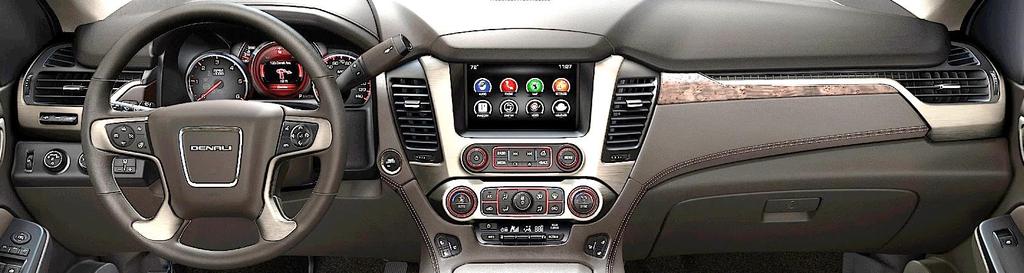
2 Overview The MY-CUE VIM enables video in motion, navigation destination input while in motion, and Bluetooth setup while in motion in select GM vehicles equipped with either the MyLink or CUE media systems. Note: Video playback is only supported on vehicles that have factory Rear Seat Entertainment installed. Kit Contents Power/GMLAN T-Harness NTV-HAR278 MY-CUE VIM pin out MY-CUE VIM Module NTV-ASY161 USB Cable (updates) NTV-CAB009 Pin # Description Color 1 12v Constant Power Yellow 9 GMLAN (to RADIO) Green 10 Ground (-) Black 11 Output 1 (ACC OUT) White 18 GMLAN (to VEHICLE) Purple Preliminary Note Wire side Remaining wires not mentioned here are not used for this install. The connectors that the installer needs to gain access to for the installation are located at the radio tuner module. This is most commonly found close to the DVD player and near the screen assembly. An image of the tuner module is shown below, with the plugs circled: 2 P a g e

.")
, and also (4x) T15 screws underneath.")
3 Dash Disassembly (Yukon) 1. Begin by raising the monitor with the button shown below (ignition is not required). Leave the monitor in the upright position during dash disassembly. 2. Remove the dash panel on the passenger side above the glove box. It is secured with clips only and pulls straight out (towards the rear of the vehicle). 3. Remove the underdash on the driver s side (beneath the steering wheel, not pictured). This requires that you remove (2x) Torx T15 screws hidden beneath the fuse panel cover on the left side of the dash (hidden by the driver s door), and also (4x) T15 screws underneath. After the screws have been removed, the dash panel will pull off straight towards you. 4. Remove (1x) 7mm screw from the panel that secures the push to start button, and pry the panel from the sub-dash. 3 P a g e

.")
4 5. Lift the center console armrest and remove the large trim panel containing the cupholders, 12v plugs and seat heaters/coolers. It is secured with clips only. Disconnect all associated plugs and set this trim piece aside. 6. Remove (2x) 7mm screws that secure the climate control onto the sub dash (one on each lower corner). After the screws have been removed, the climate control assembly panel will pull straight out towards you (clips secure it snugly). Remove all connectors and set the panel 7. The radio tuner module is located just beneath the DVD player, behind this panel. Proceed to Installation to complete the install. 4 P a g e


5 Installation Note: Verify that this vehicle has RSE (rear seat entertainment) AND plays video on the FRONT screen while in park BEFORE installing this module! 1. Locate the gray, 20-pin factory connector located at the factory tuner module and disconnect it. 2. Connect the provided Power/GMLAN T-Harness in between the radio and the factory gray 20-pin harness. 3. Connect the VIM module to the 18-pin connector, and secure it inside the dash with zipties or Velcro. Be sure not to affect any motorized monitor arms (if equipped). 4. Reinstall the dash pieces and proceed to My-CUE VIM Operation to test for proper functionality. NOTE: no other wires or RCA plugs are used for this install. Installing an older My-CUE VIM without the Plug & Play T-harness? Use red for power and black for ground (green plug), and split the OEM GM-LAN green wire, PIN 14 (gray plug) in half. Connect the radio side of the cut wire to PIN 9 and the car side of the cut wire to PIN 18 of the module. 5 P a g e

6 My-CUE VIM Operation To toggle Video in Motion*, press the Rear Defrost button twice within 1 second. This will enable any video to continue playing while driving. This feature will reset upon every key cycle. 2x 6 P a g e
MY-CUE VIM Video in Motion for MyLink/CUE NTV-KIT495
 3950 NW 120 th Ave, Coral Springs, FL 33065 TEL 561-955-9770 FAX 561-955-9760 MY-CUE VIM Video in Motion for MyLink/CUE NTV-KIT495 BHM Overview The MY-CUE VIM enables video in motion in select 2013+ GM
PCM3.1 XG-CAM NTV-KIT375/383/384/385
 3950 NW 120 th Ave, Coral Springs, FL 33065 TEL 561-955-9770 FAX 561-955-9760 www.nav-tv.com info@nav-tv.com PCM3.1 XG-CAM NTV-KIT375/383/384/385 Overview The PCM3.1 XG-CAM integrates an aftermarket camera
Mazda-CAM 2. Reverse camera kit for select Mazda NTV-KIT812 BHM 04/06/17 NTV-DOC294
 3950 NW 120 th Ave, Coral Springs, FL 33065 TEL 561-955-9770 FAX 561-955-9760 Mazda-CAM 2 Reverse camera kit for select Mazda NTV-KIT812 BHM Overview The Mazda-CAM 2 integrates a single reverse camera
PCM3.1 XG-CAM NTV-KIT375/383/384/385
 3950 NW 120 th Ave, Coral Springs, FL 33065 TEL 561-955-9770 FAX 561-955-9760 www.nav-tv.com info@nav-tv.com PCM3.1 XG-CAM NTV-KIT375/383/384/385 Overview The PCM3.1 XG-CAM integrates an aftermarket camera
GM IOH-PRG/IOM-PRG NTV-KIT628/KIT722
 3950 NW 120 th Ave, Coral Springs, FL 33065 TEL 561-955-9770 FAX 561-955-9760 GM IOH-PRG/IOM-PRG Reverse camera programmer for select GM vehicles equipped with MyLink IOH or IOM Radio IOH = IO5/IO6 (8
MOST-H.U.R. MB/MB-S. Mercedes Head Unit Replacement Interface NTV-KIT421/501. DS, BM 10/18/18 NTV-DOC141 rb10
 3950 NW 120 th Ave, Coral Springs, FL 33065 TEL 561-955-9770 FAX 561-955-9760 MOST-H.U.R. MB/MB-S Mercedes Head Unit Replacement Interface NTV-KIT421/501 DS, BM rb10 Overview NAV-TV s OPTI-1 is a radio
MOST-H.U.R. MB/MB-S. Mercedes Head Unit Replacement Interface NTV-KIT421/501. DS, BM 11/10/14 NTV-DOC141 rb8
 3950 NW 120 th Ave, Coral Springs, FL 33065 TEL 561-955-9770 FAX 561-955-9760 MOST-H.U.R. MB/MB-S Mercedes Head Unit Replacement Interface NTV-KIT421/501 DS, BM 11/10/14 Overview NAV-TV s OPTI-1 is a radio
PK-SIEN11 Toyota Sienna Piranha System
 Toyota Sienna Installation Guide NOTICE OF INTENDED INSTALLATION AND USE PK-SIEN11 Toyota Sienna Piranha System THE ROSEN MULTI-MEDIA NAVIGATION SYSTEMS CONTAIN AN INTERNAL VIDEO PLAYER, WHICH IS NOT INTENDED
For additional technical tips, please visit
 NOTICE OF INTENDED INSTALLATION AND USE THE ROSEN MULTI-MEDIA NAVIGATION SYSTEMS CONTAIN AN INTERNAL VIDEO PLAYER, WHICH IS NOT INTENDED FOR VIEWING BY THE DRIVER. THE VIDEO PLAYER IS DISABLED WHEN THE
(1) Remote Control with (2) AAA Batteries
 Remote Control with (2) AAA Batteries") TOOLS REQUIRED: KIT CONTENTS: E14 Torx (1) Remote Control with (2) AAA Batteries (2) Wireless Headphones with (4) AAA Batteries (2) DVD Headrest Units Owner s Manual (1) Owner s Manual (1) Power / Audio
TOOLS REQUIRED: KIT CONTENTS: E14 Torx (1) Remote Control with (2) AAA Batteries (2) Wireless Headphones with (4) AAA Batteries (2) DVD Headrest Units Owner s Manual (1) Owner s Manual (1) Power / Audio
INSTALLATION INSTRUCTIONS
 Backup Camera Interface (Kit # 9002-7762) Please read thoroughly before starting installation and check that kit contents are complete. Items Included in the Kit: Cam T-Harness Plug & Play I/O T-Harness
For additional technical tips, please visit
 NOTICE OF INTENDED INSTALLATION AND USE THE ROSEN MULTI-MEDIA NAVIGATION SYSTEMS CONTAIN AN INTERNAL VIDEO PLAYER, WHICH IS NOT INTENDED FOR VIEWING BY THE DRIVER. THE VIDEO PLAYER IS DISABLED WHEN THE
Push Start Ignition (05-10 All) Installation
 Installation") Tools Required: Phillips head screwdriver Flat head screwdriver Ratchet 7mm Socket Torx T20 bit Wire strippers/cutters Hand file Needle nose pliers Installation Instructions: Push Start Ignition (05-10
Tools Required: Phillips head screwdriver Flat head screwdriver Ratchet 7mm Socket Torx T20 bit Wire strippers/cutters Hand file Needle nose pliers Installation Instructions: Push Start Ignition (05-10
AXi-GMBOX1 INSTALLATION MANUAL
 AXi-GMBOX1 INSTALLATION MANUAL PLEASE REVIEW THIS INSTALLATION MANUAL CAREFULLY BEFORE BEGINNING ANY WORK COMPATIBLE PLUG & PLAY WIRING HARNESSES AXI-GM1-C AXI-GMMLX-C AXI-GMQUAD1-C AXI-GMDTS-C AXI-GMSTS-C
* JBL Audio equipped vehicles will require additional part # DP-TYJBL1 audio interface NOTICE OF INTENDED INSTALLATION AND USE
 * JBL Audio equipped vehicles will require additional part # DP-TYJBL1 audio interface NOTICE OF INTENDED INSTALLATION AND USE THE ROSEN MULTI-MEDIA NAVIGATION SYSTEMS CONTAIN AN INTERNAL VIDEO PLAYER,
* Premium Audio equipped vehicles will require additional part # DP-HD0822P audio interface NOTICE OF INTENDED INSTALLATION AND USE
 * Premium Audio equipped vehicles will require additional part # DP-HD0822P audio interface NOTICE OF INTENDED INSTALLATION AND USE THE ROSEN MULTI-MEDIA NAVIGATION SYSTEMS CONTAIN AN INTERNAL VIDEO PLAYER,
VOH681A Drop Down Video Monitor VOH682A Drop Down TV / Video Monitor OPEN. Installation Guide
 VOH681A Drop Down Video Monitor VOH682A Drop Down TV / Video Monitor ON OFF AUTO OPEN Installation Guide Important Notice It is unlawful in most jurisdictions for a person to drive a motor vehicle which
Nissan Pathfinder (without NAV) (with color screen) HG
 (with color screen) HG") Installation instructions for part 99-7627HG Nissan Pathfinder 2013-2016 (without NAV) (with color screen) 99-7627HG KIT FEATURES ISO DIN radio provision with pocket ISO DDIN radio provision Painted to
Installation instructions for part 99-7627HG Nissan Pathfinder 2013-2016 (without NAV) (with color screen) 99-7627HG KIT FEATURES ISO DIN radio provision with pocket ISO DDIN radio provision Painted to
I want to try my hand here at doing a TacoBill write up so here it goes.
 Here is part 3 of my tutorial for the conversion of my Shaker 1000 to the Kenwood DNX7100 Navigation / Head Unit. With the 7100, my new system will include the Kenwood I-pod Adapter (P.I.E. KNW/USB-AV),
AXi-GM2-R INSTALLATION MANUAL
 Rev. 4.0 081915 AXi-GM2-R INSTALLATION MANUAL PLEASE REVIEW THIS INSTALLATION MANUAL PLUG & PLAY WIRING HARNESS COMPATIBLE WITH AXi-RGB1 AXi-RGB2 AXi-RGB3 Tech Support: 844-AXX-ESSI WWW.AXXESSINTERFACES.COM
Conflicts: Toyota Tundra CrewMax w/non Sunroof Overhead Video. Part Number: Accessory Code: ED80.
 Toyota Tundra CrewMax w/non Sunroof 2011-8.5 Overhead Video Part Number: 00016-00125-07 Accessory Code: ED80 Conflicts: 1.) Third Passenger Front Seating 2.) Sunroof General Applicability: Non Sunroof
Conflicts: Vehicles with no sunroof or dual sunroof
 Toyota Sienna (Single Sunroof) 2012-8.5 Overhead Video Part Number: 00016-00125 -11 Accessory Code: ED9 Conflicts: Vehicles with no sunroof or dual sunroof General Applicability: 2011 Sienna SMR Kit Contents:
TOYOTA CAMRY HANDS FREE BLU LOGIC Preparation
 TOYOTA CAMRY 2008- HANDS FREE BLU LOGIC Preparation Part #: PT923-00111 Conflicts: JBL Audio, Factory Navigation NOTE: Part number of this accessory may not be the same as the part number shown. Kit Contents:
OE Style Touch Screen Navigation
 2010-2014 OE Style Touch Screen Navigation Step 1 Begin by removing the shift knob on manual transmission equipped vehicles or the shifter trim bezel on an automatic car. Step 2 Open the center console.
Conflicts: Vehicles without a sunroof Vehicles with a single sunroof
 Toyota Sienna (Dual Sunroof) 2011-10.2 Overhead Video Part Number: 00016-00110 00016-00110-17 Fit Kit 00016-00120 00016-00120-17 Fit Kit Accessory Code: ED5 Conflicts: Vehicles without a sunroof Vehicles
CI-C1-RNSE. Compatible with navigation systems Audi Navi Plus RNS-E
 c.logic-interface Compatible with navigation systems Audi Navi Plus RNS-E Only for vehicles WITHOUT factory rear-view camera Product features full plug and play multimedia interface 1 AV-input with separate
Conflicts: Highlander without sunroof
 Toyota Highlander (Sunroof) 2011-8.5 Overhead Video Part Number: 00016-00125; Fit Kit-00016-00125-02 Accessory Code: ED9 Conflicts: Highlander without sunroof Kit Contents: Item # Qty. Component Description
AXi-FL24-R INSTALLATION MANUAL
 Rev. 4.0 081915 AXi-FL24-R INSTALLATION MANUAL PLEASE REVIEW THIS INSTALLATION MANUAL CAREFULLY BEFORE BEGINNING ANY WORK PLUG & PLAY WIRING HARNESS COMPATIBLE WITH AXi-RGB1 AXi-RGB2 AXi-RGB3 Tech Support:
TOYOTA VENZA HANDS FREE BLU LOGIC Preparation
 TOYOTA VENZA 2009- HANDS FREE BLU LOGIC Preparation Part #: PT923-00111 Conflicts: JBL Audio NOTE: Part number of this accessory may not be the same as the part number shown. Kit Contents: For kits manufactured
Conflicts: JBL Audio, Factory Navigation, Accessory XM Satellite Radio, and Accessory Sirius Satellite Radio
 TOYOTA YARIS SEDAN 2008- HANDS FREE BLU LOGIC Preparation Part #: PT923-00111 NOTE: Part number of this accessory may not be the same as the part number shown. Conflicts: JBL Audio, Factory Navigation,
NNG-Honda 3. Navigation interface for New Honda Accord/Odyssey NTV-KIT555/584 NTV-DOC225
 3950 NW 120 th Ave, Coral Springs, FL 33065 TEL 561-955-9770 FAX 561-955-9760 NNG-Honda 3 Navigation interface for New Honda Accord/Odyssey NTV-KIT555/584 NTV-DOC225 This is a NEW VERSION (HONDA 3) for
TOYOTA TACOMA HANDS FREE BLU LOGIC Preparation. Item 5 Item 6 Item 7 Item 8. Item 4. General Applicability Note: Recommended Tools
 TOYOTA TACOMA 2008- HANDS FREE BLU LOGIC Preparation Part #: PT923-00098 Conflicts: JBL Audio, Factory Navigation Kit Contents: NOTE: Part number of this accessory may not be the same as the part number
GROM Interface Installation into Nissan and Infiniti cars using NIS2 vehicle specific harness
 GROM Interface Installation into Nissan and Infiniti cars using NIS2 vehicle specific harness Tools needed 1. The wire crimp tool 2. Panel trim removal tool (optional) 3. Philips screwdriver Picture 1:
2015 Copyright Maxspeed-Motorsports.com
 1 Porsche PCM 3.1 Backup Camera Installation Instructions. Thank you for purchasing your product at www.maxspeedmotorsports.com Before you start please understand that these installation instructions are
If technical support is required, please contact Advent Technical Support at
 Document 128-9015A Created 12/12/11 Kit Contents: Item # Qty. Component Description 1 2 Headrest Assembly 2 2 Cables # 3 3 1 Power Cord # 9 4 1 FM Antenna 5 1 Control Box 6 2 IR Headphones 7 2 Remote Control
General Applicability Note: Recommended Tools. Personal & Vehicle Protection Safety Goggles Seat Covers Floor Covers Special Tools. Installation Tools
 TOYOTA HIGHLANDER/HIGHLANDER HV 2008- Preparation Part #: PT923-00111 Conflicts: JBL Audio, Factory Navigation NOTE: Part number of this accessory may not be the same as the part number shown. Kit Contents:
SCION xb HEADREST DVD RSE Section I Installation Preparation. Part Number: PT
 Section I Installation Preparation Part Number: PT900-52080 Kit Contents Item # Quantity Reqd. Description 1 2 DVD Headrest Unit 2 2 Headrest Extension Cables 3 1 Audio Interface Module 4 1 Audio Interface
393: Multimedia system for the rear seat Multimedia system for the rear seat
 393: Multimedia system for the rear seat S80 (07-), 2008, B8444S, TF-80SC AWD, L.H.D, YV1AH852881073834, 073834 4/1/2013 PRINT 393: Multimedia system for the rear seat Multimedia system for the rear seat
Tools Needed: 7mm Socket socket wrench socket extension interior removal tool wire cutter electical tape Wrangler Raxiom Navigation
 2007-2010 Wrangler Raxiom Navigation Contents: (1) - Raxiom Head Unit (1) - Headphone Jack With Wire (A) (1) - GPS Antennae With Wire (B) (1) - Amplifier Pre-Outs Wire Harness (C) (1) - External Microphone
STEPS FOR REMOVING REAR ASHTRAY & CUP HOLDER, CENTER ARMREST, E- BRAKE CONSOLE, FRONT ASHTRAY, LOWER CENTER CONSOLE AND GLOVE BOX
 Please give credit where credit is due! This DIY was completed ENTIRELY by the hardest working VW Vortex moderator on the site!! Gary Thompson, Ph.D. - vortex ID VGRT6, email address vgrt6@yahoo.com. Please
SCION tc Navigation System Preparation. Part Number: PT
 Preparation Part Number: PT611-21111 Kit Contents Item # Quantity Reqd. Description 1 1 Navigation System 2 1 GPS Antenna 3 1 Bluetooth Antenna 4 1 Wire Harness (Reverse / Park Brake) 5 1 RCA Relay Cable
Conflicts: Vehicles with a sunroof
 Toyota 4Runner Non/MR 2010-10.2 Overhead Video Part Number: 00016-00110; Fit Kit -00110-15, Beige 00016-00120; Fit Kit -00120-15, Gray Accessory Code: ED6 Conflicts: Vehicles with a sunroof Kit Contents:
2017 Price List Version
 CARRAD Y IMPORTS LTD. 220 VICEROY ROAD, UNIT 5 CONCORD, ONT. L4K 3C2 PH : 905-669-1439 FAX : 905-669-7047 TOLL FREE : 1-888-802-3310 F.C.T. O FFIC E PH : 519-656-1124 FAX : 519-656-1125 2014-2015 Price
xpressstart Mercedes Solution Mercedes Benz S and CL Class
 DIGITAL REMOTE START SYSTEM WWW.XPRESSKIT.COM MADE IN THE USA xpressstart Mercedes Solution 2007-2012 Mercedes Benz S and CL Class Tools you will need -T-25 Torx Driver -Panel Removal tool -3/4 Drill bit
INSTALLATION GUIDE AV7900 Dual Multimedia Headrest Replacement System
 INSTALLATION GUIDE AV7900 Dual Multimedia Headrest Replacement System NOTICE OF INTENDED INSTALLATION AND USE AV7900 VIDEO PRODUCTS ARE NOT INTENDED FOR VIEWING BY THE DRIVER, AND ARE TO BE INSTALLED ONLY
by B6 Boost Volkswagen -> (46) Golf & Jetta V (13) Passat B6 (11) Passat B5.5 (4) Phaeton (8) Eurovan (7) Touareg (3) Audi
 Golf & Jetta V (13) Passat B6 (11) Passat B5.5 (4) Phaeton (8) Eurovan (7) Touareg (3) Audi") 1 of 10 Top» Volkswagen» Passat B6» European Cup Holder DIY Installations European Cup Holder by B6 Boost Volkswagen -> (46) Golf & Jetta V (13) Passat B6 (11) Passat B5.5 (4) Phaeton (8) Eurovan (7) Touareg
1 of 10 Top» Volkswagen» Passat B6» European Cup Holder DIY Installations European Cup Holder by B6 Boost Volkswagen -> (46) Golf & Jetta V (13) Passat B6 (11) Passat B5.5 (4) Phaeton (8) Eurovan (7) Touareg
Chevy Equinox / GMC Terrain 2013-up (with color display) G
 G") INSTALLATION INSTRUCTIONS FOR PART 99-3308G Chevy Equinox / GMC Terrain 2013-up (with color display) 99-3308G KIT FEATURES ISO DIN radio provision with pocket ISO DDIN radio provision Painted gray to match
INSTALLATION INSTRUCTIONS FOR PART 99-3308G Chevy Equinox / GMC Terrain 2013-up (with color display) 99-3308G KIT FEATURES ISO DIN radio provision with pocket ISO DDIN radio provision Painted gray to match
Jeep Wrangler Rear Vision Camera, 2007 Current (Kit # )
") Items Included in the Kit Camera Chassis Harness Zip lock bag with 15 Wire Ties & 3 Push Nuts These Instructions 22--pin white connector w/ video RCA (for factory display radio) Jeep Wrangler Rear Vision
Items Included in the Kit Camera Chassis Harness Zip lock bag with 15 Wire Ties & 3 Push Nuts These Instructions 22--pin white connector w/ video RCA (for factory display radio) Jeep Wrangler Rear Vision
Toyota 4RUNNER With/MR Overhead Video
 Toyota 4RUNNER With/MR 2010-10.2 Overhead Video Part Number: 00016-00110; Fit Kit-00110-14, Beige 00016-00120; Fit Kit-00120-14, Gray Accessory Code: ED7 Conflicts: Vehicles without a sunroof Kit Contents:
Jeep Cherokee Latitude/Limited 2014-up
 Installation instructions for part 99-6526 REV. 5/23/2017 INST99-6526 KIT FEATURES ISO DDIN radio provision Included interface shows climate and menu info on the aftermarket radio screen. Painted scratch-resistant
INSTALLATION GUIDE Car Show Dual DVD Headrest Replacement System
 INSTALLATION GUIDE Car Show Dual DVD Headrest Replacement System NOTICE OF INTENDED INSTALLATION AND USE CAR SHOW VIDEO PRODUCTS ARE NOT INTENDED FOR VIEWING BY THE DRIVER, AND ARE TO BE INSTALLED ONLY
SCION TC HANDS FREE BLU LOGIC Preparation
 SCION TC 2008- HANDS FREE BLU LOGIC Preparation Part #: PT923-00099 Conflicts: JBL Audio NOTE: Part number of this accessory may not be the same as the part number shown. Kit Contents: For kits manufactured
Chevrolet Camaro 2010-up S-LC
 INSTALLATION INSTRUCTIONS FOR PART 99-10S-LC APPLICATIONS Chevrolet Camaro 2010-up 99-10S-LC KIT FEATURES DIN and DDIN head unit provision Painted silver to match factory dash AXXESS Interface included
TOYOTA tc HANDS FREE BLU LOGIC Preparation
 TOYOTA tc 2011- HANDS FREE BLU LOGIC Preparation Part #: PT923-00111 Conflicts: JBL Audio, Factory Navigation NOTE: Part number of this accessory may not be the same as the part number shown. Kit Contents:
B. Land Rover Range Rover
 99-9402B INSTALLATION INSTRUCTIONS KIT FEATURES ISO DIN radio provision with pocket ISO DDIN radio provision Painted black KIT COMPONENTS A) Radio trim panel B) Radio brackets C) Radio bracket adapters
INSTALLATION GUIDE AV7000 Dual DVD Headrest Replacement System
 INSTALLATION GUIDE AV7000 Dual DVD Headrest Replacement System NOTICE OF INTENDED INSTALLATION AND USE ROSEN ENTERTAINMENT SYSTEMS VIDEO PRODUCTS ARE NOT INTENDED FOR VIEWING BY THE DRIVER, AND ARE TO
Accessory Fuse Block. Please read this entire manual before proceeding with installation.
 Accessory Fuse Block Please read this entire manual before proceeding with installation. Kit Components: (1) Fuse Block Assembly (1) Harness (1) Positive power cable (1) Negative power cable (5) Pigtails
GMOS-LAN-012. GM LAN-29 Data Interface 2006-up* *Visit AxxessInterfaces.com for up-to-date vehicle specific applications.
 GMOS-LAN-012 INSTALLATION INSTRUCTIONS INTERFACE FEATURES Provides accessory power (12-volt 10-amp) Maintains the retained accessory power (R.A.P.) feature Can be used in non-amplified, or analog/digital
RETAINS STEERING WHEEL CONTROLS, ONSTAR TM, ONSTAR TM BLUETOOTH, XM TM SATELLITE AND MORE!
 Owner's guide GM5 & Alpine radio RETAINS STEERING WHEEL CONTROLS, ONSTAR TM, ONSTAR TM BLUETOOTH, XM TM SATELLITE AND MORE! PRODUCTS REQUIRED idatalink Maestro RR Radio Replacement Interface GM5+ Installation
TOYOTA TUNDRA HANDS FREE BLU LOGIC Preparation
 TOYOTA TUNDRA 2008- HANDS FREE BLU LOGIC Preparation Part #: PT923-00111 Conflicts: JBL Audio NOTE: Part number of this accessory may not be the same as the part number shown. Kit Contents: For kits manufactured
 INSTALLATION INSTRUCTIONS Accessory Application Publications No. All 38163 XM SATELLITE RADIO SYSTEM 2008 ODYSSEY Issue Date OCT 2007 PARTS LIST XM Radio Attachment (sold separately): P/N 08B15-SHJ-100A
C1-NTG2. Compatible with Mercedes Benz Comand APS NTG1 and Comand APS NTG2 navigation systems
 c.logic lite-interface Compatible with Mercedes Benz Comand APS NTG1 and Comand APS NTG2 navigation systems Product features full plug and play multimedia interface 1 AV-input with separate IR-control
Installation instructions, accessories - Bluetooth XC / Volvo Car Corporation Göteborg, Sweden
 XC90 Section Group Weight(Kg/Pounds) Year Month 3 393 1/2.2 2008 03 XC90 2003, XC90 2003, XC90 2004, XC90 2004, XC90 2005, XC90 2005, XC90 2006, XC90 2006, XC90 2007, XC90 2007, XC90 2008, XC90 2008, XC90
INSTALLATION INSTRUCTIONS
 2007-Current Jeep Wrangler 360º System for Factory Display Radios (Kit # AVMS-3701) Please read thoroughly before starting installation and check that kit contents are complete. Items Included in the Kit:
INSTALLATION INSTRUCTIONS
 2007-Current Jeep Wrangler 360º System for Factory Display Radios (Kit # AVMS-3701v2) Please read thoroughly before starting installation and check that kit contents are complete. Items Included in the
AXi-HA16P-R INSTALLATION MANUAL
 Rev. 4.0 081915 AXi-HA16P-R INSTALLATION MANUAL PLEASE REVIEW THIS INSTALLATION MANUAL CAREFULLY BEFORE BEGINNING ANY WORK PLUG & PLAY WIRING HARNESS COMPATIBLE WITH AXi-RGB2 AXi-RGB3 Tech Support: 844-AXX-ESSI
E90 AVIN Non-iDrive Head Unit Install with Logic 7 Integration
 E90 AVIN Non-iDrive Head Unit Install with Logic 7 Integration Option 1: If you prefer to go an easier route you can order our BMW MOST interface. It would make the install a lot easier and will not require
Parts & Service Information K810054C PRODUCT IMPROVEMENT
 Parts & Service Information K810054C Disclaimer: This bulletin release is for informational purposes only and is not factory authorization for warranty repairs or warranty claim submission. PRODUCT IMPROVEMENT
INSTALLATION INSTRUCTIONS
 INSTALLATION INSTRUCTIONS Accessory Application Publications No. XM RADIO SYSTEM (EXCEPT LX) 2006 ODYSSEY All 30392 Issue Date AUG 2005 PARTS LIST XM Radio Attachment (sold separately): P/N 08B15-SHJ-100
XM Adapter Cable (P/N: ) MUST be used for this vehicle.
 MUST be used for this vehicle.") TOYOTA 2013 - Part Number:00016-00076 Code: RX30 XM Adapter Cable (P/N: 00016-00076-10) MUST be used for this vehicle. Conflicts 1. Entune 2. Vehicle s with factory XM radio Kit Contents Item # Qty Description
TOYOTA 2013 - Part Number:00016-00076 Code: RX30 XM Adapter Cable (P/N: 00016-00076-10) MUST be used for this vehicle. Conflicts 1. Entune 2. Vehicle s with factory XM radio Kit Contents Item # Qty Description
INSTALLATION INSTRUCTIONS
 Rear Vision System Aftermarket Display 2007-Current Chevrolet Silverado, Silverado HD; GMC Sierra, Sierra HD (Kit part number 9002-9560) Kit Contents: Chassis Harness with RCA (Note: In some cases a RCA
INSTALLATION INSTRUCTIONS
 Rear Vision System Aftermarket Display 2007-Current Chevrolet Silverado, Silverado HD; GMC Sierra, Sierra HD (Kit part number 9002-9560) Kit Contents: Camera/Module/Bezel Assembly Chassis Harness with
* * Inside Ram. Tools Required 1500, 2500, 3500 IMPORTANT
 Revision 10/07/14 IMPORTANT Before starting, compare items on your invoice with items received. Carefully check through packaging material. If any item is missing, please call Crutchfield Technical Support
BEN-HUR Bentley head unit replacement kit (INSTALLATION MANUAL)
") JH (rev 1.4) 31-03-17 BEN-HUR Bentley head unit replacement kit (INSTALLATION MANUAL) DO NOT ATTEMPT TO FIT THE BEN-HUR UNTIL YOU HAVE READ THE INSTALL MANUAL Overview The BEN-HUR allows you to install
JH (rev 1.4) 31-03-17 BEN-HUR Bentley head unit replacement kit (INSTALLATION MANUAL) DO NOT ATTEMPT TO FIT THE BEN-HUR UNTIL YOU HAVE READ THE INSTALL MANUAL Overview The BEN-HUR allows you to install
AX-ADGM01. GM Data Interface 2006-up* *Visit AxxessInterfaces.com for up-to-date vehicle specific applications.
 AX-ADGM01 INSTALLATION INSTRUCTIONS INTERFACE FEATURES Provides accessory power (12-volt 10-amp) Maintains the retained accessory power (R.A.P.) feature Provides NAV outputs (parking brake, reverse, speed
SELECT YOUR INSTALL GUIDE
 SELECT YOUR INSTALL GUIDE 20130924 20130924 INSTALL GUIDE WITH MUS1 DASH KIT RETAINS STEERING WHEEL CONTROLS, SYNC TM VOICE COMMANDS, SYNC TM BLUETOOTH, CLIMATE CONTROLS AND MORE! INSTALL GUIDE WITH FO1
RETAINS STEERING WHEEL CONTROLS, ONSTAR TM, ONSTAR TM BLUETOOTH, XM TM SATELLITE AND MORE!
 Owner's guide GM5 & Kenwood radio RETAINS STEERING WHEEL CONTROLS, ONSTAR TM, ONSTAR TM BLUETOOTH, XM TM SATELLITE AND MORE! PRODUCTS REQUIRED idatalink Maestro RR Radio Replacement Interface GM5 Installation
INSTALLATION INSTRUCTIONS
 2007-Current Jeep Wrangler 360º System for Factory MyGig Display (Kit # AVMS-3701) Please read thoroughly before starting installation and check that kit contents are complete. Items Included in the Kit:
INSTALLATION INSTRUCTIONS
 INSTALLATION INSTRUCTIONS Accessory Application Publications No. / IN-DASH (LX) 005 PILOT AII 806 Issue Date SEP 004 PARTS LIST Cassette Player (sold separately): P/N 08A03-5B-050 In-Dash CD Changer (sold
INSTALLATION INSTRUCTIONS
 9002-6513 Rear Vision System W/ Zoom Aftermarket and Factory 8.4 Touch Screen Display (Factory Display requires Chrysler/Dodge dealer to activate) 2009 2012 RAM (Part B) 2013 Current RAM (Part A) NOTE:
VDS102T DROP-DOWN VIDEO MONTOR
 VDS102T DROP-DOWN VIDEO MONTOR ON OFF AUTO Installation Guide Important Notice An LCD panel and/or video monitor may be installed in a motor vehicle and visible to the driver if the LCD panel or video
GENUINE PARTS INSTALLATION INSTRUCTIONS
 GENUINE PARTS INSTALLATION INSTRUCTIONS 1. 2. 3. DESCRIPTION: APPLICATION: PART NUMBER: Accent light Kit Cube (MY2013+) 999F3 AW000 - Universal Accent Lighting Kit. 4. KIT CONTENTS: Item QTY Description
Jeep Wrangler Rear Vision Camera, 2007 Current (Kit # )
") Jeep Wrangler Rear Vision Camera, 2007 Current (Kit # 9002-8837) Items Included in the Kit Required Tools & Supplies Camera Chassis Harness Zip lock bag with 15 Wire Ties & 3 Push Nuts Program Module 22--pin
Jeep Wrangler Rear Vision Camera, 2007 Current (Kit # 9002-8837) Items Included in the Kit Required Tools & Supplies Camera Chassis Harness Zip lock bag with 15 Wire Ties & 3 Push Nuts Program Module 22--pin
INSTALLATION INSTRUCTIONS
 Jeep Wrangler Rear Vision Camera, 2007 Current (Kit # 9002-8838) Items Included in the Kit Camera Chassis Harness Zip lock bag with 15 Wire Ties & 3 Push Nuts These Instructions Required Tools & Supplies
AXi-HON1-R INSTALLATION MANUAL
 Rev. 4.0 081915 AXi-HON1-R INSTALLATION MANUAL PLEASE REVIEW THIS INSTALLATION MANUAL CAREFULLY BEFORE BEGINNING ANY WORK PLUG & PLAY WIRING HARNESS COMPATIBLE WITH AXi-RGB1 AXi-RGB2 AXi-RGB3 Tech Support:
PART NUMBER: H630SSJ000. Kit Contents: A. Amplifier with Bracket (1) D. Badge (2) with push nuts (4)
 D. Badge (2) with push nuts (4)") Kit Contents: A. Amplifier with Bracket (1) D. Badge (2) with push nuts (4) E. Clip B. Harness (1) C. Cable tie (8) F. Mounting Hardware (2) G. Replacement Speaker (2) H. HVAC Duct extension (2) IMPORTANT:
Kit Contents: A. Amplifier with Bracket (1) D. Badge (2) with push nuts (4) E. Clip B. Harness (1) C. Cable tie (8) F. Mounting Hardware (2) G. Replacement Speaker (2) H. HVAC Duct extension (2) IMPORTANT:
Rear Vision System Tailgate Emblem Camera Aftermarket Display 2009-Current Ford F-150 and 2010-Current Super Duty (Kit part number )
") Rear Vision System Tailgate Emblem Camera Aftermarket Display 2009-Current Ford F-150 and 2010-Current Super Duty (Kit part number 1008-6509) Kit Contents: Tailgate Emblem Mount with Camera Chassis Harness
Rear Vision System Tailgate Emblem Camera Aftermarket Display 2009-Current Ford F-150 and 2010-Current Super Duty (Kit part number 1008-6509) Kit Contents: Tailgate Emblem Mount with Camera Chassis Harness
M.O.S.T HUR MB OPTI-1 NTV-KIT421 Mercedes Benz Head Unit Replacment Interface
 M.O.S.T HUR MB OPTI-1 NTV-KIT421 Mercedes Benz Head Unit Replacment Interface Brendon Martell January 15,2013 Included Parts: OPTI-1 INTERFACE Needed Tools: Power, RCA input and remote turn on harness
A7 DVD Entertainment System Installation Guide
 A7 DVD Entertainment System Installation Guide BEFORE YOU START THE INSTALLATION, READ THIS GUIDE! The Rosen A7 is the easiest-to-install DVD entertainment system available today. Even though it is very
This is a guide only.
 2006-2013 Toyota Hilux Reverse Camera Installation Guide Disclaimer Images and information in this document are to be used as a reference only. This manual is a installation guide only and all installations
394: Handsfree, Bluetooth Handsfree, Bluetooth
 394: Handsfree, Bluetooth S80 (07-), 2008, B8444S, TF-80SC AWD, L.H.D, YV1AH852881073834, 073834 4/1/2013 PRINT 394: Handsfree, Bluetooth Handsfree, Bluetooth Installation instruction: 31310098 INTRODUCTION
Toyota Prius Dual Player Headrest Video ATTENTION: SECURITY COVERS ARE NO LONGER INCLUDED IN THE HEADREST KITS AS OF 01/17/2011
 Toyota Prius 2011 - Dual Player Headrest Video Part Number: 00016-47210-01; 04; 11 Code : EH5 ATTENTION: SECURITY COVERS ARE NO LONGER INCLUDED IN THE HEADREST KITS AS OF 01/17/2011 Conflicts Kit Contents
Rear Vision System Liftgate Emblem Camera for Aftermarket Display Ford Flex (Kit part number )
") Rear Vision System Liftgate Emblem Camera for Aftermarket Display 2009-2012 Ford Flex (Kit part number 1008-6509) Kit Contents: Liftgate Emblem Mount with Camera Chassis Harness with RCA (Note: In some
Rear Vision System Liftgate Emblem Camera for Aftermarket Display 2009-2012 Ford Flex (Kit part number 1008-6509) Kit Contents: Liftgate Emblem Mount with Camera Chassis Harness with RCA (Note: In some
Conflicts. TOYOTA Camry XM Satellite Radio. Part Number: Code: RX30. Vehicle Service Parts (May be required for reassembly)
") TOYOTA 2013 - Part Number:00016-00076 Code: RX30 Conflicts 1. Entune 2. Vehicle s with factory XM radio Kit Contents Item # Qty Description 1 1 XM Module 2 1 XM Tuner Module 3 1 Wiring Harness 4 1 Hardware
TOYOTA 2013 - Part Number:00016-00076 Code: RX30 Conflicts 1. Entune 2. Vehicle s with factory XM radio Kit Contents Item # Qty Description 1 1 XM Module 2 1 XM Tuner Module 3 1 Wiring Harness 4 1 Hardware
Acura/Honda/Isuzu AT-807HD, IBR-807HD, CF-807HD, AW-807HD
 Installation instructions for part Acura/Honda/Isuzu 1988-2006 99-7898 AT-807HD, IBR-807HD, CF-807HD, AW-807HD WIRING & ANTENNA CONNECTIONS (sold separately) Wiring Harness: Not Required KIT FEATURES DIN
JB N55 E Series Stage 1 and JB4 Install Guide Last Updated: 6/8/2017
 JB N55 E Series Stage 1 and JB4 Install Guide Last Updated: 6/8/2017 Use subject to terms and conditions posted at http://www.burgertuning.com/terms.html THIS PART IS LEGAL FOR USE ONLY IN COMPETITION
GMOS-LAN-02 GM LAN 29 Amplified OnStar Interface 2006-up
 M4 M5 M3 ISO 6 2.5 1.5 INSTALLATION INSTRUCTIONS FOR PART INSTGMOS-LAN-02 GMOS-LAN-02 GM LAN 29 Amplified OnStar Interface 2006-up APPLICATIONS See inside front cover KIT FEATURES Provides accessory (12-volt
AXi-MBCIRC-R INSTALLATION MANUAL
 Rev. 4.0 081915 AXi-MBCIRC-R INSTALLATION MANUAL PLEASE REVIEW THIS INSTALLATION MANUAL CAREFULLY BEFORE BEGINNING ANY WORK PLUG & PLAY WIRING HARNESS COMPATIBLE WITH AXi-RGB2 AXi-RGB3 Tech Support: 844-AXX-ESSI
Installation instructions, accessories. Multimedia monitor with DVD, Dual screen. Multimedia monitor with DVD, Dual screen V1.
 Installation instructions, accessories Instruction No 30756560 Version 1.2 5 Part. No. 30756177 Multimedia monitor with DVD, Dual screen Volvo Car Corporation Multimedia monitor with DVD, Dual screen-