INSTALLATION INSTRUCTIONS
|
|
|
- Claire Wilson
- 5 years ago
- Views:
Transcription

1 Backup Camera Interface (Kit # ) Please read thoroughly before starting installation and check that kit contents are complete. Items Included in the Kit: Cam T-Harness Plug & Play I/O T-Harness module USB Update cable These instructions Tools & Supplies Needed: Wire strippers Wire cutters Electrical tape Zip ties Plastic panel removal tools Digital Volt Meter / BCM safe test light Screwdriver Socket set Wrench Safety Precautions: Work in well ventilated area that is clear of obstructions. Secure vehicle with tire chucks in both front and rear of tires. Turn vehicle accessories OFF and ensure ignition key is in OFF position. Wear safety goggles and snug fitting clothes. Use tools only for their intended purpose and which are in good repair. Only perform this task if confidence, skill, and physical ability permit. NOTE: We strive to provide accurate and up-to-date installation instructions.
2 The adds an additional video input on select GM vehicles equipped with the MyLink (model IOH) 4 and 8 color media screens. Forcing (aftermarket) AUX Video or front camera to display at any time is activated with wire triggers. 1. After gaining access to the HMI module, Disconnect the gray, 12-pin plug from the OEM HMI circled above. 2. Disconnect the black, 16-pin plug from the OEM HMI circled below. 3. Connect the provided pin & 16-pin (male end) connectors into the HMI plug locations from steps 1 & Connect the factory 12-pin & 16-pin plugs (previously connected to the HMI) into the provided Plug & Play T-Harness (female end) Installation (without existing OEM reverse camera): BACKUP CAM at the UNI- CAM module. Connect the front cam/aux video to the RCA labeled FRONT CAM. Connect the (male) VIDEO OUT RCA to the female RCA from the CAM T- Harness (at the HMI). Leave the male RCA on the CAM T- Harness disconnected. c. If this vehicle is equipped with a 4 screen, connect INPUT 3 (pink) to a CONSTANT 12 source. a. Adding a single rear camera: power your camera with an ACC source or OUTPUT 1 (especially if using the forced feature), and connect your camera signal directly to the female RCA (into the HMI) from the 12- pin gray plug. b. Adding 2 aftermarket cameras: Instead of connecting camera signal directly to the HMI, connect the RVC signal to the RCA labeled NOTE: If this wire is not connected, the will program for 8 screen (image will appear zoomed in). 6. Optional: Connect INPUT 1 &/or INPUT 2 to an ACC 12v (+) source through toggles for displaying rear view camera and front view camera (or AUX video) at any time. NOTE: the factory GM screen may generate parking guidelines (while in reverse), which can be turned off in the OEM settings (through radio). This is usually required when using the for an additional


3 AUX video input. 7. Connect the module to the 18-pin plug located on the Plug & Play T-Harness.

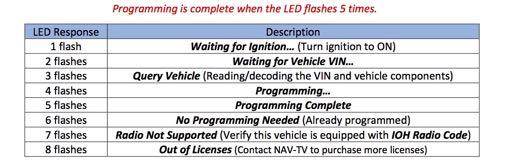
4 DISCLAIMER: Do NOT disconnect the programmer during programming this may result in complete radio brick (factory limitation). BRANDMOTION is not responsible for failure to comply with this rule. 8. Once all connections are made, turn the key to the IGNITION ON position. Watch the LED on the UNI- CAM Module and verify flash codes below. 9. Wait for radio to reboot fully. The radio
5 may reboot more than once wait a little while. Programming is complete when the LED flashes 5 times. Cycle the vehicle key once (turn off, wait 5 seconds, turn back to IGNITION ON) 3. Verify 6 FLASHES from LED on module. 4. Verify that the radio accepted the program properly by placing the vehicle in reverse. The reverse screen should appear (or black screen if no camera connected yet) when in reverse only. NOTE: the vehicle may have to be running (engine) for the reverse camera to show (factory limitation) 6. UPDATE: if nothing happens in reverse after programming, disconnect the 20-pin power plug (black) at the OEM HMI module, then reconnect to reset the system manually. Once the radio has reset and booted fully, test for rear camera activation again. Factory GM HMI (Human IMPORTANT NOTE: There is NO De- Programming option with the GM UNI- CAM. Once programmed, this system modification will remain forever After installation/programming is complete, placing the vehicle in reverse (with engine running) will show the connected camera automatically. Sending 12v to INPUT 1 through a toggle will force the rear camera on at any time, in any gear.* Sending 12v to INPUT 2 through a toggle will force the front camera (or aux video) on at any time. If Front Camera is active and the vehicle is placed in reverse, the reverse image will show (priority). Once placed back into Drive or Park, the Front Camera will show again if still activated. Note: Once the transmission leaves reverse gear, there may be a ~5 second delay on transitioning back to the radio screen. This is normal OE operation. *For aftermarket cameras only. If OEM rear camera forced action is wanted, the camera must be powered separately (OEM GM rear cameras are normally powered while in reverse only)
6

7 Display Radio Camera Interface Harness (Kit # ) INSTALLATION INSTRUCTIONS Please read thoroughly before starting installation and check that kit contents are complete. Items Included in the Kit: Interface module Video 1, video 2, and camera input harness Can power box w/12 to 6 pin harness LVDS screen/display T harness Aux audio harness Audio push button switch GM 16 pin T harness GM 10 pin T harness Tools & Supplies Needed: Phillips screw driver 7mm socket 10mm socket Wire strippers Wire cutters Zip ties Electrical tape Plastic panel removal tool Safety Precautions: Work in well ventilated area that is clear of obstructions. Secure vehicle with tire chucks in both front and rear of tires. Turn vehicle accessories OFF and ensure ignition key is in OFF position. Wear safety goggles and snug fitting clothes. Use tools only for their intended purpose and which are in good repair. Only perform this task if confidence, skill, and physical ability permit. NOTE: We strive to provide accurate and up-to-date installation instructions.
 7mm bolts that hold in the screen/display to the dash. 4. Unplug the factory LVDS (video) cable from back of the screen/display and plug into the female plug on the LVDS T-harness. 5.")

8 1. Please make sure that your system has a GM 4.2 or 8 display screen. INSTALLATION INSTRUCTIONS 2. Remove trim from dash to access the screen/display. 3. Remove the (4) 7mm bolts that hold in the screen/display to the dash. 4. Unplug the factory LVDS (video) cable from back of the screen/display and plug into the female plug on the LVDS T-harness. 5. Plug the male side of the LVDS T-harness into the screen/display where the factory cable was unplugged. 6. Run the 8-pin plug from the LVDS to the interface module and plug in. 7. Determine the correct power harness needed for the vehicle, either the 16-pin or 10-pin T- harness. The power harness connector will be located on the back of the screen. 8. Unplug factory power harness from the screen and plug into the female side of the T power harness. 9. Plug the male side of the T-harness where the factory power harness was removed in previous step. 10. Plug the 6-pin plug from the power harness into the CAN power box. 11. Run the 6-pin white plug from the other end of CAN power box to the interface module and plug in. Also plug in the small 8 pin white plug next to the 6 pin plug 12. The red wire can be used for accessory power for the camera. The black wire can be used for ground to the camera, from the 6 pin white plug that was just plugged in. Strip the wires back and splice them in, then wrap with electrical tape. (See figure 1.) 13. Plug the video harness into the interface module.

9 14. Use the RED video RCA marked camera IN for the back-up camera input. 15. Mount or zip tie interface module into dash or under dash securely. 16. The audio harness does NOT need to be used in this application. 17. The audio switch does NOT need to be used in this application. 18. Make sure vehicle is in PARK and all connections and plugs are connected. 19. Start vehicle, press brake and pull vehicle into reverse to check camera. 20. The interface module will generate dynamic parking lines on factory screen/display. Adjustment instructions are included in this document. 21. Reassemble the vehicle in reverse order.


10 For Cadillac vehicles equipped with CUE, use the 8-inch screen settings. INSTALLATION INSTRUCTIONS Figure 1.

11 How to Adjust Right and Left Parking Guides: INSTALLATION INSTRUCTIONS DOWN or MINUS UP or PLUS MENU The module box has 3 side keys (highlighted in the red circle above). These are used to tune the picture display and fine-tune the parking guidelines. Some versions of the module box have the keys labeled on the top of the module. ON SCREEN MENU SETTINGS: Guide CTRL: the installer can set ON or OFF to enable or disable the on-screen parking guidelines. Guide L: adjusts the left guideline offset on screen. When the value changes, the left guideline moves its location. Use the UP/PLUS and DOWN/MINUS keys to adjust the guidelines position. Guide R: adjusts the right guideline offset on screen. When the value changes, the right guideline moves its location. Use the UP/PLUS and DOWN/MINUS keys to adjust the guidelines position. **You MUST move the steering wheel for the adjustments to take effect and display on the screen** With this combination, the guideline can always fit the car and show the safety area no matter which camera the installer uses. FAQ: Q: I adjusted the Guide L or Guide R and the line did not move. A: After every adjustment in value, the installer needs to turn the steering wheel to see the adjustment of the associated guide implemented on the screen. Q: The on-screen menu on the 4.2 screen is hard to read or unreadable. A: Re-cycle the menu on and off the screen. Wait 5-10 sec. for the menu to time out. Then use the Menu key again to initiate the menu.
")
12 2014-Current Chevrolet Silverado and GMC Sierra Rear Vision Camera with Optional Parklines FLTW-7616 Kit Contents: Chassis Harness 1 bubble bag containing: Tailgate Handle Camera 1 bag containing: These instructions Tools & Supplies Required: Socket Wrench or Socket Driver Plastic Trim Removal Tool Phillips and Flat Blade Screwdrivers Power Drill Center Punch Heat Shrink Tubing (recommended) or Electrical Tape Soldering Iron and Solder (optional) or T-taps Corrosion Inhibitor (recommended) Wire Ties (recommended) Note: We strive to provide accurate and up-to-date installation instructions. IMPORTANT: Verify kit contents are complete against list above before beginning installation.

 remove plastic Tailgate Protector. 6. Remove the Tailgate Access Panel. (Figure 1) Figure 1 7.")


 plastic Latch Rod Retainer Clips using your fingers. 14. Reattach Tailgate Access Panel. 15.")
13 Preparation 1. Ensure all lamps and accessories are OFF. 2. Ensure ignition switch is in the OFF position. 3. Loosen negative battery cable bolt. Remove negative battery cable from terminal and position away from battery 4. Wait one (1) minute prior to working on vehicle to assure SIR roof rail airbag system has been disabled for your safety Install Camera into Tailgate 5. Lower Tailgate and (if equipped) remove plastic Tailgate Protector. 6. Remove the Tailgate Access Panel. (Figure 1) Figure 1 7. Disengage (2) plastic Latch Rod Retainer Clips using your fingers. (Figure 2) Figure 2 9. Remove lock cylinder from original Tailgate Handle. Remove Tailgate Lock Cylinder Retaining Clip and then Tailgate Lock Cylinder and reinstall into supplied Tailgate Handle Camera. (Figure 4) Figure Route Tailgate Handle Camera connector down through Tailgate Handle opening then out through the hole at bottom of Tailgate. 11. Pull Tailgate Handle Camera connector through the pass-through hole in the rear of the pickup box. 12. Reinstall Tailgate Handle. 13. Reattach (2) plastic Latch Rod Retainer Clips using your fingers. 14. Reattach Tailgate Access Panel. 15. (If equipped), reinstall plastic Tailgate Protector. 16. Close Tailgate. Chassis Harness Pass Through 17. Using a Plastic Trim Removal Tool, remove Left Instrument Panel Outer Trim Cover. (Figure 5) Figure 5 8. Remove Tailgate Handle using a Socket. (Figure 3) Figure 3

 below the dash just to the left of the steering wheel.")


 Figure 7 24. Remove green BCM X3 Connector from the BCM. (Figure 10).")
 Recommended: Solder and cover with Heat Shrink Tubing.")
14 18. Remove driver side door sill cover/kick panel cover. (Figure 6) Figure Insert RCA connector end of supplied Chassis Harness through cab floor into cab. (Recommended: Silicon or Grommet to seal off hole.) Wire Chassis Harness 23. Locate the Body Control Module (BCM) below the dash just to the left of the steering wheel. Note: the BCM connectors face toward the firewall. (Figure 9) Figure Pull back driver side floor carpet. 20. Look for existing grommet or hole to run chassis harness through. If no existing hole is available make sure that there is nothing on the back side of pass through opening (wiring, parking brake cable, etc), mark center with a Center Punch and use a 1/2 Drill. (Figure 7) Figure Remove green BCM X3 Connector from the BCM. (Figure 10). Splice Red Ignition wire of the Chassis Harness to the Violet/Black wire in Pin 6 of the connector (pinout below Figure 10.) Recommended: Solder and cover with Heat Shrink Tubing. Figure Recommended: Apply a corrosion inhibitor to the Chassis Harness pass through hole. (Figure 8) Figure 8 Green BCM Connector X3 Pinout

 Figure 11 CAMERA PARKLINE OPTION The camera offers Park lines or non-park lines options. Park line options: Default setting displays Park lines.")
15 25. Reinsert green BCM X1 connector in the BCM. 26. Attach black Ground wire to chassis ground. Connect & Secure Chassis Harness 27. Plug the RCA connector end of the supplied Chassis Harness into Video In your display. 28. Route supplied Chassis Harness along existing chassis harness toward rear of vehicle, staying clear of body mounts. (Figure 11) Figure 11 CAMERA PARKLINE OPTION The camera offers Park lines or non-park lines options. Park line options: Default setting displays Park lines. To remove the grid line display, pull back plastic convolute from end of camera harness and connect the two green wires. Display options: Do not use white wires. Green and White wires on the Camera Harness. 29. Connect supplied Chassis Harness to Tailgate Handle Camera harness. 30. Secure supplied Chassis Harness along the existing Chassis Harness using Wire Ties (recommended) every 200mm (approximately 8 ). Note: Depending on vehicle wheelbase there may be excess length in the Chassis Harness. Loop, and secure with Wire Ties (recommended) or Electrical Tape, any excess harness length along the Body Frame away from Mechanical areas. 31. Reconnect negative battery terminal. 32. Test system functionality. 33. Re-install all previously removed trim. Accept no compromises, choose only quality cameras and driver safety.
INSTALLATION INSTRUCTIONS
 OEM Tailgate Camera/Bezel Assembly with Chassis Harness 2014-current Chevrolet Silverado and GMC Sierra (Kit part number 9002-1005) Kit Contents: Chassis Harness 1 bubble bag containing: Tailgate Handle
INSTALLATION INSTRUCTIONS
 Toyota 24-pin Dual Camera Blind Spot Monitoring System (Kit # 9002-2911) Please read thoroughly before starting installation and check that kit contents are complete. Items Included in the Kit: 2 Adjustable
INSTALLATION INSTRUCTIONS
 Rear Vision System Aftermarket Display 2007-Current Chevrolet Silverado, Silverado HD; GMC Sierra, Sierra HD (Kit part number 9002-9560) Kit Contents: Chassis Harness with RCA (Note: In some cases a RCA
INSTALLATION INSTRUCTIONS
 Dual Camera Blind Spot Monitoring System w/multi-camera Switcher (Kit # 9002-2904) Please read thoroughly before starting installation and check that kit contents are complete. Items Included in the Kit:
INSTALLATION INSTRUCTIONS
 Toyota 24-pin Dual Camera Blind Spot Monitoring System (Kit # 9002-2911) Please read thoroughly before starting installation and check that kit contents are complete. Items Included in the Kit: 2 Adjustable
INSTALLATION INSTRUCTIONS
 Rear Vision System Aftermarket Display 2007-Current Chevrolet Silverado, Silverado HD; GMC Sierra, Sierra HD (Kit part number 9002-9560) Kit Contents: Camera/Module/Bezel Assembly Chassis Harness with
INSTALLATION INSTRUCTIONS
 Multi Camera Interface (Kit # 9002-6118) Please read thoroughly before starting installation and check that kit contents are complete. Items Included in the Kit: Interface module Video input harness These
INSTALLATION INSTRUCTIONS
 Rear Vision System NAV Display 2009-Current Chevrolet Silverado, Silverado HD; GMC Sierra, Sierra HD (Kit part number 9002-9501) Kit Contents: Camera/Module/Bezel Assembly Chassis Harness NAV Harness 1
INSTALLATION INSTRUCTIONS
 2012-2014 F-150 4 MyFord factory display 360º Vision System (Kit # AVMS-3604) Please read thoroughly before starting installation and check that kit contents are complete. Items Included in the Kit: Video
OEM Lip Mount Camera with Harness and OnStar Mirror for GM Vehicles with 16-pin Mirror Connector (Kit part number )
") OEM Lip Mount Camera with Harness and OnStar Mirror for GM Vehicles with 16-pin Mirror Connector (Kit part number 9002-8722) Please read thoroughly before starting installation and check that kit contents
OEM Lip Mount Camera with Harness and OnStar Mirror for GM Vehicles with 16-pin Mirror Connector (Kit part number 9002-8722) Please read thoroughly before starting installation and check that kit contents
INSTALLATION INSTRUCTIONS
 2007-Current Jeep Wrangler 360º System for Factory MyGig Display (Kit # AVMS-3701) Please read thoroughly before starting installation and check that kit contents are complete. Items Included in the Kit:
INSTALLATION INSTRUCTIONS
 Ford 4 MyFord factory display interface for backup camera (Kit # 9002-2750v2) Please read thoroughly before starting installation and check that kit contents are complete. ***SEE PAGES 5-6 TO DETERMINE
INSTALLATION INSTRUCTIONS
 2007-Current Jeep Wrangler 360º System for Factory Display Radios (Kit # AVMS-3701) Please read thoroughly before starting installation and check that kit contents are complete. Items Included in the Kit:
INSTALLATION INSTRUCTIONS
 2007-Current Jeep Wrangler 360º System for Factory Display Radios (Kit # AVMS-3701v2) Please read thoroughly before starting installation and check that kit contents are complete. Items Included in the
INSTALLATION INSTRUCTIONS
 OEM Recessed Lip Camera with Harness and OnStar Mirror for GM Vehicles with 10-pin Mirror Connector (Kit part number 9002-8722) Please read thoroughly before starting installation and check that kit contents
INSTALLATION INSTRUCTIONS
 OEM Lip Mount Camera with Harness and OnStar Mirror for GM Vehicles with 10-pin Mirror Connector (Kit part number 9002-8723) Items Included in the Kit: Bubble bag containing: Camera with Mount Mirror Mirror
INSTALLATION INSTRUCTIONS. Jeep Wrangler Adjustable Rear Vision System for Factory Display Radios, 2007 Current (Kit # )
") Jeep Wrangler Adjustable Rear Vision System for Factory Display Radios, 2007 Current (Kit # 9002-8847) Items Included in the Kit Camera Chassis Harness Power Harness 22--pin white connector w/ video RCA
Jeep Wrangler Adjustable Rear Vision System for Factory Display Radios, 2007 Current (Kit # 9002-8847) Items Included in the Kit Camera Chassis Harness Power Harness 22--pin white connector w/ video RCA
INSTALLATION INSTRUCTIONS
 2007-Current Jeep Wrangler 360º System for Aftermarket display (Kit # AVMS-3700v2) Please read thoroughly before starting installation and check that kit contents are complete. Items Included in the Kit:
Jeep Wrangler Rear Vision Camera, 2007 Current (Kit # )
") Jeep Wrangler Rear Vision Camera, 2007 Current (Kit # 9002-8837) Items Included in the Kit Required Tools & Supplies Camera Chassis Harness Zip lock bag with 15 Wire Ties & 3 Push Nuts Program Module 22--pin
Jeep Wrangler Rear Vision Camera, 2007 Current (Kit # 9002-8837) Items Included in the Kit Required Tools & Supplies Camera Chassis Harness Zip lock bag with 15 Wire Ties & 3 Push Nuts Program Module 22--pin
INSTALLATION INSTRUCTIONS
 OEM Recessed Lip Camera with Harness and Auto Dimming Mirror (Kit part number 9002-8721) Please read thoroughly before starting installation and check that kit contents are complete. Items Included in
INSTALLATION INSTRUCTIONS
 Rear Vision System Tailgate Handle Camera Mirror Display 2004-2014 Ford F-150 and 2008-2015 Ford Super Duty (Kit part numbers 9002-9521) Kit Contents: Mirror Tailgate Handle with camera and harness Interior
Please read thoroughly before starting installation and check that kit contents are complete.
 Rear Vision System Mirror Display 2013-Current Ram (Kit part number 1009-9518) Please read thoroughly before starting installation and check that kit contents are complete. Items Included in the Kit: Rear
INSTALLATION INSTRUCTIONS
 9002-6513 Rear Vision System W/ Zoom Aftermarket and Factory 8.4 Touch Screen Display (Factory Display requires Chrysler/Dodge dealer to activate) 2009 2012 RAM (Part B) 2013 Current RAM (Part A) NOTE:
INSTALLATION INSTRUCTIONS
 OEM Recessed Lip Camera with Harness and Slimline Mirror (Kit part number 9002-8724) Please read thoroughly before starting installation and check that kit contents are complete. Items Included in the
GM IOH-PRG/IOM-PRG NTV-KIT628/KIT722
 3950 NW 120 th Ave, Coral Springs, FL 33065 TEL 561-955-9770 FAX 561-955-9760 GM IOH-PRG/IOM-PRG Reverse camera programmer for select GM vehicles equipped with MyLink IOH or IOM Radio IOH = IO5/IO6 (8
Rear Vision System Tailgate Emblem Camera Aftermarket Display 2009-Current Ford F-150 and 2010-Current Super Duty (Kit part number )
") Rear Vision System Tailgate Emblem Camera Aftermarket Display 2009-Current Ford F-150 and 2010-Current Super Duty (Kit part number 1008-6509) Kit Contents: Tailgate Emblem Mount with Camera Chassis Harness
Rear Vision System Tailgate Emblem Camera Aftermarket Display 2009-Current Ford F-150 and 2010-Current Super Duty (Kit part number 1008-6509) Kit Contents: Tailgate Emblem Mount with Camera Chassis Harness
INSTALLATION INSTRUCTIONS
 360º Vision System for Aftermarket Radio/Display (Kit # AVMS-3690) DUE TO THE COMPLEXITY OF THIS KIT PROFESSIONAL INSTALLATION IS REQUIRED CALIBRATION KIT IS REQUIRED FOR FINAL PROGRAMMING Please read
INSTALLATION INSTRUCTIONS
 Rear Vision System Aftermarket and Factory 5.0, 8.4 and 6.1 MyGig Touch Screen Display (Factory Display requires Chrysler/Dodge dealer to activate) 2009 Current* Dodge Ram (Kit part number 1009-6503) *NOTE:
Dodge Ram 09-Current CS-DTR SERIES BACKUP CAMERA INSTALLATION
 Dodge Ram 09-Current CS-DTR SERIES BACKUP CAMERA INSTALLATION Thank you for your purchase! These instructions cannot possibly cover every option group for every model year of RAM trucks so you may find
INSTALLATION INSTRUCTIONS
 Rear Vision System Tailgate Emblem Camera Aftermarket Display 2009-Current Ford F-150 and 2010-Current Super Duty (Kit part number 1008-6509) Kit Contents: Tailgate Emblem Mount with Camera Chassis Harness
Jeep Wrangler Adjustable Infrared Light Rear Vision Camera System for Factory Display Radios 2007 Current (Kit # )
") Jeep Wrangler Adjustable Infrared Light Rear Vision Camera System for Factory Display Radios 2007 Current (Kit # 9002-8857) Items Included in the Kit Required Tools & Supplies Camera Chassis Harness Power
Jeep Wrangler Adjustable Infrared Light Rear Vision Camera System for Factory Display Radios 2007 Current (Kit # 9002-8857) Items Included in the Kit Required Tools & Supplies Camera Chassis Harness Power
# ) THERE ARE 2 DIFFERENT HEIGHT BRACKETS. MAKE SURE THAT THIS IS THE CORRECT ONE FOR YOUR FAIRLEAD!
 THERE ARE 2 DIFFERENT HEIGHT BRACKETS. MAKE SURE THAT THIS IS THE CORRECT ONE FOR YOUR FAIRLEAD!") SummitView Winch Mount Front Camera (SHORT) (Kit # 9002-8850) THERE ARE 2 DIFFERENT HEIGHT BRACKETS. MAKE SURE THAT THIS IS THE CORRECT ONE FOR YOUR FAIRLEAD! Please read thoroughly before starting installation
SummitView Winch Mount Front Camera (SHORT) (Kit # 9002-8850) THERE ARE 2 DIFFERENT HEIGHT BRACKETS. MAKE SURE THAT THIS IS THE CORRECT ONE FOR YOUR FAIRLEAD! Please read thoroughly before starting installation
Jeep Wrangler Adjustable Rear Vision Camera, 2007 Current (Kit # )
") Items Included in the Kit Jeep Wrangler Adjustable Rear Vision Camera, 2007 Current (Kit # 9002-8848) Camera Chassis Harness Power Harness 22--pin white connector w/ video RCA (for factory display radio)
Items Included in the Kit Jeep Wrangler Adjustable Rear Vision Camera, 2007 Current (Kit # 9002-8848) Camera Chassis Harness Power Harness 22--pin white connector w/ video RCA (for factory display radio)
GM TRUCK BACKUP CAMERA INSTALLATION
 GM TRUCK 07-13 BACKUP CAMERA INSTALLATION Thank you for your purchase! These instructions are intended for the do-it-yourselfer who decides to install the camera without professional assistance. Keep in
Rear Vision System Liftgate Emblem Camera for Aftermarket Display Ford Flex (Kit part number )
") Rear Vision System Liftgate Emblem Camera for Aftermarket Display 2009-2012 Ford Flex (Kit part number 1008-6509) Kit Contents: Liftgate Emblem Mount with Camera Chassis Harness with RCA (Note: In some
Rear Vision System Liftgate Emblem Camera for Aftermarket Display 2009-2012 Ford Flex (Kit part number 1008-6509) Kit Contents: Liftgate Emblem Mount with Camera Chassis Harness with RCA (Note: In some
INSTALLATION INSTRUCTIONS
 2015 Silverado Qi Wireless Charging Kit (Kit # FDMC-1276) Please read thoroughly before starting installation and check that kit contents are complete. Items Included in the Kit: Qi Wireless Charging Module
INSTALLATION INSTRUCTIONS
 Rear Vision System Tailgate Emblem Camera Mirror Display 2009-Current Ford F-150 and 2010-Current Super Duty (Kit part number 1008-9527) Kit Contents: Mirror Tailgate Emblem Mount with Camera Interior
INSTALLATION INSTRUCTIONS
 Rear Vision System Mirror Display 2004 onwards Ford F-150 and 2008 onwards Ford Super Duty (Kit part numbers 1008-9520 and 1008-9525) Kit Contents: RVS Interior (shorter) Harness RVS Chassis (longer) Harness
Please read thoroughly before starting installation and check that kit contents are complete.
 Radar Blind Spot Brackets for 2015-Current Toyota RAV4 (Part # RDBS-1411) ***REQUIRES RDBS-1400 UNIVERSAL RADAR BLIND SPOT SYSTEM*** Please read thoroughly before starting installation and check that kit
INSTALLATION INSTRUCTIONS
 2015 - Ford Mustang Qi Wireless Charging Kit (Kit # FDMC-1222) Please read thoroughly before starting installation and check that kit contents are complete. Items Included in the Kit: Qi Wireless Charging
INSTALLATION INSTRUCTIONS
 Rear Vision System Liftgate Emblem Camera Mirror Display 2009-2012 Ford Flex (Kit part number 1008-9527) Kit Contents: Mirror Liftgate Emblem Mount with Camera Interior (shorter) Harness Chassis (longer)
Jeep Wrangler Rear Vision Camera, 2007 Current (Kit # )
") Items Included in the Kit Camera Chassis Harness Zip lock bag with 15 Wire Ties & 3 Push Nuts These Instructions 22--pin white connector w/ video RCA (for factory display radio) Jeep Wrangler Rear Vision
Items Included in the Kit Camera Chassis Harness Zip lock bag with 15 Wire Ties & 3 Push Nuts These Instructions 22--pin white connector w/ video RCA (for factory display radio) Jeep Wrangler Rear Vision
INSTALLATION INSTRUCTIONS
 Jeep Wrangler Rear Vision Camera, 2007 Current (Kit # 9002-8838) Items Included in the Kit Camera Chassis Harness Zip lock bag with 15 Wire Ties & 3 Push Nuts These Instructions Required Tools & Supplies
INSTALLATION INSTRUCTIONS
 2015 Tahoe/Suburban/Yukon Qi Wireless Charging Kit (Kit # FDMC-1273) Please read thoroughly before starting installation and check that kit contents are complete. Items Included in the Kit: Qi Wireless
INSTALLATION INSTRUCTIONS
 Universal Radar Blind Spot System (Part # RDBS-1400) Please read thoroughly before starting installation and check that kit contents are complete. NOTE: VEHICLE-SPECIFIC INSTRUCTIONS ARE INCLUDED WITH
INSTALLATION INSTRUCTIONS. Rear Vision System Aftermarket Display 2009-Current Dodge Ram (Kit part number )
") Rear Vision System Aftermarket Display 2009-Current Dodge Ram (Kit part number 1009-6503) Kit Contents: Chassis Harness with RCA (Note: In some cases a RCA extension may be required to connect to your
Rear Vision System Aftermarket Display 2009-Current Dodge Ram (Kit part number 1009-6503) Kit Contents: Chassis Harness with RCA (Note: In some cases a RCA extension may be required to connect to your
INSTALLATION INSTRUCTIONS. Rear Vision System Aftermarket Display 2009-Current Dodge Ram (Kit part number )
") Rear Vision System Aftermarket Display 2009-Current Dodge Ram (Kit part number 1009-6503) Kit Contents: Chassis Harness with RCA Endgate Handle with Camera 1 bag containing: Wire Ties (Qty: 17) Bottle
Rear Vision System Aftermarket Display 2009-Current Dodge Ram (Kit part number 1009-6503) Kit Contents: Chassis Harness with RCA Endgate Handle with Camera 1 bag containing: Wire Ties (Qty: 17) Bottle
INSTALLATION INSTRUCTIONS. Rear Vision System Mirror Display 2010 onwards Camaro (Kit part number )
") Rear Vision System Mirror Display 2010 onwards Camaro (Kit part number 1018-9540) Kit Contents: RVS Interior (shorter) harness RVS Chassis (longer) harness Camera with mounting bracket Mirror 1 bag containing:
Rear Vision System Mirror Display 2010 onwards Camaro (Kit part number 1018-9540) Kit Contents: RVS Interior (shorter) harness RVS Chassis (longer) harness Camera with mounting bracket Mirror 1 bag containing:
B. Ford Fusion 2013-up
 99-5841B INSTALLATION INSTRUCTIONS Ford Fusion 2013-up KIT FEATURES ISO DIN radio provision with pocket ISO DDIN radio provision Integrated controls for info center Painted black Note: Does not support
CH. Ford Edge (with 4.2 screen)
") 99-5848CH INSTALLATION INSTRUCTIONS Ford Edge (with 4.2 screen) 2011-2014 KIT FEATURES ISO DIN radio provision with pocket ISO DDIN radio provision Touchscreen display for climate and personalization features
99-5848CH INSTALLATION INSTRUCTIONS Ford Edge (with 4.2 screen) 2011-2014 KIT FEATURES ISO DIN radio provision with pocket ISO DDIN radio provision Touchscreen display for climate and personalization features
Nissan Pathfinder (without NAV) (with color screen) HG
 (with color screen) HG") Installation instructions for part 99-7627HG Nissan Pathfinder 2013-2016 (without NAV) (with color screen) 99-7627HG KIT FEATURES ISO DIN radio provision with pocket ISO DDIN radio provision Painted to
Installation instructions for part 99-7627HG Nissan Pathfinder 2013-2016 (without NAV) (with color screen) 99-7627HG KIT FEATURES ISO DIN radio provision with pocket ISO DDIN radio provision Painted to
CH. Ford Explorer (with 4.2 screen)
") 99-5847CH INSTALLATION INSTRUCTIONS Ford Explorer (with 4.2 screen) 2011-2015 KIT FEATURES ISO DIN radio provision with pocket ISO DDIN radio provision Touchscreen display for climate and personalization
99-5847CH INSTALLATION INSTRUCTIONS Ford Explorer (with 4.2 screen) 2011-2015 KIT FEATURES ISO DIN radio provision with pocket ISO DDIN radio provision Touchscreen display for climate and personalization
Nissan Maxima (with Technology Package) Nissan Maxima (with NAV) 2009 KIT FEATURES. ISO DIN radio provision with pocket...
 Nissan Maxima (with NAV) 2009 KIT FEATURES. ISO DIN radio provision with pocket...") 99-7633 INSTALLATION INSTRUCTIONS KIT FEATURES ISO DIN radio provision with pocket ISO DDIN radio provision Painted high gloss black KIT COMPONENTS A) Radio trim panel with climate controls B) Radio brackets
99-7633 INSTALLATION INSTRUCTIONS KIT FEATURES ISO DIN radio provision with pocket ISO DDIN radio provision Painted high gloss black KIT COMPONENTS A) Radio trim panel with climate controls B) Radio brackets
TOYOTA TACOMA LED DRL. Part Number: TTA-712
 Part Number: TTA-712 Kit Contents Item # Quantity Reqd. Description 1 2 DRL s bezels w/led DRL 2 1 Driver Box 3 1 Harness bag 4 1 User s card 5 1 Switch Hardware Bag Contents Item # Quantity Reqd. Description
(1) Remote Control with (2) AAA Batteries
 Remote Control with (2) AAA Batteries") TOOLS REQUIRED: KIT CONTENTS: E14 Torx (1) Remote Control with (2) AAA Batteries (2) Wireless Headphones with (4) AAA Batteries (2) DVD Headrest Units Owner s Manual (1) Owner s Manual (1) Power / Audio
TOOLS REQUIRED: KIT CONTENTS: E14 Torx (1) Remote Control with (2) AAA Batteries (2) Wireless Headphones with (4) AAA Batteries (2) DVD Headrest Units Owner s Manual (1) Owner s Manual (1) Power / Audio
Jeep Cherokee Latitude/Limited 2014-up
 Installation instructions for part 99-6526 REV. 5/23/2017 INST99-6526 KIT FEATURES ISO DDIN radio provision Included interface shows climate and menu info on the aftermarket radio screen. Painted scratch-resistant
AX-ADGM01. GM Data Interface 2006-up* *Visit AxxessInterfaces.com for up-to-date vehicle specific applications.
 AX-ADGM01 INSTALLATION INSTRUCTIONS INTERFACE FEATURES Provides accessory power (12-volt 10-amp) Maintains the retained accessory power (R.A.P.) feature Provides NAV outputs (parking brake, reverse, speed
3-5 Hours Professional installation recommended
 I N S T A L L A T I O N G U I D E APPLICATION AMP Part # Chevrolet Silverado500 / GMC Sierra 500 - Double Cab * 04-7 7554-0A Chevrolet Silverado500 / GMC Sierra 500- Crew Cab 04-7 7554-0A Chevrolet Silverado
3-5 Hours Professional installation recommended
 I N S T A L L A T I O N G U I D E APPLICATION AMP Part # Chevrolet Silverado 2500/3500 / GMC Sierra 2500/3500 - Ext. Cab * 2007-201 75126-01A Chevrolet Silverado 2500/3500 / GMC Sierra 2500/3500 - Crew
INSTALLATION INSTRUCTIONS
 Ultrasonic Rear Park Aid Kit (Kit # 9002-3000) INSTALLATION INSTRUCTIONS Please read thoroughly before starting installation and check that kit contents are complete. Items Included in the Kit: 4 Ultrasonic
CH. Ford Mustang
 99-5839CH INSTALLATION INSTRUCTIONS Ford Mustang 2010-2014 KIT FEATURES ISO DIN radio provision with pocket ISO DDIN radio provision Painted charcoal with a matte black center Touchscreen interface for
B. Ford Fusion 2013-up* *Visit metraonline.com for up-to-date vehicle specific applications.
 99-5841B INSTALLATION INSTRUCTIONS Ford Fusion 2013-up* *Visit metraonline.com for up-to-date vehicle specific applications. KIT FEATURES ISO DIN radio provision with pocket ISO DDIN radio provision Integrated
B. Ford F-150 (with 4.2 screen)
") 99-5846B INSTALLATION INSTRUCTIONS KIT FEATURES ISO DIN radio provision with pocket ISO DDIN radio provision Touchscreen display for climate and personalization features Integrated hazard button and passenger
99-5846B INSTALLATION INSTRUCTIONS KIT FEATURES ISO DIN radio provision with pocket ISO DDIN radio provision Touchscreen display for climate and personalization features Integrated hazard button and passenger
SCION im PREMIUM AUDIO Preparation
 SCION im 2016 - PREMIUM AU Preparation Part Number: PT296-12160 (Extension Module w/ AHA) Kit Contents Item # Quantity Reqd. Description 1 1 Extension Module 2 1 BT cable 3 1 DA/Ext Harness 4 1 GPS Antenna
Chevy Equinox / GMC Terrain 2013-up (with color display) G
 G") INSTALLATION INSTRUCTIONS FOR PART 99-3308G Chevy Equinox / GMC Terrain 2013-up (with color display) 99-3308G KIT FEATURES ISO DIN radio provision with pocket ISO DDIN radio provision Painted gray to match
INSTALLATION INSTRUCTIONS FOR PART 99-3308G Chevy Equinox / GMC Terrain 2013-up (with color display) 99-3308G KIT FEATURES ISO DIN radio provision with pocket ISO DDIN radio provision Painted gray to match
INSTALLATION INSTRUCTIONS
 INSTALLATION INSTRUCTIONS Accessory Application Publications No. REAR VIEW CAMERA ATTACHMENT PILOT AII 23620 Issue Date MAY 2002 PARTS LIST Attachment Kit : P/N 08B21-S9V-100 Control unit harness Rear
TOYOTA TACOMA XSP-X LED DRL. Part Number: Accessory Code: LDRL10
 TOYOTA TACOMA 2013 - XSP-X LED DRL Part Number: 00016-35230 Accessory Code: LDRL10 Conflicts -None Kit Contents Item # Quantity Reqd. Description 1 2 LED DRL 2 1 Driver Box 3 1 Harness bag 4 Hardware Bag
Gentex by VOXX Corporation Installation Instructions
 KIT CONTENTS: Item Qty Part Number Description 1 1: ADVGEN20A 7 Pin Auto-Dimming Mirror with Compass and Temperature 2 1 Gentex by VOXX Corporation Installation Instructions Contact VOXX Customer Service
Conflicts: Highlander without sunroof
 Toyota Highlander (Sunroof) 2011-8.5 Overhead Video Part Number: 00016-00125; Fit Kit-00016-00125-02 Accessory Code: ED9 Conflicts: Highlander without sunroof Kit Contents: Item # Qty. Component Description
INSTALLATION INSTRUCTIONS
 Rear Vision System Mirror Display Dodge Ram Kit Contents: Instruction Sheets Template Chassis Harness Endgate Handle with Camera Wire Ties (Qty: 17) Bottle of ZTech Plug for Non-Locking Endgates (Optional)
Part Number: TTA-712. Hardware Bag Contents. General Applicability All models
 Date: 09.30.2013 TOYOTA TACOMA 2012-15 LED DRL Part Number: TTA-712 Kit Contents Item # Quantity Reqd. Description 1 2 DRL s bezels w/led DRL 2 1 Driver Box 3 1 Harness bag 4 1 User s card 5 1 Switch Hardware
Raxiom Factory GPS Rear Back-up Camera Kit (07-17 Wrangler)
") Raxiom Factory GPS Rear Back-up Camera Kit (07-17 Wrangler) Installation Time: 2.5-3Hrs Tools Required: 7mm Socket & Driver 10mm Socket 10mm Open end wrench Knife / Razor blade Zip-ties Wire Cutters Needle
Raxiom Factory GPS Rear Back-up Camera Kit (07-17 Wrangler) Installation Time: 2.5-3Hrs Tools Required: 7mm Socket & Driver 10mm Socket 10mm Open end wrench Knife / Razor blade Zip-ties Wire Cutters Needle
Conflicts. TOYOTA Camry XM Satellite Radio. Part Number: Code: RX30. Vehicle Service Parts (May be required for reassembly)
") TOYOTA 2013 - Part Number:00016-00076 Code: RX30 Conflicts 1. Entune 2. Vehicle s with factory XM radio Kit Contents Item # Qty Description 1 1 XM Module 2 1 XM Tuner Module 3 1 Wiring Harness 4 1 Hardware
TOYOTA 2013 - Part Number:00016-00076 Code: RX30 Conflicts 1. Entune 2. Vehicle s with factory XM radio Kit Contents Item # Qty Description 1 1 XM Module 2 1 XM Tuner Module 3 1 Wiring Harness 4 1 Hardware
GMOS-LAN-012. GM LAN-29 Data Interface 2006-up* *Visit AxxessInterfaces.com for up-to-date vehicle specific applications.
 GMOS-LAN-012 INSTALLATION INSTRUCTIONS INTERFACE FEATURES Provides accessory power (12-volt 10-amp) Maintains the retained accessory power (R.A.P.) feature Can be used in non-amplified, or analog/digital
TOYOTA im NAVIGATION UPGRADE Preparation
 Preparation Part Number: PT296-00170 PT296-12170 (Extension Module w/ AHA) Kit Contents Item # Quantity Reqd. Description 1 1 Extension Module 2 1 BT cable 3 1 DA/Ext Harness 4 1 GPS Antenna kit 5 6 Bolt
Part Number: TBL-016S
 5/18/17 TOYOTA TUNDRA 2014-2017 LED Truck Bed Light Kit Part Number: TBL-016S Kit Contents Item # Quantity Reqd. Description 1 2 LED Bed Light Harness (10 ) 2 2 LED Bed Light Harness (5 ) 3 1 Y Harness
TOYOTA COROLLA 2010 TVIP V4 PREPARATION
 PREPARATION Part #: PT398-02080 or PT398-02100 NOTE: Part number of this accessory may not be the same as the part number shown. Conflicts: Do not install into Manual Transmission Vehicles or Vehicles
Ram 1500/2500/ up (with 8 touchscreen) B
 B") INSTALLATION INSTRUCTIONS FOR PART 99-6527B Ram 1500/2500/3500 2013-up (with 8 touchscreen) 99-6527B KIT FEATURES ISO DIN radio provision with pocket ISO DDIN radio provision Touchscreen display for climate
INSTALLATION INSTRUCTIONS FOR PART 99-6527B Ram 1500/2500/3500 2013-up (with 8 touchscreen) 99-6527B KIT FEATURES ISO DIN radio provision with pocket ISO DDIN radio provision Touchscreen display for climate
INSTALLATION INSTRUCTIONS
 Qi Wireless Charging Installer Kit (Kit # FDMC-1210) INSTALLATION INSTRUCTIONS Please read thoroughly before starting installation and check that kit contents are complete. Items Included in the Kit: Qi
SCION tc Navigation System Preparation. Part Number: PT
 Preparation Part Number: PT611-21111 Kit Contents Item # Quantity Reqd. Description 1 1 Navigation System 2 1 GPS Antenna 3 1 Bluetooth Antenna 4 1 Wire Harness (Reverse / Park Brake) 5 1 RCA Relay Cable
INSTALLATION INSTRUCTIONS
 INSTALLATION INSTRUCTIONS Accessory Application Publications No. AII 26042-26353 XM INTERFACE ODYSSEY EXCEPT EX-L WITH NAVI/RES Issue Date FEB 2004 PARTS LIST 8 Wire ties XM Radio Attachment P/N 08B15-S0X-100
TOYOTA SEQUOIA TVIP V4 REMOTE ENGINE STARTER (RES)
") Preparation Part Number: PT398-34111 NOTE: Part number of this accessory may not be the same as the part number shown. Conflicts Do not install into vehicles without RKE system. Recommended Sequence of
Preparation Part Number: PT398-34111 NOTE: Part number of this accessory may not be the same as the part number shown. Conflicts Do not install into vehicles without RKE system. Recommended Sequence of
TOYOTA PRIUS XM SATELLITE RADIO Preparation
 Preparation Part Number: Mounting Kit PT546-4700 Tuner Assy 8680-0W03 NOTE: Part number of this accessory may not be the same as the part number shown. Tuner Assembly Kit Contents (8680-0W03) Item # Quantity
TOYOTA COROLLA LED DRL eyebrow. Part Number: TCO-DRL
 Part Number: TCO-DRL Kit Contents Item # Quantity Reqd. Description 1 2 DRL s bezels w/led DRL 2 1 Driver Box 3 1 Harness bag 4 1 User s card 5 1 Switch Hardware Bag Contents Item # Quantity Reqd. Description
Introduction. Note. To Ensure Safe Use, Always Follow These Precautions
 SGS-CH0 / Jeep Wrangler SGS-CH0 Factory Radio Camera Interface with Active Guideline system Installation Manual Model: Wrangler Model Year: 20-208 Model Year Active Guidlines Static Guidelines Jeep Wrangler
Installation of Auto Meter Cobalt Boost/Vacuum Gauge:
 Installation of Auto Meter Cobalt Boost/Vacuum Gauge: Fitment: All 79-14 models. This installation was completed on a 2004 Mustang GT, and should be identical for all 1999-2004 model Mustangs. Time needed:
Amp & Speaker Upgrade Install Instructions for Victory Cross Country
 Amp & Speaker Upgrade Install Instructions for Victory Cross Country Tools Needed: 13mm Socket 4mm Ball Head Allen Socket 5mm Allen Wrench 10mm Wrench Wire Cutters Wire Strippers Phillips Screwdriver Pocket
Ford F up CH
 INSTALLATION INSTRUCTIONS FOR PART 99-5834CH KIT FEATURES ISO DIN radio provision with pocket ISO DDIN radio provision Painted Charcoal Touchscreen display for climate and personalization features Ford
RECOMMENDED SEQUENCE OF APPLICATION
 2007-2008 TOYOTA TUNDRA CAMERA KIT PART NUMBER: 250-8045 KIT CONTENTS ITEM QTY DESCRIPTION 1 1 CAMERA ASSEMBLY 2 1 TRUCK EXTENSION HARNESS 3 1 TAILGATE EXTENSION HARNESS 4 1 POWER HARNESS 5 1 HARDWARE
Reverse Camera Installation Instructions
 Reverse Camera Installation Instructions XUV500 Issue: 1-01/03/2013 Page 1 of 12 Fitting Time: 45 Minutes Parts Supplied: Reverse Camera Wiring Harness Tools and Materials Flat Blade Screw driver Phillips
I N S T A L L A T I O N G U I D E. Chevrolet Silverado / GMC Sierra - Ext Cab * A (Diesel Only)
") I N S T A L L A T I O N G U I D E APPLICATION AMP Part # Chevrolet Silverado / GMC Sierra - Crew Cab 2011-201 751-01A (Diesel Only) Chevrolet Silverado / GMC Sierra - Ext Cab 2011-201* 751-01A (Diesel
I N S T A L L A T I O N G U I D E APPLICATION AMP Part # Chevrolet Silverado / GMC Sierra - Crew Cab 2011-201 751-01A (Diesel Only) Chevrolet Silverado / GMC Sierra - Ext Cab 2011-201* 751-01A (Diesel
TOYOTA YARIS XM SATELLITE RADIO Preparation (Sedan & Hatchback)
") Preparation (Sedan & Hatchback) Part Number: Mounting Kit PT546-52096 Tuner Assy 86180-0W031 Tuner Assy Kit Contents (86180-0W031) Item # Quantity Reqd. Description 1 1 Tuner Assy, Stereo Component Mounting
Preparation (Sedan & Hatchback) Part Number: Mounting Kit PT546-52096 Tuner Assy 86180-0W031 Tuner Assy Kit Contents (86180-0W031) Item # Quantity Reqd. Description 1 1 Tuner Assy, Stereo Component Mounting
Ford Flex (without NAV) TABLE OF CONTENTS Dash Disassembly Kit Preparation...4 Kit Assembly KIT FEATURES
 TABLE OF CONTENTS Dash Disassembly Kit Preparation...4 Kit Assembly KIT FEATURES") 99-5842 INSTALLATION INSTRUCTIONS KIT FEATURES ISO DIN radio provision with pocket ISO DDIN radio provision Touchscreen display for climate and personalization features Center panel painted silver with
99-5842 INSTALLATION INSTRUCTIONS KIT FEATURES ISO DIN radio provision with pocket ISO DDIN radio provision Touchscreen display for climate and personalization features Center panel painted silver with
Ford Mustang 2015-up CH. Table of Contents. METRA The World s best kits. metraonline.com. (with 4.2 screen)
") INSTALLATION INSTRUCTIONS FOR PART 99-5838CH Ford Mustang 2015-up Table of Contents (with 4.2 screen) Dash Disassembly...2-4 Kit Preparation...5-7 Kit Assembly 99-5838CH REV. 2/7/2017 INST99-5838CH KIT
INSTALLATION INSTRUCTIONS FOR PART 99-5838CH Ford Mustang 2015-up Table of Contents (with 4.2 screen) Dash Disassembly...2-4 Kit Preparation...5-7 Kit Assembly 99-5838CH REV. 2/7/2017 INST99-5838CH KIT
Toyota 4RUNNER With/MR Overhead Video
 Toyota 4RUNNER With/MR 2010-10.2 Overhead Video Part Number: 00016-00110; Fit Kit-00110-14, Beige 00016-00120; Fit Kit-00120-14, Gray Accessory Code: ED7 Conflicts: Vehicles without a sunroof Kit Contents:
TOYOTA SIENNA XM SATELLITE RADIO Preparation
 Preparation Part Number: Mounting Kit: PT546-08070 Tuner Assy: 86180-0W031 Tuner Assy Kit Contents (86180-0W031) Item # Quantity Reqd. Description 1 1 Tuner Assy, Stereo Component Mounting Kit Contents
GENUINE PARTS INSTALLATION INSTRUCTIONS
 GENUINE PARTS INSTALLATION INSTRUCTIONS 1. 2. 3. 4. DESCRIPTION: APPLICATION: PART NUMBER: KIT CONTENTS: Accent light Kit Versa Note 999F3 4Z000 - Accent Lighting Kit. 999Q9 AY000 - Accessory Service Connector
LEXUS RC 350/RC-F ILLUMINATED DOOR SILLS Preparation
 Preparation Part Number: PT944-24150 Kit Contents Item # Quantity Reqd. Description 1 2 Inner LED Scuff 2 2 Outer Scuff 3 1 Hardware Bag Hardware Bag Contents Item # Quantity Reqd. Description 1 15 20
TOYOTA SIENNA LED DRL Black-Out
 TOYOTA SIENNA 2013 - LED DRL Black-Out Part Number: 00016-08021 Accessory Code: LDBO10 Conflicts - Fog Lights Kit Contents Item # Quantity Reqd. Description 1 2 DRL Housing 2 2 DRL s bezels 3 1 Driver
INSTALLATION INSTRUCTIONS
 INSTALLATION INSTRUCTIONS Accessory Application Publications No. SYSTEM 2005 ACCORD All 27511 (DX, LX) 2-AND 4-DOOR Issue Date AUG 2004 PARTS LIST Security System Attachment (LX): P/N 08E55-SDA-100A Unit