Crestline Dampening System. Installation Instructions. Ryobi 500N X /98
|
|
|
- Douglas Riley
- 5 years ago
- Views:
Transcription
1 Crestline Dampening System Installation Instructions Ryobi 500N X /98
2 GENERAL INFORMATION ATTENTION CRESTLINE DAMPENER OWNER! Accel Graphic Systems provides parts and service through its authorized distributors and dealers. Therefore, all requests for parts and service should be directed to your local dealer. The philosophy of Accel Graphic Systems is to continually improve all of its products. Written notices of changes and improvements are sent to Accel Graphic System's Dealers. If the operating characteristics or the appearance of your product differs from those described in this manual, please contact your local Accel Graphic System's Dealer for updated information and assistance. Always update your dampener when improvements are made available, especially those related to safety. YOUR AUTHORIZED CRESTLINE DEALER IS: THE SERIAL NUMBER OF YOUR CRESTLINE DAMPENER(S) IS: 2 SAFETY INFORMATION TECHNICAL ASSISTANCE FOR YOUR SAFETY, DO NOT DISENGAGE OR REMOVE ANY GUARDS FROM THE CRESTLINE DAMPENER. THE DAMPENER CONTAINS SOME INWARD ROTATING ROLLER NIPS THAT CAN CAUSE INJURY IF LEFT UNGUARDED. For technical assistant during the installation, please contact: ACCEL GRAPHIC SYSTEMS Indian Trail Dallas, TX Phone (972) Fax (800) accel@dallas.net Web Site accelgraphicsystems.com Crestline is covered by U.S. Patents and patents pending.
3 GENERAL INFORMATION BASIC CONFIGURATION OF CRESTLINE Metering To Pan Pressure 3/16" Metering Roller Metering To Intermediate Pressure 1/8" - 5/32" Pan Roller Intermediate Roller Oscillator Water Form Roller Form To Plate Pressure 5/32" REQUIRED TOOLS 1. Phillips Screwdriver 2. Standard Screwdriver 3. 3/32" Allen Wrench 4. 1/8" Allen Wrench 5. 5/32" Allen Wrench 6. 7/16" Open End Wrench 7. 1/2" Open End Wrench mm Allen Wrench 9. 3 mm Allen Wrench mm Allen Wrench mm Open End Wrench 12. Spring Hook Tool 3

4 4
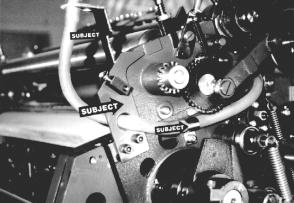
5 DISASSEMBLY 1 AT OPS & NOPS, remove operating handles and side covers. Also remove molleton covered rollers from existing dampener. 2 Remove plate at OPS (subject arrow). Save the following pieces for use in the Crestline installation: A. Small black block and bolt securing it to the plate. B. Phillips head cover screw. C. Bolts and lock washers securing plate to press frame. ATTENTION! The newer model Ryobi 500N presses do not use the small black block to attach the side cover. Accel is now providing these blocks as well as the hardware to attach it to the plate. 3 Remove the plate at the NOPS (subject arrow) Save the same pieces listed in Step 4 for future use. Loosen clip (subject arrow) and remove water hose from holder (subject arrow). 5


6 6
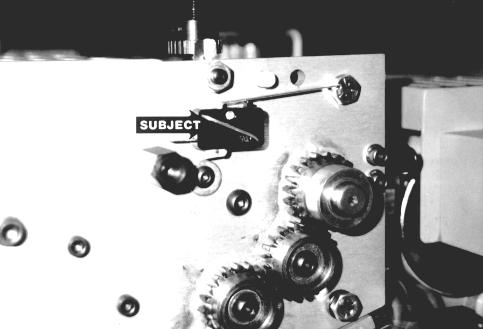
7 DISASSEMBLY 4 Remove "E" clip and washer (subject arrow) and save for later use. Loosen set screw (subject arrow) and remove linkage. 5 Remove the four bolts securing existing dampener to the press frames. Dampener should then be lifted off the press. 6 There are two recessed screws (subject arrow) at OPS & NOPS which secure guide pins. Replace them with the provided long set screws #05-157M25, making sure to push guide pins inward when tightening. Screws will protrude above press frame when installed. YOU ARE NOW READY TO INSTALL CRESTLINE. 7


8 8
9 INSTALLATION 1 The dampener is shipped attached to the mounting assembly. Remove the two extension springs and pivot bolts to separate the assembly from the dampener. Place the assembly on the press frame as shown. The two protruding set screws will pass through the lower slots in the mounting brackets (subject arrow). Install provided countersunk screws #05-147M12 (subject arrow) at OPS and NOPS and tighten. Install provided nuts # on the set screws (subject arrow) and tighten. Make sure the lift shaft turns freely. 2 Install provided linkage as shown. Use washer and "E" clip from old single lever linkage to attach to press arm (subject arrow). Do not tighten set screw in control block (subject arrow) at this time. NOTE: Behind arm (subject arrow) there may be a bearing. Push 3 the bearing inward to position the arm as shown. Place the dampener on the frame work. Install the bolts # and pivot spools # (subject arrow) and springs # between the studs (subject arrow). Make sure the dampener form roller is centered relative to the ink form rollers. 9


10 10
11 INSTALLATION 4 Install the OPS press cover mounting plate # (subject arrow). Make sure that the cover screw block is on the outside as shown in the picture. Position and angle the plate as shown when installing. 5 Install the NOPS press cover mounting plate # (subject arrow). Make sure that the cover screw block is on the outside as shown in the picture. Angle the plate as shown when installing. Route the water hose #99-29 from the pan through the clip (subject arrow). Tighten clip. Replace the metal cap from the end of the old water hose onto the new one. YOUR ARE NOW READY TO MAKE FINAL ADJUSTMENTS. 11


12 12
13 FINAL ADJUSTMENTS 1 LIFT ADJUSTMENT Operate the single lever a few time and make sure things are moving smoothly. Place the single lever in the "dampener on" position. Position the cam (subject arrow) so that the flat side is approximately parallel with the top of the mounting block and tighten set screw in black control block. Return single lever to the "Off" position. The lift cams should then rotate and the round portion should pass underneath adjusting eccentrics (subject arrow). Adjust the eccentrics on the OPS & NOPS to get an even.030" -.040" gap between the dampener form and plate cylinder. WARNING: Do no change the position of the cams on the shaft. They are paralleled at the factory. P M I F O 2 FORM ROLLER TO PLATE CYLINDER PRESSURE Mount a plate on the press. Dab some ink on the dampener oscillator and turn on the press to distribute. Turn off the press and lower the dampener to the plate to check the stripe. The proper setting is an even 5/32" (4mm) across the plate. Adjust the stripe by turning the screws (subject arrow) in the blocks. Turning the screws down makes a thinner stripe and vice versa. Adjust to 5/32" (4mm) and secure the screws with the lock nuts. 5/32" (4mm) Plate Cylinder P M I F 1/8" (3mm) O 3 INTERMEDIATE TO METERING ROLLER PRESSURE Next check the stripe between the intermediate and metering rollers by dropping the dampener to the plate and turning the press backwards by hand. The strip should be parallel and between 1/8" and 5/32" (3-4mm). If not, loosen top screw in hanger brackets. Also loosen bottom screws, but keep a little tension against the hanger brackets. The hangers will pivot around bottom screw since the top screw hole is oversize. Reset brackets as needed and retighten all screws. Plate Cylinder 13

14 14
15 3/16" (5mm) P M I F Plate Cylinder O 4 FINAL ADJUSTMENTS MAXIMUM METERING TO PAN ROLLER PRESSURE Place the dampener in the "Off" position. Turn the press on and let the press idle for 20 seconds. After the press sits still for 20 seconds, check the stripe between the pan and metering rollers by bumping hand wheel. It should be 3/16" (5mm). Adjust by turning the knurled knobs (subject arrow). Turning the knobs down makes a wider stripe. The ratchet gear (subject arrow) is not locked to the knob at this time. Once the pan to metering roller has been set at 3/16", spin ratchet gears down (while holding the knobs still) until they bottom out on the stud and lock in place with set screws. This position is minimum water. 5 Apply a small amount of grease on the dampener gears, lift cams, and springs. 6 Reinstall the upper press side covers and adjust the cover screw blocks on the plates (plates installed in Steps 4 & 5, Dampener Installation Instructions) to hold the covers properly. Tighten phillips head cover screws. 15


16 16
17 FINAL ADJUSTMENTS 7 LEVEL OF WATER PAN Place full water bottle in dampener pan and check water level. It should be about half way up the pan. Adjust bottle if necessary. Raising bottle bracket will raise the water level and vice-versa. 8 Remove old plate cylinder guard. Install new, shorter cylinder guard # using the same hinges as before. 9 Attach inker extension guard # as shown using 3 flanged nuts # provided. (View is from ink fountain looking back toward feeder.) 17


18 18
19 FINAL ADJUSTMENTS 10 Attach dampener guard # by sliding pivot rod through the 1/4" holes nearest the thumb screws and center guard on dampener. 11 Place trip cam #14-06 at the NOPS (subject arrow). A set collar # is provided to secure the OPS. 12 Remove press microswitch cover at NOPS. Disconnect the common wire from the press microswitch and run the new wires as diagrammed. Secure new wires with provided zip ties making sure they are clear of all gears and moving parts. Replace press switch cover when finished. Install dampener side covers. The one with the cutout goes to the NOPS. THE DAMPENER IS NOW READY TO RUN. NOTE: For a better view of the wiring diagram, see parts section drawing #SK11591A in the back of this manual. 19
20 BASIC OPERATION START OF DAY A. Make sure all rollers are secure in their proper position. B. Turn knurled knob on ratchet assembly clockwise until it stops. C. Before adding water, ink-up the dampener. This is done either by applying a small amount of ink directly to the dampener oscillator, or by dropping both water and ink form rollers to the plate and allowing the dampener to ink-up from the plate. D. Place water bottle in bracket. Accel recommend using the proper fountain solution formulated for the specific plate type being run on the press. RUNNING DURING THE DAY A. Typically, the Crestline Dampener should not have to be adjusted from job to job. The form roller setting should never be changed unless it has deviated from the factory specification of 5/32" to the plate. B. If necessary, the amount of water fed to the plate can be adjusted by turning the knurled ratchet knob. You are running minimum water with the knob turned fully clockwise. If you need more water, loosen the lock-knob, turn ratchet assembly counterclockwise one "click" at a time until proper moisture is achieved, then retighten lock knob. Make sure the arm on the pan roller shaft follows the black eccentric on the ratchet assembly. If necessary, turn the knurled knob on the pan roller shaft until the aluminum arm stops against the eccentric. 20
21 CLEANING & MAINTENANCE WASH UPS DURING THE DAY 1. Remove bottle and drain the excess water from the pan. 2. Mount a cleanup mat to the press. 3. Turn on the press and squirt a small amount of press wash on the ink rollers and dampener oscillator. Avoid excessiveapplication of wash to the dampener or most of it will end up in the water pan. Do not use an extremely fast drying wash on the dampener as this can damage soft rubber. Fast-dry washes should only be used on blankets! 4. Drop both the dampener and ink forms to the cleanup mat. 5. Remove water pan and clean any solution left in it. 6. Be sure to wipe excess clean up solution from the ends of the dampener metering and pan rollers. END OF THE DAY 1. Wash up dampener as describe above. Pay close attention to cleaning the ends of the pan and metering rollers that extend past the form rollers. 2. Spin the knurled knob counterclockwise and relieve pressure between the metering and pan rollers. 3. Remove any excess wash that may remain on dampener metering and pan rollers. 21
22 CLEANING & MAINTENANCE DEGLAZING THE DAMPENER Periodic deglazing of water-soluble contaminants will be necessary with the Crestline. Typically, once every 2-3 weeks will be sufficient, unless you are running electrostatic plates on a daily basis whereas deglazing should be performed weekly. A 50/50 solution of household ammonia and hot water can be used for deglazing purposes. If you prefer a commercially available deglazer, avoid those containing pumice or gritty substances. Always follow deglazing with straight water and then roller wash OILING AND GREASING THE DAMPENER A. Place a small amount of grease on the gears once a month. B. Inject grease into the oscillator grease fitting one a month. 22
23 CLEANING & MAINTENANCE CRESTLINE CLEANING & MAINTENANCE CHART Daily Weekly Bi-Weekly Monthly Wash Rollers Deglaze Rollers Metal Plate Users Silvermaster Plate Users Electrostatic Plate Users Grease Gears Inspect Ball Bearings Check Roller Pressures Check Roller Surfaces 23
24 1
25
26
27
28
29
30
31
32
33
34
35
36
37
38
39
40
41
42
43
44
45
46
47
48
49
50
51
52
53
54 11103 Indian Trail Dallas, TX Phone , Fax Web Site accelgraphicsystems.com
Crestline Dampening System
 Crestline Dampening System Installation Instructions Ryobi 3200 MCD Itek 985 X88-31 Rev-A 5/98 GENERAL INFORMATION ATTENTION CRESTLINE DAMPENER OWNER! Accel Graphic Systems provides parts and service through
Crestline Dampening System. Installation Instructions. A.B. Dick 350, 360, 375 Single & Dual Lever Machines. X /01 Rev-A
 Crestline Dampening System Installation Instructions A.B. Dick 350, 360, 375 Single & Dual Lever Machines X88-20 01/01 Rev-A GENERAL INFORMATION ATTENTION CRESTLINE DAMPENER OWNER! Accel Graphic Systems
CRESTLINE DAMPENING SYSTEM INSTALLATION INSTRUCTIONS. Ryobi 3302M Itek 3985 A.B. Dick 9985 X /99
 CRESTLINE DAMPENING SYSTEM INSTALLATION INSTRUCTIONS Ryobi 3302M Itek 3985 A.B. Dick 9985 X88-32 3/99 GENERAL INFORMATION ATTENTION CRESTLINE DAMPENER OWNER Accel Graphic Systems provides parts and service
Crestline Dampening System. Installation Instructions. Hamada RS34 & VS34 Satellite Unit. For Presses Originally Equipped With. Integrated Dampeners
 Crestline Dampening System Installation Instructions Hamada RS34 & VS34 Satellite Unit For Presses Originally Equipped With Integrated Dampeners X88-113 01/2001 Rev-A GENERAL INFORMATION ATTENTION CRESTLINE
Crestline Dampening System Installation Instructions
 Crestline Dampening System Installation Instructions Hamada RS/ VS 34 II Parent Unit DU 34 II Upper Unit X88-104 Rev-B 01/2001 GENERAL INFORMATION ATTENTION CRESTLINE DAMPENER OWNER! Accel Graphic Systems
Altra Series Dampener
 Crestline TM Altra Series Dampener Installation Instructions Ryobi 512 X88-69 10/98 Rev-A GENERAL INFORMATION ATTENTION CRESTLINE ALTRA SERIES TM DAMPENER OWNER! Accel Graphic Systems provides parts and
Crestline Altra TM Series Dampener. Installation Instructions. Didde MCP/Conserver. X /2001 Rev-A
 Crestline Altra TM Series Dampener Installation Instructions Didde MCP/Conserver X88-55 01/2001 Rev-A GENERAL INFORMATION ATTENTION CRESTLINE ALTRA TM SERIES DAMPENER OWNER! Accel Graphic Systems provides
Crestline Altra Series TM Dampener. Installation Instructions. Heidelberg GTO. X /98 Rev-A
 Crestline Altra Series TM Dampener Installation Instructions Heidelberg GTO X88-63 7/98 Rev-A GENERAL INFORMATION ATTENTION CRESTLINE ALTRA SERIES TM DAMPENER OWNER! Accel Graphic Systems provides parts
PowderPro Spray System
 PowderPro Spray System Installation Instructions Hamada C248 X88-72 10/98 REV-C 2657 GENERAL INFORMATION ATTENTION POWDERPRO OWNER! Accel Graphic Systems provides parts and service through its authorized
Roller Removal Instructions
 Roller Removal Instructions Rollers for the Crestline dampener are broken down into numerical categories as follows: Prefix Roller Position Prefix Roller Position x07-01.. Form Roller x07-04.. Oscillator
INSTALLATION INSTRUCTIONS FOR DSP9600/9100 WHEEL BALANCER
 Form 5063T, 06-05 Supersedes Form 5063T, 02-04 INSTALLATION INSTRUCTIONS FOR DSP9600/9100 WHEEL BALANCER This document provides the information needed to install the DSP9600/9100 Wheel Balancer. NOTE:
Installation Manual TWM Performance Short Shifter Cobalt SS/SC, SS/TC, HHR SS, Ion Redline and Saab 9-3
 Page 1 Installation Manual TWM Performance Short Shifter Cobalt SS/SC, SS/TC, HHR SS, Ion Redline and Saab 9-3 Please Note: It is preferable to park on a flat surface, as you will have to engage and disengage
AmTryke Adult Recumbent Model JT2000 #50-FC-2000
 AmTryke Adult Recumbent Model JT2000 #50-FC-2000 TOOLS Needed for Assembly 5 mm Allen Wrench 8 mm Socket or Wrench 10 mm Socket or Wrench 14 mm Socket or Wrench 15 mm Socket or Wrench 22 mm Socket or Adjustable
HYDRAULICS. TX420 & & lower. Hydraulic Tandem Pump Removal. 4. Remove the LH side panel (Fig. 0388).
.") TX420 & 425 240000299 & lower 4. Remove the LH side panel (Fig. 0388). Hydraulic Tandem Pump Removal Note: Cleanliness is a key factor in a successful repair of any hydraulic system. Thoroughly clean all
TX420 & 425 240000299 & lower 4. Remove the LH side panel (Fig. 0388). Hydraulic Tandem Pump Removal Note: Cleanliness is a key factor in a successful repair of any hydraulic system. Thoroughly clean all
Tel/Fax: Replacement parts for : MULTI 1210, 1250OS, 1250W, 1250N, 1250DOM.
 Replacement parts for : MULTI 1210, 1250OS, 1250W, 1250N, 1250DOM., 1215CD, VARIABLE SPEED PULLEY 1250 O.S. - 1/2 Shaft P-1629 1250 N.S. - 5/8 Shaft P-1649 V-BELTS 35 Motor to printing head P-4904 33 Pump
AmTryke Adult Recumbent Model HP1000 #50-HC-1000
 AmTryke Adult Recumbent Model HP1000 #50-HC-1000 TOOLS Needed for Assembly 5 mm Allen Wrench 8 mm Socket or Wrench 10 mm Socket or Wrench 14 mm Socket or Wrench 15 mm Socket or Wrench 22 mm Socket or Adjustable
Subaru 5-Speed Double Adjustable Short Throw Shifter
 Subaru 5-Speed Double Adjustable Short Throw Shifter 1999+ Subaru Impreza 5-Speed 2004-2005 Subaru Forester XT 5-Speed Congratulations on your purchase of the COBB Tuning Double Adjustable Short Throw
9905/9910/9910D/ 9910XCS/9910XC2 Service Reference Manual
 9905/9910/9910D/ 9910XCS/9910XC2 Service Reference Manual 1996, A.B.Dick Company P/N 177187 (REV. 0) WARNING: This equipment must be connected to a properly grounded three (3) wire outlet. Failure to do
INSTALLATION & OWNER S MANUAL
 Rev. E p. of 3 INSTALLATION & OWNER S MANUAL V446 Front Cab Kit and V446 Rear Cab Kit for RTV 40 INSTALLATION & OWNER S MANUAL The contents of this envelope are the property of the owner. Be sure to leave
Tooling Assistance Center
 Safeguards are designed into this application equipment to protect operators and maintenance personnel from most hazards during equipment operation. However, certain safety precautions must be taken by
Steeda S550 MT-82 Tri-Ax Race Short Throw Shifter Installation Instructions For Parts: ,
 Steeda S550 MT-82 Tri-Ax Race Short Throw Shifter Installation Instructions For Parts: 555-7317, 555-7318 Tools required 1. 7mm socket 2. 10mm socket 3. 13mm socket 4. 15mm socket 5. 18mm socket 6. 3/8
2000SR. Installation Instructions May Donovan Enterprises 3353 S.E. Gran Park Way Stuart, Florida
 311499-Donovan 4/28/04 11:22 PM Page 1 Installation Instructions May 2003 Donovan Enterprises 3353 S.E. Gran Park Way Stuart, Florida 34997 1-800-327-8287 Visit our web site at: www.donovan-ent.com 311499-Donovan
TECHNICAL INFORMATION
 TECHNICAL INFORMATION Model No. Description SP6000 Plunge Cut Circular Saw 165mm (6-1/2") CONCEPT AND MAIN APPLICATIONS Model SP6000 is the first Makita plunge cut saw. Features great conveniences such
62 Deck Idler Kit High Speed
 Part No. 00 FORM NO. -899 6 Deck Idler Kit High Speed For Model 70 Serial No. 99000 to 99000 For Model 7 Serial No. 9900 to 99000 INSTALLATION INSTRUCTIONS Loose Parts Note: Use the chart below to identify
ASSEMBLY INSTRUCTIONS / OWNERS MANUAL AIR BIKE AB-1
 AIR BIKE AB- ASSEMBLY INSTRUCTIONS / OWNERS MANUAL IMPORTANT : READ ALL ASSEMBLY INSTRUCTIONS AND SAFETY PRECAUTIONS BEFORE USING THIS PRODUCT. REFERENCE ALL SAFETY GUIDELINES AND WARNING LABELS. RETAIN
INSTALLATION AND OPERATING INSTRUCTIONS
 ASTRO ENVELOPE FEEDER AMC-2000-5 FOR RYOBI 3302 / ITEK 3985 (2 COLOR) INSTALLATION AND OPERATING INSTRUCTIONS INTRODUCTION Thank you for purchasing the Astro Envelope Feeder. It is fast, efficient, reliable,
CALIFORNIA TRIMMER MOWER MAINTENANCE MANUAL
 CALIFORNIA TRIMMER MOWER MAINTENANCE MANUAL 2 Table of Contents Section 1: General Information Page Handle Assembly Instructions 4 Maintenance All Models 6 Oil Change Procedures All Models 9 Height Adjustment
"Engineered to Ride, Built to Last "
 Congratulations on your purchase of an Arnott air suspension product. We at Arnott Incorporated are proud to offer a high quality product at the industry s most competitive pricing. Thank you for your
INSTALLATION & OWNER S MANUAL
 Rev. A, p. of 0 INSTALLATION & OWNER S MANUAL MASSEY FERGUSON GC2400 cab kit p/n MFGC2400 Installation Instructions The contents of this envelope are the property of the owner. Be sure to leave with the
One- Touch Installation Instructions
 One- Touch Installation Instructions 1 1 Height Adjustable Pivot w/ screws 9 Upper Work Surface 2 Rail Mount Knobs 10 Back Cover 3 Transformer 11 Center Pivot w/ screws 4 Support Legs 12 Left Monitor Arm
Assembly Manual. 1/10th Formula 1 Car
 Assembly Manual 1/10th Formula 1 Car Center Pivot Bag 1 3374 - Center Pivot Socket 40194 - Hard Anodized Alum Pivot ball 3254-2-56 *Note - Sometimes it is helpful to slightly over-tighten the top clamp
Installation Manual TWM Performance Short Shifter Nissan 350Z, 370Z Infiniti G35, G37
 Installation Manual TWM Performance Short Shifter Nissan 350Z, 370Z Infiniti G35, G37 It is preferable to park on a flat surface, as you will have to engage and disengage the hand brake and shift from
SUT-450-I ASSEMBLY REQUIREMENTS
 SUT-450-I Torque wrench, carpenters square, wire cutters, Phillips screwdriver, 7/16, 9/16, and 3/4 combination wrenches, ratchet, 9/16,3/4,13/16, and 7/8 sockets. ASSEMBLY REQUIREMENTS *Torque all T-bolt
STEERING COLUMN FOR CARS WITH 605, 670(500) OR DELPHI(600) POWER STEERING
 OR DELPHI(600) POWER STEERING") by Randy Irwin 1955-57 STEERING COLUMN FOR CARS WITH 605, 670(500) OR DELPHI(600) POWER STEERING Tools Needed: Philips Screwdriver 7/16 Wrench 1/2 Deep Socket And Ratchet Randy Irwin - Technical Writer
by Randy Irwin 1955-57 STEERING COLUMN FOR CARS WITH 605, 670(500) OR DELPHI(600) POWER STEERING Tools Needed: Philips Screwdriver 7/16 Wrench 1/2 Deep Socket And Ratchet Randy Irwin - Technical Writer
Chrysler 727, 904, 518 Floor Mount Automatic Transmission Shifter Installation Instructions
 Chrysler 727, 904, 518 Mount Automatic Transmission Shifter Installation Instructions Building American Quality With A Lifetime Warranty! TOLL FREE 1-877-469-7440 tech@lokar.com www.lokar.com Release Button
Land Cruiser FJ80 and FZJ80 Double Swingout Rear Bumper Installation Instructions PRELIMINARY
 Land Cruiser FJ80 and FZJ80 Double Swingout Rear Bumper Installation Instructions Fits 1991-1997 80 Series Land Cruiser / Lexus LX450 PRELIMINARY Thank you for purchasing a Rear Bumper for your Land Cruiser.
INSTALLATION & OWNER S MANUAL
 p. 1 of 15 INSTALLATION & OWNER S MANUAL YANMAR Sc2450 cab kit with hard doors and soft rear curtain Curtis p/n: 1CYSC2450AS The contents of this envelope are the property of the owner. Be sure to leave
Procharger Stage II Intercooled Supercharger System (11-14 GT)
") Procharger Stage II Intercooled Supercharger System (11-14 GT) Installation Time: Approximately one day. Installed on 2012 Mustang GT 5.0/Manual Required Tools 3/8 Socket Set (Standard and Metric) 1/2
Procharger Stage II Intercooled Supercharger System (11-14 GT) Installation Time: Approximately one day. Installed on 2012 Mustang GT 5.0/Manual Required Tools 3/8 Socket Set (Standard and Metric) 1/2
phone
 AS-25-59 Ball AS-035508 Pinion Housing Bearing AS-035515 Bearing AS-036552 Ink Fountain Adjusting Screw AS-051120 Bearing call for details AS-053111 Cam Follower AS-087047 Bearing Hanger Bracket Assembly
INSTALLATION INSTRUCTIONS
 Accessory Application Publication No. INSTALLATION INSTRUCTIONS 2 PIECE FOLDING POLY WINDSCREEN (OPTICAL) P/N 0SR72-HL3-100 SXS700M4/M2 Honda Dealer: Please give a copy of these instructions to your customer.
Barton Short Throw Shifter 11/12 V6, GT Mustang:
 Barton Short Throw Shifter 11/12 V6, GT Mustang: Tools Required: 10mm deep socket Socket wrench 10 extension for socket wrench Jack Jack stand Small piece of wood Small hook tool (recommended) *can be
FOR SIT-STAND WORKSTATION
 INSTALLATION MANUAL FOR SIT-STAND WORKSTATION Weight Capacity: 6.5-24.5 lbs. 6017180 Rev. B Contents Tools Required / Supplied Part Kits / Warnings/Disclaimers...2 Base Installation Clamp Mount Base Location...3
BEW engine timing belt replacement procedure from MOGolf (as demonstrated on a 2004 Jetta).
.") BEW engine timing belt replacement procedure from MOGolf (as demonstrated on a 2004 Jetta). Based on the procedure published by Volkswagen, but modified for the "average" shadetree mechanic. Some special
BEW engine timing belt replacement procedure from MOGolf (as demonstrated on a 2004 Jetta). Based on the procedure published by Volkswagen, but modified for the "average" shadetree mechanic. Some special
INSTALLATION INSTRUCTIONS
 INSTALLATION INSTRUCTIONS Accessory TWO-PIECE POLY (HARD COAT) P/N 0SR71-HL4-A00 Application SXS1000M/M3P/M5D/M5P Honda Dealer: Please give a copy of these instructions to your customer. Publication No.
Spares Suitable for Heidelberg S Series Machines
 23360 Screw Driver 515 mm. Total Length 23362 Swing Gripper Side Spring 23363 Clip For Coil Spring 20104 Chain Delivery Gripper 20109 Chain Delivery Gripper Clamp Old Type 20110 Chain Delivery Gripper
phone
 AS-25-59 Ball AS-035508 Pinion Housing AS-035512 AS-036552 Ink Fountain Adjusting Screw AS-053111 Cam Follower sliding block fountain AS-085015 AS-087459 Idler Gear AS-1001705 Set Screw AS-1023953 Top
Brake System H TX, H2.0TXS [B475]; H TX [B466] Safety Precautions Maintenance and Repair
![Brake System H TX, H2.0TXS [B475]; H TX [B466] Safety Precautions Maintenance and Repair](/thumbs/86/93834005.jpg "Brake System H TX, H2.0TXS [B475]; H TX [B466] Safety Precautions Maintenance and Repair") HMM180001 Brake System H1.5-1.8TX, H2.0TXS [B475]; H2.5-3.5TX [B466] Safety Precautions Maintenance and Repair When lifting parts or assemblies, make sure all slings, chains, or cables are correctly fastened,
HMM180001 Brake System H1.5-1.8TX, H2.0TXS [B475]; H2.5-3.5TX [B466] Safety Precautions Maintenance and Repair When lifting parts or assemblies, make sure all slings, chains, or cables are correctly fastened,
DAKE / JOHNSON VERTICAL BAND SAW
 DAKE / JOHNSON VERTICAL BAND SAW Model F - 6 INSTRUCTION MANUAL MODEL:F-6 SERIAL NUMBER: DATE PURCHASED: Need band saw blades? Call Dake DAKE (Division of JSJ) 724 Robbins Road Grand Haven, Michigan 4947
# C5/C6
 Part # 00-998-0 C/C Level CoilOver System Front Components: 0 Front Coilovers Recommended Tools Rear Components: 0 Rear Coilover Miscellaneous Components: 8000000 Spanner Wrench 998-0 C/C Level Coilover
Technical Support (707)
") Installation Instructions UNIMATIC SHIFTER Fits: GM, Powerglide, Ford and Chrysler Transmissions See Application Guide for Specific Vehicles Catalog # 80775 WORK SAFELY! For maximum safety, perform this
Installation Instructions UNIMATIC SHIFTER Fits: GM, Powerglide, Ford and Chrysler Transmissions See Application Guide for Specific Vehicles Catalog # 80775 WORK SAFELY! For maximum safety, perform this
Powerglide Automatic Floor Mount Shifter Installation Instructions
 Powerglide Automatic Mount Installation Instructions Building American Quality With A Lifetime Warranty! TOLL FREE 1-877-469-7440 (865) 966-2269 FAX (865) 671-1999 tech@lokar.com www.lokar.com Powerglide
SINGLE WIDE MASTER CATALOG GOSS COMMUNITY UNIT GOSS COMMUNITY FOLDER
 SINGLE WIDE MASTER CATALOG GOSS COMMUNITY UNIT GOSS (Click on the name to be taken to that section) Stocking Manufacturer of Quality Replacement Parts (815) 965-0884 Fax (815)965-1049 Welcome to the Quality
Chevrolet Cobalt Short Shifter Installation Manual
 Chevrolet Cobalt Short Shifter Installation Manual Pull shift boot down on the shifter shaft. Pull up on the shift knob to remove it. It requires some force. Remove the ebrake console, shifter console
INSTALLATION & OWNER S MANUAL
 Rev. C, p. of 2 INSTALLATION & OWNER S MANUAL KUBOTA B2650/3350 Hard Sided Cab p/n KB33AS Soft Sided Cab p/n KB33SS Installation Instructions The contents of this envelope are the property of the owner.
Installation Instructions QUARTER STICK Fits: 2 Speed (Powerglide) or 3 Speed (Turbo-Hydramatic)
 or 3 Speed (Turbo-Hydramatic)") Installation Instructions QUARTER STICK Fits: 2 Speed (Powerglide) or 3 Speed (Turbo-Hydramatic) Catalog# 3160020 WORK SAFELY! For maximum safety, perform this installation on a clean, level surface and
Installation Instructions QUARTER STICK Fits: 2 Speed (Powerglide) or 3 Speed (Turbo-Hydramatic) Catalog# 3160020 WORK SAFELY! For maximum safety, perform this installation on a clean, level surface and
Honda Civic Oil Change
 1988-1991 Honda Civic Oil Change Change the oil in your '88-'91 Honda Civic to improve engine performance and longevity. Written By: Phillip Takahashi ifixit CC BY-NC-SA www.ifixit.com Page 1 of 13 INTRODUCTION
Installation Instructions Unimatic Shifter
 Installation Instructions Unimatic Shifter Universal Shifter for Automatic Transmissions Part Number 80775 2000 by B&M Racing & Performance Products LLC The B&M Unimatic is a universal shifter that will
TCI FastGate Shifter Installation Instructions
 151 INDUSTRIAL DRIVE ASHLAND, MISSISSIPPI 38603 http://www.tciauto.com TELEPHONE: 662-224-8972 FAX LINE: 662-224-8255 E-MAIL: tech@tciauto.com TCI 616541 FastGate Shifter Installation Instructions The
INSTALLATION & OWNER S MANUAL
 Rev. B, p. 1 of 25 INSTALLATION & OWNER S MANUAL POLARIS RANGER RCS (for models XP or HD) (for model years 2009-) cab without doors kit (p/n 1POLRCWD) cab with doors kit (p/n 1POLRC) doors only kit (p/n
1 Green Pressure Regulator Spring Automatic transmissions operate at temperatures between 150ºF and
 Installation Instructions for 603107 Valve Body Kit C-4 1970 & Later Tools Required Speed Handle or Ratchet 3/8 Drive 1/2 Socket 3/8 Drive 7/16 Socket 3/8 Drive 5/16 Socket 3/8 Drive Small Screwdriver
Conflicts: Vehicles without a sunroof Vehicles with a single sunroof
 Toyota Sienna (Dual Sunroof) 2011-10.2 Overhead Video Part Number: 00016-00110 00016-00110-17 Fit Kit 00016-00120 00016-00120-17 Fit Kit Accessory Code: ED5 Conflicts: Vehicles without a sunroof Vehicles
Chrysler 727, 904, and 518 Automatic Trans Mount Shifter Installation Instructions
 Chrysler 727, 904, and 518 Automatic Trans Mount Installation Instructions Building American Quality With A Lifetime Warranty! TOLL FREE 1-877-469-7440 tech@lokar.com www.lokar.com Chrysler 727, 904, and
Installation Instructions COMPETITION/PLUS SHIFTER Ford Mustang MT82 6-Speed Manual Transmission Catalog#
 Installation Instructions COMPETITION/PLUS SHIFTER 2015-2017 Ford Mustang MT82 6-Speed Manual Transmission Catalog# 3916037 Rev. 00 WORK SAFELY! For maximum safety, perform this installation on a clean,
INSTALLATION AND OPERATING INSTRUCTIONS
 ASTRO ENVELOPE FEEDER AMC-2000 INSTALLATION AND OPERATING INSTRUCTIONS INTRODUCTION Thank you for purchasing the Astro Envelope Feeder. It is fast, efficient, reliable, and designed to provide many years
Short Shifter Installation Instructions For Miata, 6-speed Manual Transmission
 Short Shifter Installation Instructions For 2006-15 Miata, 6-speed Manual Transmission PART# 994-060 Required tools: 10mm deep socket Long extension Ratchet Small flathead screwdriver Phillips-head screwdriver
FlexJet Carriage Circuit Board (PCB) Replacement
 Replacement") P/N: 111484 R0 14140 NE 200th St. Woodinville, WA. 98072 PH: (425) 398-8282 FX: (425) 398-8383 ioline.com FlexJet Carriage Circuit Board (PCB) Replacement Notices: Warning! Ensure that all AC power cables
P/N: 111484 R0 14140 NE 200th St. Woodinville, WA. 98072 PH: (425) 398-8282 FX: (425) 398-8383 ioline.com FlexJet Carriage Circuit Board (PCB) Replacement Notices: Warning! Ensure that all AC power cables
N62 & N62-TU Valve Stem Seal Tool Kit
 N62 & N62-TU Valve Stem Seal Tool Kit Part #: AGA-N62-VST-K Problem: You have a smoking BMW due to bad valve stem seals. The valve stem seal problem is that the old valve stem seal becomes hard over time
RAMPAGE POWER LIFT RAMP
 RAMPAGE POWER LIFT RAMP INSTALLATION AND OPERATING INSTRUCTIONS (3/10/07) The Rampage Power Lift Ramp is the fast, easy, and safe way to load a motorcycle into a truck. One person can load or unload a
phone
 AS-035508 Pinion Housing AS-035511 AS-035512 AS-040502 AS-040504 Locknut sliding block fountain AS-053111 Cam Follower AS-082220 Lockwasher AS-085015 AS-087459 Idler Gear AS-1001705 Nylon Tip Set Screw
SUT-250-S (These instructions are used for SUT-250-SCLC also)
") SUT-250-S (These instructions are used for SUT-250-SCLC also) Torque wrench, carpenters square, wire cutters, Phillips screwdriver, 7/16, 9/16, and 3/4 combination wrenches, ratchet, 9/16, 3/4, 13/16,
SUT-250-S (These instructions are used for SUT-250-SCLC also) Torque wrench, carpenters square, wire cutters, Phillips screwdriver, 7/16, 9/16, and 3/4 combination wrenches, ratchet, 9/16, 3/4, 13/16,
INSTALLATION & OWNER S MANUAL
 Rev. G, p. 1 of 19 INSTALLATION & OWNER S MANUAL YANMAR Sc SERIES cab kit with hard doors and soft rear curtain Curtis p/n: 1CYSC1AS Yanmar p/n: 59A40056727 Optional Hard Rear Panel Curtis p/n: SC100-06A
Installation Instructions Unimatic Shifter
 Installation Instructions Unimatic Shifter Universal Shifter for Automatic Transmissions Part Number 80775 2010, 2000 by B&M Racing & Performance Products The B&M Unimatic is a universal shifter that will
INSTALLATION AND OPERATING INSTRUCTIONS
 ASTRO ENVELOPE FEEDER AMC-2000 INSTALLATION AND OPERATING INSTRUCTIONS INTRODUCTION Thank you for purchasing the Astro Envelope Feeder. It is fast, efficient, reliable, and is designed to give you many
C5/C6 Level 2 Coilover
 Part # 5020-998-203 C5/C6 Level 2 CoilOver System Front Components: 530 Front Coilovers Recommended Tools Rear Components: 560 Rear Coilover Miscellaneous Components: 85000000 Spanner Wrench 998-203 C5/C6
Woodward PSG Governor
 Woodward PSG Governor Linkage Adjustment PSG GOVERNOR CONTROL LINKAGE 1. Rod assembly. 2. Lever. 3. Lever. 1. Make sure levers (2 and 3) are at the SHUTOFF position (fully counterclockwise). 2. With both
TOYOTA COROLLA ILLUMINATED DOOR SILLS Preparation
 Preparation Part Number: PT942-02140 Kit Contents Item # Quantity Reqd. Description 1 1 Illuminated Scuff plate, Front Right Hand 2 1 Illuminated Scuff plate, Front Left Hand 3 1 Door Scuff plate, Rear
Ford AOD-4R70W-AODE Cable Operated Shifter Installation Instructions
 Ford AOD-4R70W-AODE Cable Operated Shifter Installation Instructions Building American Quality With A Lifetime Warranty! TOLL FREE 1-877-469-7440 tech@lokar.com www.lokar.com Ford AOD-4R70W-AODE Cable
C5/C6 Level 3 Coilover
 Part # 11510311-1998-2013 C5/C6 Level 3 CoilOver System Front Components: 11513111 Front Coilovers Recommended Tools Rear Components: 11516111 Rear Coilover Miscellaneous Components: 85000000 Spanner Wrench
Type 2 Push-Through 37 Ton Log Splitter. Assembly Manual
 Type 2 Push-Through 37 Ton Log Splitter Assembly Manual Refer to this manual for the following models: RS37PT-LF09PC-16-1 RS37PT-LF09EC-16-1 RS37PT-LF09EC-16-2 RS37PT-LF13EC-22-1 RS37PT-LF13EC-22-2 RS37PT-LF15EC-22-1
A special Tool for the inspection of brake components and diagnosis of difficult to identify cases of vibration.
 AGA Brake Rotor Gauge Kit Part #: AGA-BRG-K BMW Part #: 83 30 2 457 555 A special Tool for the inspection of brake components and diagnosis of difficult to identify cases of vibration. Measures run-out
WARNING! THIS SHIFTER IS FOR RACING USE ONLY. NOT FOR STREET USE!
 Installation Instructions Quarter Stick Shifter Fits: GM Powerglide w/forward or reverse valve body. Also fits: TH250, TH350, TH375 and TH400 Auto transmissions w/reverse valve body. Catalog# 3162020 WORK
Installation Guide. Philips MP20/30/40/50 IntelliVue VHM Wall Mount Kit
 Installation Guide Philips MP20/30/40/50 IntelliVue VHM Wall Mount Kit The purpose of this guide is to: 1. Describe attachment of Table Top Mount to Mounting Adapter. 2. Describe attachment of Mounting
CHAINGUARD REGAL ST COLOR
 DESOTO/ REGAL HAULER PARTS LIST Item Part # Description QTY Item Part # Description QTY 1 11871 REFLECTOR KIT TRIKE 1 32 11764 FENDER BRACE 24" MWT 1 2 12199 SCREW #14 x 3/4 4 33 12176 NUT5/16-24 HEX 2
GM 6-Cylinder Cam Tool Set 3.0L and 3.2L Operating Instructions
 GM 6-Cylinder Cam Tool Set 3.0L and 3.2L Operating Instructions Set Includes: Locking Tool... 536594 Locking Tool... 536595 Crankshaft Holding Tool... 536596 Alignment Gauge... 536608 Belt Installation
Return to Instruction Sheet index. Installation Instructions For C-4 70 and Later, Except 70 Falcon
 Page 1 of 8 Return to Instruction Sheet index TCI 260100 Trans-Scat Automatic Transmission Installation Instructions For C-4 70 and Later, Except 70 Falcon TCI 260100 Kit Contains: Qty. Description One
PRO RATCHET UNIVERSAL SHIFTER
 Installation Instructions PRO RATCHET UNIVERSAL SHIFTER Fits: GM, Ford and Chryslers w/automatic Transmission See Application Guide for Specific Vehicles Catalog # 80842 WORK SAFELY! For maximum safety,
INSTALLATION & OWNER S MANUAL
 Rev. D, p. 1 of 14 INSTALLATION & OWNER S MANUAL Bobcat CT 230 and KIOTI CK30 cab kit with hard doors and soft rear curtain p/n 1BCT230 & 1KTCK30 The contents of this envelope are the property of the owner.
Universal Super Shield & Ultimate Aluminum w/electric Drive Conversion Kits , , Installation Instructions
 WLH 09/19/16 111-0215 & 112-0215 607-0026 For technical support call us at (800) 368-3075 or visit our website at PullTarps.com. TABLE OF CONTENTS ***Assembly*** Conversion Kit-Universal Super Shield ***Wiring,
Installation Instructions
 Powerglide Automatic Trans Mount Installation Instructions Building American Quality With A Lifetime Warranty! TOLL FREE 1-877-469-7440 (865) 966-2269 FAX (865) 671-1999 tech@lokar.com www.lokar.com Powerglide
Property of American Airlines
 Date Maintenance Check list The inspection and preventive maintenance schedule of the Power Stow Rollertrack is as follows: Daily (10 hrs), Weekly (50 hrs.), every 6 months ( hrs.), yearly (1 hrs.) and
phone
 AS-035508 Pinion Housing AS-040502 AS-040504 Locknut AS-085015 AS-1023953 Top Plate Seal AS-1080-AY Ink Fountain Divider AS-229246 Retaining Ring AS-236250 Retaining Ring AS-250-833 Water Union Tube 90
INSTALLATION INSTRUCTIONS
 INSTALLATION INSTRUCTIONS Accessory S P/N 08V31-SNA-100D Application 2010 CIVIC 4-DOOR Publications No. AII 42452 Issue Date SEP 2009 PARTS LIST Right fog light 6 Wire ties Left fog light Clip Switch harness
CHAINGUARD REGAL ST COLOR
 DESOTO/ REGAL HAULER PARTS LIST Item Part # Description QTY Item Part # Description QTY 1 11871 REFLECTOR KIT TRIKE 1 32 11762 FENDER BRACE 20" MWT 1 2 12199 SCREW #14 x 3/4 4 11764 FENDER BRACE 24" MWT
Parts and tools needed for installation- Cleaning and Painting -
 Thank you for the purchase of our JK Front Trail Doors. We have made these from 6061-T6 aluminum and reinforced them with stiffeners at the top that double as a comfortable armrest and support for Rugged
DYNATRAC THE PERFORMANCE AXLE SPECIALIST
 DYNATRAC THE PERFORMANCE AXLE SPECIALIST DynaLoc Installation Instructions, Appendix A iinformation: Dynatrac has included an additional bushing in the DynLoc kit. Part DA60-0022-L will be referred to
JARVIS. Model Buster V (CE) Beef Splitting Band Saw
 Beef Splitting Band Saw") Model Buster V (CE) Beef Splitting Band Saw EQUIPMENT SELECTION............. Ordering No. TABLE OF CONTENTS......................... Page Buster V Band Saw Shower Head.......... 4006049 Shower Head and
Model Buster V (CE) Beef Splitting Band Saw EQUIPMENT SELECTION............. Ordering No. TABLE OF CONTENTS......................... Page Buster V Band Saw Shower Head.......... 4006049 Shower Head and
Installation Manual TWM Performance Short Shifter Subaru STi 2008+
 - 1 - Installation Manual TWM Performance Short Shifter Subaru STi 2008+ Please Note: It is preferable to park on a flat surface, as you will have to engage and disengage the hand brake and shift from
TOYOTA COROLLA LOWERING SPRINGS Preparation
 Preparation Part Number: PTR07-02140 Kit Contents Item # Quantity Reqd. Description 1 2 Front Spring 2 2 Rear Spring 3 1 Hardware 4 1 Instruction Form Hardware Bag Contents Item # Quantity Reqd. Description
Written By: David Hodson
 2008-Present Scion xb Oil Change Second generation Scion xb oil change. Written By: David Hodson ifixit CC BY-NC-SA www.ifixit.com Page 1 of 19 INTRODUCTION Change the oil in your 2008 or newer Scion xb
Step-by-Step Instructions for ieq45 R.A. Worm Installation/Replacing September 2013
 Step-by-Step Instructions for ieq45 R.A. Worm Installation/Replacing September 2013 These instructions serve to explain how to Replace a R.A. worm; Adjust a RA worm/wheel meshing; Inspect and clean a RA