Parts and tools needed for installation- Cleaning and Painting -
|
|
|
- Clyde Todd Francis
- 6 years ago
- Views:
Transcription


1 Thank you for the purchase of our JK Front Trail Doors. We have made these from 6061-T6 aluminum and reinforced them with stiffeners at the top that double as a comfortable armrest and support for Rugged Ridge uppers. Center supports have also been added to give you a design that combines high strength and light weight. These are the perfect solution for those times when you need a bit more comfort and would like to leave your OEM doors protected in a safe place. Rear latch doors are difficult to open and our solution mimics the OEM doors with the unique remote front lever handle and rear latch knob. The use of a quality rotary latch on the inside affords a rattle-free experience and protects them from trail damage with an uncluttered look. Enclosed you will find a set of instructions that will enable you to install the Trail Doors with a minimum of fuss and little more than basic hand tools. If you attempt the install and find yourself not understanding what needs to be done, please contact Savvy Off Road with your technical issue. Please take the time to read these instructions and familiarize yourself with the hardware parts list before attempting your installation. The instructions are lengthy, but are written to provide you with a step-bystep guide to install the Savvy Trail Doors with minimal issues. Parts and tools needed for installation- Outside of the parts supplied in the kit, you will need personal safety equipment, assorted hand tools, allen wrenches, and a phillips screw driver to complete the installation. Cleaning and Painting - Depending on your climate and environment you may choose to paint your Trail Doors. Cleaning with brake cleaner or mineral spirits is recommended to remove the material ink markings on door skins as well as good prep if painting. Should you choose to paint your Trail Doors, it is best to do so while fully disassembled. Page 1
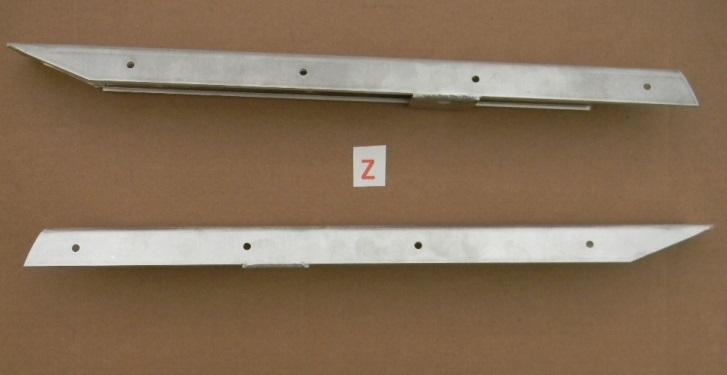
2 Hardware Parts List Hardware Quantity x 5/8" Flat Head Philips (A) Flange Nuts (B) 20 1/4-20 x 1/2" Socket Head Cap Screw ( C ) 2 1/4-20 x 3/4" Socket Head Cap Screw (D) 4 1/4-20 x 3/4" Button Head Socket Screw ( E) 4 1/4-20 Nylock Nut (F) 4 1/4 Washer (G) 4 7/16-20 x 2" Stainless Bolts (H) 4 7/16-20 Nylock Nut (I) 4 1/4 Nylock Washer (J) 2 Cables (K) 2 8/32 x 1/2 Pan Head Philips (L) 2 8/32 Nylock Nuts (M) x 3/4" Buttonhead Socket Screws (N) Flange Nuts (O) 8 #8 Washer (P) 2 Black Door Knobs (Q) 2 Door Handles (Left & Right) ( R) 2 Door Handle Brackets (S) 2 Door Latches (Left & Right) (T) 2 Door Latch Brackets (Left & Right) (U) 2 Door Hinges (Left & Right) (V) 4 Door Hinge Backing Plate (W) 4 Door Skin (Left & Right) (X) 2 Upper Arm Support (Left & Right ) (Y) 2 Lower Arm Support (Left & Right) (Z) 2 Page 2


3 Page 3

 (9) 10 24 x 5/8 Flat head Philips screws (A) (9) 10-24")


4 Step 1: Starting on the Left Door organize the following components to assemble the Left Door. (1) Left Door Skin (X) (1) Upper and (1) Lower Left Arm Supports (Y & Z) (9) x 5/8 Flat head Philips screws (A) (9) Flange Nuts (B) Use a philips screwdriver and 3/8 wrench to assemble the upper and lower arm supports onto the door skin with the above listed screws and flange nuts making sure to align the middle hole in the upper and lower arms as this will affect installation of Rugged Ridge uppers, if used. Page 4


5 Step 2: Now gather the following components for the Left Door Handle Assembly. (1) Left Door Handle (R) (1) Left Door Handle Bracket (S) Assemble the Left Door Handle to the Left Door Handle Bracket with the attached pan head screws using a flat screwdriver as shown in the picture. Page 5
 Door latch (T) (1) Door latch bracket (U) (2) ¼ - 20 X ¾")

6 Step 3: Using the following components, assemble the left door latch as follows (1) Door latch (T) (1) Door latch bracket (U) (2) ¼ - 20 X ¾ socket head cap screw (D) Using a 7/16 wrench, attach latch to latch bracket. DO NOT TIGHTEN AT THIS TIME, adjustments will need to be made. Page 6
 and (2) ¼ washers (G) with a 5/32 allen wrench and 3/8 wrench.")


7 Step 4: Now attach the assembly to the door using (2) ¼ - 20 x ¾ button head socket screws (E), (2) ¼ - 20 nylock nuts (F) and (2) ¼ washers (G) with a 5/32 allen wrench and 3/8 wrench. The latch jaws should be facing the bottom of the door. DO NOT FULLY TIGHTEN as adjustments will need to be made. Step 5: Next, gather these components in order to attach the inner door knob and cable to the door latch and outer door handle. (1) Black door knob (Q) (1) ¼ - 20 x ½ socket head cap screw (C) (1) Cable (K) (1) Nylon washer (J) (1) 8/32 x ½ pan head screw (L) (1) 8/32 nylock nut (M) (1) #8 washer (P) Page 7
 then place bolt through outside hole and attach")
 on screw (L) and insert through opposite end of")
.")
 Door hinges (V) (2) Door hinge")
8 Place Nylon washer listed above (J) on screw (C) and insert through either loop of cable (K) then place bolt through outside hole and attach with door knob (Q) with knob on top. (see photo ). Next place washer (P) on screw (L) and insert through opposite end of cable and put through the arm of the outer door handle and attach using nylock nut (M). Step 6: At this time you are now ready to install hinges on the door using the components listed below (2) Door hinges (V) (2) Door hinge backing plates (W) (4) x ¾ button head screws (N) (4) x ¾ flange nuts (O) Page 8
 on upper and lower")
 on top of plates (W).")
 to")

9 Turn door panel so outer side is visible, align hinge plates (W) on upper and lower locations as indicated in photo and line up hinges (V) on top of plates (W). Slide screws (N) through holes on top of hinges and tighten with flange nuts (O) to back side of door panel until snug, adjustments will need to be made when aligning door onto vehicle. Page 9
 12 24 x ¾ button head screws (N).")
10 Step 7: At this time you are ready to test fit door to Jeep using (2) 7/16 20 x 2 stainless bolts (H) and (2) 7/16 20 nylock nuts (I). Make adjustments necessary to have even spacing between door and surround, then tighten the (4) x ¾ button head screws (N). Adjust the latch assembly so it closes securely and tightly to striker on the Jeep and tighten bolts. Once door is installed and all adjustments have been made, make sure all hardware is fully tightened. Repeat above steps on right door to assemble and install right side. You have now completed your Savvy JK Front door installation. Page 10
Savvy Off Road Front Bumper TJ/LJ
 Savvy Off Road Front TJ/LJ 1997-2006 Thank you for the purchase of our Front. Our front bumpers are available in two thicknesses 3/16 and 1/4 to suit your off-road needs. They are made from 6061-T6 aluminum
Installation Instructions
 Installation Instructions TrailView Soft Top Important Safety Information For proper installation and best possible fit, please read all instructions BEFORE you begin. Periodically check all components
Switchback Carrier Rack System
 Switchback Carrier Rack System Installation Instructions 1 Rocky Mountain Westy Ph. (970)310-3441 Introduction Thank you for purchasing the Rocky Mountain Westy Switchback Carrier Rack System. We pride
Installation Instructions I - Sheet Number I-TVR-01 Rev. A
 Installation Instructions I - Sheet Number I-TVR-01 Rev. A TrailView Soft Top For proper installation and best possible fit, please read all instructions BEFORE you begin. For technical assistance or to
Factory Five Racing, Inc. 818 Kit Assembly manual revision 1J update
 Factory Five Racing, Inc. 818 Kit Assembly manual revision 1J update Turbo coolant overflow tank...1 Shifter handle...4 Install...4 Door skin...7 Door Liner... 10 Side mirrors... 14 Door handles and pulls...
P/N Rev 01 04/14-1- NOTE: If you are ordering hinges for your rear doors, order and/or
 REAR CANVAS DOOR KIT 900 XP RANGER CREW P/N 2879899 Application RANGER 900 XP CREW Before you begin, read these instructions twice and check to be sure all parts and tools are accounted for. Please retain
HiBoy Maverick/Commander Doors Part # HiBoy4 Maverick/Commander Doors Black
 Racing 3191 N Washington St. Suite 2 Chandler, AZ 85225 1 (800) 708-9803 http://www.racing.com HiBoy Maverick/Commander Doors Part # 07-2001 HiBoy4 Maverick/Commander Doors Black Congratulations on your
Rugged Ridge Spartacus HD Tire Carrier Kit Install
 Rugged Ridge Spartacus HD Tire Carrier Kit Install Installation Time: 2 hours Tools Required: Ratchet ¾ socket 19 mm socket 13 mm socket 10 mm socket 19 mm Wrench 10 mm wrench 6mm Allen Wrench T50 torx
JKS Quicker Disconnects (Item 2030) Installation Guide
 Installation Guide") JKS Quicker Disconnects (Item 2030) Installation Guide Installation Time: 30 minutes Tools Required: Metric / Standard Socket Wrench Set o 18mm Socket o 18mm Open Ended Wrench o 19mm Open Ended Wrench
JKS Quicker Disconnects (Item 2030) Installation Guide Installation Time: 30 minutes Tools Required: Metric / Standard Socket Wrench Set o 18mm Socket o 18mm Open Ended Wrench o 19mm Open Ended Wrench
INSTALLATION INSTRUCTIONS DRAWERS #240
 INSTALLATION INSTRUCTIONS DRAWERS #240 Please read and fill out the enclosed warranty registration card to activate your warranty. SHIPMENT CONTENTS #1 Lid #2 Rear #3 Left side panel #4 Right side panel
JEEP JK MANUAL SHIFT 1 1/4 2 / 4 DOOR BODY LIFT
 92RC60300 JEEP JK MANUAL SHIFT 1 1/4 2 / 4 DOOR BODY LIFT Thank you for choosing Rough Country for your Jeep JK needs. Rough Country recommends a certified technician installs this system. In addition
WOC Mid Size Door Installation
 WOC-10112 Mid Size Door Installation NOTE: If the Mid Size Ranger that you are installing this door system on is a 2010 or newer you will need to remove the sill plates and side nets. If the doors are
JEEP Wrangler JK/JKU Swing-A-Way Tire Carrier/RotoPpax WARNINGS/CAUTIONS NOTE. INSTALLATION INSTRUCTIONS 2 Door Models 85209
 JEEP Wrangler JK/JKU Swing-A-Way Tire Carrier/RotoPpax 2007-2017 INSTALLATION INSTRUCTIONS Item Kit No. 2 Door Models 85209 4 Door Models 85209 WARNINGS/CAUTIONS These instructions are for both the can
Ref Qty Part Description Part Number -1- Kit ( ) Contents:
 Contents:") REAR CANVAS DOOR KIT 900 XP RANGER CREW P/N 2879899 Application RANGER 900 XP CREW Before you begin, read these instructions twice and check to be sure all parts and tools are accounted for. Please retain
REAR CANVAS DOOR KIT 900 XP RANGER CREW P/N 2879899 Application RANGER 900 XP CREW Before you begin, read these instructions twice and check to be sure all parts and tools are accounted for. Please retain
INSTRUCTIONS INSTRUCCIONES CONSIGNES
 AUTOMOTIVE PRODUCTS, INC. INSTRUCTIONS INSTRUCCIONES CONSIGNES APPLICATION: 2013-UP FORD ESCAPE APP PART # 28-21010, 28-21015 STYLIZED RUNNING BOARD ITEM QUANTITY DESCRIPTION TOOLS NEEDED 1 2 RUNNING BOARDS
Before starting installation
 Before starting installation The load rating for these tire-can/tire carriers is a MAXIMUM of 175 lbs. Please be aware that some tire and wheel combinations along with gas cans and hi-lift jacks can exceed
INSTALLATION & OWNER S MANUAL
 INSTALLATION & OWNER S MANUAL CAB INSTALLATION INSTRUCTIONS JOHN DEERE 4000 SERIES (4500/4600/4700) (4510/4610/4710) (4120/4320/4520/4720) HARD SIDED CAB ENCLOSURE (p/n 1JD4120AS) SOFT SIDED CAB ENCLOSURE
JK HALF DOOR INSTALLATION INSTRUCTIONS
 JK HALF DOOR INSTALLATION INSTRUCTIONS TOOLS NEEDED T-50 Torx Socket (JK) 13mm Socket (Other model wranglers) 2.5mm Allen Wrench 7mm Socket 3/16" Allen Wrench 1/2" Wrench HARDWARE JKHD-F 20-5/16" x.75"
INSTALLATION INSTRUCTIONS C-VS-2000-DUR-1 20 VEHICLE SPECIFIC CONSOLE for 2018 Dodge Durango with Standard Shifter
 INSTALLATION INSTRUCTIONS C-VS-2000-DUR-1 20 VEHICLE SPECIFIC CONSOLE for 2018 Dodge Durango with Standard Shifter TOOLS REQUIRED: Phillips Screw Driver T-20 Torx bit Standard Socket set 9/64 Allen wrench
5102 JK Hood Louver Panel
 SYNERGY MFG. 870 INDUSTRIAL WAY, SAN LUIS OBISPO, CA (805) 242-0397 5102 JK Hood Louver Panel GENERAL NOTES: These instructions are also available on our website; www.synergymfg.com. Check the website
PRODUCT USE INFORMATION
 9RC61000 Jeep YJ Body Lift Thank you for choosing Rough Country for all your suspension needs. This body lift fits both manual and Automatic equipped vehicles!!! Refer to last page of this Instruction
Installation of Barricade Flat Style Fender Flare Kit (97-06 Wrangler TJ)
") Installation of Barricade Flat Style Fender Flare Kit (97-06 Wrangler TJ) Installation Time: 3-4 Hours Tools Required: 8mm wrench 8mm socket drive #1 Phillips screw driver Pliers Pry bar Electric drill
Installation of Barricade Flat Style Fender Flare Kit (97-06 Wrangler TJ) Installation Time: 3-4 Hours Tools Required: 8mm wrench 8mm socket drive #1 Phillips screw driver Pliers Pry bar Electric drill
INSTALLATION & OWNER S MANUAL
 INSTALLATION & OWNER S MANUAL CAB INSTALLATION INSTRUCTIONS JOHN DEERE GATOR HPX and/or XUV HARD SIDED CAB ENCLOSURE (p/n: 1GTR44AS) SOFT SIDED CAB ENCLOSURE (p/n: 1GTR44SS) 111 HIGGINS STREET, WORCESTER,
SafeGuard Flex Seat Maintenance Guide
 SafeGuard Flex Seat Maintenance Guide 1) Preparation For Removal And Replacement Of Seat Back Covers And Retractor Assemblies a) Unlatch seat cushion and pivot cushion up and forward. b) Separate seat
LoD Offroad. Jeep JK Door Linked Rear Bumper with Tire Carrier Installation Instructions
 LoD Offroad Jeep JK Door Linked Rear Bumper with Tire Carrier Installation Instructions Please read through the instructions before beginning any part of the installation process. Packaging List: 1-Rear
JK SHIELD TIRE CARRIER INSTALLATION INSTRUCTIONS
 JK SHIELD TIRE CARRIER INSTALLATION INSTRUCTIONS TOOLS NEEDED 7/16" wrench or socket 3/4" wrench or socket 15/16" wrench or socket 5/8" wrench or socket 3/16 Allen wrench or socket 1 1/8" Wrench HARDWARE
One Piece Products. Series XI Ford F SERIES TRUCKS One Piece Door Glass Conversion Manual.
 *Registered Trademark One Piece Products *Patent Pending Series XI 1980-1996 Ford F SERIES TRUCKS One Piece Door Glass Conversion Manual www.onepieceproducts.com (888)One Products (888)663-7763 1 Installation
INSTALLATION INSTRUCTIONS
 INSTALLATION INSTRUCTIONS WJ2 FULL-WIDTH FRONT BUMPER APPLICATION: 2018 Jeep Wrangler JL PART NUMBER: 59-80105, 59-80115, 59-80125 CONTENT ITEM QUANTITY DESCRIPTION TOOLS NEEDED 1 1 FRONT BUMPER ASSEMBLY
Engo 10,000lb. 12 Volt Electric Winch Install
 Engo 10,000lb. 12 Volt Electric Winch Install Note: This installation was completed on a 2016 JK with Rough Country Modular Winch Plate Bumper. A bumper with winch mount, or a winch plate is required for
Installation Instructions Supertop NX Twill
 Installation Instructions Supertop NX Twill Vehicle Application: Jeep Wrangler Unlimited 2007-current Part Number 54823 Installation Tips Before you begin installing your new Supertop NX Twill, please
INSTALLATION & OWNER S MANUAL
 Rev. E p. of 3 INSTALLATION & OWNER S MANUAL V446 Front Cab Kit and V446 Rear Cab Kit for RTV 40 INSTALLATION & OWNER S MANUAL The contents of this envelope are the property of the owner. Be sure to leave
Retrofit Instructions for Replacing an In-Tube Motor from within a Face Mount Shaver Door
 Retrofit Instructions for Replacing an In-Tube Motor from within a Face Mount Shaver Door 1. Remove all Garage Door Style rollers from the curtain door s pultrusion tubes. This will be most easily done
Operator's Manual VERSA Compact Tiller and Cultivator. ILLUSTRATED PARTS BREAKDOWN Handle Bar Assembly
 ILLUSTRATED PARTS BREAKDOWN Handle Bar Assembly 4 3 2 7 5 6 7 8 6 4 2 3 0 9 7 8 4, 5 9 33 2 20 8 8 30,32 30,3 30 34 35 28 29 22 23 27 24 23 7 25 8 8 8 26-866-373-9665 3833 GRIP IN KNOB TEXTURED 2 2 23548
K9-C23 INSTALLATION INSTRUCTIONS K9 Kit for CHEVY TAHOE PPV (9C1)
") K9-C23 INSTALLATION INSTRUCTIONS K9 Kit for 2015-2018 CHEVY TAHOE PPV (9C1) TOOLS Needed: Phillips Screw Driver Trim panel removal tool Caulk Gun Standard Socket set Wire Cutters /Crimpers Drill & Drill
K9-C23 INSTALLATION INSTRUCTIONS K9 Kit for 2015-2018 CHEVY TAHOE PPV (9C1) TOOLS Needed: Phillips Screw Driver Trim panel removal tool Caulk Gun Standard Socket set Wire Cutters /Crimpers Drill & Drill
RTX 2000 Thomas Compressor TG-550 Graco PN
 RTX 2000 Thomas Compressor TG-550 Graco PN 246888 Print of Complete Compressor--------------Page 2 Instruction for Kit 118628-------------------Page 3 Instruction for Kit 287845-------------------Page
Assembly Instructions
 Assembly Instructions Part Number Description Model Approx. Assembly Time 99994-049 Cab Enclosure MULE SX 3-4 Hours WARNING Improper installation of this accessory could result in an accident causing serious
INSTRUCTIONS 360 Y-DROP
 INSTRUCTIONS 60 Y-DROP INSTRUCTIONS 60 Y-DROP RECOMMENDED TOOLS Ratchet wrench with /" and 9/6" deep well sockets /8" -point socket /" and 9/6" combination wrenches Impact driver # Philips screwdriver
INSTALLATION MANUAL
 INSTALLATION MANUAL 2563000 Parts List 1 Carrier weldment 2 Support arm assembly 1 Third brake light assembly 1 Light extension bracket 1 Spare tire adjustment plate 1 Spare tire mount plate 1 Female spade
2013+ SUBARU IMPREZA XV CROSSTREK MUD FLAP INSTALLATION INSTRUCTIONS
 2013+ SUBARU IMPREZA XV CROSSTREK MUD FLAP INSTALLATION INSTRUCTIONS PLEASE REVIEW THESE INSTRUCTIONS IN ITS ENTIRETY BEFORE ATTEMPTING INSTALLATION For high resolution color images of these instructions,
(2) #10 Washers (1) ¼ Washers (6) 5/16 Washers (2) Locknuts (2) 5/16 Locknuts
 #10 Washers (1) ¼ Washers (6) 5/16 Washers (2) Locknuts (2) 5/16 Locknuts") INSTALLATION INSTRUCTIONS TJ Speaker / Storage Security Console #066 Please read and fill out the enclosed warranty registration card to activate your warranty. SHIPMENT CONTENTS Console Front Shift Lever
INSTALLATION INSTRUCTIONS TJ Speaker / Storage Security Console #066 Please read and fill out the enclosed warranty registration card to activate your warranty. SHIPMENT CONTENTS Console Front Shift Lever
(2) #10 Washers (6) 5/16 Narrow Washers (2) Locknuts (2) 5/16 Locknuts
 #10 Washers (6) 5/16 Narrow Washers (2) Locknuts (2) 5/16 Locknuts") INSTALLATION INSTRUCTIONS TJ Speaker / Storage Security Console #066 Please read and fill out the enclosed warranty registration card to activate your warranty. SHIPMENT CONTENTS Console Front Shift Lever
INSTALLATION INSTRUCTIONS TJ Speaker / Storage Security Console #066 Please read and fill out the enclosed warranty registration card to activate your warranty. SHIPMENT CONTENTS Console Front Shift Lever
Flip Extension Install Instructions
 Tools Required: Tape Measure, knife, Allen key set, Phillips screwdriver, a 1/2" wrench, and a 1/2" socket 1.0 Preparing TRUCKBOSS Deck. 1.1 Remove the plastic end caps from the rear of the TRUCKBOSS deck.
Service Procedure COL-213
 TRW Automotive Commercial Steering Systems Service Procedure COL-213 J19-6032 Steering Column Right Hand Stalk Remove and Replace Procedure Use when installing service kit 480898X1 through 480907X1 This
CANVAS DOOR KIT P/N , APPLICATION BEFORE YOU BEGIN KIT CONTENTS. Verify accessory fitment at Polaris.com.
 CANVAS DOOR KIT P/N 2882902, 2882903 APPLICATION Verify accessory fitment at Polaris.com. BEFORE YOU BEGIN Read these instructions and check to be sure all parts and tools are accounted for. Please retain
TESLA MODEL S REAR UNDER SPOILER & DIFFUSER SYSTEM
 TESLA MODEL S Thank you for purchasing your Unplugged Performance Rear Under Spoiler & Diffuser System for the Tesla Model S! Please read this manual carefully prior to installation. REAR UNDER SPOILER
Installation of Smittybilt XRC Gen2 Front Bumper
 Installation of Smittybilt XRC Gen2 Front Bumper Installation Time: 2 hours, not including preparing a winch for the first time Tools Required: Ratchet Various length extensions 16mm deep well socket 19mm
INSTALLATION & OWNER S MANUAL
 INSTALLATION & OWNER S MANUAL CAB INSTALLATION INSTRUCTIONS JOHN DEERE 3000 SERIES (4200/4300/4400) (4210/4310/4410) & (3120/3320/3520/3720) HARD SIDED CAB ENCLOSURE (p/n 1JD3520AS) SOFT SIDED CAB ENCLOSURE
Installation instructions for Camaro/Firebird and Nova* Windshield Wiper Systems
 Installation instructions for 1967-69 Camaro/Firebird and 1968-74 Nova* Windshield Wiper Systems The Raingear 1967-69 Camaro/Firebird and 1964-74 Nova wiper system is designed for ease of installation
INSTALLATION & OWNER S MANUAL
 Rev. R p. 1 of 16 INSTALLATION & OWNER S MANUAL V4211 HARD SIDED CAB KIT and/or V4275 CAMO HARD SIDED CAB KIT INSTALLATION & OWNER S MANUAL The contents of this envelope are the property of the owner.
PERFORMANCE HOOD VENTS CONTENTS: Left Side Hood Vent (1) Right Side Hood Vent (1) Mounting Bracket, Inner (2) Mounting Bracket, Outer (2) OE Hood Temp
 Right Side Hood Vent (1) Mounting Bracket, Inner (2) Mounting Bracket, Outer (2) OE Hood Temp") CONTENTS: Left Side Hood Vent (1) Right Side Hood Vent (1) Mounting Bracket, Inner (2) Mounting Bracket, Outer (2) OE Hood Template (1) HARDWARE: Mounting Bracket, Inner X 2 Phillips Screw X 8 Mounting
CONTENTS: Left Side Hood Vent (1) Right Side Hood Vent (1) Mounting Bracket, Inner (2) Mounting Bracket, Outer (2) OE Hood Template (1) HARDWARE: Mounting Bracket, Inner X 2 Phillips Screw X 8 Mounting
(W) INSTALLATION INSTRUCTIONS GRILLE GUARD 2014 GMC SIERRA 1500 EXCLUDES DENALI PART # /
 INSTALLATION INSTRUCTIONS GRILLE GUARD 2014 GMC SIERRA 1500 EXCLUDES DENALI PART # /") (W) INSTALLATION INSTRUCTIONS GRILLE GUARD PART # 508514/ 508515 PARTS LIST: GRILLE GUARD Qty Description Qty Description 1 Grille Guard Assembly 6 12-1.75mm Hex Nuts 2 Frame Brackets 4 10-1.50mm x 30mm
(W) INSTALLATION INSTRUCTIONS GRILLE GUARD PART # 508514/ 508515 PARTS LIST: GRILLE GUARD Qty Description Qty Description 1 Grille Guard Assembly 6 12-1.75mm Hex Nuts 2 Frame Brackets 4 10-1.50mm x 30mm
Prepare to Install Rock Doors
 2. Verify all parts have been received in this kit by checking the parts list at the end of this document. JEEP WRANGLER, RUBICON, UNLIMITED ROCK DOOR KIT INSTALLATION INSTRUCTIONS 1980-1986 CJ 1987-1995
OWNER S MANUAL. ROTARY SURFACE CLEANER Models 105C, 105F, 105CW, & 105FW. Revision 2.01
 OWNER S MANUAL ROTARY SURFACE CLEANER Models 105C, 105F, 105CW, & 105FW Revision 2.01 ROTARY SURFACE CLEANER WARNING HIGH PRESSURE CAN CAUSE SERIOUS INJURY, MAXIMUM WORKING PRESSURE IS 4000 P.S.I. Any
EVO-1162 EVO Tailgate Tire Carrier
 EVO-1162 EVO Tailgate Tire Carrier Bill of Materials EVO-1162 Tailgate Tire Carrier Part number Description Quantity EVO-12161 EVO Tailgate Tire Carrier 1 EVO-12162 Bolt Plate 1 EVO-12163 Wheel Mount 1
Lexus NX Fine Mesh and Dynamic Radar Cruise Control Fine Mesh Grilles
 IMPORTANT: PLEASE KEEP THIS INSTRUCTION MANUAL FOR FUTURE REFERENCE! 2015-16 Lexus NX Fine Mesh and Dynamic Radar Cruise Control Fine Mesh Grilles Upper Insert - factory chrome surround and emblem reused
INSTALLATION INSTRUCTIONS JEEP 2011-UP JK SECURITY FULL CONSOLE #274
 INSTALLATION INSTRUCTIONS JEEP 2011-UP JK SECURITY FULL CONSOLE #274 PARTS CHECKLIST Tuffy Console #9 Left Front Mounting Bracket #10 Right Front Mounting Bracket #11 Electronics mounting bracket #12 Divider
INSTALLATION INSTRUCTIONS GRILLE GUARD SILVERADO 1500 PART #
 INSTALLATION INSTRUCTIONS PART # 3-5863 4-0863 PARTS LIST: Qty Description Qty Description 1 Grille Guard Assembly 6 12-1.75mm Hex Nuts 2 Frame Brackets 4 10-1.50mm x 30mm Hex Bolts 1 Driver/Left Mounting
Installation Instructions
 Installation Instructions Important INSTALLATION REQUIRES WELDING to the unibody chassis by a qualified welder or metal fabricator. A bolt-on installation is not possible for this product. CHECK STEERING
Suicide Door Hinge Installation Before installing: Modified or installed parts cannot be returned for a refund
 PLEASE CAREFULLY READ ALL INSTRUCTIONS BEFORE ATTEMPTING TO INSTALL THIS PRODUCT. Vertical Doors Inc. assumes no responsibility for any damages caused by improper installation Suicide Door Hinge Installation
Installation Instructions: Alpha Doors CFMOTO ZForce 500 / 800 / 800EX
 Installation Instructions: Alpha Doors CFMOTO ZForce 500 / 800 / 800EX *** SAFETY FIRST: ALWAYS DISCONNECT THE NEGATIVE BATTERY LEAD ON YOUR MACHINE PRIOR TO PERFORMING ANY MAINTENANCE OR INSTALLATION.
ECO-SERIES REAR BUMPER FORD F150 PART # FD-2962
 15-16 FORD F150 PART # FD-2962 Body Armor 4x4 272 Corporate Terrace St. Corona, CA 92879 951-808-0750 Customer Service hours: M-TH: 7:30am to 4:30 PM Pacific Time Friday: 8 AM Noon Pacific Time PARTS LIST:
Jeep JK Wrangler XHD Rear Tire Carrier
 Contents: 1. Frame (1) 2. Pivot Mount (1) 3. Latch Mount (1) 4. Lug Nuts (3) 5. Catch Pin (1) 6. M12 Washer (18) 7. M12 x 30 Hex Bolt (14) 8. Brake Light Mount (1) 9. Snap Ring (1) 10. Rub Strip (1) 11.
INSTALLATION INSTRUCTIONS
 AUTOMOTIVE PRODUCTS, INC. INSTALLATION INSTRUCTIONS APPLICATION: DODGE CHARGER POLICE PUSH BAR (2011 & UP) APP PART # 36-2035 ITEM QUANTITY DESCRIPTION TOOLS NEEDED 1 1 PUSH BAR ASSEMBLY RATCHET 2,3 2
IMPORTANT: PLEASE KEEP THIS INSTRUCTION MANUAL FOR FUTURE REFERENCE! TOOLS REQUIRED
 IMPORTANT: PLEASE KEEP THIS INSTRUCTION MANUAL FOR FUTURE REFERENCE! 2014-15 Toyota Tundra Mesh Grille Upper Insert - Fits ALL model Tundras with chrome or painted factory grille surround Black Mesh Part
Installation Instructions - D-Series Warming Cabinet Instruction Door for Hinge UseReversal (Glass and Stainless Steel Doors)
") Header Cam Lock Reversal... pg 1-4 Glass Door hinge reversal..... pg 5-9 Steel Door hinge reversal..... pg 10-13 Remove Panels Before reversing door hinges, the Header Cam Lock assembly must be reversed.
Header Cam Lock Reversal... pg 1-4 Glass Door hinge reversal..... pg 5-9 Steel Door hinge reversal..... pg 10-13 Remove Panels Before reversing door hinges, the Header Cam Lock assembly must be reversed.
Service Procedure COL-211
 TRW Automotive Commercial Steering Systems Service Procedure COL-211 J19-6032/6033 Steering Column Horn Contact Remove and Replace Procedure Use when installing service kit 453107X2 This ZF Commercial
INSTALLATION INSTRUCTIONS
 INSTALLATION INSTRUCTIONS Accessory HARD FRONT DOORS P/N 0SU95-HL4-104 Application SXS1000M3/M3P/M3L/M5D/ M5P/M5L Honda Dealer: Please give a copy of these instructions to your customer. Publication No.
INSTALLATION INSTRUCTIONS Product Revision Form Rev. C INST-439 CRADLE, DELL E-6510/6500
 7160-0202 Cradle is designed to be used with a Dell E-Port or E-Port Plus Port Replicator. The cradle is assembled for used with Dell E-6510. By removing 2 Side Spacers the Cradle can also be used with
Part Numbers: TTU-BGP14 & TTU-BGB14
 Date: 10.14.2015 TOYOTA TUNDRA 2014-17 Billet Grille Part Numbers: TTU-BGP14 & TTU-BGB14 Grille Hardware Bag Contents Item # Quantity. Description 1 6 U-Nuts 2 8 #10 Screws 3 2 #8 Screws 4 2 2 Flange Brackets
Universal Tall HoneyBadger Chase Rack Installation Instructions
 PREPARATION Universal Tall HoneyBadger Chase Rack Installation Instructions 1. Disconnect the negative terminal on the battery. Park the vehicle on level ground and set the emergency brake. 2. We recommend
TJ RockBrawler Rear Bumper with Tire Carrier (shown above) D TJ RockBrawler Rear Bumper with Tire Carrier & Recovery Shackle Tabs
 D TJ RockBrawler Rear Bumper with Tire Carrier & Recovery Shackle Tabs") INSTALLATION INSTRUCTIONS INST-14-61-020_A TJ RockBrawler Rear Bumper with Tire Carrier IMPORTANT: Thank you for purchasing this Poison Spyder product. Please read through this entire document before proceeding
INSTALLATION INSTRUCTIONS INST-14-61-020_A TJ RockBrawler Rear Bumper with Tire Carrier IMPORTANT: Thank you for purchasing this Poison Spyder product. Please read through this entire document before proceeding
INSTALLATION INSTRUCTIONS
 INSTALLATION INSTRUCTIONS Accessory HARD FRONT DOORS P/N 0SU95-HL4-105 Application SXS1000M3/M3P/M3L/M5D/ M5P/M5L Honda Dealer: Please give a copy of these instructions to your customer. Publication No.
Service Procedure COL-209
 TRW Automotive Commercial Steering Systems Service Procedure COL-209 J19-6032/6033 Steering Column Turn Stalk Remove and Replace Procedure Use when installing service kit 480791X2 This ZF Commercial Steering
Service Procedure COL-210
 TRW Automotive Commercial Steering Systems Service Procedure COL-210 J19-6032 Steering Column Clockspring Remove and Replace Procedure Use when installing 455079X2 service kit This ZF Commercial Steering
INSTALLATION INSTRUCTIONS GRILLE GUARD GMC SIERRA 1500 EXCLUDES DENALI PART # 4084/
 INSTALLATION INSTRUCTIONS GRILLE GUARD 14-15 GMC SIERRA 1500 PART # 4084/ 4084-2 PARTS LIST: GRILLE GUARD Qty Description Qty Description 1 Grille Guard Assembly 6 12-1.75mm Hex Nuts 2 Frame Brackets 4
FREEDOM3 Portable Restroom Assembly Instructions
 FREEDOM3 Portable Restroom Assembly Instructions PN 21337 REV M - 1-1-19-17 FREEDOM 3 ASSEMBLY INSTRUCTIONS PN 21337 REV M -2-1-19-17 PARTS LIST: PN 21337 REV M - 3-1-19-17 INTRODUCTION Satellite portable
Installation Guide CLAAS Lexion Combines with 9 inch Elevators
 Installation Guide CLAAS Lexion Combines with 9 inch Elevators 955614_01 4/17 1 Table of Contents System Overview 3 Quick Start Guide 4 Flow Sensor Installation 5 Hydraulic Elevator Adjustment Kit Installation
Ford Mustang V6 OEM-Style Fog Light Kit Parts List: Quantity: Tool List:
 2015-2017 Ford Mustang V6 OEM-Style Fog Light Kit Parts List: Quantity: Tool List: LED Foglights/ Bezels 2 Flat head & Phillips screwdriver (if you ordered part#3600) Ratchet & Socket set OR Wiring harness
INSTALLATION INSTRUCTIONS Progress Technology Rear Anti-Sway Bar Honda Civic Part # No Revision (7/20/16)
") INSTALLATION INSTRUCTIONS Progress Technology Rear Anti-Sway Bar Honda Civic 96-00 Part # 62.1042 No Revision (7/20/16) WHO SHOULD INSTALL THIS PRODUCT? Progress Technology products should only be installed
INSTALLATION INSTRUCTIONS Progress Technology Rear Anti-Sway Bar Honda Civic 96-00 Part # 62.1042 No Revision (7/20/16) WHO SHOULD INSTALL THIS PRODUCT? Progress Technology products should only be installed
INSTALLATION & OWNER S MANUAL
 Rev. L p. 1 of 16 INSTALLATION & OWNER S MANUAL V4262 CAMO (SOFT SIDED) CAB KIT INSTALLATION & OWNER S MANUAL The contents of this envelope are the property of the owner. Be sure to leave with the owner
Part# JL AIR IT UP 4 Tire On Board Air Delivery System. (Requires External Air Source)
") Part# 18-1819 JL AIR IT UP 4 Tire On Board Air Delivery System (Requires External Air Source) The most up-to-date instructions always visit www.updownair.com www.updownair.com 833-226-4863 I M P O R T
Part# 18-1819 JL AIR IT UP 4 Tire On Board Air Delivery System (Requires External Air Source) The most up-to-date instructions always visit www.updownair.com www.updownair.com 833-226-4863 I M P O R T
James Barone Racing Aftermarket Parts and Accessories
 Page1 James Barone Racing Aftermarket Parts and Accessories What you will need: Jack and Jack Stands Drill 1/8 and 1/4 drill bits Ratchet wrench 11mm socket Philips head screw driver Flat head screw driver
FLOODLIGHT unit IMPORTANT WARNING! RRAC055/RRAC059. INSTALL TIME: 30 mins
 LED 4" FLOODLIGHT unit RRAC055/RRAC059 INSTALL TIME: 30 mins Depending on the type of installation chosen, not all components supplied will be used. Refer to Page 13 Section 7 on how to set the angle of
Service Procedure COL-212
 TRW Automotive Commercial Steering Systems Service Procedure COL-212 J19-6032/6033 Steering Column Angle Sensor Harness Remove and Replace Procedure Use when installing service kit 450210X1 or 450217X1
INSTALLATION & OWNER S MANUAL
 INSTALLATION & OWNER S MANUAL CAB INSTALLATION INSTRUCTIONS MASSEY FERGUSON TGX SERIES SOFT SIDED CAB ENCLOSURE (p/n MFTGXSS) This Curtis Cab is designed and manufactured for use only as reasonable weather
Driver/Left Mounting Bracket. Passenger/Right Mounting Bracket. Bolt Plates
 PARTS LIST: 1 Bull Bar 6 12-1.75mm Nylon Lock Nut 1 Driver/Left Mounting Bracket 4 Bolt Assembly 1 Passenger/Right Mounting Bracket 1 LED Light Bar with mounting bolts 2 12x1.75mm x 30mm Double 2 12 x
FRONT FENDERS WITH FACTORY INNER FENDERS JEEP WRANGLER TJ/LJ/YJ/CJ7 INSTALLATION INSTRUCTIONS
 FRONT FENDERS WITH FACTORY INNER FENDERS JEEP WRANGLER TJ/LJ/YJ/CJ7 INSTALLATION INSTRUCTIONS TOOLS NEEDED 13mm socket 5/32 Allen head 5/16 wrench or socket 7/16 wrench or socket 7/32 Allen head 5/8 wrench
ALL AMERICAN BILLET. Front Drive System - Small Block Ford Installation Instructions
 ALL AMERICAN BILLET Front Drive System - Small Block Ford Installation Instructions Small Block Ford with AC & PS All American Billet Store (800) 764-0926 www.allamericanbilletstore.com Items needed for
Wildcat System Instructions
 Wildcat System Instructions NOTE: Most steps contained in these instructions will need to be repeated on the other side of the vehicle. Prior to assembly of windshield it is necessary to establish what
DL650 Odyssey Luggage Installation Guide
 DL650 Odyssey Luggage Installation Guide Thank you for purchasing Jesse Luggage for your Motorcycle. Our Luggage, handcrafted in the USA, is designed for those with an interest in finding the most durable
Tru-Billet Climate Control Knob Installation Instructions
 P/N S197-525-07 2007-08 Tru-Billet Climate Control Knob Installation Instructions Thank you for your purchase of SilverHorse Racing products. Please read all directions before beginning the installation.
Subaru Front Mount Intercooler Kit STI Subaru Front Mount Intercooler Kit STI
 Subaru Front Mount Intercooler Kit STI 2008-2014 715500 Subaru Front Mount Intercooler Kit STI 2008-2014 Congratulations on your purchase of the Subaru Front Mount Intercooler Kit STI 2008-2014. The following
Jeep Wrangler JK 2.5" Suspension Lift Installation Instructions
 www.skyjacker.com Jeep Wrangler JK 2.5" Suspension Lift Installation Instructions Required Tools List: Standard / Metric Wrenches and Sockets Floor Jack Jack Stands Assorted Drill Bits Before beginning
Chapter 52 DOORS -Title
 Chapter 52 DOORS 52-Title Page 1 January 23, 2012 INTENTIONALLY LEFT BLANK 52-Title Page 2 January 23, 2012 LIST OF EFFECTIVE PAGES Chapter Section Page No. Date 52 52-Title 1 January 23, 2012 2 January
2007 Current Jeep Wrangler JK Stealth Fighter Front Bumper Installation Instructions
 2007 Current Jeep Wrangler JK Stealth Fighter Front Bumper Installation Instructions PREPARATION 1. Disconnect the negative terminal on the battery. Park the vehicle on level ground and set the emergency
INSTRUCTIONS 360 Y-DROP
 INSTRUCTIONS 60 Y-DROP JOHN DEERE 60 60 Y-DROP REGISTRATION Please visit productregistration.60yieldcenter.com to complete the product registration for your 60 Y-DROP so we can better support our products
Conflicts None. TOYOTA TUNDRA 2017 Black Laser Cut Grille. Part Number: Accessory Code: BG3000. General Applicability
 TOYOTA TUNDRA 2017 Black Laser Cut Grille Part Number: 00016-34173 Accessory Code: BG3000 Conflicts None Kit Contents Item # Quantity Reqd. Description 1 1 Laser Cut Grille 2 1 Complete hardware kit General
INSTALLATION & OWNER S MANUAL
 Rev. B, p. 1 of 25 INSTALLATION & OWNER S MANUAL POLARIS RANGER RCS (for models XP or HD) (for model years 2009-) cab without doors kit (p/n 1POLRCWD) cab with doors kit (p/n 1POLRC) doors only kit (p/n
Factory Five Racing, Inc. 818 Kit Assembly manual revision 1i update
 Factory Five Racing, Inc. 818 Kit Assembly manual revision 1i update Pedal box...1 Cable Accelerator Pedal (2002-2005)...2 OEM seats...7 Windshield... 13 Center console... 19 Pedal box Attach the pedal
K9-F17 INSTALLATION INSTRUCTIONS K9 Kit for FORD INTERCEPTOR SEDAN
 K9-F17 INSTALLATION INSTRUCTIONS K9 Kit for 2013-2018 FORD INTERCEPTOR SEDAN TOOLS Needed: Phillips Screw Driver Trim panel removal tools Caulk Gun Standard Socket set Metric Socket set Wire Cutters /Crimpers