"Everyone who builds a DIY project has their own set of goals and constraints which they work with."
|
|
|
- Patricia Hall
- 5 years ago
- Views:
Transcription

1 racesim BUILD K E Y F E AT U R E S Named "MRAP Seatmover" Made almost entirely from MDF, Rope And Pulleys Uses common materials and no special tools required 3 rd DOF for traction loss easily added Electronics neatly housed inside the racesim Electronics neatly housed inside the racesim D I Y D E S I G N N O T E S F O R A 2 /3D O F R A C E S I M U S I N G M D F. "Everyone who builds a DIY project has their own set of goals and constraints which they work with." "The rest is up to you to customize to your specific requirements." "After reading through the vast amount of valuable information in the motion simulator forums and reviewing many designs, I have taken what I believe suits my requirements best " Craig Hoffmann Aka RufusDufus MANUAL VERSION 0.1 This work is licensed under a Creative Commons Attribution - NonCommercial -ShareAlike 3.0 Unported License.
2 Contents Contents... 2 Introduction... 3 Design Goals... 4 Approach Adopted... 4 Bill Of Materials... 5 MDF Part Templates... 7 Assembling the Base... 8 Seat Platform & Pivot Positioning the pulleys Constructing the Motor Drive Pulley Constructing the Position Feedback Pulley Mounting the Motors Adding the Pulley Cables Wiring the Motors and Controllers Mounting the Motors and Controllers Limit Switches Emergency Stop Adding a Steering Wheel and Pedals Build Assessment... 32
3 Introduction I stumbled across the DIY motion simulator community by chance while searching the web for other unrelated information. I was fascinated with the quality and complexity of the designs and the support everyone gave each other. After finding the software was free for private use I was certain I wanted to give it a go myself. This manual is my attempt at giving back to the community everything that I have learned from my time in the forums. Thanks to all those who answered questions and participated in the discussions. While it is written more as a record of my own build in case I have to make any repairs later, I have tried as much as possible to include diagrams or photos to assist anyone that wants to use all or part of the design. Unless you use all the same materials you will need to make adjustments to suit. The rest is up to you to customize to your specific requirements. I will point out that this is a reasonably heavy unit and not as small as many others in the forums. Personally I liked the idea of a solid professional looking unit and space wasn't an issue. You wouldn't want to be moving this racesim every time you have finished using it it is large and heavy.
4 Design Goals Everyone who builds a DIY project has their own set of goals and constraints which they work with. This is great for the person building the project however means that the design may not be ideal for someone else. This project is no exception, I have come up with a build that suits my needs without concern for other's requirements. The design objectives and constraints for this build were: Car raceseat style simulator 2DOF movement of the racing seat only Ability to add 3rd DOF for traction loss at later stage Use materials that I have the tools and skill to work with Low cost is important but not the primary driver Look good enough (in my eyes) to be kept in the kids play room Robust and solid design that will last Ability to easily break down and transport in my car Approach Adopted After trolling through the vast amount of valuable information in the motion simulator forums and reviewing many designs, I have taken what I believe suits my requirements best and arrived at the following design. It is somewhat different to most in the forums but works on the same general principles. Made predominantly with MDF Use "Big" worm gear motors Use cable and pulleys to transfer movement from motors to seat Use Arduino controller and H-Bridges to drive motors As such I have named it the "MRAP Seatmover". MRAP being short for MDF, Rope And Pulleys.
5 Bill Of Materials All costs are in Australian dollars as of 2013 B nnnnn Qty Description Cost Notes? MDF Sheets 900 x 1200 x 16mm Local hardware store (Bunnings) $25.94 per sheet 2 Worm Drive Motors $ Includes $22.45 delivery fee. 2 BTS7960B 43A H-Bridges $ Ebay, search for "bts7960b" 1 12V 30A Switch Mode Power Supply $ Ebay, common 360W supply sold for LED lighting, search "360w led" 1 Arduino Duo R3 $ Ebay 1 LED Volt/Current meter $ Ebay, optional 1 1/2in Drive Universal socket $ 6.99 Super cheap auto (or hardware store) 1 Fixed Back Car Seat $ On special at soldsmart.com.au 1 4 point Seat belt $ Ebay, Optional 8 Small Hoist Pulleys $ Ebay, price is for 10 pcs, search "0.03 pulley" 2 5K Potentiometers - Already had them 6 Small Turnbuckles $ Local hardware store (Bunnings) $4.30ea 1 Rope Grunt Hi Viz Safety 180kg $ m roll only need about 2m Local hardware store (Bunnings) 1 Wire spade terminals $ in packet Local hardware store (Bunnings) 2 Terminal strips $ Local hardware store (Bunnings) 2 150mm x 12mm Bolt & Nuts $ Used for the drive shaft 1m Multi-colour Ribbon Cable - Already had some for wiring Arduino *** NEED TO COMPLETE THIS SECTION *** Other items that will be needed include 12V high current hook up wire Solder and soldering iron Circular saw/jigsaw or good hand saw Electric or hand drill Various nails and screws Wood glue Computer to run game and the motion simulator software Suitable TV, monitor, or projector Force feedback steering wheel and pedals Paint
6 Spare time
7 MDF Part Templates The MDF parts were cut from 2 sheets 900 x 1200 x 16mm. Part dimensions are shown in the figures below. If you use an MDF sheet thickness other than 16mm you will need to make adjustments to the dimensions. I would not recommend using sheets thinner than 16mm though. It is important to note that you may need to adjust some of the dimensions to suit your own requirements and available materials. I have tried to detail where you may need to do this throughout the build instructions. Take your time measuring and cutting the parts. The more accurate you are here the easier and neater it will be when fitting everything together.
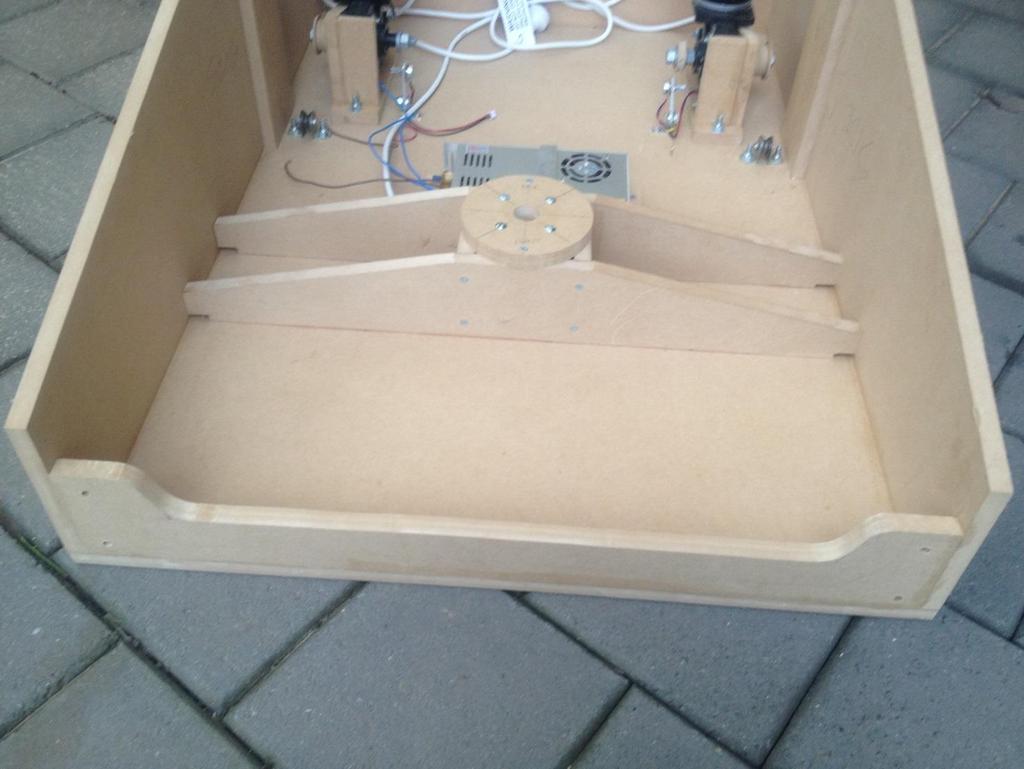
8 Assembling the Base

9

10 Next I added the seat supports.

11 I cut the corners out before mounting the assembly into the base unit. This was to allow the cabling to run from the front to the back. Unfortunately I didn t make them big enough for the connectors and ferrites on the cable so I had a difficult job of trying to enlarge them later. I would now suggest cutting out a 20mmx20mm square out of the corners of the support assembly but check the cables/connectors being used. The assembled seat support then mounts inside the base unit, glued and screwed from the bottom to hold while the glue dries. This, together with the pivot used, sets the height of the seat so if you are planning to use something other than the 1/2in universal socket for the pivot you may need to make adjustments here. The goal is to have the seat platform central (in height) in the base unit so that it can move equal distance up and down.
12
. Will it be strong enough in the long term?")
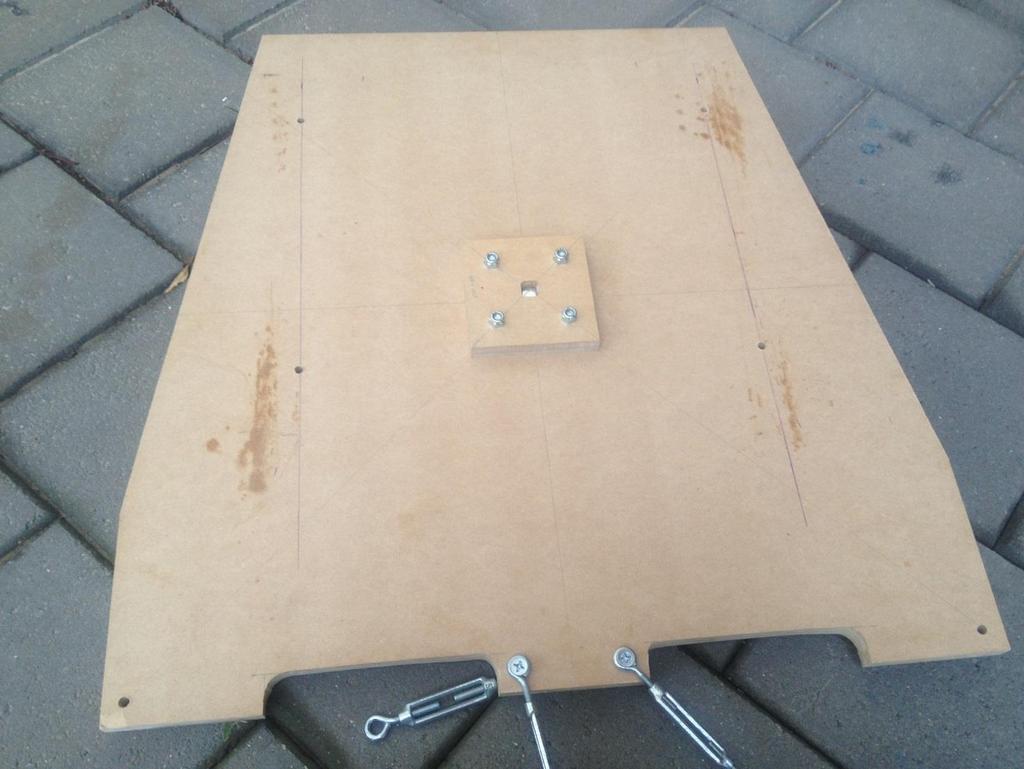
13 Seat Platform & Pivot Once the seat support was in place I moved on to the pivot mount. Here I decided to use a 1/2in universal socket adaptor as it was only $6 from the local auto shop (or hardware store). Will it be strong enough in the long term? I m not sure, but it seems to do the job well at the moment and is cheap and easily replaced if necessary. The pivot point is centered on the seat platform however when mounting the seat on the platform it needs to be placed so as to best balance the seated driver. Try to make the fit of the 1/2in universal socket into the MDF as snug as possible to avoid any rattles when the simulator is in motion. This really relies on having the right size drills. I find spade drills are the best for this size hole in MDF. For the sockets I had, a 24mm spade drill produced the perfect fit experiment in a scrap piece first. It would be better to have the hole slightly smaller to start with and take the time to slowly sand or file it out to fit rather than start with a hole that is too large.

14 At this stage I made the seat platform square (600mmx600mm), later once everything was assembled I trimmed it down to taper the sides to the front of the seat. The photo below shows after I have trimmed it down. Be sure to mark the center of the platform as this is where the pivot mounts. The seat is later positioned on the platform to produce the best balance.
15
16 Positioning the pulleys ****** Do a diagram of the pulley dimensions ******

17 The top and bottom pulleys are cheap metal ones I found on ebay. There were 5 in the pack and they were from China. Fairly rough but they seem good enough for the job. See below: Next I modified 4 of the pulleys so that they could be mounted in a vertical position bolted directly to the base of the simulator. To do this I pulled the pulleys apart and bent the metal side plates outward and then reassembled them. See below: A modification I will probably do at a later stage is replace the bold through the pulley wheel with a slightly larger one. They wheels tend to wobble around a bit but at the moment I don't have the right size bolts and I want to keep on with the build.

18 The top pulleys are mounted to a piece of MDF U-channel. The U-channel is made of three straight lengths of MDF glued and screwed into a U-channel. This is done for strength so that it has minimal flex when the ropes are tensioned.

19

20 Constructing the Motor Drive Pulley Continuing with my goal to make as much of the simulator as possible using readily available materials, I started to look for suitable pulleys for the motor drive. These seemed harder to come by so I decided to see how easy it would be to make my own. Since I was using MDF already it seemed like a good starting point. It turned out to be perfect for this application and was easy to make a drive pulley the size needed. I also later discovered the rope used seemed to grip to the MDF very well also eliminating any slip. The size of the motor drive pulley required was calculated as follows: I wanted a max (no load) seat speed of 200mm/s (MaxSeatSpeed) The motor wormgear output is 160 rpm (MotorSpeed) Therefore: Pulley Diameter = ( MaxSeatSpeed * 60 / MotorSpeed ) / π Pulley Diameter = (200 * 60 / 160) / = 24mm (approx.) Note how small the diameter is which means the motor is placed under much less load compared to the traditional level arm/connecting rod style designs that typically have at least 50mm lever (equates to 100mm diameter). I don't have any to test but believe this design would suit wiper motors very well (you would increase the pulley diameter to 64mm for a 60rpm wiper motor which is still better than a 50mm lever). Actually I decided a 24mm pulley wheel was too small for my plans to make it out of MDF. I had a hole saw drill attachment that made 40mm discs so I went with that giving a speed of 335mm/s. Because the motor is under less load it will typically run closer to max no load speed as well. If you really want to get technical you can calculate the optimal diameter to get max speed from the motor given the load I couldn't be bothered with this.

21 To make the pulley wheel cut 1 disc out of the 16mm MDF with the diameter calculated above. Then cut two more discs out of some 3mm MDF with a diameter about 10-20mm larger than the first disc. Refer to images below: Once you have the three discs, glue them together.

22 The construction of the pulley does not need to be extremely precise. If you don't have a hole saw, cut them as close to shape with any saw and then file or sand into a disc. Alternatively attach to an electric drill and sand it to shape while spinning it in the drill.
23 Constructing the Position Feedback Pulley Since I was onto a winner with the MDF drive pulley, it made sense to use the same technique for the position feedback pulley. The size of the position feedback pulley required was calculated as follows: The pots used turned a max of just over 270 degs (MaxPotTurn) I wanted a maximum movement in the seat of 150mm (MaxSeatMovement) Therefore: Pulley Diameter = ( MaxSeatMovement * 360 / MaxPotTurn ) / π Pulley Diameter = (150 * 360 / 270) / = 64mm (approx.) This calculation assumes that the position feedback pulley is driven off the same size pulley as the drive pulley.

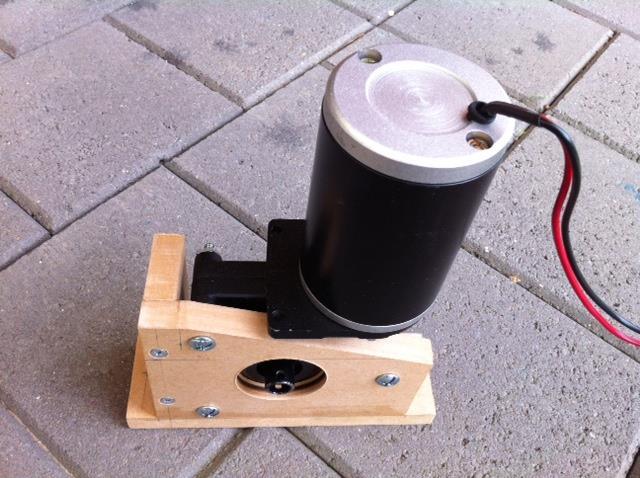
24 Mounting the Motors To make assembly easy I made a couple of motor mounts. The motors bolt to the mounts and then the complete assembly is bolted to the base of the racesim. Don't forget to make one left and one right motor mount.
25

26

27

28 Adding the Pulley Cables While working on the design I was quite unsure if rope and pulleys would work for this application. I was even thinking I may require stainless steel cable. However after a visit to the hardware store I found some cheap "Grunt Hi Viz Safety Rope" with a rated breaking strength of 180kg. It was a woven rope with 4mm diameter and appeared to have no stretch at all which seemed ideal. So I decided to use this for the initial tests. It worked well and is still being used. Given how cheap it is even if it eventually breaks I have plenty to do numerous repairs although I am hoping it won't come to this!

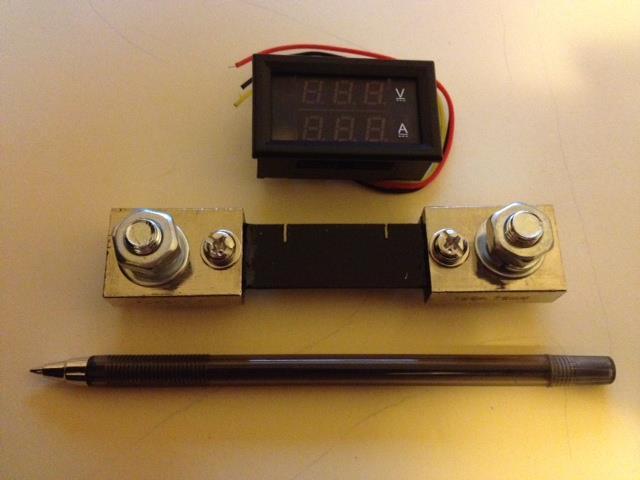
29 Wiring the Motors and Controllers I chose to use the Arduino Open source X-PID software together with an Arduino Duo R3. The H-Bridges were found on ebay I believe IBT-2 is the model and is often referred to as a BTS7960B 43A Motor Driver. These H-Bridges have two sets of inputs for PWM, one for each direction. After a closer look at the circuit and BTS7960B datasheet I realized it was possible to use the inputs labeled R_PWM and L_PWM (which are actually the driver highside/lowside select inputs) for the motor direction inputs, and tie the R_EN and L_EN (the driver enable inputs) together and connect them to the Arduino PWM output. Refer to the wiring details. I found a combined Voltage and Current panel meter on ebay and decided to get one to wire into the motor power circuit to monitor the load. You could easily leave this out, I just thought it was a nice touch to the design.
30

31 To make assembly and repairs/modifications as easy as possible I tried to use connectors as much as possible between the modules rather than solder directly to them. For the Arduino I used some prototype pcb to make a piggyback board that could be unplugged and all the wiring was connected to that. I have quite a stock of electronics at home so I didn't have to go and buy anything, but this does increase costs a bit. **** INSERT PHOTO ***** Mounting the Motors and Controllers Limit Switches
32 Not yet implemented I like living on the edge! Emergency Stop Not yet implemented Hopefully it doesn't end in flames! Adding a Steering Wheel and Pedals Using G27 Wheels and pedals. I have gathered info on the gearstick to steering wheel interface and looking into a plugin design that allows using an alternate gearshift and switch layout in parallel to the original. Build Assessment Now that the build is (semi) complete and tested I have the following comments: Overall the design was successful and met my requirements It was quite easy to make especially if you have power tools The design is really solid and I would expect 12mm MDF would have been suitable reducing both cost and weight (I wouldn't go thinner, and I would stay with 16mm for the actual Seat Platform to prevent any flexing) I feel that the big motors I have used are actually overkill in this design as the whole approach aims to minimize the load on the motors. I would suspect this would be an ideal design for standard wiper motors with a few adjustments to the pulley dimensions (although I have never had or used such motors to confirm)
Introduction: Problem statement
 Introduction: Problem statement The goal of this project is to develop a catapult system that can be used to throw a squash ball the farthest distance and to be able to have some degree of accuracy with
Timing the 9N/2N Steering Sector Gears
 Timing the 9N/2N Steering Sector Gears by John Korschot - www.johnsoldiron.com (May 2010) The procedure for timing a set of steering gears in the 9/2n tractors is published in the I&T FO4 shop manual.
Kobo/XCSoar Large Battery Notes -
 Kobo/XCSoar Large Battery Notes - www.50k-or-bust.com These notes relate to the modification of Kobo Mini and Touch ebook readers by fitting a GPS chip (technically a GPS module) for navigation only or
How to Build with the Mindstorm Kit
 How to Build with the Mindstorm Kit There are many resources available Constructopedias Example Robots YouTube Etc. The best way to learn, is to do Remember rule #1: don't be afraid to fail New Rule: don't
Improving the gearshift feel in an SW20.
 Improving the gearshift feel in an SW20. Part one In 3 parts. The SW20 gearshift can be often be greatly improved by eliminating play in the shift linkages, and this article covers three areas that need
This is what we are trying to create in the steps below
 You will need: (1) Some 3/4 aluminium or steel flat bar (+/- 1 foot) (2) About 12 of 3 Aluminium or steel tubing. (2) Piece of 3X3 silicone hose and 2 hose clamps (3) 1 K&N (or similar) high flow filter
C5 Audi Allroad (Wabco) Suspension Compressor Strip/Repair.
 Suspension Compressor Strip/Repair.") C5 Audi Allroad (Wabco) Suspension Compressor Strip/Repair. Here are some of my experiences stripping 2 off Audi Allroad C5 suspension compressors to see what makes them tick; The compressor is fairly
C5 Audi Allroad (Wabco) Suspension Compressor Strip/Repair. Here are some of my experiences stripping 2 off Audi Allroad C5 suspension compressors to see what makes them tick; The compressor is fairly
Gearbox Assembly 101. Introduction. Before Beginning. By Mark Schutzer 4/13/06
 Gearbox Assembly 101 By Mark Schutzer 4/13/06 Introduction If you are planning to re-motor an old brass locomotive you may want to upgrade to a new gearbox at the same time. The early 60 s and 70 s gearboxes
Amateur Radio Station WFØGM Repairing a Yaesu G-1000DXA Rotor
 WFØGM Home http://wf0gm.fpage.com/index.htm Amateur Radio Station WFØGM Repairing a Yaesu G-1000DXA Rotor (Part 1 of 2) The following is my experience with a faulty Yaesu G-1000DXA Rotor, and how I repaired
Volvo 1800 Dash Pad Replacement
 Volvo 1800 Dash Pad Replacement (courtesy of John Garden State Chapter Volvo Club America) Reupholstering the dash Well it has been some time since I have been online in the forum. Winter is a quite time
Converting a Chevy Non-positraction rear-end to a positraction rear using an Eaton posi unit.
 Converting a 56-62 Chevy Non-positraction rear-end to a positraction rear using an Eaton posi unit. Tom Parsons Non-posi unit Posi unit 1 Converting a 56-62 Chevy Non-positraction rear-end to a positraction
Tools & Parts I Used. Here's everything that comes with the kit.
 Ford Super Duty Power Tailgate Lock Install 2004 F250 4x4 XLT Sport Crew Cab Back to 2004 F250 Main Page This page describes the steps to install the Pop & Lock PL8250 power tailgate lock kit. This kit
Plumbing Part VI - Blowdown Valve Nelson Riedel Initial: 9/28/03 Last Revised: 04/24/2006
 Page 1 of 8 Plumbing Part VI - Blowdown Valve Nelson Riedel Nelson@NelsonsLocomotive.com Initial: 9/28/03 Last Revised: 0 When I started to think about the blowdown I realized that I'd never seen the actual
Railbike Chassis Assembly
 Railbike Chassis Assembly This chassis is designed to suit a 1:18 scale Harley Davidson 1 model from Maisto. It could be adapted easily to other motorbike models. The important thing to note here is that
ECSE-2100 Fields and Waves I Spring Project 1 Beakman s Motor
 Names _ and _ Project 1 Beakman s Motor For this project, students should work in groups of two. It is permitted for groups to collaborate, but each group of two must submit a report and build the motor
Smart Opener Retrofit by Richard Bevan (bimmerfest riku2)
") Smart Opener Retrofit by Richard Bevan (bimmerfest riku2) Document history V 1.0 02.04.2015 Document created. Introduction This document tells how to retrofit the smart opener to a 2011 BMW 5 series (F10).
Smart Opener Retrofit by Richard Bevan (bimmerfest riku2) Document history V 1.0 02.04.2015 Document created. Introduction This document tells how to retrofit the smart opener to a 2011 BMW 5 series (F10).
Mini EV Prize Solar Car Kit
 Mini EV Prize Solar Car Kit Each Kit includes 2 x Solar Panels 8 x Wheels 4 x 50mm, 4 x 40mm 2 x Axels (short & long) & 4 x Axel Collars 1 x Motor - F18 & 3D printed mount 2 x Large Spur Gear 60T & 48T
Passive Income Ideas
 DOWNLOAD & BUILD UPLOAD & SELL!!"#$%&'()%%)$'*$+$*,-,./0$(%$1123# Earn commissions on many of our plans! See how by visiting our home page www.gizmoplans.com and click on the Affiliates link at the top
The TR8 TPS (Throttle Potentiometer Switch ERC 3619 NLA)
") The TR8 TPS (Throttle Potentiometer Switch ERC 3619 NLA) My TR8 Efi had been running odd for some time with on occasions a very strong HC smell. Unfortunately with its MOT looming it was fairly obvious
The TR8 TPS (Throttle Potentiometer Switch ERC 3619 NLA) My TR8 Efi had been running odd for some time with on occasions a very strong HC smell. Unfortunately with its MOT looming it was fairly obvious
*Some speedometers have these additional electronic connections. If yours does, then remove the smaller slotted screws shown.
 www.odometergears.com 1981-1985 240 Cable-Driven Speedometers (NOT for 1986 and later electronic units) http://www.davebarton.com/240-odometer-repair.html For this set of instructions below, I will not
SOIL MOISTURE-SENSING BY HACKING A SOLAR LIGHT
 SOIL MOISTURE-SENSING BY HACKING A SOLAR Getting started LIGHT In this tutorial, we are going to take a simple solar powered pathway light from a department store and rewire it to be a soil moisture sensor.
Installation of Transom Ladder on Montgomery 15 Sailboat By David Grah Winter 2012 / 2013
 Installation of Transom Ladder on Montgomery 15 Sailboat By David Grah Winter 2012 / 2013 For the few years we have had our 1986 Montgomery 15, we have used a removable ladder for getting back on the boat
Balancing the Wheels on a Bench Grinder, version 2
 Balancing the Wheels on a Bench Grinder, version 2 By R. G. Sparber Copyleft protects this document. 1 I recently replaced the wheels on my bench grinder and the vibration was horrible. With a lot of help
Door panel removal F07 5 GT
 Things needed Decent plastic trim removal tools Torx 30 Spare door clips 07147145753 I got away with a set of 5 but if I did it again I d be cautious and get 10. From prior experience if they are damaged
SunFlower Helicopter Rocket LUNAR Build Session: 9/25/08 By Tom Desmarais
 SunFlower Helicopter Rocket LUNAR Build Session: 9/25/08 By Tom Desmarais Contents of Kit: A. 3 1/16 x1 x11 basswood rotors B. 3 1/16 x2 x2 basswood fins C. 3 1/16 x5/16 x1/2 basswood hold spacer D. 3
9 Locomotive Compensation
 Part 3 Section 9 Locomotive Compensation August 2008 9 Locomotive Compensation Introduction Traditionally, model locomotives have been built with a rigid chassis. Some builders looking for more realism
Connecting the rear fog light on the A4 Jetta, while keeping the 5 Light Mod
 Connecting the rear fog light on the A4 Jetta, while keeping the 5 Light Mod DISCLAIMER: I'm human and make mistakes. If you spot one in this how to, tell me and I'll fix it This was done on my 99.5 Jetta.
SAM-1 Fan Kit Installation Into HENG S Range Hood Model #R C David Jeffs June 2015
 SAM-1 Fan Kit Installation Into HENG S Range Hood Model #R0623500C David Jeffs June 2015 If you own an RV you probably have come to the same conclusion that I have. Everything related to an RV is plagued
VEHICLE TOWING SAFETY
 When you've got the correct gear, some practice and confidence, towing can be as easy as single-vehicle driving. Yet safety should always be your main concern when you're pulling a trailer. Because no
THE TORQUE GENERATOR OF WILLIAM F. SKINNER
 THE TORQUE GENERATOR OF WILLIAM F. SKINNER IN 1939, WHICH WAS THE START OF WORLD WAR TWO, WILLIAM SKINNER OF MIAMI IN FLORIDA DEMONSTRATED HIS FIFTH-GENERATION SYSTEM WHICH WAS POWERED BY SPINNING WEIGHTS.
Conversion of a Turnigy 9X to Hall effect sensors
 Conversion of a Turnigy 9X to Hall effect sensors Because English is not my mother language I kindly ask to be gracious. Unfortunately I had several times some problems with the low quality potentiometers
Bottom Mount Seat Mount Installation & Wiring Instructions
 E81/E87/E90/E91/E92/F22/F30/F31/F32/F80/F82/F87 (and other cars with the same sliders) Bottom Mount Seat Mount Installation & Wiring Instructions These instructions assume a basic comfort with crimping
Instructions: PRR Sam Rea Shops X58 Class Box Car Kit Tangent Part Numbers: XX through XX 9/2015
 Instructions: PRR Sam Rea Shops X58 Class Box Car Kit Tangent Part Numbers: 14000-XX through 14002-XX 9/2015 Thank you for purchasing the Tangent Scale Models PRR Sam Rea Shops X58 Class Box Car Kit! A
PYRTE. Building The Front Axle, Fork and Steering
 PYRTE Building The Front Axle, Fork and Steering The front axle on this traction engine is a very simple affair, in that it is a rectangular steel rod, sat on edge, with a pivot in the centre, which is
Char-Griller Smokin Pro Modifications
 Char-Griller Smokin Pro Modifications By Phil Lee aka HawgHeaven Right out of the box, the Char-Griller Smokin Pro has a few design deficiencies that need to be addressed, and are fairly easy to remedy.
Shay - Painting The Trucks & Frames
 Shay - Painting The Trucks & Frames Nelson Riedel Nelson@NelsonsLocomotive.com Initial:2/23/04 Last Revised: 06/06/2004 Painting of the locomotive trucks and frame are described in this page. The tender
Tip: and Orient Express LED Light Upgrade Date: Correction
 Hi All, I have since inherited my friend Rudolf s 42755 Orient Express with the extra 42760 car set and wanted to complete the LED light upgrade as we had planned. Side view of the Restaurant car with
Bendix Hydroboost Repair
 Bendix Hydroboost Repair Report this image Pic 1 the leaky power piston seal... (probably master cyl too.) Pic 2 PS fluid after spider removal and MC actuator rod Pic 3 Removing the accumulator (note 1/8
Simple Free-Energy Devices
 Simple Free-Energy Devices There is nothing magic about free-energy and by free-energy I mean something which produces output energy without the need for using a fuel which you have to buy. Chapter 5:
Memories of a Power Brakes conversion on a 1971 Corvette
 Memories of a Power Brakes conversion on a 1971 Corvette I did the job all by myself, except for the brake bleeding. Looks like an easy job but its not, you definitely need some experience to avoid screw
Device to Rotate Rail Cars By: Chuck Hackett
 Device to Rotate Rail Cars By: Chuck Hackett (MiscCDH@WhiteTrout.net) I have had several requests to provide more info about the device I built to rotate my passenger cars to make it easier to work on
The Body Slinger
 http://www.scaryguys.com/slinger.htm The Body Slinger The body slinger is a nifty animation that looks like a benign corpse in a coffin until its triggered, then leaps almost straight up over your head!
STEP #1: Remove the wheels from the truck. There are (6) 21mm lug nuts holding each wheel on... Remember Lefty Loosy, Righty Tighty.
 21mm lug nuts holding each wheel on... Remember Lefty Loosy, Righty Tighty.") - CustomTacos.com Page 1 of 36 How-To: Toytec Lift Install Read all of these install instructions prior to installing Toytec's suspension lift. I cannot be held responsible for any damages or personal
- CustomTacos.com Page 1 of 36 How-To: Toytec Lift Install Read all of these install instructions prior to installing Toytec's suspension lift. I cannot be held responsible for any damages or personal
Building Robots with Lo-tech Materials
 Building Robots with Lo-tech Materials 1 By Andrew Fisher When you think about robots, you probably imagine drones, self-driving cars, or humanoid robots like Atlas or Asimo. Many of these more serious
ALIGNING A 2007 CADILLAC CTS-V
 ALIGNING A 2007 CADILLAC CTS-V I ll describe a four-wheel alignment of a 2007 Cadillac CTS-V in this document using homemade alignment tools. I described the tools in a previous document. The alignment
Re-building a Caliper
 Re-building a Caliper by Leslie Henson The pistons in the calipers on the 90 are in very poor condition, and although the brakes work ok, it plays on our mind that the pistons are badly corroded, and it
4TH GEN SEATS IN A 3RD GEN TRUCK
 4TH GEN SEATS IN A 3RD GEN TRUCK by Flopster843 02 Oct 2016 If you drive a 3rd generation Dodge Ram truck, I am sure you have discovered that the OEM seats are not the greatest (Figure 1.) They are extremely
Door Panel Removal & Window Stop Adjustment
 Door Panel Removal & Window Stop Adjustment By: Jeff Wolford Disclaimer: This is simply an article of how I fixed my car. I m not responsible if you break, scratch, or mess up anything following my example.
Hood stripes Tools needed from AutoZone or any auto parts store: bottle spray, squeegee, a towel that you re using to clean you car up after washing,
 WARNING These following pages are instruction for C5 CE stripes; however, it is the same method applying vinyl. Please spend time to read thru these pages. At the end, it is your C5 GS1 stripes instruction.
 Installing Seat Belts in my Tudor August 2009 My '29 Tudor was restored about 25 years ago by my brother-in-law. He restored it to close to original, but made a few changes that many will claim are for
MOUSETRAP VEHICLE 2012 CONSTRUCTION TIPS
 MOUSETRAP VEHICLE 2012 CONSTRUCTION TIPS Bro. Nigel Pratt bronigel@kellenberg.org 1 Dennis Papesh dpapesh@holyangels.cc Many Thanks Thank you to Bobby B. of Magsig Middle School and Patrick B. of Holy
CADILLAC CTS & CTS-V: (HAYNES REPAIR MANUAL) BY EDITORS OF HAYNES MANUALS
 BY EDITORS OF HAYNES MANUALS") CADILLAC CTS & CTS-V: 2003-2012 (HAYNES REPAIR MANUAL) BY EDITORS OF HAYNES MANUALS DOWNLOAD EBOOK : CADILLAC CTS & CTS-V: 2003-2012 (HAYNES REPAIR Click link bellow and free register to download ebook:
CADILLAC CTS & CTS-V: 2003-2012 (HAYNES REPAIR MANUAL) BY EDITORS OF HAYNES MANUALS DOWNLOAD EBOOK : CADILLAC CTS & CTS-V: 2003-2012 (HAYNES REPAIR Click link bellow and free register to download ebook:
Compact 6-Speed and Reverse Gearbox
 Compact 6-Speed and Reverse Gearbox By Alan Wenbourne Downloaded from the South East London Meccano Club Website www.selmec.org.uk The Gearbox During the construction of my demonstration Direct Shift Gearbox
SIM RIG GT. Product Manual
 SIM RIG GT Product Manual Introduction Thank you for purchasing the Heusinkveld Engineering Sim Rig GT! This is a compact, clean, adjustable and very stiff simulator frame for a GT-style simracing experience.
Figure 6 - This photo shows the two types of rods; the top one simulates the brake rod that connects to the brake equipment in the truck while the
 These two segments appeared as sidebars to two installments of Essential Freight Cars in the August and September, 2003 issues of Railroad Model Craftsman. Text and photos Ted Culotta. Distribution for
Installing the Audiovox CCS-100 Cruise Control.
 Installing the Audiovox CCS-100 Cruise Control. This article was written by: Lon Lawrence w650kawasaki@leaco.net Cruise Control : Audiovox CCS-100 ($89) Webpage : www.summitracing.com Message: I've installed
RAFIG IDLE TUNING PROCESS
 RAFIG IDLE TUNING PROCESS I decided to PDF this process and bring everything I found into one document as when I went to idle tune it was in bits and pieces so I have gathered SSpdmon s info and put it
Doors. Sound Deadener Showdown. Inner Door Skin. Trim Panel. The Standard Plan for Doors.
 Page 1 of 6 Sound Deadener Showdown Your Source for Sound Deadening Products and Information Home Doors Outer Door Skin A door is complicated enough that we have to break it down into components for discussion.
How To: Fix That Ugly Hanging E-Brake Cable A CFans Members Mod Project by dirtydawg
 How To: Fix That Ugly Hanging E-Brake Cable A CFans Members Mod Project by dirtydawg Skill Level: Easy Disclaimer: Please use caution and seek professional assistance when necessary. ColoradoFans.com,
Scratchbuilding an F25 Well Flat Car
 Scratchbuilding an F25 Well Flat Car By David J. Vinci (Flat Figure 1) Well flats are a pretty rare car type generally, but the Pennsy seems to have had the lion s share of variety. Most of these cars
How I Fitted the Digital Temperature Guage... By T-Cut
 How I Fitted the Digital Temperature Guage... By T-Cut Here's one way to install the digital temperature gauge designed by Hans Schaaper. I decided to fit mine into the redundant slot above the CD-80 radio
2001 V70 T5 ETM Removal and Cleaning Directions
 2001 V70 T5 ETM Removal and Cleaning Directions Howard Cheng howardc64@gmail.com 10/24/05 Version 1.4 Read this before you start I performed this ETM cleaning because I had gotten 2 reduced performance
Troubleshooting Guide for Limoss Systems
 Troubleshooting Guide for Limoss Systems NOTE: Limoss is a manufacturer and importer of linear actuators (motors) hand controls, power supplies, and cables for motion furniture. They are quickly becoming
Autonomously Controlled Front Loader Senior Project Proposal
 Autonomously Controlled Front Loader Senior Project Proposal by Steven Koopman and Jerred Peterson Submitted to: Dr. Schertz, Dr. Anakwa EE 451 Senior Capstone Project December 13, 2007 Project Summary:
Orientation and Conferencing Plan Stage 1
 Orientation and Conferencing Plan Stage 1 Orientation Ensure that you have read about using the plan in the Program Guide. Book summary Read the following summary to the student. Everyone plays with the
How I Installed the Edgerider Wheels on my Gammill Classic Plus
 How I Installed the Edgerider Wheels on my Gammill Classic Plus Jeffrey Lomicka May 15, 2004 I'd been looking forward to installing these wheels since I tried them this year at MQX. This is my pictorial
Athearn Pacific Digital Sound Decoder Installation Notes
 New Dimensions in Digital Sound Technology TM APPLICATION NOTE Overview This application note describes how to install a DSD-100LC Digital Sound Decoder into the Athearn Pacific Locomotive. All of the
Ladders. Meeting Objectives. Introduction/Overview. General Hazards. OSHA Regulations and Frequent Violations
 Ladders Meeting Objectives To explain the proper selection, use, and maintenance of portable ladders. The result should be closer inspection of ladders and greater awareness of how to use them safely.
Moddit. How to Install Raceseng S1/S2 Pulley Kit on Subaru BRZ
 Moddit How to Install Raceseng S1/S2 Pulley Kit on Subaru BRZ A quick and simple write up on the Raceseng S1/S2 Pulley Kit install on our Subaru BRZ. Written By: Ruthie 2017 www.moddit.com Page 1 of 11
Brake Caliper Rebuild - Part Numbers & Tips Per Jim Millet, 3/15/2005
 Per Jim Millet, 3/15/2005 Not too difficult a job. Rears are easier than fronts to access. You ll need the following gasket sets: Front caliper gasket set, P/N 34 11 1 157 037, MSRP $13.58 Rear caliper
Wine Glass Orchestra. Leah Buechley CSCI 7000 Things That Think
 Wine Glass Orchestra Leah Buechley CSCI 7000 Things That Think Abstract My wine glass orchestra project consists of three mechanical wine glass instruments coordinated with Crickets. The first automaton,
~~~~~~~~~~~~~~~~~~~~~~~~~~~~~~~~~~~~~~~~~~~~~~~~ ~~~~~~~~~~~~~~~~~~~~~~~~~~~~~~~~~~~~~~~~~~~~~~~~
 ~~~~~~~~~~~~~~~~~~~~~~~~~~~~~~~~~~~~~~~~~~~~~~~~ GSB Design Concepts Runnin' At Redline 7/9/17 ~~~~~~~~~~~~~~~~~~~~~~~~~~~~~~~~~~~~~~~~~~~~~~~~ Guest Shot: Gene Mills I've known Gene for a number of years,
Basic voltmeter use. Resources and methods for learning about these subjects (list a few here, in preparation for your research):
:") Basic voltmeter use This worksheet and all related files are licensed under the Creative Commons Attribution License, version 1.0. To view a copy of this license, visit http://creativecommons.org/licenses/by/1.0/,
Basic voltmeter use This worksheet and all related files are licensed under the Creative Commons Attribution License, version 1.0. To view a copy of this license, visit http://creativecommons.org/licenses/by/1.0/,
Tip: LED Lighting for the 3098 Locomotive and 4392 Coach Set Date: , ,
 Hi All, Over the past few months I have been working at a steady pace to install LED lighting in my passenger coaches. The coach lighting must have LED lights to reduce power consumption on the layout
MID-MOTOR EBIKE KITS: INFORMATION FOR INSTALLERS
 MID-MOTOR EBIKE KITS: INFORMATION FOR INSTALLERS Tips for evaluating bikes for conversion Consider the age, condition and value of the bike. Is it worthwhile using it as a donor? For reference, a good
Peugeot 406 Coupe: Delocking your boot V.1 April 2005
 This is a first stab at a DIY guide to de-locking your 406 Coupe. It isn t a hard modification to do yourself, but you do need to be confident working on your cars electrics and removing and refitting
Stephenson's Valve Gear: 7mm cast white-metal kit 19 th Century swing-link version - non-working, cosmetic only. Instructions
 SER-Kits Stephenson's Valve Gear: 7mm cast white-metal kit 19 th Century swing-link version - non-working, cosmetic only Page 1 of 5 Instructions HEALTH & SAFETY: The castings contain some lead. Dispose
Fly Rocket Fly: Design Lab Report. The J Crispy and The Airbus A
 Fly Rocket Fly: Design Lab Report The J Crispy and The Airbus A380 800 Rockets: Test 1 Overall Question: How can you design a water, bottle rocket to make it fly a maximum distance. It needs to be made
SHARK UPPER WINDSHIELD FRAME & WINDSHIELD REPLACEMENT. Text and Photos by TOM BENFORD
 Text and Photos by TOM BENFORD I purchased a fathom green 69 big-block tri-power T-top coupe with only 42,000 original miles on it recently. I'm the third owner of the car, and I got it for a very good
PORSCHE V r Valve Timing Instructions. Copyright 2009 Written by Mike Frye Edited my Adam G.
 PORSCHE 928 32V r Valve Timing Instructions Copyright 2009 Written by Mike Frye Edited my Adam G. Sections: Overview.3 Disclaimer/warnings/things to watch for 4 Terms and naming conventions used in this
MGB V8 Roadster restoration project Report 103
 23th December 2016. Wishing all V8 members a Happy Christmas. I now have a list of jobs that need doing to the MG. I shall work through the list. If it s possible, I shall attempt to finish each job before
A Never-Ending Demolition Derby
 A Never-Ending Demolition Derby The demolition derby has always held a special place in our culture. Not unlike Ultimate Fighting, the spectacle is simple: Two cars enter, one car leaves. Problem is, once
QUASAR KIT No THYRISTOR - TRIAC TESTER
 QUASAR KIT No. 1087 THYRISTOR - TRIAC TESTER GENERAL DESCRIPTION With this new kit Quasar Kit offers you a very useful instrument for your bench that will help you to test THYRISTORS and TRIACS. These
Course. GNEG 1103 Introduction to Engineering. Assignment. Team Design Project. Project Selected. Solar Powered Stereo Cooler. Project Presentation
 Course GNEG 1103 Introduction to Engineering Assignment Team Design Project Project Selected Solar Powered Stereo Cooler Project Presentation April 23, 2014 Team Members Kenny Callis Ronny Akhaphong Alfredo
Lincoln Mark VII T5 Swap Version submitted by 5.0 bird
 Lincoln Mark VII 1984-1989 T5 Swap Version 20070611 submitted by 5.0 bird I've decided to make an article to assist with the T5 swap for the 84-89 Mark VIIs, since I was just in there because my DOA didn't
HOW TO MAKE YOUR OWN BATTERIES
 HOW TO MAKE YOUR OWN BATTERIES 1 Page TABLE OF CONTENTS Introduction....3 Usage....4 Aluminum Can Batteries/Cells....8 A Long Lasting, Yet Powerful Battery....10 PVC Pipe Batteries...13 Lab Notes....17
BMW 528i E39 Sunroof Repair
 These instructions will help guide you through the repair process for broken sunroof control rails on an E39 chassis. Before I get started, I want to give a shout-out to a couple people who also posted
Suzuki Samurai to Toyota Front Spring Swap Kit, with Missing Link Shackles (SKU#SSP-TSFM) Installation Instructions
 Installation Instructions") Suzuki Samurai to Toyota Front Spring Swap Kit, with Missing Link Shackles (SKU#SSP-TSFM) Installation Instructions CAUTION: Safety glasses should be worn at all times when working with vehicles and related
Suzuki Samurai to Toyota Front Spring Swap Kit, with Missing Link Shackles (SKU#SSP-TSFM) Installation Instructions CAUTION: Safety glasses should be worn at all times when working with vehicles and related
This article, written by forum member Paulages in September 2008, is from the SOHC/4 Tips and Tricks Forum.
 This article, written by forum member Paulages in September 2008, is from the SOHC/4 Tips and Tricks Forum. When Honda produced the SOHC CB650, it was immediately following the end of the CB550 production,
Modular Engine 1, 2008 revision August 3, 2008
 Modular Engine 1, 2008 revision August 3, 2008 David Kerzel 2008 Back in 2002 I wanted to build a bunch of different engines without a lot of detail to learn how to build an engine, what works and what
Pack 150 Pinewood Derby Rules
 Pack 150 Pinewood Derby Rules Basic Rules 1. Only a BSA supplied kit is permissible. 2. No pre-made cars or kits will be allowed. 3. The car must be made this year, use of last years car is not allowed.
Installing Rear Brake Pads on a WK Jeep
 Installing Rear Brake Pads on a WK Jeep Step by Step By Chirpz Disclaimer: I do not claim that this procedure is the right way or even the best way to change your rear brake pads. This is what I did after
The September, 1997 issue of Railroad Model Craftsman has an excellent article on these cars.
 TTX 60 flat cars The prototypes Pre-Size Model Specialties TTX is best known for it s fleets of intermodal and auto rack cars. The company started building a fleet of 60 flat cars in 1964. They purchased
Utility Trailer 5 x 8 Building Notes
 Utility Trailer 5 x 8 Building Notes This is a standard utility trailer model that is currently on the market (at least in Minnesota). The price tag seems to average around $900 - $1100. There is no doubt
Restoring the Strategic Air & Space Museum s E-4B Model
 Restoring the Strategic Air & Space Museum s E-4B Model By Don Joy IPMS Fort Crook I received a request from the SASM (Strategic Air and Space Museum) to do a restoration of the model. They had a member
283F & 327F Engines : Distributor Cap Modification Kit Development Project
 283F & 327F Engines : Distributor Cap Modification Kit Development Project By Dick Morland Chris Craft offered the "F" series engines (283 F & 327 F) in Commanders from 23' to 35'. There are a lot of these
Folding Shopping Cart Design Report
 Folding Shopping Cart Design Report EDSGN 100 Section 010, Team #4 Submission Date- 10/28/2013 Group Image with Prototype Submitted by: Arafat Hossain, Mack Burgess, Jake Covell, and Connor Pechko (in
TL4076 Top 5 Tips Get to know your TL4076
 TL4076 Top 5 Tips Get to know your TL4076 Thermal Break with Teflon liner (behind fan) Hot End Assembly Fan Heat Block Extruder with toothed gear(brass) and idler (steel) Filament Guide Tube Nozzle Cable
RV8 boot lid lock and boot light switch
 Godfrey Dennis has some useful pictures of the lock on the boot lid on his RV8 which he feels should help to clarify the metal tab which acts as the switch mechanism for the interior boot lamp, particularly
X-Type w/ non-premium sound amplifier installation instructions
 X-Type w/ non-premium sound amplifier installation instructions 1. Pull radio from dash (see Radio Removal Instructions ) 2. Disconnect wiring harness from back of radio by pushing in tab on plug and pulling