2001 V70 T5 ETM Removal and Cleaning Directions
|
|
|
- Shana Mason
- 5 years ago
- Views:
Transcription
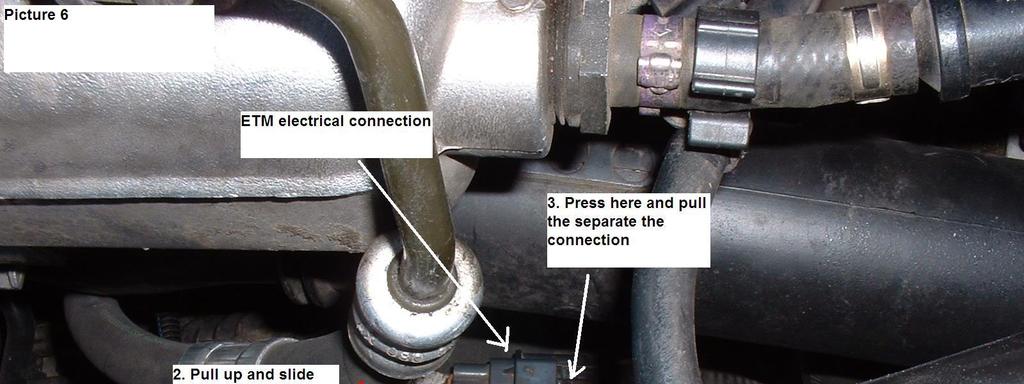
1 2001 V70 T5 ETM Removal and Cleaning Directions Howard Cheng 10/24/05 Version 1.4 Read this before you start I performed this ETM cleaning because I had gotten 2 reduced performance messages at 50+ mph driving. I also felt faint hesitation at extended period of highway speed driving (over an hour). It felt similar to the driving on highway during windy days. After the ETM cleaning, my car had more performance and ran really well. I was impressed. It was like having a new car again. But then I got another reduced performance message and all my performance gains after the ETM cleaning was gone. I decided to reset the computer by disconnecting the ETM and the battery. The improved performance magically came back after. I realized it is the computer reset from ETM cleaning that gave me the performance increase and not the removal of slight oily film in the throttle body. The butterfly in the throttle body is under a fair amount of spring tension. This tension is much higher than any resistance that the oily film might offer. In my case, I have reduced performance even with a clean throttle body. Of course, I still need to track down the cause of the reduce performance message. So you might consider doing this before attempting to clean the ETM. My assessment is the oil film removal from throttle body + butterfly won t do anything. Disconnecting the ETM See picture 6. Maybe disconnecting the car battery is unnecessary but I haven t yet determined this. IMPORTANT: If you really want to clean the throttle body or want the directions for ETM removal+replacement. Please continue. Keep in mind if you put in a new ETM, the car won t run because it needs to have the computer programmed at the dealer. Acknowledgement
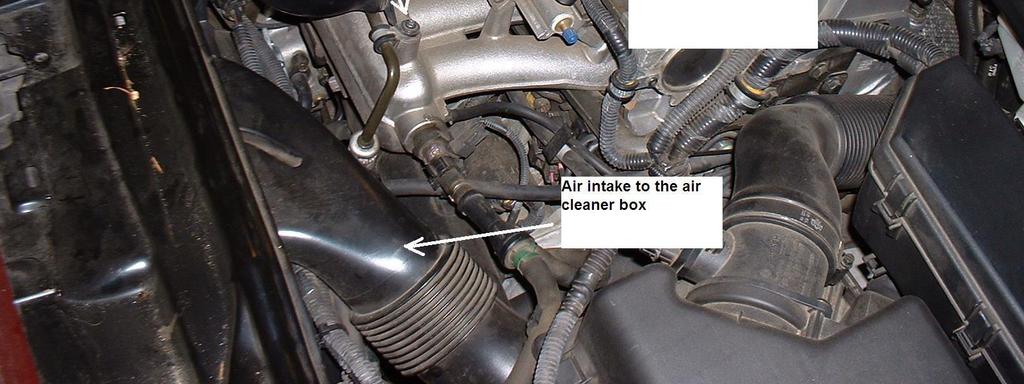
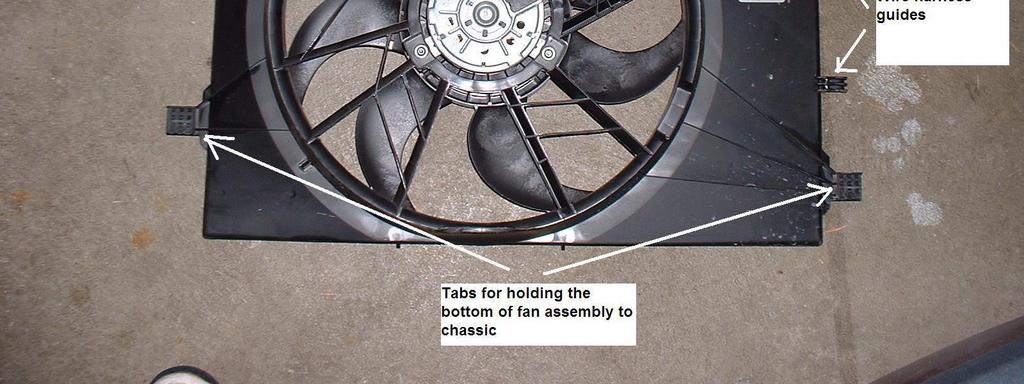
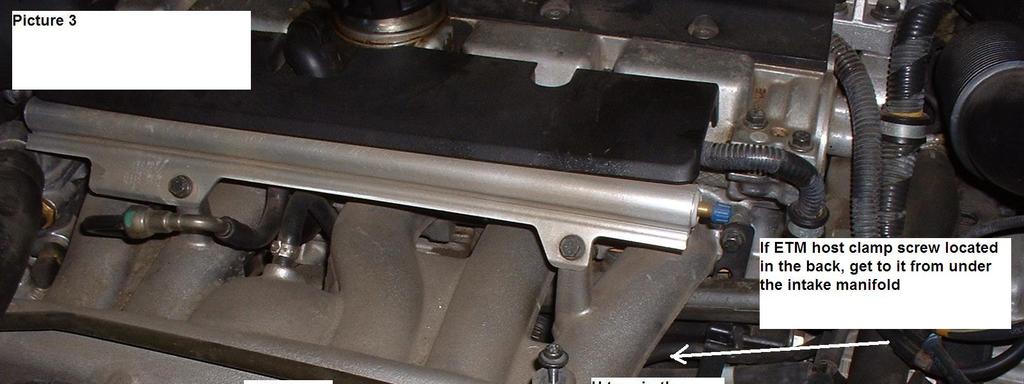
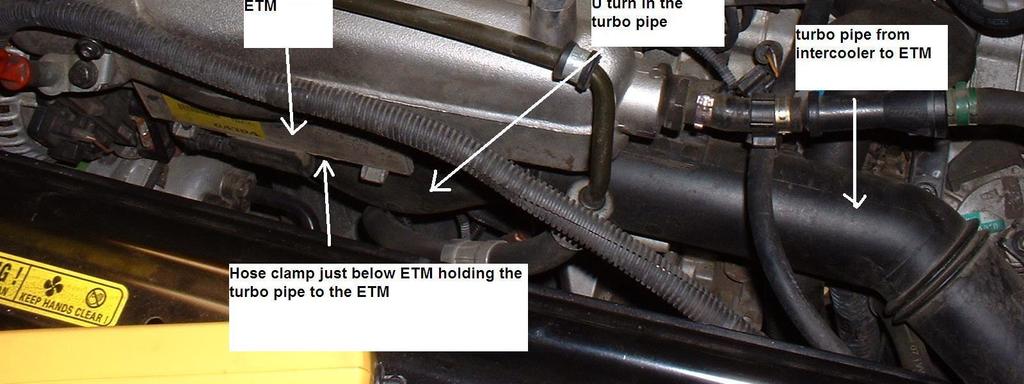
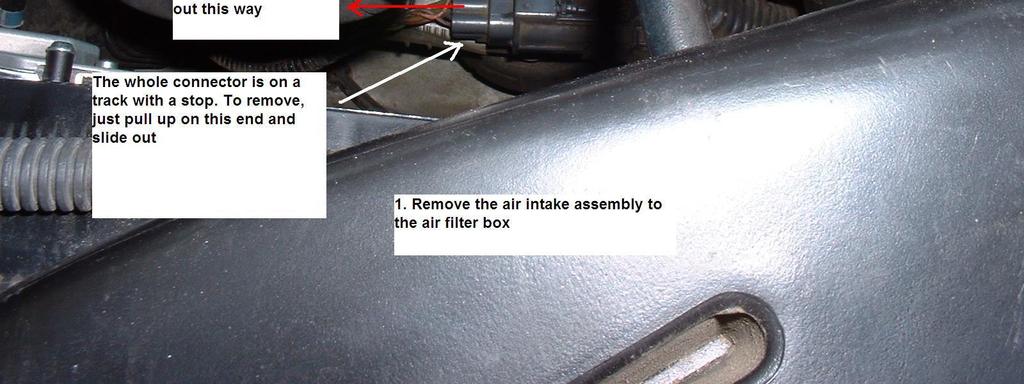
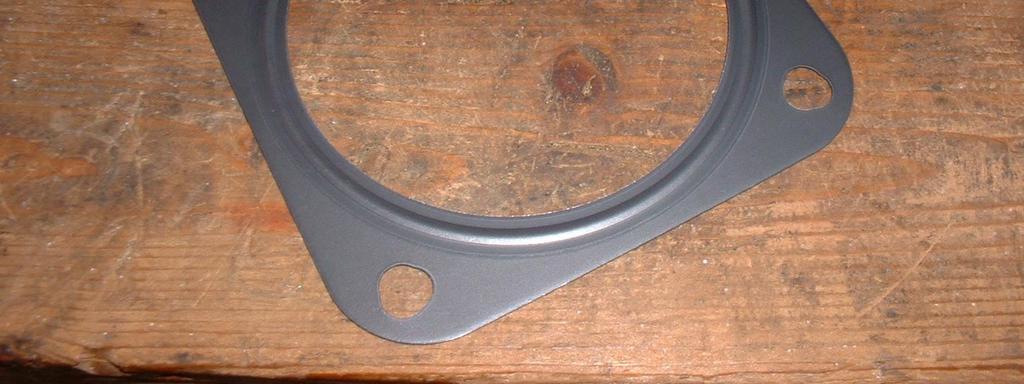
2 Big thanks to flippu10 on Volvospeed. His directions motivated me to not be overwhelmed by all those pipes and wires at first glance on this job. General Comments Most steps of this job looks harder than it really is. Most items and connections you can see removes easily The turbo pipe feeding the ETM is the single hardest item to remove and reassemble. Reassembly was harder for me (took me 1.5 hour to figure out the best way). You work blindly under ETM by feel in this step. flippu10 on Volvospeed offered a good tip to grease the pipe fitting to make it a lot easier. Took me a total of about 4-5 hours. But I think I spent 3+ hours trying to figure out how to remove and reassemble the turbo pipe from the ETM. Sequence of main components to be removed A1. Air pipe connecting the turbo to the intercooler (see picture 1) A2. Air intake to the air filter box (see picture 1) A3. electric fan assembly (see picture 2) A4. Turbo pipe from intercooler to ETM (see picture 3). A5. ETM (see picture 3) Parts you will need B1. ETM to intake manifold gasket ~$5 (picture 5) B2. Hose clamps with screw for tightening/loosing clamp for about 5/8" diameter hose B3. 3 tie wraps that can provide about 1 inch loop B4. Throttle body cleaner (valvoline synthetic carb+choke+throttle body cleaner worked well for me) B5. Old tooth brush to scrub the ETM deposits Tools you will need C1. 1/4 drive + extension + 7mm and 10mm socket C2. Screw driver handle attachment to the above sockets (may not be necessary. See "Remove turbo pipe from intercooler to ETM") C3. T-25 Torx screw driver + T-25 Torx tip/bit (one screw is oriented with no room for screw driver)
3 Note The directions will indicate some locations with left and right. Left is driver side and right is passenger side in US models. Disconnect the battery I saw a thick red wire that is probably positive below the ETM. Rather than to take a chance and touch ground, I just disconnected the negative terminal on the battery. Whenever I disconnect/reconnect the power on my car, sunroof and a few other electrical circuits don't work after. Just use your remote to lock and unlock the doors. This resets all the communications on those circuits properly. Remove Air pipe connecting the turbo to intercooler (picture 1) Loosen clamps at 3 locations (picture 1, hose clamp H1, H2, H3). H2 and H3 are on the rubber pipe connecting the plastic pipe to the plastic piping to the intercooler. Take off the 2 T-25 Torx screws (picture 1, T1 and T2). The one near the dip stick don't have enough clearance for a Torx screw driver. So use the Torx tip/bit with a 1/4 drive. Remove air intake to the air filter box (picture 1) 2 pieces of loosely connected plastic parts Remove fan assembly (picture 2) Remove the T-25 Torx screw (T3) holding the bracket Disconnect the electrical connector (E1 and E2) Cut the 3 tie wraps (W1, W1 and W3) Remove 2 bolts (B1 and B2) Un-guide the radiator fluid hose on top of the fan Take the wiring harness out of the guides on the right side of the fan assembly. Move the wires aside, take out the dip stick to have more room and pull out the fan. Have to wiggle a little to get the tabs on the bottom of the fan assembly to clear radiator hoses on both sides of the radiator.
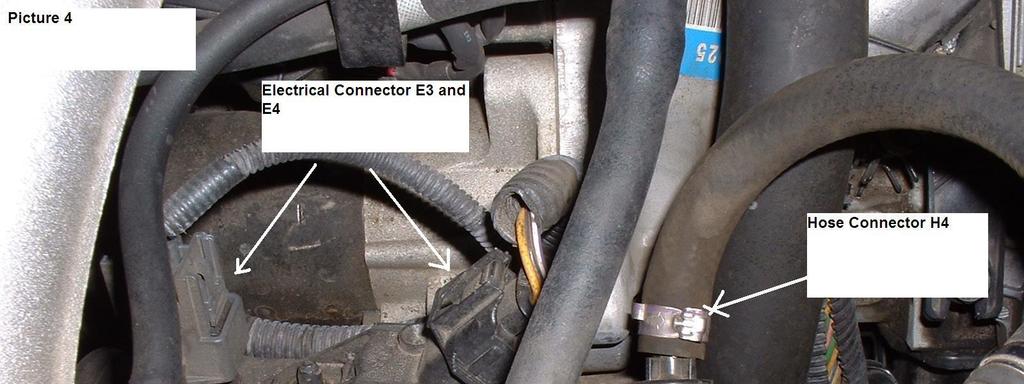
4 Remove turbo pipe from intercooler to ETM (picture 3, picture 4) I really wished I took a picture of this pipe after removal so you can see it clearly. I simply forgot. If anyone performs this procedure, please take a picture and forward to me so I can include it. Thanks. Loosen the clamp on intercooler side (about half way down the lower left of the radiator) Take off the hose after removing hose clamp (H4). I squeezed the crimped part (edge wise along the length of the clamp) on top with a pair of plier and the clamp just popped open. Take off the 2 electrical connectors (E3 and E4) Here is one of the hard steps. Feel and find the screw on the clamp (at the end of the U turn on the turbo pipe) holding the turbo pipe to the ETM. Use the proper tool depending on orientation. Mine was located in the very back (toward the firewall) with the screw head facing left. I had to use a 7mm socket fitted to a screw driver handle + extension (to make about 10 inches total) to reach in under the intake manifold (picture 3) This pipe was really hard to pull off as you couldn't get much leverage on it. I finally put a screw driver over the U turn on the pipe and pushed down with one hand in front of the ETM and the other under the intake manifold. It came out right away. Remove ETM Trace the ETM wire to connector and disconnect it. Take out 4 ~3 inch long 10mm bolts arranged rectangular pattern around the throttle body opening hold the ETM to the intake manifold. Need to feel for it and operate in blind. Remember, counter clock wise to loosen (Remember that the ratchet is upside down so it looks like clock wise if you look down from top of the engine compartment) Pop off the ETM. Use slight force to loosen the hold by the gasket Clean the ETM Spray and clean the inside round walls of the throttle body + butterfly. Use the tooth brush to get off the more gummed up areas. I wouldn't get the rest of the ETM wet, there is electronics in there. Use a razor blade and scrap off the remaining sticky gasket material on the ETM. Clean this surface with throttle body cleaner.
5 Reinstalling the ETM IMPORTANT: Before reinstalling the ETM, look at the instructions on the next step (Installing the turbo pipe to ETM) You will be doing that installation blind as you can't see the area you are working in. So take a good look and try to memorize what you will feel. Put the new gasket on (I put the raised ring on gasket facing ETM, but I heard it doesn t matter) and work the 2 front bolts into the intake manifold. Don't tighten with ratchet yet. Work the 2 back bolts into the intake manifold through the gasket bolt holes. Since you are blind, you ll have to trust the back bolts are going through the gasket bolt holes with the front bolts aligning everything properly. The 2 front bolt should hold everything in place if you hand tighten the bolt. Tight these 2 screws. I don't know the torque spec. The gasket has a bumped ring surface. I felt this surface compress as the screws got tight. Connect the ETM electrical connector Installing the turbo pipe to ETM This was really hard and took me a long time. The pipe's opening to the throttle body barely fits so you need really good alignment and even force while working blindly upside down without good leverage. The trick I did was to loosen the clamp and drop it to the bottom of the U part of the hose. Now you can get a good feel whether the lip of the opening is evenly over the throttle body opening (without feeling the hose clamp). Then push up and get it in there. I had to wiggle and rotate a little while providing upward force. flippu10 on Volvospeed provided a tip that greasing the pipe fittings makes this a lot easier. He said greasing all of the pipe fittings helps during installation. Since you will be doing everything by feel, you should remember there were ribs on the outer circular walls of the throttle body for the turbo hose attachment. If you can feel these, then the hose isn't on correct or fully. After the hose is on, put back and tighten the hose clamp. I put the screw facing front of the car so I don't have to work behind the ETM and under the intake manifold next time. Everything after this is easy. Just reverse the disassembly process with the following additional notes When reinstalling the fan assembly. Make sure the tabs on the bottom of the assembly fit into the slots on 2 side of the radiator. This is what holds the bottom of the fan assembly. Also be careful working these tabs pass the hoses on both side on the top of the radiator.

6 Pictures

7
8

9
Door Panel Removal & Window Stop Adjustment
 Door Panel Removal & Window Stop Adjustment By: Jeff Wolford Disclaimer: This is simply an article of how I fixed my car. I m not responsible if you break, scratch, or mess up anything following my example.
BMW 528i E39 Sunroof Repair
 These instructions will help guide you through the repair process for broken sunroof control rails on an E39 chassis. Before I get started, I want to give a shout-out to a couple people who also posted
*Some speedometers have these additional electronic connections. If yours does, then remove the smaller slotted screws shown.
 www.odometergears.com 1981-1985 240 Cable-Driven Speedometers (NOT for 1986 and later electronic units) http://www.davebarton.com/240-odometer-repair.html For this set of instructions below, I will not
Installing Nameless Performance High Flow cats on a Jaguar XKR
 Installing Nameless Performance High Flow cats on a 2000-2002 Jaguar XKR Part I, removal preparation under the hood, left side. 1. Open the hood and remove the coolant tank cap on the driver's side of
Volvo 850 Radiator Replacement Jason Reed 29 March 2013
 This write up covers removing and replacing the radiator on a 97 855 GLT wagon with light pressure turbo and automatic transmission. This car has 162K miles. The radiator, which was original, developed
Changing the Struts on a WK Jeep CRD
 Changing the Struts on a WK Jeep CRD Step by Step By Chirpz Disclaimer: I do not claim that this procedure is the right way or even the best way to change your struts. This is what I did after reading
Fitting Instructions For The TDV6 EGR Blanking Kit To A 2006 Model Discovery 3 TDV6 GHSE
 Part Number DA1112 Fitting Instructions For The TDV6 EGR Blanking Kit To A 2006 Model Discovery 3 TDV6 GHSE You do this modification at your own risk. Britpart won t be held responsible for what is written
Mercedes Diesel Valve Adjustment Procedure
 1 of 30 5/30/2008 12:58 PM Home Cars for sale Trucks for sale Where we are Links to other diesel sites About us Why diesel? Diesel Videos How they work How they sound FAQ Dodge Diesel Maintenance tips,
Some tips and tricks I learned from getting clutch out of vehicle Skoda Octavia year 2000
 Some tips and tricks I learned from getting clutch out of vehicle Skoda Octavia year 2000 Last change 2013-Oct-11 I bought Haynes manual for a starter. That s something well worth it s cost I believe.
OEM Cruise Control Installation in GMC/Chevy NBS trucks
 OEM Cruise Control Installation in 99-02 GMC/Chevy NBS trucks May 2008 ~ Rampage_Rick Having just installed factory cruise control in my 00 Sierra, I thought I d share the fun. I followed the steps outlined
Airaid Poweraid Throttle Body Spacer (11-13 V6):
:") Install Time: Less than 1 hour Required Tools: Flat blade screw driver ratchet 8mm socket 10mm socket Needle nose pliers or Channel locks Razor blade 2 small cable ties or electrical tape Airaid Poweraid
Install Time: Less than 1 hour Required Tools: Flat blade screw driver ratchet 8mm socket 10mm socket Needle nose pliers or Channel locks Razor blade 2 small cable ties or electrical tape Airaid Poweraid
OIL COOLER KIT INSTALLATION INSTRUCTIONS PART NUMBER D E92 335is (N54 engine) with BMW M-Technic bumper and with stock oil cooler
 with BMW M-Technic bumper and with stock oil cooler") OIL COOLER KIT INSTALLATION INSTRUCTIONS PART NUMBER D570-0923 APPLICATION: 2011 E92 335is (N54 engine) with BMW M-Technic bumper and with stock oil cooler Congratulations for being selective enough to
OIL COOLER KIT INSTALLATION INSTRUCTIONS PART NUMBER D570-0923 APPLICATION: 2011 E92 335is (N54 engine) with BMW M-Technic bumper and with stock oil cooler Congratulations for being selective enough to
OIL COOLER KIT INSTALLATION INSTRUCTIONS PART NUMBER D
 OIL COOLER KIT INSTALLATION INSTRUCTIONS PART NUMBER D570-0904 APPLICATION: 2011-2012 E90 335i/xi (N55 engine) with BMW standard bumper and with stock oil cooler Congratulations for being selective enough
2017+ L5P Duramax 3 ½ Down Pipe & EGR Fix Kit
 2017+ L5P Duramax 3 ½ Down Pipe & EGR Fix Kit Covers installation of PN s: WCF100630, WCF100829 Note: This Kit is for off road competition use only! Off Road Competition Use Tuning & Exhaust System is
PORSCHE V r Valve Timing Instructions. Copyright 2009 Written by Mike Frye Edited my Adam G.
 PORSCHE 928 32V r Valve Timing Instructions Copyright 2009 Written by Mike Frye Edited my Adam G. Sections: Overview.3 Disclaimer/warnings/things to watch for 4 Terms and naming conventions used in this
Spark Plug replacement on VW 2.0L engine with AEG code
 Spark Plug replacement on VW 2.0L engine with AEG code This is document is an attempt to describe and illustrate to some extent the process of replacing the spark plugs on a Volkswagen 2.0L engine with
Fitting the Bell Auto Services (B-A-S) TDV6 EGR Blanking Kit to a 2006 model Discovery 3 TDV6 HSE
 TDV6 EGR Blanking Kit to a 2006 model Discovery 3 TDV6 HSE") Fitting the Bell Auto Services (B-A-S) TDV6 EGR Blanking Kit to a 2006 model Discovery 3 TDV6 HSE Before I describe how I did this, I must first thank other members of the Disco3.co.uk forum (namely J,moore
Fitting the Bell Auto Services (B-A-S) TDV6 EGR Blanking Kit to a 2006 model Discovery 3 TDV6 HSE Before I describe how I did this, I must first thank other members of the Disco3.co.uk forum (namely J,moore
Timing belt change. Timing belt change
 Timing belt change Put 2 new Gates T275 timing belts on today. Tensioner drilled smooth and tight with less than 16,000 miles on her decided not to change the tensioners just the belts. You'll need some
DrVanos.com Stage II Installation Instructions. Tool rental is available with the purchase of a vanos kit *See website for more info*
 DrVanos.com Stage II Installation Instructions Special Tools Needed: Camshaft locking tool TDC Crank pin Sprocket turning tool Tool rental is available with the purchase of a vanos kit *See website for
Dexter Never-Adjust Brake Install
 Dexter Never-Adjust Brake Install Arctic Fox 2007 29-5T Warning: This involves lifting your trailer, working under and around it. If you do not have the correct equipment and knowledge for this, please
Ford Racing BOSS 302 Engine Oil Cooler (11-14 GT)
") Tools needed: 14mm hex socket 7mm socket/wrench 8mm socket/wrench Ford Racing BOSS 302 Engine Oil Cooler (11-14 GT) 10mm socket (for airbox removal) ¾ inch or 19mm wrench Torque wrench Appropriate ratchets
Tools needed: 14mm hex socket 7mm socket/wrench 8mm socket/wrench Ford Racing BOSS 302 Engine Oil Cooler (11-14 GT) 10mm socket (for airbox removal) ¾ inch or 19mm wrench Torque wrench Appropriate ratchets
List of parts needed below. Tools needed
 1 BMW 645 Coolant leak repair (Cap with Seal Repair and Expanding Coolant Pipe Installation w Pics) By Michael R. Brown (Estimated time to complete the job is 6-8 hrs) List of parts needed below. BMW PART
OIL COOLER KIT INSTALLATION INSTRUCTIONS PART NUMBER D E92 335i/xi (N55 engine) with BMW Standard bumper and with stock oil cooler
 with BMW Standard bumper and with stock oil cooler") OIL COOLER KIT INSTALLATION INSTRUCTIONS PART NUMBER D570-0924 APPLICATION: 2011-12 E92 335i/xi (N55 engine) with BMW Standard bumper and with stock oil cooler Congratulations for being selective enough
OIL COOLER KIT INSTALLATION INSTRUCTIONS PART NUMBER D570-0924 APPLICATION: 2011-12 E92 335i/xi (N55 engine) with BMW Standard bumper and with stock oil cooler Congratulations for being selective enough
Wiring Harness Relocation by Flopster Mar 2012
 Wiring Harness Relocation by Flopster843 21 Mar 2012 On my 2008 Ram, there is a gigantic blob of electrical wiring that Dodge decided to put between the engine and the brake master cylinder, just behind
Replacing MK4 Golf/Jetta radiator mounts in-car
 Replacing MK4 Golf/Jetta radiator mounts in-car This is a guide to replacing the radiator mounts in a MK4 Golf/Jetta. This involves moving the core support to the service position which allows you to do
How I installed new brake pads on my i with Sport Package (should be fine for other E39 s) By Robert B.
 By Robert B.") How I installed new brake pads on my 1999 528i with Sport Package (should be fine for other E39 s) How I installed new brake pads on my 1999 528i with Sport Package (should be fine for other E39 s) By
How I installed new brake pads on my 1999 528i with Sport Package (should be fine for other E39 s) How I installed new brake pads on my 1999 528i with Sport Package (should be fine for other E39 s) By
M52tu-M54 VANOS Assembly & Timing Using G.A.S. Professional Cam Tool Kit
 Home BMW Solutions Porsche Solutions DIY Tech Engine Services Dyno Services Machining About Contact Store Tool Rental M52tu-M54 VANOS Assembly & Timing Using G.A.S. Professional Cam Tool Kit This procedure
Performance Inlet Manifold
 Performance Inlet Manifold Tools needed (some tools not required on some models): 13mm Combination Wrench Flat Blade Screwdriver T30 Torx Driver T25 Torx Driver 10mm Combination Wrench and/or Socket with
Looking up the front of the engine from under the radiator. (Picture taken with belt under tension.)
") 8. If you re replacing the AC compressor drive belt as well, it s time to loosen its belt tensioner. The AC compressor belt tensioner is very obvious under the front of the car. Loosen the 13mm bolt, then
8. If you re replacing the AC compressor drive belt as well, it s time to loosen its belt tensioner. The AC compressor belt tensioner is very obvious under the front of the car. Loosen the 13mm bolt, then
Prerequisites: Shop Manual (recommended) pages 3-9 through 3-13.
 pages 3-9 through 3-13.") Prerequisites: Order your gaskets average about $25.00 bucks X 2 so $50.00 4NK-11193-00-00 Obtain a shim kit (Should have several 265 and 270s) (Some dealers will exchange) Obtain a Valve Bucket Tool YM-33961
Prerequisites: Order your gaskets average about $25.00 bucks X 2 so $50.00 4NK-11193-00-00 Obtain a shim kit (Should have several 265 and 270s) (Some dealers will exchange) Obtain a Valve Bucket Tool YM-33961
The Ford Model A Water Pump
 The Ford Model A Water Pump George Washington Chapter, Inc. 3903 Old Lee Highway Fairfax, VA 22030 1 Table of Contents Introduction/Specifications.. 3 1. Water Pump Inspection and Removal. 4 a. Removal..
Disco 3 Clock Spring / Rotary Coupler replacement
 Disco 3 Clock Spring / Rotary Coupler replacement I recently had to change my Clock spring and thought some folks may find it helpful to see what it entailed. I did lots of reading around but couldn t
WH Ford 2WD Steering System #2013/2015 Date 02/15/04 rev. 1
 Phone (209) 400-7200 Fax (209) 943-7923 www.wildhorses4x4.com WH Ford 2WD Steering System #2013/2015 Date 02/15/04 rev. 1 Basic system notes: This system works on 1966-1977 Broncos with manual steering
Ford Racing Performance Improvement Intake Manifold (96-04 GT) Time Necessary: Approximately 4 hours
 Time Necessary: Approximately 4 hours") Ford Racing Performance Improvement Intake Manifold (96-04 GT) Time Necessary: Approximately 4 hours Tools Required: Ratchet and socket set Torque wrench Large adjustable wrench Needle nose pliers A dozen
Ford Racing Performance Improvement Intake Manifold (96-04 GT) Time Necessary: Approximately 4 hours Tools Required: Ratchet and socket set Torque wrench Large adjustable wrench Needle nose pliers A dozen
Projector39/Umnitza BMW Headlight & Re-Installation for E39s Predator Angel Eyes, and Lamin-X Installation
 Projector39/Umnitza BMW Headlight & Re-Installation for E39s Predator Angel Eyes, and Lamin-X Installation Now it is time to remove the headlights! Obviously you have to open the hood to do this. 100_3630.jpg
Spikes-Spider Hub Installation
 Spikes-Spider Hub Installation The instructions that are provided with the Spikes Spiders are pretty good. I've created this page for two reasons: to show those that are thinking of buying a set exactly
2010 Toyota Prius Fog Light Retrofit
 2010 Toyota Prius Fog Light Retrofit A DIY prospective Last updated: Friday, December 25, 2009 *** Disclaimer Use this document and its contents at your own risk! *** Forward: This document was compiled
VW & Audi TDI CR140 ECO KIT Installation Guide
 VW & Audi TDI CR140 ECO KIT Installation Guide This guide is to help you install your new Rawtek DPF, EGR & Adblue Delete Exhaust ECO Kit on your (2009-2014) VW / Audi with 2.0l CR140 Diesel Engine. Note:
Improving the gearshift feel in an SW20.
 Improving the gearshift feel in an SW20. Part one In 3 parts. The SW20 gearshift can be often be greatly improved by eliminating play in the shift linkages, and this article covers three areas that need
MAZDASPEED3 Intercooler Instructions
 MAZDASPEED3 Intercooler Instructions Congratulations on your purchase of the COBB Tuning Front Mount Intercooler System for your 2007-2009 Mazdaspeed3. The following instructions should assist you through
JRSC + BBK Install on SVTF. Neil A. Shah medicnas on focaljet September 2006
 JRSC + BBK Install on SVTF Neil A. Shah medicnas on focaljet September 2006 ECU up here. When removing make sure the smaller bundles of wires don t get wrapped around the bottom edge and break - this almost
Tools needed: Here is a pic of the shift kit I used. It is a Transgo brand and as you can see, it just a bag full of springs and one valve.
 Before installing a shift kit, be sure the transmission is in good operating order. If your transmission is making noises, slipping, shifting bad or the fluid looks brown or smells burnt, take the transmission
I hope this guide helps you as much as Boomer Bob helped me. We re just sharing what we know to help out other folks. Best of luck! Phil C.
 A brief tutorial on swapping cams for the Victory Cross Roads and Cross Country on the Victory Freedom 106 inch V-Twin Engine with 6 speed over drive transmission Disclaimer: Swapping cams on a Victory
ALTERNATOR REPAIR FOR BMW 645 CI. E64 ENGINE N62 BY KEVIN BOWEN 6/9/2013
 ALTERNATOR REPAIR FOR BMW 645 CI. E64 ENGINE N62 BY KEVIN BOWEN 6/9/2013 Level of difficulty: If you follow these directions, moderate, hardest part is aligning the alternator back for repositioning. Length
Installing LED lights in a Hypercharger By Keith Edwards Joker s Wild! (Wildjokr)
") Installing LED lights in a Hypercharger By Keith Edwards Joker s Wild! (Wildjokr) THINGS YOU WILL NEED: A Hypercharger (duh!) LEDs (The ones I got were from Benny Bryant at Fantasies on Wheels in Sylacauga,
Installing LED lights in a Hypercharger By Keith Edwards Joker s Wild! (Wildjokr) THINGS YOU WILL NEED: A Hypercharger (duh!) LEDs (The ones I got were from Benny Bryant at Fantasies on Wheels in Sylacauga,
Shotgun Single Barrel HPFP install guide
 Shotgun Single Barrel HPFP install guide Thank you for your purchase of the VTT Shotgun Single Barrel HPFP upgrade! First thing to do when you open your box is to make sure all parts are in their respective
LML 3 Y-Bridge Kit or High Flow Intake Bundle Package
 2011-2016 LML 3 Y-Bridge Kit or High Flow Intake Bundle Package Covers installation of PN s: WCF100607, WCF100691, WCF100716, & WCF100353 Note: This Kit is for off road competition use only! Overview-
At Mark's suggestion I thought I'd write this up so future Coupe lovers can have as much fun* as I did with this job.
 At Mark's suggestion I thought I'd write this up so future Coupe lovers can have as much fun* as I did with this job. My enormous thanks to forum members, particularly glorfindel, for their advice when
Included parts: 1 - HSM Billet Aluminum Throttle Body Adapter 1-5-Ply Stainless-Reinforced Hose Replacement 2 - Stainless T-bolt Clamps STEP 1
 TROUBLESHOOTING: Please read and understand all installation instructions before proceeding with the installation. If you have questions during the installation of this product, please email H&S Motorsports
Intake Kit Supplement for CRV and Pathfinder
 Intake Kit Supplement for CRV and Pathfinder This guide will briefly outline how to install the intake kits for the Honda CRV and Nissan Pathfinder. This is a pretty basic job, but for the average person
WARNING These following pages are instruction for C5 CE stripes; however, it is the same method applying vinyl. Please spend time to read thru these
 WARNING These following pages are instruction for C5 CE stripes; however, it is the same method applying vinyl. Please spend time to read thru these pages. At the end, it is your C5/C6 ME stripes' instruction.
APIKOL AAN INTAKE MANIFOLD INSTALLATION INSTRUCTIONS
 APIKOL AAN INTAKE MANIFOLD INSTALLATION INSTRUCTIONS Estimated Installation Time: Approximately 2 hours Parts that will need to be modified/removed (Details provided later in the instructions): Intercooler
Prius XM Radio Installation Instructions. Eddie Bell
 2004-2005 Prius XM Radio Installation Instructions By Eddie Bell www.metrotpn.com 1 Let me begin by saying this is an easy but time consuming job. Set aside a few hours of your time for the install. If
Brake Caliper Rebuild - Part Numbers & Tips Per Jim Millet, 3/15/2005
 Per Jim Millet, 3/15/2005 Not too difficult a job. Rears are easier than fronts to access. You ll need the following gasket sets: Front caliper gasket set, P/N 34 11 1 157 037, MSRP $13.58 Rear caliper
By AM Customer: Dean Smith, Aug. 8, 2014.
 Ford Racing Bullitt Axle-Back Exhaust (05-09 GT, GT500) By AM Customer: Dean Smith, Aug. 8, 2014. Tools for the Job: 13mm Wrench 13mm Socket 15mm Socket 15mm Deep Socket Ratchet(s) [I used a bigger one
Procharger Stage II Intercooled Supercharger System (11-14 GT)
") Procharger Stage II Intercooled Supercharger System (11-14 GT) Installation Time: Approximately one day. Installed on 2012 Mustang GT 5.0/Manual Required Tools 3/8 Socket Set (Standard and Metric) 1/2
Procharger Stage II Intercooled Supercharger System (11-14 GT) Installation Time: Approximately one day. Installed on 2012 Mustang GT 5.0/Manual Required Tools 3/8 Socket Set (Standard and Metric) 1/2
Includes: 1. High Flow Turbo Up-Pipe 1. J-Hook Block Off / Coolant Reroute 1. Coolant Hose 1. EGR Valve Block Off Plate 2. Hose Clamps 4.
 Includes: 1. High Flow Turbo Up-Pipe 1. J-Hook Block Off / Coolant Reroute 1. Coolant Hose 1. EGR Valve Block Off Plate 2. Hose Clamps 4. Bolts & Nuts WARNING: This product is not legal for sale or use
Installation Instructions
 Installation Instructions Jeep JK 2-Door (2011 Present) Mounting Bracket and Air Line System Kit for ARB On-Board Twin Air Compressor (CKMTA12) Made in the USA Kit Contents: 1 Flat Bracket 1 Formed Bracket
Rear Parking Brake Cable (93 Cobra)
") Rear Parking Brake Cable (93 Cobra) Materials in the box: Brake Cable Tools Needed: One jack and four jack stands. One socket wrench with a 12mm, 13mm ( ½ inch, 12 point DEEP WALL DO NOT FORGET THIS) and
Rear Parking Brake Cable (93 Cobra) Materials in the box: Brake Cable Tools Needed: One jack and four jack stands. One socket wrench with a 12mm, 13mm ( ½ inch, 12 point DEEP WALL DO NOT FORGET THIS) and
A Simple Guide to Installing the C2Motorsports 2.5L SRI
 A Simple Guide to Installing the C2Motorsports 2.5L SRI Special Thanks to Josh and the Crew at Nothing-Leaves-Stock **Disclaimer: This is an aid for installing the SRI on a 2.5L motor. C2Motorsports is
Depress each tab as you pull the bezel off. The bezels are tight. L.H. shown.
 2013-2014 Ford Mustang V6 & Boss 302 Lower Valance Fog Light Kit Parts List: Quantity: Tool List: Fog light & bulb with bracket 2 Flat head & Phillips screwdriver Black bezels 2 Ratchet & Socket set OR
335i Upgrade Intercooler Installation Instructions
 335i Upgrade Intercooler Installation Instructions Part Number: D330-0015 Applications: 2011-12 E90/E92/E93 335i (N55) 2011-12 E92/E93 335is (N54) 2011-12 E90 335i (N55) with M-Technic bumpers (Except
Hood stripes Tools needed from AutoZone or any auto parts store: bottle spray, squeegee, a towel that you re using to clean you car up after washing,
 WARNING These following pages are instruction for C5 CE stripes; however, it is the same method applying vinyl. Please spend time to read thru these pages. At the end, it is your C5 GS1 stripes instruction.
Z1 Motorsports 300zx 2.5 Upgraded piping & BA SMIC Install Guide
 Z1 Motorsports 300zx 2.5 Upgraded piping & BA SMIC Install Guide Congratulations on your new upgraded piping and intercooler kit, this kit has proven to provide the lowest intake air temps to date on our
YOU MAY WANT TO FIRST TRY TO LOOSEN THE FILTER HOUSING
 2005 XC90 Tune-up (5-cyl) Including: Oil Change - Spark Plugs - Fuel Filter - Cabin Filter First off - let me say that I am an amateur (at best) mechanic, and I claim no responsibility for whatever you
This LED flashtube kit covers models 400, 404, 500, 504, 600, 680 & 506.
 L.E.D. INSTRUCTIONS I D T S O T U B I R M O C R Y N A P Kit contains: This LED flashtube kit covers models 400, 404, 500, 504, 600, 680 & 506. For the power supply: 1-LED power supply circuit board, 2
One set each of metric open and box end wrenches. Carpet square or something else suitable to lie upon
 TURBOCHARGER REMOVAL PROCEDURE Written by Chuck Roach(Speedster)/Jan. 2005 Edited and photos by Ilia Baldine(Attappman) The following removal procedure is specifically related to a 2002 Jetta, but should
2015+ SUBARU STI FRONT-MOUNT INTERCOOLER PARTS LIST AND INSTALLATION GUIDE INSTALL DIFFICULTY DISCLAIMER CAUTION INSTALL PROCEDURE TOOLS NEEDED
 PARTS LIST AND PARTS INCLUDED 1PC ALUMINUM INTAKE PIPE 1PC BAR-AND-PLATE INTERCOOLER 1PC STEEL CRASH BAR W/ MOUNTING HARDWARE 2PC HOT-SIDE INTERCOOLER PIPES 2PC COLD-SIDE INTERCOOLER PIPES 1PC BPV FLANGE
Aamir_bt The legend..
 Aamir_bt The legend.. How to do timing on a 4XE1-W (DOHC) engine. well i decided to to a write up for DOHC timing since there was only the SOHC written up, and i had to do a timing belt on my stylus anyways,
05/06 Gsxr 1000 Clutch Mod
 By: Ali (Jetspeedz) 05/06 Gsxr 1000 Clutch Mod Parts: 21472-41G10 - WASHER, CLUTCH - $10.09 From 06 Gsxr 750 Opt: 11482-40F00 - GASKET, CL COVER - $8.29 Tools: 13/64 Drill bit, 30mm, 12mm, 10mm, 8mm sockets,
Page1. ISF Stainless Steel Headers // Part# HDR-004
 Congratulations on the purchase of your ISF Stainless Steel Headers and thank you for choosing Sikky Manufacturing. This installation manual is intended to guide you through the removal of the factory
Accel 300+ Ignition Control System (84-95) - Installation Instructions
 - Installation Instructions") Accel 300+ Ignition Control System (84-95) - Installation Instructions The below installation instructions work for the following products: Accel 300+ Ignition Control System (84-95) Please read through
Accel 300+ Ignition Control System (84-95) - Installation Instructions The below installation instructions work for the following products: Accel 300+ Ignition Control System (84-95) Please read through
Front Suspension Redo
 Front Suspension Redo Message: First, thanks to all the previous posters for guidance in my doing the suspension. As thanks, here s the updated document for doing the front suspension. Procedure: While
COLD AIR INTAKE INSTALLATION INSTRUCTIONS PART NUMBER D A. APPLICATION: E36/7 M-Roadster or M-Coupe 3.
 COLD AIR INTAKE INSTALLATION INSTRUCTIONS PART NUMBER D760-0323A APPLICATION: 1998-00 E36/7 M-Roadster or M-Coupe 3.2 Liter PARTS LIST Air Filter Assembly 3 1/2" Tube Intake Shield Silicone Hose Airflow
Parts List See cover Page
 Thank you for purchasing the CorkSport Front Mount Intercooler Kit for the 2010-2013 Mazdaspeed 3. Keep your BAT s under check with the CorkSport FMIC Kit with the small or large intercooler. Please let
Subaru Front Mount Intercooler Kit STI Subaru Front Mount Intercooler Kit STI
 Subaru Front Mount Intercooler Kit STI 2008-2014 715500 Subaru Front Mount Intercooler Kit STI 2008-2014 Congratulations on your purchase of the Subaru Front Mount Intercooler Kit STI 2008-2014. The following
2012 SLK V6 (M276 Engine) Spark Plug Replacement
 Spark Plug Replacement") 2012 SLK 350 3.5 V6 (M276 Engine) Spark Plug Replacement Proceed at your own risk. I read the Mercedes repair documents pertaining to changing the R172 SLK M276 V6 engine s spark plugs that I could find
2012 SLK 350 3.5 V6 (M276 Engine) Spark Plug Replacement Proceed at your own risk. I read the Mercedes repair documents pertaining to changing the R172 SLK M276 V6 engine s spark plugs that I could find
How to replace your Turbo Actuator Step by Step
 How to replace your Turbo Actuator Step by Step Special thanks to other forum members who have previously dealt with this problem! Old By Chirpz New Your Turbo is a lot tougher than the electric actuator
BMW E46 Convertible Hydraulic Line #23 Replacement Guide Created by taylor192 of E46Fanatics.com
 BMW E46 Convertible Hydraulic Line #23 Replacement Guide Created by taylor192 of E46Fanatics.com BMW E46 Line #23 Replacment Guide, page 1 of 23 Background: Line #23 runs from the valve block on the driver's
Connecting the rear fog light on the A4 Jetta, while keeping the 5 Light Mod
 Connecting the rear fog light on the A4 Jetta, while keeping the 5 Light Mod DISCLAIMER: I'm human and make mistakes. If you spot one in this how to, tell me and I'll fix it This was done on my 99.5 Jetta.
Steeda Sport Mustang Lowering Springs (2005+) - Installation Instructions
 - Installation Instructions") Steeda Sport Mustang Lowering Springs (2005+) - Installation Instructions The below installation instructions work for the following products: Steeda Sport Mustang Lowering Springs (2005+) Please read
Steeda Sport Mustang Lowering Springs (2005+) - Installation Instructions The below installation instructions work for the following products: Steeda Sport Mustang Lowering Springs (2005+) Please read
INSTALL MANUAL D o d g e 1 2 v 6 B T A PLEASE READ ALL INSTRUCTIONS BEFORE INSTALLATION.
 PN#1045310 12V Dodge Twin Turbo Kit (I-00273) 1 INSTALL MANUAL BD Twin Turbo Kit 1994-1 9 9 8 D o d g e 1 2 v 6 B T A Part# 1045310 PLEASE READ ALL INSTRUCTIONS BEFORE INSTALLATION. * Picture as shown
Installation Instructions
 Installation Instructions Jeep JK Unlimited (2007 Present) Mounting Bracket and Air Line System Kit for ARB On-Board Twin Air Compressor (CKMTA12) Made in the USA Kit Contents: 1 Bracket for ARB Compressor
Special Note About The JDM High Performance Water Pump:
 Page 1 of 30 JDM Engineering, Inc. home Call Us! 732-780- 0770 back to Installation Instructions Electric Fan Upgrade Kit Electric Fan Wiring Diagram Thank you for your purchase of the JDM Engineering
J&M Mustang Rear Lower Control Arms (2005+) - Installation Instructions
 - Installation Instructions") J&M Mustang Rear Lower Control Arms (2005+) - Installation Instructions The below installation instructions work for the following products: J&M Mustang Rear Lower Control Arms (2005+) Please read through
J&M Mustang Rear Lower Control Arms (2005+) - Installation Instructions The below installation instructions work for the following products: J&M Mustang Rear Lower Control Arms (2005+) Please read through
Installing AMP-wiring in a New Beetle
 Installing AMP-wiring in a New Beetle Vehicle used: New Beetle 2.0i Type 9C (1999) Used set of cables: Dietz 35mm² power cable, double shielded Dietz chinch cable ( 35mm² Professional Line ) First of all:
Includes: 1. J-hook Block Off / Coolant Reroute 1. Coolant Hose 1. Turbocharger Up Pipe Block Off Disc 2. Hose clamps
 Includes: 1. J-hook Block Off / Coolant Reroute 1. Coolant Hose 1. Turbocharger Up Pipe Block Off Disc 2. Hose clamps WARNING: This product is not legal for sale or use on pollution controlled vehicles
Seadoo Supercharger Removal Guide RXP
 Seadoo Supercharger Removal Guide RXP RXT, RXT X, RXP X and GTX models are very similar and Removal and Installation is similar. The Ceramic washers installed by the OE manufacturer do not completely disintegrate
C&L Upper Intake Plenum (96-04 GT):
:") C&L Upper Intake Plenum (96-04 GT): Tools Needed: Flat-Head Screwdriver 10mm Socket 5/16 Socket 1/4 or 3/8 Ratchet 2 Ratchet Extension Time Required: Approximately 1 hour Installation Instructions: 1.
C&L Upper Intake Plenum (96-04 GT): Tools Needed: Flat-Head Screwdriver 10mm Socket 5/16 Socket 1/4 or 3/8 Ratchet 2 Ratchet Extension Time Required: Approximately 1 hour Installation Instructions: 1.
Wheel Bearing Replacement Passat TDI
 Rear Bearing/hub assembly replacement This is a fairly straight forward process. Pictures are not necessary for most of this procedure for a person with skills to do this repair. Anyone who thinks they
ESS INSTALL. The donor car /6 Cosmos Black/Sand UUC Short Shifter Brembo cross drilled rotors Phillips Nav System 16:9
 ESS INSTALL The donor car.. 1997 540/6 Cosmos Black/Sand UUC Short Shifter Brembo cross drilled rotors Phillips Nav System 16:9 The install went in several stages. Disconnect the battery Stage 1 Remove
13 October, 2014 Page 1
 13 October, 2014 In my second and last Helicycle I want to make everything better than the first one. That includes not only a transmission chip detector, but one for the tail rotor as well. The transmission
Remove the 3-11mm nuts holding mirror on. Don t drop the nuts!
 2005-2012 Ford Mustang Puddle Lamp Kit Parts List: Quantity: Tool List: LED Lamps 2 Flat head screwdriver Seals 2 Ratchet & Socket set OR Nuts 2 Adjustable Wrench Wiring harness 1 Drill & 11/16 th bit
Slingshot Rotrex Supercharger Kit
 Slingshot Rotrex Supercharger Kit This supercharger kit improves on the Slingshot by forcing more dense air into the engine and creating more power. Installation time of the supercharger depends on you
Audi S1 Intake kit. Qty. Description
 Audi S1 Intake kit Description Qty Silicone Intake pipe 1 Vacuum hose 1 Heatshield 1 Bracket 1 Machined inlet 1 Vacuum connector 1 Filter 1 M6x16 cap head bolt 1 Tools Ratchet Extension Torx socket Sockets
Sunroof Repair. Sunroof Repair TSB. The sunroof repair kit available for the J30 is part number Y20. See images at bottom of document.
 Sunroof Repair This document is the text/images from the TSB (technical service bulletin) issued by Infiniti concerning the repair procedure for sunroof issues. Be advised that this is a LARGE, TIME-CONSUMING
Installation Directions for FINGER STICK and Blocker Plate
 Installation Directions for FINGER STICK and Blocker Plate What is a Finger Stick? A Finger Stick is a simple circuit that modifies the MAF signal on LLY and LBZ engines (not LB7 engines) to expected levels
June 23, 2014 Page 1
 My engine looks pretty clean but this fuel pump and fuel control assembly looked really nasty. I decided to partially tear them down and clean them up. This is what the asssembly looked like to begin with.
Ford F-150 Speaker Replacement Instructions
 Ford F-150 Speaker Replacement Instructions This article was downloaded from http://www.fordf150.net Be sure to go there to view and download the other how-to articles. Thanks to John Meyer for contributing
what you need to do is hit the taper housing as hard as you can with your hammers AT THE SAME TIME and at a slight angle, what will happen is you
 first things first, get the car on axle stands and the wheels off. Open the bonnet to let more light through to the area in which you'll be working. The following guide shows the passenger side being done