Device to Rotate Rail Cars By: Chuck Hackett
|
|
|
- Emerald Nichols
- 5 years ago
- Views:
Transcription
 I have had several requests to provide more info about the device I built to rotate my passenger cars to make it easier to work on the trucks and brakes.")
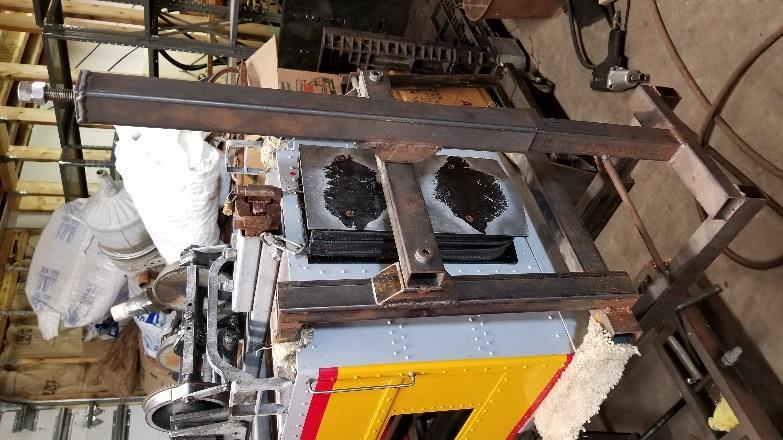
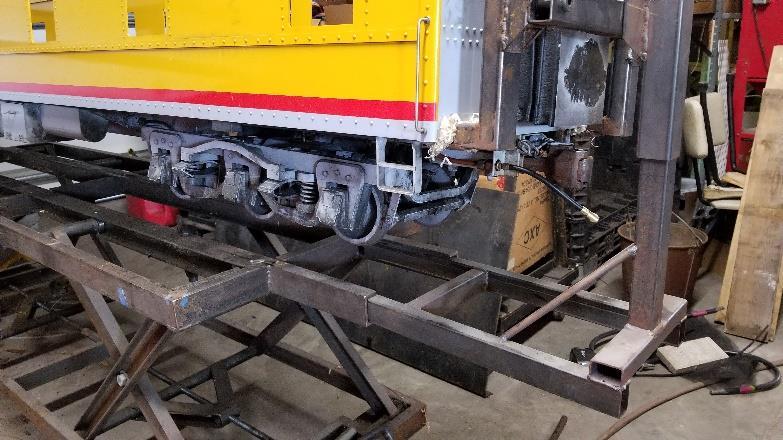
1 Device to Rotate Rail Cars By: Chuck Hackett I have had several requests to provide more info about the device I built to rotate my passenger cars to make it easier to work on the trucks and brakes. The device described here was made specifically for my (Mountain Car) passenger cars and my engine stand. The design would have to be changed to adapt to your cars(s) and engine stand, but this will present the general idea and you can adapt it to your needs. I do not provide dimensions for most items as these will be dictated by your car dimensions, center of gravity, items projecting out the end (such as the diaphragms on my cars), etc. How It s Used This is what it looks like just before lifting the car to rotate it: Figure 1 - Initial position of car


2 This shows the car after it has been lifted and ready to rotate: Figure 2- Car after lifting, ready to rotate Figure 3 - Rotated

3 This shows the final position ready to work on the brakes, etc.: Figure 4 - Tilted and ready for work Note: In this photo there is rebar through one of the cross tubes at each end to keep the car from rolling back over. Later I just lowered each end so that the cross tube hit the brace for the vertical lift tube. This was easier, and I didn t have to worry about walking into the rebar (note the glove over the end of the rebar on the far end ). That s how it s used. Now for some construction details.

4 General layout:

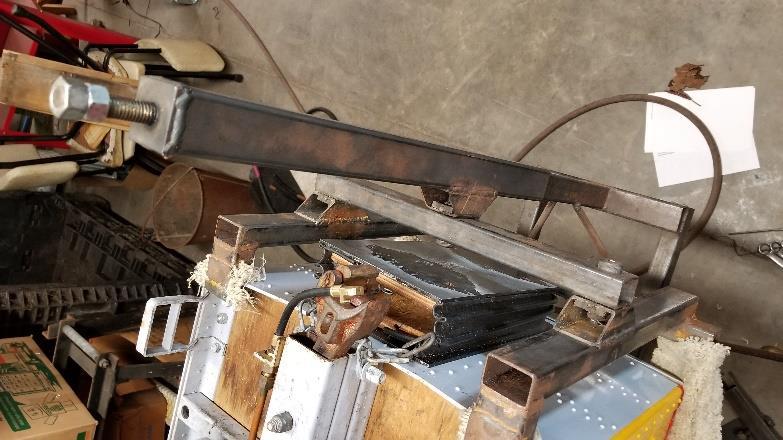
5 Specifics There are two members that slide into the ends of my engine stand. The engine stand uses 2 channel iron for rails and 1 ½ x 1 box slides easily into the rails. On these two horizontal members I have welded two cross pieces. One is welded between the horizontal members about mid-length to hold separation and one is welded on top at the outer end to support the lift tube. I also welded two (3/8 round) members as supports for the lift tube. Figure 5 - Base to hold the lift tube The lift tube is a section of 1 ¼ square tube welded to the base. A section of 1 ½ square tube slides down over the 1 ¼ section. There is a piece of ¼ thick plate welded to the top of the 1 ¼ section. This is drilled and tapped ½ x 13. The upper end of the 1 ½ section is capped by another piece of ¼ plate. This is drilled to ½ so that a piece of ½ x 13 all-thread can pass through it. This piece of all-thread has two nuts locked together about 2 from one end and then this end is passed up through the 1 ½ section and then through the cap. Two more nuts are locked on the end of the all-thread so that the all-thread is captured in the 1 ½ section but free to turn. (note: When I originally built it I think I put a thrust bearing on it before installing it in the 1 ½ section but I didn t take it apart and I do not recall for sure). This assembly is then placed over the 1 ¼ section and the all-thread is threaded into the tapped plate at the top of the 1 ¼ section.


 to prevent the car from rolling completely over.")

6 Turning the exposed double-nut raises and lowers the car with the inner two nuts lifting on the bottom side of the plate at the top of the 1 ½ section. Figure 6 - Lift tube sections Figure 7 - Tapped hole at top of bottom section and captured all-thread in the top section This shows a mark I have placed on the lift tube to denote how far to lower the car so that the cross pieces hit the 3/8 braces in the work position (either way) to prevent the car from rolling completely over. There is another, similar mark above it to indicate at what point the car clears and can be rolled into position initially or back over when work is completed. Figure 8 - "lock" mark Figure 9 - cross piece hits support


7 Pivot At this point you will have to decide at what level you are going to pivot the car. Ideally the pivot should be located so that it is at the center of gravity of the car. This makes it easy to rotate the car. Because of the way my end clamps attach to the car, my pivot point is somewhat high which makes rotating the car a little more difficult but not a big chore. The pivot is formed by welding a section of 1 ½ square to the lift tube. It is located so that it can engage with the car end clamp when the car is on the rails and the lift tube is almost all the way down. Inside this is a piece of ¼ plate with a nut welded on the back. The ¼ plate is drilled to accept the end of a ½ shoulder bolt that is used as the pivot. The pivot passes through a piece of 1 ½ x 1 rectangular tube that serves as a cross piece. The car end clamp is attached to this with two more ½ shoulder bolts (hey, I had them around, so I used them ). Car Clamp The car clamp will have to be designed for your cars. Mine has two padded (old carpet) lips that hook under the bottom edge of the car and two sections of 2 angle iron that then slide onto the roof with a good snug fit (remember you don t want the car to drop out of the lips when you flip it over). My clamp also had to be extended out from the car end to clear the diaphragms. After the end clamp is placed on the car the lift tube cross piece is bolted to the clamp (same shoulder bolt arrangement as the pivot).


8 The car is then raised to the rotate mark using a wrench on the all-thread (if you use an air driver be sure it does not impact or it may unlock the two nuts on the end of the all-thread. After both ends are at the rotate mark, the car is rotated to vertical (upside down) and the lift tubes lowered to the lock marks. That s about all there is to it Chuck Hackett
(gd8) 5/8 x 18 x (2) machined
 5/8 x 18 x (2) machined") 655 SOUTH LINCOLN AVE / SAN BERNARDINO CA. 92408 PHONE 877-470-2975 / FAX 909-890-0703 Web address: globalwest.net COR-5864 V / S / Q (1958 64) Impala rear coilover kit. This kit bolts on, welding is not
655 SOUTH LINCOLN AVE / SAN BERNARDINO CA. 92408 PHONE 877-470-2975 / FAX 909-890-0703 Web address: globalwest.net COR-5864 V / S / Q (1958 64) Impala rear coilover kit. This kit bolts on, welding is not
How to install the Barnett clutch and the stronger Oil Pump Drive Gear
 How to install the Barnett clutch and the stronger Oil Pump Drive Gear Written by WildFred I m from Germany so please excuse my English and the spelling. The following procedure is a combination of the
How to Repair the Rotating Rear Washer Nozzle
 How to Repair the Rotating Rear Washer Nozzle Yes, it looks nice. It wets the window better than the fixed central position. However, it is not supposed to do that. The tube for the washer fluid has seized
Rostra Electronic Cruise Control Install On a Stratoliner or Roadliner
 Rostra Electronic Cruise Control Install On a Stratoliner or Roadliner MATERIALS LIST: 1 - Rostra Part # 250-1223 (www.brandondist.com/products/cruise1223.htm) 1 - Signal Splitter part # 250-4369 1 - Engagement
3. Cover the hood with padding and fold the stock windshield frame down onto the hood.
 640 North El Dorado Street Stockton, CA 95202 Phone (209)943-0991 Fax (209)943-7923 www.wildhorses4x4.com Stainless steel windshield frame #5722 Date 10/30/07 Parts list: 1-10 ¾ long 1/4 NF threaded rod.
FULL FLOATER HUB KIT INSTRUCTION MANUAL
 FULL FLOATER HUB KIT INSTRUCTION MANUAL WARNING: All components are shipped assembled for illustration purposes only. IT IS YOUR RESPONSIBILITY FOR FINAL ASSEMBLY. Please read instructions thoroughly before
Brake Caliper Rebuild - Part Numbers & Tips Per Jim Millet, 3/15/2005
 Per Jim Millet, 3/15/2005 Not too difficult a job. Rears are easier than fronts to access. You ll need the following gasket sets: Front caliper gasket set, P/N 34 11 1 157 037, MSRP $13.58 Rear caliper
05/06 Gsxr 1000 Clutch Mod
 By: Ali (Jetspeedz) 05/06 Gsxr 1000 Clutch Mod Parts: 21472-41G10 - WASHER, CLUTCH - $10.09 From 06 Gsxr 750 Opt: 11482-40F00 - GASKET, CL COVER - $8.29 Tools: 13/64 Drill bit, 30mm, 12mm, 10mm, 8mm sockets,
THE TORQUE GENERATOR OF WILLIAM F. SKINNER
 THE TORQUE GENERATOR OF WILLIAM F. SKINNER IN 1939, WHICH WAS THE START OF WORLD WAR TWO, WILLIAM SKINNER OF MIAMI IN FLORIDA DEMONSTRATED HIS FIFTH-GENERATION SYSTEM WHICH WAS POWERED BY SPINNING WEIGHTS.
FORK FREE PISTON MODIFICATION 2011 HONDA CRF250R
 217 Lorain Place Los Gatos, California 95032 408.406.2089 www.smartperformanceinc.com www.spi-racing.com FORK FREE PISTON MODIFICATION 2011 HONDA CRF250R WHAT? All production versions of the 2011 HONDA
DEMOUNTABLE CONCEPTS, INC. RailTrailer Instruction Manual and Maintenance Guide
 DEMOUNTABLE CONCEPTS, INC. RailTrailer Instruction Manual and Maintenance Guide I N S T R U C T I O N S FOR DEMOUNTING BODIES FROM AIR OPERATED DEMOUNTABLE RAILTRAILER To place bodies in a free standing
X.L. BAND W/ SPRING ASSIST INSTRUCTION MANUAL
 PARTS LIST X.L. BAND W/ SPRING ASSIST INSTRUCTION MANUAL (2) Bands (1) Handle assembly (2) Side hinge assemblies (1) Left rear hinge assembly (1) Right rear hinge assembly (2) front spring s (2) rear spring
2007-Current. Adjustable wrench (that opens to about 1 ), 1/2 open end wrench, Phillips screwdriver, 3/8 socket, 7/16 socket, 7/32 Allen wrench
, 1/2 open end wrench, Phillips screwdriver, 3/8 socket, 7/16 socket, 7/32 Allen wrench") Installation Instructions Van: VNMB07SPRT55 MERCEDES BENZ / DODGE / FREIGHTLINER SPRINTER VAN 144.3 WHEELBASE 2007-Current TOOLS REQUIRED Adjustable wrench (that opens to about 1 ), 1/2 open end wrench,
Installation Instructions Van: VNMB07SPRT55 MERCEDES BENZ / DODGE / FREIGHTLINER SPRINTER VAN 144.3 WHEELBASE 2007-Current TOOLS REQUIRED Adjustable wrench (that opens to about 1 ), 1/2 open end wrench,
DODGE RAM Current
 Installation Instructions Van: VNRA13PROM65 DODGE RAM PROMASTER 159 WHEELBASE 2014-Current TOOLS REQUIRED Adjustable wrench (that opens to about 1 ), 1/2 open end wrench, Phillips screwdriver, 3/8 socket,
ALUMINUM FORD F BED LENGTH. Installation Instructions: DF4 TOOLS REQUIRED 2015-CURRENT FOLLOW #DECKEDUSA
 Installation Instructions: DF4 ALUMINUM FORD F150 5 6 BED LENGTH 2015-CURRENT TOOLS REQUIRED Adjustable wrench (that opens to about 1 ), 1/2 open end wrench, Phillips screwdriver, 3/8 socket, 7/16 deep
Bow Extension Cylinders
 Bow Extension Cylinders Level of difficulty: Fairly easy to intermediate very rewarding! Requires some patience. Tools needed: - 5-mm Allen wrench or socket (only for 90-95 models) - Needle nose pliers
OEM Cruise Control Installation in GMC/Chevy NBS trucks
 OEM Cruise Control Installation in 99-02 GMC/Chevy NBS trucks May 2008 ~ Rampage_Rick Having just installed factory cruise control in my 00 Sierra, I thought I d share the fun. I followed the steps outlined
Sunroof Repair. Sunroof Repair TSB. The sunroof repair kit available for the J30 is part number Y20. See images at bottom of document.
 Sunroof Repair This document is the text/images from the TSB (technical service bulletin) issued by Infiniti concerning the repair procedure for sunroof issues. Be advised that this is a LARGE, TIME-CONSUMING
SafeGuard Flex Seat Maintenance Guide
 SafeGuard Flex Seat Maintenance Guide 1) Preparation For Removal And Replacement Of Seat Back Covers And Retractor Assemblies a) Unlatch seat cushion and pivot cushion up and forward. b) Separate seat
150 lb. Hopper Assembly
 1819-3 2/05 The Assembly is NOT designed for single-point suspension. The upper cross brace is designed for supporting the drop tube ONLY. This Hopper Assembly is to have Two-point suspension as stated
Bachmann Spectrum Peter Witt in HO
 Bachmann Spectrum Peter Witt in HO By Bob Dietrich This is my impression of an unpainted Peter Witt from Bachmann Spectrum. The packaging of the car was impressive a large red box with a clear cover showing
Kentucky AgrAbility. Farm Equipment Modification Instructional Module By John Hancock, Carla Sanders, and Kathy Sheppard-Jones
 Kentucky AgrAbility Farm Equipment Modification Instructional Module By John Hancock, Carla Sanders, and Kathy Sheppard-Jones Farm Tractor Lifts Design and Installation Materials List Measured lengths
Steeda Lower Control Arms ( )
") Steeda Lower Control Arms (2005-2012) NOTE: The following installation was performed on a 2007 Mustang GT/California Special. The control arms were previously sold in a blue color, but now they are sold
Steeda Lower Control Arms (2005-2012) NOTE: The following installation was performed on a 2007 Mustang GT/California Special. The control arms were previously sold in a blue color, but now they are sold
Exedy Mach 400 Stage 1 Clutch and Pilot Bearing (Late GT, Bullitt, Mach 1; Cobra): SKUs: & 50116
: SKUs: & 50116") Exedy Mach 400 Stage 1 Clutch and Pilot Bearing (Late 01-04 GT, Bullitt, Mach 1; 99-04 Cobra): SKUs: 62502 & 50116 Tools Needed: Car Jack with high lift capabilities (If not, block of wood may be required)
Exedy Mach 400 Stage 1 Clutch and Pilot Bearing (Late 01-04 GT, Bullitt, Mach 1; 99-04 Cobra): SKUs: 62502 & 50116 Tools Needed: Car Jack with high lift capabilities (If not, block of wood may be required)
Replacing MK4 Golf/Jetta radiator mounts in-car
 Replacing MK4 Golf/Jetta radiator mounts in-car This is a guide to replacing the radiator mounts in a MK4 Golf/Jetta. This involves moving the core support to the service position which allows you to do
YOU MAY WANT TO FIRST TRY TO LOOSEN THE FILTER HOUSING
 2005 XC90 Tune-up (5-cyl) Including: Oil Change - Spark Plugs - Fuel Filter - Cabin Filter First off - let me say that I am an amateur (at best) mechanic, and I claim no responsibility for whatever you
Hard Bar Sport, M1/M2 Hard Core Hardtop, M2 Sport, and Xtreme Installation Instructions
 HARDWARE KIT: Hard Bar Sport, M1/M2 Hard Core Shoulder Harness Guide Relocation Assemblies: 2-3/8" X 1" grade 8 bolts 4-3/8" flat washers 2-3/8" lock nuts 2 - brass bushings 2 - plastic trim caps 2-3/8"
HEIDTS SUPERIDE IRS INSTALLATION INSTRUCTIONS INDEPENDENT REAR SUSPENSION
 HEIDTS SUPERIDE IRS INDEPENDENT REAR SUSPENSION Please read these instructions completely before starting your installation. Remember the basic rule for a successful installation: Measure Twice, Weld Once.
Door Panel Removal & Window Stop Adjustment
 Door Panel Removal & Window Stop Adjustment By: Jeff Wolford Disclaimer: This is simply an article of how I fixed my car. I m not responsible if you break, scratch, or mess up anything following my example.
Nissan Titan / / Front Bumper Installation Instructions. Removal. Hardware. 12mm/1.
 2004-2014 Nissan Titan 20-915-04 / 22-915-04 / 24-915-04 Front Bumper Installation Instructions Hardware 6 ½ Hex Bolts 10 ½ Lock Washers 16 ½ Flat washers 6 ½ Hex Nuts 4 12mm/1.25 x 35mm Removal 1. First,
Tip: LED Lighting for the 3098 Locomotive and 4392 Coach Set Date: , ,
 Hi All, Over the past few months I have been working at a steady pace to install LED lighting in my passenger coaches. The coach lighting must have LED lights to reduce power consumption on the layout
Wildcat System Instructions
 Wildcat System Instructions NOTE: Most steps contained in these instructions will need to be repeated on the other side of the vehicle. Prior to assembly of windshield it is necessary to establish what
MGB V8 Roadster restoration project Report 128
 20th March 2017. Sorry to keep you in suspenders between report 127 and report 128, with regards to the indicator stalk switch. INDICATOR & HORN STALK SWITCH - continued After removing all the internal
SATURN SKY 2006 AND UP
 SATURN SKY 2006 AND UP THIS KIT INCLUDES: 16 M8-1.25X30MM BOLTS WITH WASHERS 2 SHOULDER BOLTS WITH RIGHT AND LEFT HINGE ASSEMBLY 2 SHOCKS 550 PSI WASHERS 2 PINS TOOLS REQUIRED FOR INSTALLATION: AIR RACHET,
Next, set the bar level and tighten it down. Do this on both the driver and passenger sides.
 Next, set the bar level and tighten it down. Do this on both the driver and passenger sides. Using two tape measures, measure the outside width at the front and the rear of the tubes. The front dimension
Installation Instructions and Suggestions For Jeep YJ Fiberglass Replacement Bodies
 Installation Instructions and Suggestions For Jeep YJ Fiberglass Replacement Bodies Getting started with the removal of your existing Jeep body. Trust nothing to memory; take photos of everything at different
LIFT MATE BOAT LIFT MOTOR ASSEMBLY. Assembly and Operating Manual.
 LIFT MATE BOAT LIFT MOTOR ASSEMBLY Assembly and Operating Manual www.boatliftmotor.com 03/26/2010 LIMITED WARRANTY Shoreline Industries, Inc. warrants its products shall be free from defects in materials
Rear Speaker replacement.
 Rear Speaker replacement. First off you need the right rear speakers. The easy bit is 6x9 and better than a 15W paper cone, the difficult bit is getting a mounting depth under 74mm. Or to be more precise,
Slave Cylinder Weep Hole Drilling Procedure
 Slave Cylinder Weep Hole Drilling Procedure Tools Required: T20 Torx Driver T25 Torx Driver T25 Torx Bit with ¼ Ratchet Wrench 4mm Hex Key (Allen wrench) 5mm Hex Key 6mm Hex Key 8mm Hex Key 12mm Hex Key
Slide the billet aluminum cap over the bushing and secure with the 3/8-16 x 2 1/2 socket head allen and locknuts provided.
 Slide the billet aluminum cap over the bushing and secure with the 3/8-16 x 2 1/2 socket head allen and locknuts provided. Put the urethane bushings into the upper antiroll-bar-link eyebolt. Coat the bushings
ALUMINUM FORD F BED LENGTH. Installation Instructions: DF5 TOOLS REQUIRED 2015-CURRENT FOLLOW #DECKEDUSA
 Installation Instructions: DF5 ALUMINUM FORD F150 6 6 BED LENGTH 2015-CURRENT TOOLS REQUIRED Adjustable wrench (that opens to about 1 ), 1/2 open end wrench, Phillips screwdriver, 3/8 socket, 7/16 deep
GM A-Body Instructions 3 & 2½ Header Applications w/ Balance Tube Crossover
 GM A-Body Instructions 3 & 2½ Header Applications w/ Balance Tube Crossover Included with this kit are the following: 2 Collector Reducers 1 Balance Tube Kit A 2 Headpipes 2 Tailpipes 2 Tailpipe Extensions
E31 Repair Procedure Replace Front Wheel Hub/Bearing Assembly
 E31 Repair Procedure 31-21 Replace Front Wheel Hub/Bearing Assembly Disclaimer This repair procedure is provided as is and is not authoritative with respect to any BMW repair operation. Mark F. Fling is
Porsche 928 with 16v LH-Jetronic Fuel System
 Porsche 928 with 16v LH-Jetronic Fuel System Toll-Free Tech Hot Line: 877-FOR-928M 877-367-9286 Please do not copy this manual and give copies to your friends. Our ability to bring you this supercharger
TRAILING ARM CHEVY PICK-UP
 TRAILING ARM 1947 1954 CHEVY PICK-UP Congrats on choosing the best riding and handling rear suspension for your Chevy. Trailing arm suspension can be tricky to install correctly, so please follow our recommendations,
First, check and record the camber and caster readings, they will be adjusted later.
 First, check and record the camber and caster readings, they will be adjusted later. The caliper-mounting bosses are machined perpendicular to the spindle so they are an excellent place for the level.
LG CORVETTE GT2 COIL OVERS
 LG CORVETTE GT2 COIL OVERS THE MOST POWERFUL HEADERS ON THE PLANET Brought to you by LG Motorsports 972-429-1963 Parts Inventory: 1. Assembled Front shock and spring 2. Assembled Rear shock and spring
MSD 6AL Ignition Module w/ Rev Control - Installation Instructions
 MSD 6AL Ignition Module w/ Rev Control - Installation Instructions The below installation instructions work for the following products: MSD 6AL Ignition Module w/ Rev Control Please read through the instructions
DYNATRAC PRODUCTS V5.3
 DYNATRAC PRODUCTS V5.3 2000-2008 Dodge Hub Kit Stage 1 4x4, Front Axle Free Spin Conversion Kit Note: This Kit is not Approved for 2007 & up 3500 Cab and Chassis Trucks Due to a Larger U-Joint (If U-Joint
DODGE RAM 1500 / 2500 / 3500
 Installation Instructions: DR1 DODGE RAM 1500 / 2500 / 3500 6 4 BED LENGTH 1500: (1994-2001) 2500 & 3500: (1994-2002) TOOLS REQUIRED Adjustable wrench (that opens to about 1 ), 1/2 open end wrench, Phillips
Installation Instructions for TJ Jeep s Fiberglass Replacement Bodies and Parts
 Installation Instructions for 1997-2006 TJ Jeep s Fiberglass Replacement Bodies and Parts Getting started: We recommend that you take pictures as you dismantle your Jeep. These pictures will help you when
Fitting a.45 ACP Conversion Cylinder Copyright 2014 Roy Seifert
 Copyright 2014 Roy Seifert Disclaimer: This article is for entertainment only and is not to be used in lieu of a qualified gunsmith. Please defer all firearms work to a qualified gunsmith. The author assumes
FORD SUPER DUTY 6 9 BED LENGTH. Installation Instructions: DS1 TOOLS REQUIRED FOLLOW #DECKEDUSA
 Installation Instructions: DS1 FORD SUPER DUTY 6 9 BED LENGTH 1999-2008 TOOLS REQUIRED Adjustable wrench (that opens to about 1 ), 1/2 open end wrench, Phillips screwdriver, 3/8 socket, 7/16 deep socket,
Installation instructions for 1948 to 1952 Ford F-1 pick-up trucks. Getting started: Some recommendations : PLEASE TRY OUR WAY FIRST
 Installation instructions for 1948 to 1952 Ford F-1 pick-up trucks The Raingear s modern lever and link electric windshield wiper system for 1948 to 1952 Ford F-1 pickups provides a direct mechanical link
Peugeot 406 Coupe: Delocking your boot V.1 April 2005
 This is a first stab at a DIY guide to de-locking your 406 Coupe. It isn t a hard modification to do yourself, but you do need to be confident working on your cars electrics and removing and refitting
Installations Instructions for Maier Racing Front Coilover Kit MS Ford Mustang
 22215 Meekland Avenue Hayward, CA 94541 Phone: (510) 581-7600 Fax: (510) 581-2406 Installations Instructions for Maier Racing Front Coilover Kit MS-02-001 1964-1973 Ford Mustang Contents Front Coilover
Modular Engine 1, 2008 revision August 3, 2008
 Modular Engine 1, 2008 revision August 3, 2008 David Kerzel 2008 Back in 2002 I wanted to build a bunch of different engines without a lot of detail to learn how to build an engine, what works and what
Installation Instructions
 Installation Instructions Important INSTALLATION REQUIRES WELDING to the unibody chassis by a qualified welder or metal fabricator. A bolt-on installation is not possible for this product. CHECK STEERING
The Body Slinger
 http://www.scaryguys.com/slinger.htm The Body Slinger The body slinger is a nifty animation that looks like a benign corpse in a coffin until its triggered, then leaps almost straight up over your head!
One Piece Products. Series XI Ford F SERIES TRUCKS One Piece Door Glass Conversion Manual.
 *Registered Trademark One Piece Products *Patent Pending Series XI 1980-1996 Ford F SERIES TRUCKS One Piece Door Glass Conversion Manual www.onepieceproducts.com (888)One Products (888)663-7763 1 Installation
Falcon 5250 complete repair kit
 Towing and Suspension Solutions 855010-02 08-14 Falcon 5250 complete repair kit part number 910003-55 This kit contains the components to replace the Falcon 5250 Autowlok button assemblies, collar shoulder
Mark had the car on the lift when I got there. The dog was friendly, but not much help.
 Mark s 2015 Jetta. Changed oil and 10k service on 11 October 2015. Updated with 20k service on 28 February 2016. Mark had the car on the lift when I got there. The dog was friendly, but not much help.
20 Rigid Industries LED Light Bar Installation into a 2002 Ford Super Duty
 20 Rigid Industries LED Light Bar Installation into a 2002 Ford Super Duty This write-up is how I installed the Rigid Industries 20" E-Series LED Light Bar into the grill area behind the license plate
Falcon 2 & BlackHawk complete repair kit
 Falcon 2 & BlackHawk complete repair kit part number 910003-60 Towing and Suspension Solutions This kit contains the components to replace the Falcon 2 or BlackHawk Autowlok button assemblies, collar shoulder
REASSEMBLY SE INSTALL REAR SEATBACK LOCK ASSEMBLY (a) Install the rear seatback lock with the 2 bolts. Torque: 18 N*m (185 kgf*cm, 13 ft.
 Install the rear seatback lock with the 2 bolts. Torque: 18 N*m (185 kgf*cm, 13 ft.") AT REAR AT ASMBLY (for RH Side) 49 REASMBLY CAUTION: Wear protective gloves. Sharp surfaces on the rear seat cushion frame and the rear seatback frame could cause injuries to your hands. 1. INSTALL REAR
AT REAR AT ASMBLY (for RH Side) 49 REASMBLY CAUTION: Wear protective gloves. Sharp surfaces on the rear seat cushion frame and the rear seatback frame could cause injuries to your hands. 1. INSTALL REAR
Deuce/Ace Installation Instructions
 HARDWARE KIT: Upper Mounting Plate: 2-7/16" (11mm) X 3.5" bolts 2-7/16" flange nuts 2-2" spacers 2-7/16" trim cap mounting washers 2 - plastic trim caps TOOLS NEEDED: safety glasses wrenches 16mm or 5/8"
INSTALLATION MANUAL
 INSTALLATION MANUAL 1500350 Parts List 1 Driver / left inner fender liner 1 Passenger / right inner fender liner 4 Z-hanger brackets 1 Thread-set bolt, M6 1 Thread-set washer 1 Thread-set spacer 22 Hex
EXPRESS/SAVANNA 155 WHEELBASE. Installation Instructions Van: VNGM96EXSV65 TOOLS REQUIRED 1996-CURRENT. follow us : CHEVROLET & GMC
 Installation Instructions Van: VNGM96EXSV65 CHEVROLET & GMC EXPRESS/SAVANNA 155 WHEELBASE 1996-CURRENT TOOLS REQUIRED Adjustable wrench (that opens to about 1 ), 1/2 open end wrench, Phillips screwdriver,
Thermostats, Radiator, Coolant Hose, Hydraulic Fan/Steering R&R PT38 8V92
 REMOVING AND REPLACING THE THERMOSTATS, COOLANT HOSES, RADIATOR AND CHANGING THE HYDRAULIC FAN/STEERING FILTER/OIL/SHAFT SEALS ON A 1987 PT38 8V92 BY CURT SPRENGER March 2007 Thermostats, Radiator, Coolant
Installing LED lights in a Hypercharger By Keith Edwards Joker s Wild! (Wildjokr)
") Installing LED lights in a Hypercharger By Keith Edwards Joker s Wild! (Wildjokr) THINGS YOU WILL NEED: A Hypercharger (duh!) LEDs (The ones I got were from Benny Bryant at Fantasies on Wheels in Sylacauga,
Installing LED lights in a Hypercharger By Keith Edwards Joker s Wild! (Wildjokr) THINGS YOU WILL NEED: A Hypercharger (duh!) LEDs (The ones I got were from Benny Bryant at Fantasies on Wheels in Sylacauga,
2014-Current. Adjustable wrench (that opens to about 1 ), 1/2 open end wrench, Phillips screwdriver, 3/8 socket, 7/16 socket, 7/32 Allen wrench
, 1/2 open end wrench, Phillips screwdriver, 3/8 socket, 7/16 socket, 7/32 Allen wrench") Installation Instructions Van: VNFD13TRAN65 FORD TRANSIT 148 WHEELBASE 2014-Current TOOLS REQUIRED Adjustable wrench (that opens to about 1 ), 1/2 open end wrench, Phillips screwdriver, 3/8 socket, 7/16
Installation Instructions Van: VNFD13TRAN65 FORD TRANSIT 148 WHEELBASE 2014-Current TOOLS REQUIRED Adjustable wrench (that opens to about 1 ), 1/2 open end wrench, Phillips screwdriver, 3/8 socket, 7/16
Building A Replica Aircraft. Part Two Construction Details Fuselage and Tail Group
 Building A Replica Aircraft Part Two Construction Details Fuselage and Tail Group Brief Review After obtaining a partially complete Graham Lee 7/8 scale Nieuport 11 project I decided to reconfigure it
GM G-Body Manifold Back System Instruc ons
 GM G-Body Manifold Back System Instruc ons Page 1 of 5 Buick 400, 430, 455 xxxxxxxxxxxxxxxxxxxx Pontiac Ram Air / HO x xxxxxxxxxxxxxxxxxxxx Olds 442 w/w & Z x xxxxxxxxxxxxxxxxxxxxxx Chevy Big & Small Block
Kodak 750H Carousel Projector Repair
 Kodak 750H Carousel Projector Repair An AT YOUR OWN RISK PROJECT by Klaus Wolter, Rev B, 3-26-2016 Here I documen the repair of my 750H carousel. A common problem with this projector, and all of the projectors
Universal Storage - Storage/Wardrobe/Combo Cabinets/Lateral Files
 Universal Storage - Storage/Wardrobe/Combo Cabinets/Lateral Files Storage Wardrobe Table of Contents Stack and Rotate Lateral File Combo Cabinet If you have a problem, question, or request, call your local
Installation instructions for Camaro/Firebird and Nova* Windshield Wiper Systems
 Installation instructions for 1967-69 Camaro/Firebird and 1968-74 Nova* Windshield Wiper Systems The Raingear 1967-69 Camaro/Firebird and 1964-74 Nova wiper system is designed for ease of installation
CHEVY SILVERADO/GMC SIERRA
 Installation Instructions: DG1 CHEVY SILVERADO/GMC SIERRA 5 9 BED LENGTH 1999-2007 CLASSIC TOOLS REQUIRED Adjustable wrench (that opens to about 1 ), 1/2 open end wrench, Phillips screwdriver, 3/8 socket,
(6) Universal Mounting Brackets (NOTE: same bracket used for left or right side installation) Driver/left Running Board (example only)
 Universal Mounting Brackets (NOTE: same bracket used for left or right side installation) Driver/left Running Board (example only)") PARTS LIST: Qty Description Qty Description 6 Universal Left/Right Mounting Brackets 12 6-1.0mm x 20mm T-Bolts 12 8-1.25mm Clip-On Nuts 12 6mm x 22mm OD x 2mm Flat Washers 12 8-1.25mm x 25mm Hex Bolt 12
PARTS LIST: Qty Description Qty Description 6 Universal Left/Right Mounting Brackets 12 6-1.0mm x 20mm T-Bolts 12 8-1.25mm Clip-On Nuts 12 6mm x 22mm OD x 2mm Flat Washers 12 8-1.25mm x 25mm Hex Bolt 12
Air Compressor/Water Pump III - Making the Steam Valves
 Page 1 of 14 Air Compressor/Water Pump Part III Making the Steam Valves Nelson Riedel Nelson@NelsonsLocomotive.com Initial: 1/09/04 Last Revised: 0 The cylinders pistons and water valves were completed
1/6 Scale Waco SRE ARF
 How to bash an ARF or how to BARF a WACO. Paul Fleming This is a short photo essay on how I converted the SIG SRE into a UC-72. Mostly it was just recovering and a paint job, but that doesn t make for
INSTALLATION INSTRUCTIONS GRILLE GUARD SILVERADO 1500 PART #
 INSTALLATION INSTRUCTIONS PART # 3-5863 4-0863 PARTS LIST: Qty Description Qty Description 1 Grille Guard Assembly 6 12-1.75mm Hex Nuts 2 Frame Brackets 4 10-1.50mm x 30mm Hex Bolts 1 Driver/Left Mounting
NSGV EVE-ER I, O, & M MANUAL
 TABLE OF CONTENTS Rail Layout.. Page 1 Support Placement...Page 1 Rail Assembly.Page 1 Rail Duct Connections.. Page 2 Rubber Lip Installation.. Page 3 Pneumatic End Stop. Page 4 End Stop. Page 4 End Cap..
 Solid State Ignition Replacement May 15, 2005 Introduction: There are two Tecumseh Solid State Ignitions ( SSI ) configurations we are concerned with here: The one on the left I call SSI Under for short
DODGE RAM 1500 / 2500 / 3500
 Installation Instructions: DR5 DODGE RAM 1500 / 2500 / 3500 8 BED LENGTH 1500: (2009-2017) 2500 & 3500: (2010-2017) TOOLS REQUIRED Adjustable wrench (that opens to about 1 ), 1/2 open end wrench, Phillips
Dodge SuperRail Mounting Kit #3516
 1995-2002 Dodge SuperRail Mounting Kit #3516 #3600 SuperGlide (24K) Gross Trailer Weight (Maximum) Vertical Load Weight (Max. Pin Weight) 24,000 lbs. 6,000 lbs. Installation Instructions SPECIFICATIONS
GM Muscle Car Upper Control Arms
 GM Muscle Car Upper Control Arms Q1: My SPC upper control arms contact the frame when I lift the vehicle with a jack. What should I do? A1: It is critical that you consider the entire suspension system
MAC Catback Exhaust (86-93 LX; GT)
") MAC Catback Exhaust (86-93 LX; 94-95 GT) Installation Time: 3-4 hours for a novice, including time for adjustments. Tools recommended: Sawz-all or hacksaw, or exhaust cutoff tool 7/16 deep socket and/or
MAC Catback Exhaust (86-93 LX; 94-95 GT) Installation Time: 3-4 hours for a novice, including time for adjustments. Tools recommended: Sawz-all or hacksaw, or exhaust cutoff tool 7/16 deep socket and/or
Balancing the Wheels on a Bench Grinder, version 2
 Balancing the Wheels on a Bench Grinder, version 2 By R. G. Sparber Copyleft protects this document. 1 I recently replaced the wheels on my bench grinder and the vibration was horrible. With a lot of help
Page 3. Misc. insulator pads to go under the inverter and spark box. I used the packing material from around a glass jar
 Page 1 Convert vehicle 1978 Chevy Camaro with stock 350 engine, automatic trans. Stock 4-barrel carb, and stock fuel pump. The gas tank has been changed to a metal water tank and the fill cap is vented
Wheel Bearing Replacement Passat TDI
 Rear Bearing/hub assembly replacement This is a fairly straight forward process. Pictures are not necessary for most of this procedure for a person with skills to do this repair. Anyone who thinks they
Operating instructions for Little Giant SkyScraper Telescoping A-frame ladder.
 22 Operating instructions for Little Giant SkyScraper Telescoping A-frame ladder. I. Description - SkyScraper Telescoping A-Frame Ladder A. Three basic components -The ladder is a telescoping A-frame unit
Timing belt change. Timing belt change
 Timing belt change Put 2 new Gates T275 timing belts on today. Tensioner drilled smooth and tight with less than 16,000 miles on her decided not to change the tensioners just the belts. You'll need some
HOT TUBBIN INCREASING WHEELWELL REAL ESTATE WITH A MINI-TUB KIT FROM CHRIS ALSTON S CHASSISWORKS.
 TECH Steven CLICK for Product Info Rupp the Author and Dick Kvamme HOT TUBBIN INCREASING WHEELWELL REAL ESTATE WITH A MINI-TUB KIT FROM CHRIS ALSTON S CHASSISWORKS. Under a classic Chevy, big rear meats
Our goal is to make the install a breeze. Please read the entire guide before beginning.
 www.airkewld.com Page 1 of 6 IRS Axle Kit Install IRS Axle Kit Install Our goal is to make the install a breeze. Please read the entire guide before beginning. KITS SHOULD INCLUDE 2 - Control-arm mounting
Rebuilding the Power Steering Pump for a 2007 Honda Accord 4CYL
 Rebuilding the Power Steering Pump for a 2007 Honda Accord 4CYL Disclaimer: I have benefited greatly from others who have taken the time to post auto repair videos/tutorials online. To try and return the
Magna Track Magnetic Mounting System for ECEX Air Intake Screens. Features / Benefits
 Magna Track Magnetic Mounting System for ECEX Air Intake Screens Our Magnetic Track Mounting System lets you easily mount ECEX Air Intake Screens in sensitive or difficult to reach areas. Using Powerful
INSTALLATION INSTRUCTIONS GRILLE GUARD GMC SIERRA 1500 EXCLUDES DENALI PART # 4084/
 INSTALLATION INSTRUCTIONS GRILLE GUARD 14-15 GMC SIERRA 1500 PART # 4084/ 4084-2 PARTS LIST: GRILLE GUARD Qty Description Qty Description 1 Grille Guard Assembly 6 12-1.75mm Hex Nuts 2 Frame Brackets 4
1964 1/2-70 Mustang Torque Arm Rear Suspension Installation Instructions
 1964 1/2-70 Mustang Torque Arm Rear Suspension Installation Instructions 1-800-984-6259 www.totalcostinvolved.com Version 2 (c) 2008 Total Cost Involved Engineering, Inc. All Rights Reserved. Page 1 of
INSTRUCTION G-Comp Unser Edition Rear Suspension: Chevy Nova. Kit Contents:
 INSTRUCTION 350-400 G-Comp Unser Edition Rear Suspension: 62-67 Chevy Nova Speedway Motors, Inc. 2017 Kit Contents: 350003.1 G-Comp Chassis Brace 350003.2 G-Comp Front Support 350400.1 Chevy II Unser Rear
RAMPAGE POWER LIFT RAMP
 RAMPAGE POWER LIFT RAMP INSTALLATION AND OPERATING INSTRUCTIONS (3/10/07) The Rampage Power Lift Ramp is the fast, easy, and safe way to load a motorcycle into a truck. One person can load or unload a