Torsion Axle Air Ride Installation Instructions Tandem or Triple KLM
|
|
|
- Shanon Fisher
- 5 years ago
- Views:
Transcription


1 Torsion Axle Air Ride Installation Instructions Tandem or Triple KLM


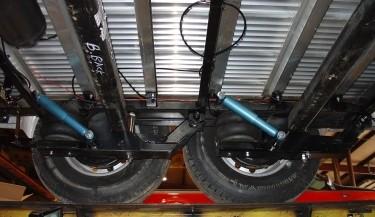
2 Installation 1. Place the trailer on a level surface. Jack the trailer up around 8 and place jack stands under all four corners. It is also recommended to use the jacks on the front of the trailer to help support the trailer. 2. Using a tape measure, measure forward from the front axle around 24 somewhere on the bottom of the trailer. Use a center punch to mark this measurement. Make sure to do this on each side. You will need this mark later to ensure that the axles are in the same place once the air ride sub frame is installed. Remove the tires, cut the brake lines (if electric, if hydraulic unfasten them) and remove the axles. 3. If the axles were bolted to a mounting bracket, take a torch and cut off the factory hangers from the trailer frame. Use extreme caution not to start a fire. Wood floors, hay from horse trailers can start a fire very quickly from the sparks from a torch or plasma cutter. 4. Now, cut the brackets off the axle. Try and stay away from the tube around 1/4-3/8. This will help keep the heat off the axle. A cut off wheel or hand saw works best, Old brackets cut off the axle but if those are not available, when using a torch or plasma, make sure to spray lots of water on the axle tube to keep it cool. 5. Locate the upper air ride framework. It works best to lay the framework on a set of saw horses. Measure the inside of the Make sure to keep cool when cutting

3 axle dog bones. Also measure the trailer framework. Use these measurements to give you a starting point to know how far to lay the left and right framework apart. Next locate the swing arms. You can tell the difference between the right and left hand sides by placing the shock mounts towards the inside. The swing arms fasten into the upper framework mounts with the 7/8x5 bolts. The axles fasten into the swing arms with the 5/8x bolts. Do not tighten all these bolts until you have both axles (or three axles if it s a triple) in place. Take a tape measure and measure from corner to corner to make sure your framework is square. It also works good to cut a couple of pieces of square tubing or angle iron and weld on the front and back sides of the upper air ride framework. This will keep things in line when taking the framework off the sawhorses, flipping it write side up and positioning it under the trailer. 6. Once you get the framework lined up, axles and swing arms tightened up you can install the air bags and shocks. Insert the air fittings in the air bags and fasten them into the upper framework with the 1/2 nuts and lock washers. Use the 3/8x bolts to fasten the bottom of the air bag to the swing arms. Use the 1/2 nuts and washers to install the shocks. NOTE: Make sure to use a couple of straps to collapse the air bags and hold the swing arms to the upper air bag framework. This will make turning the sub frame over much more manageable. 1 1/2x 1 1/2 square tubing


4 Tubing welded on the end of sub frame Completed sub frame ready for install

5 7. Slide the sub frame under the trailer. It is very important to center up the axles side to side as well as forward and back. Use the mark on the frame that you made before you removed the front axle to locate where the sub frame located in regards to the front axle placement. Once you get the sub frame in place weld the sub frame to the trailer frame. You don't have to weld it solid. Staggerd four to six inch welds are fine. If the trailer tires have been showing any type of unusual wear, we recommend dropping a plum bob off the front gooseneck, marking the spot on the floor and measuring from this spot to the corners of the front axle. This will make sure the axles are aligned correctly with the pull point of the trailer.
6
7

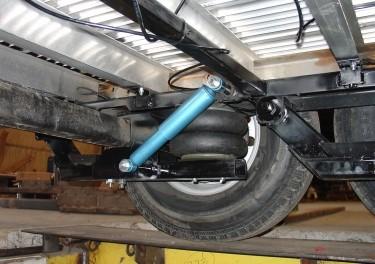
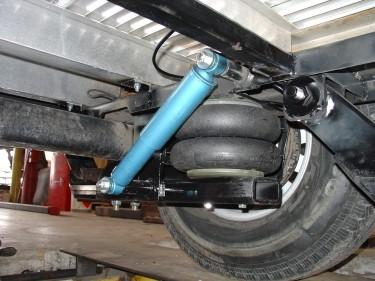
8 8. Reconnect the brake lines. Make sure that there is adequate slack in the wiring if the trailer uses electric brakes. If the trailer has hydraulic brakes, make sure there is additional slack in the rubber brake lines. The axle will have nearly 6 inches of travel from air bags deflated to topped out. 9. Locate the compressor box. It works well to mount this on one of the legs of the landing gear. You can make a steel bracket to weld to the landing gear and then bolt the box to the bracket. If you don't want to mount the compressor box there, you can bolt it on a storage compartment or to the front area of the trailer. Next locate the air tank. It can be mounted pretty much anywhere on the trailer. 10. Locate the control panel. The factory likes to mount it on the drivers side somewhere near the battery box so that the driver can have easy access to the dump valve when you get out of the truck. Use the wiring diagram to hook up the wires. We recommend turning off the system when the trailer is not in use. This will prevent the compressor from running the battery down when not in use. 11. Locate the height control valve. It works best to hook the height control valve to the rear axle on a tandom trailer and the middle axle on a triple. You will need to weld the upper bracket in place so that the height control valve arm does not hit the bottom of the floor when in the dump position. The bottom bracket (3/8x1 steel bent 90 degrees) will weld to the bottom swing arm. The linkage that goes between the height control lever and the lower bottom bracket will have to be trimmed to fit. Set the length of the linkage so that the air bag is 8 tall. Dump valve Height control valve Linkage arm


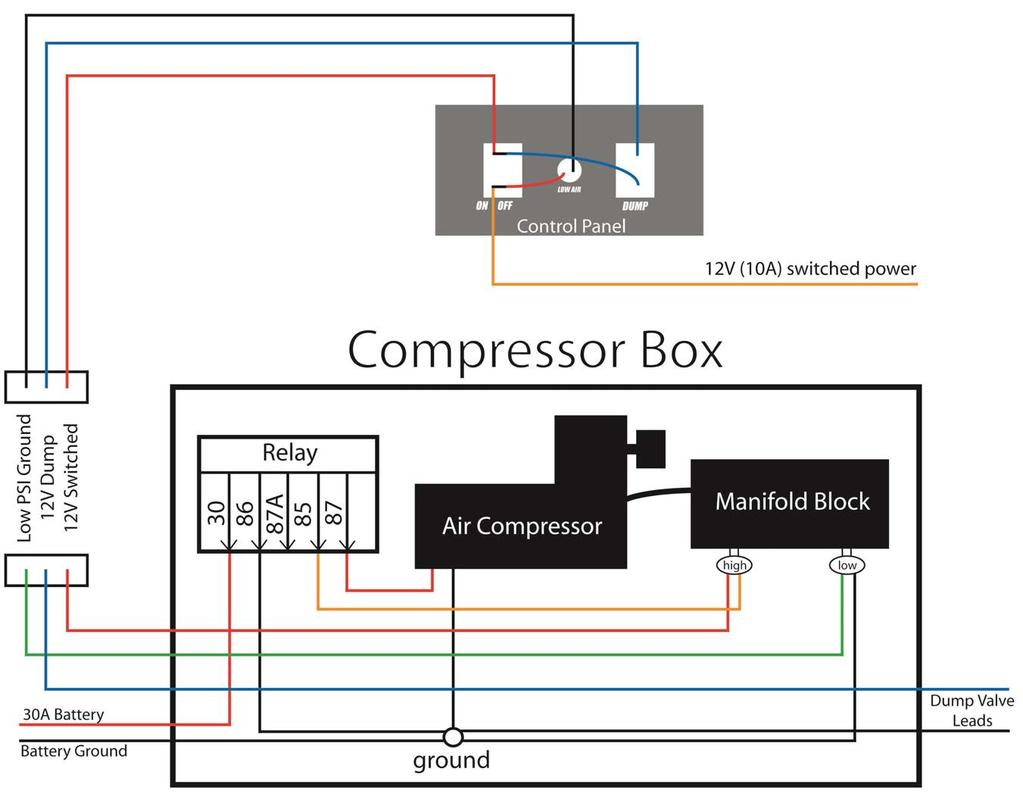
9 12. Locate the dump valve. This is can be mounted anywhere under the trailer near the height control valve. Either one of the black wires must be grounded so keep that in mind when mounting it. The other wire hooks into the red wire coming from the compressor box. 13. Use the diagram to wire up the rest of the compressor box tank Compressor box
10

11 Discover other performance suspension parts on our website.
General Medium Duty KLM C&C 2-Stage Rear Air Suspension Installation Instructions
 2686 Highway 92 - Oskaloosa, IA 52577 Phone: 641.673.0468 - Fax: 641.673.4168 www.kelderman.com General Medium Duty KLM 10745 C&C 2-Stage Rear Air Suspension Installation Instructions Class 6 & 7 Trucks
SYNERGY SUSPENSION UNIVERSAL FRONT 3-LINK KIT Version 1.0
 5051 - SYNERGY SUSPENSION UNIVERSAL FRONT 3-LINK KIT Version 1.0 GENERAL NOTES: These instructions are also available on our website; www.synergymfg.com. Check the website before you begin for any updated
R4TECH PRODUCT SAFETY NOTICE
 R4TECH PRODUCT SAFETY NOTICE Congratulations. This vehicle has been equipped with an R4Tech suspension system that provides the ride quality of a full-air suspension with the ease of installation of a
B&W Turnover Ball Installation
 B&W Turnover Ball Installation by Flopster843 02 Jan 2012 I wanted to start this article out by stating one very important thing. Installing a gooseneck hitch is not a task to be taken lightly. If you
kelderman air ride The difference in the ride is like night and day Improves the ride of the truck Automatic leveling is available
 Air Ride Conversion System Installation Instructions 800 334-6150 www.keldermanairride.com The difference in the ride is like night and day Inside this manual: 2003 & Newer Dodge 2-bag Rear System Tools
Super Duty Front Air Bag Installation Instructions
 2005-2010 Super Duty Front Air Bag Installation Instructions Congratulations! You have just purchased the best engineered, highest quality front air suspension kit available on the market for your 2005-2010
Installing RideSentry Suspension Axle Seats onto RideStar RHP Series Single-Axle and Sliding Tandem Trailer Air Suspension Systems
 Issued 10-07 Technical Bulletin Installing RideSentry Suspension Axle Seats onto RideStar RHP Series Single-Axle and Sliding Tandem Trailer Air Suspension Systems Issued 1 Technical 10-07 Bulletin Hazard
kelderman air ride The difference in the ride is like night and day
 KLM11152, KLM15756 A i r R i d e C o n v e r s i o n S y s t e m 800 334-6150 www.keldermanairride.com kelderman air ride The difference in the ride is like night and day Inside this manual: 2005 & Newer
CDL Series Pre-Trip Inspection AT-TC3TS T1-JA01. Pre-Trip Inspection Checklist
 Pre-Trip Inspection Checklist This checklist covers different parts of the vehicle you would check before a trip. Note that some specifications described in the following content may not be the same as
PPM-5011 JK FRONT COIL OVER/AIR BUMP STOP BRACKET KIT INSTALLATION Version 1
 POLY PERFORMANCE MFG. 870 INDUSTRIAL WAY, SAN LUIS OBISPO, CA (805) 242-0397 PPM-5011 JK FRONT COIL OVER/AIR BUMP STOP BRACKET KIT INSTALLATION Version 1 GENERAL NOTES: These instructions are also available
INSTALLATION INSTRUCTIONS P/N: C2006 LADDER BAR
 INSTALLATION INSTRUCTIONS P/N: C2006 LADDER BAR PARTS LIST 2) Ladder Bars 4) Lg. Housing Brackets 4) RH Solid Rod Ends 6) RH Jam Nuts 2) Spherical Rod Ends 4) Washers 6) 3/4"-16 x 2-1/2" Bolts 6) 3/4"-16
<THESE INSTRUCTIONS MUST BE GIVEN TO THE END USER> B&W
 B&W Trailer Hitches 1216 Hawaii Rd / PO Box 186 Humboldt, KS 66748 P:620.473.3664 F:620.869.9031 Turnoverball Gooseneck Hitch Installation Instructions
As stated, these are solely based off of how I like to do the Pre-Trip. I give my personal opinions as well as some helpful tips.
 Here are our sections: Engine Compartment Drivers Door Fuel Area Coupling System Trailer (Please note in the type of suspension your trailer has) Light Check In-Cab Inspection and Brake Tests You will
HP10220 KIT. See application guide for proper fitment.
 HP10220 KIT Dodge Dakota* (2WD/4WD) * 2005 All Dodge Dakotas 2006 - All Dodge Dakotas except Night Runner and R/T sub models 2007 - All Dodge Dakotas except SXT and TRX4 sub models 2008 - All Dodge Dakotas
Comfort Ride Shock absorber system part numbers 2450, 2460 and 2470 Installation Instructions
 Comfort Ride Shock absorber system part numbers 2450, 2460 and 2470 Installation Instructions All specifications are subject to change without notice. MOUNTING FLANGE CENTER HOLE FRONT OF Item Qty Part
KLM and up Ford F-53 Chassis Motorhome Front Installation Instructions
 KLM15757 2006 and up Ford F-53 Chassis Motorhome Front Installation Instructions Installation 1. Place the coach on a level concrete surface. 2. Place a jack under each side of the frame just behind the
Toyota Tundra Tow Kit Installation Instructions
 2007-2013 Toyota Tundra Tow Kit Installation Instructions Congratulations! You have just purchased the best engineered, highest quality air suspension kit available on the market for your 07-14 Toyota
INSTALLATION INSTRUCTIONS P/N: C2005 LADDER LINK
 INSTALLATION INSTRUCTIONS P/N: C2005 LADDER LINK The Competition Engineering Ladder Link offers all the strength of our standard ladder bar coupled with an adjustable pivoting lower link that enables you
DODGE OFF ROAD T-STYLE STEERING KIT INSTALLATION INSTRUCTIONS
 Dodge Off Road, LLC Specializing in Dodge Ram Solid-Axle 4x4 Suspension and Steering for Off Road Applications 855.9009.DOR sales@dodgeoffroad.com dodgeoffroad.com DODGE OFF ROAD T-STYLE STEERING KIT INSTALLATION
WARNING DO NOT EXCEED THE MANUFACTURER S RECOMMENDED GROSS VEHICLE WEIGHT RATING (GVWR).
.") WARNING DO NOT EXCEED THE MANUFACTURER S RECOMMENDED GROSS VEHICLE WEIGHT RATING (GVWR). As in any suspension installation, it is the installer s responsibility to assure a correct installation. The installer
WARNING DO NOT EXCEED THE MANUFACTURER S RECOMMENDED GROSS VEHICLE WEIGHT RATING (GVWR). As in any suspension installation, it is the installer s responsibility to assure a correct installation. The installer
DC Series Installation Manual (# )
") DC Series Installation Manual (# 101630) Page 1 of 33 In this booklet you will find: TOWER INSTALLATION... 3 U-Bolt Style mount... 4 Side Frame Style mount... 4 PIVOT INSTALLATION... 5 External Pivot Installation:
DC Series Installation Manual (# 101630) Page 1 of 33 In this booklet you will find: TOWER INSTALLATION... 3 U-Bolt Style mount... 4 Side Frame Style mount... 4 PIVOT INSTALLATION... 5 External Pivot Installation:
2008 & Newer Ford F-350 Chassis Cab 4-Link Rear Installation Instructions
 KLM18100 2686 Highway 92 - Oskaloosa, IA 52577 phone: 641.673.0468 - fax: 641.673.4168 2008 & Newer Ford F-350 Chassis Cab 4-Link Rear Installation Instructions Installation 1. Before doing anything, measure
PARTS LIST: 8581 DODGE LONG ARM BRACKETS 03-13
 SYNERGY MFG. 870 INDUSTRIAL WAY, SAN LUIS OBISPO, CA (805) 242-0397 8580 03-12 DODGE 2500/3500 4X4, 06-08 1500 MEGACAB 4X4 LONG ARM SUSPENSION KIT V3.0 GENERAL NOTES: These instructions are also available
»Product» Safety Warning
 #C1354 Installation Instructions 1999-2002 Chevy/GM 1500 4wd 3.5" Combo Lift Kit Read and understand all instructions and warnings prior to installation of product and operation of vehicle. Zone Offroad
INSTALLATION INSTRUCTIONS
 28 INSTALLATION INSTRUCTIONS SECTION - AIR SPRING SECTION 2 - AIR ACCESSORY 2-5 ! IMPORTANT PLEASE DON T HURT YOURSELF, YOUR KIT OR YOUR VEHICLE. TAKE A MINUTE TO READ THIS IMPORTANT INFORMATION. This
Tools Needed. I. Getting Started
 5 /16 ", 7 /16 ", 9 /16 " and 19mm open-end or box wrenches Crescent Wrench Ratchet with 9 /16 " and 1 /2 " deep well sockets 3 /8 " and 5 /16 " drill bits (very sharp) Heavy Duty Drill Torque Wrench Tools
A i r R i d e C o n v e r s i o n S y s t e m I n s t a l l a t i o n I n s t r u c t i o n s. kelderman air ride
 A i r R i d e C o n v e r s i o n S y s t e m I n s t a l l a t i o n I n s t r u c t i o n s 800 334-6150 www.keldermanairride.com kelderman air ride The difference in the ride is like night and day Inside
Our goal is to make the install a breeze. Please read the entire guide before beginning.
 www.airkewld.com Page 1 of 6 IRS Axle Kit Install IRS Axle Kit Install Our goal is to make the install a breeze. Please read the entire guide before beginning. KITS SHOULD INCLUDE 2 - Control-arm mounting
Kit No (THIS KIT IS FOR A 2" AND 4" DROP)
") Kit No. 59103 (THIS KIT IS FOR A 2" AND 4" DROP) by MN-348 (06005) ECN 3080 Please read these instructions completely before proceeding with installation. Air Spring Kit Parts List Item Description Quantity
Kit No. 59103 (THIS KIT IS FOR A 2" AND 4" DROP) by MN-348 (06005) ECN 3080 Please read these instructions completely before proceeding with installation. Air Spring Kit Parts List Item Description Quantity
<THESE INSTRUCTIONS MUST BE GIVEN TO THE END USER> B&W
 B&W Trailer Hitches 6 Hawaii Rd / PO Box 86 Humboldt, KS 66748 P:60.473664 F:60.869.903 Turnoverball Gooseneck Hitch Installation Instructions MODEL 08
KIT # CSS-C SUSPENSION LIFT KIT
 14385 Veterans Way Moreno Valley, CA 92553 Phone: (951) 571-0212 Fax: (951) 571-0215 2001-2010 CHEVROLET SILVERADO 1500 AND 2500 HD 4WD AND 2WD PICK-UP 1999-2010 CHEVY 2500 4WD PICK-UPS 2001-2010 2500
INSTALLATION INSTRUCTIONS
 2807 INSTALLATION INSTRUCTIONS SECTION - AIR SPRING SECTION 2 - AIR ACCESSORY -6 ! IMPORTANT PLEASE DON T HURT YOURSELF, YOUR KIT OR YOUR VEHICLE. TAKE A MINUTE TO READ THIS IMPORTANT INFORMATION. This
Kit No (THIS KIT IS FOR A 2" AND 4" DROP)
") Kit No. 59103 (THIS KIT IS FOR A 2" AND 4" DROP) by MN-348 (06005) ECN 3080 Please read these instructions completely before proceeding with installation. Air Spring Kit Parts List Item Description Quantity
Kit No. 59103 (THIS KIT IS FOR A 2" AND 4" DROP) by MN-348 (06005) ECN 3080 Please read these instructions completely before proceeding with installation. Air Spring Kit Parts List Item Description Quantity
Dodge Ram 2500/3500 Tow Kit Installation Instructions
 2003-2010 Dodge Ram 2500/3500 Tow Kit Installation Instructions Congratulations! You have just purchased the best engineered, highest quality air suspension kit available on the market for your 2003-2010
Part # Chevy Level 2 Air Suspension Package One Piece Frame
 350 S. St. Charles St. Jasper, In. 47546 Ph. 812.482.2932 Fax 812.634.6632 www.ridetech.com Part # 11020299 55-57 Chevy Level 2 Air Suspension Package One Piece Frame Front Components: 1 11013001 Master
PPM-8022 / PPM-8042 JEEP JK STAGE 2 SYNERGY SUSPENSION SYSTEM Version 1
 POLY PERFORMANCE MFG. 870 INDUSTRIAL WAY, SAN LUIS OBISPO, CA (805) 242-0397 PPM-8022 / PPM-8042 JEEP JK STAGE 2 SYNERGY SUSPENSION SYSTEM Version 1 GENERAL NOTES: These instructions are also available
Learning to Set-Up Your Warrior Drive Belt Arizona Warrior (Rev4) BEFORE GETTING STARTED
 BEFORE GETTING STARTED") BEFORE GETTING STARTED 1. A noise one guy calls 'howling' is the same noise another guy calls 'squealing' so unless you are both hearing the noise with your own ears its better to not assume a drive belt
BEFORE GETTING STARTED 1. A noise one guy calls 'howling' is the same noise another guy calls 'squealing' so unless you are both hearing the noise with your own ears its better to not assume a drive belt
Roll Cage Installation Notes
 Roll Cage Installation Notes Introduction The regulations state that you have to fit one of 3 versions of Safety Devices 6 point bolt-in cage. The items you need are shown below: Option 1 Part Number RBC052
PPM-8023 / PPM-8043 JEEP JK SYNERGY STAGE 3 SUSPENSION SYSTEM Version 1
 SYNERGY MFG. 870 INDUSTRIAL WAY, SAN LUIS OBISPO, CA (805) 242-0397 PPM-8023 / PPM-8043 JEEP JK SYNERGY STAGE 3 SUSPENSION SYSTEM Version 1 GENERAL NOTES: These instructions are also available on our website;
CLAYTON OFF ROAD COR JEEP GRAND CHEROKEE LONG ARM UPGRADE KIT ( WJ)
") CLAYTON OFF ROAD COR-4806011 JEEP GRAND CHEROKEE LONG ARM UPGRADE KIT (1999-2004 WJ) NOTES: This product requires general welding, fabrication and automotive mechanic skills. ing should only be done by
CLAYTON OFF ROAD COR-4806011 JEEP GRAND CHEROKEE LONG ARM UPGRADE KIT (1999-2004 WJ) NOTES: This product requires general welding, fabrication and automotive mechanic skills. ing should only be done by
Part # Chevy Level 3 Street Challenge Package Two Piece Frame
 350 S. St. Charles St. Jasper, In. 47546 Ph. 812.482.2932 Fax 812.634.6632 www.ridetech.com Part # 11030399 55-57 Chevy Level 3 Street Challenge Package Two Piece Frame Front Components: 1 11013002 Master
INSTALLATION INSTRUCTIONS 97 FORD EXPEDITION
 INSTALLATION INSTRUCTIONS 97 FORD EXPEDITION 1. Read the instructions completely and carefully before you begin. Check the kit for proper contents (refer to the part s list and the picture diagrams). Before
WARNING indicates a potentially hazardous situation which, if not avoided, could result in property damage, serious personal injury or even death.
 Comfort Ride Third axle slipper leaf spring system (part numbers 2560-50, 2570-50 and 2580-50) and shock absorber system (part numbers 2450-50, 2460-50 and 2470-50) Installation Instructions All specifications
60-65 Falcon, Comet & Ranchero Coil Spring IFS
 60-65 Falcon, 62-65 Comet & 62-65 Ranchero Coil Spring IFS All engine installations with this front end will require a rear sump oil pan. 289-302 Small Block Ford Motors Milodon rear sump pan holds 7 quarts
07-11 GM 4WD 1500 P/U 1 1/4 Body Lift
 92RC70100 07-11 GM 4WD 1500 P/U 1 1/4 Body Lift Thank you for choosing Rough Country for all your suspension needs. Rough Country recommends a certified technician install this kit. Attempts to install
<THESE INSTRUCTIONS MUST BE GIVEN TO THE END USER> B&W Trailer Hitches 1216 Hawaii Rd / PO Box 186 Humboldt, KS P: F:
 B&W Trailer Hitches 6 Hawaii Rd / PO Box 86 Humboldt, KS 6678 P:60.7366 F:60.73766 Turnoverball Gooseneck Hitch Installation Instructions MODEL 38 0 06
92-00 Civic/ Integra/ Del Sol/ Accord/ CRX
 92-00 Civic/ 94-01 Integra/ 93-97 Del Sol/ 90-97 Accord/ 92-95 CRX Front Kit Part No. 75440 www.airliftperformance.com Please read these instructions completely before proceeding with installation MN-513
EVO-1050 JK Long Arm Upgrade w/ EVOlever
 EVO-1050 JK Long Arm Upgrade w/ EVOlever Recommended: All Vehicles that spend time on salted roads. It is recommended that removal of both threaded collar and joint on all arms. Apply a small amount of
07-11 GM 1500 Pickup, Avalanche, Yukon, Tahoe, Suburban Front 2.5 Kit
 92130500 07-11 GM 1500 Pickup, Avalanche, Yukon, Tahoe, Suburban Front 2.5 Kit Thank you for choosing Rough Country for all your suspension needs. Rough Country recommends a certified technician install
STATE OF MINNESOTA PRICING Page % DISCOUNT
 TRAILERS: DUMP BODY, LOWBOYS, FLATBED, TAG, SLIDE AXLE, UTILITY, GOOSENECK, ENCLOSED, ETC. Vendor Name: Truck Utilities Inc Contact Person: Paul Warner Street Address: 2370 English Street P.O. Box: City,
Standard Features (20,000 lb. to 60,000 lb. capacities)
") Felling s Low Profile design delivers a 33 loaded deck height, providing users with load versatility and ease of loading/unloading low clearance equipment. Each trailer is constructed with an engineered,
Felling s Low Profile design delivers a 33 loaded deck height, providing users with load versatility and ease of loading/unloading low clearance equipment. Each trailer is constructed with an engineered,
<THESE INSTRUCTIONS MUST BE GIVEN TO THE END USER> B&W
 B&W Trailer Hitches 6 Hawaii Rd / PO Box 86 Humboldt, KS 6678 P:60.7366 F:60.86.03 Turnoverball Gooseneck Hitch Installation Instructions MODEL 38 0 08
DEMOUNTABLE CONCEPTS, INC. RailTrailer Instruction Manual and Maintenance Guide
 DEMOUNTABLE CONCEPTS, INC. RailTrailer Instruction Manual and Maintenance Guide I N S T R U C T I O N S FOR DEMOUNTING BODIES FROM AIR OPERATED DEMOUNTABLE RAILTRAILER To place bodies in a free standing
INSTALLATION INSTRUCTIONS READ THOROUGHLY BEFORE BEGINNING
 Catalog No. 6320 INSTALLATION INSTRUCTIONS READ THOROUGHLY BEFORE BEGINNING 6320 RAIL KIT - 1988 through 2000 Chevrolet/GMC Pickup w/6 ft. bed, 1999 Chevrolet C/K LS and GMC Sierra Classic w/6 ft. bed
Hale Trailer Brake & Wheel
 Hale Trailer Brake & Wheel 062290 Design Type: FRAMELESS DUMP TRAILER BODY SPECIFICATIONS Genesis Design - INBOARD Length: 32'-0" Width: 96" Overall Side Height: 66" (64"+2") Aluminum Height: 64" Top Rail
PLEASE READ THIS INSTRUCTIONS CAREFULLY, BEFORE YOU START INSTALLATION
 INSTALLATION INSTRUCTIONS PART NUMBER: L0SXC000 DESCRIPTION: 09 ASCENT TRAILER HITCH PLEASE READ THIS INSTRUCTIONS CAREFULLY, BEFORE YOU START INSTALLATION SAFETY PRECAUTION: When installing Trailer Hitch,
»Product» Safety Warning
 #F9387 Installation Instructions 1999-2003 Ford Super Duty 2/4wd Gas Only 3" Body Lift Kit Read and understand all instructions and warnings prior to installation of product and operation of vehicle. Zone
Part # GM F Body Rear R-Joint Bolt-in 4 Link GM F Body Rear Bolt-in 4Link. Table of contents. Installation Instructions
 Part # 11167199-1967-1969 GM F Body Rear R-Joint Bolt-in 4 Link Recommended Tools 1967-1969 GM F Body Rear Bolt-in 4Link Installation Table of contents Page 2-3... Included Components Page 4... Hardware
PRODUCT USE INFORMATION
 9RC61000 Jeep YJ Body Lift Thank you for choosing Rough Country for all your suspension needs. This body lift fits both manual and Automatic equipped vehicles!!! Refer to last page of this Instruction
TruckSkin F.A.Q.s and Tips
 1 TruckSkin F.A.Q.s and Tips Here are some helpful answers and tips for your self installation. You can see more installation information on our website TruckSkin.com Please contact us with any questions.
Hazard Alert Messages. Kits Required. How to Obtain Additional Maintenance, Service and Parts Information. How to Obtain Tools, Kits and Supplies
 TP-5 Revised 04-7 Technical Bulletin Trailing Arm Bushing Removal and Installation Procedures for All Meritor MTA Series Trailer Air Suspension Systems Kit 50 (MTA) Kit 5 (MTA5 and 0) TP-5 Revised Technical
STANDARD FEATURES (20,000 lb. to 60,000 lb. capacities)
") Felling s Low Profile design delivers a 33 loaded deck height, providing users with load versatility and ease of loading/unloading low clearance equipment. Each trailer is constructed with an engineered,
Felling s Low Profile design delivers a 33 loaded deck height, providing users with load versatility and ease of loading/unloading low clearance equipment. Each trailer is constructed with an engineered,
SNOWPLOWS INSTALLATION MANUAL
 SNOWPLOWS HOME PRO 3000 INSTALLATION MANUAL Curtis Tractor Cab, Inc. and/or Curtis International, Inc. reserves the right to change product design or specifications without notice or liability. Curtis
ASSEMBLY MANUAL. 45-Foot Air Double Disc Drill. Amity Technology, LLC th Avenue North Fargo, ND (701)
") ASSEMBLY MANUAL 45-Foot Air Double Disc Drill Amity Technology, LLC 2800 7th Avenue North Fargo, ND 58102 (701) 232-4199 www.amitytech.com TABLE OF CONTENTS Main Frame 1 Wing Lock Towers 3 Wing Frames
ASSEMBLY MANUAL 45-Foot Air Double Disc Drill Amity Technology, LLC 2800 7th Avenue North Fargo, ND 58102 (701) 232-4199 www.amitytech.com TABLE OF CONTENTS Main Frame 1 Wing Lock Towers 3 Wing Frames
Steel Grain Trailers. Aluminum Grain Trailers
 Maurer steel and aluminum grain trailers RED.qxp_Layout 1 1/15/18 4:15 PM Page 1 Steel Grain Trailers Aluminum Grain Trailers 4010 320th Street Boyden, Iowa 51234 Phone: 1-800-543-3626 Fax: 1-800-845-6420
'03 and up Dodge tube frame Chev HD (wide frame) 2011 (up) GM Trucks UP/Down Cylinder Boom
 2011 (up) GM Trucks UP/Down Cylinder Boom") Installation Manual 3 Series 5 Series Z Series Typical Installation Place truck on lift or suitable jack stands with rear wheels off the surface. Remove rear wheels, hitch & rear bumper. Remove spare tire
Installation Manual 3 Series 5 Series Z Series Typical Installation Place truck on lift or suitable jack stands with rear wheels off the surface. Remove rear wheels, hitch & rear bumper. Remove spare tire
Commercial Driver s License Manual SECTION 7. Section-7 Doubles and Triples
 SECTION 7 doubles and triples this section Is for drivers WHo WIll tow double or triple trailers Section-7 Doubles and Triples section 7 - doubles and triples this section covers Pulling double/triple
Part # Chevy Level 3 Street Challenge Package One Piece Frame
 350 S. St. Charles St. Jasper, In. 47546 Ph. 812.482.2932 Fax 812.634.6632 www.ridetech.com Part # 11020399 55-57 Chevy Level 3 Street Challenge Package One Piece Frame Front Components: 1 11013011 TQ
5003 TJ/LJ REAR COILOVER BRACKET KIT
 GENERAL NOTES: SYNERGY MFG. 870 INDUSTRIAL WAY, SAN LUIS OBISPO, CA (805) 242-0397 5003 TJ/LJ REAR COILOVER BRACKET KIT These instructions are also available on our website; www.synergymfg.com. Check the
05+ Toyota Tacoma Rear Shock Hoop Install Notes Part# 86460
 159 North Maple St. Unit J, CORONA CA 92880 P. 951-737-9682 F. 951-737-9006 WWW.CHAOSFAB.COM 05+ Toyota Tacoma Rear Shock Hoop Install Notes Part# 86460 Note: This kit is designed to work with the Total
Mustang Radiator Conversion DIY. By GearHeadPeter. January 27, 2011
 1964-1966 Mustang Radiator Conversion DIY By GearHeadPeter January 27, 2011 We all know that the radiators in our cars are not the best, especially if you have done any customization to the engine, which
Center Point Tandem Axle Equalizer
 Center Point Tandem Axle Equalizer by Trailair Installation and Owner s Manual (For Aftermarket Applications) Table of Contents Introduction... 2 Quick Facts... 2 Parts List... 2 Preparation... 3 Installation...
For all Ram x4 Trucks, and all Ram x4 trucks.
 Dodge Off Road, LLC Specializing in Dodge Ram Solid-Axle 4x4 Suspension and Steering for Off Road Applications 855.9009.DOR sales@dodgeoffroad.com dodgeoffroad.com DODGE OFF ROAD 5 th GEN STEERING KIT
DODGE RAM 2500
 81234007 2014-2015 DODGE RAM 2500 Congratulations - your new LevelTow Helper Springs are quality products capable of improving the handling and comfort of your vehicle. As with all products, proper installation
Part 3: CHECKING TOE ANGLE -
 CHECKING TOE ANGLE - Part 3: With the caster and camber out of the way and the vehicle on a properly leveled surface, it's time to lay out the string network that will allow you to take accurate measurements
Side Dump Tarp System Driver or Passenger Stowing Non-Sealed applications
 Roll Rite, LLC and its entire staff would like to not only Thank You but congratulate you on your purchase of one of what we feel to be the finest line of tarping systems in the industry. Side Dump Tarp
INSTALLATION INSTRUCTIONS 64 ½ - 70 SUPERRIDE II INDEPENDENT FRONT SUSPENSION BX-350 FOR COYOTE AND MOD ENGINES
 INSTALLATION INSTRUCTIONS 64 ½ - 70 SUPERRIDE II INDEPENDENT FRONT SUSPENSION BX-350 FOR COYOTE AND MOD ENGINES Please read these instructions completely before starting your installation. Assemble suspension
Universal Super Shield & Ultimate Aluminum w/electric Drive Conversion Kits , , Installation Instructions
 WLH 09/19/16 111-0215 & 112-0215 607-0026 For technical support call us at (800) 368-3075 or visit our website at PullTarps.com. TABLE OF CONTENTS ***Assembly*** Conversion Kit-Universal Super Shield ***Wiring,
Carli Suspension Front Instructions
 Carli Suspension Front Instructions 94-08 DODGE 2500-3500 4X4 SUSPENSION SYSTEM Note: Prior to installation, carefully inspect the vehicle=s steering and drive train components. Be sure to check ball joints,
»Product» Safety Warning
 C1351 Installation Instructions 2014 Chevy/GMC, ½ Ton, 2/4wd 3.5" Combo Kit Read and understand all instructions and warnings prior to installation of product and operation of vehicle. Zone Offroad Products
Owner s Instructions and Safety Manual. Double-Double series. Performance Bicycle Trailers
 Owner s Instructions and Safety Manual Double-Double series TM Performance Bicycle Trailers Contents 1. Trailer Components 2. Tow Bar and Hitch Components 3. Assembling Your Trailer 4. Attaching the Wheels
<THESE INSTRUCTIONS MUST BE GIVEN TO THE END USER> B&W
 B&W Trailer Hitches 1216 Hawaii Rd / PO Box 186 Humboldt, KS 66748 Turnoverball Gooseneck Hitch Installation Instructions MODEL 1314 2013 2014 RAM 3500
Part # Mopar LX Level 1 Air Suspension System
 Part # 13040199 05-14 Mopar LX Level 1 Air Suspension System Front Components: 1 1304409 Front RQ ShockWave Kit for Stock Lower Arms Rear Components: 1 13044099 Rear CoolRide Kit 1 13040709 RQ Series Rear
Required tools General hand tools 21/64" drill bit Torque wrench Threadlocker Center punch
 Slipper Spring Kit (part numbers 2560, 2570 and 2580) Item Qty Part number Description 1... 8... 350054-50...3/8-16 x 1" grade 8 self-tapping screw 2... 4... 350084-00...7/16-14 x 4" grade 5 3... 6...
Kit No Please read these instructions completely before proceeding with installation. Air Spring Kit Parts List. Bracket Attaching Hardware
 Kit No. 59532 MN-572 (021108) ECR 7136 Please read these instructions completely before proceeding with installation Air Spring Kit Parts List A Item Description Quantity A Air Sleeves 2 B Upper Brackets
I. Before starting installation
 5. Park the vehicle on a clean, dry, flat, level surface and block the tires so the vehicle cannot roll in either direction. A. Disconnect battery cables 1. Disconnect the negative cable first, then the
Subject: Align-Trac Procedures. Lit No: LIT1004 Date: 05/30/2015 Revision: A
 Watson & Chalin recently announced the addition of the new Align-Trac trailing arm-to-hanger pivot connection for trailer air suspensions. This Technical Bulletin outlines the procedure to align the axle
TC2000. This control box is typically located in the cab of the truck and the cable runs back to the auxiliary plug at the front of the trailer.
 ELECTRICAL TC2000 Part No: 3500128 Air Ride Control Box With 30 ft. Cable This control box is typically located in the cab of the truck and the cable runs back to the auxiliary reverse ground plug at the
69-74 VW Beetle IRS Rear Kit Part No
 www.airliftcompany.com 69-74 VW Beetle IRS Rear Kit Part No. 75615 MN-476 (01102) ECN 3455 Please read these instructions completely before proceeding with installation A C B E D AA F F ITEM QTY. PART
DO NOT GRIND ANY WELDS! DO NOT QUENCH WELDS WITH WATER OR OIL. ALLOW TO AIR COOL.
 1 READ FIRST! PLEASE READ THROUGH ALL OF THE INSTRUCTIONS AND ENSURE THAT YOU UNDERSTAND THEM. BE SURE THAT YOU HAVE ALL THE REQUIRED GSI COMPONENTS, BASIC TOOLS, AND SKILLS. CUTTING THIS KIT REQUIRES
2017+ Ford F-250/350 4X4 Rear Lift Kit Installation Instructions
 A 13/64 drill bit and 1/4-20 tap is required. 7/8 drill bit is required 2017+ Ford F-250/350 4X4 Rear 10-12 Lift Kit Installation Instructions 1 1. Before you remove anything off the truck, measure the
TC35160 & TC35270 Operation Manual & Installation Instructions
 Please visit www.blueox.com for the latest version of these installation instructions. TC35160 & TC35270 Operation Manual & Installation Instructions Serial Number Blue OX One Year Limited Warranty 292-6090
INSTALLATION INSTRUCTIONS
 2806 INSTALLATION INSTRUCTIONS SECTION - AIR SPRING SECTION 2 - AIR ACCESSORY -6 ! IMPORTANT PLEASE DON T HURT YOURSELF, YOUR KIT OR YOUR VEHICLE. TAKE A MINUTE TO READ THIS IMPORTANT INFORMATION. This
Please read these instructions completely before proceeding with installation. Read all maintenance guidelines on page 7 before operating the vehicle.
 MN-643 (02511) ECR 5461 Kit No. 39205 Please read these instructions completely before proceeding with installation Item P/N Description Quantity A 26391 Driver-Side Beam Assembly 1 B 26414 Passenger-Side
97-06 JEEP TJ/LJ LONG ARM UPGRADE KIT
 921663U00 97-06 JEEP TJ/LJ LONG ARM UPGRADE KIT Thank you for choosing Rough Country for your suspension needs. This kit is an upgrade kit only. This kit includes frame mounting points and adjustable long
Kit No Please read these instructions completely before proceeding with installation. Air Spring Kit Parts List. Attaching Hardware
 Kit No. 57340 MN-431 (02409) NPR 4796 Please read these instructions completely before proceeding with installation by www.airliftcompany.com Air Spring Kit Parts List A B1 B2 Item Description Quantity
AIR-SUSPENSION. Designed for: Alko Chassis
 AIR-SUSPENSION Dunlop Systems and Components Het Wegdam 22 7496 CA Hengevelde The Netherlands Tel.: +31-(0)547-333065 Fax: +31-(0)547-333068 Website: www.dunlopsystems.com Art. nr.: L.AL.02 Designed for:
Combine Cover Manual
 Combine Cover Manual Installation Instructions Page 27 Operating Instructions Page 8 Warranty Page 8 Trouble Shooting Page 9 11 For Model s: Case I.H. 2388, 2188, 1688 and 1680 With a MAURER Hopper Extension
Trailer Parts. Brake Components. Axle Components. Suspensions. Lights & Electrical. Wheels & Tires. Loading Ramps. Couplers & Safety Chains
 Trailer Parts Brake Components Axle Components Suspensions Lights & Electrical Wheels & Tires Loading Ramps Couplers & Safety Chains Trailer Jacks Fenders Dump Trailer Parts Tilt SST Parts Decal Kits Brake
Air Ride Conversion SYstem Dodge Two Bag Rear
 Kelderman Air Ride Conversion SYstem Dodge Two Bag Rear 1994 and hlewer Installation nstr ctions *Te;; Warranty Disclaimer l\otice Read Before Beginning lnstallation Some Kelderman Air Ride Kits contain