SYNERGY SUSPENSION UNIVERSAL FRONT 3-LINK KIT Version 1.0
|
|
|
- Barrie Williamson
- 5 years ago
- Views:
Transcription
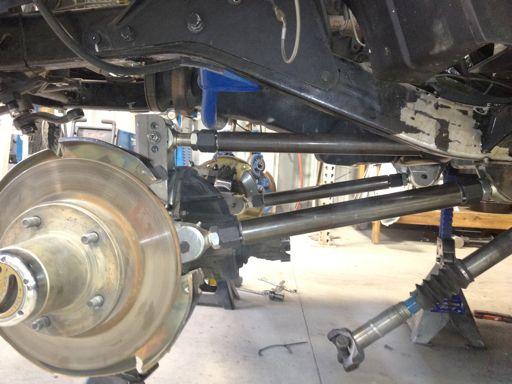
1 SYNERGY SUSPENSION UNIVERSAL FRONT 3-LINK KIT Version 1.0 GENERAL NOTES: These instructions are also available on our website; Check the website before you begin for any updated instructions and additional photos for your reference. These instructions include only the link suspension kit, you will need to accommodate steering, spring and shock mounts in addition This is a universal kit and will likely require modifications to these components to fit your application correctly The installation of this suspension kit requires extensive cutting, grinding and fabrication. Many of the major suspension brackets on the frame will need to be cut off and ground smooth. A plasma cutter or oxy-acetylene torch works best but you can also use a grinder with a cut off wheel. You will need basic hand tools, MIG welder a grinder with cut off wheel or sawzall, floor jack or automobile lift, and two sturdy jack stands to complete this installation. 1. Unpack the suspension components from the boxes, verify that all parts are intact and in good condition. 2. Read all the following steps before beginning installation. If you do not have the proper tools or ability to install the components properly do not attempt installation. Find a creditable, local shop to do the installation work. 3. Take some baseline measurements of your existing suspension so you know what you had, measure the distance from the axle to the frame at ride height, axle to the ground, and axle location front to back. 4. Make a plan and take notes of what you want to change, i.e. move the axle forward +2 is common. 5. Tack weld everything, do not finish weld any component until you have cycled the suspension and checked that everything clears adequately. FRAME LINK BRACKETS 6. Use a floor jack under the center of front axle to lift the tires off the ground. Place jack stands under each side of the front portion of the frame rails to support the weight of the vehicle. Raise or lower the floor jack under the front axle to remove and install suspension components. 7. Remove the front suspension components and the entire front axle assembly

2 8. Cut off any suspension bracket on the frame that you will not be using, i.e. lower control arm brackets, shock mount, spring mounts, track bar brackets, leaf spring hangers, etc 9. Position and clamp the new front frame control arm brackets on the frame. The front to back location is entirely up to you, on a TJ or YJ, the front tub body mount generally is where it goes, but you can go as far back to the T-case skid plate. You may need to relocate or push the brake, fuel lines above the frame control arm bracket.

3 10. Mark the bracket where the top edge of the frame is.

4 11. Remove the control arm bracket and cut at the line.

5 12. Reposition the control arm bracket to the frame and tack weld the upper plate on. 13. Remove the control arm bracket again and weld the top plate on.

6 14. Decide which side you want the upper control arm on. It usually goes on the side that the drive shaft is on. Driver side for a TJ or YJ. Weld the upper control arm top plate and gusset as shown below. There of two of these brackets included, you can use both and make a triangulated 4-link. The opposite side frame bracket without the upper control arm gets the 2 vertical gussets.

7 15. Reinstall and tack weld the control arm brackets on the frame. Double check the front to back location and make sure they are the same side to side. AXLE LINK BRACKETS 16. Cut off all or any unwanted suspension brackets from the axle housing. Use a grinder with a cut off wheel, plasma cutter or oxy-acetylene torch. Grind the welds smooth. 17. It is best to set the axle on jack stands with a jack supporting the pinion to set the castor angle. Adjust the castor to your desired castor, 6-8 degrees is typical for this type of application. 18. Position the lower control arm brackets on the axle tube. These brackets are made for a 3" axle tube, you may need to modify them to fit your axle tube if it's a different size. This is not a set location and is up to you to find the optimum position. Typically the lower control arm brackets are as far apart on the axle housing as possible without the tire contacting the lower control arms at full turn. The lower control arm brackets are usually anywhere from 2" to up against the inner C weld. The top of bracket is typically level to the ground. Make sure the angle inward looking from the top.

8 19. Mock up the single upper control arm mount (may require fabrication or purchase of an axle bridge for over the diff housing). Do not weld entirely to a cast diff housing, it will not hold. The side to side location is usually pretty tight so you may want to wait until you place the axle back in the vehicle to finalize this mount. LOWER CONTROL ARMS 20. Position the axle housing back under the vehicle on jack stands. Set the front to back location and set the axle at ride height and correct castor angle based on your notes and dimensions from the beginning. 21. Measure center to center of the bolt holes of the lower control arm brackets. This will be the length of the lower control arms. Thread the rod ends or Johnny Joints with

9 jam nuts into the threaded bungs. Only leave a couple of threads exposed past the jam nuts. Measure from the center of rod end to the step on the threaded bung were the tube is to be welded. Subtract two times this dimension from your center to center measurement and this is the cut length of your tube. 22. Cut the lower control arm tubing to the length calculated above and tack weld the threaded bungs in. 23. Install the lower control arms to the axle and frame brackets. UPPER CONTROL ARMS 24. Tack weld one end of the upper control arm tubing and threaded bung 25. Install the upper control arm rod end, jam nut, threaded bung and tube into the frame bracket. You generally want the upper control arm level at ride height. Set the upper control arm level and measure the height to the top of the front axle. This is how tall you want to make axle upper control arm bracket. The side to side location is variable and usually depends on upper control arm clearance to other components like motor mounts, steering or radiator.

10 26. You may want to raise the front axle up to where you think full bump is to check clearance for the upper control arm. Once you have determined a upper control arm side to side location you can fabricate the upper control arm bracket.
11

12 27. Measure center to center of the upper control arm bracket, cut and tack weld the tube for the upper control arm and install in the vehicle. TRACK BAR 28. Position the axle track bar mount on the axle. This bracket typically goes as far out to the knuckle as possible. Usually up against the inner C weld. This height works well for most high steer configurations, but can be trimmed to make it lower if needed. Set the front to back rotation as far forward as possible without hitting the tie rod or steering arm at full turn. Tack weld the bracket.

13 29. Determine the mounting location for the frame mount track bar bracket. The track bar needs to be parallel to the drag link so you may need to trim the bracket to mount higher if needed. Tack weld the bracket to the frame.

14

15 30. Assemble the bushing at the frame end and rod end at the axle end of the track bar. 31. Cut the track bar tube to the appropriate length, you may need to put a bend in the track bar to clear the differential, cycle the suspension to check for proper clearance. 32. Tack weld the track bar tubing to the frame bushing and rod end tube bung. FINAL CHECK AND ASSEMBLY 33. The following components are not covered in these instructions, but now would be the time to address them Shock and spring mounts Steering Anti-sway bar mounts Brake lines Drive shaft angle or slip differential breather length
16 33. Cycle the suspension and double check that everything clears satisfactorily. 34. Remove the control arms, axle housing and weld: Weld the axle housing control arms and track bar mount Install the gussets and weld the frame track bar mount Weld the frame control arm brackets to the frame Remove the rod ends from the control arms and weld the tube bungs Remove the track bar bushing and rod ends and weld the bushing tube and tube bung 35. Paint all components and reinstall, torque the 9/16 hardware to 150 ft-lb 36. Have the vehicle aligned by a professional shop. Check all hardware after 500 miles of driving. We also recommend checking all hardware before and after all off road trips to avoid failure from loose fasteners.
PPM-8023 / PPM-8043 JEEP JK SYNERGY STAGE 3 SUSPENSION SYSTEM Version 1
 SYNERGY MFG. 870 INDUSTRIAL WAY, SAN LUIS OBISPO, CA (805) 242-0397 PPM-8023 / PPM-8043 JEEP JK SYNERGY STAGE 3 SUSPENSION SYSTEM Version 1 GENERAL NOTES: These instructions are also available on our website;
PPM-8022 / PPM-8042 JEEP JK STAGE 2 SYNERGY SUSPENSION SYSTEM Version 1
 POLY PERFORMANCE MFG. 870 INDUSTRIAL WAY, SAN LUIS OBISPO, CA (805) 242-0397 PPM-8022 / PPM-8042 JEEP JK STAGE 2 SYNERGY SUSPENSION SYSTEM Version 1 GENERAL NOTES: These instructions are also available
PPM-8032 JEEP JK 2 DR STRETCH KIT Version 1
 POLY PERFORMANCE MFG. 870 INDUSTRIAL WAY, SAN LUIS OBISPO, CA (805) 242-0397 PPM-8032 JEEP JK 2 DR STRETCH KIT Version 1 GENERAL NOTES: These instructions are also available on our website; www.synergysuspension.com.
IFS Eliminator Kit,
 IFS Eliminator Kit, 110001-1 IFS Eliminator Kit Contents: Front Leaf Springs (choice 3", 4", or 5") 1.0 High Steer Crossover Steering Kit 1.0 Frame Tube Jig Kit 1.0 Steering Stabilizer Kit 1.0 U-bolt Flip
5003 TJ/LJ REAR COILOVER BRACKET KIT
 GENERAL NOTES: SYNERGY MFG. 870 INDUSTRIAL WAY, SAN LUIS OBISPO, CA (805) 242-0397 5003 TJ/LJ REAR COILOVER BRACKET KIT These instructions are also available on our website; www.synergymfg.com. Check the
5021 JK FRONT LOWER CONTROL ARM FRAME BRACKETS
 SYNERGY MFG. 870 INDUSTRIAL WAY, SAN LUIS OBISPO, CA (805) 242-0397 5021 JK FRONT LOWER CONTROL ARM FRAME BRACKETS GENERAL NOTES: These instructions are also available on our website; www.synergymfg.com.
PARTS LIST: 8581 DODGE LONG ARM BRACKETS 03-13
 SYNERGY MFG. 870 INDUSTRIAL WAY, SAN LUIS OBISPO, CA (805) 242-0397 8580 03-12 DODGE 2500/3500 4X4, 06-08 1500 MEGACAB 4X4 LONG ARM SUSPENSION KIT V3.0 GENERAL NOTES: These instructions are also available
PPM-5011 JK FRONT COIL OVER/AIR BUMP STOP BRACKET KIT INSTALLATION Version 1
 POLY PERFORMANCE MFG. 870 INDUSTRIAL WAY, SAN LUIS OBISPO, CA (805) 242-0397 PPM-5011 JK FRONT COIL OVER/AIR BUMP STOP BRACKET KIT INSTALLATION Version 1 GENERAL NOTES: These instructions are also available
5019 JK FRONT AIR BUMP KIT (THRU COIL)
") GENERAL NOTES: SYNERGY MFG. 870 INDUSTRIAL WAY, SAN LUIS OBISPO, CA (805) 242-0397 5019 JK FRONT AIR BUMP KIT (THRU COIL) These instructions are also available on our website; www.synergymfg.com. Check
GENERAL NOTES: SYNERGY MFG. 870 INDUSTRIAL WAY, SAN LUIS OBISPO, CA (805) 242-0397 5019 JK FRONT AIR BUMP KIT (THRU COIL) These instructions are also available on our website; www.synergymfg.com. Check
Dodge Ram 2500/3500 Tow Kit Installation Instructions
 2003-2010 Dodge Ram 2500/3500 Tow Kit Installation Instructions Congratulations! You have just purchased the best engineered, highest quality air suspension kit available on the market for your 2003-2010
INSTALLATION INSTRUCTIONS 64 ½ - 70 SUPERRIDE II INDEPENDENT FRONT SUSPENSION BX-350 FOR COYOTE AND MOD ENGINES
 INSTALLATION INSTRUCTIONS 64 ½ - 70 SUPERRIDE II INDEPENDENT FRONT SUSPENSION BX-350 FOR COYOTE AND MOD ENGINES Please read these instructions completely before starting your installation. Assemble suspension
OVER THE KNUCKLE 1-TON STEERING INSTALLATION INSTRUCTIONS
 OVER THE KNUCKLE 1-TON STEERING INSTALLATION INSTRUCTIONS TOOLS NEEDED Grinder with cutoff wheel, sawzall, cutting torches, or a plasma cutter Welder (for optional sway bar mounts) Hand drill with a ½
Super Duty Front Air Bag Installation Instructions
 2005-2010 Super Duty Front Air Bag Installation Instructions Congratulations! You have just purchased the best engineered, highest quality front air suspension kit available on the market for your 2005-2010
Jeep JK Dana 44 and 30 Front Axle Truss Axle Truss Installation Instructions
 THE INFORMATION CONTAINED IN THIS DRAWING IS THE SOLE PROPERTY OF SYNERGY MFG. ANY REPRODUCTION IN PART OR WHOLE WITHOUT THE WRITTEN PERMISSION OF SYNERGY MFG IS PROHIBITIED. Revisions Rev. Description
INSTALLATION INSTRUCTIONS P/N: C2006 LADDER BAR
 INSTALLATION INSTRUCTIONS P/N: C2006 LADDER BAR PARTS LIST 2) Ladder Bars 4) Lg. Housing Brackets 4) RH Solid Rod Ends 6) RH Jam Nuts 2) Spherical Rod Ends 4) Washers 6) 3/4"-16 x 2-1/2" Bolts 6) 3/4"-16
INSTALLATION INSTRUCTIONS P/N: C2005 LADDER LINK
 INSTALLATION INSTRUCTIONS P/N: C2005 LADDER LINK The Competition Engineering Ladder Link offers all the strength of our standard ladder bar coupled with an adjustable pivoting lower link that enables you
Installation Guide for the TJ LCG PRO Suspension System (Low Center of Gravity) Available 4 or 5
 Available 4 or 5") INSTALLATION GUIDE Installation Guide for the TJ LCG PRO Suspension System (Low Center of Gravity) Available 4 or 5 Take every precaution to make this installation a safe procedure. Make safety the number
INSTALLATION GUIDE Installation Guide for the TJ LCG PRO Suspension System (Low Center of Gravity) Available 4 or 5 Take every precaution to make this installation a safe procedure. Make safety the number
Toyota Tundra Tow Kit Installation Instructions
 2007-2013 Toyota Tundra Tow Kit Installation Instructions Congratulations! You have just purchased the best engineered, highest quality air suspension kit available on the market for your 07-14 Toyota
97-06 JEEP TJ/LJ LONG ARM UPGRADE KIT
 921663U00 97-06 JEEP TJ/LJ LONG ARM UPGRADE KIT Thank you for choosing Rough Country for your suspension needs. This kit is an upgrade kit only. This kit includes frame mounting points and adjustable long
Suzuki Samurai Trail Slayer Coil Kit Instructions
 Suzuki Samurai Trail Slayer Coil Kit Instructions 1. Remove: (unbolt) *Rear axle, leaf springs, shocks, brake hoses, brake hard lines, e-brake cables, and drive shaft. *Front axle, leaf springs, shocks,
INSTRUCTION G-Comp Unser Edition Rear Suspension: Chevy Nova. Kit Contents:
 INSTRUCTION 350-400 G-Comp Unser Edition Rear Suspension: 62-67 Chevy Nova Speedway Motors, Inc. 2017 Kit Contents: 350003.1 G-Comp Chassis Brace 350003.2 G-Comp Front Support 350400.1 Chevy II Unser Rear
INSTALLATION INSTRUCTIONS
 INSTALLATION INSTRUCTIONS 2005-2012 Nissan Xterra/Frontier / Pathfinder PART NUMBERS: NP17500, NP17525, NP17550 FRONTIER PARTS & CORRESPONDING HARDWARE LIST XTERRA PATHFINDER ABOVE LISTED 1/2 Metal Lock
Installation Instructions
 86-95 Low Range Off Road Universal Front Shock Tower Kit for Suzuki Samurai (SKU# SSP-UST) Installation Instructions Revised 10/29/13 Suggested Tools: CAUTION: Safety glasses should be worn at all times
PPM-5013 JK REAR C/O KIT Version 2
 POLY PERFORMANCE MFG. 870 INDUSTRIAL WAY, SAN LUIS OBISPO, CA (805) 242-0397 PPM-5013 JK REAR C/O KIT Version 2 GENERAL NOTES: These instructions are also available on our website; www.polyperformance.com.
5713 / 5714 JK HEAVY DUTY GAS TANK SKID PLATE Version 1.1
 SYNERGY MFG. 870 INDUSTRIAL WAY, SAN LUIS OBISPO, CA (805) 242-0397 5713 / 5714 JK HEAVY DUTY GAS TANK SKID PLATE Version 1.1 GENERAL NOTES: These instructions are also available on our website; www.synergymfg.com.
TOYOTA FJ CRUISER 6 SUSPENSION KIT
 92177000 TOYOTA FJ CRUISER 6 SUSPENSION KIT Thank you for choosing Rough Country for your suspension needs. Rough Country recommends a certified technician installs this system. In addition to these instructions,
ZJ 4-Link Rear Long Arm Upgrade Instructions
 Parts Checklist: Instructions Iron Rock Off Road logo decal (Qty: 1) Rock-Link decal 13287 (2) ironrockoffroad.com Decal (1) Crossmember 99118 (1) 3/16 steel brake line tubing (5 feet) Coil spring retainer
HEIDTS RF-110. INSTALLATION INSTRUCTIONS Fairlane Comet Rear 4-Link
 HEIDTS RF-110 INSTALLATION INSTRUCTIONS 66-67 Fairlane 66-67 Comet Rear 4-Link Please read these instructions completely before starting your installation. Remember the basic rule for a successful installation:
kelderman air ride 2003 & Newer Dodge Front 8-10 Lift Kit Warranty Disclaimer Notice Read Before Beginning Installation
 Air Ride Conversion System Installation Instructions 800 334-6150 www.keldermanairride.com kelderman air ride The difference in the ride is like night and day Inside this manual: 2003 & Newer Dodge Front
CLAYTON OFF ROAD COR JEEP GRAND CHEROKEE PRO SERIES 3 LINK FRONT LONG ARM UPGRADE KIT ( , ZJ)
") CLAYTON OFF ROAD COR-4804331 JEEP GRAND CHEROKEE PRO SERIES 3 LINK FRONT LONG ARM UPGRADE KIT (1993-1995, ZJ) NOTES: This product requires general welding, fabrication and automotive mechanic skills. Welding
CLAYTON OFF ROAD COR-4804331 JEEP GRAND CHEROKEE PRO SERIES 3 LINK FRONT LONG ARM UPGRADE KIT (1993-1995, ZJ) NOTES: This product requires general welding, fabrication and automotive mechanic skills. Welding
2011-UP CHEVY/GM 2500/3500 HD 7.5 NTD DROP LIFT KIT
 921253X00B 2011-UP CHEVY/GM 2500/3500 HD 7.5 NTD DROP LIFT KIT Thank you for choosing Rough Country for all of your suspension needs. Rough Country recommends a certified technician installs this system.
05+ Toyota Tacoma Rear Shock Hoop Install Notes Part# 86460
 159 North Maple St. Unit J, CORONA CA 92880 P. 951-737-9682 F. 951-737-9006 WWW.CHAOSFAB.COM 05+ Toyota Tacoma Rear Shock Hoop Install Notes Part# 86460 Note: This kit is designed to work with the Total
NOTICE TO DEALER AND VEHICLE OWNER
 921751200 *1751BAG1* 1751BAG1 Thank you for choosing Rough Country for all your suspension needs. This kit will fit both 4WD and 2WD models, all brackets will be used for 4WD models. On 2WD models the
97-06 JEEP TJ 3 1/4 PROGRESSIVE COIL/SPACER KIT
 92PERF1641 97-06 JEEP TJ 3 1/4 PROGRESSIVE COIL/SPACER KIT Thank you for choosing Rough Country for your suspension needs. Rough Country recommends a certified technician installs this system. In addition
DO NOT GRIND ANY WELDS
 1 READ FIRST! PLEASE READ THROUGH ALL OF THE INSTRUCTIONS AND ENSURE THAT YOU UNDERSTAND THEM. BE SURE THAT YOU HAVE ALL THE REQUIRED GSI COMPONENTS, BASIC TOOLS, AND SKILLS. CUTTING THIS KIT REQUIRES
*1234BAG1 1234BAG WD CHEVY/GM LIFT N200
 *1234BAG1 1234BAG1 921234N200 99-06 2WD CHEVY/GM 1500 6 LIFT Thank you for choosing Rough Country for all of your suspension needs. Rough Country recommends a certified technician installs this system.
2011-UP CHEVY/GM 2500/3500HD 2WD/4WD 7.5 NTD LIFT KIT
 921253X00H *1253BAG16* 1253BAG16 2011-UP CHEVY/GM 2500/3500HD 2WD/4WD 7.5 NTD LIFT KIT Thank you for choosing Rough Country for all of your suspension needs. Rough Country recommends a certified technician
'99-03 CHEVROLET/GMC IFS 4WD 6" SUSPENSION SYSTEM P/N INSTALLATION INSTRUCTIONS
 1/16/04 '99-03 CHEVROLET/GMC IFS 4WD 6" SUSPENSION SYSTEM P/N. 10-41099 INSTALLATION INSTRUCTIONS NOTE: Each Lift Kit and options to Lift Kits are packaged separately. Therefore, installation procedures
2011-UP CHEVY/GM 2500HD 2WD/4WD 5 NTD LIFT KIT
 921260X00F *1260BAG6* 1260BAG6 2011-UP CHEVY/GM 2500HD 2WD/4WD 5 NTD LIFT KIT Thank you for choosing Rough Country for all of your suspension needs. Rough Country recommends a certified technician installs
Master Your Terrain. (307) XD Front Axle Truss Installation Instructions
 XD Front Axle Truss Installation Instructions") Master Your Terrain (307) 775 9565 www.tntcustoms.com XD Front Axle Truss Installation Instructions Congratulations for purchasing TNT, Inc. Extreme Duty Front Axle Truss. Begin by unpacking your kit and
Master Your Terrain (307) 775 9565 www.tntcustoms.com XD Front Axle Truss Installation Instructions Congratulations for purchasing TNT, Inc. Extreme Duty Front Axle Truss. Begin by unpacking your kit and
02-10 GM 2500HD / HD & HD CLASSIC 6 2WD SUSPENSION KIT
 92122000 92127400 02-10 GM 2500HD / 01-06 1500HD & 07 1500HD CLASSIC 6 2WD SUSPENSION KIT Thank you for choosing Rough Country for your suspension needs. Rough Country recommends a certified technician
CLAYTON OFF ROAD COR JEEP GRAND CHEROKEE LONG ARM UPGRADE KIT ( WJ)
") CLAYTON OFF ROAD COR-4806011 JEEP GRAND CHEROKEE LONG ARM UPGRADE KIT (1999-2004 WJ) NOTES: This product requires general welding, fabrication and automotive mechanic skills. ing should only be done by
CLAYTON OFF ROAD COR-4806011 JEEP GRAND CHEROKEE LONG ARM UPGRADE KIT (1999-2004 WJ) NOTES: This product requires general welding, fabrication and automotive mechanic skills. ing should only be done by
Installation Manual ZJ Long Arm Upgrade kit Jeep Grand Cherokee Last Revision No.: 1/30/12 PN
 Thank you for purchasing a Clayton Off Road suspension. Please check to make sure you have all necessary parts before you start your install. 4804010 ZJ 93-95 Long Arm Upgrade Kit 1200010 4 Link Axle Truss
Detroit Speed, Inc. Mini-Tub Kit Chevy Nova, Oldsmobile Omega, Pontiac Ventura P/N: &
 Detroit Speed, Inc. Mini-Tub Kit 1968-74 Chevy Nova, Oldsmobile Omega, Pontiac Ventura P/N: 041207 & 041208 Item Component Quantity 1 DSE Mini Tubs 1968-74 X-Body 2 2 Rear Upper Shock Crossmember 1 3 Upper
Step 5 Install the frame rail insert into the frame.
 COR-6372S, COR-6372D 63-72 C-10 Rear Coil-over KIT Tool s for the job Car Lift Floor Jack Chalks Jack Stands Standard Wrench set Standard Socket set Spring Compressor Phneumatic/ Electric Grinder Phneumatic/
PPM-8055/8089 JK FRONT TRACK BAR RELOCATION BRACKET Version 1.2
 POLY PERFORMANCE MFG. 870 INDUSTRIAL WAY, SAN LUIS OBISPO, CA (805) 242-0397 PPM-8055/8089 JK FRONT TRACK BAR RELOCATION BRACKET Version 1.2 GENERAL NOTES: These instructions are also available on our
AEV30213AF Last Updated: 05/24/18. jk wrangler dualsport sc suspension right hand drive INSTALLATION GUIDE
 AEV30213AF Last Updated: 05/24/18 jk wrangler 3.5 4.5 dualsport sc suspension right hand drive INSTALLATION GUIDE PLEASE READ BEFORE YOU START TO GUARANTEE A QUALITY INSTALLATION, WE RECOMMEND READING
Installation Guide for the High Steer System Kit Part # (HSK) Part # (HSK-LCG)
 Part # (HSK-LCG)") INSTALLATION GUIDE Inc. Inc. Tera TeraFlex, Manufacturing, 5680 W Dannon Way 5251 South Commerce Dr. West Jordan, UT 84081 Murray, Utah 84107 Phone/801.288.2585 Fax/801.713.2313 Phone/801.288.2585 www.teraflex.com
INSTALLATION GUIDE Inc. Inc. Tera TeraFlex, Manufacturing, 5680 W Dannon Way 5251 South Commerce Dr. West Jordan, UT 84081 Murray, Utah 84107 Phone/801.288.2585 Fax/801.713.2313 Phone/801.288.2585 www.teraflex.com
PRELIMINARY The following is a list of suggestions to make your installation easier:
 INSTALLATION INSTRUCTIONS P/N: C2028 MAGNUM SERIES 4-LINK This is the strongest 4-link ever offered by Competition Engineering. It is designed to work in conjunction with our Part No.: C3060 4-Link Frame
Installation Manual Clayton Off Road Suspension: XJ 6.5 Coil Conversion Long Arm Lift Kit Jeep Cherokee Last Revision No.: 3/1/11 PN
 Thank you for purchasing a Clayton Off Road suspension. Please check to make sure you have all necessary parts before you start your install. XJ 8.0 Coil 1100107 3 Link Bridge W/mount 1100108 Front Spring
»Product» Safety Warning
 Zone C2350 Installation Instructions 2007-2013 Chevy 1500 3.5" Lift Read and understand all instructions and warnings prior to installation of product and operation of vehicle. Zone Offroad Products recommends
»Product» Safety Warning
 #F1424 Installation Instructions 2011 Ford Super Duty F250/350 4wd 4" Radius Arm Suspension Lift Read and understand all instructions and warnings prior to installation of product and operation of vehicle.
Installation Guide for the TeraFlex Elite LCG JK 4 Long Arm Suspension System
 Tera Manufacturing, Inc. 5251 South Commerce Dr. Murray, Utah 84107 Phone/801.288.2585 Fax/801.713.2313 www.teraflex.biz INSTALLATION GUIDE Installation Guide for the TeraFlex Elite LCG JK 4 Long Arm Suspension
»Product» Safety Warning
 #F1420 Installation Instructions 2011 Ford Super Duty F250/350 4wd 4" Suspension Lift Read and understand all instructions and warnings prior to installation of product and operation of vehicle. Zone Offroad
Carli Suspension Front Instructions
 Carli Suspension Front Instructions 94-08 DODGE 2500-3500 4X4 SUSPENSION SYSTEM Note: Prior to installation, carefully inspect the vehicle=s steering and drive train components. Be sure to check ball joints,
Installation Instructions Truckin Suspension 6.5 Suspension Lift Kit DODGE DAKOTA-DURANGO (worm and sector)
") Installation Instructions Truckin Suspension 6.5 Suspension Lift Kit 1997-1999 DODGE DAKOTA-DURANGO (worm and sector) Important! Read all instructions before attempting any work on the vehicle. DO NOT
Installation Instructions Truckin Suspension 6.5 Suspension Lift Kit 1997-1999 DODGE DAKOTA-DURANGO (worm and sector) Important! Read all instructions before attempting any work on the vehicle. DO NOT
GM P/U, Blazer, Suburban, 1 Ton 4WD 4-6 Kits
 92114500 1973-87 GM P/U, 1973-91 Blazer, Suburban, 1 Ton 4WD 4-6 Kits Thank you for choosing Rough Country for all of your suspension needs. Rough Country recommends a certified technician installs this
Chrysler A-Body Tubular A-Arms Installation Instructions A-ARM INSTALLATION
 1967-1976 Dodge Demon 1112 67-72 Chrysler A-Body Tubular A-Arms Installation Instructions Thank you for your purchase of this Hotchkis Performance product. Your A-Arm set was designed with the performance
»Product» Safety Warning
 #F2622 Installation Instructions 1997-2003 Ford F-150 4WD 6" Suspension System Read and understand all instructions and warnings prior to installation of product and operation of vehicle. Zone Offroad
2014 GM 1500 TRUCK STOP---READ THIS FIRST! 7" Lift KIT. **Read These Entire Instructions Before Starting Anything**
 STOP---READ THIS FIRST! **Read These Entire Instructions Before Starting Anything** 2014 GM 1500 TRUCK LIFT KIT INSTRUCTIONS (PART #50768 & #50769 ) 5680 W. Barstow, Fresno, CA 93722 PH: (559) 226-8196
»Product» Safety Warning
 #F1422 Installation Instructions 2008-2010 Ford Super Duty F250/350 4wd 4" Radius Arm Suspension Lift Read and understand all instructions and warnings prior to installation of product and operation of
Installation Instructions
 Installation Instructions 6 Suspension System FTS25005BK / FTS25006BK 2006-2012 Nissan Frontier 2wd/4wd SHORT BED ONLY Tool List: (not included) Floor Jack & Jack Stands Assorted Metric & S.A.E Sockets
07-UP AVALANCHE 7.5 KIT
 92120900R1 07-UP AVALANCHE 7.5 KIT Thank you for choosing Rough Country for your suspension needs. We appreciate your business!! This kit will not fit vehicles equipped with electric steering or trucks
DO NOT GRIND ANY WELDS! DO NOT QUENCH WELDS WITH WATER OR OIL. ALLOW TO AIR COOL.
 1 READ FIRST! PLEASE READ THROUGH ALL OF THE INSTRUCTIONS AND ENSURE THAT YOU UNDERSTAND THEM. BE SURE THAT YOU HAVE ALL THE REQUIRED GSI COMPONENTS, BASIC TOOLS, AND SKILLS. CUTTING THIS KIT REQUIRES
Runner w/x-reas -2 Front 1 Rear Leveling Kit
 92176700 2010-2018 4 Runner w/x-reas -2 Front 1 Rear Leveling Kit Thank you for choosing Rough Country for your suspension needs. Rough Country recommends a certified technician install this system. In
Installation Instructions Truckin Suspension Lift Kit 1999-Newer DODGE DAKOTA-DURANGO (Rack and Pinion)
") Installation Instructions Truckin Suspension Lift Kit 1999-Newer DODGE DAKOTA-DURANGO (Rack and Pinion) Important! Read all instructions before attempting any work on the vehicle. DO NOT DISSASSEMBLE ANY
Installation Instructions Truckin Suspension Lift Kit 1999-Newer DODGE DAKOTA-DURANGO (Rack and Pinion) Important! Read all instructions before attempting any work on the vehicle. DO NOT DISSASSEMBLE ANY
INSTRUCTION G-Comp Rear Suspension: Chevy Camaro. Kit Contents:
 INSTRUCTION 350-700 G-Comp Rear Suspension: 70-81 Chevy Camaro Speedway Motors, Inc. 2017 Kit Contents: 350700.1 G-Comp Crossmember & Chassis Brace 350700.2 G-Comp Rear Crossmember Assembly 350700.3 G-Comp
All Pro Off Road 104 Sheafman Creek, Suite 2 Victor, MT 59875
 Important notices: ALL-PRO 3 LINK SAS KIT INSTRUCTIONS These instructions are intended only as a general guide for installing All-Pro products. For some items, specialized mechanical skills, metal fabrication
PRODUCT USE INFORMATION
 9RC61000 Jeep YJ Body Lift Thank you for choosing Rough Country for all your suspension needs. This body lift fits both manual and Automatic equipped vehicles!!! Refer to last page of this Instruction
Long Arm Suspension System. Jeep Wrangler JK 4WD Part#:
 Part#: 014493-014690 Long Arm Suspension System Jeep Wrangler JK 4WD 2007-2016 Rev. 021206 491 W. Garfield Ave., Coldwater, MI 49036. Phone: 517-279-2135 Web/live chat: www.bds-suspension.com. E-mail:
EVO-1050 JK Long Arm Upgrade w/ EVOlever
 EVO-1050 JK Long Arm Upgrade w/ EVOlever Recommended: All Vehicles that spend time on salted roads. It is recommended that removal of both threaded collar and joint on all arms. Apply a small amount of
Read and understand all instructions and warnings prior to installation of system and operation of vehicle.
 102 S. Michigan Ave., Coldwater, MI 49036 Phone: 517-279-2135 Web/live chat: www.bds-suspension.com E-mail: tech@bds-suspension.com Part#: 023620 Product: 6" Suspension System Application: 2009-2012 Ford
60-65 Falcon, Comet & Ranchero Coil Spring IFS
 60-65 Falcon, 62-65 Comet & 62-65 Ranchero Coil Spring IFS All engine installations with this front end will require a rear sump oil pan. 289-302 Small Block Ford Motors Milodon rear sump pan holds 7 quarts
*1274BAG9* 1274BAG GM 4-6 SUSPENSION KIT N2.0. Thank you for choosing Rough Country for your suspension needs A
 92127400A 88-98 GM 4-6 SUSPENSION KIT N2.0 Thank you for choosing Rough Country for your suspension needs. *1274BAG9* 1274BAG9 Rough Country recommends a certified technician installs this system. In addition
Nissan Titan 4 Front & 2 Rear Suspension Kit
 92187400 Nissan Titan 4 Front & 2 Rear Suspension Kit Thank you for choosing Rough Country for all your suspension needs. Rough Country recommends a certified technician install this system. In addition
NOTE: LIFETIME PRODUCT WARRANTY
 Carli Suspension: 422 Jenks Circle, Corona, CA 92880 Tech Support: (714) 532-2798 CS-DD30-6-03-D CS-DD30-6-10-D CS-DD30-6-10-D-12MM CS-DD30-6-12-D CS-DD30-6-12-D-12MM NOTE: Please review the product instructions
STOP---READ THIS FIRST!
 STOP---READ THIS FIRST! **Read These Entire Instructions Before Starting Anything** 2007-2010 GM 1500 TRUCK LIFT KIT INSTRUCTIONS (PART# 50700 & 50720) 5680 W. Barstow, Fresno, CA 93722 PH: (559) 226-8196
READ AND UNDERSTAND ALL INSTRUCTIONS AND WARNINGS PRIOR TO INSTALLATION OF SYSTEM AND OPERATION OF VEHICLE.
 #021700, 021701 7 Suspension System 2000-2004 Chevy/GMC 1500 2wd Extended Cab w/ Front Coil Springs READ AND UNDERSTAND ALL INSTRUCTIONS AND WARNINGS PRIOR TO INSTALLATION OF SYSTEM AND OPERATION OF VEHICLE.
4 & 6 High Clearance Suspension System. Dodge Ram WD Part#: ,
 Part#: 022624, 022402 4 & 6 High Clearance Suspension System Dodge Ram 1500 4WD 2012-2017 Rev. 020918 491 W. Garfield Ave., Coldwater, MI 49036. Phone: 517-279-2135 E-mail: tech-bds@sporttruckusainc.com
99-06 CHEVY/GM LIFT KIT
 92127200 99-06 CHEVY/GM 1500 6 LIFT KIT Thank you for choosing Rough Country for all of your suspension needs. Rough Country recommends a certified technician installs this system. In addition to these
STOP---READ THIS FIRST!
 STOP---READ THIS FIRST! **Read These Entire Instructions Before Starting Anything** 2007-2013 GM 1500 TRUCK LIFT KIT INSTRUCTIONS (PART# 50700 & 50720) 5680 W. Barstow, Fresno, CA 93722 PH: (559) 226-8196
kelderman air ride 2003 & Newer Dodge Rear 5-6 Lift Kit Warranty Disclaimer Notice Read Before Beginning Installation
 Air Ride Conversion System Installation Instructions kelderman air ride The difference in the ride is like night and day Inside this manual: 2003 & Newer Dodge Rear 5-6 Lift Kit Tools required for installation
4.5 Suspension System. Jeep TJ BDS PART # Ultimate; # Standard
 BDS PART #014460 Ultimate; #014440 Standard 491 W. Garfield Ave., Coldwater, MI 49036. Phone: 517-279-2135 Web/live chat: www.bds-suspension.com. E-mail: tech-bds@sporttruckusainc.com 4.5 Suspension System
Installation Instructions
 Installation Instructions FTS24071BK 97-06 Jeep Extended Rear Link Kit w/ Stock Dana 44 Axle NON UNLIMITED Qua Part # Description 2 FT50275BK Rear Lower Link Ext. 1 FT50276BK Wish Bone Ext. 1 FT50277BK
Detroit Speed, Inc. Second Generation Camaro/Firebird Mini-Tub Kit Camaro/Firebird P/N: ,
 Detroit Speed, Inc. Second Generation Camaro/Firebird Mini-Tub Kit 1970-1981 Camaro/Firebird P/N: 041222, 041223 The Detroit Speed Second Generation Camaro/Firebird Rear Mini-Tub Kit is designed to accommodate
PRODUCT USE INFORMATION
 Toyota 2007-17 Tundra 3.5 4wd/2wd Suspension Kit Thank you for choosing Rough Country for all your suspension needs. 9217682000A *76820BAG4* 76820BAG4 Rough Country recommends a certified technician install
»Product» Safety Warning
 #D2500 Installation Instructions 2002-2005 Dodge Ram 1500 4WD 5" Suspension System Read and understand all instructions and warnings prior to installation of product and operation of vehicle. Zone Offroad
Nissan Titan 6 Front & 4 Rear Suspension Kit
 92187500 Thank you for choosing Rough Country for all your suspension needs. Nissan Titan 6 Front & 4 Rear Suspension Kit Rough Country recommends a certified technician install this system. In addition
Colorado/ Canyon 4, 5, and 6 Lift Kit
 *1221BAG3* 1221BAG3 921221200B 2015-16 Colorado/ Canyon 4, 5, and 6 Lift Kit Thank you for choosing Rough Country for all of your suspension needs. Rough Country recommends a certified technician installs
Jeep Wrangler Steering Stabilizer Relocation Bracket Installation Instructions
 THE INFORMATION CONTAINED IN THIS DRAWING IS THE SOLE PROPERTY OF SYNERGY MFG. ANY REPRODUCTION IN PART OR WHOLE WITHOUT THE WRITTEN PERMISSION OF SYNERGY MFG IS PROHIBITIED. Revisions Rev. Description
AEV30213AH Last Updated: 04/28/17. jk wrangler dualsport sc suspension INSTALLATION GUIDE
 AEV30213AH Last Updated: 04/28/17 jk wrangler 3.5 4.5 dualsport sc suspension INSTALLATION GUIDE PLEASE READ BEFORE YOU START TO GUARANTEE A QUALITY INSTALLATION, WE RECOMMEND READING THESE INSTRUCTIONS
00-06 CHEVY/GM TAHOE, YUKON, SUBURBAN, YUKON XL & AVALANCE 6 NTD LIFT
 921280N2B *1272BAG10* 1272BAG10 00-06 CHEVY/GM TAHOE, YUKON, SUBURBAN, YUKON XL & AVALANCE 6 NTD LIFT Thank you for choosing Rough Country for all of your suspension needs. Rough Country recommends a certified
" CHEVY / GMC WD BASIC KIT
 84302 2007-2013 6" CHEVY / GMC 1500 4WD BASIC KIT 100% Bolt On 6 Spindle Kit Front Differential Is Dropped A Full 6 To Maintain Proper CV Axle Angles Impact Struts To Distribute Front Suspension Impact
97-06 Jeep TJ Wrangler Installation Instructions Models Kit# TJ251K/TJ401K-SX -DX 03 Models Kit# TJ253K/TJ403K-SX -DX
 97-06 Jeep TJ Wrangler Installation Instructions 97-02 Models Kit# TJ251K/TJ401K-SX -DX 03 Models Kit# TJ253K/TJ403K-SX -DX Before beginning the installation, read these instructions and the enclosed driver
Chevrolet 3100 IFS Kit
 1947-54 Chevrolet 3100 IFS Kit Congratulations on your purchase on what we believe is the finest IFS kit available for 1947-54 Chevrolet pickups with stock frames. We have invested many hours into designing
4.5 Long Arm Suspension System. Jeep Wrangler TJ Part#:
 Part#: 014447 4.5 Long Arm Suspension System Jeep Wrangler TJ 1997-2006 Rev. 080917 491 W. Garfield Ave., Coldwater, MI 49036. Phone: 517-279-2135 E-mail: tech-bds@sporttruckusainc.com Read And Understand
JK HD Skid Plate for Rear Falcon Shocks
 1 JK HD Skid Plate for Rear Falcon Shocks Kit # 36-07-01-300 Tools needed: Important Notes: Prior to beginning this or any installation read these instructions to familiarize yourself with the required
XJ CHEROKEE LIFT KIT
 92162300 84-01 4.5 XJ CHEROKEE LIFT KIT Thank you for choosing Rough Country for your suspension needs. Rough Country recommends a certified technician installs this system. In addition to these instructions,
»Product» Safety Warning
 RBP-LK305-60 Installation Instructions 1999-2004 Ford Super Duty F-250/350 4wd 6" Suspension Lift Read and understand all instructions and warnings prior to installation of product and operation of vehicle.
Installation Instructions
 Installation Instructions Jeep TJ Long Arm Suspension System 1997-2002 JEEP TJ 4WD 6 1997-2002 JEEP TJ 4WD FTS24002 & BK / FTS24003 & BK / FTS44002 & BK PARTS LIST FTS24002BK Jeep TJ 6' Box Kit 1 FTS24003BK