This is a hobby website dedicated to the Kawasaki KLR650 motorcycle. I make no claim concerning the
|
|
|
- Everett Mitchell
- 5 years ago
- Views:
Transcription
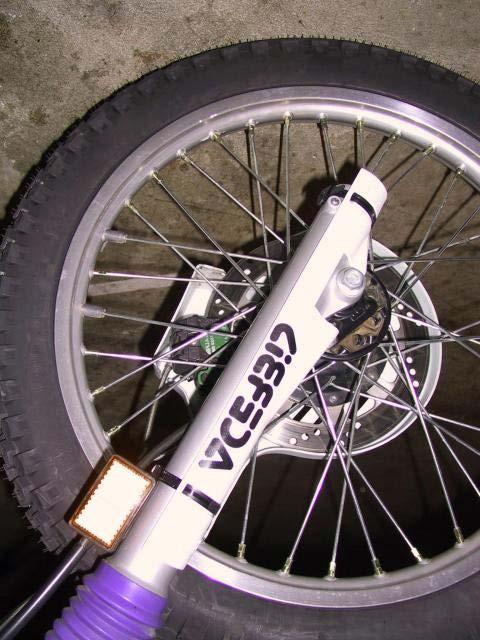
1 KLR650 Homepage Contact Me You must remove the "REMOVE-THIS" in my address for it to work. This is a hobby website dedicated to the Kawasaki KLR650 motorcycle. I make no claim concerning the accuracy of the procedures, nor do I guarantee the success of any work done using them. All users of the material found here are advised that there is no real or implied warranty associated in any way with the website content, and that all content available here is for use at your own risk. Copyright 2001 Mark's KLR Pages All Rights Reserved No copying or other redistribution by any method will be permitted without my express written permission. Links Miscellaneous Info D.I.Y. Tips Grease 101 Technical Articles A1 Brochure Conversions KLR650 FAQ Painting Plastic Forms Maintenance Log Shim Record Chart Pictures Corbin Saddle Procedures in PDF 12v Waterproof Outlet ACERBIS (SUZUKI) FRONT DISK PROTECTOR FOR THE KLR The credit for this procedure goes entirely to MarkB - A3, A9. In respect for his work, the content was pasted in exactly as received... I had seen other MX bikes, dualsport bikes, KLRs with the nifty disc and fork protectors and went to get some for my '95 Barbie Bike, only to find that Acerbis had discontinued the guards for the KLR650. Used sets came and went on ebay but usually at a substantial premium. I wanted these to protect the front brake rotor and the fork sliders. If you never crash, then you have nothing to worry about. Unfortunately, I have to worry about these things. After much hand wringing, I began looking for an alternative. I compared the disc/fork guards for several other bikes and found that the unit for the Suzuki DR350 was very close in size for the disk as well as the fork diameters. I matched them up on a KLR at a local bike shop and decided that for the $32 it would be a good experiment. Other recommended the disk guards from the KLR600 as an option, nice, but these are discontinued too. They do come up on ebay at times, but even used, they pull 50 bucks. A few notes: The kit for the DR350 actually works well. The fit over the brake disc is very close, leaving about 1/4inch all around. Other areas like the axle bolt or the caliper section can fit with more tolerance for adjustment. But the cover must clear the brake disc all around. If the disc cover drags or rubs against the brake disc, it will eventually cut through the plastic guard, possibly interfering with the front brake. 1. Review the basic instruction provided by Acerbis. The kit contains an extended bolt to pre-place one of caliper mount bolts. This bolt can take a screw to act as a mount for the disc cover. I decided to ignore this
2 Acerbis Disk Installation Balancer Adjustment part as I did not want the extended caliper mount bolt getting sheared off in a crash. The right side fork cover fits well right out of the box. It was just a little long on the lower end, maybe a half-inch too long. I opted not to trim the excess at the bottom of the cover. Brake Pads Cam Chain Timing Carb Air Mixture Carb Rain T-Mod Decalifornication Doohickey Upgrade Easy Lift Fork Oil Change Horn Upgrade Hydraulic Clutch JC Whitney Trunk Maier Woods Pro Mirror Mount Repair Oil Screen Cleaning TIME-SERT Radiator Cooling Mod Ramp Loading 2. Place the disc cover into position and check for clearance and overall fit. Take several test fits, and use a helper or masking tape to hold the pieces in position. The important thing is to clear the brake disc; top, sides, and bottom. Remember, the brake disc should NOT touch the disc cover. Safety Switch Bypass Shark Fin Installation Shim Storage Box

3 Shim Value Table SuperBrace Swingarm Maint Torque Values Tube Valve Tools Valve Adjustment Vista-Cruise Lock Water Pump Seals Wheel Alignment 3. While in position use a wood or plastic mallet to tap on the outside of the cover; especially over the axle bolt area and the caliper bosses. Use this technique to mark the inside of the cover -show you where to start the cutout for the bolt. First, drill a small 1/8inch pilot and make a few more test fits. Then move on to enlarging the hole to clear the axle bolt & nut. Check the disk to see that it does NOT drag on the cover - usually top and bottom are critical, but also the rear most area. I decided not to use the axle nut to hold on the disc cover.

4 4. Also tap the cover directly over the shoulder on the caliper to locate this point for a second cutout. Drill the pilot, and check for fitting before enlarging. The clearance holes here came out too large. With care, yours will be much cleaner. Also, I made a little extra clearance for the other shoulder on the caliper but it wasn't needed. While it looks a bit rough, it is after all a dual-sport so a little snafu like this aint no big thing.

5 5. The brake line will need a hole. I first drilled the 3/8inch hole in position for the brake lin to pass through, then using a hand saw, I cut a slot leading into the hole, like a keyhole. Also, if your brake line is the stock rubber unit, you will need to protect it from cuts or abrasion from the edges of the disc cover. Use a rubber grommet or fit a rubber sleeve cut from fuel line and attach with zip ties above and below where it passes through the cover.

6 6. The very top of the disc/fork cover had to be trimmed to fit under the amber side reflector. A couple of passes with the utility knife it was a near perfect fit. Both the fork cover and disc cover mount with re-usable zip-ties. These are pretty neat, not sure how sturdy they are, or how they work in the cold. I should re-arrange them so they all facing backward to prevent them from catching on brush or trail stuff. The covers have a little foam pad on the inside to prevent rubbing or squeaking. The padding prevents the plastic from chaffing directly against the alloy fork sliders. If you need a little more padding, it s easy and cheap to fit some self stick weather-stripping from the hardware store.

7 7. A fine addition to the bike -looks almost MX tuff and should reduce the amount of casual damage from crashing and thrown up rocks, for both the forks and the front disc. I had posted on the net sometime back, looking for disc/fork covers and got no response other than "Acerbis quit making them". I have been scheming ever since. Luckily the DR350 disc and forks are about the same size. For final testing after mounting, I found the disc cover was dragging a bit on lower, rear-most section. So, I just trimmed it back with the utility knife. The big feature is that it protects the rotor from rock and other impacts, so a small gap in the coverage on the rear of the rotor is of little concern.
8

9
This is a hobby website dedicated to the Kawasaki KLR650 motorcycle. I make no claim concerning the
 KLR650 Homepage Contact Me You must remove the "REMOVE-THIS" in my email address for it to work. This is a hobby website dedicated to the Kawasaki KLR650 motorcycle. I make no claim concerning the accuracy
BRAKE PADS REPLACEMENT
 KLR650 Homepage Contact Me You must remove the "REMOVE-THIS" in my email address for it to work. This is a hobby website dedicated to the Kawasaki KLR650 motorcycle. I make no claim concerning the accuracy
This is a hobby website dedicated to the Kawasaki KLR650 motorcycle. I make no claim concerning the
 KLR650 Homepage Contact Me You must remove the "REMOVE-THIS" in my email address for it to work. This is a hobby website dedicated to the Kawasaki KLR650 motorcycle. I make no claim concerning the accuracy
Prerequisites: Shop Manual (recommended) pages 3-9 through 3-13.
 pages 3-9 through 3-13.") Prerequisites: Order your gaskets average about $25.00 bucks X 2 so $50.00 4NK-11193-00-00 Obtain a shim kit (Should have several 265 and 270s) (Some dealers will exchange) Obtain a Valve Bucket Tool YM-33961
Prerequisites: Order your gaskets average about $25.00 bucks X 2 so $50.00 4NK-11193-00-00 Obtain a shim kit (Should have several 265 and 270s) (Some dealers will exchange) Obtain a Valve Bucket Tool YM-33961
05/06 Gsxr 1000 Clutch Mod
 By: Ali (Jetspeedz) 05/06 Gsxr 1000 Clutch Mod Parts: 21472-41G10 - WASHER, CLUTCH - $10.09 From 06 Gsxr 750 Opt: 11482-40F00 - GASKET, CL COVER - $8.29 Tools: 13/64 Drill bit, 30mm, 12mm, 10mm, 8mm sockets,
Installing the Audiovox CCS-100 Cruise Control.
 Installing the Audiovox CCS-100 Cruise Control. This article was written by: Lon Lawrence w650kawasaki@leaco.net Cruise Control : Audiovox CCS-100 ($89) Webpage : www.summitracing.com Message: I've installed
My Hawk build Part 8 by Stuart Clarke
 My Hawk build Part 8 by Stuart Clarke Front hubs, brakes and brake lines. There was still no news on my rear springs so I thought I d find something else to get on with. I had the front hubs, brake calipers
25460/25465/25485/ Toyota Adjustable Upper Control Arms
 25460/25465/25485/25490 Toyota Adjustable Upper Control Arms Q1: I have the new SpecRide bushings. Why is my front suspension squeaking? A1: If you used the INCLUDED grease packet, and greased both the
PYRTE. Building The Front Axle, Fork and Steering
 PYRTE Building The Front Axle, Fork and Steering The front axle on this traction engine is a very simple affair, in that it is a rectangular steel rod, sat on edge, with a pivot in the centre, which is
25455/25470/ Toyota Adjustable Upper Control Arms
 Toyota Adjustable Upper Control Arms Q1: I have a lift kit; will the control arms handle the increased angle? A1: These control arms have approximately 20 more articulation capability than your OEM arms
Installing Rear Brake Pads on a WK Jeep
 Installing Rear Brake Pads on a WK Jeep Step by Step By Chirpz Disclaimer: I do not claim that this procedure is the right way or even the best way to change your rear brake pads. This is what I did after
INSTALLATION INSTRUCTIONS CHEVROLET NOVA (NVR-301) INDEPENDENT REAR SUSPENSION
 INDEPENDENT REAR SUSPENSION") INSTALLATION INSTRUCTIONS 68-74 CHEVROLET NOVA (NVR-301) INDEPENDENT REAR SUSPENSION Please read these instructions completely before starting your installation. Assemble suspension on vehicle before powder-coating
INSTALLATION INSTRUCTIONS 68-74 CHEVROLET NOVA (NVR-301) INDEPENDENT REAR SUSPENSION Please read these instructions completely before starting your installation. Assemble suspension on vehicle before powder-coating
MAXI-BORE TM CARBURETTORS
 MAXI-BORE TM CARBURETTORS 26mm/28mm Mik bored to 30.5mm 33mm Smoothbores bored to 38.5mm Don t just rebuild your carbs MAXI-BORE TM them! MAXI-BORE TM carbs are more than just cleaned, rebuilt, or bored,
Platine Verdier tips & tweaks
 1. Platine Verdier tips & tweaks This document is offered by Callas-Audio The Netherlands. There are some alternative motor drives at the marketplace which convert to tape drive or otherwise. Some who
Installing LED lights in a Hypercharger By Keith Edwards Joker s Wild! (Wildjokr)
") Installing LED lights in a Hypercharger By Keith Edwards Joker s Wild! (Wildjokr) THINGS YOU WILL NEED: A Hypercharger (duh!) LEDs (The ones I got were from Benny Bryant at Fantasies on Wheels in Sylacauga,
Installing LED lights in a Hypercharger By Keith Edwards Joker s Wild! (Wildjokr) THINGS YOU WILL NEED: A Hypercharger (duh!) LEDs (The ones I got were from Benny Bryant at Fantasies on Wheels in Sylacauga,
Mustang Radiator Conversion DIY. By GearHeadPeter. January 27, 2011
 1964-1966 Mustang Radiator Conversion DIY By GearHeadPeter January 27, 2011 We all know that the radiators in our cars are not the best, especially if you have done any customization to the engine, which
Attached Images. Attached Images
 Results from May 9 th : I'm sorry to say... I should have stayed home!.. Well, actually I'm glad I went, but the day was NOT a success from a competitive standpoint. It's always risky to take an untested
Tip: Axle Bearing Replacement Date:
 Hi All, Some time ago I came into possession of some Donnerbüchsen or Thunder Boxes, Märklin items 4313,4314 and 4315 which were no longer usable as the axle bearings had worn out causing the wheels to
This article, written by forum member Paulages in September 2008, is from the SOHC/4 Tips and Tricks Forum.
 This article, written by forum member Paulages in September 2008, is from the SOHC/4 Tips and Tricks Forum. When Honda produced the SOHC CB650, it was immediately following the end of the CB550 production,
Rekluse Motor Sports. The e-axle KTM. Installation Guide Copyright 2006 Rekluse Motor Sports e-axle Revision 1.
 Rekluse Motor Sports The e-axle 2003 2007 KTM Installation Guide Copyright 2006 Rekluse Motor Sports e-axle Revision 1.000 RMS 2733 195-2733C Manual Revision: 032207 Rekluse Motor Sports, Inc. 110 E. 43
Now we re ready to install our new mounts. The picture on the right shows our old and new for comparison.
 Well I didn t have a chance to write last week so we have a little catching up to do. Last Sunday I started out with setting up a jig to weld in the mounts. The jig is made out of a old fork tube that
WARNING: the engine does not come with oil in it. Please fill the oil before starting. The 200cc hardknock requires 9/10 of a quart of oil.
 WARNING: the engine does not come with oil in it. Please fill the oil before starting. The 200cc hardknock requires 9/10 of a quart of oil. Things needed for assembly. -2 tubes of blue loc-tite. I don
Rear Parking Brake Cable (93 Cobra)
") Rear Parking Brake Cable (93 Cobra) Materials in the box: Brake Cable Tools Needed: One jack and four jack stands. One socket wrench with a 12mm, 13mm ( ½ inch, 12 point DEEP WALL DO NOT FORGET THIS) and
Rear Parking Brake Cable (93 Cobra) Materials in the box: Brake Cable Tools Needed: One jack and four jack stands. One socket wrench with a 12mm, 13mm ( ½ inch, 12 point DEEP WALL DO NOT FORGET THIS) and
Changing the Struts on a WK Jeep CRD
 Changing the Struts on a WK Jeep CRD Step by Step By Chirpz Disclaimer: I do not claim that this procedure is the right way or even the best way to change your struts. This is what I did after reading
Rekluse Motor Sports. The z-start Clutch DRZ400 KLX400. Installation Guide Copyright 2002 Rekluse Motor Sports z-start Revision 3.
 Rekluse Motor Sports The z-start Clutch DRZ400 KLX400 Installation Guide Copyright 2002 Rekluse Motor Sports z-start Revision 3.000 RMS160 KLX400 DRZ400 z-start Clutch 191-260 Manual Revision: 103105 Rekluse
PLEASE READ THROUGH THE WHOLE WRITE UP BEFORE ACTUALLY USING IT!!!!
 JDM power folding mirror switch install into stock USDM harness. By: Greg L., Zeke21 on twinturbo.net PLEASE READ THROUGH THE WHOLE WRITE UP BEFORE ACTUALLY USING IT!!!! This is how I was able to get the
A/F/X Body GM Installation Instructions
 A/F/X Body GM Installation Instructions Rear Disc Conversion 64-72 A Body / 67-69 F Body / 62-74 X Body This kit is for axle with a 3 1/8 spread center to center on the top two bolt holes (pictured left).
How many miles do you have on that KLR? Last update: September 3, 2018
 How many miles do you have on that KLR? Last update: September 3, 2018 A red-letter day for my KLR back in 2013. The addition of the "1" and the comma seemed like a requirement. As the miles pile on my
NEW BRAKE INSTALLATION. Let us show you how a
 Tech Article From Newsletter 17.2-2nd Quarter of 2011 NEW BRAKE INSTALLATION Let us show you how a Big Brake Install is easier than you think!! So, you have a 572 (or a hot 383) in your shoebox... you
TFI 70GAL XB ADJUSTABLE OVER THE BED RAIL TOOL BOX REFUELING SYSTEM
 TFI 70GAL XB ADJUSTABLE OVER THE BED RAIL TOOL BOX REFUELING SYSTEM Installation Instructions 889 IS-889 Page 2 of 12 FOREWORD Thank you for a purchasing a Transfer Flow Inc. 70gal XB adjustable over the
Converting a generator to run on gas
 D I S C L A I M E R O F L I A B I L I T Y A N D W A R R A N T Y This publication describes the author s opinions regarding the subject matter herein. The author and publisher are not rendering advice or
Retrofit Steering Column
 Retrofit Steering Column INSTALLATION INSTRUCTIONS for 1965 Ford Falcon FOR PART NUMBER S: 1170906010, 1170906020, 1170906051, 1130906010, 1130906020, 1130906051 S INCE 1986 www.ididitinc.com 610 S. Maumee
RIGGING THE FLIGHT CONTROLS
 RIGGING THE FLIGHT CONTROLS Rigging refers to the installation and adjustment of the rods that move flight surfaces in response to inputs from the controls of the helicopter. These rods are cut to length,
Our goal is to make the install a breeze. Please read the entire guide before beginning.
 www.airkewld.com Page 1 of 6 IRS Axle Kit Install IRS Axle Kit Install Our goal is to make the install a breeze. Please read the entire guide before beginning. KITS SHOULD INCLUDE 2 - Control-arm mounting
SXR 19" rear wheel conversion kit
 SXR 19" rear wheel conversion kit Updated 2/27/18 Street trackers, Dirt trackers and Hooligan racers need 19 wheels on the rear so they can get traction from dirt track tires only made in 19. My kits permit
Connecting the rear fog light on the A4 Jetta, while keeping the 5 Light Mod
 Connecting the rear fog light on the A4 Jetta, while keeping the 5 Light Mod DISCLAIMER: I'm human and make mistakes. If you spot one in this how to, tell me and I'll fix it This was done on my 99.5 Jetta.
INSTRUCTIONS ON HOW TO R & R YOUR Swingarm
 R and R Your Swingarm INSTRUCTIONS ON HOW TO R & R YOUR Swingarm Upgrade Your Pre-2002 FL Or FXR Rear Fork & Get Rid Of The Crappy & Dangerous (Cleve Blocks) & Replace Them With A Stable System. R & R
Full Size GM Installation Instructions Rear Disc Conversion
 Full Size GM Installation Instructions Rear Disc Conversion 65 68 Full Size GM (Impala, Bel Air, etc.) This kit is for axles with a 3 3/8 spread center to center on the top two bolt holes (pictured left).
IRS-151 INSTALLATION INSTRUCTIONS `55-57 CHEVY INDEPENDENT REAR SUSPENSION
 IRS-151 INSTALLATION INSTRUCTIONS `55-57 CHEVY INDEPENDENT REAR SUSPENSION Please read these instructions completely before starting your installation. Remember the basic rule for a successful installation:
Mercedes Diesel Valve Adjustment Procedure
 1 of 30 5/30/2008 12:58 PM Home Cars for sale Trucks for sale Where we are Links to other diesel sites About us Why diesel? Diesel Videos How they work How they sound FAQ Dodge Diesel Maintenance tips,
Днепр) Russian Motorcycle Carburetors Part 2B: PZ-24 and PZ-28 Carburetor Assembly and Jet Drilling
 Russian Motorcycle Carburetors Part 2B: PZ-24 and PZ-28 Carburetor Assembly and Jet Drilling") Ural (Урал( Урал) - Dnepr (Днепр( Днепр) Russian Motorcycle Carburetors Part 2B: PZ-24 and PZ-28 Carburetor Assembly and Jet Drilling (applies also to K-37 K and K-38 K carbs) Ernie Franke eafranke@tampabay.rr.com
Ural (Урал( Урал) - Dnepr (Днепр( Днепр) Russian Motorcycle Carburetors Part 2B: PZ-24 and PZ-28 Carburetor Assembly and Jet Drilling (applies also to K-37 K and K-38 K carbs) Ernie Franke eafranke@tampabay.rr.com
Ultra-micro Yak-55 by Dynamic Foamy Review
 Ultra-micro Yak-55 by Dynamic Foamy Review About myself: This is my first official review. Bert Wilson, from Dynamic Foamy was looking for somebody to review his latest kit offering, the micro Yak-55.
Revision Date: Building a dual pump system for an open boat. Description:
 Disclaimer: The information is provided as-is. The author(s) accepts no liability for the accuracy, availability, suitability, reliability and usability. The following information is in the public domain
Triumph Street Triple VSM Grip Heater Install
 Triumph Street Triple VSM Grip Heater Install Introduction: With winter fast approaching and with painful memories of last winter riding with the club it was time to do something about getting some grip
Full Size GM Installation Instructions
 Full Size GM Installation Instructions Rear Disc Conversion 55 64 Full Size GM (Impala, Bel Air, etc.) This kit is for axle with a 3 3/8 spread center to center on the top two bolt holes (pictured left).
Trike Conversion Kit ROADLINER, STRATOLINER, & STRATOLINER DELUXE
 by Trike Conversion Kit ROADLINER, STRATOLINER, & STRATOLINER DELUXE Installation Instructions Revised 1-2015 California Sidecar Parts & Technical Support 434.263.8866 Table of Contents: 1. Warnings and
Door Panel Removal & Window Stop Adjustment
 Door Panel Removal & Window Stop Adjustment By: Jeff Wolford Disclaimer: This is simply an article of how I fixed my car. I m not responsible if you break, scratch, or mess up anything following my example.
Setting The Sag. We ve gathered up a few tutorials on setting the sag. Read them over and decide which one makes the most sense to you.
 Setting The Sag Setting the sag on your bike is the first step in correctly adjusting your suspension. We here at MotorPsycle.com want you to have a safe, great-handling bike. A suspension set up too hard
The Sands Mechanical Museum
 The Sands Mechanical Museum How to Change Your Oil It is more difficult to change the oil in a Lotus Elise because the oil plug and filter are difficult to access. They are located behind an access panel.
Pic.: Jo Wolframm Germany. Husqvarna special parts. more husqvarna parts: shop.touratech.com
 684 Pic.: Jo Wolframm Germany Husqvarna special parts more husqvarna parts: shop.touratech.com Husqvarna Nuda Terra 685 Husqvarna Nuda Crash Bung Set for Rear+Front Axle Husqvarna Nuda 900, Nuda 900R Add-on
Slide on the heat shrink tubing and connect the wire to the color matched cable on the Junction Box, making sure to line up the cable properly
 Manual Routing Di2 Frame Wires Down Tube E-wire Remove the Battery Cover and Hidden Battery compartment from the frame and put aside (Figure 1). Using electrical tape, attach the end of the Down Tube E-wire
DODGE DIESEL KIT DODGE DIESEL KIT
 69120 2009-2013 DODGE 2500 8 DIESEL KIT 2009-2012 DODGE 3500 8 DIESEL KIT Heavy Duty Long Arm Construction For Superior Ride Quality And Travel Lower Arms Constructed Of 1.75 DOM Tubing W/ Urethane Bushing
Front Axle Pinion Seal Replacement
 Front Axle Pinion Seal Replacement by Flopster843 10 Apr 2016 The AAM 925 axle used on the front of Dodge Ram trucks is a decent unit, but it does have its flaws. This axle lacks lockout hubs on the front
PRICE GUIDE: This will be a black engined model finished in the green and yellow paintwork.
 Z1-D 900 PROJECT NAME: Z1-D 1972 Z1-900 PRICE GUIDE: 9000 This will be another one of our "standard" special bikes. Based on an original Z1 but with all the updates seen on the Z1-C project, upgraded brakes,
Before starting installation
 Before starting installation The load rating for these tire-can/tire carriers is a MAXIMUM of 175 lbs. Please be aware that some tire and wheel combinations along with gas cans and hi-lift jacks can exceed
Another Shay Steam Brake Valve Nelson Riedel Initial: 1/30/2004 Last Revised: 02/26/2006
 Page 1 of 5 Another Shay Steam Brake Valve Nelson Riedel NARiedel@Adelphia.net Initial: 1/30/2004 Last Revised: 0 I was not happy with the valve described in the brake valve section Shay Steam Brake Valve
A /F/X Body Instruction Packet Rear Disc Conversion
 A /F/X Body Instruction Packet Rear Disc Conversion 64-72 A Body / 67-81 F Body / 62-74 X Body This kit is for axles with a 3 1/8 spread center to center on the top two bolt holes (pictured left). If your
ST1100 HID HEADLAMP CONVERSION
 ST1100 HID HEADLAMP CONVERSION HID lighting systems have become increasingly popular among the Long Distance Riding community within the last few years. The ability of HID lighting to cast light far down
Slave Cylinder Weep Hole Drilling Procedure
 Slave Cylinder Weep Hole Drilling Procedure Tools Required: T20 Torx Driver T25 Torx Driver T25 Torx Bit with ¼ Ratchet Wrench 4mm Hex Key (Allen wrench) 5mm Hex Key 6mm Hex Key 8mm Hex Key 12mm Hex Key
SXR 19" rear wheel conversion kit
 SXR 19" rear wheel conversion kit Updated 6/19/18 Street trackers, Dirt trackers and Hooligan racers need 19 wheels on the rear so they can get traction from dirt track tires only made in 19. My kits permit
Signature Series A/F/X Body GM Installation Instructions Rear Disc Conversion
 Signature Series A/F/X Body GM Installation Instructions Rear Disc Conversion 64-72 A Body / 67-81 F Body / 62-74 X Body This kit is for axles with a 3 1/8 spread center to center on the top two bolt holes
55-64 Full Size Chevy
 55-64 Full Size Chevy Installation Instructions Power Disc Conversion 9 slimline booster pictured Your new disc brake conversion kit can be bolted up with standard hand tools. The only tools you may not
Pictorial Installation : Schnitz 685cc piston kit for Kawasaki KLR650 Part 1: Disassembly by: JeremyZ
 - 1 - Pictorial Installation : Schnitz 685cc piston kit for Kawasaki KLR650 Part 1: Disassembly by: JeremyZ Note: This pictorial was conducted on a non-california, US model 2009 KLR650. On California and
APPLIED GMC / 1 (800) KATO RD. FREMONT, CA GMC ALL DISC BRAKE KIT
 KATO RD. FREMONT, CA GMC ALL DISC BRAKE KIT") APPLIED GMC 510-440-1101 / 1 (800) 752-7502 47626 KATO RD. FREMONT, CA 94538 GMC ALL DISC BRAKE KIT Shade Tree Mechanic's Guide to Disc Brake Upgrade Installation Instructions Written by: Edited by: Randy
APPLIED GMC 510-440-1101 / 1 (800) 752-7502 47626 KATO RD. FREMONT, CA 94538 GMC ALL DISC BRAKE KIT Shade Tree Mechanic's Guide to Disc Brake Upgrade Installation Instructions Written by: Edited by: Randy
**WARNING READ FIRST** If you are not familiar with series wiring or 12 volt wiring, we strongly suggest you have a professional finish the wiring.
 **WARNING READ FIRST** If you are not familiar with series wiring or 12 volt wiring, we strongly suggest you have a professional finish the wiring. Incorrect polarity or improper wiring may cause damage
Yamaha Manual Cam Chain Tensioner Drz400 Kawasaki Concours
 Yamaha Manual Cam Chain Tensioner Drz400 Kawasaki Concours Kawasaki concours 14 cold star after manual cam chain Installation. 98 Yamaha R1. Manual Cam Chain Tensioner Suzuki LTZ 400 Z400 DVX New, Manual
How I installed new brake pads on my i with Sport Package (should be fine for other E39 s) By Robert B.
 By Robert B.") How I installed new brake pads on my 1999 528i with Sport Package (should be fine for other E39 s) How I installed new brake pads on my 1999 528i with Sport Package (should be fine for other E39 s) By
How I installed new brake pads on my 1999 528i with Sport Package (should be fine for other E39 s) How I installed new brake pads on my 1999 528i with Sport Package (should be fine for other E39 s) By
Intake Kit Supplement for CRV and Pathfinder
 Intake Kit Supplement for CRV and Pathfinder This guide will briefly outline how to install the intake kits for the Honda CRV and Nissan Pathfinder. This is a pretty basic job, but for the average person
Converting a Chevy Non-positraction rear-end to a positraction rear using an Eaton posi unit.
 Converting a 56-62 Chevy Non-positraction rear-end to a positraction rear using an Eaton posi unit. Tom Parsons Non-posi unit Posi unit 1 Converting a 56-62 Chevy Non-positraction rear-end to a positraction
4TH GEN SEATS IN A 3RD GEN TRUCK
 4TH GEN SEATS IN A 3RD GEN TRUCK by Flopster843 02 Oct 2016 If you drive a 3rd generation Dodge Ram truck, I am sure you have discovered that the OEM seats are not the greatest (Figure 1.) They are extremely
Page 1. File: Motolight caliper one-piece Harley Date: 8/15/2006
 Page 1 Harley-Davidson FL Caliper Mount Installation One-piece mounting brackets You should allow about two to three hours for installation. We suggest you use a well-lighted space for installation. PLEASE
Char-Griller Smokin Pro Modifications
 Char-Griller Smokin Pro Modifications By Phil Lee aka HawgHeaven Right out of the box, the Char-Griller Smokin Pro has a few design deficiencies that need to be addressed, and are fairly easy to remedy.
Tach-Drive Distributor Reconditioning Joe Fisher PDF prepared by Dave Zuberer Link to Thread on the Corvette Forum (C1-C2)
") Tach-Drive Distributor Reconditioning Joe Fisher PDF prepared by Dave Zuberer Link to Thread on the Corvette Forum (C1-C2) I just finished two Corvette tach-drive distributors. One was a 71 small block
Tach-Drive Distributor Reconditioning Joe Fisher PDF prepared by Dave Zuberer Link to Thread on the Corvette Forum (C1-C2) I just finished two Corvette tach-drive distributors. One was a 71 small block
Thermo-Bob 3 Installation Manual: KLR650E (2008 and newer)
") Thermo-Bob 3 Installation Manual: KLR650E (2008 and newer) Thank you for purchasing the Thermo-Bob 3 radiator bypass system for the KLR650. Since the KLR already has a doohickey, it seemed that this thingamabob
Thermo-Bob 3 Installation Manual: KLR650E (2008 and newer) Thank you for purchasing the Thermo-Bob 3 radiator bypass system for the KLR650. Since the KLR already has a doohickey, it seemed that this thingamabob
60 76 A Body Mopar Power Disc Conversion Installation Instructions
 62-72 B & E BodyMopar 60 76 A Body Mopar Power Disc Conversion Installation Instructions Special A-Body only parts shown below (In addition to parts above for A-Body cars, part # MDC66DC & MDC46DC) Your
SS41HF Mitsubishi Pajero NS & NT V8/V9 Series 3.2 Litre Turbo Diesel (4M41 Engine) 3.8 Litre V6 Petrol (6G76 Engine)
 3.8 Litre V6 Petrol (6G76 Engine)") SS41HF Mitsubishi Pajero NS & NT V8/V9 Series 3.2 Litre Turbo Diesel (4M41 Engine) 3.8 Litre V6 Petrol (6G76 Engine) 21/7/2010 Parts List ITEM PART NO DESCRIPTION QTY 1 570-133-200 BODY - SNORKEL (SS41HF)
SS41HF Mitsubishi Pajero NS & NT V8/V9 Series 3.2 Litre Turbo Diesel (4M41 Engine) 3.8 Litre V6 Petrol (6G76 Engine) 21/7/2010 Parts List ITEM PART NO DESCRIPTION QTY 1 570-133-200 BODY - SNORKEL (SS41HF)
MGB V8 Roadster restoration project Report 138
 24th May 2017. FITTING THE CARPETS - continued I have included quite a lot of detail and photographs on the carpet and trim fitting, as it may help those who decide to do this job on their own car. The
Figure 1 Factory G50 update and old Shift Fork Shaft
 911 Clutch Job So you have one of the best 911s there is, a 87-89 G50 Porsche. However, after many years of service, it is time for a clutch. Maybe, the rubber clutch disc has failed, or the clutch is
Shotgun Single Barrel HPFP install guide
 Shotgun Single Barrel HPFP install guide Thank you for your purchase of the VTT Shotgun Single Barrel HPFP upgrade! First thing to do when you open your box is to make sure all parts are in their respective
RHINO SUSPENSION SYSTEM INSTALLATION INSTRUCTIONS
 PARTS INCLUDED: 2 FRONT UPPER A-ARMS 2 FRONT LOWER A-ARMS 2 UNI-BALL JOINTS 2 UNI-BALL JOINT STUDS 2 UNI-BALL JOINT CAPS 2 RETAINING RINGS 1 FRONT SHOCK ASSEM. 2 DELRON STEERING STOPS 2 SHOCK MOUNT SPACERS
JEEP Wrangler JK/JKU Swing-A-Way Tire Carrier/RotoPpax WARNINGS/CAUTIONS NOTE. INSTALLATION INSTRUCTIONS 2 Door Models 85209
 JEEP Wrangler JK/JKU Swing-A-Way Tire Carrier/RotoPpax 2007-2017 INSTALLATION INSTRUCTIONS Item Kit No. 2 Door Models 85209 4 Door Models 85209 WARNINGS/CAUTIONS These instructions are for both the can
Maybe Splash Guards Will Solve the Protection Need
 W A Technology GM Plastic Rocker Panel Film Removal sticky tires, especially when they are hot. It s difficult to see from pictures how very noticeable the plastic protectors are that GM installed on the
1986 Rear Disk Brake Upgrade. All hard lines mounted to the rear axle with mounting screws. 1/4" fittings
 1986 Rear Disk Brake Upgrade Being well prepared for a project of this size is the key to success. I thought I was well prepared by doing a lot of research and getting all of the required parts before
55-64 Full Size Chevy Installation Instructions Standard Disc Conversion
 55-64 Full Size Chevy Installation Instructions Standard Disc Conversion DBMC09, PV71 & PVB71 Pictured (Booster, master cylinder & valve setups may vary by upgrades selected) Your new disc brake conversion
Installation Manual. stairlift. A 4724 Neukirchen/W, Salling 8 Tel: 07278/ , Fax: 07278/ Mobil: 0664/
 Installation Manual Ω MEGA stairlift A 4724 Neukirchen/W, Salling 8 Tel: 07278/3514-15, Fax: 07278/3514-12 Email: office.lehner@gmx.at Mobil: 0664/1612980 CONTENTS OBSERVE THE FOLLOWING POINTS BEFORE INSTALLATION!...
Rekluse Motor Sports. The z-start Clutch GAS GAS. 200, 250, and strokes. 400 and strokes
 Rekluse Motor Sports The z-start Clutch GAS GAS 200, 250, and 300 2-strokes 400 and 450 4-strokes Installation Guide Copyright 2002-2004 Rekluse Motor Sports z-start Revision 3.000 RMS100 Gas Gas z-start
2018 MotoTrax. Track Kit Installation Manual
 2018 MotoTrax Track Kit Installation Manual 1 Preparing the bike 1) Put the motorcycle on a stand. 2) Remove stock drive chain 3) Remove the rear wheel 4) Remove the mud flap 5) Disconnect the suspension
BMW 2002 M42 Swap Notes-THIS IS NOT FINISHED
 BMW 2002 M42 Swap Notes-THIS IS NOT FINISHED This document is to help those that want to install an m42 into a BMW 2002. It is based around an e30 engine, trans, and wiring. You can use the e36 block/head/wiring
Setting up and adjusting SU/Hitachi carbs on the Datsun Roadster by Keith Williams. Service screw
 Setting up and adjusting SU/Hitachi carbs on the Datsun Roadster by Keith Williams Service screw This is the service screw it s only use it to raise the engine speed while adjusting the carbs. In normal
Projector39/Umnitza BMW Headlight & Re-Installation for E39s Predator Angel Eyes, and Lamin-X Installation
 Projector39/Umnitza BMW Headlight & Re-Installation for E39s Predator Angel Eyes, and Lamin-X Installation Now it is time to remove the headlights! Obviously you have to open the hood to do this. 100_3630.jpg
2014 F /6 LIFT KIT
 92157500 2014 F-150 4 /6 LIFT KIT THANK YOU FOR CHOOSING ROUGH COUNTRY FOR YOUR SUSPENSION NEEDS. Rough Country recommends a certified technician install this system. In addition to these instructions,
283F & 327F Engines : Distributor Cap Modification Kit Development Project
 283F & 327F Engines : Distributor Cap Modification Kit Development Project By Dick Morland Chris Craft offered the "F" series engines (283 F & 327 F) in Commanders from 23' to 35'. There are a lot of these
Front plate before plating and painting. Shifter plate with hole for exhaust cutout lever
 Jan 3: I had to make a mounting plate for the choke cable, which goes under the dash. Worked on the wires to route them to the gauges, it had been a challenge to determine where everything goes. Cleaned
Mopar 8 3/4 & 9 3/4 (Dana) Installation Instructions Rear Disc Conversion
 Installation Instructions Rear Disc Conversion") Mopar 8 3/4 & 9 3/4 (Dana) Installation Instructions Rear Disc Conversion This kit is for either Mopar 8 ¾ or Mopar 9 ¾ (Dana). This kit is designed to work with axles with either GM 5 x 4.75 Bolt Pattern
Mopar 8 3/4 & 9 3/4 (Dana) Installation Instructions Rear Disc Conversion This kit is for either Mopar 8 ¾ or Mopar 9 ¾ (Dana). This kit is designed to work with axles with either GM 5 x 4.75 Bolt Pattern
Rekluse Motor Sports. The z-start Clutch CRF 250X. Installation Guide Copyright 2002 Rekluse Motor Sports z-start Revision RMS116 CRF 250X
 Rekluse Motor Sports The z-start Clutch CRF 250X Installation Guide Copyright 2002 Rekluse Motor Sports z-start Revision 3.000 RMS116 CRF 250X 191-216 Manual Revision: 103105 Rekluse Motor Sports, inc.
Lincoln Mark VII T5 Swap Version submitted by 5.0 bird
 Lincoln Mark VII 1984-1989 T5 Swap Version 20070611 submitted by 5.0 bird I've decided to make an article to assist with the T5 swap for the 84-89 Mark VIIs, since I was just in there because my DOA didn't
82-04 S-10 and Midsize GM --- Rear Disc Brake Conversion
 82-04 S-10 and Midsize GM --- Rear Disc Brake Conversion 82-04 S-10 and Midsize GM --- Rear Disc Brake Conversion EARLY STYLE 82-92 S-series trucks 78-04 G-body and some F-body LATE STYLE 92-03 S-series
2k2GT Registered User
 1 of 44 7/22/2009 01:17 Corral Forums > Modular Tech Forums > GT & SOHC My J.R. Granatelli K-member install story...56k death Welcome, xomp. You last visited: Today at 12:07 AM Private Messages: Unread
Rear Wheel Removal (by BassCliff)
") Rear Wheel Removal (by BassCliff) Hello to my GS riding friends! After picking up a nail in my rear tire (while on the freeway at 75mph!) I thought I would take a few pictures to help illustrate the rear
Rear Wheel Removal (by BassCliff) Hello to my GS riding friends! After picking up a nail in my rear tire (while on the freeway at 75mph!) I thought I would take a few pictures to help illustrate the rear
Hard Bar Sport, M1/M2 Hard Core Hardtop, M2 Sport, and Xtreme Installation Instructions
 HARDWARE KIT: Hard Bar Sport, M1/M2 Hard Core Shoulder Harness Guide Relocation Assemblies: 2-3/8" X 1" grade 8 bolts 4-3/8" flat washers 2-3/8" lock nuts 2 - brass bushings 2 - plastic trim caps 2-3/8"