INSTRUCTIONS ON HOW TO R & R YOUR Swingarm
|
|
|
- Ginger Holland
- 6 years ago
- Views:
Transcription
1 R and R Your Swingarm INSTRUCTIONS ON HOW TO R & R YOUR Swingarm Upgrade Your Pre-2002 FL Or FXR Rear Fork & Get Rid Of The Crappy & Dangerous (Cleve Blocks) & Replace Them With A Stable System. R & R your Swing Arm, Belt Drive, Swing Arm Pivot Shaft, and Rear Wheel. The paragraphs below are a photo journey into the replacement of a FL or FXR swing arm. To upgrade the pre 2002 FL, here is a How-To on cheaply replacing the poor parts Harley stuck you with. Now - Let s Get Er Done Pre had weak swing arms and are known to fail. The cleve blocks are the cause of Rear Steer or Rear Fork Deflection. Harley came up with a patch in 2002, using bearings. Because the pre 2002 transmissions have a 5/8 mounting hole for the 5/8 swing arm pivot shaft, a conversion unit has been made. No transmission removal for boring is necessary. Under no circumstances, do I recommend drilling out the transmission case with a hand drill. The drill will wander (drift)! Solution: Go to either a trike shop/manufacturer, e-bay, or shop and buy a new style swingarm. Harley made an additional upgrade in 2007, try and buy this type 2007 & above). If upgrading to a 2008, Harley use 25mm (smaller than 1 ) axles & wheel bearings, you will have to use 25mm bearings. With that said, let s get on with it. In the case of a 2007 swingarm; buy and do not pay over $40 for the swing arm and axle. You must use the corresponding axle as a ¾ axle set-up is different (along with wheel bearings & spacers). You positively can not use a pre HD stock wheel because the wheel bearing spacer will fit into the wheel. Buy 2002 & above style wheels as they (9 spoke) are cheep. You are going to have to either bore out your stock rear caliper bracket or better still, upgrade your whole rear brake to the new model & sell yours on e-bay. I recommend doing the following before hand and have it ready for installation; Remove bearings et al. from the 2002 & later swing arm via press. Bike Work: Jack up your bike using a center jack. Secure the bike so it will not fall over. You can also use a motorcycle jack. I use a motorcycle dolly
 table with the dolly strapped to the bike in place of a motorcycle jack.")
.")
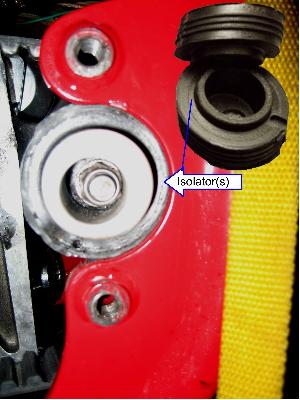
2 and a cherry picker crane. Than I use the crane to put the bike on a (Handy) table with the dolly strapped to the bike in place of a motorcycle jack. I than strap the dolly and the front end along with the rear of the bike to the (Handy) table. This helps greatly when using the Saws-All to remove the stubborn swingarm (should be your last option). Remove your rear wheel & set aside, make sure you use a brass drift pin for axle removal. This is what you have in your original swingarm (Cleve Blocks)

3 As per Harley manual; remove, foot pegs, primary case, clutch, et al., inner primary. Should look like this. Remember to cut wedge 2X4 blocks and force them under the cross member & both sides of the transmission. With the inner primary removed, use a strap & ratchet to support the transmission.

4 Remove your pivot shaft by removing the nuts off the shaft. This is a great time to inspect the threads as the nut should tighten fairly freely.

5 In the event that your pivot shaft will not come out (frozen) use a Saws-All in the areas indicated & remove the swingarm. This is not a walk in the park, however, you will remember to use Anti Seize on your shaft & axle from now on.

6
 and put the new rear fork back into the bike.")
7 With both nuts off the pivot shaft, make sure your pivot shaft is straight by rolling it on a piece of glass. This is very important! Put the belt back on (make sure you do not forget this as you will be pissed & have to start all over) and put the new rear fork back into the bike. Replace the pivot shaft (Anti Seize) thru the rear fork and transmission. Put back the isolators while noticing relationship between the (in this case roll pins in the swingarm) mounting blocks (Pivot End Caps)location. You will also notice the mounting holes in the isolator do not share the same axis as the isolators mounting shoulder. This is very important.

8 Replace the pivot pin nuts.

9 Make final adjustments to the isolators before installing the swingarm mounting block in relationship to the (in this case) roll pins. If you are using my kit rotate the outer support bushing than install the swingarm mounting blocks to the frame. Align the wheel properly with a straight edge. Belt drive should be moved out of the way. The rear wheel should be installed and tightened with all spacers for operational use. NOTE* You find that In the picture it shows the pivot bolt and swingarm mounting blocks off, however, they must to be installed and tightened for operational use. (my mistake in not taking a this step). Install the belt drive back on the wheel pulley R & R axle & needed spacers and tighten axle, than button her up. You should be good to go. Vibrations will be more pronounced but will diminish in a short period of time. This fix is in the place of any type of Truest Trax's, Strided 88, or other band-aid (which are much better than doing nothing) fix. Make sure when installing your inner primary you:
. Make sure all metal tabs are good. Leaks suck! Replace the starter seal.")
10 o o o Apply a "ring" of good quality silicone around the 6 bolts that hold the primary onto the (4) motor & (2) transmission (4 inside of the primary & 2 on the front outside). Apply Locktight under this ring (on the threads). Make sure all metal tabs are good. Leaks suck! Replace the starter seal. It is cheap insurance & you will be pissed if it leaks & you have to do it all over again. Red Locktight the motor and transmission shaft nuts. Remember that the transmission shaft is left handed thread. o I use a thin skim coating of ThreeBond 1194 or other locally avail;able product such as (YamaBond 4 Discontinued By Yamaha), Honda 4, Kawasaki semi sealer and Suzuki sealant are all the same. This has replaced Three Bond TB-1104 with ThreeBond 1194./ It is a semidrying liquid gasket whose major component is special synthetic rubber. This patch fix will work until I re-design the wheel and come out with my new Carbon Fiber swingarm that is mounted much differently (the way Harley should have done it) using no frame modifications and will contain the missing 3rd link for stability and control "Rear Steer". The project is being worked on for your FL Bagger. This carbon fibered frame and swingarm is currently being tested at the track with a 200+ HP motor under real duress. Everything I do is developed and starts out at the track. Do you think this extreme testing will make for a great Harley product? As with all my products, we use them before you ever read about them. I do not use my customers for test subjects, we have highly paid professionals (my friends who love to ride & drink beer) for that. A hint of things to come for your Bagger: Why, what is its purpose? Less un-sprung weight (smoother ride) and reducing the weight of
11 your bagger. We aim to make them handle. I see in the future a 600 lb. full dresser with over 150 hp that will convert right at the Hotel front door with removable body parts, and rise like a Phoenix into a fun "Canyon Carver" with the smooth touring characteristics masked with just the turn of a few knobs. A true "Un-Dresser". My Front Superbike Suspension, Carbon Fiber Wheels, Metal Matrix Composite Rotors, Motorcycle Metal/Penske rear shocks, Carbon Fiber Rear Swingarm (Fork) and updated Aerodynamic Carbon Fiber Bodywork. `ÉàÉÜvçvÄxÅxàtÄAvÉÅ \ÇvA 5490 S.W. 42nd St. Davie, FL Toll free Local
R O A D S M I T H TRIKE CONVERSIONS BY THE TRIKE SHOP
 R O A D S M I T H TRIKE CONVERSIONS BY THE TRIKE SHOP Please thoroughly review the instructions before and during installation. Keep in mind that this product was designed to be installed by trained dealer
Installation Guide. Sportster. 34 Sport Trike Kit 2004 & UP
 Installation Guide Sportster 34 Sport Trike Kit 2004 & UP INCLUDED IN YOUR TRIKE KIT: COMPONENTS Frankenstein Trikes Rear End 2 Sport Shocks Swing Arm 2 Sport Fenders 2 Fender Brackets 10 lug nuts 1 2
Installation Guide. Sportster. 34 Sport Trike Kit & Down
 Installation Guide Sportster 34 Sport Trike Kit 2003 & Down INCLUDED IN YOUR TRIKE KIT: COMPONENTS Frankenstein Trikes Rear End 2 Sport Shocks Swing Arm 2 Sport Fenders 2 Fender Brackets 10 lug nuts 1
R O A D S M I T H TRIKE CONVERSIONS BY THE TRIKE SHOP
 R O A D S M I T H TRIKE CONVERSIONS BY THE TRIKE SHOP Please thoroughly review the instructions before and during installation. Keep in mind that this product was designed to be installed by trained dealer
Installation Guide. Yamaha Bolt. 36 Light Sport 200 Trike Kit. All Years
 Installation Guide Yamaha Bolt 36 Light Sport 200 Trike Kit All Years INCLUDED IN YOUR TRIKE KIT: COMPONENTS Frankenstein Trikes Rear End Swing Arm 2 Fenders 2 Fender Brackets 10 lug nuts 1 2 Pacer 15
Installation Guide. Yamaha. 40 Sport Trike Kit All Years
 Installation Guide Yamaha 40 Sport Trike Kit All Years INCLUDED IN YOUR TRIKE KIT: COMPONENTS Frankenstein Trikes Rear End Swing Arm Body Body Mounting Bracket 10 lug nuts 1 2 American Eagle 15 X 8 wheels
Installation Instructions
 Installation Instructions for Harley Tri-Glide Trike Step 1 Step 2 Remove trike body and set aside Disassemble the rear suspension. Set aside the differential, ring gear, pulley, differential clamps, wheel
FULL FLOATER HUB KIT INSTRUCTION MANUAL
 FULL FLOATER HUB KIT INSTRUCTION MANUAL WARNING: All components are shipped assembled for illustration purposes only. IT IS YOUR RESPONSIBILITY FOR FINAL ASSEMBLY. Please read instructions thoroughly before
R O A D S M I T H TRIKE CONVERSIONS BY THE TRIKE SHOP
 R O A D S M I T H TRIKE CONVERSIONS BY THE TRIKE SHOP Please thoroughly review the instructions before and during installation. Keep in mind that this product was designed to be installed by trained dealer
Rear Axle Hub, Bearing, Cup, and/or Seal Replacement
 Page 1 of 11 Rear Axle Hub, Bearing, Cup, and/or Seal Replacement Special Tools J 8092 Universal Driver Handle - 3/4 inch - 10 J 2222-C Wheel Bearing Nut Wrench J 24426 Wheel Bearing Race Installer - Outer
R O A D S M I T H TRIKE CONVERSIONS BY THE TRIKE SHOP
 R O A D S M I T H TRIKE CONVERSIONS BY THE TRIKE SHOP Please thoroughly review the instructions before and during installation. Keep in mind that this product was designed to be installed by trained dealer
R O A D S M I T H TRIKE CONVERSIONS BY THE TRIKE SHOP
 R O A D S M I T H TRIKE CONVERSIONS BY THE TRIKE SHOP Please thoroughly review the instructions before and during installation. Keep in mind that this product was designed to be installed by trained dealer
NEW BRAKE INSTALLATION. Let us show you how a
 Tech Article From Newsletter 17.2-2nd Quarter of 2011 NEW BRAKE INSTALLATION Let us show you how a Big Brake Install is easier than you think!! So, you have a 572 (or a hot 383) in your shoebox... you
1996+ Yamaha G16 / G22 Yamaha G29/YDRA Drive
 Vegas Carts & Performance 2995 Coleman St North Las Vegas, NV 89032 702-530-7753 VegasCarts.com 625cc Big Block Installation Instructions 1996+ Yamaha G16 / G22 Yamaha G29/YDRA Drive Revised 8/6/2018 1
Installation Guide. Sportster 34 Sport Trike Kit
 Installation Guide Sportster 34 Sport Trike Kit INCLUDED IN YOUR TRIKE KIT: COMPONENTS HARDWARE PULLEY MOUNTING 5 pcs. - 7/16-14 x 1 ½ Grd. 8 (Gold) Bolt 5 pcs. - 7/16 Lock Washer 34 Light Sport Rear End
Flt/Flh Road King 38 Sport Trike Kit. Installation Guide
 Flt/Flh Road King 38 Sport Trike Kit Installation Guide INCLUDED IN YOUR TRIKE KIT: COMPONENTS HARDWARE 38 Sport Std. Rear End Swing Arm PULLEY MOUNTING 5 pcs. - 7/16-14 x 2 Grd. 8 (Gold) Bolt (2000 &
WARNING: the engine does not come with oil in it. Please fill the oil before starting. The 200cc hardknock requires 9/10 of a quart of oil.
 WARNING: the engine does not come with oil in it. Please fill the oil before starting. The 200cc hardknock requires 9/10 of a quart of oil. Things needed for assembly. -2 tubes of blue loc-tite. I don
Repair of rear shock absorbers.
 Repair of rear shock absorbers. I guess everyone owns an Aquila knows the rear shocks are not the strongest elements in this bike. Just ride with a passenger on relatively level roads and you quickly feel
HEIDTS SUPERIDE IRS INSTALLATION INSTRUCTIONS INDEPENDENT REAR SUSPENSION
 HEIDTS SUPERIDE IRS INDEPENDENT REAR SUSPENSION Please read these instructions completely before starting your installation. Remember the basic rule for a successful installation: Measure Twice, Weld Once.
MGB V8 Roadster restoration project - 145
 11th June 2017. The MGB V8 rebuild is getting near to being finished. The exhaust manifold this side was a lot easier to fit than the left hand side. I could get my 3/8 drive Allen key socket onto the
Installation Guide. V-Rod. 38 Sport Trike Kit. All Years
 Installation Guide V-Rod 38 Sport Trike Kit All Years INCLUDED IN YOUR TRIKE KIT: COMPONENTS Frankenstein Trikes Rear End Swing Arm 2 Sport Fenders 2 Fender Brackets 10 lug nuts 2 American Eagle 15 X 8
Our goal is to make the install a breeze. Please read the entire guide before beginning.
 www.airkewld.com Page 1 of 6 IRS Axle Kit Install IRS Axle Kit Install Our goal is to make the install a breeze. Please read the entire guide before beginning. KITS SHOULD INCLUDE 2 - Control-arm mounting
Page 1. File: Motolight caliper one-piece Harley Date: 8/15/2006
 Page 1 Harley-Davidson FL Caliper Mount Installation One-piece mounting brackets You should allow about two to three hours for installation. We suggest you use a well-lighted space for installation. PLEASE
186A2 186A2DD N187-1 N187SD
 Axle Kits For Paughco Springers 186A2 186A2DD Axle Kits For Paughco Wide Half-Round Springers These 3/4"-diameter axle kits are intended for use with Paughco s 181 Wide Springers (see pages 30 and ), and
SV Ignition Key Install 1
 SV Ignition Key Install 1 Instruction Text and Photos by: Pat (Reddog99, socalsvriders.com) Originally posted http://www.socalsvriders.com/forums/showthread.php?s=&threadid=2305 First, a disclaimer and
Installation Instructions
 Installation Instructions Rear Disc Brake Conversion Kit Item # RC2001, RC2001X Applications: Mopar 8-3/4 & 9-3/4 Rear Axles Thank you for choosing Leed Brakes for your automotive product needs. Before
55-64 Full Size GM (Impala, Bel Air, etc.) This kit is for axles with a 3 3/8 spread center to center on the top two bolt holes (pictured left).
 This kit is for axles with a 3 3/8 spread center to center on the top two bolt holes (pictured left).") SUM-BK1624A Full Size GM Installation Instructions Rear Disc Conversion 55-64 Full Size GM (Impala, Bel Air, etc.) This kit is for axles with a 3 3/8 spread center to center on the top two bolt holes (pictured
SUM-BK1624A Full Size GM Installation Instructions Rear Disc Conversion 55-64 Full Size GM (Impala, Bel Air, etc.) This kit is for axles with a 3 3/8 spread center to center on the top two bolt holes (pictured
CLASSIC MOTORCYCLE RESTORATION
 2.6 A good hammer helps with tasks such as knocking out rusted-in spindles, bushes, and shafts, gently easing in or out bolts or bushes, or gently tapping the end of the screwdriver to help split mating
A /F/X Body Instruction Packet Rear Disc Conversion
 A /F/X Body Instruction Packet Rear Disc Conversion 64-72 A Body / 67-81 F Body / 62-74 X Body This kit is for axles with a 3 1/8 spread center to center on the top two bolt holes (pictured left). Rotor
Rear Wheel Removal (by BassCliff)
") Rear Wheel Removal (by BassCliff) Hello to my GS riding friends! After picking up a nail in my rear tire (while on the freeway at 75mph!) I thought I would take a few pictures to help illustrate the rear
Rear Wheel Removal (by BassCliff) Hello to my GS riding friends! After picking up a nail in my rear tire (while on the freeway at 75mph!) I thought I would take a few pictures to help illustrate the rear
DYNA EVO & T.C. MODELS 91-05
 ASSEMBLY DIAGRAM AND ASSEMBLY REFERENCE ULTIMA OLD SCHOOL 2 BELT DRIVE UNITS DYNA EVO & T.C. MODELS 91-05 Part # 58-900 2 BELT DRIVE ASSEMBLY REV 1-20-10 ASSEMBLY DIAGRAM AND ASSEMBLY REFERENCE ULTIMA
Installation Instructions
 Installation Instructions Rear Disc Brake Conversion Kit Item # RC4001, RC4001X Applications: Mopar 7.25, 8.25, 9.25 Axles Thank you for choosing Leed Brakes for your automotive product needs. Before you
JBrake.com Made in the U.S.A. Forums.SuperTrapp.com P:
 Master Index 3 FORWARD CONTROLS & PEGS: J-FL Forward Controls 131 Classic Solid Forward Controls 132-133 Radial Slotted Forward Controls 134-135 J-FX Forward Controls 136-137 Pegs 138-139 HAND CONTROLS
This is a hobby website dedicated to the Kawasaki KLR650 motorcycle. I make no claim concerning the
 KLR650 Homepage Contact Me You must remove the "REMOVE-THIS" in my email address for it to work. This is a hobby website dedicated to the Kawasaki KLR650 motorcycle. I make no claim concerning the accuracy
 This document provides instructions for removing and installing a rear shock absorber on a Ducati Superbike with a single-sided swingarm. The torque values used are for the 748/916/996 from 1994 to 2001
DYNA EVO & T.C. MODELS 91-05
 ASSEMBLY DIAGRAM AND ASSEMBLY REFERENCE ULTIMA OLD SCHOOL 2 BELT DRIVE UNITS DYNA EVO & T.C. MODELS 91-05 Part # 58-900 2 BELT DRIVE ASSEMBLY REV 10-22-14 ASSEMBLY DIAGRAM AND ASSEMBLY REFERENCE ULTIMA
Sherco Setup and Lubrication Guide
 Sherco Setup and This guide is designed to provide the Sherco owner with instructions on how to: Set up a new bike Clean and re-oil the air filter Change the transmission oil Change the fork oil Repack
Sportster 34 Sport Trike Kit
 Sportster 34 Sport Trike Kit INCLUDED IN YOUR TRIKE KIT: COMPONENTS HARDWARE PULLEY MOUNTING 5 pcs. - 7/16-14 x 1 ½ Grd. 8 (Gold) Bolt 5 pcs. - 7/16 Lock Washer 34 Light Sport Rear End FENDER MOUNTING
EVO-1085 JK DoubleD Long Arm Upgrade. EVO /37 JK DoubleD LongArm Kit
 EVO-1085 JK DoubleD Long Arm Upgrade EVO-1084-35/37 JK DoubleD LongArm Kit (EVO-1084 pictured above with Bilstein 5100 Shocks and optional EVO HD Swaybar Endlinks) NOTES: Cutting and grinding is required
Permatex products can also be used for other applications on Dirt Bikes, Cruisers, ATVs, Side-by-Sides / UTVs, Scooters and more!
 MotorcycleChecklist Ext.ai 8/7/08 10:41:50 AM P E R M AT E X P R O D U C T Recommendations for Maintenance Keep it together with P E R M AT E X ADHESIVES & SEALANTS 80328 Permatex Weatherstrip Cement,
IRS-151 INSTALLATION INSTRUCTIONS `55-57 CHEVY INDEPENDENT REAR SUSPENSION
 IRS-151 INSTALLATION INSTRUCTIONS `55-57 CHEVY INDEPENDENT REAR SUSPENSION Please read these instructions completely before starting your installation. Remember the basic rule for a successful installation:
No Drill Modern Gas Shock Installation on a 1931 Ford Model A Coupe
 No Drill Modern Gas Shock Installation on a 1931 Ford Model A Coupe Today we are not going to cover something new but just a little insider info in to what we do during our time off at Apex Tool Company.
Installation Notes: #86000-R Race Series +3.5 L/T Kit
 159 North Maple St. Unit J, CORONA CA 92880 P. 951-737-9682 F. 951-737-9006 WWW.CHAOSFAB.COM Installation Notes: #86000-R Race Series +3.5 L/T Kit Factory manual is recommended for removal and re-installation
Installation Instructions
 Installation Instructions Rear Disc Brake Conversion Kit Item # RC1001, RC1001X Applications: 64-72 A-body, 67 F-Body, 63-67 X-body with Non Staggered Shocks Thank you for choosing GPS Auto for your automotive
2010+ Victory Cross Country / Cross Roads Installation Guide Nov 2014
 2010+ Victory Cross Country / Cross Roads Installation Guide Nov 2014 125 Industrial Drive Spearfish, SD 57783 Toll Free 888.3WHEELS w w w. l e h m a n t r i k e s. c o m UNDERSTANDING SAFETY LABELS &
ALIGNING A 2007 CADILLAC CTS-V
 ALIGNING A 2007 CADILLAC CTS-V I ll describe a four-wheel alignment of a 2007 Cadillac CTS-V in this document using homemade alignment tools. I described the tools in a previous document. The alignment
INSTALLATION INSTRUCTIONS FOR THE MOTOR TRIKE CROSS COUNTRY / CROSS ROADS / HARD BALL RAKE KIT
 INSTALLATION INSTRUCTIONS FOR THE MOTOR TRIKE CROSS COUNTRY / CROSS ROADS / HARD BALL RAKE KIT Thank you for choosing the Motor Trike Cross Country / Cross Roads / Hard Ball rake kit. We ask that you read
05/06 Gsxr 1000 Clutch Mod
 By: Ali (Jetspeedz) 05/06 Gsxr 1000 Clutch Mod Parts: 21472-41G10 - WASHER, CLUTCH - $10.09 From 06 Gsxr 750 Opt: 11482-40F00 - GASKET, CL COVER - $8.29 Tools: 13/64 Drill bit, 30mm, 12mm, 10mm, 8mm sockets,
KIT # CSS-C SUSPENSION LIFT KIT
 14385 Veterans Way Moreno Valley, CA 92553 Phone: (951) 571-0212 Fax: (951) 571-0215 2001-2010 CHEVROLET SILVERADO 1500 AND 2500 HD 4WD AND 2WD PICK-UP 1999-2010 CHEVY 2500 4WD PICK-UPS 2001-2010 2500
PPM-8022 / PPM-8042 JEEP JK STAGE 2 SYNERGY SUSPENSION SYSTEM Version 1
 POLY PERFORMANCE MFG. 870 INDUSTRIAL WAY, SAN LUIS OBISPO, CA (805) 242-0397 PPM-8022 / PPM-8042 JEEP JK STAGE 2 SYNERGY SUSPENSION SYSTEM Version 1 GENERAL NOTES: These instructions are also available
How To Build A Mini Chopper!
 How To Build A Mini Chopper! by Custom-Choppers-Guide.com Copyright All Rights Reserved. If you are new to such projects, it is strongly recommended that you do an assembly job, purchasing pre-constructed
EVO-1063 JK Enforcer System
 EVO-1063 JK Enforcer System QTY PART# DESCRIPTION 1 EVO-760008 BOX#1 32x10x6.5 1 EVO-11022B EVO Front Lower Control Arm, Driver 1 EVO-11023B EVO Front Lower Control Arm, Pass 1 EVO-10080B Rear Trackbar
PPM-8023 / PPM-8043 JEEP JK SYNERGY STAGE 3 SUSPENSION SYSTEM Version 1
 SYNERGY MFG. 870 INDUSTRIAL WAY, SAN LUIS OBISPO, CA (805) 242-0397 PPM-8023 / PPM-8043 JEEP JK SYNERGY STAGE 3 SUSPENSION SYSTEM Version 1 GENERAL NOTES: These instructions are also available on our website;
MAKING YOUR DREAMS A REALITY. FITTING INSTRUCTIONS APRILIA RS125 Exhaust System EXCS-0019
 MAKING YOUR DREAMS A REALITY FITTING INSTRUCTIONS APRILIA RS125 Exhaust System EXCS-0019 The TYGA Performance Aprilia RS-125 Stainless Steel chamber, when used with a TYGA silencer, offers huge saving
BRUTE IV EXTREME TM BELT DRIVE FOR 1990 TO 2005 EVO & TWIN CAM Dyna Models
 INSTALLATION INSTRUCTIONS FOR BRUTE IV EXTREME TM BELT DRIVE FOR 1990 TO 2005 EVO & TWIN CAM Dyna Models PLEASE NOTE: PICTURES CONTAINED WITHIN THIS INSTRUCTION SHEET ARE ALSO USED FOR OTHER INSTRUCTIONS,
Trike Conversion Installation Guide Kawasaki Vulcan 900 Classic, Classic LT, and Custom Models 2007 and Up Solid Axle Suspension
 Trike Conversion Installation Guide Kawasaki Vulcan 900 Classic, Classic LT, and Custom Models 2007 and Up Solid Axle Suspension CAUTION: -Failure to make the proper adjustments will potentially lead to
INSTALLATION INSTRUCTIONS CHEVROLET NOVA (NVR-301) INDEPENDENT REAR SUSPENSION
 INDEPENDENT REAR SUSPENSION") INSTALLATION INSTRUCTIONS 68-74 CHEVROLET NOVA (NVR-301) INDEPENDENT REAR SUSPENSION Please read these instructions completely before starting your installation. Assemble suspension on vehicle before powder-coating
INSTALLATION INSTRUCTIONS 68-74 CHEVROLET NOVA (NVR-301) INDEPENDENT REAR SUSPENSION Please read these instructions completely before starting your installation. Assemble suspension on vehicle before powder-coating
Learning to Set-Up Your Warrior Drive Belt Arizona Warrior (Rev4) BEFORE GETTING STARTED
 BEFORE GETTING STARTED") BEFORE GETTING STARTED 1. A noise one guy calls 'howling' is the same noise another guy calls 'squealing' so unless you are both hearing the noise with your own ears its better to not assume a drive belt
BEFORE GETTING STARTED 1. A noise one guy calls 'howling' is the same noise another guy calls 'squealing' so unless you are both hearing the noise with your own ears its better to not assume a drive belt
How To Install A Manual Clutch In Your XR / CRF 50 By Dan Navarrete
 How To Install A Manual Clutch In Your XR / CRF 50 By Dan Navarrete C1. One of the biggest performance upgrades you can make to your XR or CRF 50 is to replace the stock semi auto clutch with a fully manual
ACE 325/570 2 Lift Kit
 ACE 325/570 2 Lift Kit Polaris Ace 325/570 2014+ Part #: 5101244 Rev. 082316 491 W. Garfield Ave., Coldwater, MI 49036. Phone: 517-278-7768 E-mail: sales-rtpro@sporttruckusainc.com SAFETY WARNING RT Pro
Helpful Installation Hints
 Helpful Installation Hints Because most suspensions travel in arc, the use of a lift or supporting the vehicle by the frame and allowing the wheels to hang can cause bar misalignment and installation difficulties.
Mopar 8 3/4 & 9 3/4 (Dana) Installation Instructions Rear Disc Conversion
 Installation Instructions Rear Disc Conversion") Mopar 8 3/4 & 9 3/4 (Dana) Installation Instructions Rear Disc Conversion This kit is for either Mopar 8 ¾ or Mopar 9 ¾ (Dana). This kit is designed to work with axles with either GM 5 x 4.75 Bolt Pattern
Mopar 8 3/4 & 9 3/4 (Dana) Installation Instructions Rear Disc Conversion This kit is for either Mopar 8 ¾ or Mopar 9 ¾ (Dana). This kit is designed to work with axles with either GM 5 x 4.75 Bolt Pattern
Rusty's WJ Steering and Brake Conversion
 Rusty's Off-Road Products 7161 Steele Station Rd. Rainbow City, AL 35906 techline: 256-442-0607 www.rustysoffroad.com Rusty's WJ Steering and Brake Conversion PART #: RS-BC999-UV APPLICATION: XJ,TJ,ZJ
Carli Suspension Front Instructions
 Carli Suspension Front Instructions 94-08 DODGE 2500-3500 4X4 SUSPENSION SYSTEM Note: Prior to installation, carefully inspect the vehicle=s steering and drive train components. Be sure to check ball joints,
Full Size GM Installation Instructions
 Full Size GM Installation Instructions Rear Disc Conversion 55 64 Full Size GM (Impala, Bel Air, etc.) This kit is for axle with a 3 3/8 spread center to center on the top two bolt holes (pictured left).
CHASSIS CONTENTS EXTERIOR PARTS 7-1 FRONT WHEEL 7-2 FRONT BRAKE 7-6 HANDLEBARS 7-13 FRONT FORK 7-15 STEERING 7-23 REAR WHEEL 7-26 REAR BRAKE 7-30
 CHASSIS CONTENTS EXTERIOR PARTS 7- FRONT WHEEL 7-2 FRONT BRAKE 7-6 HANDLEBARS 7-3 FRONT FORK 7-5 STEERING 7-23 REAR WHEEL 7-26 REAR BRAKE 7-30 REAR SHOCK ABSORBER 7-32 SWING ARM 7-33 7 7- CHASSIS EXTERIOR
Why Does Your Harley Davidson Wobble?
 Why Does Your Harley Davidson Wobble? By Tim Stone (2016-Sept) The rubber mounted Harley is a great thing. It provides us with an enjoyable (and distinctive) riding experience. The design however lacks
PPM-D44538RJK JK Rear 5.38 Ring and Pinion Installation Instructions Version 1
 PPM-D44538RJK JK Rear 5.38 Ring and Pinion Installation Instructions Version 1 GENERAL NOTES: Gear set up and installation should be performed by someone experienced in gear and axle set up Special tools
Installation. Installation Instructions Monotube Cartridge Fork Kit 97-Later* Harley Davidson FLH/FLT
 Installation Instructions Monotube Cartridge Fork Kit 97-Later* Harley Davidson FLH/FLT ATTENTION Statements in these instructions that are preceded by the following words are of special significance:
The Ryan Overdrive by Tom Endy
 The Ryan Overdrive by Tom Endy The Ryan overdrive is a factory built overdrive designed for the Model a Ford. They were manufactured in Denver, Colorado and marketed between 1990 and 2000. They were discontinued
MOTOX 70cc Assembly Manual
 MOTOX 70cc Assembly Manual Assembly Manual This manual should be considered a permanent part of the motorcycle and should remain if it is resold. This manual contains the latest product information available
CHASSIS CONTENTS EXTERIOR PARTS 6-1 FRONT WHEEL 6-2 FRONT BRAKE 6-6 HANDLEBARS 6-12 REAR WHEEL 6-30 REAR BRAKE 6-34 REAR SHOCK ABSORBER 6-36
 CHASSIS CONTENTS EXTERIOR PARTS 6-1 FRONT WHEEL 6-2 FRONT BRAKE 6-6 HANDLEBARS 6-12 FRONT FORK ( ) 6-14 FRONT FORK ( ) 6-20 STEERING 6-27 REAR WHEEL 6-30 REAR BRAKE 6-34 REAR SHOCK ABSORBER 6-36 6 SWING
Now we re ready to install our new mounts. The picture on the right shows our old and new for comparison.
 Well I didn t have a chance to write last week so we have a little catching up to do. Last Sunday I started out with setting up a jig to weld in the mounts. The jig is made out of a old fork tube that
Thanks for Ordering The Kawasaki KLX Adjustable Lowering Kit From
 www.scootworks.com Thanks for Ordering The Kawasaki KLX Adjustable Lowering Kit From READ THIS BEFORE UNPACKING YOUR KIT! This instruction booklet contains detailed steps for installing the rear suspension
Safety First. Please remember to always use SAFE shop practices when performing all service procedures.
 Safety First Please remember to always use SAFE shop practices when performing all service procedures. 2006 Update Manual January 2006 Country Clipper 2006 Update Manual Index Joystick Kill Switch Oil
HOME OF PRIMO BELT DRIVES QUALITY & PERFORMANCE SINCE 1973 BRUTE FORCE TM. Belt Drive INSTALLATION INSTRUCTIONS
 HOME OF PRIMO BELT DRIVES QUALITY & PERFORMANCE SINCE 1973 BRUTE FORCE TM Belt Drive INSTALLATION INSTRUCTIONS 3-1/2 WIDE / 14mm BELT FITS 1990-2006 EVO & TWIN CAM SOFTAIL PRIMO BRUTE FORCE TM BELT DRIVE
TRANSMISSION 6.7 GENERAL HOME. See Figure The transmission is a five-speed constantmesh type housed in an extension of the crankcase.
 TRANSMISSION 6.7 GENERAL See Figure 6-46. The transmission is a five-speed constantmesh type housed in an extension of the crankcase. b06x6x Neutral st Gear Mainshaft Mainshaft 4 5 4 5 Countershaft Out
TRANSMISSION 6.7 GENERAL HOME. See Figure The transmission is a five-speed constantmesh type housed in an extension of the crankcase.
 TRANSMISSION 6.7 GENERAL See Figure 6-45. The transmission is a five-speed constantmesh type housed in an extension of the crankcase. Mainshaft Neutral Mainshaft st Gear b06x6x Countershaft 4 Out 5 Countershaft
Thanks for Ordering The Honda VLX Adjustable Lowering Kit from READ THIS BEFORE UNPACKING YOUR KIT!
 Thanks for Ordering The Honda VLX Adjustable Lowering Kit from READ THIS BEFORE UNPACKING YOUR KIT! This instruction booklet contains detailed steps for installing the Adjustable Lowering kit on your Honda
How To Install A Manual Clutch In Your XR / CRF 50 By Dan Navarrete
 How To Install A Manual Clutch In Your XR / CRF 50 By Dan Navarrete C1. One of the biggest performance upgrades you can make to your XR or CRF 50 is to replace the stock semi auto clutch with a fully manual
INSTALLATION MANUAL FOR ROCK KRAWLER SUSPENSION, INC. LIBERTY, GRAND CHEROKEE, AND COMMANDER 3.5 X FACTOR SUSPENSION SYSTEMS THIRD EDITION 02/04/08
 INSTALLATION MANUAL FOR ROCK KRAWLER SUSPENSION, INC. LIBERTY, GRAND CHEROKEE, AND COMMANDER 3.5 X FACTOR SUSPENSION SYSTEMS THIRD EDITION 02/04/08 Dear customer: Thank you for purchasing the best engineered
V PN 4-155N1-K (N1 Shift Drum Kit For Ratchet Style Top Covers) PAGE 1 COVER
 PAGE 1 COVER") BAKER 4-SPEED CRUISE N1 DRIVE SHIFT TOP DRUM COVER KIT V3-05222014 PN 4-155N1-K (N1 Shift Drum Kit For Ratchet Style Top Covers) PAGE 1 COVER FEATURES Tired of stalling your jockey shift bike while trying
BAKER 4-SPEED CRUISE N1 DRIVE SHIFT TOP DRUM COVER KIT V3-05222014 PN 4-155N1-K (N1 Shift Drum Kit For Ratchet Style Top Covers) PAGE 1 COVER FEATURES Tired of stalling your jockey shift bike while trying
Installation Instructions
 Instructions Created by an: 2007-Present Toyota Tundra LRT Leveling Lift Kit - 4WD by Low Range Off-Road (SKU# LR-LRTundra) Instructions also apply to 2WD Kits. Installation Instructions Revised 7-11-17
OSKRG Research/Restoration Bulletin #7 Sportsters Kick Starter Parts This research and restoration bulletin was created with input and
 OSKRG Research/Restoration Bulletin #7 Sportsters 57-79 Kick Starter Parts This research and restoration bulletin was created with input and assistance from members of the OSKRG. The report consolidates
GM FULL SIZE REAR DISC BRAKE KIT
 GM FULL SIZE REAR DISC BRAKE KIT This kit is for axles with a 3 3/8 spread center to center on the top two bolt holes (pictured left). If your axle flange measures 3 1/8 from center to center, you need
Trike Conversion Kit ROADLINER, STRATOLINER, & STRATOLINER DELUXE
 by Trike Conversion Kit ROADLINER, STRATOLINER, & STRATOLINER DELUXE Installation Instructions Revised 1-2015 California Sidecar Parts & Technical Support 434.263.8866 Table of Contents: 1. Warnings and
Mopar 8 3/4 & 9 3/4 (Dana) Installation Instructions Rear Disc Conversion
 Installation Instructions Rear Disc Conversion") Mopar 8 3/4 & 9 3/4 (Dana) Installation Instructions Rear Disc Conversion This kit is for either Mopar 8 ¾ or Mopar 9 ¾ (Dana). This kit is designed to work with axles with either GM 5 x 4.75 Bolt Pattern
Mopar 8 3/4 & 9 3/4 (Dana) Installation Instructions Rear Disc Conversion This kit is for either Mopar 8 ¾ or Mopar 9 ¾ (Dana). This kit is designed to work with axles with either GM 5 x 4.75 Bolt Pattern
EVO-1063 JK Enforcer System
 EVO-1063 JK Enforcer System NOTES: Cutting and grinding is required to complete the installation of the rear roll center correction trackbar bracket. Wheel spacers or aftermarket wheels with a smaller
Page 1. File: Motolight caliper one-piece Date: 8/14/2006
 Page 1 Caliper Mount Installation One-piece mounting brackets You should allow about two to three hours for installation. We suggest you use a well-lighted space for installation. PLEASE READ ALL THE INSTRUCTIONS.
PRODUCT INFORMATION. CoverMax Deluxe Motorcycle Cover COVERMAX DELUXE MOTORCYCLE COVER. Deluxe heavyweight all-weather cover
 MAX DELUXE MOTORCYCLE PRODUCT INFORMATION CoverMax Deluxe Motorcycle Cover Deluxe heavyweight all-weather cover Top: Water resistant 420 denier 100% Polyester, with PVC coating Bottom: 65/35 Polyester/cotton
Installation Instructions
 BY Trike Conversion Kit KAWASAKI Vulcan 900 CLASSIC- CLASSIC LT AND CUSTOM MODELS 2006-CURRENT Installation Instructions Revised 1-2015 California Sidecar Parts & Technical Support 434.263.8866 2 Table
Urban cool with attitude
 Urban cool with attitude With its stripped-down supersport-type bodywork and exposed handlebars and instruments, the Aerox R Naked has been built for pure fun and total freedom. And it has got to be the
03-04 Mach 1. Hellion Power Systems Mach 1 Kit Instructions
 Hellion Power Systems 03-04 Mach 1 Kit Instructions Part 1 Hellion recommends that the front suspension system be installed either by trained professionals or by 5.Remove rack bolts K-Member Installation
Slide the billet aluminum cap over the bushing and secure with the 3/8-16 x 2 1/2 socket head allen and locknuts provided.
 Slide the billet aluminum cap over the bushing and secure with the 3/8-16 x 2 1/2 socket head allen and locknuts provided. Put the urethane bushings into the upper antiroll-bar-link eyebolt. Coat the bushings
B-025A August 31, 1999 SAFETY RECALL CODE SWINGARM RETURN THIS TO: INITIAL HERE TECHNICIAN NO. 1 LEAD TECHNICIAN
 15 SERVICE BULLETIN B-025A August 31, 1999 GENERAL SAFETY RECALL CODE 0816 - SWINGARM Buell Motorcycle Company has learned that certain 1995 through 1998 Buell motorcycles were built with a swingarm that
Installation Time One / Two Hours
 Front Caliper (With Bracket) Install Guide 1999-2002 Mustang GT or V6 NOTE: These instructions are for the front driver side caliper, but can also be applied to the passenger side front caliper as well.
1986 Rear Disk Brake Upgrade. All hard lines mounted to the rear axle with mounting screws. 1/4" fittings
 1986 Rear Disk Brake Upgrade Being well prepared for a project of this size is the key to success. I thought I was well prepared by doing a lot of research and getting all of the required parts before
96-04 tt. Hellion Power Systems Mustang Twin Turbo Kit Instructions
 96-04 tt Hellion Power Systems 1996-2004 Mustang Twin Turbo Kit Instructions 1. Disconnect battery and elevate front end of car on either Jack stands or a lift if available 2.Lock steering wheel and remove
RHINO SUSPENSION SYSTEM INSTALLATION INSTRUCTIONS
 PARTS INCLUDED: 2 FRONT UPPER A-ARMS 2 FRONT LOWER A-ARMS 2 UNI-BALL JOINTS 2 UNI-BALL JOINT STUDS 2 UNI-BALL JOINT CAPS 2 RETAINING RINGS 1 FRONT SHOCK ASSEM. 2 DELRON STEERING STOPS 2 SHOCK MOUNT SPACERS
List of tools: Jack Two Jack Stands Conventional Socket Set Liquid Collection pan Rear axle lubricant and friction modifier Rags for wiping up spills
 List of tools: Jack Two Jack Stands Conventional Socket Set Liquid Collection pan Rear axle lubricant and friction modifier Rags for wiping up spills 1. Jack car up Loosen wheel lugs first. Don t take