05/06 Gsxr 1000 Clutch Mod
|
|
|
- Blaze Cannon
- 6 years ago
- Views:
Transcription
 may need 2 diff torque wrench one for high And low.")
1 By: Ali (Jetspeedz) 05/06 Gsxr 1000 Clutch Mod Parts: G10 - WASHER, CLUTCH - $10.09 From 06 Gsxr 750 Opt: F00 - GASKET, CL COVER - $8.29 Tools: 13/64 Drill bit, 30mm, 12mm, 10mm, 8mm sockets, and Torque wrench (7ft-bls and 68.5ft-lbs) may need 2 diff torque wrench one for high And low. Also an impact gun & air compressor is highly recommended but not necessary, just makes it easier taking 30mm nut off. Additional Parts: Grease with Molybdenum disulfide - Valvoline Durablend Part#vv278 Pictures later below, Gasket Sealer any auto parts store This is a very simple procedure so don t let the size of this document scare you. There are a lot of pictures so you can t get confused. Good Luck


2 Drain oil and filter- Might as well do this while doing an oil change.


3

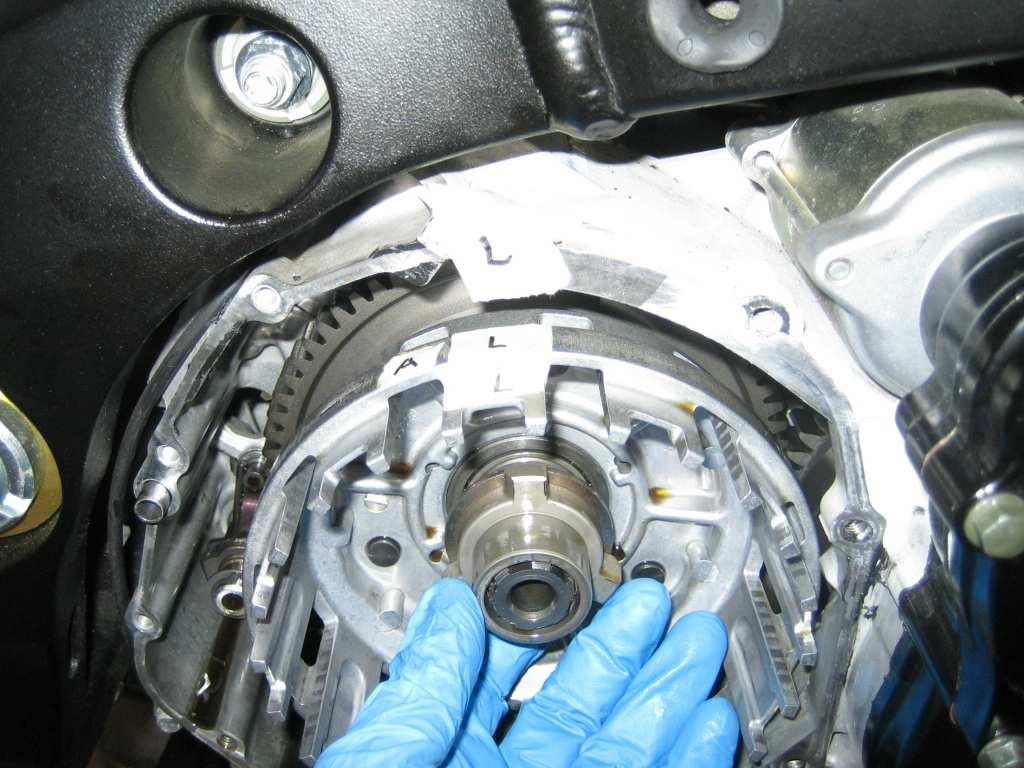
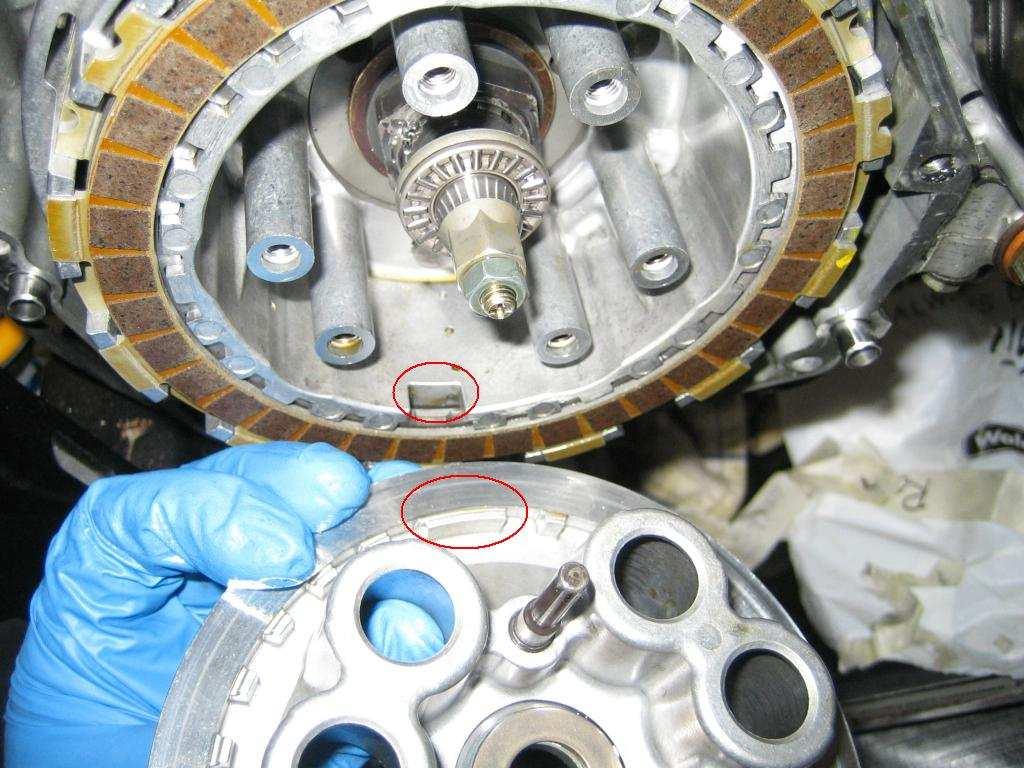
4 At this Point I decided to Mark the Sleeves A for All, L for Last this is so I remember the last plate goes in a different slot. Also helps at the end when assembling the plate back on the hub and lining up lifter pins.

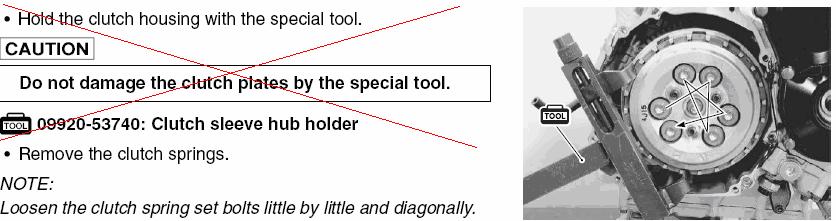
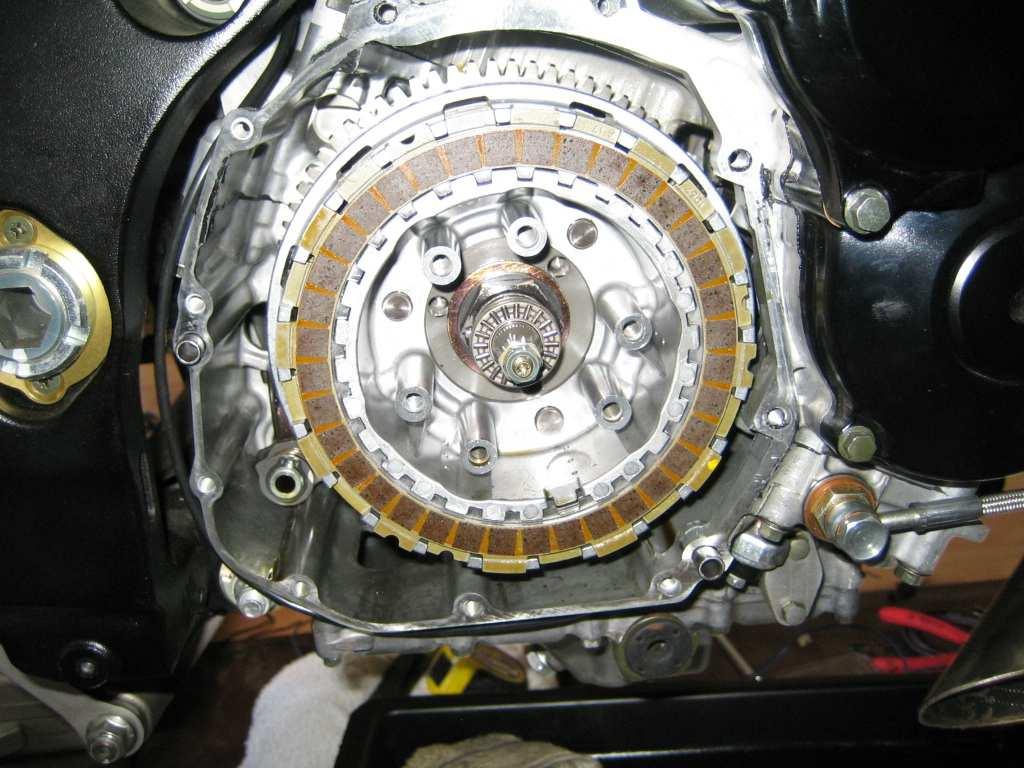
5 Take out all the fibers and plates and make sure to stack them in the same order and facing the same direction in which they came out. I used MASKING Tape to MARK a small group of plates and fibers each time I took out a few and separate mark for the LAST Plate on Hub
6

7 them Make sure you take them out in the same order you put them back in. This is where I started to take out the fibers and plates and marked

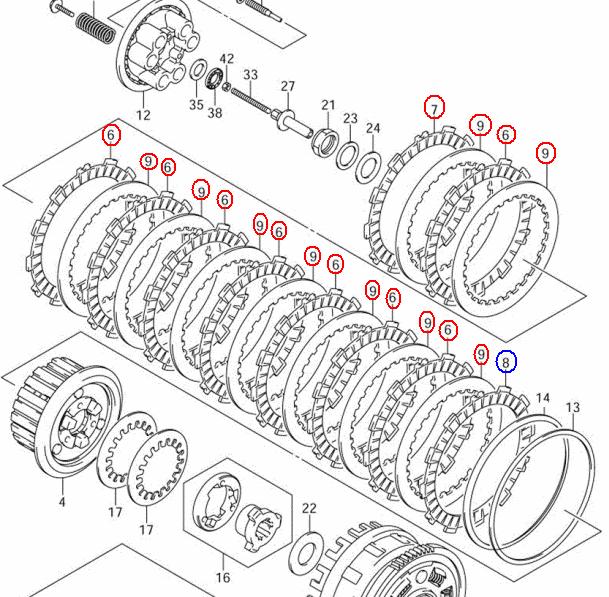
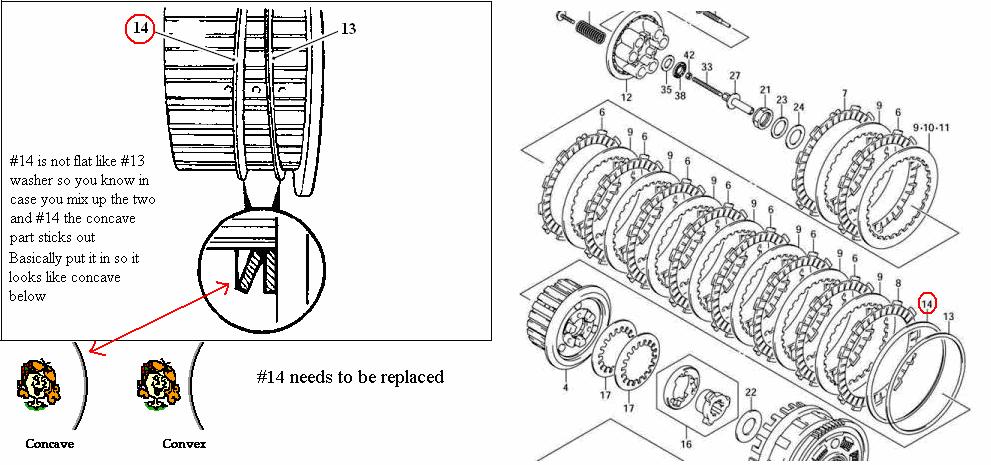
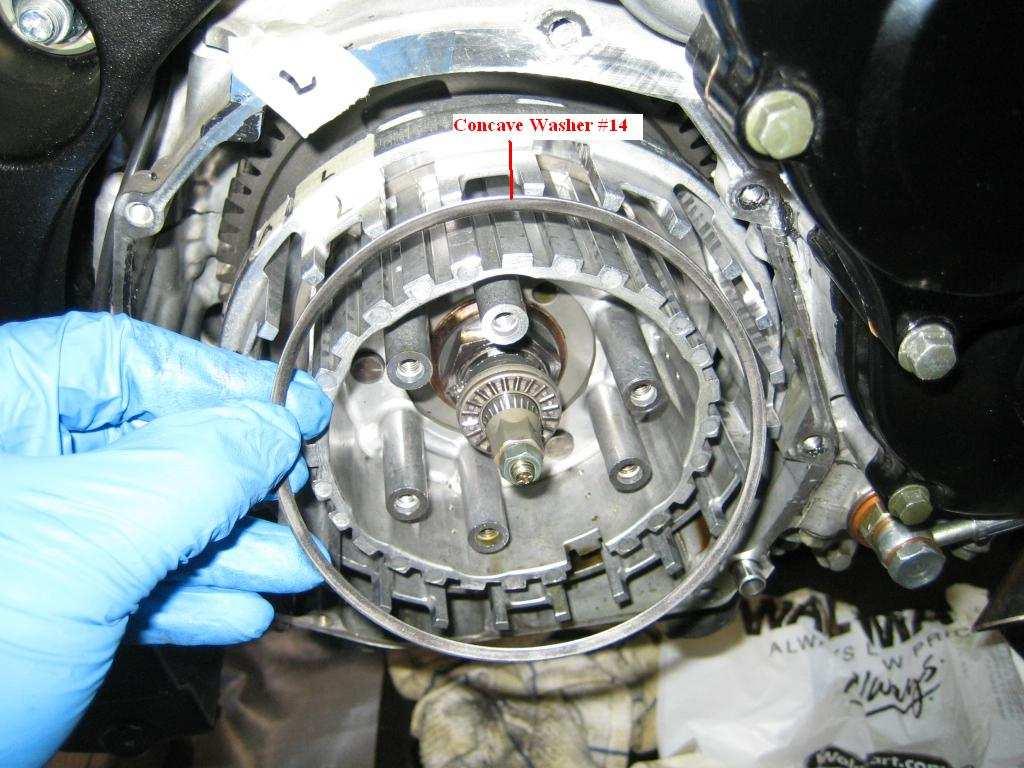
8 Concave spring Washer #14, will be replaced.

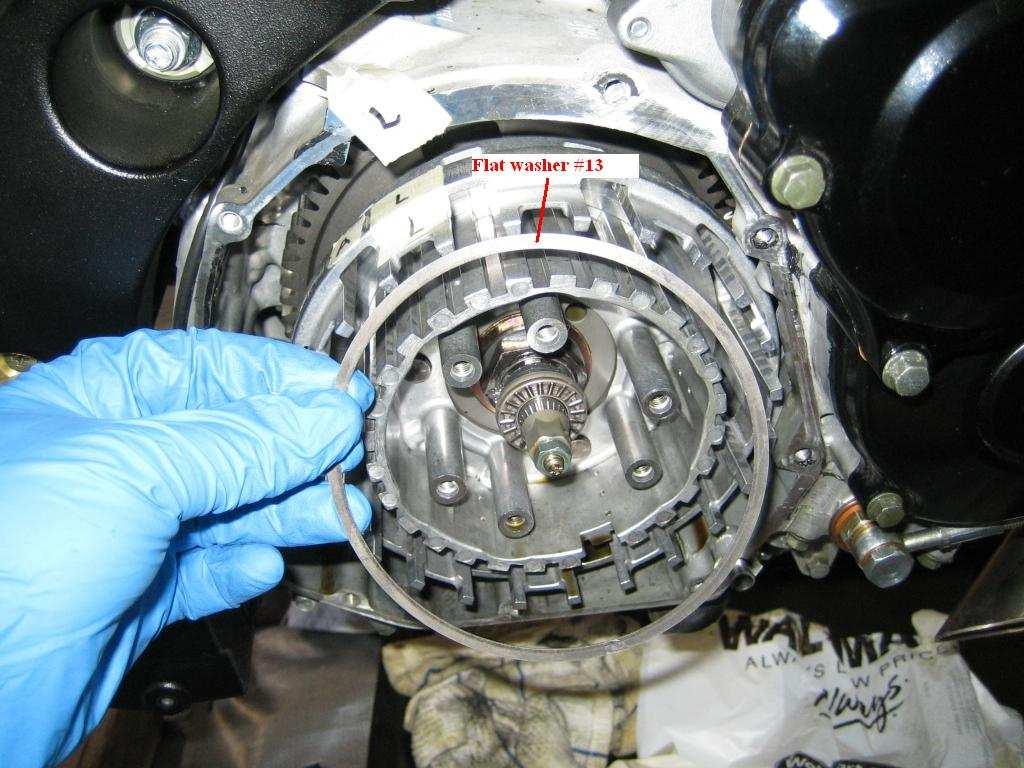
9 This is #13 and this is a Flat washer and you need to keep this.
10

11 driver and lightly tap it till you get the center punch to lift. Be very careful when undoing the center punch. Take a flat head screw

12 I marked the Washers (not necessary but helps and #9 is convex)
13
14

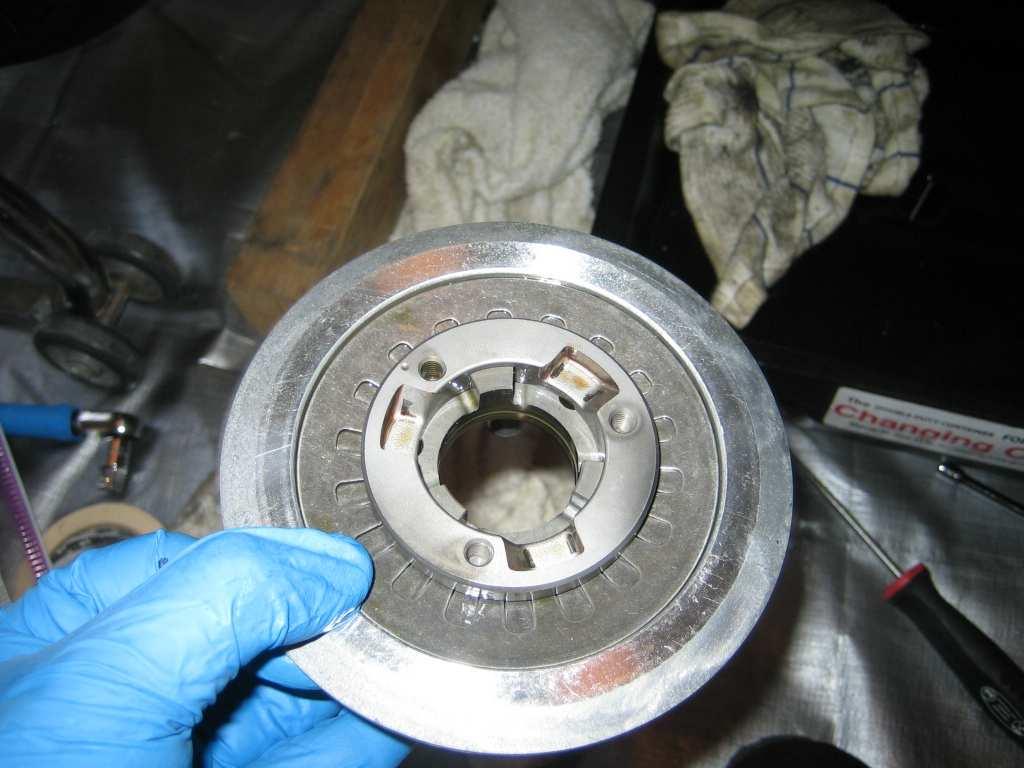
15 The Trick here is to simply use a magnet and it comes right off.
16

17 Drilling the holes You can t remove the basket from the flywheel so don t bother. Basically your drilling blind but you will know for sure when you drill through the basket trust me. The drill bit I used was 13/64 which is about 1mm bigger then oem hole but will work just fine.

18 This is the part where some people might get worried about drilling to Far. That I why I used masking tape to give me a guide to where I can apply less pressure when I get close to the tape which indicated I'm about to go through the basket. Even if you punch through and hit the flywheel for a second you will not harm anything so don t worry.


19 Cleaning all the metal shavings after drilling can be a pain staking and takes some time to get it all so here is what I did. One of the tools I recommended was air compressor which helps take most of the metal shavings out but not all. The second half of taking all the metal out is using water which works perfectly. Just make sure you dry it after well with an air compressor and towels, especially in between the springs. Make sure you flow water through all the holes to make sure you get any metal left behind.

20 I used CO2 compressed air and air compressor for those tight spots.

21 Now Assembling the Clutch


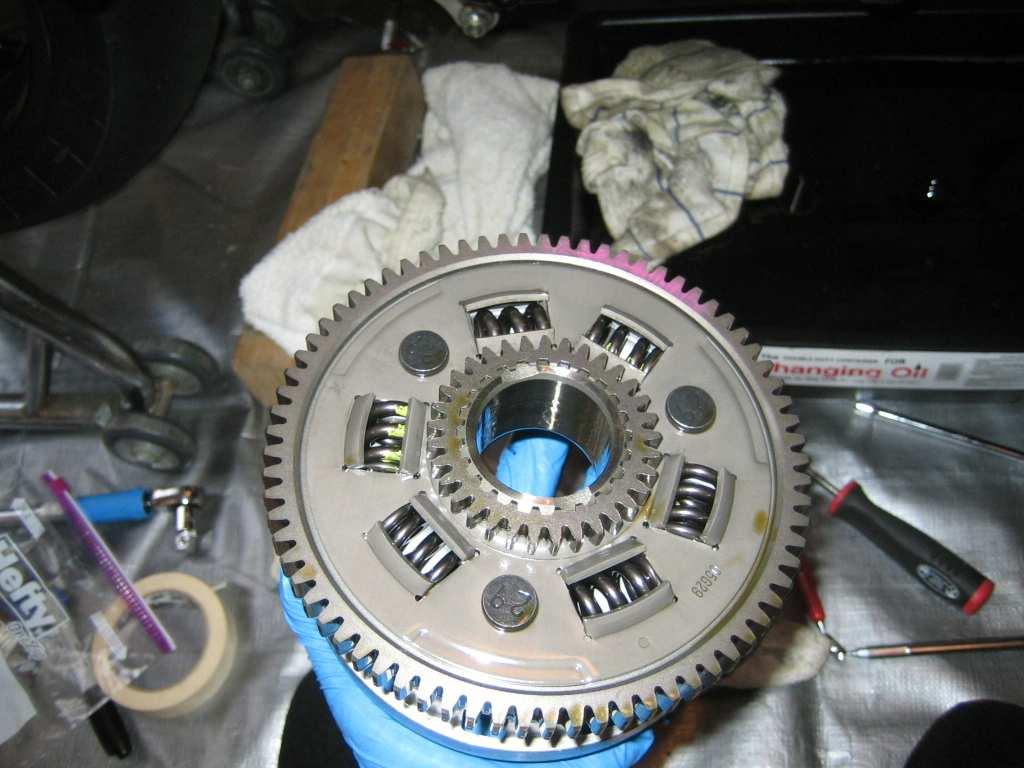
22 Apply a small amount of the Valvoline Grease between 3 & 4

23 Apply some Valvoline grease between 7 & 8. Just rub it around the inner rim of 7 and outer rim of 8 as indicated by the manual.

24 Reassemble the washers

25
26
27
28


29 Reinstall all fibers and steel plates in same order and since they were marked should be easy to reinstall. Note last fiber with blue mark is in diff slit. This is why I marked everything when taking it apart so putting it back together would be easy.

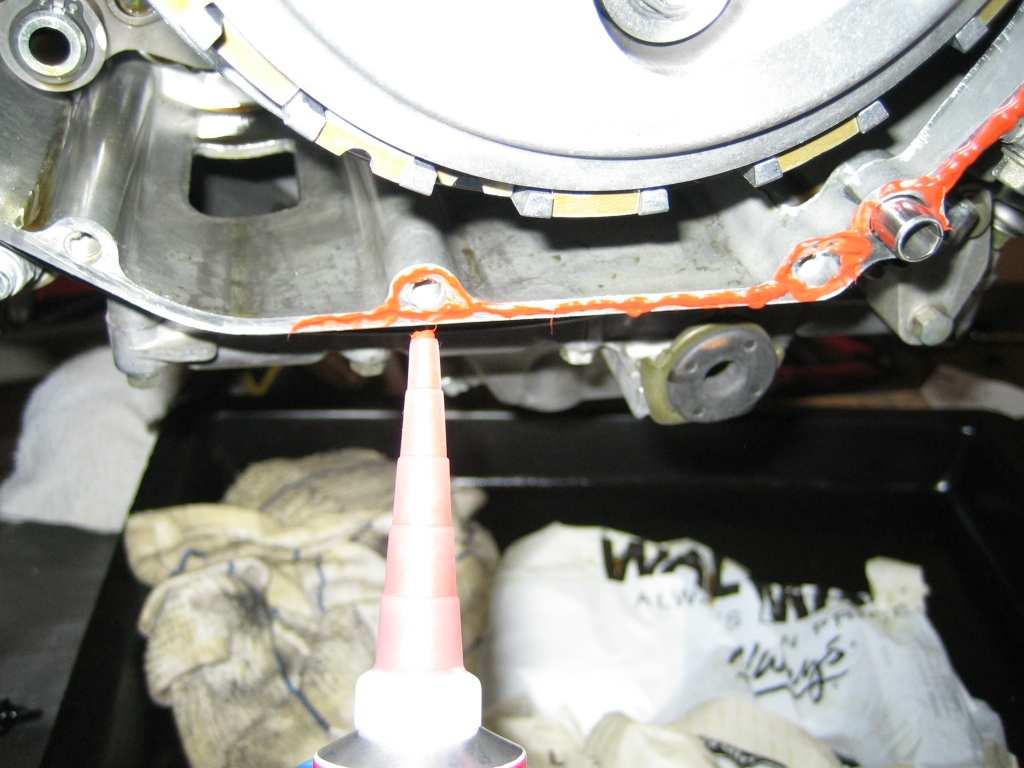
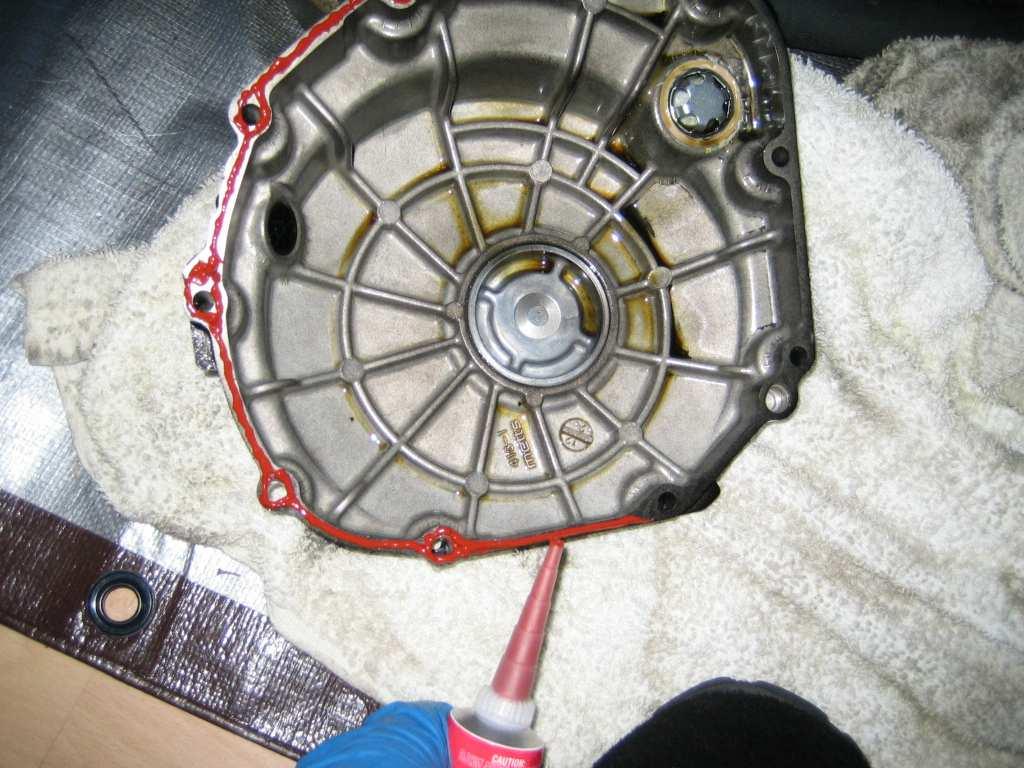
30
31
32
33


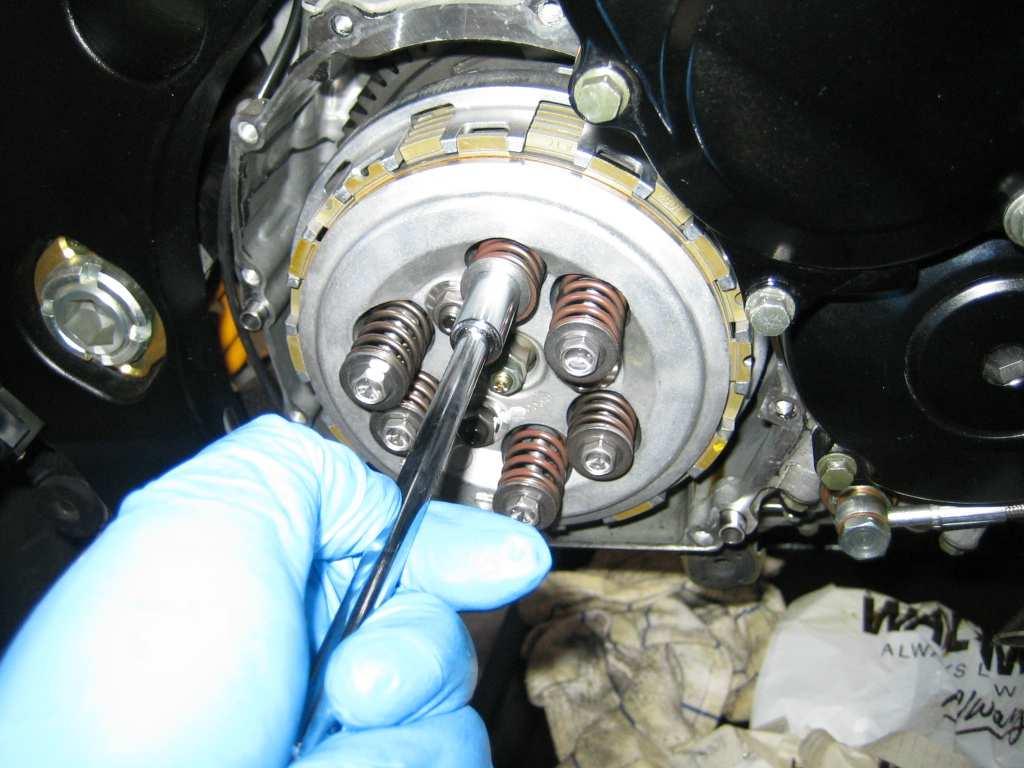
34 Lastly adjust the lifter pins now that it s almost done. You can assemble the whole thing and take clutch adjust cover off or just do it now while you got the entire cover off. Turn the lift pins in till they bottom then back out 2 ¼ turns and lock the nuts. Oem is 3 threads showing after 2 ¼ it s about 1.99 threads showing (2 nd thread just shows so 1.99=2) Note: For tuning purposes, the farther in you screw the 3 lifter pins in the more the clutch will slip and if you go too far in it will slip under gas.

35 This is after all have been adjusted to 2 ¼.
36
37
 for the info on this mod and others who")
38 ALL DONE!!! Don t forget to fill her back up with your favorite Oil and new Suzuki oil filter. Got to give credit where it s due so Thanks to Gerard (Stocky) for the info on this mod and others who contributed!
Moddit. How to Install an OS Giken Differential into a
 Moddit How to Install an OS Giken Differential into a Subaru BRZ This guide goes over the steps necessary to remove and install the OS Giken Limited Slip Differential into a Subaru BRZ. This guide may
Mustang 7.5 Limited Slip Differential (28 Spline) V8; V6:
 V8; V6:") Mustang 7.5 Limited Slip Differential (28 Spline) 79-85 V8; 86-10 V6: Required Tools: Ratchet Wrench Torque Wrench 1/2", 5/16, 3/4", 12mm and 15mm Sockets Lug nut Wrench Dial Indicator Digital Measuring
Mustang 7.5 Limited Slip Differential (28 Spline) 79-85 V8; 86-10 V6: Required Tools: Ratchet Wrench Torque Wrench 1/2", 5/16, 3/4", 12mm and 15mm Sockets Lug nut Wrench Dial Indicator Digital Measuring
Some tips and tricks I learned from getting clutch out of vehicle Skoda Octavia year 2000
 Some tips and tricks I learned from getting clutch out of vehicle Skoda Octavia year 2000 Last change 2013-Oct-11 I bought Haynes manual for a starter. That s something well worth it s cost I believe.
Volvo 1800 Dash Pad Replacement
 Volvo 1800 Dash Pad Replacement (courtesy of John Garden State Chapter Volvo Club America) Reupholstering the dash Well it has been some time since I have been online in the forum. Winter is a quite time
4TH GEN SEATS IN A 3RD GEN TRUCK
 4TH GEN SEATS IN A 3RD GEN TRUCK by Flopster843 02 Oct 2016 If you drive a 3rd generation Dodge Ram truck, I am sure you have discovered that the OEM seats are not the greatest (Figure 1.) They are extremely
There is hence three things you can do - add oil, adjust the temp that the clutch begins to engage, or do both.
 As most of you may be aware, I have been doing a lot of research lately on our cooling system in the 80's including the fact that we have a dead spot on the OEM temp gauge which prompted me to not rely
Connecting the rear fog light on the A4 Jetta, while keeping the 5 Light Mod
 Connecting the rear fog light on the A4 Jetta, while keeping the 5 Light Mod DISCLAIMER: I'm human and make mistakes. If you spot one in this how to, tell me and I'll fix it This was done on my 99.5 Jetta.
Rekluse Motor Sports. The z-start Clutch GAS GAS. 200, 250, and strokes. 400 and strokes
 Rekluse Motor Sports The z-start Clutch GAS GAS 200, 250, and 300 2-strokes 400 and 450 4-strokes Installation Guide Copyright 2002-2004 Rekluse Motor Sports z-start Revision 3.000 RMS100 Gas Gas z-start
How to Replace the B2 Piston Bore Seal
 Page 1 Home Cars for sale Trucks for sale Where we are Links to other diesel sites About us Why diesel? Diesel Videos How they work How they sound FAQ Dodge Diesel Maintenance tips, parts and DIY DVD's
Днепр) Russian Motorcycle Carburetors Part 2B: PZ-24 and PZ-28 Carburetor Assembly and Jet Drilling
 Russian Motorcycle Carburetors Part 2B: PZ-24 and PZ-28 Carburetor Assembly and Jet Drilling") Ural (Урал( Урал) - Dnepr (Днепр( Днепр) Russian Motorcycle Carburetors Part 2B: PZ-24 and PZ-28 Carburetor Assembly and Jet Drilling (applies also to K-37 K and K-38 K carbs) Ernie Franke eafranke@tampabay.rr.com
Ural (Урал( Урал) - Dnepr (Днепр( Днепр) Russian Motorcycle Carburetors Part 2B: PZ-24 and PZ-28 Carburetor Assembly and Jet Drilling (applies also to K-37 K and K-38 K carbs) Ernie Franke eafranke@tampabay.rr.com
Kodak 750H Carousel Projector Repair
 Kodak 750H Carousel Projector Repair An AT YOUR OWN RISK PROJECT by Klaus Wolter, Rev B, 3-26-2016 Here I documen the repair of my 750H carousel. A common problem with this projector, and all of the projectors
How to install the Barnett clutch and the stronger Oil Pump Drive Gear
 How to install the Barnett clutch and the stronger Oil Pump Drive Gear Written by WildFred I m from Germany so please excuse my English and the spelling. The following procedure is a combination of the
2001 V70 T5 ETM Removal and Cleaning Directions
 2001 V70 T5 ETM Removal and Cleaning Directions Howard Cheng howardc64@gmail.com 10/24/05 Version 1.4 Read this before you start I performed this ETM cleaning because I had gotten 2 reduced performance
IRS-151 INSTALLATION INSTRUCTIONS `55-57 CHEVY INDEPENDENT REAR SUSPENSION
 IRS-151 INSTALLATION INSTRUCTIONS `55-57 CHEVY INDEPENDENT REAR SUSPENSION Please read these instructions completely before starting your installation. Remember the basic rule for a successful installation:
Rekluse Motor Sports. The z-start Clutch DRZ400 KLX400. Installation Guide Copyright 2002 Rekluse Motor Sports z-start Revision 3.
 Rekluse Motor Sports The z-start Clutch DRZ400 KLX400 Installation Guide Copyright 2002 Rekluse Motor Sports z-start Revision 3.000 RMS160 KLX400 DRZ400 z-start Clutch 191-260 Manual Revision: 103105 Rekluse
Mikuni RS Carburetor Conversion
 Mikuni RS Carburetor Conversion After putting your carbies on the bench or the kitchen table if the wife is out, you will see that the linkages may be in different positions depending on which brand of
YOU MAY WANT TO FIRST TRY TO LOOSEN THE FILTER HOUSING
 2005 XC90 Tune-up (5-cyl) Including: Oil Change - Spark Plugs - Fuel Filter - Cabin Filter First off - let me say that I am an amateur (at best) mechanic, and I claim no responsibility for whatever you
Oil Cooler Upgrade Install Guide
 Oil Cooler Upgrade Install Guide CAUTION: Before beginning please make sure that the engine is completely cold. Hot engine will have extremely hot oil and components leading to the danger of being burned.
 This document provides instructions for removing and installing a Front Wheel / Rotor on a Ducati Superbike. The torque values used are for the 748/916/996 from 1994 to 2001 and may be applicable for later
Door Panel Removal & Window Stop Adjustment
 Door Panel Removal & Window Stop Adjustment By: Jeff Wolford Disclaimer: This is simply an article of how I fixed my car. I m not responsible if you break, scratch, or mess up anything following my example.
Re-building a Caliper
 Re-building a Caliper by Leslie Henson The pistons in the calipers on the 90 are in very poor condition, and although the brakes work ok, it plays on our mind that the pistons are badly corroded, and it
Timing belt change. Timing belt change
 Timing belt change Put 2 new Gates T275 timing belts on today. Tensioner drilled smooth and tight with less than 16,000 miles on her decided not to change the tensioners just the belts. You'll need some
Brake Caliper Rebuild - Part Numbers & Tips Per Jim Millet, 3/15/2005
 Per Jim Millet, 3/15/2005 Not too difficult a job. Rears are easier than fronts to access. You ll need the following gasket sets: Front caliper gasket set, P/N 34 11 1 157 037, MSRP $13.58 Rear caliper
Shotgun Single Barrel HPFP install guide
 Shotgun Single Barrel HPFP install guide Thank you for your purchase of the VTT Shotgun Single Barrel HPFP upgrade! First thing to do when you open your box is to make sure all parts are in their respective
*Some speedometers have these additional electronic connections. If yours does, then remove the smaller slotted screws shown.
 www.odometergears.com 1981-1985 240 Cable-Driven Speedometers (NOT for 1986 and later electronic units) http://www.davebarton.com/240-odometer-repair.html For this set of instructions below, I will not
TCI E4OD/4R100 Valve Body Performance Improver Kit
 151 INDUSTRIAL DRIVE ASHLAND, MISSISSIPPI 38603 http://www.tciauto.com TCI 496500 E4OD/4R100 Valve Body Performance Improver Kit TELEPHONE: 662-224-8972 FAX LINE: 662-224-8255 E-MAIL: tech@tciauto.com
 Solid State Ignition Replacement May 15, 2005 Introduction: There are two Tecumseh Solid State Ignitions ( SSI ) configurations we are concerned with here: The one on the left I call SSI Under for short
The Ford Model A Water Pump
 The Ford Model A Water Pump George Washington Chapter, Inc. 3903 Old Lee Highway Fairfax, VA 22030 1 Table of Contents Introduction/Specifications.. 3 1. Water Pump Inspection and Removal. 4 a. Removal..
This is a hobby website dedicated to the Kawasaki KLR650 motorcycle. I make no claim concerning the
 KLR650 Homepage Contact Me You must remove the "REMOVE-THIS" in my email address for it to work. This is a hobby website dedicated to the Kawasaki KLR650 motorcycle. I make no claim concerning the accuracy
Rekluse Motor Sports. The z-start Clutch. Cannondale
 Rekluse Motor Sports The z-start Clutch Cannondale Installation Guide Copyright 2002-2004 Rekluse Motor Sports z-start Revision 3.000 RMS105 Cannondale 191-205 Manual Revision: 091304 Rekluse Motor Sports,
Wheel Bearing Replacement Passat TDI
 Rear Bearing/hub assembly replacement This is a fairly straight forward process. Pictures are not necessary for most of this procedure for a person with skills to do this repair. Anyone who thinks they
Mustang Radiator Conversion DIY. By GearHeadPeter. January 27, 2011
 1964-1966 Mustang Radiator Conversion DIY By GearHeadPeter January 27, 2011 We all know that the radiators in our cars are not the best, especially if you have done any customization to the engine, which
Ford F-150 Speaker Replacement Instructions
 Ford F-150 Speaker Replacement Instructions This article was downloaded from http://www.fordf150.net Be sure to go there to view and download the other how-to articles. Thanks to John Meyer for contributing
REPLACEMENT OF TRANSMISSION EXTENSION-CASE GASKET AND OUTPUT-SHAFT SEAL ON 95 XJ6
 D. Jensen 2006 Distribution: www.jag-lovers.com REPLACEMENT OF TRANSMISSION EXTENSION-CASE GASKET AND OUTPUT-SHAFT SEAL ON 95 XJ6 V. 1.0 June 2006 The Fine Print: The following is a summary of my experience
JRSC + BBK Install on SVTF. Neil A. Shah medicnas on focaljet September 2006
 JRSC + BBK Install on SVTF Neil A. Shah medicnas on focaljet September 2006 ECU up here. When removing make sure the smaller bundles of wires don t get wrapped around the bottom edge and break - this almost
Rekluse Motor Sports. The z-start Clutch KTM LC4 ( )
") Rekluse Motor Sports The z-start Clutch KTM LC4 (1999 2005) Installation Guide Copyright 2002-2004 Rekluse Motor Sports z-start Revision 3.000 RMS630 KTM LC4 191-280 Manual Revision: 103105 Rekluse Motor
Rekluse Motor Sports The z-start Clutch KTM LC4 (1999 2005) Installation Guide Copyright 2002-2004 Rekluse Motor Sports z-start Revision 3.000 RMS630 KTM LC4 191-280 Manual Revision: 103105 Rekluse Motor
Converting a Series Land Rover to front wheel disc brakes using the kit made by Torrel Industries Ltd,
 Converting a Series Land Rover to front wheel disc brakes using the kit made by Torrel Industries Ltd, Torrel Industries ltd Series Land Rover front brake conversion kit: Difficulty - Low Except for one
13 October, 2014 Page 1
 13 October, 2014 In my second and last Helicycle I want to make everything better than the first one. That includes not only a transmission chip detector, but one for the tail rotor as well. The transmission
INSTALLATION GUIDE. KTM RFS Husaberg Polaris 450/525 Outlaw KTM 450/525 XC ATV Manual Revision:
 REKLUSE MOTOR SPORTS The z-start Pro Clutch INSTALLATION GUIDE KTM RFS 03-07 Husaberg Polaris 450/525 Outlaw KTM 450/525 XC ATV 191-833 Manual Revision: 010615 2002 Rekluse Motor Sports Rekluse Motor Sports,
Front Axle Pinion Seal Replacement
 Front Axle Pinion Seal Replacement by Flopster843 10 Apr 2016 The AAM 925 axle used on the front of Dodge Ram trucks is a decent unit, but it does have its flaws. This axle lacks lockout hubs on the front
Rekluse Motor Sports. The z-start Clutch CRF 250R. Installation Guide Copyright 2002 Rekluse Motor Sports z-start Revision RMS112 CRF 250R
 Rekluse Motor Sports The z-start Clutch CRF 250R Installation Guide Copyright 2002 Rekluse Motor Sports z-start Revision 3.000 RMS112 CRF 250R 191-212 Manual Revision: 091205 Rekluse Motor Sports, Inc.
Commander SUSPENSION SYSTEM INSTALLATION INSTRUCTIONS
 PARTS INCLUDED: 2 - FRONT UPPER A-ARMS 2 - FRONT LOWER A-ARMS 4 - COTTER PINS 2-12MM JAM NUTS 2 - TIE ROD EXTENDERS 8- FLANGED DELRON BUSHINGS 4- DELRON CASTER SPACERS 6 - GREASE FITTINGS 3 - BEARING REMOVAL
M62 Alternator Removal / Replacement (Water Cooled)
") M62 Alternator Removal / Replacement (Water Cooled) Pre-Steps 1. Disconnect Battery Positive lead 2. Charge Your Battery with battery charger to full charge (So you new alternator wont have to work as
M62 Alternator Removal / Replacement (Water Cooled) Pre-Steps 1. Disconnect Battery Positive lead 2. Charge Your Battery with battery charger to full charge (So you new alternator wont have to work as
Preparation. With the car on the ground you will want to:
 Doing a stage 3 swap was a LOT of work Audi S4 Stage 3 (K04) Install Doing a stage 3 swap was a LOT of work. Just a lot of small and simple tasks really. Just make sure you keep track of what you re doing.
INSTALLATION GUIDE. KTM 950/990 LC8 Engine Manual Revision:
 REKLUSE MOTOR SPORTS The z-start Pro Clutch INSTALLATION GUIDE KTM 950/990 LC8 Engine 191-631 Manual Revision: 071510 2007 Rekluse Motor Sports Rekluse Motor Sports, Inc. 110 E. 43rd Street Boise, Idaho
Ford Racing BOSS 302 Engine Oil Cooler (11-14 GT)
") Tools needed: 14mm hex socket 7mm socket/wrench 8mm socket/wrench Ford Racing BOSS 302 Engine Oil Cooler (11-14 GT) 10mm socket (for airbox removal) ¾ inch or 19mm wrench Torque wrench Appropriate ratchets
Tools needed: 14mm hex socket 7mm socket/wrench 8mm socket/wrench Ford Racing BOSS 302 Engine Oil Cooler (11-14 GT) 10mm socket (for airbox removal) ¾ inch or 19mm wrench Torque wrench Appropriate ratchets
My Hawk build Part 8 by Stuart Clarke
 My Hawk build Part 8 by Stuart Clarke Front hubs, brakes and brake lines. There was still no news on my rear springs so I thought I d find something else to get on with. I had the front hubs, brake calipers
 www.odometergears.com Mercedes-Benz Mechanical Odometer Repair This how to can be used for all mechanical repairs as the only difference will be the removal of the instrument cluster. http://www.dieselgiant.com/repairyourodometer.htm
MAXI-BORE TM CARBURETTORS
 MAXI-BORE TM CARBURETTORS 26mm/28mm Mik bored to 30.5mm 33mm Smoothbores bored to 38.5mm Don t just rebuild your carbs MAXI-BORE TM them! MAXI-BORE TM carbs are more than just cleaned, rebuilt, or bored,
De clunking your MGB rear axle. By Stuart Clarke
 De clunking your MGB rear axle By Stuart Clarke Do you have that annoying clunking noise when accelerating or decelerating, or even when you lift off to change gear, well it s possible to resolve the issue
Changing the Struts on a WK Jeep CRD
 Changing the Struts on a WK Jeep CRD Step by Step By Chirpz Disclaimer: I do not claim that this procedure is the right way or even the best way to change your struts. This is what I did after reading
SATURN SKY 2006 AND UP
 SATURN SKY 2006 AND UP THIS KIT INCLUDES: 16 M8-1.25X30MM BOLTS WITH WASHERS 2 SHOULDER BOLTS WITH RIGHT AND LEFT HINGE ASSEMBLY 2 SHOCKS 550 PSI WASHERS 2 PINS TOOLS REQUIRED FOR INSTALLATION: AIR RACHET,
Rekluse Motor Sports. The z-start Clutch CRF 250X. Installation Guide Copyright 2002 Rekluse Motor Sports z-start Revision RMS116 CRF 250X
 Rekluse Motor Sports The z-start Clutch CRF 250X Installation Guide Copyright 2002 Rekluse Motor Sports z-start Revision 3.000 RMS116 CRF 250X 191-216 Manual Revision: 103105 Rekluse Motor Sports, inc.
Porsche 928 with 16v LH-Jetronic Fuel System
 Porsche 928 with 16v LH-Jetronic Fuel System Toll-Free Tech Hot Line: 877-FOR-928M 877-367-9286 Please do not copy this manual and give copies to your friends. Our ability to bring you this supercharger
1986 Rear Disk Brake Upgrade. All hard lines mounted to the rear axle with mounting screws. 1/4" fittings
 1986 Rear Disk Brake Upgrade Being well prepared for a project of this size is the key to success. I thought I was well prepared by doing a lot of research and getting all of the required parts before
INSTALLATION GUIDE. Kawasaki KLR Manual Revision:
 REKLUSE MOTOR SPORTS The z-start Pro Clutch INSTALLATION GUIDE Kawasaki KLR650 191-640 Manual Revision: 030308 2007 Rekluse Motor Sports Rekluse Motor Sports, Inc. 110 E. 43rd Street Boise, Idaho 83714
INSTALLATION GUIDE CRF150R Manual Revision:
 REKLUSE MOTOR SPORTS The z-start Pro Clutch INSTALLATION GUIDE CRF150R 191-810 Manual Revision: 032508 2002 Rekluse Motor Sports Rekluse Motor Sports, Inc. 110 E. 43rd Street Boise, Idaho 83714 208-426-0659
Rebuilding the Power Steering Pump for a 2007 Honda Accord 4CYL
 Rebuilding the Power Steering Pump for a 2007 Honda Accord 4CYL Disclaimer: I have benefited greatly from others who have taken the time to post auto repair videos/tutorials online. To try and return the
Prerequisites: Shop Manual (recommended) pages 3-9 through 3-13.
 pages 3-9 through 3-13.") Prerequisites: Order your gaskets average about $25.00 bucks X 2 so $50.00 4NK-11193-00-00 Obtain a shim kit (Should have several 265 and 270s) (Some dealers will exchange) Obtain a Valve Bucket Tool YM-33961
Prerequisites: Order your gaskets average about $25.00 bucks X 2 so $50.00 4NK-11193-00-00 Obtain a shim kit (Should have several 265 and 270s) (Some dealers will exchange) Obtain a Valve Bucket Tool YM-33961
RZR 900 spring/shock installation
 RZR 900 spring/shock installation Thank you for purchasing the Shock Therapy Dual Rate Spring Kit for your RZR 900. Your item list: 2 Front upper coil springs, 2 Front lower coil springs, 2 Rear upper
DrVanos.com Stage II Installation Instructions. Tool rental is available with the purchase of a vanos kit *See website for more info*
 DrVanos.com Stage II Installation Instructions Special Tools Needed: Camshaft locking tool TDC Crank pin Sprocket turning tool Tool rental is available with the purchase of a vanos kit *See website for
INSTALLATION GUIDE. KTM 125, 144, Stroke KTM 250, Stroke KTM 250 SXF, XC, XC-W KTM 450, 505 SXF Manual Revision:
 REKLUSE MOTOR SPORTS The z-start Pro Clutch INSTALLATION GUIDE KTM 125, 144, 200 2-Stroke KTM 250, 300 2-Stroke KTM 250 SXF, XC, XC-W KTM 450, 505 SXF 191-836 Manual Revision: 050307 2002 Rekluse Motor
Rekluse Motor Sports. The z-start Clutch. Husaberg
 Rekluse Motor Sports The z-start Clutch Husaberg Installation Guide Copyright 2002-2004 Rekluse Motor Sports z-start Revision 3.000 RMS126 Husaberg 04+ 191-226 Rekluse Motor Sports, inc. 110 E. 43 rd Street
Front Suspension Redo
 Front Suspension Redo Message: First, thanks to all the previous posters for guidance in my doing the suspension. As thanks, here s the updated document for doing the front suspension. Procedure: While
RTX 2000 Thomas Compressor TG-550 Graco PN
 RTX 2000 Thomas Compressor TG-550 Graco PN 246888 Print of Complete Compressor--------------Page 2 Instruction for Kit 118628-------------------Page 3 Instruction for Kit 287845-------------------Page
Andreja Premium Direct Connect Installation Instructions Chris Coffee Service
 1. Remove the outer shell. If you do not already know how to do so, see our instructions under Removing Outer Shell. 2. Mount solenoid valve to the back panel. Remove the rubber grommet from the back panel
Global West Suspension 655 South Lincoln Ave San Bernardino Ca Phone Fax Web address globalwest.
 Global West Suspension 655 South Lincoln Ave San Bernardino Ca. 92408 Phone 877-470-2975 Fax 909-890-0703 Web address globalwest.net Mustang coilover instruction sheets for 64-66 Kit includes the following
Rekluse Motor Sports, Inc. The z-start Clutch. Husaberg ( )
") Rekluse Motor Sports, Inc. The z-start Clutch Husaberg (1989-2003) Installation Guide Copyright 2002-2004 Rekluse Motor Sports z-start Revision 3.000 RMS125 Husaberg 89-03 191-225 Manual Revision: 012805
Rekluse Motor Sports, Inc. The z-start Clutch Husaberg (1989-2003) Installation Guide Copyright 2002-2004 Rekluse Motor Sports z-start Revision 3.000 RMS125 Husaberg 89-03 191-225 Manual Revision: 012805
Tools needed: Here is a pic of the shift kit I used. It is a Transgo brand and as you can see, it just a bag full of springs and one valve.
 Before installing a shift kit, be sure the transmission is in good operating order. If your transmission is making noises, slipping, shifting bad or the fluid looks brown or smells burnt, take the transmission
Turbo 400 Trans Brake Valve Body Shift Pattern: Park Reverse Neutral 1st 2nd 3rd
 TCI 221500 Turbo 400 Trans Brake Valve Body Shift Pattern: Park Reverse Neutral 1st 2nd 3rd This Valve Body will neutralize at shut-down by putting shifter In 2nd gear position This Kit Contains: (1) Turbo
Disco 3 Clock Spring / Rotary Coupler replacement
 Disco 3 Clock Spring / Rotary Coupler replacement I recently had to change my Clock spring and thought some folks may find it helpful to see what it entailed. I did lots of reading around but couldn t
4. Remove (4) 10mm and (1) 7mm bolt that holds fascia at front corners, on each side
 10mm and (1) 7mm bolt that holds fascia at front corners, on each side") 2010 Camaro LS3 1. Disconnect battery ground 2. Remove front wheels 3. Remove (5) push pins and (5) #20 torx screws on inner front wheel well liners and remove liners on each side 4. Remove (4) 10mm and
2010 Camaro LS3 1. Disconnect battery ground 2. Remove front wheels 3. Remove (5) push pins and (5) #20 torx screws on inner front wheel well liners and remove liners on each side 4. Remove (4) 10mm and
Installation of Halo CCFL Rings edited by
 Installation of Halo CCFL Rings edited by www.motorcyclehidlights.com Please use the below installation as an example for your project. Installation is done on a CBR600 however the same procedure will
Superior Wheel Installation Guide (No Turbo removal)
") Superior Wheel Installation Guide (No Turbo removal) This is the process used to install the Turbo Wheel without having to remove the Turbo from your Engine. It should take a maximum of 5 hours. Tools:
Superior Wheel Installation Guide (No Turbo removal) This is the process used to install the Turbo Wheel without having to remove the Turbo from your Engine. It should take a maximum of 5 hours. Tools:
Installing AMP-wiring in a New Beetle
 Installing AMP-wiring in a New Beetle Vehicle used: New Beetle 2.0i Type 9C (1999) Used set of cables: Dietz 35mm² power cable, double shielded Dietz chinch cable ( 35mm² Professional Line ) First of all:
MGB V8 Roadster restoration project - 145
 11th June 2017. The MGB V8 rebuild is getting near to being finished. The exhaust manifold this side was a lot easier to fit than the left hand side. I could get my 3/8 drive Allen key socket onto the
LUGGAGE RACK MG TD with Original Steel Wheels. Installation Instructions. Step 1
 Created on 7/7/2003 8:34:00 PM by Michael Grant Last Revised 2/2/2008 1:55:00 PM Page 1 of 14 1 2 3 243-705 LUGGAGE RACK MG TD with Original Steel Wheels If your TD has been converted to wire wheels, please
2000 Mr2 Spyder Seat Cover Replacement Project
 2000 Mr2 Spyder Seat Cover Replacement Project Tool List: Plastic Trim Tool, Hog Ring Pliers, Medium or Heavy Duty Wire Cutters, 12mm socket, 14mm Socket, Ratchet, Extension, Flat Head Screwdriver & Gloves
WARNING These following pages are instruction for C5 CE stripes; however, it is the same method applying vinyl. Please spend time to read thru these
 WARNING These following pages are instruction for C5 CE stripes; however, it is the same method applying vinyl. Please spend time to read thru these pages. At the end, it is your C5/C6 ME stripes' instruction.
EGR Performance Brakes Assembly Instructions DODGE DANA 70 '87 - '93 (Will not fit stock sized dual rear wheels)
") EGR Performance Brakes Assembly Instructions DODGE DANA 70 '87 - '93 (Will not fit stock sized dual rear wheels) Got Brakes? Parts List (2) Vented Rotors (2) Multi hole Cable Mount & L Brkt (2) Axle Tube
EGR Performance Brakes Assembly Instructions DODGE DANA 70 '87 - '93 (Will not fit stock sized dual rear wheels) Got Brakes? Parts List (2) Vented Rotors (2) Multi hole Cable Mount & L Brkt (2) Axle Tube
How To: Thermostat change - D8 V6 194bhp
 How To: Thermostat change - D8 V6 194bhp Firstly, take off the Air Filter hoses and connectors and lift off. This leaves you with this workable space... I started with taking the two bolts out of the cable
BBK LONG TUBE HEADERS (99-04 GT, Mach 1, Bullitt)
") BBK LONG TUBE HEADERS (99-04 GT, Mach 1, Bullitt) Install Time: Approx. 8-10 hrs Parts Needed: BBK Long Tube Headers Shorty mid pipe X/H O2 wiring harness extensions Hi-temp thread locker Tools Required:
BBK LONG TUBE HEADERS (99-04 GT, Mach 1, Bullitt) Install Time: Approx. 8-10 hrs Parts Needed: BBK Long Tube Headers Shorty mid pipe X/H O2 wiring harness extensions Hi-temp thread locker Tools Required:
E31 Repair Procedure Replace Front Wheel Hub/Bearing Assembly
 E31 Repair Procedure 31-21 Replace Front Wheel Hub/Bearing Assembly Disclaimer This repair procedure is provided as is and is not authoritative with respect to any BMW repair operation. Mark F. Fling is
Slave Cylinder Weep Hole Drilling Procedure
 Slave Cylinder Weep Hole Drilling Procedure Tools Required: T20 Torx Driver T25 Torx Driver T25 Torx Bit with ¼ Ratchet Wrench 4mm Hex Key (Allen wrench) 5mm Hex Key 6mm Hex Key 8mm Hex Key 12mm Hex Key
INSTALLATION KIT INSTRUCTIONS
 INSTALLATION KIT INSTRUCTIONS Please read completely before beginning This installation guide was written to provide the novice and professional with easy guidelines for differential setup. Over the years
Crankshaft Seal, Replacement (Front) This information covers service procedures for replacing the rear crankshaft seal on the Volvo D16F engine.
 This information covers service procedures for replacing the rear crankshaft seal on the Volvo D16F engine.") Volvo Trucks North America Greensboro, NC USA Crankshaft Seal, Replacement (Front) DService Bulletin Trucks Date Group No. Page 3.2007 216 89 1(7) Crankshaft Seal Replacement (Front) D16F W2005773 This
Volvo Trucks North America Greensboro, NC USA Crankshaft Seal, Replacement (Front) DService Bulletin Trucks Date Group No. Page 3.2007 216 89 1(7) Crankshaft Seal Replacement (Front) D16F W2005773 This
Single Barrel Shotgun HPFP Install Guide
 Single Barrel Shotgun HPFP Install Guide Thank you for purchasing the VTT Single Barrel Shotgun HPFP upgrade kit! PLEASE READ THE ENTIRE GUIDE BEFORE BEGINNING INSTALLATION! The first thing you should
Dodge Ram 09-Current CS-DTR SERIES BACKUP CAMERA INSTALLATION
 Dodge Ram 09-Current CS-DTR SERIES BACKUP CAMERA INSTALLATION Thank you for your purchase! These instructions cannot possibly cover every option group for every model year of RAM trucks so you may find
Winterizing the Truma-Equipped Winnebago Travato
 Winterizing the Truma-Equipped Winnebago Travato DANIEL SENIE MONDAY, OCTOBER 16, 2017 REVISION 2 Introduction When we bought our 2016 Travato 59G, the manual s instructions for winterizing seemed to not
Another CJ picture guide to replacing the key cylinder in a non-tilt steering column
 Another CJ picture guide to replacing the key cylinder in a non-tilt steering column by John Strenk Well I'm sure it's happened to all of us one time or another. You park your jeep and go to turn off your
Memories of a Power Brakes conversion on a 1971 Corvette
 Memories of a Power Brakes conversion on a 1971 Corvette I did the job all by myself, except for the brake bleeding. Looks like an easy job but its not, you definitely need some experience to avoid screw
Another CJ picture guide to
 Another CJ picture guide to replacing the key cylinder in a non-tilt steering column by John Strenk Well I'm sure it's happened to all of us one time or another. You park your jeep and go to turn off your
PYRTE. Building The Front Axle, Fork and Steering
 PYRTE Building The Front Axle, Fork and Steering The front axle on this traction engine is a very simple affair, in that it is a rectangular steel rod, sat on edge, with a pivot in the centre, which is
Appendix B A Step-by-Step Guide to Changing the Front Oil Seals on the Volvo B-230 Engine
 Appendix B A Step-by-Step Guide to Changing the Front Oil Seals on the Volvo B-230 Engine When replacing the timing belt, check to see that there are no oil leaks around any of the pulleys. If no leaks,
Our goal is to make the install a breeze. Please read the entire guide before beginning.
 www.airkewld.com Page 1 of 6 IRS Axle Kit Install IRS Axle Kit Install Our goal is to make the install a breeze. Please read the entire guide before beginning. KITS SHOULD INCLUDE 2 - Control-arm mounting
RJS2021 LTO SPORT OVAL RACER LESS ELECTRICS
 RJS2021 LTO SPORT OVAL RACER LESS ELECTRICS THANKS FOR BUYING THE RJ SPEED 1/10 LTO SPORT KIT FOR OVAL RACING. THE ASSEMBLY WILL NOT BE DIFFICULT IF YOU READ THE TEXT, LOOK AT THE PICTURES, AND THE EXPLODED
Quad shift seal installation tips
 Quad shift seal installation tips Rev. B Effective: 31-DEC-2015 Unobtainium Supply Co. 523 Longley Rd Groton, MA 01450 978.448.2110 www.unobtainiumsupply.com Quad shift seal installation tips TIP#1: BREAK
INSTALLATION GUIDE. Clutch Cable Actuated Models Manual Revision:
 REKLUSE MOTOR SPORTS The z-start Pro Clutch INSTALLATION GUIDE Clutch Cable Actuated Models 191-800 Manual Revision: 041513 2012 Rekluse Motor Sports Rekluse Motor Sports, Inc. 12000 W Franklin Rd. Boise,
Slinky Long Travel Suspension. Toyota Land Cruiser. 80 Series Installation Instructions
 Slinky Long Travel Suspension Toyota Land Cruiser 80 Series Installation Instructions 1991-1997 www.facebook.com/redlinelandcruisers www.twitter.com/redlinecruisers www.instagram.com/redlinelandcruisers
STEP #1: Remove the wheels from the truck. There are (6) 21mm lug nuts holding each wheel on... Remember Lefty Loosy, Righty Tighty.
 21mm lug nuts holding each wheel on... Remember Lefty Loosy, Righty Tighty.") - CustomTacos.com Page 1 of 36 How-To: Toytec Lift Install Read all of these install instructions prior to installing Toytec's suspension lift. I cannot be held responsible for any damages or personal
- CustomTacos.com Page 1 of 36 How-To: Toytec Lift Install Read all of these install instructions prior to installing Toytec's suspension lift. I cannot be held responsible for any damages or personal