FITTING INSTRUCTIONS
|
|
|
- Jordan Ray
- 5 years ago
- Views:
Transcription
 BPFS-00 (GRP, race) BPFS-00 (Carbon,")
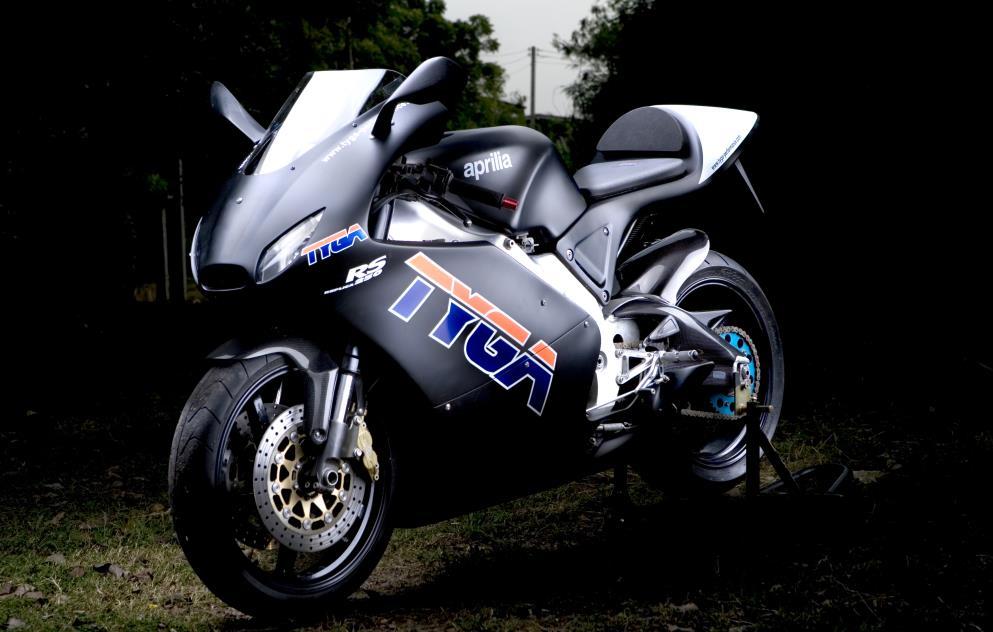
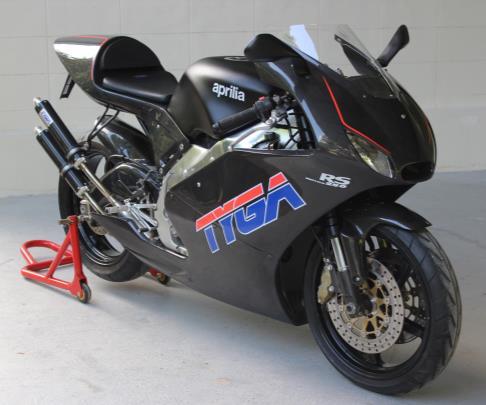
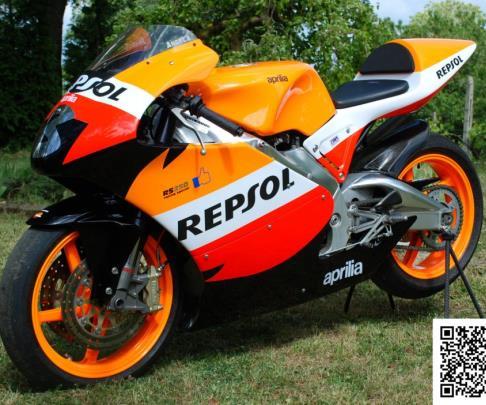
1 MAKING YOUR DREAMS A REALITY FITTING INSTRUCTIONS APRILIA RS50 GP Style Fairing Sets BPFS-000 (GRP, street) BPFS-00 (GRP, race) BPFS-00 (Carbon, street)


2 Aprilia RS50 GP Fairing Fitment of Aprilia RS50 GP Style Fairing (BPFS-000, BPFS-00 and BPFS-00) Thank you for purchasing the TYGA Aprilia GP Style Fairing Kit. Please take a few minutes to read these instructions in order to make the fitment of this kit on your motorcycle a straight forward and easy task. It requires no special skills or tools, but reasonable mechanical competence and a decent tool kit. Always trial fit the fairing before painting to save a lot of trouble later on.. Before starting work on the bike, remove all the components from the box and familiarize yourself with each one. The following are the contents for each GP style fairing: Product Name: Kit, Fairing Set (Street), Aprilia RS-50 GP Motorcycle Model: Aprilia RS-50 Part Number: BPFS-000 and BPFS-00 ( carbon) BPFS-000 BPFS-00
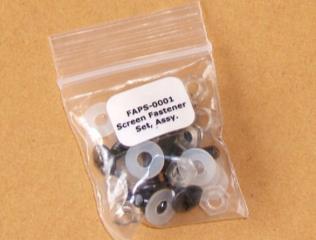
3 x BPFU-9030 Upper Cowling (GRP), Aprilia RS-50, GP Style, Assy. x BPFL-9030 Lower Cowling (GRP), Aprilia RS-50, GP Style, Assy. x BPCX-930 Dash Cover, Aprilia RS50. x SCRE-00/5 TYGA GP00 clear/tint x BPLT-00 Headlight Assembly, Dual GP, Assy. x TYLY-0063 Meter Stay, Aprilia RS-50 GP Style, Assy. code Description quantity BPFU-9030 BPFU-9030(p) BPSY-003 BPSY-00 BPSY-007 JTST-06 WPPC-0600 JTST KW6-0 CLIP-0600 NUBO-0003 Upper Cowling (GRP), Aprilia RS-50, GP Style, Assy Upper Cowling (GRP), Aprilia RS-50, GP Style, Assy Cowling Bung Cowling Bung Tube RS50 Cowling Bung Fr. M6x0 JT Domehead Bolt Washer Plastic M6x3x.0 Mx0 JT Domehead Bolt Upper Cowl mat M6 Tab Clip R clip SSP-0 Mesh BPFL-9030 BPFL-9030(p) STHB-0003 JTST-065 BPSY-005 BPSY-006 WPPC-0600 Lower Cowling (GRP), Aprilia RS-50, GP Style, Assy. Lower Cowling (GRP), Aprilia RS-50, GP Style, Assy. Hanger Bush 3 mm M6x5 JT Domehead Bolt Lower Mid Stay L., Aprilia RS50 Lower Mid Stay R., Aprilia RS50 Washer Plastic M6x3x.0 BPLT-00 Headlight Assembly, Dual GP, Assy. Headlight Unit Socket, Complete, Headlight Mx JT Domehead Bolt Headlight bulb, Halogen TYLY-0063 TYLY-0063(p) JTST-060 CLIP-0005 WPPC-0600 CTBL-000 BHSS-050 Meter Stay, Aprilia RS-50 GP Style, Assy. Meter Stay, Aprilia RS-50 GP Style, Assy. M6x0 JT Domehead Bolt M5 Tab Clip Washer Plastic M6 Cable ties CT-00 (Black) M5x0 Button Rubber 3 BPCX-930 Dash Cover, Aprilia RS50. Foam Strip Screen Fastener Set, Assy. Screw JT Mx0( Black colour) Nut Plastic M (PA) Washer Plastic Mxx KW6-96 JTST SVS/RV FAPS-000 SCPC-00 NTPC-000 WPPC-000 The Carbon street set ( BPFS-00) has the same parts as above, the only difference is being the Upper ( BPCU-9030) and Lower Cowling (BPCL-9030) made of Carbon
, Aprilia RS50, GP Style, Assy. x SCRE-00/5 TYGA GP00 clear/tint x TYLY-0063 Meter Stay, Aprilia RS-50 GP Style, Assy. x BPCX-930 Dash Cover, Aprilia RS50.")
4 Product Name: Kit, Fairing Set (Race), No duct, Aprilia RS-50 GP Motorcycle Model: Aprilia RS-50 Part Number: BPFS-00 BPFS-00 x BPFU-930 Upper Cowling (GRP), Aprilia RS50, GP Style, Assy. x BPFL-9030 Lower Cowling (GRP), Aprilia RS50, GP Style, Assy. x SCRE-00/5 TYGA GP00 clear/tint x TYLY-0063 Meter Stay, Aprilia RS-50 GP Style, Assy. x BPCX-930 Dash Cover, Aprilia RS50. Code Description Quantity BPFU-930 BPFU-930(p) BPSY-003 BPSY-00 BPSY-007 JTST-06 WPPC-0600 JTST-00 CLIP-0600 NUBO-0003 Upper Cowling (GRP), Aprilia RS-50, GP Style, Assy Upper Cowling (GRP), Aprilia RS-50, GP Style, Assy Cowling Bung Cowling Bung Tube RS50 Cowling Bung Fr. M6x0 JT Domehead Bolt Washer Plastic M6x3x.0 Mx0 JT Domehead Bolt M6 Tab Clip R clip SSP BPFL-9030 BPFL-9030(p) STHB-0003 JTST-065 BPSY-005 BPSY-006 WPPC-0600 Lower Cowling (GRP), Aprilia RS-50, GP Style, Assy. Lower Cowling (GRP), Aprilia RS-50, GP Style, Assy. Hanger Bush 3 mm M6x5 JT Domehead Bolt Lower Mid Stay L., Aprilia RS50 Lower Mid Stay R., Aprilia RS50 Washer Plastic M6x3x.0 TYLY-0063 TYLY-0063(p) JTST-060 CLIP-0005 WPPC-0600 CTBL-000 BHSS-050 Meter Stay, Aprilia RS-50 GP Style, Assy. Meter Stay, Aprilia RS-50 GP Style, Assy. M6x0 JT Domehead Bolt M5 Tab Clip Washer Plastic M6 Cable ties CT-00 (Black) M5x0 Button Rubber 3 BPCX-930 Dash Cover, Aprilia RS50. Foam Strip FAPS-000 SCPC-00 NTPC-000 WPPC-000 SCPC-00 NTPC-000 WPPC-000 Screen Fastener Set, Assy. Screw JT Mx0( Black colour) Nut Plastic M (PA) Washer Plastic Mxx.0 Screw JT Mx0( Black colour) Nut Plastic M (PA) Washer Plastic Mxx.0


")

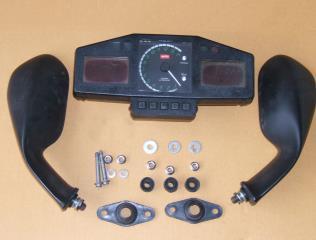
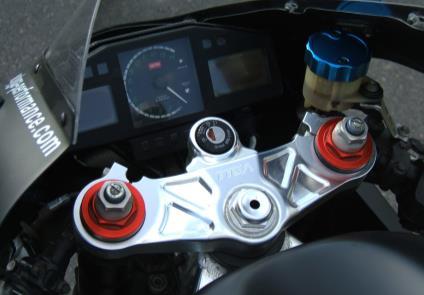
5 BPFU-930 BPCU-9030 BPFU-9030 BPFL-9030 BPLT-00 BPCL-9030 BPCX-930 TYLY-0063 BPSY-007 M6 Bolts, Washers and Clips Lower Mid Stays Fairing Mounting Hardware Side Fairing Mounting Hardware Screen Fasteners Plastic Washers Aprilia parts to be (re) used Mesh Clips


6 . Remove the, mirrors, stock fairing, headlight, meter stay, lower stays and associated parts. You will be reusing the mirrors and mounting hardware shown in the photo above so make sure they are in good condition too. 3. Replace the stock meter stay with the TYGA one. It is installed in exactly the same way as the stock one. secure to frame but leave bolts loose for now to allow for later adjustment. Fit instruments and wiring harness using the original Aprilia mounting hardware. Connect electrical system and check everything works. Attach the dash panel using hardware provided. There is strip of foam that can be used on the leading rear edge to prevent damage to instrument cluster when installed. The dash can be adjusted slightly to make sure it is straight before tightening. Use cable ties provided to tidy up wiring harness and secure it to the meter stay.


7 . The next job to do is to fit the headlight if you have the street set. Check the headlight works properly by plugging it into the stock Aprilia harness. The headlight consists of two units which fits into the fairing by way of a screw which screws through the headlight and into the fairing on the top and a screw underneath which screws into the headlight. Remove the harness and bulbs so you can fit the headlights independently. Remove the screws in the headlight and the headlight mounting position in the fairing and place one headlight unit in the fairing making sure the tabs are locating properly. Then turn the fairing over and fit the screw through the hole and into the headlight housing. When this is completed, do the same for the other side. Replace the bulbs and harness and this part is now down. While you are here, check the mesh fits over the front air duct. Only secure it after paintwork is completed because this will make the painting easier and avoid overspray on the mesh. the same is true also for the foam around the headlight to reduce glare inside the fairing. attach it last after painting.

 to one of the rear corners.")


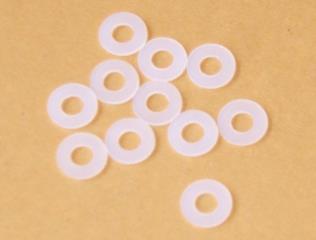
8 5. On the street set, you need to fit the mirrors to the upper fairing in the same way they fit the stock bike except with the addition of a rubber piece between the stock plastic Aprilia mirror housing and the fairing as shown in the photo. The mirror housings will later be mounted to the meter stay to secure them. 6. The screen is next. The fitting is straight forward but you do need to take care no to scratch it and for a trial fit it may be better to leave it in the plastic bag rather than risk mounting it and then removing it. However, the procedure is to fit loosely a screen fastener (consisting of a plastic bolt through from the outside with a washer and nut on the inside) to one of the rear corners. Do the same for the other corner. The do the two front positions and finish off with the two middle positions. This will minimise scratching because acrylic against glass fibre is no contest! You can then push and pull the screen around because the holes are slotted to find the optimum position before tightening. Be careful not to overtighten the plastic screws. If there seems to be a small gap between screen and fairing, this can generally be ironed out by loosening the screws and re-tightening, while squeezing the components together at the gap.. 7. Next thing to do is the mounting points. There are three plastic bungs. You will notice one is slightly longer than the other two and this fits on the inside of the front mounting hole above the headlight and is secured using the M6 bolt and plastic washer provided. This bung will later locate in the front of the meter stay. The other two plastic cowling bungs are used in the side positions. You will see there are also two tubes. Fit the tubes and bungs as shown in the photos using the R clips. The fairing will need to be drilled and the bungs mounted but that is a later job.


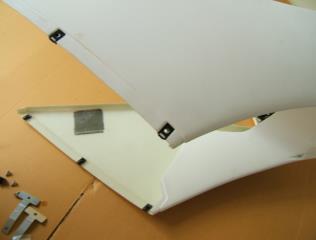
9 . It is now time to mount the upper to the bike. It is fairly straight forward. Be careful not to snag the sides as you slide it on from the front but once it has moved over the bike and the bung located it is quite safe and stable. The mirrors housings are then secured to the meter stay. If the mirrors are lose, tighten the 0 mm. nut underneath and this will tension the spring and make the mirrors stiffer to move on their housings. now is a good time to connect the headlights to make sure they are working. The upper fairing is now ready to accept the lower fairing. Don't drill the side mount holes yet. We'll do this as a final attack when the lowers are in place


10 9. Before mounting the lower fairing, attention now needs to be focused on the mounting points. There are two lower mid stays. These fit as shown in the photo and replace the stock Aprilia ones. Their purpose is to allow for adjustments of the fairing to prevent it touching the exhaust system. These can be adjusted later or even removed if not required. also check to make sure your bike has the rear lower stays mounted. There are hanger bushes 3 mm thick which can be used as required to space components to get the necessary clearance on components. Have them on standby read to use. The side stand will slide through the hole in the lower and there is not much clearance. First thing is to check the spring is mounted as shown in the photo with the shaft of the spring at the rear of the mounting tab at the top. If it is mounted with the shaft at the front it will snag on the fairing when the side stand is deployed. if you are worried about scratching the fairing or sidestand use sock technology and slide a sock over the side stand during the lower fairing mounting to prevent and scratches! 0. Now is the time to mount the lower fairing sliding it through the bike from the left side with the side stand deployed and going through the hole first. Be careful not to snag on anything and it is very helpful if you have an assistant during this phase to hold one side while you secure the other. The M6 bolts and plastic washers are used to mount it to the upper and the two rear positions making a total of positions. Be careful that the front part near the radiator is correctly aligned before securing the bolts. This lower cowling is very different to the one it replaces so don't expect it to immediately bolt into place with no issues. The main points are the exhaust chamber clearance, the foot controls and the sidestand which are all in close proximity to the TYGA lower cowling. The challenge is to mount the lowers with minimum or no modifications and to do this we suggest you do the following: a. Put the bike on a paddock stand or as high off the ground as you can. Best to do this when fitting the upper but very worthwhile for the lowers. If you are retaining the sidestand, check to see if it is worn. You can do this by rocking the leg in and out, not rotating it and most have a lot of free play where the pivot has worn. What happens is the spring will pull the sidestand away from the bike so the more worn the less issues here! If there is a clearance issue We suggest that you consider cutting and grinding smooth the part of the casting which is on the tip of the leg which will hit the lower cowling first. This will give you a cm or so extra clearance at the cost of not being able to park on boggy soil. Another thing you can do is place a washer on the front mounting bolt sandwiched between the frame and the side stand. When the sidestand is mounted it will then rotate outwards slightly without being visually noticeable and compromising looks or function. Another fix is to build up the final stop on the side stand so it doesn't rotate as far. You can build this with weld and then grind back for an optimum position. Of course, many of these things are
 or space out the hanger if there is a chamber exiting this side.")

11 not needed depending on the exhausts and the wear of the sidestand but they are worth noting just in case and we would certainly recommend the washer fix as a matter of course as it is quick, easy and reversible. It may be necessary to bend the left side lower rear fairing mount (the one on the left foot hanger) or space out the hanger if there is a chamber exiting this side. If stock step hangers are used with stock chambers, it may be necessary to cut parts of the lowers to avoid contact. We make no apologies for this because our fairings are designed for a race bike or at least one with race chambers and we cannot make the fairing fit all possible combinations. The advantage of fibreglass is it is easy to cut and retain a good looking strong part after modifications so don t be afraid to nibble at edges. Use a dremmel, a file or two and finish with abrasive paper. The left side has a lot of parts near the lower cowling and the first thing to do is to mount the lowers so the sidestand will operate without touching the lower fairing on the spring or the stand when it is retracted. Follow the steps above if needed. The next thing to look out for is the exhaust chamber. The likely areas to watch are half way down on the main section of the chamber and you may need to nibble the lowers away at the bottom to get clearance if you can't bend the lower fairing stay out enough to clear the chamber. The other area is where the exit pipe leaves the lowers. Some chambers may hang too low and again some cutting may be needed. however before doing that, loosen off the chamber and the silencer clamp and try rotating the silencer clamp so the lower silencer moves in more the centreline of the bike. You may also need to move the lower fairing out to get clearance on side by side systems and discover that the side stand touches the fairing. Some set ups have the chamber exit pipes and the side stand so close that there is no optimum position that will leave the components intact. Our advice is to modify the sidestand to gain extra clearance using the steps outlined above. Failing that, you may need to cut a hole for the exhaust but we do not recommend that as it spoils the look of the fairing. Again, you need to check for foot control movement and if the gear change contacts with the fairing when depressed adjustments and if necessary, cutting will need to be done. Remember, the above is not going to apply to every bike and if you have a race bike, the fitment will be very straight forward. For street bikes with side by side chambers and a side stand, we recommend fitting our later model chambers which have been specifically designed for the GP lower fairing. Remember to try to stay patient throughout and if you feel a loss of impatience, better take a break and come back to the job fresh. Other tips are a clean bike and a friend to help you in holding things in position.

12 . This next phase is best done in dark or near dark conditions. test the headlight beam alignment on high and dip and it should be close to the correct position. Adjust the position by pulling the upper fairing up or pushing it down with the meter stay to frame mounting bolts loose until you find the correct headlight beam position. (Some headlight adjustment can be done by slotting the lower headlight hole in the fairing but this is minimal. Remember that suspension changes such as ride height or different components will affect the stance of the bike and the headlight beam with the ground.) When you are certain you have the position you want, tighten the meter stay mounting bolts. Now you can go back to the side mounting stays. The holes for mounting the side bungs in the upper need to be drilled. To mark out the screw position, hold the cowling up against the bung and then shine a torch at the shiny frame which will reflect the light from the torch to the inside area around the bung. Look from the outside and you will see the point of interference as a shadow. Mark this point with a magic marker and then drill through with a 3 mm. drill bit. Offer up the side cowl again to check position. It may need tweaking a little. Final hole size should be 6.5 mm.. Tighten the side cowl. Now check headlight adjustment to confirm that it's within the parameters required. Check to see that all the other clearances with chambers, side stand and foot controls are still ok and adjust as necessary. Finally, remove the fairings and have them painted. When you fit them after painting there will be much less risk of damage because of the trial fitment. If you are struggling to find a good set up, please contact us and we will do our best to advise you on any problems or issues you may have.
13


14 Check out our other Aprilia RS50 products
MAKING YOUR DREAMS A REALITY FITTING INSTRUCTIONS. KAWASAKI ZXR250 Ninja Style Fairing Set BPFS-0071
 MAKING YOUR DREAMS A REALITY FITTING INSTRUCTIONS KAWASAKI ZXR250 Ninja Style Fairing Set BPFS-0071 Handy Hints for fitting our fairings: 1. We recommend trial fitting of our fairings before painting.
FITTING INSTRUCTIONS
 MAKING YOUR DREAMS A REALITY FITTING INSTRUCTIONS MiniRacerXtreme MRX Bodywork kits BPFS-055 and BPFS-056 for nd gen Honda MSX5SF, Grom TRANSFORM the MSX5SF GROM to the: MRX MiniRacerXtreme Fitment of
MAKING YOUR DREAMS A REALITY FITTING INSTRUCTIONS
 MAKING YOUR DREAMS A REALITY FITTING INSTRUCTIONS Honda NC30 Two Seat, Street, BPFS-0078 Thank you for purchasing the TYGA NC30 Two Seat, Street kit. Please take a few minutes to read these instructions
MAKING YOUR DREAMS A REALITY FITTING INSTRUCTIONS. KTM RC series STEP KIT STAA-0024 (street) STAA-0124 ( race only)
 STAA-0124 ( race only)") MAKING YOUR DREAMS A REALITY FITTING INSTRUCTIONS KTM RC series STEP KIT STAA-0024 (street) STAA-0124 ( race only) KTM RC Series Step Kit Fitting Instructions, KTM RC Series Adjustable Step Kit STAA-0024,
MAKING YOUR DREAMS A REALITY FITTING INSTRUCTIONS KTM RC series STEP KIT STAA-0024 (street) STAA-0124 ( race only) KTM RC Series Step Kit Fitting Instructions, KTM RC Series Adjustable Step Kit STAA-0024,
MAKING YOUR DREAMS A REALITY. FITTING INSTRUCTIONS APRILIA RS125 Exhaust System EXCS-0019
 MAKING YOUR DREAMS A REALITY FITTING INSTRUCTIONS APRILIA RS125 Exhaust System EXCS-0019 The TYGA Performance Aprilia RS-125 Stainless Steel chamber, when used with a TYGA silencer, offers huge saving
COLD AIR INTAKE INSTALLATION INSTRUCTIONS
 COLD AIR INTAKE INSTALLATION INSTRUCTIONS # D760-0030 Fits: 2007-10 135i (E82, E88; with N54 engine) 2007-08 335i/xi (E90) 2007-10 335i (E92, E93; with N54 engine) Congratulations for being selective enough
Tools Required. Metric Wrench Set Screwdriver Set Metric Socket Set Pliers Heavy duty hydraulic Jack and Car Stands Box knife or similar Hacksaw WD40
 Subaru 2004+ Legacy GT & Outback XT For JDM 2.0 twinscroll turbo and USDM 2.5 turbo models Front Mount Intercooler Fitting Instructions PN# LEG-1348-000 You are now the proud owner of a highly tested and
Subaru Front Mount Intercooler Kit STI Subaru Front Mount Intercooler Kit STI
 Subaru Front Mount Intercooler Kit STI 2008-2014 715500 Subaru Front Mount Intercooler Kit STI 2008-2014 Congratulations on your purchase of the Subaru Front Mount Intercooler Kit STI 2008-2014. The following
COLD AIR INTAKE INSTALLATION INSTRUCTIONS
 COLD AIR INTAKE INSTALLATION INSTRUCTIONS # D760-0029 Fits: 2009-10 335i/xi (E90; with N54 engine) Congratulations for being selective enough to use a Dinan Engineering Cold Air Intake. We have spent many
INSTALLATION INSTRUCTIONS JEEP 2011-UP JK SECURITY FULL CONSOLE #274
 INSTALLATION INSTRUCTIONS JEEP 2011-UP JK SECURITY FULL CONSOLE #274 PARTS CHECKLIST Tuffy Console #9 Left Front Mounting Bracket #10 Right Front Mounting Bracket #11 Electronics mounting bracket #12 Divider
Page 1. File: Motolight caliper one-piece Harley Date: 8/15/2006
 Page 1 Harley-Davidson FL Caliper Mount Installation One-piece mounting brackets You should allow about two to three hours for installation. We suggest you use a well-lighted space for installation. PLEASE
INFINITI Q50/Q60 Red Alpha Heat Exchanger
 INFINITI Q50/Q60 Red Alpha Heat Exchanger Whether you live in a hot climate region, enjoy racing, or long high speed pulls the INFINITI Q60/Q50 Red Alpha Heat Exchanger will help keep your intake temps
Tusk Pannier Racks. Instructions and information KLR
 1 Tusk Pannier Racks Instructions and information KLR650 2008 + Congratulations on your purchase of the Tusk Pannier Racks. These racks are made to handle extreme adventure riding, but work great for the
MadStad Victory Cross Country Adjustable Windshield Mount
 What Is In The Box: MadStad Victory Cross Country Adjustable Windshield Mount Installation Instructions (1) Set of Pre-Assembled MadStad Adjustable Windshield Mounts with (4) rubber well nuts installed
M7 R52S & R53 Cold Air Intake Installation Guide 53-3M7301
 M7 R52S & R53 Cold Air Intake Installation Guide 53-3M7301 M7 Speed engineers and manufactures the highest quality MINI COOPER accessories and performance parts available anywhere on Planet Earth! Please
Slingshot Rotrex Supercharger Kit
 Slingshot Rotrex Supercharger Kit This supercharger kit improves on the Slingshot by forcing more dense air into the engine and creating more power. Installation time of the supercharger depends on you
STOP---READ THIS FIRST!
 STOP---READ THIS FIRST! **Read These Entire Instructions Before Starting Anything** 2003-2013 DODGE Ram 2500/3500, 8 LIFT KIT NOTE: * The factory wheels and tires WILL fit on the front of the vehicle once
INSTALLATION INSTRUCTIONS
 COLD AIR INTAKE INSTALLATION INSTRUCTIONS PART NUMBER D760-0390C APPLICATION: 1999-2003 E39 M5 PARTS LIST 1 Left Aluminum Intake Tube 1 Air Pump Bracket (A) 1 Right Aluminum Intake Tube 1 Air Pump Bracket
Z1 Motorsports 300zx 2.5 Upgraded piping & BA SMIC Install Guide
 Z1 Motorsports 300zx 2.5 Upgraded piping & BA SMIC Install Guide Congratulations on your new upgraded piping and intercooler kit, this kit has proven to provide the lowest intake air temps to date on our
INSTALLATION INSTRUCTIONS FOR THE MOTOR TRIKE GL1500 RAKE KIT
 INSTALLATION INSTRUCTIONS FOR THE MOTOR TRIKE GL1500 RAKE KIT Thank you for choosing the Motor Trike GL1500 Rake Kit. We ask that you read the directions before you start and follow them very closely.
MAZDASPEED3 Intercooler Instructions
 MAZDASPEED3 Intercooler Instructions Congratulations on your purchase of the COBB Tuning Front Mount Intercooler System for your 2007-2009 Mazdaspeed3. The following instructions should assist you through
DrVanos.com Stage II Installation Instructions. Tool rental is available with the purchase of a vanos kit *See website for more info*
 DrVanos.com Stage II Installation Instructions Special Tools Needed: Camshaft locking tool TDC Crank pin Sprocket turning tool Tool rental is available with the purchase of a vanos kit *See website for
HID INSTALLATION ON RST1000 Futura
 HID INSTALLATION ON RST1000 Futura Disclaimer: This is a full description of what I have done to my motorcycle. I am in no way suggesting you do as I have done by following these instructions. I have not
Installation instructions for Camaro/Firebird and Nova* Windshield Wiper Systems
 Installation instructions for 1967-69 Camaro/Firebird and 1968-74 Nova* Windshield Wiper Systems The Raingear 1967-69 Camaro/Firebird and 1964-74 Nova wiper system is designed for ease of installation
Toyota Tacoma Winch Mount Bumper Installation Instructions Tools Required: Transmission cooler relocation brackets Torque Wrench
 2016-2017 Toyota Tacoma Winch Mount Bumper Installation Instructions Tools Required: Items Included: Small flat head screw driver Winch Mount Ratchet, 10mm, 12mm, 14mm, 17mm & Skid Plate 19mm sockets Transmission
COLD AIR INTAKE INSTALLATION INSTRUCTIONS. # D Fits: i (4.8L)
") COLD AIR INTAKE INSTALLATION INSTRUCTIONS # D760-0012 Fits: 2006-10 550i (4.8L) PARTS LIST Air Box Assembly Left tube Center tube Right tube Outer Tube AFM housing AFM/TB tube Hardware Kit Congratulations
COLD AIR INTAKE INSTALLATION INSTRUCTIONS # D760-0012 Fits: 2006-10 550i (4.8L) PARTS LIST Air Box Assembly Left tube Center tube Right tube Outer Tube AFM housing AFM/TB tube Hardware Kit Congratulations
Peg-Harness installation instructions
 Peg-Harness installation instructions I know it s not the easiest thing to do, but PLEASE READ THESE INSTRUCTIONS COMPLETELY so you will understand what you are trying to accomplish before you start drilling
Procharger Stage II Intercooled Supercharger System (11-14 GT)
") Procharger Stage II Intercooled Supercharger System (11-14 GT) Installation Time: Approximately one day. Installed on 2012 Mustang GT 5.0/Manual Required Tools 3/8 Socket Set (Standard and Metric) 1/2
Procharger Stage II Intercooled Supercharger System (11-14 GT) Installation Time: Approximately one day. Installed on 2012 Mustang GT 5.0/Manual Required Tools 3/8 Socket Set (Standard and Metric) 1/2
Free Flow Exhaust Installation Instructions
 Free Flow Exhaust Installation Instructions PART NUMBER: APPLICATION: D660-0035 (polished tips) or D660-0035-BLK (black ceramic tips) 2010-11 X5-M & X6-M Parts List 1 D663-0159 (-BLK, for black tips) X5
Bachmann GWR Earl (Dukedog) EM Finescale Conversion
 EM Finescale Conversion") Bachmann GWR Earl (Dukedog) EM Finescale Conversion Before you start, it is a good idea to have some small containers or snap top poly bags to put screws and components in for safe keeping...much better
Bachmann GWR Earl (Dukedog) EM Finescale Conversion Before you start, it is a good idea to have some small containers or snap top poly bags to put screws and components in for safe keeping...much better
BBK LONG TUBE HEADERS (99-04 GT, Mach 1, Bullitt)
") BBK LONG TUBE HEADERS (99-04 GT, Mach 1, Bullitt) Install Time: Approx. 8-10 hrs Parts Needed: BBK Long Tube Headers Shorty mid pipe X/H O2 wiring harness extensions Hi-temp thread locker Tools Required:
BBK LONG TUBE HEADERS (99-04 GT, Mach 1, Bullitt) Install Time: Approx. 8-10 hrs Parts Needed: BBK Long Tube Headers Shorty mid pipe X/H O2 wiring harness extensions Hi-temp thread locker Tools Required:
Installation Instructions :AUDI 8V RS3 : Page 1
 Installation Instructions :AUDI 8V RS3 : Page 1 1. We will start by removing the stock airbox system. Remove the 2 screws holding the inlet duct in place. Then push the duct into the airbox to release
Fitting instructions for Voodoo Fairing - KTM 950/990 Adventure
 Fitting instructions for Voodoo Fairing - KTM 950/990 Adventure Thank you for purchasing the Voodoo fairing. Your fairing kit comes largely completed and includes the following. 1 x Fairing 1x Screen,
Sunroof Repair. Sunroof Repair TSB. The sunroof repair kit available for the J30 is part number Y20. See images at bottom of document.
 Sunroof Repair This document is the text/images from the TSB (technical service bulletin) issued by Infiniti concerning the repair procedure for sunroof issues. Be advised that this is a LARGE, TIME-CONSUMING
Multistrada (MTS) Tank Installation Notes. Tools Required. Phase 1: Remove Fairings. Phase 2: Remove Fuel Tank
 Tank Installation Notes. Tools Required. Phase 1: Remove Fairings. Phase 2: Remove Fuel Tank") The California Cycleworks MTS tank provides an aftermarket alternative to the OEM nylon fuel tanks as used on aircooled Desmodue Ducati Multistrada 1100, 1000, and 620 models. This fuel tank is NOT for
The California Cycleworks MTS tank provides an aftermarket alternative to the OEM nylon fuel tanks as used on aircooled Desmodue Ducati Multistrada 1100, 1000, and 620 models. This fuel tank is NOT for
B5 A4 1.8t Front Mount Intercooler Install Instructions
 B5 A4 1.8t Front Mount Intercooler Install Instructions Only work underneath your vehicle after properly supporting it with adequate jack stands on a flat surface. NEVER work under a vehicle only supported
VRSC-DX Truck-Lite LED Headlight Installation Instructions
 VRSC-DX Truck-Lite LED Headlight Installation Instructions The following Instructions are for installing a 7 Truck-Lite LED headlight into a Harley Davidson VRSC-DX Night Rod Special fairing. Other 7 headlights
FRONT FENDERS WITH FACTORY INNER FENDERS JEEP WRANGLER TJ/LJ/YJ/CJ7 INSTALLATION INSTRUCTIONS
 FRONT FENDERS WITH FACTORY INNER FENDERS JEEP WRANGLER TJ/LJ/YJ/CJ7 INSTALLATION INSTRUCTIONS TOOLS NEEDED 13mm socket 5/32 Allen head 5/16 wrench or socket 7/16 wrench or socket 7/32 Allen head 5/8 wrench
Installation instruction do88 performance Intercooler for Volvo S60/V60 T6 MY10-
 Installation instruction do88 performance Intercooler for Volvo S60/V60 T6 MY10-1. This instruction shows how to replace the OEM intercoolers with do88 performance intercoolers. At this type of installation
1. Invert the tender, and hold in a suitable device. We use a foam cradle the Peco loco service cradle being ideal.
 Bachmann J11 EM Finescale Conversion Before you start, it is a good idea to have some small containers or snap top poly bags to put screws and components in for safe keeping...much better than crawling
INTERCOOLER UPGRADE INSTALLATION INSTRUCTIONS PART NUMBER D
 INTERCOOLER UPGRADE INSTALLATION INSTRUCTIONS PART NUMBER D330-0021 APPLICATION: 2014-16 F22 228i & xdrive coupe (see restrictions below) 2015-16 F23 228i & xdrive convertible 2012-16 F30 328i & xdrive
Last Revision: 30JN THRU 1979 C3 CORVETTE STANDARD (NON-ADJUSTABLE) STEERING COLUMN DISASSEMBLY & REPAIR INSTRUCTIONS PAPER #2
 STEERING COLUMN DISASSEMBLY & REPAIR INSTRUCTIONS PAPER #2") Last Revision: 30JN2007 1969 THRU 1979 C3 CORVETTE STANDARD (NON-ADJUSTABLE) STEERING COLUMN DISASSEMBLY & REPAIR INSTRUCTIONS PAPER #2 Disassembly and Repair Instructions Addressed in this Paper Degree
Last Revision: 30JN2007 1969 THRU 1979 C3 CORVETTE STANDARD (NON-ADJUSTABLE) STEERING COLUMN DISASSEMBLY & REPAIR INSTRUCTIONS PAPER #2 Disassembly and Repair Instructions Addressed in this Paper Degree
Mikuni RS Carburetor Conversion
 Mikuni RS Carburetor Conversion After putting your carbies on the bench or the kitchen table if the wife is out, you will see that the linkages may be in different positions depending on which brand of
97-06 JEEP TJ REPL BODY BUSHING / 1 BODY LIFT KIT
 9RC60700 97-06 JEEP TJ REPL BODY BUSHING / BODY LIFT KIT Congratulations on your purchase of a new Rough Country Body Bushing / Body Lift Combo. We are committed to providing you with the best product
 Special Tools Needed: DrVanos.com Stage I Installation Instructions Camshaft locking tool TDC Crank pin Sprocket turning tool Tool rental is available with the purchase of a vanos kit *See website for
Bachmann D11 EM/S4 Finescale Conversion
 Bachmann D11 EM/S4 Finescale Conversion Before you start, it is a good idea to have some small containers or snap top poly bags to put screws and components in for safe keeping...much better than crawling
Honda Super Cub Etc. Frame & Forks
 Honda Super Cub Etc. Frame & Forks Introduction This section is all about how to strip, servioce and rebuild the frame and forks of the Honda Super Cub and other bikes using the same frames, plus all the
RHINO SUSPENSION SYSTEM INSTALLATION INSTRUCTIONS
 PARTS INCLUDED: 2 FRONT UPPER A-ARMS 2 FRONT LOWER A-ARMS 2 UNI-BALL JOINTS 2 UNI-BALL JOINT STUDS 2 UNI-BALL JOINT CAPS 2 RETAINING RINGS 1 FRONT SHOCK ASSEM. 2 DELRON STEERING STOPS 2 SHOCK MOUNT SPACERS
INTERCOOLER UPGRADE INSTALLATION INSTRUCTIONS PART NUMBER D
 INTERCOOLER UPGRADE INSTALLATION INSTRUCTIONS PART NUMBER D330-0021 APPLICATION: 2014-16 F22 228i & xdrive coupe (see restrictions below) 2012-16 F30 328i & xdrive sedan 2014-16 F31 328i xdrive wagon 2014-16
INSTALLATION INSTRUCTIONS Horizon CCR HZ13054
 INSTALLATION INSTRUCTIONS Horizon CCR HZ13054 IMPORTANT: PLEASE GIVE CUSTOMER ENCLOSED INFORMATION! Thank you for your purchase of our HeliBars. They are designed to increase your long distance comfort
Connecting the rear fog light on the A4 Jetta, while keeping the 5 Light Mod
 Connecting the rear fog light on the A4 Jetta, while keeping the 5 Light Mod DISCLAIMER: I'm human and make mistakes. If you spot one in this how to, tell me and I'll fix it This was done on my 99.5 Jetta.
Thanks for Ordering The Kawasaki KLX Adjustable Lowering Kit From
 www.scootworks.com Thanks for Ordering The Kawasaki KLX Adjustable Lowering Kit From READ THIS BEFORE UNPACKING YOUR KIT! This instruction booklet contains detailed steps for installing the rear suspension
Automatic Roof Hatch Opener
 Automatic Roof Hatch Opener Installation Guide REQUIRED TOOLS (These tools are required to complete the installation) Cordless Drill 1/8 1/4 Drill Bits 1/8 Pin Punch #2 Philips Bit Rachet Sharpie Hammer
Remove the 3-11mm nuts holding mirror on. Don t drop the nuts!
 2005-2012 Ford Mustang Puddle Lamp Kit Parts List: Quantity: Tool List: LED Lamps 2 Flat head screwdriver Seals 2 Ratchet & Socket set OR Nuts 2 Adjustable Wrench Wiring harness 1 Drill & 11/16 th bit
Helpful Installation Hints
 Helpful Installation Hints Because most suspensions travel in arc, the use of a lift or supporting the vehicle by the frame and allowing the wheels to hang can cause bar misalignment and installation difficulties.
CBR250 Fitment Guide
 CBR250 Fitment Guide 35W Bulbs Before 60W GT150 Power2Night Bulbs The mod is designed to allow the headlights to be upgraded from the 35W bulbs to 60W bulbs. Normally, this would cause flat battery trouble
Exhaust Heat Shield Instructions ND
 Exhaust Heat Shield Instructions ND 2016 + Thank you for purchasing the Track Dog Racing Exhaust Heat Shield for the 2016 to Present Mazda MX-5. Our TDR Heat Shield is designed to help maintain lower temperatures
1967 (Late) CORVETTE STANDARD (NON-ADJUSTABLE) STEERING COLUMN DISASSEMBLY & REPAIR INSTRUCTIONS PAPER #2
 CORVETTE STANDARD (NON-ADJUSTABLE) STEERING COLUMN DISASSEMBLY & REPAIR INSTRUCTIONS PAPER #2") Last Revision: 03SE2012 1967 (Late) - 1968 CORVETTE STANDARD (NON-ADJUSTABLE) STEERING COLUMN DISASSEMBLY & REPAIR INSTRUCTIONS PAPER #2 Disassembly and Repair Instructions Addressed in this Paper Degree
Last Revision: 03SE2012 1967 (Late) - 1968 CORVETTE STANDARD (NON-ADJUSTABLE) STEERING COLUMN DISASSEMBLY & REPAIR INSTRUCTIONS PAPER #2 Disassembly and Repair Instructions Addressed in this Paper Degree
Mercedes E63/CLS AMG Carbon Turbo Intake System Instructions
 Mercedes E63/CLS AMG Carbon Turbo Intake System Instructions The goal of Alpha Performance is to provide the highest quality, best performing products available. By utilizing research and development,
Tri-Spark Ignition System Installation Triple Cylinder TRI-0001
 Tri-Spark Ignition System Installation Triple Cylinder TRI-0001 There are potentially lethal high voltages produced at the ignition coils and spark plugs, therefore every precaution must be taken to prevent
2010 Toyota Prius model II Head Unit Upgrade
 2010 Toyota Prius model II Head Unit Upgrade Monday, December 21, 2009 Disclaimer: Use this document and its contents at your own risk. Forward: Huge thanks to those members on Priuschat.com that forged
This advice was put together by Roger Butterfield for SJSC in June 2003 following the installation of a Walzendynamo 9501.
 This advice was put together by Roger Butterfield for SJSC in June 2003 following the installation of a Walzendynamo 9501. It consists of: advice about the selection of a dynamo advice on fitting the Walzendynamo
Door panel removal F07 5 GT
 Things needed Decent plastic trim removal tools Torx 30 Spare door clips 07147145753 I got away with a set of 5 but if I did it again I d be cautious and get 10. From prior experience if they are damaged
GrilleGuy.com, LLC. Installation Instructions and Care guide : Scion tc : Honda S2000 : Honda Civic
 Installation Instructions and Care guide : 2005 2009 Scion tc : 2000 2003 Honda S2000 : 2004 2005 Honda Civic Thanks again for purchasing your custom grille insert from the GrilleGuy. The following are
& 6 XJ CHEROKEE LONG ARM KIT
 92PERF1689 84-01 4.5 & 6 XJ CHEROKEE LONG ARM KIT Thank you for choosing Rough Country for your suspension needs. Rough Country recommends a certified technician installs this system. In addition to these
BEW engine timing belt replacement procedure from MOGolf (as demonstrated on a 2004 Jetta).
.") BEW engine timing belt replacement procedure from MOGolf (as demonstrated on a 2004 Jetta). Based on the procedure published by Volkswagen, but modified for the "average" shadetree mechanic. Some special
BEW engine timing belt replacement procedure from MOGolf (as demonstrated on a 2004 Jetta). Based on the procedure published by Volkswagen, but modified for the "average" shadetree mechanic. Some special
We will be upgrading from the factory, paper-cone disgrace to an Infinity Kappa 62.9i:
 In order to fully round out your stereo upgrade, the factory rear speakers must go. This is another easy job to tackle, but the fitment of the package tray and being hunched over in the rear glass area
The M7 Direct Flow Intercooler (DFIC) Installation Guide
 Installation Guide") The M7 Direct Flow Intercooler (DFIC) Installation Guide This information is meant only as a guide. The author of this information,, or any M7 Tuning employees assumes no liabilities for any outcomes resulting
The M7 Direct Flow Intercooler (DFIC) Installation Guide This information is meant only as a guide. The author of this information,, or any M7 Tuning employees assumes no liabilities for any outcomes resulting
Thermo-Bob 3 Installation Manual: KLR650E (2008 and newer)
") Thermo-Bob 3 Installation Manual: KLR650E (2008 and newer) Thank you for purchasing the Thermo-Bob 3 radiator bypass system for the KLR650. Since the KLR already has a doohickey, it seemed that this thingamabob
Thermo-Bob 3 Installation Manual: KLR650E (2008 and newer) Thank you for purchasing the Thermo-Bob 3 radiator bypass system for the KLR650. Since the KLR already has a doohickey, it seemed that this thingamabob
Coupling & Uncoupling a Tractor-Trailer
 TRAINING TOOL Coupling & Uncoupling a Tractor-Trailer DRIVING THE FUTURE 2 Coupling and Uncoupling a Tractor-Trailer TRAINING TOOL Coupling a Tractor-Trailer 1 When operating articulating vehicles such
Luggage System Fitting Instructions - Sprint ST
 WARNING: Always have Triumph approved parts, accessories and conversions fitted by a trained technician of an authorised Triumph dealer. The fitting of parts, accessories and conversions by a technician
Installation Instructions for the EVO3 Height-Adjustable Ultimate Short Shifter
 Installation Instructions for the EVO3 Height-Adjustable Ultimate Short Shifter for 1992-2005 325, 323, 318 and 1986-1994 525, 528, 535, 540 5-speed models only. (part number USSE3 and USSE5) Thank you
Guide to fitting a MK2.5 (Facelift) Centre Console into a MK2 Focus. The Parts
 Centre Console into a MK2 Focus. The Parts") Guide to fitting a MK2.5 (Facelift) Centre Console into a MK2 Focus For the latest project on my MK2 Focus I decided that a Facelift centre console would tie my previous interior uplift together. As I
Guide to fitting a MK2.5 (Facelift) Centre Console into a MK2 Focus For the latest project on my MK2 Focus I decided that a Facelift centre console would tie my previous interior uplift together. As I
I. Before starting installation
 5. Park the vehicle on a clean, dry, flat, level surface and block the tires so the vehicle cannot roll in either direction. A. Disconnect battery cables 1. Disconnect the negative cable first, then the
Applicable to the Following Part Numbers. Notes and Maintenance. Torque Specifications. Metric SAE. Use above torque setting unless otherwise noted
 INSTALLATION MANUAL Level of Difficulty Moderate This is the second first of two of two manuals required to complete this installation. The first second manual manual is is included with with your mounting
Starter One-Way Clutch Replacement
 Starter One-Way Clutch Replacement by Joe Conway YOU NEED THE RIGHT TOOLS TO DO THIS JOB!! IF YOU HAVE ANY HESITATIONS TAKE IT TO A SHOP. I CLAIM NO RESPONSIBILITY FOR DAMAGE DUE TO MISTAKES MADE DURING
INSTALLATION GUIDE Front Bumper. KL Cherokee (Trailhawk)
") INSTALLATION GUIDE Front Bumper KL Cherokee (Trailhawk) Included Hardware: Sample Sample Sample Skill Level: 5/5 stars (Professional install recommended) Disclaimer Expedition One is not responsible for
INSTALLATION GUIDE Front Bumper KL Cherokee (Trailhawk) Included Hardware: Sample Sample Sample Skill Level: 5/5 stars (Professional install recommended) Disclaimer Expedition One is not responsible for
Rear Strong-Strut. Installation Instructions
 Rear Strong-Strut Installation Instructions Please read instructions completely before installing the rear Strong-Strut Forward Installation of the rear Strong-Strut is quite simple and involves the removal
Page 1. File: Motolight caliper one-piece Date: 8/14/2006
 Page 1 Caliper Mount Installation One-piece mounting brackets You should allow about two to three hours for installation. We suggest you use a well-lighted space for installation. PLEASE READ ALL THE INSTRUCTIONS.
Installation Instructions and Suggestions For Jeep YJ Fiberglass Replacement Bodies
 Installation Instructions and Suggestions For Jeep YJ Fiberglass Replacement Bodies Getting started with the removal of your existing Jeep body. Trust nothing to memory; take photos of everything at different
We recommend installing the TRS Racebars first as we have done
 Thanks for purchasing the 2 Front Lowering Kit for the Honda Grom (MSX125). This is a basic installation guide, and we tried to cover everything, but use your best judgment along the process. It is recommended
/3500 Dodge 5 Long Arm Kit
 92137900A 11-12 2500/3500 Dodge 5 Long Arm Kit Thank you for choosing Rough Country Suspension for your Off Road needs. Rough Country recommends a certified technician installs this system. In addition
97-06 JEEP TJ 3 1/4 PROGRESSIVE COIL/SPACER KIT
 92PERF1641 97-06 JEEP TJ 3 1/4 PROGRESSIVE COIL/SPACER KIT Thank you for choosing Rough Country for your suspension needs. Rough Country recommends a certified technician installs this system. In addition
Installing LED lights in a Hypercharger By Keith Edwards Joker s Wild! (Wildjokr)
") Installing LED lights in a Hypercharger By Keith Edwards Joker s Wild! (Wildjokr) THINGS YOU WILL NEED: A Hypercharger (duh!) LEDs (The ones I got were from Benny Bryant at Fantasies on Wheels in Sylacauga,
Installing LED lights in a Hypercharger By Keith Edwards Joker s Wild! (Wildjokr) THINGS YOU WILL NEED: A Hypercharger (duh!) LEDs (The ones I got were from Benny Bryant at Fantasies on Wheels in Sylacauga,
Ford Mustang V6 OEM-Style Fog Light Kit Parts List: Quantity: Tool List:
 2015-2017 Ford Mustang V6 OEM-Style Fog Light Kit Parts List: Quantity: Tool List: LED Foglights/ Bezels 2 Flat head & Phillips screwdriver (if you ordered part#3600) Ratchet & Socket set OR Wiring harness
VW & Audi TDI CR140 ECO KIT Installation Guide
 VW & Audi TDI CR140 ECO KIT Installation Guide This guide is to help you install your new Rawtek DPF, EGR & Adblue Delete Exhaust ECO Kit on your (2009-2014) VW / Audi with 2.0l CR140 Diesel Engine. Note:
Porsche 928 with 16v LH-Jetronic Fuel System
 Porsche 928 with 16v LH-Jetronic Fuel System Toll-Free Tech Hot Line: 877-FOR-928M 877-367-9286 Please do not copy this manual and give copies to your friends. Our ability to bring you this supercharger
Depress each tab as you pull the bezel off. The bezels are tight. L.H. shown.
 2013-2014 Ford Mustang V6 & Boss 302 Lower Valance Fog Light Kit Parts List: Quantity: Tool List: Fog light & bulb with bracket 2 Flat head & Phillips screwdriver Black bezels 2 Ratchet & Socket set OR
Looking up the front of the engine from under the radiator. (Picture taken with belt under tension.)
") 8. If you re replacing the AC compressor drive belt as well, it s time to loosen its belt tensioner. The AC compressor belt tensioner is very obvious under the front of the car. Loosen the 13mm bolt, then
8. If you re replacing the AC compressor drive belt as well, it s time to loosen its belt tensioner. The AC compressor belt tensioner is very obvious under the front of the car. Loosen the 13mm bolt, then
WARNING: the engine does not come with oil in it. Please fill the oil before starting. The 200cc hardknock requires 9/10 of a quart of oil.
 WARNING: the engine does not come with oil in it. Please fill the oil before starting. The 200cc hardknock requires 9/10 of a quart of oil. Things needed for assembly. -2 tubes of blue loc-tite. I don
NOTICE TO DEALER AND VECHICLE OWNER
 84-01 4.5 & 6 XJ CHEROKEE LONG ARM KIT Thank you for choosing Rough Country for your suspension needs. Rough Country recommends a certified technician installs this system. In addition to these instructions,
Ford Racing BOSS 302 Engine Oil Cooler (11-14 GT)
") Tools needed: 14mm hex socket 7mm socket/wrench 8mm socket/wrench Ford Racing BOSS 302 Engine Oil Cooler (11-14 GT) 10mm socket (for airbox removal) ¾ inch or 19mm wrench Torque wrench Appropriate ratchets
Tools needed: 14mm hex socket 7mm socket/wrench 8mm socket/wrench Ford Racing BOSS 302 Engine Oil Cooler (11-14 GT) 10mm socket (for airbox removal) ¾ inch or 19mm wrench Torque wrench Appropriate ratchets
#GL18006-L2 Honda Gold Wing 1800 & F6B models - All Years Lower Cowl LED Driving Lights INSTALLATION INSTRUCTIONS
 #GL18006-L2 Honda Gold Wing 1800 & F6B models - All Years Lower Cowl LED Driving Lights INSTALLATION INSTRUCTIONS 1. Lay out and familiarize yourself with the parts included in the set. Remove the left
Mishimoto Performance Aluminum Radiator w/ Stabilizer - Manual (97-04 GT, Mach 1; Cobra)
") Mishimoto Performance Aluminum Radiator w/ Stabilizer - Manual (97-04 GT, Mach 1; 97-01 Cobra) Installed on: 2000 Mustang GT (manual transmission) Tools: 8mm socket 10mm socket 13mm socket 3/4" wrench
Mishimoto Performance Aluminum Radiator w/ Stabilizer - Manual (97-04 GT, Mach 1; 97-01 Cobra) Installed on: 2000 Mustang GT (manual transmission) Tools: 8mm socket 10mm socket 13mm socket 3/4" wrench
Installation instructions for Alpha Racing Quickshifter/Blipper for a pre-2014 S1000RR
 Skill Level: Intermediate Installation instructions for Alpha Racing Quickshifter/Blipper for a pre-2014 S1000RR Tools Required: Alen keys/socket/drivers Torx keys/sockets/drivers Metric box wrenches and
PARTS LIST: 8581 DODGE LONG ARM BRACKETS 03-13
 SYNERGY MFG. 870 INDUSTRIAL WAY, SAN LUIS OBISPO, CA (805) 242-0397 8580 03-12 DODGE 2500/3500 4X4, 06-08 1500 MEGACAB 4X4 LONG ARM SUSPENSION KIT V3.0 GENERAL NOTES: These instructions are also available
---Optional Items---
 1 2 3 4 5 6 ---Optional Items--- 10 9 11 7 8 12 This package should contain: 1. One (1) CorkSport Crashbar Weldment 2. Eight (8) M8x1.25x20 mm Bolts 3. Eight (8) M8x1.25mm Nyloc Nuts 4. Sixteen (16) M8
Trike Conversion Installation Guide for Indian Scout Motorcycles 2016 & Up Revision 2
 Trike Conversion Installation Guide for Indian Scout Motorcycles 2016 & Up Revision 2 Warning - This product was not intended for more than one rider. Weight limit on this product has been set at 400 lbs.
Hayes TrailTrac Kit Installation Guidelines Polaris Rush / Pro-R / Indy
 Models: 2010-2014 Polaris Rush / Pro-R / Indy Packing List 1 Electronic Control Unit (ECU) 1 ECU Velcro, 3 inch 1 Switch face plate 1 Switch face plate adhesive 1 Switch 1 Wiring harness 1 Fully pre-filled
Part 5. Front Sub-frames, Sneaky Rust and a hole lot more
 Part 5 Front Sub-frames, Sneaky Rust and a hole lot more One of the Mean n Greens faults listed on the ebay sales blurb was top wishbone bushes need renewal. This was more than evident, given away by the