Rear Strong-Strut. Installation Instructions
|
|
|
- Harvey Wilkins
- 5 years ago
- Views:
Transcription
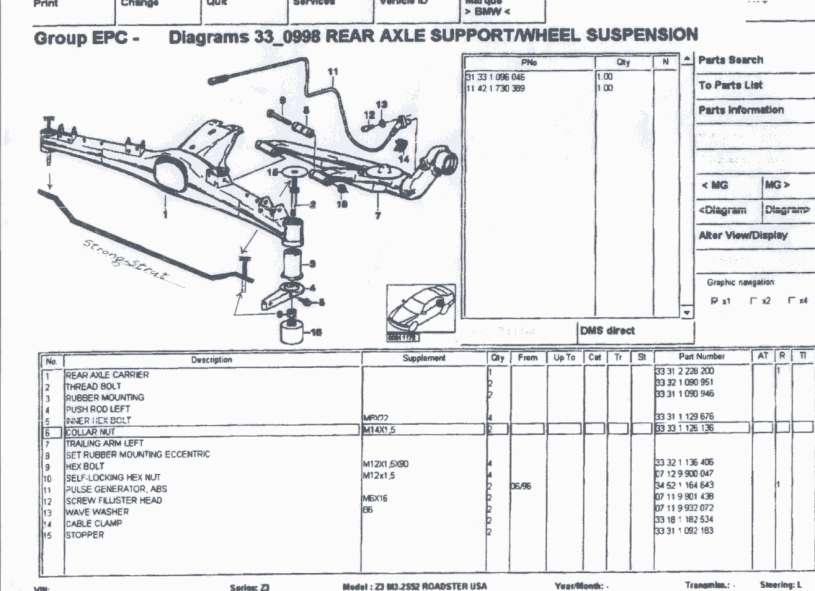
1 Rear Strong-Strut Installation Instructions Please read instructions completely before installing the rear Strong-Strut Forward Installation of the rear Strong-Strut is quite simple and involves the removal of two large nuts that fasten the rear axle carrier to the car, positioning the rear Strong-Strut in place and attaching the spacing hardware and custom fasteners (nuts) Once your car is SAFELY on a hoist or jackstands, it should be no more than a 30 minute process. Most of our customers are installing it without raising the car at all. It works, but there is a bit less room to work. We have included an enhanced parts diagram from BMW and a hand drawn illustration to assist you in the installation. Please familiarize yourself with these documents before starting the installation There are colored pictures of the installed prototype rear Strong-Strut on the web page at Viewing the pictures will be an installation aid. Clearance concerns The variation in available engines in the Z3 result in several different exhaust system configurations, component size, and component location. The rear Strong-Strut is a universal fit for all models. The only clearance issues are for either the exhaust system or for the quilted aluminum heat shielding nearby. In addition to the 2 inch square spacer, we provide a round,¼ inch thick and two thinner washers. These can be used singly or in combination at the owners discretion to provide more or less clearance where necessary. If the rear Strong-Strut touches any of the aluminum heat shielding, it s best to modify the shield by tapping or bending it slightly out of harms way. It is important that you use the ½ inch thick round spacer and the ¼ inch thick round spacer in every installation. Use of both will insure that the shank of the custom fastener will not bottom out on the mounting bracket but leave the rear Strong-Strut itself, lose. You have the option of inserting both the spacers wherever they result in the best installation for your car.but both MUST BE USED. Providing there are no clearance issues with the exhaust routing, we suggest mounting the round ¼ inch spacer above the rear Strong-Strut and then place the ½ inch thick square spacer below the rear Strong-Strut under the head of the fastener. This provides the most ground clearance for the rear Strong-Strut. This arrangement may not be possible on all cars but try this method first. The two thin washers can be used at the owners discretion to gain additional exhaust pipe clearance if needed. Tools needed 22 mm deep socket (7/8 inch) or open end/ box wrench to remove OEM nuts on axle carrier. 1 and 1/8 inch socket and torque wrench to attach custom fasteners. Safety concerns
2 NEVER get under a vehicle that is supported only by a jack. If the jack were to fail for any reason, you could be crushed to death. Do not utilize any of the movable rear suspension components for jacking up the car or for jackstand placement. Use the provided jacking pads in the rocker panel and place your jackstands or other supports in a safe and appropriate location. Installation steps 1. Elevate the rear of your car to enable you to access the rear axle carrier and nuts. (optional--- can be completed without raising vehicle) (see safety concerns for jack and stand placement) Secure the vehicle on a hoist or other means you deem to be safe. Once you are certain the vehicle is safely elevated and will not fall, proceed to step #2. 2. Locate the two OEM 22 mm nuts that secure the rear axle carrier to their mounts. Refer to the attached parts diagram and nut indicated by #6 "collar nut." You can safely remove the nuts and the rear axle carrier and other parts will remain in place. These nuts are factory torqued to a fairly high setting so it will require a proper fitting wrench or socket and some muscle or leverage to loosen them. Before removing the nuts, clean the threads on the stud protruding through the nut with a solvent on a rag or brush. Remove the nuts and be very careful with the threads, taking care not to damage them. The OEM nuts are the slightly oval, self locking type and will offer some resistance to removal even after you have them loose. When both the collar nuts are removed, go to step #3. 3. Position the rear Strong-Strut below the two mounting brackets and OEM threaded studs. Insert the appropriate spacer for your car, either the square or round one and position it between the top of the rear Strong-Strut and the mounting bracket. While holding it in place, position the remaining spacer under the head of the fastener, line up all the parts and screw on the fastener with your fingers. Repeat on the other side of the car. In order to install the first side, the rear Strong-Strut must be close to level and raised near its final position. You can use a box or prop of some kind to hold the second side up near its stud while you work on the first side. If you have an extra person, it s easier and no need to prop up. The holes in the strut, spacer and washers (if used) are large enough to allow the shank of the fastener to pass through them. Tighten the fasteners so there is only a small amount of slack remaining and then lower the car to the ground allowing the suspension to settle. Then torque the fasteners to 75 to 80 ft. pounds. Please remember that both the 2 inch square spacer and the round spacer MUST be used on every installation to prevent the shank of the fastener from bottoming out and leaving the strut lose in the mounts. The rear Strong-Strut was made to fit all models of the Z3 in stock configuration. If you have a custom exhaust or other modifications in the vicinity of the rear Strong-Strut, there may be conflicts in clearances. Often in these situations, the application of a little imagination, common sense, and addition of some extra washers, is all that is needed to correct the issue. Be especially kind to the threaded studs (on diagram, #2 thread bolt) If they get damaged to the point of replacement, it will require removal of the inner fender liner for access. IMPORTANT After 300 miles of operation, re-torque the custom fasteners to ft pounds. Thereafter, we suggest you check them at each oil change. A WORD ABOUT THE DESIGN AND LOCATION The rear Strong-Strut is bolted below the sub frame rear axle carrier. Everything above the OEM mounting brackets of the sub frame is mounted in rubber anti-vibration mounts and is designed to move around. Therefore, the rear axle carrier, although massive in appearance, provides no stiffing element to the body/chassis. Because the rear Strong-Strut is bolted below, and directly to the mounting brackets, which are in turn solidly bolted to the body, the rear Strong-Strut serves as a rigid transverse reinforcing member. This ties both sides of the body/chassis together just forward of the rear wheels and resists the torquing/twisting forces of the rear body structure when subjected to aggressive cornering or uneven


3 roadway. By eliminating or reducing body flex, the rear of the car follows the front more crisply when turning into corners. One experienced driver remarked that it feels like rear wheel steering has been added to the car. The obvious benefit is the disappearance of the "lose" feeling in the rear that all Z3 Roadsters seem to have, and a more unified feel to the structure when subjected to bumpy or uneven road surfaces. The Strong-Strut rear Strong-Strut functions much the same way as the front Strong-Strut, in that it prevents sheet metal structures from reacting to twisting and torquing forces. If you encounter difficulties with the installation, please do not hesitate to contact us. azz3man@cox.net Thank you for your purchase of the Strong-Strut rear Strong-Strut, we know you will get many years of enjoyment from its benefits. Please visit our web site and review our other products. Many find that out factory matching spray paint kit is quite handy. Best wishes, Paul and the Strong-Strut Team Installed in ///M Roadster from behind Fender liner removed
4
5
Installation Instructions
 Instructions Created by an: 2007-Present Toyota Tundra LRT Leveling Lift Kit - 4WD by Low Range Off-Road (SKU# LR-LRTundra) Instructions also apply to 2WD Kits. Installation Instructions Revised 7-11-17
Please take time to read and understand these installation instructions.
 Cat Back Exhaust System 2013+ SRT/ GTS Viper Please take time to read and understand these installation instructions. CORSA recommends that the installation of this system be performed by a qualified service
Performance Brake Caliper Guide Bushing Set Installation Guide
 Performance Brake Caliper Guide Bushing Set Installation Guide Proper service and repair procedures are vital to the safe, reliable operation of all motor vehicles as well as the personal safety of those
Carli Suspension Front Instructions
 Carli Suspension Front Instructions 94-08 DODGE 2500-3500 4X4 SUSPENSION SYSTEM Note: Prior to installation, carefully inspect the vehicle=s steering and drive train components. Be sure to check ball joints,
COBB Catback Exhaust
 591100 COBB Catback Exhaust 2013 Ford Focus ST Congratulations on your purchase of the COBB Catback Exhaust for your 2013 Ford Focus ST. The following instructions will assist you through your installation
ReadyLift (Part# ) Lift Kit, Installation Instructions Toyota Tundra New Body Style 2WD & 4WD
 Lift Kit, Installation Instructions Toyota Tundra New Body Style 2WD & 4WD") SAFETY WARNING: recommends this system be installed by a professional technician. In addition to these instructions, professional knowledge of disassembly/ reassembly procedures and post installation checks
SAFETY WARNING: recommends this system be installed by a professional technician. In addition to these instructions, professional knowledge of disassembly/ reassembly procedures and post installation checks
I. Before starting installation
 5. Park the vehicle on a clean, dry, flat, level surface and block the tires so the vehicle cannot roll in either direction. A. Disconnect battery cables 1. Disconnect the negative cable first, then the
OIL COOLER KIT INSTALLATION INSTRUCTIONS PART NUMBER D
 OIL COOLER KIT INSTALLATION INSTRUCTIONS PART NUMBER D570-0907 APPLICATION: 2011-12 E90 335i/xi (N55 engine) with BMW M-Technic bumper and without stock oil cooler Congratulations for being selective enough
RHINO SUSPENSION SYSTEM INSTALLATION INSTRUCTIONS
 PARTS INCLUDED: 2 FRONT UPPER A-ARMS 2 FRONT LOWER A-ARMS 2 UNI-BALL JOINTS 2 UNI-BALL JOINT STUDS 2 UNI-BALL JOINT CAPS 2 RETAINING RINGS 1 FRONT SHOCK ASSEM. 2 DELRON STEERING STOPS 2 SHOCK MOUNT SPACERS
HP10220 KIT. See application guide for proper fitment.
 HP10220 KIT Dodge Dakota* (2WD/4WD) * 2005 All Dodge Dakotas 2006 - All Dodge Dakotas except Night Runner and R/T sub models 2007 - All Dodge Dakotas except SXT and TRX4 sub models 2008 - All Dodge Dakotas
BEW engine timing belt replacement procedure from MOGolf (as demonstrated on a 2004 Jetta).
.") BEW engine timing belt replacement procedure from MOGolf (as demonstrated on a 2004 Jetta). Based on the procedure published by Volkswagen, but modified for the "average" shadetree mechanic. Some special
BEW engine timing belt replacement procedure from MOGolf (as demonstrated on a 2004 Jetta). Based on the procedure published by Volkswagen, but modified for the "average" shadetree mechanic. Some special
2015+ WRX COLD AIR INTAKE PSP-INT-325BK & PSP-INT-325RD
 Vehicle Fitment Chart: 2015-18 SUBARU WRX H4-2.0L Turbo 2015+ WRX COLD AIR INTAKE PSP-INT-325BK & PSP-INT-325RD 2017-09-05 Thank you for purchasing this PERRIN product for your car! Installation of this
PRE-INSTALLATION Ford F150 4WD 4" Suspension Lift Kit
 2009-2013 Ford F150 4WD 4" Suspension Lift Kit PRE-INSTALLATION 25007 2 - Knuckle (Driv/Pass) 2 - Crossmember (Front/Rear) 2 - Differential Bracket (Driv/Pass) 1 - Diff. Brace Bracket (Pass) 2 - Front
INSTALLATION INSTRUCTIONS
 2595 INSTALLATION INSTRUCTIONS 2-6 ! IMPORTANT PLEASE DON T HURT YOURSELF, YOUR KIT OR YOUR VEHICLE. TAKE A MINUTE TO READ THIS IMPORTANT INFORMATION. DO NOT INSTALL IF THE TRUCK HAS BEEN LIFTED AND THE
Installation Instructions
 Suzuki Samurai 1 Inch and 2 Inch Body Lift Kit (SKU# SSP-BL) Installation Instructions Background: These instructions are designed for installing the 2 body lift. Our approach is to raise the entire body
INSTALLATION INSTRUCTIONS DODGE DAKOTA 2 KIT # 682 (2WD), 692 (4WD) 3 KIT # 683 (2WD), 693 (4WD)
, 692 (4WD) 3 KIT # 683 (2WD), 693 (4WD)") INSTALLATION INSTRUCTIONS 1997-1999 DODGE DAKOTA 2 KIT # 682 (2WD), 692 (4WD) 3 KIT # 683 (2WD), 693 (4WD) Installation of a Performance Accessories body lift kit will change the vehicle s center of gravity
INSTALLATION INSTRUCTIONS 1997-1999 DODGE DAKOTA 2 KIT # 682 (2WD), 692 (4WD) 3 KIT # 683 (2WD), 693 (4WD) Installation of a Performance Accessories body lift kit will change the vehicle s center of gravity
TRU-Turn JK Tie rod Installation Document
 TRU-Turn JK Tie rod Installation Document Off Road Only ph 651.644.2323 www.offroadonly.com oro-info@offroadonly.com The TRU-Turn will bolt onto the stock JK steering knuckles at the stock tapered tie
OIL COOLER KIT INSTALLATION INSTRUCTIONS PART NUMBER D E92 335i/xi (N55 engine) with M-Technic bumper and without stock oil cooler
 with M-Technic bumper and without stock oil cooler") OIL COOLER KIT INSTALLATION INSTRUCTIONS PART NUMBER D570-0925 APPLICATION 2011-12 E92 335i/xi (N55 engine) with M-Technic bumper and without stock oil cooler Congratulations for being selective enough
OIL COOLER KIT INSTALLATION INSTRUCTIONS PART NUMBER D570-0925 APPLICATION 2011-12 E92 335i/xi (N55 engine) with M-Technic bumper and without stock oil cooler Congratulations for being selective enough
OIL COOLER KIT INSTALLATION INSTRUCTIONS PART NUMBER D
 OIL COOLER KIT INSTALLATION INSTRUCTIONS PART NUMBER D570-0904 APPLICATION: 2011-2012 E90 335i/xi (N55 engine) with BMW standard bumper and with stock oil cooler Congratulations for being selective enough
TOYOTA TUNDRA BIG BRAKE KIT Section I - Installation Preparation
 TOYOTA TUNDRA 2007- BIG BRAKE KIT Section I - Installation Preparation Part Number: PTR09-34070 Kit Contents Item # Quantity Reqd. Description 1 1 Brake Rotor, LH Front 2 1 Brake Rotor, RH Front 3 1 Brake
Z1 Motorsports 370Z/G37 Oil Cooler Kit Installation Manual
 Z1 Motorsports 2877 Carrollton Villa Rica Hwy Carrollton GA 30116 770.838.7777 Z1 Motorsports 370Z/G37 Oil Cooler Kit Installation Manual For 19, 25 and 34 Row Oil Cooler Kits Parts Included: 1 SETRAB
ReadyLift (Part# ) Installation Instructions Toyota Tacoma Pre-Runner/ 4WD
 Installation Instructions Toyota Tacoma Pre-Runner/ 4WD") SAFETY WARNING:ReadyLift Suspension Inc. recommends this system be installed by a professional technician. In addition to these instructions, professional knowledge of disassembly/ reassembly procedures
SAFETY WARNING:ReadyLift Suspension Inc. recommends this system be installed by a professional technician. In addition to these instructions, professional knowledge of disassembly/ reassembly procedures
96-06 TOYOTA TUNDRA & TOYOTA TACOMA FRONT 2.0 LEVELING KIT INSTALLATION
 INSTRUCTION PART NO 15292 LEVELING KIT PART NO 3829 96-06 TOYOTA TUNDRA & 96-04 TOYOTA TACOMA FRONT 2.0 LEVELING KIT INSTALLATION READ INSTRUCTIONS/WARNINGS COMPLETELY THROUGH BEFORE STARTING. FAILURE
PRODUCT NOTES: These components are designed for suspension height adjustment lower than stock height.
 INSTALLATION INSTRUCTIONS Progress Technology Competition Series Coilover System 2001 2005 Acura RSX 2001-2005 Honda Civic, Civic Si Revision B (2/19/13) WHO SHOULD INSTALL THIS PRODUCT? Progress Technology
BAG 3 (2) 2.25 x 1 Sleeves (4) 1/4 Nylock Nuts (4) 1/4 x 2 Bolts (4) 3/8 Nylock Nuts (4) 3/8 Flat Washers (2) 3/8 U-Bolts
 2.25 x 1 Sleeves (4) 1/4 Nylock Nuts (4) 1/4 x 2 Bolts (4) 3/8 Nylock Nuts (4) 3/8 Flat Washers (2) 3/8 U-Bolts") INSTALLATION INSTRUCTIONS PART # DESCRIPTION 799 Lincoln Ave. Riverside, CA 90 Phone: 9.689.ICON Fax: 9.689.06 90 00+ RAPTOR REAR BUMPSTOP SYSTEM ** READ ALL INSTRUCTIONS THOROUGHLY FROM START TO FINISH
INSTALLATION INSTRUCTIONS PART # DESCRIPTION 799 Lincoln Ave. Riverside, CA 90 Phone: 9.689.ICON Fax: 9.689.06 90 00+ RAPTOR REAR BUMPSTOP SYSTEM ** READ ALL INSTRUCTIONS THOROUGHLY FROM START TO FINISH
Installation Instructions
 2003-Present Toyota 4Runner 2007-2014 FJ Cruiser LRT 3" Lift Kit by Low Range Off-Road (SKU# LR-LRFJ4RU) Installation Instructions Suggested Tools: CAUTION: Safety glasses should be worn at all times when
PRE-INSTALLATION. INSTALLATION INSTRUCTIONS Front Ford F150 4WD 4" Suspension Lift Kit
 2015 Ford F150 4WD 4" Suspension Lift Kit PRE-INSTALLATION 2 - Knuckle (Driv/Pass) 2 - Crossmember (Front/Rear) 2 - Differential Bracket (Driv/Pass) 1 - Diff. Brace Bracket (Pass) 2 - Front Brake Line
8 Rear Suspension System. Dodge Ram Part#:
 Part#: 012619 8 Rear Suspension System Dodge Ram 2500 2014 Rev. 070518 491 W. Garfield Ave., Coldwater, MI 49036. Phone: 517-279-2135 Web: www.bds-suspension.com. E-mail: tech-bds@ridefox.com Read And
Switchback Carrier Rack System
 Switchback Carrier Rack System Installation Instructions 1 Rocky Mountain Westy Ph. (970)310-3441 Introduction Thank you for purchasing the Rocky Mountain Westy Switchback Carrier Rack System. We pride
A i r R i d e C o n v e r s i o n S y s t e m I n s t a l l a t i o n I n s t r u c t i o n s. kelderman air ride
 A i r R i d e C o n v e r s i o n S y s t e m I n s t a l l a t i o n I n s t r u c t i o n s 800 334-6150 www.keldermanairride.com kelderman air ride The difference in the ride is like night and day Inside
INSTALLATION INSTRUCTIONS Progress Technology Rear Anti-Sway Bar Honda Civic Part # No Revision (7/20/16)
") INSTALLATION INSTRUCTIONS Progress Technology Rear Anti-Sway Bar Honda Civic 96-00 Part # 62.1042 No Revision (7/20/16) WHO SHOULD INSTALL THIS PRODUCT? Progress Technology products should only be installed
INSTALLATION INSTRUCTIONS Progress Technology Rear Anti-Sway Bar Honda Civic 96-00 Part # 62.1042 No Revision (7/20/16) WHO SHOULD INSTALL THIS PRODUCT? Progress Technology products should only be installed
2015 WRX Engine Oil Cooler
 2015 WRX Engine Oil Cooler 2014-04-24 Thank you for purchasing this PERRIN product for your car! Installation of this product should only be performed by persons experienced with installation of aftermarket
Kit Chevrolet/GMC Heavy Duty. Installation Guide
 Installation Guide Kit 57538 Chevrolet/GMC Heavy Duty Representative vehicle image MN-1034 (021810) ECR 9155 For maximum effectiveness and safety, please read these instructions completely before proceeding
07 & UP GM 1500 PICKUP 2.0 FRONT 1.0 REAR LEVELING KIT INSTALLATION
 INSTRUCTION PART NO 15265 LEVELING KIT NO 3813 07 & UP GM 1500 PICKUP 2.0 FRONT 1.0 REAR LEVELING KIT INSTALLATION READ INSTRUCTIONS/WARNINGS COMPLETELY THROUGH BEFORE STARTING. FAILURE TO ADHERE TO THE
OIL COOLER KIT INSTALLATION INSTRUCTIONS PART NUMBER D E92 335i/xi (N55 engine) with BMW Standard bumper and with stock oil cooler
 with BMW Standard bumper and with stock oil cooler") OIL COOLER KIT INSTALLATION INSTRUCTIONS PART NUMBER D570-0924 APPLICATION: 2011-12 E92 335i/xi (N55 engine) with BMW Standard bumper and with stock oil cooler Congratulations for being selective enough
OIL COOLER KIT INSTALLATION INSTRUCTIONS PART NUMBER D570-0924 APPLICATION: 2011-12 E92 335i/xi (N55 engine) with BMW Standard bumper and with stock oil cooler Congratulations for being selective enough
Steeda Sport Mustang Lowering Springs (2005+) - Installation Instructions
 - Installation Instructions") Steeda Sport Mustang Lowering Springs (2005+) - Installation Instructions The below installation instructions work for the following products: Steeda Sport Mustang Lowering Springs (2005+) Please read
Steeda Sport Mustang Lowering Springs (2005+) - Installation Instructions The below installation instructions work for the following products: Steeda Sport Mustang Lowering Springs (2005+) Please read
2014 F /6 LIFT KIT
 92157500 2014 F-150 4 /6 LIFT KIT THANK YOU FOR CHOOSING ROUGH COUNTRY FOR YOUR SUSPENSION NEEDS. Rough Country recommends a certified technician install this system. In addition to these instructions,
OIL COOLER KIT INSTALLATION INSTRUCTIONS PART NUMBER D E92 335i/xi without stock oil cooler
 OIL COOLER KIT INSTALLATION INSTRUCTIONS PART NUMBER D570-0921 APPLICATION 2007-08 E92 335i/xi without stock oil cooler Congratulations for being selective enough to use a Dinan Engineering Oil Cooler
Victory CrossRoads CrossCountry CrossCountry Tour HardBall
 by Trike Conversion Kit Victory CrossRoads CrossCountry CrossCountry Tour HardBall Installation Instructions Revised 3-2018 California Sidecar Parts & Technical Support 434.263.8866 Table of Contents:
Part # Mustang Complete HQ Series Coil-Over Kit
 350 S. St. Charles St. Jasper, In. 47546 Ph. 812.482.2932 Fax 812.634.6632 www.ridetech.com Front Components: Part # 12090210 64-66 Mustang Complete HQ Series Coil-Over Kit 1 12093509 HQ Series Front Coil-Overs
This is the Unpacking Guide for the Optibike Pioneer Allroad electric bicycle. The Guide provides information required to remove the Allroad from the
 This is the Unpacking Guide for the Optibike Pioneer Allroad electric bicycle. The Guide provides information required to remove the Allroad from the box and assemble it. If you have not assembled a bicycle
Product: Variable Height Spring. Part Numbers: N. Applications: BMW F8x, M2/M3/M
 Product: Variable Height Spring Part Numbers: 415-503001-N Applications: BMW F8x, M2/M3/M4 2014-17 Contents in the box: Qty Part # Description 1 00P-0A1646-B Front Passenger Sleeve Assembly 1 00P-0A1645-N
Subaru Front Mount Intercooler Kit STI Subaru Front Mount Intercooler Kit STI
 Subaru Front Mount Intercooler Kit STI 2008-2014 715500 Subaru Front Mount Intercooler Kit STI 2008-2014 Congratulations on your purchase of the Subaru Front Mount Intercooler Kit STI 2008-2014. The following
Automatic Roof Hatch Opener
 Automatic Roof Hatch Opener Installation Guide REQUIRED TOOLS (These tools are required to complete the installation) Cordless Drill 1/8 1/4 Drill Bits 1/8 Pin Punch #2 Philips Bit Rachet Sharpie Hammer
GP113S STAINLESS HEADER WITH STAINLESS Y-PIPE
 GP113S STAINLESS HEADER WITH STAINLESS Y-PIPE HAS NO AIR FITTING AT THE FRONT OF EACH MANIFOLD FOR CHEVROLET/GMC 96-00 PICKUP 7.4L 2/4WD 96-00 SUBURBAN 7.4L 2/4WD GIBSON HEADERS ARE 50 STATE SMOG LEGAL
Eurocompulsion Camshaft Installation
 Eurocompulsion Camshaft Installation Introduction, please read. The purpose of this article is too assist our customers with installation of a performance camshaft in the Fiat Multiair 1.4 Turbo. The operation
07-13 TOYOTA TUNDRA 2WD 6" LIFT SPINDLES
 MAXTRAC SUSPENSION 4030 E LEAVERTON CT ANAHEIM, CA 92807 714-630-0363 WWW.MAXTRACSUSPENSION.COM SALES@MAXTRACSUSPENSION.COM PRODUCT: K886764 07-13 TOYOTA TUNDRA 2WD 6" LIFT SPINDLES PARTS LIST QTY LIFT
TOYOTA TUNDRA 3 BODY LIFT INSTALLATION INSTRUCTIONS 2014 KIT# 5643
 3651 N Highway 89 Chino Valley, AZ 86323 (928) 636-7080 www.p-a-g.net TOYOTA TUNDRA 3 BODY LIFT INSTALLATION INSTRUCTIONS 2014 KIT# 5643 Installation of a Performance Automotive Group body lift kit will
INSTALLATION INSTRUCTIONS
 COLD AIR INTAKE INSTALLATION INSTRUCTIONS PART NUMBER D760-0390C APPLICATION: 1999-2003 E39 M5 PARTS LIST 1 Left Aluminum Intake Tube 1 Air Pump Bracket (A) 1 Right Aluminum Intake Tube 1 Air Pump Bracket
TOYOTA FJ CRUISER 6 SUSPENSION KIT
 92177000 TOYOTA FJ CRUISER 6 SUSPENSION KIT Thank you for choosing Rough Country for your suspension needs. Rough Country recommends a certified technician installs this system. In addition to these instructions,
J&M CASTER/CAMBER PLATE INSTALLATION INSTRUCTIONS (#24213) Hardware:
 Hardware:") J&M CASTER/CAMBER PLATE INSTALLATION INSTRUCTIONS (#24213) Thank you for purchasing J&M Product s Caster/Camber Plates (#24213) for 1994-2004 Ford Mustang. The J&M Caster/Camber plates are the highest
J&M CASTER/CAMBER PLATE INSTALLATION INSTRUCTIONS (#24213) Thank you for purchasing J&M Product s Caster/Camber Plates (#24213) for 1994-2004 Ford Mustang. The J&M Caster/Camber plates are the highest
What s in your new header system kit?
 !"#$% "#$%& ' "())' **+ Congratulations on your purchase of the Dynatech / SuperMaXX system for the Dodge Magnum / Chrysler 300C. We believe, and think you will agree that this system is second to none
Installation Instructions
 Installation Instructions Rear Disc Brake Conversion Kit Item # RC1001, RC1001X Applications: 64-72 A-body, 67 F-Body, 63-67 X-body with Non Staggered Shocks Thank you for choosing GPS Auto for your automotive
JEEP JK 4 LONGARM. Tools Needed: Thank you for choosing Rough Country for your suspension needs.
 921786000 Thank you for choosing Rough Country for your suspension needs. JEEP JK 4 LONGARM Rough Country recommends a certified technician install this system. In addition to these instructions, professional
SCION tc LOWERING SPRINGS Preparation
 Preparation Part Number: PTR11-21100 PTR11-21100-50 Kit Contents Item # Quantity Reqd. Description 1 2 Front Spring 2 2 Rear Spring 3 2 Locking Nut 4 2 Spring Bumper, Front 5 1 Instruction Form Hardware
4, 6 Suspension System. Ford Super Duty 4WD Part#: ,
 Part#: 013413, 013610 4, 6 Suspension System Ford Super Duty 4WD 2011-2016 Rev. 012518 491 W. Garfield Ave., Coldwater, MI 49036. Phone: 517-279-2135 E-mail: tech-bds@sporttruckusainc.com Read And Understand
Part # Mustang Complete CoilOver Kit
 Front Components: 1 12103509 Front CoilOvers 1 12102899 Lower StrongArms 1 12103699 Upper StrongArms 350 S. St. Charles St. Jasper, In. 47546 Ph. 812.482.2932 Fax 812.634.6632 www.ridetech.com Part # 12100109
COLD AIR INTAKE INSTALLATION INSTRUCTIONS. # D Fits: E92 328i & xdrive PARTS LIST
 COLD AIR INTAKE INSTALLATION INSTRUCTIONS # D760-9001 Fits: 2007-13 E92 328i & xdrive PARTS LIST (1) Intake Snorkel (1) Flex Tube (1) Brake Scoop Assy (1) Front Grill (1) Filter (1) Hardware Kit (2) Edge
JK SHIELD TIRE CARRIER INSTALLATION INSTRUCTIONS
 JK SHIELD TIRE CARRIER INSTALLATION INSTRUCTIONS TOOLS NEEDED 7/16" wrench or socket 3/4" wrench or socket 15/16" wrench or socket 5/8" wrench or socket 3/16 Allen wrench or socket 1 1/8" Wrench HARDWARE
Instant Chat off the main page of Or simply call our tech team at
 FRONT MOUNT INTERCOOLER 2015+ WRX 2017-07-07 Thank you for purchasing this PERRIN product for your car! Installation of this product should only be performed by persons experienced with installation of
 This document provides instructions for removing and installing a Front Wheel / Rotor on a Ducati Superbike. The torque values used are for the 748/916/996 from 1994 to 2001 and may be applicable for later
STOP---READ THIS FIRST!
 STOP---READ THIS FIRST! **Read These Entire Instructions Before Starting Anything** 2007-2010 GM 1500 TRUCK LIFT KIT INSTRUCTIONS (PART# 50700 & 50720) 5680 W. Barstow, Fresno, CA 93722 PH: (559) 226-8196
STOP IMPORTANT WARRANTY & INSTALLATION INSTRUCTIONS ATTACHED TO ACTIVATE YOUR LIMITED LIFETIME WARRANTY GO TO: CORSAPERFORMANCE.
 IMPORTANT WARRANTY & INSTALLATION INSTRUCTIONS ATTACHED Please Forward All Attached Information to Consumer Warranty Not Valid Unless Returned to CORSA Exhaust We ask that you take a few moments to complete
DYNATRAC PRODUCTS V1.3
 DYNATRAC PRODUCTS V1.3 2007-2017 Jeep JK Wrangler ProGrip Performance Brake Kit Front & Rear Required tools: 13mm wrench 15mm wrench 18mm socket 21mm socket Calibrated torque wrench. Anti-Seize compound.
ReadyLift (Part# T6-2059) (04-11) Ford F-150 2WD, (04-11) 4WD (All cabs) 2.0 Leveling Kit exc. Heritage & SVT Raptor
 (04-11) Ford F-150 2WD, (04-11) 4WD (All cabs) 2.0 Leveling Kit exc. Heritage & SVT Raptor") SAFETY WARNING:ReadyLift Suspension Inc. recommends this system be installed by a professional technician. In addition to these instructions, professional knowledge of disassembly/ reassembly procedures
SAFETY WARNING:ReadyLift Suspension Inc. recommends this system be installed by a professional technician. In addition to these instructions, professional knowledge of disassembly/ reassembly procedures
Geared Drives 200Z PSRU Zero Offset Gearbox with Centrifugal Clutch Assembly
 Instructions for Removing and replacing Gen X Gearbox with Geared Drives 200Z Prior to your gear box arriving: Using a strap or chain and an engine hoist to hold your engine up in the mount, remove your
Installation Instructions
 Parts Installation Instructions DESCRIPTION PART # QTY A Alignment Tab PN ESB101 1 B Drill Guide PN ESB102 1 C Actuator Cable Assembly PN ESB103 1 C1 72 Actuator Cable 1 C2 5/16 Jam Nut 1 C3 Star Washer
KJ09168BK Renegade 1.5 Lift Kit
 KJ09168BK Renegade 1.5 Lift Kit www.daystarweb.com Tech Support Contact Info Tech@DaystarWeb.com Phone: 623.907.0081 Fax: 623.907.0088 841 South 71 st Avenue Phoenix, AZ 85043 Instruction Sheet: P21677
Steeda Bumpsteer Kit (94-04) - Installation Instructions
 - Installation Instructions") Steeda Bumpsteer Kit (94-04) - Installation Instructions The below installation instructions work for the following products: Steeda Bumpsteer Kit (94-04) Please read through the instructions carefully
Steeda Bumpsteer Kit (94-04) - Installation Instructions The below installation instructions work for the following products: Steeda Bumpsteer Kit (94-04) Please read through the instructions carefully
Multistrada (MTS) Tank Installation Notes. Tools Required. Phase 1: Remove Fairings. Phase 2: Remove Fuel Tank
 Tank Installation Notes. Tools Required. Phase 1: Remove Fairings. Phase 2: Remove Fuel Tank") The California Cycleworks MTS tank provides an aftermarket alternative to the OEM nylon fuel tanks as used on aircooled Desmodue Ducati Multistrada 1100, 1000, and 620 models. This fuel tank is NOT for
The California Cycleworks MTS tank provides an aftermarket alternative to the OEM nylon fuel tanks as used on aircooled Desmodue Ducati Multistrada 1100, 1000, and 620 models. This fuel tank is NOT for
SUT-450-I ASSEMBLY REQUIREMENTS
 SUT-450-I Torque wrench, carpenters square, wire cutters, Phillips screwdriver, 7/16, 9/16, and 3/4 combination wrenches, ratchet, 9/16,3/4,13/16, and 7/8 sockets. ASSEMBLY REQUIREMENTS *Torque all T-bolt
Part # Lincoln Level 2 Air Suspension Package
 350 S. St. Charles St. Jasper, In. 47546 Ph. 812.482.2932 Fax 812.634.6632 www.ridetech.com Part # 12060299 64-69 Lincoln Level 2 Air Suspension Package Front Components: 1 12060999 CoolRide Kit 1 12060601
Trike Conversion Kit ROADLINER, STRATOLINER, & STRATOLINER DELUXE
 by Trike Conversion Kit ROADLINER, STRATOLINER, & STRATOLINER DELUXE Installation Instructions Revised 1-2015 California Sidecar Parts & Technical Support 434.263.8866 Table of Contents: 1. Warnings and
INSTALLATION INSTRUCTIONS 88518
 INSTALLATION INSTRUCTIONS 88518 For Rancho Suspension Systems RS6518: 2009 FORD F-150 4WD READ ALL INSTRUCTIONS THOROUGHLY FROM START TO FINISH BEFORE BEGINNING INSTALLATION Rev A IMPORTANT NOTES! WARNING:
Installation Guide for Rough Country 2.5 inch Lift Kit w/o Shocks (07-15 Wrangler JK) Item # J10212
 Item # J10212") Installation Guide for Rough Country 2.5 inch Lift Kit w/o Shocks (07-15 Wrangler JK) Item # J10212 Installation Time: 3 Hours Tools Required: Jack (2 helps, but not needed) Jack stands(2 3-ton, 2 2-ton)
Installation Guide for Rough Country 2.5 inch Lift Kit w/o Shocks (07-15 Wrangler JK) Item # J10212 Installation Time: 3 Hours Tools Required: Jack (2 helps, but not needed) Jack stands(2 3-ton, 2 2-ton)
2004 Ford F-150 4WD / 2WD 2" - 3 Performance Strut Installation Instructions
 www.skyjacker.com 2004 Ford F-150 4WD / 2WD 2" - 3 Performance Strut Installation Instructions Spring Compressor Metric/Standard Wrenches & Sockets Floor Jack Jack Stands Measuring Tape Torque Wrench REQUIRED
(877) MON-FRI 7AM-5PM PST OR WEBSITE: ReadyLIFT.COM **Please retain this document in your vehicle at all times**
 MON-FRI 7AM-5PM PST OR WEBSITE: ReadyLIFT.COM **Please retain this document in your vehicle at all times**") IF YOUR ReadyLIFT PRODUCT IS MISSING A OR HAS A DAMAGED PART, PLEASE CONTACT CUSTOMER SERVICE DIRECTLY. For warranty issues please return to the place of installation and contact ReadyLIFT. A NEW REPLACEMENT
IF YOUR ReadyLIFT PRODUCT IS MISSING A OR HAS A DAMAGED PART, PLEASE CONTACT CUSTOMER SERVICE DIRECTLY. For warranty issues please return to the place of installation and contact ReadyLIFT. A NEW REPLACEMENT
RS-2 SINGLE ACTION REAR BUMPER WITH TIRE CARRIER INSTALL MANUAL FOR JEEP WRANGLER ALL MODELS.
 RS-2 SINGLE ACTION REAR BUMPER WITH TIRE CARRIER INSTALL MANUAL FOR 2007-2016 JEEP WRANGLER ALL MODELS. Rear Bumper Installation Instructions 1) Remove factory rear bumper, (this includes all tow hitch
 INSTALLATION INSTRUCTIONS REAR STABILIZER BAR Thank you for purchasing a quality Hellwig Product. PLEASE READ THIS INSTRUCTION SHEET COMPLETELY BEFORE STARTING YOUR INSTALLATION 1 Threaded Plate Threaded
PRE-INSTALLATION. INSTALLATION INSTRUCTIONS STEP 1: Park vehicle on level surface and chock rear wheels.
 2007-2013 7.5" GMC/Chevrolet 1500 4WD Suspension Lift kit PRE-INSTALLATION 15004 2 - Cross-member (Fr/Rr) 2 - Sway Bar Drop Bracket 2 - Knuckle (Dr/Pass) 1 - Driver Diff. Bracket 1 - Passenger Diff. Bracket
INSTALLATION INSTRUCTIONS
 2583 INSTALLATION INSTRUCTIONS 7-16 ! IMPORTANT PLEASE DON T HURT YOURSELF, YOUR KIT OR YOUR VEHICLE. TAKE A MINUTE TO READ THIS IMPORTANT INFORMATION. DO NOT INSTALL IF THE TRUCK HAS BEEN LIFTED AND THE
KIT # CSS-C SUSPENSION LIFT KIT
 14385 Veterans Way Moreno Valley, CA 92553 Phone: (951) 571-0212 Fax: (951) 571-0215 2001-2010 CHEVROLET SILVERADO 1500 AND 2500 HD 4WD AND 2WD PICK-UP 1999-2010 CHEVY 2500 4WD PICK-UPS 2001-2010 2500
DODGE DAKOTA (AUTO TRANS. ONLY) 3 BODY LIFT INSTALLATION INSTRUCTIONS KIT# 60163
 3 BODY LIFT INSTALLATION INSTRUCTIONS KIT# 60163") 3651 N Highway 89 Chino Valley, AZ 86323 (928) 636-7080 www.p-a-g.net DODGE DAKOTA (AUTO TRANS. ONLY) 3 BODY LIFT INSTALLATION INSTRUCTIONS 2005-2006 KIT# 60163 Many states and municipalities have laws
3651 N Highway 89 Chino Valley, AZ 86323 (928) 636-7080 www.p-a-g.net DODGE DAKOTA (AUTO TRANS. ONLY) 3 BODY LIFT INSTALLATION INSTRUCTIONS 2005-2006 KIT# 60163 Many states and municipalities have laws
»Product» Safety Warning
 RBP-LK305-60 Installation Instructions 1999-2004 Ford Super Duty F-250/350 4wd 6" Suspension Lift Read and understand all instructions and warnings prior to installation of product and operation of vehicle.
JK HD Skid Plate for Rear Falcon Shocks
 1 JK HD Skid Plate for Rear Falcon Shocks Kit # 36-07-01-300 Important Notes: Prior to beginning this or any installation read these instructions to familiarize yourself with the required steps and evaluate
55-64 Full Size Chevy
 55-64 Full Size Chevy Installation Instructions Power Disc Conversion 9 slimline booster pictured Your new disc brake conversion kit can be bolted up with standard hand tools. The only tools you may not
TAS002 TORQUE ARM CONVERSION INSTALLATION INSTRUCTIONS Camaro and Firebird Ford 9
 TAS002 TORQUE ARM CONVERSION INSTALLATION INSTRUCTIONS 1967-1969 Camaro and Firebird Ford 9 Please take note before proceeding with this installation: This product may interfere with certain exhaust kits.
09-UP FORD F150 6 LIFT KIT
 92159800 09-UP FORD F150 6 LIFT KIT THANK YOU FOR CHOOSING ROUGH COUNTRY FOR YOUR SUSPENSION NEEDS. Rough Country recommends a certified technician install this system. In addition to these instructions,
Jeep Grand Cherokee ZJ 4 Suspension Kit
 92168800 Jeep Grand Cherokee 93-98 ZJ 4 Suspension Kit Thank you for choosing Rough Country for all your suspension needs. Rough Country recommends a certified technician install this system. In addition
»Product» Safety Warning
 #F1420 Installation Instructions 2011 Ford Super Duty F250/350 4wd 4" Suspension Lift Read and understand all instructions and warnings prior to installation of product and operation of vehicle. Zone Offroad
Sport Sway Bar Kit Mustang
 Sport Sway Bar Kit 22102 2005 Mustang Installation of Hotchkis Front Sway Bar 1F Raising Vehicle Securely block the rear wheels of the vehicle. Use a jack to lift up the front of the vehicle and use jack
EVO Manufacturing. 2.5 /3.5 Jeep Wrangler JL Enforcer Kit Instruction Manual. for all: EVO-3011, EVO-3012, EVO-3013, EVO-3014 Kits
 EVO Manufacturing 2.5 /3.5 Jeep Wrangler JL 2018+ Enforcer Kit Instruction Manual for all: EVO-3011, EVO-3012, EVO-3013, EVO-3014 Kits READ BEFORE INSTALL: 2.5 JL Enforcer/Enforcer Overland kits with either
Installation Instructions for BMR Lowering Springs Performance ( Mustang GT)
") Installation Instructions for BMR Lowering Springs Performance (2015-2017 Mustang GT) Time Required: 3+ hours Notes: This install was done with the performance springs from BMR, but install should be the
Installation Instructions for BMR Lowering Springs Performance (2015-2017 Mustang GT) Time Required: 3+ hours Notes: This install was done with the performance springs from BMR, but install should be the
HP10207 KIT. Ram WD*
 HP10207 KIT Ram 1500 4WD* (For 2WD call customer service 800.663.0096 for assistance) * See application guide for proper fitment. Use the most advanced air springs on the market to eliminate your vehicle
55-64 Full Size Chevy Installation Instructions Standard Disc Conversion
 55-64 Full Size Chevy Installation Instructions Standard Disc Conversion DBMC09, PV71 & PVB71 Pictured (Booster, master cylinder & valve setups may vary by upgrades selected) Your new disc brake conversion
Installation Instructions
 Instructions Created by an: 2005+ Toyota Tacoma BTB Front Coilovers by Low Range Off Road SKU# TAC-SP-05CO-BTB-650 Diff Drop Kit (SKU# LR-2GDDK) Instructions included Installation Instructions Revised
SCION tc BIG BRAKE KIT Section I - Installation Preparation
 SCION tc 2005- BIG BRAKE KIT Section I - Installation Preparation Part Number: PTR09-21080 Kit Contents Item # Quantity Reqd. Description 1 1 Brake Rotor, LH Front 2 1 Brake Rotor, RH Front 3 1 Brake Caliper
STEP #1: Remove the wheels from the truck. There are (6) 21mm lug nuts holding each wheel on... Remember Lefty Loosy, Righty Tighty.
 21mm lug nuts holding each wheel on... Remember Lefty Loosy, Righty Tighty.") - CustomTacos.com Page 1 of 36 How-To: Toytec Lift Install Read all of these install instructions prior to installing Toytec's suspension lift. I cannot be held responsible for any damages or personal
- CustomTacos.com Page 1 of 36 How-To: Toytec Lift Install Read all of these install instructions prior to installing Toytec's suspension lift. I cannot be held responsible for any damages or personal
MOUNTAIN HORSE INSTALL KIT
 MOUNTAIN HORSE INSTALL KIT P/N 9928508 APPLICATION Installation Instructions are for all Mountain Horse TSS and TFS Installation Kits and Timbersled Mountain Horse chassis installations. The Timbersled
7C1550 COBB Tuning R35 GT-R Silicone Hose Kit Install Instructions
 7C1550 COBB Tuning R35 GT-R Silicone Hose Kit Install Instructions Nissan GT-R (R35) Silicone Hose Kit Congratulations on your purchase of the COBB GT-R Silicone Hose Kit for your Nissan GT-R. The following