Volaro PA800/PA800S Operator Manual
|
|
|
- Lawrence Potter
- 6 years ago
- Views:
Transcription


1 Volaro PA800/PA800S Operator Manual 1
2 STAND-SERIES 5 OPERATOR MANUAL INDEX User Guide PAGE 2 INDEX PAGE 3 PAGE 4 PAGE 5 PAGE 6 PAGE 7 PAGE 8 PAGE 9 PAGE 10 PAGE PAGE 14 CAUTIONS GENERAL RECOMMENDATIONS APPLYING SLING TO THE PATIENT ATTACHING SLING TO THE LIFT TRANSFERRING FROM CHAIR TO COMMODE TRANSFERRING FROM CHAIR TO BED TRANSFERRING FROM BED TO CHAIR STANDING AND AMBULATING WITH THE PA800 SLING LAUNDERING INSTRUCTIONS CHARGING PROCEDURE ELECTRONIC SCALE OPERATION LIFTING SLING AND ACCESSORIES GENERAL PROCEDURE GUIDE (to be copied for personnel records) & SAFE WORKING LOAD MECHANICAL OPERATION Maintenance PAGE PARTS AND EXPLODED VIEW PAGE 19 PAGE 20 PAGE PAGE PAGE 26 PAGE 27 PAGE 28 CIRCUIT BOARD WIRING ROUTINE MAINTENANCE SCHEDULE TROUBLESHOOTING GUIDE ITEMS TO INSPECT MONTHLY INSPECTION RECORD LIFT / TRANSFER ASSESSMENT FORM WARRANTY PROBLEMS OR QUESTIONS? SMT HEALTH SYSTEMS, INC LEGION ROAD DETROIT LAKES, MN PHONE: (218) (800) sales@smths.com 2 PA
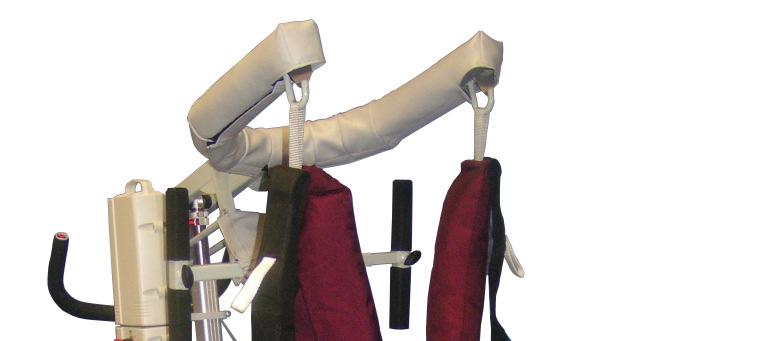
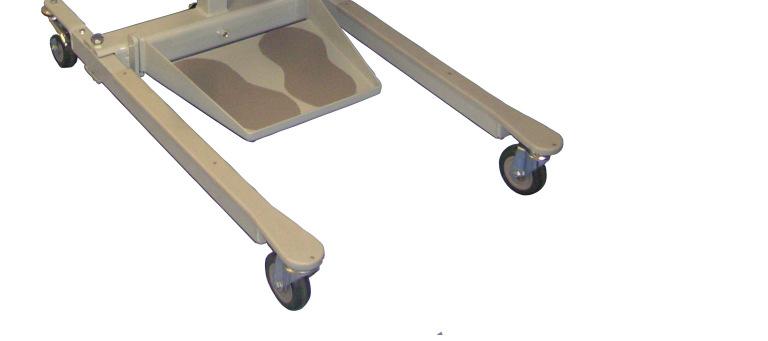
3 PLEASE READ BEFORE OPERATING 1. VOLARO LIFTS ARE DESIGNED FOR TRANSFERRING ONLY, NOT FOR TRANSPORTING OVER LONG DISTANCES. 2. FOR THE SAFEST TRANSFER, VOLARO LIFT LEGS MUST BE FULLY EXTENDED INTO THE WIDE POSITION WHEN LIFTING A PATIENT OR RESIDENT. 3. FOR EMERGENCY STOP, PULL BATTERY FROM BATTERY RECEPTACLE. 4. MAKE SURE THAT BOTH LOOPS FROM THE SLING ARE PROPERLY NESTED IN THE BOTTOM OF THE HOOKS BEFORE LIFTING OR TRANS- FERRING A PATIENT OR RESIDENT AND THAT BOTH RETAINER SPRINGS ARE FUNCTIONING. 5. USE ONLY VOLARO SLINGS AND ACCESSORIES DESIGNED FOR USE WITH THE VOLARO LIFT MODELS. 1. DO NOT PUSH OR PULL ON THE BEAM OR RESIDENT. THIS WILL JEOP- ARDIZE THE LIFT S STABILITY. 2. DO NOT USE ANY OTHER BATTERY CHARGER.USE ONLY THE BATTERY CHARGER SUPPLIED WITH THE LIFT. 3. DO NOT EXCEED THE WEIGHT LIMIT LISTED ON THE LIFT 4. DO NOT USE A SLING THAT SHOWS WEAR, IS TORN, BLEACHED OUT, OR HAS ANY LOOSE THREADS. INSPECT SLING BEFORE EVERY LIFT. 3
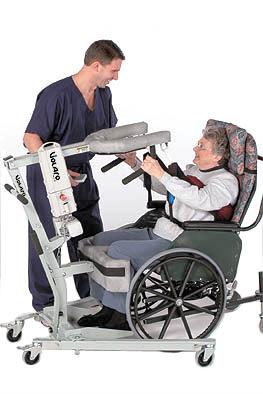
4 GENERAL RECOMMENDATIONS - SERIES 5 The Volaro Stand was designed specifically to assist your residents to a standing position. Once the resident is in a standing position, you or your staff can safely perform a number of resident care tasks. The Volaro Series 5 Stand may also be modified to be used as a walking device. Because the Volaro Stand was designed as an assistive device, it requires more advanced motor skills than a traditional lift such as our Volaro Lift-Series 3 or 4. It is important to first determine the appropriateness of this piece of equipment for any patient. This is especially true if the optional ambulating bars are to be used. The Volaro Stand is intended for residents who are semi weight-bearing and simply require some lifting to perform ambulation or the activities of daily living. 4
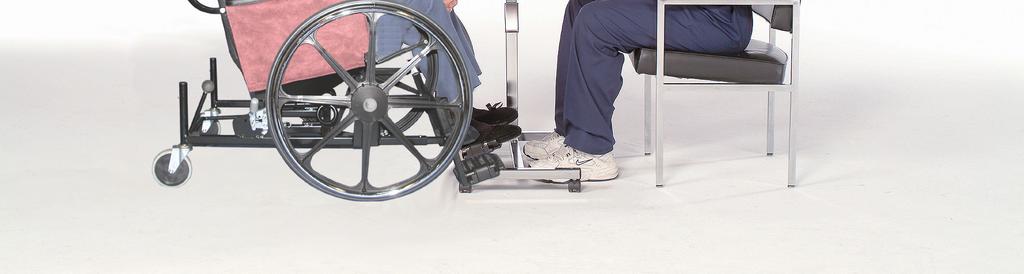
5 STAND-SERIES 5 APPLYING SLING TO PERSON The most important part of the lifting experience is applying the SLING properly. The first step is to lean the person slightly forward just enough to insert the sling behind the back. NOTE: Place the sling as far down as you can. Position the wings of the sling under the arms and make sure they are centered. Secure buckle as low as possible around the lower abdomen. Fasten the buckle and pull snug. Tighten by holding onto the strap, not the buckle. Sometimes it binds and feels snug when it truly is not. As a person sits, the abdomen is wide. As a person stands, the abdomen will become more narrow; therefore you must tighten the security strap as you lift the person. This procedure will help keep the strap in proper alignment. ATTACHING SLING TO LIFT Once the SLING is applied, lock the brakes on the wheel chair. This will minimize having to slide the person down and onto the foot board. Present the lift to the person you are lifting. Assist the person s feet onto the foot board. Now the lift can be pushed forward until the person s knees touch the shin rest. Adjust the shin rest up or down. Locate the top of the shin rest two inches below the knee cap. At this point you can lock the brakes on the lift to prevent the person from pushing the lift away from him. The shin rest has a built-in safety support strap. The strap helps those who need the added security and support. This will keep their shins and feet securely in place. It is not necessary to use the strap on everyone. At this time, if the person is able, have him hold onto the handle grips. Sometimes this makes the person feel more independent. It also prevents you from having to hold on to him while you re attaching the colored loops to the positive-locking J hooks. NOTE: Make sure you use the same colored loop on each J hook. Be sure the person s arms are located outside the fabric. If the person is unable to hold onto the handle grips, then take the remaining material hanging from the J hooks and place the last (distal) loop back in the J hook to form a large loop of fabric. Then direct the person s hand through the fabric, until it s safely supported. If you have a VOLARO WRIST ASSIST, just hang the Wrist Assist from the J hook and do the same. With the VOLARO Stand, the person being transferred does need some body strength. We encourage anyone being lifted with the VOLARO Stand Lift to use his legs and arms as the lift is doing its work. If you find that the person you are lifting is either less ambulatory than you originally thought, or the person is just not cooperative, use the VOLARO Full Body Lift Series 3 or Series 4. 5
6 STAND-SERIES 5 TRANSFERRING FROM CHAIR TO COMMODE After Applying sling to Person and Attaching sling to Lift segments, you are now ready to lift. When the PA800 begins lifting and the abdomen becomes increasingly flat, snug the security strap. This will make the transfer much more comfortable for the person being transferred. Now that the person being transferred is clear of chair, unlock the brakes and roll him to the commode or bathroom. Once in position, lock the brakes and attend to the person s needs. Then lower him down onto the seat. NOTE: Be sure to loosen the buckle as they are seated. If you wish, you may leave the lift with the person for added support. TRANSFERRING FROM CHAIR TO BED After Applying sling to Person and Attaching sling to Lift segments, you are now ready to lift. The VOLARO STAND can be used to transport a person back to their bed. Lift the person to a standing position. Now transport the person to the side of the bed. Center him and make sure the back of their legs are touching the bed. Lower the person down until they are seated. Be sure to leave slack in the loops. This will make it much easier for you to remove the colored loops. Unbuckle their legs from the shin rest safety strap, if applicable. Unbuckle the security strap around their abdomen and unhook them from the J hooks. Remove the sling. You may push the lift away. You may have to assist the person s feet off the foot board. Be sure to use proper body mechanics by assisting the person to a lying position. TRANSFERRING FROM BED TO CHAIR When transferring from bed to wheelchair, it is required that the person be assisted to a seated position on the edge of the bed. It is very important to use proper body mechanics. In some cases you may wish to do this transfer with the VOLARO LIFT Series 3 OR the VOLARO LIFT Series 4 and then use the VOLARO STAND to go back to bed. It is recommended that you use a two-person transfer when performing this particular activity. However, a person who has demonstrated to you their ability to stay seated on the edge of the bed without help may not need much assistance with proper placement of the sling. For someone with little ability, apply the sling while they are in a lying position by raising the shoulders and inserting the sling behind the back. Attach the security strap, then bring him to a seated position on the edge of the bed. This will shorten the time you will have to support the person in a seated position before you hook him up. REGARDING ONE OR TWO PERSON TRANSFERS There are several organizations that promote the use of a one person transfer in the appropriate circumstances. However, determining those conditions can be difficult. The patient s characteristics and the training level of the staff can affect whether a one person or two person transfer is proper. For instance, if the resident is combative or the staff is inexperienced in using the lift, we would always recommend that two staff members be used during the transfer. In the final analysis, we believe that the facility s staff is in the best position to assess the training level of the employees, to determine the unique needs of each patient, and to ultimately establish the appropriate guidelines. 6
7 STAND-SERIES 5 STANDING AND AMBULATING WITH THE PA800 The VOLARO STAND-Series 5 allows a person to be lifted to a standing position with their feet flat on the floor. This provides an opportunity for the therapist to ambulate or perform standing exercises. Some therapists utilize the VOLARO Seat Strap as an assist to help support the person while they are ambulating, standing, or resting. Lifting a person with their feet on the floor: After Applying sling to Person and Attaching sling to Lift segments, open the legs and remove the foot board. Place the sling behind the person and hook him up, remove foot plate, lock the brakes and adjust the shin rest. Make sure their feet are located on a non-slippery surface. Adjust the shin rest. Hold onto the lift and begin to lift until the person is standing. Make sure they are straight and not leaning back before you begin ambulation. The H handles or optional ambulating bars are located directly in front and to the sides of the patient as they face the lift. The bars work well when the person you are ambulating needs extra support. If the person becomes fatigued, just lower him into a chair. Sling material and webbing are made of nylon. The padding is neoprene and polyfill. Because of sling rigidity, recommended washing instructions are as follows: Brush with warm, soapy water and non-chlorine disinfectant Rinse Drip dry only VOLARO SLING LAUNDERING INSTRUCTIONS BLUE MAX SLING - BX-100 The sling rigidity makes it more difficult to machine wash. Care should be taken if attempting to machine wash. Make sure the sling fits properly into the machine. If the sling rides on lip of drum, the sling could be damaged. It is recommended that you put the sling in a mesh bag to protect the buckles and to keep the straps from becoming tangled. WARNING: EXCESSIVE HEAT AND/OR BLEACH WILL SHORTEN THE SERVICEABLE LIFE OF THE SLING. IF THE SLING IS DAMAGED DUE TO IMPROPER LAUNDERING, THE WARRANTY IS VOID. ALL SLINGS SHOULD BE INSPECTED FOR TEARS OR FRAYING PRIOR TO USE. 7
 for optimum battery life.")
 4) Plug in the charger. (Note: if no battery is in the charger the GREEN light will be on.")


8 CHARGING PROCEDURE 1) The RED LED, located on the battery receptacle that will glow when the battery is discharged. At this point the battery should be exchanged with one that is fully charged. However, it is best to exchange your battery at a regular time(s) for optimum battery life. 2) Locate the battery charger near an outlet and on a counter or flat surface where the suction cups will have good contact. 3) Insert the battery. (It will fit in either direction.) 4) Plug in the charger. (Note: if no battery is in the charger the GREEN light will be on.) The RED light may come on briefly if the battery is excessively discharged, but it should go off within the first few minutes followed by the YELLOW light. If the RED light stays on it may mean the battery is extremely discharged. Leave the battery on the charger overnight to see if it can be restored. If it stays on red the battery has at least one bad cell. 5) When the YELLOW light has gone out, the battery is fully charged and will shut off automatically. However, you should leave the battery on for its full charging cycle of 12 hours. The GREEN light will stay on. It will not harm the battery to leave it on the charger longer than the normal charging cycle. Note: Charging sequence: Insert battery and then plug into outlet for proper electronic function. Leaving the battery on the charger will not cause it to overcharge. If the battery goes to GREEN in a short period it may mean you have a weak cell that will not take a full charge. Plug battery into charger every night. Do not remove until charging cycle is complete. Battery will not be damaged if left plugged in. The charger will get warm during its charge cycle. Additional charging information: The VOLARO charger uses a three part process which could take up to 12 hours. The first part is called the bulk charge. During this stage the charger supplies 1.5 Amps until the battery terminal voltage reaches 13.8 volts. The current then begins to ramp down from 1.5 Amps to about.5 Amps at the conclusion of the charging process. This ramping charge (absorption mode) will take several hours. Finally, the GREEN light will come on indicating that the charger has switched to the third part of the cycle, the temperature compensated float charge. The charger is now in its maintenance mode, keeping the battery in its ideal charged state. The VOLARO charger is not a trickle charger nor will the battery be damaged if left permanently attached and powered. If the GREEN light comes on soon after putting the battery on the charger it means that, either the battery is already charged OR you have a weak battery that will only hold a minimal charge. Maintaining the proper battery voltage when the battery is not in use will extend the serviceable life of the battery. 8 TESTER
9 ELECTRONIC SCALE (optional) The electronic digital scale allows the person to be weighed during a transfer. Press the ON/ZERO button to turn on the scale. Make sure that LOW BAT did not appear on the screen; if so replace the lift batteries. The scale will take about 5 seconds to zero itself. Place the desired sling unto the hanger making sure it is not touching the ground and press the ON/ ZERO button. This will place the weight of the sling into memory and will automatically deduct the weight of the sling from the reading. This reading will always stay in memory even if the scale is shut off until you run this procedure again. Now with the scale still on, remove the sling and place it beneath the person being weighed. Select pounds or kilograms by pressing and holding the unit s button to toggle back and forth. Lift the person clear of the chair or bed. Once the reading is steady, the scale will lock on the reading to make it easier to read if the person will not remain steady. The scale runs on the lift battery. The scale will automatically shut off by itself if left untouched for over two minutes SCALE CALIBRATION INSTRUCTIONS SERIES 5 STAND (PA800S) 1. Should calibration be necessary, all that is required is a 25 lb. precision weight. Do not use packaged goods, fitness weights, or other items that say they weigh 25 lbs. Failure to use a precision weight may cause the scale to display an inaccurate weight. Using a certified weight is the method preferred. 25 lb. certified weights are available from SMT Health Systems. 2. When calibrating scale, remove hand control from the lift and have the beam positioned in the middle of its stroke. 3. To enter calibration mode, push ON/ZERO button. 4. While holding the ON/ZERO button, press and hold the LB/KG button. After approximately 3 seconds the message on the display will change from ZERO to CAL. Release both and the display will show C O. 5. Hang strap or sling that will hold calibration weight on the hanger hooks. If using a sling, make sure it is empty. Push the ON/ZERO button. The display will count down from 16 to 0. When finished, the display will show the message C Now hang 25 LB. calibration weight on strap which you previously attached to the hanger (step 4, above) or place it in the sling and permit the scale to stabilize. (Failure to stabilize the unit may cause the scale to display an inaccurate weight.) 7. Push ON/ZERO button again. Scale will count down from 16 to 0 as before and then the display should read 25, which is the weight of the calibration weight. Calibration is now complete. 8. Remove the 25 lb. precision weight, stabilize the sling or strap, and press the ON/ZERO button to zero the scale. The scale is ready to use. 9


10 LIFTING SLING AND ACCESSORIES: BX-100: BLUE MAX SLING The SLING offers comfortable support for patients / residents during transfers as well as for ambulation : FLEECE COVER The fleece cover offers extra comfort for people with soft or delicate skin : SEAT/THIGH STRAP The seat/thigh strap is designed for use with the SLING during a transfer to minimize pressure around the torso : WRIST ASSIST The wrist assist provides comfortable support and assistance in gripping the lift handle bars. 10
11 This form is intended as a guide to help you develop a procedure sheet that will fit your specific application in your facility. It is recommended that everyone be in serviced by the company representative or use the manufacturer s in-service video before operating any mechanical lift. (This for should be copied for each operator and kept with their personnel records.) Staff Name: Date: Checked Off By: General Preparation: Yes No 1. Identify the resident. 2. Explain what you are going to do 3. Wash hands. 4. Get supplies ready, sling, wheelchair, blanket or lap robe. 5. Get Help from experienced team member for this procedure. 6. Have assistant stand on opposite side of bed to assist with transfer. 7. Provide privacy. Pull curtain all around the bed. General Procedure: Yes No 1. Position wheelchair at foot of bed. 2. Adjust bed to working level. 3. Make sure battery indicator does not indicate a low battery. (If so replace) 4. a.) Examine lift sling for any damage: tears, frays, or weak areas. b.) Make sure the correct size sling is to be applied. c.) If weighing resident, hang the sling on the hanger hooks, press the on button 11
12 Yes No 5. Lower side rails. 6. Roll resident to one side and place sling, folded halfway under resident. Top of sling should be approximately at shoulder blade area. Bottom of sling should be approximately near the tail bone. 7. Roll resident to other side and pull rolled half of sling through. Smooth sling and check correct placement. 8. Roll resident onto center of sling. Pull padded legs on sling along each side and wrap inside thigh areas close to groin area. Crisscross straps through the holes before hooking to the lift. 9. Raise head of bed slightly 10. Position lift over bed and instruct assistant to help guide lift into proper position. 11. Check that base legs of lift are in wide position where applicable. If base position must remain in a narrow position, make sure the lift area between bed and chair are clear of any obstacles. Widen once clear from bed. 12. Attach straps on sling to lift with the strap nesting in the bottom of the hook. Remember, with the divided leg sling, the straps at the thigh area must be crisscrossed at the hanger before lifting. 13. Tell assistant to guide resident as you begin to lift them from the bed using up button on hand control or up button at handle grips. Once there is slight tension on the straps check to make sure all four loops are still nested in the bottom of the hooks before lifting. 14. Lift resident until buttocks have cleared the bed. Give reassurance to allay fears. If weighing, steady resident and look at the reading on the scale. 15. Tell assistant to steady the resident in lift and guide to position over wheelchair, trolley, tub lift, etc. CAUTION: Push and turn the lift from the handles only. Pushing on the top of the beam or on the resident could jeopardize the lift s stability. 16. Lock wheelchair brakes. 17. Instruct assistant to stand behind wheelchair and place hands in positioning straps on both sides of sling while the resident is coming down pull the handles back to position the resident in an upright position. 12
13 Yes No 18. Disconnect all straps from the hanger and remove sling by raising legs and pulling along sides. Ask resident to lean forward as you assist and support them to remove for back and hip area. 19. Move lift away and adjust for comfort. Apply safety belt if ordered. Position feet on foot pedals. 20. Cover lap with blanket and leave call light within reach. 21. Wash hands. report reaction and overall tolerance to team leader. SAFE WORKING LOADS SMT Health Systems Volaro slings have been developed, tested and manufactured to have a safe working load of 1000 lbs. Due to the variety of resident shapes and dimensions, the appropriate size should be selected to accommodate specific patients. Care should be taken to ensure that the mechanical lift selected has the capacity to safely lift the resident. The Volaro Sling Sizing Chart is designed only to suggest which resident will safely fit into the sling based on their size and weight. (Sling sizing chart is available on the SMT website ) NOTE: Lifts are designed to transfer residents, not transport them. 13
14 MECHANICAL OPERATION 1. This lift is powered by a 12VDC removable battery pack located at the back of the lift. The battery fits either way in the lift and charger receptacle to make it easy to remove and replace the battery. NOTE: Battery removal is your emergency stop feature. 2. The lift has a built-in battery indicator which illuminates when the battery is about 60% discharged. This would be the best time to replace with the battery with one that is fully charged. 3. Once the battery is inserted into the charging receptacle, the charge light on the charging unit comes on. Make sure this yellow light comes on to assure your battery is charging. Once the battery is fully charged, the light will shut off. The charger is fully automatic and will quit charging when the battery reaches a full charge. You will not damage the battery or charger if the battery is left on the charger. 4. The lift is operated by switches located at the tips of the handles. This allows proper ergonomics by keeping the hands on the handles while operating the lift and maneuvering it at the same time. 5. The optional hand control provides a second source to operate the lift. This allows the operator to be next to the person being transferred and to operate the lift at the same time. It also aids as a back-up source to operate the lift. 6. If for any reason the lift would stop in mid travel, the first thing to check is the circuit breaker located on the battery receptacle. If the breaker has popped out, simply press it back in and try lifting. If the problem is not the breaker, and you cannot lower the patient/resident by the switch on the handle or the remote control, you must use the manual safety override bit (5/32 hex bit; part # 71048) provided with the lift. (Power driver recommended) 8. The leg adjuster opens and closes the legs of the lift. By pulling back the handle, the pin is pulled out and goes around the beam. This allows you to rotate the handle back and forth. This process enables the lift to be narrowed to go through doorways and widened to go around a wheel chair or lounge chair. 9. The brakes are located on the rear wheels. Press the tab with your foot to lock the wheel and the pivot. Press the upper portion of the tab forward to release the brakes. 14
15 PA800 PARTS LIST 15
16 PA800 EXPLODED VIEW 16
17 PA800S PARTS LIST 17
18 PA800S EXPLODED VIEW 18
19 CIRCUIT BOARD WIRING POSITIVE POWER - LARGE RED 2 - POSITIVE TO SWITCH - SMALL RED 3 - UP THUMB SWITCH & REMOTE - 2 SMALL BLACK 5 - POSITIVE UP TO SWITCH - SM GREEN 6 - NEGATIVE POWER - LARGE WHITE 7 - REMOTE & HANDLE BAR SWITCH - 2 SMALL WHITE 4 - MOTOR - LARGE RED 8 - MOTOR - LARGE BLACK Circuit board plug position relative to relays may vary on different boards. 19
20 Every Day MAINTENANCE SCHEDULE VOLARO SERIES 5 LIFT Every 3 Months Periodic Testing After each person you lift, you should check the sling, and wash if needed. Refer to the VOLARO laundering instructions Check the condition of all slings. If you are in doubt of its operational ability to safely lift a person, then discard the sling and order a new sling Check to see that strap retainer flapper and spring are working. Check the lift; if the RED light is on, then charge the batteries Keep your VOLARO lift clean by wiping it down with a damp cloth. Use a mild detergent if needed NOTE: Do not use a petroleum based solvent on paint, stickers, or plastic. Lube pivot points on lift Check leg adjuster stop for signs of wear Check the movement of the lift; remove hair from the casters if needed Check leg covers; if cracked replace with new Check all vinyl covers; if worn, replace with new Check all external fittings; tighten where needed NOTE: At the back of this manual you will find a sample monthly inspection sheet and check off list. We encourage you to make copies for each lift and keep for your records. General Lift Condition: A general visual inspection of the external parts and all functions can be carried out at any time to ensure no adverse damage has occurred. If any doubt, withdraw the equipment from use and call the VOLARO Service Department. (800) THIS IS A SUGGESTED MAINTENANCE SCHEDULE - DEPENDING ON USE. THE EQUIPMENT MAY NEED TO BE INSPECTED MORE FREQUENTLY. 20
21 TROUBLESHOOTING GUIDE GUIDE PROBLEM POSSIBLE CAUSE SOLUTION 1. LIFT 1. Lift won t go up or down. 1. Dead battery. 2. Battery is not making connection. 3. Actuator is not working. 4. Hand control is not connected properly or hand control is damaged. 5. Circuit breaker popped 6. Bad lift control switch (in handle).. 1. Switch battery or charge battery. Replace if defective. 2. Make sure battery pack is making contact with terminals. Watch for arcing (melting of plastic around contacts). Replace terminal contacts. 3. Replace motor and/or actuator 4. Check cable and connection. Replace if necessary. 5. Push in breaker. Replace if necessary. 6. Check connection. Replace red switch if necessary. 2. ACTUATOR 1. Actuator makes noise. 2. Actuator shuts down during operation. 3. BATTERY PACK 1. Battery runs down quickly. 2. Battery light stays on 4. BATTERY CHARGER 1. Light does not come on when battery is inserted. 1. Faulty/worn out actuator. 2. Batteries low. 3. Actuator overloaded. 1. Battery worn out or not being charged when red charge light comes on. 2. Battery worn out or circuit board is bad. 1. Transformer bad. 2. Electric outlet not working. 3. Battery not placed correctly. 4. Battery worn out. 5. Charger is bad Replace actuator. 2. Charge battery. 3. Check to make sure not over weight capacity. 1. Make sure battery is put on charger if red light comes on. Leave on overnight. Replace battery if necessary. 2. Make sure battery charger is working properly. 1. Replace transformer if necessary. 2. Use different outlet. 3. Check battery position. 4. Replace battery if necessary. 5. Replace charger
22 TROUBLESHOOTING GUIDE CONT. PROBLEM CAUSE SOLUTION 4. BATTERY CHARGER 2. Battery does not charge. (Green light on) 1. Battery worn out 1. Replace battery 3. Red light stays on 1. Reverse leads or other short. 2. Battery is totally discharged 3. Check terminal contacts for wear and replace 4. Reset charger: take out battery, unplug transformer, put battery back on charger, plug in. 5. Leave battery on charger for 24 hours to revive. 6. Replace battery 5. SCALE 1. Inaccurate weights 1. Not zeroing out scale properly 2. Lb to Kg switch is in the wrong setting 3. Batteries in scale are low 4. Person in lift is moving excessively while taking weight 5. Scale is out of calibration 1. Zero scale according to instructions 2. Switch to desired setting 3. Replace the four AA batteries in scale 4. Make sure the patient is hanging evenly under the hanger and there is minimal movement 5. Calibrate the scale following the calibration instructions 2. Display is erratic 1. AA batteries in scale low. 2. Scale is out of calibration 3. Wire from load cell to circuit board is loose. 4. Circuit board is bad 5. Load cell is bad 3. Display is blank 1. Power to scale is not turned on 2. 4 AA batteries are bad 3. Scale is damaged 1. Replace four AA batteries 2. Calibrate scale 3. Remove battery box and check connection 4. Replace circuit board 5. Replace load cell 1. Turn scale on 2. Replace batteries 3. Call tech. support for instructions 22
23 SMT HEALTH SYSTEMS - LIFT ITEMS TO INSPECT 1380 Legion Road, Detroit Lakes, MN 56501, HANGER: FULL BODY LIFT STRAP RETAINER SPRINGS ATTACHING HARDWARE BEARINGS ARM PIVOT PADDING HANGER BOLT REPLACED EVERY THREE YEARS 2. Y-BEAM: STAND LIFT STRAP RETAINER SPRINGS PADDING 3. BOLTS AND NUTS TORQUE BOLTS UNDER BEAM PADDING TO 55 POUNDS CHECK ALL BOLTS AND NUTS 4. LEG ADJ. HANDLE CONDITION (Check wear at pivot points.) ATTACHING HARDWARE SPRING 5. LEG ADJ. NOTCH PLATE WEAR (Are legs kept securely in locked position?) ATTACHING HARDWARE 6. LEG ADJ. STOP PIN/ ROD WEAR 7. LEG LINKAGE HARDWARE CONDITION 8. SLINGS (Reasons to discard) WORN FRAYED BLEACHED OUT 9. ACTUATOR: NOISE-UP/DOWN (Replace bearing after 5 years.) WITH AND W/O WEIGHT GREASE (should be greased at least semi-annually) 10. SCALE: ACCURACY (Calibration needed?) BATTERIES MOUNT 23
24 11. POWER BOX: PLASTIC GUIDES TERMINALS (Bent or worn) 12. LED: REMOTE JACK HOLDER OR LENS 13. THUMB SWITCHES LEFT AND RIGHT 14. REMOTE SWITCHES STRAIN RELIEF CORD (Replace if stretched out or cut.) 15. CASTERS BRAKES SWIVEL ROLL BEARINGS 16. LEG BUMPERS CRACKED OR MISSING 17. KNEE REST: (STAND LIFT) SAFETY STRAP PADDING PIVOT ADJUSTING PINS/KNOBS 18. CHARGER OPERATION LIGHTS TERMINALS (Bent or worn) 19. BATTERIES LOAD TEST AGE 20. GRIPS 21. LEGS PIVOT ATTACHING HARDWARE ALIGNMENT 24
25 22. WELDS VISUALLY INSPECT FOR CRACKS 23. PAINT 24. BEAM SAFETY SWITCH LIFT UP ON BEAM WHILE HOLDING DOWN BUTTON 25. DECALS CORRECT MISSING 26. OTHER: 25
26 FORM SHOULD BE COPIED AND USED ON EACH LIFT FOR ONE YEAR 26
27 SMT LIFT PROGRAM LIFT / TRANSFER ASSESSMENT FORM CAN INDIVIDUAL SAFELY PERFORM > OR = 50% OF LIFT / TRANSFER WITH ONLY STANDBY ASSISTANCE NO FROM CAREGIVER? YES CAN INDIVIDUAL BEAR WEIGHT ON AT LEAST ONE LEG? NO LIFT NEEDED YES NO DOES THE INDIVIDUAL HAVE MODERATE UPPER BODY STRENGTH AND ABILITY TO FOLLOW SIM- PLE COMMANDS? DOES THE INDIVIDUAL WEIGH LESS THAN THE MAXIMUM CAPACITY OF THE SMT FULL BODY LIFT? NO YES YES NO DOES THE INDIVIDUAL WEIGH LESS THAN THE CAPACITY OF THE SMT SIT-TO-STAND LIFT CONTACT SAFETY COMMITTEE FULL BODY LIFT REQUIRED YES NO SIT-TO-STAND REQUIRED CONTACT SAFETY COMMITTEE Patient Name ID# Room# Assessment Completed by Date Lift(s) Required Sling Size Comments for PRN Use Assessment Updated by Date Date Date Assessment Care Planned by Date 27
28 STAND-SERIES 5 1 YEAR LIMITED WARRANTY ON ALL PARTS ONLY UNDER CONDITIONS OF NORMAL AND INTENDED USE. 5 YEAR WARRANTY ON THE MAIN STRUCTURE OF THE LIFT. MISUSE, DAMAGE, OR ALTERATION OF THE LIFT OR ANY OF ITS PARTS VOIDS THE WARRANTY. NO OTHER WARRANTIES - WRITTEN, VERBAL, IMPLIED, OR OTHER THAN LISTED HERE WILL BE HONORED. SMT HEALTH SYSTEMS, INC LEGION ROAD DETROIT LAKES, MN PHONE: (218) (800)
USER MANUAL For Bariatric Patient Lift MODEL
 FOR CUSTOMER ASSISTANCE P.O. Box 3417 Abilene, TX 79604 Toll 800-637-8436 info@convaquip.com www.convaquip.com As a future reference, we suggest you record the information listed below for quick accessibility.
Service Manual. Model L500 and L600 Smart Lift. WARNING: Cancer and Reproductive Harm - Form #1-144 Rev.
 Service Manual Model L500 and L600 Smart Lift WARNING: Cancer and Reproductive Harm - www.p65warnings.ca.gov. Form #1-144 Rev. 2/5/19 Table of Contents Parts Breakdown 3 Monthly Maintenance Checklist 5
Service Manual Model L1000 Smart Lift
 Service Manual Model L1000 Smart Lift Form #1-147 Rev. 10/1/13 Table of Contents Parts Breakdown 3 Monthly Maintenance Checklist 5 Smart Lift Operating Instructions 7 Scale Calibration 8 Advanced Smart
Easy Lift Patient Lifting System
 Easy Lift Patient Lifting System Easy Lift Patient Lifting System Heavy-gauge steel construction Six-Point spreader bar with 360 rotation tilts to enhance comfort and safety Uses Lumex six-point, four-point,
Service Manual Model S800 Smart Stand
 Service Manual Model S800 Smart Stand Form #1-146 Rev. 10/3/13 Table of Contents Parts Breakdown 3 Monthly Maintenance Checklist 7 Smart Stand Operating Instructions 9 Scale Calibration 10 Advanced Smart
INSTRUCTIONS AND WARRANTY FOR THE STAND AID MODEL 1501 STAND AID SERIAL #
 MAKERS OF STAND AID, PTA, FREEDOM CHAIR STAND AID MODEL 1501 PO BOX 386 Sheldon, IA 51201 1-800-831-8580 1-712-324-2153 (In Iowa) Fax: 712-324-5210 www.stand-aid.com INSTRUCTIONS AND WARRANTY FOR THE STAND
Service Manual Model S400 and S500 Smart Stand
 Service Manual Model S400 and S500 Smart Stand Form #1-145 Rev. 10/3/13 Table of Contents Parts Breakdown 3 Monthly Maintenance Checklist 7 Smart Stand Operating Instructions 9 Scale Calibration 10 Advanced
INSTRUCTIONS AND WARRANTY FOR THE STAND AID MODEL 1501 STAND AID SERIAL #
 MAKERS OF STAND AID AND ROLL AID STAND AID MODEL 1501 PO BOX 386 Sheldon, IA 51201 1-800-831-8580 1-712-324-2153 (In Iowa) Fax: 712-324-5210 INSTRUCTIONS AND WARRANTY FOR THE STAND AID MODEL 1501 STAND
EZ Way Shower Trolleys
 EZ Way Shower Trolleys 2000/3000 Operator s Instructions EZ Way, Inc. PO Box 89 Clarinda, IA 51632 1-800-627-8940 www.ezlifts.com Form 2-207 Rev. 12/14/11 The EZ Way Shower trolley is unique with its side-mounted
P44 Stepper. User Manual
 P44 Stepper User Manual Table of Contents Introduction 1 Safety Warning 2 Overview of Parts 2 Attaching to Chair 3 Manoeuvring Around 4 Setting Pedal Stops 4 Getting On 5 Setting the Resistance (models
R710. R710 Product Manual
 R710 R710 Product Manual Contents Safety messages and important information 3 Recommended use and item dimensions 4 Check your order 5 Basic components 5-7 SoloVest 7 Directions for use 8 Operation and
Pro Battery-Powered Floor Lift
 Pro Battery-Powered Floor Lift provide safer and more secure transfers of patients by caregivers. Lumex lifts are very sturdy and easy to use. Optional digital scale DSC270 and rubber-coated low base legs
Supplying Hospitals for Over 90 Years. User Guide MDS86825SLR. Ultra-Light Rollator
 Supplying Hospitals for Over 90 Years User Guide MDS86825SLR Ultra-Light Rollator Revised: July 1, 2008 Contents Ultra-Light Rollator Features... 3 Rollator Components... 4 Safety Instructions... 5 Assembly
Phoenix Buggy User Instructions
 Phoenix Buggy User Instructions Issued 1 st March 2015 Introduction Welcome to the Phoenix Buggy User Guide. The Phoenix Buggy has been designed to provide a robust, transportable mobility solution for
Prime Engineering GRANSTAND II
 OWNER S MANUAL PRODUCT PHOTO PARTS LIST ASSEMBLY INSTRUCTIONS FITTING & ADJUSTING DAILY USAGE ACCESSORIES MAINTENANCE WARRANTY Prime Engineering GRANSTAND II Manufactured By Prime Engineering A Division
190/195 Tilt Shower Commode User Manual
 ... 190/195 Tilt Shower Commode User Manual Healthline Products 1065 E Story Rd Winter Garden Florida 34787 Fax 407-656-5641 Toll Free: 800-987-3577 Product Information This series of rehab commodes offer
Booster Car Seat User Guide
 Booster Car Seat User Guide For future use, STORE USER GUIDE in location on bottom of base. IS0133.E 2015 Artsana USA, Inc. If you have any problems with your Chicco Booster Seat, or any questions regarding
Stand Up Patient Lift RPS350-1
 User Manual Stand Up Patient Lift RPS350-1 DEALER: This manual MUST be given to the user of the product. USER: BEFORE using this product, read this manual and save for future reference. SYMBOL LEGEND DO
GoFitTM. Booster Car Seat User Guide. in location on bottom of base. IS0147.2E Artsana USA, Inc.
 GoFitTM Booster Car Seat User Guide For future use, STORE USER GUIDE in location on bottom of base. IS047.2E 207 Artsana USA, Inc. www.chiccousa.com TABLE OF CONTENTS If you have any problems with your
GoFitTM. Booster Car Seat User Guide. in location on bottom of base. IS0147E_ Artsana USA, Inc. 01/19
 GoFitTM Booster Car Seat User Guide For future use, STORE USER GUIDE in location on bottom of base. IS047E_04 209 Artsana USA, Inc. 0/9 www.chiccousa.com TABLE OF CONTENTS If you have any problems with
Free Standing Track. Owner s Manual. Use and Care Trouble Shooting
 Free Standing Track Owner s Manual Use and Care Trouble Shooting VANCARE, INC. 1515 1ST STREET, AURORA, NE 68818 T (800) 694-4525 F (402) 694-3994 info@vancare.com www.vancare.com Table of Contents Free
The Future of Homecare Lifting is Here!
 HYDRAULIC OR BATTERY OPERATED MODEL:400H / 400EL / 400LK The Future of Homecare Lifting is Here! Thank you for choosing the BestLift 400 To better serve you, please record the following information: Dealer
Wheelchair Safety, Maintenance and Operations Guide
 Wheelchair Safety, Maintenance and Operations Guide Back Arm Seat Tire Cross brace Axle Foot rest Hand rim Caster Index Page Introduction 3 Knowing equipment and be organised 3 Opening a wheelchair 4 Closing
EZ Ceiling Lift System
 EZ Ceiling Lift System CL650, CL1000 Owner s Manual Use and features Warranty Specifications EZ Way, Inc. PO Box 89 Clarinda, IA 51632 1-800-627-8940 www.ezlifts.com Form #2-209 Rev. 3/20/18 1 2 The EZ
Able Assist Transfer Aids User Manual
 www.drivemedical.co.uk The Team at Drive Medical develops its products to give our customers the freedom to live independently. This encompasses their daily home life and provides them with the opportunity
Booster Car Seat. User Guide. in location on bottom of base. IS0174E_ Artsana USA, Inc. 01/19
 Booster Car Seat User Guide For future use, STORE USER GUIDE in location on bottom of base. IS0174E_03 2019 Artsana USA, Inc. 01/19 www.chiccousa.com TABLE OF CONTENTS If you have any problems with your
Roze Stand Up Patient Lift
 User Manual Roze Stand Up Patient Lift DEALER: This manual MUST be given to the user of this product. USER: BEFORE using this product, read this manual and save for future reference. For more information
Electric Portable Patient Lift - RPA600-1E
 Owner s Operator and Maintenance Manual Electric Portable Patient Lift - RPA600-1E DEALER: This manual MUST be given to the user of the patient lift. USER: BEFORE using this patient lift, read this manual
OWNER S MANUAL GUZZLER MODEL 620 READ THESE INSTRUCTIONS BEFORE USING
 OWNER S MANUAL GUZZLER MODEL 620 OPERATION MAINTENANCE TROUBLE SHOOTING REPAIR PARTS WARRANTY READ THESE INSTRUCTIONS BEFORE USING 201 COMMERCE DRIVE MONTGOMERYVILLE, PA 18936 215-393-4700 800-331-1423
HEAVY-DUTY SIZE MODEL User/Caregiver Manual FOLD & GO Wheelchairs A Division of OneKubedDESIGNS, LLC.
 HEAVY-DUTY SIZE MODEL User/Caregiver Manual 2018 FOLD & GO Wheelchairs A Division of OneKubedDESIGNS, LLC. INTRODUCTION Thank you for buying the FOLD & GO WHEELCHAIR, which is designed and manufactured
Instructions for use Shower stretcher Marina
 Instructions for use Shower stretcher Marina Important: Read these instructions carefully before using the Marina! Date of first use User Name Address Manufactured by: Lopital Nederland B.V. Laarakkerweg
Aluminium 4-Wheeled Rollator/ Occassional Transport Chair VP184 Range Usage and Maintenance Instructions
 Aluminium 4-Wheeled Rollator/ Occassional Transport Chair VP184 Range Usage and Maintenance Instructions This file is available to view and download as a PDF at www.aidapt.co.uk. Sight impaired customers
BATTERY OPERATED PATIENT LIFT MODEL:650HD OWNER S MANUAL
 BATTERY OPERATED PATIENT LIFT MODEL:650HD OWNER S MANUAL Thank you for choosing BestcareLift! To better serve you, please record the following information: Supplier Name: Telephone: Serial #: Date of Purchase:
Advanced Wheelchair Anti-Rollback Device INSTALLATION INSTRUCTIONS. An installation video is available at our website
 Safe t mate SM2-3 Advanced Wheelchair Anti-Rollback Device INSTALLATION INSTRUCTIONS An installation video is available at our website www.safetmate.com MODELS SM2-3 16-20 wide wheelchairs SM2-3W 22-24
stationary massage table
 stationary massage table Operator Manual TABLE OF CONTENTS Warnings... 3 Table Specifications Aura Basic... 4 Aura Lift Back... 5 Aura Deluxe... 6 Installation Caution... 7 Parts Included...7 Instructions
Quick Install Lift AL065 Installation Guide & Owners Manual
 Quick Install Lift AL065 Installation Guide & Owners Manual Congratulations on your new lift purchase. The Quick Install Lift line is one of the easiest and most trouble free ways to transport your scooter
SGA-440 by Prism Medical
 SGA-440 by Prism Medical Introduction... 2 Overview... 2 Components of the Sit to Stand Lift... 3 Component List... 4 Specifications... 5 Cautions... 6 Assembly Instruction... 7 Operation Charging......12
XXL-Rehab Minimaxx Folding Wheelchair
 user manual user manual user manual user manual user manual user manual L-Rehab Minimaxx Folding Wheelchair Strongly engineered and functionally designed exclusively for bariatric users! Push handle Back
A3 Seats and Seat Belts
 7DEOHRI&RQWHQWV A3 Seats and Seat Belts A3 Seats and Seat Belts Table of Contents Table of Contents... 1 Safety... 1 Warnings and Cautions... 1 Introduction... 2 List of Figures... 1 Seats... 2 Driver's
User s Manual. Automatic Switch-Mode Battery Charger
 User s Manual Automatic Switch-Mode Battery Charger IMPORTANT Read, understand, and follow these safety rules and operating instructions before using this battery charger. Only authorized and trained service
Sequoia 2 Post System
 Sequoia 2 Post System Owner s Manual Use and Care Fault Finding Warranty Information Table of Contents Sequoia 2 Post System Introduction... 3 Overview... 3 Placement of the Sequoia... 4 Components of
Owner s Operating and Maintenance Manual For Standard Wheelchairs
 L200 Owner s Operating and Maintenance Manual For Standard Wheelchairs INTRODUCTION Standard wheelchairs are the result of extensive engineering research, and rigid quality assurance testing. Every new
Owner s Operator and Maintenance Manual Invacare Rollator
 Owner s Operator and Maintenance Manual Invacare Rollator Important information is contained in this booklet. Please read it carefully before using your Invacare Rollator. Consult your doctor, therapist
TECHNICAL SPECIFICATIONS. CAPACITY per slot width 1ʺ 1.25ʺ 1.5ʺ HKPX2VC/A 2 modules devices HKPY2VC/A 3 modules devices
 USER GUIDE Mobility MiX Cart HKPX2VC/A Mobility MiX Cart 30 HKPY2VC/A Mobility MiX Cart 45 TECHNICAL SPECIFICATIONS CAPACITY per slot width 1ʺ 1.25ʺ 1.5ʺ HKPX2VC/A 2 modules 30 24 20 devices HKPY2VC/A
DOC /500/600 Series Sit to Stand Lift Owner's Manual REV 001
 Page1 BESTCARE MODELS COVERED BestStand 400 Series Sit to Stand BestStand 500 Series Sit to Stand BestStand 600 Series Sit to Stand CONTENTS Product Features Assembly Operating Instructions Warranty BEFORE
TR 2000/3000. Operating manual. Shower Trolleys. Hygiene Equipment Designed for People
 Operating manual Always study this manual carefully before operating the Shower Trolley. Operating instructions and recommended maintenance procedures are explained in the following pages. Only qualified
U-Step 2 Press Down Model
 Step-by-Step Guide to Using Your U-Step 2 Press Down Model Flip brake bar Ergonomically positioned handlebars Press down brake handle Comfort grips Backrest Padded seat Your choice of left or right brake
Advancement Chair. R901, R902, & R903 Product Manual
 Advancement Chair R901, R902, & R903 Product Manual Contents Warnings and Important Information 3 Recommended Use 4 User and Item Dimensions 4 Assembly and Adjustment Information 5 Maintenance 14 Cleaning
Take care of your equipment
 363 Take care of your equipment This chapter has information about how women with certain disabilities can take care of their equipment so it will work well and last as long as possible. Hearing aids Hearing
SP6. Automatic Battery Charger. Model
 Model SP6 Automatic Battery Charger OWNERS MANUAL PLEASE SAVE THIS OWNERS MANUAL AND READ BEFORE EACH USE. This manual will explain how to use the charger safely and effectively. Please read and follow
O P E R A T I N G I N S T R U C T I O N S
 O P E R A T I N G I N S T R U C T I O N S Select-A-Charge Battery Chargers models: SCP, SCPX, SCS, SCSX, SCX For Industrial Use: Designed for gel, wet cell, AGM, and Lithium Ion batteries (Lithium ion
atient lifters Assembly, Maintenance & Specifications Manual SUNRISE HML400 Hoyer Manual Patient Lift HPL400 Hoyer Power Patient Lift Sunrise Medical
 SUNRISE 800-556-5438 Oshkosh, WI 54901 2815 Oregon Street Continuing Care Group Sunrise Medical HML400 Hoyer Manual Patient Lift HPL400 Hoyer Power Patient Lift Assembly, Maintenance & Specifications Manual
Parkit360 Transformer
 Parkit360 Transformer 1 Owner s Manual Introduction We know you re busy, and need to get that fifth wheel moved. Now. So with that in mind, we ve kept these instructions as brief as possible, but they
Quickie S-11 Service Manual
 Quickie S-11 Service Manual 05 Sunrise Medical Inc. 100740 Rev A Quickie S-11 Troubleshooting Guide INTRODUCTION... 0.1 Specifications VSI Controller... 0.2 Plugs/Connectors... 0.3 Main Wiring Diagram/
SARA PLUS THE ADVANCED STANDING AND RAISING AID
 SARA PLUS THE ADVANCED STANDING AND RAISING AID OPERATING AND PRODUCT CARE INSTRUCTIONS KKX52180M-EN Issue 2 October 2006 ARJO ARJO products are patented or patent pending. Patent information is available
HD 7700 Setup & Operator Manual
 HD 7700 Setup & Operator Manual Issue 1 December, 01 Performance Design Inc. The Heavy Duty Ultima (HD 7700) electric punch has been designed to punch most any job that may pass through your bindery or
QUICKIE 5 R Quick Guide. IMPORTANT! Read all Warnings and Instructions contained in the complete Owner s Manual prior to using this product.
 QUICKIE 5 R Quick Guide IMPORTANT! Read all Warnings and Instructions contained in the complete Owner s Manual prior to using this product. Backrest Upholstery Back Canes Tire Seat Sling Handrim Angle-Adjustable
The Chameleon Trac II Patent Pending M-Series User s Manual
 The Chameleon Trac II Patent Pending M-Series User s Manual YOU MAY ALSO VIEW OUR GENERAL OPERATION VIDEO ONLINE AT: www.marionbrush.com Please read entire manual prior to using this system. Page 1 The
Marlin Bath Lift BLM-8200 WARNING! Read ALL instructions before using this product!
 Marlin Bath Lift BLM-8200 www.inspiredbydrive.com WARNING! Read ALL instructions before using this product! PRODUCT DESCRIPTIONS Your Marlin Bath Lift has been built to the highest standards of quality
Usage of GTM 1 and GTM HAMMER VARIO
 USER'S MANUAL TABLE OF CONTENTS Usage of GTM 1 and GTM HAMMER VARIO 3 Basic information 3 Appendix 1 4 Description of construction 5 Safe handling of GTM 1 5 Stability and Balance 6 Curbs 6 Stairways 7
LF2020 EASY LIFT SIT-TO-STAND LF2090 BARIATRIC EASY LIFT SIT-TO-STAND
 LF2020 EASY LIFT SIT-TO-STAND LF2090 BARIATRIC EASY LIFT SIT-TO-STAND USER MANUAL LF2020-INS-LAB-RevE15 2005 GF Health Products, Inc. Read this manual before operating your Easy Lift Sit-to-Stand. Save
Zoma 3 Wheeler Instruction Manual
 Zoma 3 Wheeler Instruction Manual IMPORTANT PLEASE READ THESE INSTRUCTIONS CAREFULLY BEFORE USING THIS PRODUCT KEEP FOR FUTURE REFERENCE 2 Safety Warnings Getting to know your Stroller 3 Thank you for
***Please follow instructions for ease of installation and correct fit.***
 RAMPAGE P R O D U C T S Installation Instructions Part number 1094XX Frameless Soft Top for Jeep Wrangler YJ 1992-1995 with Half Doors NOTE: Installation of the top in warm weather is optimal for ease
Instruction Manual. Canada English Version
 Instruction Manual Canada English Version Product: Monterey child booster seat Model: 15000 Mfg. by: Diono Canada, ULC 50 Northland Road, Suite 400 Waterloo, Ontario N2V 1N3 Customer Service Tel: 519-725-1700
Owner s Manual. Transport / Companion Wheelchairs M4TV M2TF M2TC M2TL HEALTH PRODUCTS, INC.
 Owner s Manual M4TV M2TF Transport / Companion Wheelchairs M2TL M2TC HEALTH PRODUCTS, INC. INTRODUCTION Congratulations on the purchase of your new companion chair. Please read this introduction with your
For more information on specifications and fitting of the RoughRider wheelchair see
 RoughRider For more information on specifications and fitting of the RoughRider wheelchair see www.whirlwindwheelchair.org/roughrider Rider Name Rider Age Rider Gender Rider Reference # Rider Contact information
BRF 700 BRF 701. Fan Bike OWNER S MANUAL. * This item is for consumer use only and it is not meant for commercial use.
 BRF 700 Fan Bike BRF 701 * This item is for consumer use only and it is not meant for commercial use. OWNER S MANUAL General Information Safety Before you undertake any exercise program, please be sure
R310, R320, R330, R340 & R350 Product Manual. Compass Chair. R310, R320, R330, R340 & R350 Product Manual
 R310, R320, R330, R340 & R350 Product Manual Compass Chair R310, R320, R330, R340 & R350 Product Manual Contents Important information 3 Safety messages 4 Recommended use and item dimensions 5 Check your
Garaventa Power Evacu-Trac
 Garaventa Power Evacu-Trac Emergency Evacuation Chair Owner s Manual Item No. 21102-A-OM Power Evacu-Trac OWNER S MANUAL Table of Contents 1. Safety First Page 4 2. Terminology Page 5 3. Operating Instructions
Perfect Park 7000 Installation & Unloading Instructions Operating Manual
 Perfect Park 7000 Installation & Unloading Instructions Operating Manual 1) Always file a claim with the truck line if the lift has been damaged! (If you don t originally notice the damage, but find some
Owner s Manual. website: phone: (574)
") Owner s Manual email: sales@startracks.org website: www.startracks.org phone: (574) 596-5331 Please do not use your new Glide n Go lift until you have read this manual thoroughly. Table of Contents Welcome
Owner s Manual email: sales@startracks.org website: www.startracks.org phone: (574) 596-5331 Please do not use your new Glide n Go lift until you have read this manual thoroughly. Table of Contents Welcome
expandable booster Instruction Manual US Version
 expandable booster Instruction Manual US Version product: monterey XT expandable booster model series: 108000 mfg. by: Diono US 14810 Puyallup Street E Suite 200 Sumner, WA 98390 Customer Care Tel: 1 855
Ensure the product has been assembled according to the instructions in this manual.
 ConvaQuip S I T - T O - S T A N D L I F T MODELS ConvaQuip STS600E ConvaQuip STS600E-D PRODUCT FEATURES *ConvaQuip STS600E shown Ensure the product has been assembled according to the instructions in this
SARA PLUS INSTRUCTIONS FOR USE
 SARA PLUS INSTRUCTIONS FOR USE 0086...with people in mind ArjoHuntleigh ArjoHuntleigh products are patented or patent pending. Patent information is available by contacting ArjoHuntleigh. The policy of
(H) TOUR VANTAGE STROLLER ASSEMBLY INSTRUCTIONS ADULT ASSEMBLY REQUIRED. Styles and colors may vary
 TOUR VANTAGE STROLLER ASSEMBLY INSTRUCTIONS ADULT ASSEMBLY REQUIRED. Styles and colors may vary") TOUR VANTAGE STROLLER ASSEMBLY INSTRUCTIONS ADULT ASSEMBLY REQUIRED Styles and colors may vary IMPORTANT: Read all instructions before assembly and use of the stroller Keep the instructions for future
TOUR VANTAGE STROLLER ASSEMBLY INSTRUCTIONS ADULT ASSEMBLY REQUIRED Styles and colors may vary IMPORTANT: Read all instructions before assembly and use of the stroller Keep the instructions for future
Users Manual. Ultra Care May 2003 GLO Pub. No
 Users Manual Ultra Care 4000 May 2003 GLO Pub. No. 234-2117-01 Ultra Care 4000 Disclaimer This manual contains general instructions for the use, operation and care of this product. The instructions are
Uplift Premium Power Lifting Seat
 Uplift Premium Power Lifting Seat User Guide Read all instructions before using the Uplift Power Seat DANGER - To reduce the risk of electric shock: IMPORTANT SAFETY INSTRUCTIONS Always unplug the Uplift
MotorScrubber MS2000S/M/L Instruction Manual
 MotorScrubber MS2000S/M/L Instruction Manual PLEASE READ ALL INSTRUCTIONS When using electric products, basic safety precautions should always be followed to reduce the risk of electric shock and personal
2 in 1 Rollator and Transit Chair M58203
 User Instructions 2 in 1 Rollator and Transit Chair M58203 Maximum Safe Working Load Please ensure these Instructions are fully read and understood before using this equipment. Retain these instructions
Tandem User Instructions
 Tandem User Instructions Issued 1 st November 2014 Tandem Buggy We designed the tandem buggy to enable families who have a disabled child and another younger child to enjoy the freedom they deserve. The
ASSEMBLY INSTRUCTIONS / OWNERS MANUAL AIR BIKE AB-1
 AIR BIKE AB- ASSEMBLY INSTRUCTIONS / OWNERS MANUAL IMPORTANT : READ ALL ASSEMBLY INSTRUCTIONS AND SAFETY PRECAUTIONS BEFORE USING THIS PRODUCT. REFERENCE ALL SAFETY GUIDELINES AND WARNING LABELS. RETAIN
EZ Ceiling Lift System
 EZ Ceiling Lift System CL650 PM Portable Ceiling Lift Owner s Manual Use and features Warranty Specifications EZ Way, Inc. PO Box 89 Clarinda, IA 51632 1-800-627-8940 www.ezlifts.com WARNING: Cancer and
expandable booster Instruction Manual US Version
 expandable booster Instruction Manual US Version product: monterey expandable booster model series: 15000 mfg. by: Diono LLC 14810 Puyallup Avenue Sumner, WA 98390 Customer Care Tel: 1 (855) 463-4666 us.diono.com
Instruction Manual AVTM for. Strip Chart Recorder Catalog Nos and
 AVTM220003 Rev. B January 2003 Instruction Manual AVTM220003 for DC µa Strip Chart Recorder Catalog Nos. 220003 and 220003-47 PO Box 9007 Valley Forge, PA 19485-1007 U.S.A. 610-676-8500 Shipping Address:
Liko M220 / Liko M230
 Liko M220 / Liko M230 Instruction Guide English 7EN150106-04 2012-03-06 Applies to the following models: Liko M220 Prod. no. 2050010 Liko M230 Prod. no. 2050015 Liko M230 Product Description Liko M220
Ride JAVA Adjustable Back Support Owner s Handbook
 Ride JAVA Adjustable Back Support Owner s Handbook Warranty Policy Installation and Use Instructions Warranty Policy Your Ride Designs JAVA Adjustable Back Support has been carefully constructed to meet
K710 Product Manual. Support Station. K710 Product Manual
 K710 Product Manual Support Station K710 Product Manual Contents Important information 2 Safety messages 3 Recommended use 4 Item dimensions 5 Check your order 6 Installation 6 Basic components 7 Accessories
Overhead lift Roomer 5200
 USER S MANUAL Overhead lift Roomer 5200 The Roomer 5200 offers you the unique ability to lift and move a patient from one room to another. The lift is equipped with two belts. When transferring from room
Wallace Tri-Adjustable Gantry Cranes Square Tube Assembly Instructions
 Wallace Tri-Adjustable Gantry Cranes Square Tube Assembly Instructions For any additional information, Please call 1- S 1. Read and understand instructions before using this gantry. 2. Inspect gantry thoroughly
Rehab Shower Commodes
 Rehab Shower Commodes Size Model Seat Width Front Rear Wheels Wheels Small 1 1 Small 22 15-22 1 22 Standard 180 Standard - 24 180-24 24 Large 185 20 Large 24 185-24 20 24 Extra Large 186 22 X Large - 24
Push Down Wheeled Walker
 Push Down Wheeled Walker Push down hand grip Handle height adjustment knob Backrest Padded seat with concealed pouch Side brace Bag with shopping basket inside Push down brake stopper 6 inch (150 mm) wheels
USER MANUAL. Item: #13246 Stand-Aid Lift. Drive Medical Design and Manufacturing Push Handle. Base Width Adjustment Handle.
 USER MANUAL Item: #13246 Stand-Aid Lift Push Handle Base Width Adjustment Handle Mast Sling Attachment Hook Adjustable Knee Pad Front Caster W/Brake Foot Plate Front Caster W/O Brake Rev1.06.11.14 IMPORTANT
RoughRider. Rider Measurements. Select Wheelchair Size Options
 For more information on specifications and fitting of the RoughRider wheelchair see www.whirlwindwheelchair.org/roughrider Rider Name Rider Age Rider Gender Rider Reference # Rider contact information
JBI Docupunch P33 Automatic Punch
 JBI Docupunch P33 Automatic Punch Instruction Manual Provided By http://www.mybinding.com http://www.mybindingblog.com TABLE OF CONTENTS SECTION I: INSTALLATION & TESTING: 1) Uncrating, Inspection & removal
ATLAS SIT-TO-STAND LIFT
 Direct Supply ATLAS SIT-TO-STAND LIFT Owner s Manual Please keep and refer to this Owner s Manual. Thank you for purchasing a Direct Supply Atlas Sit-to-Stand Lift from Direct Supply Equipment & Furnishings.
INSTRUCTION MANUAL 16K - Fifth Wheel Hitch
 You can take it with you. INSTRUCTION MANUAL 16K - Fifth Wheel Hitch Product No. 30047 DEALER/INSTALLER: END USER: (1) Provide this Manual to end user. (2) Physically demonstrate hitching and unhitching
DEMOUNTABLE BODY INSPECTION PROCEDURE Follow Detailed Instructions Inside for Each Step
 DEMOUNTABLE BODY INSPECTION PROCEDURE Follow Detailed Instructions Inside for Each Step Inspection Date: Inspected By: Serial #: Unit #: INSPECT: Inspected OK Needs Repair Comments Front Locking Bar Rear
Garaventa EVACU-TRAC CD7. Owner s Manual
 Garaventa EVACU-TRAC CD7 Emergency Evacuation Chair Owner s Manual Item No. 12440 Rev E Printed in Canada Evacu-Trac CD7 OWNER S MANUAL Table of Contents 1. Safety First Page 3 2. Terminology Page 4 3.
This Booster seat is NOT for use on Aircrafts Meets or exceeds all applicable requirements of Federal Motor Vehicle Safety Standard 213 WARNING!
 R Fits Children Between Backless Booster Weight is: 40-100 lbs (18-45 kg) Height is: 40-57 in. (101-145 cm) Age is: At least four years old Belt-Positioning Booster Car Seat Instruction Manual This Booster
Uplift Power Seat Users Guide
 Safety Precautions 1. Use the Uplift Power Seat only in armchairs or sofas with at least one armrest for optimum stability when sitting or rising. 2. Uplift Power Seat is not intended for use in rocking