SARA PLUS INSTRUCTIONS FOR USE
|
|
|
- Gervase Bruce
- 6 years ago
- Views:
Transcription


1 SARA PLUS INSTRUCTIONS FOR USE with people in mind
2 ArjoHuntleigh ArjoHuntleigh products are patented or patent pending. Patent information is available by contacting ArjoHuntleigh. The policy of ArjoHuntleigh is one of continuous development and we therefore reserve the right to make technical alterations without notice. The content of this publication may not be copied either whole or in part without the consent of ArjoHuntleigh. This product has been manufactured for ArjoHuntleigh by: ArjoHuntleigh AB Hans Michelsensgatan Malmö, Sweden Sara Plus, ArjoHuntleigh and ARJO are registered trademarks of GETINGE AB. The SARA PLUS is produced in Poland by ArjoHuntleigh AB for GETINGE AB and sold under the ArjoHuntleigh brand.
3 Contents Safety Instructions Foreword Consumables Product Description/Function Intended Use Parts referred to in this manual Controls and Features Control handset Dual control panel Emergency stop button (red) Power on/reset button (green) Power off button (red) Automatic cut out Automatic stop function System failure lower override Battery Discharge Indicator Hour Meter Chassis castor Brakes Straight line steering function Arc-Rest (with handgrips) Foot Support Proactive Pad Lower leg Straps Adjustable width chassis legs Commode Seat (Accessory) Using the Sara Plus for Toiletting and Transporting Using your Sara Plus Standing Sling Transfer and Walking Sling ArjoHuntleigh Scale (if fitted) Scale Labels Scale Display Display symbols /functions Method A Weighing before the patient is suspended in the sling Method B Weighing with the patient already suspended in the sling Calibration Care of your Sara Plus General Lifter Care Environmental Advice Periodic Testing Emergency Stop Adjustable Width Chassis Function General Lifter Condition Cleaning and Disinfecting the Toilet Commode Chair and Frame (if fitted)...27 Disassembly of the Commode Seat Servicing Advice Labels
4 Technical Specification Component Weights Maximum sound power level Scale Environment - Operating Environment - Transport & Storage Lifter Dimensions Problem Solving / Troubleshooting Electromagnetic Compatibility
5 Safety Instructions Symbols used adjacent to the text in these instructions: Warning This means failure to understand and obey this warning may result in injury to you or to others. Caution This means failure to follow these instructions may cause damage to all or parts of the system or equipment. Note This means this is important information for the correct use of this system or equipment. General instructions Warning: Before using the Sara Plus, a qualified health professional must carry out a clinical assessment of the patient to ensure that it is safe to lift them. Warning: This equipment must only be operated by caregivers who have been trained in the correct use of this equipment and have read and understood the Instructions for Use. This product has been designed and manufactured to provide you with trouble free use, however, this product does contain components that with regular use are subject to wear. Warning: SOME OF THESE PARTS ARE SAFETY CRITICAL TO THE OPERATION OF THE LIFTER AND WILL NEED EXAMINING AND SERVICING ON A REGULAR BASIS AND MUST BE REPLACED WHEN NECESSARY. See also Care of your Sara Plus section. Warning: IMPORTANT: When using the transfer and walking sling for the transfer operation the maximum lifting capacity is 140kg (308lbs). When using the same sling for walking practice the maximum lifting capacity is 190kg (420lbs). Do not exceed these weight limits. Warning: It is advisable to familiarise yourself and understand the operation of the various controls and features of the Sara Plus as described in Product Description/Function section in this manual and ensure that any action or check specified is carried out before commencing to lift a patient. If you require assistance in the setting up, use or maintenance of the Sara Plus, or if you experience any unexpected operation while using it, please contact your local ArjoHuntleigh office. A list is given inside the back cover of this manual. Warning: This equipment includes small parts that may present a choking hazard to small children if inhaled or swallowed. Keep children and pets away from the equipment. Warning: The control handset cable presents a possible strangulation risk. Take all necessary precautions to prevent this. 3
6 Foreword Thank you for purchasing ArjoHuntleigh equipment Your Sara Plus is part of a series of quality products designed especially for hospitals, nursing homes and other health care uses. We are dedicated to serving your needs and providing the best products available along with training that will bring your staff maximum benefit from every ArjoHuntleigh product. Please contact us if you have any questions about the operation or maintenance of your ArjoHuntleigh equipment. The touch panel label on the dual control panel displays several instruction symbols. The letter (i) shown on the open book icon indicates information, and is an instruction to always read the operating instructions before use. (See Fig 1). The expected operational life of the Sara Plus is 10 (ten) years or 10,000 transfers, whichever is sooner. Operational life is defined as the period during which the product will maintain the specified performance and safety provided the following conditions are adhered to:- The unit is cared for and serviced in accordance with recommended, published Operating and Product Care Instructions and the Preventive Maintenance Schedule. The unit is maintained to the minimum requirements as published in the Preventive Maintenance Schedule. The servicing and product care, in accordance with ArjoHuntleigh requirements, must begin on first use of the unit by the customer. The equipment is used for its intended purpose only and is operated within the published limitations. Warning: Unauthorized modifications or repairs to the Sara Plus may affect its safety and will invalidate any warranty. ArjoHuntleigh accepts no liability for any incident, accident or reduction in performance that may occur as a result of such repairs or modifications. To maintain the safety of this equipment, always use only ArjoHuntleigh designated spare parts. Consumables The expected operational life for fabric slings and fabric stretchers is approximately 2 years from date of purchase. This life expectancy only applies if the slings and stretchers have been cleaned, maintained and inspected in accordance with the Arjo- Huntleigh Sling Information documents, the Operating and Product Care Instructions and the Preventive Maintenance Schedule. The expected life for other consumable products, such as batteries, fuses, lamps, gel cushions, filters, seal kits, seat inserts, mattresses, safety belts, padded covers, straps and cords is dependent upon the care and usage of the equipment concerned. Consumables must be maintained in accordance with published Operating and Product Care Instructions and the Preventive Maintenance Schedule. All references to the patient in these instructions refer to the person being lifted, and reference to the attendant refer to the person who operates the lifter. References to left and right of the lifter in these instructions are as viewed from the rear of the Sara Plus, i.e. viewed from the dual control panel (see Fig. 1) Lifting operations in these instructions are described as if lifting a patient from a chair, the same operations can be performed effectively when lifting a patient from a wheelchair or sitting position on a bed, although a second attendant should support the patient if the patient lacks sitting balance. All operations in these instructions are described as if the attendant were using the control handset. Each operation described can be controlled using the control handset and/or the dual switch panel, situated at the rear of the mast. The Sara Plus is manufactured to a very high standard, and primarily designed to assist patients when standing and toileting, for use as a short distance patient transfer aid, and for standing and walking practice. When used as a standing aid the Sara Plus is extremely useful for quick easy transfers from one sitting position to another, and to elevate a patient for toileting, repositioning, changing of incontinence pads or wound dressings, standing practice etc. it is not intended for long periods of suspension or transportation. Some information contained in these instructions may become outdated, due to improvements made to this product in the future. If you have any questions regarding these instructions or your lifter, please contact ArjoHuntleigh or their approved distributor. 4
7 Product Description/Function Intended Use Sara Plus is a standing and raising aid for short transfers e.g. raising from bed and transfer to wheelchair, or from wheelchair to toilet. Sara Plus is also suitable for walking training when the footboard and kneepad are removed. Sara Plus is intended to be used in hospitals, nursing homes or other health care facilities for the different categories of residents/patients. Category C, where the resident/patient: Sits in a wheelchair Is able to partially bear weight on at least one leg Has some trunk stability Is dependent on the caregiver in most situations Needs mobility-maintaining standing exercises Category D, where the resident/patient: Sits in a wheelchair Is dependent on the caregiver in most situations Sara Plus is the only standing and raising aid where a resident/patient such as Category D, can safely be raised and transferred. The unique support of the EPS (Extra Postural Support) /BOS sling makes it feasible. Sara Plus shall always be handled by a trained caregiver and in accordance with the instructions outlined in these Operating and Product Care Instructions. Sara Plus is intended to be used with specifically designed ArjoHuntleigh slings Lifting operations in these instructions are described as if lifting a patient from a chair, the same operations can be performed effectively when lifting a patient from a sitting position on a bed, although a second attendant should support the patient if the patient lacks sitting balance. Caution: Although manufactured to a high standard the Sara Plus and its accessories should not be left for extended periods in humid or wet areas. Do not under any circumstances spray the Sara Plus or accessories (excluding slings) with water e.g. under a shower. 5

 7. Commode pan (optional) 8. Commode seat and frame (optional) 9.")
 12. Detail view of cord locking cleats 13.")


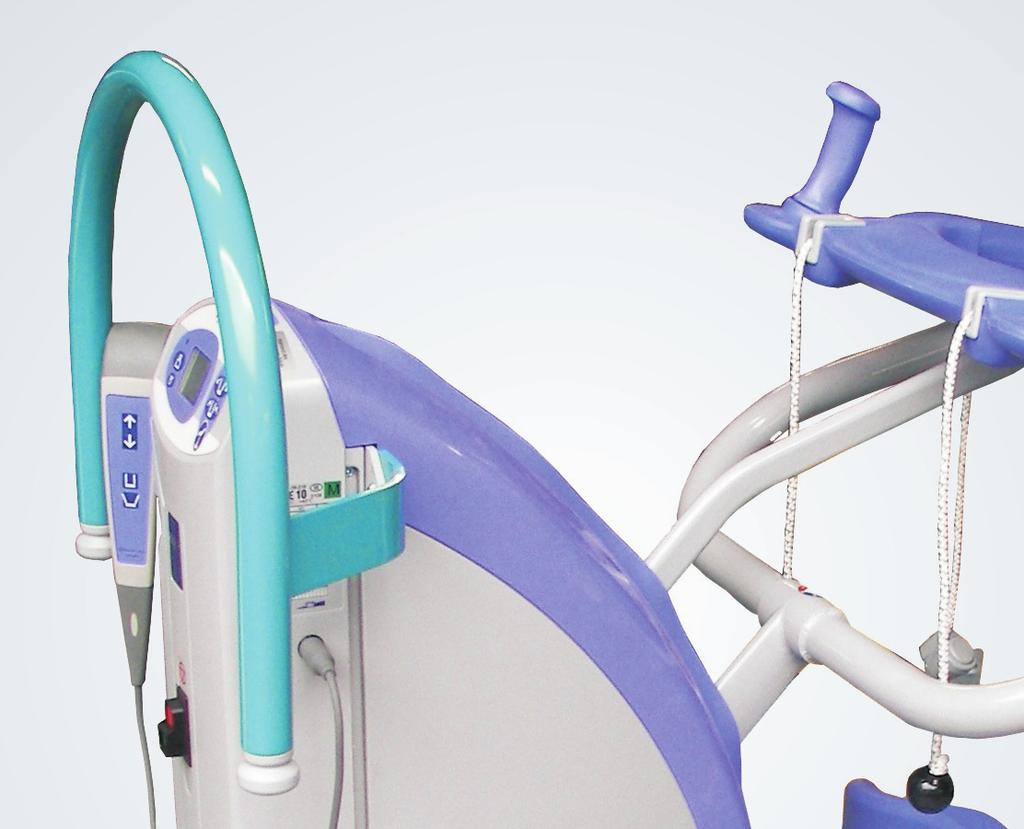
8 Product Description/Function Parts referred to in this manual 12 P1331a/2, P1431a, P1224, P1381c Fig Manoeuvring handle 2. Battery pack 3. Braked castors (rear) 4. Chassis legs 5. Front castors (unbraked) 6. Foot support (removable) 7. Commode pan (optional) 8. Commode seat and frame (optional) 9. Proactive Pad (Adjustable) 10. Sling attachment cords 11. Arc-Rest (Supportive arm rests with handgrips) 12. Detail view of cord locking cleats 13. dual control panel 14. Control handset 15. System failure lower override knob 16. Label - System failure lower override identification 17. Handset cable connection 18. Battery discharge indicator 19. Power on/reset button (green) 20. Power off button (red) 21. Label - Read operating instructions before use 22. Label - Sling size guide 23. Hour meter 24. Scale display panel (if fitted) 25. Label - Read operating instructions before use 26. Emergency stop button 6

.")
9 Product Description/Function Unpack the battery pack supplied, and fully charge it as described in Battery Charging section. When the battery pack is charged, disconnect the mains power, then remove the pack from the charger and insert it fully into the Sara Plus battery position, located at the left hand side of the lifter. Locate the recess in the bottom of the battery with the protrusion at the bottom of the battery position then pivot the battery into position until the retaining catch operates. Electrical connection is made automatically. Ensure that the green reset button situated on the back of the lifter cover is pressed in. (see inset to Fig. 1). Check that the system failure lower override knob is turned fully clockwise and finger tight, (see Fig. 1). Ensure that both sling types are available for the types of lift likely to be encountered when using the ArjoHuntleigh Sara Plus. Two types of sling can be used with the Sara Plus. Standing Sling a single loop, used for supporting patients at the toilet, and to aid in the standing process. The sling has a fleece cover for added comfort, which can be easily removed for cleaning. Transfer and Walking Sling A loop sling with back, buttock and leg support, used for easy and comfortable transporting of patients over short distances without the need for the detachable seat frame. By using different attachment straps the same sling can be used for supporting patients during the training procedure of standing, stepping and walking under the supervision of trained nursing staff. The sling has variable adjustment. Note: The slings have colour coded connection loops for size identification, as follows:- Red - Small (S) Yellow - Medium (M) Green - Large (L) Blue - Extra Large (XL) A circular label is fitted to the central lifting tube for quick colour to size reference. (see fig 1) Controls and Features Control handset:- Is a semi-remote control unit attached to the lifter by an extending cable. The handset controls lift and lower and chassis leg opening/closing. Direction arrows adjacent to the buttons indicate each function. (See Fig. 2). If pressure is released from any button during use, powered movement will stop immediately. Raise button Warning: Do not press two control buttons simultaneously as this may result in unexpected movement of the hoist. Chassis legs open button Lower button Chassis legs close button Fig. 2 Dual control panel:- offers the same controls as the handset and is conveniently positioned on the top of the main body of the lifter (See Fig. 3). Emergency stop button (red):- (see Fig. 1) If, in an emergency, you have to immediately stop any powered movement, (other than by releasing pressure on the button either on the handset or dual control panel), press the emergency stop button situated on the side of the cover. (See Fig. 1). Once the emergency stop button has been operated, it must be reset by turning the red cap until it pops back out, before any further powered movement can be utilised. P1396a P1431b Fig. 3 7
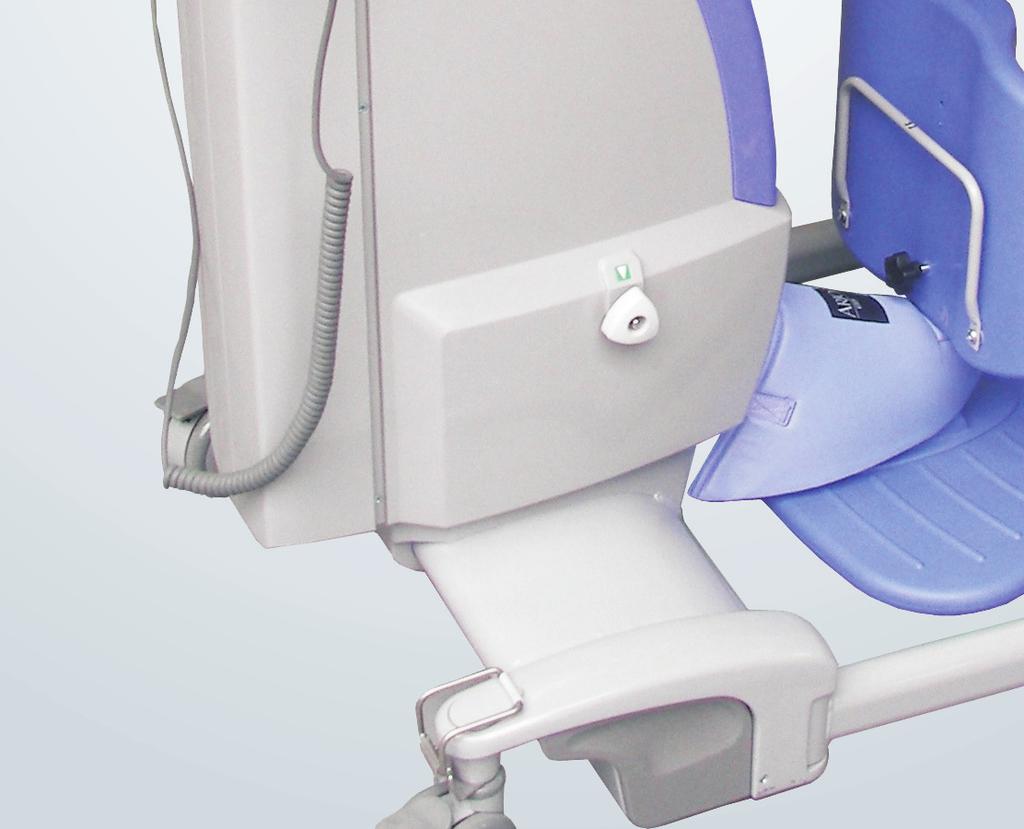
10 Product Description/Function Power on/reset button (green):- (see Fig. 1) On the rear of the case below the dual control panel. Press this button to turn on power to the lifter. Also used to reset if the automatic overload fuse has operated (indicated by the button projecting outwards slightly). If the fuse has operated and once reset, operates again, withdraw the lifter from use and contact ArjoHuntleigh Service department or their appointed distributor. Power off button (red):- (see Fig. 1) On the rear of the case below the dual control panel. Press this button to turn off power to the lifter. Automatic cut out:- (not an operator control but a function built into the lifter electronics). If the lifter is inadvertently overloaded (trying to lift a patient heavier than permitted), an automatic cut out operates to prevent the lifter raising a load in excess of one and a half times the maximum rated load; this will stop the lift motion automatically. If this occurs, when pressure is released from the lift button on the handset or dual control the electronics will reset and enable the patient to be lowered only, by pressing either lower button. Remove the patient from the lifter. Automatic stop function:- Great care should be taken not to lower the patient support arms onto the patient or any other obstruction but if this should happen inadvertently the motor will continue to run but downward movement will be held by the obstruction. If this occurs release pressure from the lower button immediately, operate the raise button until clear, then remove the obstruction. System failure lower override:- This can be used in the event of main control failure. In the unlikely event that the control handset or dual control panel fails to operate the lifter, with a patient still supported by the sling, provision for lowering has been made, using the lower override knob, situated on the right hand side of the main cover (see Fig. 4). A label situated above the switch is for quick and easy recognition (see Fig. 1) To operate the lower override, turn the knob anti clockwise half a turn, to cease lowering turn the knob clockwise until finger tight only (do not over tighten), only use this knob in the event of normal control failure do not use it for normal function lowering. Warning: Before operating the lower override to lower a patient, always ensure that a chair or suitable support is underneath ready to accept the patient. The lower override will operate whether the emergency stop button has been operated or not. The automatic stop function of the jib will still operate when using the lower override knob. When using the Sara Plus normally, always ensure the system failure lower override knob is always turned fully clockwise and finger tight. Battery Discharge Indicator:- is a small LED display which shows the charge condition of the lifter battery. (See Fig. 1 and also Battery Charging Section for complete description). Hour Meter:- Is a small LCD display (See Fig. 1) which shows the total duration of powered operation (in hours). This is primarily intended as an aid to service engineers and to help the attendant calculate servicing intervals. Chassis castor Brakes:- The chassis rear castors have brakes which can be foot operated if required, (see Fig. 5) for example, when leaving the patient unattended, or to keep the Sara Plus in position. Straight line steering function :- When using the Sara Plus for walking practice it may be considered useful to fix one of the castors to steer in a straight line. This has the effect of allowing the Sara Plus, without assistance to follow the intended straight line walked by the patient. The function is activated by flipping over the steering guide on the rear castor to hold it in position (see Fig. 5). Straight line steering guide P1332c Fig. 4 P1332e, f Fig. 5 8
11 . Product Description/Function Arc-Rest (with handgrips):- Integral Part of the Lifting mechanism of the lifter, the intuitive and supportive armrests allow patient participation and comfort during the lifting procedure. (See Fig. 1) Foot Support:- For positioning the patient s feet when lifting and transporting, it can be removed if using the Sara Plus to lift a patient to their feet prior to them using a walking aid eg. Zimmer etc. To remove the foot support, raise the Proactive knee support to its highest position, (note: where installed, unclip one side of the Velcro tie strap from around the foot support cover and slide the cover up the knee support column). Position yourself between the chassis legs and grip both sides of the foot support, lift up the front half of the foot support until it just comes into contact with the foot support bracket (see fig. 6), whilst it is in this position pivot the rear of the foot support upwards until the foot support is horizontal. Pull the foot support towards yourself until it is clear of the support bracket. Store carefully for future use. Slide the foot support cover back down into position and secure using the Velcro strap. Re-adjust the Proactive kneepad to the position required. Re-fitting the foot support is achieved by reversing the above procedure. Note: Ensure the two hooks on the foot support locate over the top two locating buttons. P1450 the other hand. When the correct height has been established re-tighten the knob. Proactive Pad clamping screw knob Proactive Pad Fig. 7 It can be removed from its mount quickly, for walking practice, simply by lifting upwards, after the foot support has been removed. Lower leg Straps:- An optional accessory used for ensuring the lower parts of the patient s legs stay in close proximity to the Proactive Pad for correct lifting procedure. The Strap ensures the lower parts of the patient s legs stay in close proximity to the Proactive Pad for correct lifting procedure. The strap is held in position in relationship to the Proactive Pad by passing through the guides on the back of the Proactive Pad then around the patients lower calves to be finally overlapped and pressed together to join the velcro fastening. (See Fig. 8). Ensure the strap is firm but comfortable for the patient P1334c/2 P1333a/2 Fig. 6 Proactive Pad :- This is a reactive lower leg support Fig. 1 and 7), which enables the patient to be lifted comfortably and effortlessly. It can be adjusted vertically for differing lower leg lengths and is sprung to stay in contact, when the patient s legs move radially during the lifting procedure. To adjust, hold the Proactive Pad with one hand (see Fig. 7) and slacken the clamping screw knob with Fig. 8 Adjustable width chassis legs:- By operating the appropriate button on either the control handset or dual control panel on the lifter the chassis legs can be opened to any variable width (See Fig. 9). When pressure is released from the button, movement will stop and the chassis legs will remain securely in position. 9
12 Product Description/Function Transportation should be done with the chassis legs closed, it will be easier through doorways etc. rear of the seat, (see Fig. 11), may be utilised, or removed to enable the patient to be positioned over a toilet. Apply chassis brakes if leaving the patient unattended. P1332d Fig. 9 Warning: At all times the patient and/or operator should not allow their feet or any other part of their body to be placed in the area between the foot support and chassis legs when the chassis legs are closing. Commode Seat (Accessory) For toileting patients at the chair or bedside or for patients who cannot be transported with the transfer sling, the use of the commode seat and frame is the recommended method of transporting patients over longer distances. The commode frame is inserted into the holes in the chassis legs (see Fig. 10), once the patient has been lifted to a standing or near standing position in the manner previously described. P1335d/2 P1335e Fig. 11 Fig. 10 Removal of any clothing can be attended to, and the patient is then lowered down onto the commode seat. It is recommended that the patient is kept supported by the sling. The retractable commode pan, accessible from the 10
13 Using your Sara Plus Using the Sara Plus for Toiletting and Transporting Before approaching the Patient the attendant should always tell the patient what they are going to do, and have the correct size and type of sling ready. (See description of sling types in the Introduction section.) Although the sling can be fitted to the patient with the Sara Plus in close proximity it may be considered easier to fit the sling to the patient with the Sara Plus away. Once the sling has been fitted (see following sections) the Sara Plus may be brought to the patient as follows:- Adjust the height of the Patient Support arms to be raised or lowered sufficiently to avoid approaching the patient at eye level, making allowances for the patients arms and any obstructions, e.g. chair arms etc. Approach the patient from the front with the lifter, stop before the foot support and Proactive Pad are in contact with the patient. (See Fig. 12) Adjust the Proactive Pad height (if necessary) an approximate guide is to align the top of the Proactive Pad just below the patient s patella. (See Fig. 14). P1334b/2 Fig. 13 P1334g/2 P1334a/2 Fig. 12 If required, the chassis legs may be opened to go around the chair, by operating the appropriate button on the control handset or dual control on the lifter. If the handset button or dual control button is released during any function, powered motion will stop immediately. Fig. 14 Carefully push the lifter in closer to make full lower leg contact with the Proactive Pad (see Fig. 15), then apply the chassis brakes. P1331e/2 Fig. 15 When the patient is ready, give assistance or allow the patient to place his/her feet on the foot support, pushing the Sara Plus towards the patient a little to achieve this easily. (See Fig. 13). For the use of each individual type of sling see following sections: - 11
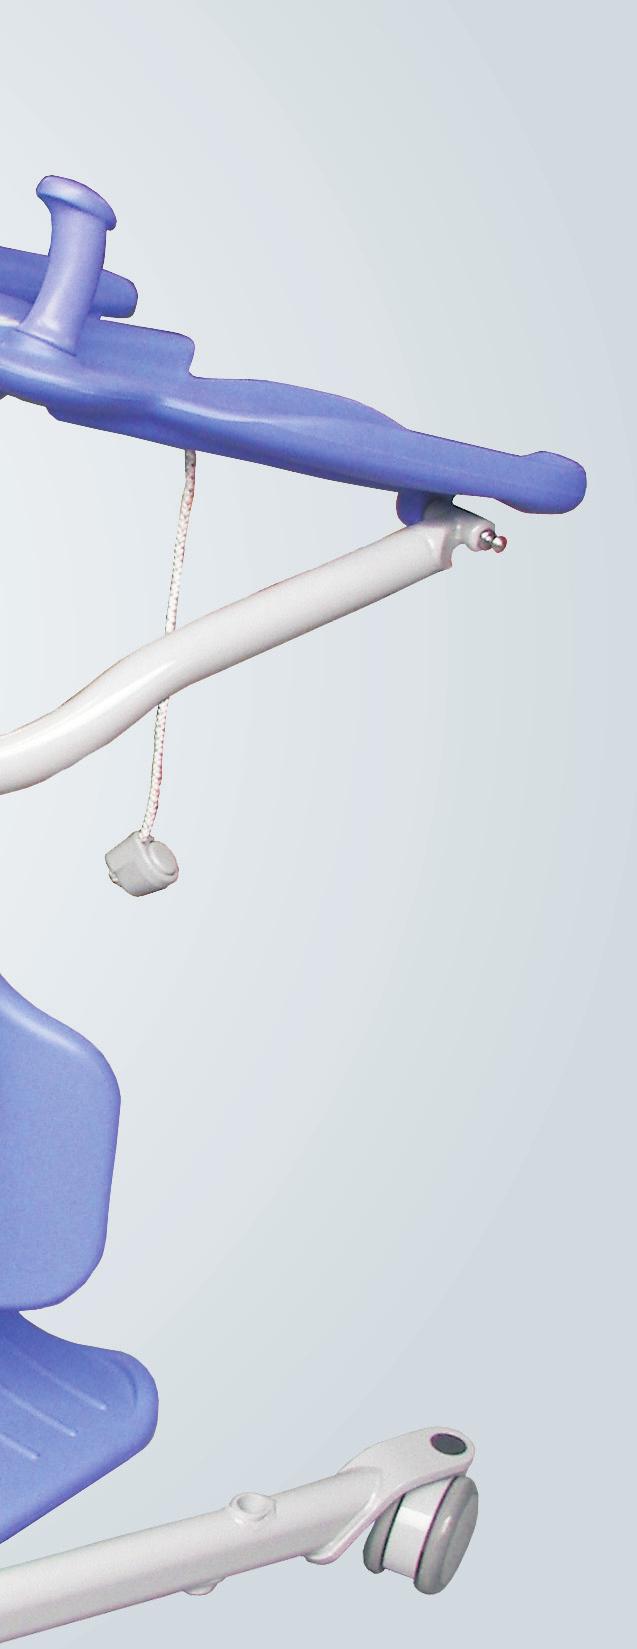
14 Using your Sara Plus Standing Sling Warning: Assessment will have to be made whether the patient requires the lower leg straps, apply if necessary. Allow the patient to hold the handgrips, with their arms resting on the Arc-Rest. This will not apply if fitting the sling around the patient before the Sara Plus is brought into close proximity. Encourage the patient to lean slightly forwards to enable the sling to be placed around the lower back of the patient (see Fig. 16). Position the sling around the patient s back so that the bottom of the sling lies horizontally approximately two inches above the patient s waistline, with the patient s arms outside the sling. Ensure the support strap is separated, brought loosely around the body, and is not twisted or trapped behind the patient s back. The support strap will assist in supporting the patient in the sling during the lifting procedure. The strap also retains the sling in the correct position around the patient. P1333c P1333b Fig. 17 If the Sara Plus is not already in close proximity to the patient bring it to the patient as described previously. Take each adjustment cord in turn and attach to the sling. (See Fig. 18). Fitting the Loop Lock cord attachment system P1333d, e, f Fig. 16 Fasten the support strap securely by overlapping and pressing the Velcro together. The strap should be tight, but comfortable for the patient. (See Fig. 17). As stated previously, the standing sling may be applied before the Sara Plus is brought into position as shown in figure 13. Cone Cup section Warning: The support strap must always be applied when using any of the slings. Fig
15 Using your Sara Plus Warning: Ensure the cone is pulled tightly into the cup section. (See Fig. 18). When both cords are attached correctly make adjustments on both cords equally so that any slack is taken up in each cord and the back section of the sling supports the patient comfortably and securely, lock the adjustment cords down into the cord retaining cleats. (See Fig. 19). Warning: Ensure the cord end knobs are away from the proactive pad when the patients legs are near or in contact with the pad. Detail view showing cords & cleats P1331b/2, P1381b If possible, the patient should then hold on to the Patient Support arms with one or both hands. The patient is then ready to be lifted. If the handset button or dual control button is released during lifting or lowering powered motion will stop immediately. If the patient is able to offer some assistance when standing this may be beneficial to patient confidence and muscular exercise. Encourage the patient to assist all he/she can to raise from the chair and/or steady themselves. Operate the lift button on the handset or dual control panel to raise the patient to a suitable and comfortable height for the particular function, e.g. transportation, toileting with commode, etc. (See Fig. 21) P1334f/2 Fig. 19 The patient should be supported by the sling, but not pulled forward too much. (See Fig. 20) P1334e/2 Fig. 20 Fig. 21 IMPORTANT: Always check that the sling adjustment cords are fully in position and locked before and during the commencement of the lifting cycle, and in tension as the patient s weight is gradually taken up. If the patient can stand sufficiently well and lock his/her knees in the normal way when fully raised, their knees will come away from the Proactive Pad and he/ she will be able to lean back into the sling. Patients who can only hold on with one hand, (those who have suffered a stroke, for example) may still be lifted by using the Sara Plus. The patient may just rest the unusable arm on the Arc-Rest or hold it across their chest, and rest their elbow on the end of the Arc-Rest, while their useable hand holds the handgrip in the normal way. 13
16 Using your Sara Plus Warning: Only use this or other methods after a satisfactory professional assessment has been carried out on the individual patient. If required insert the detachable seat frame into the receptor holes in the chassis legs, then lower the patient to a comfortable seating position for commode toiletting or longer distance transportation. (See Fig. 22). Pull apart the Velcro fastening to remove the support strap. Warning: Do not attempt to release the support strap while the patient is supported by the sling. Remove the sling from the patient. Remove the lower leg straps if they have been applied. PP1331e/2 Warning: If the patient lacks sitting balance and has been returned to sit on the side of the bed a second attendant may be needed to support the patient while the sling is being removed. Fig. 22 The chassis legs will have to be adjusted to the closed position to fit the seat frame. Release the brakes, and transfer the patient to new position, i.e., toilet, wheelchair, chair, bed, etc. Transportation should be done with the chassis legs closed, it will be easier through doorways etc. Always move in the direction shown in Fig. 22. While the patient is raised, make any necessary adjustments to clothing, incontinence pads etc., before lowering again. Lower the patient carefully using the control handset or dual control panel. Transfer and Walking Sling Using the sling for transfer (140Kg lbs maximum patient weight):- The attendant should always tell the patient what they are going to do, and have the correct size and type of sling ready. (See description of sling types in the Introduction section.) Encourage the patient to lean slightly forwards to enable the selected sling to be placed around the lower back of the patient (see Fig. 23). Position the sling around the patient s back so that the bottom edge of the sling is level with the base of the spine. Ensure the patient s arms are outside the sling and that the support strap is separated. Take each leg section of the sling in turn and slide under each leg, (see Fig. 24). Bring the support strap around the body and fasten securely by overlapping and pressing the Velcro together. P1337a Warning: Apply the chassis brakes if leaving the patient at the toilet, or if leaving the patient unattended. When the patient is seated in the new position, and you wish to remove the sling. Pull each cord up from the locking cleats and slacken the cords sufficiently to release the Loop Lock fitting, then remove the cords from the sling. Fig. 23 Take each leg section of the sling in turn and slide under each leg, (see Fig. 25). 14
17 Using your Sara Plus P1337b Fig. 24 P1334a/2 The support strap will assist in supporting the patient in the sling during the lifting procedure. P1337d Fig. 26 If required, the chassis legs may be opened to go around the chair, by operating the appropriate button on the control handset or dual control on the lifter. If the handset button or dual control button is released during any function, powered motion will stop immediately. Give assistance or allow the patient to place his/her feet on the foot support, pushing the Sara Plus towards the patient a little to achieve this easily. (See Fig. 27). P334b/2 Fig. 25 The strap should be tight but comfortable for the patient. (See Fig. 26). Fig. 27 Adjust the Proactive Pad height (if necessary) - to align the top of the Proactive Pad just above the patients patella, or adjust the pad to its highest position. (see Fig. 28). 15
18 Using your Sara Plus P1334d/2 Detail view showing cords & cleats P1338a, P1381b Fig. 28 Identify the attachment loop on each side of the sling and attach the right hand adjustment cord to the left loop, repeat for the other side (see Fig. 29). See also Fig. 18 for attachment of the cords. P1337c Fig. 30 Identify the support strap on each side of the sling (fitted with a plastic attachment clip), and adjust both straps to their maximum length. Attach each clip to the lug situated on the outer sides of the Arc- Rest (see Fig. 31). P1338b Fig. 29 When both cords are attached correctly make adjustments on both cords equally so that any slack in the cord is taken up. Warning: Lock the adjustment cords down into the cord retaining cleats (see also Fig. 30). Warning: Ensure the cord end knobs are away from the proactive pad when the patients legs are near or in contact with the pad. Fig. 31 Warning: Ensure each clip is attached correctly and secure onto the lug. Allow the patient to hold the hand grips with their arms resting on the Arc-Rest. Operate the lift button on the handset or dual control panel, continue to raise until each support strap is in tension and the patient s back just comes away from the chair, then stop the lift. Then adjust both cords equally to take up any slack, lock both cords into the locking cleats. (See Fig. 32). Continue raising until the patient is just clear of the seat. 16
19 Using your Sara Plus If any discomfort is experienced by the patient return to the sitting position and re-adjust. Be careful not to raise the patient too high as this will negate the comfort of the transfer sling. Release the chassis brakes and close the chassis legs, then transport the patient to desired position.(see Fig. 33). P1338c Fig. 32 Warning: Important: Always check that the sling adjustment cords and support strap attachment clips are fully in position and locked before and during the commencement of the lifting cycle, and in tension as the patients weight is gradually taken up. Using the sling for walking practice - (190Kg lbs maximum patient weight):- Remove the foot support from the lifter and store carefully for future use (see Product Description/ Function section in this manual). As with all types of lift, before approaching the patient the attendant should always tell the patient what they are going to do, and have the correct size and type of sling ready. Encourage the patient to lean slightly forwards to enable the selected sling to be placed around the lower back of the patient (see Fig. 23). Position the sling around the patient s back so that the bottom edge of the sling is level with the base of the spine. Ensure the patient s arms are outside the sling and that the support strap is separated. Bring the support strap around the body and fasten securely by overlapping and pressing the Velcro together. The strap should be tight but comfortable for the patient. The support strap will assist in supporting the patient in the sling during the lifting procedure. Take each leg section of the sling in turn and slide under each leg (See Fig. 25). Pull up each leg section strap and connect to each corresponding body strap, by connecting both halves of the buckles securely (see Fig. 34). P1339d P1338d Fig. 33 Transportation should be done with the chassis legs closed, it will be easier through doorways etc. Warning: Apply the chassis brakes if leaving the patient unattended. Do not attempt to release the straps or cords while the patient is supported by the sling. Fig. 34 Adjust the straps to be supportive but not restrictive for the patient. (See Fig. 35). The leg section strap connection can be performed after the patient has been lifted if preferred. 17
20 Using your Sara Plus P1339e Identify the cord attachment loop on each side of the sling body and attach the cords (Loop Lock method as previously shown in Fig. 18). When both cords are attached correctly adjust both cords equally so that the slack is taken up, but does not pull the patient forward. Warning: Lock the adjustment cords down into the cord retaining cleats. (See Fig. 37). Fig. 35 Adjust the height of the Arc-Rest to be as low as possible, making allowances for obstructions, e.g. Chair arms etc. Approach the patient from the front with the lifter; stop before the Proactive Pad is in contact with the patient. (See Fig. 36). Detail view showing cords & cleats P1331d/2 P1339a, P1381b Fig. 37 Allow the patient to hold the handgrips with their arms resting on the Arc-Rest. Slacken the adjustment on each body support strap (if required), enough to be able to connect the attachment clips to the lugs on the outer sides of the Arc-Rest (See Fig. 38). Fig. 36 If required, the chassis legs may be opened to go around the chair, by operating the appropriate button on the control handset or dual control on the lifter. Detail view of strap attachment P1339c, P1381a If the handset button or dual control button is released during any function, powered motion will stop immediately. Adjust the Proactive Pad height (if necessary) - an approximate guide is to align the top of the Proactive Pad just below the patient s patella. (See Fig. 28). Carefully push the lifter in closer to make full lower leg contact with the Proactive Pad, then apply the chassis brakes. Fig. 38 When the patient is ready, operate the lift button on the handset or dual control to raise the patient, at the same time encourage him/her to actively stand (See Fig. 39). 18
21 Using your Sara Plus P1339b Fig. 39 Continue to raise the Arc-Rest until the patient is in a comfortably supported standing position (see Fig. 40). P1339f Fig. 41 Warning: When the Pro-Active pad assembly is removed, ensure that the attachment bracket is also removed before starting therapy. Failure to do so could lead to serious injury. P1340b P1340a Fig. 40 If walking practice is to be carried out ensure the patient is correctly and comfortably supported, adjust the body support straps equally to take up any slack and be supportive but not too tight and make adjustment to the Arc-Rest as necessary. When the patient is standing confidently release the brakes and pull the lifter slightly away from the patient until the Proactive Pad is clear of the patients legs (see Fig. 41). Re-apply the chassis brakes then carefully remove the Proactive Pad complete with attachment bracket by lifting upwards and store carefully for future use. (See Fig. 42). Fig. 42 The chassis legs may be opened or left open to give better clearance for the patient. The straight line steering lock (if fitted) can be applied over the rear castor as an additional aid if required. With the Pro-Active pad removed and the brakes released, the patient will be able to walk at their own pace, while being supported by the Sara Plus. (See Fig. 43). 19
22 Using your Sara Plus P1340c ArjoHuntleigh Scale (if fitted) If your Sara Plus has been supplied with the integral Scale unit (see Fig. 44), it is possible to weigh a patient during the lifting procedure. The scale has been designed to weigh hospital or care facility patients under the supervision of trained nursing staff. All other uses must be avoided. Reset Button (lbs to kg) Scale operating button mp1431c Fig. 43 To have better flexion for the leg it may be necessary to slacken the leg straps slightly, this will allow better leg movement. Warning: Do not separate the two halves of the buckles or release the adjustment cords at any stage other than when the patient is seated and fully supported. Ensure there are no obstructions in the path before the patient is encouraged to walk. Once walking practice has been completed, apply the chassis brakes and replace the Pro-Active pad, return the patient to a chair and when fully supported, remove the sling by reversing the fitting procedure. Warning: When refitting the Pro-Active pad, ensure the pad is reinserted, retightened, and covers the support bracket. Failure to do so could lead to serious injury. Print out button (if facility is fitted) Scale Labels Visual display Fig. 44 On the labels relating to the Scale you will find the following information:- Rating and Battery Size Label (attached to the plate behind the lifter battery) Weight range 1 = 2kg - 120kg (4lbs lbs) d = e 100g (0.2lbs) Weight range 2 = 4kg - 190kg (10lbs - 419lbs) d = e 200g (0.5lbs) d = Actual Scale Division Serial number label (attached to the plate behind the lifter battery) 20
23 Using your Sara Plus Upper indicator P1122a Menu function Trend indicator Mode display Battery symbol Unit of measurement (kg or lb) Maximum symbol Lock symbol 0 symbol Dual range scale Minimum symbol Fig. 45 Scale Display The scale has an LCD which displays various numbers and symbols which are explained below (see Fig. 45). Display symbols /functions Menu Functions Shows Operation function. Other functions are only available when calibrating. Mode Display B/G Gross Weight NET Net Weight Battery Symbol If on battery power is low. (Approximately 1 hour of operation left). All digits flashing batteries are exhausted. Lock symbol Input password. (Only available for special and configuration functions. Contact ArjoHuntleigh Service Department if a password is required). 0 symbol Displayed when the Scale is in zero range, 25g (0.05lbs). Dual range symbol L = Low: 2kg-120kg (4lbs-264.4lbs) H = High: 4kg-190kg (10lbs-418lbs) The symbol is displayed for weights over 120kg (264.6lbs). Min symbol Displayed when the load is below 2kg (4lbs). Max symbol Displayed when the load is above 191.8kg (422.5lbs). If the Scale is overloaded, remove the load immediately. Do no move the Scale/lifter until the symbol is switched off. Trend indicator Visual weighing range indicator. Blocks are displayed which increase from left to right as loading increases. Unit of measurement The unit of measurement, in either kg or lbs will be preset before delivery. If, for any reason you need to change from kg to lbs, press the operating button for a minimum of 10 seconds. Upper indicator Shows weight in kilograms or pounds. (-) shows, when weight is negative. (See section Weighing with the Patient already suspended in the sling. ). 21
24 Using your Sara Plus To return to the kg setting use a ball point pen or similar to press the reset button (small dot recess). Situated on the scale display panel (see Fig. 46). Only weigh a patient when they are completely suspended with feet on the foot support. Do not attempt to weigh when the patient is sitting either in a chair or on the commode seat (if fitted). There are two methods to weigh the patient:- Method A Weighing before the patient is suspended in the sling. Press the scale operating button (see Fig. 46). With agitated patients the attendant should wait until the patient is calm before attempting to weigh. A display test is performed, all segments of the display are shown for approximately one second. The display will show WAIT and after some seconds will display the mode that the scale is in. Hang the sling to be used over the Patient Support arms and press the operating button again. The scale will display NET 0.0 (see Fig. 46). Reset Button (lbs to kg) Print out button (if facility is fitted) Scale operating button Visual display This procedure is to Zero Out (Tare) the Scale, to take account of the weight of accessories, e.g. sling etc. Remove the sling and position it around the patient, as in normal lifting procedure. Lift the patient until clear of any obstructions, e.g. chair, bed, commode seat (if fitted) etc. Ensure the patient s feet are securely on the foot support. Do not press the button again the number P1431c Fig. 46 displayed will be the weight of the patient. IMPORTANT: Do not touch or lean on the patient or lifter during the weighing operation. The scale, once switched on will operate for 6 minutes. After this time, the scale will automatically switch off. Should this happen, press the button again. Caution: Do not overload the scale. If the scale unit displays MAX, remove the patient immediately. Method B Weighing with the patient already suspended in the sling. Ensure the patient is suspended free and clear of any obstructions, e.g. chair, bed, commode seat (if fitted) etc. Press the scale operating button (see Fig. 46). With agitated patients the attendant should wait until the patient is calm before attempting to weigh. A display test will be performed, all display segments are shown for approximately one second. The display will show WAIT and after some seconds will display the mode that the scale is in. Ignore the weight displayed, and press the operating button again. The scale will display NET 0.0 (see Fig. 46) Lower the patient to a suitable position and remove the sling, then leave the patient sitting comfortably and move the lifter away from the patient. Hang the sling over the Patient Support arms. The weight is displayed, and although having a minus (-) sign in front of it, is the weight of the patient. Remove the sling. IMPORTANT: Do not touch or lean on the patient or lifter during weighing. The scale, once switched on will operate for 6 minutes. After this time, the scale will automatically switch off. Should this happen, press the button again. 22
25 Using your Sara Plus Caution: Do not overload the scale. If the scale unit displays MAX, remove the patient immediately. It is permissible to Zero Out (Tare) during operation. With the scale apart from cleaning, no other special maintenance should be required. Calibration ArjoHuntleigh recommend that your scale is checked every 12 months for accuracy and the calibration adjusted if necessary. This must be carried out by an ArjoHuntleigh service engineer. For more information contact your local ArjoHuntleigh distributor. 23
26 Battery Charging Warning: The charging of the battery must only be performed away from the patient environment. The charger is for indoor use only. Only use the charger unit in a dry environment, do not use it in the bathroom. Do not expose the charger unit or battery pack to rain or spray and do not immerse in water. Do not expose the charger unit to dust. To avoid overheating, the charger must not be covered whilst in use. No smoking or naked flames in battery vicinity. The battery charger is for use only with ArjoHuntleigh supplied batteries that are to be used with the Sara Plus. The battery charger is for use with sealed lead acid batteries only. Under no circumstances should the charger be used to attempt to recharge nonrechargeable batteries. Do not attempt to open or tamper with the charger unit in any way, for any repair the charger must be sent to the manufacturer. The mains electricity socket must be easily accessible. Should a faulty condition occur switch off and remove the connection plug from the socket. Only use ArjoHuntleigh components that have been specifically designed for the purpose when charging batteries Only use the ArjoHuntleigh battery that is supplied to be used with the Sara Plus. Only use the ArjoHuntleigh charger unit supplied with the Sara Plus. Do NOT charge batteries in a sealed container. Do NOT place batteries near, or dispose of, in a fire. Do NOT short circuit a battery. Do NOT store batteries at temperatures in excess of 60 C (140 F). Warning: Do NOT crush, puncture, open, dismantle or otherwise mechanically interfere with batteries. Should the battery casing become cracked, and electrolyte come into contact with skin or clothing, wash immediately with water. Should the battery casing become cracked, and electrolyte come into contact with skin or clothing, wash immediately with water. If the electrolyte contacts the eyes, wash immediately with copious amounts of water, and seek medical attention. When disposing of batteries, contact the appropriate local authority for advice. The abbreviation Pb shown adjacent to the recycling and trash bin symbols on the battery back label is the element symbol for lead, and indicates that the battery contains lead and therefore should not be disposed of in the normal manner but must be recycled. Ensure the battery is removed from the lifter if it is anticipated it will not be used for a prolonged period of time. For more details of caring for your lifter battery refer to ArjoHuntleigh Battery Care literature, Part No. KDX01660.GB. The Sara Plus incorporates a battery discharge indicator, situated on the right hand side of the cover (see Fig. 1). The display shows ten levels of battery state ranging from fully charged on the right to very low on the left (green, through yellow to red). The battery discharge indicator has an energy saving function, automatically switching off the display if a function button has not been operated for at least 30 seconds. The moment a button is pressed to operate any function, the display will re-start. It is recommended that the battery is removed from the lifter and recharged when the display reaches the yellow range, but lifting is possible until the display shows the red flashing light, at this point, the battery must be recharged as soon as possible. Recharging the battery pack before it reaches a low state of battery charge or certainly totally discharged will prolong its life. 24
27 Battery Charging Your lifter is fitted with an audible warning device this will sound when the battery discharge indicator reaches the red light range. To ensure the Sara Plus is always ready for use, it is recommended that a freshly charged battery pack is always available. This is achieved by having additional battery packs available and keeping one on charge while the other is in use. It may be considered good protocol to have a freshly charged battery ready for the start of every work shift. Whichever level the indicator has reached, once a fully charged battery is re-inserted into the lifter, the display will return to the green fully charged position, but if a partially charged battery is reinserted, the level at which the indicator had reached will remain, even though the recently inserted battery may be in a better state of charge than indicated. To achieve a true indication of battery state a fully charged battery must be inserted into the lifter to reset the indicator. Place the battery pack on charge as follows: Caution: Ensure the mains power to the charger unit is switched off before connecting the battery. The cable that connects the main electricity supply to the charger is supplied as a detachable item. If using the battery charger for the first time or if the cable has been unplugged from the charger, connect the cable fully into the charger before connecting to the mains electrical socket. power. An orange light will be displayed on the charger unit when the battery is totally discharged. This will change to a yellow light as the battery approaches full charge capacity, finally changing to a green light when the battery is fully charged. A discharged battery should be left approximately 8 hours to totally recharge (See also ArjoHuntleigh Battery Care document). Warning: Hold the pack firmly to ensure it does not drop and become damaged, or cause personal injury. The battery pack may be left connected to the charger unit when it is fully charged without being damaged by overcharging, this will also ensure the battery is kept fully charged. Caution: Always disconnect the mains supply before disconnecting the battery from the charger unit. When the battery pack is fully charged, disconnect the mains power, remove the battery pack from the charger, and insert it back into the Sara Plus battery position. Ensure the green reset button (situated on the rear of the mast) is pressed in (see Fig. 1). The Sara Plus is now ready for use. Caution: Turn off the hoist after use by pressing the red Power off button (see Fig. 1). This will reduce power consumption. Warning: Always ensure the cable connection plugs that fit into the charger and into the battery are fully inserted before switching on mains electricity. When the LEDs on the battery discharge indicator display amber, complete your lift cycle then take the lifter to a convenient situation and remove the battery pack by holding the grip position of the battery and pressing the release catch situated above, pivot the battery away and lift clear. Take the battery to the battery charger unit and ensure the battery is positioned securely then insert the battery connector from the charger into the corresponding connector in the back of the battery, switch on mains 25
28 Care of your Sara Plus General Lifter Care How often the following actions are taken depends on how often the equipment is used. Unless otherwise stated, it is a good idea to begin once a week and then rely on experience to decide how often it is necessary in the future. Warning: The slings should be checked, and if necessary washed according to instructions on the sling, also refer to sling instruction sheet MAX INT. The Polyester fleece sling cover may be removed from the sling cushion assembly for laundering. To remove the cover, undo the tie cords at each end of the sling, open up the Velcro seam and remove. Secure the tie cords with a knot before laundering. Warning: With regard to laundering, slings should not be classified as linen, but as an accessory to a patient transfer lifter and therefore classified as a medical device. Slings should be cleaned and disinfected only in strict accordance with the manufacturers instructions. ArjoHuntleigh strongly recommends that the support strap is removed from the sling prior to washing, this is to prevent velcro hook damage to the fabric of the sling. The support strap should be washed separately with the velcro patches in the closed position i.e.: fold the strap, over on itself and press velcro mating halves together. Always ensure the support strap is reconnected to the sling before use. Mechanical pressure should be avoided during the washing and drying procedure e.g. rolling or pressing, as these can damage parts vital to the safe and comfortable operation of the sling. It is recommended that ArjoHuntleigh Patient lifters, equipment, accessories and slings are regularly cleaned. If the slings, lifters and equipment needs cleaning, or are suspected of being contaminated, follow the cleaning and/or disinfection procedures recommended below, before re-using the equipment. This is especially important when using the same equipment for another patient, to minimise the risk of cross infection. For cleaning your lifter, equipment and accessories wipe down with a damp cloth using warm water to which a disinfectant/cleaner has been added e.g. ARJO CLEAN - disinfectant/cleaner or equivalent. Warning: The lifter should be cleaned before it is used by another patient. ARJO CLEAN - disinfectant cleaner is available from ArjoHuntleigh or their approved distributors. Caution: Do not over wet areas of the product which could cause problems with electrical components or internal corrosion. If a hot air dryer is used to dry the lifter, the temperature must not exceed 80 C (176 F). Do not use petroleum based solvents or similar, since this may damage plastic parts. Warning: For disinfection of contaminated lifters, equipment and accessories, use the preferred method of wiping the product completely with hard surface disinfectant wipes that are supplied impregnated with a 70% v/v solution of Isopropyl Alcohol. A rubbing action will be necessary when using the wipes to promote effective disinfection of the surfaces. Warning: IMPORTANT: Cleaning and disinfection products must be used in accordance with the manufacturers instructions and suitable eye, hand and clothing protection must be worn at all times when handling disinfectants. 70% v/v Isopropyl Alcohol wipes have been proved to be effective against MRSA and several other micro-organisms under light soiling conditions. Ensure that the battery pack is always in a good state of charge. Check that the lifter can be propelled in a normal manner, making sure that the castors are quite free in their movement, as clogging by hair and fluff can occur, also check that the tread of the castor is not damaged. 26
29 Care of your Sara Plus Warning: Ensure that the castors are firmly secured to the chassis. Carefully inspect all parts, in particular where there is personal contact with the patient s body, ensure that no cracks or sharp edges have developed which could injure the patient s skin or become unhygienic. It is essential that the sling attachment cords, the slings, their straps and attachment clips are carefully inspected before each and every use. If the slings, cords or straps are frayed, or the clips damaged, the sling or attachment cord should be withdrawn from use immediately and replaced. Check that all external fittings are secure and that all screws and nuts are tight. Ensure that all instruction labels are firmly attached and in good readable condition. Environmental Advice This device is marked with the WEEE symbol (crossed-out wheeled bin) to indicate that it is electronic equipment covered by the Directive 2002/96/EC on waste electrical and electronic equipment. This is a European directive but applies worldwide. In European countries the WEEE symbol reminds you that all electrical and electronic products must be taken to a separate collection at the end of their working life. Do not dispose of this product in normal domestic or commercial waste - contact your local authority for advice on disposal Periodic Testing For normal operation - raise and lower the Patient Support arms using the control handset and dual control panel, this is to test for full and efficient movement. Automatic Stop Function:- With the Patient Support arms raised well above its lowest position, using the control handset lower it, and at the same time with your other hand hold the Patient Support arms up briefly. The motor will continue to run while the Patient Support arms weight is held, this is quite normal, release the button, then lower the Patient Support arms carefully. Repeat this check using the dual control lower button on the lifter. This check is for the correct function of the automatic stop. Emergency Stop:- Test the emergency stop facility by operating the control handset to lift or lower the patient support arms, and whilst operating, press in the emergency stop button. (See Fig. 1). Powered movement should stop immediately. Reset to normal function by pressing the green reset button. (See Fig. 1). Repeat for chassis legs opening / closing function, and reset the button. Adjustable Width Chassis Function:- Open and close the chassis legs using the control handset to check for full and efficient movement. General Lifter Condition:- A general visual inspection of all external parts should be carried out, and all functions should be tested for correct operation, to ensure that no adverse damage has occurred during use. Warning: If in any doubt about the correct functioning of the Sara Plus, withdraw it from use and contact ArjoHuntleigh Service Department. Cleaning and Disinfecting the Toilet Commode Chair and Frame (if fitted) For exterior areas of the seat and frame the hard surface disinfectant wipes mentioned above will be very effective, but for internal and crevice areas of the equipment ArjoHuntleigh recommend that the seat and frame is cleaned in accordance with your normal cleaning and disinfecting protocol. Disassembly of the Commode Seat Remove the plastic commode seat from the seat frame by pulling the rear edge up sharply to disengage the locating lugs (see Fig. 47). Slide the seat forwards a short distance until clear of the frame tubes and lift away. P1248c Fig
30 Care of your Sara Plus To refit the commode seat, locate the seat holes over the seat frame tubes, and align the location lugs over the rear cross bar of the seat frame as shown in Fig. 48. Apply sharp downward blows onto the rear of the seat, (as shown in Fig. 49), in two places directly above the location lugs, until the seat snaps back into place. P1248a Fig. 48 Warning: Always ensure the seat is secure before allowing a patient to use it. P1248b Fig. 49 Warning: UK LIFTERS ONLY: Important legislation came into force on 5th December 1998, which has an impact on the schedule of service for your patient lifter(s), variable height baths and other raising and lowering equipment. The Lifting Operations and Lifting Equipment Regulations (LOLER) 1998 and The Provision and Use of Work Equipment Regulations (PUWER 98) must be satisfied by the duty holder. A scheme of six monthly thorough examinations has been devised to comply with the law and details can be obtained from ArjoHuntleigh Service UK Parts lists and circuit diagrams are available from ArjoHuntleigh or their approved distributors on request. Warning: Spare parts, if required are available from ArjoHuntleigh or their approved distributors. Special tools are required for certain component replacement. Warning: The simplest; safest and most effective way to maintain your product in good working order, is to have it methodically and professionally serviced by an ArjoHuntleigh approved engineer using ArjoHuntleigh approved spare parts. For information on service and maintenance contracts, please contact your local ArjoHuntleigh distributor. Servicing Advice Warning: ArjoHuntleigh recommend that the Sara Plus is maintained at regular intervals, see Sara Plus Preventative maintenance schedule literature Part No. PMS001. With regular use the following items are subject to wear:- Slings, batteries, sling cords, straps, castors. These items must be regularly checked as described previously, and replaced as necessary. 28


 8.")

31 Labels P ,8 7, 8 Fig Label - Battery discharge indicator and hour meter 2. Label - ArjoHuntleigh logo 3. Label - Emergency stop button identification 4. Label - Reset button identification 5. Label - Address and SWL 190kg (420 lbs) 6. Label - Sara Plus 7. Label - Safe working load 190kg (420 lbs) 8. Label - CE mark 9. Label - System failure lower override identification 10. Label - Sling size guide 11. Label - Read operating instructions before use 29
32 Technical Specification kg lbs Maximum weight limit to be lifted or carried (when using standing sling ) (420) Maximum weight limit to be lifted or carried (when using transfer and walking sling for walking practice only) (420) Maximum weight limit to be lifted or carried (when using the transfer and walking sling for transfer operation only) (308) Maximum weight limit to be carried (when using toilet commode seat and frame ) (420) Component Weights kg (lbs) Sara Plus - non-scale version (complete - less battery)73.8(162.7) Sara Plus - scale version (complete - less battery) 82.9(182.8) Battery pack 4.9(10.8) Commode seat and frame (option)4(8.8) Commode pan and holder (option)1.2(2.6) Foot support5(11) Electrical Battery type and part number (Rechargeable - lead acid) SPI3021 Battery capacity 6Ah Battery charger part number SPL3024** (Note:** indicates relevant country code) Protection class lifter IP X4 Protection class hand control IP X7 Lifter nominal voltage 24V DC Operating force of controls< 5 N Medical Equipment:- type B protection against electrical shock in accordance with IEC 601-1) ArjoHuntleigh patient handling products meet the requirements of Electromagnetic Compatibility (EMC) as stated in clause 12.5 of the Medical Devices Directive 93/42/EEC Although compliant with EMC requirements there is a remote chance that close proximity usage may affect oversensitive electrical equipment The symbol IP n 1 n 2 indicates the degree of ingress protection against solid particles (n 1 ) and liquids (n 2 ). Duty cyclemax voltsmax amps Mast Lift Actuator (sealed electro-hydraulic unit) 15% (9 min/hr)2420 V Chassis Actuator (electro-mechanical unit)10% (6 min/hr)244 Maximum sound power level In accordance with ISO db (db re 1pW ± 3dB) Scale Power supplymain lifter battery Protection classip 53 Accuracy (standard scale) 2-50kg (4-110lbs)±.5kg (1.1lbs) Accuracy (standard scale)50-120kg ( lbs) ±.5kg (1.1lbs) Accuracy (standard scale) kg ( lbs) ±.5kg (1.1lbs) Environment - Operating Relative humidity30% to 75% Ambient temperature10ºc to 40ºC (50ºF to 104ºF) Atmospheric pressure800 to 1060hPa Environment - Transport & Storage Relative humidity10% to 80% Ambient temperature-20ºc to 70ºC(-4ºF to 158ºF) Atmospheric pressure500 to 1110hPa 30
33 Technical Specification Lifter Dimensions Dimensions in millimetres (equivalent in inches) 31
34 Problem Solving / Troubleshooting Problem description Probable cause Solution The Sara Plus is brand new and not functioning at all. The Sara Plus is raising and lowering more slowly than usual. The Sara Plus does not raise or lower and the chassis legs cannot be opened or closed when using the control handset. The Sara Plus does not raise or lower and the chassis legs cannot be opened or closed when using either the control handset or the Dual Up/Down controls. When the Raise button is pressed, the Sara Plus makes a noise but the resident support arms do not move upwards. When the Chassis Legs Open button is pressed, the Sara Plus makes a noise but the chassis legs do not open. Unexpected movement of hoist Power Off button (red) is still engaged. Low battery power level. Control handset is damaged Control electronics or actuator malfunction The resident support arms are blocked by an obstruction The chassis legs are blocked by an obstruction. Two control buttons pressed simultaneously. Faulty control handset, push buttons or electronics. Press the green Reset/Power On button to disengage the Power Off button. Check LED, digital display and hour meter (on the mast of the Sara Plus, just above the battery). This indicates the power level of the battery. If in doubt, replace the battery with a fully charged one and compare the performance. In case of low battery power level, replace the battery on the Sara Plus with a fully charged one. Try operating the Sara Plus with the Dual Up/Down control located on the mast. If the equipment functions correctly when using these controls, the control handset should be replaced. Contact your ArjoHuntleigh dealer or an ArjoHuntleigh approved service engineer. Remove the obstruction and check the Sara Plus thoroughly for damage before continuing the lifting cycle. If in doubt, use the System Failure Lower Override to return the resident to a safe seated position, then remove the Sara Plus from use. Do not use the equipment again until it has been inspected and passed for safe working by an ArjoHuntleigh approved service engineer. Remove the obstruction and check the Sara Plus thoroughly for damage before continuing the lifting cycle. If in doubt, use the System Failure Lower Override to return the resident to a safe seated position, then remove the Sara Plus from use. Do not use the equipment again until it has been inspected and passed for safe working by an ArjoHuntleigh approved service engineer. Release both control buttons. If releasing the buttons does not work: Push the red Emergency Stop button and remove the battery from the hoist. Use the System Failure Lowering Override to put the patient back into a safe seated position, then remove the Sara Plus from use. Do not use the equipment again until it has been inspected and passed for safe working by an ArjoHuntleigh approved service engineer. 32

35 Electromagnetic Compatibility This product complies with the requirements of applicable standards for electromagnetic compatibility (EMC). However, medical electrical equipment such as the Sara Plus requires special precautions regarding EMC and should be installed and used in accordance with the information below. Warning: Wireless communications equipment such as wireless computer network devices, mobile phones, cordless telephones and their base stations, walkietalkies, etc. can affect this equipment and should be kept at least 1.5m away from the equipment. Guidance and manufacturer s declaration: electromagnetic emissions (EMI) Emissions test Compliance Electromagnetic environment - guidance RF emissions CISPR11 RF emissions CISPR 11 Group 1 Class B This equipment uses RF energy only for its internal functions. Therefore its RF emissions are very low and are not likely to cause any interference in nearby electronic equipment. This equipment is suitable for use in all establishments, including domestic establishments and those directly connected to the public low voltage power supply network that supplies buildings used for domestic purposes. Guidance and manufacturer s declaration: electromagnetic immunity Immunity test IEC60601 test level Compliance level Electromagnetic environment - guidance Electrostatic discharge (ESD) IEC Radiated RF IEC ±6kV contact ±8kV air 3V rms 80MHz to 2.5GHz ±6kV contact ±8kV air 3V rms 80MHz to 2.5GHz Floors should be wood, concrete or ceramic tile. If floors are covered with synthetic material the relative humidity level should be at least 30% Portable and mobile RF communications equipment should be used no closer to any part of the Sara Plus, including cables, than 1.0m, if the transmitter s output power rating exceeds 1W (a) Field strengths from fixed RF transmitters, as determined by an electromagnetic site survey, should be less than the compliance level in each frequency range (b) Interference may occur in the vicinity of equipment marked with this symbol: a) Field strengths from fixed transmitters, such as base stations for cellular/cordless telephones and land mobile radios, amateur radio, AM and FM radio broadcast and TV broadcast cannot be accurately predicted theoretically. To assess the electromagnetic environment due to fixed RF transmitters, an electromagnetic site survey should be considered. If the measured field strength in the location in which the Sara Plus is used exceeds the applicable RF compliance level above, the Sara Plus should be observed to verify normal operation. If abnormal performance is observed. additional measures may be necessary. b) Over the frequency range 150kHz to 80MHz, field strength should be less than 1V/m. Recommended separation distances between portable and mobile RF communications equipment and the Sara Plus The Sara Plus is intended for use in an electromagnetic environment in which radiated RF disturbances are controlled. The customer and user of the Sara Plus can help prevent electromagnetic interference by maintaining a minimum distance between portable and mobile RF communications equipment (transmitters) and the Sara Plus by maintaining a distance of not less than 1 metre to any part of the Sara Plus, including cables, if the transmitter s output power rating exceeds 1W. 33
SARA PLUS THE ADVANCED STANDING AND RAISING AID
 SARA PLUS THE ADVANCED STANDING AND RAISING AID OPERATING AND PRODUCT CARE INSTRUCTIONS KKX52180M-EN Issue 2 October 2006 ARJO ARJO products are patented or patent pending. Patent information is available
Chorus. Operating and Product Care Instructions KKX US KKX GB/2. October 2002
 TM Chorus Operating and Product Care Instructions KKX 55440.US KKX 52180.GB/2 Aug 2000 Issue 3 October 2002 The vertical and horizontal lines printed in the margins adjacent to the text/illustrations in
Operating and Product Care Instructions KPX GB KKX GB/2. November 2003
 Tempo TM Operating and Product Care Instructions KPX 50550.GB KKX 52180.GB/2 Aug 2000 Issue 5 November 2003 Country Approvals The vertical and horizontal lines printed in the margins adjacent to the text/illustrations
Opera. Operating and Product Care Instructions KPX GB KKX GB/2. Jan. 2001
 TM Opera Operating and Product Care Instructions KPX 01700.GB KKX 52180.GB/2 Aug 2000 Issue 1 Jan. 2001 The vertical and horizontal lines printed in the margins adjacent to the text/illustrations in these
Maxi Move TM. Instructions for Use. ...with people in mind EN rev /2017
 Maxi Move TM Instructions for Use 001.25060.EN rev. 13 06/2017...with people in mind Design Policy and Copyright and are trademarks belonging to the ArjoHuntleigh group of companies. ArjoHuntleigh 2015.
AND RENEWS IT FOR THE FUTURE
 AND RENEWS IT FOR THE FUTURE PRODUCT SPECIFICATIONS Space requirement Product information Max. safe working load Weighing capacity Weight 200 kg /440 lbs 190 kg/418 lbs 62 kg / 137 lbs 3000 mm (118 ) Weight
USER MANUAL. Item: #13246 Stand-Aid Lift. Drive Medical Design and Manufacturing
 USER MANUAL Item: #13246 Stand-Aid Lift IMPORTANT SAFEGUARDS Your lift is for transferring patients only. Do not use the lift for any other purpose. Stand-Aid Lift is intended to be used for persons within
Maxi Twin INSTRUCTIONS FOR USE
 Maxi Twin INSTRUCTIONS FOR USE 0086 04.KT.00_13US.CA September 2014...with people in mind To avoid injury, always read this Instructions for Use and accompanied documents before using the product. Mandatory
BATTERY OPERATED PATIENT LIFT MODEL:650HD OWNER S MANUAL
 BATTERY OPERATED PATIENT LIFT MODEL:650HD OWNER S MANUAL Thank you for choosing BestcareLift! To better serve you, please record the following information: Supplier Name: Telephone: Serial #: Date of Purchase:
Visual inspection Inspect lift functions regularly. Check to ensure that material is free from damage.
 MiniLift200 Manual The MiniLift200 is an electrically powered stand-up lifter for people with impaired mobility and strength and who are unable to stand up unassisted. The MiniLift200 is designed for indoor
USER MANUAL. Item: #13246 Stand-Aid Lift. Drive Medical Design and Manufacturing Push Handle. Base Width Adjustment Handle.
 USER MANUAL Item: #13246 Stand-Aid Lift Push Handle Base Width Adjustment Handle Mast Sling Attachment Hook Adjustable Knee Pad Front Caster W/Brake Foot Plate Front Caster W/O Brake Rev1.06.11.14 IMPORTANT
Poollift Neptune with Transporter
 Poollift Neptune with Transporter Operating and Product Care Instructions Doc.:065 Rev.: 0 Datum: 26/11/2012 Thank you for purchasing Nibotechncis equipment. Your POOL LIFT is one of a series of quality
SARA PLUS THE ADVANCED STANDING AND RAISING AID
 SARA PLUS THE ADVANCED STANDING AND RAISING AID with people in mind SECURITY, MOBILISATION, TRAINING SARA Plus joins SARA 3000 as an advanced addition to the ArjoHuntleigh standing and raising aid family.
DOC /500/600 Series Sit to Stand Lift Owner's Manual REV 001
 Page1 BESTCARE MODELS COVERED BestStand 400 Series Sit to Stand BestStand 500 Series Sit to Stand BestStand 600 Series Sit to Stand CONTENTS Product Features Assembly Operating Instructions Warranty BEFORE
Overhead lift Roomer 5200
 USER S MANUAL Overhead lift Roomer 5200 The Roomer 5200 offers you the unique ability to lift and move a patient from one room to another. The lift is equipped with two belts. When transferring from room
DOC /500/600 Series Patient Lift Owner's Manual REV 001
 Page1 BESTCARE MODELS COVERED 400 Series 500 Series 600 Series CONTENTS Product Features Assembly Operating Instructions Warranty BEFORE USE: Ensure the product has been assembled according to the instructions
The Future of Homecare Lifting is Here!
 HYDRAULIC OR BATTERY OPERATED MODEL:400H / 400EL / 400LK The Future of Homecare Lifting is Here! Thank you for choosing the BestLift 400 To better serve you, please record the following information: Dealer
seca 954 D GB F I E Instruction manual and guarantee
 seca 954 D GB F I E Instruction manual and guarantee 1. Congratulations! By purchasing the seca 954 electronic chair scale, you have acquired a highly-accurate and sturdy piece of equipment. seca has been
WheelieSafe. WheelieSafe. User Manual. Motorized Trolley. Distributor:
 WheelieSafe Motorized Trolley WheelieSafe Distributor: User Manual You must read this manual before using your WheelieSafe trolley P/N: 9023100 Rev. 01/16 Table of contents Contents Pages Safety Symbols,
Aston Shower Commode Chair Owner s Handbook
 Aston Shower Commode Chair Owner s Handbook Aston Shower Commode (CWC003) Page 1 of 15 Introduction Aston Shower Commode Chair These instructions aid the user and/or carer about the safe and efficient
Instruction manual. RP800 - HYDRAULIC actuator, load 150Kg. RP815 - LINAK actuator, load 150Kg
 HYDRAULIC patient lift RP800 - HYDRAULIC actuator, load 150Kg MA RP800_805_806_ 807_810_811_815 02 A_12-2010 Electric patient lifts RP805 - LINAK actuator, load 150Kg RP806 - HIWIN actuator, load 150Kg
Aston Shower Commode Chair Owner s Handbook
 Aston Shower Commode Chair Owner s Handbook Aston Shower Commode (CWC003) Page 1 of 12 Introduction Aston Shower Commode Chair These instructions aid the user and/or carer about the safe and efficient
MAXi twin CoMPACt the optimum LiftEr for CArE in ConfinED spaces
 MAXI TWIN COMPACT THE OPTIMUM LIFTER FOR CARE IN CONFINED SPACES with people in mind Big benefits in small spaces Maxi Twin Compact opens up new possibilities to improve resident and patient handling in
User Manual. Posture+ Adjustable Base. For customer service call:
 User Manual Posture+ Adjustable Base For customer service call: 1-877-707-7533 1 IMPORTANT INFORMATION PLEASE READ THESE INSTRUCTIONS THOROUGHLY BEFORE USING THIS PRODUCT. PROPER OPERATION OF YOUR ADJUSTABLE
English - Electronic Levelling System User Manual
 English - Electronic Levelling System User Manual 36 37 () LED display SLOPE IS TOO STEEP - In this position, the caravan cannot be levelled, as the ground on which it is standing is too uneven. Switch
INSTRUCTIONS AND WARRANTY FOR THE STAND AID MODEL 1501 STAND AID SERIAL #
 MAKERS OF STAND AID AND ROLL AID STAND AID MODEL 1501 PO BOX 386 Sheldon, IA 51201 1-800-831-8580 1-712-324-2153 (In Iowa) Fax: 712-324-5210 INSTRUCTIONS AND WARRANTY FOR THE STAND AID MODEL 1501 STAND
Owners Manual Unilift
 Owners Manual Unilift Contents Chapter Page Introduction 2 Safety Advise 3 Warranty 4 Using the Unilift 5 Fitting the Sling 6 Lifting and lowering 7 Emergency Controls 8 Battery and Charging Systems 9
POWER ASSISTHD OWNERS MANUAL Apollo Drive Hallam VIC 3803 PH: (03) FAX: (03)
 FAX: (03)") POWER ASSISTHD OWNERS MANUAL 20-24 Apollo Drive Hallam VIC 3803 PH: (03) 8770 9600 FAX: (03) 9703 2720 www.pridemobility.com.au ACN 088 609 661 ABN 66 088 609 6611 CONTENTS Introduction...pg 1 Safety Procedures...pg
POWER ASSISTHD OWNERS MANUAL 20-24 Apollo Drive Hallam VIC 3803 PH: (03) 8770 9600 FAX: (03) 9703 2720 www.pridemobility.com.au ACN 088 609 661 ABN 66 088 609 6611 CONTENTS Introduction...pg 1 Safety Procedures...pg
Ensure the product has been assembled according to the instructions in this manual.
 ConvaQuip S I T - T O - S T A N D L I F T MODELS ConvaQuip STS600E ConvaQuip STS600E-D PRODUCT FEATURES *ConvaQuip STS600E shown Ensure the product has been assembled according to the instructions in this
U S E R M A N U A L. To avoid injury, read user manual prior to use. enablelifecare.com.au. Hoyer Journey. Joerns Hoyer Presence
 U S E R M A N U A L Hoyer Journey To avoid injury, read user manual prior to use. enablelifecare.com.au Contents 1. The Hoyer Journey Patient Lift... 3 2. Introduction: About Your Lift... 4 3. Assembly
MAXI LITE Instruction for Use
 MAXI LITE Instruction for Use March 2014 Design Policy and Copyright and are trademarks belonging to the ArjoHuntleigh group of companies. ArjoHuntleigh 2013. As our policy is one of continuous improvement,
Phoenix Buggy User Instructions
 Phoenix Buggy User Instructions Issued 1 st March 2015 Introduction Welcome to the Phoenix Buggy User Guide. The Phoenix Buggy has been designed to provide a robust, transportable mobility solution for
BATTERY OPERATED PATIENT LIFT MODEL: 650HD OWNER'S MANUAL
 BATTERY OPERATED PATIENT LIFT MODEL: 650HD OWNER'S MANUAL Apex Dynamics Healthcare Products, LLC. 6225 Shiloh Road, Suite C Alpharetta, GA 30005 70-888-0796 or 1-800-742-0453 Copyright 2002 Apex Dynamics
INSTRUCTIONS AND WARRANTY FOR THE STAND AID MODEL 1501 STAND AID SERIAL #
 MAKERS OF STAND AID, PTA, FREEDOM CHAIR STAND AID MODEL 1501 PO BOX 386 Sheldon, IA 51201 1-800-831-8580 1-712-324-2153 (In Iowa) Fax: 712-324-5210 www.stand-aid.com INSTRUCTIONS AND WARRANTY FOR THE STAND
Model S-777NA USER MANUAL. Please ensure this manual is read and understood before using the scooter.
 Model S-777NA USER MANUAL Please ensure this manual is read and understood before using the scooter. CONTENTS Introduction 3 Feature Guide 3 Safety Advice 4 Adjustments 5 Tiller Angle Adjustment Seat Swivel
AQUATEC R / AQUATEC F / AQUATEC XL. Bathlift Operating instructions
 AQUATEC R / AQUATEC F / AQUATEC XL Bathlift Operating instructions 1 2 3 4 5 6 7 8 9 10 11 Contents 1 General instructions................. 3 1.1 Introduction......................... 3 1.2 Proper use.........................
Apollo Tilt Wheelchair 18" and 20" Instruction Manual
 Apollo Tilt Wheelchair 18" and 20" Instruction Manual Table of Contents Contents Table of Contents... 2 Introduction... 3 Warning... 4 Safety Guidelines... 5 Parts of the Tilt Wheelchair... 6 Setup & Operation...
Model S888NR & Model S889NR USER MANUAL. Please ensure this manual is read and understood before using the scooter.
 Model S888NR & Model S889NR USER MANUAL Please ensure this manual is read and understood before using the scooter. CONTENTS Introduction 3 Feature Guide 3 Safety Advice 4 Adjustments 4 Tiller angle Seat
MAXI SKY 600 OPERATING AND PRODUCT CARE INSTRUCTIONS
 MAI SKY 600 OPERATING AND PRODUCT CARE INSTRUCTIONS 001.14150.33.EN rev.4 February 2006 ARJO AB 2005 ARJO products are patented or patent pending. Patent information is available by contacting ARJO AB.
FORWARD-FACING USER MANUAL ECE R44 04 GROUP. WEIGHT 9-18 kg. AGE 9m-4y
 FORWARD-FACING USER MANUAL ECE R44 04 GROUP 1 WEIGHT 9-18 kg AGE 9m-4y 1 Thank you for choosing BeSafe izi Comfort ISOfix. BeSafe has developed this seat with much care, to protect your child during the
EZ Way Shower Trolleys
 EZ Way Shower Trolleys 2000/3000 Operator s Instructions EZ Way, Inc. PO Box 89 Clarinda, IA 51632 1-800-627-8940 www.ezlifts.com Form 2-207 Rev. 12/14/11 The EZ Way Shower trolley is unique with its side-mounted
P44 Stepper. User Manual
 P44 Stepper User Manual Table of Contents Introduction 1 Safety Warning 2 Overview of Parts 2 Attaching to Chair 3 Manoeuvring Around 4 Setting Pedal Stops 4 Getting On 5 Setting the Resistance (models
All-in-One Hoist User Manual , , ,
 All-in-One Hoist User Manual 25-20010, 25-20020, 25-20030 25-20040, 25-20050 PDF 5946 Nov-2010 General about the hoist Index General about the hoist 3 Operation Operating instructions 4 Battery charging
Cordless Rechargeable Saw Instructions for Use
 Technical data Voltage: DC 10.8V Weight: 1.25Kg Stroke rate: 0-2100/min Stroke: 15mm Cutting capacity: max diameter in wood 80mm / in soft metal 7mm Charging time: Between 5.0-5.5 Hours Battery: 1.3Ah
Oxford. Manufacturer s Contact Details. Contents. Oxford Presence. English
 English Manufacturer s Contact Details EUROPE Joerns Healthcare Limited Drakes Broughton Business Park, Worcester Road Drakes Broughton, Pershore, Worcestershire WR10 2AG United Kingdom Tel: 0844 811 1156
Turner PRO. User manual. BM61099 Rev B
 Turner PRO User manual BM6099 Rev B 06-09- Contents User manual - English - 4 Bruksanvisning - Svenska - 8 Brukermanual - Norsk - Brugsvejledning - Dansk - 6 Käyttöohje - Suomi - 0 Gebrauchsanweisung
Graduate 150 Scholar 175 Master 200
 Instruction Manual for Graduate 150 Scholar 175 Master 200 Contents Unihoist Ltd Electric and Hydraulic illustrations..... 2-3 Introduction.. 4 Assembly and commissioning instructions... 5-6 Safety precautions....
A205 Patient Lifter - Aluminium USER MANUAL
 A205 Patient Lifter - Aluminium USER MANUAL IMPORTANT: Do not use the ASPIRE A205 Lifter without having first read this manual. TABLE OF CONTENTS 1. Overview 3 2. Safety Precautions 4 3. Parts Glossary
Free Standing Track. Owner s Manual. Use and Care Trouble Shooting
 Free Standing Track Owner s Manual Use and Care Trouble Shooting VANCARE, INC. 1515 1ST STREET, AURORA, NE 68818 T (800) 694-4525 F (402) 694-3994 info@vancare.com www.vancare.com Table of Contents Free
Liko M220 / Liko M230
 Liko M220 / Liko M230 Instruction Guide English 7EN150106-04 2012-03-06 Applies to the following models: Liko M220 Prod. no. 2050010 Liko M230 Prod. no. 2050015 Liko M230 Product Description Liko M220
RECHARGEABLE SPOTLIGHT
 RECHARGEABLE SPOTLIGHT MODEL: RWL10 Part No: 4002822 INSTRUCTION MANUAL LS0609 INTRODUCTION Thank you for purchasing this CLARKE product Before attempting to use the product, it is essential that you read
Pro Booster 802Li. Please read and fully understand the instructions in this manual before operation. Keep this manual safe for future reference.
 Please dispose of packaging for the product in a responsible manner. It is suitable for recycling. Help to protect the environment, take the packaging to the local amenity tip and place into the appropriate
HALOGEN FLOODLIGHTS Models CHL1260C & 1260T Part Nos: &
 HALOGEN FLOODLIGHTS Models CHL1260C & 1260T Part Nos: 5460600 & 5460595 OPERATING & MAINTENANCE INSTRUCTIONS GC0610 INTRODUCTION Thank you for purchasing this CLARKE Halogen Floodlight. Before attempting
R710. R710 Product Manual
 R710 R710 Product Manual Contents Safety messages and important information 3 Recommended use and item dimensions 4 Check your order 5 Basic components 5-7 SoloVest 7 Directions for use 8 Operation and
PE51 HURLEY 3 STATION METAL SWING SET OWNER'S MANUAL
 PE51 HURLEY 3 STATION METAL SWING SET OWNER'S MANUAL WARNING! The disassembled product may contain small parts which pose a choking hazard to children under 3. IMPORTANT: This product may contain sharp
Accessibility At Its Best
 Accessibility At Its Best Wheelchair personal lift USER GUIDE & WARRANTY TERMS Veziris H E A L T H C A R E Dear Customer, Thank you for your confidence in purchasing our product. You have just acquired
Nimbo Lightweight Posterior Posture Walker
 Nimbo Lightweight Posterior Posture Walker Assembly & Operating Instructions with optional Forearm Platforms with optional Pelvic Stabiliser Please read these instructions carefully before assembling or
QUALITY TESTED PRODUCT OWNERS MANUAL
 TM Est. 1965 QUALITY TESTED PRODUCT OWNERS MANUAL TM Est. 1965 This product is made in Australia by TOPFORM FURNITURE Pty Ltd who are a member of the FIAA and a signatory to the Residential Furnishing
Molift Mover 300. EN - User manual. BM06101 Rev. F
 Molift Mover 300 EN - User manual BM06101 Rev. F 2016-06-01 English Manual Content Molift Mover 300...2 Lifter components...2 About Molift Mover 300...2 General...3 Declaration of conformity...3 Conditions
Cordless Sweeper. OWNER S MANUAL Model: CFT Volt DC. Made Exclusively for ALDI Inc. Batavia, IL.,
 Cordless Sweeper OWNER S MANUAL Model: CFT25 4.8 Volt DC Made Exclusively for ALDI Inc. Batavia, IL., 60510-1477 CFT25 ONE (1) YEAR LIMITED WARRANTY This product is warranted to be free from defects in
3.25 Ton Heavy Duty Floor Jack
 Please dispose of packaging for the product in a responsible manner. It is suitable for recycling. Help to protect the environment, take the packaging to the local amenity tip and place into the appropriate
Yesterday s challenge Today s solution. User Manual. innova.uk.com
 Yesterday s challenge Today s solution User Manual innova.uk.com Contents 2 www.innova.uk.com Contents Contents 1. Purpose & Use 1.1 Introduction 4 1.2 Who are Innova? 5 1.3 Unpacking & preparation 6 1.4
AquaLift Bath Lift System MODEL #8100
 AquaLift Bath Lift System MODEL #8100 Thank you for Choosing Columbia! Your AquaLift Bath Lift has been built to the highest standards of quality to ensure years of superior service. Please take the time
INSTRUCTION MANUAL STANDING WHEELCHAIR. KARMAN HEALTHCARE INC. City of Industry, CA
 INSTRUCTION MANUAL STANDING WHEELCHAIR KARMAN HEALTHCARE INC. City of Industry, CA 91748 www.karmanhealthcare.com **Karman Healthcare Inc. Recommends Patient Seek Physicians Counsel Before Purchase TABLE
Floor Lifts. We re the company that brings you. next generation of mobile lifts. Toll Free:
 We re the company that brings you Floor Lifts next generation of mobile lifts For the most strenuous lifting tasks, the Prism Medical Mobile Floor Lifts enable the caregiver to lift patients from one surface
Mighty Mack Wheeled Walker
 Mighty Mack Wheeled Walker Handle with lever brake Backrest Handle height adjustment knob Brake cable Extra wide padded seat Shopping basket Side brace 7 inch (180 mm) wheels user guide Prior to use please
User Manuel. Titan Hummer XL
 User Manuel Titan Hummer XL Dear User, Tzora Active Systems Ltd. thanks you for choosing the Titan Hummer-XL and wishes you safe and enjoyable journeys. For proper operation and to maintain the scooter
SGA-440 by Prism Medical
 SGA-440 by Prism Medical Introduction... 2 Overview... 2 Components of the Sit to Stand Lift... 3 Component List... 4 Specifications... 5 Cautions... 6 Assembly Instruction... 7 Operation Charging......12
Roller Door Operator
 INSTALLATION INSTRUCTIONS AND OWNERS MANUAL Roller Door Operator IMPORTANT PLEASE READ THESE INSTRUCTIONS CAREFULLY PRIOR TO COMMENCING THE INSTALLATION OF THE OPERATOR UNIT CAUTION This Automatic Opener
Maxi Sky 2 A complete patient handling system
 Maxi Sky 2 A complete patient handling system Enhancing care worldwide With over 50 years experience of serving healthcare, ArjoHuntleigh is dedicated to increasing the quality and efficiency of care.
MAXI 500 Instruction for Use
 MAXI 500 Instruction for Use February 2014 Design Policy and Copyright and are trademarks belonging to the ArjoHuntleigh group of companies. ArjoHuntleigh 2014. As our policy is one of continuous improvement,
Molift Mover 180. EN - User manual. BM08101 Rev. D
 Molift Mover 180 EN - User manual BM08101 Rev. D 2016-04-01 English manual Content Molift Mover 180...2 Lifter components...2 About Molift Mover 180...2 General...3 Declaration of conformity...3 Conditions
USER MANUAL. CareCo (UK) Ltd, Hubert Road, Brentwood, Essex, CM14 4JE PAGE 1
 Ltd, Hubert Road, Brentwood, Essex, CM14 4JE PAGE 1") by USER MANUAL CareCo (UK) Ltd, Hubert Road, Brentwood, Essex, CM14 4JE PAGE 1 Thank you for purchasing your I-GO product. We are delighted you have chosen I-GO for your mobility needs. CONTENTS Introduction
by USER MANUAL CareCo (UK) Ltd, Hubert Road, Brentwood, Essex, CM14 4JE PAGE 1 Thank you for purchasing your I-GO product. We are delighted you have chosen I-GO for your mobility needs. CONTENTS Introduction
Q5 5 th Wheel. Unpacking Assembly / Installation
 PA1 Unpacking Assembly / Installation Installer: Read and understand this manual. Fully instruct and demonstrate the operation of this 5 th Wheel Hitch to the End-User. Include the importance of observing
Molift Quick Raiser 205
 Molift Quick Raiser 205 EN - User manual BM13001 Rev. C 2018-01-08 English Manual Content Molift Quick Raiser 205...2 Lifter components...2 About Molift Quick Raiser 205...2 General...3 Declaration of
Molift Partner 255. EN - User manual. BM03101 Rev. L
 Molift Partner 255 EN - User manual BM03101 Rev. L 2016-06-14 English Manual Content Molift Partner 255...2 Lifter components...2 About Molift Partner 255...2 General...3 Declaration of conformity...3
Entroy. With people in mind
 Entroy With people in mind Entroy Pool access for everybody ARJO believes the benefits of hydrotherapy should be available to everybody. The new Entroy pool lift system makes this possible by providing
RAUTOOL G2 BATTERY HYDRAULIC TOOL KIT PRODUCT INSTRUCTIONS. Construction Automotive Industry
 RAUTOOL G2 BATTERY HYDRAULIC TOOL KIT PRODUCT INSTRUCTIONS www.rehau.com Construction Automotive Industry TABLE OF CONTENTS Safety Information... 3 Items Supplied............................................4
190/195 Tilt Shower Commode User Manual
 ... 190/195 Tilt Shower Commode User Manual Healthline Products 1065 E Story Rd Winter Garden Florida 34787 Fax 407-656-5641 Toll Free: 800-987-3577 Product Information This series of rehab commodes offer
Daylight Rechargeable Portable Light
 Daylight Rechargeable Portable Light DH367 Please retain these instructions for future reference. These instructions are also available in other formats. Special warning Please note: Do not look directly
SERVICE MANUAL. Seat system for electric wheelchair
 SERVICE MANUAL US VS Seat system for electric wheelchair How to contact Permobil Permobil Inc. USA 6961 Eastgate Blvd. Lebanon, TN 37090 USA Phone: 800-736-0925 Fax: 800-231-3256 Email: info@permobilusa.com
USER S MANUAL CAUTION. Visit our website at. new products, prizes, fitness tips, and much more!
 Patent Pending Model No. 831.159730 Serial No. The serial number is found in the location shown below. Write the serial number in the space above. USER S MANUAL Serial Number Decal SEARS, ROEBUCK AND CO.
FORWARD-FACING USER MANUAL ECE R GROUP WEIGHT AGE kg 9m-4y
 FORWARD-FACING USER MANUAL ECE R44 04 GROUP WEIGHT AGE 1 9-18 kg 9m-4y 1 ! Thank you for choosing BeSafe izi Comfort. BeSafe has developed this seat with much care, to protect your child during the next
Prime Engineering GRANSTAND II
 OWNER S MANUAL PRODUCT PHOTO PARTS LIST ASSEMBLY INSTRUCTIONS FITTING & ADJUSTING DAILY USAGE ACCESSORIES MAINTENANCE WARRANTY Prime Engineering GRANSTAND II Manufactured By Prime Engineering A Division
3 YEAR WARRANTY USER GUIDE BATHROOM SCALE BATHROOM. 148 mm 148 mm. 210 mm AFTER SALES SUPPORT MODEL: 91389, 07/2014 CN KW / / / / / /
 USER GUIDE BATHROOM SCALE AFTER SALES SUPPORT 1-855 754 8297 Aldi-US@Supra-elektronik.com MODEL: 91389, 07/2014 3 YEAR WARRANTY BATHROOM Cover Back Cover MYSGS Job No.: 485723 VERSION 1.1 JOB DESCRIPTION:
MAXI SKY with people in mind
 MAXI SKY 2 A complete patient handling system...with people in mind enhancing care worldwide With over 50 years experience of serving healthcare, ArjoHuntleigh is dedicated to increasing the quality and
EZ LITE CRUISER. Service & Maintenance Manual
 EZ LITE CRUISER Service & Maintenance Manual Table Of Contents Introduction to the EZ Lite Cruiser 3 Identification of Components 4 Controller System Component Diagram 6 Controller System I/O Ports Detail
Tri-Wheel Wheeled Walker
 Tri-Wheel Wheeled Walker Handle with lever brake Brake cable Handle height adjustment knob Removable basket and tray Large vinyl bag 8 inch (203 mm) wheels user guide Prior to use please read all instructions.
Skippa Mobility Scooter Owner Manual
 Skippa Mobility Scooter Owner Manual Page 1 CATALOGUE I. SAFETY GUIDELINES...3 II. SPECIFICATION... 5 III. YOUR TRAVEL SCOOTER...6 IV. OPERATION...9 V. DISASSEMBLY AND ASSEMBLY... 11 VI. BATTERY AND CHARGING...14
EZ Ceiling Lift System
 EZ Ceiling Lift System CL650, CL1000 Owner s Manual Use and features Warranty Specifications EZ Way, Inc. PO Box 89 Clarinda, IA 51632 1-800-627-8940 www.ezlifts.com Form #2-209 Rev. 3/20/18 1 2 The EZ
DIGITAL BATTERY TESTER 12V
 INSTRUCTIONS FOR DIGITAL BATTERY TESTER 12V MODEL NO: BT103 Thank you for purchasing a Sealey product. Manufactured to a high standard, this product will, if used according to these instructions, and properly
Yesterday s challenge Today s solution. User Manual. innova.uk.com
 Yesterday s challenge Today s solution User Manual innova.uk.com Contents 2 www.innova.uk.com Contents Contents 1. Purpose & Use 1.1 Introduction 4 1.2 About the manufacturer 5 1.3 Unpacking & preparation
20 TONNE HYDRAULIC PRESS MODEL NO: CSA20FBT
 20 TONNE HYDRAULIC PRESS MODEL NO: CSA20FBT PART NO: 7614058 OPERATION & MAINTENANCE INSTRUCTIONS WARNING: Read these instructions before using the press GC0516 INTRODUCTION Thank you for purchasing this
U S E R M A N U A L. To avoid injury, read user manual prior to use. enablelifecare.com.au. Joerns Hoyer Presence
 U S E R M A N U A L Hoyer Presence To avoid injury, read user manual prior to use. enablelifecare.com.au Contents 1. The Hoyer Presence Patient Lift... 3 2. Introduction: About Your Lift... 4 3. Assembly
HEAVY DUTY BATTERY BOOSTERS / CHARGERS. MODEL Nos. BC185N & BC205N OPERATING INSTRUCTIONS
 HEAVY DUTY BATTERY BOOSTERS / CHARGERS MODEL Nos. BC185N & BC205N OPERATING INSTRUCTIONS 0614 Thank you for purchasing this CLARKE Battery Charger. These units are suitable for charging and boosting 12
S-Drive Performance Trainer
 S-Drive Performance Trainer SERVICE MANUAl Table of contents CHAPTER 1: Serial number location... 1 CHAPTER 2: Important Safety instructions 2.1 Read and Save These Instructions... 2 2.2 Before Getting
REARWARD-FACING USER MANUAL ECE R GROUP WEIGHT AGE 0+/ kg 6m-4y
 REARWARD-FACING USER MANUAL ECE R44 04 GROUP WEIGHT AGE 0+/1 0-18 kg 6m-4y 1 Thank you for choosing BeSafe izi Kid ISOfix. BeSafe has developed this seat with much care, to protect your child during the
A200S Patient Stander - Aluminium USER MANUAL
 A200S Patient Stander - Aluminium USER MANUAL IMPORTANT: Do not use the ASPIRE A200S Stander without having first read this manual. TABLE OF CONTENTS 1. Overview 3 2. Safety Precautions 4 3. Parts Glossary
ELECTRIC HOIST MODEL NO: CH2500B, CH4000B OPERATION & MAINTENANCE INSTRUCTIONS PART NO: , LS1010
 ELECTRIC HOIST MODEL NO: CH2500B, CH4000B PART NO: 7630386, 7630391 OPERATION & MAINTENANCE INSTRUCTIONS LS1010 INTRODUCTION Thank you for purchasing this CLARKE Electric Hoist. Before attempting to use
RESTWELL RISE & RECLINE ARMCHAIRS INTALIFT - OWNER S HANDBOOK PARTS DESCRIPTION
 RESTWELL RISE & RECLINE ARMCHAIRS INTALIFT - OWNER S HANDBOOK CONTENTS 1. Introduction 2. Model Description 3. Parts Description 4. Personal Safety 5. Installation Instructions 6. Backrest Removal 7. Operating