Getting started with BART
|
|
|
- Phyllis Susanna Thomas
- 5 years ago
- Views:
Transcription

1 Getting started with BART
2
 2 x geared motors 2 x wheels 2 x brackets 4 x long screws 4 x short screws 4 x nuts 4 x pillarts 4 x screws 4 x")
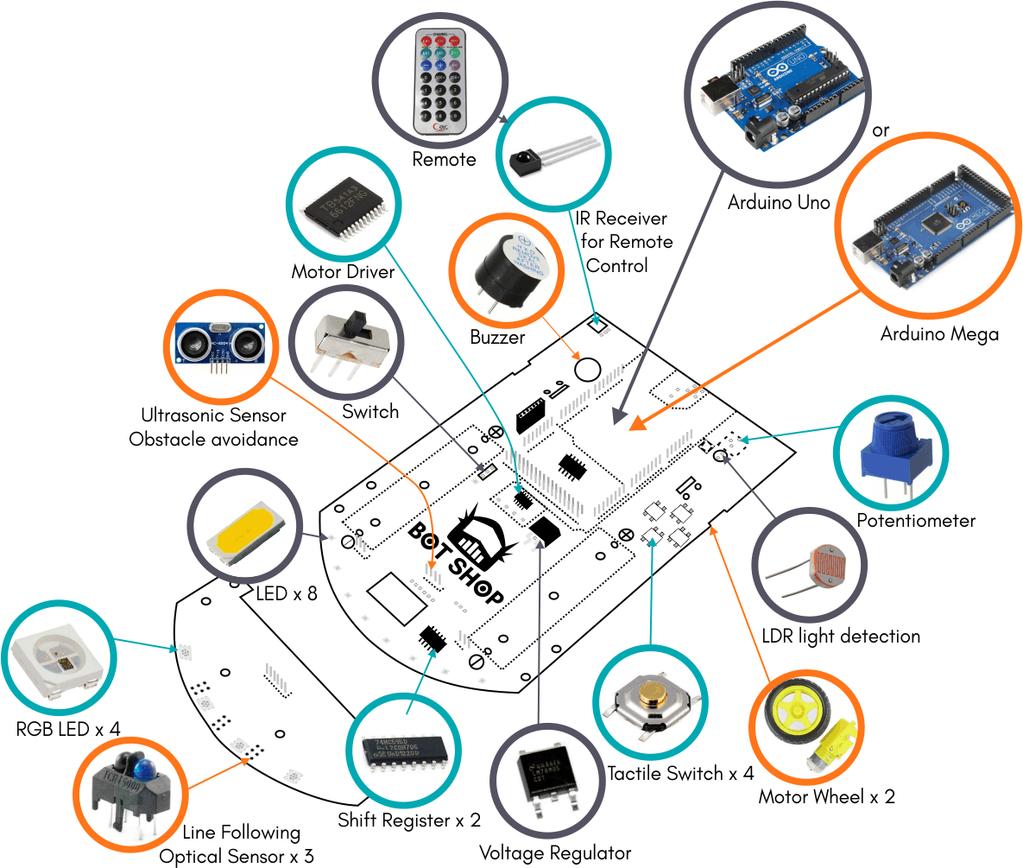
3 Included in the kit: 1 x main board 1 x sensor board 1 x remote control 1 x antenna 1 x ultra sonic sensor 1 x ball caster (front wheel) 2 x geared motors 2 x wheels 2 x brackets 4 x long screws 4 x short screws 4 x nuts 4 x pillarts 4 x screws 4 x nuts
4 Step 1, assemble the ball caster wheel (front wheel) 2 x nuts 2 x screws 1 x ball caster wheel 1 x sensor board 1. turn the sensor board upside down 2. align the ball caster wheel with the holes provided 3. mount with the screws 4. tighten with the nuts 4x pillars (tall screws) 4 x nuts 4 x screws 1 x sensor board
5 Step 2, assemble the pillars on the sensor board 1. mount the pillars on the board through the holes provided 2. secure the pillars with the nuts 3. assemble the sensor board to the main board 4. align the pillars with the holes in the main board 5. and insert the screws through the main board into the pillars

6 Step 3: assemble the wheels 4 x nuts 4 x long screws 4 x short screws 2 x brackets 2 x wheel motors 2 x wheels Tip: There are two holes in the robot main board to mount th brackets, so make sure you have the brackets the right side up. 1. insert the long screws through the motor 2. then mount the bracket on the other side of the motor and secure with the nuts
7 3. turn the main board up side down 4. align the motor with the printed lines on the board 5. place the short screws through the top side of the main board and mount the motor 6. slide the wheel on the motor driver
8 7. connect the geared motor to the screwed terminal block 8. it doesn t matter in which order you put the wires as long as they are red, black, red, black or black, red, black, red Step 4: assemble the antenna 1 x antenna 1. screw the antenna in at the back of the main board 2. bend the antenna so it will be in an upright position


9 Step 5: assemble the ultra sonic sensor 1 x ultra sonic sensor also know as distance sensor or HC-SR04 1. Slide the ultra sonic sensor in the middle of the female header on the main board


10 Step 6: batteries 4 x HR123A batteries You can choose to use eithger the HR123A batteries or the batteries. For the HR123A batteries the jumper has to be on Paralle and on Series for the battery.

11 Step 7: connect your Arduino Uno or Arduino Mega There is a printed line to indicate where the arduino should be placed. The outline of the board will match the printed line on the main board. The Arduino Mega will fit over the pins

12 Step8: remote control You can program the buttons as you please We have just programmed the buttons on the remote so you can see that your remote and robot is working Time to test your robot. Once you completed putting your robot together its time to test it. Before testing it remember to put the batteries in and to connect the Arduino Uno or Mega to the Bart main board. The test procedure is a quick and simple one: 1. You will find a switch next to the right-hand side battery to switch your robot on or off. Next to the switch is a little red LED indicating if your robot has power or not. If this does not light up the most common problem is that the batteries are the wrong way inserted or flat. 2. Use the included remote control to move your robot forward, backward and turn left or right. If the robot runs as expected, then you now know the motors are connected
13 correctly. If not, please ensure that the battery wires make a proper connection and that they are the right way around (you will not damage the motors if they are the wrong way connected, but they will turn in the wrong direction). 3. The LED's on the sensor board (bottom board) will come alive for a couple of seconds when you push the down button (button 4), showing all kinds of different colors. If not there is a connection problem between the sensor board and main board, please ensure the connection between the two boards make good contact. 4. Press the up push button (button 3) to see the LED's on the main board flashes on and off. What is next? Now that you know that your robot it working as it should it is time to start learning to create some fantastic things with your robot. The course that comes for free with your robot will take care of that, so let's get going. If you do not have access to the course yet, please jackie@botshop.co.za so she can activate your online training. Soon you will have your robot obey your every command. Enjoy and have lots of fun!
ARDUINO 2WD SMART ROBOT CAR KIT
 EN ARDUINO 2WD SMART ROBOT CAR KIT P a g e 2 PARTS LIST Please make sure that the following pieces are included in your kit Component Quantity Remarks Arduino Sensor Shield v5.0 1 Align pins using needle
BATTERY BOOSTER SHIELD
 BATTERY BOOSTER SHIELD Introduction The Battery Booster Shield is an add-on for the Arduino that efficiently boosts a lower input voltage (0.65V to 4.5V) up to 5V. It powers the Arduino and peripherals
Model: K0072. Smart Bluetooth Robot Car Kit User Guide
 Model: K0072 Wheel 4 pieces Ultrasonic bracket M330 socket screws 2 bars M36 socket screws 6 bars Ultrasonic module Battery container Servo accessory 1 set M330 round head screws 8 bars Motor drive board
An Actual Driving Lesson Learning to drive an automatic car
 An Actual Driving Lesson Learning to drive an automatic car Where are the controls that I might have to use in my driving: Knowing where the controls are, and being able to locate and use them without
BeetleBot. The Simple Zippy Screw-Together Robot Kit! SKU: K JB. jb/
 BeetleBot The Simple Zippy Screw-Together Robot Kit! www.solarbotics.com 1-866-276-2687 SKU: K JB http://www.solarbotics.com/products/k_ jb/ Document Revision: January 05 2016 Shell Board 2 x Sensor Wires
Assembly Guide for RedBot with Shadow Chassis
 Page 1 of 32 Assembly Guide for RedBot with Shadow Chassis Introduction The SparkFun RedBot is a platform for teaching basic robotics and sensor integration! It is based on the SparkFun RedBoard and fully
Soldering Pi2Go Lite. Soldering the Line-Follower PCB
 Soldering Pi2Go Lite First check which version of the main PCB you have. It is marked above the left motor "Pi2Go-Lite v1.x". There are minor changes to some parts of the build. v1.0 (initial release)
What Is an Electric Motor? How Does a Rotation Sensor Work?
 What Is an Electric Motor? How Does a Rotation Sensor Work? Electric Motors Pre-Quiz 1. What is an electric motor? 2. Name two applications (things) you use every day that use electric motors. 3. How does
Uno Compatible Pogobed Kit
 Uno Compatible Pogobed Kit Intermediate Level The pogobed kit is a hardware fixture that enables you to temporarily connect from your Arduino development board to any Arduino shield. Using the springloaded
Assembly notes for RFX Nano 3.0 carrier board
 Assembly notes for RFX Nano 3.0 carrier board Mark Pendrith , Dec 2014. Basic kit parts (BOM) 1 PCB mount 5mm/2.1mm DC barrel jack (see note below) 1 LD1117v33 (either TO-220
How to Become A Formula Vee Race Driver
 How to Become A Formula Vee Race Driver Cams Licence To race a Formula Vee you will need a Cams racing licence. You can find the application form in our members area on our website under racing forms.
LED NEON FLEX INSTALLATI ON GUI DE
 LED NEON FLEX INSTALLATI ON GUI DE F I R E F L Y L I G H T I N G. C O M. A U WHAT IS LED NEON FLEX? THE MOST VERSATILE AND SIMPLE LIGHTING SYSTEM YOU WILL EVER USE LED Neon Flex is a green friendly, safe,
Installing LED lights in a Hypercharger By Keith Edwards Joker s Wild! (Wildjokr)
") Installing LED lights in a Hypercharger By Keith Edwards Joker s Wild! (Wildjokr) THINGS YOU WILL NEED: A Hypercharger (duh!) LEDs (The ones I got were from Benny Bryant at Fantasies on Wheels in Sylacauga,
Installing LED lights in a Hypercharger By Keith Edwards Joker s Wild! (Wildjokr) THINGS YOU WILL NEED: A Hypercharger (duh!) LEDs (The ones I got were from Benny Bryant at Fantasies on Wheels in Sylacauga,
PLEASE READ THROUGH THE WHOLE WRITE UP BEFORE ACTUALLY USING IT!!!!
 JDM power folding mirror switch install into stock USDM harness. By: Greg L., Zeke21 on twinturbo.net PLEASE READ THROUGH THE WHOLE WRITE UP BEFORE ACTUALLY USING IT!!!! This is how I was able to get the
An Actual Driving Lesson. Learning to drive a manual car
 An Actual Driving Lesson Learning to drive a manual car Where are the controls that I might have to use in my driving: Knowing where the controls are, and being able to locate and use them without looking
Quick Guide. Unipro Laptimer Version Go faster faster. UNIPRO ApS
 Quick Guide Unipro Laptimer 5004 Version 1.32 Go faster faster UNIPRO ApS VIBORG HOVEDVEJ 24 DK-7100 VEJLE DENMARK Tel.: +45 75 85 11 82 Fax: +45 75 85 17 82 www.uniprolaptimer.com mail@uniprolaptimer.com
Educating the AF33-5. As 2007 quickly approaches its end and 2008 is in LET'S PLAY BALL. by Lance Wiggins
 LET'S PLAY BALL Educating Spe aker the AF33-5 by Lance Wiggins As 2007 quickly approaches its end and 2008 is in sight, it occurred to me that my 20th high school reunion is coming up next year. 20 years
Fanatec GT3RS V1 to GT3RS V2 Tutorial
 Fanatec GT3RS V1 to GT3RS V2 Tutorial by Roy Visser 1 How to update your Fanatec GT3RS V1 wheel to a GT3RS V2 wheel Welcome to this guided and detailed tutorial for upgrading your Fanatec GT3RS V1 wheel
Lab 4: Robot Assembly
 E11: Autonomous Vehicles Lab 4: Robot Assembly In this lab, you ll put together your very own robot! You should have a Mudduino and a chassis, as well as your kit of parts. Now it s time to put them all
CCL LLC 88 Black Falcon Ave., Ste. 247, Boston, MA USA Contact: Antea Risso
 88 Black Falcon Ave., Ste. 247, Boston, MA 02210 USA Contact: Antea Risso Digi-Key Corporation e-mail: antea@arduino.org 701 Brooks Ave.South PRODUCT CHANGE NOTIFICATION Thief River Falls, MN 5670 January
Magnets. Unit 6. How do magnets work? In this Unit, you will learn:
 Previously From Page 220 Forces appear whenever two objects interact. From Page 225 Unbalanced forces cause the motion of a body to change. Unit 6 Magnets How do magnets work? Magnets are interesting things
INSTRUCTIONS FOR STRUT FRONT, 4-LINK REAR, ROADSTER CHASSIS
 #917406 Page 1 of 5 7406 INSTRUCTIONS FOR STRUT FRONT, 4-LINK REAR, ROADSTER CHASSIS ITEM QTY SIZE/PART NO. TUBE CODE DESCRIPTION 1 1 4215 Front frame rail strut 1 5/8 (pair) 2 1 4236 Roadster firewall
DIY Synth Kit - Manual
 DIY Synth Kit - Manual Welcome to the DIY Synth - Manual This is a step-by-step guide to making your own electronic Synth. All the equipment you ll need to make your synth is your DIY Synth kit and of
ROBOTICS BUILDING BLOCKS
 ROBOTICS BUILDING BLOCKS 2 CURRICULUM MAP Page Title...Section Estimated Time (minutes) Robotics Building Blocks 0 2 Imaginations Coming Alive 5...Robots - Changing the World 5...Amazing Feat 5...Activity
LG CORVETTE GT2 COIL OVERS
 LG CORVETTE GT2 COIL OVERS THE MOST POWERFUL HEADERS ON THE PLANET Brought to you by LG Motorsports 972-429-1963 Parts Inventory: 1. Assembled Front shock and spring 2. Assembled Rear shock and spring
Building Robots with Lo-tech Materials
 Building Robots with Lo-tech Materials 1 By Andrew Fisher When you think about robots, you probably imagine drones, self-driving cars, or humanoid robots like Atlas or Asimo. Many of these more serious
Electricity and. Circuits Science Unit 1. For Special Education. Created by Positively Autism. Hands-On Low Prep Easy to Use
 Electricity and Circuits Science Unit 1 For Special Education Hands-On Low Prep Easy to Use Created by Positively Autism Making Learning Fun and Meaningful for Children with Autism Thank You for Downloading
INSTRUCTIONS ASSEMBLY. CONNECT the RESISTOR. The resistor (re-zis-ter) is the tube-shaped piece with two purple legs. Here we go!
 is the tube-shaped piece with two purple legs. Here we go!") BEFORE YOU BEGIN ASSEMBLING YOUR VOICE CHANGER You will need One 9-volt battery Masking tape or clear tape Adult help (if you re under 10) Now remove the parts from the plastic tray. 1 CONNECT the RESISTOR
BEFORE YOU BEGIN ASSEMBLING YOUR VOICE CHANGER You will need One 9-volt battery Masking tape or clear tape Adult help (if you re under 10) Now remove the parts from the plastic tray. 1 CONNECT the RESISTOR
How to build a Hydraulic Ram Pump By Seth Johnson Land To House Version 1.1
 Seth Johnson How to build a Hydraulic Ram Pump By Seth Johnson Land To House Version 1.1 History: A man named John Whitehurst first created the Hydraulic Ram Pump in 1772. That means that this ingenious
Experimental Procedure
 1 of 19 9/10/2018, 11:03 AM https://www.sciencebuddies.org/science-fair-projects/project-ideas/robotics_p023/robotics/line-following-robot (http://www.sciencebuddies.org/science-fair-projects/projectideas/robotics_p023/robotics/line-following-robot)
RHINO SUSPENSION SYSTEM INSTALLATION INSTRUCTIONS
 PARTS INCLUDED: 2 FRONT UPPER A-ARMS 2 FRONT LOWER A-ARMS 2 UNI-BALL JOINTS 2 UNI-BALL JOINT STUDS 2 UNI-BALL JOINT CAPS 2 RETAINING RINGS 1 FRONT SHOCK ASSEM. 2 DELRON STEERING STOPS 2 SHOCK MOUNT SPACERS
CPSC 226 Robot Base Recipes Spring 2016
 CPSC 226 Robot Base Recipes Spring 2016 Here are some hints on how to cook up your personalized motorized robot base which an Arduino will control. Cooking is always more fun with friends so be sure to
Experimental Procedure
 1 of 14 9/11/2018, 3:22 PM https://www.sciencebuddies.org/science-fair-projects/project-ideas/robotics_p026/robotics/build-a-solar-powered-bristlebot (http://www.sciencebuddies.org/science-fairprojects/project-ideas/robotics_p026/robotics/build-a-solar-powered-bristlebot)
DIY Synth Kit - Manual STUTTER SYNTH
 DIY Synth Kit - Manual STUTTER SYNTH Welcome to the DIY Synth - Manual This is a step-by-step guide to making your own electronic Synth. All you will need is your hands and your DIY Synth kit which includes
FI AirGap intake installation instructions
 Updated March 2016 FI AirGap intake installation instructions Please read and understand all of the instructions and check to make sure that all of the parts (shown on last page) are present before you
Teachers Resource: BaseBot Assembly
 Teachers Resource: BaseBot Assembly Overview: This document contains all the instructions for assembling the BaseBot. The diagram numbers correspond to the section of the REC curriculum in which the instructions
Chapter 2. Battery Charger and Base Assembly
 Chapter 2 Battery Charger and Base Assembly 11 CHAPTER 2. BATTERY CHARGER AND BASE ASSEMBLY 2.1 Section Overview This Lab teaches students how to assemble a Tekbot, in the following steps: Describe the
SMART LAB PUTTING TOGETHER THE
 PUTTING TOGETHER THE SMART LAB INSTALLING THE SPRINGS The cardboard workbench with all the holes punched in it will form the base to the many cool circuits that you will build. The first step in transforming
Road Safety Problems Documented On April 23, 2012
 Road Safety Problems Documented On April 23, 2012 Posting Date: 23 April 2012 This is a chronicle of a single morning's drive through the rural outskirts of London, Ontario, Canada, and the safety-related
DC-Motor Controller. User Manual
 Jægergårdsgade 152/05A DK-8000 Aarhus C DENMARK WWW.WAHLBERG.DK Forside DC-Motor Controller User Manual Firmware V4.00 Product content 1 Controller box - for controlling a DC-motor. 1 PowerCON TRUE1 female
About the moto:bit Board
 About the moto:bit Board The moto:bit is a carrier board for the micro:bit. Similar to an Arudino shield, it is designed to add functionality to the micro:bit without the hassle of a number of other boards,
SHIELD LIPO Cytron LiPo Power Shield
 SHIELD LIPO Cytron LiPo Power Shield User's Manual V1.0 January 2016 1 Index 1. Introduction and Overview 3 2. Packing List 4 3. Dimension 5 4. Board Layout 6 5. Hardware 8 6. Software 12 7. Warranty 13
Connecting the rear fog light on the A4 Jetta, while keeping the 5 Light Mod
 Connecting the rear fog light on the A4 Jetta, while keeping the 5 Light Mod DISCLAIMER: I'm human and make mistakes. If you spot one in this how to, tell me and I'll fix it This was done on my 99.5 Jetta.
Trading the Line. How to Use Trendlines to Spot Reversals and Ride Trends. ebook
 Trading the Line How to Use Trendlines to Spot Reversals and Ride Trends ebook EWI ebook Trading the Line How to Use Trendlines to Spot Reversals and Ride Trends By Jeffrey Kennedy, Elliott Wave International
EMG SpikerShield v1.2 Instructions
 EMG SpikerShield v1.2 Instructions Prepare yourself. In 2-4 hours, you will have built your own Arduino compatible EMG SpikerBox, so you can control robots and anything you wish with your EMG muscle activity.
BAY PARKING TO THE LEFT. 1) Drive slowly along the bays about 1 metre away.
 Drive slowly along the bays about 1 metre away.") BAY PARKING TO THE LEFT There are two methods. Method. ) Drive slowly along the bays about metre away. As the nearest line of the empty bay aligns with the left door pillar stop the car. ) Observations
BAY PARKING TO THE LEFT There are two methods. Method. ) Drive slowly along the bays about metre away. As the nearest line of the empty bay aligns with the left door pillar stop the car. ) Observations
Chapter 12. Formula EV3: a racing robot
 Chapter 12. Formula EV3: a racing robot Now that you ve learned how to program the EV3 to control motors and sensors, you can begin making more sophisticated robots, such as autonomous vehicles, robotic
HIGH-VOLTAGE BATTERIES DIAGNOSTICS & MAINTENANCE TRAINER
 Lucas Nülle is proudly and exclusively represented in Australia and New Zealand by Training Systems Australia First in Vocational Training Equipment A Division of Pullman Learning Group 300 Centre Road,
Machines That Work. What You Already Know. Technology is using science to solve problems. Technology changes over time. Technology helps people.
 Machines That Work What You Already Know Technology is using science to solve problems. Technology changes over time. Technology helps people. Tools and machines are kinds of technology. They help people
HOW-TOs How-To #1: Assemble DC-Motor Robot Chassis
 HOW-TOs How-To #: Assemble DC-Motor Robot Chassis HT Background: A chassis is the frame of a device. The components are attached to this frame. The chassis described in this How-To is for two geared DC
Table of Contents. Executive Summary...4. Introduction Integrated System...6. Mobile Platform...7. Actuation...8. Sensors...9. Behaviors...
 TaleGator Nyal Jennings 4/22/13 University of Florida Email: Magicman01@ufl.edu TAs: Ryan Chilton Josh Weaver Instructors: Dr. A. Antonio Arroyo Dr. Eric M. Schwartz Table of Contents Abstract...3 Executive
THERMOMETER PROJECT KIT
 ESSENTIAL INFORMATION BUILD INSTRUCTIONS CHECKING YOUR PCB & FAULT-FINDING MECHANICAL DETAILS HOW THE KIT WORKS MEASURE INDOOR AND OUTDOOR TEMPERATURES WITH THIS THERMOMETER PROJECT KIT Version 2.0 Build
SUBWING 700 USER S AND INSTALLER S MANUAL V1.0 REV. 04/2017
 SUBWING 700 USER S AND INSTALLER S MANUAL V1.0 REV. 04/2017 00. CONTT 01. SAFETY INSTRUCTIONS INDEX 01. SAFETY INSTRUCTIONS STANDARDS TO FOLLOW 02. OPERATOR CONNECTION SCHEME INSTALLATION MAP TECHNICAL
CHARGE DU SOLEIL TAKING CHARGE OF THE FUTURE. DANIEL ZAPATA, EE
 CHARGE DU SOLEIL TAKING CHARGE OF THE FUTURE. GROUP XII ALAN M CHAMPAGNE, EE AARON MITCHELL, CPE DANIEL ZAPATA, EE Summary Solar-powered remote-controlled vehicle with mobile device charging capabilities
It has taken a while to get
 HOVERING15 99 15 BASICS HOVERING Hovering It has taken a while to get here, but this is what all the building and planning were for to see light under those skids. But this is also the time when you have
INSTRUCTIONS FOR STRUT FRONT, 4-LINK REAR, 1 5/8 FRAME, FULL SIZE, 4130 ELIMINATOR CHASSIS
 #917230 Page 1 of 6 7230 INSTRUCTIONS FOR STRUT FRONT, 4-LINK REAR, 1 5/8 FRAME, FULL SIZE, 4130 ELIMINATOR CHASSIS ITEM QTY SIZE/PART NO. TUBE CODE DESCRIPTION 1 2 4350 Cage Side 2 2 4351 Forward strut
Tutorial 2. Introduction to Electronics
 Tutorial 2. Introduction to moway robot Electronics www.moway-robot.com 1 Index Introduction... 2 Basic concepts of electronics... 3 Hydraulic circuit... 3 Electrical circuit... 5 www.moway-robot.com 1
GARAGE DOOR OPENERS. Safety and comfort through technology
 GARAGE DOOR OPENERS Safety and comfort through technology www.marantec.com As a leading manufacturer of door opener and control systems, our mission is to equip doors with Marantec openers and to make
Prusa i3 Printer Assembly Guide
 Prusa i3 Printer Assembly Guide Special thanks to Carlos Sanchez and Miguel Sanchez for the graphics. All graphics captured from their great animation: http://www.carlos-sanchez.com/ Prusa3/ For copyright
U-Score U-Score AAC Rank AAC Rank Vocabulary Vocabulary
 go 1 927 you 2 7600 i 3 4443 more 4 2160 help 5 659 it 6 9386 want 7 586 in 8 19004 that 9 10184 like 10 1810 what 11 2560 make 12 1264 is 13 10257 on 14 6674 out 15 2350 do 16 2102 here 17 655 eat 18
1 of 5 9/22/ :44 AM
 1 of 5 9/22/2016 10:44 AM 2 of 5 9/22/2016 10:44 AM The materials you need to move around come in all shapes and sizes. There s usually no one-size-fits-all solution, as your workers also come in all shapes
Mini EV Prize Solar Car Kit
 Mini EV Prize Solar Car Kit Each Kit includes 2 x Solar Panels 8 x Wheels 4 x 50mm, 4 x 40mm 2 x Axels (short & long) & 4 x Axel Collars 1 x Motor - F18 & 3D printed mount 2 x Large Spur Gear 60T & 48T
20th. SOLUTIONS for FLUID MOVEMENT, MEASUREMENT & CONTAINMENT. Do You Need a Booster Pump? Is Repeatability or Accuracy More Important?
 Do You Need a Booster Pump? Secrets to Flowmeter Selection Success Is Repeatability or Accuracy More Important? 20th 1995-2015 SOLUTIONS for FLUID MOVEMENT, MEASUREMENT & CONTAINMENT Special Section Inside!
Instruction Manual Recharging Aids and Dock
 Instruction Manual Recharging Aids and Dock Charge! We re thrilled to be on your hearing journey. You hold in your hands a guide to using and caring for your rechargeable hearing aid kit Congrats, your
We thank you for purchasing a manual petcock conversion kit from Murphs!
 We thank you for purchasing a manual petcock conversion kit from Murphs! The first step is removing the gas tank from the bike. We suggest running the tank down to reserve before removal, both for the
A Special Report. 7 Model Train Mistakes To Avoid
 A Special Report 7 Model Train Mistakes To Avoid Legal Notice Copyright: Copyright 2009 www.themodeltrainclub.com All rights reserved. You may give or forward this report to as many people as you like
Electric Bicycle Hub Motor Conversion Home Assembly Guide 2006 EV Depot, a Priority Fulfillment and Distribution, LLC Company
 Electric Bicycle Hub Motor Conversion Home Assembly Guide 2006 EV Depot, a Priority Fulfillment and Distribution, LLC Company Overview... 2 Your safety... 2 Required tools... 2 Unpack... 2 Kit Contents...3
Montana Teen Driver Education and Training. Module 6.4. Dangerous Emotions. Keep your cool and your control
 Montana Teen Driver Education and Training Module 6.4 Dangerous Emotions Keep your cool and your control 1 Objectives Dangerous Emotions Students will understand and be able to explain: Emotions and their
TIP SHEET. Step 1: Prepare the Vehicle
 TIP SHEET Installation Tips for LC + EVO-CHR4 (C) Remote Start Kit Pre-wired Txxxx Chrysler 300 (2011) Chrysler Town and Country (2011-2015) Dodge RAM (2011-2012) Dodge Challenger (2011-2014) RAM CV (2011-2016)
Wild Thumper Robot Kit (#28192) Information and Assembly Guide
 Information and Assembly Guide") Web Site: www.parallax.com Forums: forums.parallax.com Sales: sales@parallax.com Technical: support@parallax.com Office: (916) 624-8333 Fax: (916) 624-8003 Sales: (888) 512-1024 Tech Support: (888) 997-8267
Web Site: www.parallax.com Forums: forums.parallax.com Sales: sales@parallax.com Technical: support@parallax.com Office: (916) 624-8333 Fax: (916) 624-8003 Sales: (888) 512-1024 Tech Support: (888) 997-8267
ThePiHut.com/motozero
 MotoZero Mechanics Manual Motor Controller Board User Guide and Information Product Page: ThePiHut.com/motozero Guide Contents Introduction 3 Design Features 4 Kit Contents 5 Assembly 6 Motor Selection
7211 A-ARM FRONT, 4-LINK, 3 X 2 FRAME, INTERMEDIATE, ELIMINATOR CHASSIS ITEM QTY SIZE/PART NO. TUBE CODE DESCRIPTION
 #917211 Page 1 of 6 7211 A-ARM FRONT, 4-LINK, 3 X 2 FRAME, INTERMEDIATE, ELIMINATOR CHASSIS ITEM QTY SIZE/PART NO. TUBE CODE DESCRIPTION 1 2 4138 Cage Side 2 2 4208 Forward strut 3 1 4038 Main Hoop 4 1
Operator s Manual. Single Hand Manual Drive Wheelchair
 Operator s Manual Single Hand Manual Drive Wheelchair Jordan R. Smith Kayla Gosse Leah McElhaney Team #5 Project for Client: Danielle Giroux Client Contact Information: Dave and Suzanne Giroux 53 Charlotte
Vehicle transport. General description Köln Chester Business Park
 Kollmorgen Steuerungstechnik GmbH Kollmorgen Lift Controls Ltd. Broichstrasse 32 Unit 2, The Office Village 509 Köln Chester Business Park Telefon +49 (0) 22 89 85 0 Chester, Cheshire, CH4 9QP Telefax
Driver Board User Manual
 Personal Mechatronics Lab Driver Board User Manual 2012 by M.R. Emami Table of Contents General Notes... 3 1 Modular Arrangement of the Driver Board... 4 2 Powering the Board... 5 3 Computer Interface...
RS-2 SINGLE ACTION REAR BUMPER WITH TIRE CARRIER INSTALL MANUAL FOR JEEP WRANGLER ALL MODELS.
 RS-2 SINGLE ACTION REAR BUMPER WITH TIRE CARRIER INSTALL MANUAL FOR 2007-2016 JEEP WRANGLER ALL MODELS. Rear Bumper Installation Instructions 1) Remove factory rear bumper, (this includes all tow hitch
INSTALLING THE #OMEGA-3v9s ESC.
 - 2 - INSTALLING THE #OMEGA-3v9s ESC. We usually supply the # OMEGA-3v9s ESC with a Lemon brand Rx which is simply plugged in upside down on the ESC pcb in the 24 pin socket. The two parts are bench tested
Environmental Science Lab: Buying a Car.
 Environmental Science Lab: Buying a Car. People make vehicle choices every day. The following lab and presentation will help you understand some of the complex dynamics of buying a car and the choices
How to Replace the B2 Piston Bore Seal
 Page 1 Home Cars for sale Trucks for sale Where we are Links to other diesel sites About us Why diesel? Diesel Videos How they work How they sound FAQ Dodge Diesel Maintenance tips, parts and DIY DVD's
Biasing the Vintage Series (Nomad, BelAir, VT50, Vintage 33)
") Biasing the Vintage Series (Nomad, BelAir, VT50, Vintage 33) This chapter will outline and guide you through the procedures of biasing the Vintage series amplifier. The procedures are broken down in a
Biasing the Vintage Series (Nomad, BelAir, VT50, Vintage 33) This chapter will outline and guide you through the procedures of biasing the Vintage series amplifier. The procedures are broken down in a
The Life of a Lifter, Part 2
 Basics Series: The Life of a Lifter, Part 2 -Greg McConiga Last time we looked at some complicated dynamics and compared flats to rollers. Now for the hands-on. 6 FEATURE This off-the-shelf hydraulic lifter
Part List ASSEMBLY INSTRUCTIONS. Backrest. Seat. Armrests. Star Base. Caster. Arm Bolts (M8 X 22mm) Back Bolts (M8 X 15mm) Allen Wrench
 Back Bolts (M8 X 15mm) Allen Wrench") IOO-BLK/IOO-WHT ASSEMBLY INSTRUCTIONS IOO-BLK/IOO-WHT Part List Key Description Part Qty. Spare A Backrest B Seat C Armrests ( left & right armrest) 2 D Seat Post(Cylinder) E Star Base F Caster r 5 G H
IOO-BLK/IOO-WHT ASSEMBLY INSTRUCTIONS IOO-BLK/IOO-WHT Part List Key Description Part Qty. Spare A Backrest B Seat C Armrests ( left & right armrest) 2 D Seat Post(Cylinder) E Star Base F Caster r 5 G H
Hand Pallet Truck NC. Operation Manual
 Hand Pallet Truck -------NC Operation Manual Operation Manual 1 Application Range This product is suitable for using in rated load of up to 5500lbs. This PL5500HD is the perfect jack for handling palletized
- BRONZE SERIES 30 - INSTALLATION MANUAL
 - BRONZE SERIES 30 - INSTALLATION MANUAL Thank you for purchasing our high quality retract system! We hope you will soon be experiencing the joy of flicking the retract switch with confidence and then
ACE 325/570 2 Lift Kit
 ACE 325/570 2 Lift Kit Polaris Ace 325/570 2014+ Part #: 5101244 Rev. 082316 491 W. Garfield Ave., Coldwater, MI 49036. Phone: 517-278-7768 E-mail: sales-rtpro@sporttruckusainc.com SAFETY WARNING RT Pro
Instructions For PG-1200RC Magnetic Locking Devices
 Instructions For PG-1200RC Magnetic Locking Devices (Remote control distance up to 10 meters) Ver. 18.1 Please Read Carefully Before Installing Magnetic Lock A. Carefully for handling to prevent damage
Lecture 1: Basic Ideas, Safety and Administration.
 Lecture 1: Basic Ideas, Safety and Administration Lecture 1 Page: 1 Basic Ideas Safety Administration colintan@nus.edu.sg Lecture 1: Basic Ideas, Safety and Administration Page: 2 WELCOME TO SINGAPORE
Orientation and Conferencing Plan Stage 1
 Orientation and Conferencing Plan Stage 1 Orientation Ensure that you have read about using the plan in the Program Guide. Book summary Read the following summary to the student. Everyone plays with the
Traditional method Oil Change Instructions For VW 1.9 TDI
 Traditional method Oil Change Instructions For VW 1.9 TDI Created by DeafBug This document provides instructions on changing the oil and filter on a VW 1.9 TDI engines. All the pictures here are taken
PIN BULKHEAD CONNECTOR KIT
 2501 Ludelle Street Fort Worth, Texas 76105 817-244-6212 Phone 817-244-4024 Fax 888-350-6588 Sales 800-423-9696 Tech E-mail: painless@painlessperformance.com Web: www.painlessperformance.com 40130 22 PIN
A GUIDE TO YOUR NEW JUMPING ROBOTIC TIGER
 A GUIDE TO YOUR NEW JUMPING ROBOTIC TIGER CREATED BY: TREVOR CRANDELL ANDREW PACE PHILE BROWN SEAN MOSIER JEFF MANICONE TABLE OF CONTENTS Unpacking and Setup of the Tiger.3 Operation via LabView....4 Operation
Macnet Technology. https://www.indiamart.com/macnet-technology/
 +91-8048078598 Macnet Technology https://www.indiamart.com/macnet-technology/ We are one of the prominent trader, exporter and supplier of various types of Engineering Products for Robotic Institutes.
In the last issue of Let s LET S PLAY BALL. Every code represents a perceived failure to the computer. by Lance Wiggins
 LET S PLAY BALL by Lance Wiggins A Look at the 450-43LE (Aisin Seiki), Part 2 Please note: In the April issue of GEARS, Aisin Seiki was spelled incorrectly. The correct spelling is listed above. Our apologies
Rear Speaker replacement.
 Rear Speaker replacement. First off you need the right rear speakers. The easy bit is 6x9 and better than a 15W paper cone, the difficult bit is getting a mounting depth under 74mm. Or to be more precise,
Mike and Barb s 1953 MG TD
 Mike and Barb s 1953 MG TD The first time I remember seeing an MG was in about 1959. I was like in 2 nd grade. I remember my dad bringing home a remote car for me. Not the remote you think of now, it had
RAMPAGE POWER LIFT RAMP
 RAMPAGE POWER LIFT RAMP INSTALLATION AND OPERATING INSTRUCTIONS (3/10/07) The Rampage Power Lift Ramp is the fast, easy, and safe way to load a motorcycle into a truck. One person can load or unload a
A RISE IN MOTORCYCLE RIDER FATALITIES SINCE 2000
 MOTORCYCLE A motorcycle is commonly defined as any vehicle having a seat or saddle for the use of the operator designed to travel on at least two, and not more than three, wheels in contact with the ground,
elabtronics Voltage Switch
 elabtronics Voltage Switch Want to trigger a device when a monitored voltage, temperature or light intensity reaches a certain value? The elabtronics Voltage Switch is an incredibly easy way of doing it.
The Merit 1:48 scale Late War 80 ft. Elco PT Boat -By- T. Garth Connelly
 The Merit 1:48 scale Late War 80 ft. Elco PT Boat -By- T. Garth Connelly Earlier this year, I heard that a company, Merit International, was going to be releasing two 1:48 scale kits of the eighty-foot
Mustang Radiator Conversion DIY. By GearHeadPeter. January 27, 2011
 1964-1966 Mustang Radiator Conversion DIY By GearHeadPeter January 27, 2011 We all know that the radiators in our cars are not the best, especially if you have done any customization to the engine, which