Pushback and Tow Tractor Operating Instructions Table of Contents (pg.1)
|
|
|
- Katrina Harrell
- 5 years ago
- Views:
Transcription
1 Pushback and Tow Tractor Operating Instructions Table of (pg.1) Charlatte MODEL: T-135 CLARK CTA-30,M-30 EQUITECH M30HmHTA30D HARLAN BT345,MA30-8 TUG and S/S CTA6-30D JETLINE MA30-4,MA30H, MA30-13,14,15 CLARK CTA-30,M-30 EQUITECH M30HmHTA30D HARLAN BT345,MA30-8 TUG and S/S CTA6-30D JETLINE MA30-4,MA30H, MA30-13,14,15 CLARK, EQUITECH, HARLAN, TUG and S/S, JETLINE Gasoline Engine Clark, Jetline Model: CT-120, M-120 Eagle MODEL: TT-8 Equitech Model: M-30 FMC, EQUITECH, JETLINE/JETWAY Model: B-350, B-250, B-320 GILIBERTI Model: G12 HARLAN MODEL: HLE Harlan Model: HTAZ30SDWDN Harlan Model: HTAZ, HTAW Kubota Model: L2550 Lektro Model: AP8850SDA Lektro Model: AP8750A
2 Pushback and Tow Tractor Operating Instructions Table of (pg.2) NMC/Wollard Model: 100DCTC6-8K NMC/Wollard Model: 100 DPC6,DCC6 NMC/Wollard Model: 60F-6K NMC/Wollard MODEL: 100-F-8000 TIGER, Taylor Dunn Model: Tig-30, 60, TC-100/120 TLD MODEL: JET-16 TLD Model: TPX-100 TLD Model: TMX-150 TRONAIR Model: JP100SSCUS TUG Model: GT16/28 TUG Model: GT32 TUG Model: GT35, 35A TUG Model: GT50 Tug Model: M3A, M3A-35 TUG Model: MC13, 15, 22 Tug Diesel MH Series Tug Gasoline or CNG MH Series United MODEL: SMLP-120


3 Charlatte MODEL: T-135 OPERATING INSTRUCTIONS EQUIPMENT: Baggage or Baggage/Pushback Tractor TYPE: Electric MANUFACTURER: Charlatte MODEL: T-135 Operator Controls


4
5 Safety This tractor is designed to travel on relatively smooth terrain and to tow freight and baggage to and from the aircraft. COMPLETE understanding of the operation and use of this unit is required to maintain a safe environment for the operator and other persons in the work area. Starting Do not operate any controls located inside the operator s compartment from outside the operator s compartment to prevent the unit from hitting you or other personnel. Operating Operation and servicing of this unit must be performed by properly trained and authorized persons only. Always make sure that no person or obstruction is in your line of travel before starting the unit into motion. Never climb onto, or climb out of the unit while it is in motion. Do not operate the unit with any part of your body outside of the operator s compartment. Use extreme caution and be observant when maneuvering unit or working in close quarters or blind travel areas. Slow down and sound horn when operating unit in this type of area. Never carry passengers to prevent the passengers from being thrown off or crushed between the unit and outside objects. Always look in all directions before changing your direction of travel. Always follow all safety rules of each particular airline when operating unit. If problems or equipment malfunctions are encountered while operating the unit, it must be properly shutdown and repaired. Continuing to use malfunctioning equipment can not only be unsafe for the operator and other personnel, but can lead to further damage to the unit as well. Stopping Always set the parking brake when the unit is not in operation. Consider the size and weight of the unit when allowing for maneuverability and braking. This situation is magnified in severe weather conditions and on grades. Always park the unit on solid level ground. If this is not possible, chock all four (4) wheels in both directions. Use proper flags, warnings or barriers when parking in areas of traffic.
6 Starting the Tow Tractor 1. For maximum safety observe all safety precautions specified at the beginning of this section. 2. Enter the operator s compartment. 3. The unit is equipped with an adjustable seat that can be adjusted closer to or farther from the foot pedals. If adjustment is required: a. Lift the seat adjustment lever located on the lower front of the seat and slide the seat to a comfortable position relative to the foot and hand controls and release the lever. 4. If the unit is equipped with a COBO console, adjustment can be made to the tilt of the console. 5. Buckle seat belt, if equipped. 6. Check that the direction control lever is in the NEUTRAL position. 7. Rotate the master switch to the ON position. When the tractor is turned on, the Controller Readout Panel goes through the following sequence depending on the controller type installed on the unit. For units with MC610 or MOS90 controllers: a. The Hours Count will appear (950 Hr.) The operator does not have to wait for the hour count to begin operation of the machine. b. The Battery Discharge Indicator will appear. The BDI is the normal display during operation. It is displayed as a percentage of full charge. A display of C.65 would indicate that 65% of the charge remains. For units with PowerPak controllers: a. The Traction Hours Count will appear momentarily (Figure ). This shows the total number of hours that the unit has logged in traction (driving). The Battery Discharge Indicator will also appear and remain on. b. The Pump Hours Count will appear momentarily (Figure ). This count is disabled on the unit and will always register as 0.0 c. The Key Hours Count will appear and remain on throughout operation (Figure ). This shows the total number of hours that the unit has been in service (powered on). Figure Figure Figure

7 8. Turn on the required accessories such as work lights, beacon lights, etc. 9. Move the direction control lever to either FORWARD or REVERSE position. 10. Release the parking brake. 11. Slowly depress the accelerator pedal.

8 Shutdown 1. Drive the unit to its designated parking place. 2. Stop the unit by releasing the accelerator pedal and depressing the brake pedal. 3. Set the parking brake by pulling the parking brake lever to the up position. 4. Move the direction control lever to the NEUTRAL position. 5. Turn OFF all accessories. 6. Turn master switch to the OFF position. Inching Device Operation Procedure 1. Turn the main switch to the on position. 2. Set the direction lever to neutral. 3. Release the parking brake, if applied. 4. Walk to the rear of the tractor, on the side the inching device controls are located. 5. While standing beside the tractor, out of the area of movement, press the forward or reverse button to move the tractor 6. Repeat until the desired towbar is aligned with the hitch 7. Connect the towbar. Warning THIS OPTION IS ONLY TO BE USED ON LEVEL GROUND. NEVER USE THE OPTION TO MOVE THE TRACTOR FROM LEVEL GROUND TO A SLOPED AREA. IF THE FRONT WHEELS ARE TURNED, THE TRACTOR WILL MOVE IN THE SHADED AREA. STAY CLEAR OF THIS AREA. THE OPERATOR MUST BE SURE THAT NO ONE IS IN THE AREA OF TRAVEL THE OPERATOR MUST NEVER BE IN THE AREA OF TRAVEL. IF THE DIRECTION LEVER IS SET IN A DIRECTION, THE INCHING DEVICE WILL WORK IN THIS DIRECTION ONLY. THE STOP BUTTON SHUTS OFF POWER TO THE TRACTOR ONLY. THE BRAKES ARE NOT APPLIED; THEREFORE THE TRACTOR WILL COAST A VERY SHORT DISTANCE.
9 CLARK CTA-30,M-30 EQUITECH M30HmHTA30D HARLAN BT345,MA30-8 TUG and S/S CTA6-30D JETLINE MA30-4,MA30H, MA30-13,14,15 Perkins and D2300 Hercules Engine
10 CLARK, EQUITECH, HARLAN, TUG and S/S, JETLINE with Perkins and D2300 Hercules Engine OPERATING INSTRUCTIONS EQUIPMENT: TOW TRACTOR MANUFACTURE: CLARK, EQUITECH, HARLAN, TUG and S/S, JETLINE TYPE: DIESEL BEFORE STARTING: Complete Daily Check before using. Check placards for special instructions and restrictions. Check location of levers, switches and controls. Check general condition of entire unit. MODEL: CTA-30,M-30, M30HmHTA30D, BT345,MA30-8, CTA6-30D, MA30-4,MA30H, MA30-13,14,15 STARTING PROCEDURES: (Perkins and D2300 Hercules Engine) 1. Set hand brake. 2. Place Morse shift lever in NEUTRAL position. 3. Make certain the engine STOP control is pushed all the way in to the RUN position ( if applicable ) 4. Place foot on service brake pedal and apply pressure. 5. Push accelerator pedal ½ to ¾ of travel during start. 6. Turn key switch clockwise to the START position to crank engine and release to the RUN position as soon as engine starts. CAUTION: DO NOT ENGAGE STARTER FOR MORE THAN 15 SECONDS. IF ENGINE FAILS TO START, ALLOW STARTER TO COOL FOR TWO (2) MINUTES; THEN REPEAT PROCEDURE. 7. Check instruments. If not registering correctly, turn engine off and notify Supervisor. 8. Allow engine to warm up before using.
11 WARNING: ALWAYS CHECK THE OPERATION OF THE SERVICE BRAKES BEFORE MOVING VEHICLE. Vehicle Operation CAUTION: OPERATE ONLY WITH DOORS CLOSED ( IF EQUIPPED ). DO NOT USE TO PUSH OTHER EQUIPMENT. NEVER EXCEED AIRPORT SPEED LIMIT NEVER PULL MORE THAN FOUR (4) CARTS. NEVER CHANGE SHIFT LEVER POSITION WITHOUT FIRST COMING TO A COMPLETE STOP. NEVER ALLOW DIESEL POWERED EQUIPMENT TO RUN OUT OF FUEL. NEVER SET PARKING BRAKE WITHOUT FIRST BRINGING VEHICLE TO COMPLETE STOP. Engine Shut Down: 1. Set Handbrake. 2. Place Morse shift lever in NEUTRAL position. 3. Pull engine STOP control until engine stops ( if equipped ). 4. Turn ignition or key switch clockwise to the off position. 5. Assure all lights and accessories have been turned OFF.
12 CLARK CTA-30,M-30 EQUITECH M30HmHTA30D HARLAN BT345,MA30-8 TUG and S/S CTA6-30D JETLINE MA30-4,MA30H, MA30-13,14,15 ONAN L634D Engine and Deutz Engine
13 CLARK, EQUITECH, HARLAN, TUG and S/S, JETLINE with ONAN L634D Engine and Deutz Engine OPERATING INSTRUCTIONS EQUIPMENT: TOW TRACTOR MANUFACTURE: CLARK, EQUITECH, HARLAN, TUG and S/S, JETLINE TYPE: DIESEL MODEL: CTA-30,M-30, M30HmHTA30D, BT345,MA30-8, CTA6-30D, MA30-4,MA30H, MA30-13,14,15 BEFORE STARTING: Complete Daily Check before using. Check placards for special instructions and restrictions. Check location of levers, switches and controls. Check general condition of entire unit. Starting Procedures ( ONAN L634D Engine and Deutz Engine ) 1. Set Handbrake. 2. Place Morse shift lever in NEUTRAL position. 3. Place foot on service brake pedal and apply pressure. 4. Push accelerator pedal down ½ to ¾ of travel during start. 5. Turn key switch to RUN position. NOTE: Glow plug light will illuminate. 6. WAIT for glow plug light to go out (about seven seconds). When glow plug light goes out, the plugs have heated sufficiently to assist starting. 7. Deutz starter won t engage until pre-glow times out in a few seconds. CAUTION: DO NOT ENGAGE STARTER FOR MORE THAN 15 SECONDS. IF ENGINE FAILS TO START, ALLOW STARTER TO COOL FOR TWO (2) MINUTES; THEN REPEAT PROCEDURE. 8. Turn key switch the rest of the way to the START position to crank engine and release back to RUN position as soon as engine starts. 9. Allow engine to warm up before using.
14 WARNING: ALWAYS CHECK THE OPERATION OF THE SERVICE BRAKES BEFORE MOVING VEHICLE. Vehicle Operation CAUTION: OPERATE ONLY WITH DOORS CLOSED ( IF EQUIPPED ). DO NOT USE TO PUSH OTHER EQUIPMENT. NEVER EXCEED AIRPORT SPEED LIMIT NEVER PULL MORE THAN FOUR (4) CARTS. NEVER CHANGE SHIFT LEVER POSITION WITHOUT FIRST COMING TO A COMPLETE STOP. NEVER ALLOW DIESEL POWERED EQUIPMENT TO RUN OUT OF FUEL. NEVER SET PARKING BRAKE WITHOUT FIRST BRINGING VEHICLE TO COMPLETE STOP. Engine Shut Down: 1. Set Handbrake. 2. Place Morse shift lever in NEUTRAL position. 3. Pull engine STOP control until engine stops ( if equipped ). 4. Turn ignition or key switch clockwise to the off position. 5. Assure all lights and accessories have been turned OFF.

15 CLARK, EQUITECH, HARLAN, TUG and S/S, JETLINE Gasoline Engine OPERATING INSTRUCTIONS EQUIPMENT: TOW TRACTOR MANUFACTURE: CLARK EQUITECH, HARLAN, TUG, S/S, JETLINE TYPE: Gasoline MODEL: CTA-30, M-30, M-50, M30Hm, HTA30D, BT345, MA30-8, CTA6-30D, MA30-4, MA30H, MA30-13,14,15 BEFORE STARTING: Complete Daily Check before using. Check placards for special instructions and restrictions. Check location of levers, switches and controls. Check general condition of entire unit. Starting Procedures 1. Set hand brake. 2. Place Morse shift lever in NEUTRAL position. 3. Place foot on service brake pedal and apply pressure. 4. Turn key switch clockwise to the START position to crank engine and release to the RUN position as soon as engine starts. NOTE: Use the CHOKE and THROTTLE controls as needed during start. CAUTION: DO NOT ENGAGE STARTER FOR MORE THAN 15 SECONDS. IF ENGINE FAILS TO START, ALLOW STARTER TO COOL FOR TWO (2) MINUTES; THEN REPEAT PROCEDURE. 5. Check instruments. If not registering correctly, turn engine off and notify Supervisor. 6. Allow engine to warm up before using.
16 WARNING: ALWAYS CHECK THE OPERATION OF THE SERVICE BRAKES BEFORE MOVING VEHICLE. Vehicle Operation CAUTION: OPERATE ONLY WITH DOORS CLOSED ( IF EQUIPPED ). DO NOT USE TO PUSH OTHER EQUIPMENT. NEVER EXCEED AIRPORT SPEED LIMIT NEVER PULL MORE THAN FOUR (4) CARTS. NEVER CHANGE SHIFT LEVER POSITION WITHOUT FIRST COMING TO A COMPLETE STOP. NEVER ALLOW DIESEL POWERED EQUIPMENT TO RUN OUT OF FUEL. NEVER SET PARKING BRAKE WITHOUT FIRST BRINGING VEHICLE TO COMPLETE STOP. Engine Shut Down: 1. Place Morse shift lever in NEUTRAL position. 2. Set Handbrake. 3. Turn ignition or key switch clockwise to the off position. 4. Assure all lights and accessories have been turned OFF.

17 Clark, Jetline Model: CT-120, M-120 OPERATING INSTRUCTIONS EQUIPMENT: TOW TRACTOR MANUFACTURER: Clark, Jetline TYPE: Gasoline MODEL: CT-120, M-120 BEFORE STARTING: Complete Daily Check before using. Check placards for special instructions and restrictions. Check location of levers, switches and controls. Check general condition of entire unit. Starting Procedures 1. Set hand brake. 2. Place Morse shift lever in NEUTRAL position. 3. Place foot on service brake pedal and apply pressure. 4. Turn key switch clockwise to the START position to crank engine and release to the RUN position as soon as engine starts. NOTE: Use the CHOKE and THROTTLE controls as needed during start. CAUTION: DO NOT ENGAGE STARTER FOR MORE THAN 15 SECONDS. IF ENGINE FAILS TO START, ALLOW STARTER TO COOL FOR TWO (2) MINUTES; THEN REPEAT PROCEDURE. 5. Check instruments. If not registering correctly, turn engine off and notify Supervisor. 6. Allow engine to warm up before using.
18 WARNING: ALWAYS CHECK THE OPERATION OF THE SERVICE BRAKES BEFORE MOVING VEHICLE. Vehicle Operation CAUTION: OPERATE ONLY WITH DOORS CLOSED ( IF EQUIPPED ). DO NOT USE TO PUSH OTHER EQUIPMENT. NEVER EXCEED AIRPORT SPEED LIMIT NEVER PULL MORE THAN FOUR (4) CARTS. NEVER CHANGE SHIFT LEVER POSITION WITHOUT FIRST COMING TO A COMPLETE STOP. NEVER ALLOW DIESEL POWERED EQUIPMENT TO RUN OUT OF FUEL. NEVER SET PARKING BRAKE WITHOUT FIRST BRINGING VEHICLE TO COMPLETE STOP. Engine Shut Down: 1. Place the shift lever in P position. 2. Set Handbrake. 3. Reduce engine speed to idle if the engine is hot. Allow the engine to idle for several minutes to cool to below 195 degrees. Then turn the ignition switch to OFF. 4. Assure all lights and accessories have been turned OFF.


19 Eagle MODEL: TT-8 OPERATING INSTRUCTIONS EQUIPMENT: TOW TRACTOR MANUFACTURER: Eagle TYPE: Gasoline MODEL: TT-8 BEFORE STARTING: Complete Daily Check before using. Check placards for special instructions and restrictions. Check location of levers, switches and controls. Check general condition of entire unit. Starting & Shut-Down Procedures Never start the tractor's engine while standing on the ground. Start the engine from the operator's seat with the transmission in neutral or park and the parking brake in the "ON" position. Your tractor's seat(s) is/are equipped with retractable seat belts for your safety. Fasten your seat belt and adjust the seat before starting the engine. Be sure seat belt is fitted snugly around the hips, not around the waist as failure to do so may cause injury in the event of a collision. Your tractor may be equipped with an operator's seat containing a safety pressure switch and/or an operator floor mat containing a safety pressure switch (depending on model and options). If it is, it will automatically shut the engine down anytime the trans-mission is in gear and the operator is not present in the operator s workstation.
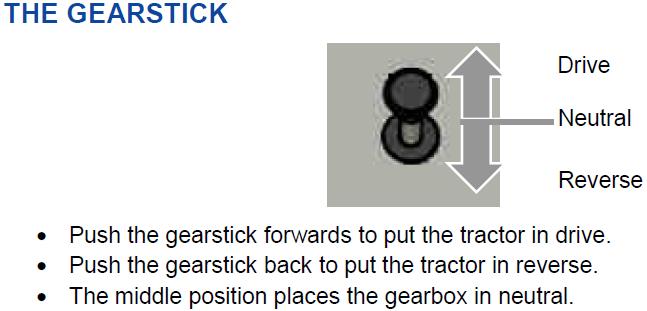
20 Gasoline/LP Tractors Be sure that the transmission is in "Park" or "Neutral". 1. Turn ignition switch to the "ON" position. 2. Depress accelerator pedal once and release. 3. Turn ignition to the "crank" (Start) position to activate the starter motor. Do not crank the engine more than 10 seconds if it doesn't start. If engine does not start, turn ignition switch off. Turn ignition switch to ON position. Depress accelerator pedal twice and release. Turn ignition to the "crank" position to activate the starter motor. 4. As soon as the engine starts, release the ignition switch and allow it to return to the ON position to avoid damage to the starter and/or flywheel gear teeth. 5. Allow the engine to warm up for a minute or two. 6. Read all instrument panel gauges to verify they are all within the normal operating ranges defined previously under "Instrumentation". Next page for Diesel Engine Starting Procedure Transmission Operation The transmission is controlled by a "lever type" gearshift located in the instrument pan-el or console. The control has six selector positions- P (Park), R (Reverse), N (Neutral), D (Drive), 2 (Second) and 1 (First). In entering or leaving a gear position, the lever must be moved past a gate. To do this, place the palm of your hand on the top of the selector lever and reach under with your fingers and grip the release mechanism and pull up (or squeeze). Shift to the desired position and release the selector. 1. Keep your foot ON the brake pedal and OFF the accelerator and release the parking brake before shifting the transmission into gear. 2. Before shifting from forward to reverse or reverse to forward, bring the vehicle to a complete stop. Do not shift into gear except when the engine is at idle speed. 3. Before dismounting from the tractor, place the transmission in "PARK" and apply the parking brake.
21 Diesel Engine Equipped Starting Procedures Diesel Engine (4TNV98) Be sure the transmission is in "Park" or "Neutral". 1. Turn ignition switch to the "ON" position. 2. See Starting the Unit in section Allow the engine to run at idle speed approximately 6 minutes (1/10 of an hour on the hour meter) to circulate and warm engine oil to a safe operating temperature. 4. To shut down the engine, reduce engine speed to idle if the engine is hot. Allow the engine to idle for several minutes to cool to below 195 degrees. Then turn the ignition switch to OFF. Diesel Engine (With Dash Mounted Glow Plug) Be sure the transmission is in "Park" or "Neutral". 1. Turn ignition switch to the "ON" position. 2. Push the Red or Black Rubber button labeled Glow Plug on the instrument panel. Hold down for the recommended length of time shown on the chart next to the button, them release. 3. Turn the ignition to the Crank position to activate the starter motor. Do not crank the engine more that 10 seconds. If the engine does not start, turn the ignition switch to the OFF position and repeat the steps above. 4. Allow the engine to run at idle speed approximately 6 minutes (1/10 of an hour on the hour meter) to circulate and warm engine oil to a safe operating temperature. 5. To shut down the engine, reduce engine speed to idle if the engine is hot. Allow the engine to idle for several minutes to cool to below 195 degrees. Then turn the ignition switch to OFF. Note: Diesel Tugs powered by a TMD, TMD27, 4JB1, 4JG1, or 4JG1T engine that are equipped with Low Oil / Hi Temp Shutdown System must follow the above start procedure as the system will recognize low oil pressure after 10 to 15 seconds of ignition ON position before the starter engages. The ignition must be put back into the OFF position to reset the timer or the engine will not attempt to restart.
22 Parking Brake The parking brake is operated by hand lever action. By pulling back on the lever, you activate and set the brake. Pushing forward will release the brake. The brake is adjustable for braking pressure by rotating the knob on the end of the handle lever. A clockwise direction is used to increase the brake holding pressure and counter clockwise to reduce the pressure. All trucks feature a safety system to protect the parking brake from accidental misuse. Depending on engine type, either the accelerator pedal will not respond when the park-ing brake is engaged, or the engine will shut off when both the parking brake is en-gaged and the truck is shifted out of Park or Neutral. Foot Brake The foot brake is power assisted and should be applied with a steady and firm down-ward pressure. If the power assist should fail, the brakes will still operate mechanically but will require increased foot pressure. Always anticipate that you may have to stop unexpectedly. Speed should always be adjusted to allow for a safe and controlled stop. Adjust your speed based on the surface conditions, the space available for stopping and the weight of the load being moved. Be aware of your surroundings. Always be prepared to stop and avoid sudden stops. Your tractor is equipped with both front and rear wheel brakes. The front and rear brakes operate on a dual system-- if one set should fail the operation of the other set will continue. The system has an emergency back up of up to three hard applications of the brakes should both systems fail. Parking Every time you park, apply the hand brake, turn the engine off, turn the ignition switch to "OFF" and return the transmission shift lever to neutral or park position. Do not park where you may block other vehicles paths or movement by emergency vehicles.
23 Moving Loads Maximum capacity towing or pushing of loads shall be done with the transmission selector lever in 1(first) or REV (reverse) gears. Load Towing Safety If towing a load, check to see that: The towed load is securely connected to the hitch of the tractor. Be sure hitch is locked/fastened into the closed position. The towed cargo load is secure and within the exterior frame of the vehicle that is carrying the load. For maximum tractor and load control and stability, as well as towing power, be sure the tongue of the trailer is parallel to the ground when connected to the tractor's hitch. Watch the trailer's rear swing clears any obstructions when cornering. Load Pushing Safety If pushing a load: Be sure the tractor is designed for and intended to be used to push the load. If using the tractor for "pushback" of an aircraft, be sure the tow bar is securely fastened to both the aircraft and the tractor and the tractor hitch is in the locked position.

24 Equitech Model: M-30 OPERATING INSTRUCTIONS EQUIPMENT: TOW TRACTOR TYPE: Gasoline MANUFACTURER: Equitech MODEL: M-30 BEFORE STARTING: Complete Daily Check before using. Check placards for special instructions and restrictions. Check location of levers, switches and controls. Check general condition of entire unit. Starting Procedures 1. Set hand brake. 2. Place Morse shift lever in NEUTRAL position. 3. Place foot on service brake pedal and apply pressure. 4. Turn key switch clockwise to the START position to crank engine and release to the RUN position as soon as engine starts. NOTE: Use the CHOKE and THROTTLE controls as needed during start. CAUTION: DO NOT ENGAGE STARTER FOR MORE THAN 15 SECONDS. IF ENGINE FAILS TO START, ALLOW STARTER TO COOL FOR TWO (2) MINUTES; THEN REPEAT PROCEDURE. 5. Check instruments. If not registering correctly, turn engine off and notify Supervisor. 6. Allow engine to warm up before using.
25 WARNING: ALWAYS CHECK THE OPERATION OF THE SERVICE BRAKES BEFORE MOVING VEHICLE. Vehicle Operation CAUTION: OPERATE ONLY WITH DOORS CLOSED ( IF EQUIPPED ). DO NOT USE TO PUSH OTHER EQUIPMENT. NEVER EXCEED AIRPORT SPEED LIMIT NEVER PULL MORE THAN FOUR (4) CARTS. NEVER CHANGE SHIFT LEVER POSITION WITHOUT FIRST COMING TO A COMPLETE STOP. NEVER ALLOW DIESEL POWERED EQUIPMENT TO RUN OUT OF FUEL. NEVER SET PARKING BRAKE WITHOUT FIRST BRINGING VEHICLE TO COMPLETE STOP. Engine Shut Down: 1. Place the shift lever in P position. 2. Set Handbrake. 3. Reduce engine speed to idle if the engine is hot. Allow the engine to idle for several minutes to cool to below 195 degrees. Then turn the ignition switch to OFF. 4. Assure all lights and accessories have been turned OFF.


26 FMC, EQUITECH, JETLINE/JETWAY Model: B-350, B-250, B-320 OPERATING INSTRUCTIONS EQUIPMENT: TOW TRACTOR MANUFACTURER: FMC, EQUITECH, JETLINE/JETWAY TYPE: Diesel MODEL: B-350, B-250, B-320 BEFORE STARTING: Complete Daily Check before using. Check placards for special instructions and restrictions. Check location of levers, switches and controls. Check general condition of entire unit. Starting Procedures

27
28

29 GILIBERTI Model: G12 OPERATING INSTRUCTIONS EQUIPMENT: TOW TRACTOR MANUFACTURER: GILIBERTI TYPE: DIESEL Model: G10 BEFORE STARTING: Complete Daily Check before using. Check placards for special instructions and restrictions. Check location of levers, switches and controls. Check general condition of entire unit. Check Fuel and Battery Charge Level The gauge should indicate 4 green lights when the vehicle is fully charged. If all four lights are red, the vehicle is not charged and should be placed back on charge. If the unit is 50% charged or less (2 green lights or 1) only use the unit with the onboard generator engaged (Hybrid mode).

 up towards seat and turn to right and lock- in.")
30 STARTING PROCEDURES: 1. To turn the vehicle on by moving the first switch on the far left of the top row of the control panel, to the forward position (labeled POWER - ON/OFF). 2. Check to see that both lights, below the POWER switch, illuminate once and then go out. (If they continue to blink, cycle the POWER switch on and off and try again) If they continue to blink please notify technician - NOTE - DO NOT USE THE VEHICLE TO PULL ANY LOADS OR AIRCRAFT IF ONLY ONE LIGHT IS ILLUMINATED. Hybrid Mode: To operate in Hybrid mode, pull the throttle cable (located in front of seat plate) up towards seat and turn to right and lock- in. Then depress the plunger ball to the left of cable and push until generator starts or no more than 3 to 5 seconds. If the generator does not start, do not depress plunger ball until throttle cable is checked it has been raised and that the unit had sufficient fuel in fuel tank. If yes to both these then repeat above operation. To shut off diesel turn throttle handle to the left of the lock position and push lever down, generator will shut off automatically.

31 To commence driving the vehicle the driver should place the second switch to the right of MAIN POWER SWITCH on the top row of the control panel, labeled FORWARD/REVERSE, forward to go forward or backward to go in reverse. Then the driver should release parking hand brake and then remove his/her right foot from the brake pedal. With the right foot, the driver should depress the accelerator pedal slowly, and at the same time, briefly look down at the two red lights under the power switch to make sure neither is illuminated or blinking. If neither light is blinking then the unit is ready for normal operation.
32 WARNING: ALWAYS CHECK THE OPERATION OF THE SERVICE BRAKES BEFORE MOVING VEHICLE. Vehicle Operation CAUTION: OPERATE ONLY WITH DOORS CLOSED ( IF EQUIPPED ). DO NOT USE TO PUSH OTHER EQUIPMENT. NEVER EXCEED AIRPORT SPEED LIMIT NEVER PULL MORE THAN FOUR (4) CARTS. NEVER CHANGE SHIFT LEVER POSITION WITHOUT FIRST COMING TO A COMPLETE STOP. NEVER ALLOW DIESEL POWERED EQUIPMENT TO RUN OUT OF FUEL. NEVER SET PARKING BRAKE WITHOUT FIRST BRINGING VEHICLE TO COMPLETE STOP. Engine Shut Down: 1. To stop operation of vehicle place right foot on brake and depress. 2. Put vehicle in neutral (second switch top row) then turn vehicle off (first switch top row) and pull up on parking brake. 3. Make sure diesel is no longer running. 4. Exit vehicle and plug in chargers by 110-volt electricity using extension cords. A/C receptacles are located front under dash on left side of vehicle.

33 HARLAN MODEL: HLE OPERATING INSTRUCTIONS EQUIPMENT: Baggage or Baggage/Pushback Tractor TYPE: Electric MANUFACTURER: HARLAN MODEL: HLE BEFORE STARTING Complete Daily Check before using. Check placards for special instructions and restrictions. Check location of levers, switches and controls. Check general condition of entire unit. Starting the Tow Tractor Complete these steps to start the tow tractor: 1. Check all controls (see indicator locations) and disengage all emergency stop switches. 2. Remove all obstructions from in front of and behind the tires. 3. Sit in the operator s seat. 4. Be sure that the directional control lever is in the Neutral position (N). 5. Turn the key switch to the ON position. 6. Select direction of travel (F) or (R).


34 Controls and Gauges Switch Options Tractors with the Push-Back option have a Mode switch with Aircraft and Bag Cart modes. When set to Aircraft mode, it reduces the maximum speed to one third of the Bag Cart setting. It also makes acceleration more gradual.


35 Operating the Tractor/Pushback Battery Condition Indicator (BCI) If your tractor has the gauge shown in Figure 3, Battery Condition Indicator (BCI), instead of the display shown in Figure 4, Electronic Dash Display, skip these headings: Electronic Dash Display User Interface engage IV Menu System Choosing Items within the Menu System TRIP Odometer reset: Figure 3, Battery Condition Indicator (BCI) The BCI displays the remaining charge in the battery and, if the controller detects a fault, the BCI displays the fault code. To decode a fault code, see the HBLE O&M Manual. Electronic Dash Display This section contains instructions for operating the tractor under normal conditions. The operator must have a complete understanding of the location and function of all of the operating controls before attempting to operate the tractor. The electronic dash display functions as a (1) speedometer, (2) trip odometer, (3) total odometer, (4) belt loader hour meter, (5) battery charge meter and (6) Park Brake / Directional Control indicator. You can set up additional functions with the (7) menu button and (8) navigation buttons.
 or reverse (R) with the directional control lever. 3. Release the pressure on the brake pedal and slowly depress the accelerator pedal to put the tractor into motion.")
. 4. To park the tractor, turn OFF the ignition switch and apply the parking brake.")
36 Driving the Tractor Complete these steps to drive the tractor: 1. Apply the brakes by depressing the brake pedal and release the hand brake. 2. Select forward (F) or reverse (R) with the directional control lever. 3. Release the pressure on the brake pedal and slowly depress the accelerator pedal to put the tractor into motion. Stopping the Tractor Complete these steps to stop the tractor: 1. Release the accelerator pedal. 2. Press the brake pedal so that the tractor decelerates smoothly. 3. When the tractor comes to a halt, put the directional control lever in the neutral position (N). 4. To park the tractor, turn OFF the ignition switch and apply the parking brake. (If you park on a flight deck, put chocks in their proper places to secure the wheels.)

37 Inching (Optional) Moving the tractor very slowly using the buttons on the back of the tractor is called Inching. Because using this feature requires getting out of the tractor with the power on and the park brake off, it conflicts with some organizations safety policies. In those cases, this feature is disabled. If the Inching feature is enabled on your tractor complete these steps to use it: 1. Stop close to the trailer. 2. Place the directional control lever in the Neutral position (N). 3. Walk to the back of the tractor. 4. Use the inching buttons to move the tractor several inches forward or backward by pushing the appropriate button. Each time the button is depressed and released the tractor will move several inches. 5. Once the tractor is position, return to the driver s seat and proceed to drive the tractor.
 1.")
38 Harlan Model: HTAZ30SDWDN OPERATING INSTRUCTIONS EQUIPMENT: TOW TRACTOR MANUFACTURER: Harlan TYPE: DIESEL MODEL: HTAZ30SDWDN BEFORE STARTING: Complete Daily Check before using. Check placards for special instructions and restrictions. Check location of levers, switches and controls. Check general condition of entire unit. STARTING PROCEDURES:: (PERKINS ENGINE) 1. Set hand brake. 2. Place Morse shift lever in NEUTRAL position. 3. Place foot on service brake pedal and apply pressure. 4. Turn IGNITION switch clockwise to the START position to crank engine. Release to the RUN position as soon as the engine starts. (use this procedure if equipped with the high heat/low oil shut down) 5. Depress the push button located on the dash until an oil pressure reading appears on the gauge (25 psi) and then crank. 6. Release button, allow engine to warm up before using. CAUTION: DO NOT ENGAGE STARTER FOR MORE THAN 15 SECONDS. IF ENGINE FAILS TO START, ALLOW STARTER TO COOL FOR TWO (2) MINUTES; THEN REPEAT PROCEDURE. 7. Check instruments. If not registering correctly, turn engine off and notify Supervisor.
39 WARNING: ALWAYS CHECK THE OPERATION OF THE SERVICE BRAKES BEFORE MOVING VEHICLE. Vehicle Operation CAUTION: OPERATE ONLY WITH DOORS CLOSED ( IF EQUIPPED ). DO NOT USE TO PUSH OTHER EQUIPMENT. NEVER EXCEED AIRPORT SPEED LIMIT NEVER PULL MORE THAN FOUR (4) CARTS. NEVER CHANGE SHIFT LEVER POSITION WITHOUT FIRST COMING TO A COMPLETE STOP. NEVER ALLOW DIESEL POWERED EQUIPMENT TO RUN OUT OF FUEL. NEVER SET PARKING BRAKE WITHOUT FIRST BRINGING VEHICLE TO COMPLETE STOP. Engine Shut Down: 1. Set hand brake. 2. Place Morse shift lever in NEUTRAL position. 3. Turn ignition or key switch clockwise to the OFF position. 4. Assure that all lights and accessories have been turned OFF.
 1.")
40 Harlan OPERATING INSTRUCTIONS EQUIPMENT: TOW TRACTOR MANUFACTURER: Harlan Model: HTAZ, HTAW TYPE: DIESEL MODEL: HTAZ, HTAW BEFORE STARTING: Complete Daily Check before using. Check placards for special instructions and restrictions. Check location of levers, switches and controls. Check general condition of entire unit. STARTING PROCEDURES:: (PERKINS ENGINE) 1. Set hand brake. 2. Place Morse shift lever in NEUTRAL position. 3. Place foot on service brake pedal and apply pressure. 4. Turn IGNITION switch clockwise to the START position to crank engine. Release to the RUN position as soon as the engine starts. (use this procedure if equipped with the high heat/low oil shut down) 5. Depress the push button located on the dash until an oil pressure reading appears on the gauge (25 psi) and then crank. 6. Release button, allow engine to warm up before using. CAUTION: DO NOT ENGAGE STARTER FOR MORE THAN 15 SECONDS. IF ENGINE FAILS TO START, ALLOW STARTER TO COOL FOR TWO (2) MINUTES; THEN REPEAT PROCEDURE. 7. Check instruments. If not registering correctly, turn engine off and notify Supervisor.


41 Vehicle Operation CAUTION: OPERATE ONLY WITH DOORS CLOSED ( IF EQUIPPED ). DO NOT USE TO PUSH OTHER EQUIPMENT. NEVER EXCEED AIRPORT SPEED LIMIT NEVER PULL MORE THAN FOUR (4) CARTS. NEVER CHANGE SHIFT LEVER POSITION WITHOUT FIRST COMING TO A COMPLETE STOP. NEVER ALLOW DIESEL POWERED EQUIPMENT TO RUN OUT OF FUEL. NEVER SET PARKING BRAKE WITHOUT FIRST BRINGING VEHICLE TO COMPLETE STOP.
42 WARNING: ALWAYS CHECK THE OPERATION OF THE SERVICE BRAKES BEFORE MOVING VEHICLE. Note: Be sure that all of the gauges are in the normal operating ranges while the tractor is in operation. 1. Complete these steps to drive the tractor: 2. Step on the brake pedal and release the hand brake. 3. Select the proper gear with the transmission selection lever. Be sure that the gear selected is suitable to move the intended load. 4. Release the pressure on the brake pedal and slowly depress the accelerator pedal to put the tractor into motion. 5. When shifting from a forward gear to reverse gear, bring the tractor to a complete stop. Caution Do not shift between forward and reverse while the tractor is moving except in a brake failure emergency. Do not shift into forward or reverse with the engine running faster than idle. Both of these actions can damage the transmission, drive line, and drive axle. 6. If the tractor is stopped for longer than a minute with the engine running, shift the transmission into neutral (N). Engine Shut Down: 1. Set hand brake. 2. Place Morse shift lever in NEUTRAL position. 3. Turn ignition or key switch clockwise to the OFF position. 4. Assure that all lights and accessories have been turned OFF.

43 Kubota OPERATING INSTRUCTIONS EQUIPMENT: TOW TRACTOR MANUFACTURER: Kubota Model: L2550 TYPE: Gasoline MODEL: L2550 BEFORE STARTING: Complete Daily Check before using. Check placards for special instructions and restrictions. Check location of levers, switches and controls. Check general condition of entire unit. Starting Procedures 1. Set hand brake. 2. Place foot on service brake pedal and apply pressure. 3. Turn key switch clockwise to the START position to crank engine and release to the RUN position as soon as engine starts. NOTE: Use the CHOKE and THROTTLE controls as needed during start. CAUTION: DO NOT ENGAGE STARTER FOR MORE THAN 15 SECONDS. IF ENGINE FAILS TO START, ALLOW STARTER TO COOL FOR TWO (2) MINUTES; THEN REPEAT PROCEDURE. 5. Check instruments. If not registering correctly, turn engine off and notify Supervisor. 6. Allow engine to warm up before using.
44 WARNING: ALWAYS CHECK THE OPERATION OF THE SERVICE BRAKES BEFORE MOVING VEHICLE. Vehicle Operation CAUTION: OPERATE ONLY WITH DOORS CLOSED ( IF EQUIPPED ). DO NOT USE TO PUSH OTHER EQUIPMENT. NEVER EXCEED AIRPORT SPEED LIMIT NEVER PULL MORE THAN FOUR (4) CARTS. NEVER CHANGE SHIFT LEVER POSITION WITHOUT FIRST COMING TO A COMPLETE STOP. NEVER ALLOW DIESEL POWERED EQUIPMENT TO RUN OUT OF FUEL. NEVER SET PARKING BRAKE WITHOUT FIRST BRINGING VEHICLE TO COMPLETE STOP. Engine Shut Down: 1. Place the shift lever in P position. 2. Set Handbrake. 3. Reduce engine speed to idle if the engine is hot. Allow the engine to idle for several minutes to cool to below 195 degrees. Then turn the ignition switch to OFF. 4. Assure all lights and accessories have been turned OFF.


45 Lektro OPERATING INSTRUCTIONS EQUIPMENT: TOW TRACTOR MANUFACTURER: Lektro Model: AP8850SDA TYPE: Electric Model: AP8850SDA BEFORE STARTING: Complete Daily Check before using. Check placards for special instructions and restrictions. Check location of levers, switches and controls. Check general condition of entire unit. Controls: a. Nose Wheel Cradle Raise/Lower Switch b. Winch Strap Motor Control Switch c. EV200 Dash Display d. Motive Power Key Switch e. Monitor for Cradle Camera
 e. 12 V POWER OUTLET f.")
46 a. MAIN POWER DISCONNECT SWITCH b. PARK BRAKE SWITCH c. FORWARD/NEUTRAL/REVERSE LEVER d. DRIVER SELECT TOGGLE SWITCH (DUAL HELM OPERATOR OPTION ONLY) e. 12 V POWER OUTLET f. CUP HOLDER

47 Aircraft Nose Wheel Cradle: This is a hydraulically operated cradle assembly to carry the aircraft wheel during towing operations. During aircraft capture and release, the front portion of the cradle is lowered to provide an access ramp to the back of the cradle. When the aircraft wheel is winched onto the back of the cradle, the front portion of the cradle is raised to provide ground clearance during towing operations. Side Gates: Two adjustable side gates, attached to a slide bar on the rear of the nose wheel cradle, are installed as an integral part of the nose wheel cradle assembly. Each gate is equipped with locks to secure the gates close to the nose wheel cradle in the required positions and secure the aircraft tire to the nose wheel cradle. In most cases, the gates will be left in their most outward positions to allow the aircraft wheel to pivot on the cradle. At other times when it is necessary to prevent movement of the aircraft wheel, the gates can be moved inward to better secure the wheel.
48 Winch Assembly The winch assembly consists of an electrically controlled, hydraulically powered winch motor and drum unit located under the front deck to which is attached a winch strap equipped with a safety hook latch extending from an opening in the tug body, just above the nose wheel cradle. Its purpose is to pull the aircraft nose wheel onto the nose wheel cradle and to secure it in place during towing. When using the fender control, a limit switch, located on the back wall of the nose wheel cradle stops the winch motor when the nose wheel is winched against the back wall switch. The operation of the hydraulic power disconnect button: This is a 2-position switch. Pushing it IN switches the power supply to the winch system off. NOTE 1: The winch control switch located on the instrument panel overrides these switches so that the winch and strut straps can be adjusted while towing. To extend the winch strap: Move either of the two winch strap motor control switches to the extend position. To retract the winch strap: Move either of the two winch strap motor control switches to the retract position.

49 Park Brake System: The park brake system on this tug is unique in that it requires power to be released. This is a "fail-safe" system to ensure the unit does not move accidentally. The park brake will engage automatically if one of the following conditions exist: Electrical power is not available from the battery. Electrical failures occur which affect the drive circuits. Leakage or loss of pressure occurs in the hydraulic system. The park brake can be engaged by taking one of the following actions: Moving the key switch to the OFF position. Moving the main power disconnect switch to the OFF position. Pulling the Park Brake Switch to the applied position.
50 To release the park brake: Pull the main power disconnect switch to the ON position. Turn the key switch to the ON position. Push the yellow diamond Park Brake Switch to the down position to release Park Brakes Move the forward/neutral/reverse lever to the FORWARD or REVERSE position. Press the accelerator pedal - or - operate the cradle or winch motors from the dash switches or remote location switches. NOTE 1: If the park brake system was engaged while the forward/neutral/reverse selectors were engaged, to disengage the park brake: Move the forward/neutral/reverse lever to the NEUTRAL position. Then select the desired and forward or reverse direction. NOTE2: The park brake will be operationally released if the cradle or winch motors are operated while the Park Brake Switch is in the released position. NOTE 3: To release the park brake system in the event of an automatic emergency application, one of the following actions must be taken: Restore electrical power. Restore hydraulic system pressure. If the above action steps are not possible or if they fail to release the brakes call GSE Maintenance.
51 Pre Driving: Ensure that a formal Operator's Pre-Use Safety Inspection has been performed. Perform a Walk-Around inspection to ensure the unit is free to move without causing damage and that all objects on the unit are secured. Lift the operator's console to provide access to the operator's seat. Sit in the operator s seat and ensure arms and legs are inside the perimeter of the unit. Lower and adjust the operator s console as required for operator comfort and safety. Lock the operator s console into place. Adjust the operator s seat as required to ensure all driving controls can be reached and operated safely and comfortably. Fasten the seat belts as required for operator and passenger safety and comfort. Adjust the arm rests as required for operator and passenger safety and comfort. Ensure the Main Power Disconnect switch is placed in the contact position. Turn the master key on. Verify that sufficient charge remains to accomplish the required task. Driving: Press the brake pedal to apply the brakes. Release Park Brake by Pushing Yellow Park Brake Switch DOWN. Place the forward/neutral/reverse selector to NEUTRAL. Place the forward/neutral/reverse selector in the desired position. After two (2) seconds, gradually press the accelerator as required to move the unit. If the unit does not move on initial accelerator application, lift foot and let the accelerator pedal return, then press again. This will reset the controller and the unit should then move. Control the speed of the unit using the accelerator and brake pedal as required. Turn as required using the steering wheel. Stop the unit using the brake pedal. WARNING: Because the tug uses the rear wheels to steer, the operator must be aware of how this affects the handling of the unit and be prepared to take special precautions to avoid accidents. When moving the tug, start slowly until it is determined in which direction the steer wheels are oriented and correct, if necessary, before accelerating. When the steer wheels are turned, check the path of the rear of the tug to ensure it is free from obstructions. Prior to parking the tug and, while still moving, always center the steer wheels so that the tug will move in a straight line.
52 Stopping the unit can be accomplished in a number of ways: By applying controlled pressure to the service brake foot pedal bringing the tug to a gradual and controlled stop. When the tug is not engaged in towing, by switching the forward/reverse selector to the position opposite to the direction of travel and then applying controlled pressure on the accelerator foot pedal to bring the unit to a controlled stop. This technique, known as "Plug Braking", is explained in greater detail below. Emergency braking by engaging the park brake. This should be done only in an emergency since it will bring the tug to an abrupt stop. Plug Braking is a procedure unique to electric vehicles. Simply put, it uses the tug s drive motor to act as a brake to slow the unit down and reverse direction in one motion. It does not damage any portion of the tug. The amount of foot pressure on the accelerator determines the resulting braking and acceleration force. To use Plug Braking: While the unit is moving in one direction, remove foot pressure on the accelerator. Switch the forward/neutral/reverse selector to the opposite direction of travel. Apply foot pressure to stop the tug and, if desired, accelerate in the opposite direction. CAUTION: Except in an emergency event of primary brake failure, do not use plug braking while towing an aircraft for these reasons: The resulting force is more sudden and not as finely controlled as service braking and could cause the aircraft wheel to override the cradle envelope. Plug braking is pre-set at the factory to safely and smoothly stop the tug when empty.
53 Emergency Braking: In the event an emergency stop is warranted due to an immediate danger of collision and service foot brake pedal fails to stop the tug, apply the park brake system to stop the tug. Should the park brake system also fail, use the plug braking technique to stop the tug. In the event a stop is required due to the failure of the service foot brake and an immediate danger of collision does not exist, use the plug braking technique to stop the operation before attempting to apply the park brake system. Leaving the Operator s Compartment Temporarily: Press the brake pedal to apply the brakes. Place the forward/neutral/reverse selector lever in the NEUTRAL position. Place the park switch in the applied position. Turn the key switch OFF. Shut Down: If the tug is to be left unattended for an extended period of time: Center the steer wheels. Press the brake pedal to apply the brakes. Place the forward/neutral/reverse selector lever in the NEUTRAL position. Place the park/switch lever in the applied position. Turn the key switch off.


54 Lektro OPERATING INSTRUCTIONS EQUIPMENT: TOW TRACTOR MANUFACTURER: Lektro Model: AP8750A TYPE: Electric Model: AP8750A BEFORE STARTING: Complete Daily Check before using. Check placards for special instructions and restrictions. Check location of levers, switches and controls. Check general condition of entire unit. Controls:

55 Dash Panel (steering wheel removed)
56

57

58

59

60

61

62 NMC/Wollard OPERATING INSTRUCTIONS EQUIPMENT: TOW TRACTOR MANUFACTURER: NMC/Wollard Model: 100DCTC6-8K TYPE: DIESEL Model: 100DCTC6-8K BEFORE STARTING: Complete Daily Check before using. Check placards for special instructions and restrictions. Check location of levers, switches and controls. Check general condition of entire unit. STARTING PROCEDURES: 1. Set hand brake. 2. Place Morse shift lever in NEUTRAL position. 3. Place foot on service brake pedal and apply pressure. 4. Turn IGNITION switch clockwise to the START position to crank engine. Release to the RUN position as soon as the engine starts. CAUTION: DO NOT ENGAGE STARTER FOR MORE THAN 15 SECONDS. IF ENGINE FAILS TO START, ALLOW STARTER TO COOL FOR TWO (2) MINUTES; THEN REPEAT PROCEDURE. 5. Check instruments. If not registering correctly, turn engine off and notify Supervisor. 6. Allow engine to warm up before using.
63 WARNING: ALWAYS CHECK THE OPERATION OF THE SERVICE BRAKES BEFORE MOVING VEHICLE. Vehicle Operation CAUTION: OPERATE ONLY WITH DOORS CLOSED ( IF EQUIPPED ). DO NOT USE TO PUSH OTHER EQUIPMENT. NEVER EXCEED AIRPORT SPEED LIMIT NEVER PULL MORE THAN FOUR (4) CARTS. NEVER CHANGE SHIFT LEVER POSITION WITHOUT FIRST COMING TO A COMPLETE STOP. NEVER ALLOW DIESEL POWERED EQUIPMENT TO RUN OUT OF FUEL. NEVER SET PARKING BRAKE WITHOUT FIRST BRINGING VEHICLE TO COMPLETE STOP. Engine Shut Down: 1. Place Morse shift lever in NEUTRAL position. 2. Set Handbrake. 3. Turn ignition or key switch clockwise to the off position. 4. Assure all lights and accessories have been turned OFF.

64 NMC/Wollard OPERATING INSTRUCTIONS EQUIPMENT: TOW TRACTOR MANUFACTURER: NMC/Wollard Model: 100 DPC6,DCC6 TYPE: DIESEL Model: 100 DPC6,DCC6 BEFORE STARTING: Complete Daily Check before using. Check placards for special instructions and restrictions. Check location of levers, switches and controls. Check general condition of entire unit. STARTING PROCEDURES: 1. Set hand brake. 2. Place Morse shift lever in NEUTRAL position. 3. Place foot on service brake pedal and apply pressure. 4. Diesel: Hold rocker switch for about 15 seconds, until green indicator on dash lights. 5. Turn key switch clockwise to the START position to crank engine and release to the RUN position as soon as engine starts. CAUTION: DO NOT ENGAGE STARTER FOR MORE THAN 15 SECONDS. IF ENGINE FAILS TO START, ALLOW STARTER TO COOL FOR TWO (2) MINUTES; THEN REPEAT PROCEDURE. 6. Check instruments. If not registering correctly, turn engine off and notify Supervisor. 7. Allow engine to warm up before using.
65 WARNING: ALWAYS CHECK THE OPERATION OF THE SERVICE BRAKES BEFORE MOVING VEHICLE. Vehicle Operation CAUTION: OPERATE ONLY WITH DOORS CLOSED ( IF EQUIPPED ). DO NOT USE TO PUSH OTHER EQUIPMENT. NEVER EXCEED AIRPORT SPEED LIMIT NEVER PULL MORE THAN FOUR (4) CARTS. NEVER CHANGE SHIFT LEVER POSITION WITHOUT FIRST COMING TO A COMPLETE STOP. NEVER ALLOW DIESEL POWERED EQUIPMENT TO RUN OUT OF FUEL. NEVER SET PARKING BRAKE WITHOUT FIRST BRINGING VEHICLE TO COMPLETE STOP. Engine Shut Down: 1. Place Morse shift lever in NEUTRAL position. 2. Set Handbrake. 3. Turn ignition or key switch clockwise to the off position. 4. Assure all lights and accessories have been turned OFF.

66 NMC/Wollard OPERATING INSTRUCTIONS EQUIPMENT: TOW TRACTOR MANUFACTURER: NMC/Wollard TYPE: DIESEL Model: 60F-6K Model: 60F-6K BEFORE STARTING: Complete Daily Check before using. Check placards for special instructions and restrictions. Check location of levers, switches and controls. Check general condition of entire unit. STARTING PROCEDURES: 1. Set hand brake. 2. Place Morse shift lever in NEUTRAL position. 3. Place foot on service brake pedal and apply pressure. 4. Diesel: Hold rocker switch for about 15 seconds, until green indicator on dash lights. 5. Turn key switch clockwise to the START position to crank engine and release to the RUN position as soon as engine starts. CAUTION: DO NOT ENGAGE STARTER FOR MORE THAN 15 SECONDS. IF ENGINE FAILS TO START, ALLOW STARTER TO COOL FOR TWO (2) MINUTES; THEN REPEAT PROCEDURE. 6. Check instruments. If not registering correctly, turn engine off and notify Supervisor. 7. Allow engine to warm up before using.
67 WARNING: ALWAYS CHECK THE OPERATION OF THE SERVICE BRAKES BEFORE MOVING VEHICLE. Vehicle Operation CAUTION: OPERATE ONLY WITH DOORS CLOSED ( IF EQUIPPED ). DO NOT USE TO PUSH OTHER EQUIPMENT. NEVER EXCEED AIRPORT SPEED LIMIT NEVER PULL MORE THAN FOUR (4) CARTS. NEVER CHANGE SHIFT LEVER POSITION WITHOUT FIRST COMING TO A COMPLETE STOP. NEVER ALLOW DIESEL POWERED EQUIPMENT TO RUN OUT OF FUEL. NEVER SET PARKING BRAKE WITHOUT FIRST BRINGING VEHICLE TO COMPLETE STOP. Engine Shut Down: 1. Place Morse shift lever in NEUTRAL position. 2. Set Handbrake. 3. Turn ignition or key switch clockwise to the off position. 4. Assure all lights and accessories have been turned OFF.
68 NMC/Wollard OPERATING INSTRUCTIONS EQUIPMENT: TOW TRACTOR MANUFACTURER: NMC/Wollard MODEL: 100-F-8000 TYPE: Gasoline MODEL: 100-F-8000 BEFORE STARTING: Complete Daily Check before using. Check placards for special instructions and restrictions. Check location of levers, switches and controls. Check general condition of entire unit. Starting Procedures 1. Set hand brake. 2. Place Morse shift lever in NEUTRAL position. 3. Place foot on service brake pedal and apply pressure. 4. Turn key switch clockwise to the START position to crank engine and release to the RUN position as soon as engine starts. NOTE: Use the CHOKE and THROTTLE controls as needed during start. CAUTION: DO NOT ENGAGE STARTER FOR MORE THAN 15 SECONDS. IF ENGINE FAILS TO START, ALLOW STARTER TO COOL FOR TWO (2) MINUTES; THEN REPEAT PROCEDURE. 5. Check instruments. If not registering correctly, turn engine off and notify Supervisor. 6. Allow engine to warm up before using.
69 WARNING: ALWAYS CHECK THE OPERATION OF THE SERVICE BRAKES BEFORE MOVING VEHICLE. Vehicle Operation CAUTION: OPERATE ONLY WITH DOORS CLOSED ( IF EQUIPPED ). DO NOT USE TO PUSH OTHER EQUIPMENT. NEVER EXCEED AIRPORT SPEED LIMIT NEVER PULL MORE THAN FOUR (4) CARTS. NEVER CHANGE SHIFT LEVER POSITION WITHOUT FIRST COMING TO A COMPLETE STOP. NEVER ALLOW DIESEL POWERED EQUIPMENT TO RUN OUT OF FUEL. NEVER SET PARKING BRAKE WITHOUT FIRST BRINGING VEHICLE TO COMPLETE STOP. Engine Shut Down: 1. Place Morse shift lever in NEUTRAL position. 2. Set Handbrake. 3. Turn ignition or key switch clockwise to the off position. 4. Assure all lights and accessories have been turned OFF.

70 TIGER, Taylor Dunn OPERATING INSTRUCTIONS EQUIPMENT: TOW TRACTOR MANUFACTURER: TIGER, Taylor Dunn Model: Tig-30, 60, TC-100/120 TYPE: Diesel/Gasoline MODEL: TIG-30, 60 TC-100/120 BEFORE STARTING: Complete Daily Check before using. Check placards for special instructions and restrictions. Check location of levers, switches and controls. Check general condition of entire unit. STARTING PROCEDURES: 1. Set hand brake. 2. Place Morse shift lever in NEUTRAL position. 3. Place foot on service brake pedal and apply pressure. 4. Turn IGNITION switch clockwise to the START position to crank engine. Release to the RUN position as soon as the engine starts. (use this procedure if equipped with the high heat/low oil shut down) 5. Depress the push button located on the dash until an oil pressure reading appears on the gauge (25 psi) and then crank. 6. Release button, allow engine to warm up before using. CAUTION: DO NOT ENGAGE STARTER FOR MORE THAN 15 SECONDS. IF ENGINE FAILS TO START, ALLOW STARTER TO COOL FOR TWO (2) MINUTES; THEN REPEAT PROCEDURE. 7. Check instruments. If not registering correctly, turn engine off and notify Supervisor.
71 WARNING: ALWAYS CHECK THE OPERATION OF THE SERVICE BRAKES BEFORE MOVING VEHICLE. Vehicle Operation CAUTION: OPERATE ONLY WITH DOORS CLOSED ( IF EQUIPPED ). DO NOT USE TO PUSH OTHER EQUIPMENT. NEVER EXCEED AIRPORT SPEED LIMIT NEVER PULL MORE THAN FOUR (4) CARTS. NEVER CHANGE SHIFT LEVER POSITION WITHOUT FIRST COMING TO A COMPLETE STOP. NEVER ALLOW DIESEL POWERED EQUIPMENT TO RUN OUT OF FUEL. NEVER SET PARKING BRAKE WITHOUT FIRST BRINGING VEHICLE TO COMPLETE STOP. Engine Shut Down: 1. Set hand brake. 2. Place Morse shift lever in NEUTRAL position. 3. Turn ignition or key switch clockwise to the OFF position. 4. Assure that all lights and accessories have been turned OFF.


72 TLD OPERATING INSTRUCTIONS EQUIPMENT: Baggage Tractor MANUFACTURER: TLD MODEL: JET-16 TYPE: Electric MODEL: JET-16 BEFORE STARTING Complete Daily Check before using. Check placards for special instructions and restrictions. Check location of levers, switches and controls. Check general condition of entire unit. JET-16 Controls Figure 4


73 JET-16 Controls Figure 5 ALARMS Alarm Location Definition Action HPD Display Accelerato r pedal activated on power up SRO Display Gear engaged on power up Handbrake Display Parking brake on Inching Display Slow speed (inching) selected Remove the action on the pedal Set the direction selector to neutral Release the parking brake Switch the rotating button #3 to driving position
74 Parking brake indicator Parking brake: positive, works on the rear wheels. It is commanded manually. The parking brake position is checked by an electric contact. As soon as the parking brake is activated, the parking brake indicator must come on. The parking brake must only be applied after the vehicle has come to a complete stop. Pull the brake lever (4 fig. 4). The indicator must come on (see 4-6 fig. 5). To use the service brake, press the central pedal (2 fig. 4). The service brake acts on the 4 wheels. MAIN BRAKE - ENGINE BRAKE: - Main brake: - by activating the brake pedal, works on the front and rear wheels. - Engine brake: - when the accelerator pedal is released. - by pushing the brake pedal switch; - when the tractor is put into neutral; - when the "dead man" pedal is released. "DEAD MAN" PEDAL (DEPENDING ON VERSIONS): - Releasing the "dead man" pedal for over 1s will cause the engine to decelerate. - Releasing the pedal for longer will shut down the central hydraulic unit and the wipers (if activated)
 has not been pushed in. Push in the power plug (7 fig.3).")

75 STARTING UP Make sure that the working position selection button (3 fig.5) is positioned to the left. Make sure that the emergency stop button in the remote control unit (fig. 5) has not been pushed in. Push in the power plug (7 fig.3). Make sure that the movement direction selector (5 fig. 4) is in neutral (3 fig. 6) Put the key into the contact (2 fig.5). Turn the key to the right to apply the contact. Running: Depending on the versions, press the "dead man" pedal (1 fig. 4) ; Select the movement direction (5 fig. 4) to forward or reverse ; Release the parking brake (4 fig. 4) Gradually press the accelerator pedal (3 fig. 4).
.")

76 SLOW APPROACH (INCHING) The slow approach enables the tow tractor's tow pin to be brought close to the baggage trolley's tow bar, while remaining outside the cab (better view). This approach is a "step by step" approach, with each command pulse moving the vehicle backwards or forwards one step. OPERATION Activate the function from the control panel by pushing the working position selection button (3 fig.5) to the right; Now from the external command it is possible to move the tow tractor forward and backward and so bring its tow bar close to the traction bar.
77 STOPPING Do not leave the driving position while the vehicle is operating; Always disconnect the contact before exiting the vehicle; Always park the vehicle on a flat, adapted surface; Use the appropriate flags, signals and barriers when parking in areas with high traffic; Do not block access to fire fighting positions when you park the vehicle; Never park your vehicle or leave the equipment towed in such a way as to hinder fire fighting equipment, an emergency exit or any other place where it might constitute an obstacle or a danger; If the vehicle needs to be left without supervision, remove the contact key; Never uncouple the towed equipment unless its parking brake is on or the wheels have been wedged. In a slope: Never park your vehicle on a ramp; If the vehicle needs to be parked on a ramp following a breakdown, etc., wedge the wheels firmly. ALWAYS CHECK THAT THE PARKING BRAKE IS APPLIED.


78 TLD Model: TPX-100 OPERATING INSTRUCTIONS EQUIPMENT: TOW TRACTOR TYPE: Gasoline MANUFACTURER: TLD MODEL: TPX-100 BEFORE STARTING: Complete Daily Check before using. Check placards for special instructions and restrictions. Check location of levers, switches and controls. Check general condition of entire unit. Controls

79


80


81

82

83
84
85


86

87

88
89

90

91

92

93

94
95

96

97
98


99 TLD Model: TMX-150 OPERATING INSTRUCTIONS EQUIPMENT: TOW TRACTOR TYPE: Gasoline MANUFACTURER: TLD MODEL: TMX-150 BEFORE STARTING: Complete Daily Check before using. Check placards for special instructions and restrictions. Check location of levers, switches and controls. Check general condition of entire unit. Controls 1 Light switch 2 Steering wheel 3 Gearbox shifting lever 4 Dashboard 5 Brake pedal 6 Gas pedal

 14 Emergency stop button 15 Emergency power plant")
100 1 Main switch, engine start 2 Gauge cluster 3 Tachometer (option) 4 Hour meter, fuel gauge 5 Oil temperature 6 Hazard lights 7 Front working light 8 Rotating beacon 9 Front windscreen wiper 10 Lave-glace 11 Rear windscreen wiper(option) 12 Heater valve 13 Vent (2 speeds) 14 Emergency stop button 15 Emergency power plant (option)

101

102
103

104

105 TRONAIR OPERATING INSTRUCTIONS EQUIPMENT: Pushback MANUFACTURER: TRONAIR Model: JP100SSCUS TYPE: Electric MODEL: JP100SSCUS BEFORE STARTING: Complete Daily Check before using. Check placards for special instructions and restrictions. Check location of levers, switches and controls. Check general condition of entire unit. Operating Instructions 1. To start, the E-stop button on the driver s console must be in the released position, the E-stop button on the left front fender must be in the released position, and the charger plug door must be closed. To release E-stops, turn clockwise and release. 2. Sit down in the operator s seat. Turn the Off- On-Start switch to Start and hold for one second. You will hear the hydraulic pump run as the accumulator charges. Release switch to On position. 3. Make sure the cradle is completely closed and completely up before moving. This is accomplished by pressing the Cradle Closed rocker switch until movement stops, and pressing the Cradle Up rocker switch until movement stops. 4. This tug is NOT designed to coast. Accelerating, braking, and maintaining a constant speed, are all very dependent on foot pedal position. This results in a tug that is very easy to drive and extremely easy to control on inclines. Push the throttle pedal to accelerate, slowly release the throttle to brake. Hold the throttle steady for a steady speed. 5. The switch located under the driver s seat and the proximity switch for the Cradle Up position must both make contact before the Jetporter will drive at normal speed (approximately 5.5 MPH). It will otherwise be limited to Creep Speed.
106 6. The Forward-Neutral-Reverse (F-N-R) toggle switch is on the center console. When initially starting the JETporter, move the F-N-R switch to the Neutral position before choosing a direction. Any time the JETporter is turned off and re-started, the F-N-R switch must be returned to the Neutral position. 7. To set the parking brake, press and hold the foot service brake for 3 seconds without touching the accelerator pedal, then release. The parking brake will also set when the key is turned off or when the E-Stop button is pressed. (Either of the latter two actions will cause the hydraulic accumulator to discharge.) 8. The JETporter steers very easily. Turning the steering wheel 3-1/4 turns from center will result in turning the steering tires approximately 88º. During a sharp turn, both motors will slow down and the inside motor will slow to a stop. The JETporter is designed to be very maneuverable at slow speeds in tight places, NEVER enter into a turn at high speed. Loss of control will cause personal injury and property damage. Do not move your JETporter any faster than is necessary. 9. The JP100SSCUS is intended to be driven while standing for capture and release. The steering console can be fully raised to allow the driver to stand for positioning the tug at the aircraft nose wheel. While the driver is in the standing position, the JETporter will be limited to Creep Speed. This provides better throttle control for capture and release. To protect both the driver and the aircraft, the JETporter will not have sufficient power to move an aircraft while in Creep Speed. Care needs to be taken while driving the tug from a standing position. Do not apply any sudden throttle or brake that may cause loss of balance. Never drive while standing except for very slow final positioning. Do not allow anyone in the passenger compartment to stand while the tug is in motion. The steering console is raised by pulling the lever on the right hand side of the console and lifting upward.

107 CAPTURE OF THE NOSE LANDING GEAR (NLG) 1. Move the aircraft selector switch to the proper position for the aircraft being moved. The aircraft selector switch is extremely important for the protection of the aircraft. The selector switch sets the overload protection and oversteer protection for the aircraft chosen. 2. Approach the aircraft while making best attempt to align with the NLG. The reflectors on the top of the JETporter and inside the cradle can be used to aid in alignment. 3. Stop 2-3 feet short of the NLG. 4. Stand while capturing aircraft. Raise the steering console to the full up position (must use sliding release lever on right hand side of console). 5. The JETporter will now be limited to creep-speed. 6. Push the Cradle Down button until movement stops. 7. To open the cradle, push the Cradle Down and Cradle Open button simultaneously. Hold both buttons until cradle movement stops. 8. Drive toward the NLG while centering the white rollers with the NLG tires. 9. If the NLG is not aligned with the aircraft body, align the JETporter with the angle of the NLG. 10. When the cradle bar contacts the NLG tires, the throttle will disengage. 11. Push the Cradle Close button until movement stops. If the aircraft has the brakes set, do not use the JETporter foot brake during capture. The JETporter will roll, if needed, during the capture process to prevent horizontal force on the NLG. 12. Push the Cradle Up button until movement stops. The cradle MUST be in the full up position to move the aircraft. 13. Lower the steering console and sit in the driver s seat. With the cradle up and the driver sitting in the seat, the JETporter will have power available for pushing or towing. 14. Press the AC Selector Reset button
108 MOVING THE AIRCRAFT Move the aircraft by choosing the direction of desired travel and slowly pressing the foot throttle. RELEASE OF THE NOSE LANDING GEAR (NLG) 1. Stand while releasing aircraft. Raise the steering console to full up position (must use sliding release lever on right hand side of console). 2. To release the aircraft, push the Cradle Down button until movement stops. Do not use the JETporter foot brake during release. The Jetporter will roll, if needed, during the release process to prevent horizontal force on the NLG. 3. To open cradle, push the Cradle Down and Cradle Open button simultaneously. Hold both buttons until cradle movement stops. 4. Back straight away from the aircraft. Do not attempt to turn the JETporter until the cradle is completely clear of the aircraft tires. 5. When clear of the aircraft, push the Cradle Close button until movement stops. 6. Push the Cradle Up button until movement stops. 7. Lower the steering console and sit in the driver seat. 8. Full power is available when the cradle is up and the driver is in the seat.
109 BRAKING The JP100SSCUS has two separate braking systems. The main braking system is the regenerative braking provided by the drive motors. As the throttle is let up the motors begin braking. The motors act like generators trying to force a charge back into the batteries. Note: This tug is designed NOT to coast Holding the throttle steady will result in a steady speed. Pumping the throttle will result in speed fluctuations (the same as accelerating and braking). Regenerative braking, as currently programmed, will provide approximately 1800 ft-lbs of torque at the drive wheels. The parking/foot brake consists of two multiple disc type brakes, one on each drive motor. These are located between the motor and the gear reduction hub. The brakes are spring set and will provide approximately 7630 ft-lbs of torque at the drive wheels. The brake is hydraulically opened when the throttle pedal is used. When the throttle is let up the brake valves will activated in 2 seconds (programmable) if there is no regenerative braking taking place. After the valves shift the hydraulic fluid bleeds through an orifice adding another second before the brakes reach full potential. If sitting on an incline hold the foot brake for 3 seconds before leaving the tug with the key on. The foot brake overrides the hydraulics that release the parking brake. The foot brake can be used when needed and should be used when coming to a stop on a slope. Note: the parking brake will not set if the tug is rolling enough to cause regenerative braking current. The foot brake may also be needed during cradle movement if the tug is on an incline (the parking brake will release during cradle movement) but should not be used while closing the cradle gates of lifting or lowering an aircraft that has the MLG brakes set. In this situation the JP100SSCUS need to be able to roll to the aircraft position.

110 TUG Model: GT16/28 OPERATING INSTRUCTIONS EQUIPMENT: TOW TRACTOR MANUFACTURER: TUG TYPE: DIESEL Model: GT16/28 BEFORE STARTING: Complete Daily Check before using. Check placards for special instructions and restrictions. Check location of levers, switches and controls. Check general condition of entire unit. STARTING PROCEDURES: 1. Adjust the operator's seat so that all controls may be comfortably reached. Fasten your seat belts. 2. Verify that the parking brake is set ON and the shift selector is in neutral( N). 3. Check that all other switches are OFF. 4. Turn the Engine Switch clockwise to RUN. The Glow Plug Light will illuminate for approximately 10 seconds. Do not start the engine 5. When the Glow Plug Light goes off, turn the Engine Switch to Crank. 6. Start the engine and check the engine oil pressure gauges and the voltmeter. Observe that they are within limits. 7. Allow the engine to idle for approximately5 minutes( warm up). 8. Turn on all necessary system switches (lights, etc.) for the operation. 9. Depress the (foot) brake pedal. Release the parking brake by moving the handle forward and down. 10. Place the shifter in the gear most appropriate for the speed and weight of the tow. 11. Release the foot brake pedal and slowly depress the accelerator pedal.
111
112
113
114 WARNING: ALWAYS CHECK THE OPERATION OF THE SERVICE BRAKES BEFORE MOVING VEHICLE. Vehicle Operation Shutdown Procedure. 1. Bring the tractor to a full stop. 2. Place the transmission in Neutral( N). 3. Set the parking brake (Pull handle fully up). 4. Turn off all system and accessory switches. 5. To stop the vehicle engine, shut it down by turning the Engine Switch to the STOP position.

115 TUG Model: GT32 OPERATING INSTRUCTIONS EQUIPMENT: TOW TRACTOR MANUFACTURER: TUG TYPE: DIESEL Model: GT32 BEFORE STARTING: Complete Daily Check before using. Check placards for special instructions and restrictions. Check location of levers, switches and controls. Check general condition of entire unit.
116 WARNING: ALWAYS CHECK THE OPERATION OF THE SERVICE BRAKES BEFORE MOVING VEHICLE. Vehicle Operation CAUTION: OPERATE ONLY WITH DOORS CLOSED ( IF EQUIPPED ). DO NOT USE TO PUSH OTHER EQUIPMENT. NEVER EXCEED AIRPORT SPEED LIMIT NEVER PULL MORE THAN FOUR (4) CARTS. NEVER CHANGE SHIFT LEVER POSITION WITHOUT FIRST COMING TO A COMPLETE STOP. NEVER ALLOW DIESEL POWERED EQUIPMENT TO RUN OUT OF FUEL. NEVER SET PARKING BRAKE WITHOUT FIRST BRINGING VEHICLE TO COMPLETE STOP.

117 TUG OPERATING INSTRUCTIONS EQUIPMENT: TOW TRACTOR MANUFACTURER: TUG Model: GT35, 35A TYPE: DIESEL Model: GT35, 35A BEFORE STARTING: Complete Daily Check before using. Check placards for special instructions and restrictions. Check location of levers, switches and controls. Check general condition of entire unit. STARTING PROCEDURES: 1. Adjust the operator's seat so that all controls may be comfortably reached. Fasten your seat belts. 2. Verify that the parking brake is set ON and the shift selector is in neutral( N). 3. Check that all other switches are OFF. 4. Turn the STOP, RUN, START switch clockwise to RUN. 5. Turn the STOP, RUN, START switch to START. 6. Start the engine and check the engine oil pressure gauges and the voltmeter. Observe that they are within limits. 7. Allow the engine to idle for approximately5 minutes( warm up). 8. Turn on all necessary system switches (lights, etc.) for the operation. 9. Turn the steering wheel until the wheels are in the straight-ahead position. Set the steering mode select switch to the desired steering mode. 10. Depress the (foot) brake pedal. Release the parking brake by setting the parking brake switch to OFF. 11. Select the desired direction of travel and speed range by placing the shifter in the gear most appropriate for the speed and weight of the tow. 12. Release the foot brake pedal and slowly depress the accelerator pedal.
118 Parking Brake Operation WARNING ALWAYS SET THE PARKING BRAKE ON PRIOR TO SHUTTING OFF THE ENGINE OR EXITING THE CAB. OTHERWISE, THE TRACTOR CAN ROLL AWAY, CAUSING DEATH, SEVERE PERSONAL INJURY, AND/OR PROPERTY DAMAGE. CAUTION RELEASE THE PARKING BRAKE BEFORE MOVING THE TRACTOR. EXCEPT IN AN EMERGENCY, DO NOT APPLY THE PARKING BRAKE WHILE THE TRACTOR IS IN MOTION. PARKING BRAKE DAMAGE WILL OCCUR. NOTE The parking brake must be released (set to OFF) before any forward or reverse gear is selected with the transmission shift selector. If not, the horn will sound and the BRAKE ON/TRANSMISSION ENGAGED PARKING BRAKE WARNING LIGHT will turn on. Transmission Range Selection 1. The transmission shifter is a cable-driven dual-selector unit. The shifter is located to the right of the steering wheel. The selector closest to the operator determines the direction of travel (F-N-R). The selector farthest from the operator picks the speed range ( l-2-3). Shifting is manual, accomplished by moving the speed range selector to a higher or lower gear as appropriate. 2. Start the operation in the gear most appropriate for the tow conditions. Shift to the next higher speed when the top speed in any particular gear is reached. 3. Generally, up shifting and down shifting is best accomplished by shifting through the normal sequence of speeds. Down-shifting will generally produce a braking effect. 4. Stop the tractor before shifting into any reverse speed.
119 CAUTION DO NOT COAST THE TOW TRACTOR IN NEUTRAL. SEVERE DAMAGE TO TFIE TRANSMISSION MAY RESULT. CAUTION NEVER SHIFT FROM ANY FORWARD GEAR TO REVERSE OR FROM REVERSE TO ANY FORWARD GEAR WHILE THE TRACTOR IS IN MOTION. THE TRACTOR CAN BE DAMAGED OR STOP SUDDENLY. Transmission Range Selection (cont.) 5. Neutral (N). Select Neutral when starting the engine, when checking the tractor's accessories and when idling the engine for extended periods. Use NEUTRAL with the parking brake set if leaving the tractor unattended with the engine running. 6. Forward (F). Shifting into Forward ( F) selects the forward gears. 7. Reverse (R). Shifting into Reverse (R) selects the gears that drive the tractor backwards. 8. l-2-3 Range Selections. Occasionally certain conditions make it necessary to restrict shifting to a lower range. In addition to more pulling power at lower speeds these selections provide progressively greater engine braking for going down medium grades (the lower the gear range, the greater the braking effect).
 will illuminate. 2. Set the steering mode select switch to desired steering mode, i.e., four wheel coordinated mode (COORD) or two wheel track mode (TRACK).")
120 Steering Mode Selection. If optional two mode steering is installed (Reference Figure2.2), select a steering mode as follows: 1. Bring the tractor to a full stop. Tum the steering wheel until the wheels are straight-ahead. The Front and/or Rear Axle Center Lights (DS43, DS44) will illuminate. 2. Set the steering mode select switch to desired steering mode, i.e., four wheel coordinated mode (COORD) or two wheel track mode (TRACK). NOTE When the steering mode select switch is in the TRACK or COORD position, the steering mode will not change until the appropriate axle is centered. When the steering mode switch is in the TRACK position, the steering mode will not change to COORD until the FRONT axle is centered. In COORD, the steering mode will not change to TRACK until the REAR axle is centered. WARNING MOVING THE STEERING MODE SELECT SWITCH WHILE THE TRACTOR IS IN MOTION CAN CAUSE A LOSS OF TRACTOR CONTROL, RESULTING IN SEVERE PERSONAL INJURY, DEATH, AND/OR PROPERTY DAMAGE.
121 Moving an Aircraft Each individual airline has established aircraft detaching procedures for attaching the tractor to an aircraft, detaching the tractor from an aircraft, or for towing or pushing back an aircraft. All operators must be familiar with these procedures prior to operating the tractor during any aircraft rerated operations. Shutdown Procedure. 1. Bring the tractor to a full stop. 2. Place the transmission in Neutral( N). 3. Set the parking brake switch to ON. 4. Turn off all system and accessory switches. 5. Allow the engine to run at idle for approximately 5 minutes, then shut it down by turning the STOP, RUN, START switch to STOP.

122 TUG Model: GT50 OPERATING INSTRUCTIONS EQUIPMENT: TOW TRACTOR TYPE: Gasoline MANUFACTURER: TUG MODEL: GT50 BEFORE STARTING: Complete Daily Check before using. Check placards for special instructions and restrictions. Check location of levers, switches and controls. Check general condition of entire unit. Controls See Next Page
123
124
125
126
127
128 Starting Procedures
129

130 Tug Model: M3A, M3A-35 OPERATING INSTRUCTIONS EQUIPMENT: TOW TRACTOR MANUFACTURER: TUG TYPE: Electric MODEL: M3A, M3A-35 BEFORE STARTING: Complete Daily Check before using. Check placards for special instructions and restrictions. Check location of levers, switches and controls. Check general condition of entire unit. Controls:
131 STARTING PROCEDURES: 1. Switch main power switch ("ignition") to ON. 2. Release parking brake 3. Select drive direction (FWD/REV) 4. Depress foot throttle 5. Maneuver vehicle with steering wheel. WARNING: ALWAYS USE PARK BRAKE WHEN LEAVING VEHICLE. DRIVE TRAIN HAS NO "PARK" POSITION AND MUST RELY ON PARK BRAKE TO PREVENT VEHICLE FROM ROLLING. WARNING: ALWAYS CHECK THE OPERATION OF THE SERVICE BRAKES BEFORE MOVING VEHICLE. DRIVE DIRECTION SELECTOR (SHIFTER): A drive direction lever controls the operation of limit switches to transfer current flow through the drive motor. To select a vehicle drive direction: 1. Move direction selector lever up (towards front of vehicle) to select reverse drive direction. 2. Move direction selector lever down (towards driver s seat) to select forward drive direction. 3. Neutral is located midway between forward and reverse. PARKING BRAKE The parking brake is a cable actuated type, manually engaging the rear brake pads onto the rotors. The brake actuating device is located to the right of the driver s seat in the driver s compartment. 1. To apply parking brake, lift actuating lever up. 2. To release parking brake, push actuating lever down. WARNING: ALWAYS USE PARK BRAKE WHEN LEAVING VEHICLE. DRIVE TRAIN HAS NO "PARK" POSITION AND MUST RELY ON PARK BRAKE TO PREVENT VEHICLE FROM ROLLING.
132 Vehicle Operation CAUTION: OPERATE ONLY WITH DOORS CLOSED ( IF EQUIPPED ). DO NOT USE TO PUSH OTHER EQUIPMENT. NEVER EXCEED AIRPORT SPEED LIMIT NEVER PULL MORE THAN FOUR (4) CARTS. NEVER CHANGE SHIFT LEVER POSITION WITHOUT FIRST COMING TO A COMPLETE STOP. NEVER ALLOW DIESEL POWERED EQUIPMENT TO RUN OUT OF FUEL. NEVER SET PARKING BRAKE WITHOUT FIRST BRINGING VEHICLE TO COMPLETE STOP. Shut Down: 1.Set hand brake. 2.Switch main power switch to the OFF position.

133 TUG Model: MC13, 15, 22 OPERATING INSTRUCTIONS EQUIPMENT: TOW TRACTOR TYPE: DIESEL MANUFACTURER: TUG Model: MC13, 15, 22 BEFORE STARTING: Complete Daily Check before using. Check placards for special instructions and restrictions. Check location of levers, switches and controls. Check general condition of entire unit. STARTING PROCEDURES: 1. Place shift lever in neutral. 2. Make sure that parking brake is set. 3. Turn ignition switch to ON position. 4. Press and hold glow plug button for 20 seconds. 5. Release glow plug button and press safety override button. 6. Turn ignition switch to engage starter. 7. Apply service brakes. 8. Release park brake. 9. Select the appropriate transmission setting. (i.e. forward, or reverse) 10. Select first gear. 11. Slowly release the brake, and press the accelerator to move the tractor. NOTE: The governor limits the speed to approximately 8 mph, by limiting the engine rpm.
134 WARNING: ALWAYS CHECK THE OPERATION OF THE SERVICE BRAKES BEFORE MOVING VEHICLE. Vehicle Operation CAUTION: OPERATE ONLY WITH DOORS CLOSED ( IF EQUIPPED ). DO NOT USE TO PUSH OTHER EQUIPMENT. NEVER EXCEED AIRPORT SPEED LIMIT NEVER PULL MORE THAN FOUR (4) CARTS. NEVER CHANGE SHIFT LEVER POSITION WITHOUT FIRST COMING TO A COMPLETE STOP. NEVER ALLOW DIESEL POWERED EQUIPMENT TO RUN OUT OF FUEL. NEVER SET PARKING BRAKE WITHOUT FIRST BRINGING VEHICLE TO COMPLETE STOP. Parking the Tractor: 1. To slow the tractor, release the accelerator and apply the service brakes. 2. To park the tractor, return the transmission shift lever to neutral, apply the parking brake, and turn off the engine. 3. Assure all lights and accessories have been turned OFF.

135 United OPERATING INSTRUCTIONS EQUIPMENT: TOW TRACTOR MANUFACTURER: United MODEL: SMLP-120 TYPE: Gasoline MODEL: SMLP-120 BEFORE STARTING: Complete Daily Check before using. Check placards for special instructions and restrictions. Check location of levers, switches and controls. Check general condition of entire unit.


136


137
Commander 15i Container and Pallet Loader. Property of American Airlines
 Commander 15i Container and Pallet Loader Section 2. Operation BEFORE ATTEMPTING TO OPERATE OR MAINTAIN THE VEHICLE, COMPLETELY READ AND UNDERSTAND THE OPERATION AND MAINTENANCE MANUAL, INCLUDING ALL DANGER,,
Property of American Airlines
 Section 2. Operation 1. GENERAL FOR EMERGENCY OPERATING INSTRUCTIONS REFER TO CHAPTER 1, SECTION 3. This section contains instructions for operation of the B350. A discussion of the principles of operation
Portable Lighting Equipment Operating Instructions Table of Contents
 Portable Lighting Equipment Operating Instructions Table of Generac Magnum Ingersoll Rand TEREX AMIDA TEREX GENIE Model: MLT3060 Model: LIGHTSOURCE Model: Amida AL4000 series Model: TML4000N Generac Magnum
Property of American Airlines
 MA Tow Tractor Section 2 SECTION 2: OPERATION A. CONTROLS, INSTRUMENTS AND SWITCHES The tractor controls and instruments include a headlight switch, ignition switch, hour meter, ammeter (if equipped),
Property of American Airlines
 MH Utility Vehicle Section 2 SECTION 2: OPERATION A. CONTROLS, INSTRUMENTS AND SWITCHES The tractor controls and instruments include a headlight switch, ignition switch, hour meter, ammeter (if equipped),
Deicer Operating Instructions Table of Contents
 Deicer Operating Instructions Table of Contents FMC FMC FMC/Trump FMC Global Premier Trump Model: LA1000 Model: LMD-2000 Model: T2000 Model: TM1800 Model: 2100TE Model: HC29050 Model: D240 Contents FMC
MANUAL SHIFT AND AUTOMATIC TRANSMISSIONS
 CHAPTER 17 MANUAL SHIFT AND AUTOMATIC TRANSMISSIONS The vehicle driver must be prepared to drive vehicles with either manual or automatic transmission. Each transmission type requires specific methods
SECTION 1 7 OPERATION OF INSTRUMENTS AND CONTROLS Ignition switch, Transmission and Parking brake
 SECTION 1 7 OPERATION OF INSTRUMENTS AND CONTROLS Ignition switch, Transmission and Parking brake Ignition switch.............................................. 114 Automatic transmission.....................................
32 quarts Transmission Allison HT 740 Automatic Fluid
 BOOK: Blue Book I SECTION: E-One Engine (SGT) Page 1 of 6 E-ONE CYCLONE TABLE OF CONTENTS SPECIFICATIONS... 2 DAILY CHECKS... 2 SAFETY CHECKS... 3 START ENGINE... 3 STOP ENGINE... 3 EMERGENCY SHUTDOWN
CAUTION. Start & Stop Procedures. Section 4-2. Engine Oil Level
 Section 4-2 Start & Stop Procedures Before operating this machine, the operator must have: received operator training, a familiarity with this manual, and a complete understanding of all the procedures
Part 1 OPERATION OF INSTRUMENTS AND CONTROLS
 Part 1 OPERATION OF INSTRUMENTS AND CONTROLS Chapter 1-6 Ignition switch, Transmission and Parking brake Ignition switch with steering lock Automatic transmission Manual transmission Four-wheel drive system
Road Service Quick Reference Guide 2016 Lincoln MKZ / MKZ Hybrid. Quality and Education Services AAA Automotive 1000 AAA Drive Heathrow, FL 32746
 Road Service Quick Reference Guide 2016 Lincoln MKZ / MKZ Hybrid Quality and Education Services AAA Automotive 1000 AAA Drive Heathrow, FL 32746 December 12, 2015 Index Towing, Loading and Transporting
Property of American Airlines
 Section 2: Operation 1. GENERAL INFORMATION Safety First! is the motto at Tesco; therefore, the first part of the Operation section begins with safety features and procedures. Operation of the Tesco CL80-20
MODEL T-137 CURTIS GENERAL REVISION - N - 3/17/16
 MODEL T-137 CURTIS CHARLATTE AMERICA, INC. 600 MOUNTAIN LANE P.O. BOX 968 BLUEFIELD, VA 24605 TELEPHONE: (276) 326-1510 FAX: (276) 326-1602 SPARE PARTS FAX: (276) 326-3898 e-mail: charlatteus@charlatteus.com
Operator s Manual. Automatic Electric Jack Leveling. The leveling system shall only be operated under the following conditions:
 Operator s Manual with Automatic Leveling Touchpad #140-1226 Control Box #140-1224 co Copyright PowerGear 1/07 #82-L0368 Rev. 0D Contents Before You Level Your Coach 1 Caution 1 Leveling System Operating
SECTION 1-6 OPERATION OF INSTRUMENTS AND CONTROLS 05 HIGHLANDER_U (L/O 0409) Gauges, Meters and Service reminder indicators
 Gauges, Meters and Service reminder indicators") SECTION 1-6 OPERATION OF INSTRUMENTS AND CONTROLS Gauges, Meters and Service reminder indicators Fuel gauge................................................ 132 Engine coolant temperature gauge...........................
SECTION 1-6 OPERATION OF INSTRUMENTS AND CONTROLS Gauges, Meters and Service reminder indicators Fuel gauge................................................ 132 Engine coolant temperature gauge...........................
CHARLATTE MODEL CBL200E MOBILE BELT CONVEYOR CHARLATTE OF AMERICA, INC. P.O. BOX 968 BLUEFIELD, VA TELEPHONE (276) FAX (276)
 FAX (276)") CHARLATTE MODEL CBL200E MOBILE BELT CONVEYOR CHARLATTE OF AMERICA, INC. P.O. BOX 968 BLUEFIELD, VA 24605 TELEPHONE (276) 326-1510 FAX (276) 326-1602 THIS GUIDE IS TO BE USED ONLY WITH THE MODEL CBL200E
CHARLATTE MODEL CBL200E MOBILE BELT CONVEYOR CHARLATTE OF AMERICA, INC. P.O. BOX 968 BLUEFIELD, VA 24605 TELEPHONE (276) 326-1510 FAX (276) 326-1602 THIS GUIDE IS TO BE USED ONLY WITH THE MODEL CBL200E
Skills and Sequences for In-Car Instruction
 The stopping procedure (shoulder parking) Check the rear view mirror Check the blind spot Right Bring the vehicle towards to the curb at designated point Stop 30 cm away from the curb Once you stop your
CAUTION. Start & Stop Procedures. Section 1-2. Engine Oil Level
 Section 1-2 Start & Stop Procedures Before operating this machine, the operator must have: received operator training, a familiarity with this manual, and a complete understanding of all the procedures
Towing and Road Service Guide For 2013 Lexus GS. Quality and Education Services AAA Automotive 1000 AAA Drive Heathrow, FL 32746
 Towing and Road Service Guide For 2013 Lexus GS Quality and Education Services AAA Automotive 1000 AAA Drive Heathrow, FL 32746 March 5, 2012 Index General Towing Information Special Precautions 1 Car
GPU Equipment Operating Instructions Table of Contents
 GPU Equipment Operating Instructions Table of Briggs & Stratton Model: 30439 Davco Model: GP28R under construction Foxtronics Model: PR-2000-T7S GUINAULT MODEL: GA90V133 HOBART MODEL: JET EX-2, EX-3, EX-4,
PowerLevel s e r i e s
 Owner s Manual Hydraulic Leveling CONTENTS Introduction Operation Control Panel Automatic Leveling Manual Leveling Retracting Jacks Remote Operation Care & Maintenance Troubleshooting Error Codes 1 2 2
Jump to Table of Contents
 Jump to Table of Contents PIPER AIRCRAFT CORPORATION PA-28R-201, CHEROKEE ARROW III SECTION 3 EMERGENCY PROCEDURES 3.3 EMERGENCY PROCEDURES CHECK LIST ENGINE FIRE DURING
WARNING - BEFORE YOU DRIVE
 See back cover for a pre-ride checklist section 3 operation WARNING - BEFORE YOU DRIVE 1. Always perform a pre-ride inspection of the vehicle using the checklist provided on the back cover of this manual.
Operation Guide. Operation Guide. Winnebago Hydraulic Leveling Systems by Kwikee. Introduction. Table of Content WARNINGS
 Operation Guide 05/07 Kwikee #1422192 Rev. 0F Table of Content Page Introduction 1 Safety Information 1 Operation 2 Control Panel 3 Manual Leveling 3 Automatic Leveling 3 Remote Operation 4 Stabilizing
Towing and Road Service Guide For Lexus LS 600h L. Quality and Education Services AAA Automotive 1000 AAA Drive Heathrow, FL 32746
 Towing and Road Service Guide For Lexus LS 600h L Quality and Education Services AAA Automotive 1000 AAA Drive Heathrow, FL 32746 June 15, 2007 Index General Towing Information Special Precautions 3 Hybrid
WILDFIRE OPERATOR TRAINING MANUAL
 WILDFIRE OPERATOR TRAINING MANUAL 1 WildFire Component Locations Turn Signal Switch Accessory Switch Panel Generator Start/Stop Switch and Hour Meter Fig. 1 Brake Pedal Gas Pedal 2 WildFire Component Locations
INSTALLATION GUIDE Table of Contents
 CT-3100 Automatic transmission remote engine starter systems. What s included..2 INSTALLATION GUIDE Table of Contents Door lock toggle mode..... 4 Notice...2 Installation points to remember. 2 Features..2
CARENADO COPYRIGHTS. Normal & Emergency Checklist
 NORMAL PROCEDURES CHECKLIST PREFLIGHT CHECK Control wheel -- RELEASE BELTS Avionics -- OFF Master Switch -- ON Fuel quantity gauges -- CHECK Master switch -- OFF Ignition -- OFF Exterior -- CHECK FOR DAMAGE
EAGLE TUGS RTT/STT OPERATIONS MANUAL QA006 REV
 EAGLE TUGS RTT/STT OPERATIONS MANUAL MODEL TYPE: RTT12, RTT18, STT20 & RTT50 AC Electric Tow Tractor This page intentionally left blank. 3 INTRODUCTION W elcome Welcome to the growing family of EAGLE tractor
Road Service Quick Reference Guide 2016 Lincoln MKX. Quality and Education Services AAA Automotive 1000 AAA Drive Heathrow, FL 32746
 Road Service Quick Reference Guide 2016 Lincoln MKX Quality and Education Services AAA Automotive 1000 AAA Drive Heathrow, FL 32746 December 12, 2015 Index Towing, Loading and Transporting 2 Curb Weight
Property of American Airlines
 - GASOLINE MANUAL NUMBER 092602 EFFECTIVITY: 09/26/02 GASOLINE POWERED Scissor Lift Vehicle -1036S thru -1037S REV 00 CORPORATION 9501 SOUTH CENTER ROAD MUNCIE, IN 47302-9443 P.O. BOX 2645 MUNCIE, IN 47307-0645
Skid Steer Loader. Owner s and Operator s Manual. PUBLICATION NO July 2003
 175 Skid Steer Loader Owner s and Operator s Manual PUBLICATION NO. 48609 July 2003 THOMAS EQUIPMENT LIABILITY WARRANTY THE WARRANTY IS THE ONLY OBLIGATION OF THOMAS OR A THOMAS DEALER TO THE PURCHASER
AIR BRAKES THIS SECTION IS FOR DRIVERS WHO DRIVE VEHICLES WITH AIR BRAKES
 Section 5 AIR BRAKES THIS SECTION IS FOR DRIVERS WHO DRIVE VEHICLES WITH AIR BRAKES AIR BRAKES/Section 5 SECTION 5: AIR BRAKES THIS SECTION COVERS Air Brake System Parts Dual Air Brake Systems Inspecting
before serial number 2214
 before serial number 2214 Contents Page Safety Rules... 3 Pre-operational & Safety Inspection... 4 Operating Instructions... 6 Transport... 12 Maintenance & Routine Service... 12 Specifications... 14 SAFETY
Towing and Road Service Guide For The Lexus CT200h. Quality and Education Services AAA Automotive 1000 AAA Drive Heathrow, FL 32746
 Towing and Road Service Guide For The Lexus CT200h Quality and Education Services AAA Automotive 1000 AAA Drive Heathrow, FL 32746 January 4 th, 2011 1 Index General Vehicle Information Major Component
Cruise Control designed. The only. and developed in Australia CRUISE CONTROL OPERATING INSTRUCTIONS. PROFESSIONAL SERIES and DRIVE by WIRE
 The only Cruise Control designed and developed in Australia CRUISE CONTROL OPERATING INSTRUCTIONS PROFESSIONAL SERIES and DRIVE by WIRE CONGRATULATIONS! You have purchased one of the most advanced cruise
1500 Series Roll Off Hoist. Owner s Manual (5-06)
") 1500 Series Roll Off Hoist Owner s Manual (5-06) Section 1: General Information Introduction Safety Information Warranty Information Table of Contents Section 2: Operation Operating the P.T.O. Operating
1500 Series Roll Off Hoist Owner s Manual (5-06) Section 1: General Information Introduction Safety Information Warranty Information Table of Contents Section 2: Operation Operating the P.T.O. Operating
Towing and Road Service Guide For The 2010 Lexus HS250H. Quality and Education Services AAA Automotive 1000 AAA Drive Heathrow, FL 32746
 Towing and Road Service Guide For The 2010 Lexus HS250H Quality and Education Services AAA Automotive 1000 AAA Drive Heathrow, FL 32746 October 7, 2009 Index General Vehicle Information Major Component
LOADING THE TDRT WARNING LOADING/UNLOADING OPERATION
 0012.3 00 LOADING THE TDRT WARNING LOADING/UNLOADING OPERATION All persons not involved in the loading or unloading operation must stand clear the full length of prime mover and Tilt Deck Recovery Trailer.
BX88175 Installation Instructions ToadStop II Vacuum Brake System
 BX88175 Installation Instructions ToadStop II Vacuum Brake System Serial No. Customer supplied tools & supplies Utility knife, 12VDC tester, drill & bits: (1/8", 1/4", 5/8 ), ¼ socket drive bit, punch,
Chapter 1 Safety and Operation
 Chapter 1 Safety and Operation General The importance of safe operation cannot be over emphasized. Carelessness and neglect on the part of operators, job supervisors and planners, rigging personnel, and
LIFT TRUCK SAFETY OPERATOR TRAINING
 LIFT TRUCK SAFETY OPERATOR TRAINING Avoiding Injury One person and a lift truck can move large amounts of material with ease and efficiency. Employers are responsible for training operators in the safe
200C II BRAKE SYSTEM
 200C II BRAKE SYSTEM The braking system on the 200C II Kress Coal Hauler uses hydraulic oil pressure from both the System and Steering accumulator circuits. Using oil from both circuits provides braking
Road Service Quick Reference Guide 2017 Land Rover Discovery. Quality and Education Services AAA Automotive 1000 AAA Drive Heathrow, FL 32746
 Road Service Quick Reference Guide 2017 Land Rover Discovery Quality and Education Services AAA Automotive 1000 AAA Drive Heathrow, FL 32746 March 31, 2017 Index Quick Specifications and Information 2
Property of American Airlines
 OPERATIONS AND PROCEDURES A. INSTRUMENT PANEL OPERATIONS The instrument panel in the operator s compartment contains the following gauges and electro/ mechanical devices: 1. Battery Discharge Indicator
Operator Manual. The most important component is you. This operator manual. has information for. all models of series. B plus some options and
 Operator Manual This operator manual has information for all models of series B plus some options and accessories. Some of the illustrations and information may not apply to your truck. The most important
Towing and Road Service Guide For 2010 Lexus GX460. Quality and Education Services AAA Automotive 1000 AAA Drive Heathrow, FL 32746
 Towing and Road Service Guide For 2010 Lexus GX460 Quality and Education Services AAA Automotive 1000 AAA Drive Heathrow, FL 32746 February 2, 2010 Index Equipment 3 General Towing Information Special
OPERATOR S MANUAL ECB-22 ELECTRIC FORKLIFT WARNING
 OPERATOR S MANUAL ECB-22 ELECTRIC FORKLIFT WARNING Do not operate or service this product unless you have read and fully understand the entire contents of this manual. Failure to do so may result in property
Road Service Quick Reference Guide Range Rover Sport. Quality and Education Services AAA Automotive 1000 AAA Drive Heathrow, FL 32746
 Road Service Quick Reference Guide 2016-2017 Range Rover Sport Quality and Education Services AAA Automotive 1000 AAA Drive Heathrow, FL 32746 March 31, 2017 Index Quick Specifications and Information
Wind and Temperature Tip Over Hazard Do not add notice boards or similar
 Lift & Work Platform Safety Information Safety Information: Boom Lifts Safety Information: Scissor Lifts Safety Information: Boom Lifts Power Lines Electrocution Hazard Maintain safe clearance from Electrical
T245 HDK. Skid Steer Loader. Owner s and Operator s Manual
 T245 HDK Skid Steer Loader Owner s and Operator s Manual PUBLICATION NO. 47640 August, 2001 THOMAS EQUIPMENT LIABILITY WARRANTY THE WARRANTY IS THE ONLY OBLIGATION OF THOMAS OR A THOMAS DEALER TO THE PURCHASER
Operation Guide. Hydraulic Leveling Systems #2000, #2010, #3000, and # Table of Content. Introduction
 Operation Guide Operation Guide Hydraulic Leveling Systems #2000, #2010, #3000, and #30130 Table of Content Page Introduction 1 Safety Information 1 Operation 2 Control Panel 3 Manual Mode 3 Auto Mode
OPERATOR S MANUAL HWH COMPUTER-CONTROLLED LEVELING SYSTEM 610 SERIES
 HCORPORATIONH W R OPERATOR S MANUAL HWH COMPUTER-CONTROLLED LEVELING SYSTEM 610 SERIES FEATURING: TOUCH PANEL CONTROL HYDRAULIC LEVELING STRAIGHT-ACTING JACKS MULTIPLE ROOM EXTENSIONS HWH COMPUTERIZED
LEAR Description
 LEAR 45 TOWING DESCRIPTION AND OPERATION 1. Description A. Towing and taxiing procedures are basically the same as those used for other aircraft equipped with tricycle landing gear. B. The aircraft can
QUICK REFERENCE FOR DEPARTURE (updated 05/22/08)
") Mariah QUICK REFERENCE FOR DEPARTURE (updated 05/22/08) The Quick Reference for Departure is just that condensed checklists and reminders. It assumes that the charter guest/operator is experienced and
Mariah QUICK REFERENCE FOR DEPARTURE (updated 05/22/08) The Quick Reference for Departure is just that condensed checklists and reminders. It assumes that the charter guest/operator is experienced and
 Manufacturers of Patented Truck Trailering Lifts 16 W. West Hill Road Barkhamsted, CT 06063. Ph. 860-379-7772 or 1-800-450-8659 Fax 860-738-2777 WWW.TRUHITCH.COM INFO@TRUHITCH.COM 1 Read All Instructions
IMPORTANT! DO NOT THROW AWAY THE SHIPPING CARTON AND PACKING MATERIAL
 Operator s Manual IMPORTANT! DO NOT THROW AWAY THE SHIPPING CARTON AND PACKING MATERIAL ii Table of Contents Operator Safety... 1 Introduction... 2 Unpacking and Setup... 3 Unpacking... 3 Setup... 4 ROCKET
EAGLETRON II REMOTE CONTROL OPERATOR and MAINTENANCE. Remote Control Procedure
 EAGLETRON II REMOTE CONTROL OPERATOR and MAINTENANCE Remote Control Procedure WARNING! DO NOT OPERATE REMOTE CONTROL UNLESS YOU HAVE A CLEAR VIEW OF THE REAR OF THE TRAILER. WARNING! THE OPERATOR IS REQUIRED
Towing and Road Service Guide For The Lexus ES300h. Quality and Education Services AAA Automotive 1000 AAA Drive Heathrow, FL 32746
 Towing and Road Service Guide For The Lexus ES300h Quality and Education Services AAA Automotive 1000 AAA Drive Heathrow, FL 32746 September 7, 2012 1 Index General Vehicle Information Major Component
SECTION 2 5 OPERATION OF INSTRUMENTS AND CONTROLS. Gauges, Meters and Service reminder indicators
 SECTION 2 5 OPERATION OF INSTRUMENTS AND CONTROLS Gauges, Meters and Service reminder indicators Fuel gauge................................................ 122 Odometer and two trip meters................................
Section 4.3. Machine Operation - Operating Procedures. Before Starting the Engine: General Pre-Start Inspection
 Section 4.3 Machine Operation - Operating Procedures Before Starting the Engine: General Pre-Start Inspection... 4.3.2 Engine Starting Procedure... 4.3.2 Cold Weather Start-Up... 4.3.3 Engine Shutdown
TOWING - MAINTENANCE PRACTICES. Lockpins. Installation of the Air Driven Generator (ADG) Lockpin
 Lockpin") TOWING - MAINTENANCE PRACTICES TASK 584 801 1. Towing of the Aircraft A. Reference Information REFERENCE TASK 10 10 01 400 801 TASK 10 10 01 400 802 TASK 10 10 01 400 803 TASK 10 10 01 587 801 TASK 10
TOWING - MAINTENANCE PRACTICES TASK 584 801 1. Towing of the Aircraft A. Reference Information REFERENCE TASK 10 10 01 400 801 TASK 10 10 01 400 802 TASK 10 10 01 400 803 TASK 10 10 01 587 801 TASK 10
User Manual. MB-6000-UD Rev. 1.03
 User Manual MB-6000-UD Rev. 1.03 Table of Contents I. The Controls II. III. IV. Unit Operations A. Folding the Unit B. Folding the Handlebars C. Unlocking and Unfolding D. Precautions and Starting E. Power
Towing and Road Service Guide For the 2003 Saab 9.3 Sedan. Quality and Education Services AAA Automotive 1000 AAA Drive Heathrow, FL 32746
 Towing and Road Service Guide For the 2003 Saab 9.3 Sedan Quality and Education Services AAA Automotive 1000 AAA Drive Heathrow, FL 32746 July 23, 2003 Index Equipment availability 3 General Towing Information
SD3-60 AIRCRAFT MAINTENANCE MANUAL. These procedures will be required by personnel engaged in manoeuvring the aircraft on the ground.
 AMM 9-00-00 1.0.0.0TOWING AND TAXIING 1. General This chapter deals with aspects of: - Towing. Refer to 9-10-00, pb201. - Taxiing. Refer to 9-20-00, pb201. These procedures will be required by personnel
MODELS 1324 & 1624 & 1824
 THE MODELS 1324 & 1624 & 1824 HYDRAULIC TRENCHERS CONGRATULATIONS! You are now the proud owner of a BARRETO trencher. Please take a moment of your time to look over the following information. Familiarize
OPERATOR S MANUAL 7(5 & ( 8&. $5.00 P/N REV.B
 OPERATOR S MANUAL &281 2817( 7(5 %$/$1&( /,)7 7758& 8&. $5.00 P/N 901345 REV.B As a lift truck operator, you are responsible for a machine that is useful, powerful, and can be hazardous if not operated
DU-ALL SAFETY FORKLIFT TRUCK OPERATORS TRAINING COURSE WRITTEN TEST PART 1 OPERATOR S NAME DATE
 DU-ALL SAFETY FORKLIFT TRUCK OPERATORS TRAINING COURSE WRITTEN TEST PART 1 OPERATOR S NAME DATE MULTIPLE CHOICE (select the answer which is most correct and circle the letter.) 1. A lift truck training
National N-55. LOAD CHARTS for Use With WRITTEN EXAMINATIONS
 LOAD CHARTS for Use With WRITTEN EXAMINATIONS National N-55 Manitowoc Crane Group, by providing pages of one of its manuals, is not providing a substitute for training on a Manitowoc crane. These pages
Humma UV35-25 LOAD CHARTS. Revision 9. A division of Westfield Nominees. Contains the following load charts: Main winch (Standard & Stationary)
") A division of Westfield Nominees Humma UV35-25 Revision 9 Contains the following load charts: Main winch (Standard & Stationary) Sliding hook 1 & 2 Rhino hook Fly-jib www.dragroup.com.au Construct Engineering
A division of Westfield Nominees Humma UV35-25 Revision 9 Contains the following load charts: Main winch (Standard & Stationary) Sliding hook 1 & 2 Rhino hook Fly-jib www.dragroup.com.au Construct Engineering
Sport Ice 240E Elektro. Operation Manual
 Sport Ice 240E Elektro Operation Manual Small Machines. Big Performance. Great Ice. 1 Introduction: The Sport Ice 240E Elektro is a compact ice resurfacing machine designed to be used on small ice surfaces.
T105. Skid Steer Loader. Owner s and Operator s Manual
 T105 Skid Steer Loader Owner s and Operator s Manual PUBLICATION NO. 47639 September, 2001 THOMAS EQUIPMENT LIABILITY WARRANTY THE WARRANTY IS THE ONLY OBLIGATION OF THOMAS OR A THOMAS DEALER TO THE PURCHASER
[Trailer is normally stored at Athens Fire Station # 2 on Congress Parkway]
![[Trailer is normally stored at Athens Fire Station # 2 on Congress Parkway]](/thumbs/77/76478902.jpg "[Trailer is normally stored at Athens Fire Station # 2 on Congress Parkway]") SOP 1.0 Trailer Pick-Up & Transport [Trailer is normally stored at Athens Fire Station # 2 on Congress Parkway] UNLOCK side door of trailer DISCONNECT power cable to trailer and place it inside trailer
SOP 1.0 Trailer Pick-Up & Transport [Trailer is normally stored at Athens Fire Station # 2 on Congress Parkway] UNLOCK side door of trailer DISCONNECT power cable to trailer and place it inside trailer
PA32-RT LANCE II CHECKLIST
 PA32-RT LANCE II CHECKLIST 6815.10.1112 1 Normal Procedures PREFLIGHT CHECK Control Wheel... RELEASE BELTS Parking brake... Set Master Switch... ON Fuel Quantity Gauges... check Master Switch... OFF Ignition...
Search by illustration
 Pictorial index Search by illustration 1 AUTO ACCESS SEAT 2 Maintenance Information regarding the AUTO ACCESS SEAT, including usage procedure Checking fuses and replacing the battery of the wireless remote
ROUGH TERRAIN VEHICLES
 ROUGH TERRAIN VEHICLES OPERATING SAFETY RULES AND PRACTICES Operator Responsibility Safe operation is the responsibility of the operator. The equipment can be dangerous if not used properly. The operator
Commercial Driver s License Manual SECTION 7. Section-7 Doubles and Triples
 SECTION 7 doubles and triples this section Is for drivers WHo WIll tow double or triple trailers Section-7 Doubles and Triples section 7 - doubles and triples this section covers Pulling double/triple
Fuller Automated Transmissions TRDR2500
 Driver Instructions Fuller Automated Transmissions TRDR2500 July 2007 RTO-10910B-DM2 RTO-12910B-DM2 RTO-14910B-DM2 RTO-16910B-DM2 Warnings & Cautions Warnings & Cautions WARNING Read the entire driver
Skippa Mobility Scooter Owner Manual
 Skippa Mobility Scooter Owner Manual Page 1 CATALOGUE I. SAFETY GUIDELINES...3 II. SPECIFICATION... 5 III. YOUR TRAVEL SCOOTER...6 IV. OPERATION...9 V. DISASSEMBLY AND ASSEMBLY... 11 VI. BATTERY AND CHARGING...14
The following procedures should be observed to ensure safe driving.
 Driving the vehicle The following procedures should be observed to ensure safe driving. n Starting the hybrid system ( P. 162) n Driving STEP 1 With the brake pedal depressed, shift the shift lever to
Section 4.3. Machine Operation - Operating Procedures. Before Starting the Engine: General Pre-Start Inspection
 Section 4.3 Machine Operation - Operating Procedures Before Starting the Engine: General Pre-Start Inspection... 4.3.2 Engine Starting Procedure... 4.3.2 Cold Weather Start-Up... 4.3.3 Engine Shutdown
Towing and Road Service Guide For Lexus RX400h Hybrid SUV. Quality and Education Services AAA Automotive 1000 AAA Drive Heathrow, FL 32746
 Towing and Road Service Guide For Lexus RX400h Hybrid SUV Quality and Education Services AAA Automotive 1000 AAA Drive Heathrow, FL 32746 April 12, 2005 Index Equipment availability 3 General Towing Information
Coupling & Uncoupling a Tractor-Trailer
 TRAINING TOOL Coupling & Uncoupling a Tractor-Trailer DRIVING THE FUTURE 2 Coupling and Uncoupling a Tractor-Trailer TRAINING TOOL Coupling a Tractor-Trailer 1 When operating articulating vehicles such
Important. Contents. Contact us:
 Operator's Manual Third Edition Third Printing Important Read, understand and obey these safety rules and operating instructions before operating this machine. Only trained and authorized personnel shall
EW-09. Owner s Manual. (888) Customer Service. (888) Service
 Customer Service. (888) Service") EW-09 Owner s Manual www.ewheelsdealers.com (888) 305-0881 Customer Service (888) 571-2845 0 Service Table of Contents Page 2 - Feature Guide Page 3 - Product Specifications Page 4 - Operation of Scooter
EW-09 Owner s Manual www.ewheelsdealers.com (888) 305-0881 Customer Service (888) 571-2845 0 Service Table of Contents Page 2 - Feature Guide Page 3 - Product Specifications Page 4 - Operation of Scooter
Universal Crane and Personnel Lif t OPERATOR'S MANUAL
 Universal Crane and Personnel Lif t OPERATOR'S MANUAL Publication No. 4500360-1/0410 A PRODUCT OF: Champ-UniLift 850 State Hwy 55 Brooten MN 56316 www.champunilift.com OPERATOR SAFETY Training Checklist
Operator Manual. TR 3600 SERiES. The most important component is you. This operator manual. has information for all. models of TR 3600 series
 TR 3600 SERiES Operator Manual This operator manual has information for all models of TR 3600 series plus some options and accessories. Some of the illustrations and information may not apply to your truck.
Main Fire Pump Engagement. Shifting Into Pump 2006 / 2007 KME
 Main Fire Pump Engagement Shifting Into Pump 2006 / 2007 KME 1 Battery Switch Ensure battery switch is turned on to BOTH. 2 Ensure Maxi (Parking) Brake Set Maxi (Parking) Brake must be set or the Pump
OWNER S MANUAL and TECHNICAL DOCUMENTATION
 IMPORTANT DOCUMENT - DELIVER TO MANAGER Quality, Performance, Value OWNER S MANUAL and TECHNICAL DOCUMENTATION MODELS 280-4036, 280-4037, 280-4063 FOR UL (Underwriter Laboratories) APPROVED CARTS Mart
Road Service Quick Reference Guide 2016 Lincoln MKT. Quality and Education Services AAA Automotive 1000 AAA Drive Heathrow, FL 32746
 Road Service Quick Reference Guide 2016 Lincoln MKT Quality and Education Services AAA Automotive 1000 AAA Drive Heathrow, FL 32746 December 12, 2015 Index Towing, Loading and Transporting 2 Curb Weight
New Bremen, Ohio USA 2004 PF14387-WEB Rev. 6/06 Printed in U.S.A.
 New Bremen, Ohio 45869 USA 2004 PF14387-WEB Rev. 6/06 Printed in U.S.A. You Must be Trained It s the law, you must be trained and certified to operate this truck. (OSHA 1910.178, Rev. 1999) You or others
Farming machinery (1) Operation of ride-on tractors
 Operation of ride-on tractors") Farming machinery (1) Operation of ride-on tractors Tractors refer to a special type of vehicles that have an independent motor, can move without relying on rails, and can tow objects. The uses and types
Farming machinery (1) Operation of ride-on tractors Tractors refer to a special type of vehicles that have an independent motor, can move without relying on rails, and can tow objects. The uses and types
Towing and Road Service Guide For Lexus GS 300 and GS 430. Quality and Education Services AAA Automotive 1000 AAA Drive Heathrow, FL 32746
 Towing and Road Service Guide For Lexus GS 300 and GS 430 Quality and Education Services AAA Automotive 1000 AAA Drive Heathrow, FL 32746 April 12, 2005 Index Equipment availability 3 General Towing Information
CORPORATION OPERATOR S MANUAL HWH HYDRAULIC SPACEMAKER ROOM EXTENSION SYSTEMS. FEATURING: Single / Multiple Room Extensions / Generator Slide
 HWH CORPORATION R OPERATOR S MANUAL HWH HYDRAULIC SPACEMAKER R ROOM EXTENSION SYSTEMS R FEATURING: Single / Multiple Room Extensions / Generator Slide H W H CORPORATION R HYDRAULIC ROOM EXTENSION OFF EXTEND
RANGE ROVER HYBRID FREQUENTLY ASKED QUESTIONS HYBRID PERFORMANCE AND EFFICIENCY
 HYBRID PERFORMANCE AND EFFICIENCY What is the performance like in a Range Rover Hybrid? Performance is increased compared to the non-hybrid V6 diesel models. This is because when the driver needs additional
Pro Tough Owner s and Operator s Manual
 Pro Tough 2200 Owner s and Operator s Manual PUBLICATION NO. 48241, MAY 2002 THOMAS EQUIPMENT LIABILITY WARRANTY THE WARRANTY IS THE ONLY OBLIGATION OF THOMAS OR A THOMAS DEALER TO THE PURCHASER OR ANYONE
Summary Report for Individual Task M-1364 Operate Vehicle with Standard, Automatic/Semiautomatic Transmission Status: Approved
 Summary Report for Individual Task 551-88M-1364 Operate Vehicle with Standard, Automatic/Semiautomatic Transmission Status: Approved Report Date: 05 Dec 2014 Distribution Restriction: Approved for public
EZ Hauler 2500 Training & Procedure Manual
 EZ Hauler 2500 Training & Procedure Manual Load Capacity One of the most important considerations when operating this machine is the Load Capacity of the EZ Hauler 2500 s boom. The maximum weight capacity
This lift will not operate with the generator engaged.
 WARNING 40' GENIE S40 PERSONNEL BOOM LIFT Any piece of equipment can be dangerous if not operated properly. YOU are responsible for the safe operation of this equipment. The operator must carefully read