After Market Subwoofer Installation Guide Silver 06 Prius, Package #7
|
|
|
- Ashlee Bond
- 5 years ago
- Views:
Transcription
1 After Market Subwoofer Installation Guide Silver 06 Prius, Package #7 i
2 Disclaimer This guide is posted for informational purposes only. The author of this guide is not held liable for any modifications, damages, accidents, or other changes to your car interior or exterior as a result of reading this guide. i
3 Table of Contents Disclaimer... i Table of Contents... ii Fiberglass Stealth Box... 3 Materials... 3 Area Preparation... 4 Preparing the Matt... 5 Mixing the Resin... 5 Applying the first layer... 6 Applying additional layers... 6 Affixing a front to the Box... 7 Finishing the Box... 8 Installing an aftermarket amplifier Affix the amplifier Getting power Getting an audio signal Running the wires ii
4 Fiberglass Stealth Box This section is devoted to the proper, safe construction of a fiberglass stealth box. While this box is made for the driver side trunk wheel well in an 06 Prius, the technique is applicable to other vehicles and locations. Materials All of the materials used in this guide were available at Lowe s, and should be available at any large hardware store. A majority of the materials were found in the paint department, with the exception of the MDF, which was in the lumber department. Totaled, the supplies cost about $100. Fiberglass Matt Fiberglass Resin Fiberglass Hardener Plastic Sheet Blue Painters Tape Paint Brush Aluminum Foil (from the kitchen, not Lowe s) ¼ inch Medium Density Fiberboard (MDF) Black aerosol sealant Respirator mask Silicon sealant 3
.")
5 Pictured here are a respirator mask, fiberglass matt, fiberglass resin/sealant, paint brush, and acetone for cleaning the brush. Additionally, I purchased grey car fabric from Area Preparation When prepping a car to use fiberglass, it is important to remember that glassing is messy, and any resin that gets on your carpet will not come out (thus ruining your carpet). To properly prep the area, first cover the area you want to fiberglass with blue painters tape (masking tape can be used as well, but is not recommended). Cover a larger area than you want the box to be, so that you can make the shell bigger and cut away the excess later. Once that is done, apply a layer of foil over that (taped down with painters tape). The foil will help to ensure that no resin will leak through any small holes in the tape, as well as to make it easier to remove later. 4

.")


6 In addition to prepping the immediate area, you should cover the surrounding area with a thick plastic dropcloth. The plastic will ensure that any spills or splatters will not get on the carpet. Preparing the Matt The fiberglass matt will come in large sheets (mine were 3 x3 ). You want to rip these sheets up into small 1-2 squares. The frayed edges you get when ripping them are preferable to neat edges that you may get if you use scissors. Mixing the Resin WARNING: The fumes from the fiberglass resin are extremely hazardous, and will damage your lungs. It is important to wear a respirator mask whenever working with fiberglass and resin. When wearing the mask, you should not be able to smell any fumes. 5
.")

7 You ll want to mix small amounts of the resin at a time, as it will gel up and become useless if you take so long. The can of resin will have mixing instructions on it. For mine, it recommended 14 drops per 1 oz of resin. I used 3 oz Dixie cups for my mixing, only filling them 2/3 full (thus 2 oz). Applying the first layer WARNING: The fumes from the fiberglass resin are extremely hazardous, and will damage your lungs. It is important to wear a respirator mask whenever working with fiberglass and resin. When wearing the mask, you should not be able to smell any fumes. Each layer will be applied using the same method. First, paint on a layer of the resin/hardener mix. Press into this slightly overlapping pieces of the matt. From there, use a stabbing motion with the brush to apply more resin/hardener mix. The idea here isn t to paint it on like before, but instead to try to beat it into the matt. It will be clear when you ve done enough, as the matt will become clear instead of white like the matt is when starting. It is important to work out as many of the air bubbles as possible, as these will reduce the strength of the finished box. When you have completed one full layer, let it dry. Drying usually takes 2-3 hours. With the first layer, you ll want to make sure it is completely dry, since you will be moving it. Applying additional layers WARNING: The fumes from the fiberglass resin are extremely hazardous, and will damage your lungs. It is important to wear a respirator mask whenever working with fiberglass and resin. When wearing the mask, you should not be able to smell any fumes. You ll want to apply a total of 3-5 layers to make a strong box that can sustain a little bit of throwing around. After the first layer is completely dry, carefully pull it out of the car. The shell will flex some at this point; that s fine, but don t test it, cause you don t want it to break. At this point, you can clean up the car. Roll up the plastic, pull the tape off, cause you re done in the car! That means you won t have to be quite as paranoid about making a mess. At this time you can also pull as much of the foil/tape off the shell as you can. Most likely it all won t come off, but that s ok. 6
8 Applying additional layers is the same as the first. Pain the surface with the resin/hardener mix, then put down the fiberglass, and finally stab it home. You can also put on several layers at once. In this case, since the layer beneath it is already wet, you can skip the painting step. I wouldn t do more than 3 layers at once. For my project, I used 3 layers total, so two more after the initial layer. So that s paint, stick, stab, stick, stab. Affixing a front to the Box Once the fiberglass shell is finished and dry, stick it back in the car (you don t have to worry about your carpet this time it won t make a mess). Using a black marker, mark off roughly where you want the shell to come out to; remember, you ll still be sticking a piece of MDF in front of it. Pull the shell out of your car, and using a Dremel, rotozip, or some other tool, cut it where you marked. Try to make the cuts as straight and flat as possible so it meets flush with the MDF. After the box is cut, use it to trace an outline on the board of MDF. Using your Dremel ro Rotozip, cut the MDF. Take this to your car and check the fit; you may have to trim it or sand down some edges to make it fit properly. Finally, stick the shell in the car along with the MDF to ensure a good fit. Take this piece of MDF and, using a Dremel or Rotozip cut the circle in it for the sub (the exact size will depend on the sub you re putting in). Next, secure the piece of MDF to the fiberglass shell with as few pieces of masking tape as possible. Finally, using the technique mastered earlier, use fiberglass to permanently secure the two (fiberglass resin bonds very well to wood). This will create a sealed box. 7

9 Finishing the Box You can finish the box however you want, or leave it as it is. Personally, I use a black aerosol sealant to paint the fiberglass portion. This ensured that there were no holes or air leaks. I finished the front of the box with carpeting so that it would look the best in the car. Finally, you need to drill a small hole in the back for the speaker wires to come out of. Seal this hole with silicon sealant. Attach the wires to the sub and drill holes and screw it in like you would with a store bought box. With this, the box is done! 8


10 Note: I ll be putting a grill cover on as soon as I can get some padding for it (currently it will rattle if installed) 9


11 Installing an aftermarket amplifier In addition to making a box and putting the sub in, you will also need to put in an aftermarket amplifier. There are several possible locations for the amplifier, however I feel the best place is in the compartment below the trunk. Affix the amplifier First, you will need to secure the amplifier to the car so it s not loose in the trunk. To do this, I cut a piece of MDF to fit in the rear hatch. It was then a simple matter to attach the amplifier to this piece of MDF with screws. Getting power For power, the amp can be attached to the battery, as it s very close. There should be an appropriately sized fuse between the amp and the battery on the positive end. You can attach the negative end to any point in the body of the car, I chose a bolt nearby. 10


12 The circles above indicate the mounting pointed for the positive and negative ends, as well as the plastic fuse holder and the holes drilled in the plastic tray to allow the wires in. Getting an audio signal This is where it gets tricky. Under the front passenger seat is a factory installed JBL amp (for those models with the upgraded 9 speaker premium sound system). From the rear of the seat, detach the two plastic bolts and remove the plastic cover on the amp. Then detach the cords on the side of the amp. Finally, remove the 3 bolts that secure the amp to the floor and pull the amp out. Set it someplace safe, and prepare to get confused. 11


13 Above, the red circles indicate the location of the two plastic bolts, and the yellow indicates the location of a rear bolt that holds the amp to the floor. This bolt is hidden beneath a piece of carpet that easily pulls back. 12


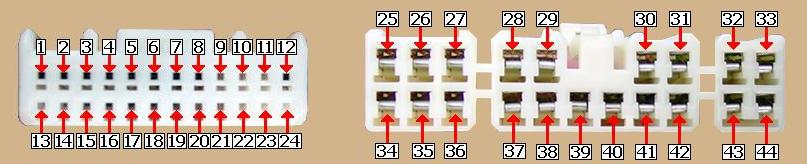
14 Note: The two bolts you need to remove from the front are beneath two flaps of carpet just inside of the bolts holding the seat to the car. For this part, I used a Scosche SLC4 Speaker to RCA converter. This is a little box that takes speaker inputs and provides RCA pre-amp outputs. The trick here is to identify the wires you need to tap. Use the following picture and table to figure it out. Then use an 18 gauge wire tap to add a line out of the appropriate wires. You ll need to tap the positive and negative rear door speakers. Note: the plugs were different on my Amp. There were three plugs instead of two. The oblong, 3 part plug on the right below was separated into two separate plugs, however the wires seemed to match up pin for pin, and the wire colors were the same. Note: The light blue plastic fittings above are the line taps. They fit over the current wires and simply require crimping to work. You don t have to cut any wires! 13

15 14
16 The Remote line needs to be run from the back of the factory head unit. When this is pulled out, there are two plugs on the back. Looking at it from the top of the unit with the front facing you, the wire you need to tap is in the left most connector (sorry, I forgot to take pictures!). As explained to me by the Crutchfield Technical Rep, you want to tap the grey wire (there are three of them total) that is coming from the bottom left location of the plug. Bottom left, that is, if you are looking at the face of the plug (with the wires coming out the back) with the tab on top. When I install my VAIS SLI (when it s 06 compatible), I ll take some pictures. Disassembling the dash was fairly easy, and for that part I used a guide written by Eddie Bell for installing an XM radio. For convenience, I have attached his entire guide to the end of my guide. 15

17 Running the wires Now that you have a sub, a powered amplifier, and pre-amp outputs with a remote wire, you just need to attach them all. The speaker wire from the amplifier to the sub can be run under the plastic plate above the battery and up the back, keeping it hidden. Note, here you can see the power wires, remote wire, and speaker wire. For running the remote wire from the dash and the RCA wires from under the passenger seat, you can refer to Eddie Bell s guide for XM radio, as he ran wires to the rear for a receiver. The guide shows how to pull up the trim so you can tuck the wires underneath. 16
18 Prius XM Radio Installation Instructions By Eddie Bell 1
19 Let me begin by saying this is an easy but time consuming job. Set aside a few hours of your time for the install. If you take your time, with the help of this guide you will be rewarded with a tidy XM radio install. I have spent a good bit of time on this guide. It is my first try at creating a pdf document so there may be some errors. I offer this guide free of charge. All I ask in return is that if you find an error, please let me know. Also if you have additions that you feel may help someone else, let me know so that I may make the changes. Let s get started. What you will need: 10 mm socket Socket wrench aka ratchet Phillips head screwdriver (you know, the one that looks like this +) Fish tape or coat hanger A little patience 2
20 67 2 AUDIO & VISUAL SYSTEM AUDIO & VISUAL SYSTEM COMPONENTS 6716E 01 Multi Display Assy Instrument Panel Register Assy No.4 Instrument Panel Register Assy No.3 Radio Receiver Assy Radio Receiver Assembly w/ Bracket Instrument Cluster Finish Panel Assy Center Radio Bracket No.1 Radio Bracket No.2 Stereo Opening Cover I PRIUS REPAIR MANUAL (RM1130U) Author : Date : 3801
21 INSTRUMENT PANEL/METER INSTRUMENT PANEL/METER COMPONENTS INSTRUMENT PANEL/METER LL 01 Front Pillar Garnish RH Front Pillar Garnish LH w/ JBL Sound System: Instrument Panel Speaker Panel Sub assy No.1 w/ CTR Speaker Front Pillar Garnish Corner Piece RH Front Pillar Garnish Corner Piece LH D D Instrument Panel Cluster Finish Panel End A Clock Assy D 20 (204, 15) A Instrument Panel Register Assy No.2 Instrument Panel Hole Cover Multi Display Assy Instrument Panel Finish Panel Sub assy Upper C C Instrument Panel Register Assy No.1 Glove Compartment Door Instrument Panel Cushion Instrument Panel Finish Panel Sub assy Lower Instrument Panel Register Assy No.3 Instrument Panel Register Assy No.4 Glove Compartment Door Stopper Sub assy E E Glove Compartment Door Assy N m (kgf cm, ft lbf) : Specified torque B PRIUS REPAIR MANUAL (RM1130U) Author : Date : 3884

22 REMOVE INSTRUMENT PANEL REGISTER ASSY NO.1 Grasp at the very top and very bottom and pull towards you. The register is held on very tightly. A flat blade screwdriver wrapped in tape comes in handy. 3
23 3 ( 2 Claws 4 Clips B74044


24 REMOVE INSTRUMENT PANEL FINISH PANEL SUB ASSY LOWER Remove the 2 screws. 4
25 4 ( ( ( ( 5 ( ( 4 Claws 5 Clips B Claws 4 Clips B74046


26 The panel is held on with the same clips as the ones for the register Grasp the panel and pop it loose. Do the same here. You should have your technique down pat by now. 5

 Disengage the 3 claws and")
27 Let panel hang loose. REMOVE INSTRUMENT PANEL FINISH PANEL SUB ASSY UPPER (a) Disengage the 3 claws and the 4 clips. 6


28 Do the same here. Remember that technique that you learned? What do you mean no. Let this panel hang loose also. 7
 Disengage the claw and the 5 clips.")

29 . REMOVE INSTRUMENT PANEL REGISTER ASSY NO.3 (a) Disengage the claw and the 5 clips. (b) There is a small tab on the black connector. Disconnect the connector and then remove the instrument panel register assy No.3. 8
30 6 ( ( Claw 5 Clips B74047

31 9
 Disengage the 6 clips and then")

32 REMOVE INSTRUMENT PANEL REGISTER ASSY NO.4 (a) Disengage the 6 clips and then remove the instrument panel register assy No.4. Might need that screwdriver again. 10
33 7 ( 6 Clips B74048


34 REMOVE INSTRUMENT PANEL REGISTER ASSY NO.2 (a) Disengage the 2 claws and the 4 clips, and then remove the instrument panel register assy No.2. 11


35 REMOVE INSTRUMENT PANEL FINISH PANEL LOWER CENTER (a)remove the push in trim clip from the instrument panel finish panel lower center. Do like I did and get your fingers behind the panel and pull towards you. The clip will pop out. (b) Disengage the 4 claws and the 2 clips, and then remove the instrument panel finish panel lower center. 12
36 4 Claws 2 Clips B74061


37 Unplug connector. Put panel aside. 13
 Remove the 2 screws.")

38 REMOVE INSTRUMENT CLUSTER FINISH PANEL ASSY CENTER (a) Remove the 2 screws. (b) Disengage the 4 clips and then remove the instrument cluster finish panel assy center. 14
39 4 Clips B74060


40 REMOVE MULTI DISPLAY ASSY (a) Remove the 2 bolts. 15


41 It is not necessary to disconnect the cables to the multi display. It can sit off to the side of the dash. If you feel more comfortable, you can remove the cables to facilitate removing the display from the car. 16


42 Remove radio assembly. Remove the 4 screws. 17


43 Grasp radio with both hands and pull it out of the dash. 18


44 Unplug antenna cable and the remaining connectors then remove the radio. 19


45 Remove instrument panel finish panel lower, right scuff plate and right cowl side trim. 20
46 Clip Claw B Claw A Claw B 1 ( Claw A Claw A H T Clip B73586
47 Clip Claw B73588


48 Take the cable from the XM radio kit foam side first and feed it behind the dash. 21


49 Feed the cable out of the register hole. You really only need to pull enough cable to make it to the radio assembly. 22


50 Feed the cable behind the glove box. Open and lower the glove box, to make sure of cable placement. 23


51 Bring the cable out by the radio. 24


52 Make sure to run the XM radio cable under this bundle of wires. Leave enough cable to plug into the radio then tie the XM cable off with one of the zip ties located in the XM radio kit. 25


53 There is a special cable tie in the kit. It has sticky tape attached to it. Put the XM cable into the tie then stick the tie to the inside of the dash by register No.4. Be sure the cable is pulled taught. What we are trying to do is have the cable not interfere with the glove box door. Be sure to check it s operation and make adjustments to the cable as needed. 26

54 Plug the XM Radio cable into the radio. Reinstall the radio, center dash, multi display. Reinstall all dash panels and registers. Reassemble everything except the RH cowl panel and the RH front sill plate. Take a quick break. Stretch your legs, have a drink. Water, beer or whatever. If it s beer, have only one. Take your XM radio unit from the box and plug the XM cable into it. Take the antenna from the kit and plug it into the XM unit. You can temporarily place the antenna on the dash.turn on the factory radio. Press the AM button on your radio until you see SAT 1.Tune to channel one which should show your XM radio ID. Jot down the ID. You will needt his to set up your subscription once your install is complete. Once that is done, you can browse the preview channels that are available. Don't sit there too long, you have work to do Remove the right rear sill plate. 27


55 Pull the weatherstrip away from both sides of the B pillar panel (You know, that plastic panel between the front and rear doors). 28
56 Front Pillar Garnish Corner Piece RH Front Pillar Garnish RH Front Door Opening Trim Weatherstrip RH Center Pillar Garnish RH Rear Door Opening Trim Weatherstrip RH Roof Side Garnish Assy Inner RH 42 (430, 31) 42 (430, 31) Deck Trim Side Panel Assy RH Front Door Scuff Plate RH Center Pillar (B) Garnish Lower RH Front Seat Outer Rear Door Scuff Plate RH Lap Belt Outer Anchor Cover Rear Seat Belt Assy RH Roof Side Garnish Assy Inner LH


57 Pull the B pillar panel away from the B pillar. 29


58 Route the XM cable behind the B pillar panel. 30


59 Pull the cable out the otherside. 31

60 Here you will see that the rear seat is removed. It is not absolutely necessary but it is so easy to do and makes the install a little easier. The front of the rear seat pops into these plastic clips. Grasps the lower front of the seat and with a quick snatching motion, pull the seat up and out of the clips. 32


61 Once the clips are disengaged, pull the seat forward and remove it from the car. 33


62 Fold down right rear seat. Remove cargo cover, spare tire cover and cargo tray. Peel back carpet (velcroed to seat back). 34


63 Remove right rear floor board panel. Remove upper panel. Pull carpet away from the rear quarter panel. It will pop back into place perfectly when we are done. Pull carpet away from the rear quarter panel. It will pop back into


64 Remove clip from carpeting located just behind the right rear seat. 36


65 Feed the XM radio cable up behind the folded rear seat on the outside of the seat belt. 37

66 Route the cable under the carpet and along the right quarter panel. A coat hanger or fish tape might come in handy here. Pull the carpet liner out at the bottom, it's easier to see where the cable is being routed. 38


67 Pull the cable out through the hole in the carpet where the upper panel came from. Take the XM radio unit and attach the duo lock tape from the kit to it. Plug the cable into the unit then mount the unit to the right quarter panel. 39


68 Make sure your plugs are facing down and not up when mounting. Find the flattest surface possible. There is a prime spot just above and ahead of the battery. The duo-lock and XM unit will be going on the back of the exterior sheet metal (rear quarter). 40


69 Remove this bolt. Pull panel back slightly. Take the XM radio antenna from the box. There is a black plastic sheathing tape to the antenna wire. Carefully remove the tape from both ends. Allow the sheathing to move freely on the antenna wire. You can remove the sheathing completely if you choose but it is not necessary. 41


70 Take the template for mounting the antenna out of the kit. Line the template up on the roof and mount the antenna. The antenna has double sided tape as well as a magnet to mount it. We choose not to permanently mount the antenna. If it ever needs to be replaced, it would be very difficult to remove it from the car. It s up to you to decide. 42


71 Remove the backing from the tape on the antenna wire and stick it to the car. Be sure the area is clean. 43


72 Route antenna wire over the top of the hatch weather stripping. Make sure the sheathing is not in the way if you chose not to completely remove it. Route the antenna wire behind the right finish panel. Plug the antenna into the XM radio unit. Test the XM radio operation once again. Dress up your wiring and refit the panel. 44


73 Refit all of your panels. Replace the carpeting, cargo and spare tire covers. Replace the sill plates and any other items removed. 45


74 And we are done!!! 46
75 This Prius installation is my interpretation. It is by no means the only way to do the installation. I have presented this as a guide so that others may learn from it. If you feel there are errors or that additions need to be made, please contact me. 47
Prius XM Radio Installation Instructions. Eddie Bell
 2004-2005 Prius XM Radio Installation Instructions By Eddie Bell www.metrotpn.com 1 Let me begin by saying this is an easy but time consuming job. Set aside a few hours of your time for the install. If
SCION xb 2004 SATELLITE RADIO TUNER Section I Installation Preparation
 Section I Installation Preparation Part Number: PT546 52040 Section I Installation Preparation Kit Contents Item # Quantity Reqd. Description 1 1 Satellite Tuner 2 1 Ground Cable 3 1 Tuner Cable 4 2 Tuner
X-Type w/ non-premium sound amplifier installation instructions
 X-Type w/ non-premium sound amplifier installation instructions 1. Pull radio from dash (see Radio Removal Instructions ) 2. Disconnect wiring harness from back of radio by pushing in tab on plug and pulling
SCION xb SIRIUS SATELLITE RADIO TUNER Preparation
 Preparation Part Number: PTS3-52050 NOTE: Part number of this accessory may not be the same as the part number shown. Kit Contents Item # Quantity Reqd. Description Antenna, Exterior 2 Wire Harness 3 Bracket,
SCION xa 2004 SATELLITE RADIO TUNER Section I Installation Preparation
 Section I Installation Preparation Part Number: PT546 52040 Section I Installation Preparation Kit Contents Item # Quantity Reqd. Description 1 1 Satellite Tuner 2 1 Ground Cable 3 1 Tuner Cable 4 2 Tuner
TOYOTA TACOMA XM SATELLITE RADIO Preparation
 Preparation Part Number: Mounting Kit PT546-35090 Tuner Assembly 8680-0W03 NOTE: Part number of this accessory may not be the same as the part number shown. Tuner Assembly Kit Contents (8680-0W03) Item
TOYOTA PRIUS XM SATELLITE RADIO Preparation
 Preparation Part Number: Mounting Kit PT546-4700 Tuner Assy 8680-0W03 NOTE: Part number of this accessory may not be the same as the part number shown. Tuner Assembly Kit Contents (8680-0W03) Item # Quantity
TOYOTA RAV TRAILER WIRE HARNESS Preparation
 Preparation Part Number: PU322-42013-UW Kit Contents Item # Qty Description 1 1 Trailer Module Harness 2 1 Trailer 4-Flat Harness 3 1 Trailer Power Wire Harness 4 1 Mounting Bracket, 4-Flat 5 2 Screw #10-24
TOYOTA im INTERIOR LIGHT KIT Preparation
 Preparation Part Number: PT922-12170 Kit Contents Item # Quantity Reqd. Description 1 1 Main Wire Harness 2 1 Switch 3 1 Switch Header 4 1 ECU 5 1 ECU Bracket 6 1 Hardware Kit 7 1 Instruction Card 8 1
Model Year: 2008 Model: xb Doc ID: RM000001XUW004X
 1 of 18 2/28/2008 10:41 AM Last Modified: 2-12-2007 Service Category: Vehicle Interior 1.6 A Section: Interior Panels/Trim Model Year: 2008 Model: xb Doc ID: RM000001XUW004X Title: INTERIOR: ROOF HEADLINING:
TOYOTA SOLARA CONVERTIBLE XM SATELLITE RADIO Preparation. Part Number: Mounting Kit PT
 Preparation Part Number: Mounting Kit PT546-06061 Tuner Assy 86180-0W030 Tuner Assy Kit Contents (86180-0W030) 1 1 Tuner Assy, Stereo Component Mounting Kit Contents (PT546-06061) 1 Ground Cable 1 1 Wire,
TOYOTA YARIS XM SATELLITE RADIO Preparation (Sedan & Hatchback)
") Preparation (Sedan & Hatchback) Part Number: Mounting Kit PT546-52096 Tuner Assy 86180-0W031 Tuner Assy Kit Contents (86180-0W031) Item # Quantity Reqd. Description 1 1 Tuner Assy, Stereo Component Mounting
Preparation (Sedan & Hatchback) Part Number: Mounting Kit PT546-52096 Tuner Assy 86180-0W031 Tuner Assy Kit Contents (86180-0W031) Item # Quantity Reqd. Description 1 1 Tuner Assy, Stereo Component Mounting
2015 Copyright Maxspeed-Motorsports.com
 1 Porsche PCM 3.1 Backup Camera Installation Instructions. Thank you for purchasing your product at www.maxspeedmotorsports.com Before you start please understand that these installation instructions are
OEM Cruise Control Installation in GMC/Chevy NBS trucks
 OEM Cruise Control Installation in 99-02 GMC/Chevy NBS trucks May 2008 ~ Rampage_Rick Having just installed factory cruise control in my 00 Sierra, I thought I d share the fun. I followed the steps outlined
Mustang CDC Lightbar (94-04) - Installation Instructions
 - Installation Instructions") Mustang CDC Lightbar (94-04) - Installation Instructions The below installation instructions work for the following products: Classic Design Concepts Mustang Convertible Lightbar (94-04 Carbon Fiber) Classic
Mustang CDC Lightbar (94-04) - Installation Instructions The below installation instructions work for the following products: Classic Design Concepts Mustang Convertible Lightbar (94-04 Carbon Fiber) Classic
IMPORTANT. Tools Needed: (depending upon vehicle) Phillips Screwdriver. Drill & Bit Set. Wire Stripper/ Crimp Tool
 Phillips Screwdriver. Drill & Bit Set. Wire Stripper/ Crimp Tool") Revision 3/14/05 Amplifier Installation Guide IMPORTANT Before starting, compare items on your invoice with items received. Carefully check through packaging material. If any item is missing, please call:
Revision 3/14/05 Amplifier Installation Guide IMPORTANT Before starting, compare items on your invoice with items received. Carefully check through packaging material. If any item is missing, please call:
Raxiom Factory GPS Rear Back-up Camera Kit (07-17 Wrangler)
") Raxiom Factory GPS Rear Back-up Camera Kit (07-17 Wrangler) Installation Time: 2.5-3Hrs Tools Required: 7mm Socket & Driver 10mm Socket 10mm Open end wrench Knife / Razor blade Zip-ties Wire Cutters Needle
Raxiom Factory GPS Rear Back-up Camera Kit (07-17 Wrangler) Installation Time: 2.5-3Hrs Tools Required: 7mm Socket & Driver 10mm Socket 10mm Open end wrench Knife / Razor blade Zip-ties Wire Cutters Needle
Stand Alone Fog Lights Installation Instructions
 Tools Required: 1. Trim Removal tool or protected flat screwdriver 2. #2 Phillips Screwdriver 3. 10mm socket 4. 10mm wrench 5. 8mm or 5/16 socket 6. Adjustable Pliers 7. Electrical Tape WARNING!!! Disconnect
Conflicts: Vehicles without a sunroof Vehicles with a single sunroof
 Toyota Sienna (Dual Sunroof) 2011-10.2 Overhead Video Part Number: 00016-00110 00016-00110-17 Fit Kit 00016-00120 00016-00120-17 Fit Kit Accessory Code: ED5 Conflicts: Vehicles without a sunroof Vehicles
Scion xa SATELLITE RADIO TUNER Preparation
 Preparation Part Number: PTS31-00051 Kit Contents Item # Quantity Reqd. Description 1 1 Antenna, Interior 2 1 Antenna Tape Pad 3 1 Wire Harness 4 1 Bracket, Floor 5 3 Hardware Bags 6 3 Templates 7 1 SIRIUS
Conflicts: Vehicles with a sunroof
 Toyota 4Runner Non/MR 2010-10.2 Overhead Video Part Number: 00016-00110; Fit Kit -00110-15, Beige 00016-00120; Fit Kit -00120-15, Gray Accessory Code: ED6 Conflicts: Vehicles with a sunroof Kit Contents:
SCION XB SUBWOOFER ENCLOSURE Preparation
 Preparation Part Number: Kit Contents Item # Quantity Reqd. Description 1 1 Subwoofer enclosure 2 1 Wire Harness 3 1 Paper Template 4 1 Plastic Drill Template 5 1 Hardware Bag Hardware Bag Contents 1 Item
IR 13 INTERIOR ROOF HEADLINING REMOVAL
 INTERIOR ROOF HEADLINING 13 REMOVAL 1. DISCONNECT CABLE FROM NEGATIVE BATTERY TERMINAL 2. REMOVE REAR SEATBACK BOARD CARPET ASSEMBLY RH (See page SE-43) 3. REMOVE REAR SEATBACK ASSEMBLY RH (See page SE-43)
Deuce/Ace Installation Instructions
 HARDWARE KIT: Upper Mounting Plate: 2-7/16" (11mm) X 3.5" bolts 2-7/16" flange nuts 2-2" spacers 2-7/16" trim cap mounting washers 2 - plastic trim caps TOOLS NEEDED: safety glasses wrenches 16mm or 5/8"
Toyota 4RUNNER With/MR Overhead Video
 Toyota 4RUNNER With/MR 2010-10.2 Overhead Video Part Number: 00016-00110; Fit Kit-00110-14, Beige 00016-00120; Fit Kit-00120-14, Gray Accessory Code: ED7 Conflicts: Vehicles without a sunroof Kit Contents:
Installation Instructions
 Installation Instructions Jeep JK 2-Door (2011 Present) Mounting Bracket and Air Line System Kit for ARB On-Board Twin Air Compressor (CKMTA12) Made in the USA Kit Contents: 1 Flat Bracket 1 Formed Bracket
Installation of Auto Meter Cobalt Boost/Vacuum Gauge:
 Installation of Auto Meter Cobalt Boost/Vacuum Gauge: Fitment: All 79-14 models. This installation was completed on a 2004 Mustang GT, and should be identical for all 1999-2004 model Mustangs. Time needed:
Depress each tab as you pull the bezel off. The bezels are tight. L.H. shown.
 2013-2014 Ford Mustang V6 & Boss 302 Lower Valance Fog Light Kit Parts List: Quantity: Tool List: Fog light & bulb with bracket 2 Flat head & Phillips screwdriver Black bezels 2 Ratchet & Socket set OR
Connecting the rear fog light on the A4 Jetta, while keeping the 5 Light Mod
 Connecting the rear fog light on the A4 Jetta, while keeping the 5 Light Mod DISCLAIMER: I'm human and make mistakes. If you spot one in this how to, tell me and I'll fix it This was done on my 99.5 Jetta.
TOYOTA SIENNA XM SATELLITE RADIO Preparation
 Preparation Part Number: Mounting Kit: PT546-08070 Tuner Assy: 86180-0W031 Tuner Assy Kit Contents (86180-0W031) Item # Quantity Reqd. Description 1 1 Tuner Assy, Stereo Component Mounting Kit Contents
LEXUS GS 350/450h ILLUMINATED DOOR SILLS Preparation
 Preparation Part Number: PT922-30120 (GS350) PT922-30130 (GS450h) NOTE: Part number of this accessory may not be the same as the part number shown. Kit Contents Item # Quantity Req'd. Description 1 1 Illuminated
INSTALLATION INSTRUCTIONS FUEL SURGE TANK KIT
 INSTALLATION INSTRUCTIONS FUEL SURGE TANK KIT BMW E46 3-Series, Excl Convertible Document: 19-0056 Support: info@radiumauto.com Relieve fuel pressure in vehicle before beginingthe installation. Disconnect
Installation Instructions
 Installation Instructions Jeep JK Unlimited (2007 Present) Mounting Bracket and Air Line System Kit for ARB On-Board Twin Air Compressor (CKMTA12) Made in the USA Kit Contents: 1 Bracket for ARB Compressor
Peugeot 406 Coupe: Delocking your boot V.1 April 2005
 This is a first stab at a DIY guide to de-locking your 406 Coupe. It isn t a hard modification to do yourself, but you do need to be confident working on your cars electrics and removing and refitting
TOYOTA COROLLA ILLUMINATED DOOR SILLS Preparation
 Preparation Part Number: PT942-02140 Kit Contents Item # Quantity Reqd. Description 1 1 Illuminated Scuff plate, Front Right Hand 2 1 Illuminated Scuff plate, Front Left Hand 3 1 Door Scuff plate, Rear
Roll Bar (MMRB-6.1 to -6.7)
") 3430 Sacramento Dr., Unit D San Luis Obispo, CA 93401 Telephone: 805/544-8748 Fax: 805/544-8645 www.maximummotorsports.com 1994-04 Roll Bar (MMRB-6.1 to -6.7) NOTE: These instructions cover Roll Bars with
3430 Sacramento Dr., Unit D San Luis Obispo, CA 93401 Telephone: 805/544-8748 Fax: 805/544-8645 www.maximummotorsports.com 1994-04 Roll Bar (MMRB-6.1 to -6.7) NOTE: These instructions cover Roll Bars with
REMOVAL IR 11. Slide the inner rear view mirror.
 11 Slide REMOVAL CAUTION: Some of these service operations affect the SRS airbag system. Read the precautionary notices concerning the SRS airbag system before servicing (See page RS-1). 1. DISCONNECT
SCION tc Navigation System Preparation. Part Number: PT
 Preparation Part Number: PT611-21111 Kit Contents Item # Quantity Reqd. Description 1 1 Navigation System 2 1 GPS Antenna 3 1 Bluetooth Antenna 4 1 Wire Harness (Reverse / Park Brake) 5 1 RCA Relay Cable
TOYOTA COROLLA ILLUMINATED DOOR SILLS Preparation
 Preparation Part Number: PT942-02140 Kit Contents Item # Quantity Reqd. Description 1 1 Illuminated Scuff plate, Front Right Hand 2 1 Illuminated Scuff plate, Front Left Hand 3 1 Door Scuff plate, Rear
Please read thoroughly before starting installation and check that kit contents are complete.
 Rear Vision System Mirror Display 2013-Current Ram (Kit part number 1009-9518) Please read thoroughly before starting installation and check that kit contents are complete. Items Included in the Kit: Rear
Ford Racing BOSS 302 Engine Oil Cooler (11-14 GT)
") Tools needed: 14mm hex socket 7mm socket/wrench 8mm socket/wrench Ford Racing BOSS 302 Engine Oil Cooler (11-14 GT) 10mm socket (for airbox removal) ¾ inch or 19mm wrench Torque wrench Appropriate ratchets
Tools needed: 14mm hex socket 7mm socket/wrench 8mm socket/wrench Ford Racing BOSS 302 Engine Oil Cooler (11-14 GT) 10mm socket (for airbox removal) ¾ inch or 19mm wrench Torque wrench Appropriate ratchets
TOYOTA Matrix XM SATELLITE RADIO Preparation
 Preparation Part Number: Mounting Kit PT546-12080 Tuner Assembly 86180-0W031 (Music Only) Tuner Assembly PT546-00090 (Music Plus Data) NOTE: Part number of this accessory may not be the same as the part
TOYOTA VENZA 2009 TRAILER WIRE HARNESS Procedure
 Part Number: PT791-0T099 Kit Contents Item # Quantity Reqd. Description 1 1 Trailer Wire Harness Module 2 1 4-Flat Harness 3 1 Battery Power Wire Harness 4 1 Mounting Bracket, 4-Flat 5 2 Screw #10-24 6
Installing Custom Puddle Lamps 2009 Subaru Forester
 Installing Custom Puddle Lamps 2009 Subaru Forester By John Perkins This guide will assist you in installing a set of LED puddle lamps on a 2009 Subaru Forester. This is NOT using the $150 Subaru kit.
Curt Mfg. Trailer Hitch and Hoppy Wiring Kit Installation Instructions
 Curt Mfg. Trailer Hitch and Hoppy Wiring Kit Installation Instructions The Curt trailer hitch replaces the stock rear cross member in the Touareg. It attaches with 8 bolts just like the factory VW hitch.
REASSEMBLY IR INSTALL ROOF WIRE (a) Apply new double-sided tape to the roof headlining along the markings of the roof headlining.
 Apply new double-sided tape to the roof headlining along the markings of the roof headlining.") 31 REASSEMBLY 1. INSTALL ROOF WE (a) Apply new double-sided tape to the roof headlining along the markings of the roof headlining. Double-sided Tape Marking B130653E01 (b) NOTICE: Apply the tape securely
31 REASSEMBLY 1. INSTALL ROOF WE (a) Apply new double-sided tape to the roof headlining along the markings of the roof headlining. Double-sided Tape Marking B130653E01 (b) NOTICE: Apply the tape securely
SlamPak SLPK-CAN-SPYDER1 SKU#94491& I n s t a l l a t i o n G u i d e for the
 SlamPak I n s t a l l a t i o n G u i d e for the SLPK-CAN-SPYDER1 SKU#94491& 94490 If you choose to perform the installation yourself, it is absolutely vital that the Stealthbox be properly mounted to
Ford Mustang V6 OEM-Style Fog Light Kit Parts List: Quantity: Tool List:
 2015-2017 Ford Mustang V6 OEM-Style Fog Light Kit Parts List: Quantity: Tool List: LED Foglights/ Bezels 2 Flat head & Phillips screwdriver (if you ordered part#3600) Ratchet & Socket set OR Wiring harness
INSTALLATION INSTRUCTIONS
 INSTALLATION INSTRUCTIONS Accessory Application Publications No. AII 32459-34084 XM RADIO SYSTEM 2007 RIDGELINE Issue Date NOV 2006 PARTS LIST 4 Washer-screws, 5 x 8 mm Attachment Kit: P/N 08B15-SJC-100A
I want to try my hand here at doing a TacoBill write up so here it goes.
 Here is part 3 of my tutorial for the conversion of my Shaker 1000 to the Kenwood DNX7100 Navigation / Head Unit. With the 7100, my new system will include the Kenwood I-pod Adapter (P.I.E. KNW/USB-AV),
SCION im PREMIUM AUDIO Preparation
 SCION im 2016 - PREMIUM AU Preparation Part Number: PT296-12160 (Extension Module w/ AHA) Kit Contents Item # Quantity Reqd. Description 1 1 Extension Module 2 1 BT cable 3 1 DA/Ext Harness 4 1 GPS Antenna
LEXUS CT 200h ILLUMINATED DOOR SILLS Preparation
 Preparation Part Number: PT922-89100 Kit Contents Item # Quantity Req'd. Description 1 1 Door Sill, Front Right Hand 2 1 Door Sill, Front Left Hand 3 1 Door Sill, Rear Right Hand 4 1 Door Sill, Rear Left
INSTALLATION INSTRUCTIONS
 INSTALLATION INSTRUCTIONS Accessory Application Publications No. AII 26042-26353 XM INTERFACE ODYSSEY EXCEPT EX-L WITH NAVI/RES Issue Date FEB 2004 PARTS LIST 8 Wire ties XM Radio Attachment P/N 08B15-S0X-100
INSTALLATION INSTRUCTIONS
 INSTALLATION INSTRUCTIONS Accessory S Application 2011 PILOT Publications No. AII 43298 Issue Date MARCH 2010 PARTS LIST Back-up Sensor Attachment Kit P/N 08V67-SZA-100A Back-up sensor harness Fuse label
Mustang Radiator Conversion DIY. By GearHeadPeter. January 27, 2011
 1964-1966 Mustang Radiator Conversion DIY By GearHeadPeter January 27, 2011 We all know that the radiators in our cars are not the best, especially if you have done any customization to the engine, which
TOYOTA VENZA 2009 TRAILER WIRE HARNESS Procedure
 Part Number: PT791-0T099 Kit Contents Item # Quantity Reqd. Description 1 1 Trailer Wire Harness Module 2 1 4-Flat Harness 3 1 Battery Power Wire Harness 4 1 Mounting Bracket, 4-Flat 5 2 Screw #10-24 6
STEPS FOR REMOVING REAR ASHTRAY & CUP HOLDER, CENTER ARMREST, E- BRAKE CONSOLE, FRONT ASHTRAY, LOWER CENTER CONSOLE AND GLOVE BOX
 Please give credit where credit is due! This DIY was completed ENTIRELY by the hardest working VW Vortex moderator on the site!! Gary Thompson, Ph.D. - vortex ID VGRT6, email address vgrt6@yahoo.com. Please
Sunroof Repair. Sunroof Repair TSB. The sunroof repair kit available for the J30 is part number Y20. See images at bottom of document.
 Sunroof Repair This document is the text/images from the TSB (technical service bulletin) issued by Infiniti concerning the repair procedure for sunroof issues. Be advised that this is a LARGE, TIME-CONSUMING
TOYOTA Yaris Hatchback EC REARVIEW MIRROR Preparation
 Preparation Part Number: PT374-02090 Kit Contents Item # Quantity Reqd. Description 1 1 Auto Dimming Mirror Assembly w/ shift area light 2 1 Hardware bag Hardware Bag Contents Item # Quantity Reqd. Description
TOOLS REQUIRED: Panel Removal Tool Phillips Screwdriver 10mm Nut Driver Ratchet 10mm Socket 7mm Wrench 7mm Nut Driver Straight Screwdriver
 CONTENTS: 1EA. FIVE CHANNEL AMPLIFIER/BRACKET ASSEMBLY P/N MPDSP039AA 1EA. OVERLAY HARNESS P/N RH41LX10 3EA. 7MM SCREWS P/N RF7MM 6EA. WIRE TIE P/N RFZIP6 1EA. 30 AMP FUSE P/N RFUSE30 1EA. INSTRUCTIONS
TOYOTA SIENNA TRAILER WIRE HARNESS Preparation
 Preparation Part Number: PT791-08150 (non-se) PT791-08102 (SE only) Kit Contents Item # Quantity Reqd. Description 1 1 Trailer Module Harness 2 1 4-Flat Harness 3 1 Battery Power Wire Harness 4 1 Mounting
INSTALLATION INSTRUCTIONS
 INSTALLATION INSTRUCTIONS Document# 19-0038 2004+ Lotus Elise (Series 2) Rear Clamshell Removal Kit Safely support the vehicle. This is a two-person job. Allow 1 to 2 hours for initial disassembly. Have
INSTALLATION INSTRUCTIONS
 INSTALLATION INSTRUCTIONS Accessory Application Publications No. XM RADIO SYSTEM 2009 RIDGELINE AII 40319 Issue Date AUG 2008 PARTS LIST 4 Washer-screws, 5 x 8 mm Attachment Kit: P/N 08B15-SJC-100A 2 XM
PDC RETROFIT INSTALLATION By Kevin
 1 PDC RETROFIT INSTALLATION By Kevin Kshek369@hotmail.com 1 These instructions are intended to help those who chose to do this retrofit by showing you what you are in store for and to give you some instructions
SEAT BELT WARNING SYSTEM
 WARNING SYSTEM LOCATION WARNING SYSTEM 611 6105001 Combination Meter (Driver s Seat Belt Warning Lamp) Clock Assy (Passenger s Seat Belt Warning Lamp) Seat Belt Warning Sensor Front Seat Inner Belt Assy
TOYOTA VENZA HANDS FREE BLU LOGIC Preparation
 TOYOTA VENZA 2009- HANDS FREE BLU LOGIC Preparation Part #: PT923-00111 Conflicts: JBL Audio NOTE: Part number of this accessory may not be the same as the part number shown. Kit Contents: For kits manufactured
Part Number: PT
 Preparation Part Number: PT374-02090 Kit Contents Item # Quantity Reqd. Description 1 1 Auto Dimming Mirror Assembly w/ shift area light 2 1 Hardware bag Hardware Bag Contents Item # Quantity Reqd. Description
Drag Race Roll Bar (MMRB-6, -7)
") 3430 Sacramento Dr., Unit D San Luis Obispo, CA 93401 Telephone: 805/544-8748 Fax: 805/544-8645 www.maximummotorsports.com 1994-04 Drag Race Roll Bar (MMRB-6, -7) The Maximum Motorsports 6-point Drag Race
3430 Sacramento Dr., Unit D San Luis Obispo, CA 93401 Telephone: 805/544-8748 Fax: 805/544-8645 www.maximummotorsports.com 1994-04 Drag Race Roll Bar (MMRB-6, -7) The Maximum Motorsports 6-point Drag Race
INSTALLATION INSTRUCTIONS
 INSTALLATION INSTRUCTIONS Accessory Application Publications No. AII 26031 2004 ODYSSEY Issue Date AUG 2003 NOTE: You cannot install the subwoofer in a vehicle equipped with both an under seat Navigation
PRELIMINARY INSTALLATION INSTRUCTIONS. PARTS LIST Attachment Kit(sold separately): P/N 08B23-S9V-100B. Display bracket.
: P/N 08B23-S9V-100B. Display bracket.") INSTALLATION INSTRUCTIONS Accessory Application Publications No. in- ENTERTAINMENT SYSTEM 2006 PILOT All 30502 Issue Date SEP 2005 PARTS LIST Attachment Kit(sold separately): P/N 08B23-S9V-100B Display
INSTALLATION INSTRUCTIONS Accessory Application Publications No. in- ENTERTAINMENT SYSTEM 2006 PILOT All 30502 Issue Date SEP 2005 PARTS LIST Attachment Kit(sold separately): P/N 08B23-S9V-100B Display
INSTALLATION INSTRUCTIONS
 INSTALLATION INSTRUCTIONS Accessory XM RADIO SYSTEM Application 2009 CIVIC 2-AND 4-DOOR (Si) Publications No. AII 40186 Issue Date AUG 2008 PARTS LIST XM Radio Attachment (sold separately): P/N 08B15-SNA-100B
INSTALLATION INSTRUCTIONS
 INSTALLATION INSTRUCTIONS Accessory Application Publications No. BII 31129 REARVIEW CAMERA 2006 RL Issue Date OCT 2005 PARTS LIST Attachment Kit P/N: 08B21-SJA-B00 Template Rear camera trim 6-Pin connector
TOYOTA CAMRY HANDS FREE BLU LOGIC Preparation
 TOYOTA CAMRY 2008- HANDS FREE BLU LOGIC Preparation Part #: PT923-00111 Conflicts: JBL Audio, Factory Navigation NOTE: Part number of this accessory may not be the same as the part number shown. Kit Contents:
INSTALLATION INSTRUCTIONS
 INSTALLATION INSTRUCTIONS [1] Description: Tow Hitch Wire Harness Kit [2] Application: Nissan Rogue Note: Tow Harness application is limited to specific vehicle option packages that include tow harness
INSTALLATION INSTRUCTIONS
 INSTALLATION INSTRUCTIONS Accessory Application Publications No. REAR VIEW CAMERA ATTACHMENT PILOT AII 23620 Issue Date MAY 2002 PARTS LIST Attachment Kit : P/N 08B21-S9V-100 Control unit harness Rear
TOYOTA im NAVIGATION UPGRADE Preparation
 Preparation Part Number: PT296-00170 PT296-12170 (Extension Module w/ AHA) Kit Contents Item # Quantity Reqd. Description 1 1 Extension Module 2 1 BT cable 3 1 DA/Ext Harness 4 1 GPS Antenna kit 5 6 Bolt
INSTALLATION INSTRUCTIONS
 Rear Vision System Aftermarket and Factory 5.0, 8.4 and 6.1 MyGig Touch Screen Display (Factory Display requires Chrysler/Dodge dealer to activate) 2009 Current* Dodge Ram (Kit part number 1009-6503) *NOTE:
REPLACEMENT. HINT: The installation procedures are the removal procedures in reverse order.
 REPLACEMENT The installation procedures are the removal procedures in reverse order. 7615 7610301 1. REMOVE FRONT DOOR SCUFF PLATE RH (a) Using a screwdriver, disengage the 2 claws and 3 clips, and remove
INSTALLATION INSTRUCTIONS
 INSTALLATION INSTRUCTIONS Accessory S Application 2010 ODYSSEY Publications No. AII 41818 Issue Date JUNE 2009 PARTS LIST Right center sensor clip (Black) Backup Sensor Attachment Kit P/N 08V67-SHJ-101C
General Applicability Note: Recommended Tools. Personal & Vehicle Protection Safety Goggles Seat Covers Floor Covers Special Tools. Installation Tools
 TOYOTA HIGHLANDER/HIGHLANDER HV 2008- Preparation Part #: PT923-00111 Conflicts: JBL Audio, Factory Navigation NOTE: Part number of this accessory may not be the same as the part number shown. Kit Contents:
Z1 Motorsports 370Z/G37 Oil Cooler Kit Installation Manual
 Z1 Motorsports 2877 Carrollton Villa Rica Hwy Carrollton GA 30116 770.838.7777 Z1 Motorsports 370Z/G37 Oil Cooler Kit Installation Manual For 19, 25 and 34 Row Oil Cooler Kits Parts Included: 1 SETRAB
C4 Sound Deadening & Insulation Kit Interior Removal & Installation Instructions
 C4 Sound Deadening & Insulation Kit Interior Removal & Installation Instructions Ok, let's start with taking the radio bezel dash area off first. Here is what the OEM radio looks like, and the points you
INSTALLATION INSTRUCTIONS INFINITI CELLPORT UNIVERSAL HANDS FREE SYSTEM
 INSTALLATION INSTRUCTIONS 1. DESCRIPTION: INFINITI CELLPORT UNIVERSAL HANDS FREE SYSTEM 2. APPLICATION: 2002 Q45 3. PART NUMBER: 948T3CELLR95 (VPC) or 999Q2TN000 (PDC) 4. TOOLS REQUIRED: a. Loctite 242
991 ROLL BAR INSTALLATION:
 991 ROLL BAR INSTALLATION: We highly recommend CMS roll bars be fitted by shops with experience in installing roll bars. 1. Move power seats to a location where the four bolts can be removed and remove
Remove the 3-11mm nuts holding mirror on. Don t drop the nuts!
 2005-2012 Ford Mustang Puddle Lamp Kit Parts List: Quantity: Tool List: LED Lamps 2 Flat head screwdriver Seals 2 Ratchet & Socket set OR Nuts 2 Adjustable Wrench Wiring harness 1 Drill & 11/16 th bit
Genuine Corvette Accessories Carbon Fiber Radio Surround Installation Instructions for Corvettes.
 Genuine Corvette Accessories Carbon Fiber Radio Surround Installation Instructions for 2005-2007 Corvettes. Difficulty: 3 out of 5. Time: Plan on about 1 hour. The tools used are: A small flashlight A
SCION tc PREMIUM AUDIO Preparation. Part Number: PT (Extension Module w/ AHA)
") Preparation Part Number: PT296-12160 Kit Contents Item # Quantity Reqd. Description 1 1 Extension Module 2 1 BT cable 3 1 DA/Ext Harness 4 1 GPS Antenna kit 5 6 Bolt (M5x8) 6 5 Wire tie (10 ) Hardware
Preparation Part Number: PT296-12160 Kit Contents Item # Quantity Reqd. Description 1 1 Extension Module 2 1 BT cable 3 1 DA/Ext Harness 4 1 GPS Antenna kit 5 6 Bolt (M5x8) 6 5 Wire tie (10 ) Hardware
INSTALLATION INSTRUCTIONS
 INSTALLATION INSTRUCTIONS FUEL SURGE TANK INSTALLATION KIT 1999-2006 BMW E46 COUPE Document# 19-0056 Support: info@radiumauto.com Note: This kit was designed for a standard single pump Radium Engineering
INSTALLATION INSTRUCTIONS
 INSTALLATION INSTRUCTIONS Accessory Application Publications No. AII 27363 ODYSSEY Issue Date SEP 2004 PARTS LIST Compact Subwoofer Kit: P/N 08A39-5E1-010 4 Flange bolt, 6 x 12 mm Subwoofer 3 Cushion tapes
(2) #10 Washers (1) ¼ Washers (6) 5/16 Washers (2) Locknuts (2) 5/16 Locknuts
 #10 Washers (1) ¼ Washers (6) 5/16 Washers (2) Locknuts (2) 5/16 Locknuts") INSTALLATION INSTRUCTIONS TJ Speaker / Storage Security Console #066 Please read and fill out the enclosed warranty registration card to activate your warranty. SHIPMENT CONTENTS Console Front Shift Lever
INSTALLATION INSTRUCTIONS TJ Speaker / Storage Security Console #066 Please read and fill out the enclosed warranty registration card to activate your warranty. SHIPMENT CONTENTS Console Front Shift Lever
INSTALLATION INSTRUCTIONS
 INSTALLATION INSTRUCTIONS Accessory Application Publications No. SYSTEM ACCORD 2-DOOR (LX/EX L4, LX V6) AII 25749 Issue Date FEB 2004 PARTS LIST Double-sided adhesive tape XM Radio Attachment Kit : P/N
GENUINE Interior Lighting Kit
 GENUINE Interior Lighting Kit INSTALLATION INSTRUCTIONS Thank you for purchasing a genuine Mazda accessory. Before removal and installation, be sure to thoroughly read these instructions. Please read the
Conf licts Note: TOYOTA Tacoma 2016 LED Illumination Package (Interior and Exterior) Part Number: Accessory Code: LL1000.
 Part Number: Accessory Code: LL1000.") TOYOTA Tacoma 2016 LED Illumination Package (Interior and Exterior) Part Number: 00016-00069 Accessory Code: LL1000 Conf licts Note: Color Applicability/Trim Level Kit Contents Item # Quantity R eqd. Description
TOYOTA Tacoma 2016 LED Illumination Package (Interior and Exterior) Part Number: 00016-00069 Accessory Code: LL1000 Conf licts Note: Color Applicability/Trim Level Kit Contents Item # Quantity R eqd. Description
PART NUMBER: H630SSJ000. Kit Contents: A. Amplifier with Bracket (1) D. Badge (2) with push nuts (4)
 D. Badge (2) with push nuts (4)") Kit Contents: A. Amplifier with Bracket (1) D. Badge (2) with push nuts (4) E. Clip B. Harness (1) C. Cable tie (8) F. Mounting Hardware (2) G. Replacement Speaker (2) H. HVAC Duct extension (2) IMPORTANT:
Kit Contents: A. Amplifier with Bracket (1) D. Badge (2) with push nuts (4) E. Clip B. Harness (1) C. Cable tie (8) F. Mounting Hardware (2) G. Replacement Speaker (2) H. HVAC Duct extension (2) IMPORTANT:
(1) Remote Control with (2) AAA Batteries
 Remote Control with (2) AAA Batteries") TOOLS REQUIRED: KIT CONTENTS: E14 Torx (1) Remote Control with (2) AAA Batteries (2) Wireless Headphones with (4) AAA Batteries (2) DVD Headrest Units Owner s Manual (1) Owner s Manual (1) Power / Audio
TOOLS REQUIRED: KIT CONTENTS: E14 Torx (1) Remote Control with (2) AAA Batteries (2) Wireless Headphones with (4) AAA Batteries (2) DVD Headrest Units Owner s Manual (1) Owner s Manual (1) Power / Audio
TOYOTA TACOMA INTERFACE KIT FOR IPOD Preparation
 Preparation Part Number: PT545-00082 Kit Contents Item # Quantity Reqd. Description 1 1 Unit Assembly Kit 2 1 Mounting Kit 3 1 Hardware Bags 4 1 Unit and Fit Kit List 5 1 Owner s Manual Unit Assembly Kit
BODY-24, Late Model 944 ( and Newer) Dash Replacement
 Dash Replacement") BODY-24, Late Model 944 (1985.5 and Newer) Dash Replacement Introduction Replacing the dash in a late model 944 is not overly difficult. However, it is very tedious and a lot of patience is required. It's
BODY-24, Late Model 944 (1985.5 and Newer) Dash Replacement Introduction Replacing the dash in a late model 944 is not overly difficult. However, it is very tedious and a lot of patience is required. It's
TOYOTA HIGHLANDER 2016 ON BOARD VACUUM CLEANER
 2016 Part Numbers: 00016-48017- (01, 02, 04) Accessory Code: SV1000 NOTE: Will not work in Highlander HV Kit Contents Item # Quantity Reqd. Description 1 1 Vacuum Assembly 2 1 Hose Assembly 3 1 Tool Kit
We will be upgrading from the factory, paper-cone disgrace to an Infinity Kappa 62.9i:
 In order to fully round out your stereo upgrade, the factory rear speakers must go. This is another easy job to tackle, but the fitment of the package tray and being hunched over in the rear glass area
Installation Instructions and Suggestions For Jeep YJ Fiberglass Replacement Bodies
 Installation Instructions and Suggestions For Jeep YJ Fiberglass Replacement Bodies Getting started with the removal of your existing Jeep body. Trust nothing to memory; take photos of everything at different