(2) #10 Washers (1) ¼ Washers (6) 5/16 Washers (2) Locknuts (2) 5/16 Locknuts
|
|
|
- Emory Rice
- 5 years ago
- Views:
Transcription


 #10 Washers (1) ¼ Washers (6) 5/16 Washers (2) 10-32 Locknuts (2) 5/16")
 8 x 1 ¼ Phillips Screws (4) 1/4 x ¾ Tapping Screws (1) ¼ x 2 ¼")

 3/8 wrench or ratchet, socket, and extension (1) 3/8 socket bit for drill")
 (1) 5/16 Wrench")
1 INSTALLATION INSTRUCTIONS TJ Speaker / Storage Security Console #066 Please read and fill out the enclosed warranty registration card to activate your warranty. SHIPMENT CONTENTS Console Front Shift Lever Console Rear Mounting Bracket Shipping Package For office use only Shipping package Lock Latch Mounting bracket Padded cushion Neoprene Seal Package Drink holder 9D Drink fingers Brush Guard Conset Warranty Card Assembly Instructions Keys Checked by (2) #10 Washers (1) ¼ Washers (6) 5/16 Washers (2) Locknuts (2) 5/16 Locknuts (4) 6-32 x 3/8 Screws (2) 10-32x1/2 Screws (3) 8 x 5/8 Phillips Screws (2) 8 x 1 ¼ Phillips Screws (4) 1/4 x ¾ Tapping Screws (1) ¼ x 2 ¼ Tapping Screw (2) ¼-20 x ½ Screws (2) 5/16-18 x ½ Bolts (2) 5/16-18 X 1 ¼ Bolts Front Mounting Bracket Shift Boot Plate Front Console Tray Neoprene seal Tools Needed (1) ½ wrench or ratchet, socket, and extension (1) ½ wrench (1) 3/8 wrench or ratchet, socket, and extension (1) 3/8 socket bit for drill (Used to insert Tapping screws, OPTION: Hole can be predrilled and the bolt could be fastened using a wrench, or socket and ratchet) (1) 5/16 Wrench Phillips head screwdriver 3/8 drill bit Electric drill Silicone sealant (not necessary but recommended)
2 Installation 1. Please read all instructions before starting installation. 2. It is recommended to use silicone sealant on any mounting points to the vehicle body to prevent future rust problems. 3. Removing one or both of the seats will make installation easier. REMOVING THE ORIGINAL FACTORY CONSOLE Vehicles already equipped with a factory speaker console 4. Remove the (4) self-tapping screws from the factory console. Two are located inside the rear drink holder under the rubber liner, one is located inside the front drink holder under the rubber insert, and one is under the gear shift boot on vehicles with a manual transmission or it is under the shifter plate on vehicles with an automatic transmission (shift boot or plate can be removed by gently pulling the plastic base up out of its mounting hole). Save these screw because you may reuse some of them. 5. Remove the factory console with the speaker box and the front shifter console. 6. Remove the (5) screws holding the speaker box to the factory console. Two are located inside the console, and three are located on the side. 7. In vehicles equipped with the air bag switch it can be removed without disconnecting wires. To do this push or pull the faceplate 8. Remove the (2) star washers holding the speaker box to the factory console. 9. Separate the factory console and the speaker box. Vehicles equipped with a full factory console without the speaker. 10. Remove the (6) self-tapping screws from the factory console. Two are located inside the console, two are on the passenger s side along the bottom, one is in the front cup holder, and one is under the gear shift boot (shift boot can be removed by gently pulling the plastic base up out of its mounting hole). Save these screw because you may reuse some of them. 11. In vehicles equipped with the air bag switch it can be removed without disconnecting wires. To do this push or pull the faceplate Vehicles not equipped with a factory console only the front shifter console. 12. Remove the rubber emergency brake cover. 13. Remove the screw in the cup holder, and one under the gear shift boot (shift boot can be removed by gently pulling the plastic base up out of its mounting hole). Save these screw because you may reuse some of them. 14. In vehicles equipped with the air bag switch it can be removed without disconnecting wires. To do this push or pull the faceplate 15. Apply the rubber seal to the underside of the lid. (SEE FIGURE 1) 16. Install the front shift lever console over the 4WD shifter. Moving the levers into different locations may make installation easier. Be sure emergency brake is on. Be careful not to rip the gearshift boot, tear the seats, or scratch the dash. If the vehicle is equipped with the air bag switch (In 2003 TJ s the tray from the original console should be used here) 17. The switch can be installed without disconnecting any wires. To do this, maneuver the air bag switch faceplate up from the bottom through the opening in the console then snap it into place. INSTALLING THE SPEAKER IN THE TUFFY CONSOLE Follow these steps if you are installing a non-factory speaker in the Tuffy console 18. Fasten the Tuffy rear mounting bracket through holes 2 and 5 (SEE FIGURE 2) to the original consoles (2) rear mounting holes in the floor, using (2) ¼ X ¾ Tapping screws. If holes (2 AND 5 IN FIGURE 2) are not already in the floor follow these instructions 1. Using (2) 5/16 x ½ bolts mount the rear mounting bracket to the console through holes 9 and 10 (SEE FIGURE 3) 2. Place the Tuffy console in the vehicle being careful not to tear the seats. Line up holes 7 and 12 (SEE FIGURE 3) in the console with the existing mounting holes in the vehicle floor. Make sure the Tuffy console is centered between the seats and flush against the front shifter console. 3. Install the ¼ x ¾ Tapping screws through holes 2 and 5 (SEE FIGURE 2) and into the floor of the vehicle. 4. Remove the (2) 5/16 x ½ bolts and take out the console. (HOLES 9 AND 10 IN FIGURE 3)
3 19. Attach the new rear drink holder to the Tuffy console using (2) x ½ screws, (2) #10 washers, and (2) locknuts. (Continued) Follow these steps if you are installing a non-factory speaker in the Tuffy console Warning! Make sure that there is nothing under the vehicle that will be damaged by the drill bit when drilling, the emergency brake is close to the drilling location. 20. Mark the floor at the spots corresponding with holes 1 and 4 (SEE FIGURE 2) and drill out to size 3/8. Be sure to inspect under the vehicle to ensure nothing was damaged by the drill bit. 21. Fasten down the rear mounting bracket with (2) 5/16 x 1 ¼ Bolts, (4) 5/16 Washers, and (2) 5/16 Locknuts. Push the bolts up from under the vehicle through holes 1 and 4 (SEE FIGURE 2). 22. Run the wires and install the speaker in the console. (Consult speaker owners manual for wire connections) 23. Place the Tuffy console in the vehicle being careful not to tear the seats Follow these steps if you are installing the factory speaker (sub-woofer) in the Tuffy Console 24. Attach the new rear drink holder to the Tuffy console using (2) x ½ screws, (2) #10 washers, and (2) locknuts. 25. Mount the new rear-mounting bracket to the speaker box. To do this remove the screws holding the original rear bracket to the speaker box, place the new mounting bracket between the speaker box and the original rear bracket and fasten with the original hardware. (Be sure to reuse the original rear bracket in conjunction with the new rear mounting bracket) (See Figure 2) 26. Place the speaker box with the mounting bracket in the vehicle and line holes 2 and 5 (SEE FIGURE 2) up with the original (2) rear mounting holes. Using (2) ¼ X ¾ self-tapping screws fasten down the rear brackets to the original mounting holes. DO NOT TIGHTEN ALL THE WAY ONLY START THE SCREWS. If these holes (2 AND 5 IN FIGURE 2) are not already in the floor perform the next step to locate the front of the speaker box. Center the speaker box between the seats then come back to this step making new holes with the tapping screws. 27. Using the front mounting bracket, line hole 7 (SEE FIGURE 2) up with the original front mounting hole, (You may want to temporarily use a screw in this hole to maintain the brackets position during this step) Fasten down the front of the speaker box through hole 8 (SEE FIGURE 2) using a ¼ x ¾ tapping screw and ¼ washer. 28. Tighten screws in holes 2 and 5 (SEE FIGURE 2) from previous step. 29. Place the Tuffy console over the top of the speaker box being careful not to tear the seats. Check the alignment for the mounting holes 7, 9, 10, and 12 (SEE FIGURE 3). Adjust speaker box location if necessary. Warning! Make sure that there is nothing under the vehicle that will be damaged by the drill bit when drilling, the emergency brake is close to the drilling location. 30. Remove console. Mark the floor at the spots corresponding with holes 1 and 4 (SEE FIGURE 2) and drill out to size 3/8. Be sure to inspect under the vehicle to ensure nothing was damaged by the drill bit. 31. Using (2) 5/16 x 1 ¼ Bolts, (4) 5/16 Washers, and (2) 5/16 Locknuts, push the bolts up from under the vehicle through Holes 1 and 4 (SEE FIGURE 2) fasten down the rear mounting bracket. 32. Install the Tuffy console over the top of the speaker box being careful not to tear the seats. 33. Fasten the Tuffy console to the speaker box using (2) 8 x 1 ¼ Panhead Phillips screws (HOLE 13 AND 14, SEE FIGURE 3) and (3) 8 x 5/8 Panhead Philips screws. (HOLES 15, 16, AND 17, SEE FIGURE 3) 34. Attach the front shift lever console to the drink holder using (2) 1/4-20x1/2 Phillips pan head screws. (SEE FIGURE 4) 35. Bolt the Tuffy console to the new mounting bracket using (2) 5/16 x ½ Bolts and washers. (HOLE 9 AND 10, SEE FIGURE 3) A small screwdriver may need to be used to maneuver the mounting bracket in order to line up the mounting holes. 36. Insert the ¼-20 x 2 ¼ self-tapping screw in the mounting hole in the bottom of the drink holder and through the hole in the front mounting bracket (HOLE 7 IN FIGURE 2 AND 3). 37. Reinstall the original screw or use a ¼ x ¾ Tapping screw in the front shifter console under the shift boot and insert the shift boot back into its original position. (HOLE 12, SEE FIGURE 3) 38. Reinstall shift boot cover. If the vehicle has an automatic transmission the shift plate should be installed by pushing the ears on the plate through the corresponding slots in the console then sliding it toward the rear of the vehicle to hold it in place. To secure the shift boot do the following applicable steps. If the vehicle is equipped with the air bag switch (In 2003 TJ s the tray from the original console should be used here) 39. Attach the shift boot plate to the console using (2) 6-32 x 3/8 screws (SEE FIGURE 5). Position the shift boot plate flush against shift boot so it holds the shift boot tightly. If the vehicle is not equipped with the air bag switch 40. Attach the front console tray using (4) 6-32 x 3/8 screws (SEE FIGURE 6). Position the tray flush against the shift boot so it holds the shift boot tightly. 41. Check the emergency brake operation. Check lock operation. The rubber seal will need to be compressed initially and will wearin with time.


4 ATTENTION: FREQUENT LUBRICATION IS NECESSARY ON THE LOCKING SYSTEM The pushbutton lock contains an O ring seal to protect the interior from dust and water. If this mechanism is not lubricated regularly it will become difficult to operate and it may not return to its home position preventing the key from operating the lock. If this happens simply pull up on the pushbutton to manually bring it back to its home position. Lubricate the pushbutton with a light lubricant such as silicone spray. The pushbutton may have to be periodically disassembled and cleaned.


5 For technical support call
(2) #10 Washers (6) 5/16 Narrow Washers (2) Locknuts (2) 5/16 Locknuts
 #10 Washers (6) 5/16 Narrow Washers (2) Locknuts (2) 5/16 Locknuts") INSTALLATION INSTRUCTIONS TJ Speaker / Storage Security Console #066 Please read and fill out the enclosed warranty registration card to activate your warranty. SHIPMENT CONTENTS Console Front Shift Lever
INSTALLATION INSTRUCTIONS TJ Speaker / Storage Security Console #066 Please read and fill out the enclosed warranty registration card to activate your warranty. SHIPMENT CONTENTS Console Front Shift Lever
INSTALLATION INSTRUCTIONS JEEP 2011-UP JK SECURITY FULL CONSOLE #274
 INSTALLATION INSTRUCTIONS JEEP 2011-UP JK SECURITY FULL CONSOLE #274 PARTS CHECKLIST Tuffy Console #9 Left Front Mounting Bracket #10 Right Front Mounting Bracket #11 Electronics mounting bracket #12 Divider
Enclosure Drawer #8 (2) Mounting Brackets. # / (L&R) Front Mounting Brackets # / (L&R) Rear Mounting Brackets
 Mounting Brackets. # / (L&R) Front Mounting Brackets # / (L&R) Rear Mounting Brackets") INSTALLATION INSTRUCTIONS Part # 188 Ford Escape Hybrid Rear Cargo Drawer Mounting Kit (This kit is designed to mount on the rear cargo drawer sold separately) Please read and fill out the enclosed warranty
INSTALLATION INSTRUCTIONS Part # 188 Ford Escape Hybrid Rear Cargo Drawer Mounting Kit (This kit is designed to mount on the rear cargo drawer sold separately) Please read and fill out the enclosed warranty
INSTALLATION INSTRUCTIONS DRAWERS #240
 INSTALLATION INSTRUCTIONS DRAWERS #240 Please read and fill out the enclosed warranty registration card to activate your warranty. SHIPMENT CONTENTS #1 Lid #2 Rear #3 Left side panel #4 Right side panel
INSTALLATION INSTRUCTIONS C-VS-2000-DUR-1 20 VEHICLE SPECIFIC CONSOLE for 2018 Dodge Durango with Standard Shifter
 INSTALLATION INSTRUCTIONS C-VS-2000-DUR-1 20 VEHICLE SPECIFIC CONSOLE for 2018 Dodge Durango with Standard Shifter TOOLS REQUIRED: Phillips Screw Driver T-20 Torx bit Standard Socket set 9/64 Allen wrench
TJ 231/241 CABLE SHIFTER
 KIT CONSISTS OF: # Qty Part No. Description P.O. Box 247, 4320 Aerotech Center Way PAGE 1 OF 10 Page Rev. Date: 08-29-16 1 1 300474 WASHER-RUBBER YOKE SEAL 32 SPLINE 2 1 300476 NUT- 7/8"-20 FLANGE LOCKNUT
Toyota Prius Interior Light Upgrade
 Toyota Prius 2012- Interior Light Upgrade Part Number 00016-00095 Accesory Code: IL2 Conflicts Kit Contents Item # Quantity Reqd. Description 1 1 Y Adapter 2 1 Wire harness 3 1 Hardware Kit 4 2 White Light
INSTALLATION INSTRUCTIONS Single Compartment Overhead Console #103
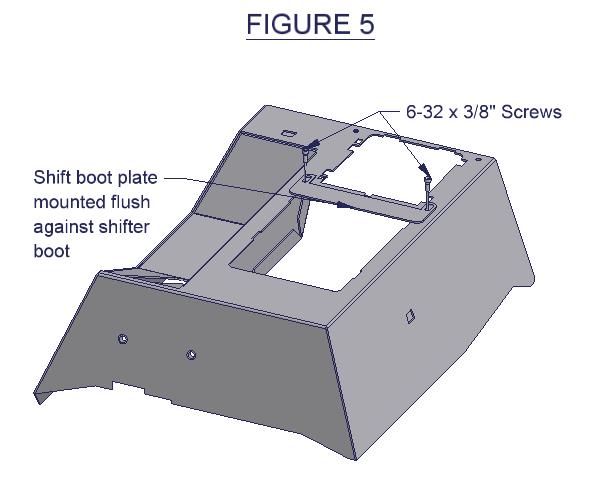
 INSTALLATION INSTRUCTIONS Single Compartment Overhead Console #103 Please read and fill out the enclosed warranty registration card to activate your warranty. Shipment Contents 103 Loop Bracket Footman
INSTALLATION INSTRUCTIONS JK DECK ENCLOSURE #326 (2 & 4 Door)
") SHIPMENT CONTENTS INSTALLATION INSTRUCTIONS JK 2011+ DECK ENCLOSURE #326 (2 & 4 Door) Please read and fill out the enclosed warranty registration card to activate your warranty. #3 Lid #7 Front Panel #4
SHIPMENT CONTENTS INSTALLATION INSTRUCTIONS JK 2011+ DECK ENCLOSURE #326 (2 & 4 Door) Please read and fill out the enclosed warranty registration card to activate your warranty. #3 Lid #7 Front Panel #4
TOYOTA AVALON INTERIOR LIGHT UPGRADE Section TOYOTA II - Installation AVALON Procedures
 TOYOTA AVALON 2005 - INTERIOR LIGHT UPGRADE Section TOYOTA II - Installation AVALON Procedures 2007 Base Toyota Illumination Kit Part Number: 00016-00060 Accessory Code: IL1 Kit Contents Item # Quantity
ADVANCE ADAPTERS INC. P/N: TJ 231/241 CABLE SHIFTER
 Paso Robles, CA 93447 PAGE 1 of 10 Telephone: (800) 350-2223 Fax: (805) 238-4201 Page Rev. Date: 09-25-15 KIT CONSISTS OF: # Qty Part No. Description 1 1 300474 WASHER-RUBBER YOKE SEAL 32 SPLINE 2 1 300476
Conflicts. Toyota Avalon Interior Light Upgrade. Part Number Accesory Code: IL2. Color Applicability/Trim Level.
 Toyota Avalon 2011 - Interior Light Upgrade Part Number 00016-00095 Accesory Code: IL2 Conflicts Kit Contents Item # Quantity Reqd. Description 1 1 Y Adapter 2 1 Wire harness 3 1 Hardware Kit 4 2 White
YZ-PSSB10 Yamaha YXZ 1000 R Behind Seat 10 Subwoofer Enclosure
 SSV WORKS, 201 N. Rice Ave Unit A, Oxnard, CA 93030 www.ssvworks.com Phone: 818-991-1778 Fax: 866-293-6751 Yamaha YXZ 1000 R Behind Seat 10 Subwoofer Enclosure WARRANTY INFORMATION: All SSV Works enclosures
Installation Manual TWM Performance Short Shift Kit Stage 1 and Stage 2 MazdaSpeed 6
 Page 1 Installation Manual TWM Performance Short Shift Kit Stage 1 and Stage 2 MazdaSpeed 6 Please Note: It is preferable to park on a flat surface, as you will have to engage and disengage the hand brake
ADVANCE ADAPTERS INC. P/N:
 Paso Robles, CA 93447 PAGE 1 of 6 KIT CONSISTS OF: Qty Part No. Description 1 303303 SHIFTER BODY BARREL RETAINER 11 303311 HEAT SHIELD-FIREPROOF SLEEVE 1/2" 2 303312 BUSHING- IGUS 3/8" 2 303313 HEIM JOINT-
Subaru 5-Speed Double Adjustable Short Throw Shifter
 Subaru 5-Speed Double Adjustable Short Throw Shifter 1999+ Subaru Impreza 5-Speed 2004-2005 Subaru Forester XT 5-Speed Congratulations on your purchase of the COBB Tuning Double Adjustable Short Throw
Steeda S550 Mustang Street Short Throw Shift Lever Installation Instructions For Part:
 Steeda S550 Mustang Street Short Throw Shift Lever Installation Instructions For Part: 555-7316 Tools required 1. 7mm socket 2. 10mm socket 3. Small flathead screwdriver 4. T20 torx bit or driver 5. Vise
Toyota Venza Interior Light Upgrade
 Toyota Venza 2011 - Interior Light Upgrade Part Number 00016-00095 Accesory Code: IL2 Conflicts Kit Contents Item # Quantity Reqd. Description 1 1 Y Adapter 2 1 Wire harness 3 1 Hardware Kit 4 2 White
JEEP TJ & (XJ 84-01) ATLAS 2 SPEED CABLE SHIFTER units built before 4/30/12
 ATLAS 2 SPEED CABLE SHIFTER units built before 4/30/12") KIT CONSISTS OF: No. Qty Part No. Description 4320 Aerotech Center Way, Page 1 of 6 1 1 302051-RLE BASE- TWIN STICK MOUNT 42RLE 2 1 302080 STUD BOLT 1/2"-13 X 7 (XJ) 3 1 303120 SERRATED LOCK NUT 1/2"-
KIT CONSISTS OF: No. Qty Part No. Description 4320 Aerotech Center Way, Page 1 of 6 1 1 302051-RLE BASE- TWIN STICK MOUNT 42RLE 2 1 302080 STUD BOLT 1/2"-13 X 7 (XJ) 3 1 303120 SERRATED LOCK NUT 1/2"-
Section II - Installation Procedures Part Number : Accessory Code IL1 Kit Contents. Color Applicability/Trim Level. Hardware Bag Contents
 Document # 10.21.00 PIO/DIO 01/14/09 TOYOTA Rav-4 2009- INTERIOR InteriorLIGHT Light UPGRADE Upgrade Part Number : 00016-00065 Accessory Code IL1 Kit Contents Color Applicability/Trim Level Item # Quantity
JEEP TJ & (XJ 84-01) ATLAS 2 SPEED CABLE SHIFTER units built before 4/30/12
 ATLAS 2 SPEED CABLE SHIFTER units built before 4/30/12") Paso Robles, CA 93447 PAGE 1 OF 6 Telephone: (800) 350-2223 Fax: (805) 238-4201 Page Rev. Date: 05-12-15 KIT CONSISTS OF: No. Qty Part No. Description 1 1 302051-RLE BASE- TWIN STICK MOUNT 42RLE 2 1 302075
Paso Robles, CA 93447 PAGE 1 OF 6 Telephone: (800) 350-2223 Fax: (805) 238-4201 Page Rev. Date: 05-12-15 KIT CONSISTS OF: No. Qty Part No. Description 1 1 302051-RLE BASE- TWIN STICK MOUNT 42RLE 2 1 302075
GENUINE PARTS INSTALLATION INSTRUCTIONS
 GENUINE PARTS INSTALLATION INSTRUCTIONS 1. 2. 3. 4. DESCRIPTION: Accent light Kit APPLICATION: Versa (2012) PART NUMBER: 999F3 AW008 - Universal Accent Lighting Kit. KIT CONTENTS: Item QTY Description
INSTALLATION INSTRUCTIONS
 INSTALLATION INSTRUCTIONS Accessory Application Publications No. SYSTEM ACCORD 2-DOOR (LX/EX L4, LX V6) AII 25749 Issue Date FEB 2004 PARTS LIST Double-sided adhesive tape XM Radio Attachment Kit : P/N
INSTALLATION INSTRUCTIONS
 INSTALLATION INSTRUCTIONS Accessory Application Publications No. AII 22903-22963 ODYSSEY Issue Date MAY 2002 PARTS LIST Subwoofer Kit: P/N 08A39-EP7-100 Subwoofer 2 Cushion tapes 8 Wire ties (1 not used)
ADVANCE ADAPTERS INC. P/N:
 Paso Robles, CA 93447 PAGE 1 of 6 KIT CONSISTS OF: Qty Part No. Description 1 303303 SHIFTER BODY BARREL RETAINER 11 303311 HEAT SHIELD-FIREPROOF SLEEVE 1/2" 2 303312 BUSHING- IGUS 3/8" 2 303313 HEIM JOINT-
TOOLS REQUIRED: Panel Removal Tool Phillips Screwdriver 10mm Nut Driver Ratchet 10mm Socket 7mm Wrench 7mm Nut Driver Straight Screwdriver
 CONTENTS: 1EA. FIVE CHANNEL AMPLIFIER/BRACKET ASSEMBLY P/N MPDSP039AA 1EA. OVERLAY HARNESS P/N RH41LX10 3EA. 7MM SCREWS P/N RF7MM 6EA. WIRE TIE P/N RFZIP6 1EA. 30 AMP FUSE P/N RFUSE30 1EA. INSTRUCTIONS
SCION tc ILLUMINATED DOOR SILLS Preparation
 Preparation Part Number: PTS21-21070 Kit Contents Item # Quantity Reqd. Description 1 2 Hardware Kit w/ power harness 2 1 Front Left Illuminated Door Sill Protector 3 1 Front Right Illuminated Door Sill
Wood Grain Warrior Line Incognito hidden winch bumper installation instructions Lexus GX470
 Wood Grain Warrior Line Incognito hidden winch bumper installation instructions 2003-2009 Lexus GX470 Version 1.0-2016 Thank you for purchasing the Southern Style OffRoad Wood Grain Warrior Line Lexus
97-02 JEEP TJ BODY LIFT KIT INSTRUCTIONS
 92RC60500 97-02 JEEP TJ BODY LIFT KIT INSTRUCTIONS Congratulations on your purchase of a new Rough Country 2 /3 Body Lift. We are committed to providing you with the best product available for the best
INSTALLATION INSTRUCTIONS
 INSTALLATION INSTRUCTIONS Accessory Application Publications No. AII 32664 TRUNK MOUNT 2007 ACCORD 4-DOOR Issue Date JULY 2006 PARTS LIST 17 Wire ties Attachment Kit (sold separately): P/N 08B26-SDA-100
INSTALLATION INSTRUCTIONS
 INSTALLATION INSTRUCTIONS Accessory P/N 08U89-TK6-111 Application 2012 FIT Publications No. AII 45981 Issue Date AUG 2011 PARTS LIST Armrest console Armrest cover Bolt cover Floor bracket Washer bolt,
Factory Five Racing, Inc. 818 Kit Assembly manual revision 1J update
 Factory Five Racing, Inc. 818 Kit Assembly manual revision 1J update Turbo coolant overflow tank...1 Shifter handle...4 Install...4 Door skin...7 Door Liner... 10 Side mirrors... 14 Door handles and pulls...
KK-K9-F16-K INSTALLATION INSTRUCTIONS K9 Kit for FORD EXPLORER (Retail Model Vehicle with OEM Center Shifter Console)
") KK-K9-F16-K INSTALLATION INSTRUCTIONS K9 Kit for 2011-2016 FORD EXPLORER (Retail Model Vehicle with OEM Center Shifter Console) TOOLS Needed: Phillips Screw Driver Power Drill with Drill Bits Trim panel
KK-K9-F16-K INSTALLATION INSTRUCTIONS K9 Kit for 2011-2016 FORD EXPLORER (Retail Model Vehicle with OEM Center Shifter Console) TOOLS Needed: Phillips Screw Driver Power Drill with Drill Bits Trim panel
Go-ped ESR750 / ESR750EX Rear Brake Installation Instructions
 Go-ped ESR750 / ESR750EX Rear Brake Installation Instructions This kit provides all the parts you need to install a rear brake on your ESR750 or ESR750EX. It will not work on an ESR Sport, or other Go-ped
INSTALLATION INSTRUCTIONS
 INSTALLATION INSTRUCTIONS Accessory Application Publications No. AII 24307 SYSTEM 2003 ELEMENT Issue Date DEC 2002 NOTE: An optional keyless entry system (sold seperately) must be installed before you
EVO-1162 EVO Tailgate Tire Carrier
 EVO-1162 EVO Tailgate Tire Carrier Bill of Materials EVO-1162 Tailgate Tire Carrier Part number Description Quantity EVO-12161 EVO Tailgate Tire Carrier 1 EVO-12162 Bolt Plate 1 EVO-12163 Wheel Mount 1
Steeda S550 Mustang Street Short Throw Shift Lever Installation Instructions: &
 Steeda S550 Mustang Street Short Throw Shift Lever Installation Instructions: 555-7316 & 555-7322 Tools required 1. 7mm socket 2. 10mm socket 3. Small flathead screwdriver 4. T20 torx bit or driver 5.
BODY-24, Late Model 944 ( and Newer) Dash Replacement
 Dash Replacement") BODY-24, Late Model 944 (1985.5 and Newer) Dash Replacement Introduction Replacing the dash in a late model 944 is not overly difficult. However, it is very tedious and a lot of patience is required. It's
BODY-24, Late Model 944 (1985.5 and Newer) Dash Replacement Introduction Replacing the dash in a late model 944 is not overly difficult. However, it is very tedious and a lot of patience is required. It's
Toyota Corolla Interior Light Upgrade
 TOYOTA Corolla 2010 INTERIOR LIGHT UPGRADE Toyota Corolla 2012- Interior Light Upgrade Part Part Number #: xxxxx-xxxxxx 00016-0009500095 NOTE: Part number of this accessory may If not printing be the same
Document # 2506 Created 6/23/04 SCION tc INTERIOR LIGHT UPGRADE Preparation Part Number: (Amber) (Blue) Code: YI-1,YI-2
 (Blue) Code: YI-1,YI-2") Document # 2506 Created 6/23/04 SCION tc 2005 - INTERIOR LIGHT UPGRADE Preparation Part Number: 00016-21010 (Amber) 00016-21020 (Blue) Code: YI-1,YI-2 General Applicability Kit Contents All Item # Quantity
Document # 2506 Created 6/23/04 SCION tc 2005 - INTERIOR LIGHT UPGRADE Preparation Part Number: 00016-21010 (Amber) 00016-21020 (Blue) Code: YI-1,YI-2 General Applicability Kit Contents All Item # Quantity
INSTALLATION INSTRUCTIONS
 INSTALLATION INSTRUCTIONS Document# 19-0038 2004+ Lotus Elise (Series 2) Rear Clamshell Removal Kit Safely support the vehicle. This is a two-person job. Allow 1 to 2 hours for initial disassembly. Have
Conflicts None. TOYOTA TUNDRA 2017 Black Laser Cut Grille. Part Number: Accessory Code: BG3000. General Applicability
 TOYOTA TUNDRA 2017 Black Laser Cut Grille Part Number: 00016-34173 Accessory Code: BG3000 Conflicts None Kit Contents Item # Quantity Reqd. Description 1 1 Laser Cut Grille 2 1 Complete hardware kit General
INSTALLATION INSTRUCTIONS
 INSTALLATION INSTRUCTIONS Accessory S Application 2011 PILOT Publications No. AII 43298 Issue Date MARCH 2010 PARTS LIST Back-up Sensor Attachment Kit P/N 08V67-SZA-100A Back-up sensor harness Fuse label
ADVANCE ADAPTERS INC. P/N: JEEP TJ & (XJ 84-01) ATLAS 4 SPEED CABLE SHIFTER units built after 5/1/12
 ATLAS 4 SPEED CABLE SHIFTER units built after 5/1/12") Paso Robles, CA 93447 PAGE 1 OF 9 Telephone: (800) 350-2223 Fax: (805) 238-4201 Page Rev. Date: 05-12-15 KIT CONSISTS OF: No. Qty Part No. Description 1 1 302051 BASE- TWIN STICK MOUNT 2 1 302080 STUD
Paso Robles, CA 93447 PAGE 1 OF 9 Telephone: (800) 350-2223 Fax: (805) 238-4201 Page Rev. Date: 05-12-15 KIT CONSISTS OF: No. Qty Part No. Description 1 1 302051 BASE- TWIN STICK MOUNT 2 1 302080 STUD
RIM Hood For Aeromaster Bodies
 RIM Hood For Aeromaster Bodies Service Guide WARNING: Hood should be opened by releasing the hold-down straps, lifting the hood, and engaging the prop rod. Be sure prop rod is properly engaged before working
Part Number: TAV-713 TOYOTA AVALON LED DRL
 Part Number: TAV-713 Kit Contents Item # Quantity Reqd. Description 1 2 DRL s bezels w/led DRL 2 1 Driver Box 3 1 Harness bag 4 1 User s card 5 1 Cushion pad 6 1 Switch 7 2 Drill Jigs Hardware Bag Contents
ROUSH Active IO Exhaust. Installation Instructions P/N: (R LITE) Fastback GT Convertible GT V8
 Fastback GT Convertible GT V8") Installation Instructions P/N: 422128 (R1318-5231LITE) Fastback GT Convertible GT V8 39555 Schoolcraft Rd, Plymouth MI, 48170 800.59.ROUSH ROUSH Active IO Exhaust Installation Instructions P/N: 422128
Installation Instructions P/N: 422128 (R1318-5231LITE) Fastback GT Convertible GT V8 39555 Schoolcraft Rd, Plymouth MI, 48170 800.59.ROUSH ROUSH Active IO Exhaust Installation Instructions P/N: 422128
M-9603-FST FOCUS ST COLD AIR INTAKE KIT INSTALLATION INSTRUCTIONS
 M-9603-FST Please visit www.fordracingparts.com for the most current instruction information.!!! PLEASE READ ALL OF THE FOLLOWING INSTRUCTIONS CAREFULLY PRIOR TO INSTALLATION. AT ANY TIME YOU DO NOT UNDERSTAND
Jeep TJ 6 Switch Panel
 921709560 1997-06 Jeep TJ 6 Switch Panel Thank you for choosing Rough Country for all your lighting needs. Please read instructions before beginning installation. Check the kit hardware against the kit
Scion xb Interior Light Upgrade Part Number: Accessory Code: YI1
 Scion xb 2008 - Interior Light Upgrade Part Number: 00016-00065 Accessory Code: YI1 Kit Contents Item # Quantity Reqd. Description 1 2 12 and 9 rod 2 1 Wire harness 3 1 Hardware Kit 4 2 White Light Engines
Hurst Billet Competition Plus Shifter - TR-3650 (05-10 GT) Installed in: 2010 Ford Mustang GT
 Installed in: 2010 Ford Mustang GT") Tools Required: Socket Ratchet 10 mm Wrench/Socket 10 mm Deep Socket 13 mm Wrench/Socket Socket Extension Flat Head Screw Driver WD-40 Hurst Billet Competition Plus Shifter - TR-3650 (05-10 GT) Installed
Tools Required: Socket Ratchet 10 mm Wrench/Socket 10 mm Deep Socket 13 mm Wrench/Socket Socket Extension Flat Head Screw Driver WD-40 Hurst Billet Competition Plus Shifter - TR-3650 (05-10 GT) Installed
Second Stage Regulator - 1/4 Turn
 Second Stage Regulator - 1/4 Turn MAINTENANCE AND REPAIR TAL 806 (L) Rev. 6 MSA 2008 Prnt. Spec. 10000005389 (I) Mat. 10042827 Doc. 10000015245 1/4 TURN SECOND STAGE REGULATOR SECOND STAGE REGULATOR COMPONENTS
INSTALLATION INSTRUCTIONS
 INSTALLATION INSTRUCTIONS Accessory Application Publications No. AUTOMATIC AII 27160 2005 CR-V Issue Date ATTACHMENT KIT SEP 2004 PARTS LIST Automatic Day/Night Mirror Attachment Kit (sold separately)
Tru-Billet Climate Control Knob Installation Instructions
 P/N S197-525-07 2007-08 Tru-Billet Climate Control Knob Installation Instructions Thank you for your purchase of SilverHorse Racing products. Please read all directions before beginning the installation.
M-7210-Z3 Focus Short-Throw Shifter (fits 2000-April 2002) INSTALLATION INSTRUCTIONS
 INSTALLATION INSTRUCTIONS") Please visit www.fordracingparts.com for the most current instruction information!!! PLEASE READ ALL OF THE FOLLOWING INSTRUCTIONS CAREFULLY PRIOR TO INSTALLATION. AT ANY TIME YOU DO NOT UNDERSTAND THE
Please visit www.fordracingparts.com for the most current instruction information!!! PLEASE READ ALL OF THE FOLLOWING INSTRUCTIONS CAREFULLY PRIOR TO INSTALLATION. AT ANY TIME YOU DO NOT UNDERSTAND THE
Barton Short Throw Shifter 11/12 V6, GT Mustang:
 Barton Short Throw Shifter 11/12 V6, GT Mustang: Tools Required: 10mm deep socket Socket wrench 10 extension for socket wrench Jack Jack stand Small piece of wood Small hook tool (recommended) *can be
JEEP TJ & (XJ 84-01) ATLAS 2 SP.
 ATLAS 2 SP.") KIT CONSISTS OF: No. Qty Part No. Description 4320 Aerotech Center Way, Page 1 of 9 1 1 302051-RLE BASE- TWIN STICK MOUNT 42RLE 2 1 302080 STUD BOLT 1/2"-13 X 7 (XJ) 3 1 303120 SERRATED LOCK NUT 1/2" X
KIT CONSISTS OF: No. Qty Part No. Description 4320 Aerotech Center Way, Page 1 of 9 1 1 302051-RLE BASE- TWIN STICK MOUNT 42RLE 2 1 302080 STUD BOLT 1/2"-13 X 7 (XJ) 3 1 303120 SERRATED LOCK NUT 1/2" X
Installation Manual TWM Performance Short Shift Kit Estimated Installation Time: Tools required:
 Page 1 Installation Manual TWM Performance Short Shift Kit 1993-2001 Nissan Altima 1991-2001 Infiniti G20 1991-2001 Nissan Sentra- 200SX 1991-1993 Nissan NX 1986-1989 Nissan Stanza 1995-2001 Nissan Maxima
VTCM Installation Manual Table of Contents
 VTCM Installation Manual Table of Contents 1. Introduction:... 2 2. Disclaimer:... 2 3. Software / Drivers:... 2 a. Plugging in the controller:... 2 b. Install 4.0.NET Frame work:... 3 c. Install COM port
C15C C15C. Page 1 of 20
 2 x Lid Front Hinge 1135 8 x M8 Bolt 8 x M8 Washer (3mm Thick) 4 x M6 Large washers 4 x M6 Spring washers 4 x M6 x 40mm Bolts 6 x M6 20mm Bolts 6 x M6 Washers 20 x Screws 2 x Lid mount gas strut bracket
PRODUCT USE INFORMATION
 9RC61000 Jeep YJ Body Lift Thank you for choosing Rough Country for all your suspension needs. This body lift fits both manual and Automatic equipped vehicles!!! Refer to last page of this Instruction
Installation Instructions HURST BILLET COMPETITION/PLUS SHIFTER Dodge Challenger
 Installation Instructions HURST BILLET COMPETITION/PLUS SHIFTER 2009-2015 Dodge Challenger Catalog #3916020 WORK SAFELY! For maximum safety, perform this installation on a clean, level surface and with
LEXUS RX/RXh RUNNING BOARDS Preparation
 Preparation Part Number: PT938-48171 Kit Contents Item # Quantity Reqd. Description 1 1 Running Board Assembly, LH 2 1 Running Board Assembly, RH 3 1 Hardware Pack Hardware Bag Contents Item # Quantity
INSTALLATION INSTRUCTIONS
 INSTALLATION INSTRUCTIONS Accessory Application Publications No. AII 26031 2004 ODYSSEY Issue Date AUG 2003 NOTE: You cannot install the subwoofer in a vehicle equipped with both an under seat Navigation
Genuine Corvette Accessories Carbon Fiber Radio Surround Installation Instructions for Corvettes.
 Genuine Corvette Accessories Carbon Fiber Radio Surround Installation Instructions for 2005-2007 Corvettes. Difficulty: 3 out of 5. Time: Plan on about 1 hour. The tools used are: A small flashlight A
Required Parts and Tools
 Welcome to the installation guide for the 2004 to 2009 CLK Class Mercedes Benz. Please thoroughly review this manual before installation as there are details that are essential to operation of the vehicle.
INSTALLATION INSTRUCTIONS
 INSTALLATION INSTRUCTIONS Accessory ACCESSORY HANDSFREELINK Application 2010 ACCORD 2 AND 4-DOOR Publications No. AII 42231 Issue Date AUG 2009 PARTS LIST HFL retainer HFL Attachment Kit P/N 08E02-TA0-100
Installation Instructions. QuickSilver Shifter. Fits: GM, Ford, Chrysler Transmissions See Application Guide for Specific Applications Part # 80683
 Installation Instructions QuickSilver Shifter Fits: GM, Ford, Chrysler Transmissions See Application Guide for Specific Applications Part # 80683 WORK SAFELY! For maximum safety, perform this installation
INSTALL/REMOVAL INSTRUCTIONS: WINDOW LIFT MOTOR
 REMOVAL/INSTALL OF WINDOW REGULATOR (742-269) Ford Mustang 1996 2004 General Tech Tips: Use painter s tape rather than duct tape to secure window. It will not damage paint or leave sticky residue. A plastic
PRELIMINARY INSTALLATION INSTRUCTIONS. Remote Engine Starter Attachment Kit P/N 08E92-SNA-100B
 INSTALLATION INSTRUCTIONS Accessory Application Publications No. REMOTE ENGINE STARTER SYSTEM 2008 CIVIC 2-DOOR AII 38215 Issue Date OCT 2007 PARTS LIST Remote Engine Starter Unit Kit P/N 08E91-E22-100B
INSTALLATION INSTRUCTIONS
 INSTALLATION INSTRUCTIONS Accessory Accessory Hands Free Link Application 2008 ACCORD 2 AND 4-DOOR Publications No. AII 38281 Issue Date NOV 2007 PARTS LIST Attachment Kit P/N 08E02-TA0-100 trim retainer
INSTALLATION INSTRUCTIONS
 INSTALLATION INSTRUCTIONS Accessory Application Publications No. / All 33055 2007 PILOT (LX) Issue Date JULY 2006 Player Attachment Kit (sold separately) : P/N 08B06-S9V-100A Cassette Player (sold separately)
I Page 1 of 5
 Page 1 of 5 MOUNTING LOCATION: Upper right side of radio cavity-es300 Right sideof radio cavity-sc430&es350 Right side of climate control-solara TOOLS REQUIRED: Hook tool / Pry tool 10mm driver/ Phillips
INSTALLATION INSTRUCTIONS
 INSTALLATION INSTRUCTIONS Accessory Accessory Hands Free Link Application 2009 ACCORD 2 AND 4-DOOR Publications No. AII 40055 Issue Date JULY 2008 PARTS LIST HFL Attachment Kit P/N 08E02-TA0-100 HFL trim
GENUINE PARTS INSTALLATION INSTRUCTIONS
 GENUINE PARTS INSTALLATION INSTRUCTIONS 1. 2. 3. DESCRIPTION: APPLICATION: PART NUMBER: Accent light Kit Cube (MY2013+) 999F3 AW000 - Universal Accent Lighting Kit. 4. KIT CONTENTS: Item QTY Description
INSTALL INSTRUCTIONS C-VS-1500-DUR-1 15 VEHICLE SPECIFIC CONSOLE for Dodge Durango with OEM Center Shifter
 INSTALL INSTRUCTIONS C-VS-1500-DUR-1 15 VEHICLE SPECIFIC CONSOLE for 2011-2013 Dodge Durango with OEM Center Shifter TOOLS NEEDED: Phillips Screw Driver Standard Socket set Metric Socket set 90 Phillips
MINI Smartphone Mount Pro Series Ver 1.1 CRMC-1000-R130. Instructions for both the XL Scissor and XXL Clamshell Cradles for Gen 2 MINIs.
 MINI Smartphone Mount Pro Series Ver 1.1 CRMC-1000-R130 Instructions for both the XL Scissor and XXL Clamshell Cradles for Gen 2 MINIs 1 of 5 Overview XL Scissor and XXL Clamshell Cradles for Gen 2 MINIs
Convenience Lighting
 Convenience Lighting by Flopster843 19 Dec 2011 In order to cut costs and make a larger profit, many automobile manufacturers decided to cut several minor items from the production line. Chrysler removed
INSTALLATION INSTRUCTIONS FOR THE MOTOR TRIKE GL1500 RAKE KIT
 INSTALLATION INSTRUCTIONS FOR THE MOTOR TRIKE GL1500 RAKE KIT Thank you for choosing the Motor Trike GL1500 Rake Kit. We ask that you read the directions before you start and follow them very closely.
POLY TIP-DOWN WINDSHIELD KIT
 POLY TIP-DOWN WINDSHIELD KIT P/N 2883261 APPLICATION Verify accessory fitment at Polaris.com. BEFORE YOU BEGIN Read these instructions and check to be sure all parts and tools are accounted for. Please
Installation Instructions HURST COMPETITION AND BILLET/PLUS SHIFTER Mustang w/5-speed Manual Transmission (GT only)
") Installation Instructions HURST COMPETITION AND BILLET/PLUS SHIFTER 2005-2010 Mustang w/5-speed Manual Transmission (GT only) Catalog# 3915201 WORK SAFELY! For maximum safety, perform this installation
Installation Instructions HURST COMPETITION AND BILLET/PLUS SHIFTER 2005-2010 Mustang w/5-speed Manual Transmission (GT only) Catalog# 3915201 WORK SAFELY! For maximum safety, perform this installation
INSTALLATION INSTRUCTIONS
 INSTALLATION INSTRUCTIONS Accessory Application Publications No. CASSETTE/MP3/ AII 30664 2006 ACCORD IN-DASH CD 2- AND 4-DOOR Issue Date ATTACHMENT AUG 2005 PARTS LIST cable Attachment Kit (sold separately):
Mustang CLASSIC LIGHT BAR INSTALLATION INSTRUCTIONS CDC #
 1990-1993 Mustang CLASSIC LIGHT BAR INSTALLATION INSTRUCTIONS CDC # 101000 Kit Components: 1 Light Bar 4 Bolts ( 5 / 16-18 x 2.5 ) #182010 4 Washer #182005 4 Shims #182009 2 Dark Blue Connectors #182004
TOYOTA YARIS HATCHBACK INTERIOR LIGHT UPGRADE Preparation
 Preparation Part Number PTS21-52062-08 NOTE: Part number of this accessory may not be the same as the part number show Kit Contents Item # Quantity Reqd. Description 1 1 12 Light Guide 2 1 7 Light Guide
INSTALLATION INSTRUCTIONS HIDDEN WINCH MOUNTING KIT No for Chevrolet & GMC Trucks (for Warn Winches M6000, M8000, XD9000 & HS9500 only)
") INSTALLATION INSTRUCTIONS HIDDEN WINCH MOUNTING KIT No. 61770 for Chevrolet & GMC Trucks (for Warn Winches M6000, M8000, XD9000 & HS9500 only) Warn Light Bar 61090 and many other grille guards can be mounted
INSTALLATION INSTRUCTIONS HIDDEN WINCH MOUNTING KIT No. 61770 for Chevrolet & GMC Trucks (for Warn Winches M6000, M8000, XD9000 & HS9500 only) Warn Light Bar 61090 and many other grille guards can be mounted
Adjustable Light Kits E-Z-Go TXT All Models Installation Instructions
 Adjustable Light Kits E-Z-Go TXT All Models 1996-2013 Installation Instructions Caution: Please read through the instructions carefully. Before starting this project, remove the system s positive and negative
GENUINE PARTS INSTALLATION INSTRUCTIONS
 GENUINE PARTS INSTALLATION INSTRUCTIONS 1. 2. 3. 4. DESCRIPTION: APPLICATION: PART NUMBER: KIT CONTENTS: Accent light Kit Versa Note 999F3 4Z000 - Accent Lighting Kit. 999Q9 AY000 - Accessory Service Connector
Technical Service Bulletin
 Source: Models: Subject: Division - Arcade, NY USA 4800, 4900 Series 185 amp - 320 amp Convert alternator to solid lead frame rectifiers This procedure will explain how to convert a 4000 series alternator
Mobile Video Installation Guide
 000MVGUIDE Revision 04/29/04 Mobile Video Installation Guide This installation guide offers examples of mobile video system types and suggested layouts. The installation of your system will depend upon
Ford Mustang V6 OEM-Style Fog Light Kit Parts List: Quantity: Tool List:
 2015-2017 Ford Mustang V6 OEM-Style Fog Light Kit Parts List: Quantity: Tool List: LED Foglights/ Bezels 2 Flat head & Phillips screwdriver (if you ordered part#3600) Ratchet & Socket set OR Wiring harness
Installation Instructions Z-Gate Shifter
 Installation Instructions Z-Gate Shifter Part Number 80681 1998, 2001 by B&M Racing and Performance Products The B&M Z-Gate shifter can be used in vehicles equipped with most popular three speed automatic
SCION xd INTERIOR LIGHTING UPGRADE Preparation
 Preparation Part Number: PTS21-52085 Light Guide Kit Contents Item # Quantity Reqd. Description 1 1 Controller Board, 4 color programmed w/ Bracket 2 1 RGB, LED Engine wire harness 3 2 14mm Light Rod,
Installation Manual TWM Performance Short Shifter Subaru STi 2008+
 - 1 - Installation Manual TWM Performance Short Shifter Subaru STi 2008+ Please Note: It is preferable to park on a flat surface, as you will have to engage and disengage the hand brake and shift from
7B1210 COBB BMW N54 Charge Pipe
 7B1210 COBB BMW N54 Charge Pipe Installation Instructions Congratulations on your purchase of the COBB BMW N54 Charge Pipe for your BMW. The following instructions will assist you through your installation
Short Shifter Installation Instructions For Miata, 6-speed Manual Transmission
 Short Shifter Installation Instructions For 2006-15 Miata, 6-speed Manual Transmission PART# 994-060 Required tools: 10mm deep socket Long extension Ratchet Small flathead screwdriver Phillips-head screwdriver
M7 R52S & R53 Cold Air Intake Installation Guide 53-3M7301
 M7 R52S & R53 Cold Air Intake Installation Guide 53-3M7301 M7 Speed engineers and manufactures the highest quality MINI COOPER accessories and performance parts available anywhere on Planet Earth! Please
97-06 JEEP TJ REPL BODY BUSHING / 1 BODY LIFT KIT
 9RC60700 97-06 JEEP TJ REPL BODY BUSHING / BODY LIFT KIT Congratulations on your purchase of a new Rough Country Body Bushing / Body Lift Combo. We are committed to providing you with the best product
Important! The subwoofer system is designed to be used only with the rear seat in the up position only.
 Important! The subwoofer system is designed to be used only with the rear seat in the up position only. CONTENTS 1EA. SUBWOOFER ASSEMBLY 2EA. BRACKET LOWER 2EA. BRACKET UPPER 1EA. OVERLAY HARNESS 2EA.
INSTALLATION INSTRUCTIONS
 INSTALLATION INSTRUCTIONS Accessory Application Publications No. CASSETTE PLAYER 2000 ACCORD (EX) 2- AND 4-DOOR All 20497 Issue Date JULY 1999 PARTS LIST Cassette Player Attachment Kit Except V6: P/N 08B12-S84-100
GENUINE PARTS INSTALLATION INSTRUCTIONS
 GENUINE PARTS INSTALLATION INSTRUCTIONS 1. 2. 3. 4. DESCRIPTION: Accent light Kit APPLICATION: Infiniti JX (2013) PART NUMBER: 999F3 YY000 - Universal Accent Lighting Kit. KIT CONTENTS: Item QTY Description