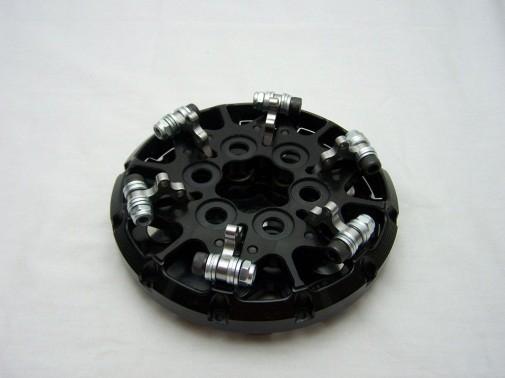
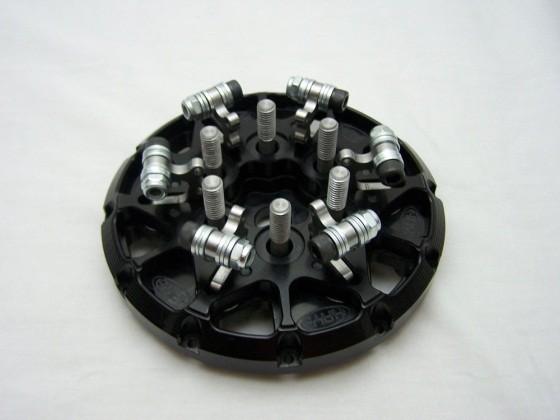
2006 Honda CBR1000. Convertable Clutch
|
|
|
- Milo Fox
- 5 years ago
- Views:
Transcription
1 Installation Guide 2006 Honda CBR1000 Convertable Clutch Thank you for purchasing the Convertable Clutch System, enclosed is a detailed installation process to ensure the reliable operation of your new clutch. The Convertable Clutch system was designed to provide more consistent elapsed times and better performance than was previously able with transmission driven systems, since our system is driven from the engine you will notice much smoother launches, better reaction times, and easier tuning then ever before. In addition to the engine driven technology the Convertable Clutch combines all the functions of every available clutch on the market and combines them into one revolutionary package. The Convertable Clutch can be set up as a single stage engine driven lockup that can be used to provide more lockup to the clutch pack in performance applications and can equally be ridden on the street in a daily driver. The Convertable Clutch can be set up as a Multi Stage engine driven clutch to obtain the maximum performance in the most demanding applications which allows you to adjust the tuning of the static and lockup arms for best performance. In addition to those modes the Convertable Clutch will easily convert to operate as a fully functional rpm activated slider for those who like to have the ease of use and consistent launching without the use of the clutch lever. One major improvement over traditional clutches that work as a slider only is the addition of retaining your clutch lever and puller shaft to use as a way to disengage your pressure plate in the event of catastrophic engine damage or when aborting a run with an automatic transmission. As a benefit of this technology you can also use the clutch lever in slider mode as well to engage the clutch at an rpm higher than your initial stall speed. Using this setup allows you to ride your bike back to the pits after your run, without needing to be towed back or operating your bike at unsafe high speeds thru the pits. Please consult your OEM maintenance manual for all torque specs and any additional information you may need to complete the following installation procedures.
2 it is the installers responsibility to double check all fitment and clearance between all components this includes the outer basket,inner hub,crank and connecting rod prior to operating engine. Hays Machine Works assumes no liability in the customers negligence to properly install the components herein. Removal of factory clutch components 1. Drain oil from Motorcycle 2. Remove Clutch Cover from the engine 3. Remove the factory springs and bolts that secure the pressure plate to the inner hub 4. Use an impact to remove the nut that fastens the inner hub to the transmission shaft 5. Remove the inner hub and the back torque assy. 6. Remove the bushing and roller cage bearing from the center of the outer basket and remove the outer basket. In order to build your clutch there are some components that we need you to send in as a core. 1 outer basket assy. 2 inner hub 3 Clutch cover
3 If you would like to purchase a core assy we have those available for additional charges. It is standard operating procedures to build the customers clutch on the customers supplied core, If the customer prefers to purchase a core rather than to send in a core there will be a $300 charge for this service. If the customer prefers us to send out a core from inventory and then send in there core for a refund There will be a $100 charge for administration and reconditioning cost for this service. (No Exceptions) the customers core has to be satisfactory for inventory replacement to be eligible for this service.

4 Installation of your new clutch

5 Install the FACTORY THRUST WASHER FIRST!!! then install the 4 piece thrust bearing assy supplied with your kit, making sure that there are shims on each side of the thrust bearing, and the thrust bearing is in the middle of the assy. The factory clutch stack height is 1.640,using the factory stack height you should obtain a.125 airgap which is suitable for lockup mode,you will need to add and additional steel plate to the clutch stack height when switching over to slider mode. This will bring your airgap around.046. The easiest way to obtain a slider airgap when converting from lockup mode is to add an extra steel in the middle of the clutch pack. Install the drive hub assembly onto the transmission shaft, be sure to torque to the settings specified in your maintenance manual, Make sure the inner hub rotates freely with no resistance, if there is resistance or the hub is binding,or the inner hub is running out of round when rotating disassemble and inspect shim kit installation.
6 Install the pressure plate pusher shaft into the transmission shaft. Install the outer hat assembly in the mode that you prefer(lockup,multi stage lockup, slider) using the 12 screws supplied in your kit using 3mm allen hex key wrench Install the clutch cover spacer and/or the clutch cover using the supplied hardware supplied in your kit.


7 Tuning hardware supplied with your kit Supplied with your kit you should have received the following tuning hardware 1. Low tension Compression springs identified by Blue color coding 2. Medium tension Compression Springs identified by Green color coding 3. High tension compression springs identified by Orange color coding pound extension springs identified by White color coding


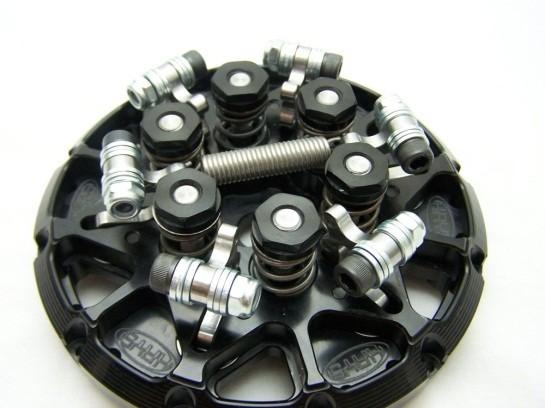
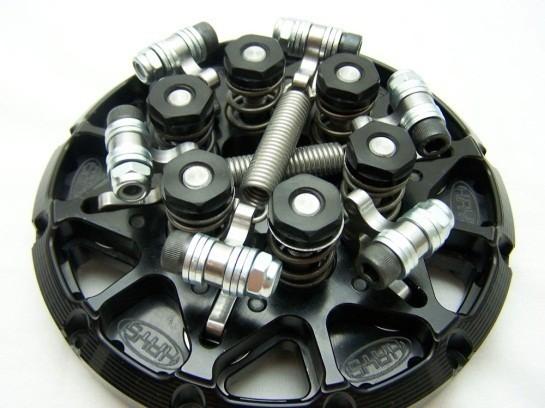
8 5. 17 pound extension springs identified by Gray color coding pound extension springs identified by Purple color coding Supplied tuning hardware supplied with your kit is sufficient to provide any tuning parameters you should need,if you have special requirements for any hardware not supplied in our kit please contact us at and let us know your specifications. Setting up your Convertable Clutch The convertable clutch is a highly versatile adjustable design that can convert from a single stage lockup, to a multi stage lockup, as well as convert to a slider and optional clutch lever override. we have attached some diagrams of the many ways you can configure your clutch Single Stage Engine Driven Lockup.


9 Multi Stage Engine Driven Lockup.

10 Single Stage Slider

11 Multi Stage Slider

12 In addition to the various types of operation available you can also configure the Convertable clutch in any lockup arm configuration you desire. As you can see the lockup arms can be configured in 2 arm,3 arm,4 arm, or 6 arm configuration to meet the needs of your application.
13 Technical support Thank you for your purchase of the Convertable Clutch,this installation guide should have all the information you will need to install and get acclimated to this revolutionary product,if you have any questions that are not covered in this document please send any technical support enquirys to If you require a more in depth consultation on clutch tuneups, chassis setup, engine management these services are available at very reasonable rates, if you are in need of these services please contact us for details. Thank You for your business Hays Machine Works
Kawasaki ZX14 Convertable Clutch
 Installation Guide Kawasaki ZX14 Convertable Clutch Thank you for purchasing the Convertable Clutch System, enclosed is a detailed installation process to ensure the reliable operation of your new clutch.
Rekluse Motor Sports. The z-start Clutch. Cannondale
 Rekluse Motor Sports The z-start Clutch Cannondale Installation Guide Copyright 2002-2004 Rekluse Motor Sports z-start Revision 3.000 RMS105 Cannondale 191-205 Manual Revision: 091304 Rekluse Motor Sports,
Rekluse Motor Sports. The z-start Clutch. Husaberg
 Rekluse Motor Sports The z-start Clutch Husaberg Installation Guide Copyright 2002-2004 Rekluse Motor Sports z-start Revision 3.000 RMS126 Husaberg 04+ 191-226 Rekluse Motor Sports, inc. 110 E. 43 rd Street
Rekluse Motor Sports. The z-start Clutch CRF 250R. Installation Guide Copyright 2002 Rekluse Motor Sports z-start Revision RMS112 CRF 250R
 Rekluse Motor Sports The z-start Clutch CRF 250R Installation Guide Copyright 2002 Rekluse Motor Sports z-start Revision 3.000 RMS112 CRF 250R 191-212 Manual Revision: 091205 Rekluse Motor Sports, Inc.
Rekluse Motor Sports, Inc. The z-start Clutch. Husaberg ( )
") Rekluse Motor Sports, Inc. The z-start Clutch Husaberg (1989-2003) Installation Guide Copyright 2002-2004 Rekluse Motor Sports z-start Revision 3.000 RMS125 Husaberg 89-03 191-225 Manual Revision: 012805
Rekluse Motor Sports, Inc. The z-start Clutch Husaberg (1989-2003) Installation Guide Copyright 2002-2004 Rekluse Motor Sports z-start Revision 3.000 RMS125 Husaberg 89-03 191-225 Manual Revision: 012805
Rekluse Motor Sports. The z-start Clutch GAS GAS. 200, 250, and strokes. 400 and strokes
 Rekluse Motor Sports The z-start Clutch GAS GAS 200, 250, and 300 2-strokes 400 and 450 4-strokes Installation Guide Copyright 2002-2004 Rekluse Motor Sports z-start Revision 3.000 RMS100 Gas Gas z-start
Rekluse Motor Sports. The z-start Clutch KTM LC4 ( )
") Rekluse Motor Sports The z-start Clutch KTM LC4 (1999 2005) Installation Guide Copyright 2002-2004 Rekluse Motor Sports z-start Revision 3.000 RMS630 KTM LC4 191-280 Manual Revision: 103105 Rekluse Motor
Rekluse Motor Sports The z-start Clutch KTM LC4 (1999 2005) Installation Guide Copyright 2002-2004 Rekluse Motor Sports z-start Revision 3.000 RMS630 KTM LC4 191-280 Manual Revision: 103105 Rekluse Motor
Rekluse Motor Sports. The z-start Clutch LTR 450. Installation Guide Copyright 2002 Rekluse Motor Sports z-start Revision 3.
 Rekluse Motor Sports The z-start Clutch LTR 450 Installation Guide Copyright 2002 Rekluse Motor Sports z-start Revision 3.000 RMS166 LTR 450 191-266 Manual Revision: 032306 Rekluse Motor Sports, inc. 110
Rekluse Motor Sports. The z-start Clutch CRF 250X. Installation Guide Copyright 2002 Rekluse Motor Sports z-start Revision RMS116 CRF 250X
 Rekluse Motor Sports The z-start Clutch CRF 250X Installation Guide Copyright 2002 Rekluse Motor Sports z-start Revision 3.000 RMS116 CRF 250X 191-216 Manual Revision: 103105 Rekluse Motor Sports, inc.
Rekluse Motor Sports. The z-start Clutch DRZ400 KLX400. Installation Guide Copyright 2002 Rekluse Motor Sports z-start Revision 3.
 Rekluse Motor Sports The z-start Clutch DRZ400 KLX400 Installation Guide Copyright 2002 Rekluse Motor Sports z-start Revision 3.000 RMS160 KLX400 DRZ400 z-start Clutch 191-260 Manual Revision: 103105 Rekluse
INSTALLATION GUIDE. KTM RFS Husaberg Polaris 450/525 Outlaw KTM 450/525 XC ATV Manual Revision:
 REKLUSE MOTOR SPORTS The z-start Pro Clutch INSTALLATION GUIDE KTM RFS 03-07 Husaberg Polaris 450/525 Outlaw KTM 450/525 XC ATV 191-833 Manual Revision: 010615 2002 Rekluse Motor Sports Rekluse Motor Sports,
HORSTMAN GREASED LIGHTNING CLUTCH
 HORSTMAN GREASED LIGHTNING CLUTCH Horstman s Greased Lightning (GL) clutch is designed for ultra high performance, and requires expert setup and a serious commitment to maintenance. Warning!!! 1. Clutch
INSTALLATION GUIDE. Kawasaki KLR Manual Revision:
 REKLUSE MOTOR SPORTS The z-start Pro Clutch INSTALLATION GUIDE Kawasaki KLR650 191-640 Manual Revision: 030308 2007 Rekluse Motor Sports Rekluse Motor Sports, Inc. 110 E. 43rd Street Boise, Idaho 83714
INSTALLATION & USER S GUIDE
 REKLUSE MOTOR SPORTS The Rekluse Core EXP Kit for Kawasaki KX80/85/100 OVERVIEW INSTALLATION & USER S GUIDE Doc ID: 191-7742A Doc Rev: 073015 This kit replaces the OEM core clutch components including
INSTALLATION GUIDE. KTM 950/990 LC8 Engine Manual Revision:
 REKLUSE MOTOR SPORTS The z-start Pro Clutch INSTALLATION GUIDE KTM 950/990 LC8 Engine 191-631 Manual Revision: 071510 2007 Rekluse Motor Sports Rekluse Motor Sports, Inc. 110 E. 43rd Street Boise, Idaho
INSTALLATION & USER S GUIDE
 REKLUSE MOTOR SPORTS The Rekluse Core EXP Kit with Adjustable Slave Cylinder INSTALLATION & USER S GUIDE Doc ID: 191-7704A Doc Rev: 102915 OVERVIEW This kit replaces the OEM core clutch components including
INSTALLATION INSTRUCTIONS FOR BRUTE IV EXTREME TM BELT DRIVE
 INSTALLATION INSTRUCTIONS FOR BRUTE IV EXTREME TM BELT DRIVE FOR 1990 TO PRESENT EVO & TWIN CAM SOFTAILS Shown w/optional mid-shift control It s common knowledge that a belt drive primary can provide advantages
INSTALLATION GUIDE CRF150R Manual Revision:
 REKLUSE MOTOR SPORTS The z-start Pro Clutch INSTALLATION GUIDE CRF150R 191-810 Manual Revision: 032508 2002 Rekluse Motor Sports Rekluse Motor Sports, Inc. 110 E. 43rd Street Boise, Idaho 83714 208-426-0659
BRUTE IV EXTREME TM BELT DRIVE FOR 1990 TO 2005 EVO & TWIN CAM Dyna Models
 INSTALLATION INSTRUCTIONS FOR BRUTE IV EXTREME TM BELT DRIVE FOR 1990 TO 2005 EVO & TWIN CAM Dyna Models PLEASE NOTE: PICTURES CONTAINED WITHIN THIS INSTRUCTION SHEET ARE ALSO USED FOR OTHER INSTRUCTIONS,
INSTALLATION GUIDE. Doc ID Revision
 REKLUSE MOTOR SPORTS INSTALLATION GUIDE OVERVIEW Doc ID 191-6300 Revision 013017 Read the separate included Safety Information document before operating the vehicle with the product installed. If you are
Right Side Drive Builder s Kits
 INSTALLATION INSTRUCTIONS FOR Right Side Drive Builder s Kits Ground-up Construction Only Big Twin Applications 9804 E. Saginaw Haslett, MI. 48840 - Phone: (517) 339-3835 - Fax: (517) 339-4590 - Toll Free:
20. Install and tighten the cap screws that hold the end frame and field frame together
 4006-30 19. Fill the oil reservoir in the bearing bore of the end frame with SAE 10 engine oil. Then put the the end frame on the armature shaft. Align the marks on the end frame and field frame and push
INSTALLATION GUIDE. Doc ID Revision
 REKLUSE MOTOR SPORTS OVERVIEW INSTALLATION GUIDE Doc ID 191-6301 Revision 123016 Read the separate included Safety Information document before operating the vehicle with the product installed. If you are
Z-Ball Clutch Installation
 Supplied Components Qty. Description Cobra # 30 Balls CCEX0009 1 Spring loaded ball plate CCEX0019 1 Thrust plate CCEX0008 2 1.2mm (0.047 ) steel drive plate CCEX0006 2 1.4mm (0.055 ) steel drive plate
ST 93 RIPPER INSTALL KIT
 ST 93 RIPPER INSTALL KIT P/N 2883777;2883778;2883779 APPLICATION The Timbersled Ripper ST93 Install Kit is designed to fit all Timbersled ST90 and ST93 Ripper models. This includes; Timbersled Model No.
Superbike Kit
 Superbike Kit www.spieglerusa.com sales@spieglerusa.com Mounting Instructions & Safety Instructions for Honda CBR 1000 RR ABS model year 2017 - Attention Important Safety Instructions: Thank you for purchasing
INSTALLATION & USER S GUIDE
 REKLUSE MOTOR SPORTS The Rekluse Core EXP Kit for Cable-Actuated Motorcycles INSTALLATION & USER S GUIDE Doc ID: 191-7706A Doc Rev: 062215 OVERVIEW This kit replaces the OEM core clutch components including
HOME OF PRIMO BELT DRIVES QUALITY & PERFORMANCE SINCE 1973 BRUTE FORCE TM. Belt Drive INSTALLATION INSTRUCTIONS
 HOME OF PRIMO BELT DRIVES QUALITY & PERFORMANCE SINCE 1973 BRUTE FORCE TM Belt Drive INSTALLATION INSTRUCTIONS 3-1/2 WIDE / 14mm BELT FITS 1990-2006 EVO & TWIN CAM SOFTAIL PRIMO BRUTE FORCE TM BELT DRIVE
INSTALLATION GUIDE. Clutch Cable Actuated Models Manual Revision:
 REKLUSE MOTOR SPORTS The z-start Pro Clutch INSTALLATION GUIDE Clutch Cable Actuated Models 191-800 Manual Revision: 061810 2002 Rekluse Motor Sports Rekluse Motor Sports, Inc. 110 E. 43rd Street Boise,
Inspection and Verification, Ranger
 file://c:\tso\tsocache\vdtom_5368\svk~us~en~file=svk53a03.htm~gen~ref.htm Page 1 of 1 Section 05-03A: Wheel Hubs and Bearings, Front Wheels, 4- Wheel Drive DIAGNOSIS AND TESTING 1997 Ranger 4x4 with Dana
1. General Description
 1. General Description A: SPECIFICATIONS 1. Type Transmission gear ratio Front reduction gear Rear reduction gear 2. TRANSMISSION GEAR OIL Recommended oil Final Transfer 5-forward speeds with synchromesh
INSTALLATION GUIDE. Doc ID: Revision:
 REKLUSE MOTOR SPORTS INSTALLATION GUIDE OVERVIEW Doc ID: 191-6301 Revision: 052418 Read the separate included Safety Information document before operating the vehicle with the product installed. If you
BRUTE IV EXTREME TM BELT DRIVE FOR 1990 TO 2006 EVO & TWIN CAM SOFTAILS
 Brute IV Extreme Instructions_Brute IV Extreme Instructions 4/17/12 3:47 PM Page 1 INSTALLATION INSTRUCTIONS FOR BRUTE IV EXTREME TM BELT DRIVE FOR 1990 TO 2006 EVO & TWIN CAM SOFTAILS Shown w/optional
Rekluse Motor Sports. The ProStart Clutch. H-D Big Twin ( )
") Rekluse Motor Sports The ProStart Clutch H-D Big Twin (1990 1997) Installation Guide Copyright 2006 Rekluse Motor Sports ProStart Revision 1.000 RMS680 H-D Big Twin 195-680 Manual Revision: 121206 Rekluse
Rekluse Motor Sports The ProStart Clutch H-D Big Twin (1990 1997) Installation Guide Copyright 2006 Rekluse Motor Sports ProStart Revision 1.000 RMS680 H-D Big Twin 195-680 Manual Revision: 121206 Rekluse
IMCO SCX SERIES INFORMATION, OPERATION & MAINTAINANCE
 IMCO SCX SERIES INFORMATION, OPERATION & MAINTAINANCE Warning! Warning! Warning! Danger! Warning! 1. SCX & SCX4 Drives will not fit on a standard gimbal helmet, IMCO HELMET: #05-8025 Black or #05-8027
INSTALLATION GUIDE. Clutch Cable Actuated Models Manual Revision:
 REKLUSE MOTOR SPORTS The z-start Pro Clutch INSTALLATION GUIDE Clutch Cable Actuated Models 191-800 Manual Revision: 041513 2012 Rekluse Motor Sports Rekluse Motor Sports, Inc. 12000 W Franklin Rd. Boise,
Service Manual. #19 Gearmatic Winch
 Allis Chalmers Service Manual #19 Gearmatic Winch Service Manual THIS IS A MANUAL PRODUCED BY JENSALES INC. WITHOUT THE AUTHORIZATION OF ALLIS CHALMERS OR IT S SUCCESSORS. ALLIS CHALMERS AND IT S SUCCESSORS
Instructions to install the early ( ) Limited Slip Differential in the Late-model ( ) G28 Transaxle
 Limited Slip Differential in the Late-model ( ) G28 Transaxle") Instructions to install the early (1978-83) Limited Slip Differential in the Late-model (1985-1995) G28 Transaxle BACKGROUND: Most 928 owners know about the improvements to the 5- speed transaxle that
Instructions to install the early (1978-83) Limited Slip Differential in the Late-model (1985-1995) G28 Transaxle BACKGROUND: Most 928 owners know about the improvements to the 5- speed transaxle that
INSTALLATION & USER S GUIDE
 INSTALLATION & USER S GUIDE RadiusCX Clutch for cable-actuated Hondas Revision: 102617 2017 Rekluse Motor Sports Rekluse Motor Sports, Inc. support@rekluse.com Table of Contents OVERVIEW... 3 INSTALLATION
TC20 Chain Driven Power Take-Off Overhaul Instructions
 TC20 Chain Driven Power Take-Off Overhaul Instructions Table of Contents Section Page Introduction 4 Ordering Repair Parts 4 General Information 5 Special Tools 6 Disassembly See Page 2 Reassembly See
INSTALLATION & USER S GUIDE
 REKLUSE MOTOR SPORTS The Rekluse Core EXP Kit for Cable-Actuated Motorcycles INSTALLATION & USER S GUIDE Doc ID: 191-7706A Doc Rev: 121417 OVERVIEW This kit replaces the OEM core clutch components including
Avoid damage to the motorcycle. Protect painted surfaces with a soft cloth or blanket.
 HOUSINGS 7808 Thank You For Choosing Küryakyn! Protect yourself and others from potential injury and property damage or loss. Pay close attention to all instructions, warnings, cautions, and notices regarding
INSTALLATION GUIDE. KTM 125, 144, Stroke KTM 250, Stroke KTM 250 SXF, XC, XC-W KTM 450, 505 SXF Manual Revision:
 REKLUSE MOTOR SPORTS The z-start Pro Clutch INSTALLATION GUIDE KTM 125, 144, 200 2-Stroke KTM 250, 300 2-Stroke KTM 250 SXF, XC, XC-W KTM 450, 505 SXF 191-836 Manual Revision: 050307 2002 Rekluse Motor
DYNATRAC THE PERFORMANCE AXLE SPECIALIST
 DYNATRAC THE PERFORMANCE AXLE SPECIALIST DynaLoc Installation Instructions, Appendix A iinformation: Dynatrac has included an additional bushing in the DynLoc kit. Part DA60-0022-L will be referred to
INSTALLATION & USER S GUIDE
 INSTALLATION & USER S GUIDE RadiusCX Clutch Upgrade Kit For KTM/Husqvarna DDS clutches Revision: 050217 2017 Rekluse Motor Sports Rekluse Motor Sports, Inc. support@rekluse.com TABLE OF CONTENTS OVERVIEW...
Group 4 CONTENTS DATA AND SPECIFICATIONS
 PARKING BRAKE 1 Group 4 PARKING BRAKE CONTENTS Paragraph Page Parking Brake 5 4 Disassembly Assembly Adjustment Parking Brake Cable 6 5 Removal Installation Service Diagnosis 1 2 DATA AND SPECIFICATIONS
INSTALLATION GUIDE. Doc ID: C Doc Rev:
 REKLUSE MOTOR SPORTS The Rekluse Core EXP Kit INSTALLATION GUIDE Doc ID: 191-7700C Doc Rev: 012213 2012 Rekluse Motor Sports Rekluse Motor Sports, Inc. 12000 W Franklin Rd Boise, Idaho 83709 208-426-0659
cfr angle kit INSTALLATION INSTRUCTIONS: 2009-present nissan 370z z infiniti g37 v36 Part Numbers: VOO-akns-0400
 cfr angle kit INSTALLATION INSTRUCTIONS: 2009-present nissan 370z z34 2008-2013 infiniti g37 v36 Part Numbers: VOO-akns-0400 We recommend that installation of all Voodoo13 parts be completed by a professional
Models Affected: Certain 2015 & 2016 All American Front Engine and Vision Buses Equipped with Hydraulic Brakes ISSUE _ CORRECTIVE ACTION _
 R E C A L L C A M P A I G N -- R 1 4 X R ---- Models Affected: Certain 2015 & 2016 All American Front Engine and Vision Buses Equipped with Hydraulic Brakes ISSUE _ CORRECTIVE ACTION -- -- _ The parking
Service Manual. Fuller Mechanical Transmissions TRSM0992 October 2007
 Service Manual Fuller Mechanical Transmissions TRSM0992 October 2007 Introduction Warnings and Precautions Before starting a vehicle always be seated in the driver s seat, place the transmission in neutral,
INSTALLATION GUIDE. Doc ID: A Doc Rev:
 REKLUSE MOTOR SPORTS EXP Kit for Harley-Davidson Big Twin Hydraulic-Actuated OVERVIEW INSTALLATION GUIDE Doc ID: 191-6200A Doc Rev: 061215 This kit replaces the OEM clutch pack (friction disks and drive
MM Adjustable IRS Tie-Rod (MMIRSTR-2)
") 3430 Sacramento Dr., Unit D San Luis Obispo, CA 93401 Telephone: 805/544-8748 Fax: 805/544-8645 www.maximummotorsports.com MM Adjustable IRS Tie-Rod (MMIRSTR-2) Sample Bumpsteer Curve: Read all instructions
3430 Sacramento Dr., Unit D San Luis Obispo, CA 93401 Telephone: 805/544-8748 Fax: 805/544-8645 www.maximummotorsports.com MM Adjustable IRS Tie-Rod (MMIRSTR-2) Sample Bumpsteer Curve: Read all instructions
Riding Mowers. Z44 and Z52 Accu-Z Razor (S/N and above) SM Service Manual Printed 9/24/09
 SM Service Manual Printed 9/24/09") Riding Mowers Z44 and Z52 Accu-Z Razor (S/N 472620 and above) 23802 357-044SM Service Manual 2006 Printed 9/24/09 Copyright 2006 All rights Reserved Land Pride provides this publication as is without warranty
Riding Mowers Z44 and Z52 Accu-Z Razor (S/N 472620 and above) 23802 357-044SM Service Manual 2006 Printed 9/24/09 Copyright 2006 All rights Reserved Land Pride provides this publication as is without warranty
Stellar 4 Clutch Manual
 INSTRUCTIONS Stellar 4 Clutch Manual Thank you for choosing Tomar products; we are proud to be your manufacturer of choice. Please read this instruction sheet carefully before beginning installation, and
1. General Description
 1. General Description A: SPECIFICATION 1. MANUAL TRANSMISSION AND FRONT DIFFERENTIAL Type Transmission gear ratio Front reduction gear Rear reduction gear Front differential Center differential Final
Gen III Front Drive System Differential Gearcase P/N
 Gen III Front Drive System Differential Gearcase P/N 6203-01-256 Parts and Service Manual Rev. 0 Released 11/12/2007 Basic Operation: The Hilliard Front Drive System (Differential) is an electro-mechanically-activated
MAINTENANCE MANUAL DP-265
 MAINTENANCE MANUAL DP-265 Drive Gears Sisu Axles, Inc. Autotehtaantie 1 P.O. Box 189 FIN-13101 Hämeenlinna Finland Phone int + 358 204 55 2999 Fax int + 358 204 55 2900 DP265DG.PDF (2/2003) k Table of
1. Spare Parts List 1.1 Preface The spare parts list is only valid for the type and versions of transmission, as shown below. You will find the transm
 S P A R E P A R T S L I S T A N D E X P L O S I O N V I E W P A S C A T A L O G U E R T R E A S P ZF 15 MIV (HBW 150 V) Cod. 310.01.0100 1. Spare Parts List 1.1 Preface The spare parts list is only valid
INSTALLATION & USER S GUIDE
 REKLUSE MOTOR SPORTS The Rekluse Core EXP Kit with Adjustable Slave Cylinder INSTALLATION & USER S GUIDE Doc ID: 191-7705A Doc Rev: 051215 OVERVIEW This kit replaces the OEM core clutch components including
Tool Description. Heim Joint Press Tool Usage Date: Sept 22, Author: MW
 Product: Heim Joint Press Tool (HJPT) Author: MW Document Number: HJPT-001 Tool Description 1) The Heim Joint Press Tool (HJPT) is used to remove and press in new bearings to KTM offroad motorcycles swingarms
2018 MotoTrax. Track Kit Installation Manual
 2018 MotoTrax Track Kit Installation Manual 1 Preparing the bike 1) Put the motorcycle on a stand. 2) Remove stock drive chain 3) Remove the rear wheel 4) Remove the mud flap 5) Disconnect the suspension
Installation Procedure GR40 S197 SLA Front Suspension System (Does not include Aluminum Spindle and Hub Instructions)
") Installation Procedure GR40 S197 SLA Front Suspension System (Does not include Aluminum Spindle and Hub Instructions) Please take the time and read these instructions first! The GR40 S197 system is designed
Installation Procedure GR40 S197 SLA Front Suspension System (Does not include Aluminum Spindle and Hub Instructions) Please take the time and read these instructions first! The GR40 S197 system is designed
PPM-D44538RJK JK Rear 5.38 Ring and Pinion Installation Instructions Version 1
 PPM-D44538RJK JK Rear 5.38 Ring and Pinion Installation Instructions Version 1 GENERAL NOTES: Gear set up and installation should be performed by someone experienced in gear and axle set up Special tools
KING KONG CLUTCH INSTALLATION INSTRUCTIONS
 KING KONG CLUTCH INSTALLATION INSTRUCTIONS over view BAKER KING KONG CLUTCH V.05_091008 FEATURES: 1 Piece steel clutch basket design 66 tooth ring gear configuration, 23% thicker than stock 20 massive
Ilustrated Parts List
 Spicer Drive Axles Ilustrated Parts List Spicer All Wheel 4 x 4 Drive System AXIP-0400 November 1999 Page to Insert The Spicer 4x4 Drive System Axle models and other equipment covered in this publication
Original Parts & Accessories Installation Instructions
 Original Parts & Accessories Installation Instructions BMW R1100S Sport Rear Stand Part Number: 82 00 0 419 570 Sport Rear Stand Overview: The Sport Rear Stand is designed to lift and support the R 1100
CALIFORNIA TRIMMER MOWER MAINTENANCE MANUAL
 CALIFORNIA TRIMMER MOWER MAINTENANCE MANUAL 2 Table of Contents Section 1: General Information Page Handle Assembly Instructions 4 Maintenance All Models 6 Oil Change Procedures All Models 9 Height Adjustment
INSTALLATION & USER S GUIDE
 INSTALLATION & USER S GUIDE RadiusCX Clutch for cable-actuated bikes Revision: 102617 2017 Rekluse Motor Sports Rekluse Motor Sports, Inc. customerservice@rekluse.com Table of Contents OVERVIEW... 3 INSTALLATION
 Page 1 of 22 SECTION 307-01: Automatic Transaxle/Transmission 4R70E/4R75E ASSEMBLY Procedure revision date: 05/29/2009 Transmission Printable View (1554 KB) Special Tool(s) Air Test Plate, Transmission
WORKSHEET 4-1 Transaxle Case Removal and Component Identification
 WORKSHEET 4-1 Transaxle Case Removal and Component Identification Vehicle: Year/Prod. Date: Engine Transmission: Worksheet Objectives With this worksheet, you will follow the disassembly of a front-drive
WARNING: the engine does not come with oil in it. Please fill the oil before starting. The 200cc hardknock requires 9/10 of a quart of oil.
 WARNING: the engine does not come with oil in it. Please fill the oil before starting. The 200cc hardknock requires 9/10 of a quart of oil. Things needed for assembly. -2 tubes of blue loc-tite. I don
Type 1051 and 1052 Size 33 Diaphragm Rotary Actuator
 Instruction Manual Type 1051 and 1052 Size 33 Diaphragm Rotary Actuator 1051 & 1052 Actuator Contents Introduction............................. 1 Scope of Manual........................... 1 Description................................
Models 642E, 642F, 662E, 644E, 664F, & 6A4E
 Models E, F, E, E, F, & AE 0 0 0 0 Models E, F, E, E, F, & AE. -0 Lock Jam Nut /-. -0 Flat Idler. -B Auger Idler Arm. 0-0A Hex Cap Screw /- x.0. -0 Bushing. -0 Bell Washer. -00 Hex Nut /-. -0 Hex Lock
Designed for the Street Proven on the Track
 Supercharger Pulley Tensioner Power Steering Delete Bracket and Optional A/C Delete Pulley Installation The TDR Tensioner Power Steering Delete Bracket installs in place of the power steering assembly.
Last month we looked at the
 TECHNICAL TRAINING Up To Standards Author: Mike Weinberg, Contributing Editor Subject Matter: Internal components Unit: Tremec TR6070 Vehicle Application: 2014 Corvette Stingray Inside the Tremec TR6070
Multistrada (MTS) Tank Installation Notes. Tools Required. Phase 1: Remove Fairings. Phase 2: Remove Fuel Tank
 Tank Installation Notes. Tools Required. Phase 1: Remove Fairings. Phase 2: Remove Fuel Tank") The California Cycleworks MTS tank provides an aftermarket alternative to the OEM nylon fuel tanks as used on aircooled Desmodue Ducati Multistrada 1100, 1000, and 620 models. This fuel tank is NOT for
The California Cycleworks MTS tank provides an aftermarket alternative to the OEM nylon fuel tanks as used on aircooled Desmodue Ducati Multistrada 1100, 1000, and 620 models. This fuel tank is NOT for
INSTALLATION GUIDE Manual Revision:
 REKLUSE MOTOR SPORTS The z-start Pro Clutch INSTALLATION GUIDE KTM 125, 144, 200 2-Stroke KTM 250, 300 2-Stroke KTM 250 SXF, XC, XC-W KTM 400 XC-W KTM 450, 505 SXF, XC-F KTM 450, 530 XCR-W, EXC-R Husaberg
15.Main Shaft Assembly
 15.Main Shaft Assembly A: REMOVAL 1) Remove the manual transmission assembly from vehicle. 2) Remove the transfer case with extension case assembly.
MTMANUAL TRANSMISSION GENERAL 1. SPECIFICATIONS. 1) General Specifications. 2) Tightening Torque MANUAL TRANSMISSION
 General Specifications. 2) Tightening Torque MANUAL TRANSMISSION") 03-3 MT GENERAL 1. SPECIFICATIONS 1) General Specifications 2) Tightening Torque 03-4 OVERVIEW AND OPERATION PROCESS 1. OVERVIEW 4WD Features 1. All gears use the helical type and high strength materials.
03-3 MT GENERAL 1. SPECIFICATIONS 1) General Specifications 2) Tightening Torque 03-4 OVERVIEW AND OPERATION PROCESS 1. OVERVIEW 4WD Features 1. All gears use the helical type and high strength materials.
Current. Installation Instructions
 by Trike Conversion Kit 2004 - Current Harley-Davidson Sportster Installation Instructions REVISED 4-2017 California Sidecar Parts & Technical Support 434.263.8866 Table of contents: 1. Warnings and Considerations
PRO-CLUTCH TM PC-1100-CA Evo Big-Twin. chain drive primary PC-1200-CA Evo Big-Twin. chain drive primary PC-1298-CA
 HOME OF PRIMO BELT DRIVES PRO-CLUTCH TM PC-1100-CA / PC-1200-CA / PC-1298-CA / 1056-0020 INSTALLATION INSTRUCTIONS PC-1100-CA 1986-1989 Evo Big-Twin chain drive primary Pro-Clutch TM Stock Clutch PC-1200-CA
Installation and Maintenance Instructions JSE MAEAD Extruder Clutch. World Leader in Modular Torque Limiters
 World Leader in Modular Torque Limiters Installation and Maintenance Instructions JSE.5-0104MAEAD Extruder Clutch 1304 Twin Oaks Street Wichita Falls, Texas 76302 (940) 723-7800 Fax: (940) 723-7888 E-mail:
Agri-Fab OWNERS MANUAL. Model No " ROUGH CUT TRAILMOWER. CAUTION: Read Rules for Safe Operation and Instructions Carefully
 Agri-Fab OWNERS MANUAL Model No. 45-03071 45-0361 CAUTION: Read Rules for Safe Operation and Instructions Carefully Safety Assembly Operation Maintenance Parts 42" ROUGH CUT TRAILMOWER the fastest way
70001 and Clutch Rebuild Instructions
 70001 and 70010 Clutch Rebuild Instructions Brinn, Incorporated 1615 Tech Drive Bay City, MI 48706 Telephone 989.686.8920 Fax 989.686.6520 www.brinninc.com Notice Use these instructions if you only want
Installation Instructions
 Installation Instructions for Harley Tri-Glide Trike Step 1 Step 2 Remove trike body and set aside Disassemble the rear suspension. Set aside the differential, ring gear, pulley, differential clamps, wheel
RETRACTED SIDE MINIMUM. 4 1/4 in. [108.0 mm] CP-493 HANGER (WITHOUT TRIGGER) RETRACTED SIDE CP-007 CLIP ACTIVATED SIDE MINIMUM. [108.
![RETRACTED SIDE MINIMUM. 4 1/4 in. [108.0 mm] CP-493 HANGER (WITHOUT TRIGGER) RETRACTED SIDE CP-007 CLIP ACTIVATED SIDE MINIMUM. [108.](/thumbs/88/116251221.jpg "RETRACTED SIDE MINIMUM. 4 1/4 in. [108.0 mm] CP-493 HANGER (WITHOUT TRIGGER) RETRACTED SIDE CP-007 CLIP ACTIVATED SIDE MINIMUM. [108.") TYPE CC-NRB CATCH N CLOSE CROWDERFRAME POCKET DOOR KIT INSTRUCTION SHEET FOR NARROW DOORS 18 in [457 mm] TO LESS THAN 26 in [660 mm] WIDE ONLY ACTIVATED SIDE CC-493 HANGER (WITH TRIGGER) SEE RIGHT (COMPLETE
TYPE CC-NRB CATCH N CLOSE CROWDERFRAME POCKET DOOR KIT INSTRUCTION SHEET FOR NARROW DOORS 18 in [457 mm] TO LESS THAN 26 in [660 mm] WIDE ONLY ACTIVATED SIDE CC-493 HANGER (WITH TRIGGER) SEE RIGHT (COMPLETE
Printed from CyberCat-STIGA Section: GARDEN ELECTRICAL SYSTEM
 Section: GARDEN ELECTRICAL SYSTEM Section: GARDEN ELECTRICAL SYSTEM 2312 2333 1 1 1134-3625-01 Harness 2 1 1134-3623-02.Interlock module 4 2 9849-8013-16 Screw 5 2 1134-3132-01 Cable holder 6 2 1134-3204-01
Section 4 GOV. CONTROLS & GOVERNOR
 Section 4 GOV. CONTROLS & Page GENERAL INFORMATION................................................................ 1 REMOTE CONTROLS Section Contents Speed Regulation.................................................................
Global West Suspension 655 South Lincoln Ave San Bernardino Ca Phone Fax Web address globalwest.
 Global West Suspension 655 South Lincoln Ave San Bernardino Ca. 92408 Phone 877-470-2975 Fax 909-890-0703 Web address globalwest.net Mustang coilover instruction sheets for 64-66 Kit includes the following
INSTALLATION & USER S GUIDE
 REKLUSE MOTOR SPORTS The Rekluse Core EXP Kit for DDS Clutches INSTALLATION & USER S GUIDE Doc ID: 191-7701A Doc Rev: 122817 OVERVIEW This kit replaces the OEM core clutch components including the center
RC4WD Diablo Instruction Manual
 Version 1.1 RC4WD Diablo Instruction Manual Thank you for your purchase. Welcome to the RC4WD family. This kit is a combination of many specially engineered and manufactured parts. Enjoy your build. This
C5/C6 Level 3 Coilover
 Part # 11510311-1998-2013 C5/C6 Level 3 CoilOver System Front Components: 11513111 Front Coilovers Recommended Tools Rear Components: 11516111 Rear Coilover Miscellaneous Components: 85000000 Spanner Wrench
introduction Welcome to Midwest Motorcycle Supply s Engine Reference Guide.
 introduction Welcome to Midwest Motorcycle Supply s Engine Reference Guide. In an effort to make servicing your V-Twin engine easier, the staff at Midwest Motorcycle Supply have put together what we believe
Tech Note Truck 14 & 15.5 Twin Plate Cast Iron Type Installation Guidelines
 1. (14 & 15.5 ) Check condition of the flywheel. Grind to resurface or replace flywheel. Surface MUST BE machined or premature clutch failure can occur. Flywheel depth must be 2.938 (74.62mm) for 14 (350mm)
GLACIER PRO RANGER MID SIZE MOUNT KIT
 GLACIER PRO RANGER MID SIZE MOUNT KIT P/N 2880261 APPLICATION FOR USE WITH THE GLACIER PRO MID SIZE PLOW SYSTEM (P/N 2880260) ON 2010 AND NEWER RANGER MID SIZE MODELS BEFORE YOU BEGIN Read these instructions
INSTALLATION & USER S GUIDE
 REKLUSE MOTOR SPORTS The Rekluse EXP Kit for KTM 690 & Husqvarna 701 - LC4 OVERVIEW INSTALLATION & USER S GUIDE Doc ID: 191-6380A Doc Rev: 070716 For MY2016 bike owners only: Refer to the Slave Cylinder
Part Name. TOYOTA electrical tester. Engine sling device. Crankshaft pulley replacer. Belt tension gage. Connecting rod bushing remover & replacer
 16-2 SST LIST Illustration Part No. Part Name Section : Newly adopted SST 1 2 4 5 6 7 8 11 12 13 14 15 09082-76002-71 (09082-00050) TOYOTA electrical tester 09090-76002-71 (09090-04020) Engine sling device
SD Bendix Manual Slack Adjusters DESCRIPTION ADJUSTING MECHANISM OPERATION
 SD-05-1200 Bendix Manual Slack Adjusters WORM SHAFT (LOCK SCREW) FIGURE 1 - POSITIVE LOCK TYPE SLACK ADJUSTER DESCRIPTION In an s-cam type foundation brake, the final link between the pneumatic system
DRIVE AXLE Nissan 240SX DESCRIPTION & OPERATION AXLE RATIO & IDENTIFICATION AXLE SHAFT & BEARING R & I DRIVE SHAFT R & I
 DRIVE AXLE 1990 Nissan 240SX 1990 DRIVE AXLES Rear Axle - R200 240SX, 300ZX DESCRIPTION & OPERATION The axle assembly is a hypoid type gear with integral carrier housing. The pinion bearing preload adjustment
TYPE CC-W CATCH N CLOSE CROWDERFRAME POCKET DOOR KIT INSTRUCTION SHEET FOR DOORS 26 in [660 mm] TO 48 in [1219 mm] WIDE ONLY
![TYPE CC-W CATCH N CLOSE CROWDERFRAME POCKET DOOR KIT INSTRUCTION SHEET FOR DOORS 26 in [660 mm] TO 48 in [1219 mm] WIDE ONLY](/thumbs/93/113592678.jpg "TYPE CC-W CATCH N CLOSE CROWDERFRAME POCKET DOOR KIT INSTRUCTION SHEET FOR DOORS 26 in [660 mm] TO 48 in [1219 mm] WIDE ONLY") TYPE CC-W CATCH N CLOSE CROWDERFRAME POCKET DOOR KIT INSTRUCTION SHEET FOR DOORS 26 in [660 mm] TO 48 in [1219 mm] WIDE ONLY (COMPLETE TYPE CC-W KIT ILLUSTRATED. FRAMING BY OTHERS) CATCH N CLOSE TM CROWDERFRAME
TYPE CC-W CATCH N CLOSE CROWDERFRAME POCKET DOOR KIT INSTRUCTION SHEET FOR DOORS 26 in [660 mm] TO 48 in [1219 mm] WIDE ONLY (COMPLETE TYPE CC-W KIT ILLUSTRATED. FRAMING BY OTHERS) CATCH N CLOSE TM CROWDERFRAME