Superbike Kit
|
|
|
- Jason Oliver
- 5 years ago
- Views:
Transcription

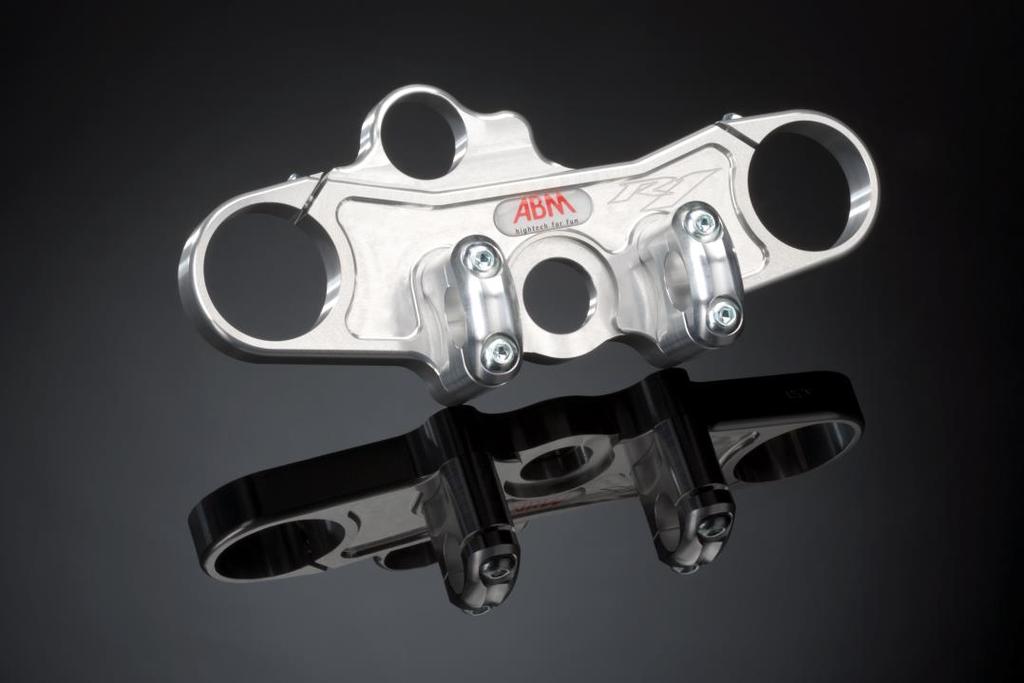

1 Superbike Kit
2 Mounting Instructions & Safety Instructions for Honda CBR 1000 RR ABS model year Attention Important Safety Instructions: Thank you for purchasing a Spiegler Handlebar riser kit. Please make sure that you read all directions before you start to work on your bike. If you are not a certified motorcycle mechanic, stop right here and contact your local certified motorcycle repair shop to have the kit installed. Steering components and brakes are safety related vehicle parts; therefore this work can only be performed by certified mechanics. Brake fluid can damage the paint and surface of the fairing and other components. Protect all surfaces properly. Use only new brake fluid from a sealed container. ABS-brake systems should only be bled and maintained by an authorized repair shop. During removal and installation of OE parts follow the Honda repair shop manual especially for the torque settings of fasteners. To guarantee safe functioning it is necessary that all contact surfaces of clamping connections are clean, dry and free of damages and oil, silicon or other cleaning solutions. It is important that you follow the recommend torque settings. The torque settings are for dry connections. Check the torque settings at each inspection of your bike. It is your obligation to check this product on regular intervals to ensure if service or replacement parts are needed. This handlebar riser kit is a safety related part of your motorcycle. After an accident or crash check the handlebar, riser clamps and triple clamp and replace it if there are any signs of damage. Never tie down your motorcycle at the handlebars during transportation on a trailer, truck etc. This product was developed for the stock motorcycle. ABM Fahrzeugtechnik GmbH excludes any liability or warranty for damages which resulted from a combination with other aftermarket parts which might have been improperly installed or from a lack of maintenance. Revision: ABM Fahrzeugtechnik GmbH Page 2 of 12
3 1 Preparations Read and understand the Important Safety Instructions. During the upcoming work your motorcycle could fall over. Make sure that your motorcycle is secured on an even floor and cannot fall over, roll away or similar. Keep children and pets out of the work area. Protect dismantled parts from getting damaged. Under no circumstances remove the upper triple clamp without relieving the front wheel; otherwise you could damage the lower triple clamp. During dismantling of the motorcycle watch how the parts were mounted and use the same bolts again when installing the parts back onto the motorcycle so far no other instructions are provided. 2 Content and recommended Accessories Needed special tools? Torque wrench Throttle cable(s): Original Clutch cable / line: New, included Labor time: Approx. 4-5 hours Fairing trimming: No Windshield trimming: No Brake line: New, included Riser/Handlebar BK1, 0439 Choke cable: N/A Scope of Supply: Handlebar Extensions: Yes, included Upper triple clamp with riser blocks, handlebar, clutch cable, brake line, bracket for brake fluid reservoir, mirror spacer kit, handlebar extensions, horn cable extension, mounting kit Revision: ABM Fahrzeugtechnik GmbH Page 3 of 12


4 3 Installation Remove seat and tank covers. Disconnect all switch housing and ignition lock connections under the cover. Release the harness from the mounting loop. Disconnect the horn connectors and remove the zip tie. Remove both handlebar weights and the left handlebar grip (use air pressure for the grip) Unhinge the clutch cable at the lever. Remove nut with the plastic cover and loosen up the pinch bolts in the triple clamp. Remove the steering damper cover and the hex nut of the steering damper arm at the triple clamp. Pull up the triple clamp and remove it. Tip: Unload the front wheel a little and it will be easier to slide the triple clamp off. Revision: ABM Fahrzeugtechnik GmbH Page 4 of 12


5 Remove the original clutch cable and replace it with the new one. Follow the same routing as for the stock clutch cable, use the original support brackets. TIP: Before you remove the original clutch cable attached a fish wire to the end of it. Pull the original clutch cable out and attach the new clutch cable to the fish wire. Pull the new cable into position and remove the fish wire. Drain the brake fluid out of the master cylinder and reservoir. Cover up the related work area. Remove the upper brake line from the master cylinder. Tip: Plug the fitting and master cylinder connection with shop towel paper. Loosen up the switch housing and the master cylinder. Remove both clip-ons. Tip: Loosen the banjo bolt at the master cylinder and let the rest of the brake fluid drip out. Plug the master cylinder and brake line fitting with shop paper towels. Slide the supplied aluminum spacer ring over the steering stem. Revision: ABM Fahrzeugtechnik GmbH Page 5 of 12


.")

6 Remove the mounting bolts for the ignition lock with special tools or drill out the bolt heads. Unscrew the mounting bolts for the immobilizer and remove the lock from the triple clamp. Install the ignition lock with the included spacers, bolts and washers at the new triple clamp (Torque Nm). For theft protection you can drill out the hex in the bolt heads. Assemble the immobilizer to the triple clamp. Use for each bolt an additional washer, see picture. Align all parts centric. Install the riser clamps utilizing the supplied the M10 bolts and Schnorr-safety washer (use also thread locker) at the triple clamp with 28Nm. Revision: ABM Fahrzeugtechnik GmbH Page 6 of 12


7 The wider side of the riser clamps point forwards! Attention: The bolts should not protrude into the clamping area! Install the triple clamp with the original steering stem nut and cover. Apply torque settings in reference to the manufacturers shop manual. Torque 2x M8x20 pinch bolts with 18Nm. Align the handlebar and tighten slightly up the riser clamps. Assemble the handlebar extensions. Revision: ABM Fahrzeugtechnik GmbH Page 7 of 12
 onto new handlebar.")


8 Install switch housings and clutch/brake/throttle cables preliminary (do not tighten by now) onto new handlebar. Attention: Install the switch housings and handlebar grips on both side in this way that you have 10mm of the bar extension left, see picture. Important: All wires and cables of the switch housings and controls need to be behind the fork legs. The clutch cable and the brake line are routed in front of the fork legs. Connect the instrument plug connector underneath the tank and route the cables in the same way as the original. Install the steering damper arm with the original hex nut at the new triple clamp. Mount the plastic cover. Revision: ABM Fahrzeugtechnik GmbH Page 8 of 12


9 Extend the horn cable with the supplied extension. Next use the supplied zip tie to secure it into place. Mount the original brake fluid reservoir with the supplied bracket as shown in the picture. After installation you will need to adjust (bend) the bracket slightly so that the reservoir stands up straight and is not colliding with the fairing. Disconnect the connectors for the blinker. Unbolt the 2 windscreen bolt in the middle. Before removing the 2 mirrors rotate the mirror footer in this way that you can replace the hex head bolt with the supplied M6x70 bolt. Widen/drill carefully the forward holes in the fairing stay to 8.5mm. Place the 4 bushings onto the mirror support. Install the mirror risers onto the mirrors. Next place the mirror-riser assembly onto the fairing and use the original nut to mount it to the fairing stay. Use the extra-long special nut and a washer to install it through the widened 8.5mm hole and tighten it down with the original bolt. Align the mirror pads tighten all fastener. Revision: ABM Fahrzeugtechnik GmbH Page 9 of 12


10 Slide the supplied spacer between fairing stay and fairing (windshield bolt location). Mount the supplied longer windshield bolts. Reconnect the blinker cables. Check functionality. Install the supplied longer stainless steel braided brake line. Make to install the supplied 2 way manifold in this way, that the pressed in brass ferrule side connects to the original steel hard line. Attention: You can align the fittings to eliminate any line twist. Follow the brake line instructions. Revision: ABM Fahrzeugtechnik GmbH Page 10 of 12


11 Align the master cylinder. Check (with no pressure in the system) the master cylinder if you can pull the lever towards the handlebar without hitting any object. Bleed the ABS brake system in accordance with the manufacturers shop manual. Use glue to install the left handlebar grip. Before you tighten up the handlebar in the riser clamps make sure that there is no contact with other body parts at full steering lock (LH & RH) such as the tank or fairing. Tighten riser clamp bolts with 24Nm and plug in the bolt covers. For the proper alignment of the switch housings you will need to drill the holes for the locator pins into the handlebar. Therefore wrap some electrical tape around the handlebar at the pin location and align the switch housings. Now apply pressure to the switch housing and center punch the indentations in the tape. Drill the holes accordingly to the diameter of the locator pins. Install the LH & RH switch housings. Connect the clutch cable. Revision: ABM Fahrzeugtechnik GmbH Page 11 of 12

12 4 Final Check Check that at full steering lock (left & right) nothing gets kinked, shaved or pinched. All controls (brake, throttle and clutch) have to function without any problems. This needs to be checked also with compressing the suspension. All bolts have to be tightened to the recommended torque specifications. Make sure that the handlebar, switch housings have enough free play at left and right steering stop. The handlebar has to move from left to right steering lock freely. Check the play of the throttle cables, the rpm should not increase when moving the handlebar to left and right. After finishing the install check all components for leaks and function. Ensure that the brake fluid level in the reservoir is to specs. Check that the front wheel spins freely. Check the brake system and electrical systems. Do a test ride! After this test ride check again on all fasteners, leaks, proper install of all movable parts, enough clearance and a proper brake fluid level in the reservoir. Check again that the front wheel spins freely. Check the brake system for any overheating. After approximately 100 mi check all screw connections for proper torque specs. Check the handlebar and all controls again. Revision: ABM Fahrzeugtechnik GmbH Page 12 of 12
Be sure to read and go over all pages before you start your installation
 Yamaha Gen-2 V-MaxV Holeshot Superbike Bars Installation Guide Pre-Installation Note Be sure to read and go over all pages before you start your installation Preparation for Installation A) It is recommended
INSTALLATION INSTRUCTIONS FOR THE MOTOR TRIKE CROSS COUNTRY / CROSS ROADS / HARD BALL RAKE KIT
 INSTALLATION INSTRUCTIONS FOR THE MOTOR TRIKE CROSS COUNTRY / CROSS ROADS / HARD BALL RAKE KIT Thank you for choosing the Motor Trike Cross Country / Cross Roads / Hard Ball rake kit. We ask that you read
2010 BMW S1000RR TracStar HeliBars TS mm taller (1.7 ) ~ 20mm Rear Offset (.8 ) ~ Stock Width (25 ¼ )
 ~ 20mm Rear Offset (.8 ) ~ Stock Width (25 ¼ )") WARNING: IMPROPER INSTALLATION COULD RESULT IN SERIOUS INJURY OR DEATH. HAVE A QUALIFIED MECHANIC INSTALL YOUR HELIBARS. Right Side To protect your motorcycle during installation place clean shop rags
WARNING: IMPROPER INSTALLATION COULD RESULT IN SERIOUS INJURY OR DEATH. HAVE A QUALIFIED MECHANIC INSTALL YOUR HELIBARS. Right Side To protect your motorcycle during installation place clean shop rags
INSTALLATION INSTRUCTIONS
 INSTALLATION INSTRUCTIONS 2013-2014 Honda CBR500R/RA Tour Performance Handlebar Risers P/N: HR01087 IMPORTANT: PLEASE GIVE CUSTOMER ENCLOSED INFORMATION! Thank you for your purchase of our HeliBars. They
w w w. h d o n l i n e s h o p. d e STREET SLAMMER HANDLEBAR KIT GENERAL INSTALLATION -J03363 REV Kit Number Models Kit Contents
 -J06 REV. 006-06- GENERAL Kit Number 69-0 Models STREET SLAMMER HANDLEBAR KIT Ask a Harley-Davidson dealer or refer to the latest Harley- Davidson Genuine Motor Accessories and Genuine Motor Parts catalog
INSTALLATION INSTRUCTIONS
 INSTALLATION INSTRUCTIONS 2017+ BMW R9T Racer HeliBars Replacement Triple Clamp w/built in Risers Part # HRT05126 IMPORTANT: PLEASE GIVE CUSTOMER ENCLOSED INFORMATION! Thank you for your purchase of our
INSTALLATION PROCESS: FK003D945-7 Complete Front, Rear, and Clutch A.B.S. KIT Harley Davidson FLH Touring Models
 INSTALLATION PROCESS: FK003D945-7 Complete Front, Rear, and Clutch A.B.S. KIT 2014-2017 Harley Davidson FLH Touring Models Parts List: 4 Lines 1 Brake Light Switch Adapter 7 Single banjo bolts 2 Caliper
INSTALLATION INSTRUCTIONS
 INSTALLATION INSTRUCTIONS BMW S1000RR 2015+ TracStar Replacement Handlebars P/N: TS05099 IMPORTANT: PLEASE GIVE CUSTOMER ENCLOSED INFORMATION! Thank you for your purchase of our HeliBars. They are designed
INSTALLATION INSTRUCTIONS
 INSTALLATION INSTRUCTIONS Ducati 749/999 TracStar TM HeliBars Replacement Handlebars P/N: TS07059 IMPORTANT: PLEASE GIVE CUSTOMER ENCLOSED INFORMATION! Thank you for your purchase of our HeliBars. They
INSTALLATION INSTRUCTIONS
 INSTALLATION INSTRUCTIONS HeliBars Tour Performance Adjustable Handlebar Bridge 2006-2013 Yamaha FJR1300 US & European P/N: HR09079 IMPORTANT: PLEASE GIVE CUSTOMER ENCLOSED INFORMATION! Thank you for your
INSTALLATION GUIDE. RMS510, 511, 512, 513, 511MC 510-OR, 512-OR Manual Revision:
 REKLUSE MOTOR SPORTS z-start Dual-Actuated Brake Kit INSTALLATION GUIDE RMS510, 511, 512, 513, 511MC 510-OR, 512-OR 196-210 Manual Revision: 051309 2002-2009 Rekluse Motor Sports Rekluse Motor Sports,
INSTALLATION PROCESS: FK003D932-6 FRONT & REAR A.B.S. KIT 2017 Harley Davidson FXDL Lowrider S ABS
 INSTALLATION PROCESS: FK003D932-6 FRONT & REAR A.B.S. KIT 2017 Harley Davidson FXDL Lowrider S ABS Parts List: 6 Lines 1 Splitter Block 4 A.B.S. Block Bolts (KIT A) 1 1x1/4 x20x1 Bolt 4 Caliper/Front Master
WARNING: the engine does not come with oil in it. Please fill the oil before starting. The 200cc hardknock requires 9/10 of a quart of oil.
 WARNING: the engine does not come with oil in it. Please fill the oil before starting. The 200cc hardknock requires 9/10 of a quart of oil. Things needed for assembly. -2 tubes of blue loc-tite. I don
Page 1. File: Motolight caliper one-piece Harley Date: 8/15/2006
 Page 1 Harley-Davidson FL Caliper Mount Installation One-piece mounting brackets You should allow about two to three hours for installation. We suggest you use a well-lighted space for installation. PLEASE
Torque specifications Stainless steel ft. lbs Aluminum ft. lbs
 INSTALLATION PROCESS: FK003D738C Front and Rear Brake Line Kit 2009-2012 BMW S1000 RR ABS Torque specifications Stainless steel 15-17 ft. lbs Aluminum 12-15 ft. lbs Step 1: Identify the key components
ENGINE REMOVAL & INSTALLATION
 TORQUE VALUES ENGINE MOUNTING = Apply Victory All Purpose Grease 2872187 1. Install all bolts in order A-H Do not tighten. E 41 Nm (30 lb-ft) M8 x 25mm D 111 Nm (82 lb-ft) 12 x 100mm ENGINE INSTALLATION
INSTALLATION INSTRUCTIONS. KAWASAKI Concours Handlebar Risers for ABS & Non-ABS Part # HR04042 & HR04042-NABS
 INSTALLATION INSTRUCTIONS KAWASAKI Concours14 2008-2015 Handlebar Risers for ABS & Non-ABS Part # HR04042 & HR04042-NABS IMPORTANT: PLEASE GIVE CUSTOMER ENCLOSED INFORMATION! Thank you for your purchase
INSTALLATION INSTRUCTIONS
 INSTALLATION INSTRUCTIONS Horizon ST Patented Multi Axis Adjustable Handlebar System for 2012-2015 BMW K1600GTL P/N: HST05078 IMPORTANT: PLEASE GIVE CUSTOMER ENCLOSED INFORMATION! Patent No: US 8,230,758
Sherco Setup and Lubrication Guide
 Sherco Setup and This guide is designed to provide the Sherco owner with instructions on how to: Set up a new bike Clean and re-oil the air filter Change the transmission oil Change the fork oil Repack
Replacing a Brake Line by UCLA-Vstar, April 2007
 Replacing a Brake Line by UCLA-Vstar, April 2007 Replacing a brake line may seem intimidating if you ve never bled brakes before, and especially if you cannot find a stepby-step how-to. Here s a crude
CALIFORNIA TRIMMER MOWER MAINTENANCE MANUAL
 CALIFORNIA TRIMMER MOWER MAINTENANCE MANUAL 2 Table of Contents Section 1: General Information Page Handle Assembly Instructions 4 Maintenance All Models 6 Oil Change Procedures All Models 9 Height Adjustment
w w w. h d o n l i n e s h o p. d e ROAD KING FAT HANDLEBAR KIT GENERAL PREPARATION - ALL MODELS -J02375 REV Kit Number Models ABS Models
 -J02375 REV. 2008--9 GENERAL Kit Number 56675-05 Models For model fitment information, see the P&A Retail Catalog or the Parts and Accessories section of www.harley-davidson.com (English only). ABS Models
Engine Removal/Installation
 Engine Removal/Installation Make sure jacks and safety stands are placed properly and hoist brackets are attached to correct positions on the engine. (See Section 1). Apply parking brake and block rear
Owners manual. Öhlins Superbike front fork FG 170
 Owners manual Öhlins Superbike front fork FG 0 Including: Setting up your fork Changing springs and seals Service the fork Trouble shooting Technical info Spare parts & tools Öhlins super bike front fork
Torque specifications Stainless steel ft. lbs Aluminum ft. lbs
 INSTALLATION PROCESS: FK003D802-8 Complete Brake Line Kit 2013 Kawasaki VN1700 Voyager Custom ABS 2013 Kawasaki VN1700 Vaquero ABS Torque specifications Stainless steel 15-17 ft. lbs Aluminum 12-15 ft.
P/N Instr Rev Page 1 of 11
 BRAKE AND CLUTCH KIT P/N 2883864 IMPORTANT Due to the technical nature of this kit, Indian Motorcycle insists this installation be performed by a certified Indian Motorcycle Technician. APPLICATION Verify
TSS Fit Kit Installation Instructions Timbersled Snow Bike System
 TSS Fit Kit Installation Instructions Timbersled Snow Bike System Information needed before you start: Read the entire installation instructions before starting. The instruction sheet is universal for
INSTALLATION INSTRUCTIONS Horizon CCR HZ13054
 INSTALLATION INSTRUCTIONS Horizon CCR HZ13054 IMPORTANT: PLEASE GIVE CUSTOMER ENCLOSED INFORMATION! Thank you for your purchase of our HeliBars. They are designed to increase your long distance comfort
INSTALLATION INSTRUCTIONS FOR THE MOTOR TRIKE GL1500 RAKE KIT
 INSTALLATION INSTRUCTIONS FOR THE MOTOR TRIKE GL1500 RAKE KIT Thank you for choosing the Motor Trike GL1500 Rake Kit. We ask that you read the directions before you start and follow them very closely.
Page 1. File: Motolight caliper one-piece Date: 8/14/2006
 Page 1 Caliper Mount Installation One-piece mounting brackets You should allow about two to three hours for installation. We suggest you use a well-lighted space for installation. PLEASE READ ALL THE INSTRUCTIONS.
Accessory Fitting Instructions
 Accessory Fitting Instructions Kit Number Models Affected A9689 Thruxton 00 A96808 Thruxton 00 R Low Handlebar Kit Front Fairing Kit Kit Number Models Affected A97080 Thruxton 00 A97084 Thruxton 00 R Note:
MOUNTAIN HORSE INSTALL KIT
 MOUNTAIN HORSE INSTALL KIT P/N 9928508 APPLICATION Installation Instructions are for all Mountain Horse TSS and TFS Installation Kits and Timbersled Mountain Horse chassis installations. The Timbersled
INSTALLATION INSTRUCTIONS
 INSTALLATION INSTRUCTIONS 2004-2008 Ducati ST3/ST4 HeliBars Replacement Handlebar Risers P/N: HB2405 IMPORTANT: PLEASE GIVE CUSTOMER ENCLOSED INFORMATION! Thank you for your purchase of our HeliBars. They
Tusk Pannier Racks. Instructions and information KLR
 1 Tusk Pannier Racks Instructions and information KLR650 2008 + Congratulations on your purchase of the Tusk Pannier Racks. These racks are made to handle extreme adventure riding, but work great for the
Slingshot Rotrex Supercharger Kit
 Slingshot Rotrex Supercharger Kit This supercharger kit improves on the Slingshot by forcing more dense air into the engine and creating more power. Installation time of the supercharger depends on you
Fitting Instructions: Sprint ST (955i), Sprint RS & Tiger 955cc Heated Grip Kit
, Sprint RS & Tiger 955cc Heated Grip Kit") Fitting Instructions: Sprint ST (955i), Sprint RS & Tiger 955cc Heated Grip Kit This accessory kit is designed for use on Triumph Sprint ST (955i), Sprint RS & Tiger 955cc motorcycles only and should not
Fitting Instructions: Sprint ST (955i), Sprint RS & Tiger 955cc Heated Grip Kit This accessory kit is designed for use on Triumph Sprint ST (955i), Sprint RS & Tiger 955cc motorcycles only and should not
Horizon LST Installation Photos Honda GL F6B Bagger P/N: LST01084
 Horizon LST Installation Photos 2001-2015 Honda GL1800 2013-2015 F6B Bagger P/N: LST01084 IMPORTANT: PLEASE GIVE CUSTOMER ENCLOSED INFORMATION! Thank you for your HeliBars purchase. HeliBars are designed
INSTALLATION INSTRUCTIONS HONDA CBR250R P/N: HB01075
 INSTALLATION INSTRUCTIONS HONDA CBR250R P/N: HB01075 IMPORTANT: PLEASE GIVE CUSTOMER ENCLOSED INFORMATION! Thank you for your purchase of our HeliBars. They are designed to increase your long distance
INSTALLATION INSTRUCTIONS
 Accessory Application Publication No. INSTALLATION INSTRUCTIONS HEATED GRIP ATTACHMENT P/N 08T70-MJE-D00 CBR650F/FA MII 14960 Issue Date April 2014 PARTS LIST HEATED GRIP Sold separately (1) (2) (4) (2)
INSTALLATION INSTRUCTIONS FUEL SURGE TANK KIT
 INSTALLATION INSTRUCTIONS FUEL SURGE TANK KIT BMW E46 3-Series, Excl Convertible Document: 19-0056 Support: info@radiumauto.com Relieve fuel pressure in vehicle before beginingthe installation. Disconnect
Sherco Motorcycle Assembly Instructions
 Sherco Motorcycle Assembly This manual is intended to be used as an assembly guide for the Sherco 1.25 2.9 Trials Motorcycles. The motorcycle shown in the pictures is a new 2002, 2.9, the one that you
INSTALLATION PROCESS: FK003D771-9 Complete Brake Line Kit 2012 Yamaha XT 1200Z Super Tenere
 INSTALLATION PROCESS: FK003D771-9 Complete Brake Line Kit 2012 Yamaha XT 1200Z Super Tenere Step 1: Identify the key components that complete our brake line kit: You should have nine (9) lines, one (1)
INSTALLATION INSTRUCTIONS
 INSTALLATION INSTRUCTIONS 2006-2010 Kawasaki ZX10R TracStar Replacment Handlebars P/N: TS04072-KA 2011-2012 Kawasaki ZX10R TracStar Replacment Handlebars P/N: TS04072-KB IMPORTANT: PLEASE GIVE CUSTOMER
Revised BX-1000 BLACK MAX
 Revised 8-22-12 BX-1000 BLACK MAX PLEASE READ THROUGH THE ENTIRE MANUAL BEFORE INSTALLING YOUR BRAKE SYSTEM WARNING - DO NOT USE BRAKE FLUID - USE ATF HYDRAULIC FLUID ONLY **IMPORTANT** DO NOT USE ANY
KIT # MC-2992, MC-2993 INDIAN SCOUT SERIES W/ ABS 2014-PRESENT
 Congratulations on your purchase of an Arnott Motorcycle Air Suspension system. This system provides you with the ability to maintain your bike at a constant level regardless of load, resulting in enhanced
INSTALLATION INSTRUCTIONS
 INSTALLATION INSTRUCTIONS 2006-2008 BMW K1200R TracStar Handlebars P/N: TS05028 IMPORTANT: PLEASE GIVE CUSTOMER ENCLOSED INFORMATION! Thank you for your purchase of our HeliBars. They are designed to increase
SADDLEBAG AUDIO WIRE HARNESS KIT P/N
 SADDLEBAG AUDIO WIRE HARNESS KIT P/N 2880986 APPLICATION ALL INDIAN MOTORCYCLES WITH BOTH TRUNK AND SADDLEBAG AUDIO INSTALLED BEFORE YOU BEGIN Read these instructions and check to be sure all parts and
INSTALLATION GUIDE. RMS500, RMS501, RMS502, RMS503, RMS506, RMS507, RMS508, RMS509, -OR Manual Revision:
 REKLUSE MOTOR SPORTS z-start Brake Kit INSTALLATION GUIDE RMS500, RMS501, RMS502, RMS503, RMS506, RMS507, RMS508, RMS509, -OR 196-200 Manual Revision: 051309 2009 Rekluse Motor Sports Rekluse Motor Sports,
INSTALLATION INSTRUCTIONS
 INSTALLATION INSTRUCTIONS HeliBars Tour Performance Handlebar Riser 2014+ Yamaha Super Tenere P/N: HR09109 IMPORTANT: PLEASE GIVE CUSTOMER ENCLOSED INFORMATION! Thank you for your purchase of our HeliBars.
INSTALLATION INSTRUCTIONS
 INSTALLATION INSTRUCTIONS 1998-2008 R1 & 2008-2013 R6 TracStar Replacment Handlebars P/N: TS09073 IMPORTANT: PLEASE GIVE CUSTOMER ENCLOSED INFORMATION! Thank you for your purchase of our HeliBars. They
03-04 Mach 1. Hellion Power Systems Mach 1 Kit Instructions
 Hellion Power Systems 03-04 Mach 1 Kit Instructions Part 1 Hellion recommends that the front suspension system be installed either by trained professionals or by 5.Remove rack bolts K-Member Installation
INSTALLATION PROCESS: FK003D744 Complete Brake Line Kit VFR800 NON ABS
 INSTALLATION PROCESS: FK003D744 Complete Brake Line Kit 2000-2007 VFR800 NON ABS Step 1: Identify the key components that complete our brake line kit: You should have Ten (10) hoses, one (1) double banjo
MicrofichesExcel. Tavola Posizione Codice Quant Ing
 Tavola Posizione Codice Quant Ing 1 1 T1P52MI-A-011200 1 LH Crankcase 1 2 T1P52MI-A-011300 1 RH Crankcase 1 3 T11119 1 Crankcase gasket 1 4 TOR00037 4 Screw M5 6 1 5 T1P52MI-011400 2 Bush 1 6 T11118 2
CHAS FRONT FORK FRONT FORK LEGS 4-45 FRONT FORK. Order Job/Part Q ty Remarks
 EAS00647 FRONT FORK FRONT FORK LEGS 30 Nm (3.0 m kg, 22 ft lb) 6 Nm (0.6 m kg, 4.3 ft lb) 30 Nm (3.0 m kg, 22 ft lb) Order Job/Part Q ty Remarks 2 3 4 5 Removing the front fork legs Front wheel Front brake
06-11 Civic Si / EM1 Clutch Master Cylinder
 06-11 Civic Si / EM1 Clutch Master Cylinder Upgrade This guide will show you how to install the EM1 CMC upgrade kit in a 2006-2011 Honda Civic Si. Written By: Hybrid Racing 2017 guides.hybrid-racing.com/
Multistrada (MTS) Tank Installation Notes. Tools Required. Phase 1: Remove Fairings. Phase 2: Remove Fuel Tank
 Tank Installation Notes. Tools Required. Phase 1: Remove Fairings. Phase 2: Remove Fuel Tank") The California Cycleworks MTS tank provides an aftermarket alternative to the OEM nylon fuel tanks as used on aircooled Desmodue Ducati Multistrada 1100, 1000, and 620 models. This fuel tank is NOT for
The California Cycleworks MTS tank provides an aftermarket alternative to the OEM nylon fuel tanks as used on aircooled Desmodue Ducati Multistrada 1100, 1000, and 620 models. This fuel tank is NOT for
Brake Upgrade Kit Fitting Instructions Bonneville America
 WARNING: Always have Triumph approved parts, accessories and conversions fitted by a trained technician of an authorised Triumph Dealer. The fitment of parts, accessories and conversions by a technician
99-04 GT. Hellion Power Systems Mustang GT Kit Instructions
 Hellion Power Systems 99-04 Mustang GT Kit Instructions Part 1 Hellion recommends that the front suspension system be installed either by trained professionals or by 5.Remove rack bolts K-Member Installation
INSTALLATION INSTRUCTIONS
 INSTALLATION INSTRUCTIONS 2005-2008 BMW K1200S TracStar Replacment Handlebars P/N: TS05027 IMPORTANT: PLEASE GIVE CUSTOMER ENCLOSED INFORMATION! Thank you for your purchase of our HeliBars. They are designed
2018 MotoTrax. Track Kit Installation Manual
 2018 MotoTrax Track Kit Installation Manual 1 Preparing the bike 1) Put the motorcycle on a stand. 2) Remove stock drive chain 3) Remove the rear wheel 4) Remove the mud flap 5) Disconnect the suspension
RC 390 WHITE ABS US 2015
 SPAREPARTSCATALOG: // CHASSIS RC 390 WHITE ABS US 05 ART.-NR.: 3CFF5375OEN CONTENT RC 390 WHITE ABS US 05 FRONT FORK, TRIPLE CLAMP HANDLEBAR, CONTROLS SHOCK ABSORBER FRAME 5 SWING ARM 8 TANK, SEAT, COVERS
MASTER CYLINDER INSPECTION
 7-16 CHASSIS A-PDF Split DEMO : Purchase from www.a-pdf.com to remove the watermark Remove the piston assembly. MASTER CYLINDER INSPECTION MASTER CYLINDER Inspect the master cylinder bore for any scratches
INSTALLATION INSTRUCTIONS Horizon XP Performance Handlebar
 INSTALLATION INSTRUCTIONS Horizon XP Performance Handlebar HZ10090XP, HZ10090XP-BA (1 Mount) Gen 1 HZ10093XP, HZ10093XP-BA (1 1/4 Mount) Gen 1 HZ10096XP, HZ10096XP-BA ( 1 1/4 Mount) Gen 2 HZ10097XP, HZ10097XP-BA
Tools Needed: Class 8.8 Class MM 55ft/lbs 75ft/lbs 14MM 85ft/lbs 120ft/lbs 16MM 130ft/lbs 165ft/lbs 18MM 170ft/lbs 240ft/lbs
 921788000 JEEP JK 6 LONGARM Rough Country recommends a certified technician install this system. In addition to these instructions, professional knowledge of disassemble/reassembly procedures as well as
w w w. h d o n l i n e s h o p. d e CHROME 1.25 INCH (31.75 MM) DIAMETER HANDLEBAR KIT GENERAL INSTALLATION -J04405 REV Kit Number Models
 DIAMETER HANDLEBAR KIT GENERAL INSTALLATION -J04405 REV Kit Number Models") -J005 REV. 008-09-0 CHROME.5 INCH (.75 MM) DIAMETER HANDLEBAR KIT GENERAL Kit Number 560-08 Models For model fitment information, see the P&A retail catalog or the Parts and Accessories section of www.harley-davidson.com
-J005 REV. 008-09-0 CHROME.5 INCH (.75 MM) DIAMETER HANDLEBAR KIT GENERAL Kit Number 560-08 Models For model fitment information, see the P&A retail catalog or the Parts and Accessories section of www.harley-davidson.com
Torque settings Torque settings. Frame torque settings. Note
 3 - Torque settings Frame torque settings Part Thread (mm) Nm ±10% Tolerance Side stand Stand sensor screw M6x1 5 LOCK 2 Stand plate fixing screw M10x1.5 43 LOCK 2 Side stand fastening pin M8x1.25 Side
MINI BIKE-2016 MB 200 Set-up Instruction
 MINI BIKE-2016 MB 200 Set-up Instruction 2016-06-01 1. Install rear shocks: open the crate and install the rear shocks with bolt M10x1.25x40 and self-locking nut M10x1.25. The requested torque is 37-44N.m
INSTALLATION INSTRUCTIONS FOR THE TOMAHAWK ELECTRIC REVERSE
 INSTALLATION INSTRUCTIONS FOR THE TOMAHAWK ELECTRIC REVERSE LAST UPDATED: April 2018 Thank you for choosing the Motor Trike Electric Reverse. We ask that you read the directions before you start and follow
w w w. h d o n l i n e s h o p. d e MODULAR DIAMONDBACK BRAKE LINE KITS GENERAL -J04284 REV Kit Number Models Tools and Supplies Required
 -J08 REV. 007-07-6 GENERAL MODULAR DIAMONDBACK BRAKE LINE KITS Table. Upper Brake Line s (Banjo Angle 0 - Straight) 7-07 77-07 79-07 8-07 87-07 9-07 8-07 8 inch 9 inch 0 inch inch inch inch inch 96-07
Rostra Electronic Cruise Control Install On a Stratoliner or Roadliner
 Rostra Electronic Cruise Control Install On a Stratoliner or Roadliner MATERIALS LIST: 1 - Rostra Part # 250-1223 (www.brandondist.com/products/cruise1223.htm) 1 - Signal Splitter part # 250-4369 1 - Engagement
ST 93 RIPPER INSTALL KIT
 ST 93 RIPPER INSTALL KIT P/N 2883777;2883778;2883779 APPLICATION The Timbersled Ripper ST93 Install Kit is designed to fit all Timbersled ST90 and ST93 Ripper models. This includes; Timbersled Model No.
M-TUNED COOLANT RE-ROUTE KIT
 M-TUNED COOLANT RE-ROUTE KIT Part # MC-RR-216, MC-RR-218 Applications: 90-93 Miata 1.6L B6 94-97 Miata 1.8L BP More detailed instructions: http://www.etdracing.com/m-tuned/reroute.pdf 1) Disconnect Negative
Installation Notes: #86000-R Race Series +3.5 L/T Kit
 159 North Maple St. Unit J, CORONA CA 92880 P. 951-737-9682 F. 951-737-9006 WWW.CHAOSFAB.COM Installation Notes: #86000-R Race Series +3.5 L/T Kit Factory manual is recommended for removal and re-installation
Slave Cylinder Weep Hole Drilling Procedure
 Slave Cylinder Weep Hole Drilling Procedure Tools Required: T20 Torx Driver T25 Torx Driver T25 Torx Bit with ¼ Ratchet Wrench 4mm Hex Key (Allen wrench) 5mm Hex Key 6mm Hex Key 8mm Hex Key 12mm Hex Key
JEEP JK 4 LONGARM. Tools Needed: Thank you for choosing Rough Country for your suspension needs.
 921786000 Thank you for choosing Rough Country for your suspension needs. JEEP JK 4 LONGARM Rough Country recommends a certified technician install this system. In addition to these instructions, professional
Ford Full-Size Rack & Pinion Kit Instructions #
 1949-1951 Ford Full-Size Rack & Pinion Kit Instructions # 8011660 Unisteer offers a limited warranty against all manufacturer defects of their kits and supplied parts. Unisteer will not honor any warranty
Trike Conversion Installation Manual. All Models
 Trike Conversion Installation Manual For Honda VTX 1300 Motorcycles All Models Revision 4 Mar. 2011 CAUTION: Failure to follow these instructions can lead to serious personal injury and/or property damage
07-13 TOYOTA TUNDRA 2WD 6" LIFT SPINDLES
 MAXTRAC SUSPENSION 4030 E LEAVERTON CT ANAHEIM, CA 92807 714-630-0363 WWW.MAXTRACSUSPENSION.COM SALES@MAXTRACSUSPENSION.COM PRODUCT: K886764 07-13 TOYOTA TUNDRA 2WD 6" LIFT SPINDLES PARTS LIST QTY LIFT
*1557BAG12* 1557BAG F /5 /6 LIFT KIT G THANK YOU FOR CHOOSING ROUGH COUNTRY FOR YOUR SUSPENSION NEEDS.
 2015-18 F-150 4 /5 /6 LIFT KIT THANK YOU FOR CHOOSING ROUGH COUNTRY FOR YOUR SUSPENSION NEEDS. 92155700G *1557BAG12* 1557BAG12 Rough Country recommends a certified technician install this system. In addition
INSTALLATION INSTRUCTIONS
 Accessory Application Publication No. INSTALLATION INSTRUCTIONS HEATED GRIPS ATTACHMENT KIT P/N 08T70-MJL-D30 2014-2015 NC700X/XD Honda Dealer: Please give a copy of these instructions to your customer.
INSTALLATION INSTRUCTIONS
 Accessory Application Publication No. INSTALLATION INSTRUCTIONS HEATED GRIPS P/N 08T71-MKK-D00 After 17 CRF1000L/LD Honda Dealer: Please give a copy of these instructions to your customer. MII 16656 Issue
12. FRONT WHEEL/FRONT BRAKE/
 12 4.5kgm 0.9kg-m 4.5kg-m 12-0 SERVICE INFORMATION... 12-1 HYDRAULIC BRAKE... 12-10 TROUBLESHOOTING... 12-2 FRONT SHOCK ABSORBER... 12-16 FRONT WHEEL... 12-3 STEERING HANDLEBAR... 12-19 FRONT BRAKE...
Installation Instructions
 Installation Instructions Rear Disc Brake Conversion Kit Item # RC1001, RC1001X Applications: 64-72 A-body, 67 F-Body, 63-67 X-body with Non Staggered Shocks Thank you for choosing GPS Auto for your automotive
Installation Instructions LamboStyleDoors (The instruction are to be used as a reference. Please repeat for both doors)
") Installation Instructions LamboStyleDoors (The instruction are to be used as a reference. Please repeat for both doors) Pre installation check list: - Double check vehicles data with TUV certificate -
Installation Instructions LamboStyleDoors (The instruction are to be used as a reference. Please repeat for both doors) Pre installation check list: - Double check vehicles data with TUV certificate -
Avoid damage to the motorcycle. Protect painted surfaces with a soft cloth or blanket.
 HOUSINGS 7808 Thank You For Choosing Küryakyn! Protect yourself and others from potential injury and property damage or loss. Pay close attention to all instructions, warnings, cautions, and notices regarding
12. FRONT WHEEL/FRONT BRAKE/
 12 12 12-0 SERVICE INFORMATION... 12-1 FRONT BRAKE... 12-7 TROUBLESHOOTING... 12-2 FRONT SHOCK ABSORBER... 12-18 STEERING HANDLEBAR... 12-3 FRONT FORK... 12-21 FRONT WHEEL... 12-4 SERVICE INFORMATION GENERAL
ON-VEHICLE SERVICE
 1- CLUTCH General Information/Service Specifications/ Lubricants/On-vehicle Service GENERAL INFORMATION 110001009 The clutch is a dry single-disc, diaphragm type; hydraulic pressure is used for the clutch
Trike Conversion Kit. KAWASAKI 1700 Vulcan Voyager Vulcan Vaquero Vulcan Nomad. Installation Instructions
 BY Trike Conversion Kit KAWASAKI 1700 Vulcan Voyager Vulcan Vaquero Vulcan Nomad Installation Instructions REVISED 1-2015 California Sidecar Parts & Technical Support 434.263.8866 Table of Contents: 1.
Your G3 buggy is fitted with three switches on the front part of the body:
 CONTENTS Buggy operation... 3 General Maintenance... 5 Technical Maintenance... 6 Front wheel bearing replacement... 6 Rear wheel bearing replacement... 7 Chain replacement... 8 Chain Adjustment... 9 Brake
Shotgun Single Barrel HPFP install guide
 Shotgun Single Barrel HPFP install guide Thank you for your purchase of the VTT Shotgun Single Barrel HPFP upgrade! First thing to do when you open your box is to make sure all parts are in their respective
KIT # MC-2990, MC-2991 INDIAN SCOUT SERIES W/O ABS 2014-PRESENT
 Congratulations on your purchase of an Arnott Motorcycle Air Suspension system. This system provides you with the ability to maintain your bike at a constant level regardless of load, resulting in enhanced
INSTALLATION & USER S GUIDE
 REKLUSE MOTOR SPORTS The Rekluse Left Hand Rear Brake Kit INSTALLATION TIPS INSTALLATION & USER S GUIDE Doc ID: 196-5301 Doc Rev: 031016 Before continuing, we recommend watching the Brake Kit Installation
Nemesis-TCS Traction Control System Installation manual Honda CBR600 RR 2003_04 with race seat
 Nemesis-TCS Traction Control System Installation manual Honda CBR600 RR 2003_04 with race seat Kit part No. TCS-4C_CBR600_RR_0304.AA This application is designed for use with the Honda CBR600 RR 2003_2004
KIT # MC-3104 FOR HARLEY DAVIDSON DYNA SERIES
 Congratulations on your purchase of an Arnott Motorcycle Air Suspension system. This system provides you with the ability to maintain your bike at a constant level regardless of load, resulting in enhanced
IAG Street Series Air / Oil Separator (AOS) For WRX
 For WRX") P IAG Street Series Air / Oil Separator (AOS) For 2015-16 WRX Part# IAG-ENG-7152 Tools Required: Ratchet, torque wrench, extensions, needle nose pliers, hose cutter, snips/scissors, flat head screw driver,
P IAG Street Series Air / Oil Separator (AOS) For 2015-16 WRX Part# IAG-ENG-7152 Tools Required: Ratchet, torque wrench, extensions, needle nose pliers, hose cutter, snips/scissors, flat head screw driver,
2014 F /6 LIFT KIT
 92157500 2014 F-150 4 /6 LIFT KIT THANK YOU FOR CHOOSING ROUGH COUNTRY FOR YOUR SUSPENSION NEEDS. Rough Country recommends a certified technician install this system. In addition to these instructions,
Hexhead Torque Values
 Contents: 11: Engine 12: Engine Electrical 13: Fuel Preparation 16: Fuel Supply 17: Cooling 18: Exhaust 21: Clutch 23: Gearbox 31: Front Axle, Front Wheel Steering 32: Steering 33: Rear axle, rear-wheel
Comfort Tri-Rider Assembly Guide
 1. Carefully remove all the components and packaged hardware from the shipping boxes. 2. Remove all protective materials from the fork, front frame and rear frame sections. 3. Read this assembly manual
RHINO SUSPENSION SYSTEM INSTALLATION INSTRUCTIONS
 PARTS INCLUDED: 2 FRONT UPPER A-ARMS 2 FRONT LOWER A-ARMS 2 UNI-BALL JOINTS 2 UNI-BALL JOINT STUDS 2 UNI-BALL JOINT CAPS 2 RETAINING RINGS 1 FRONT SHOCK ASSEM. 2 DELRON STEERING STOPS 2 SHOCK MOUNT SPACERS
RAINGEAR 1955/ 1956 Chevrolet
 RAINGEAR 1955/ 1956 Chevrolet GETTING STARTED: SOME RECOMMENDATIONS PLEASE TRY OUR WAY FIRST! Note: This system is designed with built in adjustments to fit in your car. If, as you are installing it, you