PRO-CLUTCH TM PC-1100-CA Evo Big-Twin. chain drive primary PC-1200-CA Evo Big-Twin. chain drive primary PC-1298-CA
|
|
|
- Jessie Hutchinson
- 6 years ago
- Views:
Transcription


1 HOME OF PRIMO BELT DRIVES PRO-CLUTCH TM PC-1100-CA / PC-1200-CA / PC-1298-CA / INSTALLATION INSTRUCTIONS PC-1100-CA Evo Big-Twin chain drive primary Pro-Clutch TM Stock Clutch PC-1200-CA Evo Big-Twin chain drive primary PC-1298-CA Evo Big-Twin & Twin-Cam (except 2006 Dyna) chain drive primary Dyna Models & All 2007-up Big Twin Models Pro-Clutch TM Pro-Clutch TM Pro-Clutch TM Stock Clutch Stock Clutch Stock Clutch Congratulations you have just purchased Rivera Primo s Pro-Clutch TM, the best clutch upgrade in the world. Please read and follow the directions for a simple, trouble free installation. If you have any questions about this installation please contact Rivera Primo, and a knowledgeable Pro-Clutch TM technician will assist you. Thank you for purchasing Pro-Clutch TM. Rivera Primo s Pro-Clutch TM for 1990 & later Evolution Big-Twin motorcycles increases clutch area almost 100%. For applications clutch area is increased 325%. More clutch surface means more performance potential. Installation is very simple. Pro-Clutch TM installs quickly into the existing clutch basket by removing the OEM hub, and then installing the Pro-Clutch TM hub, followed by the Pro-Clutch TM clutch pack assembly. Pro-Clutch will easily transmit all your motor s horsepower to the transmission without slipping or grabbing. Smooth, easy hand control makes Rivera Primo s Pro-Clutch TM a must for any stock or high performance Big-Twin Harley motorcycle / Revised 6-08


2 SAFETY FIRST When performing work on any motorcycle, and prior to starting this installation disconnect BOTH battery cables. If the motorcycle is on a lift, fasten the motorcycle securely to prevent it from falling. Please read and become familiar with the Pro-Clutch TM instructions before starting. A hydraulic press is required to remove the OEM clutch hub and install the Rivera Primo Pro-Clutch TM hub. For safety use only the proper tools for a given task and wear eye protection. STEP 1: As you disassemble the Pro-Clutch TM prior to installation, keep the clutch plates in exactly the same sequence as shipped. The clutch plates must be re-installed in exactly the same order. Drain the primary lubricant from the chain-case, and remove the outer primary cover. Loosen the primary chain adjuster and remove the OEM clutch basket and all of the OEM clutch components. 1 STEP 2: Remove the snap ring from the rear of the OEM clutch hub using the appropriate snap-ring tool. ALWAYS wear eye protection during this procedure. 2 Remove snap ring STEP 3: Using a hydraulic press remove the OEM clutch hub from the clutch basket! Firmly support the OEM clutch bearing as shown during this operation. After pressing the hub out, check the bearing for smoothness by rotating the clutch basket while holding the inner bearing race. If the bearing feels rough or binds, it must be replaced. 3 Press out the OEM hub STEP 4: Using the press, install the Rivera Primo Pro-Clutch TM hub into the OEM clutch basket. Securely support the INNER bearing races during this process. Carefully bottom the Pro-Clutch TM hub in the OEM basket. After pressing in the Pro-Clutch TM hub, check the bearing for smoothness again! Carefully align the Pro-Clutch TM hub. 4 4A Press until the hub bottoms. Support inner bearing race STEP 5: Install the snap ring onto the rear of the Pro-Clutch TM hub as shown. Make sure the snap ring is correctly installed into the snap-ring groove. 5 5A Make sure the snap ring is fitted securely in the groove! 2


 lubricant for a minute prior to")

3 STEP 6: Thoroughly wipe down the primary case & components to remove the OEM lubricant. Re-install the clutch basket into the primary case with chain & associated components. Dexron III ATF is recommended as the primary lubricant for use with Pro-Clutch TM units. 6 Re-install the clutch basket STEP 6A: Put two drops of blue thread lock on the transmission main shaft prior to installing the clutch hub nut. Tighten the clutch hub nut using the factory torque specifications (50-60 foot pounds of torque for models, or foot pounds for 90 & later models) indicated by your original equipment service manual. 6A Rivera blue threadlock. STEP 7: Soak friction discs in Dexron III ATF (wipe away excess before installation) lubricant for a minute prior to installation. Install steel & friction clutch plates exactly as they were shipped. Install the.120 steel plate first, then friction, alternating until all are installed. Never install 2 friction or 2 steel plates together Steel plate in first! 7A Friction plate next! Alternate steel-friction until all plates are installed STEP 8: Generously dab some quality anti-seize on the stud threads of the Pro-Clutch hub! 8 Anti-seize! 3

 be installed with the big-end towards the transmission")

 until they bottom.")


4 STEP 9: Install the pressure plate as shown! Use your OEM adjuster screw! 9 The Rivera Pro-Clutch TM PC1100-C requires that the clutch hub nut spacer (PC-215) be installed with the big-end towards the transmission as shown. Install the pressure plate! STEP 10: The diaphragm spring & spring retainer are installed next. (spring retainer goes beveled side in). Tighten the shouldered nuts equally (cross pattern) until they bottom Spring retainer beveled side in with lock tabs in place as shown Tighten shouldered nuts until they bottom, bend over locking tabs. STEP 11: Adjust the clutch as you would normally using the center bolt adjuster. 11 Adjust the clutch Tighten the adjuster screw lock nut. 11 STEP 12: Check and adjust primary chain tension as needed. Re-install the outer primary cover using a new gasket, and fill the chain case with Dextron III ATF to the bottom of the ring gear. 12 Adjust chain tension. 12 Re-install the outer primary cover. Fill with ATF, go riding! 4


5 PRO-CLUTCH ADJUSTMENT As delivered, the Pro-Clutch TM clutch-pack requires no adjustment, having been set at the factory. After the Pro-Clutch TM has accumulated significant mileage, it may require some adjustment due to normal wear. Use the procedures outlined below if & when adjustment is required. For best performance the diaphragm spring MUST be compressed to within of being flat when the shouldered spring retainer nuts have been properly tightened (bottomed)! This will provide maximum spring pressure to the clutch pack, with minimum hand effort at the handlebar! Three clutch springs are available: A stock replacement spring (black in color), a medium spring for street performance (silver in color), and a competition spring (gold in color) for drag race only applications. If the diaphragm spring adjustment requires LESS ARCH, this can be accomplished by using one or more of the special.020 washers on each of the shouldered nuts. (photo A) If the diaphragm spring adjustment requires lmore ARCH, this can be accomplished by using one or more of the special.030 washers on the clutch hub studs nuts as pictured. Photo A Photo B The diaphragm spring will be compressed to within.010 -to-.020 of being flat when correctly installed & adjusted Photo C shows a diaphragm spring that is compressed too far, and needs to be adjusted. Special adjustment washers be added to the clutch hub studs as shown in photo B. This is a diaphragm spring that is correctly adjusted. A little daylight is showing at either edge, because the spring is within.010 -to-.020 of being flat! (Slightly bowed outward) as seen in photo D. WRONG RIGHT Photo C Photo D GENERAL WARRANTY Rivera Primo Inc. s sole obligation and the customer s sole remedy is limited to replacement or repair of products free of charge in the event products fail to perform as warranted for a period of one year from actual date of purchase. Proof of purchase must accompany any warranty claim. In no event shall Rivera Primo Inc. be liable for claims for any other damages, whether direct, incidental, foreseeable, consequential, or special (including but not limited to loss of use, revenue or profit), whether based upon warranty, contract, tort (including negligence) or strict liability arising in connection with the sale or the failure of Rivera Primo Inc. products to perform in accordance with the stated specifications. Rivera Primo Inc. makes no other warranty of any kind whatsoever, and specifically disclaims and excludes all other warranties of any kind or nature whatsoever, directly or indirectly, express or implied, including, without limitation, as to the suitabilitly, productivity, durability, fitness for a particular purpose or use, merchantability, condition, or any other matter with respect to Rivera Primo Inc. products. 5
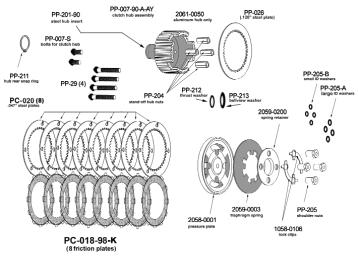

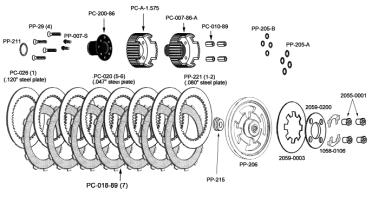
6 PC-1298-CA PC-1200-CA 6 PC-1100-CA
7 PC-1100-CA Qty Part # Description 1 PP Small snap ring (hub rear) 1 PC Steel inner hub 1 PC Nut for clutch hub screw (need 4) Diaphragm clutch spring (silver/medium) Diaphragm spring retainer Shouldered nut (retainer)(need 4) Locking clip for retainer nuts (2 req) 4 PP-205-A...Washer for nut (need 4) 1 PC-A Outer hub aluminum PC-1100-CA Fits Evo Big Twin 4 PP-29...Bolts for clutch hub 4 PP-205-B...Washer (stud side adjustment)(4 req) 7 PC Clutch friction plate 1 PP Clutch plate steel (.080 ) 1 PP Pressure plate (center hump) 1 PP Clutch hub nut spacer 6 PC Steel plate (.047 ) 1 PP Steel plate (.120 ) 2 PP-007-S...Screws for clutch hub(2) Installation instructions PC-1200-CA Qty Part # Description 1 PP Steel inner hub Outer hub (aluminum) 1 PP Thrust washer 1 PP Bellview washer 2 PP-007-S...Screws for clutch hub 4 PP-29...Bolts for clutch hub 4 PP Nuts for clutch hub screws 9 PC K Clutch friction plate(s)/kevlar PC-1200-CA Fits Evo Big Twin Clutch plate steel (.080 ) 7 PC A Clutch plate steel (.047 ) Clutch plate steel (.120) 1 PP Snap ring small Pressure plate Diaphragm clutch spring (silver/medium) Shouldered nuts (for retainer) Lock clips for shouldered nuts Diaphragm spring retainer 1 PP-205-AB...Washer set (4 plus 4) Installation instructions PC-1298-CA Fits Evo & Twin Cam (except 2006 Dyna) PC-1298-CA Qty Part # Description 1 PP Steel inner hub Outer hub (aluminum) 1 PP Thrust washer 1 PP Bellview washer 2 PP-007-S...Screws for clutch hub 4 PP-29...Bolts for clutch hub 4 PP Nuts for clutch hub screws 8 PC K Clutch friction plate(s)/kevlar 8 PC Clutch plate steel (.047 ) 1 PP Clutch plate steel (.120) 1 PP Snap ring small Pressure plate Diaphragm clutch spring (silver/medium) 4 PP Shouldered nuts (for retainer) Lock clips for shouldered nuts Diaphragm spring retainer 1 PP-205-AB...Washer set (4 plus 4) Installation instructions Fits 2006 Dyna & 2007-Up All Big Twin Qty Part # Description Complete clutch hub assembly Steel inner hub only Outer hub (aluminum) only 1 PP Thrust washer 1 PP Bellview washer 2 PP-007-S...Screws for clutch hub 4 PP Bolts for mounting alum. plate 4 PP Stand-off hub nuts 7 PC K...Clutch friction plate/kevlar 7 PC Clutch plate steel (.047 ) 1 PP Clutch plate steel (.120 ) 1 PP Small snap ring Pressure plate Diagraphm clutch spring (silver/medium) Diaphragm spring retainer Shouldered nuts (for retainer) Lock clips for retainer nuts 1 PP-205-AB...Shims for clutch pack (4 large / 4 small) Installation instructions 7


 when installing a Pro-Clutch TM or Primo Belt drive.")
8 TAPERED SHAFT HUB REMOVER TOOL PC Tapered hub removal tool (all applications). Simply mount the tool on the left hand threads of the transmission main shaft, and give the end of the tool a sharp tap with a medium weight hammer and the clutch hub simply pops off. Available now for all tapered shaft clutch hubs. RIVERA CLUTCH HUB PULLER PC Quickly attaches to most Pro-Clutch TM or Primo Belt Drives diaphragm-spring style clutch hub to allow quick easy removal. CLUTCH HUB HOLDER PC Engages & holds clutch hub splines to allow correct torque specification to be applied to the clutch hub nut (left-hand thread) when installing a Pro-Clutch TM or Primo Belt drive. Also holds clutch hub for de-installation. Rivera Primo Inc Whittier Blvd., Whittier, CA TEL: (562) FAX: (562) / / info1@riveraprimoinc.com 8
INSTALLATION INSTRUCTIONS FOR BRUTE IV EXTREME TM BELT DRIVE
 INSTALLATION INSTRUCTIONS FOR BRUTE IV EXTREME TM BELT DRIVE FOR 1990 TO PRESENT EVO & TWIN CAM SOFTAILS Shown w/optional mid-shift control It s common knowledge that a belt drive primary can provide advantages
BRUTE IV EXTREME TM BELT DRIVE FOR 1990 TO 2005 EVO & TWIN CAM Dyna Models
 INSTALLATION INSTRUCTIONS FOR BRUTE IV EXTREME TM BELT DRIVE FOR 1990 TO 2005 EVO & TWIN CAM Dyna Models PLEASE NOTE: PICTURES CONTAINED WITHIN THIS INSTRUCTION SHEET ARE ALSO USED FOR OTHER INSTRUCTIONS,
HOME OF PRIMO BELT DRIVES QUALITY & PERFORMANCE SINCE 1973 BRUTE FORCE TM. Belt Drive INSTALLATION INSTRUCTIONS
 HOME OF PRIMO BELT DRIVES QUALITY & PERFORMANCE SINCE 1973 BRUTE FORCE TM Belt Drive INSTALLATION INSTRUCTIONS 3-1/2 WIDE / 14mm BELT FITS 1990-2006 EVO & TWIN CAM SOFTAIL PRIMO BRUTE FORCE TM BELT DRIVE
BRUTE IV EXTREME TM BELT DRIVE FOR 1990 TO 2006 EVO & TWIN CAM SOFTAILS
 Brute IV Extreme Instructions_Brute IV Extreme Instructions 4/17/12 3:47 PM Page 1 INSTALLATION INSTRUCTIONS FOR BRUTE IV EXTREME TM BELT DRIVE FOR 1990 TO 2006 EVO & TWIN CAM SOFTAILS Shown w/optional
KING KONG CLUTCH INSTALLATION INSTRUCTIONS
 KING KONG CLUTCH INSTALLATION INSTRUCTIONS over view BAKER KING KONG CLUTCH V.05_091008 FEATURES: 1 Piece steel clutch basket design 66 tooth ring gear configuration, 23% thicker than stock 20 massive
A Division of Thiessen Products, Inc.
 JIMS PERFORMANCE BILLET CLUTCH KIT Important Note: Before installing this new clutch thoroughly read complete instructions. Recommended tools for Big Twin clutch and primary work: JIMS No. 971 Clutch basket
Dodge SpynTec Hub Conversion Kit
 SpynTec SpynTec Industries Installation Instructions for the Dodge SpynTec Hub Conversion Kit I n d u s t r i e s SpynTec Industries LLC. 11501 South Avenue North Lima, Ohio 4445 1.888.90.AXLE Page 1 Warning
Stage4 Installation Guide STAGE 4 TRANSMISSION KIT INSTALLATION GUIDE Allison LB7/ LLY only for 5 speed trasmissions
 STAGE 4 TRANSMISSION KIT INSTALLATION GUIDE 2001-2005 Allison LB7/ LLY only for 5 speed trasmissions DISCLAIMER OF LIABILITY This is a performance product which can be used with increased horsepower above
Stellar 4 Clutch Manual
 INSTRUCTIONS Stellar 4 Clutch Manual Thank you for choosing Tomar products; we are proud to be your manufacturer of choice. Please read this instruction sheet carefully before beginning installation, and
BAKER 9 PLATE AND BIG DOG CLUTCH PACK SERVICE KIT
 BAKER 9 PLATE AND BIG DOG CLUTCH PACK SERVICE KIT P/N: CPRK-9P CPRK-BDM (9 PLATE CLUTCH SERVICE PACK) (BIG DOG CLUTCH SERVICE PACK) PAGE 1 TABLE OF CONTENTS 1. Cover 2. Table of Contents 3. Exploded View
Through-Shaft Clutch-Brake LSCB-32HT, LSCB-32HT, LSCB-44, LSCB-44HT, LSCB-54HT FORM NO. L D-0606 MEX (55) QRO (442)
 QRO (442)") Through-Shaft Clutch-Brake LSCB-HT, LSCB-HT, LSCB-, LSCB-HT, LSCB-5HT In accordance with Nexen s established policy of constant product improvement, the specifications contained in this manual are subject
Through-Shaft Clutch-Brake LSCB-HT, LSCB-HT, LSCB-, LSCB-HT, LSCB-5HT In accordance with Nexen s established policy of constant product improvement, the specifications contained in this manual are subject
AIR CHAMP PRODUCTS. User Manual. Models DPC-9T and DPC-11T. (i) FORM NO. L C-0501
 FORM NO. L C-0501") AIR CHAMP PRODUCTS User Manual Models DPC-9T and DPC-11T (i) In accordance with Nexen s established policy of constant product improvement, the specifications contained in this manual are subject to change
AIR CHAMP PRODUCTS User Manual Models DPC-9T and DPC-11T (i) In accordance with Nexen s established policy of constant product improvement, the specifications contained in this manual are subject to change
Single-Position Detent Clutch DC Series. (i) MTY (81) MEX (55) QRO (442)
 MTY (81) MEX (55) QRO (442)") Single-Position Detent Clutch DC Series (i) FORM NO. L-2017-A-001 In accordance with Nexen s established policy of constant product improvement, the specifications contained in this manual are subject
Single-Position Detent Clutch DC Series (i) FORM NO. L-2017-A-001 In accordance with Nexen s established policy of constant product improvement, the specifications contained in this manual are subject
Installation and Maintenance Manual
 Installation and Maintenance Manual WorldWide Electric Corporation WSMR Series Backstop Assemblies *Suitable for use in WWE Ultimate series Shaft Mount Reducers only. WorldWide Electric Corporation Phone:
TECHNICAL SERVICE MANUAL
 Electronic copies of the most current TSM issue can be found on the Viking Pump website at www.vikingpump.com TECHNICAL SERVICE MANUAL VIKING HELICAL GEAR REDUCERS A, B, AND C SIZES SECTION PAGE ISSUE
INSTALLATION GUIDE CRF150R Manual Revision:
 REKLUSE MOTOR SPORTS The z-start Pro Clutch INSTALLATION GUIDE CRF150R 191-810 Manual Revision: 032508 2002 Rekluse Motor Sports Rekluse Motor Sports, Inc. 110 E. 43rd Street Boise, Idaho 83714 208-426-0659
Elgin Hydraulic Clutch-Brake ECB-240, Product Number FORM NO. L F FORM NO. L F-0704
 Elgin Hydraulic Clutch-Brake ECB-20, Product Number 96225 FORM NO. L-20283-F-070 1 FORM NO. L-20283-F-070 In accordance with Nexen s established policy of constant product improvement, the specifications
AT Clutch Major Service Sizes 25, 55, 115
 P-1404 819-0324 AT Clutch Major Service Sizes 25, 55, 115 Installation Instructions Contents Introduction............................ 2 Warranty....................... back cover Failure to follow these
INSTALLATION GUIDE. Kawasaki KLR Manual Revision:
 REKLUSE MOTOR SPORTS The z-start Pro Clutch INSTALLATION GUIDE Kawasaki KLR650 191-640 Manual Revision: 030308 2007 Rekluse Motor Sports Rekluse Motor Sports, Inc. 110 E. 43rd Street Boise, Idaho 83714
Straight-Bore Clutch LSCC-32, 44, 54
 Straight-Bore Clutch LSCC-32, 44, 54 1 In accordance with Nexen s established policy of constant product improvement, the specifications contained in this manual are subject to change without notice. Technical
Rekluse Motor Sports. The z-start Clutch CRF 250X. Installation Guide Copyright 2002 Rekluse Motor Sports z-start Revision RMS116 CRF 250X
 Rekluse Motor Sports The z-start Clutch CRF 250X Installation Guide Copyright 2002 Rekluse Motor Sports z-start Revision 3.000 RMS116 CRF 250X 191-216 Manual Revision: 103105 Rekluse Motor Sports, inc.
BAKER 9 PLATE AND BIG DOG CLUTCH PACK SERVICE KIT
 BAKER 9 PLATE AND BIG DOG CLUTCH PACK SERVICE KIT PAGE 1 BAKER 9 PLATE AND BIG DOG CLUTCH PACK SERVICE KIT TABLE OF CONTENTS: 1. Cover 2. Table of Contents 3. Exploded view 9plate 4. Exploded view BDM
INSTALLATION GUIDE. KTM 125, 144, Stroke KTM 250, Stroke KTM 250 SXF, XC, XC-W KTM 450, 505 SXF Manual Revision:
 REKLUSE MOTOR SPORTS The z-start Pro Clutch INSTALLATION GUIDE KTM 125, 144, 200 2-Stroke KTM 250, 300 2-Stroke KTM 250 SXF, XC, XC-W KTM 450, 505 SXF 191-836 Manual Revision: 050307 2002 Rekluse Motor
- INSTALLATION INSTRUCTIONS -
 APPLICATION(S): RXT-X / RXT / GTX-SC Pump Extension Kit (+50mm) PART# - RS33085-PEK-50 Required tools Part# Drive Shaft Holder Tool 529 035 986 PTO Seal Support Tool 529 035 842 Floating Ring Tool 529
Single Post Caliper Brake VC500
 Single Post Caliper Brake VC500 1 In accordance with Nexen s established policy of constant product improvement, the specifications contained in this manual are subject to change without notice. Technical
DYNA EVO & T.C. MODELS 91-05
 ASSEMBLY DIAGRAM AND ASSEMBLY REFERENCE ULTIMA OLD SCHOOL 2 BELT DRIVE UNITS DYNA EVO & T.C. MODELS 91-05 Part # 58-900 2 BELT DRIVE ASSEMBLY REV 1-20-10 ASSEMBLY DIAGRAM AND ASSEMBLY REFERENCE ULTIMA
DAP-625S and DAP-875S
 AIR CHAMP PRODUCTS DAP-625S and DAP-875S (i) FORM NO. L-20078-B-0501 In accordance with Nexen s established policy of constant product improvement, the specifications contained in this manual are subject
Advanced Technology Tension Clutches
 P-220 819-0339 Advanced Technology Tension Clutches Installation Instructions Contents Installation................................. 2 Clutch Repair On the Shaft.................. 4 Clutch Service Major.......................
DYNA EVO & T.C. MODELS 91-05
 ASSEMBLY DIAGRAM AND ASSEMBLY REFERENCE ULTIMA OLD SCHOOL 2 BELT DRIVE UNITS DYNA EVO & T.C. MODELS 91-05 Part # 58-900 2 BELT DRIVE ASSEMBLY REV 10-22-14 ASSEMBLY DIAGRAM AND ASSEMBLY REFERENCE ULTIMA
Rekluse Motor Sports. The z-start Clutch CRF 250R. Installation Guide Copyright 2002 Rekluse Motor Sports z-start Revision RMS112 CRF 250R
 Rekluse Motor Sports The z-start Clutch CRF 250R Installation Guide Copyright 2002 Rekluse Motor Sports z-start Revision 3.000 RMS112 CRF 250R 191-212 Manual Revision: 091205 Rekluse Motor Sports, Inc.
Rekluse Motor Sports. The ProStart Clutch. H-D Sportster (2004 +)
") Rekluse Motor Sports The ProStart Clutch H-D Sportster (2004 +) Installation Guide Copyright 2006 Rekluse Motor Sports ProStart Revision 1.000 RMS687 H-D Sportster 195-687 Manual Revision: 111308 Rekluse
Rekluse Motor Sports The ProStart Clutch H-D Sportster (2004 +) Installation Guide Copyright 2006 Rekluse Motor Sports ProStart Revision 1.000 RMS687 H-D Sportster 195-687 Manual Revision: 111308 Rekluse
SERIES G3DB/AG3DB ELEVATOR
 TM INSTRUCTIONS AND PARTS LIST SERIES G3DB/AG3DB ELEVATOR WARNING This manual, and GENERAL INSTRUCTIONS MANUAL, CA-1, should be read thoroughly prior to pump installation, operation or maintenance. SRM00059
OPERATIONS MANUAL LEVER CHAIN HOIST
 OPERATIONS MANUAL LEVER CHAIN HOIST IMPORTANT SAFETY INFORMATION Please read, understand and follow all safety information contained in these instructions prior to the use of this hoist. Retain these instructions
INSTALLATION MANUAL. TORQ Locker TL GM 14 Bolt Installation Instructions. Made in USA By: Page 1 of 8
 INSTALLATION MANUAL TORQ Locker TL-19035 GM 14 Bolt Installation Instructions Made in USA By: Page 1 of 8 Page 2 of 8 INSTALLATION MANUAL TORQ Locker TL-19035 GM 14 Bolt Installation Instructions By: INTRODUCTION
IMPORTANT NOTICE Stock Height OEM Spindle
 IMPORTANT NOTICE Ball Joint Info: Before you install this product, please verify which front spindles you have. We have designed the upper a arms to utilize the 73 87 style spindles. This type of spindle
LB7/ LLY Allison 5 speed transmissions
 PPEdiesel.com STAGE 4 TRANSMISSION KIT INSTALLATION GUIDE 2001-2005 LB7/ LLY Allison 5 speed transmissions Technical Support (714) 985-4825 Rev: 01/31/18 v7 DISCLAIMER OF LIABILITY This is a performance
INSTALLATION GUIDE Manual Revision:
 REKLUSE MOTOR SPORTS The z-start Pro Clutch INSTALLATION GUIDE KTM 125, 144, 200 2-Stroke KTM 250, 300 2-Stroke KTM 250 SXF, XC, XC-W KTM 400 XC-W KTM 450, 505 SXF, XC-F KTM 450, 530 XCR-W, EXC-R Husaberg
Rekluse Motor Sports. The z-start Clutch. Cannondale
 Rekluse Motor Sports The z-start Clutch Cannondale Installation Guide Copyright 2002-2004 Rekluse Motor Sports z-start Revision 3.000 RMS105 Cannondale 191-205 Manual Revision: 091304 Rekluse Motor Sports,
Illumifalls Patio Pond
 Illumifalls Patio Pond REMINDER CALL 1-888-755-4497 BEFORE RETURNING TO STORE. Questions, problems, missing parts? Before returning to your retailer, call our customer service department at 1-888-755-4497,
EZ-R7 T-Plug. Universal 7-Pin Heavy Duty Plug For Vehicles equipped with 7-Way Trailer Connectors. Installation Instructions and Product Warranty
 EZ-R7 T-Plug Universal 7-Pin Heavy Duty Plug For Vehicles equipped with 7-Way Trailer Connectors Installation Instructions and Product Warranty Professional Installation Required Thank you for purchasing
580RK SERVICE GUIDELINES For coupling models: 580 & 580J
 580 Coupling THE FIRST NAME IN QUALITY COUPLINGS 580RK SERVICE GUIDELINES For coupling models: 580 & 580J BEFORE GETTING STARTED: This procedure should only be performed by a qualified mechanic. Measure
Harley Davidson FL Touring Current Xtreme
 ITEMS SUPPLIED Description Part # Qty Front Header (Chr/Blk) 100-0119/100-0123 1 Rear Header (Chr/Blk) 100-0120/100-0124 1 Front Heat Shield (Chr/Blk) 100-0121/100-0125 1 Rear Heat Shield (Chr/Blk) 100-0122/100-0126
Installation Instructions
 Installation Instructions INSTALLATION INSTRUCTIONS over view V.031407 FEATURES BAKER FUNCTION FORMED PRIMARY ALL BILLET 6061-T6 AIRCRAFT GRADE ALUMINUM CONSTRUCTION One piece STARTER jackshaft (INCLUDED)
FCB-450, LCB-600, MCB-800
 AIR CHAMP PRODUCTS User Manual FCB-450, LCB-600, MCB-800 Clutch-Brakes (i) In accordance with Nexen s established policy of constant product improvement, the specifications contained in this manual are
OPERATION AND CONSTRUCTION-AIRFLEX MAGNETIC CLUTCH
 105.1A OPERATION AND CONSTRUCTION-AIRFLEX MAGNETIC CLUTCH The Airflex Magnetic Clutch is a stationary field, multiple disc clutch actuated by electromagnetic force and designed for operation in either
PV BAKER HYDRAULIC SIDE COVERS FOR FACTORY 6-SPEED INSTALLATION INSTRUCTIONS
 BAKER HYDRAULIC SIDE COVERS FOR FACTORY 6-SPEED INSTALLATION INSTRUCTIONS BAKER HYDRAULIC SIDE COVERS FOR FACTORY 6-SPEED TABLE OF CONTENTS 1. CD6 Hydraulic Side Cover Detail View 2. M8 Hydraulic Side
AWE Track Edition Performance Exhaust System Audi B8 / B8.5 S4.
 Thank you for purchasing the AWE Track Edition Performance Exhaust System for the 2010-2016 Audi B8 / B8.5 S4. For up-to-the-minute fitment information, be sure to visit the Audi B8 / B8.5 S4 section of
ASSEMBLY DIAGRAM AND ASSEMBLY REFERENCE ULTIMA OLD SCHOOL 2 BELT DRIVE UNITS
 ASSEMBLY DIAGRAM AND ASSEMBLY REFERENCE ULTIMA OLD SCHOOL 2 BELT DRIVE UNITS BELT DRIVE ASSEMBLIES Part# 58-850 2 Old School Belt Drive Assembly - Polished Part# 58-851 2 Old School Belt Drive Assembly
Rekluse Motor Sports. The z-start Clutch GAS GAS. 200, 250, and strokes. 400 and strokes
 Rekluse Motor Sports The z-start Clutch GAS GAS 200, 250, and 300 2-strokes 400 and 450 4-strokes Installation Guide Copyright 2002-2004 Rekluse Motor Sports z-start Revision 3.000 RMS100 Gas Gas z-start
INSTRUCTIONS. 4-Link Parallel With Adjustable Panhard Bar Rear Suspension System FOR MOPAR MUSCLE CARS: A-BODY (RS-5435)
") MOPAR A-BODY 4-LINK PARALLEL COIL OVER SYSTEM INSTRUCTIONS 4-Link Parallel With Adjustable Panhard Bar Rear Suspension System FOR MOPAR MUSCLE CARS: 1967-1976 A-BODY (RS-5435) Revised: 6-1-2011 Page 2
MOPAR A-BODY 4-LINK PARALLEL COIL OVER SYSTEM INSTRUCTIONS 4-Link Parallel With Adjustable Panhard Bar Rear Suspension System FOR MOPAR MUSCLE CARS: 1967-1976 A-BODY (RS-5435) Revised: 6-1-2011 Page 2
INSTALLATION GUIDE. Clutch Cable Actuated Models Manual Revision:
 REKLUSE MOTOR SPORTS The z-start Pro Clutch INSTALLATION GUIDE Clutch Cable Actuated Models 191-800 Manual Revision: 041513 2012 Rekluse Motor Sports Rekluse Motor Sports, Inc. 12000 W Franklin Rd. Boise,
INSTALLATION INSTRUCTIONS QA1 P/N x400, x500, x600, x400, x500, x F100 Front Coil-over Suspension System
 INSTALLATION INSTRUCTIONS QA1 P/N 52620-x400, 52620-x500, 52620-x600, 52621-x400, 52621-x500, 52621-x600 65-72 F100 Front Coil-over Suspension System TOOLS AND SUPPLIES REQUIRED Floor Jack Two (2) Jack
Model GP Triplex Ceramic Plunger Pump Operating Instructions/ Manual
 Model GP6145-3100 Triplex Ceramic Plunger Pump Operating Instructions/ Manual Contents: Installation Instructions: page 2 Pump Specifications: page 3 Exploded View: page 4 Parts List / Kits: page 5 Repair
INSTALLATION GUIDE. Clutch Cable Actuated Models Manual Revision:
 REKLUSE MOTOR SPORTS The z-start Pro Clutch INSTALLATION GUIDE Clutch Cable Actuated Models 191-800 Manual Revision: 061810 2002 Rekluse Motor Sports Rekluse Motor Sports, Inc. 110 E. 43rd Street Boise,
Slimline Duals Installation Instructions Harley-Davidson Touring Models 2009-Current
 Slimline Duals Installation Instructions Harley-Davidson Touring Models 2009-Current Thank you for buying a Rinehart Racing exhaust system. We are committed to providing premium products that with proper
BD POWER SHORT SHIFTER Dodge Speed Dodge Speed Dodge Speed.
 June 05 Cummins Short Shift Kit (1031050/1031055/103156) 1 BD POWER SHORT SHIFTER for Dodge Cummins 1998-2005 Manual Transmissions Application Chart 1031056 Dodge 1998-2002 5 Speed 1031050 Dodge 2000-2002
Installation manual 2 Leveling kit GM x 4. Part # Part # Important customer information: GM x 4
 Installation manual 2 Leveling kit 2007-2008 GM 1500 4 x 4 Part # 12000 sj121007rev.02 Part # 12000 2007-2008 GM 1500 4 x 4 2 leveling system Parts list: Part # Description Qty. 12000-01 Front leveling
Rekluse Motor Sports. The ProStart Clutch. H-D Big Twin ( )
") Rekluse Motor Sports The ProStart Clutch H-D Big Twin (1990 1997) Installation Guide Copyright 2006 Rekluse Motor Sports ProStart Revision 1.000 RMS680 H-D Big Twin 195-680 Manual Revision: 121206 Rekluse
Rekluse Motor Sports The ProStart Clutch H-D Big Twin (1990 1997) Installation Guide Copyright 2006 Rekluse Motor Sports ProStart Revision 1.000 RMS680 H-D Big Twin 195-680 Manual Revision: 121206 Rekluse
PowerMax Diesel Upgrade For Cummins Engines
 PowerMax Diesel Upgrade For Cummins Engines Installation Instructions 998.5-2002 Dodge Ram Part Numbers: 75936-000 (Stage ) 75936-0002 (Stage 2) 75936-0003 (Stage 3) Parts List Tools Needed Item 2 3 4
DeZURIK 2 20" BOS BUTTERFLY VALVES
 2 20" BOS BUTTERFLY VALVES Instruction D10459 October 2013 2-20 BOS Butterfly Valves Instructions These instructions provide information about BOS Butterfly Valves. They are for use by personnel who are
TH400 STREETFIGHTER SERIES VALVE BODY MANUAL/AUTO VALVE BODY INSTALLATION INSTRUCTIONS
 1 INSTRUCTIONS TH400 STREETFIGHTER SERIES VALVE BODY 1965-87 MANUAL/AUTO VALVE BODY INSTALLATION INSTRUCTIONS TCI 222400 TCI 222400 ALLOWS AUTOMATIC SHIFT FEATURES IN THE DRIVE POSITION Thank you for choosing
Air-Boss VP Intake Plenum
 Installation Manual P/N 98502-ABIP 98.5-02 DODGE CUMMINS Air-Boss VP Intake Plenum Installation Instructions P/N 98502-ABIP GDP Air-Boss VP Plenum Installation PLEASE READ ALL INSTRUCTIONS BEFORE BEGINNING
Giant Hydraulic Disc Brake System
 Giant Hydraulic Disc Brake System INSTALLATION INSTRUCTI IMPORTANT NOTICE Contact the place of purchase or Authorized Giant Retailer for information on detail of installation and maintenance. Read this
PowerMax Diesel Upgrade For Cummins Engines
 PowerMax Diesel Upgrade For Cummins Engines 00.5-007.5 Dodge Ram With Cummins 5.9L Item 3 4 5 6 7 8 9 0 3 4 5 6 7 8 Parts List Description Turbocharger Ancillary kit 773069- (includes) Installation Instructions
Maintenance Instructions
 General Note These instructions contain information common to more than one model of Bevel Gear Drive. To simplify reading, similar models have been grouped as follows: GROUP 1 Models 11, 0, 1,, (illustrated),,
COOPER POWER SERIES. QD5 Quik-Drive tap-changer reversing neutral stationary contact asssembly kit A26 installation instructions
 Voltage Regulators MN225025EN Effective March 2016 Supersedes S225-50-48 November 2008 COOPER POWER SERIES QD5 Quik-Drive tap-changer reversing neutral stationary contact asssembly kit 5791646A26 installation
INTRODUCTION INSTALLATION
 INTRODUCTION INSTALLATION, OPERATION & MAINTENANCE INSTRUCTIONS This instruction manual includes installation, operation and maintenance information for the figure G73 gear operator. The figure G73 is
INSTALLATION MANUAL TOYOTA TUNDRA 5 SUSPENSION SYSTEM PART # 55905
 PART NUMBER : 55905 1999 2003 TOYOTA TUNDRA 5 SUSPENSION SYSTEM PARTS LIST: Part # Description Qty. 55900-01 Driver Side Spindle 1 55900-02 Passenger Side Spindle 1 55905-03 Rear brake proportioning valve
Technical Support Line: (952) Hanover Ave. Lakeville, MN
 Hanover Ave. Lakeville, MN") Technical Support Line: (952) 985-5675 Email: Sales@QA1.net 21730 Hanover Ave. Lakeville, MN 55044 www.qa1.net INSTALLATION INSTRUCTIONS QA1 1967-1979 Mopar A-Body Rear 6 link Conversion System QA1 p/n
Technical Support Line: (952) 985-5675 Email: Sales@QA1.net 21730 Hanover Ave. Lakeville, MN 55044 www.qa1.net INSTALLATION INSTRUCTIONS QA1 1967-1979 Mopar A-Body Rear 6 link Conversion System QA1 p/n
Effective June 2016 New Issue
 Voltage Regulators MN225035EN Effective June 2016 New Issue COOPER POWER SERIES QD8 Quik-Drive Tap-Changer Switch Assembly Kit 5740785B13 and Switch Neutral Stationary Assembly Kit 5791646A48 Installation
Tubular Lower A-Arms GM A-Body Tubular Lower A-Arms GM F-Body
 1104 - Tubular Lower A-Arms 64-72 GM A-Body 1108 - Tubular Lower A-Arms 70-81 GM F-Body Tubular Lower A-Arms: Thank you for your purchase from our new line of A-Body parts. Please call us at (877) 4NO
Rekluse Motor Sports, Inc. The z-start Clutch. Husaberg ( )
") Rekluse Motor Sports, Inc. The z-start Clutch Husaberg (1989-2003) Installation Guide Copyright 2002-2004 Rekluse Motor Sports z-start Revision 3.000 RMS125 Husaberg 89-03 191-225 Manual Revision: 012805
Rekluse Motor Sports, Inc. The z-start Clutch Husaberg (1989-2003) Installation Guide Copyright 2002-2004 Rekluse Motor Sports z-start Revision 3.000 RMS125 Husaberg 89-03 191-225 Manual Revision: 012805
INSTALLATION MANUAL TOYOTA TACOMA 5 SUSPENSION SYSTEM PART # 54900
 PART NUMBER : 54900 1996 2004 TOYOTA TACOMA 5 SUSPENSION SYSTEM PARTS LIST: Part # Description Qty. 55900-01 Driver Side Spindle 1 55900-02 Passenger Side Spindle 1 54900-01 Rear brake proportioning valve
TCI Turbo 400 Full Manual Valve Body. Shift Pattern: Park Reverse Neutral First Second Third. NOTE: You must reuse stock manual control valve.
 TCI 221100 Turbo 400 Full Manual Valve Body Shift Pattern: Park Reverse Neutral First Second Third This Kit Contains: (1) Turbo 400 Full Manual Valve Body (1) Separator Plate & Gaskets (1) Pressure Regulator
Rekluse Motor Sports. The z-start Clutch DRZ400 KLX400. Installation Guide Copyright 2002 Rekluse Motor Sports z-start Revision 3.
 Rekluse Motor Sports The z-start Clutch DRZ400 KLX400 Installation Guide Copyright 2002 Rekluse Motor Sports z-start Revision 3.000 RMS160 KLX400 DRZ400 z-start Clutch 191-260 Manual Revision: 103105 Rekluse
 Page 1 of 22 SECTION 307-01: Automatic Transaxle/Transmission 4R70E/4R75E ASSEMBLY Procedure revision date: 05/29/2009 Transmission Printable View (1554 KB) Special Tool(s) Air Test Plate, Transmission
Service Manual. Christini Technologies, Inc. 611 N. 2nd St Philadelphia, PA fax Version 1.6.
 Christini Technologies, Inc. 611 N. 2nd St Philadelphia, PA 19123 215.351.9895 215.351.9896 fax info@christini.com Version 1.6 Page 1 Notice: Due to the design of the gears, front and rear international
RIVA YAMAHA GPR MECHANICAL TRIM-TAB SYSTEM PART # (RY2820) APPLICATIONS: GP1200R GP800R NOTICE :
 APPLICATIONS: GP1200R GP800R NOTICE :") RIVA YAMAHA GPR MECHANICAL TRIM-TAB SYSTEM PART # (RY80) APPLICATIONS: 000-00 GP00R 00-00 GP800R NOTICE : This system has been upgraded with a new heavy-duty pivot rod that features welded on push rod
RIVA YAMAHA GPR MECHANICAL TRIM-TAB SYSTEM PART # (RY80) APPLICATIONS: 000-00 GP00R 00-00 GP800R NOTICE : This system has been upgraded with a new heavy-duty pivot rod that features welded on push rod
AWE SwitchPath Track Edition Exhaust System VW Golf R. AWE website here
 Thank you for purchasing the AWE SwitchPath or Track Edition Exhaust System for the 2018+ VW Golf R. For up-to-the-minute fitment information, be sure to visit the MK7 Golf R section of the AWE website.
TECHNICAL SERVICE MANUAL
 Electronic copies of the most current TSM issue can be found on the Viking Pump website at www.vikingpump.com TECHNICAL SERVICE MANUAL SECTION TSM 610 Viking Helical Gear Reducers a, b, and c sizes PAGE
MEX (55) QRO (442) Web Controls
 QRO (442) Web Controls") Web Controls SINGLE AND DUAL ROTOR TENSION CONTROL BRAKES MODELS:,,,, AND INSTALLATION, OPERATION, AND MAINTENANCE INSTRUCTIONS Read this manual carefully, making full use of its explanations and instructions.
Web Controls SINGLE AND DUAL ROTOR TENSION CONTROL BRAKES MODELS:,,,, AND INSTALLATION, OPERATION, AND MAINTENANCE INSTRUCTIONS Read this manual carefully, making full use of its explanations and instructions.
1109 Tubular Lower A-Arms Camaro/Firebird
 1109 Tubular Lower A-Arms 67-69 Camaro/Firebird Tubular Lower A-Arms: Thank you for your purchase from our new line of F-Body parts. Please call us at (877) 4NO - ROLL if you have any questions regarding
SPECIAL TOOLS REQUIRED:
 INSTALLATION INSTRUCTIONS FOR 2010-15 TOYOTA 4RUNNER WITH XREAS SUSPENSION 3 SUSPENSION LIFT KIT PART NUMBER 432X WARNING!!! READ AND UNDERSTAND ALL INSTRUCTIONS BEFORE PROCEEDING. MAKE SURE THAT YOU HAVE
p.t.o. Slip clutch Read this material before using this product. Failure to do so can result in serious injury. Save this manual.
 p.t.o. Slip clutch 65517 Installation Instructions Distributed exclusively by Harbor Freight Tools. 3491 Mission Oaks Blvd., Camarillo, CA 93011 Visit our website at: http://www.harborfreight.com Read
P SERIES PUMPS. 18mm Versions Nickle-Aluminum Bronze Models: P , P , P , P , P , P , P
 P200-3100 SERIES PUMPS 18mm Versions Nickle-Aluminum Bronze Models: P217-3100, P218-3100, P219-3100, P220-3100, P221-3100, P227-3100, P230-3100 Triplex Ceramic Plunger Pump Operating Instructions/ Repair
COOPER POWER SERIES. 200 A Fused Loadbreak Elbow Connector Replacement Fuse Installation Instructions. Fusing Equipment MN132021EN
 Fusing Equipment MN132021EN Effective November 2016 Supersedes June 2011 (S240-97-1) COOPER POWER SERIES Installation Instructions DISCLAIMER OF WARRANTIES AND LIMITATION OF LIABILITY The information,
Adjustable Angled Incline Conveyor Owners Manual with Operating Instructions
 Adjustable Angled Incline Conveyor Owners Manual with Operating Instructions Revision 012211 Table of Contents Basic Conveyor Features 3 Getting Started 4 Setting Up the Incline Conveyor 5 Belt Removal
INSTALLATION GUIDE. KTM RFS Husaberg Polaris 450/525 Outlaw KTM 450/525 XC ATV Manual Revision:
 REKLUSE MOTOR SPORTS The z-start Pro Clutch INSTALLATION GUIDE KTM RFS 03-07 Husaberg Polaris 450/525 Outlaw KTM 450/525 XC ATV 191-833 Manual Revision: 010615 2002 Rekluse Motor Sports Rekluse Motor Sports,
DynaCon Instruction Manual
 DynaCon Instruction Manual Table of Contents Technical Specification & Warranty.... 3 Construction, Benefits & Safe Operating Procedures... 4 Noise Levels... 5 Installation, Operation & Maintenance...
Rekluse Motor Sports. The z-start Clutch LTR 450. Installation Guide Copyright 2002 Rekluse Motor Sports z-start Revision 3.
 Rekluse Motor Sports The z-start Clutch LTR 450 Installation Guide Copyright 2002 Rekluse Motor Sports z-start Revision 3.000 RMS166 LTR 450 191-266 Manual Revision: 032306 Rekluse Motor Sports, inc. 110
UPPER TRAILING ARM REMOVAL
 #1204 MUSTANG UPPER TRAILING ARMS Thank you for your purchase. Please call us at (562) 907-7757 if you have any questions regarding your Hotchkis Performance products. Visit us online @ www.hotchkis.net
Smartflow FasTie Quick-Connect Ejector Tie-In System
 Smartflow FasTie Quick-Connect Tie-In System 1"HS, 1-3/8", 2" & 3" Components, Installation Instructions US Patent No. 6,379,072 General FasTie Quick-Connect System ties-in the mold ejector plate to the
Instruction Manual for DOHC 4-VALVE HEAD PISTON / CYLINDER KIT
 Instruction Manual for DOHC 4-VALVE HEAD PISTON / CYLINDER KIT Thank you for purchasing one of our TAKEGAWA s products. These piston and cylinder kits are for exclusive use in a motorcycle equipped with
GM P/U, Blazer, Suburban, 1 Ton 4WD 4-6 Kits
 92114500 1973-87 GM P/U, 1973-91 Blazer, Suburban, 1 Ton 4WD 4-6 Kits Thank you for choosing Rough Country for all of your suspension needs. Rough Country recommends a certified technician installs this
Pneumatic Cylinder 14 Bore X 22 Stroke Part No. R (Formerly P )
") Pneumatic Cylinder 14 Bore X 22 Stroke Part No. R434001268 (Formerly P -193419-00003) Service Information INSTALLATION Before installing this cylinder, all air lines in the system should be blown clean
Pneumatic Cylinder 14 Bore X 22 Stroke Part No. R434001268 (Formerly P -193419-00003) Service Information INSTALLATION Before installing this cylinder, all air lines in the system should be blown clean
Model BP6150. Triplex Ceramic Plunger Pump Operating Instructions/ Manual
 Model BP6150 Triplex Ceramic Plunger Pump Operating Instructions/ Manual Contents: Installation Instructions: page 2 Pump Specs: page 3 Exploded View: page 4 Parts List / Kits Torque Specifications: page
AWE Track Edition Touring Edition Exhaust System Audi B9 3.0T S4. AWE website here
 Thank you for purchasing the AWE Track Edition or Touring Edition Exhaust System for the 2017+ Audi B9 3.0T S4. For up to the minute fitment information, be sure to visit the Audi B9 S4 section of the
ORIGINAL INSTRUCTIONS G715A. Pneumatic-hydraulic Riveter E. Warner Ave Santa Ana, CA
 ORIGINAL INSTRUCTIONS G715A Pneumatic-hydraulic Riveter 1224 E. Warner Ave Santa Ana, CA 92705 www.cherryaerospace.com DESCRIPTION The Cherry G715A Pneumatic-Hydraulic Riveter is designed specifically
Maintenance Information
 45528270 Edition 1 June 2007 Barring Motor T480 Series Maintenance Information Save These Instructions WARNING Always wear eye protection when operating or performing maintenance on this Barring Motor.
High-voltage primary bushings installation instructions
 OEM Equipment Effective November 2013 Supersedes April 2013 S800-35-2 High-voltage primary bushings installation instructions DISCLAIMER OF WARRANTIES AND LIMITATION OF LIABILITY The information, recommendations,