Axle Length. Page 1 of 16
|
|
|
- Melvin McCarthy
- 5 years ago
- Views:
Transcription

1 Page 1 of 16 Rear Axle Alignment The edge of the level is against the spinner. You can tell by how far away the reflection of the level is, from the level itself, at the lowest point of the panel, just how much further the spinner projects on the left compared to the right - 6mm. The shape of the reflection also shows how there is more of a curve below the trim strip on the left compared to the right. This puts the trim strip on the left another 6mm further away from the spinner compared to the right, making a 12mm or nearly half an inch difference between sides, if both wings had the same profile. Axle Length Stud wheel axle, measured between bearing cap outer faces/backplate inner faces. Just 1/8" short of 48.5" shows this is a Salisbury stud wheel axle.

2 Page 2 of 16 Steel wheel on the left, about 2" between the U-bolt and the weld for the bearing housing, wire wheel on the right, about 1". This also shows the effect of the different wheel offsets, and why the axles need to be different lengths as a result - most of the brake gear and the back-plate nuts are concealed in the well of the stud-mount wheel, whereas those with a wire wheel are clearly visible. Note this is a feature of the wheel offset, not the axle length. To see which axle you have you must measure the tube from U-bolt to weld as described.
, but other than both being attached to the tube in adjacent areas the two are")
3 Page 3 of 16 Handbrake Cable, 1977-on Rear Axle Showing the rubber flap attached to a flange on the axle casing, to which a bracket on the handbrake cable is attached. The rear pivot and mounting for the anti-roll bar can be seen on top of the axle casing (top left), but other than both being attached to the tube in adjacent areas the two are entirely separate.

4 Page 4 of 16 Showing the rear of the diff, where the handbrake pivot used to be, with the anti-roll bar well out of the way.


5 Page 5 of 16 Showing the anti-roll bar, rear pivot on the axle casing, and front pivot mounting point on the body. Salisbury: Representative sketch only, not to scale Hub Assembly

6 Page 6 of 16 A - Half-shaft B - Bearing C - Bearing spacer D - Bearing cap E - Axle casing F - Oil seal G - Back-plate H - oil seal collar J - Hub K - outer collar L - Hub nut M - Splines Typical MG Banjo: From Totally T-Type 2 Cut-away Images of the Rear Axle

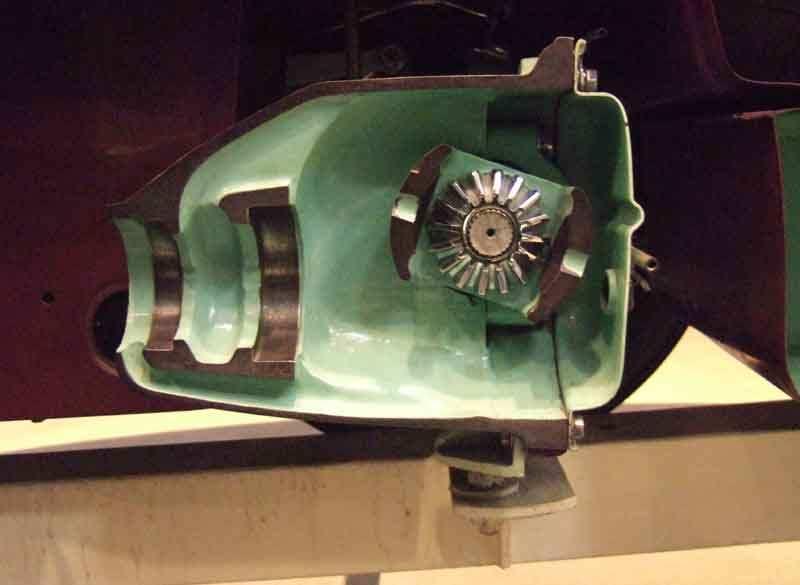
7 Page 7 of 16


8 Page 8 of 16 Axle level/drain Plugs Suitable bolt with level-plug Bolt cut and tapered, with spacer and location stub welded on the back of the head Showing the effect of the spacer, the adapter is how held at the open end of the socket, allowing the user to press the adapter into the axle plug for maximum effect. Product placement for Halfords unintentional!


9 Page 9 of 16 Adapter in use. This is on a spare axle in the garage. My drive is on a slope, so I usually back the car onto ramps until it is level, which gives me plenty of room to get underneath to check the level. It also means that the weight of the car is on its springs, so the axle is tucked up in front of the fuel tank, which is what limits the space available for socket drive and attachments. If I jacked the body up at the rear to be level, and let the axle hand on the check-straps, space might not be a problem, but that is a lot more fiddling about than simply driving it onto ramps. But I still had problems getting enough purchase from the tapered square drive, so decided to modify a plug by welding a 3/4" bolt hex end with a short stub into the square recess


10 Page 10 of 16 Comparing modified axle level plug to gearbox level plug - the latter being significantly larger. Measuring the two shows no overlap in the diameter of the tapers i.e. the large end of the smaller plug is still less than the small end if the larger plug... if you see what I mean. Modified axle plug with 3/4" hex head, and hopefully no more struggles undoing it.

11 Page 11 of 16 Axle Rebound Straps Spacer tube, showing corrosion before cleaning off


12 Page 12 of 16 Barely a centimetre of stretch in the original reinforced straps... but over 3cm of stretch in the modern 'all rubber'


13 Page 13 of 16 Clear signs of reinforcing in the original (top), none in the current stock The different markings on old (top) and new


14 Page 14 of 16 Reinforcing straps reducing the extra travel with the rubber straps to about 3mm from over 30mm before


15 Page 15 of 16 Fully fitted, with cable tie U-bolts The orange staining where the axle butts up against the top spring plate, probably showing where the two have been fidgetting. The U-bolts were certainly not tight enough.

16 Page 16 of 16 Copyright 1999 to 2015 I.T. Answers.
Installation Notes: #86000-R Race Series +3.5 L/T Kit
 159 North Maple St. Unit J, CORONA CA 92880 P. 951-737-9682 F. 951-737-9006 WWW.CHAOSFAB.COM Installation Notes: #86000-R Race Series +3.5 L/T Kit Factory manual is recommended for removal and re-installation
Guide to fitting a MK2.5 (Facelift) Centre Console into a MK2 Focus. The Parts
 Centre Console into a MK2 Focus. The Parts") Guide to fitting a MK2.5 (Facelift) Centre Console into a MK2 Focus For the latest project on my MK2 Focus I decided that a Facelift centre console would tie my previous interior uplift together. As I
Guide to fitting a MK2.5 (Facelift) Centre Console into a MK2 Focus For the latest project on my MK2 Focus I decided that a Facelift centre console would tie my previous interior uplift together. As I
REAR STEEL BUMPER INSTALLATION INSTRUCTIONS Runner
 REAR STEEL BUMPER INSTALLATION INSTRUCTIONS 2010+ 4Runner Version 2.1.0 - September 2016 Thank you for purchasing the Southern Style OffRoad Toyota 4Runner 5 th Gen Modular Rear Plate Steel Bumper. It
250P Manure Spreader
 0P Manure Spreader Illustrated Parts Breakdown Page - Page Page Page Page Page Page Page Page Page Page Page Page Page Page - Page Page Page 0 Complete Front End PTO/Jack/Hitch Assembly Front Pulley Assembly
Your G3 buggy is fitted with three switches on the front part of the body:
 CONTENTS Buggy operation... 3 General Maintenance... 5 Technical Maintenance... 6 Front wheel bearing replacement... 6 Rear wheel bearing replacement... 7 Chain replacement... 8 Chain Adjustment... 9 Brake
ILLUSTRATED PARTS LIST
 LM700 INDEPENDENT REAR SUSPENSION WITH 653cc SUBARU ENGINE 800-643-7332 amsportworks.com NOTE: Some part numbers vary by serial number. The serial number is located on a brass tag beneath the dump bed
TOYOTA FJ CRUISER 6 SUSPENSION KIT
 92177000 TOYOTA FJ CRUISER 6 SUSPENSION KIT Thank you for choosing Rough Country for your suspension needs. Rough Country recommends a certified technician installs this system. In addition to these instructions,
PARTS LIST INTRAAX AAT 23K, 25K, 30K LIT NO: L405
 PARTS LIST INTRAAX AAT 23K, 25K, 30K LIT NO: L405 DATE: December 2008 REVISION: F 2b 2a Used on 25K and 30K only 1 2 ITEM DESCRIPTION PART NO. PER AXLE NOTE 1 AXLE/BEAM WELDMENT HTRAAX.XX Contact Hendrickson
Carli Suspension Front Instructions
 Carli Suspension Front Instructions 94-08 DODGE 2500-3500 4X4 SUSPENSION SYSTEM Note: Prior to installation, carefully inspect the vehicle=s steering and drive train components. Be sure to check ball joints,
Litter Spreader. Models SP400, SP450, SP500, SP550. Illustrated Parts Breakdown
 Litter Spreader Models SP00, SP0, SP00, SP0 Illustrated Parts Breakdown Page Front End Page Hydraulic System (w/ Side Mounted Reservoir) Page Hydraulic System (w/ Front Mounted Reservoir) Page Hydraulic
Front Suspension. Front Suspension Component Layout. NOTE: Without Dynamic Response version shown
 Published: Jan 25, 2005 Front Suspension Front Suspension Component Layout NOTE: Without Dynamic Response version shown 1 Flanged bolt (Upper arm forward bush) 2 Bush - forward (Upper arm) Page 1 of 9
RJS2001 PRO STOCK KIT LESS ELECTRICS
 RJS2001 PRO STOCK KIT LESS ELECTRICS THANKS FOR BUYING RJ SPEED S PRO STOCK DRAG KIT. IT IS MADE FOR STRAIGHT LINE DRAG RACING AND CAN BE BROKEN IF RUN INTO SOLID OBJECTS REPEATEDLY AT HIGH SPEED. IT REQUIRES
Assembly Manual. 1/10th Formula 1 Car
 Assembly Manual 1/10th Formula 1 Car Center Pivot Bag 1 3374 - Center Pivot Socket 40194 - Hard Anodized Alum Pivot ball 3254-2-56 *Note - Sometimes it is helpful to slightly over-tighten the top clamp
Rear Axle. Alignment September Page 2 of 15. Page 1 of January 2018
 Page 1 of 15 Page 2 of 15 the tyres centrally with respect to the outer rear wing panels, will offset the rear axle and cause the car to crab. Steering Wheels Rear Body Brakes Clutch Cooling Electrics
ToyTec Front Suspension Install Instructions 2.5" Coilovers Toyota 4Runner / FJ Cruiser ( NON-KDSS)
") ToyTec Front Suspension Install Instructions 2.5" Coilovers 2010+ Toyota 4Runner / FJ Cruiser ( NON-KDSS) Note: ToyTec recommends that all products are installed by trained professionals. List of contents:
ToyTec Front Suspension Install Instructions 2.5" Coilovers 2010+ Toyota 4Runner / FJ Cruiser ( NON-KDSS) Note: ToyTec recommends that all products are installed by trained professionals. List of contents:
RJS2021 LTO SPORT OVAL RACER LESS ELECTRICS
 RJS2021 LTO SPORT OVAL RACER LESS ELECTRICS THANKS FOR BUYING THE RJ SPEED 1/10 LTO SPORT KIT FOR OVAL RACING. THE ASSEMBLY WILL NOT BE DIFFICULT IF YOU READ THE TEXT, LOOK AT THE PICTURES, AND THE EXPLODED
RHINO SUSPENSION SYSTEM INSTALLATION INSTRUCTIONS
 PARTS INCLUDED: 2 FRONT UPPER A-ARMS 2 FRONT LOWER A-ARMS 2 UNI-BALL JOINTS 2 UNI-BALL JOINT STUDS 2 UNI-BALL JOINT CAPS 2 RETAINING RINGS 1 FRONT SHOCK ASSEM. 2 DELRON STEERING STOPS 2 SHOCK MOUNT SPACERS
Slave Cylinder Weep Hole Drilling Procedure
 Slave Cylinder Weep Hole Drilling Procedure Tools Required: T20 Torx Driver T25 Torx Driver T25 Torx Bit with ¼ Ratchet Wrench 4mm Hex Key (Allen wrench) 5mm Hex Key 6mm Hex Key 8mm Hex Key 12mm Hex Key
HEIDTS SUPERIDE IRS INSTALLATION INSTRUCTIONS INDEPENDENT REAR SUSPENSION
 HEIDTS SUPERIDE IRS INDEPENDENT REAR SUSPENSION Please read these instructions completely before starting your installation. Remember the basic rule for a successful installation: Measure Twice, Weld Once.
Front suspension - Plus suspension, servicing. Volkswagen Passat B4 - Front suspension - Plus suspension, servicing
 Volkswagen Passat B4 - Front suspension - Plus suspension, servicing Page 1 / 22 40-2 Front suspension - Plus suspension, servicing I - Subframe, anti-roll bar, control arm (Plus suspension), removing
Edition October 2014 Part No
 Edition 1.3 - October 2014 Part No. 8999076 1 Contents Ordering Your Parts... 3 Centre Section - S180025.70... 5 Wing Section - S180025.71/72...7 Centre Axle - S180025.110... 9 Wing Axle - S180025.111...10
ENG-16, Turbocharger Replacement (Including Tips on K27 Turbocharger Installation)
") ENG-16, Turbocharger Replacement (Including Tips on K27 Turbocharger Installation) Introduction Replacing the turbocharger on a 951 is not extremely difficult. However, it is very tedious because there
ENG-16, Turbocharger Replacement (Including Tips on K27 Turbocharger Installation) Introduction Replacing the turbocharger on a 951 is not extremely difficult. However, it is very tedious because there
Commander SUSPENSION SYSTEM INSTALLATION INSTRUCTIONS
 PARTS INCLUDED: 2 - FRONT UPPER A-ARMS 2 - FRONT LOWER A-ARMS 4 - COTTER PINS 2-12MM JAM NUTS 2 - TIE ROD EXTENDERS 8- FLANGED DELRON BUSHINGS 4- DELRON CASTER SPACERS 6 - GREASE FITTINGS 3 - BEARING REMOVAL
LUGGAGE RACK MG TD with Original Steel Wheels. Installation Instructions. Step 1
 Created on 7/7/2003 8:34:00 PM by Michael Grant Last Revised 2/2/2008 1:55:00 PM Page 1 of 14 1 2 3 243-705 LUGGAGE RACK MG TD with Original Steel Wheels If your TD has been converted to wire wheels, please
ILLUSTRATED PARTS LIST
 LMC4 CREW CAB WITH 653cc SUBARU ENGINE 800-643-7332 amsportworks.com NOTE: Some part numbers vary by serial number. The serial number is located on a brass tag beneath the dump bed on the driver side.
POWERED RUNNING BOARDS INSTALLATION MANUAL
 POWE RUNNING BOARDS INSTALLATION MANUAL Level of Difficulty Moderate Parts List 1 Driver / left running board* 1 Passenger / right running board* 4 Mounting bracket, standard 2 Mounting bracket, middle
INSTALLATION GUIDE. High Steer Kit
 AEV30212AE Last Updated: 12/09/16 High Steer Kit Designed for 2007 current Jeep JK Wrangler and Wrangler Unlimited models in all trim levels, including Rubicon, with at least 3.0 of suspension lift. INSTALLATION
TITAN Fuel Tanks. INSTALLATION INSTRUCTIONS G e n e r a t i o n V. Extended Capacity Replacement Tank for Diesel Chevrolet / GMC Trucks
 Important: Please read these instructions carefully and completely before starting the installation. TITAN Fuel Tanks INSTALLATION INSTRUCTIONS G e n e r a t i o n V Extended Capacity Replacement Tank
Lime Spreader. Model SL10. Illustrated Parts Breakdown. Hydraulic System Hydraulic Manifold. Twin Speed Reducer
 Lime Spreader Model SL0 Illustrated Parts Breakdown Page Page Page Page Page Page Page Page Page Page 0 Front End Hydraulic System Hydraulic Manifold Switch Box Floor & Apron Axle Assembly Apron Drive
RJS2020 SPORT 3.2 1/10 PAN CAR KIT LESS ELECTRICS
 RJS2020 SPORT 3.2 1/10 PAN CAR KIT LESS ELECTRICS THANKS FOR BUYING THE RJ SPEED 1/10 SPORT 3.2 KIT. THE ASSEMBLY WILL NOT BE DIFFICULT IF YOU READ THE TEXT, LOOK AT THE PICTURES, AND THE EXPLODED VIEW
TrailGator REAR BUMPER INSTALLATION INSTRUCTIONS Runner
 TrailGator REAR BUMPER INSTALLATION INSTRUCTIONS 2010+ 4Runner Version 3.1.0 - December 2018 Thank you for purchasing the Southern Style OffRoad Toyota 4Runner 5 th Gen Modular Rear Plate Steel Bumper.
Slide the billet aluminum cap over the bushing and secure with the 3/8-16 x 2 1/2 socket head allen and locknuts provided.
 Slide the billet aluminum cap over the bushing and secure with the 3/8-16 x 2 1/2 socket head allen and locknuts provided. Put the urethane bushings into the upper antiroll-bar-link eyebolt. Coat the bushings
INSTALLATION INSTRUCTIONS
 INSTALLATION INSTRUCTIONS REAR DISC CONVERSION KIT A136-1 1976-86 AMC 20 AXLES WITH WARN FULL FLOATING AXLE CONVERSION Thank you for choosing STAINLESS STEEL BRAKES CORPORATION for your braking needs.
PARTS LIST INTRAAX AAT 23K, 25K, 30K, AAEDT 30K AND AANT 23K
 PARTS LIST INTRAAX AAT 23K, 25K, 30K, AAEDT 30K AND AANT 23K LIT NO: L405 DATE: January 2002 REVISION: E TABLE OF CONTENTS SUSPENSION AND AXLE COMPONENTS...........................................2, 4,
PARTS MANUAL THIS PAGE INTENTIONALLY LEFT BLANK. Ag-Bag International, Ltd. G7000 June Appendix A
 The parts manual is organized into groups, it is designed to make the locating of parts easier. The exploded drawings also show assembly paths. All parts listed are available from your authorized Ag-Bag
FULL LENGTH HEADERS/ CATTED HEAD PIPES
 INSTALLATION INSTRUCTIONS INS232 2016-2018 CAMARO 6.2L V8 FULL LENGTH HEADERS/ CATTED HEAD PIPES Part #4044 and 40440 Special Tools required: 10mm, 12mm, 13mm, 15mm Socket and Wrenches, Pliers, Saw, Welder
Front Suspension Redo
 Front Suspension Redo Message: First, thanks to all the previous posters for guidance in my doing the suspension. As thanks, here s the updated document for doing the front suspension. Procedure: While
Siebert 13 axle (3+3+3), 85 ton trailer West Coast Suspension
, 85 ton trailer West Coast Suspension") Siebert 13 axle (3+3+3), 85 ton trailer West Coast Suspension KS-Stock Date: 1/17/14 Overall Trailer 1) Capacity 170,000# in 14 of main deck (without any deck inserts). GAWR & tire rating determine legal
Siebert 13 axle (3+3+3), 85 ton trailer West Coast Suspension KS-Stock Date: 1/17/14 Overall Trailer 1) Capacity 170,000# in 14 of main deck (without any deck inserts). GAWR & tire rating determine legal
Winter Project Dec-Jan Peter Kitching Rear Axle Rebuild: Rolls-Royce 25/ GRM23 Reg. AV8692
 Winter Project Dec-Jan 2009-2010 Peter Kitching Rear Axle Rebuild: Rolls-Royce 25/30 1936 - GRM23 Reg. AV8692 During the past two years I noticed that oil was running from the central wheel nut locking
05+ Toyota Tacoma Rear Shock Hoop Install Notes Part# 86460
 159 North Maple St. Unit J, CORONA CA 92880 P. 951-737-9682 F. 951-737-9006 WWW.CHAOSFAB.COM 05+ Toyota Tacoma Rear Shock Hoop Install Notes Part# 86460 Note: This kit is designed to work with the Total
Note: ToyTec recommends that all products are installed by trained professionals.
 ToyTec Front Suspension Install Instructions 2.5" Front Suspension Kit 2003 2009 Toyota 4Runner, 2007 2009 Toyota FJ Cruiser, 2005+ Toyota Tacoma, 2002-2009 Prado 120, 2005-2011 Toyota Hilux Note: ToyTec
Tacoma Front Suspension Install Instructions
 1995-04 Tacoma Front Suspension Install Instructions Important notices: These instructions are intended only as a general guide for installing All-Pro products. For some items, specialized mechanical skills,
Chrysler A-Body Tubular A-Arms Installation Instructions A-ARM INSTALLATION
 1967-1976 Dodge Demon 1112 67-72 Chrysler A-Body Tubular A-Arms Installation Instructions Thank you for your purchase of this Hotchkis Performance product. Your A-Arm set was designed with the performance
'99-03 CHEVROLET/GMC IFS 4WD 6" SUSPENSION SYSTEM P/N INSTALLATION INSTRUCTIONS
 1/16/04 '99-03 CHEVROLET/GMC IFS 4WD 6" SUSPENSION SYSTEM P/N. 10-41099 INSTALLATION INSTRUCTIONS NOTE: Each Lift Kit and options to Lift Kits are packaged separately. Therefore, installation procedures
INSTALLATION INSTRUCTIONS
 INSTALLATION INSTRUCTIONS REAR DISC BRAKE CONVERSION KIT A158 1994-97 Dodge Ram 1500 (2WD & 4WD) and REAR DISC BRAKE CONVERSION KIT A158-1 1998-01 Dodge Ram 1500 (2WD & 4WD) Thank you for choosing STAINLESS
ILLUSTRATED PARTS LIST
 LM500 WITH 479cc VANGUARD ENGINE 800-643-7332 amsportworks.com NOTE: Some part numbers vary by serial number. The serial number is located on a brass tag beneath the dump bed on the driver side. 479cc
E31 Repair Procedure Replace Front Wheel Hub/Bearing Assembly
 E31 Repair Procedure 31-21 Replace Front Wheel Hub/Bearing Assembly Disclaimer This repair procedure is provided as is and is not authoritative with respect to any BMW repair operation. Mark F. Fling is
ILLUSTRATED PARTS LIST
 LM650 WITH 653cc SUBARU ENGINE 800-643-7332 amsportworks.com NOTE: Some part numbers vary by serial number. The serial number is located on a brass tag beneath the dump bed on the driver side. unit shown
cfr angle kit INSTALLATION INSTRUCTIONS: 2009-present nissan 370z z infiniti g37 v36 Part Numbers: VOO-akns-0400
 cfr angle kit INSTALLATION INSTRUCTIONS: 2009-present nissan 370z z34 2008-2013 infiniti g37 v36 Part Numbers: VOO-akns-0400 We recommend that installation of all Voodoo13 parts be completed by a professional
2018 MotoTrax. Track Kit Installation Manual
 2018 MotoTrax Track Kit Installation Manual 1 Preparing the bike 1) Put the motorcycle on a stand. 2) Remove stock drive chain 3) Remove the rear wheel 4) Remove the mud flap 5) Disconnect the suspension
 Page 1 of 33 Welcome, goldeneye006 Notifications My Profile Settings Log Out Forum What's New? Home Classifieds Vendors Vendor Specials Store New Rules Posts Private Advertising Messages FAQ Calendar Community
MM Tubular K-Member, (Mm5KM-7)
") 3430 Sacramento Dr., Unit D San Luis Obispo, CA 93401 Telephone: 805/544-8748 Fax: 805/544-8645 www.maximummotorsports.com MM Tubular K-Member, 2005-14 (Mm5KM-7) This Kit Contains Congratulations on purchasing
3430 Sacramento Dr., Unit D San Luis Obispo, CA 93401 Telephone: 805/544-8748 Fax: 805/544-8645 www.maximummotorsports.com MM Tubular K-Member, 2005-14 (Mm5KM-7) This Kit Contains Congratulations on purchasing
SECTION H STEERING. Section Description Page No. H.1 GENERAL DESCRIPTION 3 H.2 STEERING WHEEL 3 H.3 INNER COLUMN 5 H.
 SECTION H STEERING Section Description Page No. H.1 GENERAL DESCRIPTION 3 H.2 STEERING WHEEL 3 H.3 INNER COLUMN 5 H.4 OUTER COLUMN 5 H.5 STEERING UNIT LOCK STOPS 6 H.6 STEERING UNIT 6 H.7 STEERING ARMS
INSTALLATION INSTRUCTIONS CHEVROLET NOVA (NVR-301) INDEPENDENT REAR SUSPENSION
 INDEPENDENT REAR SUSPENSION") INSTALLATION INSTRUCTIONS 68-74 CHEVROLET NOVA (NVR-301) INDEPENDENT REAR SUSPENSION Please read these instructions completely before starting your installation. Assemble suspension on vehicle before powder-coating
INSTALLATION INSTRUCTIONS 68-74 CHEVROLET NOVA (NVR-301) INDEPENDENT REAR SUSPENSION Please read these instructions completely before starting your installation. Assemble suspension on vehicle before powder-coating
ROTARY RAKE PARTS BOOK MODEL E
 ROTARY RAKE PARTS BOOK MODEL 1150 17.00803E This parts book is furnished for your convenience only. All parts must be purchased through an authorized dealer. Call us for a dealer near you. Issue Date:
SCdefault. 900 Installation instructions
 SCdefault 900 Installation instructions SITdefault Sports chassis MONTERINGSANVISNING INSTALLATION INSTRUCTIONS MONTAGEANLEITUNG INSTRUCTIONS DE MONTAGE Accessories Part No. Group Date Instruction Part
IRS-151 INSTALLATION INSTRUCTIONS `55-57 CHEVY INDEPENDENT REAR SUSPENSION
 IRS-151 INSTALLATION INSTRUCTIONS `55-57 CHEVY INDEPENDENT REAR SUSPENSION Please read these instructions completely before starting your installation. Remember the basic rule for a successful installation:
2013+ DODGE RAM " Kit PART# STOP! READ THIS FIRST!
 NOTE: 2013+ DODGE RAM 3500 4" Kit PART# 54346 STOP! READ THIS FIRST! **READ THESE ENTIRE INSTRUCTIONS BEFORE STARTING ANYTHING** or chroming, which can damage the strength and structure of the metal, any
Converting a Series Land Rover to front wheel disc brakes using the kit made by Torrel Industries Ltd,
 Converting a Series Land Rover to front wheel disc brakes using the kit made by Torrel Industries Ltd, Torrel Industries ltd Series Land Rover front brake conversion kit: Difficulty - Low Except for one
DAVIMAC CHASER BIN PARTS LIST
 DAVIMAC CHASER BIN PARTS LIST FROM: 0 CB TO 9 DAVIMAC PTY LTD WELINGTON STREET MOLONG NSW STANDARD CHASER BIN - RIGHT 0 8 9 000 CHASSIS -8 008 BIN 9-0 0000 AUGER -8 000 STEP BOLTED - 000-0 BIN TO CHASSIS
DODGE OFF ROAD T-STYLE STEERING KIT INSTALLATION INSTRUCTIONS
 Dodge Off Road, LLC Specializing in Dodge Ram Solid-Axle 4x4 Suspension and Steering for Off Road Applications 855.9009.DOR sales@dodgeoffroad.com dodgeoffroad.com DODGE OFF ROAD T-STYLE STEERING KIT INSTALLATION
ILLUSTRATED PARTS LIST
 LMC2 CREW CAB WITH 653cc SUBARU ENGINE 800-643-7332 amsportworks.com NOTE: Some part numbers vary by serial number. The serial number is located on a brass tag beneath the dump bed on the driver side.
2014 GM 1500 TRUCK STOP---READ THIS FIRST! 7" Lift KIT. **Read These Entire Instructions Before Starting Anything**
 STOP---READ THIS FIRST! **Read These Entire Instructions Before Starting Anything** 2014 GM 1500 TRUCK LIFT KIT INSTRUCTIONS (PART #50768 & #50769 ) 5680 W. Barstow, Fresno, CA 93722 PH: (559) 226-8196
A1062 & A1072 AUGER ASSEMBLY MANUAL. Read & understand all instructions pertaining to this auger prior to use!
 A1062 & A1072 AUGER ASSEMBLY MANUAL Read & understand all instructions pertaining to this auger prior to use! Safety Alert Watch for this ALERT Symbol. It identifies potential hazards to Personal SAFETY
Pypes Polished Shorty Headers (05-10 V6):
:") Pypes Polished Shorty Headers (05-10 V6): Introduction: The kit comes complete with replacement hardware and gaskets and can be easily done in your driveway. The hardware supplied for install includes
Pypes Polished Shorty Headers (05-10 V6): Introduction: The kit comes complete with replacement hardware and gaskets and can be easily done in your driveway. The hardware supplied for install includes
GENERAL VEHICLE INFORMATION FRONT LOWER STRUCTURE CENTRE LOWER STRUCTURE UPPER FRONT STRUCTURE NON-SIDE OPENING ELEMENTS
 4 Panelwork 40A GENERAL VEHICLE INFORMATION 41A FRONT LOWER STRUCTURE 41B CENTRE LOWER STRUCTURE 41C SIDE LOWER STRUCTURE 41D REAR LOWER STRUCTURE 42A UPPER FRONT STRUCTURE 43A SIDE UPPER STRUCTURE 44A
Parts Manual 125 Series MA
 Parts Manual 125 Series MA - 1 - HEADSTOCK ASSEMBLY - 2 - HEADSTOCK ASSEMBLY ITEM PART N DESCRIPTION QTY 1 1156300 Handle 2 2 900115 Self Locking Nut 3/8 UNF 2 3 1320500 Verticality Screw 2 4 900027 Bolt
INSTALLATION OF ROAD WHEELS AND TIRES
 INSTALLATION OF ROAD WHEELS AND TIRES SAFETY PRECAUTIONS If any installation problems are encountered, please call G&B Specialties, Inc. for technical assistance before continuing with the installation
PARTSBOOK. This part of the manual contains part numbers and illustrations based on the latest information available at the time of print.
 2 PARTSBOOK This part of the manual contains part numbers and illustrations based on the latest information available at the time of print. Hall Manufacturing, Inc. reserves the right to make changes at
Loader Backhoe Front Axle Parts 2WD & 4WD
 Loader Backhoe Front Axle Parts 2WD & 4WD SECTION G LOADER BACKHOE FRONT AXLE PARTS CASE 2WD AXLE PARTS G2 - G5 CARRARO APPLICATIONS G6 - G25 FRONT AXLE KITS G23 - G25 CASE POWER STEERING VALVES & PUMPS
1 HR-301/D Parts Manual. Table Of Contents
 Table Of Contents 301/D Parts Manual 3 Point Hitch...2 Pull-Type Hitch...4 Main Frame...6 Angle Adjuster - Serial Number 44982 & Prior...8 Rotor Assembly - Serial Number 44982 & Prior...10 Rotor Assembly
PARTS LIST TRAILER BRAKE SYSTEMS. LIT NO: DATE: October 2017 REVISION: H
 PARTS LIST TRAILER BRAKE SYSTEMS LIT NO: 97-097 DATE: October 07 REVISION: H TABLE OF CONTENTS INTRODUCTION ABBREVIATIONS DRUM BRAKES & 6. DRUM FOUNDATION BRAKE HXS Brakes P-TYPE DRUM FOUNDATION BRAKE
OPERATOR S MANUAL REPAIR PARTS CATALOG. Models: SCP-51 & SCP-71 SCP-52 & SCP-72 SCP-91 & SCP-111 SCP-92 & SCP-112 BRILLION FARM EQUIPMENT
 OPERATOR S MANUAL REPAIR PARTS CATALOG Subsoil Chisel Plow Models: SCP-51 & SCP-71 SCP-52 & SCP-72 SCP-91 & SCP-111 SCP-92 & SCP-112 IMPORTANT! Repairs cannot be purchased retail direct from factory. Order
Mulching and Finishing Mowers MP and FP
 Mulching and Finishing Mowers MP and FP Parts Manual Locke Turf 0 Highway E, Opp, Alabama, () -00 Transport Wheel, Tire & Spindle MP and FP ALPHABETICAL INDEX CONTENTS PAGE 00 Hydraulic Cylinder (Rear)
table of Contents Warranty:
 table of Contents placement of the Mounting Bolts spudnik swingout... 2 spudnik solid... 2 logan swingout... 3 logan solid... 3 double l swingout... 4 double l solid... 4 Mounting Framework... 5-6 Mounting
INSTALLATION INSTRUCTIONS FOR: DECK LIFT KIT 629GN-001A
 INSTALLATION INSTRUCTIONS FOR: DECK LIFT KIT 629GN-001A 1. SHUT OFF THE ENGINE AND SET THE PARK BRAKE. 2. ROTATE THE FRONT CASTER WHEELS AWAY FROM THE DECK. (SEE ILLUSTRATION 3) 3. REMOVE THE DECK HEIGHT
Sheet metal work. Mechanisms and accessories
 Sheet metal work GENERAL LOWER STRUCTURE UPPER SIDE STRUCTURE UPPER REAR STRUCTURE TOP OF BODY Mechanisms and accessories EXTERIOR PROTECTION JE0 AL - JE0 EL - JE0 HL 77 11 196 742 DECEMBER 1997 Edition
DODGE / RAM 1500 *** DO NOT EXCEED VEHICLE MANUFACTURER'S RECOMENDED TOWING CAPACITY ***
 6444 DODGE / RAM 500 6/8/207 OF 5 *** DO NOT EXCEED MANUFACTURER'S RECOMENDED TOWING CAPACITY *** ITEM QTY PART NUMBER 0 /2-3 x 2" 2 4 /2-3 x 3/4, GR8 3 4 CM-SP2 4 2 CM-SP6 5 4 HFN 23, GR8 6 2 CM-SP4 7
2011+ Adjustable Tie-rod Ends (Mm5TR-2)
") 3430 Sacramento Dr., Unit D San Luis Obispo, CA 93401 Telephone: 805/544-8748 Fax: 805/544-8645 www.maximummotorsports.com 2011+ Adjustable Tie-rod Ends (Mm5TR-2) Instructions 1. Set the parking brake
3430 Sacramento Dr., Unit D San Luis Obispo, CA 93401 Telephone: 805/544-8748 Fax: 805/544-8645 www.maximummotorsports.com 2011+ Adjustable Tie-rod Ends (Mm5TR-2) Instructions 1. Set the parking brake
ILLUSTRATED PARTS LIST
 BD700 WITH 653cc SUBARU ENGINE 800-643-7332 amsportworks.com NOTE: Some part numbers vary by serial number. The serial number is located on a brass tag beneath the dump bed on the driver side. 653cc 4
SAFETY THIS PRODUCT IS FOR OFFROAD USE ONLY. ALL LIABILITY FOR INSTALLATION AND USE RESTS WITH THE OWNER.
 SAFETY Your safety and the safety of others is very important. In order to help you make informed decisions about safety, we have provided installation instructions and other information. These instructions
Spearhead Multicut 460 MULTICUT th Edition - July 2015 Part No
 MULTICUT 460 14 th Edition - July 2015 Part No. 8999023 1 Spearhead Multicut 460 Parts Book 14 th Edition July 2015 Spearhead Machinery Ltd Green View Salford Priors Evesham Worcestershire WR11 8SW Tel:
Fig A ADDICTIVE DESERT DESIGNS. Preparation: Removal: Release these clips
 Preparation: Disconnect the negative battery terminal. Park the vehicle on level ground and set the emergency brake. We recommend reading through the installation instructions in whole before performing
SUT-450-I ASSEMBLY REQUIREMENTS
 SUT-450-I Torque wrench, carpenters square, wire cutters, Phillips screwdriver, 7/16, 9/16, and 3/4 combination wrenches, ratchet, 9/16,3/4,13/16, and 7/8 sockets. ASSEMBLY REQUIREMENTS *Torque all T-bolt
MGB V8 Roadster restoration project - 145
 11th June 2017. The MGB V8 rebuild is getting near to being finished. The exhaust manifold this side was a lot easier to fit than the left hand side. I could get my 3/8 drive Allen key socket onto the
1964 1/2-70 Mustang Torque Arm Rear Suspension Installation Instructions
 1964 1/2-70 Mustang Torque Arm Rear Suspension Installation Instructions 1-800-984-6259 www.totalcostinvolved.com Version 2 (c) 2008 Total Cost Involved Engineering, Inc. All Rights Reserved. Page 1 of
*USE ONLY POWER STEERING FLUID IN SYSTEM. DO NOT USE ATF. YOU MUST USE THE SUPPLIED HEADERS, MODIFY EXHAUST PIPES, AND WELD FLANGES.
 1949-1951 Ford Full-Size Rack & Pinion Kit Instructions # 8011660 Full refund will NOT be granted to any kits that are damaged, scratched, or altered in any fashion. *USE ONLY POWER STEERING FLUID IN SYSTEM.
 Page 1 of 10 43: Transmission, automatic, B5254T2, AW50/51 AWD V70 XC (01-) / XC70 (-07), 2004, B5254T2, AW50/51 AWD, L.H.D, YV1SZ59H241147306, 147306 15/10/2011 PRINT 43: Transmission, automatic, B5254T2,
Spearhead STARCUT 500 STARCUT 500. Edition Jan 2013 Post Serial No. S Part No
 STARCUT 500 Edition 2.0 - Jan 2013 Post Serial No. S136498 Part No. 8999040 1 Contents Ordering Your Parts 3 Centre Section 4 Wing Section 6 Centre Axle 8 Wing Axle 10 Std Drawbar 12 Tie-Bar Assembly 14
TT4100 Rotary Tedder
 TT0 Rotary Tedder Serial numbers 0 and higher Illustrated Parts Breakdown Page Page Tongue Assembly S/N - Tongue Assembly S/N to Page Page Page Page Page Tongue Assembly S/N to Tongue Assembly S/N + Main
From a modest beginning in 1976 producing small. quantities of gravity conveyor rollers, Arnott Handling
 ARNOTT HANDLING LTD From a modest beginning in 1976 producing small quantities of gravity conveyor rollers, Arnott Handling Equipment Limited has grown to become one of the United Kingdom s foremost manufacturers
INSTALLATION INSTRUCTIONS
 INSTALLATION INSTRUCTIONS Thank you for purchasing ROLTECTM Electric Hopper Conversion. Agri-Cover, Inc. proudly manufactured this hardware using superior quality materials and workmanship. With proper
NHP Exhaust Boxster Muffler V2 Installation Instructions and Tech Tips.
 NHP Exhaust Boxster Muffler V2 Installation Instructions and Tech Tips. Thank you for purchasing your new Porsche 986 NHP Exhaust System, below you will find installation instructions to help you complete
De clunking your MGB rear axle. By Stuart Clarke
 De clunking your MGB rear axle By Stuart Clarke Do you have that annoying clunking noise when accelerating or decelerating, or even when you lift off to change gear, well it s possible to resolve the issue
Part # GM F Body Rear R-Joint Bolt-in 4 Link GM F Body Rear Bolt-in 4Link. Table of contents. Installation Instructions
 Part # 11167199-1967-1969 GM F Body Rear R-Joint Bolt-in 4 Link Recommended Tools 1967-1969 GM F Body Rear Bolt-in 4Link Installation Table of contents Page 2-3... Included Components Page 4... Hardware
69-74 VW Beetle IRS Rear Kit Part No
 www.airliftcompany.com 69-74 VW Beetle IRS Rear Kit Part No. 75615 MN-476 (01102) ECN 3455 Please read these instructions completely before proceeding with installation A C B E D AA F F ITEM QTY. PART
FITTING OIL TEMP AND PRESSURE GUAGES
 FITTING OIL TEMP AND PRESSURE GUAGES this guide is of reference to fitting an oil temp and pressure sender/ sensor into a sandwich plate- not the sump plug temp sensor (although it wouldn't be much different
PARTSBOOK. Hall Manufacturing, Inc E. Washington Ave., P.O. Box Drawer 5638 North Little Rock, AR (501)
") 540 RPM 2 PARTSBOOK This part of the manual contains part numbers and illustrations based on the latest information available at the time of print. Hall Manufacturing, Inc. reserves the right to make changes
540 RPM 2 PARTSBOOK This part of the manual contains part numbers and illustrations based on the latest information available at the time of print. Hall Manufacturing, Inc. reserves the right to make changes
Some Basics: Single Inlet Forward Curve Blower Wheels & How to determine Rotation Direction on a Single Inlet Blower Wheel
 Selection Guide for Forward Curve Blower Wheels Since 1903, Electric Trading Company has been providing it s customers with fine quality HVAC equipment & supplies, while always striving to offer exceptional
ILLUSTRATED PARTS LIST
 CW413 / TW413 WITH 390cc HONDA ENGINE 00-643-7332 amsportworks.com NOTE: Some part numbers vary by serial number. The serial number is located on a brass tag beneath the dump bed on the driver side. 390cc