August Alfa Giulia Forza Exhaust Controller Installation
|
|
|
- Asher Lester
- 5 years ago
- Views:
Transcription


1 August 2018 Alfa Giulia Forza Exhaust Controller Installation


 Single")


2 Forza Controller kit contents Forza Model B3A or Model E Controller (B3A is shown) Single electrical connector Special configuration Always closed option is disabled One or two remote transmitters 3M Dual Lock adhesive mounting strips One connection cable (120 cm) Page 2
3 Installation Summary Completely read through the installation instructions Locate the vacuum solenoid valve Make preliminary connection of the controller module and test function Ignition on Check polarity of electrical connection (LED on controller illuminated). Correct polarity if necessary. Use remote to check function of relays. You will hear clicking of relays as you press the buttons. Locate controller in luggage compartment There should be a plastic storage box in the floor of the boot. Try this location see additional photos on following pages. Route connection cable from solenoid valve to controller Secure connection cable and controller Test function of controller with engine running finalizing the installation Complete the installation Page 3

4 Locate Vacuum Solenoid Valve and make preliminary connection to controller Open the plate under (near) the rear differential Screws, nuts and clips. Once removed, you should be able to reach the solenoid valve Disconnect the JPT electrical plug on the solenoid Connect this to the male plug on the connection cable Connect female JPT connector to the solenoid Connect Superseal connector to the Forza controller and connect the green wire to a proper vehicle ground. Turn on ignition Check electrical polarity (LED illuminated on controller) Make preliminary test press fob buttons and listen for clicking sound in controller. These are the relays working. If you discover that the LED does not illuminate, the relays will not function as this is an indication of incorrect electrical polarity or a bad ground connection. The installation instruction included with the kit have directions for changing the electrical polarity of the controller which only takes 5 minutes and requires only a small screwdriver to change the connection on four electrical terminals. Page 4
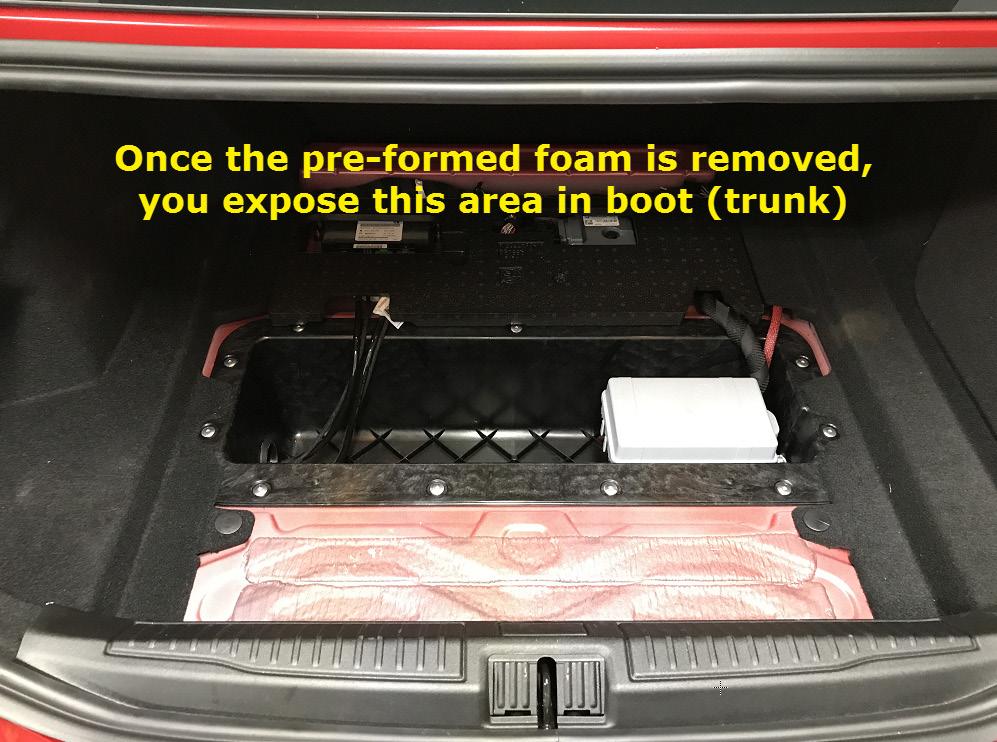
 Check cable routing to outside of box There should already be some")


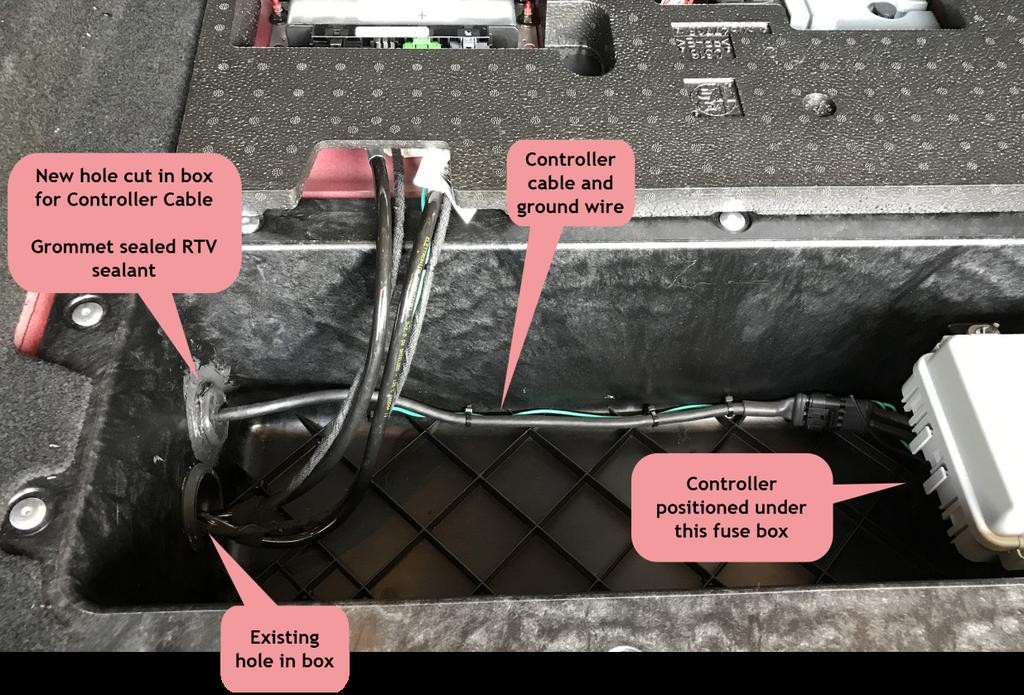
5 Locate suitable spot for installing controller in luggage compartment of vehicle Look for plastic box in boot (trunk) Check cable routing to outside of box There should already be some cables routed into the box. Check to see if you can use this existing hole to route your connection cable. If not, then drill a hole in the side of the box to route cable Use rubber grommet after routing cable into box. Cut through one side of grommet to wrap around cable. Secure with a dab or two of RTV or silicone caulking. Find suitable ground for controller and make connection ensure the point used for the ground is indeed a good ground. Install controller in plastic box and secure it to keep in place Secure the connection cable where you route in from the solenoid valve Page 5


6 Additional photos of installation Page 6


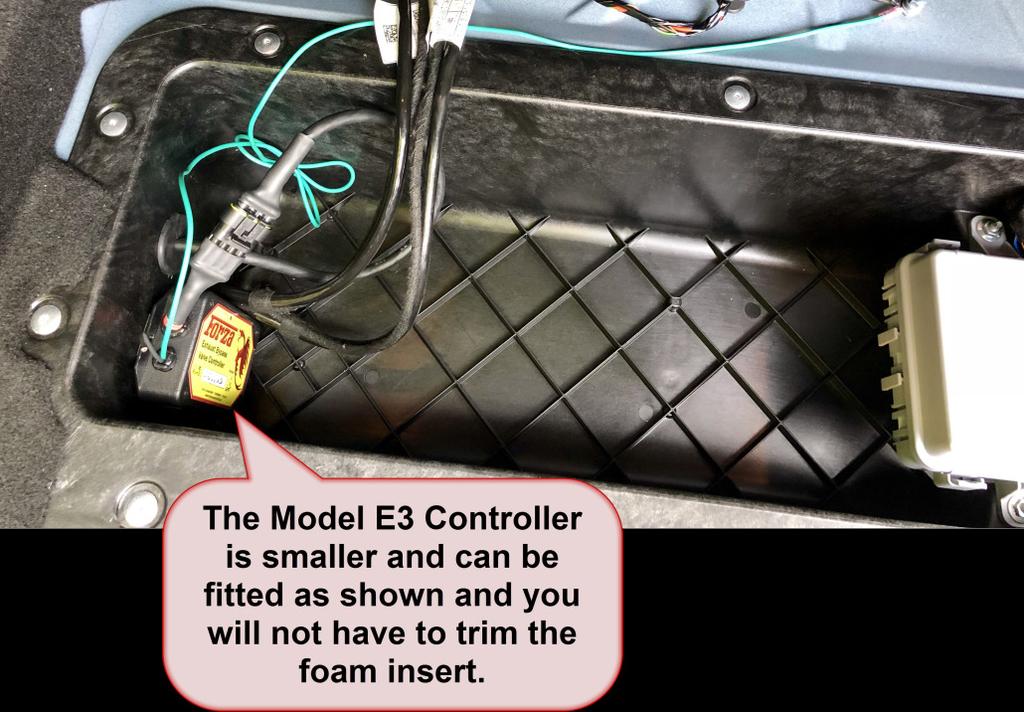

7 Additional photos of installation Page 7
8 Controller operation summary Default mode is Normal in this mode, the car s ECU controls valves. This is as if the controller is not installed at all. Always Open mode in this mode, the bypass valves will be open regardless of the vehicle s speed, engine RPM or throttle position. Always Closed mode disabled for Alfa Giulia. Disabled due to Engine Check Light fault when car is in race mode Controller is initially shipped to use the Remote Fob, but you have option to use a manual switch instead. Splice into black (or blue) wire and route to manual On/Off switch that you mount in the cabin. The black (or blue) wire is merely a path to ground. There is no need to fuse protect it. Full details included in the installation instruction document. Page 8
Forza Componenti Model E2 Controller Installation Instructions October 2018 Page 1 of 14
 Page 1 of 14 Model E2 3-Way Exhaust Bypass Valve Controller Installation Instructions for Camaro and Corvette Note: These instructions are available on our web site www.forzacomponenti.com/documents.html
Forza Componenti Model C1 Controller Installation Instructions September 2017 Page 1 of 15
 Page 1 of 15 Model C1 Dual-Mode Exhaust Bypass Valve Controller for Camaro, Corvette, Aston Martin and others. Note: These instructions are available on our web site www.forzacomponenti.com/documents.html
Exhaust System Bypass Valves and Exhaust Valve Bypass Controller
 Exhaust System Bypass Valves and Exhaust Valve Bypass Controller Basic Primer on Exhaust System Flow Velocity and Backpressure The information about exhaust system theory was obtained from research on
Juice Box Plus (JB+) Installation Guide 5/01/09
 Installation Guide 5/01/09") 1. The ECU must be asleep before removing TMAP connector. Open hood, lock and close doors, and wait 15 minutes. If you have comfort access place your keys far enough away to avoid waking the ECU up. Alternatively
1. The ECU must be asleep before removing TMAP connector. Open hood, lock and close doors, and wait 15 minutes. If you have comfort access place your keys far enough away to avoid waking the ECU up. Alternatively
JB N20/N26 Stage 1 & JB4 Install Guide Last Updated: 10/31/2017
 JB N20/N26 Stage 1 & JB4 Install Guide Last Updated: 10/31/2017 Use subject to terms and conditions posted at http://www.burgertuning.com/terms.html THIS PART IS LEGAL FOR USE ONLY IN COMPETITION RACING
SP Switch Programmable Switch Panel Power System. Parts Included
 SP8100 8-Switch Programmable Switch Panel Power System Parts Included 1 Switch Panel 1 100 amp Power Module 1 Power Module Harness 1 Power Module Mounting Plate 1 Battery Cable w/100a MIDI fuse (Littlefuse
REC-11+ REMOTE RECEIVER UNIT
 Resetting The Programmable Features The installer may quickly and easily return all 17 programmable features back to the factory settings. Changing individual features were explained in detail in the previous
Installation Instructions for Key Switch SNOWRATOR
 2017 Installation Instructions for Key Switch SNOWRATOR We appreciate your purchase of L.T. Rich s Product. Please read carefully before Operating or detaching. AES L.T.RICH 6/15/2017 SHIPPING CONTENTS...
BX8848 Installation Instructions 4 Diode Wiring Kit For Motorhomes With Red Tail Lights
 For Motorhomes With Red Tail Lights WARNG: Incorrect wiring may result in blown fuses, damaged wiring, fire, or bodily injury. Blue Ox recommends installation of this kit by a trained professional. Blue
Installation Tips for your Add-on Remote Start (for GM vehicles with INTSL Install 2) v3.2 Updated 11/12/2012
 v3.2 Updated 11/12/2012") Installation Tips for your Add-on Remote Start (for GM vehicles with INTSL Install 2) v3.2 Updated 11/12/2012 Thank you for purchasing your remote start from MyPushcart.com - an industry leader in providing
Installation Tips for your Add-on Remote Start (for GM vehicles with INTSL Install 2) v3.2 Updated 11/12/2012 Thank you for purchasing your remote start from MyPushcart.com - an industry leader in providing
Smart Opener Retrofit by Richard Bevan (bimmerfest riku2)
") Smart Opener Retrofit by Richard Bevan (bimmerfest riku2) Document history V 1.0 02.04.2015 Document created. Introduction This document tells how to retrofit the smart opener to a 2011 BMW 5 series (F10).
Smart Opener Retrofit by Richard Bevan (bimmerfest riku2) Document history V 1.0 02.04.2015 Document created. Introduction This document tells how to retrofit the smart opener to a 2011 BMW 5 series (F10).
M-9424-M50CJ INTAKE MANIFOLD INSTALLATION INSTRUCTIONS
 Please visit www.fordracingparts.com for the most current instruction information!!! PLEASE READ ALL OF THE FOLLOWING INSTRUCTIONS CAREFULLY PRIOR TO INSTALLATION. AT ANY TIME YOU DO NOT UNDERSTAND THE
Installation Tips for your Remote Start system (for Toyota Camry & Prius C, ) Crimestopper RS0+ EVO-ALL T3468 rev#1.
 Crimestopper RS0+ EVO-ALL T3468 rev#1.") Installation Tips for your Remote Start system (for Toyota Camry & Prius C, 2012-2014) Crimestopper RS0+ EVO-ALL T3468 rev#1.1 1/22/2015 Thank you for purchasing your remote start from MyPushcart.com -
Installation Tips for your Remote Start system (for Toyota Camry & Prius C, 2012-2014) Crimestopper RS0+ EVO-ALL T3468 rev#1.1 1/22/2015 Thank you for purchasing your remote start from MyPushcart.com -
C WD 2 WHEEL LOW KIT FOR DODGE RAM 4WD VEHICLES
 C18056-4WD 2 WHEEL LOW KIT FOR 1994-2002 DODGE RAM 4WD VEHICLES Pacbrake s 4WD 2 Wheel Low Kit allows the vehicle operator to engage the transfer case into 4WD low range without engaging the front wheel
2-row and All-row systems included.
 Ag Leader Technology Cotton Picker Installation Installation Instructions for John Deere cotton picker models: 2-row and All-row systems included. IMPORTANT: Ensure the model numbers shown above correspond
INSTALLATION MANUAL SPECTRUM BRAKE CONTROL
 INSTALLATION MANUAL 51170 SPECTRUM BRAKE CONTROL TABLE OF CONTENTS Controls & Components Tools List Before You Begin Wiring Wiring Diagram Mounting the LED Display Rotary Knob Wiring the Plug Connector
RA2 Installation Manual Rev. B
 Important Information Required Installation Tools Voltmeter Wire Strippers Electric Drill & Bits Phillips Screwdriver Convoluted Tubing * Solder Gun * Wire Crimpers Shrink Tube or Electrical Tape * Optional
PRXB EXHAUST BRAKE MAXIMUM EXHAUST FLOW DESIGN
 MAXIMUM EXHAUST FLOW DESIGN PRXB EXHAUST BRAKE C44072/C44073/C44074/C44075/C44076 APPLICATION: 994-2002 DODGE RAM TRUCKS W/5.9L CUMMINS DIESEL ENGINES WITH MANUAL & AUTOMATIC TRANSMISSIONS STOCK DODGE
Please read thoroughly before starting installation and check that kit contents are complete.
 Rear Vision System Mirror Display 2013-Current Ram (Kit part number 1009-9518) Please read thoroughly before starting installation and check that kit contents are complete. Items Included in the Kit: Rear
HP10134 & HP10135 KITS BASIC SIMULTANEOUS AIR SPRING ACTIVATION KIT
 HP10134 & HP10135 KITS BASIC SIMULTANEOUS AIR SPRING ACTIVATION KIT Thank you and congratulations on the purchase of a Pacbrake simultaneous air spring activation kit. This kit was designed to add in-cab
6R / 5-BUTTON SERIES VEHICLE SECURITY SYSTEM
 6R / 5-BUTTON SERIES VEHICLE SECURITY SYSTEM Button 1 Button 2 Button 5 Button 3 Button 4 Standard Features: Two 5-Button Remote Transmitters Status indicator (LED) Valet / override switch Multi-tone siren
Installation Guide Currie Electro-Drive Conversion Kits 2, 3, & 4
 Installation Guide Currie Electro-Drive Conversion Kits 2, 3, & 4 1 Before you start... Use this information to determine whether one of our kits will fit your bike Drawing Ref. Fork Area Leg clearance
6 RELAY SYSTEM 5-BUTTON SERIES VEHICLE SECURITY SYSTEM INSTALLATION MANUAL
 6 REAY SYSTEM 5-BUTTON SERIES VEHICE SECURITY SYSTEM INSTAATION MANUA Before you begin the installation Read the INSTRUCTIONS! Always use a multi-meter when verifying vehicle wiring. Before mounting the
INSTALLATION INSTRUCTIONS TRAILER HITCH MAIN HARNESS KIT
 PART NUMBER: 0000-89-N30 GENUINE ACCESSORIES INSTALLATION INSTRUCTIONS TRAILER HITCH MAIN HARNESS KIT APPLICABLE MODELS: 2016 > CX-9 PACKAGE CONTENTS: INSTALLATION INSTRUCTIONS QTY 1 CABLE TIE MOUNT QTY
Installing Ignition Coil relay
 Installing Ignition Coil relay Above is a schematic diagram of the coil relay modification. All it really does is, it uses the existing 12 Volt positive that normally powers the coils, to power a relay,
1 of 5 9/19/2017, 8:29 PM
 1 of 5 9/19/2017, 8:29 PM Electrical Emergency Release, Front Cover (Hood) and Trunk Lid - Early Production (Emergency Unlocking of the Luggage Compartment Lids) ALLDATA EDITORS NOTE: This article is a
Part Number: TBL-016S
 5/18/17 TOYOTA TUNDRA 2014-2017 LED Truck Bed Light Kit Part Number: TBL-016S Kit Contents Item # Quantity Reqd. Description 1 2 LED Bed Light Harness (10 ) 2 2 LED Bed Light Harness (5 ) 3 1 Y Harness
Diablo 2 /AMX 68/AT-58 Installation Manual 3/31/99
 1 Table of Contents Required Installation Tools... 2 Important Information... 2 Wiring Diagram.... 3 14 Pin Con nec tor... 4 Starter Dis able Relay...4 Installation Procedures...5 Control Unit... 5 Antenna...
Manual - Inside Front Cover (Blank)
") FRONT COVER Manual - Inside Front Cover (Blank) Table of Contents Important Information... 2 Recommended Installation Tools... 2 Recommended Procecures... 2 Wiring Diagram... 3 14 Pin Connector...4 Installation
FRONT COVER Manual - Inside Front Cover (Blank) Table of Contents Important Information... 2 Recommended Installation Tools... 2 Recommended Procecures... 2 Wiring Diagram... 3 14 Pin Connector...4 Installation
MEGA 462 REMOTE CONTROL AUTO ALARM SYSTEM INSTALLATION & OPERATION INSTRUCTIONS WIRING DIAGRAM. White. H1 5 Pin White. H6 2 Pin White.
 MEGA 462 REMOTE CONTROL AUTO ALARM SYSTEM INSTALLATION & OPERATION INSTRUCTIONS WIRING DIAGRAM H7/1 Green : (-) 200mA Pulse H7 3 Pin H7/3 Blue : (-) 200mA Unlock White LED Indicator Valet Switch H6 2 Pin
Part Number: TBL-016S
 5/18/17 TOYOTA TACOMA 2016-2017 LED Bed Light Kit Part Number: TBL-016S Kit Contents Item # Quantity Reqd. Description 1 2 LED Bed Light Harness (10 ) 2 2 LED Bed Light Harness (5 ) 3 1 Y Harness Extension
150 PSI ILLUMINATED DASH PANEL GAUGE KIT
 150 PSI ILLUMINATED DASH PANEL GAUGE KIT PART NO. 10061 (For Use with 20/30 Amp Systems) PART NO. 20062 (For Use with 30/40 Amp Systems) IMPORTANT: It is essential that you and any other operator of this
General Installations Instruktion (Foretages af serviceværksted) Model # SP-1575/SP-1875
 Model # SP-1575/SP-1875") General Installations Instruktion (Foretages af serviceværksted) Model # SP-1575/SP-1875 Step 1: Take harness assembly and route from the rear of the vehicle to the front. Route harness along frame and
General Installations Instruktion (Foretages af serviceværksted) Model # SP-1575/SP-1875 Step 1: Take harness assembly and route from the rear of the vehicle to the front. Route harness along frame and
CLASSIC UPDATE WIRING KIT
 by Randy Irwin 1955-57 CLASSIC UPDATE WIRING KIT Randy Irwin - Technical Writer Randy has been involved in the Chevy parts business for over 25 years. He is a wizard at creating, making and modifying custom
BMW-Motorrad Installing LED auxiliary headlights Preparatory work. Core activity
 77 51 001 Installing LED auxiliary headlights + 77 51 502 Equipment trim-level variant: LED auxiliary headlights Note Not all the components contained in the installation kit are necessary for installing
Instructions for 2-row monitoring only
 Installation Instructions for CaseIH cotton picker models: Instructions for 2-row monitoring only CAUTION: Ensure the model numbers shown above correspond to the machine model. If you receive the incorrect
INSTALLATION INSTRUCTIONS
 INSTALLATION INSTRUCTIONS FUEL SURGE TANK INSTALL KIT Honda S2000 Document# 19-0063 Support: info@radiumauto.com WARNING: DO NOT SMOKE WHILE WORKING ON FUEL SYSTEMS. KEEP SPARKS AND OPEN FLAMES AWAY FROM
Instructions for 2-row monitoring only
 Installation Instructions for CaseIH cotton picker models: Instructions for 2-row monitoring only Ensure the model numbers shown above correspond to the machine model. If you receive the incorrect installation
INSTALLATION INSTRUCTIONS
 INSTALLATION INSTRUCTIONS Electric Vacuum Pump Kit 28146 Thank you for choosing STAINLESS STEEL BRAKES CORPORATION for your braking needs. Pleases take the time to read and carefully follow these instructions
INSTALLATION MANUAL. Model: PLUS Vehicle Security
 R Vehicle Security INSTALLATION MANUAL Model: PLUS-5000 Copyright 1999 Magnadyne Corporation For Technical Assistance (800) 638-3600 For Fax on Demand Technical Assistance (800) 994-9977 (Must be a Registered
Assembly instructions Original parking distance control system, Volkswagen
 Assembly instructions Original parking distance control system, Volkswagen Set contents: 1 x controller 1 x buzzer 4 x sensor Set contents: 4 x covering rings 4 x protective rings Special tools, test and
IN VEHICLE SECURITY ULTIMATE FLEXIBILITY. Installation Supplement. ClassicOne & UltraOne
 25) Ignition-Activated Anti-Carjacking Protection: Default OFF. 26) Door-Activated Anti-Carjacking Protection: Default OFF. 27) Open Door Warning Upon Arming: Default OFF. 28) PANIC Button Operates "Panic"
Consists of. Date:17/02/2011 Page 1/8
 Consists of 470518 Qty. Product 4 1 DEFA Termina - interior heater with holder 1 1 DEFA Futura - time program controller/timer 3 1 DEFA MultiCharger 1203 - battery charger/relay 6 1 DEFA Extension cable
INSTALLATION INSTRUCTIONS
 INSTALLATION INSTRUCTIONS FUEL SURGE TANK INSTALLATION KIT 1999-2006 BMW E46 COUPE Document# 19-0056 Support: info@radiumauto.com Note: This kit wasn t designed for a FST-R, but can be accomplished. 1.
Model APS-101N Installation Manual
 Programmable Features Model APS-101N Installation Manual Select By Operating Transmitter Press Lock Button Press Unlock Button Siren Indications 1 Chirp 2 Chirps Factory Default 1) Arming Method Passive
INSTALLATION INSTRUCTIONS PART NUMBER D APPLICATIONS:
 INSTALLATION INSTRUCTIONS PART NUMBER D440-0056 APPLICATIONS: 12/14-2017 F55 John Cooper Works Mini Cooper S (5-door with 2.0L B48 engine) 12/14-2017 F56 John Cooper Works Mini Cooper S (3-door with 2.0L
INSTALLATION INSTRUCTIONS
 INSTALLATION INSTRUCTIONS FUEL SURGE TANK INSTALLATION KIT 1999-2006 BMW E46 COUPE Document# 19-0056 Support: info@radiumauto.com Note: This kit was designed for a standard single pump Radium Engineering
Jeep JK 6 Switch Panel
 921709590 2007-17 Jeep JK 6 Switch Panel Thank you for choosing Rough Country for all your lighting needs. Please read instructions before beginning installation. Check the kit hardware against the kit
Using the Key or Remote Transmitter*
 VEHICLE CONTROLS Vehicle Controls Learn about the various controls necessary for operating and driving the vehicle. Using the Key or Remote Transmitter* Lock or unlock the doors and trunk. Lock button:
3.4L V6 SUPERCHARGER 7 TH INJECTOR KIT
 Part Number: 00602-17620-260 00602-17620-261 00602-17620-263 00602-17620-264 00602-17620-274 00602-17620-275 00602-17620-276 Section I Installation Preparation Kit Contents Item # Quantity Reqd. Description
INSTALLATION INSTRUCTIONS
 INSTALLATION INSTRUCTIONS Electric Vacuum Pump Kit 28146 Thank you for choosing STAINLESS STEEL BRAKES CORPORATION for your braking needs. Pleases take the time to read and carefully follow these instructions
INSTALLATION MANUAL. Remote Mobile Security System. Model: PL50
 Remote Mobile Security System INSTALLATION MANUAL Model: PL50 Copyright 2000 Magnadyne Corporation For Technical Assistance (800) 638-3600 For Fax on Demand Technical Assistance (800) 994-9977 (Must be
Lethal Performance Dual FPDM Harness Kit Installation
 Lethal Performance Dual FPDM Harness Kit Installation The Lethal Performance Dual FPDM Harness Kit is a plug-and-play modification. Depending on whether you are using the Lethal Performance wire upgrade
SPEED CONTROL 4 AND 6 CYL. JEEP WRANGLER. Read entire instructions thoroughly before starting. INSTALLATION INSTRUCTIONS TOOLS REQUIRED:
 Read entire instructions thoroughly before starting. TOOLS REQUIRED: SPEED CONTROL 4 AND 6 CYL. JEEP WRANGLER INSTALLATION INSTRUCTIONS Complete socket set Phillips screwdriver Torx drivers Wire strippers/cutters
CAMRY STRIP LED DRL TOYOTA Part Number: Accessory Code: LDRS10. PIO / DIO Rev. A 02/26/13. Doc
 Doc. 02.126.00 TOYOTA CAMRY PIO / DIO Rev. A 2013-02/26/13 STRIP LED DRL Part Number: 00016-32280 Accessory Code: LDRS10 Conflicts - Only works on Camry SE Kit Contents Item # Quantity Reqd. Description
ACD-PRO Install in 2008 EvoX
 Turning in a counter clockwise direction, unscrew ift knob ACD-PRO Install in 2008 EvoX Slide back and remove the floor console panel assembly Pull up to remove the center console tray Disconnect the plug
Previa (RHD) - MMC PZ425-R PART NUMBER INSTALLATION INSTRUCTIONS TOYOTA NAVIGATION SYSTEM. (Production date 05/03)
 - MMC PZ425-R PART NUMBER INSTALLATION INSTRUCTIONS TOYOTA NAVIGATION SYSTEM. (Production date 05/03)") TOYOTA NAVIGATION SYSTEM Previa (RHD) - MMC INSTALLATION INSTRUCTIONS PART NUMBER NAVIGATION KIT 08545-52800 MOUNTING BRACKET FOR **R*R (Production date 05/0) PZ425-R0261-60 Manual ref. n NRR/W-0-0 TOYOTA
TOYOTA NAVIGATION SYSTEM Previa (RHD) - MMC INSTALLATION INSTRUCTIONS PART NUMBER NAVIGATION KIT 08545-52800 MOUNTING BRACKET FOR **R*R (Production date 05/0) PZ425-R0261-60 Manual ref. n NRR/W-0-0 TOYOTA
Stay-IN-Play with Panic Stop Braking
 INSTALLATION INSTRUCTIONS TOWED VEHICLE BRAKING SYSTEM Stay-IN-Play with Panic Stop Braking SMI Manufacturing, Inc. P.O. Box 14040 Evansville, IN 47728 1-800-893-3763 www.smibrake.com SIP0906 Model SIP0603
AviStart 6500 Installation Manual
 Table of Contents Important Information... 1 Recommended Installation Tools... 1 Recommended Procedures... 1 Main Wiring Diagrams.... 2 Pin Connectors... 5 Installation Procedures...7 Control Unit... 7
WirelessONE. Kit INSTALLATION GUIDE. Key Fob Activated Compressor System
 Kit 25870 Key Fob Activated Compressor System MN-751 (041202) ECR 7260 INSTALLATION GUIDE For maximum effectiveness and safety, please read these instructions completely before proceeding with installation.
INSTALLATION MANUAL 601-S INFORMATION.) 8. REMOVE DOME LIGHT FUSE TO PRE- VENT BATTERY DRAIN.
 8. REMOVE DOME LIGHT FUSE TO PRE- VENT BATTERY DRAIN.") FOR NEGATIVE PARKING LIGHTS (MOST JAPANESE VEHICLES) FOR POSITIVE PARKING LIGHTS TRUNK RELEASE CIRCUIT DIAGRAM: OUT TO TRUNK 12V 2nd CHANNEL AUXILIARY (GRAY WIRE) 86 a 85 If the power trunk release requires
FOR NEGATIVE PARKING LIGHTS (MOST JAPANESE VEHICLES) FOR POSITIVE PARKING LIGHTS TRUNK RELEASE CIRCUIT DIAGRAM: OUT TO TRUNK 12V 2nd CHANNEL AUXILIARY (GRAY WIRE) 86 a 85 If the power trunk release requires
Line Lock Package, Mustang GT/GT500, 2007 PACKING LIST
 PART #M25002 Line Lock Package, Mustang GT/GT500, 2007 PACKING LIST Before installation, use this check list to make sure all necessary parts have been included. ITEM QTY CHECK PART NUMBER DESCRIPTION
INSTALLATION INSTRUCTIONS DOCUMENT REVISION : /17/2014
 INSTALLATION INSTRUCTIONS DOCUMENT REVISION : 1.0 10/17/2014 LPF COMPONENT LIST LPF W/ WIRE & GROMMET ( 1 ) M6 X 20MM SCREW ( 2 )* LPF DRIVER BOX ( 1 ) REVERSE CIRCUIT WIRE ( 1 ).25 THICK LICENSE PLATE
Gas Spreader PLUS Remote Kit With Built in Clutch Relay and On/Off Switch
 Gas Spreader PLUS Remote Kit With Built in Clutch Relay and On/Off Switch NOTE: Read all directions first before continuing. This wireless controller kit has been programmed and tested before shipping.
MOTOALLIANCE WINCH MOUNT
 , / 1-866-527-7637 www.motoalliance.com MOTOALLIANCE WINCH MOUNT Polaris RZR Thank you for purchasing our MotoAlliance winch mount(s). You now own a premium custom winch mount to allow you to use your
TIP SHEET. Installation Tips for your RS IB-MUX / PKUMUX (D) + SPDT T1205 v1.2 4/3/14. 1 P a g e
 + SPDT T1205 v1.2 4/3/14. 1 P a g e") Installation Tips for your RS-150 + IB-MUX / PKUMUX (D) + SPDT T1205 v1.2 4/3/14 TIP SHEET Thank you for purchasing your remote start from MyPushcart.com - an industry leader in providing remote starts
Installation Tips for your RS-150 + IB-MUX / PKUMUX (D) + SPDT T1205 v1.2 4/3/14 TIP SHEET Thank you for purchasing your remote start from MyPushcart.com - an industry leader in providing remote starts
TIP SHEET T0937. Installation Tips For RS00/PS00 + ADS-TBSL-PL + SPDT
 Installation Tips For RS00/PS00 + ADS-TBSL-PL + SPDT TIP SHEET T0937 Thank you for purchasing your remote start from MyPushcart.com - an industry leader in providing remote starts to do-it-yourself installers
INSTALLATION INSTRUCTIONS PART NUMBER D APPLICATIONS: 2015 W205 Mercedes C W205 Mercedes C450 AMG 2017 W205 Mercedes AMG C43
 INSTALLATION INSTRUCTIONS PART NUMBER D440-0057 APPLICATIONS: 2015 W205 Mercedes C400 2016 W205 Mercedes C450 AMG 2017 W205 Mercedes AMG C43 PARTS LIST Qty Part # Description 1 D443-0045 DINANTronics Elite
VS 315 DELUXE 4-CHANNEL MOTORCYCLE ALARM. Installation And Operation Manual MEGATRONIX CALIFORNIA, U.S.A. VS 315 1
 VS 315 DELUXE 4-CHANNEL MOTORCYCLE ALARM Installation And Operation Manual MEGATRONIX CALIFORNIA, U.S.A. VS 315 1 VS 315 2 INSTALLATION We recommend insulating all your soldered or crimped connections
ARV43M Instruction Manual
 ARV43M Instruction Manual In terms of the wiring of the camera system, the Gator ARV43M can be electrically installed in 2 different ways, wired or wireless. We call this versatility Dual Tech. WIRELESS
AviStart 3000 Installation Manual
 Table of Contents Important Information... 2 Recommended Installation Tools... 2 Recommended Procedures... 2 Main Wiring Diagram... 3 12 Pin Connector... 4 6 Pin Connector... 4 Installation Procedures...5
Installation Tips for your Crimestopper/ProStart Remote Start system (for GM vehicles) v1.01 updated 2/27/2012
 v1.01 updated 2/27/2012") Installation Tips for your Crimestopper/ProStart Remote Start system (for GM vehicles) v1.01 updated 2/27/2012 Thank you for purchasing your remote start from MyPushcart.com - an industry leader in providing
Installation Tips for your Crimestopper/ProStart Remote Start system (for GM vehicles) v1.01 updated 2/27/2012 Thank you for purchasing your remote start from MyPushcart.com - an industry leader in providing
DLRM DLRM
 Table of Contents 1. Before You Begin.........................................................Page 1 2. Installation Tips..........................................................Page 2 3. Mounting Components
INSTALLATION MANUAL. Remote Mobile Security System. Model: PL30
 Remote Mobile Security System INSTALLATION MANUAL Model: PL30 Copyright 1998 Magnadyne Corporation For Technical Assistance (800) 638-3600 For Fax on Demand Technical Assistance (800) 994-9977 (Must be
CA-210 Installation Instructions
 CA-210 Installation Instructions PROFESSIONAL INSTALLATION STRONGLY RECOMMENDED Installation Precautions: Roll down window to avoid locking keys in vehicle during installation Avoid mounting components
CS-2001FC Series II REMOTE CONTROL ALARM SYSTEM INSTALLATION & OPERATING INSTRUCTIONS INTRODUCTION
 CS-2001FC Series II REMOTE CONTROL ALARM SYSTEM INSTALLATION & OPERATING INSTRUCTIONS INTRODUCTION CONGRATULATIONS on your choice of a Gargoyle Remote Alarm System by Crimestopper Security Products Inc.
2016 HONDA 1000 Pioneer PN 3102 Turn signal / horn kit rev nc
 2016 Honda 1000 Pioneer STOP - THIS KIT IS DESIGNED SPECIFICALLY FOR 2016 HONDA 1000 PIONEER IF YOUR MACHINE IS NOT THIS MODEL DO NOT PROCEED. THIS KIT DOES NOT WORK ON THE PIONEER 500 nor 700 S. Contact
INSTALLATION INSTRUCTIONS
 Total System Reset The 30 features, including the Selectable Coded Override, may be easily returned to the default settings. To perform this Total System Reset, follow these steps: Step 1 - Locate the
Installation. Instructions ES416. VW MKIV Golf/Jetta/GLI 337/20AE. to activate integral fog lights in Jetta GLX, E-Code, and HID Lighting Systems
 Installation Instructions to activate integral fog lights in Jetta GLX, E-Code, and HID Lighting Systems This tutorial is provided as a courtesy by ECS Tuning. VW MKIV Golf/Jetta/GLI 337/20AE best viewed
INSTALLATION MANUAL. Model: PLUS For Technical Assistance, please call (800) , or visit
 , or visit") R Vehicle Security INSTALLATION MANUAL Model: PLUS-4700 This device complies with part 15 of the FCC rules. Operation is subject to the following two conditions: (1) This device may not cause harmful interference;
R Vehicle Security INSTALLATION MANUAL Model: PLUS-4700 This device complies with part 15 of the FCC rules. Operation is subject to the following two conditions: (1) This device may not cause harmful interference;
Installation Tips Crimestopper/ProStart Remote Start system + PLJX + DLRM + SPDT (for GM vehicles) T0760 v1.1 updated 2/5/14
 T0760 v1.1 updated 2/5/14") Installation Tips Crimestopper/ProStart Remote Start system + PLJX + DLRM + SPDT (for GM vehicles) T0760 v1.1 updated 2/5/14 Thank you for purchasing your remote start from MyPushcart.com - an industry
Installation Tips Crimestopper/ProStart Remote Start system + PLJX + DLRM + SPDT (for GM vehicles) T0760 v1.1 updated 2/5/14 Thank you for purchasing your remote start from MyPushcart.com - an industry
SAISBM V36W Installation Instructions
 The Original Secondary Air Injection System Bypass Kit SAISBM V36W Installation Instructions All Applicable Toyota/Lexus Vehicles Introduction: The Secondary Air Injection System (SAIS) bypass module is
Gentex by MITO Corporation Installation Instructions KIT CONTENTS: Item Qty Part Number Description 1
 1 of 14 5/5/2008 9:05 AM Installation Instructions KIT CONTENTS: Item Qty Part Number Description 1 GEN-K2 7 Pin - Night Vision Safety (NVS) Mirror 1 of the GEN-K3 7 Pin NVS Mirror w/map Lamps following
Vehicle Alarm System With Channel 2 Auxiliary Output Installation Instructions
 Model PRO 9842 Installation Manual Vehicle Alarm System With Channel 2 Auxiliary Output Installation Instructions This Unit Is Intended For Installation In Vehicles With 12 Volt Negative Ground Electrical
Electromotive Tec GT Installation Supplement for the Porsche
 Electromotive Tec GT Installation Supplement for the Porsche 928 1987-95 Copyright 2009 928 Motorsports, LLC. all rights reserved Toll-Free Tech Hot Line: 877-FOR-928M 877-367-9286 Please do not copy this
Installation Tips for your Remote Start w/ Keyless Entry (Toyota Vehicles) v3.2 Updated 3/14/13
 v3.2 Updated 3/14/13") Installation Tips for your Remote Start w/ Keyless Entry (Toyota Vehicles) v3.2 Updated 3/14/13 Thank you for purchasing your remote start from MyPushcart.com an industry leader in providing remote starts
Installation Tips for your Remote Start w/ Keyless Entry (Toyota Vehicles) v3.2 Updated 3/14/13 Thank you for purchasing your remote start from MyPushcart.com an industry leader in providing remote starts
GMC Duramax (LBZ) High Idle Kit Note: Only for automatic transmissions with cruise control
 High Idle Kit Note: Only for automatic transmissions with cruise control") U 17 December 2014 (1036606) 2006-07 GMC Duramax (LBZ) High Idle Kit (I-00318) 1 GMC Duramax (LBZ) High Idle Kit Note: Only for automatic transmissions with cruise control 1036606 2006-2007 GMC Duramax
U 17 December 2014 (1036606) 2006-07 GMC Duramax (LBZ) High Idle Kit (I-00318) 1 GMC Duramax (LBZ) High Idle Kit Note: Only for automatic transmissions with cruise control 1036606 2006-2007 GMC Duramax
KEYLESS ENTRY SYSTEM
 KEYLESS ENTRY SYSTEM 1995 Volvo 850 1995 ACCESSORIES & EQUIPMENT Volvo Keyless Entry Systems 850 DESCRIPTION & OPERATION 850 models with central locking and factory installed alarm system can be equipped
ISIS Power Manual and Installation Guide Race Car Replicas- Superlite Coupe
 ISIS Power Manual and Installation Guide Race Car Replicas- Superlite Coupe Table of Contents Overview... 2 System Details... 3 Kit Includes... 3 Technical Specifications... 3 Harness Descriptions... 4
INFORMATION DELLORTO IGNINTION SYSTEM HOW TO ASSURE FAULTLESS FUNCTION
 INFORMATION DELLORTO IGNINTION SYSTEM HOW TO ASSURE FAULTLESS FUNCTION We have verified different complaints from the market regarding malfunctions of the ignition system. The following guideline should
Three Function Remote Control System with Alarm (Model RCA-3)
") Golden RODtronics P.O. Box 146 Golden Colorado 80402-0146 Phone 303-423-8597 Fax 303-420-4575 Three Function Remote Control System with Alarm (Model RCA-3) Congratulations! You have just purchased one
Golden RODtronics P.O. Box 146 Golden Colorado 80402-0146 Phone 303-423-8597 Fax 303-420-4575 Three Function Remote Control System with Alarm (Model RCA-3) Congratulations! You have just purchased one
Ford 7.3L Powerstroke Positive Air Shutoff
 24 October 2012 Ford 7.3L 1999.5-2003 Positive Air Shutoff 1 1999.5-2003 Ford 7.3L Powerstroke Positive Air Shutoff P/N# 1036700 P/N# 1036700-M UPLEASE READ ALL INSTRUCTIONS BEFORE INSTALLATION 24 October
High-Performance Ignition Coil Installation Instructions
 Page 1/6 11.11 INS423 BAVARIAN AUTOSPORT High-Performance Ignition Coil Installation Instructions INPORTANT! Installer must read these instructions prior to coil installation. Late model BMW pencil coils
JBD Quick Install. Install Guide Last Updated: 3/25/14. Use subject to terms and conditions posted at
 JBD Quick Install Install Guide Last Updated: 3/25/14 Use subject to terms and conditions posted at http://www.burgertuning.com/terms.html THIS PART IS LEGAL FOR USE ONLY IN COMPETITION RACING VEHICLES
Installation Instructions HURST ROLL CONTROL Challenger SRT8 (w/4 port system)
") Installation Instructions HURST ROLL CONTROL 2008-2010 Challenger SRT8 (w/4 port system) Catalog# 5671517 WORK SAFELY: Perform this installation on a good clean level surface for maximum safety and with
Installation Instructions HURST ROLL CONTROL 2008-2010 Challenger SRT8 (w/4 port system) Catalog# 5671517 WORK SAFELY: Perform this installation on a good clean level surface for maximum safety and with
Canems Engine Management Solutions. +44 (0) Scotter Road Scunthorpe DN15 7EH UK
 Scotter Road Scunthorpe DN15 7EH UK") DRH Performance ECU Porsche 911 3.2 MAP sensor conversion kit Kit Contents A) 1 x Green Filters cotton gauze air filter B) 1 x Air intake pipe / air temperature sensor C) 1 x MAP sensor D) 1 x CNC MAP
DRH Performance ECU Porsche 911 3.2 MAP sensor conversion kit Kit Contents A) 1 x Green Filters cotton gauze air filter B) 1 x Air intake pipe / air temperature sensor C) 1 x MAP sensor D) 1 x CNC MAP
Ducati 899, 1199 Clutch-Free shifting Perfected This manual is for Blip Box with firmware 1.11 onwards
 Ducati 899, 1199 Clutch-Free shifting Perfected This manual is for Blip Box with firmware 1.11 onwards Welcome to Blip Box, the world s first Plug n Play throttle auto-blip system for Ducati 899 / 1199
COMMANDO REMOTE CONTROL ENGINE STARTER. Limited Warranty Statement MADE IN THE U.S.A. IMPORTANT KEEP YOUR INVOICE WITH THIS WARRANTY STATEMENT!
 Limited Warranty Statement GNU COMMANDO LINE WARRANTY STATEMENT GNU warrants this product to be free from defects in material and workmanship for a period of one (1) year from the date of sale to the original
2013 Road King CVO FLHRSE5 Detachable Fairing w/ Garmin Zumo 665 Installation Instructions
 2013 Road King CVO FLHRSE5 Detachable Fairing w/ Garmin Zumo 665 Installation Instructions 1 1. Turn ignition switch to on position and leave there. This will prevent alarm from going off when you disconnect
Power Distribution System User s Manual. Model: PDS-100
 Power Distribution System User s Manual Model: PDS-0 Section Page Product Overview... 1 I) General Information... 2 II) Important Safety Information... 2 III) Installation... 3 A) Materials Provided...