High-Performance Ignition Coil Installation Instructions
|
|
|
- Eustacia Bell
- 5 years ago
- Views:
Transcription


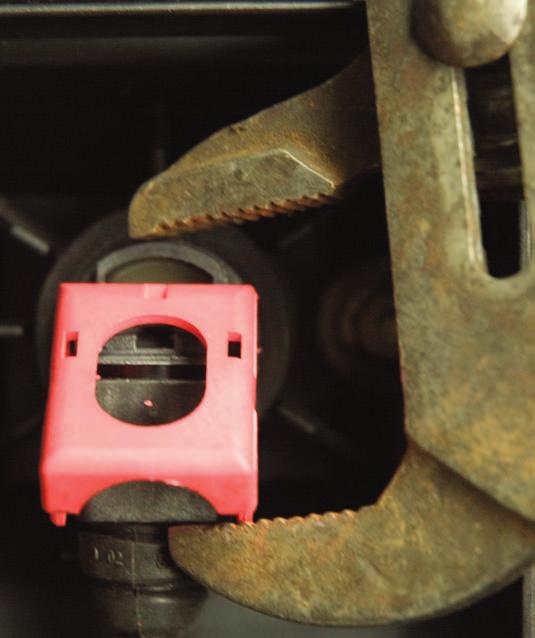
1 Page 1/ INS423 BAVARIAN AUTOSPORT High-Performance Ignition Coil Installation Instructions INPORTANT! Installer must read these instructions prior to coil installation. Late model BMW pencil coils require special attention during installation, to assure proper installation. Failure to follow these steps and notes may result in engine fault codes and/or a no-start situation. SAFETY WARNING: Be sure the engine is cool before beginning the installation. INSTALLATION NOTE: Depending on the mileage of your BMW, you may want to consider having a fresh set of spark plugs and a valve cover gasket set on hand before beginning the installation. These parts are available from Bavarian Autosport. PROCEDURE NOTE: These instructions will assume that the installer is familiar with the standard ignition coil replacement procedures and has access to the appropriate repair manuals for the applicable BMW models. Repair manuals are available from Bavarian Autosport. Accompanying photos show 6 cyl. installation; 8 cyl. and 12 cyl. are similar. 3 series 6 cyl. 03 thru 05 M3 01 thru 06 5 series 6 cyl. 03 thru 05 8 cyl. 04 thru 09 6 series 8 cyl. 04 thru 09 7 series 8 cyl. 02 thru cyl. 02 thru 09 Z3 M roadster/coupe 01 thru 02 Z4 thru 09 X3 thru 09 X5 6 cyl. 03 thru 09 8 cyl. 04 thru 09 (except M) PART NUMBERS: PROCEDURE (SHOWN ON M54 6 CYL.): 1. Open the engine hood. Watch the installation video at blog.bavauto.com/go/coils2 2. Remove the plastic valve cover trim panel(s) by first removing the oil filler cap and then the plastic plugs which cover the trim panel retaining nuts (Figure 1). Remove the cover retaining nuts and then lift off the trim panel(s) (Figure 2). 3. For each coil, gently pry up the coil harness plug lock clip (Figures 3 & 4) and remove the harness plug from the coil (Figures 5 & 6). Be sure to note the position of each harness plug. 4. Gently pull up on the coil assembly. The spark plug connector boot may be stuck to the spark plug. If so, twist the coil a bit while pulling up. Careful prying with a screwdriver may be required (Figures 7 & 8). Repeat for each coil. 5. a) Inspect the spark plug cavities for evidence of any oil. If there is oil in any of the cavities, the valve cover gasket is leaking and should be replaced. The oil can cause random miss-fires and will contribute to deterioration of the spark plug connector boots. New valve cover gasket sets are available from Bavarian Autosport. b) If you re installing new spark plugs, do so at this point. 6. Carefully install the new high-performance coil assemblies over the spark plugs and push down until the coil is fully seated and against the valve cover (Figure 9). 7. Install the coil harness plugs over the coil plug housings. Firmly push the female harness plug housing onto the coil s male housing. Use your forefinger and thumb to squeeze the female socket fully onto the coil s male housing (Figures 10 & 11). NOTE: If you are having trouble fully seating the female socket onto the coil s male housing, you can carefully use a pair of channel-lock type pliers to pull the socket fully onto the male housing (Figures 12 & 13). NOTE: DO NOT try to secure the female socket by levering the locking clamp down. As the socket is fully seated, the locking clamp will automatically move down over the female socket.
. 9.")
.")
2 Page 2/ INS Verify that the female socket is fully seated up to the stop flange on the coil s male housing (Figure 14 & 15). 9. Secure the locking clip by pressing down, once the harness socket is verified as being fully seated (See Step 8, Figure 16). NOTE: Reference Figures 14, 15, 17 and 18. Female socket must be flush against coil stop flange (Figures 14 & 15). Sides of locking clip must be flush with side flange on coil (Figures 17 & 18). 10. Install the plastic trim cover(s) and the oil filler cap. Figure 1 Figure 2


3 Page 3/ INS423 Figure 3 Figure 4 Figure 5 Figure 6


4 Page 4/ INS423 Figure 7 Figure 8 Upper boot is flush with alignment flange on valve cover Figure 9


5 Page 5/ INS423 Figure 10 Figure 11 Figure 12 Figure 13


6 Page 6/ INS423 Shown without locking clip in place for clarity. Shown without locking clip in place for clarity. Coil stop flange Coil stop flange No gap Gap CORRECT INCORRECT Figure 14 Figure 15 Sides of locking clip are flush with side flange on coil No gap CORRECT Figure 17 Sides of locking clip are outside side flange on coil Gap INCORRECT Figure 16 Figure 18
2003 CR-V - A/T Shift Cable Replacement-Print Preview
 Page 1 of 7 2003 CR-V - A/T Shift Cable Replacement 1. Raise the front of the vehicle, or lift the vehicle up, and make sure it is securely supported. 2. Remove the driver's dashboard lower cover, and
IMPORTANT: When replacing the ignition lock cylinder only, the passlock relearn procedure is not required.
 A 1 of 11 2/18/2012 3:27 PM IMPORTANT: The important statement at the beginning of the "Ignition Lock Cylinder removal procedure on page 188 in the 2000/2001 Saturn S-Series Body/Electrical Volume II Service
GMC Yukon
 Torch Series LED Grille TOOLS REQUIRED: Flat Head Screwdriver Long Flat Head Screwdriver Phillips Screwdriver 7mm Socket 10mm Socket Ratchet & Extensions 3/16 Drill Bit Power Drill Cutting Wheel or Saw
2012 SLK V6 (M276 Engine) Spark Plug Replacement
 Spark Plug Replacement") 2012 SLK 350 3.5 V6 (M276 Engine) Spark Plug Replacement Proceed at your own risk. I read the Mercedes repair documents pertaining to changing the R172 SLK M276 V6 engine s spark plugs that I could find
2012 SLK 350 3.5 V6 (M276 Engine) Spark Plug Replacement Proceed at your own risk. I read the Mercedes repair documents pertaining to changing the R172 SLK M276 V6 engine s spark plugs that I could find
N62 Secondary Air Cleaner Part #: AGA-N62-SEC-AIR
 N62 Secondary Air Cleaner Part #: AGA-N62-SEC-AIR Problem: The airflow from the secondary air injection pump doesn t reach into the exhaust system because the system is blocked. Therefore, the O2 sensors
Remove the 3-11mm nuts holding mirror on. Don t drop the nuts!
 2005-2012 Ford Mustang Puddle Lamp Kit Parts List: Quantity: Tool List: LED Lamps 2 Flat head screwdriver Seals 2 Ratchet & Socket set OR Nuts 2 Adjustable Wrench Wiring harness 1 Drill & 11/16 th bit
INSTALL/REMOVAL INSTRUCTIONS: WINDOW LIFT MOTOR
 REMOVAL/INSTALL OF WINDOW REGULATOR (742-269) Ford Mustang 1996 2004 General Tech Tips: Use painter s tape rather than duct tape to secure window. It will not damage paint or leave sticky residue. A plastic
Push Start Ignition (05-10 All) Installation
 Installation") Tools Required: Phillips head screwdriver Flat head screwdriver Ratchet 7mm Socket Torx T20 bit Wire strippers/cutters Hand file Needle nose pliers Installation Instructions: Push Start Ignition (05-10
Tools Required: Phillips head screwdriver Flat head screwdriver Ratchet 7mm Socket Torx T20 bit Wire strippers/cutters Hand file Needle nose pliers Installation Instructions: Push Start Ignition (05-10
Integrated Engineering Solid Shift Bushing Installation Guide
 Integrated Engineering Solid Shift Bushing Installation Guide Thank you for purchasing another high quality Integrated Engineering product! This instruction sheet is used for installation of the Integrated
Mustang Short Throw Sport Shifter (All 83 - Early 01 & V6 T-5/T-45 Transmission) - Installation Instructions
 - Installation Instructions") Mustang Short Throw Sport Shifter (All 83 - Early 01 & 01-04 V6 T-5/T-45 Transmission) - Installation Instructions The below installation instructions work for the following products: Mustang Short Throw
Mustang Short Throw Sport Shifter (All 83 - Early 01 & 01-04 V6 T-5/T-45 Transmission) - Installation Instructions The below installation instructions work for the following products: Mustang Short Throw
INSTALLATION INSTRUCTIONS
 INSTALLATION INSTRUCTIONS FUEL SURGE TANK INSTALLATION KIT 1999-2006 BMW E46 COUPE Document# 19-0056 Support: info@radiumauto.com Note: This kit was designed for a standard single pump Radium Engineering
FUEL SYSTEM SECTION CONTENTS B ENGINE FL-1
 B ENGINE A SECTION FUEL SYSTEM FL C D CONTENTS E FUEL SYSTEM... 2 Checking Fuel Lines... 2 General Precautions... 2 FUEL LEVEL SENSOR UNIT, FUEL FILTER AND FUEL PUMP ASSEMBLY... 3 Removal and Installation...
Signal Mirror Installation Instructions Honda Goldwing GL 1500,
 Signal Mirror Installation Instructions Honda Goldwing GL 1500, 1988-2000 THE safety accessory of the 21 st Century. P/N 210-0049-0 Rev E (10/5/07), BTV 2003 Muth Mirror Systems, LLC. Please read instructions
Athearn Pacific Digital Sound Decoder Installation Notes
 New Dimensions in Digital Sound Technology TM APPLICATION NOTE Overview This application note describes how to install a DSD-100LC Digital Sound Decoder into the Athearn Pacific Locomotive. All of the
INSTALLATION INSTRUCTIONS
 INSTALLATION INSTRUCTIONS FUEL SURGE TANK INSTALLATION KIT 1999-2006 BMW E46 COUPE Document# 19-0056 Support: info@radiumauto.com Note: This kit wasn t designed for a FST-R, but can be accomplished. 1.
INSTALLATION INSTRUCTIONS REPAIR SEAL KIT PowerSurvivor 40E
 INSTALLATION INSTRUCTIONS REPAIR SEAL KIT PowerSurvivor 40E PURPOSE OF THE KIT The Repair Seal Kit should be installed after 1000 hours of operation. It should be installed regardless of whether or not
* * Inside Toyota Avalon. Tools Required IMPORTANT
 Revision 08/02/16 2013- Toyota Avalon IMPORTANT Before starting, compare items on your invoice with items received. Carefully check through packaging material. If any item is missing, please call Crutchfield
MX150L ASSEMBLY INSTRUCTIONS
 CONNECTOR PLUG ASSEMLY TERMINAL INSERTION MX150L ASSEMLY INSTRUCTIONS 1. egin assembly of the crimped male terminals into the plug housing by making sure the Terminal Position Assurance feature () is in
Installation Manual TWM Performance Kia Forte Short Shifter
 Installation Manual TWM Performance Kia Forte 2009+ Short Shifter Begin the installation by parking on a flat surface, as you will have to engage and disengage the hand brake and shift from gears to neutral.
COLD AIR INTAKE INSTALLATION INSTRUCTIONS
 COLD AIR INTAKE INSTALLATION INSTRUCTIONS # D760-0033 Fits: 2013-15 F01 B7, 750i & xdrive (N63TU engine) 2013-15 F02 B7L, 750Li & xdrive (N63TU engine) PARTS LIST Left and right carbon fiber air box lids
Raxiom Mustang Headlights (94-98) - Installation Instructions
 - Installation Instructions") Raxiom Mustang Headlights (94-98) - Installation Instructions The below installation instructions work for the following products: Dark Smoked Mustang Headlights (94-98) Raxiom Chrome Mustang Headlights
Raxiom Mustang Headlights (94-98) - Installation Instructions The below installation instructions work for the following products: Dark Smoked Mustang Headlights (94-98) Raxiom Chrome Mustang Headlights
IE Audi B9 S4, S5, A4, A5, Allroad FDS Intercooler Install Guide IETPCK1
 IE Audi B9 S4, S5, A4, A5, Allroad FDS Intercooler Install Guide IETPCK1 Thank you for purchasing the best performing intercooler on the market! This instruction guide is used for installation of IE s
GENUINE PARTS INSTALLATION INSTRUCTIONS
 GENUINE PARTS INSTALLATION INSTRUCTIONS DESCRIPTION: APPLICATION: PART NUMBER: KIT CONTENTS: Illuminated Kick Plate Maxima (Applicable ONLY to U.S. Market Vehicles with Build Date June 2012 or later) 999G6
Service Manual Air Tech Second Stage
 Service Manual Air Tech Second Stage Copyright 2002, Cressi-sub Revised 3/2002 2 Air Tech Second Stage Service Manual Contents BEFORE STARTING... 3 DISASSEMBLY... 3 PARTS CLEANING AND LUBRICATION... 9
INSTALLATION MANUAL
 INSTALLATION MANUAL 2563000 Parts List 1 Carrier weldment 2 Support arm assembly 1 Third brake light assembly 1 Light extension bracket 1 Spare tire adjustment plate 1 Spare tire mount plate 1 Female spade
ATTENTION. Custom Dynamics UTV Turn Signal Kit Installation Instructions
 Custom Dynamics UTV Kit Installation Instructions We thank you for purchasing the Custom Dynamics UTV LED Kit. Our products utilize the latest technology and high quality components to ensure you the most
XK8 / XKR Navigation to Triple Gauge Cluster Conversion Harness Kit. Instructions
 XK8 / XKR Navigation to Triple Gauge Cluster Conversion Harness Kit Instructions Kit Contents: 1 - Gauge Cluster Wiring Harness 1 - Posi-Tap connector 4-4" Tie-Wraps 1- Cable pulling tool (shipped pre-applied
Retrofit Steering Column
 Retrofit Steering Column INSTALLATION INSTRUCTIONS for 1970-75 Camaro FOR PART NUMBER S: 1620860010, 1620860020, 1620860051, 1626860010, 1626860020, 1626860051 S INCE 1986 www.ididitinc.com 610 S. Maumee
Toyota 4RUNNER With/MR Overhead Video
 Toyota 4RUNNER With/MR 2010-10.2 Overhead Video Part Number: 00016-00110; Fit Kit-00110-14, Beige 00016-00120; Fit Kit-00120-14, Gray Accessory Code: ED7 Conflicts: Vehicles without a sunroof Kit Contents:
INSTALLATION INSTRUCTIONS FORD F-150 2WD & 4WD RETAINS FACTORY TOW HOOKS PART #P3063
 INSTALLATION INSTRUCTIONS FORD F-150 2WD & 4WD RETAINS FACTORY TOW HOOKS PART #P3063 PARTS LIST: 1 Grille Guard 2 10-1.5mm Nylon Lock Nuts 1 Driver/Left Frame Mounting Bracket 4 12mm Plastic Washers 1
VISOR AUDIO KIT P/N , APPLICATION BEFORE YOU BEGIN KIT CONTENTS. Verify accessory fitment at Polaris.com.
 VISOR AUDIO KIT P/N 2882888, 2882891 APPLICATION Verify accessory fitment at Polaris.com. BEFORE YOU BEGIN Read these instructions and check to be sure all parts and tools are accounted for. Please retain
Please read thoroughly before starting installation and check that kit contents are complete.
 Rear Vision System Mirror Display 2013-Current Ram (Kit part number 1009-9518) Please read thoroughly before starting installation and check that kit contents are complete. Items Included in the Kit: Rear
Cold Air Intake Installation Instructions
 BAVARIAN AUTOSPORT Cold Air Intake Installation Instructions PARTS LIST: PF BMWE36-4 PROCEDURE: 1. Using a flat-head screwdriver, loosen the hose clamp between the AFM and rubber boot leading to engine
Evo X Walbro 450 Pump System
 Evo X Walbro 450 Pump System Installation Guide Please contact us at sales@wtftuned.com with any additional questions Tools required: 8 mm socket and wrench, needle-nose pliers, razor, drill w/ 5/64 bit,
P3066 INSTALLATION MANUAL
 P3066 INSTALLATION MANUAL Parts List 1 Grille guard 1 Driver / left frame bracket Level of Difficulty Moderate Scan for helpful install tips 1 Passenger / right frame bracket 1 Driver / left top bracket
INSTALLATION INSTRUCTIONS
 INSTALLATION INSTRUCTIONS REAR DISC BRAKE CONVERSION KITS A112, A112-1 & A112-93 1979-93 FORD MUSTANG with 7.5" & 8.8" AXLES Thank you for choosing STAINLESS STEEL BRAKES CORPORATION for your braking needs.
Rear Vision System Liftgate Emblem Camera for Aftermarket Display Ford Flex (Kit part number )
") Rear Vision System Liftgate Emblem Camera for Aftermarket Display 2009-2012 Ford Flex (Kit part number 1008-6509) Kit Contents: Liftgate Emblem Mount with Camera Chassis Harness with RCA (Note: In some
Rear Vision System Liftgate Emblem Camera for Aftermarket Display 2009-2012 Ford Flex (Kit part number 1008-6509) Kit Contents: Liftgate Emblem Mount with Camera Chassis Harness with RCA (Note: In some
Exhaust System Installation for the Mustang GT & Shelby GT500 PN , , , , ,
 Exhaust System Installation for the Mustang GT & Shelby GT500 PN 140370, 140371, 140372, 140410, 140411, 140412 These instructions have been written to help you with the installation of your Borla Performance
PERFORMANCE EXHAUST INSTALLATION INSTRUCTIONS. PART NUMBER: D or D BLK APPLICATION: 2019 BMW F90 M5
 PERFORMANCE EXHAUST INSTALLATION INSTRUCTIONS PART NUMBER: D660-0079 or D660-0079-BLK APPLICATION: 2019 BMW F90 M5 Congratulations for being selective enough to use a Dinan Performance Exhaust. We have
Remove black panel shown. Save 6 retaining pins for re-install later. Pry up on center part of pin first. Then pry out entire retaining pin.
 2005-2009 Ford Mustang V6 Fog Light Wiring Kit Parts List: Quantity: Tools Required: Wiring harness 1 Flat head screwdriver Supplemental wire leads 2 Ratchet & Socket set OR Wire tap red 2 Adjustable Wrench
GENUINE PARTS INSTALLATION INSTRUCTIONS
 GENUINE PARTS INSTALLATION INSTRUCTIONS DESCRIPTION: APPLICATION: PART NUMBER: KIT-CARBON FIBER REAR SPOILER INFINITI Q50 T99J1 J5000 KIT CONTENTS: Item A B C D Qty. 1 4 1 1 Part Description Spoiler Assembly
Conflicts: Vehicles with a sunroof
 Toyota 4Runner Non/MR 2010-10.2 Overhead Video Part Number: 00016-00110; Fit Kit -00110-15, Beige 00016-00120; Fit Kit -00120-15, Gray Accessory Code: ED6 Conflicts: Vehicles with a sunroof Kit Contents:
POLY TIP-DOWN WINDSHIELD KIT
 POLY TIP-DOWN WINDSHIELD KIT P/N 2883261 APPLICATION Verify accessory fitment at Polaris.com. BEFORE YOU BEGIN Read these instructions and check to be sure all parts and tools are accounted for. Please
INSTALLATION INSTRUCTIONS
 Rear Vision System NAV Display 2009-Current Chevrolet Silverado, Silverado HD; GMC Sierra, Sierra HD (Kit part number 9002-9501) Kit Contents: Camera/Module/Bezel Assembly Chassis Harness NAV Harness 1
CorkSport ort Mazda 3 Adjustable Shifter Mazdaspeed 3, Mazda 3 6-speed and Mazda3 SkyActiv 6-speed
 Part # Axl-6-963 CorkSport ort Mazda 3 Adjustable Shifter 2010-2013 Mazdaspeed 3, 2010-2013 Mazda 3 6-speed and 2012-2013 Mazda3 SkyActiv 6-speed Pre-Installation Notes: The CorkSport Adjustable Short
Retrofit Steering Column
 Retrofit Steering Column Installation Instructions for 1970-75 Camaro For Part # s: 1620860010, 1620860020, 1620860051, 1620869910, 1620869920, 1620869951, 1625860010, 1625860020, 1625860051, 1625869910,
Conflicts: Vehicles without a sunroof Vehicles with a single sunroof
 Toyota Sienna (Dual Sunroof) 2011-10.2 Overhead Video Part Number: 00016-00110 00016-00110-17 Fit Kit 00016-00120 00016-00120-17 Fit Kit Accessory Code: ED5 Conflicts: Vehicles without a sunroof Vehicles
REAR ROOF SPEAKER KIT
 REAR ROOF SPEAKER KIT P/N 2882876 APPLICATION Verify accessory fitment at Polaris.com. BEFORE YOU BEGIN Read these instructions and check to be sure all parts and tools are accounted for. Please retain
INSTALLATION INSTRUCTIONS
 INSTALLATION INSTRUCTIONS REAR DISC CONVERSION KIT A126-2 1988-98 C1500 2WD 10" REAR DRUM Thank you for choosing STAINLESS STEEL BRAKES CORPORATION for your braking needs. Pleases take the time to read
Stand Alone Fog Lights Installation Instructions
 Tools Required: 1. Trim Removal tool or protected flat screwdriver 2. #2 Phillips Screwdriver 3. 10mm socket 4. 10mm wrench 5. 8mm or 5/16 socket 6. Adjustable Pliers 7. Electrical Tape WARNING!!! Disconnect
Installation Instructions Street Bandit Shifter
 Installation Instructions Street Bandit Shifter Part Number 80797 (see www.bmracing.com for the latest technical product information) 2006, 2000 by B&M Racing and Performance Products The B&M Street Bandit
Lakela nd H2 Low Speed Stator Coil Installation
 Lakela nd H2 Low Speed Stator Coil Installation Step 1: Place the stator assembly on a padded surface to protect the plastic signal generators, and orient it as shown in figure 1. The low speed coil is
TOYOTA VENZA 2009 TRAILER WIRE HARNESS Procedure
 Part Number: PT791-0T099 Kit Contents Item # Quantity Reqd. Description 1 1 Trailer Wire Harness Module 2 1 4-Flat Harness 3 1 Battery Power Wire Harness 4 1 Mounting Bracket, 4-Flat 5 2 Screw #10-24 6
BMS F1X M5/M6 S63TU Stage1 Install Guide
 BMS F1X M5/M6 S63TU Stage1 Install Guide Last updated 10/22/2018 Use subject to terms and conditions posted at http://www.burgertuning.com/terms.htm THIS PART IS LEGAL FOR USE ONLY IN COMPETITION RACING
advanced FLOW engineering Instruction Manual P/N: Make: BMW Model: M3/M4 (F80/82/83) Year: Engine: L6-3.
 Year: Engine: L6-3.") advanced FLOW engineering Instruction Manual P/N: 52-76305 Make: BMW Model: M3/M4 (F80/82/83) Year: 2015-2016 Engine: L6-3.0L (tt) S55 Please read the entire instruction manual before proceeding. Ensure
advanced FLOW engineering Instruction Manual P/N: 52-76305 Make: BMW Model: M3/M4 (F80/82/83) Year: 2015-2016 Engine: L6-3.0L (tt) S55 Please read the entire instruction manual before proceeding. Ensure
EXPANSION TANK PARTS LIST AND INSTALLATION GUIDE
 PARTS LIST AND INSTALLATION GUIDE PARTS LIST 1 PC MISHIMOTO RADIATOR 2 PC CAST THERMOSTAT HOUSINGS 1 PC MAGNETIC DRAIN PLUG W/ DOWTY OIL SEAL 4 PC RUBBER BUSHINGS AND METAL COLLARS 3 PC HARDWARE PACKETS
Installation Instructions INDY SHIFTER Fits: Mustang Fastback & Convertible with MT-82 Transmission Catalog #
 Installation Instructions INDY SHIFTER Fits: 2015-2018 Mustang Fastback & Convertible with MT-82 Transmission Catalog # 3916036 Watch our installation video on YouTube WORK SAFELY! For maximum safety,
CARBURETOR. Preliminary Check. Removal of DuraForce Carburetor
 Fuel Leaks From Carburetor (Leaking starts after running, stops after shutdown) Note: This condition which does NOT drain the fuel tank is called spit-back. Possible Causes Engine RPM out of proper range
GENUINE PARTS INSTALLATION INSTRUCTIONS
 GENUINE PARTS INSTALLATION INSTRUCTIONS DESCRIPTION: APPLICATION: PART NUMBERS: Sports Horn Murano / Murano Cross Cabriolet (2011) Sports Horn (B5610 1SXOA) KIT CONTENTS: Item QTY. Description Part Number
Written By: Tarun. This guide shows how to remove and replace the battery. AirPort Extreme A1521 Battery Replacement
 This guide shows how to remove and replace the battery. Written By: Tarun ifixit CC BY-NC-SA www.ifixit.com Page 1 of 7 INTRODUCTION The battery gives the device enough power to save the settings when
CERTAIN MODEL YEAR FUSION AND ESCAPE VEHICLES EQUIPPED WITH A 6F35 TRANSMISSION SHIFTER CABLE BUSHING REPLACEMENT
 PAGE 1 OF 9 CERTAIN 2013-2016 MODEL YEAR FUSION AND 2013-2014 ESCAPE VEHICLES EQUIPPED WITH A 6F35 TRANSMISSION SHIFTER CABLE BUSHING REPLACEMENT OVERVIEW In some of the affected vehicles, the bushing
INSTALLATION INSTRUCTIONS
 Rear Vision System Aftermarket Display 2007-Current Chevrolet Silverado, Silverado HD; GMC Sierra, Sierra HD (Kit part number 9002-9560) Kit Contents: Chassis Harness with RCA (Note: In some cases a RCA
Important! The subwoofer system is designed to be used only with the rear seat in the up position only.
 Important! The subwoofer system is designed to be used only with the rear seat in the up position only. CONTENTS 1EA. SUBWOOFER ASSEMBLY 2EA. BRACKET LOWER 2EA. BRACKET UPPER 1EA. OVERLAY HARNESS 2EA.
Installing Nameless Performance High Flow cats on a Jaguar XKR
 Installing Nameless Performance High Flow cats on a 2000-2002 Jaguar XKR Part I, removal preparation under the hood, left side. 1. Open the hood and remove the coolant tank cap on the driver's side of
INSTALLATION INSTRUCTIONS
 INSTALLATION INSTRUCTIONS FUEL SURGE TANK INSTALL KIT Honda S2000 Document# 19-0063 Support: info@radiumauto.com WARNING: DO NOT SMOKE WHILE WORKING ON FUEL SYSTEMS. KEEP SPARKS AND OPEN FLAMES AWAY FROM
57-1. Front door. Tools. Special tools and equipment. T Socket 3320/2 Bit insert for Socket T Assembly tool
 57-1 Front door Tools Special tools and equipment T 10011 Socket 3320/2 Bit insert for 3320 3410 Socket T 10034 Assembly tool 57-2 Front door, assembly overview Note: The instrument panel must be removed
TOYOTA VENZA 2009 TRAILER WIRE HARNESS Procedure
 Part Number: PT791-0T099 Kit Contents Item # Quantity Reqd. Description 1 1 Trailer Wire Harness Module 2 1 4-Flat Harness 3 1 Battery Power Wire Harness 4 1 Mounting Bracket, 4-Flat 5 2 Screw #10-24 6
INSTALLATION INSTRUCTIONS TRAILER HITCH MAIN HARNESS KIT
 PART NUMBER: 0000-89-N30 GENUINE ACCESSORIES INSTALLATION INSTRUCTIONS TRAILER HITCH MAIN HARNESS KIT APPLICABLE MODELS: 2016 > CX-9 PACKAGE CONTENTS: INSTALLATION INSTRUCTIONS QTY 1 CABLE TIE MOUNT QTY
6 Gauge Box Set with Programmable Speedometer. Made in the USA. Caution. Speedometer Parts. Tachometer Parts. Fuel Level Gauge Parts.
 6 Gauge Box Set with Programmable Speedometer Caution Disconnect the battery during installation. Tighten nuts on the backclamp only slightly more than you can tighten with your fingers. Six inch-pounds
Installation Instructions
 TIMES SQUARE Spread Lavatory Faucet with Speed Connect Drain Installation Instructions 8.80 8.8 Congratulations on purchasing your American Standard faucet with Speed Connect drain, a feature found only
TOYOTA CAMRY HANDS FREE BLU LOGIC Preparation
 TOYOTA CAMRY 2008- HANDS FREE BLU LOGIC Preparation Part #: PT923-00111 Conflicts: JBL Audio, Factory Navigation NOTE: Part number of this accessory may not be the same as the part number shown. Kit Contents:
COLD AIR INTAKE INSTALLATION INSTRUCTIONS PARTS LIST
 COLD AIR INTAKE INSTALLATION INSTRUCTIONS # D760-0045 Fits: 2015 F80 M3 2015 F82 M4 Coupe 2015 F83 M4 Convertible PARTS LIST (1) MAF (D762-0204) (1) Airbox Lid; Left (D762-0205) (1) Airbox Lid; Right (D762-0206)
COLD AIR INTAKE INSTALLATION INSTRUCTIONS. # D Fits: F10 M5 # D Fits: F06/F12/F13 M6 PARTS LIST
 COLD AIR INTAKE INSTALLATION INSTRUCTIONS # D760-0035 Fits: 2013-15 F10 M5 # D760-0037 Fits: 2012-15 F06/F12/F13 M6 PARTS LIST (1) Left Carbon Airbox Lid (1) Right Carbon Airbox Lid (1) Left Carbon Snorkel
advanced FLOW engineering Momentum Air Intake Instruction Manual P/N: / /
 advanced FLOW engineering Momentum Air Intake Instruction Manual P/N: 51-72103 / 54-72103 / 75-72103 Make: RAM Model: 2500 Power Wagon Year: 2014-2017 Engine: V8-6.4L HEMI CARB Executive Order D-550-27
Audi A4/1998 VW Passat Short Shifter Installation Instructions
 1996-99 Audi A4/1998 VW Passat Short Shifter Installation Instructions Thank you for purchasing the UUC Motowerks Audi Ultimate Short Shifter. Please follow the following directions for many miles of trouble-free
RoadRelay 4. Installation Guide
 RoadRelay 4 Installation Guide RoadRelay 4 Installation Guide Bulletin No. 3401767 Revision B Copyright 2002, Cummins Inc. All rights reserved. Cummins Inc. shall not be liable for technical or editorial
INTERCOOLER UPGRADE INSTALLATION INSTRUCTIONS PART NUMBER D
 INTERCOOLER UPGRADE INSTALLATION INSTRUCTIONS PART NUMBER D330-0021 APPLICATION: 2014-16 F22 228i & xdrive coupe (see restrictions below) 2012-16 F30 328i & xdrive sedan 2014-16 F31 328i xdrive wagon 2014-16
Tru-Billet Climate Control Knob Installation Instructions
 P/N S197-525-07 2007-08 Tru-Billet Climate Control Knob Installation Instructions Thank you for your purchase of SilverHorse Racing products. Please read all directions before beginning the installation.
6 Gauge Box Set IS0332
 Caution 6 Gauge Box Set IS0 Rev. A ecr 878 /0 Disconnect the battery during installation. Tighten nuts on the back clamp only slightly more than you can tighten with your fingers. Six inch-pounds of torque
C35 Mobius Floor Lamp & C Page 1 of 7
 Mobius Floor Lamp 23-4505 & 23-4505C Page 1 of 7 Prepare Base (Figures 1& 2) A 8-32 Screw (2) B Wireway Cover Plate C Base D Lower Pipe Assembly E Threaded Stud (4) F Hex Nut (4) 1. Carefully unpack the
Kia Sedona. Installation Manual: Kia Sedona. Power Lift Gate System. Page 1 of 13
 Kia Sedona Installation Manual: Kia Sedona Power Lift Gate System Page 1 of 13 NOTE: Installation Precaution 1. It is recommended to have this product installed by a professional to avoid damage caused
TOYOTA HIGHLANDE R REARSIGHT Part Number: Code: MC90 KIT CONTENTS ADDITIONAL ITEMS REQUIRED FOR INSTALL RECOMMENDED TOOLS
 TOYOTA HIGHLANDE R 2009- REARSIGHT Part Number: 00016-00085 Code: MC90 KIT CONTENTS ITEM QTY DESCRIPTION 1 1 MIRROR/MONITOR 2 1 REAR CAMERA ASSEMBLY 3 1 CAMERA EXTENSION HARNESS 4 1 SACK PARTS 5 1 OWNER
CLASSIC MOTORCYCLE RESTORATION
 2.6 A good hammer helps with tasks such as knocking out rusted-in spindles, bushes, and shafts, gently easing in or out bolts or bushes, or gently tapping the end of the screwdriver to help split mating
6 Gauge Box Set IS0333
 Caution 6 Gauge Box Set IS0 Rev. B ecr 882 9/202 Disconnect the battery during installation. Tighten nuts on the back clamp only slightly more than you can tighten with your fingers. Six inch-pounds of
Installation Instructions 7024
 HAMILTON Centerset Lavatory Faucet with EverClean Finish & Speed Connect Drain Installation Instructions 70 Congratulations on purchasing your American Standard faucet with the EverClean finish and Speed
Depress each tab as you pull the bezel off. The bezels are tight. L.H. shown.
 2013-2014 Ford Mustang V6 & Boss 302 Lower Valance Fog Light Kit Parts List: Quantity: Tool List: Fog light & bulb with bracket 2 Flat head & Phillips screwdriver Black bezels 2 Ratchet & Socket set OR
Cold Air Intake Installation Instructions
 BAVARIAN AUTOSPORT Cold Air Intake Installation Instructions Page 1/5 3.06 INS264 NOTE: The vehicle shown for this installation is equipped with ASC+T. If your vehicle dos not have this feature, installation
CARBURETION. Tank Mount, Horizontal Crankshaft. Vacu-Jet - All
 Page 1 of 1 Vacu-Jet - All Carburetor Adjustment Initial 1. Turn adjustment needle clockwise until it makes light contact with the seat. Do not force. 2. The initial setting of adjustment needle is made
1999 Corolla Valve Cover Gasket Replacement
 1999 Corolla Valve Cover Gasket Replacement While checking the spark plugs on my 1999 Corolla, I found the each plug sitting in a pool of oil. Oil on the spark plugs usually is indicative of major engine
Installation Manual: Jeep Cherokee Power Lift Gate System
 Installation Manual: Jeep Cherokee Power Lift Gate System Page 1 of 11 NOTE: Installation Precaution 1. It is recommended to have this product installed by a professional to avoid damage caused by improper
Integrated Engineering Audi RS3 8V & TTRS 8S Cold Air Intake Install Guide IEINCQ1
 Integrated Engineering Audi RS3 8V & TTRS 8S Cold Air Intake Install Guide IEINCQ1 Thank you for purchasing another high quality Integrated Engineering product! This instruction guide is used for installation
Installation instructions for Alpha Racing Quickshifter/Blipper for a pre-2014 S1000RR
 Skill Level: Intermediate Installation instructions for Alpha Racing Quickshifter/Blipper for a pre-2014 S1000RR Tools Required: Alen keys/socket/drivers Torx keys/sockets/drivers Metric box wrenches and
HiBoy Maverick/Commander Doors Part # HiBoy4 Maverick/Commander Doors Black
 Racing 3191 N Washington St. Suite 2 Chandler, AZ 85225 1 (800) 708-9803 http://www.racing.com HiBoy Maverick/Commander Doors Part # 07-2001 HiBoy4 Maverick/Commander Doors Black Congratulations on your
INSTALLATION INSTRUCTIONS
 INSTALLATION INSTRUCTIONS FUEL PUMP SLEEVE INSTALLATION KIT 2001-2006 BMW E46 M3 Document# 19-0058 Customer Support: info@radiumauto.com 1. There are 2 common ways to relieve fuel pressure on the BMW.
ROADRELAY 5 Installation Guide
 ROADRELAY 5 Installation Guide ROADRELAY 5 Installation Guide Bulletin No. 4971214 Revision A Copyright 2011, Cummins Inc. All rights reserved. Cummins Inc. shall not be liable for technical or editorial
06-11 Civic Si / EM1 Clutch Master Cylinder
 06-11 Civic Si / EM1 Clutch Master Cylinder Upgrade This guide will show you how to install the EM1 CMC upgrade kit in a 2006-2011 Honda Civic Si. Written By: Hybrid Racing 2017 guides.hybrid-racing.com/
Luminator Low-Rise Headlight. Designed and built by Radioflyer Innovations
 Luminator Low-Rise Headlight system for C5 Corvette Designed and built by Radioflyer Innovations 1 Tools Required Phillips head screwdriver Flathead screwdriver Torx 15 screwdriver Torx 20 screwdriver
T u n i n g. Professional Install
 DDM INSTALL GUIDE H1 HID Low Beams (35W or 55W) ddm T u n i n g TOOLS NEEDED: - Standard or metric socket set. Depending on the vehicle. - A drill and either a uni-bit or a 7/8 drill bit. - A Dremel with
Installation Instructions COMPETITION/PLUS SHIFTER Ford Mustang MT82 6-Speed Manual Transmission Catalog#
 Installation Instructions COMPETITION/PLUS SHIFTER 2015-2017 Ford Mustang MT82 6-Speed Manual Transmission Catalog# 3916037 Rev. 00 WORK SAFELY! For maximum safety, perform this installation on a clean,
GruvenParts.com BRASS GM Power Folding Mirror Gear Replacement Instructions. Updated 8/25/2017 Additional Pictures / Tips Posted!
 Page 1 GruvenParts.com BRASS GM Power Folding Mirror Gear Replacement Instructions Updated 8/25/2017 Additional Pictures / Tips Posted! ** Latest Design is uses an ALL BRASS SPUR GEAR!!! ** ** If you don