Top 10 reasons to have a GPS on your bike:
|
|
|
- Brendan Baldwin
- 5 years ago
- Views:
Transcription
1 Hello! My name is Genna. I believe that having the confidence of knowing where you are on the road at any given time and being able to navigate through unknown territory is what adventure cycling is all about. Using a GPS (Global Positioning System) is the way to go, my friends. There are lots of them in the market. My personal preference is the GARMIN Zumo. Regardless of what suits your fancy, a word of advice - stick with a unit offering the largest display. On the move, you need to be able to read the display as quickly as possible. Here's where I come in. GPS mounting hardware for motorcycles are very limited. For a long time I was looking for a product that would satisfy my finicky tastes. No such luck, so I decided to make my own mounting bracket. If you need help in fabricating one to custom fit on your bike, just me at: gennakim_2000@yahoo.com Top 10 reasons to have a GPS on your bike: 1. Show off to your buddies. 2. Play James Bond. 3. Humbly explain to a curious crowd at a bikers' lot that some people (like you) simply have to have the best toys, otherwise life would be so unbearably boring. 4. Take a back road scenic route rather than racing ten wheelers on a boring interstate, while making sure not to take the same road twice. 5. Never again try to unfold a map wrestling in the wind over deserted road side with your hands wrapped in top of the line leather designed for protecting your digits from damages much more severe then paper cuts. 6. Compare the speed-readings between your speedometer and actual speed shown on your GPS. Even the roadrunner would be impressed with your ACME like device. 7. Use the GPS computer to monitor your driving distance, time and average speed so you can boast to fellow speed mongers or just to your average bike fanatics. 8. Register the top speed you ever achieved on your crotch rocket (Be ready to pay with your driving privileges and constitutional rights for blatantly disregarding the safety of your fellow citizens and your own). This is guaranteed to inflate your ego even more and give goose bumps to the opposite sex. 9. If you're a bit on the nerdy side, monitor satellites and their signal strength in the sky and wonder what else they can do for or to you. 10. Never get lost in the 21 st century.


2 Bracket Kit IX Installation Minimum tools required: 1. 3/16 Hex Key 2. T-25 Torx Key 3. 5 mm. Hex Key 4. Phillips and flat screwdriver 5. Crescent wrench 6. Long nose pliers (11-inch Long Reach Long Nose Pliers works best) Installation of Bracket Kit IV starts with preparing the work area - good lighting and plenty of space to walk around the bike, couple of small containers to arrange the screws that you will take off the bike. It will help you to put the screws back to where they came from. Installation of the Bracket Kit IX starts with removal of the windshield. 1. Place the windshield in middle position 2. Remove the windshield from the lifter mechanism and windshields liner


3 3. Unscrew four screws in Dashboard cover and remove the cover. 4. Remove the left panel by unscrewing four screws. When detached, it can be suspended under the mirror frame. Use short rope, soft wire or wire tie for this purpose. 5. Remove right panel (symmetrical to step 4)


4 6. Remove right mirror by unscrewing the screw located at the bottom of the mirror. It is accessible thru the hole at the bottom of the mirror housing. 7. Unscrew two the screws holding right mirror housing. Remove right mirror housings.


 11.")

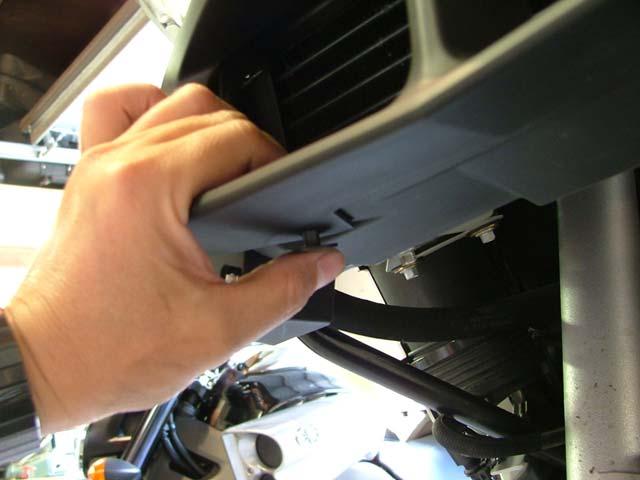
5 8. Remove left mirror and mirror housing (symmetrical to step 7 and 7) 9. Remove the screw holding the turn signal housing. Disconnect the turn signal plug. Remove the turn signal housing. 10. Remove left turn signal assembly (symmetrical to step 9) 11. Remove the radiator cover by unscrewing two screws and removing two plastic clips.


6 12. Remove plug inserts 13. Remove plugs by pushing them down


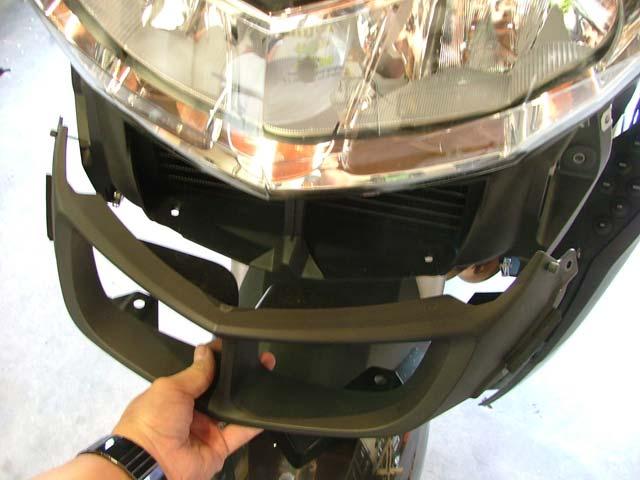
7 14. Unscrew the four screws holding the front fairing 15. Remove the headlight adjuster knob, plastic nut, and steel and rubber washers under it


8 16. Remove eight screws holding the speaker cover panel 17. Push the headlight adjuster out of its square socket and remove the speakers cover.


9 18. Slide the front fairing about 1-2 forward to open access to the back of the dashboard cluster. Positioning of windshield lifter in the middle of travel helps to slide the front fairing further. 19. Remove three E clips from the back of the dashboard cluster and pull out the dashboard cluster.


10 20. Unplug the dashboard cluster and remove two threaded clips from the top of the front fairing. 21. Snap XM receiver bracket up by pushing on locking tabs and pushing the bracket up 22. Place the T bracket on the sub frame, and push the T bracket down, so the top two clamping screws touch the horizontal section of the sub frame. Tighten four clamping screws loosely


")


11 23. Press the XM receiver bracket back in place. The fit is tight and the edge of XM receiver bracket is actually touching the rectangular clamp of Kit IX. Make sure that locking tabs of XM receiver bracket are locked. 24. Place two aluminum spacers over the top screw holes of the T bracket 25. Push the fairing back in place and tighten the four screws holding it (step# 14) Line up the screw holes between the the aluminum spacers on top of T bracket and top holes in front fairing. The screw holes in front fairing may need to be slightly elongated with an Exacto knife or a drill bit in order for the screws of the bracket kit to slide thru easily and engage with the mating thread. Make sure that the screws engage the thread with out any obstructions and the threads are clean. At this point the top screws inserted thru fairing serve as an alignment tool. Push the T bracket down, so the top two clamping screws touch the horizontal section of the sub frame. Tighten the four clamping screws.
 Base Plate(s), gadget(s), and run the power and audio wires for the gadgets.")

.")

12 26. This is a good time to temporarily install the external portion of the bracket tree - Swivel Joints, crossbar, Extension joint(s) Base Plate(s), gadget(s), and run the power and audio wires for the gadgets. It is up to the installer to decide how the wiring will be done internally or externally. Common place to get 12VDC is harness for auxiliary power plug inside left panel. 27. Remove the external portion of bracket tree - Swivel Joints, crossbar, Extension joint(s) Base Plate (s), gadget(s). Remove the four screws holding the front fairing (step # 14) and slide the front fairing 1-2 forward. 28. Connect the plug in to the dashboard cluster and install the dashboard 29. Install the three E clips holding the dashboard cluster. 30. Push the fairing back in place and tighten the four screws holding it (step# 14) 31. Install the speakers cover and six screws holding it.


. 34.")
13 32. Line up the two top screw holes. Make sure that the top two screws engage the threads in T bracket without any obstructions. It may be necessary to slightly elongate the top two screw holes in speakers cover in order for the screws to line up with mating thread. 33. Install the dashboard cover (reverse step #3). 34. Install the rest of the bracket tree components- Extension Joit(s), Base Plate(s), gadget(s). 35. Reverse steps #15-2.
 1 R1200RT Right Swivel Joint (anodized black) 1 1/2\" dia x 11.")
14 Bracket Kit IX (2010) components T-Bracket (R1200RT) Black Zink Coated 1 T-Bracket Clamp (R1200RT) Black Zink Coated 1 19mm OD x 6mm ID x 2.5mm thick Nylon Washer 4 Step spacer ID 6mm, OD 0.75" x 0.2" tall, OD 0.33" x 0.12" tall 2 R1200RT Left Swivel Joint (anodized black) 1 R1200RT Right Swivel Joint (anodized black) 1 1/2" dia x 11.25" Aluminum Rod (anodized black) 1 7/16 x 3/16 x 1/8 Rubber Grommet 3 M6x1x16 SHCS SS 4 M6x1x35 SHCS SS 2 1/4-20x3/4 SHCS SS 2 T-25 S.A. Torx Key 1 3/16" S.A. Hex Key 1 5mm S.A. Hex Key 1 Installation Instruction 1 ATTENTION!!! DO NOT attempt to program or switch functions in your GPS while driving!!! Thank you for your purchase. I hope you enjoy your trips even more, and be safe!
Tusk Pannier Racks. Instructions and information KLR
 1 Tusk Pannier Racks Instructions and information KLR650 2008 + Congratulations on your purchase of the Tusk Pannier Racks. These racks are made to handle extreme adventure riding, but work great for the
Technical Support (707)
") Installation Instructions CONSOLE MEGASHIFTER Fits: 1982-1992 Camaro & Firebird w/automatic Transmission *except 1988-1992 Firebird Formula Model Catalog # 80692 WORK SAFELY! For maximum safety, perform
Installation Instructions CONSOLE MEGASHIFTER Fits: 1982-1992 Camaro & Firebird w/automatic Transmission *except 1988-1992 Firebird Formula Model Catalog # 80692 WORK SAFELY! For maximum safety, perform
Installation Instructions COMPETITION/PLUS SHIFTER Ford Mustang MT82 6-Speed Manual Transmission Catalog#
 Installation Instructions COMPETITION/PLUS SHIFTER 2015-2017 Ford Mustang MT82 6-Speed Manual Transmission Catalog# 3916037 Rev. 00 WORK SAFELY! For maximum safety, perform this installation on a clean,
Z-Gate Universal Shifter
 Installation Instructions Z-Gate Universal Shifter Fits: GM, Ford, Lincoln and Chrysler Transmissions See Application Guide for Specific Applications Part #80681 Rev 06/01/2018 WORK SAFELY! For maximum
Installation Instructions QUICKSILVER CONSOLE SHIFTER Fits: Chevelle / El Camino
 WORK SAFELY! For maximum safety, perform this installation on a clean, level surface and with the engine turned off. Place blocks or wedges in front of and behind both rear wheels to prevent movement in
RMK HANDLEBAR KIT P/N ; ; APPLICATION BEFORE YOU BEGIN KIT CONTENTS. Verify accessory fitment at Polaris.com.
 RMK HANDLEBAR KIT P/N 2883835; 2883836; 2883837 APPLICATION Verify accessory fitment at Polaris.com. BEFORE YOU BEGIN Read these instructions and check to be sure all parts and tools are accounted for.
2017 Current Ford SuperDuty Adaptive Cruise Control Relocation Bracket Installation Instructions
 2017 Current Ford SuperDuty Adaptive Cruise Control Relocation Bracket Installation Instructions PREPARATION 1. Disconnect the negative terminal on the battery. Park the vehicle on level ground and set
Turn Signal / Horn Kit PN 7101 by All years Polaris RZR 1000 and RZR 900, 900-4, 900 trail, 900S and 900XC STOP - THIS KIT IS DESIGNED
 All years Polaris RZR 1000 and 1000-4 2015 RZR 900, 900-4, 900 trail, 900S and 900XC STOP - THIS KIT IS DESIGNED SPECIFICALLY FOR ALL YEAR AND MODEL POLARIS RZR 1000 AND 1000-4. ALSO THE 2015 POLARIS RZR
The world's first Bolt in Only stress bar for VW Mk 4 Chassis. Installation Manual V1.0.
 The world's first Bolt in Only stress bar for VW Mk 4 Chassis Installation Manual V1.0 www.yarrowsport.com Tools Needed: 1. 17mm, 10mm sockets and ratchet with 3inch extension 2. 10mm box end wrench 3.
SCION tc Navigation System Preparation. Part Number: PT
 Preparation Part Number: PT611-21111 Kit Contents Item # Quantity Reqd. Description 1 1 Navigation System 2 1 GPS Antenna 3 1 Bluetooth Antenna 4 1 Wire Harness (Reverse / Park Brake) 5 1 RCA Relay Cable
Amp & Speaker Upgrade Install Instructions for Batwing Fairing
 Amp & Speaker Upgrade Install Instructions for Batwing Fairing Tools Needed: 1/2 inch Socket Wire Cutters 7/16 inch Socket Wire Strippers 10 mm Socket Phillips Screwdriver 1/2 inch Ratchet Wrench T25 Torx
OIL COOLER KIT INSTALLATION INSTRUCTIONS PART NUMBER D E92 335is (N54 engine) with BMW M-Technic bumper and with stock oil cooler
 with BMW M-Technic bumper and with stock oil cooler") OIL COOLER KIT INSTALLATION INSTRUCTIONS PART NUMBER D570-0923 APPLICATION: 2011 E92 335is (N54 engine) with BMW M-Technic bumper and with stock oil cooler Congratulations for being selective enough to
OIL COOLER KIT INSTALLATION INSTRUCTIONS PART NUMBER D570-0923 APPLICATION: 2011 E92 335is (N54 engine) with BMW M-Technic bumper and with stock oil cooler Congratulations for being selective enough to
1999 BMW K1200 LT: Plastic Removal
 1999 BMW K1200 LT: Plastic Removal Well, it had to happen. While removing the plastic that covers the handle bars to see where to route power for GPS and/or radar detector the tip of the torx driver fell
OIL COOLER KIT INSTALLATION INSTRUCTIONS PART NUMBER D
 OIL COOLER KIT INSTALLATION INSTRUCTIONS PART NUMBER D570-0907 APPLICATION: 2011-12 E90 335i/xi (N55 engine) with BMW M-Technic bumper and without stock oil cooler Congratulations for being selective enough
INSTALLATION INSTRUCTIONS
 INSTALLATION INSTRUCTIONS Accessory HITCH Application 2009 CR-V Publications No. AII 40373 Issue Date AUG 2008 PARTS LIST Plain washer, 12 mm Trailer Hitch Kit P/N 08L92-SWA-100 Trailer hitch 6 Spring
INSTALLATION INSTRUCTIONS
 INSTALLATION INSTRUCTIONS Accessory Application Publications No. AII 37978 XM RADIO SYSTEM 2008 CIVIC HYBRID Issue Date SEP 2007 PARTS LIST XM Radio Attachment (sold separately): P/N 08B15-SNA-100B 7 Wire
Installation Instructions Z-Gate Shifter
 Installation Instructions Z-Gate Shifter Part Number 80681 1998, 2001 by B&M Racing and Performance Products The B&M Z-Gate shifter can be used in vehicles equipped with most popular three speed automatic
INSTALLATION INSTRUCTIONS
 INSTALLATION INSTRUCTIONS Accessory NIGHT Application CR-V Publications No. AII 32951 Issue Date SEP 2006 PARTS LIST Automatic Day/Night Mirror Attachment Kit P/N 08V03-SWA-100 Harness cover set Automatic
OIL COOLER KIT INSTALLATION INSTRUCTIONS PART NUMBER D
 OIL COOLER KIT INSTALLATION INSTRUCTIONS PART NUMBER D570-0904 APPLICATION: 2011-2012 E90 335i/xi (N55 engine) with BMW standard bumper and with stock oil cooler Congratulations for being selective enough
INSTALLATION INSTRUCTIONS
 INSTALLATION INSTRUCTIONS Accessory Accessory Hands Free Link Application 2008 ACCORD 2 AND 4-DOOR Publications No. AII 38281 Issue Date NOV 2007 PARTS LIST Attachment Kit P/N 08E02-TA0-100 trim retainer
PARTS LIST INSTALLATION INSTRUCTIONS PARTS LIST AND INSTALLATION GUIDE INSTALL TIME: 2 HOURS INSTALL DIFFICULTY: 3/5
 PARTS LIST AND PARTS LIST 1PC MISHIMOTO INTERCOOLER 1PC M6 X 1.0 X 20MM FLANGE BOLT 1PC M4 X 0.7 X 12MM BUTTON-HEAD BOLT 1PC M4 LOCK WASHER 1PC MAP SENSOR O-RING 2. Remove the eight pop clips that hold
INSTALLATION INSTRUCTIONS ELEVATION FRONT BUMPER DODGE RAM
 INSTALLATION INSTRUCTIONS PARTS LIST: 1 Elevation Bumper Assembly 24 12mm x 37mm OD x 3mm Flat Washers 2 Frame Mounting Brackets 12 12mm Nylon Lock Nuts 8 12-1.75mm x 50mm Hex Bolts 2 License Plate Mounting
Tutorial:Head Unit Installation
 Tutorial:Head Unit Installation From Tech Wiki : Nissan 350Z : Infiniti G35 : Nissan GT-R Here, I installed the Kenwood DDX7015 touch screen DVD system. I made this step-by-step tutorial to help those
INSTALLATION INSTRUCTIONS
 INSTALLATION INSTRUCTIONS Accessory NIGHT Application 2007 CR-V Publications No. Issue Date SEP. 2006 PARTS LIST Automatic Day/Night Mirror Attachment Kit P/N 08V03-SWA-300 Harness cover set Automatic
Contents. Installation of a Garmin Zümo 660 on my 2008 Vespa GTS 250 i.e. ABS
 Installation of a Garmin Zümo 660 on my 2008 Vespa GTS 250 i.e. ABS Contents The Vehicle... 2 The Navigator... 2 Where (not) to install all the cables?... 2 The Idea... 2 Step 1 removing the front handlebar
INSTALLATION INSTRUCTIONS
 INSTALLATION INSTRUCTIONS Accessory Application Publications No. AUTOMATIC WITH COMPASS 2006 CIVIC HYBRID AII 30315-32247 Issue Date MAY 2006 PARTS LIST Automatic Day/Night Mirror With Compass P/N 08V03-SDA-100B
INSTALLATION INSTRUCTIONS
 INSTALLATION INSTRUCTIONS Accessory TRAILER HITCH Application 2012 ODYSSEY Publications No. AII 46755 Issue Date SEP 2011 PARTS LIST Trailer Hitch Kit P/N 08L92-TK8-100 Trailer Hitch Harness Kit P/N 08L91-TK8-100
Raxiom Factory GPS Rear Back-up Camera Kit (07-17 Wrangler)
") Raxiom Factory GPS Rear Back-up Camera Kit (07-17 Wrangler) Installation Time: 2.5-3Hrs Tools Required: 7mm Socket & Driver 10mm Socket 10mm Open end wrench Knife / Razor blade Zip-ties Wire Cutters Needle
Raxiom Factory GPS Rear Back-up Camera Kit (07-17 Wrangler) Installation Time: 2.5-3Hrs Tools Required: 7mm Socket & Driver 10mm Socket 10mm Open end wrench Knife / Razor blade Zip-ties Wire Cutters Needle
DL650 Odyssey Luggage Installation Guide
 DL650 Odyssey Luggage Installation Guide Thank you for purchasing Jesse Luggage for your Motorcycle. Our Luggage, handcrafted in the USA, is designed for those with an interest in finding the most durable
INSTALLATION INSTRUCTIONS
 INSTALLATION INSTRUCTIONS Accessory TRAILER HITCH Application 2011 ODYSSEY Publications No. AII 43937 Issue Date SEP 2010 PARTS LIST Trailer Hitch Kit P/N 08L92-TK8-100 Trailer Hitch Harness Kit P/N 08L91-TK8-100
Left and Right Bar Light L Brackets. Driver/Left Frame Bracket
 PARTS LIST: 1 Bumper 14 12mm Nylon Lock Nuts 1 Bull Nose Hoop 2 10mm Double Bolt Plates 1 Winch Tray 4 10-1.5mm x 25mm Hex Bolts 1 Driver/left Frame Mounting Bracket 8 10mm x 30mm x 2.5mm Flat Washers
OIL COOLER KIT INSTALLATION INSTRUCTIONS PART NUMBER D E92 335i/xi (N55 engine) with BMW Standard bumper and with stock oil cooler
 with BMW Standard bumper and with stock oil cooler") OIL COOLER KIT INSTALLATION INSTRUCTIONS PART NUMBER D570-0924 APPLICATION: 2011-12 E92 335i/xi (N55 engine) with BMW Standard bumper and with stock oil cooler Congratulations for being selective enough
OIL COOLER KIT INSTALLATION INSTRUCTIONS PART NUMBER D570-0924 APPLICATION: 2011-12 E92 335i/xi (N55 engine) with BMW Standard bumper and with stock oil cooler Congratulations for being selective enough
INSTALLATION INSTRUCTIONS
 INSTALLATION INSTRUCTIONS Accessory Application Publications No. SECURITY SYSTEM P/N 08E49-SDA-100 ACCORD 2- AND 4-DOOR AII 30666 Issue Date AUG 2005 PARTS LIST Hood switch harness Illustration of the
RZ3-5K Polaris RZR XP 1000 & 900 Kicker 5 Speaker Audio Kit
 PO H PWER PO 5 O KIT I E D U A S A TS S I R LA R Z R R O SP pg 2 pg 9 pg 13 pg 25 pg 29 Disassembly, Wire and Amplifier Plate Installation Glovebox Subwoofer Installation Kick Panel Speakers Installation
INSTALLATION INSTRUCTIONS
 INSTALLATION INSTRUCTIONS Accessory Application Publications No. AUTOMATIC AII 27160 2005 CR-V Issue Date ATTACHMENT KIT SEP 2004 PARTS LIST Automatic Day/Night Mirror Attachment Kit (sold separately)
LAND ROVER DISCOVERY 3 ARB BULL BAR AND WINCH BAR WARNING
 LAND ROVER DISCOVERY 3 ARB BULL BAR AND WINCH BAR PART No 3432150 DISCOVERY 3 WINCH BAR PART No 3232150 DISCOVERY 3 BULL BAR WARNING FOR VEHICLES EQUIPPED WITH SRS AIRBAG WHEN INSTALLED IN ACCORDANCE WITH
Installation Instructions. QuickSilver Shifter. Fits: GM, Ford, Chrysler Transmissions See Application Guide for Specific Applications Part # 80683
 Installation Instructions QuickSilver Shifter Fits: GM, Ford, Chrysler Transmissions See Application Guide for Specific Applications Part # 80683 WORK SAFELY! For maximum safety, perform this installation
The HMC-Lite Construction Guide
 The HMC-Lite Construction Guide The Heavy Metal-Lite Chassis is constructed using two identical drive modules. The drive modules are constructed using 3 mechanical sub-assemblies. The drive modules are
INSTALLATION INSTRUCTIONS
 INSTALLATION INSTRUCTIONS Accessory TRAILER HITCH Application 2011 ODYSSEY Publications No. AII 43937 Issue Date SEP 2010 PARTS LIST Trailer Hitch Kit P/N 08L92-TK8-100 Trailer Hitch Harness Kit P/N 08L91-TK8-100
INSTALLATION INSTRUCTIONS PART NUMBER AEM C (GUN METAL GRAY FINISH)
") Equipped with AEM Dryflow Filter No Oil Required! INSTALLATION INSTRUCTIONS PART NUMBER AEM-21-805C (GUN METAL GRAY FINISH) 2016.5-17 CHEVROLET CRUZE 1.4T ITEM NO. PART NUMBER DESCRIPTION QTY. 1 21-2038DK
Equipped with AEM Dryflow Filter No Oil Required! INSTALLATION INSTRUCTIONS PART NUMBER AEM-21-805C (GUN METAL GRAY FINISH) 2016.5-17 CHEVROLET CRUZE 1.4T ITEM NO. PART NUMBER DESCRIPTION QTY. 1 21-2038DK
2016+ Mazda Miata Front & Rear Sway Bar Installation Instructions
 Page1 James Barone Racing Aftermarket Parts and Accessories 2016+ Mazda Miata Front & Rear Sway Bar Installation Instructions Tools Required: Jack Lift or ramps Ratchet wrench Torque Wrench 6 and 12 Extension
SALEEN SPEEDLAB BOOST AND WATER TEMPERATURE GAUGE POD KIT
 = SALEEN SPEEDLAB BOOST AND WATER TEMPERATURE GAUGE POD KIT INSTALLATION MANUAL: 2005-09 Mustang 4.6L 3V P/N: 10-8002-C12000B KIT P/N: 10-2903-B11511* Saleen Performance, Inc. 1225 East Maple Rd. Troy,
RZ3-5A Polaris RZR XP 1000 & 900 SSV Works 5 Speaker Audio Kit
 RZ3-5A Polaris RZR XP 1000 & 900 SSV Works 5 Speaker Audio Kit pg 2 Disassembly, Wire and Amplifier Plate Installation pg 9 Glovebox Subwoofer Installation pg 13 Kick Panel Speakers Installation pg 25
GPS AutoSteer System Installation Manual
 GPS AutoSteer System Installation Manual Supported Vehicles Case IH Vehicles Case 2577 Combines Case 2588 Combines Accuguide Ready PN: 602-0233-01-A LEGAL DISCLAIMER Note: Read and follow ALL instructions
HURST COMP/PLUS SHIFTER 2015 Ford Mustang (Getrag MT82 six-speed manual transmission) Catalog # by Hurst Performance
 Catalog # by Hurst Performance") FORM 159 0205 07/15 HURST COMP/PLUS SHIFTER 2015 Ford Mustang (Getrag MT82 six-speed manual transmission) Catalog #391 0205 2015 by Hurst Performance Thank you for purchasing the Hurst Comp/Plus Shifter.
FORM 159 0205 07/15 HURST COMP/PLUS SHIFTER 2015 Ford Mustang (Getrag MT82 six-speed manual transmission) Catalog #391 0205 2015 by Hurst Performance Thank you for purchasing the Hurst Comp/Plus Shifter.
INSTALLATION INSTRUCTIONS
 INSTALLATION INSTRUCTIONS Accessory Application Publications No. ATTACHMENT (EX-L WITH NAVI) 2008 RIDGELINE AII 36587 Issue Date MAY 2007 PARTS LIST Attachment Kit P/N: 08B21-SJC-102 Template Rear camera
GPS AutoSteer System Installation Manual
 GPS AutoSteer System Installation Manual Supported Vehicles New Holland Combines CR 9040 CX 9040 CR 9050 CX 9050 CR 9060 CX 9060 CR 9070 CX 9070 CR 9080 CX 9080 IntelliSteer Ready PN: 602-0231-01-A LEGAL
INSTALLATION INSTRUCTIONS
 Accessory Application Publication No. INSTALLATION INSTRUCTIONS NAVI ATTACHMENT P/N 08B70-MJL-D30 NC750X/XA/XD MII Issue Date November 2013 PARTS LIST RELAY SET Sold separately (4) (9) (5) (1) (2) (10)
MF 9690, 9790, Challenger 660, 670
 Ag Leader Technology Parts List Note: Indented items indicate parts included in an assembly listed above Quantity by Model Part Name/Description Part No. MF 9690 MF 9790 Challenger 660 Challenger 670 Instruction
Prius XM Radio Installation Instructions. Eddie Bell
 2004-2005 Prius XM Radio Installation Instructions By Eddie Bell www.metrotpn.com 1 Let me begin by saying this is an easy but time consuming job. Set aside a few hours of your time for the install. If
PARTS TOOLS. Set Screw. Washer (2) Blue Bushing (2) Black Bushing (2) B&M Short Throw Shifter. Jam Nut Grease. Retaining Ring (2) Insert (2)
 Blue Bushing (2) Black Bushing (2) B&M Short Throw Shifter. Jam Nut Grease. Retaining Ring (2) Insert (2)") Installation Instructions SHORT THROW SHIFTER Fits: Porsche Boxter, Boxter S, 911, 996 Cayman & Cayman S models See Application Guide for specific year ranges and engine sizes Catalog # 45135 WORK SAFELY!
Installation Instructions SHORT THROW SHIFTER Fits: Porsche Boxter, Boxter S, 911, 996 Cayman & Cayman S models See Application Guide for specific year ranges and engine sizes Catalog # 45135 WORK SAFELY!
GW-CRUISE Cruise Control Vanagon [84-91]
![GW-CRUISE Cruise Control Vanagon [84-91]](/thumbs/78/76865696.jpg "GW-CRUISE Cruise Control Vanagon [84-91]") Driving without cruise control on a long trip can be tiring. Update your vehicle with some modern convenience with this easy to install cruise control kit. Tools Needed Phillips screwdriver #2 Electric
Driving without cruise control on a long trip can be tiring. Update your vehicle with some modern convenience with this easy to install cruise control kit. Tools Needed Phillips screwdriver #2 Electric
SCION xa AUTO-DIMMING MIRROR Preparation
 Preparation Part Number: PT374-52040 (Compass) PT374-21050 (Homelink) Kit Contents Item # Quantity Reqd. Description 1a 1 AD Mirror Assembly w/compass & Map Lights (P/N PT374-52040) 1b 1 AD Mirror Assembly
 INSTALLATION INSTRUCTIONS Accessory Application Publications No. XM RADIO SYSTEM 2006-2008 CIVIC 2- AND 4-DOOR (Si) AII 37662 Issue Date AUG 2007 PARTS LIST XM Radio Attachment (sold separately): P/N 08B15-SNA-100B
INSTALLATION INSTRUCTIONS
 INSTALLATION INSTRUCTIONS Accessory XM RADIO SYSTEM Application 2011 CIVIC 2-AND 4-DOOR (EX, EX-L) Publications No. AII 44350 Issue Date AUG 2010 PARTS LIST XM Radio Attachment (sold separately): P/N 08B15-SNA-100A
INSTALLATION INSTRUCTIONS
 INSTALLATION INSTRUCTIONS Accessory Application Publications No. REAR VIEW CAMERA ATTACHMENT PILOT AII 23620 Issue Date MAY 2002 PARTS LIST Attachment Kit : P/N 08B21-S9V-100 Control unit harness Rear
INSTALLATION AND OWNER S MANUAL Side Illumination Lights Z5150 for use with K 1200 LT
 INSTALLATION AND OWNER S MANUAL Side Illumination Lights Z5150 for use with K 1200 LT Read these instructions carefully and thoroughly before beginning work. Before installing the accessory, carefully
12V Chevrolet Silverado (W461-C) 12V GMC Sierra Denali (W461-G) Customer Service Guide
 12V GMC Sierra Denali (W461-G) Customer Service Guide") 12V Chevrolet Silverado (W461-C) 12V GMC Sierra Denali (W461-G) Customer Service Guide MMXIV Copyright Aria Child Inc. 1 Contents I) Check Battery... 3 II) Check Fuse Condition 6 III) Check Wiring Condition....
12V Chevrolet Silverado (W461-C) 12V GMC Sierra Denali (W461-G) Customer Service Guide MMXIV Copyright Aria Child Inc. 1 Contents I) Check Battery... 3 II) Check Fuse Condition 6 III) Check Wiring Condition....
I N S TA L L AT I O N
 I N S TA L L AT I O N 5008 fits: H-D: '80-Up Electra glide, tour glide, road king, road glide or street glide PartS Included 1 Right Fork Mount Assembly 1 Left Fork Mount Assembly 2 H3 Driving Light Assemblies
(1) License Plate Light (2) License Plate Plugs
 License Plate Light (2) License Plate Plugs") PARTS LIST: 1 HD Replacement Bumper 4 12mm x 40mm Hex Bolts 1 Driver/Left Bracket 4 12mm Nylon Lock Nuts 1 Passenger/Right Bracket 8 12mm x 37mm x 3mm Oversize Flat Washers 2 Thin Side Spacers 4 Rubber
PARTS LIST: 1 HD Replacement Bumper 4 12mm x 40mm Hex Bolts 1 Driver/Left Bracket 4 12mm Nylon Lock Nuts 1 Passenger/Right Bracket 8 12mm x 37mm x 3mm Oversize Flat Washers 2 Thin Side Spacers 4 Rubber
INSTALLATION INSTRUCTIONS
 INSTALLATION INSTRUCTIONS Accessory S Application 2011 PILOT Publications No. AII 43298 Issue Date MARCH 2010 PARTS LIST Back-up Sensor Attachment Kit P/N 08V67-SZA-100A Back-up sensor harness Fuse label
SCION tc 2014 FOG LIGHT KIT
 Part #: PT413-21140 Conflicts: P/N PTR11-21100 Lowering Springs (CA only) Kit Contents: Wire Ties Self-Tapping Screws Switch Relay Fog Light Bezel, Left and Right Side Wire Harness Fog Lamp, Left and Right
Installation Manual TWM Performance Short Shifter Cobalt SS/SC, SS/TC, HHR SS, Ion Redline and Saab 9-3
 Page 1 Installation Manual TWM Performance Short Shifter Cobalt SS/SC, SS/TC, HHR SS, Ion Redline and Saab 9-3 Please Note: It is preferable to park on a flat surface, as you will have to engage and disengage
INSTALLATION INSTRUCTIONS
 INSTALLATION INSTRUCTIONS Horizon ST Patented Multi Axis Adjustable Handlebar System for 2012-2015 BMW K1600GTL P/N: HST05078 IMPORTANT: PLEASE GIVE CUSTOMER ENCLOSED INFORMATION! Patent No: US 8,230,758
 INSTALLATION INSTRUCTIONS Accessory ACCESSORY HANDSFREELINK Application 2010 CR-V Publications No. AII 42587 Issue Date AUG 2009 PARTS LIST HFL Attachment Kit P/N 08E02-SWA-130 (Ivory) P/N 08E02-SWA-170
PHASE 3 POWERSPORTS AUDIO KIT RZR POLARIS. pg 2 Disassembly, Wire and Amplifier Plate Installation. pg 9 Glovebox Subwoofer Installation
 POLARIS RZR PHASE 3 POWERSPORTS AUDIO KIT pg 2 Disassembly, Wire and Amplifier Plate Installation pg 9 Glovebox Subwoofer Installation pg 13 Kick Panel Speakers Installation pg 25 MRB3 and Dash Kit Installation
Step 1: Parts List and Bike Preparation
 Step 1: Parts List and Bike Preparation Please be sure to read our instructions thoroughly before attempting installation. Check Parts list supplied with your kit to be sure all parts are handy. If something
BX Honda CR-V Installation Instructions
 Attachment Tab Height: 15.5 Attachment Tab Width: 24 Serial Number Please read BOTH these and the General Instructions prior to installing or operating this equipment. 1. Blue Ox towing products and accessories
INSTALLATION INSTRUCTIONS
 INSTALLATION INSTRUCTIONS Accessory S P/N 08E10-TK6-100 Application 2013 FIT Publications No. AII 13198 Issue Date JULY 2012 PARTS LIST Ambient light kit 2 Ambient lights 6 Wire ties Fuse label 2 Grommets
GPS AutoSteer System Installation Manual
 GPS AutoSteer System Installation Manual Supported Vehicles Case STX Wheeled or Quadtrack Case STEIGER Wheeled or Quadtrack New Holland TJ New Holland T 380 380 380 9030 430 385 430 9040 480 430 480 9050
INSTALLATION INSTRUCTIONS
 INSTALLATION INSTRUCTIONS Accessory Application Publications No. AII 26033 KIT 2004 ODYSSEY Issue Date JAN 2004 PARTS LIST Trailer Hitch: P/N 08L92-S0X-100 Heavy-Duty P/S Cooler Kit P/N 53765-S0X-305 Heavy-duty
Ref Qty Part Description Part Number -1- Kit ( ) Contents:
 Contents:") REAR CANVAS DOOR KIT 900 XP RANGER CREW P/N 2879899 Application RANGER 900 XP CREW Before you begin, read these instructions twice and check to be sure all parts and tools are accounted for. Please retain
REAR CANVAS DOOR KIT 900 XP RANGER CREW P/N 2879899 Application RANGER 900 XP CREW Before you begin, read these instructions twice and check to be sure all parts and tools are accounted for. Please retain
Installation Instructions
 Installation Instructions Periscope - Version A.3 Stelvio 8V Gimpo Garage UG, all rights reserved Table of Contents Introduction...3 Before you start...3 Mounting...7 Step 1/15: remove the windscreen...7
M14 AUTOMOTIVE SPARK PLUGS AND WIRES CONVERSION KIT INSTALLATION INSTRUCTIONS
 M14 AUTOMOTIVE SPARK PLUGS AND WIRES CONVERSION KIT INSTALLATION INSTRUCTIONS (It is highly recommended you read the instructions completely before beginning) 1. Be sure the magneto switches are turned
2015 Mustang Lightbar (All Models) CDC#
 CDC#") 2015 Mustang Lightbar (All Models) CDC# 1511-7000-01 Components: 1 CDC Lightbar Note: READ instructions before starting installation!!! CDC Part# Driver side bracket 0511-6001-05 Passenger side bracket
2015 Mustang Lightbar (All Models) CDC# 1511-7000-01 Components: 1 CDC Lightbar Note: READ instructions before starting installation!!! CDC Part# Driver side bracket 0511-6001-05 Passenger side bracket
Depress each tab as you pull the bezel off. The bezels are tight. L.H. shown.
 2013-2014 Ford Mustang V6 & Boss 302 Lower Valance Fog Light Kit Parts List: Quantity: Tool List: Fog light & bulb with bracket 2 Flat head & Phillips screwdriver Black bezels 2 Ratchet & Socket set OR
Installation Instructions for Lingenfelter GM 2500 Suburban & Yukon XL Auxiliary Fan System (with AC clutch controlled fan output)
") Installation Instructions for Lingenfelter 2007-2013 GM 2500 Suburban & Yukon XL Auxiliary Fan System (with AC clutch controlled fan output) PN L300080607 Revision - 1.1 Lingenfelter Performance Engineering
Installation Instructions for Lingenfelter 2007-2013 GM 2500 Suburban & Yukon XL Auxiliary Fan System (with AC clutch controlled fan output) PN L300080607 Revision - 1.1 Lingenfelter Performance Engineering
pg 2 Disassembly, Wire and Amplifier Plate Installation pg 9 Glovebox Subwoofer Installation pg 13 Kick Panel Speakers Installation
 RZ3-5KRC RZR XP1000 & 2015+ RZR900 with Ride Command SSV Works 5 Speaker Audio Kit pg 2 Disassembly, Wire and Amplifier Plate Installation pg 9 Glovebox Subwoofer Installation pg 13 Kick Panel Speakers
MOUNT BRACKET PARTS and HARDWARE: Installation parts with * come loose in hardware kit bag. Other parts are preassembled
 INSTALL INSTRUCTIONS C-DMM-2006 Dash Monitor Mount 2017-2019 F-250, 350, 450 Pickup, F-450 and 550 Cab Chassis, 2015-2019 Ford F-150 and 2018-2019 Expedition Notes: 1. The C-DMM-2000 series Dash Monitor
Installation instructions, accessories - Rear Seat Entertainment
 XC90 Section Group Weight(Kg/Pounds) Year Month 3 39 2004 10 XC90 2003, XC90 2004, XC90 2005, XC90 2006, XC90 2007, XC90 2008 Replaces issue: 2003 12 J3904620 Page 1 of 18 Required tools A0000162 A0000163
Factory Five Racing, Inc. 818 Kit Assembly manual revision 1i update
 Factory Five Racing, Inc. 818 Kit Assembly manual revision 1i update Pedal box...1 Cable Accelerator Pedal (2002-2005)...2 OEM seats...7 Windshield... 13 Center console... 19 Pedal box Attach the pedal
Push Start Ignition (05-10 All) Installation
 Installation") Tools Required: Phillips head screwdriver Flat head screwdriver Ratchet 7mm Socket Torx T20 bit Wire strippers/cutters Hand file Needle nose pliers Installation Instructions: Push Start Ignition (05-10
Tools Required: Phillips head screwdriver Flat head screwdriver Ratchet 7mm Socket Torx T20 bit Wire strippers/cutters Hand file Needle nose pliers Installation Instructions: Push Start Ignition (05-10
Universal Tall HoneyBadger Chase Rack Installation Instructions
 PREPARATION Universal Tall HoneyBadger Chase Rack Installation Instructions 1. Disconnect the negative terminal on the battery. Park the vehicle on level ground and set the emergency brake. 2. We recommend
INSTALLATION INSTRUCTIONS
 INSTALLATION INSTRUCTIONS BMW S1000RR 2015+ TracStar Replacement Handlebars P/N: TS05099 IMPORTANT: PLEASE GIVE CUSTOMER ENCLOSED INFORMATION! Thank you for your purchase of our HeliBars. They are designed
INSTALLATION INSTRUCTIONS
 COLD AIR INTAKE INSTALLATION INSTRUCTIONS PART NUMBER D760-0390C APPLICATION: 1999-2003 E39 M5 PARTS LIST 1 Left Aluminum Intake Tube 1 Air Pump Bracket (A) 1 Right Aluminum Intake Tube 1 Air Pump Bracket
OIL COOLER KIT INSTALLATION INSTRUCTIONS PART NUMBER D E92 335i/xi (N55 engine) with M-Technic bumper and without stock oil cooler
 with M-Technic bumper and without stock oil cooler") OIL COOLER KIT INSTALLATION INSTRUCTIONS PART NUMBER D570-0925 APPLICATION 2011-12 E92 335i/xi (N55 engine) with M-Technic bumper and without stock oil cooler Congratulations for being selective enough
OIL COOLER KIT INSTALLATION INSTRUCTIONS PART NUMBER D570-0925 APPLICATION 2011-12 E92 335i/xi (N55 engine) with M-Technic bumper and without stock oil cooler Congratulations for being selective enough
FOG LAMPS INSTALL KIT
 FOG LAMPS INSTALL KIT PT CRUISER INSTALLATION INSTRUCTIONS Read entire instructions thoroughly before starting. For proper aiming of fog lamps, follow procedures in the service manual. NOTES: Left and
 INSTALLATION INSTRUCTIONS Accessory ACCESSORY HANDSFREELINK (WITH MOON) Application 2009 PILOT Publications No. AII 39492 Issue Date MAY 2008 PARTS LIST HFL Attachment Kit 2 Washer screws, 4 x 12 mm HFL
Installation Instructions Right Hand Drive Megashifter
 Installation Instructions Right Hand Drive Megashifter Part Number 80685 1995, 2001, 2006, 2010 by B&M Racing & Performance Products The B&M Right Hand Drive Megashifter is designed specifically for vehicles
INSTALLATION OF A WARN M8000 WINCH IN A HIDDEN MOUNT ON THE 2001 EXPLORER SPORT TRAC
 INSTALLATION OF A WARN M8000 WINCH IN A HIDDEN MOUNT ON THE 2001 EXPLORER SPORT TRAC By: Kyle Schwulst Email: bigmellon@yahoo.com BACKGROUND I have always wanted a winch on my vehicle. There is just something
TESLA MODEL S REAR UNDER SPOILER & DIFFUSER SYSTEM
 TESLA MODEL S Thank you for purchasing your Unplugged Performance Rear Under Spoiler & Diffuser System for the Tesla Model S! Please read this manual carefully prior to installation. REAR UNDER SPOILER
INSTALLATION INSTRUCTIONS
 INSTALLATION INSTRUCTIONS Accessory XM RADIO SYSTEM Application 2012 RIDGELINE Publications No. AII 12045 Issue Date NOV 2011 PARTS LIST Attachment Kit: P/N 08B15-SJC-100A 4 Flange nuts, 6 mm 4 Washer-screws,
SB-C-CTS/10TW3 SKU# & Up Cadillac CTS/CTS-V
 INSTALLATION GUIDE for the SB-C-CTS/10TW3 SKU# 94552 2008 & Up Cadillac CTS/CTS-V If you choose to perform the installation yourself, it is absolutely vital that the Stealthbox be properly mounted to the
Ford F-150 Billet Grilles Upper Replacement
 2015-16 Ford F-150 Billet Grilles Upper Replacement Upper Black Billet Part #1045-019U-15B Upper Polished Billet Part #1045-019U-15 TOOLS REQUIRED Automotive grade masking tape, plastic clip removal tool,
RZ3-3A Polaris RZR XP 1000 & 900 SSV Works 3 Speaker Audio Kit
 RZ3-3A Polaris RZR XP 1000 & 900 SSV Works 3 Speaker Audio Kit pg 2 Disassembly, Wire and Amplifier Plate Installation pg 9 Glovebox Subwoofer Installation pg 13 Kick Panel Speakers Installation pg 25
Please read BOTH these Installation Instructions and the General Towing Instructions before attempting to install or operate this equipment.
 Serial Number Please read BOTH these and the General Towing Instructions before attempting to install or operate this equipment. 1. Blue Ox towing products and accessories are intended to be installed
GPS AutoSteer System Installation Manual
 GPS AutoSteer System Installation Manual Supported Vehicles Case IH Vehicles Case 5088 Combines Case 6088 Combines Case 7088 Combines Accuguide Ready PN: 602-0250-01-A LEGAL DISCLAIMER Note: Read and follow
TCI FastGate Shifter Installation Instructions
 151 INDUSTRIAL DRIVE ASHLAND, MISSISSIPPI 38603 http://www.tciauto.com TELEPHONE: 662-224-8972 FAX LINE: 662-224-8255 E-MAIL: tech@tciauto.com TCI 616541 FastGate Shifter Installation Instructions The
INSTALLATION INSTRUCTIONS
 INSTALLATION INSTRUCTIONS Accessory USB ADAPTER Application 2014 INSIGHT Publications No. AII 50655 Issue Date OCT 2013 PARTS LIST USB Adapter Attachment Kit P/N 08B28-TM8-100A 6 mm Flange nut Control
Prerequisites: Shop Manual (recommended) pages 3-9 through 3-13.
 pages 3-9 through 3-13.") Prerequisites: Order your gaskets average about $25.00 bucks X 2 so $50.00 4NK-11193-00-00 Obtain a shim kit (Should have several 265 and 270s) (Some dealers will exchange) Obtain a Valve Bucket Tool YM-33961
Prerequisites: Order your gaskets average about $25.00 bucks X 2 so $50.00 4NK-11193-00-00 Obtain a shim kit (Should have several 265 and 270s) (Some dealers will exchange) Obtain a Valve Bucket Tool YM-33961