M14 AUTOMOTIVE SPARK PLUGS AND WIRES CONVERSION KIT INSTALLATION INSTRUCTIONS
|
|
|
- Melanie Fletcher
- 6 years ago
- Views:
Transcription

1 M14 AUTOMOTIVE SPARK PLUGS AND WIRES CONVERSION KIT INSTALLATION INSTRUCTIONS (It is highly recommended you read the instructions completely before beginning) 1. Be sure the magneto switches are turned off. 2. Remove the ignition wire clamps and rubber spacers from the intake tubes and ignition wires. NOTE: RETAIN THE CLAMP, RUBBER SPACER AND THE SCREW AND SQUARE NUT ON EACH CLAMP AS THERE ARE TWO OPTIONS FOR CLAMPING THE NEW IGNITION WIRES TO THE INTAKE TUBES. ONE OF WHICH RE-USES THESE CLAMPS 3. Disconnect the existing spark plug wires from the spark plugs. The left magneto (as seen from the rear of the engine) fires the front spark plugs and the right magneto fires the rear spark plugs. Remove ALL spark plugs. 4. Push the 9 rubber grommets supporting the front spark plug wires in the engine baffling through the engine baffling from the front to rear. The grommets will remain on the wires temporarily. 5. Push the front spark plug wires through the engine baffling holes. 6. Using a pair of wire cutters, make a single cut on the rubber grommets you just pushed back through the engine baffling and remove the grommet from the spark plug wire. RETAIN THE 9 RUBBER GROMMETS FOR REINSTALLATION IN THE BAFFLING HOLES. 7. Remove the top and front (black) magneto covers from both magnetos by removing the 4 9mm bolts from the black front cover and loosening the 3 slotted screws on the top cover. CAREFULLY LIFT THE MAGNETO COVER STRAIGHT UP FROM THE MAGNETO. This exposes the magneto distributor cap. 8. Carefully lift the distributor cap, turn the magneto distributor cap over and note the 10 small, slotted screws. These are the screws that pierce the ignition wires. The screw closest to the center of the distributor cap is the START wire or as it is sometimes called, the Shower of Sparks wire. It is only connected on the LEFT magneto cap. 1
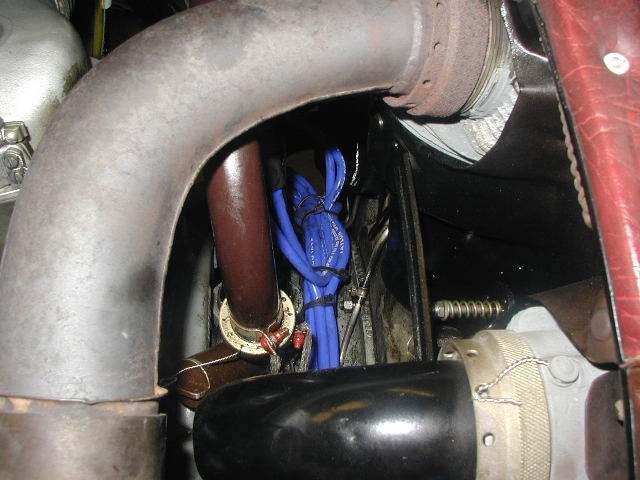
2 START Loosen each screw individually about 10 to 12 mm and remove the wire from the distributor cap. You may initially find the wire somewhat difficult to pull straight out. If you encounter this, simply rotate the wire left or right slightly (it will most likely be sticking inside the hole) and then pull the wire from the distributor cap. The rubber sleeve at the end of each wire must also be removed from the distributor cap. 10. On the left magneto distributor cap, remove the START wire (the screw closest to the center of the cap). RETAIN THIS WIRE AS IT WILL BE REUSED. 11. On the left magneto black front cover plate, loosen the large, 19 mm nut at the top-center of the black front cover plate. This nut holds the start wire you just removed from the distributor cap. Pull the start wire through the front cover plate. DO NOT CUT THIS WIRE AS IT WILL BE REINSTALLED. 12. This step applies to both left and right magnetos and offers you two options depending on whether you decide to keep the old ignition wires in tact or not. Loosen the large knurled nut that is connected to the large braided section on the front of the black front cover plate. See the photo below. 2
 at the wiring harness ring for each wire and pull the spark plug wire through the ring.")

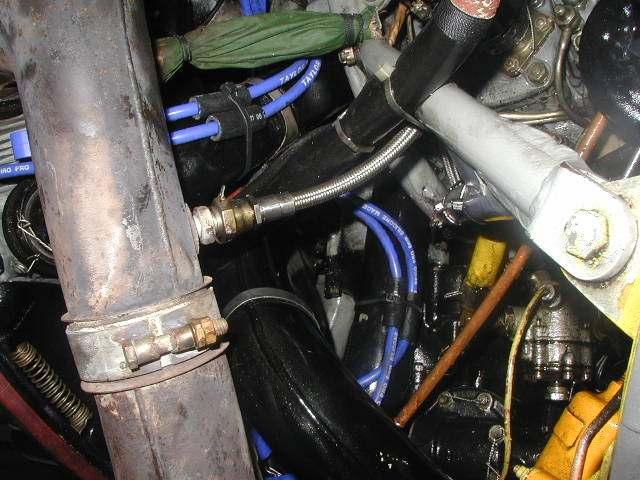
3 Loosen this knurled nut from front cover plate Regardless of whether you are going to keep the old wires in tact or not, remove the black front cover plates AND the square copper insulation gaskets from both magnetos and set them aside. a. IF YOU WISH TO KEEP THE OLD WIRES IN TACT Loosen the 22 mm nuts (see photo below) at the wiring harness ring for each wire and pull the spark plug wire through the ring. You may want to mark each wire with the cylinder number AND Front or Rear as appropriate. b. IF YOU DO NOT WISH TO KEEP THE OLD WIRES IN TACT disregard step a above and accomplish Step 13. Once the large nut at the top center of the ring is loose and the 4-11 mm nuts and lock washers holding the ring to the engine have been removed, cut the spark plug wires passing through the top-center of the ring. 13. Remove the curved ring from the engine. Look for the 4 metal tabs on the ring (2 on each side). These tabs have an 11 mm nut and lock washer holding the ring to the engine. Also, at the top-center of the ring is a large nut. This nut holds the two halves of the ring together. First, loosen the large nut at the top center of the ring. This separates the two halves of the ring. Next, remove the 4 11mm nuts and lock washers. The easiest way to access and remove the 11mm nuts is to use a ¼ drive, 11 mm flex/swivel socket with a 6 extension to a ¼ drive ratchet. Keep the 11mm nuts and lock washer as these will be reinstalled shortly. 22 mm nut Loosen to remove plug wires Large Nut at Top of Ring 3

4 11 mm nut and lock washer (x4) holding ring tab. 14. Now that the ring is separated and loose from the engine, remove the two halves of the ring. 15. Once the two halves of the ring are removed, install one flat washer supplied in the kit and the previously removed lock washer and 11mm nut onto the exposed studs which held the ring in place. Tighten the 11 mm nuts securely. 16. Using a die grinder or other suitable tools, grind the front hole in both of the black magneto front cover plates, removing approximately 1/8 of material around the entire inside diameter of the front hole. This will permit the new, larger 8 mm wires to pass through the hole. See photos below. Using a die grinder or other suitable tool, remove this material around the entire inside diameter of the front cover plate. 4
 until the drill bit bottoms out in the")
5 After Before 17. Before proceeding with this step, remove 9 wire-piercing screws from each magneto distributor cap. It is not necessary to remove the START wire screw. Using the drill bit supplied in the kit, CAREFULLY drill each hole in both magneto distributor caps (DO NOT DRILL THE START WIRE HOLE ON THE DISTRIBUTOR CAP) until the drill bit bottoms out in the hole. Once all 9 holes are drilled, clean out the debris from inside each hole and start the 9 wire-piercing screws back into the threaded holes. Look into the holes just drilled to make sure the point of the screw is not protruding into the hole. If the screw point can be seen in the hole, it will prevent the new wire from reaching the bottom of the hole and the screw point will not pierce the new wire correctly. 18. Gap the new spark plugs supplied in the kit to approximately Put a light coat of anti-seize compound on each spark plug thread. Be sure to keep the anti-seize compound off of the electrode end of the spark plug. Install the spark plugs in each cylinder and torque using a torque wrench to 24 foot-pounds. NOTE: Remove the washer from the spark plug when installing the spark plug into the cylinder with the CHT temperature probes. 20. There are two sets of spark plug wires in the kit. FRONT and REAR. Each plug wire is cut to length for its appropriate cylinder and is marked with a number band on the spark plug wire. NOTE: FOR #6 AND #9 WIRES, THE NUMBERS ARE READ IN THE SAME DIRECTION AS THE PREPRINTED WORDS (TAYLOR) ON THE INDIVIDUAL WIRE. ANOTHER WAY TO DIFFERENTIATE BETWEEN THE #6 AND THE #9 WIRE IS REAR #9 WIRE IS SHORTER THAN THE REAR #6 AND THE FRONT #9 WIRE IS SHORTER THAN THE FRONT #6 WIRE. The FRONT spark plug wire set has a RED BAND on each wire. The REAR spark plug wire set has NO BAND. 21. In the kit you will find a 50 piece of 3/8 (ID) black hose. Cut 27 pieces of hose approximately 1.5 in length. Install 1 piece of 1.5 hose on each rear spark plug wire. Install 2 pieces of 1.5 pieces of hose on the front spark plug wires 22. Place the LEFT magneto distributor cap, LEFT magneto black front cover plate and square copper gasket on a work bench or table with the bottom edge of the front cover plate and distributor cap facing down toward the table. 23. Route a FRONT spark plug starting with #8 wire, then 1, 3, 5, 7 wires ONE AT A TIME, first through the black front cover plate, then through the square copper gasket, then into the correct hole in the distributor cap with wire # s 8,1,3,5 and 7 on the bottom of the bundle going through the black front cover plate. See the photo below for the correct wire position. Refer to the Figures 1, 2, and 3 at the end of the installation instructions for proper distributor cap plug wire orientation. Make sure the wire is pushed all the way to the bottom of the hole. While holding the wire securely in the hole with one hand, tighten the wire-piercing screw. Repeat this for each individual wire. Once the wire-piercing screw is tight, gently tug on the wire to make sure the wire-piecing screw has pierced the wire. If the wire is properly installed, it will not pull out of the hole when you gently tug on the wire. NOTE: Try to keep the wires as neat as possible when they pass through the black front cover plate so they do not have to cross over each other before going into the distributor cap holes. 5

6 After completing Step 23, once again verify the wires are in the correct position in the distributor cap. 25. While holding the left distributor cap, black front cover plate and wires close to the engine, reinstall the START wire through the top of the black front cover plate and copper gasket and into the left magneto distributor cap. Insure the START wire is seated at the bottom of the hole in the distributor cap. Tighten the wire-piercing screw for the START wire. 26. Carefully place the distributor cap on the magneto with the entire wire bundle, black front cover plate and square copper gasket. To help alleviate any stress on the distributor cap and high tension lead caused by the loose hanging spark plug wires, take the entire bundle of wires and lay them over the top of the engine loosely for the time being. At this time you can install the bottom two screws through the front cover plate into the magneto. 27. Route each individual wire to its respective front spark plug through the baffling. Reinstall the rubber grommets in the baffling removed in Step 6 AFTER routing all front wires through the baffling. Place the piece of 1.5 hose closest to the spark plug end of the wire in the rubber grommet and tie wrap the 6

7 hose at the front and rear side of the baffling with a 4 tie wrap supplied in the kit, to hold it in place in the grommet. See the photo below. 1.5 rubber hose tie wrapped front and rear to hold it in place at the rubber grommet. The other piece of 1.5 hose on the front spark plug wires will be used to secure the wires to the intake tube with a tie wrap or installed in the previously removed intake tube clamps as described in Step Repeat steps 21 through 27 for the RIGHT magneto distributor cap and REAR spark plug wires. IF AFTER ROUTING THE REAR SPARK PLUG WIRES TO THEIR RESPECTIVE REAR SPARK PLUGS YOU FIND THE #9 SPARK PLUG WIRE TO BE SLIGHTLY TOO LONG, CAREFULLY REMOVE THE #9 WIRE FROM THE DISTRIBUTOR CAP AND CUT/SHORTEN THE WIRE TO FIT PROPERLY. NOTE: THE RIGHT MAGNETO DISTRIBUTOR CAP DOES NOT HAVE A START WIRE AND THE SPARK PLUG WIRES HAVE ONLY 1 PIECE OF 1.5 HOSE WHICH WILL BE PLACED IN THE INTAKE TUBE CLAMP. REMEMBER, THE REAR SPARK PLUG WIRE SET DOES NOT HAVE A RED BAND ON THE WIRES. 29. PLEASE READ THIS STEP COMPLETELY BEFORE PROCEEDING. Once all wires are neatly routed to their respective front and rear spark plugs, tie wrap the front and rear spark plug wires using the 1.5 piece of rubber hose to that cylinder s intake tube as shown in the next photo. One front and one rear wire will be tie wrapped together on each intake tube. ie: Front and rear spark plug wires for #5 cylinder will be clamped to the #5 cylinder intake tube. This example applies to all cylinders accordingly. As an option, instead of tie wrapping the wires and hose to the intake tubes, you can also reinstall the intake clamps, rubber spacers, screw and square nut, LOOSELY clamping the remaining 1.5 pieces of rubber hose on each spark plug wire into the clamp and onto the intake tubes. This will permit the new spark plug wires to temporarily slip through the rubber hose as needed. The clamps will be tightened completely in the next step. One front and one rear wire will be clamped together on each intake tube. ie: Front and rear spark plug wires for #5 cylinder will be clamped to the #5 cylinder intake tube. This example applies to all cylinders accordingly. 7

8 8 Tie wrap wires and hose to the intake tubes

9 30. Using the remaining tie-wraps in the kit, neatly dress out all wires from the magneto front covers to the spark plugs. TAKE A LOOK AT FIGURES 4, 5, 6, 7, AND 8 TO SEE HOW THE WIRES LOOK WHEN PROPERLY DRESSED OUT AND TIE WRAPPED. If you reinstalled the intake tube clamps, allow the wires to slide through the rubber hoses being held loosely by the clamps. The new spark plug wires will not be affected if they rest on the top of the engine where the old ring was installed. Once you have dressed out the wires to your satisfaction, tighten all intake clamps (if installed), install the magneto covers on both magnetos, install the remaining two 9 mm bolts through the front cover plate and safety wire the 4 magneto front cover plate screws and the 3 magneto cover screws START START WIRE hole plugged on right magneto distributor cap. Figure 1 9
10 High voltage cigarette fits into this hole. BE CAREFUL WHEN REINSTALLING ON MAGNETO NOT TO BEND OR BREAK CIGARETTE START Figure 2 10

11 START Figure 3 11

12 Figure 4 Figure 5 12

13 Figure 6 Figure 7 13

14 Figure 8 INCLUDED IN THE KIT 18 - Spark Plugs 1 Front Spark Plug Wire set with red band on each wire, cut to length and numbered 1 Rear spark plug wire set with NO red band on each wire, cut to length and numbered 1 50 piece of 3/8 ID rubber hose 4 7 mm ID washers 20 4 UV resistant tie wraps UV resistant tie wraps 1 8 mm drill bit 1 Installation instruction manual on CD Should you have any questions concerning the installation of the conversion kit, please call , between 8 AM and 5:30 PM central time in the USA or -6 hours GMT. A. Dennis Savarese 215 Crossgate Dr. Elmore, AL
Installing Nameless Performance High Flow cats on a Jaguar XKR
 Installing Nameless Performance High Flow cats on a 2000-2002 Jaguar XKR Part I, removal preparation under the hood, left side. 1. Open the hood and remove the coolant tank cap on the driver's side of
Fig. 1: Remove the bolts which fasten the upper timing belt cover... Fig. 2:... and remove the cover
 Show Timing Belt and Covers REMOVAL & INSTALLATION 1983 87 626 NOTE: For access, safely support the car, then remove the right front wheel and splash shield. 1. Loosen the alternator mounting bolts and
Powerglide Automatic Floor Mount Shifter Installation Instructions
 Powerglide Automatic Mount Installation Instructions Building American Quality With A Lifetime Warranty! TOLL FREE 1-877-469-7440 (865) 966-2269 FAX (865) 671-1999 tech@lokar.com www.lokar.com Powerglide
Installation Instructions
 Powerglide Automatic Trans Mount Installation Instructions Building American Quality With A Lifetime Warranty! TOLL FREE 1-877-469-7440 (865) 966-2269 FAX (865) 671-1999 tech@lokar.com www.lokar.com Powerglide
INSTALLATION INSTRUCTIONS
 HIGH FLOW AIRFLOW METER INSTALLATION INSTRUCTIONS PART NUMBER D763-1600A APPLICATION: 2001-06 E46 M3 Parts List: Hose clamp 64Z (7) Plastic Rivets Air Filter Temp Sensor & Harness (2) Button Head Screws
Instructions for the Replacement of CWP ROMA s and Repair of Lower Support Frame.
 Instructions for the Replacement of CWP ROMA s and Repair of Lower Support Frame. The following information describes the procedure to remove, and replace ROMA s. In addition, the procedure for replacing
Installation Instructions
 Installation Instructions Eibach Springs, Inc. 264 Mariah Circle Corona, California 92879-1751 USA Tech Support 800-222-8811 Ext 114 CASTER / CAMBER PLATE KIT # 5.3518K 1999-2004 SN95 Ford Mustang - All
Installation Instructions COMPETITION/PLUS SHIFTER Ford Mustang MT82 6-Speed Manual Transmission Catalog#
 Installation Instructions COMPETITION/PLUS SHIFTER 2015-2017 Ford Mustang MT82 6-Speed Manual Transmission Catalog# 3916037 Rev. 00 WORK SAFELY! For maximum safety, perform this installation on a clean,
Retrofit Steering Column Installation Instructions
 Retrofit Steering Column Installation Instructions for 1965-66 Mustangs www.ididitinc.com 610 S. Maumee St., Tecumseh, MI 49286 PH: (517) 424-0577 FAX: (517) 424-7293 Revised 3/22/2010 Instruction #: 8000000011
COLD AIR INTAKE INSTALLATION INSTRUCTIONS
 COLD AIR INTAKE INSTALLATION INSTRUCTIONS # D760-0029 Fits: 2009-10 335i/xi (E90; with N54 engine) Congratulations for being selective enough to use a Dinan Engineering Cold Air Intake. We have spent many
Ford AOD-4R70W-AODE Cable Operated Shifter Installation Instructions
 Ford AOD-4R70W-AODE Cable Operated Shifter Installation Instructions Building American Quality With A Lifetime Warranty! TOLL FREE 1-877-469-7440 tech@lokar.com www.lokar.com Ford AOD-4R70W-AODE Cable
GM Floor Mount Automatic Transmission Shifter Installation Instructions
 GM Mount Automatic Transmission Shifter Installation Instructions Building American Quality With A Lifetime Warranty! TOLL FREE 1-877-469-7440 tech@lokar.com www.lokar.com GM Mount Automatic Transmission
MP and MP Diaphragm and Seal Kits for MP8000 Series Actuators
 MP8000-6325 and MP8000-6350 Diaphragm and Seal Kits for MP8000 Series Actuators Contents of the MP8000-6325 Diaphragm and Seal Kit for MP82 and MP83 Actuators One seal, 5/8 in. Internal Diameter (I.D.)
Airaid Poweraid Throttle Body Spacer (11-13 V6):
:") Install Time: Less than 1 hour Required Tools: Flat blade screw driver ratchet 8mm socket 10mm socket Needle nose pliers or Channel locks Razor blade 2 small cable ties or electrical tape Airaid Poweraid
Install Time: Less than 1 hour Required Tools: Flat blade screw driver ratchet 8mm socket 10mm socket Needle nose pliers or Channel locks Razor blade 2 small cable ties or electrical tape Airaid Poweraid
TH200 & TH200-4R Automatic Trans Mount Shifter Installation Instructions
 TH200 & TH200-4R Automatic Trans Mount Installation Instructions Building American Quality With A Lifetime Warranty! TOLL FREE 1-877-469-7440 (865) 966-2269 FAX (865) 671-1999 tech@lokar.com www.lokar.com
Suspension System RS6582B
 Suspension System RS6582B Tahoe/Yukon READ ALL INSTRUCTIONS THOROUGHLY FROM START TO FINISH BEFORE BEGINNING INSTALLATION IMPORTANT NOTES! WARNING: This suspension system will enhance the off-road performance
MM Brake Hose Kit (MMBK13R)
") 3430 Sacramento Dr., Unit D San Luis Obispo, CA 93401 Telephone: 805/544-8748 Fax: 805/544-8645 www.maximummotorsports.com MM Brake Hose Kit (MMBK13R) Read all instructions before beginning work. Following
3430 Sacramento Dr., Unit D San Luis Obispo, CA 93401 Telephone: 805/544-8748 Fax: 805/544-8645 www.maximummotorsports.com MM Brake Hose Kit (MMBK13R) Read all instructions before beginning work. Following
Ford AOD-4R70W-AODE Cable Operated Shifter Installation Instructions
 Ford AOD-4R70W-AODE Cable Operated Shifter Installation Instructions Building American Quality With A Lifetime Warranty! TOLL FREE 1-877-469-7440 tech@lokar.com www.lokar.com Ford AOD-4R70W-AODE Cable
Installation Instructions
 Installation Instructions Eibach Springs, Inc. 264 Mariah Circle Corona, California 92879-1751 USA Tech Support 800-222-8811 Ext 114 CASTER / CAMBER PLATE KIT # 5.3510K 1990-1993 Ford Mustang All FOX Body
TH400 Automatic Trans Mount Shifter Installation Instructions
 TH400 Automatic Trans Mount Installation Instructions Building American Quality With A Lifetime Warranty! TOLL FREE 1-877-469-7440 tech@lokar.com www.lokar.com TH400 Automatic Trans Mount Installation
Chrysler 727, 904, 518 Floor Mount Automatic Transmission Shifter Installation Instructions
 Chrysler 727, 904, 518 Mount Automatic Transmission Shifter Installation Instructions Building American Quality With A Lifetime Warranty! TOLL FREE 1-877-469-7440 tech@lokar.com www.lokar.com Release Button
Ford C4 and C6 Floor Mount Automatic Transmission Shifter Installation Instructions
 Ford C4 and C6 Mount Automatic Transmission Shifter Installation Instructions Building American Quality With A Lifetime Warranty! TOLL FREE 1-877-469-7440 tech@lokar.com www.lokar.com Ford C4 and C6 Mount
97-06 JEEP TJ/LJ LONG ARM UPGRADE KIT
 921663U00 97-06 JEEP TJ/LJ LONG ARM UPGRADE KIT Thank you for choosing Rough Country for your suspension needs. This kit is an upgrade kit only. This kit includes frame mounting points and adjustable long
INSTALLATION INSTRUCTIONS PORT INJECTION KIT (PIK)
") INSTALLATION INSTRUCTIONS PORT INJECTION KIT (PIK) FORD FOCUS 2.3L ECOBOOST Document: 19-0155 Support: info@radiumauto.com IMPORTANT NOTES: 1. This installation requires minor metal cutting. Air tools
INSTALLATION INSTRUCTIONS PORT INJECTION KIT (PIK) FORD FOCUS 2.3L ECOBOOST Document: 19-0155 Support: info@radiumauto.com IMPORTANT NOTES: 1. This installation requires minor metal cutting. Air tools
2015 Mustang Lightbar (All Models) CDC#
 CDC#") 2015 Mustang Lightbar (All Models) CDC# 1511-7000-01 Components: 1 CDC Lightbar Note: READ instructions before starting installation!!! CDC Part# Driver side bracket 0511-6001-05 Passenger side bracket
2015 Mustang Lightbar (All Models) CDC# 1511-7000-01 Components: 1 CDC Lightbar Note: READ instructions before starting installation!!! CDC Part# Driver side bracket 0511-6001-05 Passenger side bracket
SHELBY GT500
 2007-2009 SHELBY GT500 Removal of Factory Unit WARNING: 1. Radiator fluid must be handled properly. Please observe local ordinances with regards to handling and disposal. 2. Allow vehicle and components
COLD AIR INTAKE INSTALLATION INSTRUCTIONS
 COLD AIR INTAKE INSTALLATION INSTRUCTIONS # D760-0030 Fits: 2007-10 135i (E82, E88; with N54 engine) 2007-08 335i/xi (E90) 2007-10 335i (E92, E93; with N54 engine) Congratulations for being selective enough
Procharger Stage II Intercooled Supercharger System (11-14 GT)
") Procharger Stage II Intercooled Supercharger System (11-14 GT) Installation Time: Approximately one day. Installed on 2012 Mustang GT 5.0/Manual Required Tools 3/8 Socket Set (Standard and Metric) 1/2
Procharger Stage II Intercooled Supercharger System (11-14 GT) Installation Time: Approximately one day. Installed on 2012 Mustang GT 5.0/Manual Required Tools 3/8 Socket Set (Standard and Metric) 1/2
INSTALLATION INSTRUCTIONS
 COLD AIR INTAKE INSTALLATION INSTRUCTIONS PART NUMBER D760-0390C APPLICATION: 1999-2003 E39 M5 PARTS LIST 1 Left Aluminum Intake Tube 1 Air Pump Bracket (A) 1 Right Aluminum Intake Tube 1 Air Pump Bracket
BBK Intake Manifold Kit ( L) - Installation Instructions
 - Installation Instructions") BBK Intake Manifold Kit (86-93 5.0L) - Installation Instructions The below installation instructions work for the following products: BBK Intake Manifold Kit (86-93 5.0L) Please read through the instructions
BBK Intake Manifold Kit (86-93 5.0L) - Installation Instructions The below installation instructions work for the following products: BBK Intake Manifold Kit (86-93 5.0L) Please read through the instructions
Ford C6 Automatic Trans Mount Shifter Installation Instructions
 Ford C6 Automatic Trans Mount Installation Instructions Building American Quality With A Lifetime Warranty! TOLL FREE 1-877-469-7440 tech@lokar.com www.lokar.com Ford C6 Automatic Trans Mount Installation
Chrysler 727, 904, and 518 Automatic Trans Mount Shifter Installation Instructions
 Chrysler 727, 904, and 518 Automatic Trans Mount Installation Instructions Building American Quality With A Lifetime Warranty! TOLL FREE 1-877-469-7440 tech@lokar.com www.lokar.com Chrysler 727, 904, and
Wolverine Turn Signal / Horn Kit 2102
 All years Yamaha Wolverine STOP - THIS KIT IS DESIGNED SPECIFICALLY FOR ALL YEAR AND MODELS YAMAHA WOLVERINE. IF YOUR MACHINE IS NOT ONE OF THESE MODELS DO NOT PROCEED. Contact Ryco Motorsports or your
Toyota Tacoma Winch Mount Bumper Installation Instructions Tools Required: Transmission cooler relocation brackets Torque Wrench
 2016-2017 Toyota Tacoma Winch Mount Bumper Installation Instructions Tools Required: Items Included: Small flat head screw driver Winch Mount Ratchet, 10mm, 12mm, 14mm, 17mm & Skid Plate 19mm sockets Transmission
Retrofit Steering Column Installation Instructions
 Retrofit Steering Column Installation Instructions for 1967 Mustangs www.ididitinc.com 610 S. Maumee St., Tecumseh, MI 49286 PH: (517) 424-0577 FAX: (517) 424-7293 Revised 9/29/2009 Instruction #: 8000000014
INSTALLATION INSTRUCTIONS COOLANT EXPANSION TANK
 INSTALLATION INSTRUCTIONS COOLANT EXPANSION TANK 2011+ FORD MUSTANG Document: 19-0147 Support: info@radiumauto.com Steps below show installation in a 2015+ Ford Mustang (P/N: 20-0286) The same procedure
GT-R Alpha 10/12 Turbo Kit
 GT-R Alpha 10/12 Turbo Kit Instructions V6 The goal of AMS is to provide the highest quality, best performing products available. By utilizing research and development, and rigorous testing programs AMS
2010 Camaro Long Tube Headers, Coated w/high Flow Cats Use w/#30220
 PART #30212 2010 Camaro Long Tube Headers, Coated w/high Flow Cats Use w/#30220 PACKING LIST Before installation, use this checklist to make sure all necessary parts have been included. ITEM CHECK PART
SUT-250-S (These instructions are used for SUT-250-SCLC also)
") SUT-250-S (These instructions are used for SUT-250-SCLC also) Torque wrench, carpenters square, wire cutters, Phillips screwdriver, 7/16, 9/16, and 3/4 combination wrenches, ratchet, 9/16, 3/4, 13/16,
SUT-250-S (These instructions are used for SUT-250-SCLC also) Torque wrench, carpenters square, wire cutters, Phillips screwdriver, 7/16, 9/16, and 3/4 combination wrenches, ratchet, 9/16, 3/4, 13/16,
INSTALLATION INSTRUCTIONS PORT INJECTION KIT (PIK)
") INSTALLATION INSTRUCTIONS PORT INJECTION KIT (PIK) FORD FOCUS 2.3L ECOBOOST Document: 19-0155 Support: info@radiumauto.com IMPORTANT NOTES: 1. This installation requires minor metal cutting. Air tools
INSTALLATION INSTRUCTIONS PORT INJECTION KIT (PIK) FORD FOCUS 2.3L ECOBOOST Document: 19-0155 Support: info@radiumauto.com IMPORTANT NOTES: 1. This installation requires minor metal cutting. Air tools
Installation Instructions
 Instructions Created by an: 2007-Present Toyota Tundra LRT Leveling Lift Kit - 4WD by Low Range Off-Road (SKU# LR-LRTundra) Instructions also apply to 2WD Kits. Installation Instructions Revised 7-11-17
CHALLENGER TWIN TURBO SYSTEM INSTALLATION INSTRUCTIONS
 CHALLENGER TWIN TURBO SYSTEM INSTALLATION INSTRUCTIONS 1 Verify contents of kits with supplied packing list 1) Unhook the battery. 2) Remove wheel wells & front fascia of vehicle. 3) Remove the catalytic
Installation Instructions Table of Contents
 Installation Instructions Table of Contents Pre- Installation of Garage Storage Lift 2 Layout the Garage Storage Lift 3 Installing the strut Channels 3 Install the Drive Assembly 5 Install the Drive Shaft
Assembly Instructions
 Assembly Instructions Part Number Description Model Approx. Assembly Time 99994-0903 Windshield Wiper Kit Mule SX 1 Hour WARNING Improper installation of this accessory could result in an accident causing
4L80E Automatic Trans Mount Shifter Installation Instructions
 4L80E Automatic Trans Mount Installation Instructions Building American Quality With A Lifetime Warranty! TOLL FREE 1-877-469-7440 tech@lokar.com www.lokar.com 4L80E Automatic Trans Mount Installation
Installation Instructions
 Installation Instructions Product: ACOS Pro Part Number: PN 2700 Applications: Jeep Wrangler TJ, 1997-06 (front or rear) Jeep Grand Cherokee ZJ, 1993-98 (front only) Jeep Cherokee XJ, 1984-01 (front only)
INSTALLATION INSTRUCTION 88094
 INSTALLATION INSTRUCTION 88094 FOR RANCHO SUSPENSION SYSTEM RS6594B 4WD & 2WD NISSAN TITAN READ ALL INSTRUCTIONS THOROUGHLY FROM START TO FINISH BEFORE BEGINNING INSTALLATION Rev D IMPORTANT NOTES! WARNING:
MM Brake Line Kit (MMBK14R)
") 3430 Sacramento Dr., Unit D San Luis Obispo, CA 93401 Telephone: 805/544-8748 Fax: 805/544-8645 www.maximummotorsports.com MM Brake Line Kit (MMBK14R) Read all instructions before beginning work. Following
3430 Sacramento Dr., Unit D San Luis Obispo, CA 93401 Telephone: 805/544-8748 Fax: 805/544-8645 www.maximummotorsports.com MM Brake Line Kit (MMBK14R) Read all instructions before beginning work. Following
***THE OWNER'S MANUAL MUST BE GIVEN TO THE END USE CUSTOMER AFTER COMPLETING THE INSTALLATION.***
 INSTALLATION INSTRUCTIONS FOR THE MOTOR TRIKE HARLEY MECHANICAL REVERSE 1999-2006 FIVE SPEED FLH LAST UPDATED: OCTOBER 2011 AS THE INSTALLER OF THIS MECHANICAL REVERSE, YOU MUST BECOME FAMILIAR WITH PROPER
Installation Instructions Z-Gate Shifter
 Installation Instructions Z-Gate Shifter Part Number 80681 1998, 2001 by B&M Racing and Performance Products The B&M Z-Gate shifter can be used in vehicles equipped with most popular three speed automatic
HIGH FLOW COLD AIR INTAKE SYSTEM INSTALLATION INSTRUCTIONS D , D A
 HIGH FLOW COLD AIR INTAKE SYSTEM INSTALLATION INSTRUCTIONS D760-0320, D760-0320A 1992-95 325i, is 1995 M3 (3.0L) Parts List: 1 Intake Tube 1 Silicone Hose 1 Air Flow Meter Bracket 1 Hose Clamp (#36z) 1
INSTALLATION INSTRUCTIONS
 INSTALLATION INSTRUCTIONS FUEL SURGE TANK INSTALLATION KIT 1999-2006 BMW E46 COUPE Document# 19-0056 Support: info@radiumauto.com Note: This kit wasn t designed for a FST-R, but can be accomplished. 1.
INSTALLATION INSTRUCTIONS
 INSTALLATION INSTRUCTIONS COOLANT EXPANSION TANK FORD FOCUS Document: 19-0151 Support: info@radiumauto.com WARNINGS: DO NOT WORK ON THE COOLANT SYSTEM WHEN THE ENGINE IS AT OPERATING TEMPERATURE. WAIT
2017 Current Ford Raptor Bump Stop Kit Installation Instructions
 2017 Current Ford Raptor Bump Stop Kit Installation Instructions PREPARATION 1. Disconnect the negative terminal on the battery. Park the vehicle on level ground and set the emergency brake. 2. We recommend
2010 Camaro Long Tube Headers, Coated w/high Flow Cats/ Powerflo-X Crossover Assembly
 PART #30213/30214 2010 Camaro Long Tube Headers, Coated w/high Flow Cats/ Powerflo-X Crossover Assembly PACKING LIST Before installation, use this checklist to make sure all necessary parts have been included.
EGR Performance Brakes Assembly Instructions DODGE DANA 70 '87 - '93 (Will not fit stock sized dual rear wheels)
") EGR Performance Brakes Assembly Instructions DODGE DANA 70 '87 - '93 (Will not fit stock sized dual rear wheels) Got Brakes? Parts List (2) Vented Rotors (2) Multi hole Cable Mount & L Brkt (2) Axle Tube
EGR Performance Brakes Assembly Instructions DODGE DANA 70 '87 - '93 (Will not fit stock sized dual rear wheels) Got Brakes? Parts List (2) Vented Rotors (2) Multi hole Cable Mount & L Brkt (2) Axle Tube
INSTALLATION INSTRUCTIONS FOR BRUTE IV EXTREME TM BELT DRIVE
 INSTALLATION INSTRUCTIONS FOR BRUTE IV EXTREME TM BELT DRIVE FOR 1990 TO PRESENT EVO & TWIN CAM SOFTAILS Shown w/optional mid-shift control It s common knowledge that a belt drive primary can provide advantages
INSTALLATION INSTRUCTIONS
 INSTALLATION INSTRUCTIONS REAR DISC BRAKE CONVERSION KIT A126-1 1973-87 CHEVROLET 1/2 TON 2WD Thank you for choosing STAINLESS STEEL BRAKES CORPORATION for your braking needs. Pleases take the time to
C15C C15C. Page 1 of 20
 2 x Lid Front Hinge 1135 8 x M8 Bolt 8 x M8 Washer (3mm Thick) 4 x M6 Large washers 4 x M6 Spring washers 4 x M6 x 40mm Bolts 6 x M6 20mm Bolts 6 x M6 Washers 20 x Screws 2 x Lid mount gas strut bracket
Thank you for purchasing the Craven Speed FlexPod Complete Gauge Pod Kit For R56, R58, R59, R60 with Refresh Engines (2011+)
") Thank you for purchasing the Craven Speed FlexPod Complete Gauge Pod Kit For R56, R58, R59, R60 with Refresh Engines (2011+) Before You Start Please read instructions completely before installing. These
Thank you for purchasing the Craven Speed FlexPod Complete Gauge Pod Kit For R56, R58, R59, R60 with Refresh Engines (2011+) Before You Start Please read instructions completely before installing. These
ASSEMBLY & INSTALLATION INSTRUCTIONS
 ASSEMBLY & INSTALLATION INSTRUCTIONS VEHICLE MOUNT KIT 99101087 AND VEHICLE CENTER MEMBER For 26 Series: 99100890 TO FIT 2009 & Later FORD F150 4x4 (without EcoBoost V6) 2011 & Later FORD F150 4x4 (with
M7 R52S & R53 Cold Air Intake Installation Guide 53-3M7301
 M7 R52S & R53 Cold Air Intake Installation Guide 53-3M7301 M7 Speed engineers and manufactures the highest quality MINI COOPER accessories and performance parts available anywhere on Planet Earth! Please
FlowMax Lift Pump Kit
 15 June 2016 (1050316) 2008-2010 Ford 6.4L FlowMax Lift Pump Kit (I-00359) - 1-2008-2010 Ford 6.4L PowerStroke FlowMax Lift Pump Kit Installation Instructions P/N# 1050316 PLEASE READ ALL INSTRUCTIONS
INSTALLATION INSTRUCTIONS FOR MK4 VOLKSWAGEN JETTA (BORA) /GOLF 1.8T, 2.0L, VR6, & R32 MODELS ALSO FITS ALL MODELS OF SEAT LEON & TOLEDO
 /GOLF 1.8T, 2.0L, VR6, & R32 MODELS ALSO FITS ALL MODELS OF SEAT LEON & TOLEDO") CI100001 INSTALLATION INSTRUCTIONS FOR 1999.5-2005 MK4 VOLKSWAGEN JETTA (BORA) /GOLF 1.8T, 2.0L, VR6, & R32 MODELS ALSO FITS ALL MODELS OF SEAT LEON & TOLEDO Thank you for choosing to purchase a Carbonio
CI100001 INSTALLATION INSTRUCTIONS FOR 1999.5-2005 MK4 VOLKSWAGEN JETTA (BORA) /GOLF 1.8T, 2.0L, VR6, & R32 MODELS ALSO FITS ALL MODELS OF SEAT LEON & TOLEDO Thank you for choosing to purchase a Carbonio
INSTALLATION INSTRUCTIONS
 INSTALLATION INSTRUCTIONS FUEL SURGE TANK INSTALLATION KIT 1999-2006 BMW E46 COUPE Document# 19-0056 Support: info@radiumauto.com Note: This kit was designed for a standard single pump Radium Engineering
Installation Instructions
 Instructions Created by an: Revised 7-11-17 LRT 2005-2017 3/1 Leveling/ Lift Kit for Toyota Tacoma by Low Range Off-Road (SKU# LR-LRTACO) Installation Instructions Suggested Tools: CAUTION: Safety glasses
STEALTH BIG AIR KIT - Yamaha Roadliner/Stratoliner and Raider
 Page: 1 If you question your abilities it may be best for an experienced service technician perform this installation. A Yamaha Service Manual would be helpful to have on hand for reference. Revision:
INSTALLATION INSTRUCTIONS
 INSTALLATION INSTRUCTIONS Accessory USB ADAPTER Application 2014 INSIGHT Publications No. AII 50655 Issue Date OCT 2013 PARTS LIST USB Adapter Attachment Kit P/N 08B28-TM8-100A 6 mm Flange nut Control
Installation Instructions. QuickSilver Shifter. Fits: GM, Ford, Chrysler Transmissions See Application Guide for Specific Applications Part # 80683
 Installation Instructions QuickSilver Shifter Fits: GM, Ford, Chrysler Transmissions See Application Guide for Specific Applications Part # 80683 WORK SAFELY! For maximum safety, perform this installation
1501 Industrial Way N., Toms River, NJ Fax: PACKING LIST MUSTANG LONG TUBE HEADERS (M30000)
") 2/18/04 1501 Industrial Way N., Toms River, NJ 08755 732-349-2109 Fax:732-244-0867 ADVANCED - Installation requires professional-type tools and advanced automotive-service skills. If you lack experience
2/18/04 1501 Industrial Way N., Toms River, NJ 08755 732-349-2109 Fax:732-244-0867 ADVANCED - Installation requires professional-type tools and advanced automotive-service skills. If you lack experience
INSTALLATION INSTRUCTION 88088
 INSTALLATION INSTRUCTION 88088 For Rancho Suspension Systems RS6588 & RS6589: FORD F-150 READ ALL INSTRUCTIONS THOROUGHLY FROM START TO FINISH BEFORE BEGINNING INSTALLATION Rev B IMPORTANT NOTES! WARNING:
2016 HONDA 1000 Pioneer PN 3102 Turn signal / horn kit rev nc
 2016 Honda 1000 Pioneer STOP - THIS KIT IS DESIGNED SPECIFICALLY FOR 2016 HONDA 1000 PIONEER IF YOUR MACHINE IS NOT THIS MODEL DO NOT PROCEED. THIS KIT DOES NOT WORK ON THE PIONEER 500 nor 700 S. Contact
L Intake Manifold Part #
 86-93 5.0L Intake Manifold Part #5001-5002 I N S T A L L A T I O N I N S T R U C T I O N S Supplied Materials Bottom cover, Upper manifold, Lower manifold, Plenum cover plate, 1501 Throttle body (comes
RMK HANDLEBAR KIT P/N ; ; APPLICATION BEFORE YOU BEGIN KIT CONTENTS. Verify accessory fitment at Polaris.com.
 RMK HANDLEBAR KIT P/N 2883835; 2883836; 2883837 APPLICATION Verify accessory fitment at Polaris.com. BEFORE YOU BEGIN Read these instructions and check to be sure all parts and tools are accounted for.
TH350 Automatic Trans Mount Shifter Installation Instructions
 TH350 Automatic Trans Mount Installation Instructions Building American Quality With A Lifetime Warranty! TOLL FREE 1-877-469-7440 (865) 966-2269 FAX (865) 671-1999 tech@lokar.com www.lokar.com TH350 Automatic
Bill of Materials: Please take time to read and understand these installation instructions.
 Please take time to read and understand these installation instructions. CORSA recommends that installation of this system be performed by a qualified service center or professional muffler installer who
INSTALLATION INSTRUCTIONS
 INSTALLATION INSTRUCTIONS --1075 North Ave. Sanger, CA 93657-3539 local: 559-875-0222 fax: 559-876-2259 toll free: 800-445-3767-- 2505 Lowering Spindle Assembly Installation Instructions ½ TON SILVERADO
PPM-8023 / PPM-8043 JEEP JK SYNERGY STAGE 3 SUSPENSION SYSTEM Version 1
 SYNERGY MFG. 870 INDUSTRIAL WAY, SAN LUIS OBISPO, CA (805) 242-0397 PPM-8023 / PPM-8043 JEEP JK SYNERGY STAGE 3 SUSPENSION SYSTEM Version 1 GENERAL NOTES: These instructions are also available on our website;
PPM-8022 / PPM-8042 JEEP JK STAGE 2 SYNERGY SUSPENSION SYSTEM Version 1
 POLY PERFORMANCE MFG. 870 INDUSTRIAL WAY, SAN LUIS OBISPO, CA (805) 242-0397 PPM-8022 / PPM-8042 JEEP JK STAGE 2 SYNERGY SUSPENSION SYSTEM Version 1 GENERAL NOTES: These instructions are also available
Installation Manual TWM Performance Short Shifter Cobalt SS/SC, SS/TC, HHR SS, Ion Redline and Saab 9-3
 Page 1 Installation Manual TWM Performance Short Shifter Cobalt SS/SC, SS/TC, HHR SS, Ion Redline and Saab 9-3 Please Note: It is preferable to park on a flat surface, as you will have to engage and disengage
Aluminum Valve Cover Adapter Small Block Chevy to LS Engine
 Aluminum Valve Cover Adapter Small Block Chevy to LS Engine PARTS LIST: 241-296 (Polished Finish) 241-297 (Black Finish) 241-298 (Natural Cast Finish) Instruction Sheet 199R11685 Qty. Description 1 Driver
Mercedes E63/CLS AMG Carbon Turbo Intake System Instructions
 Mercedes E63/CLS AMG Carbon Turbo Intake System Instructions The goal of Alpha Performance is to provide the highest quality, best performing products available. By utilizing research and development,
Installation Instructions
 Installation Instructions Product: SwitchBlade Swaybar System Part Number: PN 9100 Application: Jeep Wrangler TJ, 1997-06 (front) Welcome CONGRATULATIONS on purchasing a SwitchBlade Swaybar System from
03-04 Mach 1. Hellion Power Systems Mach 1 Kit Instructions
 Hellion Power Systems 03-04 Mach 1 Kit Instructions Part 1 Hellion recommends that the front suspension system be installed either by trained professionals or by 5.Remove rack bolts K-Member Installation
700-R4, 4L60, and 4L60E Automatic Trans Mount Shifter Installation Instructions
 700-R4, 4L60, and 4L60E Automatic Trans Mount Installation Instructions Building American Quality With A Lifetime Warranty! TOLL FREE 1-877-469-7440 tech@lokar.com www.lokar.com 700-R4, 4L60, and 4L60E
Hayes TrailTrac Kit Installation Guidelines Polaris Rush / Pro-R / Indy
 Models: 2010-2014 Polaris Rush / Pro-R / Indy Packing List 1 Electronic Control Unit (ECU) 1 ECU Velcro, 3 inch 1 Switch face plate 1 Switch face plate adhesive 1 Switch 1 Wiring harness 1 Fully pre-filled
PARTS LIST: 8581 DODGE LONG ARM BRACKETS 03-13
 SYNERGY MFG. 870 INDUSTRIAL WAY, SAN LUIS OBISPO, CA (805) 242-0397 8580 03-12 DODGE 2500/3500 4X4, 06-08 1500 MEGACAB 4X4 LONG ARM SUSPENSION KIT V3.0 GENERAL NOTES: These instructions are also available
Industrial Injections Compound Turbo Installation For 6.7L Scorpion
 Industrial Injections Compound Turbo Installation For 6.7L Scorpion Step 1: Whenever you are doing an installation the first thing you should do is unhook the batteries to avoid arcing. You will need an
Part Numbers: Complete Kits: C5 Base/Z06 Complete Header Package with Cats C5 Base/Z06 Complete Header Package without Cats
 Product: Corvette Tri-Y Headers & Mid-Pipe Part Numbers: Complete Kits: 1150042 C5 Base/Z06 Complete Header Package with Cats 1150043 C5 Base/Z06 Complete Header Package without Cats Applications: Chevrolet
INSTALLATION INSTRUCTIONS
 INSTALLATION INSTRUCTIONS 2102 LOWERING SPINDLE ASSEMBLY 1998-UP CHEVROLET / GMC BLAZER / X-TREME / JIMMY / ENVOY 2 Wheel Drive Congratulations! You were selective enough to choose a BELLTECH PRODUCT.
700 Pine Ridge Road Golden CO Tel (303) (888) 4X4 SLEE Fax (303)
 (888) 4X4 SLEE Fax (303)") 700 Pine Ridge Road Golden CO 80403 Tel (303) 278 8287 1(888) 4X4 SLEE Fax (303) 278 7182 Slee Off-Road 1998-07 Land Cruiser / LX470 (* Requires AHC Removal) - Second Instructions Qty Parts Included Suggested
700 Pine Ridge Road Golden CO 80403 Tel (303) 278 8287 1(888) 4X4 SLEE Fax (303) 278 7182 Slee Off-Road 1998-07 Land Cruiser / LX470 (* Requires AHC Removal) - Second Instructions Qty Parts Included Suggested
Installation Manual v1.0: Aurora Plus Turbo Kit ( ) 5.9L Dodge. Please read all instructions before installation.
 5.9L Dodge. Please read all instructions before installation.") Installation Manual v1.0: Aurora Plus - 4000 Turbo Kit (2003-2007) 5.9L Dodge Please read all instructions before installation. Figure 1: Aurora Plus - 4000 Kit Contents 1 Figure 2: Aurora Plus Hardware
Installation Manual v1.0: Aurora Plus - 4000 Turbo Kit (2003-2007) 5.9L Dodge Please read all instructions before installation. Figure 1: Aurora Plus - 4000 Kit Contents 1 Figure 2: Aurora Plus Hardware
Remove the 3-11mm nuts holding mirror on. Don t drop the nuts!
 2005-2012 Ford Mustang Puddle Lamp Kit Parts List: Quantity: Tool List: LED Lamps 2 Flat head screwdriver Seals 2 Ratchet & Socket set OR Nuts 2 Adjustable Wrench Wiring harness 1 Drill & 11/16 th bit
INSTALLATION INSTRUCTION 88146
 INSTALLATION INSTRUCTION 88146 Rev H FOR RANCHO SUSPENSION SYSTEM RS6547: 4WD SUBURBAN/YUKON XL, 4WD TAHOE/YUKON, & 4WD AVALANCHE READ ALL INSTRUCTIONS THOROUGHLY FROM START TO FINISH BEFORE BEGINNING
Ford AOD, 4R70W, and AODE Automatic Trans Mount Shifter Installation Instructions
 Ford AOD, 4R70W, and AODE Automatic Trans Mount Installation Instructions Building American Quality With A Lifetime Warranty! TOLL FREE 1-877-469-7440 tech@lokar.com www.lokar.com Ford AOD, 4R70W, and
Cut zip ties and remove 2 plastic wiring harness brackets.
 TROUBLESHOOTING: Please read and understand all installation instructions before proceeding with the installation. Included parts: 1 - New Bosch Cp3 Pump 1 - HSM Pulley 1 - Serpentine Belt 1 - Pump Bracket/
A Division of Thiessen Products, Inc.
 The JIMS FORCEFLOW CYLINDER HEAD COOLER is designed for Twin Cam Models 1999 to present. Also fits all JIMS Twin Cam Race Engines. NOTE: These instructions show the installation of this product on a 2012
»Product» Safety Warning
 J1455, J1456 Installation Instructions 1984-2001 Jeep Cherokee XJ 4.5 Suspension Lift Read and understand all instructions and warnings prior to installation of product and operation of vehicle. Zone Offroad
Air Conditioner for M915 A0/A1 Truck
 RD-2-4530-0 Air Conditioner for M915 A0/A1 Truck INSTALLATION INSTRUCTIONS Install refrigerant compressor per instructions provided with compressor mount kit. CAUTION: Edges of sheet metal can be sharp!
2017 Current Ford SuperDuty Adaptive Cruise Control Relocation Bracket Installation Instructions
 2017 Current Ford SuperDuty Adaptive Cruise Control Relocation Bracket Installation Instructions PREPARATION 1. Disconnect the negative terminal on the battery. Park the vehicle on level ground and set