RZR SUPERCHARGER KIT INSTALLATION INSTRUCTIONS POLARIS RZR 1000 SUPERCHARGER KIT. 1 of 33
|
|
|
- Gavin Bates
- 6 years ago
- Views:
Transcription

1 POLARIS RZR 1000 SUPERCHARGER KIT 1 of 33

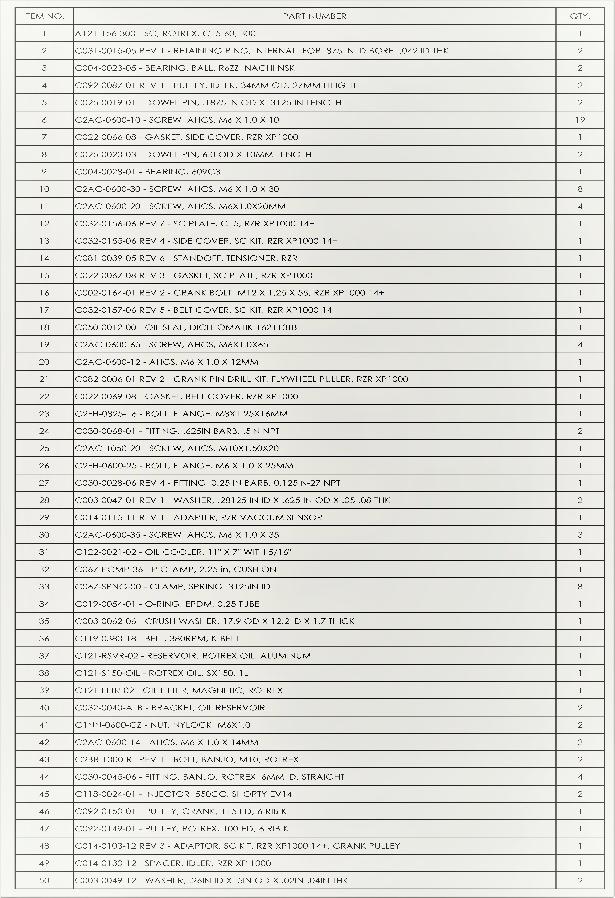
2 POLARIS RZR 1000 SUPERCHARGER KIT Part Number(s): TABLE OF CONTENTS Introduction / Pre-Installation Instructions C.A.D. Drawings Pre-Installation / Removal Supercharger Assembly / Hose Kit Supercharger Oil Cooler Kit Intercooler / Charge Pipe / Bypass Valve Supercharger Run-In / Final Checks Warranty Information TOOLS REQUIRED Metric Wrench Set Paint Pen Wire Cutters Metric Socket Set Masking Tape Hose Cutters Metric Allen Socket Set 3" Hole Saw RTV Silicone Metric Allen Wrench Set Screw Driver Set Torque Wrench 3/16" Drill Bit Tin Snips Adjustable Crescent Wrench Plier Set Razor Blade Blue Threadlocker Impact Gun Cordless Drill Grease Small Funnel Dremel Tool NOTE: UPGRADED CLUTCH COMPONENTS REQUIRED PRIOR TO INSTALL Specifications will vary due to Tire Size, Elevation, 2dr/4dr, Environment (sand, dirt, mud, etc.) 2 of 33
3 INTRODUCTION RZR SUPERCHARGER KIT GENERAL The Kraftwerks Polaris RZR 1000 Supercharger Kit was designed for easy installation. Competent mechanics with the appropriate tools will find the process to be relatively simple. This is a GENERAL installation guide; each installation, components and test vehicle may vary slightly. Some pictures may show assembly on engine stand for clarity. PLEASE BE AWARE THAT SOME PARTS MAY COME PRE-ASSEMBLED BUT ARE NOT TORQUED DOWN - Review ENTIRE installation before beginning install. If you have any questions about your ability to perform the installation, take your vehicle to a qualified performance shop for installation (Please ask your dealer or Kraftwerks representative for installers within your area). - Disconnect BOTH Battery Terminals before install. - Remove Gas Cap to relieve fuel tank vapor pressure. - A minimal amount of work underneath the vehicle may be required. If you do not have access to a lift, then a Floor Jack and Jack Stands may be required. NEVER WORK UNDER A VEHICLE WITHOUT APPROPRIATE JACK STANDS. - Always wear Safety Glasses when working on your vehicle. DISCLAIMER - WARNING: Engine Rev Limiter must be set below 8500 RPM. Any higher RPM will OVER-SPIN the Rotrex Supercharger headunit which WILL void its warranty. - Kraftwerks Supercharger Kits do not require break-in or warm-up periods. However, always warm your engine up properly before operating at full boost. - If an engine Oil and Filter change has not been performed recently, do so now using high quality, Synthetic oil. - A minimum of 91 OCTANE, premium-grade fuel must be used ROTREX COMPONENTS DISCLAIMER - Only use genuine Rotrex SX150 Traction Oil for supercharger lubrication. The proprietary traction formula protects the supercharger where other oils would fail, and is what allows its high-rpm operating levels. Use of Non-Genuine Rotrex SX150 Traction Oil WILL void the warranty of the Rotrex Supercharger. - Important: Keep all Pipes and Hoses sealed and clean until installation. The Rotrex Supercharger operates at speeds as high as 100,000 RPM on the RZR ANY debris that inadvertently enters the inlet pipes or becomes stuck to the silicone hoses can enter the Rotrex Supercharger and will damage its compressor blades. Compressor blade damage is NOT covered by the Rotrex Two-Year warranty. - NEVER rotate the Rotrex Supercharger counter-clockwise. 3 of 33

4 SUPERCHARGER BRACKET ASSEMBLY 4 of 33

5 CHARGE PIPE / INTERCOOLER LAYOUT 5 of 33


6 PRE-ASSEMBLY / REMOVAL RZR SUPERCHARGER KIT 1. Jack up vehicle and place on Jack Stands or use a lift (as pictured). Make sure that the rear suspension is not under load and that the suspension is hanging freely. 2. Disconnect Battery 3. Remove the Passenger Side Rear Tire. 4. Unbolt the Rear Passenger Shock/Spring Assembly from the bottom and swing it up out of the way and properly secure it with a strap (pictured). Remove Front Bumper. (Note: Diagram courtesy of Polaris) 6 of 33
 Remove Clutch Assembly Cover and Vent Tube.")
7 Remove OEM Intake Manifold Assembly and Piping (The shorter tube will be re-used later). (Note: Diagram courtesy of Polaris) Remove Clutch Assembly Cover and Vent Tube. (Note: Diagram courtesy of Polaris) How Driver Side Engine should look after removal of OEM Air Intake Assembly and Clutch Cover Assembly. 7 of 33


 under the")
8 Cut off a 6x6 section of the engine heat shield located above the engine. How the Heat Shield should look after modification. Place some foil and oil pan (or other type of oil drainage catch) under the engine. Remove the Engine Cover as shown. 8 of 33


9 Use a Razor Blade and scrape off ANY excess gasket that may remains to ensure that there are no leaks later in the build process. Locate the Main Crankshaft Bolt. Use an Impact Gun and 19mm Impact Socket to remove Crankshaft Bolt. Locate Crank Drill Pin Assembly. 9 of 33


10 Attach the Crank Pin Drill Assembly by using an Adjustable Wrench and ensuring it is snug (Do not overtighten or threads will strip out). How Crank Pin Drill Assembly should look at this point (Note: Orientation may vary but the most important thing is that the Crank Pin Assembly is snug tight) Using a 3/16" Drill Bit, mark off with masking tape or paint pen 31mm from the tip of the drill bit. 10 of 33


11 CAREFULLY drill Crank 5mm in depth (Note: This is a very important step so be careful to hold Drill Flat and Steady and Do NOT drill too deep). Once both holes have been drilled, clean them out thoroughly and then place Dowel Pins in as shown. END SECTION 11 of 33


12 SUPERCHARGER DRIVE ASSEMBLY / HOSE KIT RZR SUPERCHARGER KIT Locate the Supercharger Drive Assembly Kit as shown. Locate the Main S/C Drive Assembly with the mounted Rotrex Head Unit. Remove OEM Stater Assembly and install onto Main S/C Bracket Assembly. Install OEM Wire Harness Bracket and Rubber Bushing. 12 of 33


13 How the Main S/C Bracket Assembly should look at this point in the installation. Locate the Hose Kit and remove the QTY 2 Long Silicone Hose Assemblies, Silicone Coupler, Breather and Aluminum Ring. Locate the QTY 2 Long Silicone Hoses with Angled ends. Cutting from the STRAIGHT end, cut off 24" of one hose and then 10" off the other. 13 of 33


14 Attach the hoses from the prior step to the Brass Fittings attached to the S/C Main Bracket Assembly. The short hose attaches to the bottom fitting and the long hose attached to the top fitting. SHORT LONG Use included Clamps to secure. Install the supplied Gasket by DABBING some RTV Silicone to help seat the gasket for easier installation. Install Main S/C Bracket Assembly. Torque M6 bolts to 8 ft/lbs. 14 of 33


.")
15 Locate Crankshaft Pulley Assembly and New Crankshaft Bolt and Crush Washer. Oil Hub Section. Use Red Threadlocker on Bolt. Torque new Crankshaft Bolt to 95 ft/lbs (Do NOT use an impact gun). Locate S/C Drive Belt. 15 of 33

.")
16 Belt Routing Guide. Remove the Tensioner Pulley Assembly. Place belt on both S/C Pulley and Crank Pulley (Make sure the belt is seated on the grooves CLOSEST to the Mounting Plate). Re-Install Tensioner Pulley Assembly (This will take some force to push the belt down). Torque bolt down to ft/lbs Locate the S/C Belt Cover Plate, Gasket, and QTY 13 M6 x 1.0 x 10mm Allen Bolts. 16 of 33

.")

17 Install S/C Belt Cover Plate with Gasket using the M6x10 Allen Bolts (Recommend DABBING RTV Silicone to help seat the gasket properly and for ease of installation). Re-Install Crank Trigger Sensor. Locate the Silicone Coupler and Breather Assemblies from the Hose Kit. 17 of 33


18 Place the Small Breather Assembly in the small factory hole as shown. Route the LOWER Fitting Hose to the Coupler Fitting and route the UPPER Fitting Hose to the Breather. Secure all hoses with included Worm Gear Clamps. END SECTION 18 of 33


19 OIL COOLER ASSEMBLY RZR SUPERCHARGER KIT Locate the Oil Cooler Kit as shown. Rotrex Oil Line Overview You will need to cut the included Oil lines to the specified lengths: 125"- 2dr 150"- 4dr 2 Door- QTY 2, 125" Lines 4 Door- QTY 2, 150" Lines 125"- 2dr 150"- 4dr 20" 4" At this point the Front Bumper should have already been removed from the first section. Attach Oil Cooler to Radiator using the included Nylon Rod Kit. Cut QTY 2 120" Lengths and attach them to both fittings of the Oil Cooler as shown. Secure ends with included Spring Clamps. 19 of 33


20 Run Oil Cooler Lines parallel to the radiator lines and attach them with the included Zip Ties as shown. Locate the Front Bumper and find the center point. Mark off an 8" section in the middle as shown and then mark an extra 1" section from those marks. 8" Use a Dremel Tool to cut off the marked sections as shown. This is required to clear the Oil Cooler Fittings. 20 of 33


21 Locate Rotrex Oil Reservoir Assembly with attached Oil Filter as shown (Note: Bracket may differ from current version). Remove Center Console and Remove Driver Side Seat Belt Bolt closest to the Middle. Bolt the Rotrex Oil Reservoir Assembly to the Seat Belt Bolt with RED Threadlocker. 21 of 33


22 Attach Oil Lines. The Oil Line that goes to the TOP Fitting leads to the Oil Cooler. The Oil Line that goes to the BOTTOM Fitting that has the attached Oil Filter leads to the OIL IN Fitting of the Rotrex S/C (The fitting closest to the firewall). The remaining OIL OUT Fitting leads to the remaining Oil Cooler Fitting. END SECTION 22 of 33


23 INTERCOOLER / CHARGE PIPE / BYPASS VALVE RZR SUPERCHARGER KIT Locate Intercooler Kit as shown. Based on the Roll Cage of your RZR, mount the Intercooler Bracket to the Intercooler as shown. O E M C A G E A F T E R M A R K E T OEM CAGE MOUNT If you have an OEM Roll Cage, mount the Intercooler Assembly to the Roll Cage as shown using the included C-Bracket (Note: the picture shows Pre-production pieces). 23 of 33

 were used to mount the")

24 AFTERMARKET CAGE MOUNT If you have an Aftermarket Cage the mounting point may vary. In this picture Spacers (NOT included) were used to mount the Intercooler Assembly. Locate Charge Pipe Kit. Locate the Passenger Side Intercooler Charge Pipe Assembly. 24 of 33


25 Using a 3" HOLE SAW, cut a hole for the Charge Pipe Assembly. Be sure to double Charge Pipe location BEFORE cutting hole. Mount Passenger Side Intercooler Charge Pipe Assembly. Locate the Driver Side Intercooler Charge Pipe Assembly. As on the Passenger Side, use a 3" HOLE SAW and cut a hole. Be sure to double check the Charge Pipe location BEFORE cutting hole. Install Driver Side Intercooler Charge Pipe Assembly. 25 of 33


26 How the Intercooler Assembly and Charge Pipes should look like up to this point. Locate the Rotrex S/C OUTLET Charge Pipe Assembly. Install the S/C Outlet Charge Pipe by attaching one end to the Rotrex S/C Outlet and the other end to the Passenger Side Intercooler Charge Pipe Assembly. 26 of 33


27 Locate the Intake Manifold Assembly. Attach included Support Bracket to the Assembly as shown (Do not tighten down until later). Install the Custom Intake Manifold to the OEM Throttle Bodies and secure to the Engine Mount as shown. Attach the Secondary MAP Sensor to the Custom Intake Manifold. 27 of 33


28 Locate the S/C Intake Charge Pipe Assembly as shown. Attach one end with transition section to the Rotrex S/C Inlet. Attach the other end of to the Factory Air Box Outlet as shown. 28 of 33


29 Locate the Intake Manifold Inlet Charge Pipe Assembly. Attach one end to the Intake Manifold Assembly and the other end to the Driver Side Intercooler Charge Pipe Assembly. Locate the Blow Off Valve Assembly and attach the long 1"ID x 20" Length Heater Hose as shown. 29 of 33


30 Attach the short end of the Blow-Off Valve Assembly to the Intake Manifold Charge Pipe Assembly. Attach the longer end of the Blow-Off Valve Assembly to the Rotrex S/C Intake Charge Pipe Assembly as shown. Locate the Vacuum Assembly. 30 of 33


31 Install Vacuum Assembly where the PRIMARY MAP Sensor is as shown. Attach the other end of the Vacuum Hose to the top of the Bypass Valve Assembly and secure using an included Zip Tie. END SECTION 31 of 33


32 START-UP (RUN-IN) / FINAL CHECK RZR SUPERCHARGER KIT Use a small Funnel and carefully fill the Rotrex Oil Reservoir with Rotrex SX 150 Traction Fluid up to about 2/3 Full. Start up Engine and let IDLE. Periodically rev engine to no more than 3,000 RPM. Monitor the Traction Fluid and pour in more as needed until the Traction Fluid has cycled through the system (About 5min). DO NOT ALLOW RESERVOIR TO GO DRY OR ELSE THE ROTREX UNIT WILL OVERHEAT AND FAIL. Check Fluid level on the Dipstick and make sure it is to the MAX level but DO NOT overfill. END SECTION 32 of 33
33 LIMITED WARRANTY RZR SUPERCHARGER KIT Kraftwerks USA offers a 12 MONTH limited warranty against defects in materials, components, and workmanship unless specified otherwise. The warranty period starts on the ORIGINAL date of retail purchase directly from Kraftwerks or from your local dealer (Warranty of the Rotrex Supercharger Head Unit is 3 years from date of manufacture). This limited warranty is only offered to the ORIGINAL OWNER (receipt will be required for verification). Furthermore, the warranty excludes any electronic components manufactured by other companies. IF THE KRAFTWERKS SUPERCHARGER KIT IS ALTERED FROM THE FACTORY SETTINGS, THE WARRANTY MAY BE VOID. This includes but is not limited to the following: - Over spinning of the Rotrex supercharger head unit - Use of non-approved or custom hubs/pulleys - Alteration of brackets, pulleys, and other drive components - Modification or re-routing of any charge piping or intake system that is included in the "FULL" Kits Kraftwerks will honor a warranty claim at its sole discretion after the component in question is inspected at the Kraftwerks facility and/or the Rotrex A/S facility located in Denmark. NO WARRANTY CLAIM WILL BE ACCEPTED IF THE COMPONENT IS FOUND TO HAVE BEEN TAMPERED, MISINSTALLED, MISUSED, OR MISHANDLED (I.E. DROPPED) IN ANY WAY. Furthermore, disassembly of the Rotrex Supercharger Head Unit voids ALL warranty claims. No Kraftwerks dealer is authorized to make any warranty claims, repair, or modification. Any claims for freight / shipping damages will need to be directed towards the freight / shipping company. - If the component in question is covered under the Kraftwerks USA limited warranty, the product will be repaired or replaced at the discretion of Kraftwerks USA. - If the component in question is not covered by the Kraftwerks USA limited warranty, our Kraftwerks staff will advise you on the specific reason, the cost of replacement / repair, and estimated time it will take. TO PROCEED WITH A WARRANTY CLAIM YOU MUST DO THE FOLLOWING: - Contact Kraftwerks USA directly at (951) A Kraftwerks USA team member will direct you to send the following to support@kraftwerksusa.com: 1. Copy of original receipt or invoice (PayPal verifications alone are not accepted) 2. Pictures and description of issue (Limit 1-2 Pictures per or Compress Images) 3. Contact information- Name, address, and contact number 4. Vehicle description- Year, make, model, and any additional/supporting modifications - Once all of the above have been received and the warranty claim has been INITIALLY approved by a Kraftwerks team member (The component still needs to be inspected), you will be contacted with a Return Merchandise Authorization (RMA) number. - Once an RMA number has been given, you will then be directed to package the component(s) in question, write the RMA number in BOLD on the outside of the box, and then a call tag will be issued to pick up the package from your location. - Once the package arrives at the Kraftwerks facility, the Kraftwerks team members and engineers will determine if the component is covered under the limited warranty. OTHER NOTES: Kraftwerks USA is located in California. Please be aware that warranty claims will be shipping GROUND (Faster shipping available at added cost) so please allow enough lead time for us to inspect the component(s). Please package components securely as any damage to components due to improper packaging will NOT be covered by the limited warranty. Also, if a Rotrex supercharger head unit is being warrantied, the lead time will be longer due to the fact that only Rotrex A/S located in Denmark can approve or deny claims of the superchargers themselves (If this is the case and time is limited, we do offer CORE CHARGE options. Please contact a KraftwerksUSA representative for more information). KRAFTWERKS USA is also NOT liable for the following: - Voiding of Factory Warranty and/or components 33 of 33
Always wear safety glasses when working on your vehicle.
 90-93 MAZDA MIATA SUPERCHARGER KIT The KraftWerks 90-93 Mazda Miata Supercharger Kit was designed for easy installation. Competent mechanics with the appropriate tools will find the process to be relatively
Slingshot Rotrex Supercharger Kit
 Slingshot Rotrex Supercharger Kit This supercharger kit improves on the Slingshot by forcing more dense air into the engine and creating more power. Installation time of the supercharger depends on you
Weistec M113K Supercharger System Installation Guide
 Weistec M113K Supercharger System Installation Guide WARNING! DO NOT HAVE YOUR ECU REPROGRAMMED ANYWHERE BUT AT WEISTEC FOR THIS SUPERCHARGER. THE AMG 55 USES AN ELECTRONIC THROTTLE CONTROL (ETC), WHICH
JBR MAZDASPEED
 Page1 james Barone Racing Aftermarket Parts and Accessories JBR 2007 2009 MAZDASPEED 3 Front Mount Intercooler Piping Kit Installation Instructions for TR8 Intercooler Tooling: o Jack, Jack Stands, Ramps
IAG Competition Series Air / Oil Separator (AOS) For WRX
 For WRX") P IAG Competition Series Air / Oil Separator (AOS) For 2015-16 WRX Part# IAG-ENG-7252 Tools Required: Ratchet, torque wrench, extensions, needle nose pliers, hose cutter, snips/scissors, flat head screw
P IAG Competition Series Air / Oil Separator (AOS) For 2015-16 WRX Part# IAG-ENG-7252 Tools Required: Ratchet, torque wrench, extensions, needle nose pliers, hose cutter, snips/scissors, flat head screw
IAG Street Series Air / Oil Separator (AOS) For WRX
 For WRX") P IAG Street Series Air / Oil Separator (AOS) For 2015-16 WRX Part# IAG-ENG-7152 Tools Required: Ratchet, torque wrench, extensions, needle nose pliers, hose cutter, snips/scissors, flat head screw driver,
P IAG Street Series Air / Oil Separator (AOS) For 2015-16 WRX Part# IAG-ENG-7152 Tools Required: Ratchet, torque wrench, extensions, needle nose pliers, hose cutter, snips/scissors, flat head screw driver,
IAG Air / Oil Separator (AOS) For STi
 For STi") IAG Air / Oil Separator (AOS) For 2008-14 STi Part# IAG-ENG-7000 Tools Required: Ratchet, torque wrench, extensions, needle nose pliers, hose cutter, snips/scissors Sockets: 10mm, 12mm 13mm Wrenches: 10mm,
IAG Air / Oil Separator (AOS) For 2008-14 STi Part# IAG-ENG-7000 Tools Required: Ratchet, torque wrench, extensions, needle nose pliers, hose cutter, snips/scissors Sockets: 10mm, 12mm 13mm Wrenches: 10mm,
Procharger Stage II Intercooled Supercharger System (11-14 GT)
") Procharger Stage II Intercooled Supercharger System (11-14 GT) Installation Time: Approximately one day. Installed on 2012 Mustang GT 5.0/Manual Required Tools 3/8 Socket Set (Standard and Metric) 1/2
Procharger Stage II Intercooled Supercharger System (11-14 GT) Installation Time: Approximately one day. Installed on 2012 Mustang GT 5.0/Manual Required Tools 3/8 Socket Set (Standard and Metric) 1/2
IAG Street Series Air / Oil Separator (AOS) For 2017 WRX
 For 2017 WRX") P IAG Street Series Air / Oil Separator (AOS) For 2017 WRX Part# IAG-ENG-7152 Tools Required: Ratchet, torque wrench, extensions, needle nose pliers, hose cutter, snips/scissors, flathead screwdriver,
P IAG Street Series Air / Oil Separator (AOS) For 2017 WRX Part# IAG-ENG-7152 Tools Required: Ratchet, torque wrench, extensions, needle nose pliers, hose cutter, snips/scissors, flathead screwdriver,
Edelbrock E-Force RPM Carburetor Supercharger Chevrolet LS Engines
 Carburetors and air cleaner sold separately. Edelbrock E-Force RPM Carburetor Supercharger Chevrolet LS Engines Rectangular Port Heads: 1511, 15111, 15113 Cathedral Port Heads: 1512, 15121, 15123 Page
INSTALLATION INSTRUCTIONS
 INSTALLATION INSTRUCTIONS Part# 22-7810 Jeep JK/JKU ARB Mounting Kit 2007-2018.5 For the most up to date instructions please visit www.updownair.com www.updownair.com 833 226 4863 IMPORTANT INFORMATION
05-08 GT. Hellion Power Systems Mustang Kit Instructions
 Hellion Power Systems 05-08 Mustang Kit Instructions 1. Disconnect Battery 2. Drain Radiator, keep fluid for re-installation. 3. Remove air box and inlethoses. 6. Next, underneath, punch oil pan for turbo
INSTALLATION INSTRUCTIONS
 INSTALLATION INSTRUCTIONS Part# 22-7810 Add On Kit for Your ADS System Contents: Complete Install Kit for Your ARB CKMTA12V Compressor For the most up-to-date instructions please visit www.updownair.com
INSTALL MANUAL D o d g e 1 2 v 6 B T A PLEASE READ ALL INSTRUCTIONS BEFORE INSTALLATION.
 PN#1045310 12V Dodge Twin Turbo Kit (I-00273) 1 INSTALL MANUAL BD Twin Turbo Kit 1994-1 9 9 8 D o d g e 1 2 v 6 B T A Part# 1045310 PLEASE READ ALL INSTRUCTIONS BEFORE INSTALLATION. * Picture as shown
Chevy Sonic 1.4L Intake Manifold
 Chevy Sonic 1.4L Intake Manifold Install Time: 3 hours In the Box: (1) Racer X Intake manifold (6) M8x1.25 bolts (4) M6x1 bolts (2) 1/8 NPT plugs (1) 3/8 NPT plug (1) 1/4 NPT 90 degree barb (4) Small O-rings
SMALL BLOCK CHEVROLET SUPERCHARGER SYSTEM
 Installation Instructions for: SMALL BLOCK CHEVROLET SUPERCHARGER SYSTEM Step-by-step instructions for installing the best in supercharger systems. * PREMIUM FUEL REQUIRED * 89-89-57-008-TF Rev B Magnuson
03-04 Mach 1. Hellion Power Systems Mach 1 Kit Instructions
 Hellion Power Systems 03-04 Mach 1 Kit Instructions Part 1 Hellion recommends that the front suspension system be installed either by trained professionals or by 5.Remove rack bolts K-Member Installation
3 October 2016 PN# V Dodge Twin Turbo Kit (I-00274) ½ D o d g e 2 4 v I S B
 ½ D o d g e 2 4 v I S B") 3 October 2016 PN#1045320 24V Dodge Twin Turbo Kit (I-00274) 1 DOWNLOAD ENHANCED INSTALL MANUALS AT dieselperformance.com BD Twin Turbo Kit 1998½- 2 0 0 2 D o d g e 2 4 v I S B Part# 1045320 PLEASE READ
3 October 2016 PN#1045320 24V Dodge Twin Turbo Kit (I-00274) 1 DOWNLOAD ENHANCED INSTALL MANUALS AT dieselperformance.com BD Twin Turbo Kit 1998½- 2 0 0 2 D o d g e 2 4 v I S B Part# 1045320 PLEASE READ
Instant Chat off the main page of Or simply call our tech team at
 FRONT MOUNT INTERCOOLER 2008-13 STI 2014-04- 08 Thank you for purchasing this PERRIN product for your car! Installation of this product should only be performed by persons experienced with installation
BBK Intake Manifold Kit ( L) - Installation Instructions
 - Installation Instructions") BBK Intake Manifold Kit (86-93 5.0L) - Installation Instructions The below installation instructions work for the following products: BBK Intake Manifold Kit (86-93 5.0L) Please read through the instructions
BBK Intake Manifold Kit (86-93 5.0L) - Installation Instructions The below installation instructions work for the following products: BBK Intake Manifold Kit (86-93 5.0L) Please read through the instructions
Thank you for purchasing the Dezod Motorsports Return Fuel System for your Scion tc.
 Thank you for purchasing the Dezod Motorsports Return Fuel System for your Scion tc. We took much pride in putting together a fuel system that would deliver a maximum amount of fuel as simply as possible
Shotgun Double Barrel HPFP install guide
 Shotgun Double Barrel HPFP install guide Thank you for your purchase of the VTT Shotgun Double Barrel HPFP upgrade! First thing to do when you open your box is to make sure all parts are in their respective
99-04 GT. Hellion Power Systems Mustang GT Kit Instructions
 Hellion Power Systems 99-04 Mustang GT Kit Instructions Part 1 Hellion recommends that the front suspension system be installed either by trained professionals or by 5.Remove rack bolts K-Member Installation
Ford 6.7 EGR Delete Kit
 Fits: 2011 12 Powerstroke 6.7L Read instructions thoroughly before proceeding! ***This kit may void factory warranty please check with manufacturer.*** ***This kit is intended for off road use only.***
Installation manual BMW E TS1/TS2
 Installation manual BMW E46 330 TS1/TS2 Technical support Europe: +4741558555 Technical support USA: (858)314-2954 Email support: support@esstuning Installation manual BMW E46 330 TS1/TS2 Remove and send
L Intake Manifold Part #
 86-93 5.0L Intake Manifold Part #5001-5002 I N S T A L L A T I O N I N S T R U C T I O N S Supplied Materials Bottom cover, Upper manifold, Lower manifold, Plenum cover plate, 1501 Throttle body (comes
Edelbrock E-Force RPM Carburetor Supercharger C.I.D. Small-Block Chevy
 Edelbrock E-Force RPM Carburetor Supercharger 302-400 C.I.D. Small-Block Chevy 1986 and Earlier Style Heads: 1513, 1514, 15131, 15133, 15141, 15143 E-Tec and Vortec Style Heads: 1515, 1516, 15151, 15153,
INSTALLATION INSTRUCTIONS
 INSTALLATION INSTRUCTIONS Part# 69-0717 AIR IT UP 4 Tire On Board Installed Air Delivery System with Rear Mounted Controller (Requires External Air Source) For the most up-to-date instructions please visit
Shotgun Single Barrel HPFP install guide
 Shotgun Single Barrel HPFP install guide Thank you for your purchase of the VTT Shotgun Single Barrel HPFP upgrade! First thing to do when you open your box is to make sure all parts are in their respective
2015+ SUBARU STI FRONT-MOUNT INTERCOOLER PARTS LIST AND INSTALLATION GUIDE INSTALL DIFFICULTY DISCLAIMER CAUTION INSTALL PROCEDURE TOOLS NEEDED
 PARTS LIST AND PARTS INCLUDED 1PC ALUMINUM INTAKE PIPE 1PC BAR-AND-PLATE INTERCOOLER 1PC STEEL CRASH BAR W/ MOUNTING HARDWARE 2PC HOT-SIDE INTERCOOLER PIPES 2PC COLD-SIDE INTERCOOLER PIPES 1PC BPV FLANGE
MAZDASPEED3 Intercooler Instructions
 MAZDASPEED3 Intercooler Instructions Congratulations on your purchase of the COBB Tuning Front Mount Intercooler System for your 2007-2009 Mazdaspeed3. The following instructions should assist you through
Installation Instructions for: TOYOTA 3.4L SUPERCHARGER SYSTEM
 Installation Instructions for: TOYOTA 3.4L SUPERCHARGER SYSTEM 1996-2002 4Runner 1997-1998 T100 1997-2004 Tacoma 2000-2003 Tundra * PREMIUM FUEL REQUIRED * Magnuson Products LLC 1990 Knoll Drive, Bldg
2006 Honda Civic SI Supercharger Kit Installation Instruction Kit #
 2006 Honda Civic SI Supercharger Kit Installation Instruction Kit #350-091 3239 MONIER CIRCLE, STE.5 RANCHO CORDOVA, CA 95742 916.635.4550 FAX 916.635.4632 www.ct-engineering.com INS-157 VERSION: 3.25.2009
96-04 tt. Hellion Power Systems Mustang Twin Turbo Kit Instructions
 96-04 tt Hellion Power Systems 1996-2004 Mustang Twin Turbo Kit Instructions 1. Disconnect battery and elevate front end of car on either Jack stands or a lift if available 2.Lock steering wheel and remove
IAG Street Series Air / Oil Separator (AOS) For WRX & WRX STI
 For WRX & WRX STI") IAG Street Series Air / Oil Separator (AOS) For 2006-07 WRX & 2004-07 WRX STI Part# IAG-ENG-7150 Tools Required: Ratchet, torque wrench, extensions, needle nose pliers, hose cutter, snips/scissors, flat
IAG Street Series Air / Oil Separator (AOS) For 2006-07 WRX & 2004-07 WRX STI Part# IAG-ENG-7150 Tools Required: Ratchet, torque wrench, extensions, needle nose pliers, hose cutter, snips/scissors, flat
IAG Street Series Air / Oil Separator (AOS) For WRX & WRX STI
 For WRX & WRX STI") IAG Street Series Air / Oil Separator (AOS) For 2006-07 WRX & 2004-07 WRX STI Part# IAG-ENG-7100 Tools Required: Ratchet, torque wrench, extensions, needle nose pliers, hose cutter, snips/scissors, flat
IAG Street Series Air / Oil Separator (AOS) For 2006-07 WRX & 2004-07 WRX STI Part# IAG-ENG-7100 Tools Required: Ratchet, torque wrench, extensions, needle nose pliers, hose cutter, snips/scissors, flat
GEN-3 Super-duty Supercharger Shaft Kit PART# - RY17040-UK-6S5-3
 GEN-3 Super-duty Supercharger Shaft Kit PART# - RY17040-UK-6S5-3 We strongly recommend the use of a service manual to familiarize yourself with the various components and procedures involved with this
Tools Required. Metric Wrench Set Screwdriver Set Metric Socket Set Pliers Heavy duty hydraulic Jack and Car Stands Box knife or similar Hacksaw WD40
 Subaru 2004+ Legacy GT & Outback XT For JDM 2.0 twinscroll turbo and USDM 2.5 turbo models Front Mount Intercooler Fitting Instructions PN# LEG-1348-000 You are now the proud owner of a highly tested and
INSTALLATION INSTRUCTIONS AOS-R (Air Oil Separator-Return) Turbo Subaru and STi Document# Support:
 Turbo Subaru and STi Document# Support:") INSTALLATION INSTRUCTIONS AOS-R (Air Oil Separator-Return) 02-14 Turbo Subaru and 2015+ STi Document# 19-0102 Support: info@radiumauto.com These instructions are based on a vehicle with an OEM turbocharger
INSTALLATION INSTRUCTIONS AOS-R (Air Oil Separator-Return) 02-14 Turbo Subaru and 2015+ STi Document# 19-0102 Support: info@radiumauto.com These instructions are based on a vehicle with an OEM turbocharger
V1 Truck Manifold Turbo Kit for F-body
 V1 Truck Manifold Turbo Kit for 98-02 F-body Prep: -Remove all A/C Components, Alternator and brackets, tensioner, front bumper, front bumper foam, and front bumper support. Remove radiator and cooling
INSTALLATION INSTRUCTIONS DUAL OIL CATCH CAN KIT
 INSTALLATION INSTRUCTIONS DUAL OIL CATCH CAN KIT SUBARU WRX FA20F ENGINE Document: 19-0135 Support: info@radiumauto.com This dual catch can kit installs in the right-hand side of the engine bay and intercepts
IAG Street Series Air / Oil Separator (AOS) For WRX & WRX STI
 For WRX & WRX STI") IAG Street Series Air / Oil Separator (AOS) For 2006-07 WRX & 2004-07 WRX STI Part# IAG-ENG-7150 Tools Required: Ratchet, torque wrench, extensions, needle nose pliers, hose cutter, snips/scissors, flat
IAG Street Series Air / Oil Separator (AOS) For 2006-07 WRX & 2004-07 WRX STI Part# IAG-ENG-7150 Tools Required: Ratchet, torque wrench, extensions, needle nose pliers, hose cutter, snips/scissors, flat
INSTALLATION INSTRUCTIONS AOS-R (Air Oil Separator-Return) Turbo Subaru and STi
 Turbo Subaru and STi") INSTALLATION INSTRUCTIONS AOS-R (Air Oil Separator-Return) 02-14 Turbo Subaru and 2015+ STi These instructions are based on a vehicle with an OEM turbocharger and top-mount intercooler. If a front-mount
INSTALLATION INSTRUCTIONS AOS-R (Air Oil Separator-Return) 02-14 Turbo Subaru and 2015+ STi These instructions are based on a vehicle with an OEM turbocharger and top-mount intercooler. If a front-mount
SL63 Weistec M156 Supercharger System Installation Guide Stage 1 / Stage 2
 SL63 Weistec M156 Supercharger System Installation Guide Stage 1 / Stage 2 WARNING! DO NOT HAVE YOUR ECU REPROGRAMMED ANYWHERE BUT AT WEISTEC FOR THIS SUPERCHARGER. THE AMG 63 USES AN ELECTRONIC THROTTLE
Parts List See cover Page
 Thank you for purchasing the CorkSport Front Mount Intercooler Kit for the 2010-2013 Mazdaspeed 3. Keep your BAT s under check with the CorkSport FMIC Kit with the small or large intercooler. Please let
The M7 Direct Flow Intercooler (DFIC) Installation Guide
 Installation Guide") The M7 Direct Flow Intercooler (DFIC) Installation Guide This information is meant only as a guide. The author of this information,, or any M7 Tuning employees assumes no liabilities for any outcomes resulting
The M7 Direct Flow Intercooler (DFIC) Installation Guide This information is meant only as a guide. The author of this information,, or any M7 Tuning employees assumes no liabilities for any outcomes resulting
Jeep Wrangler TJ 4.0 LITER Installation instructions
 www.jeepair.com 2000-2001 Jeep Wrangler TJ 4.0 LITER Installation instructions Important information about your system, and warranty DO NOT ADD ANY OIL TO ANY PART OF THE SYSTEM. DO NOT USE THE SIGHT GLASS
Wrenches: ⅞, 8mm, 10mm, 13mm, 19mm P. allen, Other: Electrical Tape
 IAG Street Series Air / Oil Separator (AOS) For 2008-14 STI Part# IAG-ENG-7100 Tools Required: Ratchet, torque wrench, extensions, needle nose pliers, hose cutter, snips/scissors, flat head screw driver,
4. Remove (4) 10mm and (1) 7mm bolt that holds fascia at front corners, on each side
 10mm and (1) 7mm bolt that holds fascia at front corners, on each side") 2010 Camaro LS3 1. Disconnect battery ground 2. Remove front wheels 3. Remove (5) push pins and (5) #20 torx screws on inner front wheel well liners and remove liners on each side 4. Remove (4) 10mm and
2010 Camaro LS3 1. Disconnect battery ground 2. Remove front wheels 3. Remove (5) push pins and (5) #20 torx screws on inner front wheel well liners and remove liners on each side 4. Remove (4) 10mm and
8 Zip Tie Zip Tie 1 Union Fitting 1 ½ ½ Union Reducer Fitting Union 1 5/8 ½ (For Plastic Intake Manifold Vehicles)
") P IAG Street Series Air / Oil Separator (AOS) For 2017 STI Part# IAG-ENG-7151 Tools Required: Ratchet, torque wrench, extensions, needle nose pliers, hose cutter, snips/scissors, flat head screw driver,
P IAG Street Series Air / Oil Separator (AOS) For 2017 STI Part# IAG-ENG-7151 Tools Required: Ratchet, torque wrench, extensions, needle nose pliers, hose cutter, snips/scissors, flat head screw driver,
List of parts needed below. Tools needed
 1 BMW 645 Coolant leak repair (Cap with Seal Repair and Expanding Coolant Pipe Installation w Pics) By Michael R. Brown (Estimated time to complete the job is 6-8 hrs) List of parts needed below. BMW PART
Official Powerdyne Model BD Supercharger and Kit Limited Warranty
 Official Powerdyne Model BD Supercharger and Kit Limited Warranty Powerdyne Automotive Products Inc. warrants your new Powerdyne model BD Supercharger and installation kit to be free of defects in workmanship
Front Drive System - Big Block Ford Installation Instructions
 Front Drive System - Big Block Ford Installation Instructions Big Block Ford with AC & with PS All American Billet 23042 N 16th Lane Phoenix, AZ 85027 1-844-BILLET1 (844-245-5381) Items needed for install
INSTRUCTIONS E36 SUPERCHARGER WITH C38 BLOWER.
 INSTRUCTIONS 1996-1999 E36 SUPERCHARGER WITH C38 BLOWER. 1 Introduction Congratulations on your purchase of an Active Autowerke Supercharger, and welcome to the AA Tuning family. Your supercharger kit
IAG Competition Series Air / Oil Separator (AOS) For 2017 STI
 For 2017 STI") P IAG Competition Series Air / Oil Separator (AOS) For 2017 STI Part# IAG-ENG-7251 Tools Required: Ratchet, torque wrench, extensions, needle nose pliers, hose cutter, snips/scissors, flat head screw driver,
P IAG Competition Series Air / Oil Separator (AOS) For 2017 STI Part# IAG-ENG-7251 Tools Required: Ratchet, torque wrench, extensions, needle nose pliers, hose cutter, snips/scissors, flat head screw driver,
Part# JL AIR IT UP 4 Tire On Board Air Delivery System. (Requires External Air Source)
") Part# 18-1819 JL AIR IT UP 4 Tire On Board Air Delivery System (Requires External Air Source) The most up-to-date instructions always visit www.updownair.com www.updownair.com 833-226-4863 I M P O R T
Part# 18-1819 JL AIR IT UP 4 Tire On Board Air Delivery System (Requires External Air Source) The most up-to-date instructions always visit www.updownair.com www.updownair.com 833-226-4863 I M P O R T
ALL AMERICAN BILLET. Front Drive System - Small Block Ford Installation Instructions
 ALL AMERICAN BILLET Front Drive System - Small Block Ford Installation Instructions Small Block Ford with AC & PS All American Billet 23042 N 16th Lane Phoenix, AZ 85027 1-844-BILLET1 (844-245-5381) Items
SLP Camaro ZL1 STAGE 3 (650 HP)
") SLP - 2012 Camaro ZL1 STAGE 3 (650 HP) PART #26002 PACKING LIST Before installation, use this check list to make sure all necessary parts have been included. ITEM QTY CHECK PART NUMBER DESCRIPTION 1. 1
SLP - 2012 Camaro ZL1 STAGE 3 (650 HP) PART #26002 PACKING LIST Before installation, use this check list to make sure all necessary parts have been included. ITEM QTY CHECK PART NUMBER DESCRIPTION 1. 1
INSTALLATION INSTRUCTIONS
 INSTALLATION INSTRUCTIONS Part# 22-7810 Add On Kit for Your ADS System Contents: Complete Install Kit for Your ARB CKMTA12V Compressor For the most up-to-date instructions please visit www.updownair.com
03-04 Cobra. Hellion Power Systems Mustang Cobra Kit Instructions
 Hellion Power Systems 03-04 Mustang Cobra Kit Instructions NECESSARY PARTS REQUIRED FOR INSTALLATION Necessary: 03-04 Cobra hellion Kit ONLY 99-01 Alternator #YR3210346AA Alternator Bracket #XR3Z-10153-AB
Performance Inlet Manifold
 Performance Inlet Manifold Tools needed (some tools not required on some models): 13mm Combination Wrench Flat Blade Screwdriver T30 Torx Driver T25 Torx Driver 10mm Combination Wrench and/or Socket with
LChevrolet Camaro Supercharger Kit
 PART #92000A Important Notes: 2010-2013 6.2LChevrolet Camaro Supercharger Kit The use of fuel additives (ie. octane boosters) is not recommended. There is a possibility that these chemicals can damage
Page1. ISF Stainless Steel Headers // Part# HDR-004
 Congratulations on the purchase of your ISF Stainless Steel Headers and thank you for choosing Sikky Manufacturing. This installation manual is intended to guide you through the removal of the factory
INSTALLATION INSTRUCTIONS. PART NUMBER C (Gun Metal Gray Finish) 2016 HYUNDAI TUCSON 1.6 Turbo
 2016 HYUNDAI TUCSON 1.6 Turbo") INSTALLATION INSTRUCTIONS PART NUMBER 26-3002C (Gun Metal Gray Finish) 2016 HYUNDAI TUCSON 1.6 Turbo 1 ITEM NO. PART NUMBER DESCRIPTION QTY. 1 08483K HOSE CLAMP #28, BLACK ZINC PLATED 2 2 5-1070 COUPLER;1.75-2.50X3.25"
INSTALLATION INSTRUCTIONS PART NUMBER 26-3002C (Gun Metal Gray Finish) 2016 HYUNDAI TUCSON 1.6 Turbo 1 ITEM NO. PART NUMBER DESCRIPTION QTY. 1 08483K HOSE CLAMP #28, BLACK ZINC PLATED 2 2 5-1070 COUPLER;1.75-2.50X3.25"
 Special Tools Needed: DrVanos.com Stage I Installation Instructions Camshaft locking tool TDC Crank pin Sprocket turning tool Tool rental is available with the purchase of a vanos kit *See website for
INSTALLATION INSTRUCTIONS Part# , , ,
 INSTALLATION INSTRUCTIONS Part# 20-0218, 22-0318, 20-0118, 22-0219 20-0218 - 4 Tire On Board Air Delivery System and Dual Compressed Air System Includes ARB CKMTA12 Compressor 20-0118 - 2017 FORD RAPTOR
INSTALLATION INSTRUCTIONS AOS-R (Air Oil Separator-Return) Turbo Subaru and STi Document# Support:
 Turbo Subaru and STi Document# Support:") INSTALLATION INSTRUCTIONS AOS-R (Air Oil Separator-Return) 02-14 Turbo Subaru and 2015+ STi Document# 19-0102 Support: info@radiumauto.com These instructions are based on a vehicle with an OEM turbocharger
INSTALLATION INSTRUCTIONS AOS-R (Air Oil Separator-Return) 02-14 Turbo Subaru and 2015+ STi Document# 19-0102 Support: info@radiumauto.com These instructions are based on a vehicle with an OEM turbocharger
v Porsche 928
 1985-86 32v Porsche 928 Toll-Free Tech Hot Line: 877-FOR-928M 877-367-9286 Please do not copy this manual and give copies to your friends. Our ability to bring you this supercharger kit at this price relies
IAG Street Series Air / Oil Separator (AOS) For WRX
 For WRX") IAG Street Series Air / Oil Separator (AOS) For 2008-14 WRX Part# IAG-ENG-7100 Tools Required: Ratchet, extensions, needle nose pliers, hose cutter, snips/scissors, flat head screw driver, hose clamping
IAG Street Series Air / Oil Separator (AOS) For 2008-14 WRX Part# IAG-ENG-7100 Tools Required: Ratchet, extensions, needle nose pliers, hose cutter, snips/scissors, flat head screw driver, hose clamping
Instructions For Trick Flow Track Heat 4.6L 2V SOHC Ford Intake Manifold System TFS-518B0002, TFS , TFS
 MADE IN U.S.A. Instructions For Trick Flow Track Heat 4.6L 2V SOHC Ford Intake Manifold System TFS-518B0002, TFS-51800002, TFS-51811002 1999-2004 FORD MUSTANG GT INSTALLATION INSTRUCTIONS 1 LIMITED WARRANTY
Scion FR-S ZN6. GTX2867R Gen2 (Internal Wastegate) Installation Instructions GPP P/N #
 Installation Instructions GPP P/N #") TURBO KIT Scion FR-S ZN6 Subaru BRZ ZC6 GTX2867R Gen2 (Internal Wastegate) Installation Instructions GPP P/N # 11518000 Vehicle Type Chassis Code Engine Code Transmission Model Year Scion FR-S DBA-ZN6
TURBO KIT Scion FR-S ZN6 Subaru BRZ ZC6 GTX2867R Gen2 (Internal Wastegate) Installation Instructions GPP P/N # 11518000 Vehicle Type Chassis Code Engine Code Transmission Model Year Scion FR-S DBA-ZN6
Ford 6.0L Powerstoke Regulated Fuel Return
 Ford 6.0L Powerstoke Regulated Fuel Return ! WARNING REGARDING EMISSIONS LAWS Not legal for sale or use on pollution-controlled motor vehicles anywhere in the United States. Legal ONLY for off-road competition
INSTALLATION INSTRUCTIONS PART NUMBER:
 Equipped with AEM Dryflow Filter No Oil Required! INSTALLATION INSTRUCTIONS PART NUMBER: 21-450B (Blue Finish) 21-450C (Gun Metal Grey Finish) 21-450P (Vacuum Metalized Chrome-VMC) 21-450R (Red Finish)
INSTALLATION MANUAL BULLET PROOF OIL COOLER KIT F-SERIES
 INSTALLATION MANUAL BULLET PROOF OIL COOLER KIT 2003-2007 F-SERIES NEAL TECHNOLOGIES, INC. U.S. PATENT 8,375,917; 8,505,512 and OTHER PATENTS PENDING UPDATED 1/8/2018 2014 BULLET PROOF DIESEL BEFORE You
Equipped with AEM Dryflow Filter No Oil Required! INSTALLATION INSTRUCTIONS
 Equipped with AEM Dryflow Filter No Oil Required! INSTALLATION INSTRUCTIONS PART NUMBER: 21-8223DC (Gun Metal Grey Finish) 21-8223DP (Vacuum Metalized Chrome - VMC) 2008-2010 DODGE Challenger V8-6.1L C.A.R.B.
7 th Gen. Celica GTS Turbo Kit Installation Guide This kit has not been CARB approved and is intended for racing / offroad purposes only.
 7 th Gen. Celica GTS Turbo Kit Installation Guide This kit has not been CARB approved and is intended for racing / offroad purposes only. The purpose of this guide is to serve as a reference for use when
RUBICRAWLER - JEEP TJ & JK ( ) W/ UNIVERSAL SHIFTER KIT CONSISTS OF: No. Qty Part No. Description
 W/ UNIVERSAL SHIFTER KIT CONSISTS OF: No. Qty Part No. Description") KIT CONSISTS OF: No. Qty Part No. Description 1. 1 RUBICRAWLER - GEAR BOX 2. 1 42R-UNIV - UNIVERSAL SHIFTER KIT PAGE 1 OF 8 Page Rev. Date: 11-06-18 Optional Items: Part No. Description 15-1000 - UNI-RAISE,
KIT CONSISTS OF: No. Qty Part No. Description 1. 1 RUBICRAWLER - GEAR BOX 2. 1 42R-UNIV - UNIVERSAL SHIFTER KIT PAGE 1 OF 8 Page Rev. Date: 11-06-18 Optional Items: Part No. Description 15-1000 - UNI-RAISE,
CLK63 (Black Series) Weistec M156 Supercharger System Installation Guide Stage 3
 Weistec M156 Supercharger System Installation Guide Stage 3") CLK63 (Black Series) Weistec M156 Supercharger System Installation Guide Stage 3 WARNING! DO NOT HAVE YOUR ECU REPROGRAMMED ANYWHERE BUT AT WEISTEC FOR THIS SUPERCHARGER. THE AMG 63 USES AN ELECTRONIC
CLK63 (Black Series) Weistec M156 Supercharger System Installation Guide Stage 3 WARNING! DO NOT HAVE YOUR ECU REPROGRAMMED ANYWHERE BUT AT WEISTEC FOR THIS SUPERCHARGER. THE AMG 63 USES AN ELECTRONIC
INSTALLATION GUIDE HOLDEN COLORADO (RG) INTERCOOLER KIT P/N PWI66175K INTERCOOLER P/N PWA64553 ( ) PIPE KIT
 INTERCOOLER KIT P/N PWI66175K INTERCOOLER P/N PWA64553 ( ) PIPE KIT") INSTALLATION GUIDE HOLDEN COLORADO (RG) INTERCOOLER KIT P/N PWI66175K INTERCOOLER P/N PWA64553 (2012-13) PIPE KIT ENGINEERING THE UNFAIR ADVANTAGE Contents CONDITIONAL MANUFACTURERS WARRANTY... 2 Warranty
INSTALLATION GUIDE HOLDEN COLORADO (RG) INTERCOOLER KIT P/N PWI66175K INTERCOOLER P/N PWA64553 (2012-13) PIPE KIT ENGINEERING THE UNFAIR ADVANTAGE Contents CONDITIONAL MANUFACTURERS WARRANTY... 2 Warranty
INSTALLATION INSTRUCTIONS
 Equipped with AEM Dryflow Filter No Oil Required! INSTALLATION INSTRUCTIONS PART NUMBER: 21-703C (Gun Metal Grey Finish) 21-703P (Vacuum Metalized Chrome - VMC) 2011-2013 FORD Fiesta L4-1.6L C.A.R.B. E.O.
All cores due 30 days after invoice date - no credit after 60 days.
 NO WARRANTY STATEMENT High performance parts & products no warranty policy: The purchaser understands and recognizes that high performance diesel products and services sold by INDUSTRIAL INJECTION SERVICE.
2015 Corvette Supercharger System Instructions
 2015 Corvette Supercharger System Instructions These instructions are meant to serve as a guide to the installation of the ECS 2015 Corvette Supercharging system. Please be sure to use all safety equipment
SLS825 Weistec Supercharger System Installation Guide
 SLS825 Weistec Supercharger System Installation Guide 2010-Present SLS AMG (Gullwing and Roadster) 2014 SLS Black Series WARNING! DO NOT HAVE YOUR ECU REPROGRAMMED ANYWHERE BUT AT WEISTEC FOR THIS SUPERCHARGER.
INSTALLATION INSTRUCTIONS
 INSTALLATION INSTRUCTIONS Part# 22-2719 Complete Mounting System for Dual Viair Compressors For the most up-to-date instructions please visit www.updownair.com www.updownair.com 833-226-4863 I M P O R
WATER PUMP INSTALLATION INSTRUCTIONS WEIAND WATER PUMPS ACTION PLUS & TEAM G APPLICATIONS FOR SMALL BLOCK & BIG BLOCK CHEVROLETS
 WATER PUMP INSTALLATION INSTRUCTIONS WEIAND WATER PUMPS ACTION PLUS & TEAM G APPLICATIONS FOR SMALL BLOCK & BIG BLOCK CHEVROLETS APPLICATIONS: Weiand Action Plus aluminum water pumps are designed for street/performance
YOU WILL BLOW YOUR MOTOR UP IF YOU MOUNT A SUPERCHARGER TO THIS KIT AND DRIVE AWAY WITHOUT INTEGRATING A RELIABLE TUNING METHOD!!!!!!
 NOTICE This supercharger mounting kit is sold with NO supercharger head unit and is intended for use with Vortech supercharger head units exclusively. DO NOT attempt to adapt any other manufacturer s supercharger
2017+ L5P Duramax 3 ½ Down Pipe & EGR Fix Kit
 2017+ L5P Duramax 3 ½ Down Pipe & EGR Fix Kit Covers installation of PN s: WCF100630, WCF100829 Note: This Kit is for off road competition use only! Off Road Competition Use Tuning & Exhaust System is
Mazda 3 & Mazdaspeed 3 Oil Cooler Installation Instructions
 Page1 2007-2009 Mazda 3 & Mazdaspeed 3 Oil Cooler Installation Instructions Tooling: Jack and jack stands or a lift Socket wrench and torque wrench 10mm and 14mm sockets 3/16 Allen wrench 10mm wrench Pliers
LML 3 Y-Bridge Kit or High Flow Intake Bundle Package
 2011-2016 LML 3 Y-Bridge Kit or High Flow Intake Bundle Package Covers installation of PN s: WCF100607, WCF100691, WCF100716, & WCF100353 Note: This Kit is for off road competition use only! Overview-
Installation Instructions for P/N HD Water Injection Kit with 5 Gallon Tank
 Installation Instructions for P/N 30-3111 HD Water Injection Kit with 5 Gallon Tank 2001-2010 6.6L Duramax Diesel Chevrolet Silverado HD: GMC Sierra HD; Chevrolet Kodiak ; GMC Topkick Hummer H-1 Alpha;
AEROMOTIVE Part # Subaru Fuel Rails for Top Feed Injectors WRX & STI INSTALLATION INSTRUCTIONS
 AEROMOTIVE Part # 14135 Subaru Fuel Rails for Top Feed Injectors 02-14 WRX & 07-14 STI INSTALLATION INSTRUCTIONS CAUTION: Installation of this product requires detailed knowledge of automotive systems
Kit Part Number:
 Equipped with AEM DRYFLOW Filter No oil required! Kit Part Number: 21-8203 2003-2005 Dodge Ram 5.7L V8 CARB EO # D-392-28 2005 Dodge Powerwagon Hemi CARB EO # D-392-28 Brute Force Intake Systems that are
Steeda S197 Mustang Whipple Supercharger Drive
 Steeda S197 Mustang Whipple Supercharger Drive Parts List Qty. Description 1 Whipple supercharger snout 1 Whipple snout collar 1 10-rib supercharger pulley 1 10-rib crank pulley 1 10-rib belt tensioner
Installation Instructions for Lingenfelter GM 2500 Suburban & Yukon XL Auxiliary Fan System (with AC clutch controlled fan output)
") Installation Instructions for Lingenfelter 2007-2013 GM 2500 Suburban & Yukon XL Auxiliary Fan System (with AC clutch controlled fan output) PN L300080607 Revision - 1.1 Lingenfelter Performance Engineering
Installation Instructions for Lingenfelter 2007-2013 GM 2500 Suburban & Yukon XL Auxiliary Fan System (with AC clutch controlled fan output) PN L300080607 Revision - 1.1 Lingenfelter Performance Engineering
Included parts: 1 - BorgWarner SX-E Turbocharger 1 - SX-E 90-Degree Compressor Outlet Elbow 1 - HSM Cast Exhaust Manifold 1 - HSM Downpipe
 TROUBLESHOOTING: Please read and understand all installation instructions before proceeding with the installation. If you have questions during the installation of this product, please email H&S Motorsports
Tork Tech Inc. Customer Service , Sales
 Tork Tech Inc. Customer Service 971.226.9006, Sales 513.697.0060 Email: Info@TorkTech.com www.torktech.com * PREMIUM FUEL MANDATORY * Make sure vehicle has 91+ octane gas in it prior to beginning installation.
CLS63 Weistec M156 Supercharger System Installation Guide Stage 1 / Stage 2
 CLS63 Weistec M156 Supercharger System Installation Guide Stage 1 / Stage 2 WARNING! DO NOT HAVE YOUR ECU REPROGRAMMED ANYWHERE BUT AT WEISTEC FOR THIS SUPERCHARGER. THE AMG 63 USES AN ELECTRONIC THROTTLE
Z1 Motorsports 350Z / G35 Oil Cooler Kit Installation Manual
 Z1 Motorsports 2877 Carrollton Villa Rica Hwy Carrollton GA 30116 770.838.7777 Z1 Motorsports 350Z / G35 Oil Cooler Kit Installation Manual For 19, 25 and 34 Row Oil Cooler Kits Parts Included: 1 Aluminum
Instant Chat off the main page of Or simply call our tech team at
 FRONT MOUNT INTERCOOLER 2015+ WRX 2017-07-07 Thank you for purchasing this PERRIN product for your car! Installation of this product should only be performed by persons experienced with installation of
CHALLENGER TWIN TURBO SYSTEM INSTALLATION INSTRUCTIONS
 CHALLENGER TWIN TURBO SYSTEM INSTALLATION INSTRUCTIONS 1 Verify contents of kits with supplied packing list 1) Unhook the battery. 2) Remove wheel wells & front fascia of vehicle. 3) Remove the catalytic