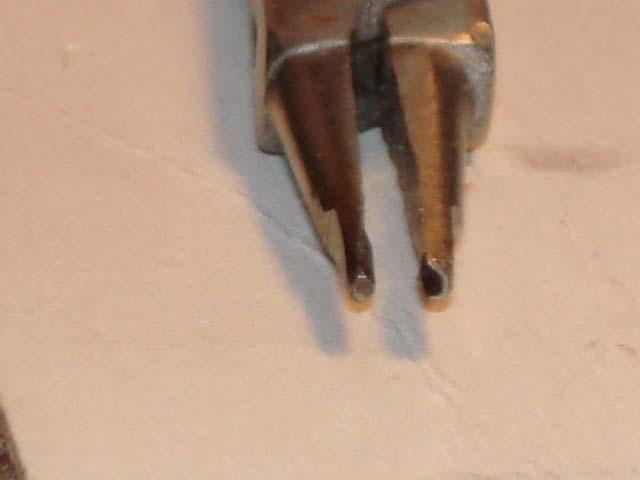
Here is a stock motor that has nasty fouling on the comm plate.
|
|
|
- Britton Hudson
- 6 years ago
- Views:
Transcription


1

2 When selecting a motor I look for one that has a flat comm plate. Doesn't do any good to have the face of the metal plates not making contact with the motor brushes. Even small waves can cause the motor brushes to bounce in their holders - no electricity transfer means no power. I chuck the motor up in my dremel (the chuck is available at Walmart for ~ $11 and it holds the motor perfectly centered by holding the shaft. Here is a stock motor that has nasty fouling on the comm plate. I then use a flexible very fine grit polishing wheel (I bought a gunsmithing polishing wheel kit with a wide variety of grits) that I hold in my hand and touch it against the shaft & comm face while it is spinning and also to remove the old crusty layering that has built up on the copper face of the comm plate. Clean as a whistle afterwards.


3 After the polishing is complete I can rotate the Dremel shaft by hand very slowly and I hold the motor at this angle so that I can look across the face of the comm plate and look for how flat it is. While you are rotating it you can see if it is flat or has rolling hills. Believe me you can't imagine how wobbly the comm plate can be. There are remedies to fix a comm plate that isn't flat but it doesn't always work.
 gear off the top plate and hold the wheel 90 degrees to the idler gear and remove some of those super tiny burrs on the teeth")
4 Since it's all about reducing friction in the drivetrain then this is a simple method. Take a dremel wire wheel and attack the teeth of the gears. Remove the top plate from the chassis first then take the center (idler) gear off the top plate and hold the wheel 90 degrees to the idler gear and remove some of those super tiny burrs on the teeth with the wheel. Make sure to wear eye protection as those wire brush pieces will fly off. They will embed in everything, soles of feet etc... If you can't or don't want to remove the other gears from the top plate then you can attack them with the wire wheel while they are still attached to the top plate. Make sure to put a little bit of oil on the shafts since they can spin up and you want that shaft lubed before doing so. The idea is to grind the teeth not get the gears spinning at 50 million rpm. Keep the gear rpms to a minimum if possible and work on the teeth. You will notice a difference in smoothness. This is the easy method. There is a messier method called lapping in the gears with paste or polishing compound. Works better though to lap them in but the wire wheel method works pretty darn good too.

5 So you think you've got a fast car? Could be lots of vibration that makes it sound fast when it really isn't. I used to use the old "ear dyno" but it lies to you big time. So the simplest solution is to make an inexpensive dyno. Radio Shack or ebay sells this voltmeter. I got a motor from a tape deck and glued it onto the voltmeter. Then I soldered the leads to the motor, put a hub and tire on the motor shaft...voila! Instant, portable dyno. Just make a power supply and solder alligator clips onto the wire ends. Then attach the clips to the pickup shoes of the chassis and then lower the rear wheel until it contacts and spins the dyno wheel. It will read a number on the volts - the higher that number then the faster the motor is spinning. You can use this dyno to help you find the fastest combo for your car. Swap between top plates, try different motor brushes in each cup, gently press up against the motor brushes on the underside and if the motor wants more spring pressure then it will respond with more rpms... Be VERY careful when adjusting the motor brush springs upward - you can ruin them easily by putting too much bend in them. You must remove the top plate and motor brushes to be able to properly adjust the pressure of the motor brush springs. Remember to match your power supply to what the power supply will be for the track that you are going to be running on since some motors run very well at 18 volts but terrible at 13.8 volts. One simple solution for an adjustable power source is an old train transformer that has the handle on it to allow you to increase/decrease the amount of power. Use your newly acquired voltmeter to set the DC power output of the train track transformer.

6 Air Gap Adjustment What is air-gapping? It's cutting/grinding down the outside dimension of the metal lams to make them all the same distance from the motor shaft. Sort or making the outside of the circle center around the motor shaft. Why do it? It allows the motor to be centered in the chassis and you can also shim the magnets closer to the motor for more power/torque. Sometimes a motor that isn't air-gapped will strike a motor magnet if the magnet is shimmed too close to the motor. You also get an equal attraction force from the metal lams towards the magnets. That smooths out the motor - sort of like when you rode your Huffy bike as a kid and each time you'd push downward on a pedal the bike would surge forward then slow down until you pushed downward on the other pedal. The motor behaves like this if the lams are differing distances from the motor shaft. I use a fine stone and hold it against the edge of the motor while it is spinning at a high rpm. Make sure you do this step before you balance your motor as you are removing metal.

7 The outside edge of the lam will look like so when finished. I try to hit 60-70% of the exposed edges - not all of it but nearly all of it. I don't want to remove too much metal. In this pic I pretty much hit 100% of this end - that means that one of the remaining two ends doesn't have much metal removed.

8 Balancing The Armature How to balance a motor? I like razor blades, long ones too. I bought some at Home Depot and then got a couple bolts, washers & nuts and sandwiched the razor blades in between the washers. Works well enough for me. I do the initial balancing on this device then move the motor over to a jeweler's balancing tool. It's got very fine/sharp edges to rest the motor shaft on to do very detailed balancing. Once the motor stops turning I use a Dremel diamond wheel to cut a slot into the metal lam and remove metal. Remember it is the side that ends up on the bottom that you want to grind away at. Remember it's a diamond wheel - it will buzz clean through the metal lam in a hurry so go slow and don't take off too much. You'll also cut into the wires and ruin your motor if you get careless. (BTDT).


9 Here are some slots that I cut into the lams to remove weight.

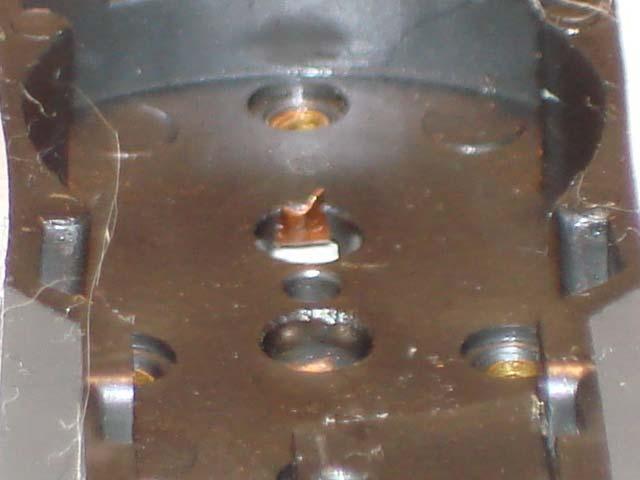
10 Another method of balancing is to add lead weight. You can cut slivers of lead off fishing weights to add to the motor. Remember, if you use this technique that you will have to add the lead weight to the TOP of the motor when it stops on the razor blades. You can see a square of lead on the right side of the motor that I added on the top of the comm plate and to the inside of the end of the lam. I use super glue to attach it to the comm plate. About Plates Not all top plates are created equal... Look at these two pics and you can see the difference in the idler gear posts. One is rounded at the top and a tiny bit more narrow, the other has sides that go straight up and is a bit wider. If you've used the wire wheel trick to grind at the teeth of the top plate gears but your car still sounds loud & raspy then you might have some sloppy gear lash. Hold the motor pinion and keep it from moving then use your other free hand to move the rear gear on the top plate back and forth and watch what happens to your middle (idler) gear. If you've got the round top center post I bet you've got some sloppy movement of the center gear when you go back and forth with the outside gears.

11 If you've got the top plate that has the straight sides going upward then you are in luck since you've got one that doesn't have lash problems.


12 Solution??? A fellow named Rick Terry at RT-HO.com has built a tool that will expand your anemic round top post outward and therefore eliminate the slop in your drivetrain. Notice that his tool drives a metal point into the plastic idler post and therefore expands it. Make sure your idler gear is ON the post when you are smashing the post otherwise you could mash it too much and bind your idler gear.

13 Brush Adjustments So how do you adjust the motor brush springs for more upward pressure. Here's a stock chassis with no adjustments. Notice one side is lower than the other. They don't necessarily have to be even - I just adjust upward the one that responds to higher rpms when I push against it while the car is running on a power supply. Remember this next race has a track that is set at 13.8 volts. Test your car at that voltage if possible. Notice the tiny screwdriver pushing upward from the bottom of the chassis. Be careful to not push too much at first - start small and see what happens.


14 Here it is after adjustment. Here are some that have been adjusted for LOTS of pressure. Of course you can adjust them too much and totally dork them up ruining the chassis.


15 Ruined motor brush spring: Something that can rob horsepower is the motor brushes spinning in the brush cups. The JL brush on the left already has a notch in the bottom of it. What do you do with a stock

16 replacement brush? The Wizzard brush on the right has a notch carved into it with an Xacto blade. Be careful when doing so as you can slice through the motor brush with too much downward pressure. Another method is to make a tool from a pair of needle nose pliers that has a U shaped end. You can then grab the motor brush spring and squeeze it to make the end of the brush spring a U shape. The points on the ends dig into the motor brush and keep it from rotating. This can be a dangerous exercise as I've ruined more brushes than helped. If the rules stated "motor brushes cannot be altered in any manner" then this is a good method from keeping the motor brush from spinning in the brush cup while the motor is running. (Bunny hairs on the chassis are no charge).
17


18 Trued Parts How round or out of round are your parts? Things spinning perfectly around an axle work better than items that are out of round. Both of these are stock crown gears - I'd prefer the one on the left. Is the hole in your idler gear centered? I marked the idler gear then made measurements with a micrometer.


19 Here are pics of the 4 different sides being measured.

20

21 Efficient Electrical System Since an automobile engine is basically an air pump and how fast or efficiently you move the air through it determines how fast you go then it stands to reason that a t-jet is an electric pump. You need to make sure that the electrical connections are optimum and that the electricity flows unrestricted through to the motor. How many electrical connections are on a t-jet chassis? 1. Pickup shoe to track rail 2. Pickup shoe to hanger plate 3. Hanger plate to bottom hanger plate (notice the rivet that holds them together?) 4. Hanger plate brush spring to motor brush 5. motor brush to motor comm plate Your job is to make sure there is little or no arcing across those connections. How to do it? I dunno - I've been trying to figure out all those connections ever since I've been racing these things. Notice the pickup shoe on the right is properly adjusted since the whole shoe is contacting the track rail. Now notice the left rail needs some adjusting as the rear portion isn't in contact with the track rail. Speed is being lost because of this improper adjustment. I made a tool from a tiny screwdriver and using a steady hand and the Dremel diamond wheel I cut a slot into it.

 and look from the sides to see if the pickup shoe pad is resting flat on the track")
22 Notice where you grab the pickup shoe to adjust the angle - twist the shoe to bend it ever so slightly then run it again and see what the results are. This takes time so be patient. You can also set the car on a piece of test track (small piece you cut of of some old track) and look from the sides to see if the pickup shoe pad is resting flat on the track rail.


23 Truing The Wheels What about your hubs - if you are using stock hubs I can probably guarantee that they will be out of round. Here is an AFX hub on an axle inserted into the Dremel. I hold it very steady and slowly take little bits of the wheel down by grinding it against the metal file. I stopped to show that the hub was in fact out of round as you can see the paint missing on one half as I'm truing up the hub.


24 Other Tips Ok last of the tips - I've got to save a couple of them for myself. I'm probably taking this a little far but if reduction of friction is the overall goal then what about these tips. I bevel the bottom edge of the top clip so that if the idler gear bounces up while the motor is running then the teeth don't run into a sharp edge but rather a beveled edge that doesn't cause as much friction on the gear. What about the comm plates - I take an Xacto blade and draw it across the leading edge of the comm plate that first comes in contact with the motor brush. If the brush has a nice ramp to ride up onto and not a sharp edge then it will most likely make a smooth transition to the next copper plate. Otherwise I'd imagine that it would bounce the brush when it hits the leading edge if it isn't beveled resulting in less time that the electrical connection is being made.

 towards the other one to remove some of that excessive gap.")
25 Make sure to clean the crud out from between the comm plates - after all the dust that comes off the motor brushes conducts so if enough of that dust got in between the comm plates theory would seem that it could short between the copper comm plates. You might notice the fact that there is some mounting slop on the rear shaft when it comes where the gear is located. Notice there is a gap between between the 9 tooth gear and the bottom side of the top plate. I'd drive one of the two gears (top gear or the 9 tooth gear) towards the other one to remove some of that excessive gap. Be careful and don't drive it too far and bind up the gear against the top plate. Lastly - remove the motor magnets and motor brushes. Re-assemble the t-jet without those two components and then spin the rear tires to see how smooth your drivetrain is. It should spin freely - try this in both directions. If not then you've got some work to still do.


26 Where to get the tools to work on t-jets? ( I remember back in the day that a screwdriver, needle nose pliers and a tiny hammer were all that we had.) I use a lot of stuff from Rick Terry. There are many other tool makers as well - the race sponsors carry lots of their stuff too. Other Tips from PSYCHOSLOT members As Jet talks about above. Here is a way to get a closer look at how your pick up shoes ride. Tweak them to run as flat as possible. Jet demonstrates a great tool he made above in his post. Old piece of Aurora track. Let's chop this mother up! Take a Dremel with a cut off tool and cut along the rail. Use a round grinding stone on your dremel to smooth things up after your rough cut with the cut off wheel. Here is what my test track looks like after completing.


27 A view from below. You can see the front of the shoe is up a little From the side -SKR


28 Attaching Weight How are racers attaching extra weight to the chassis for the Super Stock race? Super Glue does not seem to be doing the trick. Any chance we could modify the Super Stock rules to allow the weight to be attached to the underside of the body as long as it is not visible? -waltgpierce I've found this to work better at least here on our track. This will drop the frond end.018 putting more pressure on the pick up shoes. 5.32" I.D. (9/32" O.D.) by 1/16" width O-Rings. I found theses at Lowes for 59 cents. More Tips RRR stock front tires..384" To help mount the orings I rolled the orings from the ball tip side up onto the pen body. After the orings are both in place I butted the pen body up to the wheels tight and rolled each one over to the front wheels.


29 Picture from the bottom side of the chassis. Side view, new orings mounted are.366" and they touch and roll on the track. I've also had better e/t's by taking the front tires you just took off and placed them on the rear. -SKR Sam I use O Rings on front wheels all the time, here's a tip, go to Lowes or Home Depot and in the plumbing dept look for #5, O Rings on a plastic case I think I paid a buck something for 10 pcs, cheaper than getting the individual ones at the Hardware store. They also fit the AFX size front ends to. -kdogs Here are the things that we've done to our cars along with Jet's tune up tips if anyone is interested. Kim and I are running silver motor brushes that can be found through Jags here on this page Don't forget to add brush tension as Jet describes in the tuning guide. BSRT pick up shoes #504 which can be found through Lucky Bob's here I found these pick up shoes to work best on our cars. And we added lead weight to the front of the cars. I'll take pictures of the weight when I get the cars back.
30 If your running RRR wheels and tires. Try the same size orings I mentioned above on the front. Also as mentioned we took the front RRR tires off the front and put them on the rear. The cars seemed to run better this way and will get your car up to speed quicker, which should help on the 1/8th mile.
The Magazine For Slot Car Enthusiasts
 The Magazine For Slot Car Enthusiasts Building the Tomy Super G+ By Milt Surratt Tomy Super G+ slot cars have been around in the current form for about 12 years. Out of the package, the Tomy HO slot car
M1A1 Thompson Upgrade
 M1A1 Thompson Upgrade If you are mechanically inclined at all. This should be no problem. I'll start off with a list of things you will need. Thompson M1A1 Whisky Cigarettes Tools: Flat screwdriver No.
Connecting the rear fog light on the A4 Jetta, while keeping the 5 Light Mod
 Connecting the rear fog light on the A4 Jetta, while keeping the 5 Light Mod DISCLAIMER: I'm human and make mistakes. If you spot one in this how to, tell me and I'll fix it This was done on my 99.5 Jetta.
*Some speedometers have these additional electronic connections. If yours does, then remove the smaller slotted screws shown.
 www.odometergears.com 1981-1985 240 Cable-Driven Speedometers (NOT for 1986 and later electronic units) http://www.davebarton.com/240-odometer-repair.html For this set of instructions below, I will not
Rear Wheel Removal (by BassCliff)
") Rear Wheel Removal (by BassCliff) Hello to my GS riding friends! After picking up a nail in my rear tire (while on the freeway at 75mph!) I thought I would take a few pictures to help illustrate the rear
Rear Wheel Removal (by BassCliff) Hello to my GS riding friends! After picking up a nail in my rear tire (while on the freeway at 75mph!) I thought I would take a few pictures to help illustrate the rear
Speedometer Repair & Lube Pt.1
 Speedometer Repair & Lube Pt.1 1. Begin disassembly on a clean area approximately 2' by 3' so you have plenty of room to layout parts as you disassemble them. I use a piece of white or light colored paper
How to Change Front Brake Pads on a Toyota Corolla
 How to Change Front Brake Pads on a Toyota Corolla Link to this article on (All other links in this document are disabled) Follow this picture guide to change the front brake pads on a 2003-2008 Toyota
How to Build with the Mindstorm Kit
 How to Build with the Mindstorm Kit There are many resources available Constructopedias Example Robots YouTube Etc. The best way to learn, is to do Remember rule #1: don't be afraid to fail New Rule: don't
Днепр) Russian Motorcycle Carburetors Part 2B: PZ-24 and PZ-28 Carburetor Assembly and Jet Drilling
 Russian Motorcycle Carburetors Part 2B: PZ-24 and PZ-28 Carburetor Assembly and Jet Drilling") Ural (Урал( Урал) - Dnepr (Днепр( Днепр) Russian Motorcycle Carburetors Part 2B: PZ-24 and PZ-28 Carburetor Assembly and Jet Drilling (applies also to K-37 K and K-38 K carbs) Ernie Franke eafranke@tampabay.rr.com
Ural (Урал( Урал) - Dnepr (Днепр( Днепр) Russian Motorcycle Carburetors Part 2B: PZ-24 and PZ-28 Carburetor Assembly and Jet Drilling (applies also to K-37 K and K-38 K carbs) Ernie Franke eafranke@tampabay.rr.com
Improving the casting performance on old Ambassadeurs for free!
 Improving the casting performance on old Ambassadeurs for free! Whenever I acquire a fishing reel I will always strip it down and give it a service-it doesn t matter if the reel is new or old. Sometimes
Adjusting Carbs For Re-Jetting (Procedure written for an Intruder 1500 LC) NEWLY UPDATED: APRIL 2003
 NEWLY UPDATED: APRIL 2003") SECTION ONE: Get Prepared - Tools Adjusting Carbs For Re-Jetting (Procedure written for an Intruder 1500 LC) NEWLY UPDATED: APRIL 2003 Courtesy of: Half-Crazy Get a manual impact driver (the kind you hit
SECTION ONE: Get Prepared - Tools Adjusting Carbs For Re-Jetting (Procedure written for an Intruder 1500 LC) NEWLY UPDATED: APRIL 2003 Courtesy of: Half-Crazy Get a manual impact driver (the kind you hit
76 Tips to Help You Build a Fast Pinewood Derby Car From
 76 Tips to Help You Build a Fast Pinewood Derby Car From www.abc-pinewood-derby.com Weights Weights should be added to the back of the car for the most speed so keep this in mind when designing your car's
VEHICLE TOWING SAFETY
 When you've got the correct gear, some practice and confidence, towing can be as easy as single-vehicle driving. Yet safety should always be your main concern when you're pulling a trailer. Because no
HOW TO MODIFY A STOCK DODGE KEGGER INTAKE MANIFOLD
 HOW TO MODIFY A STOCK DODGE KEGGER INTAKE MANIFOLD Even though this 3.9L V6 intake manifold is smaller than the 5.2L and 5.9L V8 intake manifolds, the same instructions apply to all 3 engines. If you are
4.2 Friction. Some causes of friction
 4.2 Friction Friction is a force that resists motion. Friction is found everywhere in our world. You feel the effects of when you swim, ride in a car, walk, and even when you sit in a chair. Friction can
U-Score U-Score AAC Rank AAC Rank Vocabulary Vocabulary
 go 1 927 you 2 7600 i 3 4443 more 4 2160 help 5 659 it 6 9386 want 7 586 in 8 19004 that 9 10184 like 10 1810 what 11 2560 make 12 1264 is 13 10257 on 14 6674 out 15 2350 do 16 2102 here 17 655 eat 18
$1.00 FOR THE TQIO/RCIO
 $1.00 FOR THE TQIO/RCIO m mm HDBBYSHOP Champion Jay Halsey has an impressive track record. One of Jay's advantages is a whisper smooth tranny thanks to his dad, Jim. Now you can build a Halsey transmission!
Here's the difference (externally) in the and 04+ bumper and headlights: (00-03 on top, 04 on bottom)
 in the and 04+ bumper and headlights: (00-03 on top, 04 on bottom)") OK guys, I've been meaning to post this for awhile.. well here it goes. I did the '04 front end conversion on my '01 about 4-5 months ago, but then the dealer had to buy the car back for legal reasons.
OK guys, I've been meaning to post this for awhile.. well here it goes. I did the '04 front end conversion on my '01 about 4-5 months ago, but then the dealer had to buy the car back for legal reasons.
Conversion of a Turnigy 9X to Hall effect sensors
 Conversion of a Turnigy 9X to Hall effect sensors Because English is not my mother language I kindly ask to be gracious. Unfortunately I had several times some problems with the low quality potentiometers
Bachmann GWR Earl (Dukedog) EM Finescale Conversion
 EM Finescale Conversion") Bachmann GWR Earl (Dukedog) EM Finescale Conversion Before you start, it is a good idea to have some small containers or snap top poly bags to put screws and components in for safe keeping...much better
Bachmann GWR Earl (Dukedog) EM Finescale Conversion Before you start, it is a good idea to have some small containers or snap top poly bags to put screws and components in for safe keeping...much better
Balancing the Wheels on a Bench Grinder, version 2
 Balancing the Wheels on a Bench Grinder, version 2 By R. G. Sparber Copyleft protects this document. 1 I recently replaced the wheels on my bench grinder and the vibration was horrible. With a lot of help
How I installed new brake pads on my i with Sport Package (should be fine for other E39 s) By Robert B.
 By Robert B.") How I installed new brake pads on my 1999 528i with Sport Package (should be fine for other E39 s) How I installed new brake pads on my 1999 528i with Sport Package (should be fine for other E39 s) By
How I installed new brake pads on my 1999 528i with Sport Package (should be fine for other E39 s) How I installed new brake pads on my 1999 528i with Sport Package (should be fine for other E39 s) By
PINEWOOD DERBY PACK 98. Official District Rules and Tips
 PINEWOOD DERBY PACK 98 Official District Rules and Tips Dear Parents, Welcome to the world of Pinewood Derby. Your scout and you should make the car together as a project! It is not the intent that the
Overhauling Shimano Dynamo Hubs
 1 of 8 09/27/2007 02:37 PM? About Us Components & Accessories Services Framesets and Bicycles Gallery Custom Wheelbuilding How to Order Commuting Racing Touring Fixed-Gear & Singlespeed Randonneuring Dynohubs
Gearbox Assembly 101. Introduction. Before Beginning. By Mark Schutzer 4/13/06
 Gearbox Assembly 101 By Mark Schutzer 4/13/06 Introduction If you are planning to re-motor an old brass locomotive you may want to upgrade to a new gearbox at the same time. The early 60 s and 70 s gearboxes
2007 Crown Victoria Police Interceptor (P71) Blend Door Actuator Replacement (If I did it, you can too.)
 Blend Door Actuator Replacement (If I did it, you can too.)") 2007 Crown Victoria Police Interceptor (P71) Blend Door Actuator Replacement (If I did it, you can too.) I'm not saying this is the only way, or even the right way, but it worked for me. First time I've
2007 Crown Victoria Police Interceptor (P71) Blend Door Actuator Replacement (If I did it, you can too.) I'm not saying this is the only way, or even the right way, but it worked for me. First time I've
As stated, these are solely based off of how I like to do the Pre-Trip. I give my personal opinions as well as some helpful tips.
 Here are our sections: Engine Compartment Drivers Door Fuel Area Coupling System Trailer (Please note in the type of suspension your trailer has) Light Check In-Cab Inspection and Brake Tests You will
 www.odometergears.com Mercedes-Benz Mechanical Odometer Repair This how to can be used for all mechanical repairs as the only difference will be the removal of the instrument cluster. http://www.dieselgiant.com/repairyourodometer.htm
CALDERA 10E Spur Gear Change
 CALDERA 10E Spur Gear Change www.thirdcoastrc.com ebay handle - little*oak Click Below to Visit our Ebay Store EBAY STORE (Please take a moment and bookmark my website, ebay store, and save me as an ebay
what you need to do is hit the taper housing as hard as you can with your hammers AT THE SAME TIME and at a slight angle, what will happen is you
 first things first, get the car on axle stands and the wheels off. Open the bonnet to let more light through to the area in which you'll be working. The following guide shows the passenger side being done
2008 Toyota Tundra 4WD Brake Job: A Quick Job and Even Quicker Write-Up.
 FRONT BRAKES: 2008 Toyota Tundra 4WD Brake Job: A Quick Job and Even Quicker Write-Up. 1. Remove this bolt holding brake line bracket to the suspension. 2. I had to replace all 4 rotors at 60K miles, so
Another CJ picture guide to replacing the key cylinder in a non-tilt steering column
 Another CJ picture guide to replacing the key cylinder in a non-tilt steering column by John Strenk Well I'm sure it's happened to all of us one time or another. You park your jeep and go to turn off your
Another CJ picture guide to
 Another CJ picture guide to replacing the key cylinder in a non-tilt steering column by John Strenk Well I'm sure it's happened to all of us one time or another. You park your jeep and go to turn off your
The kit includes everything seen here, and there are only a few upgrades or mods available.
 The kit includes everything seen here, and there are only a few upgrades or mods available. Complete Kit $1,445.00 1 pair trailing arms LH/RH, with poly lined Monster balls. Pinion angle corrected 1 pair
Some tips and tricks I learned from getting clutch out of vehicle Skoda Octavia year 2000
 Some tips and tricks I learned from getting clutch out of vehicle Skoda Octavia year 2000 Last change 2013-Oct-11 I bought Haynes manual for a starter. That s something well worth it s cost I believe.
Bruce s Science workbench
 Baby Vandegraff Generator by Bruce Yeany 2001 https://www.youtube.com/watch?v=parq01q DKe4 http://www.instructables.com/id/van-de- Graaff-Electrostatic-High-Voltage- Generator/ https://www.youtube.com/watch?v=esz
[0. Title] Biased Weight Alignment Procedure for Bent Axle Alignment by Stan Pope, 4 August 2013
![[0. Title] Biased Weight Alignment Procedure for Bent Axle Alignment by Stan Pope, 4 August 2013](/thumbs/87/96968278.jpg "[0. Title] Biased Weight Alignment Procedure for Bent Axle Alignment by Stan Pope, 4 August 2013") [0. Title] Biased Weight Alignment Procedure for Bent Axle Alignment by Stan Pope, 4 August 2013 [1] Hello, pinewood derby racers! I'm Stan Pope. For a lot of years, I've been helping youngsters and their
[0. Title] Biased Weight Alignment Procedure for Bent Axle Alignment by Stan Pope, 4 August 2013 [1] Hello, pinewood derby racers! I'm Stan Pope. For a lot of years, I've been helping youngsters and their
Changing the Struts on a WK Jeep CRD
 Changing the Struts on a WK Jeep CRD Step by Step By Chirpz Disclaimer: I do not claim that this procedure is the right way or even the best way to change your struts. This is what I did after reading
HOW T O TO B UILD BUILD A F AST F PINEWOOD DERBY C AR CAR Scotten W. Jones
 HOW TO BUILD A FAST PINEWOOD DERBY CAR Scotten W. Jones I have to do what! Turn this Into this Start with the official BSA pinewood derby car kit Finish with a fast pinewood derby car Warning/disclaimer
Door Panel Removal & Window Stop Adjustment
 Door Panel Removal & Window Stop Adjustment By: Jeff Wolford Disclaimer: This is simply an article of how I fixed my car. I m not responsible if you break, scratch, or mess up anything following my example.
J&M Mustang Adjustable Panhard Rod (05-09) - Installation Instructions
 - Installation Instructions") J&M Mustang Adjustable Panhard Rod (05-09) - Installation Instructions The below installation instructions work for the following products: J&M Mustang Adjustable Panhard Rod (05-09) Please read through
J&M Mustang Adjustable Panhard Rod (05-09) - Installation Instructions The below installation instructions work for the following products: J&M Mustang Adjustable Panhard Rod (05-09) Please read through
by Paul Shoemaker Pancake History 1963-Present Tuning the Pancake Part 1 Published: November 13, 2008
 1 of 20 12/19/2009 9:58 PM Tuning the Pancake Part 1 Published: November 13, 2008 by Paul Shoemaker The pancake motor design has been with us since Aurora Plastics released it in their Model Motoring line
An Actual Driving Lesson. Learning to drive a manual car
 An Actual Driving Lesson Learning to drive a manual car Where are the controls that I might have to use in my driving: Knowing where the controls are, and being able to locate and use them without looking
Sunroof Repair. Sunroof Repair TSB. The sunroof repair kit available for the J30 is part number Y20. See images at bottom of document.
 Sunroof Repair This document is the text/images from the TSB (technical service bulletin) issued by Infiniti concerning the repair procedure for sunroof issues. Be advised that this is a LARGE, TIME-CONSUMING
4TH GEN SEATS IN A 3RD GEN TRUCK
 4TH GEN SEATS IN A 3RD GEN TRUCK by Flopster843 02 Oct 2016 If you drive a 3rd generation Dodge Ram truck, I am sure you have discovered that the OEM seats are not the greatest (Figure 1.) They are extremely
Roehrig Engineering, Inc.
 Roehrig Engineering, Inc. Home Contact Us Roehrig News New Products Products Software Downloads Technical Info Forums What Is a Shock Dynamometer? by Paul Haney, Sept. 9, 2004 Racers are beginning to realize
The Holly Buddy. 2.5cc Model Diesel - Compression Ignition engine.
 The Holly Buddy 2.5cc Model Diesel - Compression Ignition engine. Firstly I want to dedicate this engine to David Owen. I didn t know David for very long, but his influence on me and my affection for these
Installing Rear Brake Pads on a WK Jeep
 Installing Rear Brake Pads on a WK Jeep Step by Step By Chirpz Disclaimer: I do not claim that this procedure is the right way or even the best way to change your rear brake pads. This is what I did after
At Mark's suggestion I thought I'd write this up so future Coupe lovers can have as much fun* as I did with this job.
 At Mark's suggestion I thought I'd write this up so future Coupe lovers can have as much fun* as I did with this job. My enormous thanks to forum members, particularly glorfindel, for their advice when
There was some debate whether or not there was a write up, with Pictures, for replacing the ignition switch.
 Replacing the Ignition Switch - Step by Step with Pictures. http://forums.audiworld.com/showthread.php?p=18927576 (Corey 02ALMSTT) (With updates/corrections by Dave F.) February 1, 2013 (I = Corey, mostly)
This Document is property of Old New England Marine
 A lot of you folks out there seem to be tearing into carbs quite a bit. Before you choose to open up a carb, you really need to look at what's feeding the carb first, and that is the boats fuel system.
BMW Throttle Body Reconditioning. Reconditioning BMW 750il throttle assemblies./
 Reconditioning BMW 750il throttle assemblies./ My 1990 BMW 750il was not idling well, and I was starting to get "EML" errors on startup. The "EML" light would stay on when I started the car, and the engine
Aamir_bt The legend..
 Aamir_bt The legend.. How to do timing on a 4XE1-W (DOHC) engine. well i decided to to a write up for DOHC timing since there was only the SOHC written up, and i had to do a timing belt on my stylus anyways,
Team Associated RC10B4 Tuning Guide
 Team Associated RC10B4 Tuning Guide This document is a compilation of released pages from Associated Electric made for PetitRC, all credits must go to Associated Electric. Complete Tuning Guide: B4 Front
HOW TO REPLACE THE SPOILER ON YOUR GEN 3 PRIUS
 HOW TO REPLACE THE SPOILER ON YOUR GEN 3 PRIUS Yup, it happened. The spoiler on your beloved Prius has departed this earth and now is in the great junkyard in the sky. This is how you make it all better
There is hence three things you can do - add oil, adjust the temp that the clutch begins to engage, or do both.
 As most of you may be aware, I have been doing a lot of research lately on our cooling system in the 80's including the fact that we have a dead spot on the OEM temp gauge which prompted me to not rely
DAYTON SLOT CAR CLUB G3 GTP/INDY RULES
 DAYTON SLOT CAR CLUB G3 GTP/INDY RULES Page 1 Fall 2010 NOTE: The following rules are designed to keep racing in our club competitive and affordable. If it does not say you can do it, don t assume you
Mustang Radiator Conversion DIY. By GearHeadPeter. January 27, 2011
 1964-1966 Mustang Radiator Conversion DIY By GearHeadPeter January 27, 2011 We all know that the radiators in our cars are not the best, especially if you have done any customization to the engine, which
Contents. Preparing the motor Winding the rotating secondary Winding the primary... 8
 120732-130389 Propeller Clock Construction Notes Revision E, December 2, 2013 Contents Preparing the motor... 2 Winding the rotating secondary... 5 Winding the primary... 8 UltiProp Clock (Elektor Dec.
ROPE DANCER INSTRUCTION MANUAL:
 Educational Design Robot ROPE DANCER INSTRUCTION MANUAL: Model WTR-RD1 2010 AREXX - THE NETHERLANDS CONTENT 1. Product information Rope Dancer 3 2. General assembly information 4 2.1 Parts list Rope Dancer
List of tools: Jack Two Jack Stands Conventional Socket Set Liquid Collection pan Rear axle lubricant and friction modifier Rags for wiping up spills
 List of tools: Jack Two Jack Stands Conventional Socket Set Liquid Collection pan Rear axle lubricant and friction modifier Rags for wiping up spills 1. Jack car up Loosen wheel lugs first. Don t take
Corvette Set Separator (Glove Box) Lock Removal
 Lock Removal") 1956-62 Corvette Set Separator (Glove Box) Lock Removal The materials here were gathered from several Corvette Forum Threads as well as from the Web Pages of Rich Mozzetta (rich5962 on the CF). Our colleagues
1956-62 Corvette Set Separator (Glove Box) Lock Removal The materials here were gathered from several Corvette Forum Threads as well as from the Web Pages of Rich Mozzetta (rich5962 on the CF). Our colleagues
Installing AMP-wiring in a New Beetle
 Installing AMP-wiring in a New Beetle Vehicle used: New Beetle 2.0i Type 9C (1999) Used set of cables: Dietz 35mm² power cable, double shielded Dietz chinch cable ( 35mm² Professional Line ) First of all:
1 of 2 9/4/ :27 AM
 Ford Mustang IAC IAB - Solving your idle problems http://www.muscularmustangs.com/iac.php 1 of 2 9/4/2010 10:27 AM Solving idle problems part 1 - Cleaning your IAC Does your idle rise and fall over and
Pinewood Derby Building Basics
 Pinewood Derby Building Basics January 2016 edition (v1.1) Pack 242 - Phoenix, AZ Pinewood Derby Boys learn to take a plain block of wood, nails, and wheels... and turn it into an excellent racing machine
4mm scale 009 gauge Lodge Hill & Upnor railway Chattenden Drewry loco body kit.
 RT Models 4mm scale 009 gauge Lodge Hill & Upnor railway Chattenden Drewry loco body kit. HISTORY The loco was supplied by the Drewry car co. to the Lodge Hill & Upnor Railway in 1949, works number 2263.
Setup Guide and Chassis Tuning Tips (simple version) By Jim Daniels
 By Jim Daniels") This document is released into the public domain and may be reproduced and distributed in its entirety so long as all credit to Jim Daniels remains. If you find this guide helpful please consider donating
This document is released into the public domain and may be reproduced and distributed in its entirety so long as all credit to Jim Daniels remains. If you find this guide helpful please consider donating
1986 Rear Disk Brake Upgrade. All hard lines mounted to the rear axle with mounting screws. 1/4" fittings
 1986 Rear Disk Brake Upgrade Being well prepared for a project of this size is the key to success. I thought I was well prepared by doing a lot of research and getting all of the required parts before
Scratchbuilding an F25 Well Flat Car
 Scratchbuilding an F25 Well Flat Car By David J. Vinci (Flat Figure 1) Well flats are a pretty rare car type generally, but the Pennsy seems to have had the lion s share of variety. Most of these cars
G.A.S. M54 DISA Repair Kit D.I.Y. Instructions
 Home BMW Solutions Porsche Solutions DIY Tech Engine Services Dyno Services Machining About G.A.S. Contact G.A.S. M54 DISA Repair Kit D.I.Y. Instructions The installation of the German Auto Solutions DISA
Car. 1/4 Lane guide Track 1-5/8. Figure 1. Car and lane guides.
 1.0 Introduction Building a fast Pinewood Derby car My son s first year in scouting we set about building a Pinewood Derby car with no previous experince. We found a dizzying amount of information on the
Timing belt change. Timing belt change
 Timing belt change Put 2 new Gates T275 timing belts on today. Tensioner drilled smooth and tight with less than 16,000 miles on her decided not to change the tensioners just the belts. You'll need some
Troubleshooting Guide for Limoss Systems
 Troubleshooting Guide for Limoss Systems NOTE: Limoss is a manufacturer and importer of linear actuators (motors) hand controls, power supplies, and cables for motion furniture. They are quickly becoming
Troubleshooting Guide for Okin Systems
 Troubleshooting Guide for Okin Systems More lift chair manufacturers use the Okin electronics system than any other system today, mainly because they re quiet running and usually very dependable. There
STEP #1: Remove the wheels from the truck. There are (6) 21mm lug nuts holding each wheel on... Remember Lefty Loosy, Righty Tighty.
 21mm lug nuts holding each wheel on... Remember Lefty Loosy, Righty Tighty.") - CustomTacos.com Page 1 of 36 How-To: Toytec Lift Install Read all of these install instructions prior to installing Toytec's suspension lift. I cannot be held responsible for any damages or personal
- CustomTacos.com Page 1 of 36 How-To: Toytec Lift Install Read all of these install instructions prior to installing Toytec's suspension lift. I cannot be held responsible for any damages or personal
============================================================================
 Coleman 5.4V Flashcell Cordless Screwdriver - ultracapacitor Posted by opi - 2009/09/14 10:54 I've wanted to play with some ultracapacitors but the cost has been a little much for my small budget. However,
Plumbing Part VI - Blowdown Valve Nelson Riedel Initial: 9/28/03 Last Revised: 04/24/2006
 Page 1 of 8 Plumbing Part VI - Blowdown Valve Nelson Riedel Nelson@NelsonsLocomotive.com Initial: 9/28/03 Last Revised: 0 When I started to think about the blowdown I realized that I'd never seen the actual
Bag 1. Bag 1. Center Pivot. Center Pivot
 8 00734 01901 5 Center Pivot Bag 1 3374 - Center Pivot Socket 4019 - Alum Pivot ball 3254-2-56 Button Head *Note - Sometimes it is helpful to slightly over-tighten the top clamp screws, then work the ball
RZR 900 spring/shock installation
 RZR 900 spring/shock installation Thank you for purchasing the Shock Therapy Dual Rate Spring Kit for your RZR 900. Your item list: 2 Front upper coil springs, 2 Front lower coil springs, 2 Rear upper
ESPA3D Photo Essay One page ESPA3D Plans are HERE Back to Spad Plans Index
 1 of 8 8/29/2012 12:28 PM ESPA3D Photo Essay One page ESPA3D Plans are HERE Back to Spad Plans Index This little airplane has turned out to be one of the most fun Spad projects we've ever done! It is built
Stirling Engine. What to Learn: A Stirling engine shows us how energy is converted and used to do work for us. Materials
 Stirling Engine Overview: The Stirling heat engine is very different from the engine in your car. When Robert Stirling invented the first Stirling engine in 1816, he thought it would be much more efficient
Prusa i3 Printer Assembly Guide
 Prusa i3 Printer Assembly Guide Special thanks to Carlos Sanchez and Miguel Sanchez for the graphics. All graphics captured from their great animation: http://www.carlos-sanchez.com/ Prusa3/ For copyright
Bill Conkling July 2012
 Bill Conkling July 2012 Introduction: For any ham, there are moments that are priceless, like snagging that elusive rare DX station on a deserted island that hasn t been activated in 52 years. And certainly,
GTSLOTS 2018 Sideways Lamborghini Huracan Championship Rules RELEASE NOTES: DATE/TIME ELIGIBLE DRIVERS: ELIGIBLE CARS GENERAL:
 GTSLOTS 2018 Sideways Lamborghini Huracan Championship Rules RELEASE NOTES: 10/02/18 Official Release 10/14/18 Allowed modification of Sideways GT pod; allowed use of Slot.IT anglewinder pods and Slot.IT
Our goal is to make the install a breeze. Please read the entire guide before beginning.
 www.airkewld.com Page 1 of 6 IRS Axle Kit Install IRS Axle Kit Install Our goal is to make the install a breeze. Please read the entire guide before beginning. KITS SHOULD INCLUDE 2 - Control-arm mounting
2010 Toyota Prius Fog Light Retrofit
 2010 Toyota Prius Fog Light Retrofit A DIY prospective Last updated: Friday, December 25, 2009 *** Disclaimer Use this document and its contents at your own risk! *** Forward: This document was compiled
PLEASE READ THROUGH THE WHOLE WRITE UP BEFORE ACTUALLY USING IT!!!!
 JDM power folding mirror switch install into stock USDM harness. By: Greg L., Zeke21 on twinturbo.net PLEASE READ THROUGH THE WHOLE WRITE UP BEFORE ACTUALLY USING IT!!!! This is how I was able to get the
JRSC + BBK Install on SVTF. Neil A. Shah medicnas on focaljet September 2006
 JRSC + BBK Install on SVTF Neil A. Shah medicnas on focaljet September 2006 ECU up here. When removing make sure the smaller bundles of wires don t get wrapped around the bottom edge and break - this almost
Modular Engine 1, 2008 revision August 3, 2008
 Modular Engine 1, 2008 revision August 3, 2008 David Kerzel 2008 Back in 2002 I wanted to build a bunch of different engines without a lot of detail to learn how to build an engine, what works and what
Learning to Set-Up Your Warrior Drive Belt Arizona Warrior (Rev4) BEFORE GETTING STARTED
 BEFORE GETTING STARTED") BEFORE GETTING STARTED 1. A noise one guy calls 'howling' is the same noise another guy calls 'squealing' so unless you are both hearing the noise with your own ears its better to not assume a drive belt
BEFORE GETTING STARTED 1. A noise one guy calls 'howling' is the same noise another guy calls 'squealing' so unless you are both hearing the noise with your own ears its better to not assume a drive belt
Celestron CGE Mount PEC Improvement
 Celestron CGE Mount PEC Improvement By Mike Dodd, May 26, 2006 Introduction The Celestron CGE is an excellent mid-range telescope mount. It is solidly-built, has a payload capacity of 65 pounds, and uses
Fanatec GT3RS V1 to GT3RS V2 Tutorial
 Fanatec GT3RS V1 to GT3RS V2 Tutorial by Roy Visser 1 How to update your Fanatec GT3RS V1 wheel to a GT3RS V2 wheel Welcome to this guided and detailed tutorial for upgrading your Fanatec GT3RS V1 wheel
Headlamp Adjusters motorised conversion by: Ant (Banjo1981)
") Headlamp Adjusters motorised conversion by: Ant (Banjo1981) What you will need: E30 adjuster switch assembly E30 Headlight adjusters E36 Adjuster motors (pref with the plugs still attached) Variable resistor
Headlamp Adjusters motorised conversion by: Ant (Banjo1981) What you will need: E30 adjuster switch assembly E30 Headlight adjusters E36 Adjuster motors (pref with the plugs still attached) Variable resistor
This LED flashtube kit covers models 400, 404, 500, 504, 600, 680 & 506.
 L.E.D. INSTRUCTIONS I D T S O T U B I R M O C R Y N A P Kit contains: This LED flashtube kit covers models 400, 404, 500, 504, 600, 680 & 506. For the power supply: 1-LED power supply circuit board, 2
My Hawk build Part 8 by Stuart Clarke
 My Hawk build Part 8 by Stuart Clarke Front hubs, brakes and brake lines. There was still no news on my rear springs so I thought I d find something else to get on with. I had the front hubs, brake calipers
M52tu-M54 VANOS Assembly & Timing Using G.A.S. Professional Cam Tool Kit
 Home BMW Solutions Porsche Solutions DIY Tech Engine Services Dyno Services Machining About Contact Store Tool Rental M52tu-M54 VANOS Assembly & Timing Using G.A.S. Professional Cam Tool Kit This procedure
Peg-Harness installation instructions
 Peg-Harness installation instructions I know it s not the easiest thing to do, but PLEASE READ THESE INSTRUCTIONS COMPLETELY so you will understand what you are trying to accomplish before you start drilling
J & D Machine / Hyperdrive / MSA 3711 Moon Bend Rd. Chapel Hill, TN 37034
 J & D Machine / Hyperdrive / MSA 3711 Moon Bend Rd. Chapel Hill, TN 37034 www.hyperdriveracing.com 1 You now own a state of the art 1/10 scale oval race car. The Hyperdrive Assault has gone through months
Projector39/Umnitza BMW Headlight & Re-Installation for E39s Predator Angel Eyes, and Lamin-X Installation
 Projector39/Umnitza BMW Headlight & Re-Installation for E39s Predator Angel Eyes, and Lamin-X Installation Now it is time to remove the headlights! Obviously you have to open the hood to do this. 100_3630.jpg
Merkur Scorpio Odometer Repair Instructions
 www.odometergears.com Merkur Scorpio Odometer Repair Instructions http://www.bitsprings.com/gearinst.pdf Please read through these instructions completely once before proceeding. It is important to understand