These instructions were written for a MkVI VW GTI, but other models (Audi A3, VW Beetle, VW Jetta) are similar.
|
|
|
- Gordon Blair
- 6 years ago
- Views:
Transcription
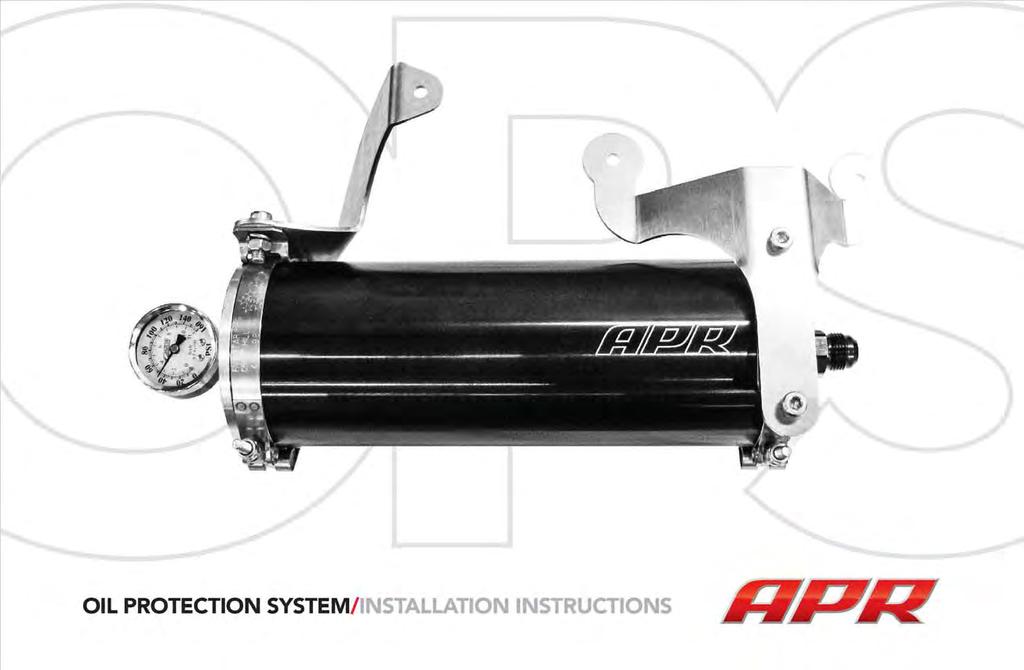
1 TL100030
2
3 Notes: These instructions were written for a MkVI VW GTI, but other models (Audi A3, VW Beetle, VW Jetta) are similar. When disassembling the car, be sure to keep all fasteners so they can be reused. It is recommend that you get some kind of compartmented tray to organize the fastners, such as a fi shing tackle box or several large ice cube trays. Fasteners that are not reused for reinstallation are noted in the instructions. These instructions assume that you have basic mechanical skills and several varieties of the tools listed in order to install the kit. If you have any questions about the install, feel free to contact your APR representative.

4 1) Support the car on jack stands or a lift. Open the hood and disconnect the two 10mm battery terminals. Remove the 13mm battery hold down bolt and remove the battery from the car. Remove the three 10mm battery bolts from the battery tray and remove the tray from the car.
5 2) Remove the belly pan on the car with a T25 Torx. Also remove the eight T25 screws connecting the lower part of the bumper to the core support.

6 3) Remove the two T25 screws that connect the intake ducting to the radiator support. Then remove any intake plumbing from the left side of the engine that might get in the way of the APR OPS install.
7 4) Remove the front radiator grill by removing the four upper T25 Torx screws. The grill can then be pulled forward and removed from the car.


8 5) Remove the six T25 screws from the front of both left and right fender liners. The lower front section of the fender liner can now be removed.

9 6) Remove the two T25 Torx Screws on the top of the bumper that were revealed when the radiator grill was removed.
10 7) Carefully pull the sides of the bumper away from the car, and then slide the bumper forward.

11 8) Disconnect the foglight electrical connector and sidemarker connector from each side of the bumper. Disconnect the metal clip connecting the wiring harness to the bumper.

12 9) With a partner, slide the bumper cover forward several inches. Clamp the headlight washer line before the T with a suitable tool to prevent washer fl uid loss. Remove the washer lines from the clips at each washer, and separate the line from the clips in the bumper.

13 10) Remove the bumper and carefully set aside as not to scratch the paint.
14 11) Remove the three T30 screws from the front of the headlight assembly.
15 12) Remove the three T30 screws holding the top side of the headlight to the vehicle.
16 13) Remove the two T25 screws that connect the plastic headlight frame to the fender of the car.

17 14) Release the retaining tab on the inside front of the headlight frame, and remove the headlight assembly from the car.

18 15) Using your preferred tool, cut the two tabs for the factory airbox off of the battery tray. Also, notch the sides of the middle bolt hole so that the APR bracket can be attached to that bolt hole.

19 16) On GTI s, trim a small crescent shape from the bottom rear of the headlight frame.

20 17) On top of the frame rail, loosen the 13mm nut to the chassis ground. Rotate the upper ground cable 180 and retighten the nut. Also, remove the power cable from the plastic guide and push it back and to the left to keep it out of the way.

21 18) Reroute the secondary air hose to under the frame rail. The intake hose that normally goes to the airbox can also be removed, and whatever fi lter that was being used can be installed directly on the secondary air pump.

22 19) Remove the two T30 screws that mount the heater core tubing to the side and front of the intake manifold.

23 20) On DSG cars, slide back the protective boot on the starter. Loosen the 13mm nut on the power lead to the starter. Rotate the lead counterclockwise until the lead is facing the front of the car. Tighten the bolt and then reinstall the boot on the starter.

24 21) On a clean work area, loosely assemble the brackets and clamps onto the OPS. The clamps must be installed at the very ends of the tube. Lightly tighten all of the hardware, so that the brackets and clamps can still be adjusted once in the car.

25 22) Reinstall the battery tray in the vehicle. Install the OPS assembly in the vehicle and loosely install the three mounting bolts on the battery tray and the socket head screw for the bracket.

26 23) For DSG cars, add spacers between the bracket and the mounting post. Space the unit enough just to allow the bottom of the assembly to clear the starter.

27 24) Using a pair of pliers wrapped with a rag, remove the metal threaded insert from the old oil fi lter. The rag is used to prevent damage to the threads of the insert. Clean any old thread sealant off this insert with a wire brush.

28 25) Prepare to assemble the oil fi lter adapter by applying a few drops of Loctite to the small threads on the oil fi lter insert.

29 26) Assemble the thread adapters to the fi lter plate as ahown. Apply clean engine oil to the o-ring gasket as you would for a regular oil fi lter change.

30 27) Loosely install the oil fi lter adapter onto the oil fi lter housing but do not tighten the main nut holding it in place. Make sure the o-ring gasket does not fall off or become pinched during installation. Orient the oil fi lter adapter such that the hose fi tting points towards the right front corner of the car.

31 28) Loosely install the hose on the oil fi lter adapter. After confi rming the hose has suffi cent clearance between the frame rail and engine, torque the oil fi lter adapter bolt to 15 lb-ft. Then fully tighten the hose on the adapter to 30 lb-ft. Install a new oil fi lter, and then reinstall the two T30 bolts holding the heater hose to the intake manifold.

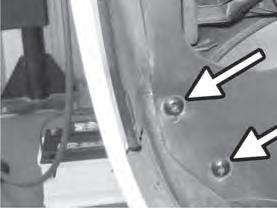
32 29) Remove the four 16mm bolts and two T30 screws from both sides of the crash beam.

33 30) Loosen but do not completely remove the two screws holding the center of the crash beam. This will allow the beam to hang loosely from the two center screws.

34 31) Route the hose from the oil fi lter underneath the frame rail and core support, over the horn, and into the backside of the crash beam. On cars that have crash beams that are not open on the back side, route the hose underneath the crash beam.

35 32) The hose sits inside the crash beam and exits on the left side of the beam.

36 33) Remove the four philips screws from the solenoid valve, but do not open the valve. Assemble the solenoid valve to the bracket as shown; depending on the vehicle you are working on. The bolt spacing is different on some frame rails. Install the four screws holding the bracket to the valve and torque to 26 lb-in.

37 34) Connect all the hoses hand tight, on both sides of the solenoid and to the OPS. The elbow end of the short hose goes to the OPS.

38 35) Reinstall the crash beam bolts, installing the solenoid bracket on top of the crash beam. Use the guide holes to align the bumper and radiator support. The supplied washers may be needed for spacing on some vehicles. Tighten the eight crash beam bolts to 44 lb-ft and the four T30 screws to 72 lb-in. Also tighten the two T30 center screws on the crash beam to 72 lb-in. Tighten the remaining three AN fi ttings to 30 lb-ft. Torque the battery tray to 15 lb-ft. After making sure the OPS is positioned correctly (with the clamps on the extreme ends of the tube), tighten the clamp nuts to 72 lb-in. Tighten the clamp to bracket bolts to 120 lb-in.
39 36) Connect the fused wire from the solenoid valve to the approriate location on the underhood fuse panel. Use the diagrams on the next three pages as a reference. For GTI s, connect the wire to SA7. There are two different styles of fuse panels in GTI s, and one might require an included M5 nut.

40 37) Connect the fused wire from the solenoid valve to the approriate location on the underhood fuse panel. For Jetta s, connect the wire to SA4.

41 38) Connect the fused wire from the solenoid valve to the approriate location on the underhood fuse panel. For Beetle s, connect the wire to SA4.

42 39) Connect the remaining black wire from the solenoid to either terminal on the pressure switch.

43 40) Install the APR CAN controller mounting bracket to the battery tray as shown with the two supplied 10mm bolts and washers.

44 41) Install the APR CAN controller to the mounting bracket with the two 5mm allen screws and washers.

45 42) Connect the APR wiring harness to the CAN controller, and secure with the attached 1/4 screw.

46 43) Connect the black wire from the CAN controller to either of the chassis grounds shown. Trim the black wire CAN controller to length, and then install the supplied ring terminal to the wire and connect to the chassis ground. Some vehicle ground points will be on the side of the frame rail.

47 44) Connect the white wire from the APR CAN controller to the other terminal on the pressure switch. Trim the wire to length, install the supplied spade terminal, and connect to the pressure switch.
 on the APR harness with a small butane torch or other adequate heat source to seal")
48 45) Crimp the red wire from the APR CAN controller to the butt connector that comes preattached to the previously installed fuse holder. Once crimped, evenly heat all three connectors (ring, spade, and butt) on the APR harness with a small butane torch or other adequate heat source to seal the shrink wrap.

49 46) Disconnect the six pin connector that is located on the top of the frame rail. The connectors from the APR CAN controller splice into this connector. Simply plug the harness from the CAN Controller into either side of the factory connector.

50 47) Reinstall and reconnect the battery in the vehicle. Torque the battery 13mm battery hold down bolt to 26 lb-ft.

51 48) Bleed the pressure out of the OPS before its first use. To do this, simply relieve pressure from the schrader valve next to the gauge. The pressure should drop to around 7-10psi. Follow the procedures at the end of this manual for OPS Oil Fill Procedure. While the engine is running for the fi rst time with the OPS, be sure to check for oil leaks in any part of the system.

52 49) Reinstall the headlight in the vehicle being sure to push it in far enough to catch the retaining tab on the front inside of the headlight. Reinstall the three T30 screws in the top of the headlight.

53 50) Reinstall the three T30 screws from the bottom front of the headlight assembly.

54 51) Reinstall the two T25 screws that connect the plastic headlight frame to the fender of the car.

55 52) Loosely test fi t the intake on the car, noting where the intake may contact the OPS. Then install the supplied foam tape in the best location on the OPS so the intake does not rub against it. Reinstall the two T25 screws that connect the intake ducting to the radiator support and reinstall the rest of the intake system.

56 53) With a partner, get the bumper cover and place it close to its original position on the car. Reinstall the headlight washer hose in the original clips in the bumper, and reconnect the headlight washers. Release the clamp on the headlight washer hose and check for leaks.

57 54) Reconnect the foglights and sidemarker electrical connections on both sides of the bumper.

58 55) Slide the bumper back into its original position on the car. The sides of the bumper cover snap back in place. Reinstall the two T25 Torx screws that normally sit hidden behind the radiator grill to keep the bumper cover in place.


59 56) Reinstall all of the T25 Torx screws that connect the bumper to the wheel well liners, including the two T25 Torx screws that connect the bumper to the fenders.
60 57) Reinstall all of the T25 screws that run along the bottom of the front bumper. Also reinstall the belly pan on the car with the T25 Torx screws.

61 58) Place the radiator grill into its original location, and install the four T25 screws.
62 OPS Oil Change Procedure Follow these additional steps when performing any oil change with the OPS. 1) Dump the oil contents of the OPS before removing the old oil fi lter. To do this, with the ignition off, simply press the pushbutton on the APR CAN Controller until the gauge on the OPS reads around 7-10psi (a pre-charged level). This might take up to 30 seconds to fully dump the contents of the OPS. 2) After removing the old oil fi lter, check the torque on the oil fi lter adapter. It should be 15 lb-ft. 3) Follow the OPS Oil Fill Procedure when filling the engine with oil. OPS Oil Fill Procedure 1) Fill the engine with oil as normal, but add one extra quart. 2) Crank the engine and rev gently to 2000rpm for a few seconds to build oil pressure in the OPS. 3) Turn the engine off and confi rm that OPS has at least 40 psi of pressure after the engine is off. 4) Top off engine oil as needed. OPS Maintenance Routinely check the following items: - Check the pre-charge pressure with the unit totally empty of oil to make sure air has not leaked out of the unit. - Manually discharge the unit with the engine off, and ensure that it automatically refi lls after the engine is restarted.
63 Symptom APR OPS not filling or fi lling too slowly. APR OPS Hardware Troubleshooting Possible Cause When fi lling from the pre-charge capacity, the unit may take several seconds to completely pressurize. The electric valve may be installed backwards. It should be mounted so the arrow on the valve points away from the APR OPS tank. If the valve is mounted backwards oil will not enter the tank during normal operating conditions. The pre-charge is set too high and is not allowing oil to enter the tank. Reset the pre-charge according to the instructions. The tank is bent, distorted or mounted incorrectly. Ensure all clamps and brackets are installed straight and not in a bind. APR OPS not discharging correctly. The electric valve is installed incorrectly. The arrow on the valve should point away from the APR OPS tank. The electric valve has become contaminated with some foreign substance and is therefore not able to function correctly. A rebuild will be necessary in this case. Contact APR for further instruction. Electric power is not reaching the solenoid valve. Check all electrical connections and perform test on the controller (Refer to APR OPS Controller Testing) The pre-charge is set too high and no oil has had a chance to enter the APR OPS tank. The pre-charge has been lost or is too low. APR OPS not holding a pre-charge. APR OPS is leaking. Indication of a leak in the air side of the tank. See causes for leaks below. To locate the source of a leak check all lines, fittings, and gauges. Leaks on the oil side of the unit are likely to produce an oil drip. Leaks on the air side of the unit can be found by pressurizing the unit to 60 psi then applying soapy water to each area and checking for bubbles. Inspect and tighten any leaking fittings or gauges. To verify your unit is leak free we recommend pressurizing the unit to 60 psi then waiting overnight to confirm the unit has retained the pressure. Note: A temperature change will affect pressure. If a pipe thread is leaking, it will need to be resealed. Remove the fitting. Apply Teflon tape to the fitting and reinstall. Other forms of pipe sealing such as pipe dope, silicone, and liquid Teflon are not recommended. All fittings that thread directly into the APR OPS tank, brass solenoid valve, and oil filter adapter are pipe threads. If one of the AN style fittings leaks, it might be damaged. Disconnect the fitting and check for nicks or deep scratches on the angled sealing surface. Leaks at the end caps of the APR OPS are very rare, unless the unit has been damaged. If the end caps are leaking, the unit should be returned to APR for inspection and possible rebuild.
64 Symptom A leak at the Safety Relief Valve can be caused by several issues. Air gauge not reading correctly Possible Cause If the safety relief valve (brass fitting on oil side of tank) is leaking, it is very likely the OPS has been set up incorrectly. Check your installation instructions and reset the pre-charge. Under no circumstance shall the safety valve be replaced with a plug. Pre-charge is set incorrectly. Review procedure for setting pre-charge. An air leak is allowing the system to become hydraulically locked. The APR OPS tank is bent or otherwise damaged and is preventing the internal piston from moving. Blow-off valve needs tightening or teflon tape to seal. Contamination is caught in the safety valve from previous purging casuing a small leak Defective safety valve. Contact APR for warranty claim (if eligible). The air gauge is a commercial gauge to be used as a relative reference and not as a precise measure of pressure. Over the years there have been slight variations in readings between the different types and different manufacturers of gauges. Your gauge should be able to give a good indication of the pressure in the air side of the unit. The gauge can be checked by reading the pressure in the air fill valve with a known accurate tire gauge. APR CAN Controller Operation OPS LPFP Ignition OFF, Engine OFF If the Button on the APR CAN controller is pressed and held down, the LED should illuminate solidly and the OPS solenoid will fi re to dump the contents of the OPS tank. No Indication Ignition ON, Engine OFF No Indication If the Button on the APR CAN controller is pressed and held down, the LED should illuminate solidly and the APR LPFP will run continuously. Ignition ON, Engine ON If the engine RPM is above 1500, the LED on the CAN controller should fl ash twice per second, unless the LPFP is activated. If the engine RPM is below 1500, the LED on the CAN controller should flash once every three seconds, unless the LPFP is activated. If the engine RPM is above 1500 AND engine load is high, the LED will illuminate solid indicating the LPFP is activated.
65 APR OPS Warranty Terms All hardware included in the system, except for the APR CAN Controller, is covered by a 90 Day manufacturer warranty. This covers any manufacturing or item quality defects during this 90 day term. The term begins on the APR invoice date from which the unit is purchased, after this term has completed there are no longer any warranty coverages on the included hardware items. The APR CAN Controller is covered by a 12 Month, 12,000 Mile warranty (Whichever occurs fi rst) from date of purchase and installation. This warranty covers any manufacturing defects or quality issues during this time. Once the warranty terms have ended there is no additional warranty coverage on the APR CAN Controller. This warranty does not cover any installation errors or improper use or installation on a vehicle the unit is not designed to fi t. The warranty also does not cover labor charges for removal and reinstallation, or vehicle down time. All warranties expressed or implied outside of these documented terms will not be honored.
APR, LLC
 + 1. 3 3 4. 5 0 2. 5 1 8 1 4 8 0 0 U S H W Y 2 8 0 W e s t, O p e l i k a, A l a b a m a 3 6 8 0 1 4 8 0 0 U S H W Y 2 8 0 W e s t, O p e l i k a, A l a b a m a 3 6 8 0 1 + 1. 3 3 4. 5 0 2. 5 1 8 1 NOTES:
#TL B8 A4/Q5 DOWNPIPE/ INSTALLATION INSTRUCTIONS
 #TL100085 B8 A4/Q5 DOWNPIPE/ INSTALLATION INSTRUCTIONS Notes: These instructions were written for a North American specification Audi A4, but other models, like the allroad, A5, and Q5 are similar. When
#TL T EA888 GEN 3 FUELING SYSTEM/ INSTALLATION INSTRUCTIONS
 #TL100069 2.0T EA888 GEN 3 FUELING SYSTEM/ INSTALLATION INSTRUCTIONS Notes: These instructions were written for a North American specification MkVII GTI. Other models, like the Golf R, are similar. When
These instructions were written for a North American specification MkVI Golf R. Other models are similar.
 Notes: These instructions were written for a North American specification MkVI Golf R. Other models are similar. When disassembling the car, be sure to keep all fasteners so they can be reused. It is recommend
Procharger Stage II Intercooled Supercharger System (11-14 GT)
") Procharger Stage II Intercooled Supercharger System (11-14 GT) Installation Time: Approximately one day. Installed on 2012 Mustang GT 5.0/Manual Required Tools 3/8 Socket Set (Standard and Metric) 1/2
Procharger Stage II Intercooled Supercharger System (11-14 GT) Installation Time: Approximately one day. Installed on 2012 Mustang GT 5.0/Manual Required Tools 3/8 Socket Set (Standard and Metric) 1/2
IE MK5/MK6 2.0T FSI & TSI FDS INTERCOOLER INSTALL GUIDE PART NUMBER: IETPCB1
 IE MK5/MK6 2.0T FSI & TSI FDS INTERCOOLER INSTALL GUIDE PART NUMBER: IETPCB1 Thank you for purchasing another high quality Integrated Engineering product! This instruction sheet is used for installation
SHELBY GT500
 2007-2009 SHELBY GT500 Removal of Factory Unit WARNING: 1. Radiator fluid must be handled properly. Please observe local ordinances with regards to handling and disposal. 2. Allow vehicle and components
IE Audi B9 S4, S5, A4, A5, Allroad FDS Intercooler Install Guide IETPCK1
 IE Audi B9 S4, S5, A4, A5, Allroad FDS Intercooler Install Guide IETPCK1 Thank you for purchasing the best performing intercooler on the market! This instruction guide is used for installation of IE s
INSTALLATION INSTRUCTIONS
 HIGH FLOW AIRFLOW METER INSTALLATION INSTRUCTIONS PART NUMBER D763-1600A APPLICATION: 2001-06 E46 M3 Parts List: Hose clamp 64Z (7) Plastic Rivets Air Filter Temp Sensor & Harness (2) Button Head Screws
2015+ SUBARU STI FRONT-MOUNT INTERCOOLER PARTS LIST AND INSTALLATION GUIDE INSTALL DIFFICULTY DISCLAIMER CAUTION INSTALL PROCEDURE TOOLS NEEDED
 PARTS LIST AND PARTS INCLUDED 1PC ALUMINUM INTAKE PIPE 1PC BAR-AND-PLATE INTERCOOLER 1PC STEEL CRASH BAR W/ MOUNTING HARDWARE 2PC HOT-SIDE INTERCOOLER PIPES 2PC COLD-SIDE INTERCOOLER PIPES 1PC BPV FLANGE
MAZDASPEED3 Intercooler Instructions
 MAZDASPEED3 Intercooler Instructions Congratulations on your purchase of the COBB Tuning Front Mount Intercooler System for your 2007-2009 Mazdaspeed3. The following instructions should assist you through
Tools Required. Metric Wrench Set Screwdriver Set Metric Socket Set Pliers Heavy duty hydraulic Jack and Car Stands Box knife or similar Hacksaw WD40
 Subaru 2004+ Legacy GT & Outback XT For JDM 2.0 twinscroll turbo and USDM 2.5 turbo models Front Mount Intercooler Fitting Instructions PN# LEG-1348-000 You are now the proud owner of a highly tested and
Mazda 3 & Mazdaspeed 3 Oil Cooler Installation Instructions
 Page1 2007-2009 Mazda 3 & Mazdaspeed 3 Oil Cooler Installation Instructions Tooling: Jack and jack stands or a lift Socket wrench and torque wrench 10mm and 14mm sockets 3/16 Allen wrench 10mm wrench Pliers
DrVanos.com Stage II Installation Instructions. Tool rental is available with the purchase of a vanos kit *See website for more info*
 DrVanos.com Stage II Installation Instructions Special Tools Needed: Camshaft locking tool TDC Crank pin Sprocket turning tool Tool rental is available with the purchase of a vanos kit *See website for
Integrated Engineering MK7/MQB TSI GEN 3 FDS Intercooler Install. Part Number IETPCI1
 Integrated Engineering MK7/MQB TSI GEN 3 FDS Intercooler Install Part Number IETPCI1 Thank you for purchasing another high quality Integrated Engineering product! This instruction guide is used for installation
Fitting Instructions. Revo MQB Golf/GTi/Octavia/Leon Intercooler. Recommended Tools. Contents RV581M Dealer installation advised.
 RV581M100100 Recommended Tools Contents No. Description Tools Size Intercooler Torx Bit T25, T30 Bracket Kit llen Key 4, 5 mm Silicone Hoses Socket 7, 10, 16, 19 mm Hose Clamps Flat Head Screwdriver Small,
Subaru Front Mount Intercooler Kit STI Subaru Front Mount Intercooler Kit STI
 Subaru Front Mount Intercooler Kit STI 2008-2014 715500 Subaru Front Mount Intercooler Kit STI 2008-2014 Congratulations on your purchase of the Subaru Front Mount Intercooler Kit STI 2008-2014. The following
OIL COOLER KIT INSTALLATION INSTRUCTIONS PART NUMBER D E92 335is (N54 engine) with BMW M-Technic bumper and with stock oil cooler
 with BMW M-Technic bumper and with stock oil cooler") OIL COOLER KIT INSTALLATION INSTRUCTIONS PART NUMBER D570-0923 APPLICATION: 2011 E92 335is (N54 engine) with BMW M-Technic bumper and with stock oil cooler Congratulations for being selective enough to
OIL COOLER KIT INSTALLATION INSTRUCTIONS PART NUMBER D570-0923 APPLICATION: 2011 E92 335is (N54 engine) with BMW M-Technic bumper and with stock oil cooler Congratulations for being selective enough to
Replacing MK4 Golf/Jetta radiator mounts in-car
 Replacing MK4 Golf/Jetta radiator mounts in-car This is a guide to replacing the radiator mounts in a MK4 Golf/Jetta. This involves moving the core support to the service position which allows you to do
FRONT MOUNT INTERCOOLER GOLF / JETTA IV 1.8T PART # & P INSTALATION INSTRUCTIONS
 FRONT MOUNT INTERCOOLER GOLF / JETTA IV 1.8T PART # 48.10.90 & 48.10.90P INSTALATION INSTRUCTIONS PART LIST: 1 INTERCOOLER CORE 1 U-BENT TUBE 1 L-SHAPED TUBE 1 INTERCOOLER INLET TUBE 4 M6 NYLOC NUT 3 M6
2017+ L5P Duramax 3 ½ Down Pipe & EGR Fix Kit
 2017+ L5P Duramax 3 ½ Down Pipe & EGR Fix Kit Covers installation of PN s: WCF100630, WCF100829 Note: This Kit is for off road competition use only! Off Road Competition Use Tuning & Exhaust System is
IE Audi 3.0T Crank Pulley Upgrade Install Guide IEBAVJ3
 IE Audi 3.0T Crank Pulley Upgrade Install Guide IEBAVJ3 Thank you for purchasing your IE 3.0T crankshaft pulley upgrade! This instruction guide is used for installation of IE s lower overdrive pulley for
#TL T DOWNPIPES/ INSTALLATION INSTRUCTIONS
 #TL100084 4.0T DOWNPIPES/ INSTALLATION INSTRUCTIONS Notes: These instructions were written for on a North American specification RS7, but other models, like the S6 and S8, are similar. When disassembling
Instant Chat off the main page of Or simply call our tech team at
 FRONT MOUNT INTERCOOLER 2008-13 STI 2014-04- 08 Thank you for purchasing this PERRIN product for your car! Installation of this product should only be performed by persons experienced with installation
PARTS LIST INSTALLATION INSTRUCTIONS PARTS LIST AND INSTALLATION GUIDE INSTALL TIME: 2 HOURS INSTALL DIFFICULTY: 3/5
 PARTS LIST AND PARTS LIST 1PC MISHIMOTO INTERCOOLER 1PC M6 X 1.0 X 20MM FLANGE BOLT 1PC M4 X 0.7 X 12MM BUTTON-HEAD BOLT 1PC M4 LOCK WASHER 1PC MAP SENSOR O-RING 2. Remove the eight pop clips that hold
Installation Instructions :BMW E39 M5 : Page 1
 Installation Instructions :BMW E39 M5 : Page 1 1. We will start by removing the front bumper. Remove the 3 x 8mm hex head bolts in the wheel arch liners on both sides. Turn the wheels to gain access. 2.
OIL COOLER KIT INSTALLATION INSTRUCTIONS PART NUMBER D E92 335i/xi (N55 engine) with BMW Standard bumper and with stock oil cooler
 with BMW Standard bumper and with stock oil cooler") OIL COOLER KIT INSTALLATION INSTRUCTIONS PART NUMBER D570-0924 APPLICATION: 2011-12 E92 335i/xi (N55 engine) with BMW Standard bumper and with stock oil cooler Congratulations for being selective enough
OIL COOLER KIT INSTALLATION INSTRUCTIONS PART NUMBER D570-0924 APPLICATION: 2011-12 E92 335i/xi (N55 engine) with BMW Standard bumper and with stock oil cooler Congratulations for being selective enough
ONBOARD AIR SYSTEM FOR ALL VEHICLES APPLICATIONS
 ONBOARD SYSTEM FOR ALL VEHICLES APPLICATIONS Thank you and congratulations on the purchase of a Pacbrake onboard air system. Please read the manual prior to starting to ensure you can complete the installation
IAG Air / Oil Separator (AOS) For STi
 For STi") IAG Air / Oil Separator (AOS) For 2008-14 STi Part# IAG-ENG-7000 Tools Required: Ratchet, torque wrench, extensions, needle nose pliers, hose cutter, snips/scissors Sockets: 10mm, 12mm 13mm Wrenches: 10mm,
IAG Air / Oil Separator (AOS) For 2008-14 STi Part# IAG-ENG-7000 Tools Required: Ratchet, torque wrench, extensions, needle nose pliers, hose cutter, snips/scissors Sockets: 10mm, 12mm 13mm Wrenches: 10mm,
INTERCOOLED SUPERCHARGER SYSTEM FORD 5.4L 3V F-150 TRUCK
 Installation Instructions for: INTERCOOLED SUPERCHARGER SYSTEM 2004-2006 FORD 5.4L 3V F-150 TRUCK Step-by-step instructions for installing the best in supercharger systems. 89-89-65-001 Rev C Magnuson
RS5mesh style Grille. Audi A5/S5. Installation Instructions. pre-facelift ES best viewed in Acrobat Reader
 Audi A5/S5 pre-facelift RS5mesh style Grille Installation Instructions ES2627648 This tutorial is provided as a courtesy by ECS Tuning. best viewed in Acrobat Reader Proper service and repair procedures
Installation Instructions
 Suzuki Samurai 1 Inch and 2 Inch Body Lift Kit (SKU# SSP-BL) Installation Instructions Background: These instructions are designed for installing the 2 body lift. Our approach is to raise the entire body
Installation Instructions Z-Gate Shifter
 Installation Instructions Z-Gate Shifter Part Number 80681 1998, 2001 by B&M Racing and Performance Products The B&M Z-Gate shifter can be used in vehicles equipped with most popular three speed automatic
Always wear safety glasses when working on your vehicle.
 90-93 MAZDA MIATA SUPERCHARGER KIT The KraftWerks 90-93 Mazda Miata Supercharger Kit was designed for easy installation. Competent mechanics with the appropriate tools will find the process to be relatively
 Special Tools Needed: DrVanos.com Stage I Installation Instructions Camshaft locking tool TDC Crank pin Sprocket turning tool Tool rental is available with the purchase of a vanos kit *See website for
IAG Competition Series Air / Oil Separator (AOS) For WRX
 For WRX") P IAG Competition Series Air / Oil Separator (AOS) For 2015-16 WRX Part# IAG-ENG-7252 Tools Required: Ratchet, torque wrench, extensions, needle nose pliers, hose cutter, snips/scissors, flat head screw
P IAG Competition Series Air / Oil Separator (AOS) For 2015-16 WRX Part# IAG-ENG-7252 Tools Required: Ratchet, torque wrench, extensions, needle nose pliers, hose cutter, snips/scissors, flat head screw
Instant Chat off the main page of Or simply call our tech team at
 FRONT MOUNT INTERCOOLER 2015+ WRX 2017-07-07 Thank you for purchasing this PERRIN product for your car! Installation of this product should only be performed by persons experienced with installation of
Thank you for purchasing the Craven Speed FlexPod Complete Gauge Pod Kit
 Thank you for purchasing the Craven Speed FlexPod Complete Gauge Pod Kit Before You Start Please read instructions completely before installing. These instructions contain the information required to install
IAG Street Series Air / Oil Separator (AOS) For WRX
 For WRX") P IAG Street Series Air / Oil Separator (AOS) For 2015-16 WRX Part# IAG-ENG-7152 Tools Required: Ratchet, torque wrench, extensions, needle nose pliers, hose cutter, snips/scissors, flat head screw driver,
P IAG Street Series Air / Oil Separator (AOS) For 2015-16 WRX Part# IAG-ENG-7152 Tools Required: Ratchet, torque wrench, extensions, needle nose pliers, hose cutter, snips/scissors, flat head screw driver,
INSTALLATION AND USER MANUAL
 INSTALLATION AND USER MANUAL SDKIT-730 & SDKIT-734 100% Bolt-On 150 PSI Train Horn System for 2011-2015 F-250 & F-350 Super Duty P/N SDKIT-730 P/N SDKIT-734 Thank you for purchasing a Kleinn Air Horns
Step 6: Remove and save the MAP sensor for later use. Step 7: Remove the passenger side intercooler pipe and the EGR intake manifold.
 LBZ Twin kit Install Step 1: Disconnect both batteries. Step 2: Drain coolant and oil also remove passenger side inner fender. Step 3: Remove intake box and piping. (Remove and save the MAF sensor in the
OIL COOLER KIT INSTALLATION INSTRUCTIONS PART NUMBER D
 OIL COOLER KIT INSTALLATION INSTRUCTIONS PART NUMBER D570-0904 APPLICATION: 2011-2012 E90 335i/xi (N55 engine) with BMW standard bumper and with stock oil cooler Congratulations for being selective enough
WEBER CARBURETOR TROUBLESHOOTING GUIDE
 This guide is to help pinpoint problems by diagnosing engine symptoms associated with specific vehicle operating conditions. The chart will guide you step by step to help correct these problems. For successful
Ford Mustang V6 OEM-Style Fog Light Kit Parts List: Quantity: Tool List:
 2015-2017 Ford Mustang V6 OEM-Style Fog Light Kit Parts List: Quantity: Tool List: LED Foglights/ Bezels 2 Flat head & Phillips screwdriver (if you ordered part#3600) Ratchet & Socket set OR Wiring harness
INFINITI Q50/Q60 Red Alpha Heat Exchanger
 INFINITI Q50/Q60 Red Alpha Heat Exchanger Whether you live in a hot climate region, enjoy racing, or long high speed pulls the INFINITI Q60/Q50 Red Alpha Heat Exchanger will help keep your intake temps
INSTALLATION INSTRUCTIONS Unitronic Intercooler Upgrade Kit for 2.0 TFSI (EA113) UH007-ICA
 UH007-ICA") Unitronic recommends that you read through the entire installation instructions prior to beginning the installation to familiarize yourself with the included components, tools required, and procedures
Unitronic recommends that you read through the entire installation instructions prior to beginning the installation to familiarize yourself with the included components, tools required, and procedures
Weistec M113K Supercharger System Installation Guide
 Weistec M113K Supercharger System Installation Guide WARNING! DO NOT HAVE YOUR ECU REPROGRAMMED ANYWHERE BUT AT WEISTEC FOR THIS SUPERCHARGER. THE AMG 55 USES AN ELECTRONIC THROTTLE CONTROL (ETC), WHICH
Z-Gate Universal Shifter
 Installation Instructions Z-Gate Universal Shifter Fits: GM, Ford, Lincoln and Chrysler Transmissions See Application Guide for Specific Applications Part #80681 Rev 06/01/2018 WORK SAFELY! For maximum
Kit Part Number:
 Equipped with AEM DRYFLOW Filter No oil required! Kit Part Number: 21-8203 2003-2005 Dodge Ram 5.7L V8 CARB EO # D-392-28 2005 Dodge Powerwagon Hemi CARB EO # D-392-28 Brute Force Intake Systems that are
Installation Instructions Part Number
 Installation Instructions Part Number 84152143 Thank you for choosing Chevrolet Performance as your high performance source. Chevrolet is committed to providing proven, innovative performance technology
SAFETY SENSORS FIELD OF VIEW WILL BE ALTERED WITH USE OF THE REPLACEMENT BUMPER. Injury hazard
 SAFETY Your safety and the safety of others is very important. In order to help you make informed decisions about safety, we have provided installation instructions and other information. These instructions
ADM Performance 6079 Mapleshade Lane Dallas, Texas (214)
") 1) Disconnect Battery Ground 2) Raise front end of Vehicle FAN INSTALL INSTRUCTIONS 3) Remove lower Radiator hose and drain coolant into a pan. (you will reuse coolant later) 4) Remove Air Intake piping
1) Disconnect Battery Ground 2) Raise front end of Vehicle FAN INSTALL INSTRUCTIONS 3) Remove lower Radiator hose and drain coolant into a pan. (you will reuse coolant later) 4) Remove Air Intake piping
JEEP CHEROKEE, WAGONEER (XJ) FRONT BUMPER INSTALLATION INSTRUCTIONS KIT# W/ WINCH KIT# 83203
 FRONT BUMPER INSTALLATION INSTRUCTIONS KIT# W/ WINCH KIT# 83203") 3651 N Highway 89 Chino Valley, AZ 86323 (928) 636-7080 www.p-a-g.net JEEP CHEROKEE, WAGONEER (XJ) FRONT BUMPER INSTALLATION INSTRUCTIONS 1984-2001 KIT# 83202 1984-2001 W/ WINCH KIT# 83203 WARNING Before
3651 N Highway 89 Chino Valley, AZ 86323 (928) 636-7080 www.p-a-g.net JEEP CHEROKEE, WAGONEER (XJ) FRONT BUMPER INSTALLATION INSTRUCTIONS 1984-2001 KIT# 83202 1984-2001 W/ WINCH KIT# 83203 WARNING Before
OIL COOLER KIT INSTALLATION INSTRUCTIONS PART NUMBER D E92 335i/xi (N55 engine) with M-Technic bumper and without stock oil cooler
 with M-Technic bumper and without stock oil cooler") OIL COOLER KIT INSTALLATION INSTRUCTIONS PART NUMBER D570-0925 APPLICATION 2011-12 E92 335i/xi (N55 engine) with M-Technic bumper and without stock oil cooler Congratulations for being selective enough
OIL COOLER KIT INSTALLATION INSTRUCTIONS PART NUMBER D570-0925 APPLICATION 2011-12 E92 335i/xi (N55 engine) with M-Technic bumper and without stock oil cooler Congratulations for being selective enough
VW Shift Paddle Kit Installation Instructions
 VW Shift Paddle Kit Installation Instructions Parts Included: (1) Left and right shift paddle (1) Small pick tool (1) Hex key (1) T20 Torx key (1) Loctite capsule Tools Needed: Medium flat-heat screwdriver
Installation Instructions LamboStyleDoors (The instruction are to be used as a reference. Please repeat for both doors)
") Installation Instructions LamboStyleDoors (The instruction are to be used as a reference. Please repeat for both doors) Pre installation check list: - Double check vehicles data with TUV certificate -
Installation Instructions LamboStyleDoors (The instruction are to be used as a reference. Please repeat for both doors) Pre installation check list: - Double check vehicles data with TUV certificate -
Audi C6 A6 RS-style Grille Installation Tutorial
 Audi C6 A6 RS-style Grille Installation Tutorial Proper service and repair procedures are vital to the safe, reliable operation of all motor vehicles as well as the personal safety of those performing
Thank you for purchasing the Craven Speed FlexPod Complete Gauge Pod Kit For R56, R58, R59, R60 with Refresh Engines (2011+)
") Thank you for purchasing the Craven Speed FlexPod Complete Gauge Pod Kit For R56, R58, R59, R60 with Refresh Engines (2011+) Before You Start Please read instructions completely before installing. These
Thank you for purchasing the Craven Speed FlexPod Complete Gauge Pod Kit For R56, R58, R59, R60 with Refresh Engines (2011+) Before You Start Please read instructions completely before installing. These
Installation Manual Volvo C30 T5 Front Mount Intercooler System
 Installation Manual Volvo C30 T5 Front Mount System Volvo C30 T5 System / Installation Manual i C Contents Important Information i Parts List i Required Tools and Materials 1 1.0 - Vehicle Preparation
MKVI Jetta Fog Light Kit
 MKVI Jetta Fog Light Kit Part Number VW Jetta Fog Light Installation This tutorial is provided as a courtesy by ECS Tuning. Proper service and repair procedures are vital to the safe, reliable operation
INSTALLATION INSTRUCTIONS 97 FORD EXPEDITION
 INSTALLATION INSTRUCTIONS 97 FORD EXPEDITION 1. Read the instructions completely and carefully before you begin. Check the kit for proper contents (refer to the part s list and the picture diagrams). Before
APPROXIMATE ASSEMBLY TIME (R&R): 45 minutes -1-
: 45 minutes -1-") PLOW ANGLE CONTROL KIT P/N 2879224 Application For use with the Glacier Pro Plow System P/N 2879103 on the below listed models MY09 and newer full size Ranger 500, 700 & 800 models MY13 and newer Ranger
PLOW ANGLE CONTROL KIT P/N 2879224 Application For use with the Glacier Pro Plow System P/N 2879103 on the below listed models MY09 and newer full size Ranger 500, 700 & 800 models MY13 and newer Ranger
Z1 Motorsports 370Z/G37 Oil Cooler Kit Installation Manual
 Z1 Motorsports 2877 Carrollton Villa Rica Hwy Carrollton GA 30116 770.838.7777 Z1 Motorsports 370Z/G37 Oil Cooler Kit Installation Manual For 19, 25 and 34 Row Oil Cooler Kits Parts Included: 1 SETRAB
Z1 Motorsports 350Z / G35 Oil Cooler Kit Installation Manual
 Z1 Motorsports 2877 Carrollton Villa Rica Hwy Carrollton GA 30116 770.838.7777 Z1 Motorsports 350Z / G35 Oil Cooler Kit Installation Manual For 19, 25 and 34 Row Oil Cooler Kits Parts Included: 1 Aluminum
4. Remove (4) 10mm and (1) 7mm bolt that holds fascia at front corners, on each side
 10mm and (1) 7mm bolt that holds fascia at front corners, on each side") 2010 Camaro LS3 1. Disconnect battery ground 2. Remove front wheels 3. Remove (5) push pins and (5) #20 torx screws on inner front wheel well liners and remove liners on each side 4. Remove (4) 10mm and
2010 Camaro LS3 1. Disconnect battery ground 2. Remove front wheels 3. Remove (5) push pins and (5) #20 torx screws on inner front wheel well liners and remove liners on each side 4. Remove (4) 10mm and
INSTALLATION & OWNER S MANUAL
 INSTALLATION & OWNER S MANUAL CAB INSTALLATION INSTRUCTIONS JOHN DEERE 3000 SERIES (4200/4300/4400) (4210/4310/4410) & (3120/3320/3520/3720) HARD SIDED CAB ENCLOSURE (p/n 1JD3520AS) SOFT SIDED CAB ENCLOSURE
C15C C15C. Page 1 of 20
 2 x Lid Front Hinge 1135 8 x M8 Bolt 8 x M8 Washer (3mm Thick) 4 x M6 Large washers 4 x M6 Spring washers 4 x M6 x 40mm Bolts 6 x M6 20mm Bolts 6 x M6 Washers 20 x Screws 2 x Lid mount gas strut bracket
Audi S4 SMIC Installation. B5 Audi S4 Side Mount Intercooler installation
 Audi S4 SMIC Installation B5 Audi S4 Side Mount Intercooler installation Disclaimer: These installation instructions are to be used as a guide only. It is at the reader and/or installer s discretion to
Installation Instructions
 2011-2013 LML DURAMAX COMPOUND-ADD 2011-2015 LML A Duramax TURBO KIT Add INSTALL A Turbo INSTRUCTIONS Compound Kit Installation Instructions 1-800-955-0476 - www.industrialinjection.com - info@industrialinjection.com
IAG Street Series Air / Oil Separator (AOS) For 2017 WRX
 For 2017 WRX") P IAG Street Series Air / Oil Separator (AOS) For 2017 WRX Part# IAG-ENG-7152 Tools Required: Ratchet, torque wrench, extensions, needle nose pliers, hose cutter, snips/scissors, flathead screwdriver,
P IAG Street Series Air / Oil Separator (AOS) For 2017 WRX Part# IAG-ENG-7152 Tools Required: Ratchet, torque wrench, extensions, needle nose pliers, hose cutter, snips/scissors, flathead screwdriver,
OIL COOLER KIT INSTALLATION INSTRUCTIONS PART NUMBER D
 OIL COOLER KIT INSTALLATION INSTRUCTIONS PART NUMBER D570-0907 APPLICATION: 2011-12 E90 335i/xi (N55 engine) with BMW M-Technic bumper and without stock oil cooler Congratulations for being selective enough
INSTALLATION INSTRUCTIONS FOR THE MOTOR TRIKE CROSS COUNTRY / CROSS ROADS / HARD BALL RAKE KIT
 INSTALLATION INSTRUCTIONS FOR THE MOTOR TRIKE CROSS COUNTRY / CROSS ROADS / HARD BALL RAKE KIT Thank you for choosing the Motor Trike Cross Country / Cross Roads / Hard Ball rake kit. We ask that you read
Installation Instructions. QuickSilver Shifter. Fits: GM, Ford, Chrysler Transmissions See Application Guide for Specific Applications Part # 80683
 Installation Instructions QuickSilver Shifter Fits: GM, Ford, Chrysler Transmissions See Application Guide for Specific Applications Part # 80683 WORK SAFELY! For maximum safety, perform this installation
Installation Instructions
 Installation Instructions 2.0T FSI Intake Manifold: Featuring better flow, higher boost capacity, 40% larger plenum volume, and integrated flapper delete; this product will take your 2.0L VW TSI and FSI
2014+ FORD FIESTA ST DIRECT-FIT OIL COOLER KIT PARTS LIST AND INSTALLATION GUIDE CAUTION PARTS INCLUDED NOTE TOOLS NEEDED INSTALL PROCEDURE
 PARTS LIST AND PARTS INCLUDED 3PC APPLICATION-SPECIFIC MOUNTING BRACKETS & SPACER 1PC 19-ROW OIL COOLER 1PC 4 ', X 1'' BRAIDED HOSE W/90-10AN FITTINGS 1PC 3'' X 2.5 '' BRAIDED HOSE W/45 AND 90-10AN FITTINGS
INSTALLATION INSTRUCTIONS
 Equipped with AEM Dryflow Filter No Oil Required! INSTALLATION INSTRUCTIONS PART NUMBER 21-818C (GUN METAL GRAY FINISH) 2017 Nissan Sentra SR Turbo 1.6T 1 ITEM NO. PART NUMBER DESCRIPTION QTY. 1 21-2157DK
Installation MKIV Headlight Housings with Fog Lamps (Procedures apply to both MKIV Jetta and Golf)
") Page 1 This tutorial is provided as a courtesy by ECS Tuning. Service Procedure Installation Proper service and repair procedures are vital to the safe, reliable operation of all motor vehicles as well
Page 1 This tutorial is provided as a courtesy by ECS Tuning. Service Procedure Installation Proper service and repair procedures are vital to the safe, reliable operation of all motor vehicles as well
READ AND UNDERSTAND ALL INSTRUCTIONS AND WARNINGS PRIOR TO INSTALLATION OF SYSTEM AND OPERATION OF VEHICLE.
 #9378 Installation Instructions 3 Body Lift Kit 1998-2000 Ranger READ AND UNDERSTAND ALL INSTRUCTIONS AND WARNINGS PRIOR TO INSTALLATION OF SYSTEM AND OPERATION OF VEHICLE. SAFETY WARNING BDS Suspension
DODGE DART 1.4L I-4 C.A.R.B. E.O. # D
 Equipped with AEM Dryflow Filter No Oil Required! INSTALLATION INSTRUCTIONS PART NUMBER: 21-722C (Gun Metal Grey Finish) 21-722P (Vacuum Metalized Chrome - VMC) 2013-2014 DODGE DART 1.4L I-4 C.A.R.B. E.O.
INSTALLATION INSTRUCTIONS FOR THE MOTOR TRIKE GL1500 RAKE KIT
 INSTALLATION INSTRUCTIONS FOR THE MOTOR TRIKE GL1500 RAKE KIT Thank you for choosing the Motor Trike GL1500 Rake Kit. We ask that you read the directions before you start and follow them very closely.
Z06 Corvette Lingenfelter High Flow Air Intake
 2006-2007 Z06 Corvette Lingenfelter High Flow Air Intake LN4233 1557 Winchester Road Decatur, Indiana 46733 260 724 2552 phone 260 724 8761 fax www.lingenfelter.com Parts List # Part number Description
05-08 GT. Hellion Power Systems Mustang Kit Instructions
 Hellion Power Systems 05-08 Mustang Kit Instructions 1. Disconnect Battery 2. Drain Radiator, keep fluid for re-installation. 3. Remove air box and inlethoses. 6. Next, underneath, punch oil pan for turbo
Volvo 850 Radiator Replacement Jason Reed 29 March 2013
 This write up covers removing and replacing the radiator on a 97 855 GLT wagon with light pressure turbo and automatic transmission. This car has 162K miles. The radiator, which was original, developed
INSTALLATION INSTRUCTIONS
 COLD AIR INTAKE INSTALLATION INSTRUCTIONS PART NUMBER D760-0390C APPLICATION: 1999-2003 E39 M5 PARTS LIST 1 Left Aluminum Intake Tube 1 Air Pump Bracket (A) 1 Right Aluminum Intake Tube 1 Air Pump Bracket
Read and understand all instructions and warnings prior to installation of product and operation of vehicle.
 #F9378 Installation Instructions 1998-2000 Ford Ranger 3" Body Lift Kit Read and understand all instructions and warnings prior to installation of product and operation of vehicle. Zone Offroad Products
Installation Instructions
 Installation Instructions Automatic Retracting Running Board Vehicle Application Ford F150 Supercrew 2001-2003 (2004 Heritage) Part Number: 75111-01 www.bestop.com - We re here to help! Visit our web site
Installation Instructions General Motors 8.1 Sequential Vapor Injection (S.V.I.) System 7500/6500 Series Trucks model year.
 System 7500/6500 Series Trucks model year.") Installation Instructions General Motors 8.1 Sequential Vapor Injection (S.V.I.) System 7500/6500 Series Trucks 2003-2005 model year. Technocarb Equipment (2004) Ltd. 4-30435 Progressive Way Abbotsford,
Installation Instructions General Motors 8.1 Sequential Vapor Injection (S.V.I.) System 7500/6500 Series Trucks 2003-2005 model year. Technocarb Equipment (2004) Ltd. 4-30435 Progressive Way Abbotsford,
Exhaust System Installation for Chevrolet Corvette C7 Stingray PN 11855, 11856
 Exhaust System Installation for Chevrolet Corvette C7 Stingray PN 11855, 11856 These instructions have been written to help you with the installation of your Borla Performance Exhaust System. Please read
2004 Fresh Water Cooling Installation Instructions - V-Drive Kit RK147050A
 2004 Fresh Water Cooling Installation Instructions - V-Drive Kit This Page Was Intentially Left Blank TABLE OF CONTENTS 1 - FWC Kit Installation Instructions - V-Drive... Table of Contents...... 1 Installation
Installation Instructions - ECS Tuning Vent Pod Vacuum/Boost Gauge Kit
 Installation Instructions - ECS Tuning Vent Pod Vacuum/Boost Gauge Kit This tutorial is provided as a courtesy by ECS Tuning. Part Number for (2005-2008) Proper service and repair procedures are vital
2010+ Audi B8 S4/S5 3.0T S-FLO Intake Kit INSTALLATION GUIDE FOR RACING USE ONLY
 INSTALLATION GUIDE 2010+ Audi B8 S4/S5 3.0T S-FLO Intake Kit FOR RACING USE ONLY Congratulations on your purchase of the AWE Tuning S-FLO Intake for the 2010+ Audi B8 S4 and B8 S5 3.0T. Exquisite build
HYDRAULICS. TX420 & & lower. Hydraulic Tandem Pump Removal. 4. Remove the LH side panel (Fig. 0388).
.") TX420 & 425 240000299 & lower 4. Remove the LH side panel (Fig. 0388). Hydraulic Tandem Pump Removal Note: Cleanliness is a key factor in a successful repair of any hydraulic system. Thoroughly clean all
TX420 & 425 240000299 & lower 4. Remove the LH side panel (Fig. 0388). Hydraulic Tandem Pump Removal Note: Cleanliness is a key factor in a successful repair of any hydraulic system. Thoroughly clean all
baseplate Chevrolet Equinox
 , Rev 3 06/16 baseplate 9518316 Chevrolet Equinox Pin height - 14-3/4 Centers - 24-1/4 25. ITEM PART # QTY DESCRIPTION 1 00057 2.25 LOCKWASHER 2 00059 8.375 FLATWASHER 3 00060 24.375 LOCKWASHER 4 00061
Front Fascia Kit Installation Instructions P/N:
 Installation Instructions P/N: 421843 421844 421845 421846 421847 421848 421849 421850 421851 421852 421853 39555 Schoolcraft Rd, Plymouth MI, 48170 800.59.ROUSH 2015-2017 Front Fascia Kit Installation
INSTALLATION INSTRUCTIONS FUEL RAIL
 INSTALLATION INSTRUCTIONS FUEL RAIL MITSUBISHI EVO X Document# 19-0067 Support: info@radiumauto.com WARNING: DON'T SMOKE OR WORK WITH OPEN SPARKS WHILE WORKING ON THE FUEL SYSTEM PREPARING THE VEHICLE:
Installation Instructions Sport Shifter
 The B&M Sport Shifter can be used in vehicles equipped with most popular three speed or four speed automatic transmissions. It is equipped with neutral safety and backup light switches, transmission brackets
Installation Instructions Camaro ZL1 ( Z) ( ZB)
 ( ZB)") Installation Instructions Camaro ZL1 (501-1099-10-Z) (501-1099-10-ZB) Parts List 1 Insulated Air Box \ Lid 1 Thermal Coated Intake Tube / MAF Housing with (2) M4 x.7 thread 8mm long Stainless Screws; 1
Installation Instructions Camaro ZL1 (501-1099-10-Z) (501-1099-10-ZB) Parts List 1 Insulated Air Box \ Lid 1 Thermal Coated Intake Tube / MAF Housing with (2) M4 x.7 thread 8mm long Stainless Screws; 1
Please compare the parts in the box with the bill of materials provided to assure that you have all the parts necessary for this installation.
 Installation for Chevrolet Corvette C7 Stingray & ZO6 (Standard exhaust) PN s - 11862, 11863, 11868, 11869, 11877, 11878, 11880, 11881 (Optional NPP) PN s - 11874, 11855, 11875, 11856 ZO6 PN s - 11902,
Installation Instructions Street Bandit Shifter
 Installation Instructions Street Bandit Shifter Part Number 80797 (see www.bmracing.com for the latest technical product information) 2006, 2000 by B&M Racing and Performance Products The B&M Street Bandit
Cut zip ties and remove 2 plastic wiring harness brackets.
 TROUBLESHOOTING: Please read and understand all installation instructions before proceeding with the installation. Included parts: 1 - New Bosch Cp3 Pump 1 - HSM Pulley 1 - Serpentine Belt 1 - Pump Bracket/