VW Shift Paddle Kit Installation Instructions
|
|
|
- Terence Crawford
- 5 years ago
- Views:
Transcription


1 VW Shift Paddle Kit Installation Instructions

2 Parts Included: (1) Left and right shift paddle (1) Small pick tool (1) Hex key (1) T20 Torx key (1) Loctite capsule Tools Needed: Medium flat-heat screwdriver (6 inch length or less with broad tip) Adjustable wrench Mechanics mirror Masking tape We highly recommend watching our installation videos. They can be found on our website at doubleapex.co/install Step 1: Disconnect the negative battery cable. Move the cable to a secure position next to the battery box and cover the battery terminal with a heavy rag. 2

3 Step 2: Remove the fuse for the air bag controller. See appendix A for the fuse location on your vehicle. Wait two minutes before proceeding to the next step to let any residual electrical charge dissipate. WARNING: PROCEDE WITH CAUTION. AIRBAG REMOVAL CAN BE DANGEROUS. TO PREVENT ACCIDENTAL DEPLOYMENT ENSURE THE BATTERY HAS BEEN DISCONNECTED. AVOID POSITIONING YOURSELF DIRECTLY IN FRONT OF THE AIRBAG. HANDLE THE AIRBAG WITH CARE. 3

4 Step 3: Release the steering column adjuster and extend the column out and downward as far as possible. Unlock the steering wheel by turning the key only slightly. Do not turn it to the power on position. Turn the wheel 90 degrees from center as shown. Step 4: Place masking tape over the top of the steering column to prevent scratches. Using a flat head screw driver carefully pry the airbag retaining clip downwards while pulling out on the airbag (Photo A). Depending on the geometry of the screwdriver it may be easier to twist the driver to disengage the clip. A mechanics mirror is recommended to help line up the driver with the clip. The airbag will only come out slightly at first (Photo B). Rotate the wheel 180 degrees and repeat for the other side. 4


5 Photo B Photo A Step 5: Pull the air bag out only enough to expose the Torx screw on the left side. You do not need to disconnect the airbag. Make sure the airbag is stable and remove the Torx screw securing the steering wheel trim piece. Note how the wires exit from the top of the trim piece. 5


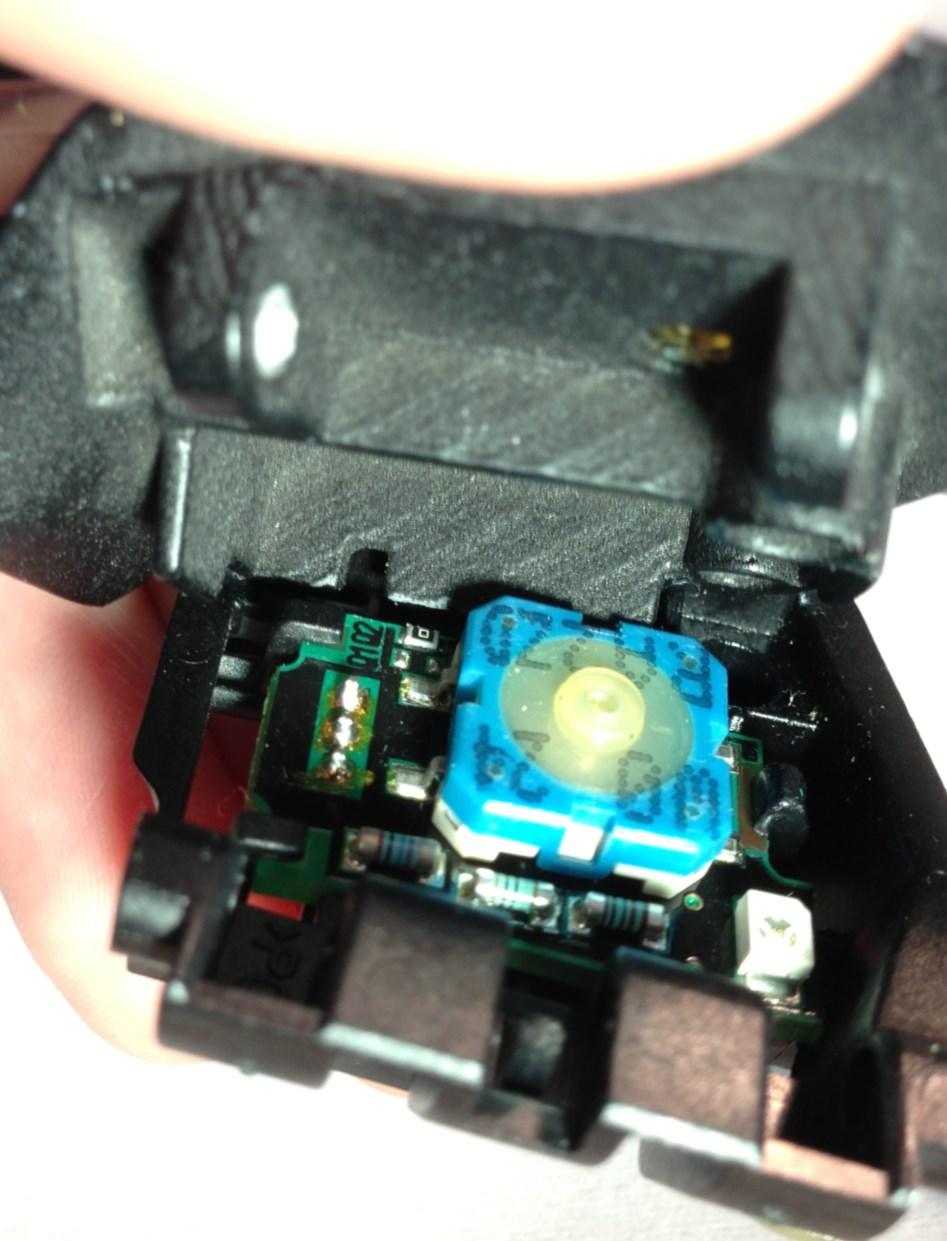
6 Step 6: Remove the trim piece and disconnect the shift paddle wire by pushing in the release tab. Step 7: Remove the Torx screw that secures the shift paddle. Remove the shift paddle, carefully feeding the wire through the opening in the steering wheel. Repeat steps 5 through 7 on the right paddle. 6


7 Step 8: Using the included hex key lightly push the hinge pin in the direction of the paddle +/- marking, so the pin puts slight pressure on the pin retaining clip (at arrow). Use the included pick tool to carefully release the clip from the pin groove. Step 9: Push the hinge pin out with the hex key until it can be removed by hand. 7


8 Step 10: Separate the two halves at the hinge side first. Carefully pry apart the snap fit on the opposite side so the spring is released slowly. Step 11: Place the return spring into its recess on the paddle base. 8
9 Step 12 (photos on next page): Insert the other end of the spring into the recess on the new paddle (Photo A). The snap lip on the paddle needs to slide under the lip in the base (arrows in Photo B). Position the paddle as shown in Photo C and slide into position as shown in Photo D. The spring has been removed in the photos for illustration clarity only. Ensure the spring does not move from its recesses. Line up the hinge pin holes; the paddle snap edge should be secure beneath the base edge. Insert the hinge pin (Photo E). If necessary use the Torx key to push in the pin completely. The fit should be snug. Make sure the pin does not stick out past either end of the hinge and the retaining clip engages the pin groove. Make sure the actuation of the paddle is smooth with no binding. Repeat steps 8 to 12 for the second paddle. 9


10 Photo A Photo B Photo C Photo D 10


11 Photo E Step 13: Install the left paddle assembly and put a drop of Loctite on the Torx screw. Thread in fully then apply a 1/4 turn. Do not over tighten. Check for smooth paddle actuation. If it binds the screw is too tight. 11


12 Step 14: Reconnect the paddle wire to the trim piece and reinstall, making sure the wire is routed as it was when first removed. Repeat steps 13 and 14 on the other side. Step 15: Align the airbag and with firm pressure on both sides push to engage the retaining latches. Reinstall the airbag fuse and reconnect your battery. Your traction control and steering warning lights may illuminate when the car is first started. These will reset after a short drive. 12
13 Thank You! Thank you for choosing the Double Apex Shift Paddle Kit. We believe in continuous improvement so until our products install themselves our instructions and process could probably be better. Any feedback is appreciated. If you have comments or questions please don t hesitate to contact us at info@doubleapex.co or visit us at doubleapex.co. Product Registration We encourage you to register your product. This allows us to contact you with any important notices or updates and makes any warranty or technical support requests easier to process. You can scan the QR label on the back of the packaging or go to doubleapex.co/registration and enter the serial numbers found on the QR label. 13
14 Appendix A Airbag Control Module Fuse Locations* Vehicle Fuse Location Fuse # MK5 Golf / GTI / Eos Inside driver door 3 MK5 Jetta (to April 2005) Inside driver door 30 MK5 Jetta (from May 2005) Inside driver door 3 MK6 Golf / GTI Inside driver door 3 MK6 Jetta Inside driver door 9 New Touareg Inside passenger door 14 Tiguan Below steering column 9 B6 Passat (to April 2008) Inside passenger door 9 B6 Passat (from May 2008) Inside driver door 9 *Double Apex is not responsible for errors, accuracy is not guaranteed. Locations may not be correct for all model variations. Refer to your owners guide or factory repair manual for more information. 14
15 Limited Warranty Double Apex LLC warrants this product, Shift Paddle Kit, to be free from defects in materials and workmanship for one year from date of purchase to the original retail Purchaser. Double Apex LLC reserves the right to repair or replace the defective product at their discretion, without charge. This is the only remedy the purchaser has for any loss or damage due to any defect in the product. This warranty does not cover labor, lost profits, down time or loss of use, shipping costs, damage to the vehicle or other incidental, indirect or consequential damages. This warranty is void if the product is misused, abused or installed incorrectly. The Purchaser is responsible for ensuring that the product is installed correctly and should immediately stop use of the product if an improper or unsafe condition is observed. Please contact Double Apex LLC to make a warranty claim before returning the product. 15
Toggle Button Kit. Installation Instructions MK5 / MK6 Golf, MK5 Jetta
 Toggle Button Kit Installation Instructions MK5 / MK6 Golf, MK5 Jetta Thank you for choosing the Double Apex Toggle Button kit. If you have any questions about the installation please do not hesitate to
Aux Port. Installation Instructions For 3.5mm Stereo Harness
 Aux Port Installation Instructions For 3.5mm Stereo Harness Thank you for choosing the Double Apex Aux Port! If you have any questions about the installation please do not hesitate to email us at support@doubleapex.co
Water Meth DIY Button. Installation Instructions
 Water Meth DIY Button Installation Instructions Thank you for choosing the Double Apex Water Meth Button. If you have any questions about the installation please do not hesitate to email us at support@doubleapex.co
Aux Port. Installation Instructions For Radio Harness
 Aux Port Installation Instructions For Radio Harness Thank you for choosing the Double Apex Aux Port! If you have any questions about the installation please do not hesitate to email us at support@doubleapex.co
Toggle Button Kit. Installation Instructions
 Toggle Button Kit Installation Instructions Thank you for choosing the Double Apex Toggle Button kit. If you have any questions about the installation please do not hesitate to email us at support@doubleapex.co.
Hatch Button Kit. Installation Instructions
 Hatch Button Kit Installation Instructions Thank you for choosing the Double Apex Hatch Button Kit. If you have any questions or feedback on the installation please do not hesitate to email us at support@doubleapex.co.
MK7 Installation Instructions
 MK7 Installation Instructions Thank you for choosing the Double Apex Garage Control. If you have any questions about the installation please do not hesitate to email us at support@doubleapex.co. A PDF
Installation Instructions
 Installation Instructions Thank you for choosing the Double Apex Garage Control. If you have any questions about the installation please do not hesitate to email us at support@doubleapex.co or call 978-371-8585.
MKVI Jetta Fog Light Kit
 MKVI Jetta Fog Light Kit Part Number VW Jetta Fog Light Installation This tutorial is provided as a courtesy by ECS Tuning. Proper service and repair procedures are vital to the safe, reliable operation
Remove the 3-11mm nuts holding mirror on. Don t drop the nuts!
 2005-2012 Ford Mustang Puddle Lamp Kit Parts List: Quantity: Tool List: LED Lamps 2 Flat head screwdriver Seals 2 Ratchet & Socket set OR Nuts 2 Adjustable Wrench Wiring harness 1 Drill & 11/16 th bit
IMPORTANT: Follow these instructions BEFORE installing the Retrax cover
 #2011 Install Instructions Supplement IMPORTANT: Follow these instructions BEFORE installing the Retrax cover Note: Use caution when cutting the wire ties holding the wire harness together so you do not
Installation Manual TWM Performance Short Shifter Cobalt SS/SC, SS/TC, HHR SS, Ion Redline and Saab 9-3
 Page 1 Installation Manual TWM Performance Short Shifter Cobalt SS/SC, SS/TC, HHR SS, Ion Redline and Saab 9-3 Please Note: It is preferable to park on a flat surface, as you will have to engage and disengage
MKVI Jetta Fog Light Kit
 MKVI Jetta Fog Light Kit Part Number VW Jetta Fog Light Installation This tutorial is provided as a courtesy by ECS Tuning. Proper service and repair procedures are vital to the safe, reliable operation
I N S T A L L A T I O N G U I D E. Chevrolet Silverado / GMC Sierra - Ext Cab * A (Diesel Only)
") I N S T A L L A T I O N G U I D E APPLICATION AMP Part # Chevrolet Silverado / GMC Sierra - Crew Cab 2011-201 751-01A (Diesel Only) Chevrolet Silverado / GMC Sierra - Ext Cab 2011-201* 751-01A (Diesel
I N S T A L L A T I O N G U I D E APPLICATION AMP Part # Chevrolet Silverado / GMC Sierra - Crew Cab 2011-201 751-01A (Diesel Only) Chevrolet Silverado / GMC Sierra - Ext Cab 2011-201* 751-01A (Diesel
INSTALLATION INSTRUCTIONS
 9 YEARS: 0-PRESENT Safety glasses should be worn at all times while installing this product. INSTALLATION INSTRUCTIONS MAKE: HONDA MODEL: CR-V STYLE: SUV WARNING: NEVER EXCEED YOUR VEHICLE MANUFACTURER'S
Audi Mk1 TT Vent Boost Gauge Kit
 2000-05 Audi Mk1 TT Vent Boost Gauge Kit Congratulations on your purchase of the A.W.E. Tuning Center Vent Boost Gauge for your Audi TT. While the install is fairly straight forward, please review these
GENUINE PARTS INSTALLATION INSTRUCTIONS
 GENUINE PARTS INSTALLATION INSTRUCTIONS 1. DESCRIPTION: Fog Lamp Kit 2. APPLICATION: Pathfinder (2013) 3. PART NUMBER: 999F1 XZ000 - Fog Lamp Kit (P42K w/ AL) 999F1 XZ001 - Fog Lamp Kit (P42K w/o AL) 999F1
2010+ VW Mk6 2.0T Vent Boost Gauge Kit INSTALLATION GUIDE
 INSTALLATION GUIDE 2010+ VW Mk6 2.0T Vent Boost Gauge Kit Congratulations on your purchase of the AWE Tuning Vent Boost Gauge Kit for the 2010+ VW Mk6 2.0T. Exquisite build quality with industry leading
INSTALLATION INSTRUCTIONS
 0 YEARS: 0-PRESENT Safety glasses should be worn at all times while installing this product. INSTALLATION INSTRUCTIONS MAKE: FORD MODEL: F-0 STYLE: TRUCK WARNING: NEVER EXCEED YOUR VEHICLE MANUFACTURER'S
Installation Instructions Seat Covers, Front Kit WARNING. Installation Tips. Installation Time. Tools. Skill Level
 Installation Instructions Seat Covers, Front Kit Vehicle Application: Wrangler 2DR, Wrangler Unlimited 2013-2017 Part Number 29283 Installation Tips Read and follow, precisely, all installation instructions
RMK HANDLEBAR KIT P/N ; ; APPLICATION BEFORE YOU BEGIN KIT CONTENTS. Verify accessory fitment at Polaris.com.
 RMK HANDLEBAR KIT P/N 2883835; 2883836; 2883837 APPLICATION Verify accessory fitment at Polaris.com. BEFORE YOU BEGIN Read these instructions and check to be sure all parts and tools are accounted for.
INSTALLATION INSTRUCTIONS
 INSTALLATION INSTRUCTIONS Accessory Application 2013 MDX Publications No. BII 13440 Issue Date JULY 2012 PARTS LIST INSTALLATION Steering wheel 2 TORX bolts Client Information: The information in this
w w w. h d o n l i n e s h o p. d e CRUISE CONTROL KIT GENERAL INSTALLATION -J04064 REV Kit Number Models Additional Parts Required
 -J006 REV. 006-08- CRUISE CONTROL KIT GENERAL Kit Number 7796-07 Models For the most up-to-date model fitment information, please see the product label or www.harley-davidson.com. Additional Parts Required.
Installation Instructions - ECS Tuning Vent Pod Vacuum/Boost Gauge Kit
 Installation Instructions - ECS Tuning Vent Pod Vacuum/Boost Gauge Kit This tutorial is provided as a courtesy by ECS Tuning. Part Number (also available as steering wheel mounted kit ES2593248) for VW
Assembly Instructions
 Assembly Instructions Revision 4: 2016 TABLE OF CONTENTS Important Information 5 Warranty 5 Limit of Liability 5 For Your Records 5 Operation 5 Maintenance 6 When Your Shipment Arrives 6 Tools & Personnel
Rear Strut Bar Installation Guide v1.0 (Dec 2014) Part No. EC
 Part No. EC") Rear Strut Bar Installation Guide v1.0 (Dec 2014) Part No. EC0111-0303 Applications VW Mk7 Golf, GTI, Golf R Audi 8V A3, S3 List of Parts Included List of Required Tools (1) Strut Bar Rod (2) Strut Bar
Rear Strut Bar Installation Guide v1.0 (Dec 2014) Part No. EC0111-0303 Applications VW Mk7 Golf, GTI, Golf R Audi 8V A3, S3 List of Parts Included List of Required Tools (1) Strut Bar Rod (2) Strut Bar
T Intercooler System INSTALLATION GUIDE. Contact us with any installation questions AWE-Tuning.com
 INSTALLATION GUIDE 2000-04 2.7T Intercooler System FOR RACING USE ONLY Congratulations on your purchase of the AWE Tuning Intercooler System for the 2002-04 Audi 2.7T engine. Exquisite build quality with
Remove 4 circled pins. Route wiring along dashed line. Remove the 2 9mm nuts and black retaining plate that secure extractor.
 2015 Ford Mustang Turn Signal Hood Kit Parts List: Quantity: Tool List: Bracket & pre-installed lamp 2 Flat head screwdriver Wiring harness 1 Phillips screwdriver PB-3660 Parts Bag 1 Ratchet & Socket set
GM AIRBAG STEERING WHEEL REPLACEMENT PROCEDURES
 GM AIRBAG STEERING WHEEL REPLACEMENT PROCEDURES Congratulations on the purchase of your new GRANT REVOLUTION steering wheel. This wheel is a direct replacement for your original factory steering wheel
LOWER EXHAUST FISHWIRE HARDWARE REQUIRED FASCIA & BRACKET TRIM REQUIRED
 3306 YEARS: 207 Safety glasses should be worn at all times while installing this product. INSTALLATION INSTRUCTIONS MAKE: HONDA MODEL: CR-V STYLE: SUV WARNING: NEVER EXCEED YOUR VEHICLE MANUFACTURER'S
2012+ Audi A6/A7 Carbon Fiber S-FLO Intake INSTALLATION GUIDE FOR RACING USE ONLY
 PERFORMANCE ENGINEERING FOR EUROPEAN AUTOS INSTALLATION GUIDE 2012+ Audi A6/A7 Carbon Fiber S-FLO Intake FOR RACING USE ONLY Congratulations on your purchase of the AWE Tuning Carbon Fiber S-FLO Intake
INSTALLATION INSTRUCTIONS
 INSTALLATION INSTRUCTIONS Accessory P/N 08U97-TX4-200 Application 2016 RDX Publications No. VERSION 1 Issue Date APRIL 2015 PARTS LIST Steering wheel Illustration of the Steering Wheel in the Vehicle 2
DF Ford F Short Bed 2009-Current
 921019 DF921019 Ford F150 5.5 Short Bed 2009-Current Hardware (Box 1 of 2) 1. Tango front rail assembly 2. Tango left rail assembly 3. Tango right rail assembly 4. Rhino Rack cross bars (2) 5. Clamps (8)
11422 INSTALLATION INSTRUCTIONS
 1122 INSTALLATION INSTRUCTIONS Safety glasses should be worn at all times while installing this product. YEARS: 2015-PRESENT MAKE: VOLKSWAGEN MODEL: STYLE: WAGON YEARS: 2017-PRESENT MAKE: VOLKSWAGEN MODEL:
13343 INSTALLATION INSTRUCTIONS
 13343 INSTALLATION INSTRUCTIONS Safety glasses should be worn at all times while installing this product. YEARS: 2011-PRESENT MAKE: TOYOTA MODEL: SIENNA STYLE: VAN WARNING: NEVER EXCEED YOUR VEHICLE MANUFACTURER'S
Quadratec Automatic Power Mirror Movers for Jeep Wrangler JK Current
 Quadratec Automatic Power Mirror Movers for Jeep Wrangler JK 2011- Current US PATENT 9573526 Installation and Instruction Manual: Item # 13125.023X 2011-2013 JK 2014-Current JK REQUIRED TOOLS: Safety Glasses
Recommended tools: Estimated install time: Parts list:
 Congratulations on your purchase of the A.W.E. Tuning Center Vent Boost Gauge for your Audi A4/S4. While the install is fairly straight forward, please review these instructions carefully before attempting
MK7 GTI Electronic Folding Mirror Conversion
 MK7 GTI Electronic Folding Mirror Conversion 01 Mirror and Switch Installation 1. Using a soft pry tool remove the trim panel on the driver side door handle. 02 2. Remove 2 T-30 torx screws. 03 3. On the
INSTALLATION INSTRUCTIONS
 INSTALLATION INSTRUCTIONS Accessory Application 2012 TL Publications No. BII 45425 Issue Date MAR 2011 PARTS LIST Steering wheel 2 TORX bolts Information INSTALLATION Client Information: The information
Installation Instructions - ECS Tuning Vent Pod Vacuum/Boost Gauge Kit
 Installation Instructions - ECS Tuning Vent Pod Vacuum/Boost Gauge Kit This tutorial is provided as a courtesy by ECS Tuning. Part Number for (2005-2008) Proper service and repair procedures are vital
Blue Jay Rodless Cylinder BC MS. Track Repair Manual 1996 & 2012 THE EASTMAN EASTMAN. All End Caps Black for Models
 EASTMAN 1996 & 2012 THE EASTMAN Blue Jay Rodless Cylinder BC-40224-MS Track Repair Manual All End Caps Black for 1996-2012 Models IMPORTANT Disconnect this equipment from pneumatic pressure lines before
INSTALLATION GUIDE. Tenino Retro Pot Filler Hi-Rise Kitchen Faucet PB-K05
 INSTALLATION GUIDE Tenino Retro Pot Filler Hi-Rise Kitchen Faucet PB-K05 RECOMMENDED TOOLS AND MATERIALS Sink Hole Cover (Optional) Allen Wrench Set Plumbers Putty Adjustable Wrench Tape Measure Basin
INSTALLATION GUIDE. Rainier Coil Pull Down Kitchen Faucet PB-K01
 INSTALLATION GUIDE Rainier Coil Pull Down Kitchen Faucet PB-K01 RECOMMENDED TOOLS AND MATERIALS Plumbers Putty Adjustable Wrench Tape Measure Basin Wrench Phillips Screwdriver Pencil Masking Tape BEFORE
JUNCTION BLOCK DESCRIPTION OPERATION XK 8W-97 POWER DISTRIBUTION 8W
 XK 8W-97 POWER DISTRIBUTION 8W - 97-7 JUNCTION BLOCK DESCRIPTION An electrical Junction Block(JB) is concealed beneath the driver side of the instrument panel in the passenger compartment of the vehicle.
1993 ACCESSORIES & EQUIPMENT Volkswagen Steering Column Switches. Cabriolet, Corrado SLC, EuroVan, Fox, Golf, GTI, Jetta, Passat
 Article Text ARTICLE BEGINNING 1993 ACCESSORIES & EQUIPMENT Volkswagen Steering Column Switches Cabriolet, Corrado SLC, EuroVan, Fox, Golf, GTI, Jetta, Passat * PLEASE READ THIS FIRST * CAUTION: Cabriolet
LEXUS RC 350/RC-F ILLUMINATED DOOR SILLS Preparation
 Preparation Part Number: PT944-24150 Kit Contents Item # Quantity Reqd. Description 1 2 Inner LED Scuff 2 2 Outer Scuff 3 1 Hardware Bag Hardware Bag Contents Item # Quantity Reqd. Description 1 15 20
11333 INSTALLATION INSTRUCTIONS
 11333 INSTALLATION INSTRUCTIONS Safety glasses should be worn at all times while installing this product. YEARS: 2011-PRESENT MAKE: MINI COOPER MODEL: COUNTRYMAN STYLE: SEDAN WARNING: NEVER EXCEED YOUR
Installation Instructions
 Approx. Install Time 3Hrs 00Min Installation Instructions Vehicle Application Year: 2013-2017 Make: Ram Model: 2500/3500 Diesel Engine: 6.7L Cummins Tools Required 7mm, 8mm, 10mm,& 13mm Wrench & Socket
INSTALLATION INSTRUCTIONS
 YEARS: 0 ~ Safety glasses should be worn at all times while installing this product. INSTALLATION INSTRUCTIONS MODEL: CX- MAKE: MAZDA STYLE: CROSSOVER WARNING: NEVER EXCEED YOUR VEHICLE MANUFACTURER'S
Audi B9 A4 & S4 Carbon Fiber Steering Wheel Trim Installation Instructions
 Audi B9 A4 & S4 Carbon Fiber Steering Wheel Trim Installation Instructions Proper service and repair procedures are vital to the safe, reliable operation of all motor vehicles as well as the personal safety
13410 INSTALLATION INSTRUCTIONS
 13410 INSTALLATION INSTRUCTIONS Safety glasses should be worn at all times while installing this product. YEARS: 2010-PRESENT MAKE: SUBARU MODEL: OUTBACK (EXCLUDING SPORT) STYLE: WAGON WARNING: NEVER EXCEED
2012+ Audi S6/S7 Carbon Fiber S-FLO Intake INSTALLATION GUIDE
 PERFORMANCE ENGINEERING FOR EUROPEAN AUTOS INSTALLATION GUIDE 2012+ Audi S6/S7 Carbon Fiber S-FLO Intake Congratulations on your purchase of the AWE Tuning Carbon Fiber S-FLO Intake for the 2012+ Audi
VW/AUDI MK7 VEHICLES
 Installation Manual P/N 1-301-1708-01 (STAGE 2+ FUEL KIT) P/N 1-301-1708-02 (STAGE 3+ FUEL KIT) VW/AUDI MK7 VEHICLES Warning: This installation is not recommended for a novice or the new guy in the shop.
2012+ BMW 328i Sedan Quad Outlet Template INSTALLATION GUIDE
 INSTALLATION GUIDE 2012+ BMW 328i Sedan Quad Outlet Template Congratulations on your purchase of the AWE Tuning high performance exhaust for the 2012+ BMW 328i Sedan. Exquisite build quality with industry
OUTDOOR TABLE TENNIS TABLE ASSEMBLY INSTRUCTIONS
 OUTDOOR TABLE TENNIS TABLE ASSEMBLY INSTRUCTIONS Please Do Not Hesitate to Contact Our Consumer Hotline at 800-759-0977 with Any Questions That May Arise During Assembly or Use of This Product! NG2336P
REARVIEW MIRROR AND BACKUP CAMERA KIT
 REARVIEW MIRROR AND BACKUP CAMERA KIT P/N 2881483 APPLICATION Verify accessory fitment at Polaris.com. BEFORE YOU BEGIN Read these instructions and check to be sure all parts and tools are accounted for.
11422 INSTALLATION INSTRUCTIONS
 11422 INSTALLATION INSTRUCTIONS Safety glasses should be worn at all times while installing this product. YEARS: 2015-PRESENT MAKE: VOLKSWAGEN MODEL: GOLF SPORTWAGEN STYLE: WAGON WARNING: NEVER EXCEED
TOYOTA COROLLA ILLUMINATED DOOR SILLS Preparation
 Preparation Part Number: PT942-02140 Kit Contents Item # Quantity Reqd. Description 1 1 Illuminated Scuff plate, Front Right Hand 2 1 Illuminated Scuff plate, Front Left Hand 3 1 Door Scuff plate, Rear
Passat (B6) CC (3c8) 2.0 TSI MED17 ECU Removal Guide Precautions and notes before removing the ECU:
 CC (3c8) 2.0 TSI MED17 ECU Removal Guide Precautions and notes before removing the ECU:") Phone: (800) 680-7921 Passat (B6) CC (3c8) 2.0 TSI MED17 ECU Removal Guide Precautions and notes before removing the ECU: The ECU (Engine Control Unit) is a computer that controls your engine. You must
Phone: (800) 680-7921 Passat (B6) CC (3c8) 2.0 TSI MED17 ECU Removal Guide Precautions and notes before removing the ECU: The ECU (Engine Control Unit) is a computer that controls your engine. You must
Tiguan (5N) 2.0 TSI MED17 ECU Removal Guide Precautions and notes before removing the ECU:
 2.0 TSI MED17 ECU Removal Guide Precautions and notes before removing the ECU:") Phone: (800) 680-7921 Tiguan (5N) 2.0 TSI MED17 ECU Removal Guide Precautions and notes before removing the ECU: The ECU (Engine Control Unit) is a computer that controls your engine. You must have the
Phone: (800) 680-7921 Tiguan (5N) 2.0 TSI MED17 ECU Removal Guide Precautions and notes before removing the ECU: The ECU (Engine Control Unit) is a computer that controls your engine. You must have the
RS5mesh style Grille. Audi A5/S5. Installation Instructions. pre-facelift ES best viewed in Acrobat Reader
 Audi A5/S5 pre-facelift RS5mesh style Grille Installation Instructions ES2627648 This tutorial is provided as a courtesy by ECS Tuning. best viewed in Acrobat Reader Proper service and repair procedures
GENUINE PARTS INSTALLATION INSTRUCTIONS
 GENUINE PARTS INSTALLATION INSTRUCTIONS 1. 2. 3. 4. DESCRIPTION: Accent light Kit APPLICATION: Versa (2012) PART NUMBER: 999F3 AW008 - Universal Accent Lighting Kit. KIT CONTENTS: Item QTY Description
Golf/Jetta (MK5), EOS (175), A3 (8P) and others Precautions and notes before removing the ECU:
, EOS (175), A3 (8P) and others Precautions and notes before removing the ECU:") Phone: (800) 680-7921 Golf/Jetta (MK5), EOS (175), A3 (8P) and others Precautions and notes before removing the ECU: The ECU (Engine Control Unit) is a computer that controls your engine. You must have
Phone: (800) 680-7921 Golf/Jetta (MK5), EOS (175), A3 (8P) and others Precautions and notes before removing the ECU: The ECU (Engine Control Unit) is a computer that controls your engine. You must have
Ford Mustang V6 OEM-Style Fog Light Kit Parts List: Quantity: Tool List:
 2015-2017 Ford Mustang V6 OEM-Style Fog Light Kit Parts List: Quantity: Tool List: LED Foglights/ Bezels 2 Flat head & Phillips screwdriver (if you ordered part#3600) Ratchet & Socket set OR Wiring harness
AWE SwitchPath Track Edition Exhaust System VW Golf R. AWE website here
 Thank you for purchasing the AWE SwitchPath or Track Edition Exhaust System for the 2018+ VW Golf R. For up-to-the-minute fitment information, be sure to visit the MK7 Golf R section of the AWE website.
1200 Southeast Ave Tallmadge, Ohio to 2014 Mustang (V6 & V8) Summit Racing Roll Stop Install Instructions.
 Summit Racing Roll Stop Install Instructions.") 1200 Southeast Ave Tallmadge, Ohio 44278 2010 to 2014 Mustang (V6 & V8) Summit Racing Roll Stop Install Instructions Part # SUM-760005 Thank you for considering the Summit Racing Roll Stop. Summit Racing
1200 Southeast Ave Tallmadge, Ohio 44278 2010 to 2014 Mustang (V6 & V8) Summit Racing Roll Stop Install Instructions Part # SUM-760005 Thank you for considering the Summit Racing Roll Stop. Summit Racing
advanced FLOW engineering Instruction Manual P/N: Make: BMW Model: 328d/dx (F30/F31) Year: Engine: L4-2.
 Year: Engine: L4-2.") advanced FLOW engineering Instruction Manual P/N: 46-20301 Make: BMW Model: 328d/dx (F30/F31) Year: 2014-2017 Engine: L4-2.0L (td) N47 Please read the entire instruction manual before proceeding. Ensure
advanced FLOW engineering Instruction Manual P/N: 46-20301 Make: BMW Model: 328d/dx (F30/F31) Year: 2014-2017 Engine: L4-2.0L (td) N47 Please read the entire instruction manual before proceeding. Ensure
1993 ACCESSORIES & EQUIPMENT Volkswagen Power Sun Roof. Volkswagen; Corrado SLC, EuroVan, Golf, GTI, Jetta, Passat
 Article Text ARTICLE BEGINNING 1993 ACCESSORIES & EQUIPMENT Volkswagen Power Sun Roof Volkswagen; Corrado SLC, EuroVan, Golf, GTI, Jetta, Passat DESCRIPTION & OPERATION The power sun roof operates at all
HANDY GATE ASSEMBLY, INSTALLATION AND OPERATING INSTRUCTIONS
 ASSEMBLY, INSTALLATION AND OPERATING INSTRUCTIONS BEFORE INSTALLING OR USING THE, REVIEW THE VEHICLE LOADING LIMITATIONS OUTLINED IN THE VEHICLE OWNER S MANUAL AND THE SAFETY COMPLIANCE CERTIFICATION LABEL
INSTALLATION INSTRUCTIONS FOR 2016 TOYOTA TACOMA 4 X 4 AND PRERUNNER FRONT LIGHT BAR MOUNT PART NUMBER 20016
 INSTALLATION INSTRUCTIONS FOR 2016 TOYOTA TACOMA 4 X 4 AND PRERUNNER FRONT LIGHT BAR MOUNT PART NUMBER 20016 WARNING!!! READ AND UNDERSTAND ALL INSTRUCTIONS BEFORE PROCEEDING. MAKE SURE THAT YOU HAVE ALL
INSTALLATION INSTRUCTIONS
 0711016 Page 1 INSTALLATION INSTRUCTIONS ELECTRONIC DEADBOLT WITH KEYPAD latch 2-3/8 Your latch is now set 2-3/8 (60mm) backset latch 2-3/4 2-3/4" (70mm) 2-3/8" (60mm) Cylindrical cover Extension plate
12171 INSTALLATION INSTRUCTIONS
 1171 INSTALLATION INSTRUCTIONS Safety glasses should be worn at all times while installing this product. YEARS: 017-PRESENT MAKE: KIA MODEL: NIRO STYLE: CUV WARNING: NEVER EXCEED YOUR VEHICLE MANUFACTURER'S
HANDLEBAR BAG WITH PHONE CHARGER KIT
 HANDLEBAR BAG WITH PHONE CHARGER KIT P/N 2883687; 2883786 APPLICATION Verify accessory fitment at Polaris.com. BEFORE YOU BEGIN Read these instructions and check to be sure all parts and tools are accounted
TECHNICAL INSTRUCTIONS FOR SPECIAL SERVICE CAMPAIGN 40F
 TECHNICAL INSTRUCTIONS FOR SPECIAL SERVICE CAMPAIGN 40F 2002 THROUGH EARLY 2004 MODEL YEAR NORTH AMERICAN PRODUCED (NAP) TOYOTA CAMRY CURTAIN SIDE AIRBAG Page 1 of 26 I. OPERATION FLOW CHART Verify Vehicle
INSTALLATION INSTRUCTIONS
 11485 YEARS: 2015-CURRENT Safety glasses should be worn at all times while installing this product. INSTALLATION INSTRUCTIONS MODEL: C300 MAKE: MERCEDES STYLE: SEDAN WARNING: NEVER EXCEED YOUR VEHICLE
SCION xb EC REARVIEW MIRROR Preparation
 Preparation Part Number: PT374-02090 Kit Contents Item # Quantity Reqd. Description 1 1 AD Mirror Assembly w/ PRNDL 2 1 Hardware bag Hardware Bag Contents Item # Quantity Reqd. Description 1 2 T-tap Connectors,
13331 INSTALLATION INSTRUCTIONS
 13331 INSTALLATION INSTRUCTIONS Safety glasses should be worn at all times while installing this product. YEARS: 2018-PRESENT MAKE: AUDI MODEL: Q5 STYLE: SUV WARNING: NEVER EXCEED YOUR VEHICLE MANUFACTURER'S
2010+ Audi S4/S5 4.2 & 3.0T S-FLO Carbon intake INSTALLATION GUIDE
 INSTALLATION GUIDE 00+ Audi S4/S5 4. & 3.0T S-FLO Carbon intake FOR RACING USE ONLY Congratulations on your purchase of the AWE Tuning S-FLO Carbon intake for the 00+ Audi S4 and S5 4. & 3.0T. Exquisite
SCION xb AUTO-DIMMING MIRROR Preparation
 Preparation Part Number: PT374-02090 Kit Contents Item # Quantity Reqd. Description 1 1 AD Mirror Assembly w/ PRNDL 2 1 Hardware bag Hardware Bag Contents Item # Quantity Reqd. Description 1 2 T-tap Connectors,
11424 INSTALLATION INSTRUCTIONS
 INSTALLATION INSTRUCTIONS Safety glasses should be worn at all times while installing this product. YEARS: 0-CURRENT MAKE: HYUNDAI MODEL: ELANTRA STYLE: SEDAN WARNING: NEVER EXCEED YOUR VEHICLE MANUFACTURER'S
1PC TONNEAU COVER INSTALLATION INSTRUCTIONS. Ford Ranger (with bedliner)
") PC TONNEAU COVER INSTALLATION INSTRUCTIONS Ford Ranger (with bedliner) Care Instructions: Clean Tonneau Cover with a mild detergent and water solution. Do not use abrasive cleaners or solvents. Place these
PC TONNEAU COVER INSTALLATION INSTRUCTIONS Ford Ranger (with bedliner) Care Instructions: Clean Tonneau Cover with a mild detergent and water solution. Do not use abrasive cleaners or solvents. Place these
Installation Manual TWM Performance 2010 Mazda 3 short shifter 5 and 6 speed non-mazdaspeed
 Installation Manual TWM Performance 2010 Mazda 3 short shifter 5 and 6 speed non-mazdaspeed Begin the installation by parking on a flat surface, as you will have to engage and disengage the hand brake
Installation Instructions INDY SHIFTER Fits: Mustang Fastback & Convertible with MT-82 Transmission Catalog #
 Installation Instructions INDY SHIFTER Fits: 2015-2018 Mustang Fastback & Convertible with MT-82 Transmission Catalog # 3916036 Watch our installation video on YouTube WORK SAFELY! For maximum safety,
FRONT DRIVELINE MODIFICATION MAY BE NECESSARY!!!!
 INSTALLATION INSTRUCTIONS FOR 2009 DODGE 2500/3500 4WD & 1500 Mega Cab 6 SUSPENSION SYSTEM PART NUMBER 7206 Requires the following parts (sold separately) for a complete installation: Front Coil Spring
13387 INSTALLATION INSTRUCTIONS
 13387 INSTALLATION INSTRUCTIONS Safety glasses should be worn at all times while installing this product. YEARS: 2018-PRESENT MAKE: BMW MODEL: X3 STYLE: SUV WARNING: NEVER EXCEED YOUR VEHICLE MANUFACTURER'S
Installation Manual TWM Performance Shift Boot 2006 and up Honda Civic Si
 Page 1 Installation Manual TWM Performance Shift Boot 2006 and up Honda Civic Si Begin the installation by parking on a flat surface, as you may have to engage and disengage the hand brake and shift from
- MK7 Mirror Integration Kit - Installation Instructions
 - MK7 Mirror Integration Kit - Thank you for choosing the Double Apex Gentex Mirror Integration kit for your Volkswagen MK7. If you have any questions about the installation please email us at support@dblapex.com.
Installation Manual TWM Performance Kia Forte Short Shifter
 Installation Manual TWM Performance Kia Forte 2009+ Short Shifter Begin the installation by parking on a flat surface, as you will have to engage and disengage the hand brake and shift from gears to neutral.
WARNING. Instructions for Guidelights and Chargers. How SnapPower Products Work
 Instructions for Guidelights and Chargers WARNING Failure to turn OFF electrical power prior to installing or removing the Guidelight or Charger can result in electrical shock, fires, and/or death. www.snappower.com
Front Door Panel: Service and Repair Front Door Trim Panel - Removal
 Front Door Panel: Service and Repair Front Door Trim Panel - Removal REMOVAL Special Tools: 1. Disconnect and isolate the negative battery cable 2. Using trim stick or equivalent, disengage the two retaining
13136 INSTALLATION INSTRUCTIONS
 INSTALLATION INSTRUCTIONS Safety glasses should be worn at all times while installing this product. YEARS: 09-PRESENT MAKE: AUDI/PORSCHE MODEL: Q/MACAN (EXCLUDING HYBRID) STYLE: SUV WARNING: NEVER EXCEED
3-5 Hours Professional installation recommended
 I N S T A L L A T I O N G U I D E APPLICATION AMP Part # Chevrolet Silverado500 / GMC Sierra 500 - Double Cab * 04-7 7554-0A Chevrolet Silverado500 / GMC Sierra 500- Crew Cab 04-7 7554-0A Chevrolet Silverado
These instructions were written for a MkVI VW GTI, but other models (Audi A3, VW Beetle, VW Jetta) are similar.
 are similar.") TL100030 Notes: These instructions were written for a MkVI VW GTI, but other models (Audi A3, VW Beetle, VW Jetta) are similar. When disassembling the car, be sure to keep all fasteners so they can be
TL100030 Notes: These instructions were written for a MkVI VW GTI, but other models (Audi A3, VW Beetle, VW Jetta) are similar. When disassembling the car, be sure to keep all fasteners so they can be
G2 INSTALLATION MANUAL
 PERFORMANCE ENGINEERED SYSTEMS G2 INSTALLATION MANUAL FOR RACING OR OFF ROAD USE 1 INTRODUCTION PLEASE PURCHASE AUDI- ONLY POWER STEERING FLUID (PENTOSIN CHF 11S) Please note this an older version, and
GENUINE PARTS INSTALLATION INSTRUCTIONS
 GENUINE PARTS INSTALLATION INSTRUCTIONS 1 DESCRIPTION: 2 APPLICATION: 3 PART NUMBER(S) REQUIRED FOR INSTALLATION: Fog Lamp Kit Rogue w/ AL 999F1 G2000 (Fog Lamp Kit) 4 KIT CONTENTS: Item Qty. Part Description
INSTALLATION INSTRUCTIONS
 INSTALLATION INSTRUCTIONS X-08 TM /CEX-08 T M Type 1F HIGH SECURITY ELECTRONIC LOCK 1 Table of Contents INTRODUCTION... 3 BASIC TOOLS AND MATERIALS NEEDED... 3 LOCK PARTS FOR INSTALLATION... 4 INSTALLATION
HAVING INSTALLATION QUESTIONS? CALL TECHNICAL SUPPORT AT DESIGNED FOR USE WITH BALL MOUNT # 36053B
 2/20/2013 ITEM 1 QTY 8 Parts List PART NUMBER DESCRIPTION 3/8" CONICAL TOOTHED WASHER TOOLS REQUIRED RATCHET TORQUE WRENCH 12" EXTENSION 12mm SOCKET 8mm SOCKET OFFSET SCREWDRIVER FLAT BLADE SCREWDRIVER
GROSS LOAD CAPACITY WHEN USED AS A WEIGHT CARRYING HITCH: 2,000 LBS. TRAILER WEIGHT & 200 LBS. TONGUE WEIGHT.
 PAGE 1 0F 6 GROSS LOAD CAPACITY WHEN USED AS A WEIGHT CARRYING HITCH: 2,000 LBS. TRAILER WEIGHT & 200 LBS. TONGUE WEIGHT. WARNING: ALL NON-TRAILER LOADS APPLIED TO THIS PRODUCT MUST BE SUPPORTED BY 18050
#1034 Ford Sport Trac Installation Instructions
 #1034 Ford Sport Trac Installation Instructions Owner s Manual Please save Instructions: Important Warranty and Maintenance information enclosed (2) 10-24 Black flathead Allen Screws Tailgate End Front
OWNERS MANUAL ASSEMBLY, MAINTENANCE, AND WARRANTY
 OWNERS MANUAL ASSEMBLY, MAINTENANCE, AND WARRANTY Although the Propel Drive is very dependable, never pedal out farther than you are willing to paddle back. Your Propel comes shipped to you in this robust