Lefty MAX 140 Travel Management, service. Lefty MAX 140 Travel management, service
|
|
|
- Chester Hubbard
- 5 years ago
- Views:
Transcription

1
2 Lefty MAX 140 Travel management, service
3 THE FOLLOWING SERVICE SHOULD BE PERFORMED AFTER EVERY HOURS OF RIDING, OR AT LEAST ONCE A YEAR. THE INSTRUCTIONS ARE FOR ADVANCED MECHANICS. THEY DO NOT REPLACE THE PARTICIPATION AT TECH SEMINARS.

4 Identification

5 24 mm socket 17mm long socket Dental tool 2 mm allen key Shimano BB tool 9 mm open 19 mm open IFP setting tool (internal floating piston)

6 Always check Shock boot Filter boot Filter Make sure the filter Is clean and lubed! (doesn t need to be Taken off!)
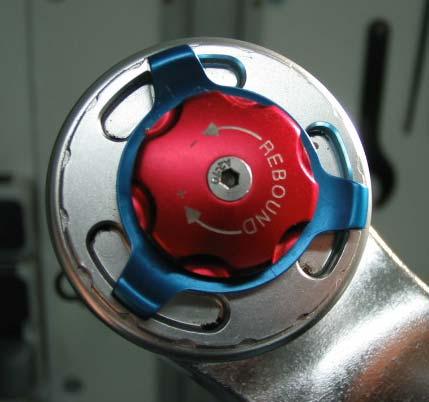
7 Remove rebound dial with 2 mm allen key
8 unhook clip Remove blue dial
9 Use Shimano BB tool to undo upper collar
10 Remove both split rings
11 Loosen pre-load lock rings
12 Unscrew top cap from damping shaft with 19mm and 9 mm (flats on shaft) open wrench

13 If needed, the rebound and TM dial assembly can be taken Appart and cleaned! Take care not to lose ball/spring TM dial TM dial clutch Rebound dial
14 Pull rubber and white plastic spacer from shaft
15


16 Remove valve cap Release air from SPV chamber
17 Unscrew lower plug with 24 mm socket


18 Pull lower plug and bladder from lower leg Drain oil into wais oil container
19 Pull tuning spindle (3mm hex) from damping shaft


20 Unthread oil plug body with long 17 mm socket


21 Rebound shaft Travel management body SPV valve TM body holds IFP inside

22 turning tuning spindle (3mm hex) activates TM, pushing it Adjusts rebound

23 What does the IFP do? How does TM work? When blue TM dial is turned, a port Is shut and captures oil inside the TM Body, which reduces the total stroke. air oil Air above IFP functions as top out for 100mm position Rebound shaft Travel management body

24 Carefully remove IFP from Travel Management body (don t damage the Surface!)


25 Remove both quad rings, clean piston And replace quad rings with new ones.


26 Remove all O-rings from Travel Management body, Clean body and renew all O-rings!


27 Slide IFP over re- Bound shaft! Respect position! Position IFP setting Tool between IFP and Outside collar of re- Bound shaft (not Inside!)

28 Slide Travel management Body over fixed IFP. Don t Damage seals! (sorry, this o-ring should not Be missing!!!)
 remove IFP setting tool.")
29 When Travel management body is Fully over rebound shaft (both Grooves must be visable!) remove IFP setting tool.


30 To check if IFP Setting is correct, Push TM body Down and release Suddenly! Body should bounce Back as shown in Pictures!


31 Insert rebound shaft with TM body And SPV valve. Tighten top cap With long 17 mm socket!

32 Fill telescope with oil from Bottom, while pulling rebound Shaft up and down to bleed System. Use 155 ccl in total.


33 If SPV volume Adjust looks like this, thread back in untill it looks like picture at bottom! Before reinstalling.

34 Make sure to remove O-rings, clean parts And renew O-rings Before re-assembling.

35 Make sure SPV lung is fully expanded before returning into telescope

36 tighten lower plug with 24 mm socket

37 Inflate SPV Air chamber to the Recommended Pressure. Min 30 PSI Max 100 PSI

38 return rubber and white plastic spacer to shaft

39 white spacer (large) over TM body (only for green and blue spring nec.)

40 Return well greased Spring.

 open")
41 thread top cap onto damping shaft with 19mm and 9 mm (flats on shaft) open wrench

42 pre-load spring at least 2 turns, max 8 turns And fix with counter ring


43 Reset telescope By pulling outer Steerer up hard a Few times until Overall fork length Of max. 728 mm As in following pictures is measured. (should be checked /done after every Hours of riding)


44 This is where and how much The tlescope should measure After the reset!

45 insert both split rings

46 Use Shimano BB tool to tighten upper collar


47 engage clip position blue dial

48 mount rebound dial with 2 mm allen key
49 DONE!
Z125 Front Fork Upgrade kits. Installation SOP
 Z125 Front Fork Upgrade kits Installation SOP Tools a. Loctite243 or Loctite2701 (Thread Locker) b. Loctite7649 (Activator) c. 33mm Hex Socket d. 17mm Hex Socket e. Shaft Clamping Tool (12mm) f. Shaft
Maverick American 3085 Bluff Street Boulder, CO Tel: Fax: ML7.2 SHOCK SERVICE MANUAL
 Maverick American 3085 Bluff Street Boulder, CO 80301 Tel: 303-415-0370 Fax: 303-415-0676 www.maverickamerican.com ML7.2 SHOCK SERVICE MANUAL 1. OVERVIEW 1.1. The Maverick ML7.2 rear shock is an oil damped
FITTING INSTRUCTIONS YAMAHA YZF-R3
 FITTING INSTRUCTIONS YAMAHA YZF-R3 120-015-270-005 20/07/2017 ISSUE 1 2 IMPORTANT NOTES KEY NB NOTE! CAUTION! WARNING! NB NB NB The front forks are a very important part of the motorcycle and will affect
Sachs 48mm Closed Cartridge fork Service Manual
 Sachs 48mm Closed Cartridge fork Service Manual 1 Fork seal driver 2 Special soft jaws 3 Fork cap wrench 4 Rebound rod holding tool 5 Compression assembly holding tool 6 Retaining clip tool Special Tools
Level 1 and Level 2/3 Fork Upgrade Fitting Instructions
 Fitting Instructions for Honda CB500X/F Level 1 and Level 2/3 Fork Upgrade Fitting Instructions Ensure bike is securely mounted on suitable stand or scissor lift, if our Engine Guard RRP 437, is fitted.
Lefty, SuperMax, Olaf Solo Air Assembly Upgrade
 Page 1 of 7 Installation Instructions (EN) Lefty, SuperMax, Olaf Solo Air Assembly Upgrade About these Instructions The upgrade should be installed at a Factory Tech Room, HeadShok Service Center or qualified
TOPAZ Service Guide. Full Service
 TOPAZ Service Guide Full Service SERVICE OVERVIEW This manual will guide you step by step performing an air service to your Topaz. Please follow each instruction carefully to achieve the best and safest
DUCATI MONSTER 696/796 CARTRIDGE KIT
 DUCATI MONSTER 696/796 CARTRIDGE KIT INSTALLATION OF THE KYB CARTRIDGE KIT Available for models Ducati Monster 696 and 796 from 2011 to 2014 This manual concerns the installation of the aftermarket KYB
X-Trainer 43mm fork service manual. Beta USA, Inc This work should be performed by a trained motorcycle technician.
 X-Trainer 43mm fork service manual Beta USA, Inc. 2016 This work should be performed by a trained motorcycle technician. Table of contents Page Introduction/special tools... 2 Fork exploded view... 3 Legend.
Wren Inverted Suspension Forks with Keyed Stanchions and TwinAir System
 Owner s Manual Wren Inverted Suspension Forks with Keyed Stanchions and TwinAir System Congratulations You have just purchased a Wren Inverted Suspension Fork. The culmination of years of design, testing
Owner s Manual Wren Inverted Suspension Forks
 Owner s Manual Wren Inverted Suspension Forks with Keyed Stanchions TwinAir System Carbon Bash Guards 2 - Travel/AC Clips 2 - Hose/Cable Guides 43mm Uppers 36mm Stanchions Check out our service videos
Maverick American 3085 Bluff Street Boulder, CO Tel: Fax: ML7.0 SHOCK SERVICE MANUAL
 Maverick American 3085 Bluff Street Boulder, CO 80301 Tel: 303-415-0370 Fax: 303-415-0676 www.maverickamerican.com ML7.0 SHOCK SERVICE MANUAL 1. OVERVIEW 1.1. The Maverick ML7.0 rear shock is an oil damped
Owners manual. Öhlins Superbike front fork FG 170
 Owners manual Öhlins Superbike front fork FG 0 Including: Setting up your fork Changing springs and seals Service the fork Trouble shooting Technical info Spare parts & tools Öhlins super bike front fork
2006 SID SERVICE GUIDE
 2006 SID SERVICE GUIDE For exploded diagram and part number information, refer to the Spare Parts Catalog available on our website at www.rockshox.com. Information contained in this publication is subject
FRONT FORK 2.16 GENERAL REMOVAL HOME. 4. See Figure Loosen upper and lower fork clamp pinch fasteners (1, 4).
.") FRONT FORK.6 GENERAL The XRScg model utilizes a mm fork assembly while all other models have changed to the mm fork assembly. The front fork consists of two telescoping outer tube/inner slider assemblies.
FRONT FORK.6 GENERAL The XRScg model utilizes a mm fork assembly while all other models have changed to the mm fork assembly. The front fork consists of two telescoping outer tube/inner slider assemblies.
Sachs shock manual. ( ) 2 & 4 Stroke RR Enduro. ( ) RS Dual Sport
 2 & 4 Stroke RR Enduro. ( ) RS Dual Sport") Sachs shock manual (2013 2015) 2 & 4 Stroke RR Enduro (2014-2015) RS Dual Sport 1 Introduction The procedures in this manual must take place in a clean environment using professional tools and some specific,
Sachs shock manual (2013 2015) 2 & 4 Stroke RR Enduro (2014-2015) RS Dual Sport 1 Introduction The procedures in this manual must take place in a clean environment using professional tools and some specific,
TUNING GUIDE. ridefox.com
 TUNING GUIDE ridefox.com sag setting To achieve the best performance from your FOX suspension, adjust the air pressure to attain your proper sag setting. Sag is the amount your suspension compresses under
TUNING GUIDE. ridefox.com
 TUNING GUIDE ridefox.com sag setting To achieve the best performance from your FOX suspension, adjust the air pressure to attain your proper sag setting. Sag is the amount your suspension compresses under
C5/C6 Level 3 Coilover
 Part # 11510311-1998-2013 C5/C6 Level 3 CoilOver System Front Components: 11513111 Front Coilovers Recommended Tools Rear Components: 11516111 Rear Coilover Miscellaneous Components: 85000000 Spanner Wrench
TUNING GUIDE. ridefox.com
 TUNING GUIDE ridefox.com sag setting To achieve the best performance from your FOX suspension, adjust the air pressure to attain your proper sag setting. Sag is the amount your suspension compresses under
1. Get fork mounted in stand. You can leave it in the bike, but you must remove the wheel and front brake.
 Tools Needed: Bike stand Lint free shop Towels 1.5mm Allen Key Pick Set Grease (We recommend Slick Honey) Oil Measuring Cup (with cc Scale) Small Metal Drift Shop Vise Oil Bucket 13mm Deep Socket (6 point)
Powers Controls 656 Powermite Valve with 3-inch Top Rebuilding
 Powers Controls 656 Powermite Valve with 3-inch Top Rebuilding Technical Bulletin Document No. 155-240P25 TB 233 Description This Technical Bulletin describes the recommended method of rebuilding the 656
Genesis Double Adjustable Shock Assembly and Repair
 Genesis Double Adjustable Shock Assembly and Repair General Operating Description The Genesis Adjustable Shock is adjusted by moving one or both of two bypassing sliding valves. These valves slide longitudinally
PILOT SL & XC SERVICE GUIDE
 For exploded diagram and part number information, refer to the Spare Parts Catalog available on our website at www.rockshox.com. 2003-2004 PILOT SL & XC SERVICE GUIDE Contact your local distributor or
CALIFORNIA TRIMMER MOWER MAINTENANCE MANUAL
 CALIFORNIA TRIMMER MOWER MAINTENANCE MANUAL 2 Table of Contents Section 1: General Information Page Handle Assembly Instructions 4 Maintenance All Models 6 Oil Change Procedures All Models 9 Height Adjustment
TUNING GUIDE. ridefox.com
 TUNING GUIDE ridefox.com sag setting To achieve the best performance from your FOX suspension, adjust the air pressure to attain your proper sag setting. Sag is the amount your suspension compresses under
fkc 102 Mounting Instructions Cartridge kit for Harley-Davidson Touring FLHx/ FLTx 2014-
 Kit Contents Description Part No Pcs Cartridge kit FKC102 1 Sticker 01185-04 2 Owner s manual 07288-01 1 Guide ring 21808-01 2 Please note that there can be small differences between your product and the
This is a guide to tearing down and rebuilding a Fox Racing Shox DHX 3/4/5 Coil shock. It shows the user how to:
 Fox DHX Coil Rebuild Introduction: This is a guide to tearing down and rebuilding a Fox Racing Shox DHX 3/4/5 Coil shock. It shows the user how to: Dismantle the shock Clean internal parts Replace internal
For exploded diagram and part number information, refer to the Spare Parts Catalog available on our website at
 For exploded diagram and part number information, refer to the Spare Parts Catalog available on our website at www.rockshox.com. Contact your local distributor or visit the RockShox website at www.rockshox.com
C5/C6 Level 2 Coilover
 Part # 5020-998-203 C5/C6 Level 2 CoilOver System Front Components: 530 Front Coilovers Recommended Tools Rear Components: 560 Rear Coilover Miscellaneous Components: 85000000 Spanner Wrench 998-203 C5/C6
OWNERS MANUAL HEADSHOK FORKS
 OWNERS MANUAL HEADSHOK FORKS 1998 HEADSHOK MOTO FR INSTRUCTIONS The HeadShok Moto FR combines the versatility of a triple-clamp fork with the superior stiction-free performance of all the HeadShok forks.
Double Barrel Service Instructions Cane Creek R&D. January 2009 V2.0 1
 Double Barrel Service Instructions Cane Creek R&D January 2009 V2.0 1 Table of Contents 3. Diagnosis for Parts Needed 4. Work Flow 5. Initial Disassembly 6. Initial Disassembly Pictures 8. Reservoir Rebuild
TTX Cartridge Kit for KTM EXC/EXC-F/XC-W & Husqvarna FE/TE/TX (WP XPlor 48) FGKT Mounting Instructions
 FGKT Mounting Instructions") No springs included in this kit. Use appropriate Öhlins Front Fork springs, part no. 08765-XX. See the Spring guide in this folder or contact Öhlins for advice. Please note that this image is a general
No springs included in this kit. Use appropriate Öhlins Front Fork springs, part no. 08765-XX. See the Spring guide in this folder or contact Öhlins for advice. Please note that this image is a general
FKR 104. Mounting Instructions. Cartridge kit for BMW S1000RR, BMW HP4
 Kit Contents Description Part No Pcs Cartridge kit FKR 10 1 O-ring (.0x3.53) 0038-26 2 O-ring (23.52x1.78) 0038-02 2 Plug 21652-06 2 Main spring 9.5 N/mm 07-95 2 Main spring 10.0 N/mm 07-10 2 Main spring
90 Utility Model Number A2013KUB2BUSZ SHARE OUR PASSION.
 2013 90 Utility Model Number A2013KUB2BUSZ TM SHARE OUR PASSION. TABLE OF CONTENTS 2013 ATV 90 (Model No. A2013KUB2BUSZ) BODY PANEL AND HEADLIGHT ASSEMBLY... 1 FRONT AND REAR RACK ASSEMBLY... 2 FRAME AND
DVX 90 MODEL NUMBER A2008KSB2BUSD (BLACK-RED) MODEL NUMBER A2008KSB2BUSE (BLACK-CAT GREEN) MORE TO GO ON. TM
 MODEL NUMBER A2008KSB2BUSE (BLACK-CAT GREEN) MORE TO GO ON. TM") 2008 DVX 90 Illustrated Parts Manual MODEL NUMBER A2008KSB2BUSD (BLACK-RED) MODEL NUMBER A2008KSB2BUSE (BLACK-CAT GREEN) MORE TO GO ON. TM TABLE OF CONTENTS Black-Red (Model No. A2008KSB2BUSD) Black-Cat
2008 DVX 90 Illustrated Parts Manual MODEL NUMBER A2008KSB2BUSD (BLACK-RED) MODEL NUMBER A2008KSB2BUSE (BLACK-CAT GREEN) MORE TO GO ON. TM TABLE OF CONTENTS Black-Red (Model No. A2008KSB2BUSD) Black-Cat
FORK FREE PISTON MODIFICATION 2011 HONDA CRF250R
 217 Lorain Place Los Gatos, California 95032 408.406.2089 www.smartperformanceinc.com www.spi-racing.com FORK FREE PISTON MODIFICATION 2011 HONDA CRF250R WHAT? All production versions of the 2011 HONDA
REBUILD MANUAL FOR PRODIGY SHOCKS
 REBUILD MANUAL FOR 2.625 PRODIGY SHOCKS JUNE 2016 EDITION TOOLS NEEDED - 11/16 th wrench - FT LBS torque wrench - 3/8 ratchet with ¾ socket - ¼ ratchet with 9mm socket - 90 degree small pick - blue lok
Marin FRS Quad-Link Service Manual
 Marin FRS Quad- Service Manual Table of Contents: 1.0 1, Exploded Diagram: Rear Shock Assembly. 1.1 Parts List: Rear Shock Assembly 2.0 Removal of Rear Shock 3.0 2, Exploded Diagram: Rear Suspension Assembly
TTX Cartridge Kit for KTM SX/SX-F/ XC/XC-F & Husqvarna FC/TC (WP USD AER 48) FGKT 1793/94. Mounting Instructions
 FGKT 1793/94. Mounting Instructions") No springs included in this kit. Use appropriate Öhlins Front Fork springs, part no. 08765-XX. See the Spring guide in this folder or contact Öhlins for advice. Please note that this image is a general
No springs included in this kit. Use appropriate Öhlins Front Fork springs, part no. 08765-XX. See the Spring guide in this folder or contact Öhlins for advice. Please note that this image is a general
Horton DriveMaster Fan Clutch 20.06
 Horton DriveMaster Fan Clutch 0.06 Fan Clutch Major Rebuild 4 4 5 06/05/00 f0057. Spring Housing/Piston ssembly. Cage Nut. Friction Lining 4. Torx-Head Screws Fig. 4, Friction Lining Removal and Installation
Super T QR20 INSTRUCTIONS GENERAL RULES
 INSTRUCTIONS GENERAL RULES 1. Where specified, assemble and disassemble the shock absorption system using the MARZOCCHI special tools only. 2. On reassembling the suspension system, always use new seals.
Firehawk Second Stage Regulator Fire Service
 Firehawk Second Stage Regulator Fire Service MAINTENANCE AND REPAIR TAL 1701 (L) Rev. 2 MSA 2017 Prnt. Spec. 10000005389(I) Mat. 10147454 Doc. 10147454 TAL 1701 (L) Rev. 2-10147454 2 NON-CBRN FIREHAWK
Owners Manual Öhlins road & track front fork FG 43 Including:
 Owners Manual Öhlins road & track front fork FG 43 Including: Safety Adjusters Setting up your fork Changing springs Oil level adjustment Technical information Inspection & maintenance Service Tools 1
SERVICE INSTRUCTIONS ASSEMBLY & DISASSEMBLY T50X DOUBLE ACTING HYDRAULIC SERIES ACTUATORS
 Page 1 of 7 SERVICE INSTRUCTIONS ASSEMBLY & DISASSEMBLY T50X DOUBLE ACTING HYDRAULIC SERIES ACTUATORS INTRODUCTION This service procedure is offered as a guide to enable general maintenance to be performed
MULTISTRADA 1200 S (ALL COUNTRY VERSIONS)
") Date: 13/09/2011 Subject: Models: FRONT END KNOCK ON OHLINS FORKS MULTISTRADA 1200 S (ALL COUNTRY VERSIONS) Dear Dealer, We hereby inform you about the technical solution to fix the above-mentioned fault;
Date: 13/09/2011 Subject: Models: FRONT END KNOCK ON OHLINS FORKS MULTISTRADA 1200 S (ALL COUNTRY VERSIONS) Dear Dealer, We hereby inform you about the technical solution to fix the above-mentioned fault;
 .1..2..3..4..5..6..7..8..9..10. MANITOU SUSPENSION FORKS CONGRATULATIONS ON CHOOSING A 2003 MANITOU SIX FORK. This Manitou SIX fork is fully assembled and ready to be installed onto your bicycle. It comes
SUSPENSION SETUP GUIDE
 For your Pivot suspension equipped bike to pedal and descend at its best, it is important to tune the suspension properly. Use this guide to familiarize yourself with the Pivot suspension setup procedures
CHASSIS CONTENTS EXTERIOR PARTS 7-1 FRONT WHEEL 7-2 FRONT BRAKE 7-6 HANDLEBARS 7-13 FRONT FORK 7-15 STEERING 7-23 REAR WHEEL 7-26 REAR BRAKE 7-30
 CHASSIS CONTENTS EXTERIOR PARTS 7- FRONT WHEEL 7-2 FRONT BRAKE 7-6 HANDLEBARS 7-3 FRONT FORK 7-5 STEERING 7-23 REAR WHEEL 7-26 REAR BRAKE 7-30 REAR SHOCK ABSORBER 7-32 SWING ARM 7-33 7 7- CHASSIS EXTERIOR
INSTALLATION INSTRUCTIONS LOKAR COLUMN SHIFT LINKAGE
 INSTALLATION INSTRUCTIONS LOKAR COLUMN SHIFT LINKAGE Part No. ACA-1807 (Ford AOD) STOP! PLEASE READ ALL INSTALLATION INSTRUCTIONS BEFORE BEGINNING INSTALLATION. CALL LOKAR FOR ANY QUESTIONS OR UNCERTAINTIES
2002 JUDY SL & XC SERVICE GUIDE
 2002 JUDY SL & XC SERVICE GUIDE For exploded diagram and part number information, refer to the Spare Parts Catalog available on our website at www.rockshox.com. Contact your local distributor or visit
MASTER CYLINDER INSPECTION
 7-16 CHASSIS A-PDF Split DEMO : Purchase from www.a-pdf.com to remove the watermark Remove the piston assembly. MASTER CYLINDER INSPECTION MASTER CYLINDER Inspect the master cylinder bore for any scratches
INSTRUCTION MANUAL. Series PROCUNIER SAFETY CHUCK CO. (Serial Nos. B4870 and higher. (Serial Nos. B9230 and higher
 PROCUNIER SAFETY CHUCK CO. 304 Winston Creek Parkway Lakeland, Florida 33810-2866 Telephone 863-688-0071 FAX: 863-682-6233 Series 29000 (Serial Nos. B4870 and higher (Serial Nos. B9230 and higher INSTRUCTION
2005 FOX FORX Owner s Manual
 2005 FOX FORX Owner s Manual F80R - F80RL - F80RLT - F80X F100R - F100RL - F100RLT - F100X FLOAT 130R - FLOAT 130RL - FLOAT 130RLC TALAS R - TALAS RL - TALAS RLC Vanilla 100R - Vanilla 100RL - Vanilla
Hayes Performance Systems 5800 W. Donges Bay Rd. Mequon, WI Tel: Web:
 PRO/Comp Hayes Performance Systems 5800 W. Donges Bay Rd. Mequon, WI 53092 Tel: 888.686.3472 Email: techsupport@hayesbicycle.com Web: www.hayescomponents.com Hayes Components Europe Dirnismaning 20 a 85748
Suspension strut, removing and installing
 Page 1 of 16 40-39 Suspension strut, removing and installing Removing - Remove wheel trim. On light alloy wheels use puller in vehicle tool kit to remove trim cap. - Remove wheels. - Remove rubber grommets
SUSPENSION SETUP GUIDE
 For your Pivot suspension equipped bike to pedal and descend at its best, it is important to tune the suspension properly. Use this guide to familiarize yourself with the Pivot suspension setup procedures
Brake Upgrade Kit Fitting Instructions Bonneville America
 WARNING: Always have Triumph approved parts, accessories and conversions fitted by a trained technician of an authorised Triumph Dealer. The fitment of parts, accessories and conversions by a technician
Difficulty Grading expert Wrench Time 1 hour Tip, Strip or Tune Strip Spares Needed Oil Seals 4.99 (pr), Dust Seals 5.75 (pr)
, Dust Seals 5.75 (pr)") URFNVKR[VHUYLFH Difficulty Grading expert Wrench Time 1 hour Tip, Strip or Tune Strip Spares Needed Oil Seals 4.99 (pr), Dust Seals 5.75 (pr) 22mm socket Rubber mallet Allen keys Small Phillips screwdriver
URFNVKR[VHUYLFH Difficulty Grading expert Wrench Time 1 hour Tip, Strip or Tune Strip Spares Needed Oil Seals 4.99 (pr), Dust Seals 5.75 (pr) 22mm socket Rubber mallet Allen keys Small Phillips screwdriver
lefty max PDF
 READ THIS MANUAL CAREFULLY! It contains important safety information. Keep it for future reference. lefty max 140 Owner s Manual Supplement 120024.PDF CONTENTS SAFETY INFORMATION... About This Supplement...2
Spring manual V3.1 ENGLISH
 Spring manual V3.1 ENGLISH HYPERPRO TOOLS, used in this manual: Tool Description Part no. A, B, C Cartridge fork spring removal tool kit HP-T01 D Big Piston Fork end cap socket 45mm HP-T102 E Big Piston
07-13 TOYOTA TUNDRA 2WD 6" LIFT SPINDLES
 MAXTRAC SUSPENSION 4030 E LEAVERTON CT ANAHEIM, CA 92807 714-630-0363 WWW.MAXTRACSUSPENSION.COM SALES@MAXTRACSUSPENSION.COM PRODUCT: K886764 07-13 TOYOTA TUNDRA 2WD 6" LIFT SPINDLES PARTS LIST QTY LIFT
nissan patrol birfield kit
 nissan patrol birfield kit 300795-kit 1987-1997 nissan patrol gr(y60) 1988-1994 ford maverick 1987-1997 nissan patrol gq 1987-1997 nissan patrol safari 1987-1997 nissan safari kit contents 5356 PINE AVE
ATV 90 UTILITY GREEN (A2006KUB2BUSG) Page 1 of 60 AIR INTAKE ASSEMBLY
 Page 1 of 60 AIR INTAKE ASSEMBLY") 2006 ATV 90 UTILITY GREEN (A2006KUB2BUSG) Page 1 of 60 AIR INTAKE ASSEMBLY 2006 ATV 90 UTILITY GREEN (A2006KUB2BUSG) Page 2 of 60 AIR INTAKE ASSEMBLY Ref # Part Number Qty S/P/F Description 1 3303-005
2006 ATV 90 UTILITY GREEN (A2006KUB2BUSG) Page 1 of 60 AIR INTAKE ASSEMBLY 2006 ATV 90 UTILITY GREEN (A2006KUB2BUSG) Page 2 of 60 AIR INTAKE ASSEMBLY Ref # Part Number Qty S/P/F Description 1 3303-005
FKR 105. Mounting Instructions. Cartridge kit for Kawasaki ZX-10R
 Kit Contents Description Part No Pcs Cartridge kit FKR 105 1 O-ring x 008-50 O-ring 0x.5 00576-0 Main spring 9.5 N/mm 07-95 Main spring 10.0 N/mm 07-10 Main spring 10.5 N/mm 07-05 Sticker 00191- Sticker
ATV 90 UTILITY CALIFORNIA GREEN (A2008KUB2BCAG) Page 1 of 58 AIR INTAKE ASSEMBLY
 Page 1 of 58 AIR INTAKE ASSEMBLY") 2008 ATV 90 UTILITY CALIFORNIA GREEN (A2008KUB2BCAG) Page 1 of 58 AIR INTAKE ASSEMBLY 2008 ATV 90 UTILITY CALIFORNIA GREEN (A2008KUB2BCAG) Page 2 of 58 AIR INTAKE ASSEMBLY Ref # Part Number Qty S/P/F Description
2008 ATV 90 UTILITY CALIFORNIA GREEN (A2008KUB2BCAG) Page 1 of 58 AIR INTAKE ASSEMBLY 2008 ATV 90 UTILITY CALIFORNIA GREEN (A2008KUB2BCAG) Page 2 of 58 AIR INTAKE ASSEMBLY Ref # Part Number Qty S/P/F Description
# C5/C6
 Part # 00-998-0 C/C Level CoilOver System Front Components: 0 Front Coilovers Recommended Tools Rear Components: 0 Rear Coilover Miscellaneous Components: 8000000 Spanner Wrench 998-0 C/C Level Coilover
Service Handbook. High-Pressure Washer Pump
 Pump 629 9/28/01 3:22 PM Page 1 Service Handbook High-Pressure Washer Pump 3.532-629.0 10.00 Pump 629 9/28/01 3:22 PM Page 2 Pump 629 9/28/01 3:22 PM Page 3 TROUBLESHOOTING OVERVIEW How to Use This Manual
Riparazione paraolio della forcella BMW R1100GS
 Riparazione paraolio della forcella BMW R1100GS Riassunto dal forum http://www.ukgser.com/forums/showthread.php?t=97873 Steptoe 12-february-2007 R1100GS Fork seal fitting. A straightforward job which can
TRAVEL ADJUST MANUAL FOR AFTERMARKET FORKS
 TRAVEL ADJUST MANUAL FOR AFTERMARKET FORKS 0-0 INTRODUCTION This manual is intended to guide the user through the steps necessary to internally adjust the travel of our aftermarket forks. As it is necessary
2005 RADIUM/ METEL SHOCK SERVICE MANUAL
 2005 RADIUM/ METEL SHOCK SERVICE MANUAL PN 042132,. '05 RADIUM/ METEL SHOCK SERVICE MANUAL Page 1 PN 042132 2005 RADIUM/ METEL SHOCK SERVICE MANUAL INDEX Section Description Page 1 INTRODUCTION 3 2 SETUP,
Slave Cylinder Weep Hole Drilling Procedure
 Slave Cylinder Weep Hole Drilling Procedure Tools Required: T20 Torx Driver T25 Torx Driver T25 Torx Bit with ¼ Ratchet Wrench 4mm Hex Key (Allen wrench) 5mm Hex Key 6mm Hex Key 8mm Hex Key 12mm Hex Key
ATV 50 DVX BLACK-RED (A2008KSA2BUSD) Page 1 of 60 AIR INTAKE ASSEMBLY
 Page 1 of 60 AIR INTAKE ASSEMBLY") 2008 ATV 50 DVX BLACK-RED (A2008KSA2BUSD) Page 1 of 60 AIR INTAKE ASSEMBLY 2008 ATV 50 DVX BLACK-RED (A2008KSA2BUSD) Page 2 of 60 AIR INTAKE ASSEMBLY Ref # Part Number Qty S/P/F Description 1 3303-005
2008 ATV 50 DVX BLACK-RED (A2008KSA2BUSD) Page 1 of 60 AIR INTAKE ASSEMBLY 2008 ATV 50 DVX BLACK-RED (A2008KSA2BUSD) Page 2 of 60 AIR INTAKE ASSEMBLY Ref # Part Number Qty S/P/F Description 1 3303-005
PS-Mustang-Strut. Strut; In-line or Remote, Single, Double, or Triple Adjustable TECHNICAL MANUAL
 PS-Mustang-Strut Strut; In-line or Remote, Single, Double, or Triple Adjustable TECHNICAL MANUAL Main Office 150 Franklin St. P.O. Box 1056 Reading, PA 19603 (610) 375-6180 (610) 375-6190 Fax Introduction
Disassembly Instructions hp. Dynafile II Models: 40352, 40353
 Disassembly Instructions - 0.4 hp. Dynafile II Models: 40352, 40353 Important: Use these instructions along with the tool parts page or manual. Notice: Shut off the air supply and depress throttle lever
Installation Notes: #86000-R Race Series +3.5 L/T Kit
 159 North Maple St. Unit J, CORONA CA 92880 P. 951-737-9682 F. 951-737-9006 WWW.CHAOSFAB.COM Installation Notes: #86000-R Race Series +3.5 L/T Kit Factory manual is recommended for removal and re-installation
Installation Instructions COMPETITION/PLUS SHIFTER Ford Mustang MT82 6-Speed Manual Transmission Catalog#
 Installation Instructions COMPETITION/PLUS SHIFTER 2015-2017 Ford Mustang MT82 6-Speed Manual Transmission Catalog# 3916037 Rev. 00 WORK SAFELY! For maximum safety, perform this installation on a clean,
Installation Instructions Short Throw Shifter
 Installation Instructions Short Throw Shifter 2000-2001 Audi TT 1.8L Turbo Including FWD and AWD (Quattro) Part Number 45146 2003,2001 by B&M Racing and Performance Products LLC This B&M Short Throw Shifter
FGK 224. Mounting Instructions. Front Fork Kit for Ducati 1199 Panigale. Warning! Warning! Note!
 Before installing this product, check the contents of the kit. If anything is missing, please contact an Öhlins dealer. Kit Contents Part No. Pcs. Front fork kit FGK224 1 Plug 21652-03 2 O-ring 00438-23
Installation Instructions
 Installation Instructions Rear Disc Brake Conversion Kit Item # RC4001, RC4001X Applications: Mopar 7.25, 8.25, 9.25 Axles Thank you for choosing Leed Brakes for your automotive product needs. Before you
Hayes Performance Systems 5800 W. Donges Bay Rd. Mequon, WI Tel: Web:
 Hayes Performance Systems 5800 W. Donges Bay Rd. Mequon, WI 53092 Tel: 888.686.3472 Email: techsupport@hayesbicycle.com Web: www.hayescomponents.com Hayes Components Europe Dirnismaning 20 a 85748 Garching
PIKE DUAL AIR PICTORIAL INSTRUCTIONS. INSTRUCTIONS FOR INSTALLING ENDURO FORK SEALS AND CHANGING SEMI-BATH OIL in RockShox PIKE Dual Air Forks
 INSTRUCTIONS FOR INSTALLING ENDURO FORK SEALS AND CHANGING SEMI-BATH OIL in RockShox PIKE Dual Air Forks RECOMMENDED PARTS AND TOOLS -Bicycle work stand -Plastic bucket/drain pan -5mm Allen wrench -DH
FGGG 992. Owner s Manual - Mounting Instructions. Öhlins Front Fork Kit for Gas Gas EC 300. Note! Warning!
 Before installing this product, check the contents of the kit. If anything is missing, please contact your Öhlins dealer. Kit Contents Part No Pcs Front Fork kit FGGG 992 1 O-ring 00338-10 2 O-ring 00438-97
Table of Contents Safety Warning Information
 SUSPENSION FORK INSTRUCTION MANUAL 2 Table of Contents 04... Safety Warning Information 05... Tools Needed 06... Fork Features Overview 07... Crown Race Installation/Steer Tube Cutting 08... Star Nut/Stem
70001 and Clutch Rebuild Instructions
 70001 and 70010 Clutch Rebuild Instructions Brinn, Incorporated 1615 Tech Drive Bay City, MI 48706 Telephone 989.686.8920 Fax 989.686.6520 www.brinninc.com Notice Use these instructions if you only want
Öhlins Front Fork Superbike FGR 900. Owner s Manual
 Öhlins Front Fork Superbike FGR 900 Owner s Manual Introduction Öhlins Racing AB - The Story It was the 1970 s, a young man named Kenth Öhlin spent most of his spare time pursuing his favourite sport:
Hayes Performance Systems 5800 W. Donges Bay Rd. Mequon, WI Tel: Web:
 Hayes Performance Systems 5800 W. Donges Bay Rd. Mequon, WI 53092 Tel: 888.686.3472 Email: techsupport@hayesbicycle.com Web: www.hayescomponents.com Hayes Components Europe Dirnismaning 20 a 85748 Garching
Disassembly Instructions hp. Mini-Dynafile II
 Disassembly Instructions - 0.4 hp. Mini-Dynafile II Important: Use these instructions along with the tool parts page or manual. Notice: Shut off the air supply and depress throttle lever to deplete the
Shock Absorber Rebuild Manual
 Shock Absorber Rebuild Manual Model PODIUM RC3 FOX RACING SHOX 130 Hangar Way, Watsonville, CA 95076 PHONE 800.369.7469 FAX 831.768.7026 Email: psservicemw@ridefox.com Website: www.ridefox.com Disclaimer
3/8 Universal Joint Phillips Head Screwdriver
 Magnetic retrieval tool Pliers 1/4 Ratchet Drive T-35 Torx Socket 3/8 Ratchet Drive 5mm Allen Head Socket Torque Wrench 7-3/8 Drive Extension Flat Head Screwdriver 10mm Socket 8mm Socket 3/8 Universal
Mega Air Pull-Shock Service Manual
 Mega Air Pull-Shock Service Manual K2 BIKE / NOLEEN RACING 19215 VASHON HWY. SW VASHON, WA 98070 206-463-8800 WWW.K2BIKE.COM SHOCK DISAS- SEMBLY AND ASSEMBLY In this section: Tools needed Shock Design
Formula SAE PS-78PB-DA Shock, Double Adjustable TECHNICAL MANUAL
 Formula SAE PS-78PB-DA Shock, Double Adjustable TECHNICAL MANUAL Introduction Thank you for your purchase from Penske Racing Shocks! All of the fundamental attributes found in any Penske Racing Shock have
MTB Full Suspension Range
 MTB Full Suspension Range G-170C Works & G-170C RS G-170 S S-150C Works & S-150C RS S-150 S T-130C Works & T-130C RS T-130 RS, T-130 S & T-130 SR Supplementary Service Manual 2018 Edition 1 1.0 Introduction
Bag 1. Bag 1. Center Pivot. Center Pivot
 8 00734 01901 5 Center Pivot Bag 1 3374 - Center Pivot Socket 4019 - Alum Pivot ball 3254-2-56 Button Head *Note - Sometimes it is helpful to slightly over-tighten the top clamp screws, then work the ball
Note: ToyTec recommends that all products are installed by trained professionals.
 ToyTec Front Suspension Install Instructions 2.5" Front Suspension Kit 2003 2009 Toyota 4Runner, 2007 2009 Toyota FJ Cruiser, 2005+ Toyota Tacoma, 2002-2009 Prado 120, 2005-2011 Toyota Hilux Note: ToyTec
FORK COMPRESSION AND REBOUND GOLD VALVE INSTALLATION - DIRT 35C/30R SFF
 1501 Pomona Rd, Corona, CA 92880 951.279.6655 racetech.com FORK COMPRESSION AND REBOUND GOLD VALVE INSTALLATION - DIRT 35C/30R SFF FK code 2 part LS FMGV 3521C P Thede 12.3.15 7 pgs
1. Single-speed bicycle (SSB) lower fork legs... Page 3 2. Multi-speed bicycle (MSB) lower fork legs... Page 4
 lower fork legs... Page 3 2. Multi-speed bicycle (MSB) lower fork legs... Page 4") TM owner s instruction manual the ULTIMATE SURFBOARD RACK I. Messages & Warnings...Page 2 II. FORK BASE UNIT COMPONENTS...Page 2 III. SELECTING PROPER LEG TYPE...Page 2 IV. LEG LENGTH ADJUSTMENT & FORK
TM owner s instruction manual the ULTIMATE SURFBOARD RACK I. Messages & Warnings...Page 2 II. FORK BASE UNIT COMPONENTS...Page 2 III. SELECTING PROPER LEG TYPE...Page 2 IV. LEG LENGTH ADJUSTMENT & FORK
Bike Suspension Service
 Bike Suspension Service Rear Shocks Service item New After each ride or race Every 30 hours Every 100 hours or annually Set sag Check sag; reset if necessary Set damping adjustments Clean shock exterior
Assembly Manual. 1/10th Formula 1 Car
 Assembly Manual 1/10th Formula 1 Car Center Pivot Bag 1 3374 - Center Pivot Socket 40194 - Hard Anodized Alum Pivot ball 3254-2-56 *Note - Sometimes it is helpful to slightly over-tighten the top clamp
FDK 106. Fork Damping Kit for Kawasaki Z125 Fork Damping Kit. Mounting Instructions. Note!
 Kit Contents Description Part No Pcs Screw M8x25 15209-01 2 Washer 8/13/1 copper 60048-01 2 Top cap 60005-25 2 O-ring 25.8x3.53 00438-29 2 Comp. damping rod FDK 106-C 1 Reb. damping rod FDK 106-R 1 Spring,Fr.fork