DewEze Clutch Pump Kit
|
|
|
- Ella Johnston
- 5 years ago
- Views:
Transcription
1
2

3

4
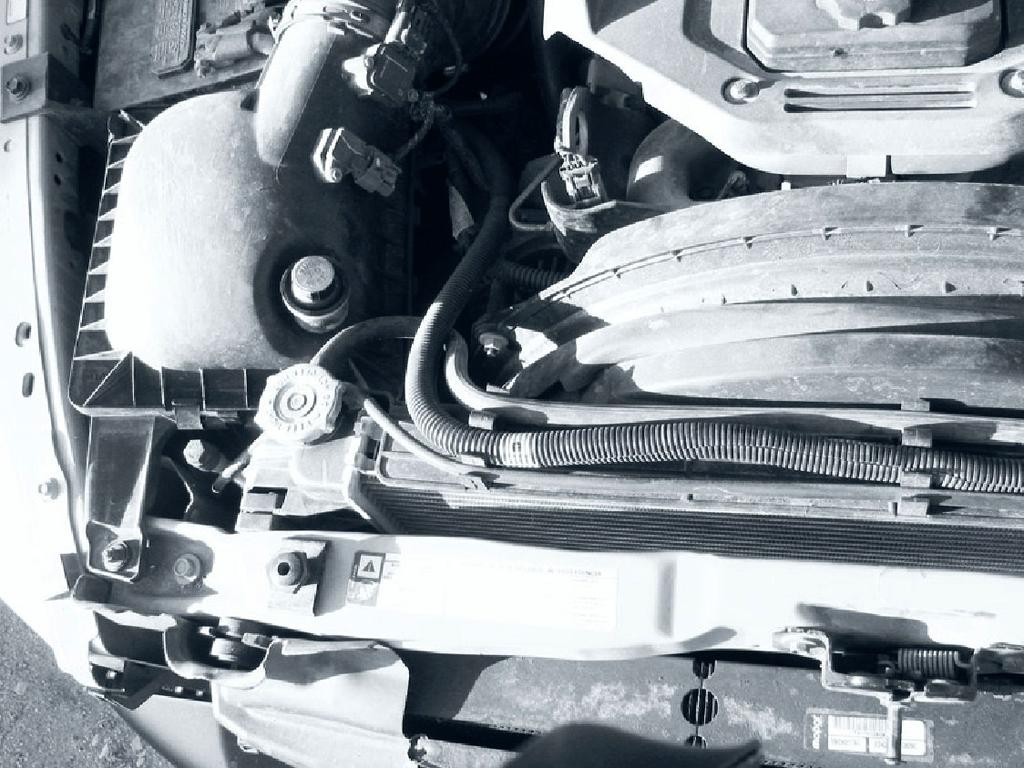
5 DewEze Clutch Pump Kit Dodge 6.7L, 2011+, P415 12, 17 GPM Pump INSTALLATION INSTRUCTIONS Record Pump Model No. and Serial No. for future reference. 1. The installation of this kit requires trained decision-making concerning clearances, tying components together, rerouting, or relocating OEM components, etc. It is impossible to describe all of the clearance and vibration points, etc. in the installation instructions. Therefore, the technician must exercise professional judgment to achieve the best quality installation. 2. Disconnect the battery. 3. Remove cover on the left front of the intercooler condenser. Fig Remove the left and right fan shroud mounting nuts. Fig. 4, Disconnect wiring plug-ins from air box. Remove air box. Fig. 4. Left and right directions are standing in front of the truck looking at the engine. transmission hoses to the power steering hoses for clearance using the cable ties (23) as in Fig. 7. Gently bend the steel hose ends slightly if needed to keep the hoses away. 8. Remove the OEM belt. 9. Mount the DewEze flat idler pulley (7) with the idler bushing (2), M10 x 75 bolt (18) and a 3/8 flat washer (17) at Location C on the bracket. 10. Install DewEze belt (27) on the OEM pulleys. It is easier to access the pulleys when the shroud can be pulled away and before the pump is installed. 11. Disconnect the ground wire attached to outside of battery post clamp on right side battery and reroute on top of existing truck hoses so pump hoses will go under wire. Reconnect. Fig Remove the top intercooler condenser bolts on the front of the truck. Fig. 5. Loosening the clamp, separate the intercooler tube (12) and the lower part of the air throttle body (11). Lift up the intercooler condenser and pull it toward you about 2 to get the tube away from the throttle body. Remove the OEM gasket from the upper portion. Replace with a new gasket (6). Using four M6 x 16 bolts (20) mount the adapter ring (3) to the upper portion of the throttle body still attached to the truck with the counterbore holes facing down. The small notch at the outside diameter beside one of the counterbore holes indicates that hole points toward the front of the truck. Fig Rotate the lower throttle body as shown in Fig. 2. Place the new gasket (6) on top of the lower throttle body and mount to the adapter ring using the OEM bolts (21). Put the condenser back into position, guiding the intercooler tube back onto the throttle body. Tie the Mount the pump (8) to the back of the pump plate (1) with two 3/8 x 1 1/4 bolts (24) and two 3/8 flat washers (17). Mount the hose adapters to the pump. 13. Mount the clutch coil (9a) to the pump bracket with four 1/4 x 1/2 flange bolts (9b). Mount the clutch pulley (9c) to the pump shaft with the 5/16 x 1 1/4 bolt (9d) and heavy flat washer (9e) making sure the key is in place on the shaft. 14. Run the hoses into the engine compartment. Pull them out far enough to attach them to the pump. Attach the top of the pump bracket (1) to the engine at Location A using three M10 x 40 bolts (14). Attach the bottom of the pump bracket to the power steering bracket at Location B with the 3/8 x 2 bolt (19), and the 3/8 lock washer (26) and 3/8 nut (25) on the back.
6 15. Finish installing the belt (27) onto the pump pulley as shown in the diagram (Fig. 1). 16. Install air box. Install intercooler cover. Connect battery. 17. Run the engine and check for any clearance or alignment problems. Re-examine the power steering lines for clearance as the engine torques. Adjust as needed. 2
DewEze Clutch Pump Kit Dodge 6.7L, 2011+, AA Pump INSTALLATION INSTRUCTIONS
 DewEze Clutch Pump Kit 700549 Dodge 6.7L, 2011+, AA Pump INSTALLATION INSTRUCTIONS Record Pump Model No. and Serial No. for future reference. 1. The installation of this kit requires trained decisionmaking
DewEze Clutch Pump Kit Ford 6.2L Gas, A Pump, Side Port, 2011+
 DewEze Clutch Pump Kit 700512 Ford 6.2L Gas, A Pump, Side Port, 2011+ INSTALLATION INSTRUCTIONS 1. The installation of this kit requires trained decisionmaking concerning clearances, tying components together,
DewEze Clutch Pump Kit Ford 6.2L Gas, A Pump, Side Port, INSTALLATION INSTRUCTIONS 1. The installation of this kit requires trained decis
 DewEze Clutch Pump Kit 700564 Ford 6.2L Gas, A Pump, Side Port, 2014+ INSTALLATION INSTRUCTIONS 1. The installation of this kit requires trained decisionmaking concerning clearances, tying components together,
FIG. 3 BRACKET INSTALLATION. i a. e h f FIG. 4 STATOR OFFSET BRACKET REMOVE OEM SPACER. REPLACE WITH BRACKET 3.
 700510 IG. 3 BRACKET INSTALLATION E D 11 C B i a b c d e h f g A B C A IG. 4 STATOR OSET BRACKET 14 G REMOVE OEM SPACER. REPLACE WITH BRACKET 3. 9 G 8 2 4 3 DewEze Clutch Pump Kit 700510 ord 6.7L, AA Pump,
Ford 6.8L, w/spider, 2000+
 DewEze Aiir Compressor Kiit 700554 Ford 6.8L, w/spider, 2000+ INSTALLATION INSTRUCTIONS 1. Disconnect the battery. 2. Drain the radiator. 3. Remove the air cleaner assembly. 4. Remove the upper radiator
6. Remove OEM bolts from engine at locations A, B, and C. Lay the wiring off to the side.
 700359 DewEze Clutch Pump Kit #700359 Ford 5.4L, 6.8L w/ and w/o A/C AA mount 1999- INSTALLATION INSTRUCTIONS 1. Disconnect the battery. 2. Drain the radiator. 3. Remove the air cleaner assembly. 4. Remove
INSTALLATION NOTES. 6. Add the 3/4 hose extension to the power steering reservoir to help keep the P/S hose away from the pump belt.
 YEAR:2017/ CURRENT INSTALLATION NOTES 1. Be sure to read and understand all available information including but not limited to instructions, warnings, sale terms, and warranties for the vehicle and all
DewEze I N S T A L L A T I O N I N S T R U C T I O N S. Clutch Pump Kit # Ford 6.8L Van with A/C AA mount Disconnect the battery.
 DewEze Clutch Pump Kit #700442 Ford 6.8L Van with A/C AA mount 2 0 0 6 + I N S T A L L A T I O N I N S T R U C T I O N S 1. Disconnect the battery. 2. Remove the OEM belt. Remove the fan shroud and fan.
INSTALLATION INSTRUCTIONS 97 FORD EXPEDITION
 INSTALLATION INSTRUCTIONS 97 FORD EXPEDITION 1. Read the instructions completely and carefully before you begin. Check the kit for proper contents (refer to the part s list and the picture diagrams). Before
Cut zip ties and remove 2 plastic wiring harness brackets.
 TROUBLESHOOTING: Please read and understand all installation instructions before proceeding with the installation. Included parts: 1 - New Bosch Cp3 Pump 1 - HSM Pulley 1 - Serpentine Belt 1 - Pump Bracket/
Muncie Power Products
 Muncie Power Products CMKF08-6400-P8-AC 2008-2010 Ford F-250-550 6.4L Diesel W-WO/AC, WO/Dual Alt. WO/Vacuum Pump INSTALLATION NOTES 1. Using a 8mm socket or wrench, disconnect the negative battery cables
Phone Fax
 Directions for Installation of ECS Paxton Supercharger Kit Disconnect battery Remove stock serpentine belt Remove stock belt tensioner, save the 2 bolts for later use on supercharger bracket Remove alternator
BLACKBIRD INSTALLATION SUPPLEMENT
 BLACKBIRD INSTALLATION SUPPLEMENT FOR 2003-7 FORD 6.0 LITER DIESEL SINGLE ALTERNATOR F-350, F-450, F-550, EXCURSION VERSION 7-07 Parts Description Blackbird Wiring Manual Installation Supplement 6.0 Liter
3. Detach the battery cable bracket (5) from the OEM alternator bracket by removing two bolts. Keep the bolts.
 from the OEM alternator bracket by removing two bolts. Keep the bolts.") DewEze Clutch Pump Kit #700370 Chevrolet/ GMC 6.0L w/ and w/o A/C AA mount 2000 INSTALLATION INSTRUCTIONS 1. Disconnect the battery. 2. Remove the OEM serpentine belt. 3. Detach the battery cable bracket
DewEze Clutch Pump Kit #700370 Chevrolet/ GMC 6.0L w/ and w/o A/C AA mount 2000 INSTALLATION INSTRUCTIONS 1. Disconnect the battery. 2. Remove the OEM serpentine belt. 3. Detach the battery cable bracket
Generator, removing and
 Page 1 of 14 27-26 Generator, removing and installing CAUTION! Disconnect the battery Ground (GND) strap before working on the electrical system. Notes: Before disconnecting the battery, determine the
FMK265SD F L DIESEL WITH DUAL ALTERNATORS
 WITH DUAL ALTERNATORS This kit will NOT work on trucks equipped with adaptive steering. INSTALLATION NOTES 1. Disconnect negative batteries cables. Remove the air duct from the passenger side and the black
BLACKBIRD INSTALLATION SUPPLEMENT
 BLACKBIRD INSTALLATION SUPPLEMENT FOR 2003-7 FORD 6.0 LITER DIESEL F-SERIES DUAL ALTERNATOR VERSION 10/07 Blackbird Installation Supplement for Ford 6.0. Liter Dual Alternator Parts included in the 6.0
BLACKBIRD INSTALLATION SUPPLEMENT
 BLACKBIRD INSTALLATION SUPPLEMENT FOR 2008-105 FORD 6.4 LITER DIESEL F-SERIES VERSION 3/10 Parts Blackbird Wiring Manual Installation Supplement 6.4 liter Diesel Owner s Manual Includes Warrantee Registration
I. Before starting installation
 5. Park the vehicle on a clean, dry, flat, level surface and block the tires so the vehicle cannot roll in either direction. A. Disconnect battery cables 1. Disconnect the negative cable first, then the
Ford E350, E450 Van LITER DIESEL ENGINE W/SINGLE OE ALTERNATOR TYPE B Uses TM-16, 4-3/4 Poly Groove Rear Port Compressor PARTS LIST
 2006-04 Ford E350, E450 Van 1784 6.0 LITER DIESEL ENGINE W/SINGLE OE ALTERNATOR TYPE B Uses TM-16, 4-3/4 Poly Groove Rear Port Compressor PARTS LIST 1 6m-1.0 x 15 Bolt 1 6m-1.0 x 45 Bolt 3 6m Flat Washer
INSTALLATION INSTRUCTIONS DODGE DAKOTA 2 KIT # 682 (2WD), 692 (4WD) 3 KIT # 683 (2WD), 693 (4WD)
, 692 (4WD) 3 KIT # 683 (2WD), 693 (4WD)") INSTALLATION INSTRUCTIONS 1997-1999 DODGE DAKOTA 2 KIT # 682 (2WD), 692 (4WD) 3 KIT # 683 (2WD), 693 (4WD) Installation of a Performance Accessories body lift kit will change the vehicle s center of gravity
INSTALLATION INSTRUCTIONS 1997-1999 DODGE DAKOTA 2 KIT # 682 (2WD), 692 (4WD) 3 KIT # 683 (2WD), 693 (4WD) Installation of a Performance Accessories body lift kit will change the vehicle s center of gravity
Symptom Possible Cause Corrective Action. * Make sure brake isn t stuck in on position. Remove brake parts as necessary to test.
 Troubleshooting Chart for the Hydro-Gear Transaxle Symptom Possible Cause Corrective Action Operates in one direction Inspect control linkage Inspect drive belt and pulleys Unit is Noisy Check oil level
Scion FR-S ZN6. GTX2867R Gen2 (Internal Wastegate) Installation Instructions GPP P/N #
 Installation Instructions GPP P/N #") TURBO KIT Scion FR-S ZN6 Subaru BRZ ZC6 GTX2867R Gen2 (Internal Wastegate) Installation Instructions GPP P/N # 11518000 Vehicle Type Chassis Code Engine Code Transmission Model Year Scion FR-S DBA-ZN6
TURBO KIT Scion FR-S ZN6 Subaru BRZ ZC6 GTX2867R Gen2 (Internal Wastegate) Installation Instructions GPP P/N # 11518000 Vehicle Type Chassis Code Engine Code Transmission Model Year Scion FR-S DBA-ZN6
Cut zip ties and remove 2 plastic wiring harness brackets.
 TROUBLESHOOTING: Please read and understand all installation instructions before proceeding with the installation. If you have questions during the installation of this product, please email H&S Motorsports
FULL LENGTH HEADERS/ CATTED HEAD PIPES
 INSTALLATION INSTRUCTIONS INS232 2016-2018 CAMARO 6.2L V8 FULL LENGTH HEADERS/ CATTED HEAD PIPES Part #4044 and 40440 Special Tools required: 10mm, 12mm, 13mm, 15mm Socket and Wrenches, Pliers, Saw, Welder
1996 Aerostar/Ranger/Explorer
 Page 1 of 11 Section 03-01B: Engine, 3.0L V-6 IN-VEHICLE SERVICE 1996 Aerostar and Ranger Vehicles Workshop Manual Water Pump SPECIAL SERVICE TOOL(S) REQUIRED Description Tool Number Fan Clutch Holding
V1 Truck Manifold Turbo Kit for F-body
 V1 Truck Manifold Turbo Kit for 98-02 F-body Prep: -Remove all A/C Components, Alternator and brackets, tensioner, front bumper, front bumper foam, and front bumper support. Remove radiator and cooling
Application List L Cummins
 1 Discharging & Recharging of the A/C System is required for this install. INTERCOOLER INSTALLATION FOR 2010+ DODGE 6.7L CUMMINS Application List 2010+ 6.7L Cummins 1042530 PLEASE READ ALL INSTRUCTIONS
Ford 6.0L. Part #: Part #: BD GASKET PART# will be needed for this installation.
 1 BD EGR COOLER 2003-2007 Ford 6.0L Part #: 1090201 Part #: 1090202 PLEASE READ ALL INSTRUCTIONS BEFORE INSTALLATION BD GASKET PART# 1090002 will be needed for this installation. 2 K I T C O N T E N T
Installation Instructions for: TOYOTA 4.5L SUPERCHARGER SYSTEM
 Installation Instructions for: TOYOTA 4.5L SUPERCHARGER SYSTEM 1995-1997 Land Cruiser * PREMIUM FUEL REQUIRED * Magnuson Products LLC 1990 Knoll Drive, Bldg A, Ventura, CA 93003 (805) 642-8833 phone *
Instant Chat off the main page of Or simply call our tech team at
 FRONT MOUNT INTERCOOLER 2015+ WRX 2017-07-07 Thank you for purchasing this PERRIN product for your car! Installation of this product should only be performed by persons experienced with installation of
L Ford Power Stroke Intercooler Pipe Upgrade
 Rev: 10.30.14 TROUBLESHOOTING: Please read and understand all installation instructions before proceeding with the installation. If you have questions during the installation of this product, please email
INSTALLATION INSTRUCTIONS FOR COZY CAB A-1 AIR CONDITIONING KIT
 INSTALLATION INSTRUCTIONS FOR COZY CAB A-1 AIR CONDITIONING KIT 05-11 INSTALLATION INSTRUCTIONS A-12235 Air Conditioner Kit Cab set up instructions; This air conditioning kit is designed to be used with
Engine, disassembling and
 Page 1 of 38 13-1 Engine, disassembling and assembling Lock carrier, moving into service position Special tools and equipment 3369 support tool 1 - Bolts 2 - Bolts 3 - Bolts 4 - Bolts 5 - Bore 45 Nm (33
REMOVAL & INSTALLATION
 REMOVAL & INSTALLATION NOTE: For reassembly reference, label all electrical connectors, vacuum hoses and fuel lines before removal. Also place mating marks on engine hood and other major assemblies before
F SERIES STARTER. thrust washer. STARTER DISASSEMBLY. to the starter motor. Remove cup. Remove starter pulley and spring. USE
 STARTER DISASSEMBLY Remove retainer ring, pinion stop washer, pinion spring and pinion gear from helix. Remove starter pulley and spring. USE CAUTION WHEN REMOVING SPRING. Remove three screws holding the
»Product» Safety Warning
 #C9315 Installation Instructions 2000-2005 Suburban/Tahoe/Yukon 1500 2/4wd 3" Body Lift Read and understand all instructions and warnings prior to installation of product and operation of vehicle. Zone
Installation Manual for VMAC System V Ford SuperDuty F250-F L Power Stroke V8
 Installation Manual for VMAC System V910006 2003.25-2007 Ford SuperDuty F250-F550 6.0L Power Stroke V8 General Information... 4 Before You Start... 4 Part 1: Warranty and System ID... 5 Part 2: Preparing
Crawford Performance Top Mount Air/Oil Separator For 08 STi + Version 2 (S0713-1)
") Crawford Performance Top Mount Air/Oil Separator For 08 STi + Version 2 (S0713-1) Parts List Part Number Quantity Description Sent Received S0709-1 1 TMIC Air/Oil Separator 08STI V2 F0365 1 Crank Case
Crawford Performance Top Mount Air/Oil Separator For 08 STi + Version 2 (S0713-1) Parts List Part Number Quantity Description Sent Received S0709-1 1 TMIC Air/Oil Separator 08STI V2 F0365 1 Crank Case
ALLDATA Online Ford Focus L4-2.0L DOHC VIN 5 - Service and Repair. Service and Repair
 Page 1 of 22 Service and Repair NOTE: Ford does not provide camshaft gear timing marks, or information to perform timing belt service without the special tools shown in this procedure. Timing Belt Special
2001 Dodge Dakota ENGINES 4.7L V8
 FRONT COVER Removal & Installation 1. Disconnect negative battery cable. Remove drive belt. Remove A/C compressor mounting bolts, and position compressor aside. Drain cooling system. Remove radiator hoses.
TABLE OF CONTENTS PARTS LIST
 TROUBLESHOOTING: Note: You will have a check engine light and/or other problems unless using this product with a compatible ECM calibration. Contact your tuning supplier to learn whether or not aftermarket
TCI FastGate Shifter Installation Instructions
 151 INDUSTRIAL DRIVE ASHLAND, MISSISSIPPI 38603 http://www.tciauto.com TELEPHONE: 662-224-8972 FAX LINE: 662-224-8255 E-MAIL: tech@tciauto.com TCI 616541 FastGate Shifter Installation Instructions The
1.6L 4-CYL - VIN [E]
![1.6L 4-CYL - VIN [E]](/thumbs/81/84172348.jpg "1.6L 4-CYL - VIN [E]") 1.6L 4-CYL - VIN [E] 1993 Nissan Sentra 1993 NISSAN ENGINES 1.6L 4-Cylinder NX, Sentra * PLEASE READ THIS FIRST * NOTE: For engine repair procedures not covered in this article, see ENGINE OVERHAUL PROCEDURES
1.6L 4-CYL - VIN [E] 1993 Nissan Sentra 1993 NISSAN ENGINES 1.6L 4-Cylinder NX, Sentra * PLEASE READ THIS FIRST * NOTE: For engine repair procedures not covered in this article, see ENGINE OVERHAUL PROCEDURES
INSTALLATION INSTRUCTIONS
 HIGH FLOW AIRFLOW METER INSTALLATION INSTRUCTIONS PART NUMBER D763-1600A APPLICATION: 2001-06 E46 M3 Parts List: Hose clamp 64Z (7) Plastic Rivets Air Filter Temp Sensor & Harness (2) Button Head Screws
Subaru WRX Performance Charge-Pipe System, 2015+
 PARTS LIST AND PARTS LIST 1PC BAR-AND-PLATE INTERCOOLER 1PC INTERCOOLER MOUNTING BRACKET 1PC CHARGE-PIPE ASSEMBLY 1PC AIR DIVERTER WITH ATTACHED RUBBER GASKETS 1PC CHARGE-PIPE-TO-INTERCOOLER HOSE INSTALLATION
Included parts: 1 - New Bosch CP3 Pump 1 - HSM Pulley 1 - Serpentine Belt 1 - Pump Bracket/ Hardware STEP 1
 TROUBLESHOOTING: Please read and understand all installation instructions before proceeding with the installation. If you have questions during the installation of this product, please contact H&S Motorsports
Service Bulletin. Premature Drive Belt Wear
 Premature Drive Belt Wear Applies to: E-TRx Tools Required Washers 120 grit sand paper Adjustable Wrench ¼ Hex key 4mm Hex key Steel Square 12 Steel Square 90 degree Symptom Drive belt is damaged (Fig.
»Product» Safety Warning
 D2201 Installation Instructions 2012-2014 Dodge Ram 1500 4WD 2" Adventure Series Suspension System Read and understand all instructions and warnings prior to installation of product and operation of vehicle.
2016+ NISSAN TITAN XD
 PARTS LIST AND PARTS INCLUDED 1PC MISHIMOTO INTERCOOLER 2PC SILICONE BOOTS WITH DURACORE TECHNOLOGY 4PC CONSTANT-TENSION T-BOLT CLAMPS 2PC ALUMINUM SPACERS MOUNTING HARDWARE CAUTION Never work on the cooling
1997 Volvo 850 GLT. Fig. 2: Removing Drive Shaft, Engine Mount Bolt & Torque Arm (5-Cylinder) Courtesy of VOLVO CARS OF NORTH AMERICA.
 Courtesy of VOLVO CARS OF NORTH AMERICA.") Fig. 2: Removing Drive Shaft, Engine Mount Bolt & Torque Arm (5-Cylinder) 4. Remove front exhaust pipe nuts and springs. Remove front exhaust pipe bolts. Disconnect speedometer. Remove engine mounting
Fig. 2: Removing Drive Shaft, Engine Mount Bolt & Torque Arm (5-Cylinder) 4. Remove front exhaust pipe nuts and springs. Remove front exhaust pipe bolts. Disconnect speedometer. Remove engine mounting
97-02 JEEP TJ BODY LIFT KIT INSTRUCTIONS
 92RC60500 97-02 JEEP TJ BODY LIFT KIT INSTRUCTIONS Congratulations on your purchase of a new Rough Country 2 /3 Body Lift. We are committed to providing you with the best product available for the best
Crawford Performance Top Mount Air/Oil Separator Install Instructions Version 1.12
 Crawford Performance Top Mount Air/Oil Separator Install Instructions Version 1.12 Parts List Part Number Quantity Description Sent Received S0774 1 TMIC Air/Oil Separator F0365 1 Crank Case Breather Connector
Subaru Front Mount Intercooler Kit STI Subaru Front Mount Intercooler Kit STI
 Subaru Front Mount Intercooler Kit STI 2008-2014 715500 Subaru Front Mount Intercooler Kit STI 2008-2014 Congratulations on your purchase of the Subaru Front Mount Intercooler Kit STI 2008-2014. The following
Air Commander
 EASYSTREET Air Commander www.airliftcompany.com MN-507 (03206) ECN 3921 Please read these instructions completely before proceeding with installation. The oil level in the compressor must be checked BEFORE
1992 Mitsubishi 3000GT VR-4
 TIMING BELT Removal (Diamante SOHC) 1. Remove left front and left side splash shields. Using engine hoist, lift engine just enough to remove weight from engine mounts. Remove drive belts. Remove A/C tensioner
2006 Honda Civic SI Supercharger Kit Installation Instruction Kit #
 2006 Honda Civic SI Supercharger Kit Installation Instruction Kit #350-091 3239 MONIER CIRCLE, STE.5 RANCHO CORDOVA, CA 95742 916.635.4550 FAX 916.635.4632 www.ct-engineering.com INS-157 VERSION: 3.25.2009
DOWNLOAD ENHANCED INSTALL MANUALS
 U 3 October 2016 1041564 6.7L Performance Intake Plate Manual (I-00371) 1 DOWNLOAD ENHANCED INSTALL MANUALS Cummins 6.7L High Flow Intake Plenum Cover 1041564 2008-2016 6.7L RAM 2500-3500 Pickup PLEASE
Yamaha Nytro Relocator Kit
 Included Parts: 1 Relocator bracket assembly 2 Upper assembly Oilite bushing halves 1 Lower steering block assembly 2 Lower assembly Oilite bushing halves 1 Tube of Loc-tite OFTRacing.com Email Scott Moto
2000 DODGE DURANGO INSTALLATION INSTRUCTIONS KIT #60053
 WARNING This body lift kit should only be installed on vehicles in good working condition. Before installation, the vehicle should be thoroughly inspected for evidence of corrosion or deformation of the
11. REMOVE OIL PAN SUB ASSY NO.2 (a) Remove the 18 bolts and 2 nuts.
 Remove the 18 bolts and 2 nuts.") 1444 ENGINE MECHANICAL REPLACEMENT 1. REMOVE ENGINE ASSEMBLY (SEE PAGE 1419) 2. REMOVE DRIVE PLATE & RING GEAR SUBASSY (AUTOMATIC TRANSMISSION) (SEE PAGE 1419) SST 0921354015 (9165160855), 0933000021 3.
1444 ENGINE MECHANICAL REPLACEMENT 1. REMOVE ENGINE ASSEMBLY (SEE PAGE 1419) 2. REMOVE DRIVE PLATE & RING GEAR SUBASSY (AUTOMATIC TRANSMISSION) (SEE PAGE 1419) SST 0921354015 (9165160855), 0933000021 3.
CHEVY / GMC BLAZER / YUKON SUBURBAN BODY LIFT INSTALLATION INSTRUCTIONS KIT # KIT #10023
 3651 N Highway 89 Chino Valley, AZ 86323 (928) 636-7080 CHEVY / GMC BLAZER / YUKON SUBURBAN BODY LIFT INSTALLATION INSTRUCTIONS 1992-1994 2 KIT #10022 1992-1994 3 KIT #10023 Before you install this kit,
INSTALLATION & OWNER S MANUAL
 1 of 18 INSTALLATION & OWNER S MANUAL (*Not including cab & other accessories) A/C Alternator Kit: Yamaha Drive & Drive2 P/N: 1ACYDR2DRK Recommended it be installed with Curtis Cab: Sandstone (p/n 1GCYD1-A,
»Product» Safety Warning
 #C1354 Installation Instructions 1999-2002 Chevy/GM 1500 4wd 3.5" Combo Lift Kit Read and understand all instructions and warnings prior to installation of product and operation of vehicle. Zone Offroad
6 Lift Dual Shock Hoop Dodge WD w/ BDS Short Arm Kit Dodge WD w/ BDS Short Arm Kit Part #: Rev.
 6 Lift Dual Shock Hoop Dodge 3500 4WD w/ BDS Short Arm Kit 2003-2012 Dodge 2500 4WD w/ BDS Short Arm Kit 2003-2013 Part #: 122604 Rev. 022118 491 W. Garfield Ave., Coldwater, MI 49036. Phone: 517-279-2135
REMOVAL & INSTALLATION
 REMOVAL & INSTALLATION CAUTION: This application is an interference engine. Do not rotate camshaft or crankshaft when timing belt is removed, or engine damage may occur. TIMING BELT Removal 1. Disconnect
IAG Street Series Air / Oil Separator (AOS) For WRX
 For WRX") P IAG Street Series Air / Oil Separator (AOS) For 2015-16 WRX Part# IAG-ENG-7152 Tools Required: Ratchet, torque wrench, extensions, needle nose pliers, hose cutter, snips/scissors, flat head screw driver,
P IAG Street Series Air / Oil Separator (AOS) For 2015-16 WRX Part# IAG-ENG-7152 Tools Required: Ratchet, torque wrench, extensions, needle nose pliers, hose cutter, snips/scissors, flat head screw driver,
Transmission MV702. Product Installation & Troubleshooting
 Transmission MV702 Product Installation & Troubleshooting 39036A 2018 I Remove transmission Product installation MV702 1) Remove mower wheels, plastic covers and axle gears from both sides 2) Remove belt
Before performing any on-vehicle adjustments to fuel or ignition systems, ensure engine mechanical condition is okay.
 Page 1 of 11 ARTICLE BEGINNING INTRODUCTION Introduction information not applicable. ENGINE MECHANICAL Before performing any on-vehicle adjustments to fuel or ignition systems, ensure engine mechanical
Dodge Charger, Coronet Condenser Kit with Drier
 an ISO 900:2008 Registered Company 966-67 Dodge Charger, Coronet Condenser Kit with Drier 05063 8865 Goll St. San Antonio, TX 78266 Phone: 20-65-77 Fax: 20-65-33 www.vintageair.com 90327 REV B 2/02/6,
READ AND UNDERSTAND ALL INSTRUCTIONS AND WARNINGS PRIOR TO INSTALLATION OF SYSTEM AND OPERATION OF VEHICLE.
 #9378 Installation Instructions 3 Body Lift Kit 1998-2000 Ranger READ AND UNDERSTAND ALL INSTRUCTIONS AND WARNINGS PRIOR TO INSTALLATION OF SYSTEM AND OPERATION OF VEHICLE. SAFETY WARNING BDS Suspension
8 Zip Tie Zip Tie 1 Union Fitting 1 ½ ½ Union Reducer Fitting Union 1 5/8 ½ (For Plastic Intake Manifold Vehicles)
") P IAG Street Series Air / Oil Separator (AOS) For 2017 STI Part# IAG-ENG-7151 Tools Required: Ratchet, torque wrench, extensions, needle nose pliers, hose cutter, snips/scissors, flat head screw driver,
P IAG Street Series Air / Oil Separator (AOS) For 2017 STI Part# IAG-ENG-7151 Tools Required: Ratchet, torque wrench, extensions, needle nose pliers, hose cutter, snips/scissors, flat head screw driver,
X5 / X6 N63 Upgrade Intercooler Installation Instructions
 X5 / X6 N63 Upgrade Intercooler Installation Instructions Part Number: D330-0016 Applications: 2010-12 E70 X5 xdrive 50i 2008-12 E71 X6 xdrive 50i PARTS LIST Qty Part No. Description 2 11 78 7 549 563
62 Deck Idler Kit High Speed
 Part No. 00 FORM NO. -899 6 Deck Idler Kit High Speed For Model 70 Serial No. 99000 to 99000 For Model 7 Serial No. 9900 to 99000 INSTALLATION INSTRUCTIONS Loose Parts Note: Use the chart below to identify
Wrenches: ⅞, 8mm, 10mm, 13mm, 19mm P. allen, Other: Electrical Tape
 IAG Street Series Air / Oil Separator (AOS) For 2008-14 STI Part# IAG-ENG-7100 Tools Required: Ratchet, torque wrench, extensions, needle nose pliers, hose cutter, snips/scissors, flat head screw driver,
Thank you for choosing Rough Country for all your suspension needs.
 06-UP JEEP COMMANDER 2 LIFT KIT Thank you for choosing Rough Country for all your suspension needs. Rough Country recommends a certified technician install this system. In addition to these instructions,
(905)
") (905)953-9260 Marc@M-Tuned.com Coolant Reroute Kit *Professional Installation Recommended but not required 1) Disconnect Negative Terminal from Battery in trunk. 2) Drain Coolant from your cooling system.
(905)953-9260 Marc@M-Tuned.com Coolant Reroute Kit *Professional Installation Recommended but not required 1) Disconnect Negative Terminal from Battery in trunk. 2) Drain Coolant from your cooling system.
TIMING BELT REPLACEMENT. Tools Required. J A (KM-421-A) Timing Belt Adjuster J Angle Meter KM-470-B Angular Torque Gage
 Timing Belt Adjuster J Angle Meter KM-470-B Angular Torque Gage") Page 1 of 20 TIMING BELT REPLACEMENT Tools Required J 42492-A (KM-421-A) Timing Belt Adjuster J 45059 Angle Meter KM-470-B Angular Torque Gage Removal Procedure Fig. 37: View Of Throttle Cable CAUTION:
Page 1 of 20 TIMING BELT REPLACEMENT Tools Required J 42492-A (KM-421-A) Timing Belt Adjuster J 45059 Angle Meter KM-470-B Angular Torque Gage Removal Procedure Fig. 37: View Of Throttle Cable CAUTION:
2015+ EcoBoost F150 & Raptor Intercooler Install
 2015+ EcoBoost F150 & 2017+ Raptor Intercooler Install Note: This entire job can be performed with the truck on the ground - No need to raise the vehicle. The most difficult part is removing the grille
Z-Gate Universal Shifter
 Installation Instructions Z-Gate Universal Shifter Fits: GM, Ford, Lincoln and Chrysler Transmissions See Application Guide for Specific Applications Part #80681 Rev 06/01/2018 WORK SAFELY! For maximum
INSTALLATION & OWNER S MANUAL
 1 of 21 INSTALLATION & OWNER S MANUAL A/C Drive Kit for KUBOTA BX2670-1 and BX2680 p/n: 1ACBX2680DRK (Note: the alternator is supplied with a new pulley) Must be installed with one of the following three
Team Z Motorsports. K-Member installation instructions
 Team Z Motorsports K-Member installation instructions Parts Included: 1-Tubular K-Member Needed Items-Solid Steering Shaft Offset Steering Rack Bushings Optional-Heavy Duty Bolt Kit Tubular Front Lower
Installation Manual for VMAC System V Ford F Super Duty 6.0L Power Stroke Diesel Without Dual Alternators
 Installation Manual for VMAC System V900080 2007 2003.25 Ford F250-550 Super Duty 6.0L Power Stroke Diesel Without Dual Alternators General Information... 3 Before You Start... 3 Part 1: Warranty and System
PRE-INSTALLATION. INSTALLATION INSTRUCTIONS STEP 1: Park vehicle on level surface and chock rear wheels.
 2007-2013 7.5" GMC/Chevrolet 1500 4WD Suspension Lift kit PRE-INSTALLATION 15004 2 - Cross-member (Fr/Rr) 2 - Sway Bar Drop Bracket 2 - Knuckle (Dr/Pass) 1 - Driver Diff. Bracket 1 - Passenger Diff. Bracket
HYBRID DEVELOPMENT INTERNATIONAL RACING INTERCOOLER KIT INSTALLATION MANUAL
 HYBRID DEVELOPMENT INTERNATIONAL RACING INTERCOOLER KIT INSTALLATION MANUAL Please read before continuing Please read through all the instruction and practice all precaution in all aspect of safety and
AEV30243AJ Last Updated: 11/14/17. 3 Dualsport front suspension ram truck 2500/3500 INSTALLATION GUIDE
 AEV30243AJ Last Updated: 11/14/17 3 Dualsport front suspension ram truck 2500/3500 INSTALLATION GUIDE PLEASE READ BEFORE YOU START TO GUARANTEE A QUALITY INSTALLATION, WE RECOMMEND READING THESE INSTRUCTIONS
05-08 GT. Hellion Power Systems Mustang Kit Instructions
 Hellion Power Systems 05-08 Mustang Kit Instructions 1. Disconnect Battery 2. Drain Radiator, keep fluid for re-installation. 3. Remove air box and inlethoses. 6. Next, underneath, punch oil pan for turbo
SLP Camaro ZL1 STAGE 3 (650 HP)
") SLP - 2012 Camaro ZL1 STAGE 3 (650 HP) PART #26002 PACKING LIST Before installation, use this check list to make sure all necessary parts have been included. ITEM QTY CHECK PART NUMBER DESCRIPTION 1. 1
SLP - 2012 Camaro ZL1 STAGE 3 (650 HP) PART #26002 PACKING LIST Before installation, use this check list to make sure all necessary parts have been included. ITEM QTY CHECK PART NUMBER DESCRIPTION 1. 1
IAG Competition Series Air / Oil Separator (AOS) For WRX
 For WRX") P IAG Competition Series Air / Oil Separator (AOS) For 2015-16 WRX Part# IAG-ENG-7252 Tools Required: Ratchet, torque wrench, extensions, needle nose pliers, hose cutter, snips/scissors, flat head screw
P IAG Competition Series Air / Oil Separator (AOS) For 2015-16 WRX Part# IAG-ENG-7252 Tools Required: Ratchet, torque wrench, extensions, needle nose pliers, hose cutter, snips/scissors, flat head screw
BD Venom Dual Fuel F O R D 6. 7 L P O W E R S T R O K E Installation Instructions
 U 21 March 2017 (1050470) Venom Dual Fuel Kit (I-00390) 1 DOWNLOAD ENHANCED INSTALL MANUALS AT dieselperformance.com BD Venom Dual Fuel 2 0 1 1-2 0 1 6 F O R D 6. 7 L P O W E R S T R O K E Installation
Olson Kustom Works th St SE #M, Monroe, WA (949)
") Olson Kustom Works 17404 147 th St SE #M, Monroe, WA 98272 (949)742-0613 Jesse@OKW-Inc.com FOR REVISIONS ALL 2017 BRACKET REVISIONS, revised July 2017 Thank you for your purchase from OKW. If you have
Olson Kustom Works 17404 147 th St SE #M, Monroe, WA 98272 (949)742-0613 Jesse@OKW-Inc.com FOR REVISIONS ALL 2017 BRACKET REVISIONS, revised July 2017 Thank you for your purchase from OKW. If you have
BD Venom Dual Fuel F O R D 6. 7 L P O W E R S T R O K E Installation Instructions
 U 30 January 2017 (1050470) Venom Dual Fuel Kit (I-00390) 1 DOWNLOAD ENHANCED INSTALL MANUALS AT dieselperformance.com BD Venom Dual Fuel 2 0 1 1-2 0 1 4 F O R D 6. 7 L P O W E R S T R O K E Installation
Service Bulletin 1988 PRELUDE. RECALL: 1988 Prelude Power Steering Supply Hose
 Service Bulletin Model Applicable To File Under Bulletin No. 1988 PRELUDE See VEHICLES AFFECTED ENGINE 88-014 Issue Date APRIL 20, 1988 RECALL: 1988 Prelude Power Steering Supply Hose PROBLEM When subjected
Installation Instruction for '84-'89 Nissan 300ZX High Performance Intercooler System (Part No )
") Installation Instruction for '84-'89 Nissan 300ZX High Performance Intercooler System (Part No. 2-124) Routing of the Intercooler Pipe It is necessary to follow the exact sequence of the installation
Installation Instruction for '84-'89 Nissan 300ZX High Performance Intercooler System (Part No. 2-124) Routing of the Intercooler Pipe It is necessary to follow the exact sequence of the installation
Installation instruction do88 performance Turbo intake hoses Porsche 911 TT (997.2)
") Installation instruction do88 performance Turbo intake hoses Porsche 911 TT (997.2) 2010-2012 3. 2. 4. 6. 7. 5. 1. This instruction shows how to replace the OEM turbo intake pipes for do88 performance
Installation instruction do88 performance Turbo intake hoses Porsche 911 TT (997.2) 2010-2012 3. 2. 4. 6. 7. 5. 1. This instruction shows how to replace the OEM turbo intake pipes for do88 performance
2001 Ford FOCUS. Submodel: ZTS Engine Type: L4 Liters: 2.0 Fuel Delivery: FI Fuel: GAS. Timing Belt
 2001 Ford FOCUS Submodel: ZTS Engine Type: L4 Liters: 2.0 Fuel Delivery: FI Fuel: GAS SECTION 303-01A: Engine??? 2.0L Zetec-E (Zetec) 2001 Focus Workshop Manual IN-VEHICLE REPAIR Procedure revision date:
D - ADJUSTMENTS - 4-CYL
 D - ADJUSTMENTS - 4-CYL 1993 Toyota Celica 1993 ENGINE PERFORMANCE Toyota 4-Cylinder On-Vehicle Adjustments Celica ENGINE MECHANICAL Before performing any on-vehicle adjustments to fuel or ignition systems,
»Product» Safety Warning
 Read and understand all instructions and warnings prior to installation of product and operation of vehicle. 1. Zone Offroad Products recommends this system be installed by a professional technician. In
Yamaha Apex Moto-R Kill w/jacobson Roll-over valve Installation Instructions
 OFTRacing.com Email Scott Moto 2006-2011 Yamaha Apex Moto-R Kill w/jacobson Roll-over valve Installation Instructions Included Parts: 1 Moto-r Kill wiring harness including Pro Armor tether switch, Jacobsen
Installation Instruction for '84-'89 Nissan 300ZX High Performance Intercooler System (Part No )
") Installation Instruction for '84-'89 Nissan 300ZX High Performance Intercooler System (Part No. 2-124) Page ii DCB (06/14/02 12:19 AM) Version 1.0 Page iii Table of Contents 1. TOOLS REQUIRED...1 2. INSTALLATION
Installation Instruction for '84-'89 Nissan 300ZX High Performance Intercooler System (Part No. 2-124) Page ii DCB (06/14/02 12:19 AM) Version 1.0 Page iii Table of Contents 1. TOOLS REQUIRED...1 2. INSTALLATION