Amazing127_RobotCDesignDoc
|
|
|
- Alexina Newman
- 5 years ago
- Views:
Transcription


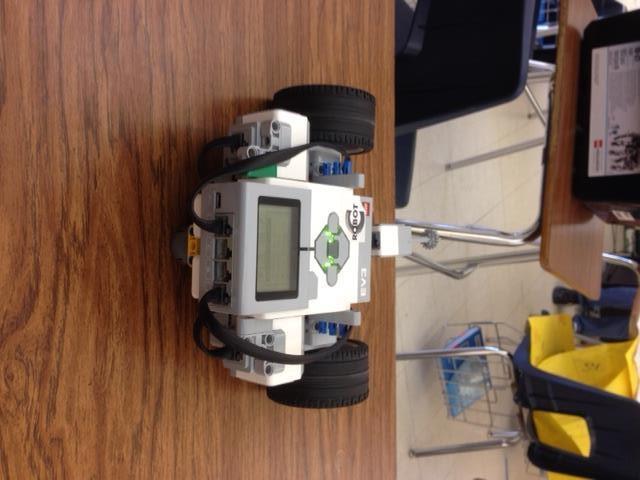
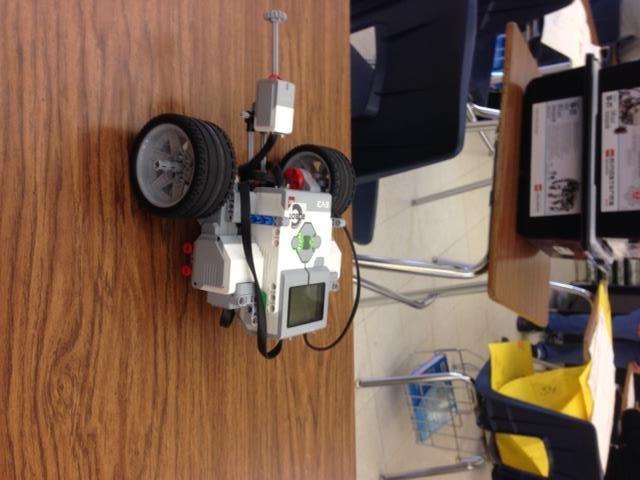
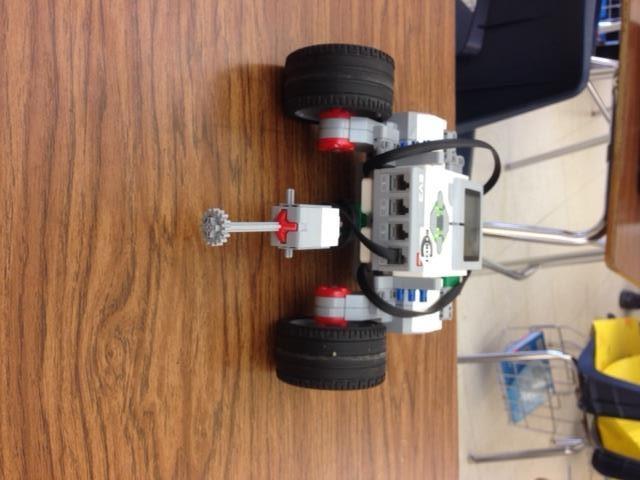
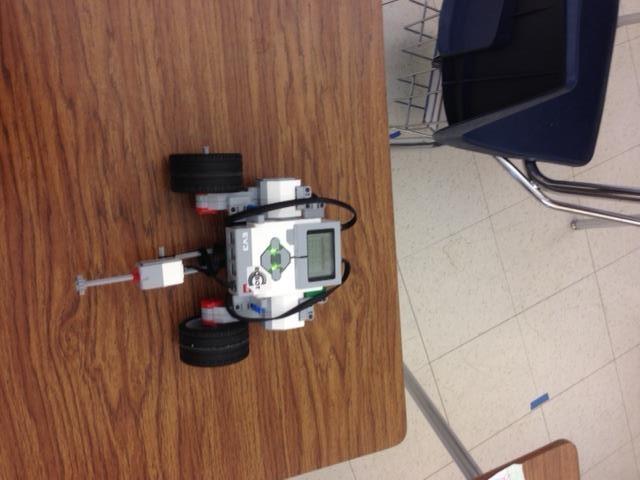
1 Amazing127_RobotCDesignDoc Specifications: -Length 6.6 in -Width 9.7 in -Height 6.6 in Pictures of our robot: Left Side Back Side Right Side


2 Front Side Componets: 1 Small Motor 2 Large Motors 1 Touch Sencor 2 Large Wheels 1 Silver Ball Programing: Our robot was programed to follow this course
3 Pesudocode And Code: Start //start motorc 100% power //start motord 100% power //run both for 3000 MiliSec //start motorc 100% power //start motord 45% power //run both for 900 MiliSec //start motorc 100% power //start motord 100% power //run both for 4400 MiliSec //start motorc 45%power //start motord 100%power // run both for 900 MiliSec //start motorc 100% power //start motord 100% power //run both for 2400 MiliSec //start motorc 100% power //start motord 45% power //run both for 900 MiliSec //start motorc 100% power //start motord 100% power //run both for 4000 MiliSec //start motorc 100% power //start motord 45% power //run both for 900 MiliSec //start motorc 100% power //start motord 100% power //run both for 5500 MiliSec //start motorc 100% power //start motord 0% power //run both for 4000 MiliSec

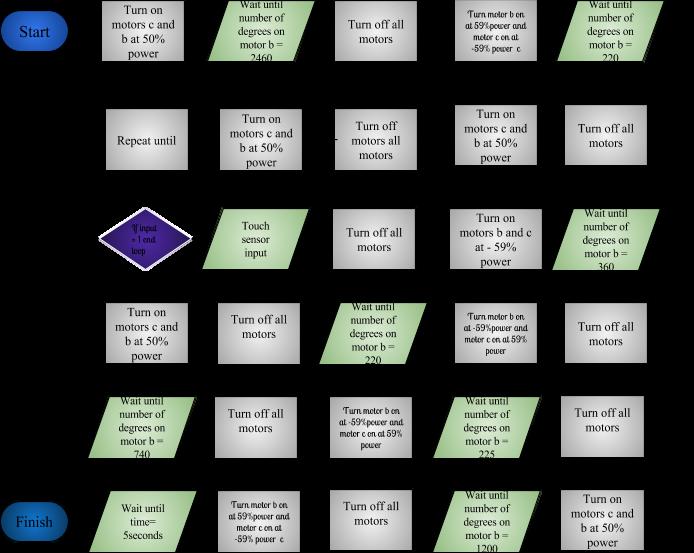
4 Flow Chart: Start File Start motor C Full power Start motor D Full power Wait 3.5 sec Start motor C full power Start motor D full power Start motor C full power Wait 0.9 sec Start motor C full power Start motor D full power Wait 5 sec Start motor C 45% power Start motor D full power Start motor D 45% power Wait 2 sec Start motor C full power Start motor D full power Wait 4 sec Start motor C full power Start motor D full power Wait 0.9 sec Wait 0.9 sec Start motor C full power Start motor C Start full motor power D 45% power Start motor D Wait 0.9 full sec power Start motor C full power
5 Wait 4 sec Start motor C full power Wait 5.5 Sec
 to drive 1 bump")


6 BigMac RobotC Design Document: Specifications: Robot Dimensions: (must be less than 12 x12 x12 ) Length: 8 Width: 7 Height: 5 Pictures of Robot: Main Components: 2 motors (B and C) to drive 1 bump sensor 2 large tires with rough tread 1 small grey ball on back Programming: The name of the program is Robot C and we have to insert every program ourselves to make our robot move. We have to program each motor with a certain name as well as type in the exact milliseconds that we want it to move with. Basically our program directs the robot to complete the following course and end the course with a 360 spin.


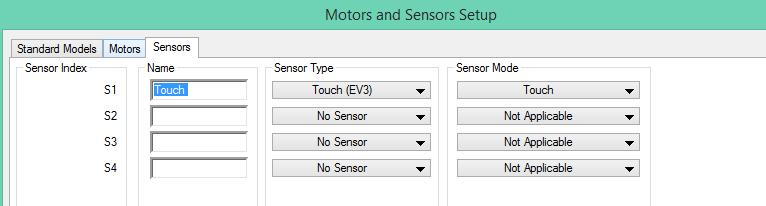
7 The robot must complete this course and do a 360 at the end. Pseudocode and Code: Pseudocode should be typed up following correct RobotC procedures (//). Code may be screen shot and pasted in, but should be free from grammar and syntax errors. Our code and pseudocode in RobotC. Be sure to capture your motor and sensor setup in the image.
8
9 //start motor b //start motor c //run both for 3.5 seconds //stop motor b //stop motor c //run both for 2 seconds //start motor b //stop motor c //run both for 1.5 seconds //start motor b //start motor c //run both for 5 seconds //repeat until touch //start motor b //stop motor c //run both for 1.5 seconds //start motor b //start motor c //run both for 4 seconds //start motor b //stop motor c //run both for 4 seconds
10 Flowchart: Start Program Wait for 5 Seconds or till you touch/bump Turn Motor B on Full Reverse Speed Turn Motor A & B Full Speed Turn Motor B & C full speed Turn Motor C off Comple Course Wait 3.5 Seconds Wait for 1.5 Seconds Wait 1.5 seconds Wait for 4 Seconds Turn Motor A & B off Turn Motor C off Turn Motor B & C full speed Turn Motor C off Wait 2 Seconds Turn Motor B full speed Wait for 4 seconds Turn Motor B full speed reverse Testing: Trial Complete/Fail Adjustments Course 1 Fail First attempt of the course with startup code 2 Fail Decreased right motor to 97 as it kept swerving 3 Fail Changed rotation time to 500 milliseconds to reach the turn 4 Complete First completion of course with Complete Double checked my programming to make sure it worked The first time I attempted the course, I failed because my code was way off on turning left and right. So, the second time I corrected the code and I decreased the right motor speed to 97 because the robot was swerving more to the right and I still failed due to the rotation of the robot when turning around the corner. So, I changed the rotation time to 500 milliseconds and this seemed to solve the problem. This change allowed me to reach the end and do a 360 degree spin. The final time I wanted to see if my program worked or if it was just luck. Depending on my placement of my robot it worked when I started the course to the left which made up for the rotation going to the right.


11 RobotC Design Document Specifications Dimensions: 8 x 5 x 7 Primary Components: Touch Sensor, EV3 Large Servo Motors and EV3 Brick Pictures: Programming

12 Testing Throughout the design of our robot, many modifications were made. One of the first modifications that we added was wheel guards; the wheel guards prevent the wheels from getting stuck on the side of the wall and this allowed the robot to be able to hit walls, if it drifted to the side, without making us worry about having our robot getting stuck. The majority of design changes were created in our coding design. We started out making the robot move by writing the movement code with every movement; we quickly realized that this was not a good way of doing things. We decided to instead write functions containing the movement code and this allowed us to quickly make the robot move. For example, to move forward, instead of typing the entire command, we can simply type forward. After that, we decided to make the writing of the movement functions faster by creating a define macro; the define macro allows us to write a little code that is then automatically replaced by more code. We also modified the placement of the touch sensor from the original design to a new location, and that allowed the robot to more accurately sense touch. One of our biggest changes was creating a program that outputted how far the robot had travelled, allowing us to measure distances much faster.
13 Modifications for Robot and Code (The time column measures, in minutes, the amount of time it took us to complete the maze. The modifications column shows the modifications we made to achieve that time.) Time (min) Modification 19 No modifications 17 Use of functions - Removes the effort required in a a writing common move commands 15 Define macro - Removes redundant move commands in a functions 13 New Wheels - Made the turns more accurate 12 Measuring Program - Removes the need for manual a measuring
 Length: 11\" 1/2 Width: 10\" ½ Height: 8\" Pictures of")
 to drive 1 touch sensor 2 medium tires")

14 Specifications: Robot Dimensions: (must be less than 12 x12 x12 ) Length: 11" 1/2 Width: 10" ½ Height: 8" Pictures of Robot: C3PO127_RobotCDesignDocument Main Components: 2 motors (B and C) to drive 1 touch sensor 2 medium tires with rough tread Programming: Our program directs the robot to follow the following course and end the course with a 360 spin.
15 Note, each square represents a motor time of 1 second. Pseudocode and Code: Pseudocode should be typed up following correct Robot-C procedures (//). Code may be screen shot and pasted in, but should be free from grammar and syntax errors.start Motor A Start Motor c 100% full speed Start Motor d 100% full speed //run both for 5.5 s 100% full power //stop motor a //start motor b //run motor b for 1.5 s //start motor a full speed //start motor b full speed //run both for 3.5 s 100% full power //stop motor a //run motor b for 1.5 s 100% full power
16 //start motor a //run both for 2.5 s 100% full power //stop motor b //start motor a //run motor a for 1.5 s //start motor b //start motor a //start motor b //run for 4.5 s //stop motor a //run motor b for 1.5 s //start motor a //run both for 4.5 s 100% full power Our code and pseudocode in RobotC. Be sure to capture your motor and sensor setup in the image.
 but should follow all rules of flowchart")
17 FlowChart: Flow charts can be done using any program (lucidchart in google drive recommended) but should follow all rules of flowchart symbols.
18 Testing: Students will explain the testing of their robot and what modifications they made to improve its speed, accuracy, or attack (BattleBots). This should include physical changes to the robot such as changing the wheels, modifications to the missile/attack arm or even redesigning the robot. It should also include specific changes to the programming. Students should include a data table showing the results of different trials. Trial Time Adjustments s First successful completion of the course s Increased the distance between the sensors to 14cm s Decreased the distance between the sensors to 12cm s Increased the power on the motors to 80% s Increased the power on the motors to 90%
19 C for Champ74_Robot C Design Doc Pseudocode and code: pseudocode in green ( 10 points ) and code in blue and red ( 10 points )

20 Flowchart Testing: I had set up a course but could not make it through. I had some difficulty's trying to go through the course like the motors were not in sync and how in some parts it was too short some miss leaded. At the end I could not do it but I was so close.at the end like the motors went left and did not stop because the sensor did not feel the bump. I put the info in the table. Trial Time Adjustments 1 fail Made it go reverse 2 fail Changing one moter speed to go straight 3 fail Making it go longer distance 4 fail Made the touch sensor longer 5 fail Also tried to change the wheels 6 fail Tried to change the code for the touch sensor
 Length: 11 Width: 8.")
 to drive 1 touch sensor (A) to use touch sensor 2 Tracks")

21 EbonHawk127_RobotCDesignDoc Specifications: Robot Dimensions: (must be less than 12 x12 x12 ) Length: 11 Width: 8.5 Height: 9 Pictures of Robot: Front: Side: Back: Main Components: 2 motors (C and B) to drive 1 touch sensor (A) to use touch sensor 2 Tracks 1 small grey wheel on back Programming: Our program directs the robot to follow the following course and end the course with a 360 spin. Each square represents a motor time of 1 second.
22 Pseudocode and Code: //start motor B //start motor C //run both for 5 seconds //Stop motor B //start motor C //run motor C for 3 seconds //start motor B //start motor C //run both for 3 seconds //stop motor C //start motor B //run motor B for 3 seconds //start motor B //start motor C //run both for 2 seconds
23 //stop motor B //start motor C //run motor C for 3 seconds //start motor C //start motor B //run both for 5 seconds //stop motor C //start motor B //run motor B for 3 seconds //start motor C //start motor B //run both for 3 seconds //stop motor C //start motor B //run motor B for 10 seconds

24 Flow Chart:
25 Testing: Trial Time Adjustment 1 13:00minutes Completed the Course 2 12:45minutes I Put Rubber Bands on the wheels to have more friction so it can move more smoothly 3 11:24 Increased the distant of the Touch Sensor by 5cm 4 11:20 Didn't do anything 5 11:49 Moved back the sensor
26 Design Document Specifications 1 Programming 3 Pseudó-Code and Code 3 Testing 3 Flowchart 4 Specifications Length(cm): 21.1 Height(cm): 14.5 Width(cm): 19.4 Motor Port Motor A Motor B Motor C Motor D Drive Side Reversed N/A Left Right N/A


27 Sensor Port S1 S2 S3 S4 Sensor Touch Sensor N/A N/A N/A Top: Back: Front:

28 Programming Pseudó-Code and Code Testing Trial Time(min) Mistakes/Improvements TIme Lost 1 47:58 We did not have turning down/for the next trial we figured out the exact number of degrees in a :34 Our turning was off by a few degrees/we replaced the battery 35 min 5 min 3 19:43 Turning was off until bat. Was replaced 6 min 4 18:50 The robot had been dropped and was now turning akwardly and unevenly until a piece was removed 10min
29 Flowchart

30 Specifications: Height:5 inches Length:4.2 inches Width:5.7 inches Program/Pseudocode:

31 Flowchart:
32 Testing: Trials Adjustments 1 At wait1msec(2000) after the end of sections of commands 2 Changed the sync motor power to -100 and Used a positive sign in front of 100 instead of a negative to make a left turn 4 Added semicolons to the commands that needed them 5 Changed number of degrees used to make turns We made many adjustments to our programming. One of the adjustments was that we had to add a wait command after the commands that were in sections. This helps the robot know when to move onto the next set of commands. The next adjustment we made was to change the sync motor power to 100 instead of This helped us with our point turns. After this we found that some commands had no semicolon so we had to add some to the ones that didn t. The program would not work without semicolons. The final adjustment we made was to change the number of degrees for the turns. Without the degrees set to the right number that robots turns would be off and could impact it ability to get through the maze.
 Code is found in red and blue (10")
33 TeamOneElement74 Pseudocode and Code Section Pseudocode is found in green below ( 10 points) Code is found in red and blue (10 points)
34 Flow Chart ( 5 points ) Testing ( 5 points ) Trial Time Results/Modifications 1 8s Crashed the wall./ Make it not hit the wall. 2 10s It went the wrong way/ make it turn and go straight. 3 12s Went off the course/ Make it turn 4 13s Stop to early/ put more sec on it 5 13s Hit the block but didn t go back/fix the code 6 15s Motor transplant/ because one motor was going faster than the other. 7 17s I finally finished it


35 Robot Dimensions: Length: 1 0.5" Width: 9 Height: 5,1/2 Pictures of Robot:
 Length: 9 Width: 8.")


36 SGTROOKIESC127_RobotCDesignDocument Specifications: Robot Dimensions: (must be less than 12 x12 x12 ) Length: 9 Width: 8.5 Height: 6 Pictures of Robot: Main Components: 2 motors (B, A, and C) to drive 2 medium tires with rough tread 1 small grey wheel on front 1 touch sensor Programming: Our program directs the robot to follow the following course and end the course with a 360 spin. Note, each square represents a motor time of 1 second.
37 Pseudocode and Code: Pseudocode should be typed up following correct Robot-C procedures (//). Code may be screen shot and pasted in, but should be free from grammar and syntax errors. //start motor a, //start motor b, //run both for 5.5 s //stop motor a //start motor b //run motor b for 1.5 s //start motor a, //start motor b, //run both for 4 s //stop motor a, //start motor b, //run both for 1.5 s //start motor a, //stop motor b, //run both for 3 s //stop motor a, //start motor b, //run both for 1.5 s //start motor a, //start motor b, //run both for 6 s //stop motor a, //start motor b, //run both for 1.5 s //start motor a, //start motor b, //run both for 3 s Our code and pseudocode in RobotC. Be sure to capture your motor and sensor setup in the image.


38 FlowChart: Flow charts can be done using any program (lucidchart in google drive recommended) but should follow all rules of flowchart symbols.
39 Testing: Students will explain the testing of their robot and what modifications they made to improve its speed, accuracy, or attack (BattleBots). This should include physical changes to the robot such as changing the wheels, modifications to the missile/attack arm or even redesigning the robot. It should also include specific changes to the programming. Students should include a data table showing the results of different trials. Trial Time Adjustments 1 7s Fixing which side to turn 2 20s Finishing the other half of the course 3 36s Fixing which side to turn 4 44s Fixing which motor to turn off and leave one on 5 53s Fixing the distance to move

")

40 Team LJ74_RobotC DesignDoc Pseudo Code and Code ( pseudo in green and code in blue and red ) Specifications: Robot Dimensions: Length: 5 Width: 8 Height: 7 Pictures of Robot:
 to")


41 Main Components: 2 motors (A and D) to drive 1 touch sensors 2 large tires with smooth tread 1 pivot wheel on the back Flowchart
42 Testing: I did a simple course to write robot c and I have made some changes in the program to get through the course. I put the changes into a data table. When the robot failed to get through the course, I made changes that I thought would help. When it was successful, I made changes that I thought would make it faster. Trial Time Adjustments 1 Fail Changed the time on the first straight block 2 Changed the positive power with negative power to go straight for 5.5sec success 3 fail Decreased the time by 50% 4 fail Changed the touch sensor to 2 seconds 5 success Changed the time to 100
 and Code in Blue and Red ( 10 points")
43 Team Teemo74_RobotCDesignDoc Pseudocode and Code Pseudocode in Green ( 10 points ) and Code in Blue and Red ( 10 points )

44 Flow Chart ( 5 points ) Testing: ( 5 points ) Trial Result Adjustments 1 Fail Hit walls and took too long / lowered left motor to keep robot straight 2 Fail Turned and hit the box / extended time for first chunk of code 3 Fail Hits the wall / decrease speed for both motors 4 Fail At the turn it hits the wall /increased speed of the right motor 5 Fail Robot didn t turn as much and hit pole / increased speed of right motor

45 Specifications: Robot Dimensions: Length: Width: 8 Height: 3.75 Pictures of Robot:
46
47
ROBOT C CHALLENGE DESIGN DOCUMENT TEAM NAME. Sample Design Document. Bolt EVA. Lightning. RoboGirls. Cloud9. Femmebots
 ROBOT C CHALLENGE DESIGN DOCUMENT TEAM NAME (SELECT TEAM NAME TO NAVIGATE TO THE TEAM S DESIGN DOCUMENT) Sample Design Document Bolt EVA Lightning RoboGirls Cloud9 Femmebots SAMPLE ROBOT C DESIGN DOCUMENT
Introduction: Problem statement
 Introduction: Problem statement The goal of this project is to develop a catapult system that can be used to throw a squash ball the farthest distance and to be able to have some degree of accuracy with
Orientation and Conferencing Plan Stage 1
 Orientation and Conferencing Plan Stage 1 Orientation Ensure that you have read about using the plan in the Program Guide. Book summary Read the following summary to the student. Everyone plays with the
What Is an Electric Motor? How Does a Rotation Sensor Work?
 What Is an Electric Motor? How Does a Rotation Sensor Work? Electric Motors Pre-Quiz 1. What is an electric motor? 2. Name two applications (things) you use every day that use electric motors. 3. How does
Deriving Consistency from LEGOs
 Deriving Consistency from LEGOs What we have learned in 6 years of FLL by Austin and Travis Schuh Objectives Basic Building Techniques How to Build Arms and Drive Trains Using Sensors How to Choose a Programming
BEGINNER EV3 PROGRAMMING LESSON 1
 BEGINNER EV3 PROGRAMMING LESSON 1 Intro to Brick and Software, Moving Straight, Turning By: Droids Robotics www.ev3lessons.com SECTION 1: EV3 BASICS THE BRICK BUTTONS 1 = Back Undo Stop Program Shut Down
Experimental Procedure
 1 of 14 9/11/2018, 3:22 PM https://www.sciencebuddies.org/science-fair-projects/project-ideas/robotics_p026/robotics/build-a-solar-powered-bristlebot (http://www.sciencebuddies.org/science-fairprojects/project-ideas/robotics_p026/robotics/build-a-solar-powered-bristlebot)
ROBOTICS BUILDING BLOCKS
 ROBOTICS BUILDING BLOCKS 2 CURRICULUM MAP Page Title...Section Estimated Time (minutes) Robotics Building Blocks 0 2 Imaginations Coming Alive 5...Robots - Changing the World 5...Amazing Feat 5...Activity
Tachometer (RPM Feedback) General
 General") Tachometer (RPM Feedback) General The force of magnetic fields interacting drives all electric motors. How the magnetic field is created on the moving rotor determines the type of control required on the
Tachometer (RPM Feedback) General The force of magnetic fields interacting drives all electric motors. How the magnetic field is created on the moving rotor determines the type of control required on the
4.2 Friction. Some causes of friction
 4.2 Friction Friction is a force that resists motion. Friction is found everywhere in our world. You feel the effects of when you swim, ride in a car, walk, and even when you sit in a chair. Friction can
Door Panel Removal & Window Stop Adjustment
 Door Panel Removal & Window Stop Adjustment By: Jeff Wolford Disclaimer: This is simply an article of how I fixed my car. I m not responsible if you break, scratch, or mess up anything following my example.
TIPS TO FINAL ASSEMBLY Radio installation. The Electronic speed control (ESC) and the receiver need to be mounted onto the chassis, using double sided
 and the receiver need to be mounted onto the chassis, using double sided") TIPS TO FINAL ASSEMBLY Radio installation. The Electronic speed control (ESC) and the receiver need to be mounted onto the chassis, using double sided tape (not supplied.) Mount the ESC first on the chassis
TIPS TO FINAL ASSEMBLY Radio installation. The Electronic speed control (ESC) and the receiver need to be mounted onto the chassis, using double sided tape (not supplied.) Mount the ESC first on the chassis
Engineering Design Process for BEST Robotics JANNE ACKERMAN COLLIN COUNTY (COCO) BEST & BEST OF TEXAS ROBOTICS
 BEST & BEST OF TEXAS ROBOTICS") Engineering Design Process for BEST Robotics JANNE ACKERMAN COLLIN COUNTY (COCO) BEST & BEST OF TEXAS ROBOTICS Agenda Getting Started Lessons Learned Design Process Engineering Mechanics 2 Save Time Complete
Engineering Design Process for BEST Robotics JANNE ACKERMAN COLLIN COUNTY (COCO) BEST & BEST OF TEXAS ROBOTICS Agenda Getting Started Lessons Learned Design Process Engineering Mechanics 2 Save Time Complete
Timing the 9N/2N Steering Sector Gears
 Timing the 9N/2N Steering Sector Gears by John Korschot - www.johnsoldiron.com (May 2010) The procedure for timing a set of steering gears in the 9/2n tractors is published in the I&T FO4 shop manual.
IT'S MAGNETIC (1 Hour)
") IT'S MAGNETIC (1 Hour) Addresses NGSS Level of Difficulty: 4 Grade Range: 3-5 OVERVIEW In this activity, students will create a simple electromagnet using a nail, a battery, and copper wire. They will
IT'S MAGNETIC (1 Hour) Addresses NGSS Level of Difficulty: 4 Grade Range: 3-5 OVERVIEW In this activity, students will create a simple electromagnet using a nail, a battery, and copper wire. They will
Improving the casting performance on old Ambassadeurs for free!
 Improving the casting performance on old Ambassadeurs for free! Whenever I acquire a fishing reel I will always strip it down and give it a service-it doesn t matter if the reel is new or old. Sometimes
Photos of the repair by Tim Miller 1. Handles off
 35 Commander Shower drip solution By Tim Miller and Bruce Harkness Introduction: Some time ago Bruce Harkness posted that he was attacking the dreaded shower drip and replaced original plastic valve seats
Physics 2048 Test 2 Dr. Jeff Saul Fall 2001
 Physics 2048 Test 2 Dr. Jeff Saul Fall 2001 Name: Group: Date: READ THESE INSTRUCTIONS BEFORE YOU BEGIN Before you start the test, WRITE YOUR NAME ON EVERY PAGE OF THE EXAM. Calculators are permitted,
How to Build with the Mindstorm Kit
 How to Build with the Mindstorm Kit There are many resources available Constructopedias Example Robots YouTube Etc. The best way to learn, is to do Remember rule #1: don't be afraid to fail New Rule: don't
PRESEASON CHASSIS SETUP TIPS
 PRESEASON CHASSIS SETUP TIPS A Setup To-Do List to Get You Started By Bob Bolles, Circle Track Magazine When we recently set up our Project Modified for our first race, we followed a simple list of to-do
FLL Workshop 1 Beginning FLL Programming. Patrick R. Michaud University of Texas at Dallas September 8, 2016
 FLL Workshop 1 Beginning FLL Programming Patrick R. Michaud pmichaud@pobox.com University of Texas at Dallas September 8, 2016 Goals Learn basics of Mindstorms programming Be able to accomplish some missions
B&W Turnover Ball Installation
 B&W Turnover Ball Installation by Flopster843 02 Jan 2012 I wanted to start this article out by stating one very important thing. Installing a gooseneck hitch is not a task to be taken lightly. If you
Speakers and Motors. Three feet of magnet wire to make a coil (you can reuse any of the coils you made in the last lesson if you wish)
") Speakers and Motors We ve come a long way with this magnetism thing and hopefully you re feeling pretty good about how magnetism works and what it does. This lesson, we re going to use what we ve learned
Speakers and Motors We ve come a long way with this magnetism thing and hopefully you re feeling pretty good about how magnetism works and what it does. This lesson, we re going to use what we ve learned
SOME BASICS OF TROUBLESHOOTING
 SOME BASICS OF TROUBLESHOOTING DICK RANDALL I decided to pull these ideas together because I have spent plenty of hobby time figuring out things that did not work or that needed repair. This process and
The Car Tutorial Part 2 Creating a Racing Game for Unity
 The Car Tutorial Part 2 Creating a Racing Game for Unity Part 2: Tweaking the Car 3 Center of Mass 3 Suspension 5 Suspension range 6 Suspension damper 6 Drag Multiplier 6 Speed, turning and gears 8 Exporting
Name: Period: Due Date: Physics Project: Balloon Powered Car
 Name: Period: Due Date: Physics Project: Balloon Powered Car Challenge: Design and build a balloon car that will travel the greatest distance in the Balloon Car Cup. To do this, you must combine key concepts
ELITE 625 With Dial Display Control
 www.racedigitaldelay.com ELITE 625 With Dial Display Control Instruction Manual - 1 - The ELITE 625 From DIGITAL DELAY 2036 Fillmore Street Davenport Iowa 52804 563-324-1046 www.racedigitaldelay.com Congratulations
PLEASE READ THROUGH THE WHOLE WRITE UP BEFORE ACTUALLY USING IT!!!!
 JDM power folding mirror switch install into stock USDM harness. By: Greg L., Zeke21 on twinturbo.net PLEASE READ THROUGH THE WHOLE WRITE UP BEFORE ACTUALLY USING IT!!!! This is how I was able to get the
Experience Matters: ADAS UX
 Experience Matters: ADAS UX WardsAuto UX Solving UX Issues October 5, 2017 Kristin Kolodge Executive Director, Driver Interaction and HMI Technology User Experience Satisfaction 2 User Experience Model
MiR Hook. Technical Documentation
 MiR Hook Technical Documentation Version 1.7 Software release 1.7 Release date: 10.11.2016 Table of contents 1 Introduction...3 2 The MiR Hook hardware...3 3 Trolley specifications...4 4 Space requirements...5
A device that measures the current in a circuit. It is always connected in SERIES to the device through which it is measuring current.
 Goals of this second circuit lab packet: 1 to learn to use voltmeters an ammeters, the basic devices for analyzing a circuit. 2 to learn to use two devices which make circuit building far more simple:
Topic: Friction. Planes, Trains, and Automobiles. A Poppins Book Nook Science Experiment. My Name Is:
 Planes, Trains, and Automobiles A Poppins Book Nook Science Experiment Topic: Friction My Name Is: ---------------------------------------------------------------------------------------------------------
Water-Gauge, Water Level Test Valve and Boiler Blow Down Valve
 Water-Gauge, Water Level Test Valve and Boiler Blow Down Valve Troubles from the get go on the water gauge. While modeling the upper fitting for the water gauge I encountered a problem with the side hole
Faraday's Law of Induction
 Purpose Theory Faraday's Law of Induction a. To investigate the emf induced in a coil that is swinging through a magnetic field; b. To investigate the energy conversion from mechanical energy to electrical
Fly Rocket Fly: Design Lab Report. The J Crispy and The Airbus A
 Fly Rocket Fly: Design Lab Report The J Crispy and The Airbus A380 800 Rockets: Test 1 Overall Question: How can you design a water, bottle rocket to make it fly a maximum distance. It needs to be made
Instructions to install the early ( ) Limited Slip Differential in the Late-model ( ) G28 Transaxle
 Limited Slip Differential in the Late-model ( ) G28 Transaxle") Instructions to install the early (1978-83) Limited Slip Differential in the Late-model (1985-1995) G28 Transaxle BACKGROUND: Most 928 owners know about the improvements to the 5- speed transaxle that
Instructions to install the early (1978-83) Limited Slip Differential in the Late-model (1985-1995) G28 Transaxle BACKGROUND: Most 928 owners know about the improvements to the 5- speed transaxle that
Table of Contents. Executive Summary...4. Introduction Integrated System...6. Mobile Platform...7. Actuation...8. Sensors...9. Behaviors...
 TaleGator Nyal Jennings 4/22/13 University of Florida Email: Magicman01@ufl.edu TAs: Ryan Chilton Josh Weaver Instructors: Dr. A. Antonio Arroyo Dr. Eric M. Schwartz Table of Contents Abstract...3 Executive
9.03 Fact Sheet: Avoiding & Minimizing Impacts
 9.03 Fact Sheet: Avoiding & Minimizing Impacts The purpose of this Student Worksheet is to acquaint you with the techniques of emergency maneuvering, to help you develop the ability to recognize the situations
2001 BMW X5 4.4i. Fuel Filter Replacement
 P P 2001 BMW X5 4.4i Fuel Filter Replacement Symptoms for Replacement: OBDII code P0171, Lean Bank1, which could be a bad or dirty MAF sensor Sluggish engine performance including hesitation with Wide
Lifting Mechanisms. Example 1: Two Stage Lift
 Lifting Mechanisms The primary scoring method for the 2018 game is to deposit fuel cubes into scoring zones. A manipulator fixed to your robot can deliver fuel cubes into ground level scoring zones, but
Emergency driving and its procedures
 Emergency driving and its procedures Prepared By (Name of the student) Enrol Number: ( ) Date: ( ) (Name of the school) How to Avoid Vehicle Malfunction Although some vehicle malfunctions may not be avoidable,
Chapter 12. Formula EV3: a racing robot
 Chapter 12. Formula EV3: a racing robot Now that you ve learned how to program the EV3 to control motors and sensors, you can begin making more sophisticated robots, such as autonomous vehicles, robotic
Friction. Coefficients of friction for rubber on roads are listed in the table. asphalt road) Dry road Wet road 0.53
 Dry road Wet road 0.53") Conceptual questions Friction 1 Most bikes have normal tires: some have fats. a Suppose the wheels on both a normal bike (not shown) and the bikes above have outside diameters of 67 cm. By using your own
Conceptual questions Friction 1 Most bikes have normal tires: some have fats. a Suppose the wheels on both a normal bike (not shown) and the bikes above have outside diameters of 67 cm. By using your own
BeetleBot. The Simple Zippy Screw-Together Robot Kit! SKU: K JB. jb/
 BeetleBot The Simple Zippy Screw-Together Robot Kit! www.solarbotics.com 1-866-276-2687 SKU: K JB http://www.solarbotics.com/products/k_ jb/ Document Revision: January 05 2016 Shell Board 2 x Sensor Wires
4TH GEN SEATS IN A 3RD GEN TRUCK
 4TH GEN SEATS IN A 3RD GEN TRUCK by Flopster843 02 Oct 2016 If you drive a 3rd generation Dodge Ram truck, I am sure you have discovered that the OEM seats are not the greatest (Figure 1.) They are extremely
Mustang 7.5 Limited Slip Differential (28 Spline) V8; V6:
 V8; V6:") Mustang 7.5 Limited Slip Differential (28 Spline) 79-85 V8; 86-10 V6: Required Tools: Ratchet Wrench Torque Wrench 1/2", 5/16, 3/4", 12mm and 15mm Sockets Lug nut Wrench Dial Indicator Digital Measuring
Mustang 7.5 Limited Slip Differential (28 Spline) 79-85 V8; 86-10 V6: Required Tools: Ratchet Wrench Torque Wrench 1/2", 5/16, 3/4", 12mm and 15mm Sockets Lug nut Wrench Dial Indicator Digital Measuring
Disco 3 Clock Spring / Rotary Coupler replacement
 Disco 3 Clock Spring / Rotary Coupler replacement I recently had to change my Clock spring and thought some folks may find it helpful to see what it entailed. I did lots of reading around but couldn t
Freescale Cup Competition. Abdulahi Abu Amber Baruffa Mike Diep Xinya Zhao. Author: Amber Baruffa
 Freescale Cup Competition The Freescale Cup is a global competition where student teams build, program, and race a model car around a track for speed. Abdulahi Abu Amber Baruffa Mike Diep Xinya Zhao The
Cable Car. Category: Physics: Balance & Center of Mass, Electricity and Magnetism, Force and Motion. Type: Make & Take.
 Cable Car Category: Physics: Balance & Center of Mass, Electricity and Magnetism, Force and Motion Type: Make & Take Rough Parts List: 1 Paperclip, large 2 Paperclips, small 1 Wood stick, 1 x 2 x 6 4 Electrical
Sometimes I truly think that I should have my head examined for attempting this project. When I said that I had grossly underestimated the time
 Sometimes I truly think that I should have my head examined for attempting this project. When I said that I had grossly underestimated the time needed it was never truer than the past two plus weeks. During
84-86 Ford SVO Mustang AC Installation Guide
 84-86 Ford SVO Mustang AC Installation Guide This installation guide is for the AC installation kit from Late Model Restoration. The Vendor is Hose Wizards that manufactures this great kit that provides
I cannot believe it has been so long since my last update. A lot has happened and I will try to bring everyone up to speed. First of all, I had my
 I cannot believe it has been so long since my last update. A lot has happened and I will try to bring everyone up to speed. First of all, I had my left knee replaced about 5 weeks ago. Needless to say
reflect energy: the ability to do work
 reflect Have you ever thought about how much we depend on electricity? Electricity is a form of energy that runs computers, appliances, and radios. Electricity lights our homes, schools, and office buildings.
6. Pre-print checks. 3D Touch
 Page 1 1. 6. Pre-print checks........................................................................................... 1.1 a. Clearing the print bed..................................................................................
Mitsubishi. VFD Manuals
 Mitsubishi VFD Manuals Mitsubishi D700 VFD Installation Mitsubishi FR-D700 VFD User Manual Mitsubishi D700 Parallel Braking Resistors VFD Wiring Diagram - Apollo Mitsubishi VFD to Interpreter Mitsubishi
PROJECT IDEA SUBMISSION
 PROJECT IDEA SUBMISSION Team Contacts - 1 st person listed serves as the point of contact with Professor Nelson - Initial team size may be from 1 to 6 members (all members must agree to have their name
1. (3) My faucet runs at a rate of 5 gallons a minute. How many gallons a second is that?
 My faucet runs at a rate of 5 gallons a minute. How many gallons a second is that?") Math 137 Exam 2 Review Fibonacci Sequence and Chapters 6-10 NAMES: Show your work. Be sure to include appropriate units. 1. (3) My faucet runs at a rate of 5 gallons a minute. How many gallons a second
Math 137 Exam 2 Review Fibonacci Sequence and Chapters 6-10 NAMES: Show your work. Be sure to include appropriate units. 1. (3) My faucet runs at a rate of 5 gallons a minute. How many gallons a second
Safe Braking on the School Bus Advanced BrakingTechniques and Practices. Reference Guide and Test by Video Communications
 Safe Braking on the School Bus Advanced BrakingTechniques and Practices Reference Guide and Test by Video Communications Introduction Brakes are considered one of the most important items for school bus
Quick Guide. Unipro Laptimer Version Go faster faster. UNIPRO ApS
 Quick Guide Unipro Laptimer 5004 Version 1.32 Go faster faster UNIPRO ApS VIBORG HOVEDVEJ 24 DK-7100 VEJLE DENMARK Tel.: +45 75 85 11 82 Fax: +45 75 85 17 82 www.uniprolaptimer.com mail@uniprolaptimer.com
Stopping distance = thinking distance + braking distance.
 Q1. (a) A driver may have to make an emergency stop. Stopping distance = thinking distance + braking distance. Give three different factors which affect the thinking distance or the braking distance. In
The BUGATTI 100P Replica Propeller(s) By Jan Carlsson January 2012
 By Jan Carlsson January 2012") The BUGATTI 100P Replica Propeller(s) By Jan Carlsson January 2012 At the end of November 2011, I got an e-mail from a Scotty Wilson, asking: Would you consider helping us to design a custom prop(s) for
The BUGATTI 100P Replica Propeller(s) By Jan Carlsson January 2012 At the end of November 2011, I got an e-mail from a Scotty Wilson, asking: Would you consider helping us to design a custom prop(s) for
Rubber Band Car. Tommy Stewart Corey Marineau John Martinez
 Tommy Stewart Corey Marineau John Martinez Rubber Band Car PURPOSE: Create a rubber band propelled car that will travel three meters. Then create a regression line using the data that represents how the
LabVIEW Claw Demo: Motor Options
 Posted by Matthew Bollom Jun 29, 2012 We have been investigating possibly replacing the current motors on the claw machine with motors that NI sells. This would allow us to use our C series motor drive
E4OD/4R100. Check Ball Identification and Symptom Chart. Early 1989 E4ODs The first E4OD had 16 checkballs.
 110 FORD Check Ball Identification and Symptom Chart Repeated failures are caused by only two types of problems: parts or technique. If a part is causing the failure, it should be no surprise that using
3 AND 5 LINK INSTALLATION MANUAL
 1127 E. Curry Rd. #3 Tempe, Arizona 85281 (480) 446-8442 www.levyracing.com 3 AND 5 LINK INSTALLATION MANUAL Thank you for your purchase of this Levy Racing quality product. Like all Levy Racing products,
Tip: - Control of the Heljan Container Terminal using TrainController Gold Date: Created
 Hi All, I have just retrieved my Container Terminal from three years in storage and thought it was about time to get the crane working with TrainController and this document is another record how I configured
The Holly Buddy. 2.5cc Model Diesel - Compression Ignition engine.
 The Holly Buddy 2.5cc Model Diesel - Compression Ignition engine. Firstly I want to dedicate this engine to David Owen. I didn t know David for very long, but his influence on me and my affection for these
DESIGN AND DEVELOPMENT OF A SUSPENSION SYSTEM USED IN ROUGH- TERRAIN VEHICLE CONTROL FOR VIBRATION SUPPRESSION IN PLANETARY EXPLORATION
 DESIGN AND DEVELOPMENT OF A SUSPENSION SYSTEM USED IN ROUGH- TERRAIN VEHICLE CONTROL FOR VIBRATION SUPPRESSION IN PLANETARY EXPLORATION Arvin Niro College of Engineering University of Hawaiʽi at Mānoa
TAYO EPISODE #22. SPEEDING IS DANGEROUS. TAYO (VO) Speeding is Dangerous! Hm-hm-hm hm-hm-hm... NA Tayo is driving along the river on his day off.
 Speeding is Dangerous! Hm-hm-hm hm-hm-hm... NA Tayo is driving along the river on his day off.") EPISODE #22. SPEEDING IS DANGEROUS [01;12;00;00)] #1. EXT. RIVERSIDE ROAD DAY (VO) Speeding is Dangerous! Hm-hm-hm hm-hm-hm... NA Tayo is driving along the river on his day off. Hi, Tayo. Huh? Hey, Shine.
EPISODE #22. SPEEDING IS DANGEROUS [01;12;00;00)] #1. EXT. RIVERSIDE ROAD DAY (VO) Speeding is Dangerous! Hm-hm-hm hm-hm-hm... NA Tayo is driving along the river on his day off. Hi, Tayo. Huh? Hey, Shine.
Now we re ready to install our new mounts. The picture on the right shows our old and new for comparison.
 Well I didn t have a chance to write last week so we have a little catching up to do. Last Sunday I started out with setting up a jig to weld in the mounts. The jig is made out of a old fork tube that
Electric Circuits Lab
 Electric Circuits Lab Purpose: To construct series and parallel circuits To compare the current, voltage, and resistance in series and parallel circuits To draw schematic (circuit) diagrams of various
Triumph Street Triple VSM Grip Heater Install
 Triumph Street Triple VSM Grip Heater Install Introduction: With winter fast approaching and with painful memories of last winter riding with the club it was time to do something about getting some grip
Asphalt Machines. Lots of different shapes and sizes
 Asphalt Machines Asphalt Machines Lots of different shapes and sizes Often Used In Teams Basic Safety, SW800 & SW850 All brakes on Sakai equipment are referred to as negative brakes. That means they are
EXPERIMENT 19. Starting and Synchronizing Synchronous Machines PURPOSE: BRIEFING: To discover the method of starting synchronous motors.
 EXPERIMENT 19 Starting and Synchronizing Synchronous Machines PURPOSE: To discover the method of starting synchronous motors. BRIEFING: When three-phase is applied to the stator of a three-phase motor,
Design and Technology: Systems and Control Technology
 Centre Number Surname Candidate Number For Examiner s Use Other Names Candidate Signature Examiner s Initials Question Mark General Certificate of Secondary Education June 2015 Design and Technology: 45651
Bachmann Spectrum Peter Witt in HO
 Bachmann Spectrum Peter Witt in HO By Bob Dietrich This is my impression of an unpainted Peter Witt from Bachmann Spectrum. The packaging of the car was impressive a large red box with a clear cover showing
High technology theft-prevention systems
 Lemme In! Mazda 626 & MPV Immobilizer System High technology theft-prevention systems have hit the automotive market full-force. Several manufacturers now offer antitheft protection integrated with the
**Detailed instructions for balancing aluminum wheels in Section 15 of manual.
 PWB-1530 Manual Please read this Manual before using the Machine. You will need to know the safety instructions, System Settings, Wheel Parameters Input and Calibration process before you can properly
index Page numbers shown in italic indicate figures. Numbers & Symbols
 index Page numbers shown in italic indicate figures. Numbers & Symbols 12T gear, 265 24T gear, 265 36T gear, 265 / (division operator), 332 % (modulo operator), 332 * (multiplication operator), 332 A accelerating
INSTALLATION GUIDE Avenger 4-Link, Scalloped for 1-5/8 Clips and Chassis
 INSTALLATION GUIDE 6260 Avenger 4-Link, Scalloped for 1-5/8 Clips and Chassis WARRANTY NOTICE: There are NO WARRANTIES, either expressed or implied. Neither the seller nor manufacturer will be liable for
VEHICLE TOWING SAFETY
 When you've got the correct gear, some practice and confidence, towing can be as easy as single-vehicle driving. Yet safety should always be your main concern when you're pulling a trailer. Because no
ELITE 600
 www.racedigitaldelay.com ELITE 600 Instruction Manual - 1 - The ELITE 600 From DIGITAL DELAY 2036 Fillmore Street Davenport Iowa 52804 563-324-1046 www.racedigitaldelay.com Congratulations on your purchase
Unit 5. Guided Work Sheet Sci 701 NAME: 1) Define the following key terms. Acceleration. DC motor. Direct current (DC) Force.
 Define the following key terms. Acceleration. DC motor. Direct current (DC) Force.") Unit 5 Guided Work Sheet Sci 701 NAME: 1) Define the following key terms. Acceleration DC motor Direct current (DC) Force Power Shaft Speed Torque Work Wrench flat 1. Determine free wheel speed and stall
Unit 5 Guided Work Sheet Sci 701 NAME: 1) Define the following key terms. Acceleration DC motor Direct current (DC) Force Power Shaft Speed Torque Work Wrench flat 1. Determine free wheel speed and stall
Engaging Inquiry-Based Activities Grades 3-6
 ELECTRICITY AND CIRCUITS Engaging Inquiry-Based Activities Grades 3-6 Janette Smith 2016 Janette Smith 2016 1 What s Inside Activity 1: Light it Up!: Students investigate different ways to light a light
NTB-800 Manual. Contents
 NTB-800 Manual Please read this Manual before using the Machine. You will need to know the safety instructions, System Settings, Wheel Parameters Input and Calibration process before you can properly balance
Measuring Battery Life on Battery Powered Medical Devices
 Measuring Battery Life on Battery Powered Medical Devices By Bob Zollo, Keysight Technologies, Inc.* *Keysight Technologies Inc., formerly Agilent Technologies electronic measurement business Battery powered
Mega 475
 www.racedigitaldelay.com Mega 475 Instruction Manual - 1 - The MEGA 475 From DIGITAL DELAY 2036 Fillmore Street Davenport Iowa 52804 563-324-1046 www.racedigitaldelay.com Congratulations on your purchase
How Regenerative Braking Works
 Feature How Regenerative Braking Works The regenerative braking systems on Nissan hybrid vehicles can be confusing and misunderstood. Let s take a look at how these systems really work. 26 Nissan TechNews
Newton s First Law. Evaluation copy. Vernier data-collection interface
 Newton s First Law Experiment 3 INTRODUCTION Everyone knows that force and motion are related. A stationary object will not begin to move unless some agent applies a force to it. But just how does the
Steering Damper for FLH Harley-Davidson Bikes/Trikes
 Steering Damper for FLH Harley-Davidson Bikes/Trikes I have spoken with several HD Touring model trikers, who are looking for increased feel in the steering department. Some want to cure a slight wobble
BASIC CONNECTION PRINCIPLE
 READ & SAVE ASSEMBLY & OPERATION INSTRUCTIONS There are four basic individual units in this unit, AMAZING AIM N SHOOT, AMAZING ROBOTIC DUCK, AMAZING TURBOAIR and AMAZING MAZE CHALLENGE. By changing different
QUASAR KIT No THYRISTOR - TRIAC TESTER
 QUASAR KIT No. 1087 THYRISTOR - TRIAC TESTER GENERAL DESCRIPTION With this new kit Quasar Kit offers you a very useful instrument for your bench that will help you to test THYRISTORS and TRIACS. These
Avoiding Crashes 5 tips to save your RC airplane! Sep 03, 2011 By Gerry Yarrish
 Avoiding Crashes 5 tips to save your RC airplane! Sep 03, 2011 By Gerry Yarrish We ve all been here, done that! The life expectancy of your RC airplane is directly proportional to how well you follow directions.
Experimental Procedure
 1 of 19 9/10/2018, 11:03 AM https://www.sciencebuddies.org/science-fair-projects/project-ideas/robotics_p023/robotics/line-following-robot (http://www.sciencebuddies.org/science-fair-projects/projectideas/robotics_p023/robotics/line-following-robot)
Rostra Electronic Cruise Control Install On a Stratoliner or Roadliner
 Rostra Electronic Cruise Control Install On a Stratoliner or Roadliner MATERIALS LIST: 1 - Rostra Part # 250-1223 (www.brandondist.com/products/cruise1223.htm) 1 - Signal Splitter part # 250-4369 1 - Engagement
Cane Creek Double Barrel Instructions
 Cane Creek Double Barrel Instructions Congratulations on your purchase of the Cane Creek Double Barrel rear shock. Developed in partnership with Öhlins Racing, the Double Barrel brings revolutionary suspension
Electricity. Teacher/Parent Notes.
 Electricity. Teacher/Parent Notes. Caution. The yellow fan. If this is used with 6 Volts, the fan will fly into the air with some force so it is advisable to keep faces well away from it! Batteries. Please
Corrado Club of Canada. VR6 Engine FAQ. By: Dennis
 Corrado Club of Canada VR6 Engine FAQ By: Dennis I thought I would snap a few pics of the engine compartment on my 1994 VR6 Corrado. First, this is the updated engine management system so it does have
The Savage X 4.6 Reverse SS power and upgrades with REVERSE!
 The Savage X 4.6 Reverse SS power and upgrades with REVERSE! Introducing the Savage X 4.6 REVERSE! This latest addition to the Savage line-up combines huge power and reversing capability for the ultimate
Converting a Series Land Rover to front wheel disc brakes using the kit made by Torrel Industries Ltd,
 Converting a Series Land Rover to front wheel disc brakes using the kit made by Torrel Industries Ltd, Torrel Industries ltd Series Land Rover front brake conversion kit: Difficulty - Low Except for one