2001 BMW X5 4.4i. Fuel Filter Replacement
|
|
|
- Jeffry Harris
- 6 years ago
- Views:
Transcription


1 P P 2001 BMW X5 4.4i Fuel Filter Replacement Symptoms for Replacement: OBDII code P0171, Lean Bank1, which could be a bad or dirty MAF sensor Sluggish engine performance including hesitation with Wide Open Throttle (WOT). PARTS Required: Fuel Filter housing with built-in pressure regulator 3 fuel line clamps Tools Required/Recommended: 8 mm box wrench/socket 10 mm box wrench/socket 14 mm box wrench/socket Extra long Socket extension (12 ) Socket Wrench Pliers (to remove fuel line crimp clamps) Safety Glasses (keeps dirt and gasoline out of your eyes) Gloves Pre-Procedure: 1. Fuel Pressure: Although I didn t do it, you may find a way to relieve the fuel pressure which is sometimes done by removing power to the fuel pump and cranking the car over. Unfortunately since these cars will crank over automatically until they drain the battery, I decide not to bother. 2. I did this procedure without jacking it up, but you may find it easier to do with the rear end lifted or putting the rear wheels on ramps. Disclaimer: Read this procedure completely before proceeding. I am not a fuel filter replacement expert nor do I purport to be one. Please note that you are doing all of the following work at your own risk, of your own free will. The author will not be held liable for errors or omissions in the procedure or any issues that might arise from this repair. If you don t feel comfortable following this procedure, take your SAV to a qualified shop. This procedure is not affiliated in any way with BMW North America. X5World.net Member: xmac


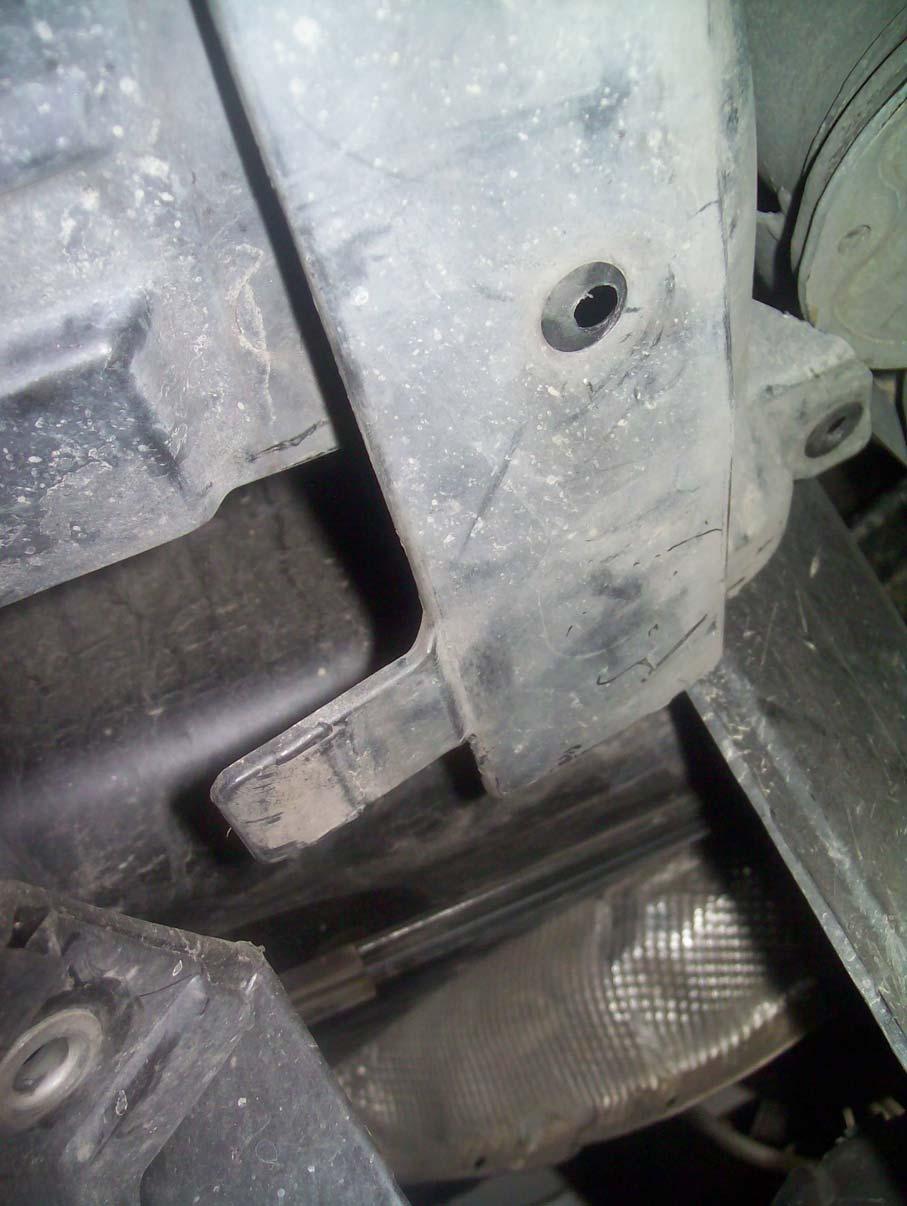
2 PROCEDURE: PART1 Removing the GIGANTIC plastic cover The toughest part of this job is removing the gigantic and bulky cover that covers up the fuel tank, fuel filter, and I believe the carbon canister. In order to remove it, you first need to remove 10 large bolt and 2 nuts as noted by the white dots below. The red dot denotes a bolt that is hidden underneath the wheel well splash guard. You will have to remove 3 10mm headed screws as noted by the green dots near the rocker panel and 3 near the red dot tab to remove the heat shield. Note that one is slightly hidden by the exhaust pipe. To begin, remove as many of the larger bolts per the diagram below then the rocker panel screws, followed by the heat shield. Then remove three 8mm screws on the splash guard nearest the red dot to get access to the large bolt. This area can be found by finding the tab of the wheel well splash that fits into the slot of the large gigantic cover. Here is a picture of the splash cover including the tab with 2 of the 3 screws removed. The third screw is higher up near the tire.
3


4 After wrestling with the cover and unclipping the emergency brake line that is attached at one of the corners, I was finally able to drop the cover onto the floor. I couldn t completely remove it so I twisted it a bit out of the way to make room to work on the filter. Note that the stamped flange you see reflecting is riveted to the gigantic plastic cover nearest the driveshaft. It takes some wiggling of the cover to get this flange to drop without removing the exhaust/driveshaft. PROCEDURE: PART2 Replacing the Fuel Filter Now we can get to the real job here. First make sure you have 3 new fuel line clamps if they did not come with the filter. Mine didn t so I used some nice Japanese-made stainless steel clamps that have a smooth inner wall. Don t use the corner auto parts store standard hose clamps that will chew up the fuel line and risk a fuel leak.


5 If you notice in the next picture, the blue fuel lines are non-metallic with a crimped rubber end on the hoses to connect to the fuel filter. If you ruin the rubber section, you can t just replace it with new fuel line.

. Here is a picture of the opposite end with the two fuel source input lines.")


6 There is one outlet hose on the side with the pressure regulator and 2 inlets since I believe there are 2 fuel pump/sender units on the fuel tank. There is also a black plastic hose with a rubber end that connects to the vacuum line on the fuel pressure regulator (FPR). Here is a picture of the opposite end with the two fuel source input lines. As you can see from the picture above, the fuel lines come from the factory with crimped clamps to hold the fuel lines in place. I used a pair of pliers to gently pry them open. I then used the tried and tested method of first twisting the lines to break the seal and then wiggling them off. If you simply try to pull them off, you run the risk of tearing them. Since I did not relieve the fuel pressure, I moved out of the way, pinched the outlet line with my fingers while holding the new filter next to it to quickly swap the line over. Using this method will limit the amount of fuel you spill to a few drops. I then connected the vacuum line to the FPR. Next remove the 2 Phillips head screws as noted with the yellow-marked screws below that hold the old filter in place and loosely install the new one.


7 I oriented the filter with the vacuum line pointing to the front of the car. This makes it easier to connect all the lines back up.

 and let it run for about 15 seconds. I then looked at the hose clamps to make sure I didn t have any fuel leaks.")
8 Next removed the crimped clamps on the opposite end of the old filter and connect them in the same locations one at a time on the new one. Next tighten all of the hose clamps and finally tighten the 2 screws holding the filter housing. Make sure you reconnected the vacuum line to the FPR. I then turned the key to the ON position without starting to pressurize the filter with fuel. I did this 3 or 4 times. I then started the car (of course after opening the garage door) and let it run for about 15 seconds. I then looked at the hose clamps to make sure I didn t have any fuel leaks. If you have UanyU signs of leaking, make sure you tighten and re-test. You don t want to be a victim of a Car-B-Q on the side of the freeway later. If all is well, go ahead and start the painful process of getting the gigantic cover back on. After some time and a few foul words, I buttoned it up, re-clipped the e-brake line and got the heat and splash shields screwed back in place. I then went out for a spin. Not sure if it was the placebo effect, but the engine seemed a bit more responsive and the WOT hesitation was gone.
Volvo 850 Radiator Replacement Jason Reed 29 March 2013
 This write up covers removing and replacing the radiator on a 97 855 GLT wagon with light pressure turbo and automatic transmission. This car has 162K miles. The radiator, which was original, developed
Installing Custom Puddle Lamps 2009 Subaru Forester
 Installing Custom Puddle Lamps 2009 Subaru Forester By John Perkins This guide will assist you in installing a set of LED puddle lamps on a 2009 Subaru Forester. This is NOT using the $150 Subaru kit.
Changing the Struts on a WK Jeep CRD
 Changing the Struts on a WK Jeep CRD Step by Step By Chirpz Disclaimer: I do not claim that this procedure is the right way or even the best way to change your struts. This is what I did after reading
HPFP DIY. Warning: The injector fuel lines, the rail, and the HPFP are pressurized long after you turn off the car, I recommend
 HPFP DIY Warning: The injector fuel lines, the rail, and the HPFP are pressurized long after you turn off the car, I recommend disconnecting the battery and letting the car sit over night before performing
COLD AIR INTAKE INSTALLATION INSTRUCTIONS PART NUMBER D A. APPLICATION: E36/7 M-Roadster or M-Coupe 3.
 COLD AIR INTAKE INSTALLATION INSTRUCTIONS PART NUMBER D760-0323A APPLICATION: 1998-00 E36/7 M-Roadster or M-Coupe 3.2 Liter PARTS LIST Air Filter Assembly 3 1/2" Tube Intake Shield Silicone Hose Airflow
INSTALLATION INSTRUCTIONS
 INSTALLATION INSTRUCTIONS FUEL SURGE TANK INSTALLATION KIT 1999-2006 BMW E46 COUPE Document# 19-0056 Support: info@radiumauto.com Note: This kit was designed for a standard single pump Radium Engineering
Installing Rear Brake Pads on a WK Jeep
 Installing Rear Brake Pads on a WK Jeep Step by Step By Chirpz Disclaimer: I do not claim that this procedure is the right way or even the best way to change your rear brake pads. This is what I did after
Spikes-Spider Hub Installation
 Spikes-Spider Hub Installation The instructions that are provided with the Spikes Spiders are pretty good. I've created this page for two reasons: to show those that are thinking of buying a set exactly
Some tips and tricks I learned from getting clutch out of vehicle Skoda Octavia year 2000
 Some tips and tricks I learned from getting clutch out of vehicle Skoda Octavia year 2000 Last change 2013-Oct-11 I bought Haynes manual for a starter. That s something well worth it s cost I believe.
Procharger Stage II Intercooled Supercharger System (11-14 GT)
") Procharger Stage II Intercooled Supercharger System (11-14 GT) Installation Time: Approximately one day. Installed on 2012 Mustang GT 5.0/Manual Required Tools 3/8 Socket Set (Standard and Metric) 1/2
Procharger Stage II Intercooled Supercharger System (11-14 GT) Installation Time: Approximately one day. Installed on 2012 Mustang GT 5.0/Manual Required Tools 3/8 Socket Set (Standard and Metric) 1/2
This is a guide to assist you adjust the valve clearance on a 2l V6 MIVEC engine found in a Mitsubishi FTO GPX
 Adjusting the valve clearance on a 2L V6 FTO engine This is a guide to assist you adjust the valve clearance on a 2l V6 MIVEC engine found in a Mitsubishi FTO GPX Disclaimer: This guide is to assist you
SR Performance Twin 62mm Throttle Body for GT
 Required Tools: SR Performance Twin 62mm Throttle Body for 2005-2010 GT Flat-head screwdriver Ratchet Small extension 10mm socket 8mm socket T20 Torx bit Needle nose pliers 5mm allen wrench Recommended
JBR MAZDASPEED
 Page1 james Barone Racing Aftermarket Parts and Accessories JBR 2007 2009 MAZDASPEED 3 Front Mount Intercooler Piping Kit Installation Instructions for TR8 Intercooler Tooling: o Jack, Jack Stands, Ramps
Injector change DIY. Warning: The injector fuel lines, the rail, and the HPFP are pressurized long after you turn off the car, I recommend
 Injector change DIY Warning: The injector fuel lines, the rail, and the HPFP are pressurized long after you turn off the car, I recommend disconnecting the battery and letting the car sit over night before
INSTALLATION INSTRUCTIONS
 INSTALLATION INSTRUCTIONS FUEL SURGE TANK INSTALLATION KIT 1999-2006 BMW E46 COUPE Document# 19-0056 Support: info@radiumauto.com Note: This kit wasn t designed for a FST-R, but can be accomplished. 1.
How to replace your Turbo Actuator Step by Step
 How to replace your Turbo Actuator Step by Step Special thanks to other forum members who have previously dealt with this problem! Old By Chirpz New Your Turbo is a lot tougher than the electric actuator
H31 BOOSTER REBUILD & MASTER CYLINDER
 2010 1991 BMW 750iL George Fontes gajfontes@yahoo.com H31 BOOSTER REBUILD & MASTER CYLINDER Rebuild hydraulic booster and replace Master Cylinder. Page 1 of 16 Master Cylinder Removal & Brake Booster Rebuild
Instant Chat off the main page of Or simply call our tech team at
 FRONT MOUNT INTERCOOLER 2015+ WRX 2017-07-07 Thank you for purchasing this PERRIN product for your car! Installation of this product should only be performed by persons experienced with installation of
Audi Q5/SQ5 Ziza LED Interior Lighting Kit Installation Instructions
 Audi Q5/SQ5 Ziza LED Interior Lighting Kit Installation Instructions Proper service and repair procedures are vital to the safe, reliable operation of all motor vehicles as well as the personal safety
Mustang CDC Lightbar (94-04) - Installation Instructions
 - Installation Instructions") Mustang CDC Lightbar (94-04) - Installation Instructions The below installation instructions work for the following products: Classic Design Concepts Mustang Convertible Lightbar (94-04 Carbon Fiber) Classic
Mustang CDC Lightbar (94-04) - Installation Instructions The below installation instructions work for the following products: Classic Design Concepts Mustang Convertible Lightbar (94-04 Carbon Fiber) Classic
 This document provides instructions for removing and installing a Front Wheel / Rotor on a Ducati Superbike. The torque values used are for the 748/916/996 from 1994 to 2001 and may be applicable for later
Thank you for purchasing the Dezod Motorsports Return Fuel System for your Scion tc.
 Thank you for purchasing the Dezod Motorsports Return Fuel System for your Scion tc. We took much pride in putting together a fuel system that would deliver a maximum amount of fuel as simply as possible
Installing the Wireless Charging upgrade kit in a 2018 XT5 (Platinum version)
") Installing the Wireless Charging upgrade kit in a 2018 XT5 (Platinum version) September 2, 2018 Tools needed: Wireless charger upgrade kit Plastic trim tools 7 mm nut driver Background: I purchased the
Installing the Wireless Charging upgrade kit in a 2018 XT5 (Platinum version) September 2, 2018 Tools needed: Wireless charger upgrade kit Plastic trim tools 7 mm nut driver Background: I purchased the
Connecting the rear fog light on the A4 Jetta, while keeping the 5 Light Mod
 Connecting the rear fog light on the A4 Jetta, while keeping the 5 Light Mod DISCLAIMER: I'm human and make mistakes. If you spot one in this how to, tell me and I'll fix it This was done on my 99.5 Jetta.
INSTALLATION INSTRUCTIONS
 HIGH FLOW AIRFLOW METER INSTALLATION INSTRUCTIONS PART NUMBER D763-1600A APPLICATION: 2001-06 E46 M3 Parts List: Hose clamp 64Z (7) Plastic Rivets Air Filter Temp Sensor & Harness (2) Button Head Screws
Disco 3 Clock Spring / Rotary Coupler replacement
 Disco 3 Clock Spring / Rotary Coupler replacement I recently had to change my Clock spring and thought some folks may find it helpful to see what it entailed. I did lots of reading around but couldn t
BMW E46 Convertible Hydraulic Line #23 Replacement Guide Created by taylor192 of E46Fanatics.com
 BMW E46 Convertible Hydraulic Line #23 Replacement Guide Created by taylor192 of E46Fanatics.com BMW E46 Line #23 Replacment Guide, page 1 of 23 Background: Line #23 runs from the valve block on the driver's
EXPANSION TANK MUSTANG GT FORD FIESTA ST PARTS LIST AND INSTALLATION GUIDE PARTS LIST AND INSTALLATION GUIDE
 PARTS LIST MMHOSE-MUS8-15L: 4 PC SILICONE HOSES 8 PC CLAMPS 1 PC STAINLESS STEEL ADAPTER MMHOSE-MUS8-15U: 1 PC SILICONE HOSE 1 PC QUICK-DISCONNECT FITTING 1 PC CLAMP MMHOSE-MUS8-15ANC: INSTALLATION INSTRUCTIONS
Raw Designs Scorpion Tips Install
 Raw Designs Scorpion Tips Install Disclaimer: The information contained in this website is for general information purposes only. The information is provided by mym109r.com and while I endeavor to keep
YOU MAY WANT TO FIRST TRY TO LOOSEN THE FILTER HOUSING
 2005 XC90 Tune-up (5-cyl) Including: Oil Change - Spark Plugs - Fuel Filter - Cabin Filter First off - let me say that I am an amateur (at best) mechanic, and I claim no responsibility for whatever you
Z1 Motorsports 300zx 2.5 Upgraded piping & BA SMIC Install Guide
 Z1 Motorsports 300zx 2.5 Upgraded piping & BA SMIC Install Guide Congratulations on your new upgraded piping and intercooler kit, this kit has proven to provide the lowest intake air temps to date on our
Installation of Barricade Flat Style Fender Flare Kit (97-06 Wrangler TJ)
") Installation of Barricade Flat Style Fender Flare Kit (97-06 Wrangler TJ) Installation Time: 3-4 Hours Tools Required: 8mm wrench 8mm socket drive #1 Phillips screw driver Pliers Pry bar Electric drill
Installation of Barricade Flat Style Fender Flare Kit (97-06 Wrangler TJ) Installation Time: 3-4 Hours Tools Required: 8mm wrench 8mm socket drive #1 Phillips screw driver Pliers Pry bar Electric drill
Aamir_bt The legend..
 Aamir_bt The legend.. How to do timing on a 4XE1-W (DOHC) engine. well i decided to to a write up for DOHC timing since there was only the SOHC written up, and i had to do a timing belt on my stylus anyways,
Page1. ISF Stainless Steel Headers // Part# HDR-004
 Congratulations on the purchase of your ISF Stainless Steel Headers and thank you for choosing Sikky Manufacturing. This installation manual is intended to guide you through the removal of the factory
This LED flashtube kit covers models 400, 404, 500, 504, 600, 680 & 506.
 L.E.D. INSTRUCTIONS I D T S O T U B I R M O C R Y N A P Kit contains: This LED flashtube kit covers models 400, 404, 500, 504, 600, 680 & 506. For the power supply: 1-LED power supply circuit board, 2
PARTS LIST INSTALLATION INSTRUCTIONS PARTS LIST AND INSTALLATION GUIDE INSTALL TIME: 2 HOURS INSTALL DIFFICULTY: 3/5
 PARTS LIST AND PARTS LIST 1PC MISHIMOTO INTERCOOLER 1PC M6 X 1.0 X 20MM FLANGE BOLT 1PC M4 X 0.7 X 12MM BUTTON-HEAD BOLT 1PC M4 LOCK WASHER 1PC MAP SENSOR O-RING 2. Remove the eight pop clips that hold
Integrated Engineering MK7/MQB Cold Air Intake Install Guide IEINCI2 & IEINCI8
 Integrated Engineering MK7/MQB Cold Air Intake Install Guide IEINCI2 & IEINCI8 Thank you for purchasing another high quality Integrated Engineering product! This instruction guide is used for installation
Mazdaspeed 6 Version 2 Oil Catch Can Kit Install Guide
 Mazdaspeed 6 Version 2 Oil Catch Can Kit Install Guide Copyright DD2, Inc. 1 WARNING: By installing this Product, you understand that: The buyer/user assumes all risk as to quality, performance and use
DrVanos.com Stage II Installation Instructions. Tool rental is available with the purchase of a vanos kit *See website for more info*
 DrVanos.com Stage II Installation Instructions Special Tools Needed: Camshaft locking tool TDC Crank pin Sprocket turning tool Tool rental is available with the purchase of a vanos kit *See website for
HOW TO REPLACE THE SPOILER ON YOUR GEN 3 PRIUS
 HOW TO REPLACE THE SPOILER ON YOUR GEN 3 PRIUS Yup, it happened. The spoiler on your beloved Prius has departed this earth and now is in the great junkyard in the sky. This is how you make it all better
NEW BRAKE INSTALLATION. Let us show you how a
 Tech Article From Newsletter 17.2-2nd Quarter of 2011 NEW BRAKE INSTALLATION Let us show you how a Big Brake Install is easier than you think!! So, you have a 572 (or a hot 383) in your shoebox... you
FUEL SYSTEM PRECAUTION FU 1
 2GR-FE EL EL SYSTEM EL SYSTEM PRECAUTION 1 1. EXPRESSIONS OF IGNITION SWITCH (a) The type of the ignition switch used on this model differs according to the specifications of the vehicle. The expressions
Installation Instructions
 Installation Instructions Jeep JK 2-Door (2011 Present) Mounting Bracket and Air Line System Kit for ARB On-Board Twin Air Compressor (CKMTA12) Made in the USA Kit Contents: 1 Flat Bracket 1 Formed Bracket
Replacing MK4 Golf/Jetta radiator mounts in-car
 Replacing MK4 Golf/Jetta radiator mounts in-car This is a guide to replacing the radiator mounts in a MK4 Golf/Jetta. This involves moving the core support to the service position which allows you to do
2010 Toyota Prius model II Head Unit Upgrade
 2010 Toyota Prius model II Head Unit Upgrade Monday, December 21, 2009 Disclaimer: Use this document and its contents at your own risk. Forward: Huge thanks to those members on Priuschat.com that forged
Rear End Installation and Bearing Kit - 8.8in (86-12 V8; V6)
") Rear End Installation and Bearing Kit - 8.8in (86-12 V8; 11-13 V6) Tools Required: Jack Stands 5 Floor Jack 2 Oil Pans 1 Wheel Blocks 2 Differential Oil 3 qts Friction Modifier 3 bottles Tube of Black
Rear End Installation and Bearing Kit - 8.8in (86-12 V8; 11-13 V6) Tools Required: Jack Stands 5 Floor Jack 2 Oil Pans 1 Wheel Blocks 2 Differential Oil 3 qts Friction Modifier 3 bottles Tube of Black
iphone 5s Front Panel Replacement
 iphone 5s Front Panel Replacement Replace the cracked or broken screen on your iphone 5s. Note: DIY at your own risk. New beginner must be careful, screens got problems mostly due to wrong installation
I hope this guide helps you as much as Boomer Bob helped me. We re just sharing what we know to help out other folks. Best of luck! Phil C.
 A brief tutorial on swapping cams for the Victory Cross Roads and Cross Country on the Victory Freedom 106 inch V-Twin Engine with 6 speed over drive transmission Disclaimer: Swapping cams on a Victory
Installation Instructions
 Installation Instructions Jeep JK Unlimited (2007 Present) Mounting Bracket and Air Line System Kit for ARB On-Board Twin Air Compressor (CKMTA12) Made in the USA Kit Contents: 1 Bracket for ARB Compressor
Raxiom Factory GPS Rear Back-up Camera Kit (07-17 Wrangler)
") Raxiom Factory GPS Rear Back-up Camera Kit (07-17 Wrangler) Installation Time: 2.5-3Hrs Tools Required: 7mm Socket & Driver 10mm Socket 10mm Open end wrench Knife / Razor blade Zip-ties Wire Cutters Needle
Raxiom Factory GPS Rear Back-up Camera Kit (07-17 Wrangler) Installation Time: 2.5-3Hrs Tools Required: 7mm Socket & Driver 10mm Socket 10mm Open end wrench Knife / Razor blade Zip-ties Wire Cutters Needle
GP125S STAINLESS HEADER
 GP125S STAINLESS HEADER WITH EGR FITTING FORD EXCURSION 6.8L-V-10 2/4WD FORD SUPERDUTY TRUCK F250HD/F350 6.8L-V10 2/4WD GIBSON HEADERS ARE 50 STATE SMOG LEGAL 2/2 WARNING! Do not rely on bumper jacks or
GrimmSpeed Install Guide Series Installing the GrimmSpeed WRX Boost Control Solenoid Updated 4/14/15
 GrimmSpeed Install Guide Series Installing the GrimmSpeed 2015+ WRX Boost Control Solenoid Updated 4/14/15 Introduction: This guide will illustrate the installation of the GrimmSpeed 2015+ WRX Boost Control
Bottom Mount Seat Mount Installation & Wiring Instructions
 E81/E87/E90/E91/E92/F22/F30/F31/F32/F80/F82/F87 (and other cars with the same sliders) Bottom Mount Seat Mount Installation & Wiring Instructions These instructions assume a basic comfort with crimping
Z1 Motorsports 350Z / G35 Oil Cooler Kit Installation Manual
 Z1 Motorsports 2877 Carrollton Villa Rica Hwy Carrollton GA 30116 770.838.7777 Z1 Motorsports 350Z / G35 Oil Cooler Kit Installation Manual For 19, 25 and 34 Row Oil Cooler Kits Parts Included: 1 Aluminum
Installation Manual Volvo C30 T5 Front Mount Intercooler System
 Installation Manual Volvo C30 T5 Front Mount System Volvo C30 T5 System / Installation Manual i C Contents Important Information i Parts List i Required Tools and Materials 1 1.0 - Vehicle Preparation
Mustang One-Touch Convertible Top Module (2005+) - Installation Instructions
 - Installation Instructions") Mustang One-Touch Convertible Top Module (2005+) - Installation Instructions The below installation instructions work for the following products: Mustang One-Touch Convertible Top Module (2005+) Please
Mustang One-Touch Convertible Top Module (2005+) - Installation Instructions The below installation instructions work for the following products: Mustang One-Touch Convertible Top Module (2005+) Please
We will be upgrading from the factory, paper-cone disgrace to an Infinity Kappa 62.9i:
 In order to fully round out your stereo upgrade, the factory rear speakers must go. This is another easy job to tackle, but the fitment of the package tray and being hunched over in the rear glass area
Mustang 7.5 Limited Slip Differential (28 Spline) V8; V6:
 V8; V6:") Mustang 7.5 Limited Slip Differential (28 Spline) 79-85 V8; 86-10 V6: Required Tools: Ratchet Wrench Torque Wrench 1/2", 5/16, 3/4", 12mm and 15mm Sockets Lug nut Wrench Dial Indicator Digital Measuring
Mustang 7.5 Limited Slip Differential (28 Spline) 79-85 V8; 86-10 V6: Required Tools: Ratchet Wrench Torque Wrench 1/2", 5/16, 3/4", 12mm and 15mm Sockets Lug nut Wrench Dial Indicator Digital Measuring
IAG Competition Series Air / Oil Separator (AOS) For 2017 STI
 For 2017 STI") P IAG Competition Series Air / Oil Separator (AOS) For 2017 STI Part# IAG-ENG-7251 Tools Required: Ratchet, torque wrench, extensions, needle nose pliers, hose cutter, snips/scissors, flat head screw driver,
P IAG Competition Series Air / Oil Separator (AOS) For 2017 STI Part# IAG-ENG-7251 Tools Required: Ratchet, torque wrench, extensions, needle nose pliers, hose cutter, snips/scissors, flat head screw driver,
COLD AIR INTAKE INSTALLATION INSTRUCTIONS
 COLD AIR INTAKE INSTALLATION INSTRUCTIONS # D760-0029 Fits: 2009-10 335i/xi (E90; with N54 engine) Congratulations for being selective enough to use a Dinan Engineering Cold Air Intake. We have spent many
Cybex Arc Trainer Owner s & Service Manual. 7 - Service
 7 - Service Table of Contents......... iii Warnings/Cautions All warnings and cautions listed in this chapter are as follows:! WARNING: All maintenance activities shall be performed by qualified personnel.
SLP Camaro ZL1 STAGE 3 (650 HP)
") SLP - 2012 Camaro ZL1 STAGE 3 (650 HP) PART #26002 PACKING LIST Before installation, use this check list to make sure all necessary parts have been included. ITEM QTY CHECK PART NUMBER DESCRIPTION 1. 1
SLP - 2012 Camaro ZL1 STAGE 3 (650 HP) PART #26002 PACKING LIST Before installation, use this check list to make sure all necessary parts have been included. ITEM QTY CHECK PART NUMBER DESCRIPTION 1. 1
LEAK TEST PROCEDURE APPLICABLE TO DC3 INTELLI-GRIP LIFTERS MODELS MRT4-DC3, MRTA8-DC3, MRTALP8-DC3 AND PC/P1-DC3 SERIES
 LEAK TEST PROCEDURE APPLICABLE TO DC3 INTELLI-GRIP LIFTERS MODELS MRT4-DC3, MRTA8-DC3, MRTALP8-DC3 AND PC/P1-DC3 SERIES TESTING AND MAINTENANCE MUST BE DONE BY A QUALIFIED PERSON KEEP FOR FUTURE REFERENCE
Shelby GT500 Front Fascia Conversion Kit (05-09 All) Item # Installation Time: 1 Day. Required tools:
 Item # Installation Time: 1 Day. Required tools:") Shelby GT500 Front Fascia Conversion Kit (05-09 All) Item #53611 Installation Time: 1 Day Required tools: Phillips Screw driver 10mm Socket + Ratchet/Wrench 8mm Socket + Ratchet/Wrench 5mm Socket + Ratchet/Wrench
Shelby GT500 Front Fascia Conversion Kit (05-09 All) Item #53611 Installation Time: 1 Day Required tools: Phillips Screw driver 10mm Socket + Ratchet/Wrench 8mm Socket + Ratchet/Wrench 5mm Socket + Ratchet/Wrench
O ring installation guide
 AtomicRice.com O ring installation guide Tools and materials needed: 1) Phillips Screwdriver ( one medium and one large head) 2) Small or Medium sized flathead screwdriver or thin rigid shim 3) Vaseline
Porsche 928 with 16v LH-Jetronic Fuel System
 Porsche 928 with 16v LH-Jetronic Fuel System Toll-Free Tech Hot Line: 877-FOR-928M 877-367-9286 Please do not copy this manual and give copies to your friends. Our ability to bring you this supercharger
Brake Caliper Rebuild - Part Numbers & Tips Per Jim Millet, 3/15/2005
 Per Jim Millet, 3/15/2005 Not too difficult a job. Rears are easier than fronts to access. You ll need the following gasket sets: Front caliper gasket set, P/N 34 11 1 157 037, MSRP $13.58 Rear caliper
2010 Prius Maintenance
 2010 Prius Maintenance Changing Oil Disclaimer: All the information stated in this document was provided by Prius owners. None were affiliated with Toyota Motor Corporation, except as customers. This document
COBB Fuel Pressure Regulator Kit
 315100 COBB Fuel Pressure Regulator Kit 2008+ Subaru STI Congratulations on your purchase of the COBB Tuning Fuel Pressure Regulator Kit for your 2008+ Subaru STI. The following instructions will assist
8 Zip Tie Zip Tie 1 Union Fitting 1 ½ ½ Union Reducer Fitting Union 1 5/8 ½ (For Plastic Intake Manifold Vehicles)
") P IAG Street Series Air / Oil Separator (AOS) For 2017 STI Part# IAG-ENG-7151 Tools Required: Ratchet, torque wrench, extensions, needle nose pliers, hose cutter, snips/scissors, flat head screw driver,
P IAG Street Series Air / Oil Separator (AOS) For 2017 STI Part# IAG-ENG-7151 Tools Required: Ratchet, torque wrench, extensions, needle nose pliers, hose cutter, snips/scissors, flat head screw driver,
Ford Focus Zetec SVT Timing Belt
 2000-2004 Ford Focus Zetec SVT Timing Belt Replacement This guide will show you how to replace the timing belt on the 2.0L DOHC Zetec with VCT on a 2002 Ford Focus SVT. This is an interference motor. Written
Slingshot Rotrex Supercharger Kit
 Slingshot Rotrex Supercharger Kit This supercharger kit improves on the Slingshot by forcing more dense air into the engine and creating more power. Installation time of the supercharger depends on you
MAX FLOW FUEL KIT KIA FORTE SX HYUNDAI VELOSTER TURBO INSTALLATION INSTRUCTIONS
 MAX FLOW FUEL KIT KIA FORTE SX 2014+ HYUNDAI VELOSTER TURBO INSTALLATION INSTRUCTIONS Installation: Tools needed: 1/4 or 3/8 drive ratchet Different length extensions 8mm socket / 10mm socket / 12mm socket
COLD AIR INTAKE INSTALLATION INSTRUCTIONS. # D Fits: i (4.8L)
") COLD AIR INTAKE INSTALLATION INSTRUCTIONS # D760-0012 Fits: 2006-10 550i (4.8L) PARTS LIST Air Box Assembly Left tube Center tube Right tube Outer Tube AFM housing AFM/TB tube Hardware Kit Congratulations
COLD AIR INTAKE INSTALLATION INSTRUCTIONS # D760-0012 Fits: 2006-10 550i (4.8L) PARTS LIST Air Box Assembly Left tube Center tube Right tube Outer Tube AFM housing AFM/TB tube Hardware Kit Congratulations
Sunroof Repair. Sunroof Repair TSB. The sunroof repair kit available for the J30 is part number Y20. See images at bottom of document.
 Sunroof Repair This document is the text/images from the TSB (technical service bulletin) issued by Infiniti concerning the repair procedure for sunroof issues. Be advised that this is a LARGE, TIME-CONSUMING
M V Intake Manifold INSTRUCTION SHEET
 Please visit www.fordracingparts.com for the most current instruction information.!!! PLEASE READ ALL OF THE FOLLOWING INSTRUCTIONS CAREFULLY PRIOR TO INSTALLATION. AT ANY TIME YOU DO NOT UNDERSTAND THE
Z06 Corvette Lingenfelter High Flow Air Intake
 2006-2007 Z06 Corvette Lingenfelter High Flow Air Intake LN4233 1557 Winchester Road Decatur, Indiana 46733 260 724 2552 phone 260 724 8761 fax www.lingenfelter.com Parts List # Part number Description
5B HIGH FLOW CATTED DOWNPIPES N54 135i/335i
 5B1202 - HIGH FLOW CATTED DOWNPIPES N54 135i/335i Installation Instructions Front Downpipe Rear Downpipe Congratulations on your purchase of the COBB High Flow Catted Downpipes for your N54 BMW 135i/335i!
Cold Air Intake Installation Instructions
 Page 1/5 3.04 INS262 BAVARIAN AUTOSPORT Cold Air Intake Installation Instructions NOTE: Throughout the instructions the term AFM is used. It refers to the Air Flow Meter which is located between the engine
COLD AIR INTAKE INSTALLATION INSTRUCTIONS. # D Fits: F10 M5 # D Fits: F06/F12/F13 M6 PARTS LIST
 COLD AIR INTAKE INSTALLATION INSTRUCTIONS # D760-0035 Fits: 2013-15 F10 M5 # D760-0037 Fits: 2012-15 F06/F12/F13 M6 PARTS LIST (1) Left Carbon Airbox Lid (1) Right Carbon Airbox Lid (1) Left Carbon Snorkel
Installation Instructions for Chevrolet C5 Corvette Lingenfelter High Flow Fuel Pump Module
 Installation Instructions for 1997-2003 Chevrolet C5 Corvette Lingenfelter High Flow Fuel Pump Module PN: L710650197 Lingenfelter Performance Engineering 1557 Winchester Road Decatur, IN 46733 (260) 724-2552
HOW TO: Rebuild the Bendex-Treadlevac Master Brake Cylinder By Ross Miller
 HOW TO: Rebuild the Bendex-Treadlevac Master Brake Cylinder By Ross Miller Whenever Packard had a design or manufacturing lapse, the correction showed up in the Service Bulletins and Letters, even if it
Moddit. How to Install Stance Coilovers on a Subaru
 Moddit How to Install Stance Coilovers on a Subaru BRZ Let's get LOW (and maybe lighter and stiffer suspension)! In this article, we will install Stance ST- ZN6-XS Coilovers on the FRSport Subaru BRZ.
Improving the gearshift feel in an SW20.
 Improving the gearshift feel in an SW20. Part one In 3 parts. The SW20 gearshift can be often be greatly improved by eliminating play in the shift linkages, and this article covers three areas that need
Fuel Pump & Sending Unit Repair
 If your C4 s fuel gauge reads full regardless of how much fuel you actually have, the sending unit in the tank is most likely at fault. If you have priced a new sending unit, you realize that they run
Mustang Headlight w/ CCFL Halo (05-09) - Installation Instructions
 - Installation Instructions") Mustang Headlight w/ CCFL Halo (05-09) - Installation Instructions The below installation instructions work for the following products: Chrome Mustang Headlight w/ CCFL Halo (05-09) Smoked Mustang Headlight
Mustang Headlight w/ CCFL Halo (05-09) - Installation Instructions The below installation instructions work for the following products: Chrome Mustang Headlight w/ CCFL Halo (05-09) Smoked Mustang Headlight
VW & Audi TDI CR140 ECO KIT Installation Guide
 VW & Audi TDI CR140 ECO KIT Installation Guide This guide is to help you install your new Rawtek DPF, EGR & Adblue Delete Exhaust ECO Kit on your (2009-2014) VW / Audi with 2.0l CR140 Diesel Engine. Note:
 Special Tools Needed: DrVanos.com Stage I Installation Instructions Camshaft locking tool TDC Crank pin Sprocket turning tool Tool rental is available with the purchase of a vanos kit *See website for
SLOWINGDOWN. For those looking for the ultimate heartpounding STAINLESS STEEL BRAKES DELIVERS WITH AN AWESOME MID-YEAR NOVA BRAKE KIT
 SLOWINGDOWN STAINLESS STEEL BRAKES DELIVERS WITH AN AWESOME MID-YEAR NOVA BRAKE KIT By Tony Gutierrez Photography by the author For those looking for the ultimate heartpounding enjoyment, strap yourself
Holden VE SIDI series II V6 OTR CAI Installation Instructions
 Holden VE SIDI series II V6 OTR CAI Installation Instructions 1 P a g e Shown above is a standard V6 VE LFW SIDI engine bay. Your MAF Loom may need to be extended by an auto electrician. Please check the
List of parts needed below. Tools needed
 1 BMW 645 Coolant leak repair (Cap with Seal Repair and Expanding Coolant Pipe Installation w Pics) By Michael R. Brown (Estimated time to complete the job is 6-8 hrs) List of parts needed below. BMW PART
REPLACEMENT OF TRANSMISSION EXTENSION-CASE GASKET AND OUTPUT-SHAFT SEAL ON 95 XJ6
 D. Jensen 2006 Distribution: www.jag-lovers.com REPLACEMENT OF TRANSMISSION EXTENSION-CASE GASKET AND OUTPUT-SHAFT SEAL ON 95 XJ6 V. 1.0 June 2006 The Fine Print: The following is a summary of my experience
Installation Instructions for Chevrolet Colorado, GMC Canyon, LT, Z71, With Factory Fog Lights
 Installation Instructions for 2015-2018 Chevrolet Colorado, GMC Canyon, LT, Z71, With Factory Fog Lights This kit is designed to allow use of your factory fog light operation along with an addition auxiliary
AMT Motorsport C7 Corvette Camber Kit User s Guide. 8 Upper Control Arm Studs and hardware for rear upper control arm adjustments
 AMT Motorsport C7 Corvette Camber Kit User s Guide Thank you for purchasing the AMT Motorsport Camber Kit for the C7 Corvette. We believe this is the most versatile camber kit available on the market,
Installation Manual TWM Performance Chevrolet Camaro 5 th Gen Full Replacement Short Shifter
 Installation Manual TWM Performance Chevrolet Camaro 5 th Gen Full Replacement Short Shifter Begin the installation by parking on a flat surface, place wooden blocks in front or behind the wheels to prevent
Slave Cylinder Weep Hole Drilling Procedure
 Slave Cylinder Weep Hole Drilling Procedure Tools Required: T20 Torx Driver T25 Torx Driver T25 Torx Bit with ¼ Ratchet Wrench 4mm Hex Key (Allen wrench) 5mm Hex Key 6mm Hex Key 8mm Hex Key 12mm Hex Key
4 pieces of silicone hose Unless you have AEM then you have 2 2.5, 1 3, and 1 3.5
 The parts in your kit: 3 pieces of Mandrel-Bent Aluminized Tubing: 1 Straight 1 45 degree bend with straight section 1 curved section 4 pieces of silicone hose 1 2.5 1 3.5 2 3 Unless you have AEM then
2014 & up MAZDA 3, 6 and CX5 2.0 & 2.5L Oil Catch Can Installation Instructions
 Page1 James Barone Racing Aftermarket Parts and Accessories 2014 & up MAZDA 3, 6 and CX5 2.0 & 2.5L Oil Catch Can Installation Instructions Tooling: Jack Jack stands or ramps Ratchet wrench 3 extension
M7 R52S & R53 Cold Air Intake Installation Guide 53-3M7301
 M7 R52S & R53 Cold Air Intake Installation Guide 53-3M7301 M7 Speed engineers and manufactures the highest quality MINI COOPER accessories and performance parts available anywhere on Planet Earth! Please
IAG Air / Oil Separator (AOS) For STi
 For STi") IAG Air / Oil Separator (AOS) For 2008-14 STi Part# IAG-ENG-7000 Tools Required: Ratchet, torque wrench, extensions, needle nose pliers, hose cutter, snips/scissors Sockets: 10mm, 12mm 13mm Wrenches: 10mm,
IAG Air / Oil Separator (AOS) For 2008-14 STi Part# IAG-ENG-7000 Tools Required: Ratchet, torque wrench, extensions, needle nose pliers, hose cutter, snips/scissors Sockets: 10mm, 12mm 13mm Wrenches: 10mm,