84-86 Ford SVO Mustang AC Installation Guide
|
|
|
- Victor Banks
- 6 years ago
- Views:
Transcription
1 84-86 Ford SVO Mustang AC Installation Guide This installation guide is for the AC installation kit from Late Model Restoration. The Vendor is Hose Wizards that manufactures this great kit that provides a great conversion to AC 134a. This document is meant as a reference only and I assume no liability or warranty for this guide. (Sorry for the legal stuff). However, I thought it might be handy for those looking for a great alternative to running an R12 or is missing their air conditioning. I hope you find this useful. Thanks Rich

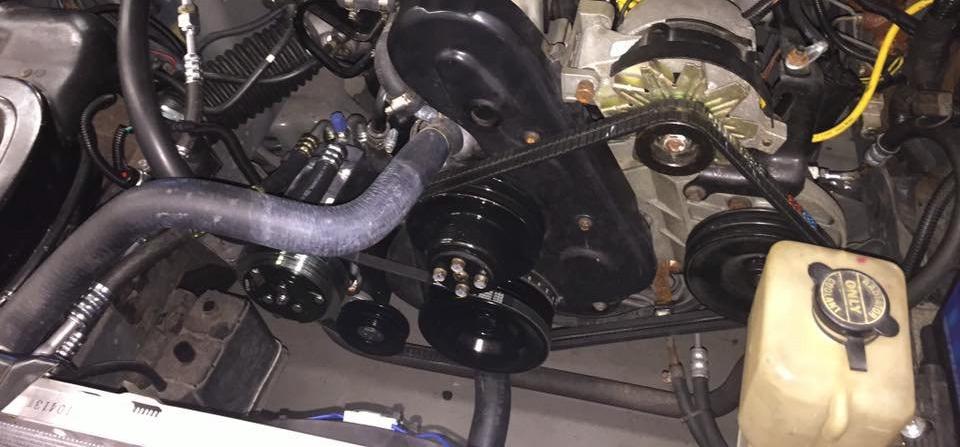
2 84-86 Ford SVO Mustang AC Installation Guide


3 Condenser Installation The first step was to install the AC Condenser. I was able to do this without draining the cooling system. Take the top radiator brackets off and tilt the radiator back. If you still have your old condenser installed. Take the brackets off and remove it. Install the new condenser on the old mounts


4 Compressor Brackets Locate the install image included in the install kit. This will give you a good exploded assembly diagram of the brackets. A great part of this install kit is that it includes EVERYTHING to install the AC in here EXCEPT the Receiver/Dryer (Accumulator) bracket. Many times as SVO s change hands the brackets are lost. No worries here! The main compressor bracket is very straight forward as shown in the diagram. The upper bracket the supplier indicated it was not needed. To use it will require modification.


5 Compressor Brackets Here s a picture showing the main bracket installed first. It s very straight forward. However, there is a contact of the lower radiator hose. You have choice to try and shorten the hose. However, you have a greater risk of a sharp contact edge cutting the hose. I m going to put a protective sleeve instead since the contact is flat with no cutting edges. It s not a severe contact so I think it will be ok since everything moves when the engine torques.


6 Compressor Brackets Now comes the secondary bracket. When the bracket was manufactured the material is a little too wide. This will not clear the thermostat housing with the clearance needed to connect at both points. The next page will show what I did.

7 Compressor Brackets Here you can see the small relief I ground off to allow the bracket to fit. Again, I was told it wasn t needed. But, decided to go ahead and modify and install. I ground off approximately 3/16 of an inch.


8 Compressor Brackets As you can see there is now enough clearance for the bracket to bolt up.


9 Compressor Installation The compressor mounting is straight forward with the diagram below. One of the many things about this kit that impressed me was it had everything to install. The original brackets are not used. This where the tension idler will be installed later


10 Coolant Line Installation The first step I did was to use a little amount of PAG 100 oil to lubricate the nitrile O rings to allow easier assembly. The lines going to the condenser should Click into place. Make sure they are secure or they will blow out.


11 Coolant Line Installation On the back of the compressor there is a fitting that needs to be installed as shown to install the lines to it. You will need to remove the sealing plate and bolt and discard. Then use the Allen Head Bolt to secure the fitting.


12 Coolant Line Installation Install the Receiver/Drier also called an Accumulator using the original bracket that came with the car or you could fabricate your own. You can also install the liquid line to the evaporator also. Important tip! If you are re-using your evaporator it is HIGHLY RECCOMENDED you flush it to clean and remove any debris.


13 Coolant Line Installation This image shows the over all line install. The last fitting will be on the liquid line with the Orifice Tube filter.


14 Pulley and Belt Routing IMPORTANT!!! When installing the idler and belt it s important to note this kit will work on Mustang SVO s. However, the kit was designed to work using the 3 Groove Crank Pulley that was on 84 to 85 ½ SVO Mustang. 85 ½ - 86 SVO Mustangs have a 3 Groove Water Pump Pulley. The belt angle on the water pump 3 groove set up will NOT grip the new compressor tight enough to turn when the clutch engages causing squealing and belt destruction. I tested every way possible and had to switch to a 3 Groove Crank Pulley like the earlier years. The good news is this pulley is fairly easy to find on online auctions new and used. Even a good pick and pull should have a 2.3 lying around. An NOS pulley online is about $65 NEW, $40 Used, and even a pick and pull around $15 to $20. CORRECT BELT ROUTING ON THE 3 GROOVE CRANK PULLEY LIKE 84 to 85 ½. WILL NOT WORK ON THE WATER PUMP PULLEY 85 ½ to 86!


15 Pulley and Belt Routing I ve also noticed I don t feel any bump when the AC clutch engages. It s nice and smooth and silent.
16 Final Compressor Wiring The SVO s original compressor wiring has a 2 wire connector. The wire with the stripe should be the hot wire. The black is a ground. Since the compressor is self grounded to the block this wire is not needed. You can tape or heat shrink it to protect it. Cut off the connector and discard it. The Hot striped wire will need to be lengthened to reach the trianary switch (This switch is to protect the compressor if the refrigerant pressure drops too low) in the liquid line. I recommend soldering and heat shrink tubing. Then add a female blade type connector and plug into one side of the switch. Take the green wire from the compressor and add a female blade connector and hook to the other side. You will notice a Black Solid wire coming from the compressor. This wire has been clipped and sealed inside the zip flex covering. Nothing is needed. The SVO comes standard with an electric fan. Whether you are running a stock fan or aftermarket make sure the fan can turn at 4200 CFM. Also, the factory harness has a trianary switch that will turn the fan on automatically when the AC calls for it. For aftermarket fans and custom setups contact your manufacturer.


17 Final Compressor Wiring This is an image showing the Trianary Pressure Switch
18 CAUTION AND WARNINGS (These are from the vendor in the documentation) If you are running a Thicker Radiator IE: a 3 row etc.. The vendor says this can cause the AC System to Blow Up due to climbing head pressures. In addition, if you are running a clutch fan setup and the clutch fails this will also cause a catastrophic failure. Make sure High Side Pressure does NOT go over 200lbs with a MAX of 220lbs anything over these, the AC System will not blow cold air. As stated earlier this system is meant replace a STOCK Factory configuration. Anything other than that will VOID the system warranty!
19 Charging and Tuning the AC System (This is from the vendor documentation) It is highly recommended you have a professional shop do the charging and tuning or you are skilled with AC systems. Make sure you evacuate the system to remove any moisture with a vacuum pump. The system requires 24oz of 134a Refrigerant. The cycle switch may need to be adjusted. Look into the top of the Accumulator with the plug out. You will see a flat blade adjustment screw. Turning the screw counter clockwise will make the compressor stay engaged longer. Clockwise will make it disengage sooner. DO NOT adjust more than ONE BLADE WIDTH at a time! This process takes time to get right so be patient. The compressor must cycle 6 to 8 times between adjustments. Make sure when you are adjusting you are set on Max Air and fan speed 2. You should be seeing 38degrees at idle.
20 Vendor Contact Information Hose Wizards 1050 Cooper Road Suite B Grayson, Georgia
A/C compressors: extending their service life
 FEATURE A/C compressors: extending their service life What can we say about the A/C compressor? Believe it or not, it is one of the hardestworking components on the vehicle. Its toughest job is to generate
Included parts: 1 - New Bosch CP3 Pump 1 - HSM Pulley 1 - Serpentine Belt 1 - Pump Bracket/ Hardware STEP 1
 TROUBLESHOOTING: Please read and understand all installation instructions before proceeding with the installation. If you have questions during the installation of this product, please contact H&S Motorsports
Shotgun Double Barrel HPFP install guide
 Shotgun Double Barrel HPFP install guide Thank you for your purchase of the VTT Shotgun Double Barrel HPFP upgrade! First thing to do when you open your box is to make sure all parts are in their respective
Shotgun Single Barrel HPFP install guide
 Shotgun Single Barrel HPFP install guide Thank you for your purchase of the VTT Shotgun Single Barrel HPFP upgrade! First thing to do when you open your box is to make sure all parts are in their respective
Single Barrel Shotgun HPFP Install Guide
 Single Barrel Shotgun HPFP Install Guide Thank you for purchasing the VTT Single Barrel Shotgun HPFP upgrade kit! PLEASE READ THE ENTIRE GUIDE BEFORE BEGINNING INSTALLATION! The first thing you should
BMW 2002 M42 Swap Notes-THIS IS NOT FINISHED
 BMW 2002 M42 Swap Notes-THIS IS NOT FINISHED This document is to help those that want to install an m42 into a BMW 2002. It is based around an e30 engine, trans, and wiring. You can use the e36 block/head/wiring
Ford Racing BOSS 302 Engine Oil Cooler (11-14 GT)
") Tools needed: 14mm hex socket 7mm socket/wrench 8mm socket/wrench Ford Racing BOSS 302 Engine Oil Cooler (11-14 GT) 10mm socket (for airbox removal) ¾ inch or 19mm wrench Torque wrench Appropriate ratchets
Tools needed: 14mm hex socket 7mm socket/wrench 8mm socket/wrench Ford Racing BOSS 302 Engine Oil Cooler (11-14 GT) 10mm socket (for airbox removal) ¾ inch or 19mm wrench Torque wrench Appropriate ratchets
M-Tuned reroute kit XX
 M-Tuned reroute kit 14-161XX Manufactured and designed by: *Professional Installation Recommended but not required 1) Disconnect the negative terminal from the battery in the trunk. 2) Drain the coolant
Procharger Stage II Intercooled Supercharger System (11-14 GT)
") Procharger Stage II Intercooled Supercharger System (11-14 GT) Installation Time: Approximately one day. Installed on 2012 Mustang GT 5.0/Manual Required Tools 3/8 Socket Set (Standard and Metric) 1/2
Procharger Stage II Intercooled Supercharger System (11-14 GT) Installation Time: Approximately one day. Installed on 2012 Mustang GT 5.0/Manual Required Tools 3/8 Socket Set (Standard and Metric) 1/2
BEW engine timing belt replacement procedure from MOGolf (as demonstrated on a 2004 Jetta).
.") BEW engine timing belt replacement procedure from MOGolf (as demonstrated on a 2004 Jetta). Based on the procedure published by Volkswagen, but modified for the "average" shadetree mechanic. Some special
BEW engine timing belt replacement procedure from MOGolf (as demonstrated on a 2004 Jetta). Based on the procedure published by Volkswagen, but modified for the "average" shadetree mechanic. Some special
2006 Honda Civic SI Supercharger Kit Installation Instruction Kit #
 2006 Honda Civic SI Supercharger Kit Installation Instruction Kit #350-091 3239 MONIER CIRCLE, STE.5 RANCHO CORDOVA, CA 95742 916.635.4550 FAX 916.635.4632 www.ct-engineering.com INS-157 VERSION: 3.25.2009
4TH GEN SEATS IN A 3RD GEN TRUCK
 4TH GEN SEATS IN A 3RD GEN TRUCK by Flopster843 02 Oct 2016 If you drive a 3rd generation Dodge Ram truck, I am sure you have discovered that the OEM seats are not the greatest (Figure 1.) They are extremely
PERFECT FIT SERIES IN-DASH HEAT/ COOL/ DEFROST MUSTANG
 specializing in AIR CONDITIONING, PARTS AND SYSTEMS for your classic vehicle PERFECT FIT SERIES IN-DASH HEAT/ COOL/ DEFROST 1969-70 MUSTANG CONTROL & OPERATING INSTRUCTIONS The controls on your new Perfect
1996 Aerostar/Ranger/Explorer
 Page 1 of 11 Section 03-01B: Engine, 3.0L V-6 IN-VEHICLE SERVICE 1996 Aerostar and Ranger Vehicles Workshop Manual Water Pump SPECIAL SERVICE TOOL(S) REQUIRED Description Tool Number Fan Clutch Holding
Installation of Cold Case Aluminum Performance Radiator in 2005 GTO. Performed October By: Chris Gray. Indianapolis, IN
 Installation of Cold Case Aluminum Performance Radiator in 2005 GTO Performed October 2015 By: Chris Gray Indianapolis, IN Car is one owner, 90,000 miles, manual transmission Factory radiator failed by
& 76 CHEVROLET NOVA HEATER ONLY
 specializing in AIR CONDITIONING, PARTS AND SYSTEMS for your classic hi l PERFECT FIT IN-DASH HEAT/ COOL/ DEFROST 1969-74 & 76 CHEVROLET NOVA HEATER ONLY CONTROL & OPERATING INSTRUCTIONS The controls on
ADVANCE ADAPTERS INC. P/N: VORTEC GEN. III V8 SQ. BOLT TJ WRANGLER MOTOR MOUNTS (WITH A/C)
") Paso Robles, CA 93447 PAGE 1 OF 6 Telephone: (800) 350-2223 Fax: (805) 238-4201 Page Rev. Date: 04-16-14 KIT CONSISTS OF: No. Qty Part No. Description 1. 2 713092A BOLT SLEEVE 2. 4 713092B GEN 3 MOTOR
Paso Robles, CA 93447 PAGE 1 OF 6 Telephone: (800) 350-2223 Fax: (805) 238-4201 Page Rev. Date: 04-16-14 KIT CONSISTS OF: No. Qty Part No. Description 1. 2 713092A BOLT SLEEVE 2. 4 713092B GEN 3 MOTOR
Cut zip ties and remove 2 plastic wiring harness brackets.
 TROUBLESHOOTING: Please read and understand all installation instructions before proceeding with the installation. Included parts: 1 - New Bosch Cp3 Pump 1 - HSM Pulley 1 - Serpentine Belt 1 - Pump Bracket/
RZR 900 spring/shock installation
 RZR 900 spring/shock installation Thank you for purchasing the Shock Therapy Dual Rate Spring Kit for your RZR 900. Your item list: 2 Front upper coil springs, 2 Front lower coil springs, 2 Rear upper
 Special Tools Needed: DrVanos.com Stage I Installation Instructions Camshaft locking tool TDC Crank pin Sprocket turning tool Tool rental is available with the purchase of a vanos kit *See website for
Connecting the rear fog light on the A4 Jetta, while keeping the 5 Light Mod
 Connecting the rear fog light on the A4 Jetta, while keeping the 5 Light Mod DISCLAIMER: I'm human and make mistakes. If you spot one in this how to, tell me and I'll fix it This was done on my 99.5 Jetta.
PERFECT FIT IN-DASH HEAT/ COOL/ DEFROST FORD FAIRLANE & CROWN VICTORIA
 PERFECT FIT IN-DASH HEAT/ COOL/ DEFROST 1955-56 FORD FAIRLANE & CROWN VICTORIA CONTROL & OPERATING INSTRUCTIONS The controls on your new Perfect Fit system, offer complete comfort capabilities in virtually
(905)
") (905)953-9260 Marc@M-Tuned.com Coolant Reroute Kit *Professional Installation Recommended but not required 1) Disconnect Negative Terminal from Battery in trunk. 2) Drain Coolant from your cooling system.
(905)953-9260 Marc@M-Tuned.com Coolant Reroute Kit *Professional Installation Recommended but not required 1) Disconnect Negative Terminal from Battery in trunk. 2) Drain Coolant from your cooling system.
Mustang Radiator Conversion DIY. By GearHeadPeter. January 27, 2011
 1964-1966 Mustang Radiator Conversion DIY By GearHeadPeter January 27, 2011 We all know that the radiators in our cars are not the best, especially if you have done any customization to the engine, which
M-TUNED COOLANT RE-ROUTE KIT
 M-TUNED COOLANT RE-ROUTE KIT Part # MC-RR-216, MC-RR-218 Applications: 90-93 Miata 1.6L B6 94-97 Miata 1.8L BP More detailed instructions: http://www.etdracing.com/m-tuned/reroute.pdf 1) Disconnect Negative
DrVanos.com Stage II Installation Instructions. Tool rental is available with the purchase of a vanos kit *See website for more info*
 DrVanos.com Stage II Installation Instructions Special Tools Needed: Camshaft locking tool TDC Crank pin Sprocket turning tool Tool rental is available with the purchase of a vanos kit *See website for
Jeep Wrangler TJ 4.0 LITER Installation instructions
 www.jeepair.com 2000-2001 Jeep Wrangler TJ 4.0 LITER Installation instructions Important information about your system, and warranty DO NOT ADD ANY OIL TO ANY PART OF THE SYSTEM. DO NOT USE THE SIGHT GLASS
Mustang/Capri Fox Body 5.0 Engine Compartment Upgrade Kit - Standard (22-132)
") Classic Auto Air Mfg. 4901A W. Rio Vista Ave, Tampa, FL 33634 Toll free - 866-352-4678 9:30am 6pm M-F EST ClassicAutoAir.Com Mustang/Capri Fox Body 5.0 Engine Compartment Upgrade Kit - Standard (22-132)
Classic Auto Air Mfg. 4901A W. Rio Vista Ave, Tampa, FL 33634 Toll free - 866-352-4678 9:30am 6pm M-F EST ClassicAutoAir.Com Mustang/Capri Fox Body 5.0 Engine Compartment Upgrade Kit - Standard (22-132)
Installing the Dan-Marc and Pingel setup.
 Installing the Dan-Marc and Pingel setup. This is an alternative to the OEM vacuum petcock. It's the setup I use and feel more comfortable with it. Many still like the OEM vacuum petcock and they can continue
Cut zip ties and remove 2 plastic wiring harness brackets.
 TROUBLESHOOTING: Please read and understand all installation instructions before proceeding with the installation. If you have questions during the installation of this product, please email H&S Motorsports
INTAKE SWAP INSTRUCTION MANUAL 1.Items to pick up before you begin:
 INTAKE SWAP INSTRUCTION MANUAL 1.Items to pick up before you begin: Someone to lend you a hand for about 10 minutes Intake gasket set that pertains to your year of engine Coil of your choice Spark plugs
Looking up the front of the engine from under the radiator. (Picture taken with belt under tension.)
") 8. If you re replacing the AC compressor drive belt as well, it s time to loosen its belt tensioner. The AC compressor belt tensioner is very obvious under the front of the car. Loosen the 13mm bolt, then
8. If you re replacing the AC compressor drive belt as well, it s time to loosen its belt tensioner. The AC compressor belt tensioner is very obvious under the front of the car. Loosen the 13mm bolt, then
Boss/Coyote 5.0 Compressor without Power Steering Serpentine Drive System
 an ISO 900:205 Registered Company Boss/Coyote 5.0 Compressor without Power Steering Serpentine Drive System 74007 8865 Goll St. San Antonio, TX 78266 Phone: 800-862-6658 Sales: sales@vintageair.com Tech
INSTALLATION INSTRUCTIONS FOR COZY CAB A-1 AIR CONDITIONING KIT
 INSTALLATION INSTRUCTIONS FOR COZY CAB A-1 AIR CONDITIONING KIT 05-11 INSTALLATION INSTRUCTIONS A-12235 Air Conditioner Kit Cab set up instructions; This air conditioning kit is designed to be used with
Retro it Steering Column
 Retro it Steering Column INSTALLATION INSTRUCTIONS for 1976-86 CJ5 & CJ7 FOR PART NUMBER S: 1520800010, 1520800020, 1520800051, 1526800010, 1526800020, 1526800051 S I NCE 1986 Instruction # 8000000010
Jeep Wrangler 4.0 Liter TJ Jeep Wrangler 2.5 Liter TJ Installation instructions
 TM www.jeepair.com 1999 Jeep Wrangler 4.0 Liter TJ 1999-2001 Jeep Wrangler 2.5 Liter TJ Installation instructions Kit Information After 1994 every vehicle was designed for R134a refrigerant. The Jeep kit
B6-B7 S4 Supercharger Install instructions
 B6-B7 S4 Supercharger Install instructions Fits all B6-B7 S4s with the 40 valve 4.2L V8. (Does NOT fit B7 7 RS4) General notes: These instructions were written on a 2008 B7 S4, however there are minor
In this article our goal is to take a tour around the modern Mustang cooling system (Fox & SN95s), and familiarize you with how all the stuff works.
, and familiarize you with how all the stuff works.") Cures for the hot blues By Rob Hernandez. We Mustang nuts are always in search for more performance and speed. Most of our projects relate to adding this or that hot part to squeeze more horsepower and
Cures for the hot blues By Rob Hernandez. We Mustang nuts are always in search for more performance and speed. Most of our projects relate to adding this or that hot part to squeeze more horsepower and
PERFECT FIT SERIES IN-DASH HEAT/ COOL/ DEFROST 1969 CHEVROLET CAMARO/ FIREBIRD NOTE: INSTRUCTIONS DEPICT CAMARO
 specializing in AIR CONDITIONING, PARTS AND SYSTEMS for your classic vehicle PERFECT FIT SERIES IN-DASH HEAT/ COOL/ DEFROST 1969 CHEVROLET CAMARO/ FIREBIRD NOTE: INSTRUCTIONS DEPICT CAMARO CONTROL & OPERATING
BRZ/FR-S 3.00 Cold Air Intake
 BRZ/FR-S 3.00 Cold Air Intake Thank you for purchasing this PERRIN product for your car! Installation of this product should only be performed by persons experienced with installation of aftermarket performance
Our goal is to make the install a breeze. Please read the entire guide before beginning.
 www.airkewld.com Page 1 of 6 IRS Axle Kit Install IRS Axle Kit Install Our goal is to make the install a breeze. Please read the entire guide before beginning. KITS SHOULD INCLUDE 2 - Control-arm mounting
Refrigerant Oil Calculation during Compressor Replacement
 Refrigerant Oil Calculation during Compressor Replacement Study Guide TMT: 100820 Dealer Education 2008 Navistar, Inc. 4201 Winfield Road, Warrenville, IL 60555. All rights reserved. No part of this publication
Jeep Wrangler TJ. Complete Air Conditioning System. Slide Control Head. Installation instructions
 WWW.JEEPAIR.COM 1996-1998 Jeep Wrangler TJ Complete Air Conditioning System Slide Control Head Installation instructions Kit Information After 1994 every vehicle was designed for R134a refrigerant. The
FMK265SD F L DIESEL WITH DUAL ALTERNATORS
 WITH DUAL ALTERNATORS This kit will NOT work on trucks equipped with adaptive steering. INSTALLATION NOTES 1. Disconnect negative batteries cables. Remove the air duct from the passenger side and the black
RetroAir JAGUAR XKE S1-3.8 LHD FULL KIT CONTENTS:
 RetroAir JAGUAR XKE S1-3.8 LHD FULL KIT 2-12-2011 CONTENTS: 1- Custom Design Evaporator Case &Core Assembly 1- Universal Bracket (installed) Evaporator Pak includes: 2-Custom Brackets; 2-1-¼ Grommets;
Kysor On/Off Rear Air Fan Drive
 . Proper precautions must be taken to prevent personal injury from contact with moving parts, unintended engine start or other hazards present when working with powered equipment. Refer to the vehicle
List of parts needed below. Tools needed
 1 BMW 645 Coolant leak repair (Cap with Seal Repair and Expanding Coolant Pipe Installation w Pics) By Michael R. Brown (Estimated time to complete the job is 6-8 hrs) List of parts needed below. BMW PART
Extreme Automatics Pressure Release Transbrake 2004R 54E10.1
 Extreme Automatics Pressure Release Transbrake 2004R 54E10.1 The Electric Trans brake will work with any 2004R VB or shift kit. The rd transmission being used must be dual feed 3. The Electric Trans brake
Jeep Wrangler TJ 4.0 LITER Installation instructions
 www.jeepair.com 2002-2004 Jeep Wrangler TJ 4.0 LITER Installation instructions Kit Information These directions are for 2002-2006 model Jeep Wranglers. After 1994 every vehicle was designed for R134a refrigerant.
Car FEAD Air Conditioning Add-On Kit AB
 1 Car FEAD Air Conditioning Add-On Kit 77072446AB 5.7L & 6.4L Crate HEMI www.mopar.com Call Out Description Part Number Quantity Car AC Add-On Kit 77072446AB 1 COMPRESSOR, Air Conditioning, Fixed Disp.
1963 GEN IV SUREFIT VINTAGE AIR CONDITIONING INSTALLATION
 by Randy Irwin 1963 GEN IV SUREFIT VINTAGE AIR CONDITIONING INSTALLATION Randy Irwin - Technical Writer Randy has been involved in the Chevy parts business for over 30 years. He is a wizard at creating,
Troubleshooting Guide for Okin Systems
 Troubleshooting Guide for Okin Systems More lift chair manufacturers use the Okin electronics system than any other system today, mainly because they re quiet running and usually very dependable. There
Ford Super Duty F-250, F and up
 Ford Super Duty F-250, F-350 2005 and up Installing Upfitter Switches by Richard L. Ray If you want to add a few aftermarket options to your new Ford Super Duty, Ford Motor Company makes things easy for
Small Block Ford Serpentine Drive System with & without Power Steering
 an ISO 9001:2008 Registered Company Small Block Ford Serpentine Drive System with & without Power Steering 18865 Goll St. San Antonio, TX 78266 Phone: 210-654-7171 Fax: 210-654-3113 www.vintageair.com
Front Drive System - Big Block Chevy Installation Instructions Big Block Chevy with AC & with PS
 Front Drive System - Big Block Chevy Installation Instructions Big Block Chevy with AC & with PS All American Billet Store (800) 764-0926 www.allamericanbilletstore.com Items needed for install Jack Jack
Small Block Ford Serpentine Drive System with & without Power Steering
 an ISO 9001:2008 Registered Company Small Block Ford Serpentine Drive System with & without Power Steering 18865 Goll St. San Antonio, TX 78266 Phone: 210-654-7171 Fax: 210-654-3113 www.vintageair.com
Slingshot Rotrex Supercharger Kit
 Slingshot Rotrex Supercharger Kit This supercharger kit improves on the Slingshot by forcing more dense air into the engine and creating more power. Installation time of the supercharger depends on you
Air Oil Separator for WRX
 Air Oil Separator for 2015+ WRX 2018-06-05 Thank you for purchasing this PERRIN product for your car! Installation of this product should only be performed by persons experienced with installation of aftermarket
ALL AMERICAN BILLET. Front Drive System - Small Block Ford Installation Instructions
 ALL AMERICAN BILLET Front Drive System - Small Block Ford Installation Instructions Small Block Ford with AC & PS All American Billet Store (800) 764-0926 www.allamericanbilletstore.com Items needed for
Air Conditioner for M915 A0/A1 Truck
 RD-2-4530-0 Air Conditioner for M915 A0/A1 Truck INSTALLATION INSTRUCTIONS Install refrigerant compressor per instructions provided with compressor mount kit. CAUTION: Edges of sheet metal can be sharp!
This is what we are trying to create in the steps below
 You will need: (1) Some 3/4 aluminium or steel flat bar (+/- 1 foot) (2) About 12 of 3 Aluminium or steel tubing. (2) Piece of 3X3 silicone hose and 2 hose clamps (3) 1 K&N (or similar) high flow filter
Special Note About The JDM High Performance Water Pump:
 Page 1 of 30 JDM Engineering, Inc. home Call Us! 732-780- 0770 back to Installation Instructions Electric Fan Upgrade Kit Electric Fan Wiring Diagram Thank you for your purchase of the JDM Engineering
Ignition Timing - Honda 180-Degree Twins
 Ignition Timing - Honda 180-Degree Twins First thing to do is make a quick test light - I used a 12 volt indicator bulb from a speedo. Test leads with alligator clips make hookup easy... The point plate
DESCRIPTION AND OPERATION
 412-03-1 Air Conditioning 412-03-1 DESCRIPTION AND OPERATION Air Conditioning Refrigerant flow into the evaporator core is metered The air conditioning system components are: by an evaporator core orifice
Industrial Injections Compound Turbo Installation For 6.7L Scorpion
 Industrial Injections Compound Turbo Installation For 6.7L Scorpion Step 1: Whenever you are doing an installation the first thing you should do is unhook the batteries to avoid arcing. You will need an
Page1. ISF Stainless Steel Headers // Part# HDR-004
 Congratulations on the purchase of your ISF Stainless Steel Headers and thank you for choosing Sikky Manufacturing. This installation manual is intended to guide you through the removal of the factory
Installation Manual Chevrolet G Body
 Installation Manual 78-88 Chevrolet G ody Engine Compartment Upgrade Kit - 122-2004 Congratulations... You have just purchased the highest quality, best performing /C system upgrade ever designed for your
Tork Tech Inc. Customer Service , Sales
 Tork Tech Inc. Customer Service 971.226.9006, Sales 513.697.0060 Email: Info@TorkTech.com www.torktech.com * PREMIUM FUEL MANDATORY * Make sure vehicle has 91+ octane gas in it prior to beginning installation.
Engine Removal and Installation
 Page 1 of 5 Home Account Contact ALLDATA Log Out Help TINO TORRES Select Vehicle New TSBs Technician's Reference Component Search: OK 2005 Chrysler Sebring Sedan V6-2.7L VIN R Conversion Calculator Vehicle
TOP FEED FUEL RAIL KIT for WRX
 TOP FEED FUEL RAIL KIT for 2002-14 WRX Thank you for purchasing this PERRIN product for your car! Installation of this product should only be performed by persons experienced with installation of aftermarket
Corrado Club of Canada. VR6 Engine FAQ. By: Dennis
 Corrado Club of Canada VR6 Engine FAQ By: Dennis I thought I would snap a few pics of the engine compartment on my 1994 VR6 Corrado. First, this is the updated engine management system so it does have
To determine if an A/C clutch should be returned for Warranty Consideration:
 Warranty is a growing concern for all partners in the distribution of A/C Components. Because of the growing number of warranty questions, please study the following pictures to familiarize yourself with
Audi A4 1.8T Ultimate Timing Belt Kit Installation ES#8146
 This is a supplement to the Audi 1.8T Ultimate Timing Belt Installation tutorial. Information in this document assists you in removing the front bumper/fascia and radiator support to gain access to the
Ford F-150 Speaker Replacement Instructions
 Ford F-150 Speaker Replacement Instructions This article was downloaded from http://www.fordf150.net Be sure to go there to view and download the other how-to articles. Thanks to John Meyer for contributing
Installation Manual TWM Performance Short Shifter Cobalt SS/SC, SS/TC, HHR SS, Ion Redline and Saab 9-3
 Page 1 Installation Manual TWM Performance Short Shifter Cobalt SS/SC, SS/TC, HHR SS, Ion Redline and Saab 9-3 Please Note: It is preferable to park on a flat surface, as you will have to engage and disengage
 Page 1 of 6 Section 03-01C: Engine, 7.5L MFI 1996 Bronco/F-Series Workshop Manual IN-VEHICLE SERVICE Procedure revision date: 06/19/2000 Cylinder Heads Removal SPECIAL SERVICE TOOL(S) REQUIRED Description
C3 Syncro Drive Proclimb 1100 Installation Instructions
 Revision 4 Nov 8-2013 201A Old Town Road, Sicamous, BC. V0E 2V4 Ph 250-833 3538 Fax 888-716 5903 www.c3powersports.com Thank you for purchasing a ProClimb M, ProCross F & XF SyncroDrive Note: This modification
X-Type w/ non-premium sound amplifier installation instructions
 X-Type w/ non-premium sound amplifier installation instructions 1. Pull radio from dash (see Radio Removal Instructions ) 2. Disconnect wiring harness from back of radio by pushing in tab on plug and pulling
GM LS Series Serpentine Drive System with & without Power Steering
 an ISO 9001:2015 Registered Company GM LS Series Serpentine Drive System with & without Power Steering 18865 Goll St. San Antonio, TX 78266 Phone: 800-862-6658 Sales: sales@vintageair.com Tech Support:
CHAPTER 21 ENVIRONMENT CONTROL. Section Title Page
 CHAPTER 21 ENVIRONMENT CONTROL Section Title Page 21-00 Description........................................ 21.1 21-10 Ventilation........................................ 21.3 21-11 Nose Vent................................
3 WRX/STI TURBO INLET HOSE
 3 WRX/STI TURBO INLET HOSE Thank you for purchasing this PERRIN product for your car! Installation of this product should only be performed by persons experienced with installation of aftermarket performance
BLACKBIRD INSTALLATION SUPPLEMENT
 BLACKBIRD INSTALLATION SUPPLEMENT FOR 2003-7 FORD 6.0 LITER DIESEL F-SERIES DUAL ALTERNATOR VERSION 10/07 Blackbird Installation Supplement for Ford 6.0. Liter Dual Alternator Parts included in the 6.0
2017+ L5P Duramax 3 ½ Down Pipe & EGR Fix Kit
 2017+ L5P Duramax 3 ½ Down Pipe & EGR Fix Kit Covers installation of PN s: WCF100630, WCF100829 Note: This Kit is for off road competition use only! Off Road Competition Use Tuning & Exhaust System is
Instant Chat off the main page of Or simply call our tech team at
 FRONT MOUNT INTERCOOLER 2015+ WRX 2017-07-07 Thank you for purchasing this PERRIN product for your car! Installation of this product should only be performed by persons experienced with installation of
An ISO 9001:2008 Registered Company
 An ISO 9001:2008 Registered Company CVC501-A HVAC & Fast Idle CAN Vehicle Controller CVC502-A HVAC Control without Fast Idle 2011-2016 Ford F250-F550 (CVC501/502-A) 2017 Ford F-250-F550 (B-CVC501/502-A)
INSTALLATION INSTRUCTIONS
 INSTALLATION INSTRUCTIONS Accessory Application Publications No. AIR CONDITIONER CIVIC 2- AND 4-DOOR AII 24158 Issue Date SEP 2002 What s New The installation instructions for the 2003 Civic A/C are the
Instant Chat off the main page of Or simply call our tech team at
 FRONT MOUNT INTERCOOLER 2008-13 STI 2014-04- 08 Thank you for purchasing this PERRIN product for your car! Installation of this product should only be performed by persons experienced with installation
Installation Manual F Body (TPI)
") Installation Manual 1986-87 F ody (TPI) Engine Compartment Upgrade Kit - 22-229 and 22-229D Congratulations... You have just purchased the highest quality, best performing /C system upgrade ever designed
Installation Manual 1986-87 F ody (TPI) Engine Compartment Upgrade Kit - 22-229 and 22-229D Congratulations... You have just purchased the highest quality, best performing /C system upgrade ever designed
ESS INSTALL. The donor car /6 Cosmos Black/Sand UUC Short Shifter Brembo cross drilled rotors Phillips Nav System 16:9
 ESS INSTALL The donor car.. 1997 540/6 Cosmos Black/Sand UUC Short Shifter Brembo cross drilled rotors Phillips Nav System 16:9 The install went in several stages. Disconnect the battery Stage 1 Remove
Compressor Installation Guide. Technical helpline :
 Compressor Installation Guide Technical helpline : 0843 330 4097 Compressor Installation All air-conditioning repairs should only be undertaken by someone that has sufficient knowledge and training that
Hiding a Ford Regulator in an Alternator Equipped Citroen D s and SM s By Mark L. Bardenwerper, Sr. January 3, 2007
 Hiding a Ford Regulator in an Alternator Equipped Citroen D s and SM s By Mark L. Bardenwerper, Sr. January 3, 2007 Many of us have replaced the Ducellier voltage regulators on our alternator equipped
Installation Instructions
 Installation Instructions Jeep JK Unlimited (2007 Present) Mounting Bracket and Air Line System Kit for ARB On-Board Twin Air Compressor (CKMTA12) Made in the USA Kit Contents: 1 Bracket for ARB Compressor
Required tools are: Parts list:
 BEW cam and lifters replacement procedure by zanzabar Jay Roberts, Petaluma, CA. (modified from engine timing belt replacement procedure from MOGolf as demonstrated on a 2004 Jetta). Required tools are:
INSTALLATION INSTRUCTIONS: P/N: / D
 INSTALLATION INSTRUCTIONS: P/N: 75-5104 / 75-5104D 15461 SLOVER AVE., FONTANA, CA 92337 PH: 909.947.0015, FAX: 909.947.0603 WWW.SBFILTERS.COM Thank You! for purchasing your new S&B Filters intake kit.
Air Commander Late Model Ford F-150
 EASYSTREET Air Commander Late Model Ford F-150 www.airliftcompany.com MN-544 (02506) ECR 5206 Please read these instructions completely before proceeding with installation The oil level in the compressor
Included parts: 1 - New Bosch CP3 Pump 1 - HSM Pulley 1 - Serpentine Belt 1 - Pump Brackets/Hardware
 TROUBLESHOOTING: Please read and understand all installation instructions before proceeding with the installation. If you have questions during the installation of this product, please email H&S Motorsports
Combine Cover Manual
 Combine Cover Manual Installation Instructions Page 26 Operating Instructions Page 7 Warranty Page 7 Trouble Shooting Page 8 10 For Big Top Extension Model s: Case I.H. 8010, 8120 Please forward onto Customer
Fabricating and Installing Headlight Relays. Mike Graham
 Fabricating and Installing Headlight Relays Mike Graham For some time I had been reading about the benefits of installing headlight relays. As I understand it, there are two principal benefits: the load
Small Block Chevrolet Serpentine Drive System with & without Power Steering
 an ISO 9001:2008 Registered Company Small Block Chevrolet Serpentine Drive System with & without Power Steering 18865 Goll St. San Antonio, TX 78266 Phone: 210-654-7171 Fax: 210-654-3113 www.vintageair.com
OEM Cruise Control Installation in GMC/Chevy NBS trucks
 OEM Cruise Control Installation in 99-02 GMC/Chevy NBS trucks May 2008 ~ Rampage_Rick Having just installed factory cruise control in my 00 Sierra, I thought I d share the fun. I followed the steps outlined