Shotgun Double Barrel HPFP install guide
|
|
|
- Douglas Paul
- 5 years ago
- Views:
Transcription


1 Shotgun Double Barrel HPFP install guide


2 Thank you for your purchase of the VTT Shotgun Double Barrel HPFP upgrade! First thing to do when you open your box is to make sure all parts are in their respective bags and nothing has been left out or lost during shipping. Here is a breakdown of what you should have. 1 Assembled Shotgun housing 1 Mounting Bracket 1 High Pressure Check valve 1 Coolant pipe adapter 1 HPFP plug and play wiring harness 2 HPFP High Pressure fuel lines 1 LPFP Quick connect Y hose adaptor 2 Fuel fitting adaptors 3 Allen HPFP pump bolts 3 HPFP bolt washers 2 Mounting bracket bolts 1 HPFP Controller (optional) 2 Mounting bracket Star washers 3 Longer AC compressor mounting bolt 2 Hose clamps 4 large zip ties 4 small zip ties

3 Once all parts are accounted for you can proceed with the Shotgun Installation. We suggest this only be done by a qualified technician and recommend using a VTT certified install center. They can be found on our Website. If something was missing for your upgrade, please contact us immediately so we can remedy this. Contact info is on the page 8 of this guide. READ THE ENTIRE GUIDE BEFORE BEGINNING INSTALLATION! ANY QUESTIONS, OR FITMENT PROBLEMS, PLEASE SALES@VARGASTURBO.COM BEFORE TRYING
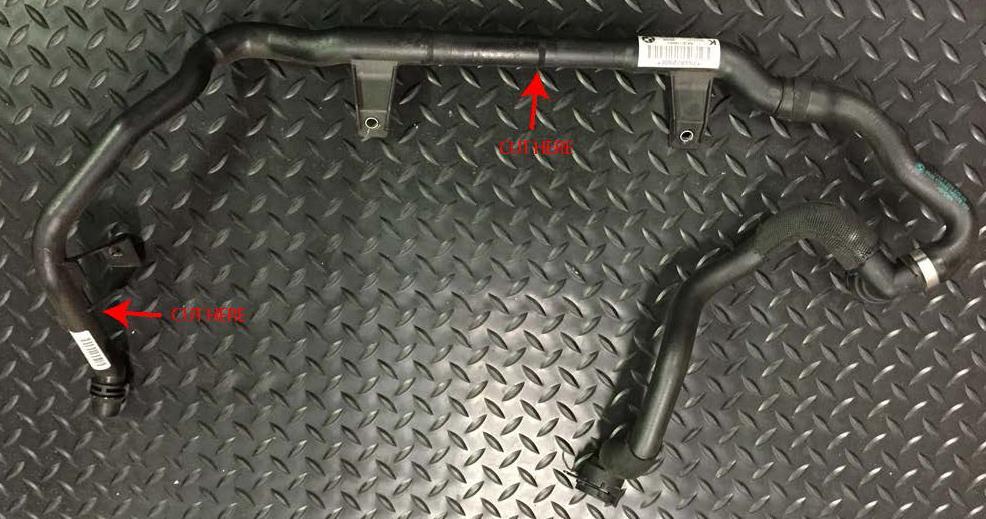
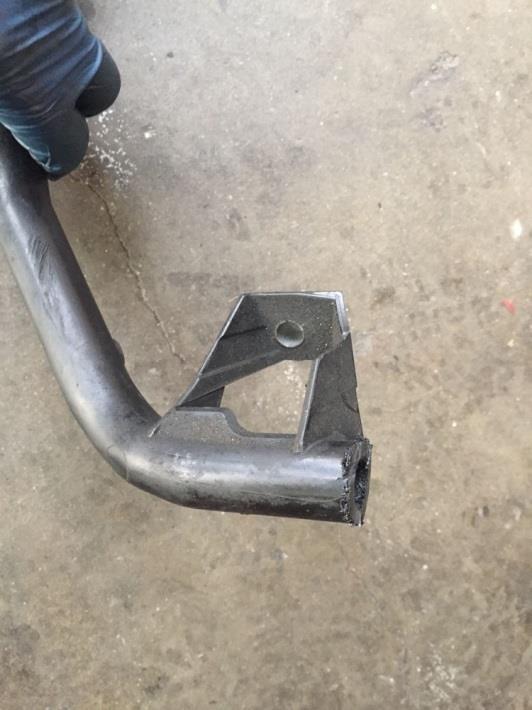
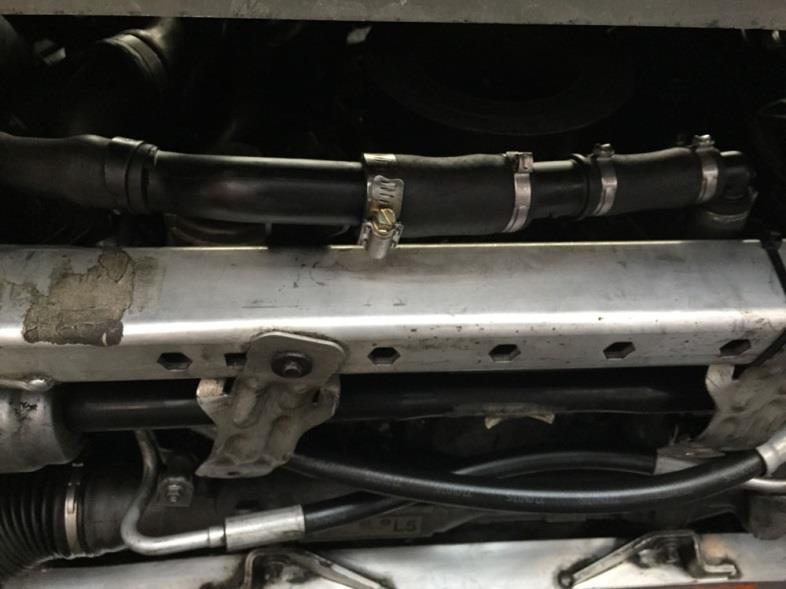
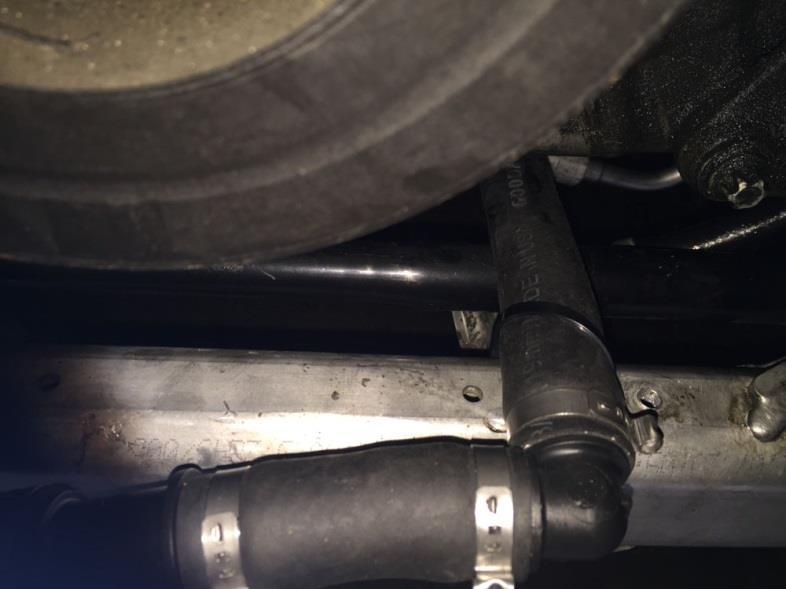
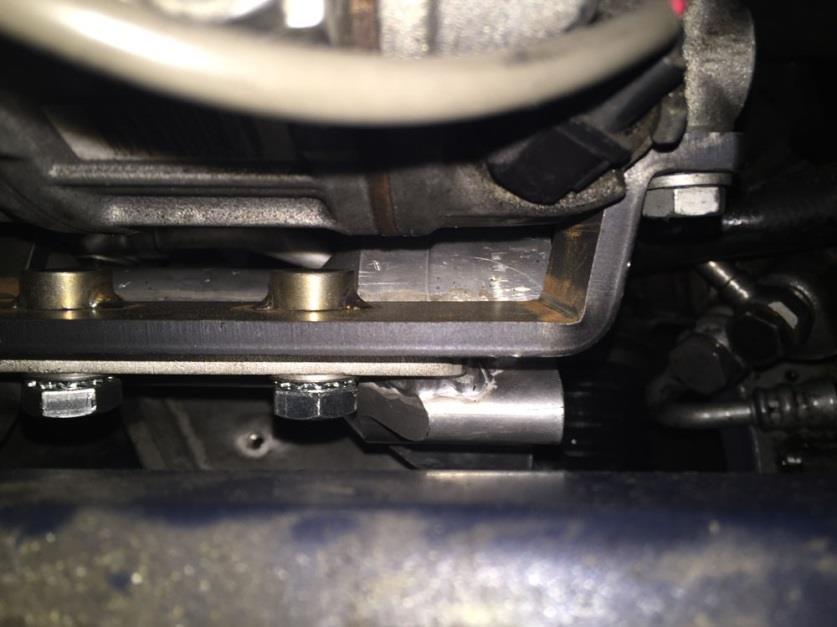
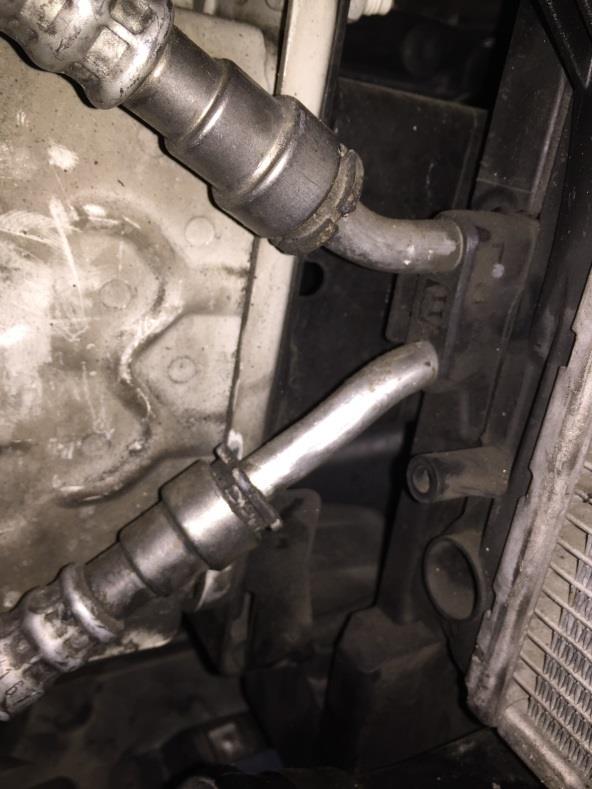
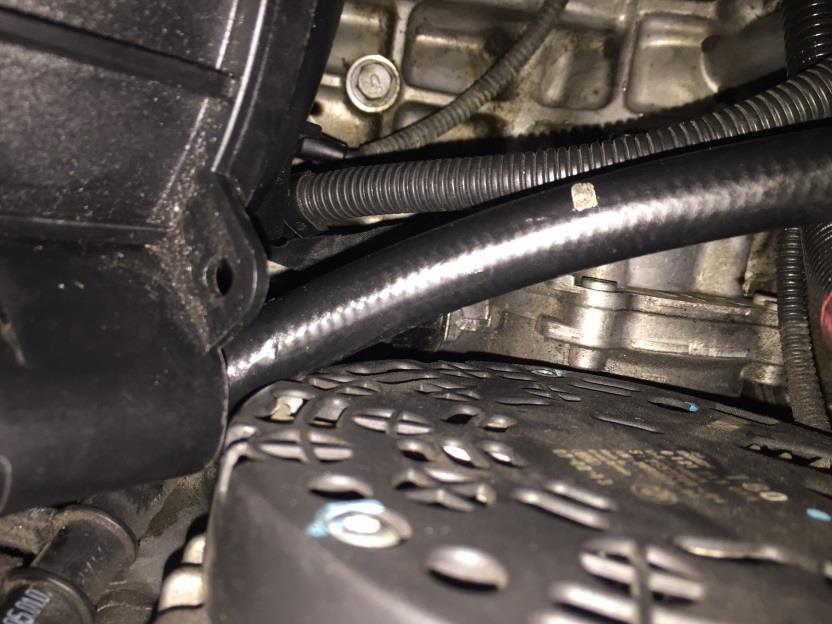
4 TO FORCE OR MODIFY ANYTHING. THIS UPGRADE IS PLUG AND PLAY IF THESE INSTRUCTIONS ARE FOLLOWED, ANY ISSUES NEED TO BE ADDRESSED TO AVOID PROBLEMS INSTALL GUIDE 1. Following factory procedures remove the air intake box, charge pipe, radiator fan, intake manifold, and serpentine belt from the vehicle. 2. From the top remove the two bolts holding the plastic water pipe to the sub frame, these can be seen now that the fan is removed. 3. Make sure the vehicle is not hot & be ready with a pan or bucket to catch the coolant! This will evacuate all the coolant from the system cooling system. Remove the cap from the coolant tank. Follow the pipe from step 2 up towards the firewall and locate the push to connect fitting that connects it to a heater hose. Remove the locking clip, and separate the two fittings. 4. Once the connection is removed and coolant is drained. Refer to Figure 1-3 for where to cut the pipe. The pipe can easily be cut with a cut off wheel, PCV tube cutter, hack saw, etc. It will need to be cut in two spots. Once cut remove all leftover burrs and plastic residue. 5. Take provided coolant pipe adaptor, and using supplied clamps assemble as shown in fig 4. o For automatic / DCT Transmissions you cut the stock pipe in the same locations, but coolant adaptor is slightly different Fig 22, you must cut the stock hose going from the original pipe to the transmission cooler, and install it on the Tee fitting in the coolant adaptor. 6. Install assembled coolant pipe adaptor onto coolant pipe as shown in fig 5. To ensure proper seal if labels are present on the pipe remove prior to assembly. Make sure you have proper penetration of the pipe into the hoses, and the clamps are tightened properly. 7. Route new coolant hose under oil pan (fig 6) and reconnect to the quick connect fitting and secure with locking clip. Reinstall the bolt in remaining bracket, secure adaptor, and hose with zip ties to ensure it does not interfere with engine function. This completes coolant pipe modifications 8. Using a jack and a wooden block, carefully raise the engine on the driver side for clearance and remove the bolts securing the AC compressor to the block. You should be able to loosen all but the top bolt without raising the motor, but most likely the top one just won t clear the the unibody, so slightly jacking up the engine will allow it to come out. CAUTION! BE VERY CAREFUL WHERE YOU CHOOSE TO JACK AS YOU CAN CAUSE DAMAGE IF THE BLOCK IS PUT IN THE WRONG SPOT! 9. Now access the three 13MM bolts holding the AC compressor to the block. Remove the all 3 bolts. Using the 3 longer bolts, and no washers, install bracket around AC compressor and retighten bolts to factory specs. Fig (Please note, pump assembly will NOT be installed on bracket yet as seen in the pictures, this is the next step) 10. There are two power steering hoses that MAY need to be slightly bent out of the way, to provide proper clearance for the pump housing. Every vehicle will be slightly
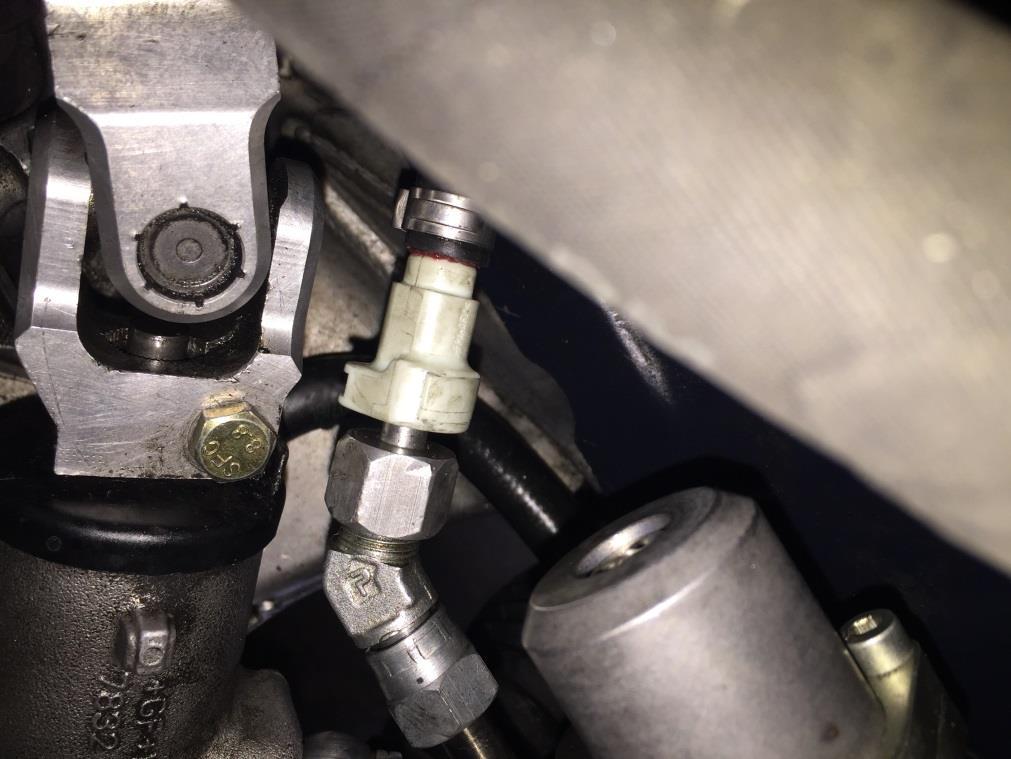
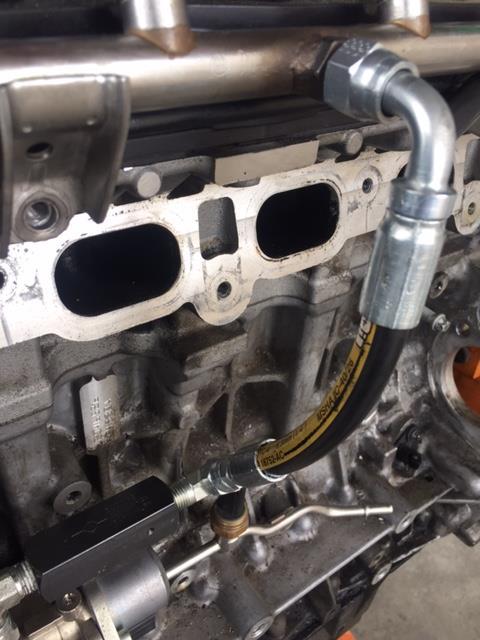
5 different on how these need to be bent. These lines are very easily bent, but use caution when bending them not to cause any damage, see Fig 14 for example of hose bent to clear. Once the hoses are positioned to provide enough access (this may be a trial and error process to get it right), you may also need to loosen and reclock the power steering fittings going into the steering rack, and or block to clear, it depends on what position they are in from the factory. Once everything is clear, coming in from the front, maneuver the assembled pump housing into place, and secure with the two supplied bolts, using the supplied star washers. These 2 steps can be tricky, as space is at a minimum, things may need to be slightly moved to fit, but with a little patience, and rearrangement, everything will fit right into place. Once both bolts are started, tighten them to the bracket, the best tool we have found to do this is a long 17mm or 11/16 open end wrench as its flat shape will easily get into the opening. 11. Lower engine, install new serpentine belt (the factory belt will fit over the new assembly with just a little more deflection of the tensioner). Use care when engaging the tensioner as it is aluminum and they strip out VERY easily. 12. Remove the fuel rail from the vehicle. Install supplied modified fuel rail. Send stock rail back for core refund 13. HPFP can now be installed to the Shotgun housing, NOTE: IF THE SMALL SCREEN IN THE INLET OF THE HPFP IS STILL PRESENT REMOVE IT USING A SMALL SCREWDRIVER OR PICK BEFORE INSTALLATION. ALSO REMOVE IT FROM THE STOCK LOCATION PUMP. Look Inside the housing, note the orientation of the shaft, rotate the pump to match the shaft, and using caution install the pump until it snaps into place. DO NOT tighten the pump until it is snapped in, and flat against the housing. Then you can tighten the 3 bolts in an alternating pattern to factory specs. ALSO IF YOUR HPFP HAS MORE THAN 50,000 MILES ON IT, IT SHOULD BE REPLACED. A WORN OR WEARING OUT HPFP WILL NOT PERFORM AS IT SHOULD, EVEN IN THE SHOTGUN SYSTEM 14. Once pump is installed, you can install one of the supplied fuel fitting adaptors, the 45 fitting, and the Bundy Adaptor. See Fig 13 for proper assembly. The best way is to install the bundy adaptor on the 45 fitting on the bench, then install the assembled fitting to the pump. Leave the assembled fitting loose as it will be tightened in the next step 15. Now install the LPFP quick disconnect Y hose (N55 just a single hose, no Y adapter), N55: Remove the stock feed line, from the frame rail connection, and snap the female quick disconnect it. N54: Remove the factory feed line, and snap the short female end to the factory fuel pipe, and the long end will now come around and connect to the feed of the shotgun HPFP. You must use the fuel adapter (a little grease helps hold it in place). Snap the shorter end to the factory fuel feed line to supply the sensor with fuel pressure (N55: there will be no short end, as there is no LPFP sensor fuel needs to be routed to. You will just have a single line from the factory line, to the new pump location.) Once threaded onto the feed with the adapter in place. Rotate the 45 fitting to gain maximum clearance from the steering shaft Fig 15, and tighten. This fitting need to be tight to ensure no leaks, but use caution to not over tighten. Fig 15. Now using supplied zip ties, secure LPFP fuel line out of the way so does not interfere with 16. Install the Double barrel Check valve assembly onto the stock location HPFP using the supplied internal fuel adapter. Now take the short High pressure line, and thread onto the fitting on the check valve, but leave loose (fig 8) 17. Plug the HPFP controller plug into the HPFP, and route the line over to the DME box where the controller is going to be kept. 18. Take intake manifold and place it back over its studs so it is loosely in place, but do not tighten.
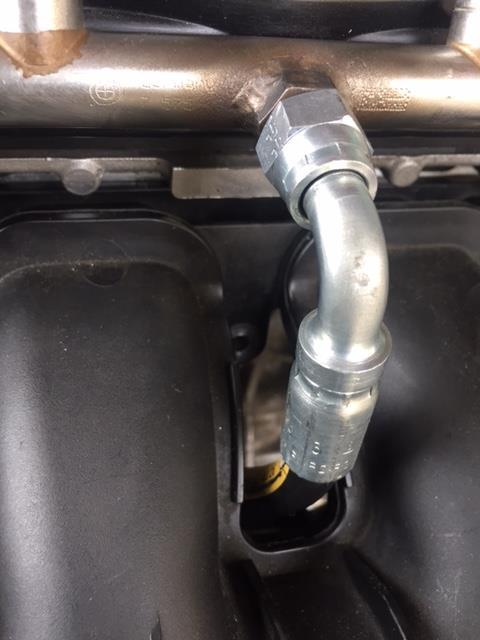
6 19. Now feed short High pressure line through manifold, and thread onto the -6 fitting on the fuel rail. You can now tighten both of these fittings, and the fitting to the outlet of the HPFP. (fig 9) See fig 21 for reference. 20. Install the 90 degree end of the High pressure line to the fuel rail do not tighten. Referring to figures 16-20, route the high pressure hose down to the HPFP. Now with everything loose, and referring to fig 16-20, make sure the hose is routed as shown in the picture. If done properly the intake manifold will seat perfectly, and the hose will be tucked nicely out of the way. Thread the fitting onto the HPFP outlet tighten the 90 at the fuel rail first then the straight fitting on the pump. 21. Take the plug and play wiring harness and plug the male end into the factory HPFP plug. This plug is a VERY VERY tight fit, it m ay require pliers to snap together. The male plug has to be fully seated into the female plug to ensure proper connection. BMW does not offer a male plug separately so the locking mechanisms will not engage but the very tight fit ensures the male plug will not come unseated. The female end is factory, and simply snaps into the pump. Zip tie the harness out of the way and the installation is complete. 22. Reassemble the vehicle, fill coolant, and perform the coolant bleed procedure. 23. CAREFULLY inspect the area around the Shotgun pulley, and Power steering pulley for any hoses or lines that may be touching or close. Using Zip ties secure ALL lines or hoses out of the way to ensure nothing is rubbing on the pulleys 24. BEFORE the vehicle is started using the push to start button with your foot OFF the brake or clutch so the engine will not start, cycle the ignition FULLY off and on at least 5-6 times. This will prime the fuel system and help remove all air from the system, and ensure the HPFP does not run dry. 25. Following the HPFP controller directions, wire the HPFP controller, and using the R4 software, load the supplied starter map for the secondary 26. Start the Vehicle and immediately check for leaks, if any leaks are present immediately turn off vehicle, identify and fix any leaks. 27. We suggest resetting all adaptations except the learned variants with an INPA cable. This will allow the DME to start fresh with the new pump system, and create proper pressure ratios. If you do not have an INPA, you may experience high HPFP on initial startup. This is normal as the DME will need to learn down as the new pump provides more fuel. 28. If the vehicle will not start, or starts and immediately goes into limp mode, the issue will most likely lie in the male plug for the belt driven shotgun, it must be fully seated into the factory plug. Double check this first. 29. Take the vehicle for a test drive, and ensure fuel pressure, and other systems are working properly. 30. This HPFP upgrade needs proper tuning to take advantage of its capabilities, 91 octane fuels and higher should always be used. 31. Enjoy your new VTT Shotgun HPFP upgrade :)

7 Troubleshooting and tips Page 13 Fig 1 Fig 2 Fig 3


8 Fig 4 Fig 5 Fig 6 Fig 7


9 Fig 8 Fig 9 Fig 10 Fig 11

10 Fig 12 Fig 14 Fig 15


11 Fig 16 Fig 17 Fig 18 Fig 19

12 Fig 20 Fig 21
13 Troubleshooting tips! Issue: I can t get the top bolt out of the AC compressor to get the bracket on. Answer: You need to slightly jack up the motor and this will fix the problem of the bolt not coming out. Issue: I cannot get the assembled pump housing into the space needed for it to fit, it keeps hitting lines, etc. Answer: The TOUGHEST part of the install is getting the pump housing in place, there is very good chance we will need to maneuver, bend, reclock the power steer lines to get the housing, and HPFP in place. With a little patience it WILL fit. Issue: I cannot get the high pressure line to route properly the intake manifold wont seat. Answer: The high pressure line can be a little tricky but if you follow the figures, it will route nicely, and tuck under the intake manifold allowing it to seat properly Issue: I just got finished and the car won t start, or has no HPFP pressure. Answer: You most likely do not have the plug seated fully, recheck the plug and make sure it is ALL the way in. Issue: I have some other issues and I cannot figure them out. Answer: Drop us an at Sales@vargasturbo.com and we will do our best to get them solved for you!
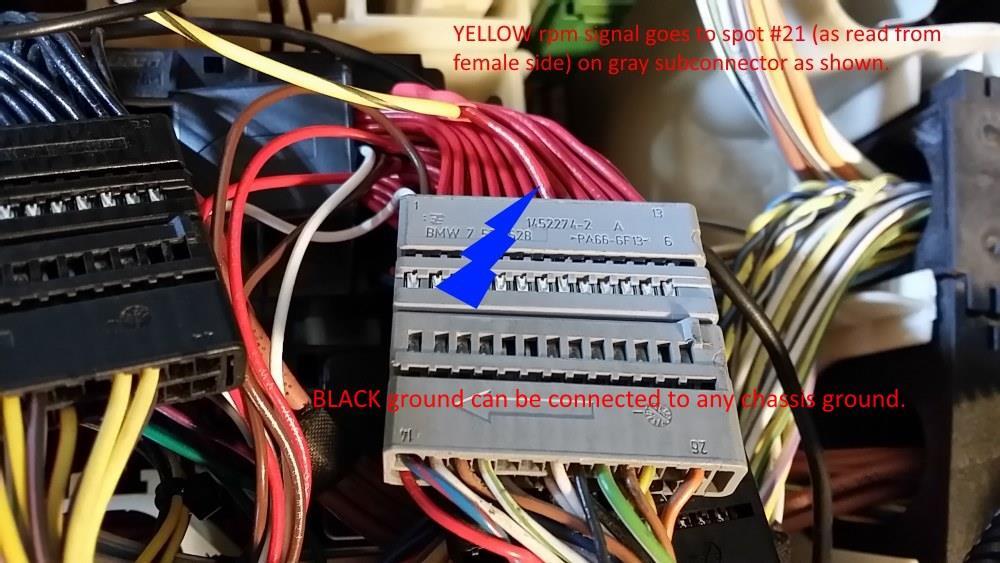
14 Wiring Instructions for Double Barrel Secondary fuel controller Directions for wiring up the AIC6: To program it you'll need a generic USB to RS232 data cable. Once wired up you can use the R4 software to monitor "live data" and ensure RPM is moving as engine idles. If it doesn't then something is likely wired wrong. I suggest locating the unit in the DME box.. While you are in there I'd suggest removing tape that holds bundles together which may have already fallen off over the years and replacing it with small black zip ties to keep the wires in the DME area tied together and easier to work with. For those running the AIC6 as basically a standalone controller without the new JB4 integration: The RED +12v power wire piggybacks power wire at the green connector. If not equipped with a JB4 just splice it in there. The BLACK ground can go to any chassis ground. The GREEN boost signal connects to the yellow wire going in to the large black sub connector on pin #10. Use the supplied Posi-tap The YELLOW rpm signal connects to #21 on the gray subconnector. Use the Supplied Posi-Tap Load the Shotgun DI Starter Map map to the AIC6. Basic R4 software directions: Download the fuel maps Select open customer. NEVER SELECT NEW CUSTOMER AS THIS WILL RESULT IN AN EMPTY FUEL MAP. If you've done this in the past download the fuel map again. Select database you downloaded, I.E. Shotgun Starter map sent Select com port under "connect to ECU". Vehicle ignition must be on. Select button to right of com port to connect Select maps-fuel maps If using the starter map then values will be filled in as you scroll along. If they are all zero you corrupted the file by selecting new customer. Download the file again. Click the button in the upper left that says write to device Once done start the car, and make sure the blue box moves with RPM, and boost / vacuum. You can also watch this by going to live values, under the real time tab
15
Shotgun Single Barrel HPFP install guide
 Shotgun Single Barrel HPFP install guide Thank you for your purchase of the VTT Shotgun Single Barrel HPFP upgrade! First thing to do when you open your box is to make sure all parts are in their respective
Single Barrel Shotgun HPFP Install Guide
 Single Barrel Shotgun HPFP Install Guide Thank you for purchasing the VTT Single Barrel Shotgun HPFP upgrade kit! PLEASE READ THE ENTIRE GUIDE BEFORE BEGINNING INSTALLATION! The first thing you should
N55 Turbo upgrade install guide
 N55 Turbo upgrade install guide Thank you for your purchase of the VTT BMW N55 Stage 2 turbo charger upgrade! First thing to do when you open your box is to make sure all parts are in their respective
Slingshot Rotrex Supercharger Kit
 Slingshot Rotrex Supercharger Kit This supercharger kit improves on the Slingshot by forcing more dense air into the engine and creating more power. Installation time of the supercharger depends on you
IAG Street Series Air / Oil Separator (AOS) For WRX
 For WRX") P IAG Street Series Air / Oil Separator (AOS) For 2015-16 WRX Part# IAG-ENG-7152 Tools Required: Ratchet, torque wrench, extensions, needle nose pliers, hose cutter, snips/scissors, flat head screw driver,
P IAG Street Series Air / Oil Separator (AOS) For 2015-16 WRX Part# IAG-ENG-7152 Tools Required: Ratchet, torque wrench, extensions, needle nose pliers, hose cutter, snips/scissors, flat head screw driver,
Instant Chat off the main page of Or simply call our tech team at
 FRONT MOUNT INTERCOOLER 2015+ WRX 2017-07-07 Thank you for purchasing this PERRIN product for your car! Installation of this product should only be performed by persons experienced with installation of
IAG Street Series Air / Oil Separator (AOS) For 2017 WRX
 For 2017 WRX") P IAG Street Series Air / Oil Separator (AOS) For 2017 WRX Part# IAG-ENG-7152 Tools Required: Ratchet, torque wrench, extensions, needle nose pliers, hose cutter, snips/scissors, flathead screwdriver,
P IAG Street Series Air / Oil Separator (AOS) For 2017 WRX Part# IAG-ENG-7152 Tools Required: Ratchet, torque wrench, extensions, needle nose pliers, hose cutter, snips/scissors, flathead screwdriver,
Flex Fuel Bluetooth Kit BRZ / FRS / GT86 install instructions
 Delicious Tuning 1250 Activity Dr. Ste A Vista, CA 92081 408-480-0995 Rev: 1.0 Date: 8/20/18 FFBT parts: (1) Ethanol Content Analyzer Module (1) Ethanol Content Analyzer Sensor (1) Sensor Bracket (1) Velcro
Procharger Stage II Intercooled Supercharger System (11-14 GT)
") Procharger Stage II Intercooled Supercharger System (11-14 GT) Installation Time: Approximately one day. Installed on 2012 Mustang GT 5.0/Manual Required Tools 3/8 Socket Set (Standard and Metric) 1/2
Procharger Stage II Intercooled Supercharger System (11-14 GT) Installation Time: Approximately one day. Installed on 2012 Mustang GT 5.0/Manual Required Tools 3/8 Socket Set (Standard and Metric) 1/2
IAG Competition Series Air / Oil Separator (AOS) For WRX
 For WRX") P IAG Competition Series Air / Oil Separator (AOS) For 2015-16 WRX Part# IAG-ENG-7252 Tools Required: Ratchet, torque wrench, extensions, needle nose pliers, hose cutter, snips/scissors, flat head screw
P IAG Competition Series Air / Oil Separator (AOS) For 2015-16 WRX Part# IAG-ENG-7252 Tools Required: Ratchet, torque wrench, extensions, needle nose pliers, hose cutter, snips/scissors, flat head screw
2017+ L5P Duramax 3 ½ Down Pipe & EGR Fix Kit
 2017+ L5P Duramax 3 ½ Down Pipe & EGR Fix Kit Covers installation of PN s: WCF100630, WCF100829 Note: This Kit is for off road competition use only! Off Road Competition Use Tuning & Exhaust System is
Mercedes E63/CLS AMG Carbon Turbo Intake System Instructions
 Mercedes E63/CLS AMG Carbon Turbo Intake System Instructions The goal of Alpha Performance is to provide the highest quality, best performing products available. By utilizing research and development,
08-18 STI Flex Fuel Bluetooth Mk2 Kit Install Instructions For Cobb Tuning Access Port
 For Cobb Tuning Access Port Delicious Tuning 1948 Don Lee Place Suite #7 Escondido, CA 92029 408-480-0995 Rough Draft BJP Rev: 2.0 Date: 2/1/17 FFBT parts: (1) Ethanol Content Analyzer Module (1) Ethanol
1963 GEN IV SUREFIT VINTAGE AIR CONDITIONING INSTALLATION
 by Randy Irwin 1963 GEN IV SUREFIT VINTAGE AIR CONDITIONING INSTALLATION Randy Irwin - Technical Writer Randy has been involved in the Chevy parts business for over 30 years. He is a wizard at creating,
05-08 GT. Hellion Power Systems Mustang Kit Instructions
 Hellion Power Systems 05-08 Mustang Kit Instructions 1. Disconnect Battery 2. Drain Radiator, keep fluid for re-installation. 3. Remove air box and inlethoses. 6. Next, underneath, punch oil pan for turbo
INSTALLATION INSTRUCTIONS FUEL SURGE TANK KIT
 INSTALLATION INSTRUCTIONS FUEL SURGE TANK KIT BMW E46 3-Series, Excl Convertible Document: 19-0056 Support: info@radiumauto.com Relieve fuel pressure in vehicle before beginingthe installation. Disconnect
MAZDASPEED3 Intercooler Instructions
 MAZDASPEED3 Intercooler Instructions Congratulations on your purchase of the COBB Tuning Front Mount Intercooler System for your 2007-2009 Mazdaspeed3. The following instructions should assist you through
WRX/STI Engine Oil Cooler
 2002-14 WRX/STI Engine Oil Cooler 2014-04-21 Thank you for purchasing this PERRIN product for your car! Installation of this product should only be performed by persons experienced with installation of
2006 Honda Civic SI Supercharger Kit Installation Instruction Kit #
 2006 Honda Civic SI Supercharger Kit Installation Instruction Kit #350-091 3239 MONIER CIRCLE, STE.5 RANCHO CORDOVA, CA 95742 916.635.4550 FAX 916.635.4632 www.ct-engineering.com INS-157 VERSION: 3.25.2009
Ford 6.7 EGR Delete Kit
 Fits: 2011 12 Powerstroke 6.7L Read instructions thoroughly before proceeding! ***This kit may void factory warranty please check with manufacturer.*** ***This kit is intended for off road use only.***
Installation Instructions
 Installation Instructions Jeep JK Unlimited (2007 Present) Mounting Bracket and Air Line System Kit for ARB On-Board Twin Air Compressor (CKMTA12) Made in the USA Kit Contents: 1 Bracket for ARB Compressor
Installation Manual v1.0: Twin CP3 Fuel Injection Kit Dodge 6.7L
 04/05/2012 Dodge 2010-2011 6.7L Twin CP3 701-900-2356-INST Installation Manual v1.0: Twin CP3 Fuel Injection Kit 2010-2011 Dodge 6.7L Figure 1 - Full Kit Photo 29 Figure 2 - Hardware Kit (800) 949-60002
4-Port Aux Fuel Injection System Installation and User Guide
 Stratified Aux Fiesta ST 4-Port Aux Fuel Injection System Installation and User Guide Stratified 4-Port Aux Fuel System Installation and User Guide -1-0204-0025 Thank you and congratulations on the purchase
#TL T EA888 GEN 3 FUELING SYSTEM/ INSTALLATION INSTRUCTIONS
 #TL100069 2.0T EA888 GEN 3 FUELING SYSTEM/ INSTALLATION INSTRUCTIONS Notes: These instructions were written for a North American specification MkVII GTI. Other models, like the Golf R, are similar. When
Mishimoto Performance Aluminum Radiator w/ Stabilizer - Manual (97-04 GT, Mach 1; Cobra)
") Mishimoto Performance Aluminum Radiator w/ Stabilizer - Manual (97-04 GT, Mach 1; 97-01 Cobra) Installed on: 2000 Mustang GT (manual transmission) Tools: 8mm socket 10mm socket 13mm socket 3/4" wrench
Mishimoto Performance Aluminum Radiator w/ Stabilizer - Manual (97-04 GT, Mach 1; 97-01 Cobra) Installed on: 2000 Mustang GT (manual transmission) Tools: 8mm socket 10mm socket 13mm socket 3/4" wrench
OIL COOLER KIT INSTALLATION INSTRUCTIONS PART NUMBER D
 OIL COOLER KIT INSTALLATION INSTRUCTIONS PART NUMBER D570-0904 APPLICATION: 2011-2012 E90 335i/xi (N55 engine) with BMW standard bumper and with stock oil cooler Congratulations for being selective enough
Chevy Sonic 1.4L Intake Manifold
 Chevy Sonic 1.4L Intake Manifold Install Time: 3 hours In the Box: (1) Racer X Intake manifold (6) M8x1.25 bolts (4) M6x1 bolts (2) 1/8 NPT plugs (1) 3/8 NPT plug (1) 1/4 NPT 90 degree barb (4) Small O-rings
Included parts: 1 - BorgWarner SX-E Turbocharger 1 - SX-E 90-Degree Compressor Outlet Elbow 1 - HSM Cast Exhaust Manifold 1 - HSM Downpipe
 TROUBLESHOOTING: Please read and understand all installation instructions before proceeding with the installation. If you have questions during the installation of this product, please email H&S Motorsports
V1 Truck Manifold Turbo Kit for F-body
 V1 Truck Manifold Turbo Kit for 98-02 F-body Prep: -Remove all A/C Components, Alternator and brackets, tensioner, front bumper, front bumper foam, and front bumper support. Remove radiator and cooling
DrVanos.com Stage II Installation Instructions. Tool rental is available with the purchase of a vanos kit *See website for more info*
 DrVanos.com Stage II Installation Instructions Special Tools Needed: Camshaft locking tool TDC Crank pin Sprocket turning tool Tool rental is available with the purchase of a vanos kit *See website for
TURBOCHARGER L INSTALLATION GUIDE
 1 TURBOCHARGER INSTALLATION GUIDE TABLE OF CONTENTS Chapter Page 1 Intake and Cooling System Preparation 04 2 Intake Plenum and Manifold 08 3 Turbocharger Lubrication 11 4 Fuel Injectors 13 5 Re-installing
INSTALLATION INSTRUCTIONS 97 FORD EXPEDITION
 INSTALLATION INSTRUCTIONS 97 FORD EXPEDITION 1. Read the instructions completely and carefully before you begin. Check the kit for proper contents (refer to the part s list and the picture diagrams). Before
OIL COOLER KIT INSTALLATION INSTRUCTIONS PART NUMBER D E92 335is (N54 engine) with BMW M-Technic bumper and with stock oil cooler
 with BMW M-Technic bumper and with stock oil cooler") OIL COOLER KIT INSTALLATION INSTRUCTIONS PART NUMBER D570-0923 APPLICATION: 2011 E92 335is (N54 engine) with BMW M-Technic bumper and with stock oil cooler Congratulations for being selective enough to
OIL COOLER KIT INSTALLATION INSTRUCTIONS PART NUMBER D570-0923 APPLICATION: 2011 E92 335is (N54 engine) with BMW M-Technic bumper and with stock oil cooler Congratulations for being selective enough to
3 WRX/STI TURBO INLET HOSE
 3 WRX/STI TURBO INLET HOSE Thank you for purchasing this PERRIN product for your car! Installation of this product should only be performed by persons experienced with installation of aftermarket performance
OIL COOLER KIT INSTALLATION INSTRUCTIONS PART NUMBER D E92 335i/xi (N55 engine) with BMW Standard bumper and with stock oil cooler
 with BMW Standard bumper and with stock oil cooler") OIL COOLER KIT INSTALLATION INSTRUCTIONS PART NUMBER D570-0924 APPLICATION: 2011-12 E92 335i/xi (N55 engine) with BMW Standard bumper and with stock oil cooler Congratulations for being selective enough
OIL COOLER KIT INSTALLATION INSTRUCTIONS PART NUMBER D570-0924 APPLICATION: 2011-12 E92 335i/xi (N55 engine) with BMW Standard bumper and with stock oil cooler Congratulations for being selective enough
Instant Chat off the main page of Or simply call our tech team at
 Subaru WRX/STI Air Oil Separator for Front Mounted Intercooler Setups 2013-02- 22 Thank you for purchasing this PERRIN product for your car! Installation of this product should only be performed by persons
Installation Instructions
 Installation Instructions Jeep JK 2-Door (2011 Present) Mounting Bracket and Air Line System Kit for ARB On-Board Twin Air Compressor (CKMTA12) Made in the USA Kit Contents: 1 Flat Bracket 1 Formed Bracket
Step 6: Remove and save the MAP sensor for later use. Step 7: Remove the passenger side intercooler pipe and the EGR intake manifold.
 LBZ Twin kit Install Step 1: Disconnect both batteries. Step 2: Drain coolant and oil also remove passenger side inner fender. Step 3: Remove intake box and piping. (Remove and save the MAF sensor in the
Mishimoto Performance Aluminum Mustang Radiator - Manual - (94-95 GT/Cobra/V6) - Installation Instructions
 - Installation Instructions") Mishimoto Performance Aluminum Mustang Radiator - Manual - (94-95 GT/Cobra/V6) - Installation Instructions The below installation instructions work for the following products: Mishimoto Performance Aluminum
Mishimoto Performance Aluminum Mustang Radiator - Manual - (94-95 GT/Cobra/V6) - Installation Instructions The below installation instructions work for the following products: Mishimoto Performance Aluminum
Stratified Aux fuel system ecoboost 2.0
 Stratified Aux fuel system ecoboost 2.0 Additional Fuel Injection System Installation and User Guide Stratified Aux Fuel System Installation and User Guide -1-0204-0021.1 Thank you and congratulations
N63TU Upgrade Intercooler Installation Instructions
 N63TU Upgrade Intercooler Installation Instructions Part Number: D330-0017 Applications: 2014 F10 550i & xdrive 2013-14 F12/F13 650i & xdrive 2013-14 F06 650i & xdrive Gran Coupe 2013-14 F01/F02 750i/Li
INSTALLATION INSTRUCTIONS AIR/OIL SEPARATOR KIT
 INSTALLATION INSTRUCTIONS AIR/OIL SEPARATOR KIT 2015+ SUBARU WRX (LHD ONLY) Document: 19-0136 Support: info@radiumauto.com This document covers the installation of the Radium brake master cylinder brace
Installation Instructions
 Installation Instructions Transverse K04 Tools Required Jack and jack stands Drain pan for coolant and oil 3" and 6" extensions Channel locks 7mm, 8mm, 10mm, 11mm, 12mm, 13mm, and 16mm sockets Oxygen sensor
03-04 Mach 1. Hellion Power Systems Mach 1 Kit Instructions
 Hellion Power Systems 03-04 Mach 1 Kit Instructions Part 1 Hellion recommends that the front suspension system be installed either by trained professionals or by 5.Remove rack bolts K-Member Installation
Disconnect the APP sensor harness connector. See Fig. 4. Remove the accelerator pedal mounting nuts. Remove the APP assembly.
 ENGINE CONTROLS - REMOVAL, OVERHAUL & INSTALLATION - 6.6L DIESEL... Page 1 of 41 FUEL SYSTEMS ACCELERATOR PEDAL POSITION SENSOR Removal & Installation Disconnect the APP sensor harness connector. See Fig.
2015 WRX Engine Oil Cooler
 2015 WRX Engine Oil Cooler 2014-04-24 Thank you for purchasing this PERRIN product for your car! Installation of this product should only be performed by persons experienced with installation of aftermarket
Rotated Tuner Kit for Garrett GT Turbos
 Rotated Tuner Kit for Garrett GT Turbos 031411 Thank you for purchasing the PERRIN performance rotated turbo kit. Installation of this turbo should only be performed by persons experienced in the installation
2016+ NISSAN TITAN XD
 PARTS LIST AND PARTS INCLUDED 1PC MISHIMOTO INTERCOOLER 2PC SILICONE BOOTS WITH DURACORE TECHNOLOGY 4PC CONSTANT-TENSION T-BOLT CLAMPS 2PC ALUMINUM SPACERS MOUNTING HARDWARE CAUTION Never work on the cooling
Included parts: 1 - New Bosch CP3 Pump 1 - HSM Pulley 1 - Serpentine Belt 1 - Pump Bracket/ Hardware STEP 1
 TROUBLESHOOTING: Please read and understand all installation instructions before proceeding with the installation. If you have questions during the installation of this product, please contact H&S Motorsports
Performance Inlet Manifold
 Performance Inlet Manifold Tools needed (some tools not required on some models): 13mm Combination Wrench Flat Blade Screwdriver T30 Torx Driver T25 Torx Driver 10mm Combination Wrench and/or Socket with
OIL COOLER KIT INSTALLATION INSTRUCTIONS PART NUMBER D E92 335i/xi (N55 engine) with M-Technic bumper and without stock oil cooler
 with M-Technic bumper and without stock oil cooler") OIL COOLER KIT INSTALLATION INSTRUCTIONS PART NUMBER D570-0925 APPLICATION 2011-12 E92 335i/xi (N55 engine) with M-Technic bumper and without stock oil cooler Congratulations for being selective enough
OIL COOLER KIT INSTALLATION INSTRUCTIONS PART NUMBER D570-0925 APPLICATION 2011-12 E92 335i/xi (N55 engine) with M-Technic bumper and without stock oil cooler Congratulations for being selective enough
Subaru Front Mount Intercooler Kit STI Subaru Front Mount Intercooler Kit STI
 Subaru Front Mount Intercooler Kit STI 2008-2014 715500 Subaru Front Mount Intercooler Kit STI 2008-2014 Congratulations on your purchase of the Subaru Front Mount Intercooler Kit STI 2008-2014. The following
INSTALLATION INSTRUCTIONS BILLET FUEL RAIL KIT
 INSTALLATION INSTRUCTIONS BILLET FUEL RAIL KIT MITSUBISHI LANCER EVOLUTION X Document# 19-0067 Support: info@radiumauto.com WARNING: DON'T SMOKE OR WORK WITH OPEN SPARKS WHILE WORKING ON THE FUEL SYSTEM
BRZ/FR-S 3.00 Cold Air Intake
 BRZ/FR-S 3.00 Cold Air Intake Thank you for purchasing this PERRIN product for your car! Installation of this product should only be performed by persons experienced with installation of aftermarket performance
3 October 2016 PN# V Dodge Twin Turbo Kit (I-00274) ½ D o d g e 2 4 v I S B
 ½ D o d g e 2 4 v I S B") 3 October 2016 PN#1045320 24V Dodge Twin Turbo Kit (I-00274) 1 DOWNLOAD ENHANCED INSTALL MANUALS AT dieselperformance.com BD Twin Turbo Kit 1998½- 2 0 0 2 D o d g e 2 4 v I S B Part# 1045320 PLEASE READ
3 October 2016 PN#1045320 24V Dodge Twin Turbo Kit (I-00274) 1 DOWNLOAD ENHANCED INSTALL MANUALS AT dieselperformance.com BD Twin Turbo Kit 1998½- 2 0 0 2 D o d g e 2 4 v I S B Part# 1045320 PLEASE READ
Ford Racing Performance Improvement Intake Manifold (96-04 GT) Time Necessary: Approximately 4 hours
 Time Necessary: Approximately 4 hours") Ford Racing Performance Improvement Intake Manifold (96-04 GT) Time Necessary: Approximately 4 hours Tools Required: Ratchet and socket set Torque wrench Large adjustable wrench Needle nose pliers A dozen
Ford Racing Performance Improvement Intake Manifold (96-04 GT) Time Necessary: Approximately 4 hours Tools Required: Ratchet and socket set Torque wrench Large adjustable wrench Needle nose pliers A dozen
OIL COOLER KIT CHEVY CAMARO 2.0T PARTS LIST AND INSTALLATION GUIDE INSTALL DIFFICULTY DISCLAIMER CAUTION TOOLS NEEDED NOTE INSTALL PROCEDURE
 PARTS LIST AND PARTS INCLUDED 3PC APPLICATION-SPECIFIC MOUNTING BRACKETS 1PC HORN RELOCATION MOUNTING BRACKET 1PC 25-ROW OIL COOLER (SLEEK SILVER OR STEALTH BLACK) 1PC 4'4" STAINLESS STEEL BRAIDED HOSE
Engine Removal/Installation
 Engine Removal/Installation Make sure jacks and safety stands are placed properly and hoist brackets are attached to correct positions on the engine. (See Section 1). Apply parking brake and block rear
Stratified Aux fuel system ecoboost 2.0/2.3
 Stratified Aux fuel system ecoboost 2.0/2.3 4-Port Fuel Injection System Installation and User Guide Stratified 4-Port Aux Fuel System Installation and User Guide -1-0204-0024.1 Thank you and congratulations
INSTALLATION INSTRUCTIONS CATCH CAN KIT
 INSTALLATION INSTRUCTIONS CATCH CAN KIT FORD FOCUS Document: 19-0150 Support: info@radiumauto.com STEPS 1-19 COVER THE PCV SIDE CATCH CAN KIT (P/N: 20-0315) STEPS 20-32 COVER THE CRANKCASE CATCH CAN KIT
96-04 tt. Hellion Power Systems Mustang Twin Turbo Kit Instructions
 96-04 tt Hellion Power Systems 1996-2004 Mustang Twin Turbo Kit Instructions 1. Disconnect battery and elevate front end of car on either Jack stands or a lift if available 2.Lock steering wheel and remove
Installation Instructions for: TOYOTA 4.5L SUPERCHARGER SYSTEM
 Installation Instructions for: TOYOTA 4.5L SUPERCHARGER SYSTEM 1995-1997 Land Cruiser * PREMIUM FUEL REQUIRED * Magnuson Products LLC 1990 Knoll Drive, Bldg A, Ventura, CA 93003 (805) 642-8833 phone *
99-04 GT. Hellion Power Systems Mustang GT Kit Instructions
 Hellion Power Systems 99-04 Mustang GT Kit Instructions Part 1 Hellion recommends that the front suspension system be installed either by trained professionals or by 5.Remove rack bolts K-Member Installation
INSTALL MANUAL D o d g e 1 2 v 6 B T A PLEASE READ ALL INSTRUCTIONS BEFORE INSTALLATION.
 PN#1045310 12V Dodge Twin Turbo Kit (I-00273) 1 INSTALL MANUAL BD Twin Turbo Kit 1994-1 9 9 8 D o d g e 1 2 v 6 B T A Part# 1045310 PLEASE READ ALL INSTRUCTIONS BEFORE INSTALLATION. * Picture as shown
JBR MAZDASPEED
 Page1 james Barone Racing Aftermarket Parts and Accessories JBR 2007 2009 MAZDASPEED 3 Front Mount Intercooler Piping Kit Installation Instructions for TR8 Intercooler Tooling: o Jack, Jack Stands, Ramps
EXPANSION TANK PARTS LIST AND INSTALLATION GUIDE
 PARTS LIST AND INSTALLATION GUIDE PARTS LIST 2 PC APPLICATION-SPECIFIC MOUNTING BRACKETS 2 PC BLACK, ANODIZED 6061 ALUMINUM CATCH CANS 4 PC SILICONE HOSES 4 PC PLASTIC BARBED FITTINGS 4 PC WORM-GEAR CLAMPS
Included parts: 1 - BorgWarner SX-E Turbocharger 1 - SX-E 90-Degree Compressor Outlet Elbow 1 - HSM Cast Exhaust Manifold 1 - HSM Downpipe
 TROUBLESHOOTING: Please read and understand all installation instructions before proceeding with the installation. If you have questions during the installation of this product, please email H&S Motorsports
Instant Chat off the main page of Or simply call our tech team at
 02-07 WRX/STI Air Oil Separator for Top Mounted Intercooler Setups 2013-02- 27 Thank you for purchasing this PERRIN product for your car! Installation of this product should only be performed by persons
Installation Manual v1.0: Aurora Plus Turbo Kit ( ) 5.9L Dodge. Please read all instructions before installation.
 5.9L Dodge. Please read all instructions before installation.") Installation Manual v1.0: Aurora Plus - 4000 Turbo Kit (2003-2007) 5.9L Dodge Please read all instructions before installation. Figure 1: Aurora Plus - 4000 Kit Contents 1 Figure 2: Aurora Plus Hardware
Installation Manual v1.0: Aurora Plus - 4000 Turbo Kit (2003-2007) 5.9L Dodge Please read all instructions before installation. Figure 1: Aurora Plus - 4000 Kit Contents 1 Figure 2: Aurora Plus Hardware
Installation manual BMW E TS1/TS2
 Installation manual BMW E46 330 TS1/TS2 Technical support Europe: +4741558555 Technical support USA: (858)314-2954 Email support: support@esstuning Installation manual BMW E46 330 TS1/TS2 Remove and send
2015+ SUBARU STI FRONT-MOUNT INTERCOOLER PARTS LIST AND INSTALLATION GUIDE INSTALL DIFFICULTY DISCLAIMER CAUTION INSTALL PROCEDURE TOOLS NEEDED
 PARTS LIST AND PARTS INCLUDED 1PC ALUMINUM INTAKE PIPE 1PC BAR-AND-PLATE INTERCOOLER 1PC STEEL CRASH BAR W/ MOUNTING HARDWARE 2PC HOT-SIDE INTERCOOLER PIPES 2PC COLD-SIDE INTERCOOLER PIPES 1PC BPV FLANGE
INSTALLATION INSTRUCTIONS
 COLD AIR INTAKE INSTALLATION INSTRUCTIONS PART NUMBER D760-0390C APPLICATION: 1999-2003 E39 M5 PARTS LIST 1 Left Aluminum Intake Tube 1 Air Pump Bracket (A) 1 Right Aluminum Intake Tube 1 Air Pump Bracket
Flex Fuel Bluetooth Kit WRX install instructions
 Delicious Tuning 1948 Don Lee Place Suite #7 Escondido, CA 92029 408-480-0995 BJP Rev: 1.0 Date: 10/1/15 FFBT parts: (1) Ethanol Content Analyzer Module (1) Ethanol Content Analyzer Sensor (1) Sensor Bracket
Powerstroke EGR Delete A B C
 20-203 6.7 Powerstroke EGR Delete A B C D E F G H I J K Part # A B C D E F G H I J K PACKING LIST: QTY. 3 5 2 Description Sensor Bracket Exhaust Blockoff Plate Straights Barbed Brass Fitting 39 5/8 Coolant
Cut zip ties and remove 2 plastic wiring harness brackets.
 TROUBLESHOOTING: Please read and understand all installation instructions before proceeding with the installation. Included parts: 1 - New Bosch Cp3 Pump 1 - HSM Pulley 1 - Serpentine Belt 1 - Pump Bracket/
VR6 Supercharger System Golf III and Jetta III VR6 Installation Manual Model Year
 VR6 Supercharger System Golf III and Jetta III VR6 Installation Manual Model Year 1994-1999.5 Date 10/28/00 Page 1 Index 1.0 Parts List 1.1 Required Tools 1.2 Required Standard Parts 1.3 Required Misc.
INSTALLATION INSTRUCTIONS CATCH CAN KIT
 INSTALLATION INSTRUCTIONS CATCH CAN KIT FORD FOCUS Document: 19-0150 Support: info@radiumauto.com STEPS 1 TO 19 COVER THE PCV SIDE CATCH CAN KIT (P/N: 20-0315) STEPS 20-32 COVER THE CRANKCASE CATCH CAN
Important information about your new a/c system. Please read the following directions prior to installing this a/c system.
 PAGE 1 Important information about your new a/c system. Please read the following directions prior to installing this a/c system. PN s: CK-7586258, CK-758642, CK-7586304, CK7586SBC, CK-7486NC Jeep CJ Series
1997 Volvo 850 GLT. Fig. 2: Removing Drive Shaft, Engine Mount Bolt & Torque Arm (5-Cylinder) Courtesy of VOLVO CARS OF NORTH AMERICA.
 Courtesy of VOLVO CARS OF NORTH AMERICA.") Fig. 2: Removing Drive Shaft, Engine Mount Bolt & Torque Arm (5-Cylinder) 4. Remove front exhaust pipe nuts and springs. Remove front exhaust pipe bolts. Disconnect speedometer. Remove engine mounting
Fig. 2: Removing Drive Shaft, Engine Mount Bolt & Torque Arm (5-Cylinder) 4. Remove front exhaust pipe nuts and springs. Remove front exhaust pipe bolts. Disconnect speedometer. Remove engine mounting
BEW engine timing belt replacement procedure from MOGolf (as demonstrated on a 2004 Jetta).
.") BEW engine timing belt replacement procedure from MOGolf (as demonstrated on a 2004 Jetta). Based on the procedure published by Volkswagen, but modified for the "average" shadetree mechanic. Some special
BEW engine timing belt replacement procedure from MOGolf (as demonstrated on a 2004 Jetta). Based on the procedure published by Volkswagen, but modified for the "average" shadetree mechanic. Some special
18SP680Rev3 EPA04 MBE 4000 Car Hauler Low Pressure Fuel Lines
 8SP680Rev3 EPA04 MBE 4000 Car Hauler Low Pressure Fuel Lines KIT DESCRIPTION These service kits include all necessary parts to replace the low pressure fuel lines between the fuel filter housing and fuel
OIL COOLER KIT INSTALLATION INSTRUCTIONS PART NUMBER D
 OIL COOLER KIT INSTALLATION INSTRUCTIONS PART NUMBER D570-0907 APPLICATION: 2011-12 E90 335i/xi (N55 engine) with BMW M-Technic bumper and without stock oil cooler Congratulations for being selective enough
IAG Air / Oil Separator (AOS) For STi
 For STi") IAG Air / Oil Separator (AOS) For 2008-14 STi Part# IAG-ENG-7000 Tools Required: Ratchet, torque wrench, extensions, needle nose pliers, hose cutter, snips/scissors Sockets: 10mm, 12mm 13mm Wrenches: 10mm,
IAG Air / Oil Separator (AOS) For 2008-14 STi Part# IAG-ENG-7000 Tools Required: Ratchet, torque wrench, extensions, needle nose pliers, hose cutter, snips/scissors Sockets: 10mm, 12mm 13mm Wrenches: 10mm,
Turner M50 Manifold Adapter Install. April 26, 2012
 April 26, 2012 Models: 1996-99 E36 328i/M3; 1997-98 E39 528i, 1997-98 Z3 2.8, 1998-2000 MZ3 S52 Product(s): Turner M50 Manifold Adapter Kit Subject: Installation Guidelines and Tips This guide will aid
DODGE OFF ROAD T-STYLE STEERING KIT INSTALLATION INSTRUCTIONS
 Dodge Off Road, LLC Specializing in Dodge Ram Solid-Axle 4x4 Suspension and Steering for Off Road Applications 855.9009.DOR sales@dodgeoffroad.com dodgeoffroad.com DODGE OFF ROAD T-STYLE STEERING KIT INSTALLATION
HPFP DIY. Warning: The injector fuel lines, the rail, and the HPFP are pressurized long after you turn off the car, I recommend
 HPFP DIY Warning: The injector fuel lines, the rail, and the HPFP are pressurized long after you turn off the car, I recommend disconnecting the battery and letting the car sit over night before performing
03-04 Cobra. Hellion Power Systems Mustang Cobra Kit Instructions
 Hellion Power Systems 03-04 Mustang Cobra Kit Instructions NECESSARY PARTS REQUIRED FOR INSTALLATION Necessary: 03-04 Cobra hellion Kit ONLY 99-01 Alternator #YR3210346AA Alternator Bracket #XR3Z-10153-AB
4.0L XJ Supercharger install instructions
 4.0L 1996-2001 XJ Supercharger install instructions Preinstall 1) Tuning is required when using a pulley smaller than 3.00. An AFR gauge is recommended when tuning the fuel map. We are happy to assist
8 Zip Tie Zip Tie 1 Union Fitting 1 ½ ½ Union Reducer Fitting Union 1 5/8 ½ (For Plastic Intake Manifold Vehicles)
") P IAG Street Series Air / Oil Separator (AOS) For 2017 STI Part# IAG-ENG-7151 Tools Required: Ratchet, torque wrench, extensions, needle nose pliers, hose cutter, snips/scissors, flat head screw driver,
P IAG Street Series Air / Oil Separator (AOS) For 2017 STI Part# IAG-ENG-7151 Tools Required: Ratchet, torque wrench, extensions, needle nose pliers, hose cutter, snips/scissors, flat head screw driver,
INSTALLATION INSTRUCTIONS
 INSTALLATION INSTRUCTIONS FUEL SURGE TANK INSTALLATION KIT 1999-2006 BMW E46 COUPE Document# 19-0056 Support: info@radiumauto.com Note: This kit was designed for a standard single pump Radium Engineering
Polaris Axys Sidekick Installation Instructions
 2016-2017 Polaris Axys Sidekick Installation Instructions 1. Remove hood and side panels. 2. Remove fasteners and slide console back. 3. Remove belt and driven clutch. 4. Remove clutch cover/ oil-tank
IAG Competition Series Air / Oil Separator (AOS) For 2017 STI
 For 2017 STI") P IAG Competition Series Air / Oil Separator (AOS) For 2017 STI Part# IAG-ENG-7251 Tools Required: Ratchet, torque wrench, extensions, needle nose pliers, hose cutter, snips/scissors, flat head screw driver,
P IAG Competition Series Air / Oil Separator (AOS) For 2017 STI Part# IAG-ENG-7251 Tools Required: Ratchet, torque wrench, extensions, needle nose pliers, hose cutter, snips/scissors, flat head screw driver,
Included parts: 1 - New Bosch CP3 Pump 1 - HSM Pulley 1 - Serpentine Belt 1 - Pump Brackets/Hardware
 TROUBLESHOOTING: Please read and understand all installation instructions before proceeding with the installation. If you have questions during the installation of this product, please email H&S Motorsports
Scion FR-S ZN6. GTX2867R Gen2 (Internal Wastegate) Installation Instructions GPP P/N #
 Installation Instructions GPP P/N #") TURBO KIT Scion FR-S ZN6 Subaru BRZ ZC6 GTX2867R Gen2 (Internal Wastegate) Installation Instructions GPP P/N # 11518000 Vehicle Type Chassis Code Engine Code Transmission Model Year Scion FR-S DBA-ZN6
TURBO KIT Scion FR-S ZN6 Subaru BRZ ZC6 GTX2867R Gen2 (Internal Wastegate) Installation Instructions GPP P/N # 11518000 Vehicle Type Chassis Code Engine Code Transmission Model Year Scion FR-S DBA-ZN6
Thank you for purchasing the Craven Speed FlexPod Complete Gauge Pod Kit For R56, R58, R59, R60 with Refresh Engines (2011+)
") Thank you for purchasing the Craven Speed FlexPod Complete Gauge Pod Kit For R56, R58, R59, R60 with Refresh Engines (2011+) Before You Start Please read instructions completely before installing. These
Thank you for purchasing the Craven Speed FlexPod Complete Gauge Pod Kit For R56, R58, R59, R60 with Refresh Engines (2011+) Before You Start Please read instructions completely before installing. These
Installation Instructions for: TOYOTA 3.4L SUPERCHARGER SYSTEM
 Installation Instructions for: TOYOTA 3.4L SUPERCHARGER SYSTEM 1996-2002 4Runner 1997-1998 T100 1997-2004 Tacoma 2000-2003 Tundra * PREMIUM FUEL REQUIRED * Magnuson Products LLC 1990 Knoll Drive, Bldg
FULL LENGTH HEADERS/ CATTED HEAD PIPES
 INSTALLATION INSTRUCTIONS INS232 2016-2018 CAMARO 6.2L V8 FULL LENGTH HEADERS/ CATTED HEAD PIPES Part #4044 and 40440 Special Tools required: 10mm, 12mm, 13mm, 15mm Socket and Wrenches, Pliers, Saw, Welder
Includes: 1. Upgraded Tube Type EGR Cooler 2. Silicone Hoses
 Includes: 1. Upgraded Tube Type EGR Cooler 2. Silicone Hoses CAUTION: Never work on a hot vehicle. The hot exhaust system or hot engine can cause serious injury in the form of burns. If the vehicle has
Parts List See cover Page
 Thank you for purchasing the CorkSport Front Mount Intercooler Kit for the 2010-2013 Mazdaspeed 3. Keep your BAT s under check with the CorkSport FMIC Kit with the small or large intercooler. Please let
This information covers the proper procedure for replacing the Volvo D16F engine in a VT or VNL chassis.
 Volvo Trucks North America Greensboro, NC USA Engine, Replacement DService Bulletin Trucks Date Group No. Page 10.2007 210 139 1(47) Engine, Replacement Volvo D16F VNL, VT W2005773 This information covers