Installation for Manitowoc Indigo Ice Machines Standard Top-Mount Installation
|
|
|
- Dorthy Knight
- 5 years ago
- Views:
Transcription

1 Installation for Manitowoc Indigo Ice Machines Standard Top-Mount Installation This module will show the steps to install IceZone X on the Manitowoc Indigo Ice Machines. Please watch the entire video prior to installation. Caution: Installation should be done by a qualified technician using appropriate safety equipment and procedures.

2 Pre-Installation Requirements Installation
3 Clean and Sanitize Ice Machine Prior to Installation Follow the manufacturer s guidelines for cleaning the ice machine thoroughly. Before Installing IceZone X, clean the interior of the ice machine thoroughly according to the manufacturer s guidelines. All surfaces should be free of slime and scale before starting the installation.
4 Recommended Tools Hand Drill Phillips Bit Driver 7/8 Step Drill Bit 1 ¾ Hole Saw ¼ Nut Driver Phillips Screwdriver 4ft Ladder Safety Goggles Hose Cutter or Utility Knife 1 ¼ Crescent Wrench Marker to mark hole locations File or knife to de-burr holes

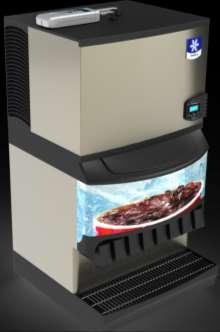
5 This is the Manitowoc Indigo Series ice machine in place above a drink dispenser in a typical restaurant installation. Installation

6 Before working on the ice machine, the ice in the bin must be removed. Turn the ice machine power switch to the off position. Remove the ice shield to allow removal of the ice curtain. Installation

7 Mark the location for the IceZone supply fitting. This is the fitting where the plasma will enter the ice machine. This should be directly over the evaporator and should deliver plasma behind the curtain. Installation
. This hole should be spaced off of the interior wall of the ice machine by 1.5 inches.")
8 Mark the location for the IceZone return fitting. This is the fitting where the plasma will return to the IceZone. This should be located on the left side of the top cover (looking at the front of the ice machine). This hole should be spaced off of the interior wall of the ice machine by 1.5 inches. The hole should be spaced from the front frame of the ice machine by 1.5 inches also. The proper spacing will prevent the return tube from interfering with the ice curtain operation

9 After the hole locations are marked. Remove the plastic ice machine cover and the interior food zone cover (outlined in red). Installation

10 Drill the holes as marked on the interior food zone cover. The final hole diameter should be 1 ¾ for each fitting. After drilling the holes, remove the burrs and smooth the edges with a file. Remove the debris from the cover before reinstalling.


11 Re-install the food zone cover on the ice machine. Place the plastic cover on the ice machine and adjust its position so that it is positioned as it would be during normal operation.

12 Using the holes drilled into the food zone cover, mark the hole locations on the plastic cover. Installation


13 Drill the holes as marked. The final hole diameter should be 1.0 for each fitting.

14 Clean the burrs from the hole edges and prepare to install the fittings. Installation

15 Assemble the supply fitting as shown. This includes a single ended barb fitting, low profile nut and white rubber washer.


16 Install the supply fitting as shown. This includes a second low profile nut and white rubber washer. There should be no exposed threads on the interior surface of the lid per NSF guidelines.

17 Assemble the return fitting as shown. This includes a double ended barb fitting, low profile nut and white rubber washer.


18 Install the supply fitting as shown. This includes a second low profile nut and white rubber washer. There should be no exposed threads on the interior surface of the lid per NSF guidelines.

19 The top side of the lid should be completed as shown. Ensure the fitting nuts are tight and prepare to mount the IceZone unit.


20 Remove the service cover from the IceZone unit. This provides access to the lamp, power input and mounting boss. As the screw is removed from the cover, be sure to keep it with the cover so it is available for re-assembly.


21 Remove the Input/Output cover from the IceZone unit. This provides access to additional mounting bosses. As the screw is removed from the cover, be sure to keep it with the cover so it is available for reassembly. The cover requires a firm pull while rotating towards the top for removal
 Place the 90 degree hose Barbs in place to visualize")
22 Place the IceZone Unit on the lid and layout the routing of the supply and return tubing. The IceZone Unit should be placed in the back right corner of the cover (looking at the front of the ice machine) Place the 90 degree hose Barbs in place to visualize the routing. Observe the flow direction arrows on the IceZone Unit. Return Supply


23 Mark the holes to mount the IceZone Unit on the lid. Use a pen to locate the three mounting holes.

24 Drill the holes to mount the IceZone Unit on the lid. Drill three 1/8 holes.


25 Place the mounting rivets or self drilling screws into the mounting holes. Installation


26 Re-attach the Input/Output cover and secure with the original screw. Installation

27 Cut two 2.5 inch pieces of tubing to connect the supply and return fittings to the 90 degree hose barbs. Installation

28 Assemble the supply and return fittings to the 90 degree hose barbs using the 2.5 inch pieces of tubing. Installer s Tip: Heating the tubing in hot water eases the installation of the tubing onto the fittings.


29 Cut and assemble the remaining supply and return tubing and fittings. There should be 12 of unused tubing. Place the handy clamps (black) on the tubing which is placed over the ports on the IceZone Unit. Installer s Tip: Heating the tubing in hot water eases the installation of the tubing onto the fittings.


30 Tighten the handy clamps with a pliers to secure the tubing on the IceZone unit. Installation


31 Insert the DC plug from the wall adapter through the P shaped hole in the service cover. Plug the DC connector into the IceZone Unit s power input plug.

32 Reinstall the service cover and secure with the original screw. Installation

33 The completed installation on the cover should look like the picture shown. Installation

34 The completed installation on the ice machine should look like the picture shown. Installation

35 The completed installation on the ice machine should look like the picture shown. The supply fitting is located above the curtain and the return fitting is located in front and to the left side of the curtain.

36 Install the remaining 12 inch length of tubing onto the return fitting. Installation

37 Test the movement of the ice curtain to ensure proper operation. The return tube should not prevent the curtain from activating the bin full switch.

38 Replace the ice shield and sanitize this as well before turning the ice machine on and closing the cover. Installation

39 Close the ice machine after turning it on. Plug the IceZone X into a nearby 100VAC outlet that is not swithed off. The IceZone runs 24 hours/day, 7 days per week. Check to make sure the blue light is lit on the top of the IceZone X.

40 When IceZone is connected to power correctly and the the operation is normal a blue light shows on top of the unit. When the red light is steady on top of the IceZone, the lamp needs to be changed. When the red light is flashing on top of the IceZone, the unit requires service.


41 Thank you for purchasing

42 Contact BioZone Scientific Today Phone: Web:
IceZone X Installation Instructions for Hoshizaki DCM-270 Ice and Water Dispensers
 IceZone X Installation Instructions for Hoshizaki DCM-270 Ice and Water Dispensers This module will show the steps to install IceZone X on Hoshizaki DCM-270 Ice and Water Dispensers. Please review the
IceZone -X Installation Instructions for Scotsman HID312 Meridian Ice and Water Dispensers
 IceZone -X Installation Instructions for Scotsman HID312 Meridian Ice and Water Dispensers This module will show the steps to install IceZone -X on Scotsman HID312 Meridian Ice and Water Dispensers. Please
INSTALLATION INSTRUCTIONS
 INSTALLATION INSTRUCTIONS Accessory Application CR-V Publications No. AII 32953-34081 Issue Date NOV 2006 PARTS LIST 2 Corner sensor clips Backup Sensor Attachment Kit P/N 08V67-SWA-100A Back-up sensor
 INSTALLATION INSTRUCTIONS Accessory Application Publications No. AII 38143-40201 S 2008 ODYSSEY Issue Date AUG 2008 PARTS LIST Backup Sensor Attachment Kit P/N 08V67-SHJ-100B Backup sensor control unit
INSTALLATION INSTRUCTIONS
 INSTALLATION INSTRUCTIONS Accessory Application Publications No. AII 26320 ATTACHMENT KIT 2004 S2000 Issue Date OCT 2003 PARTS LIST CD Changer Attachment Kit: P/N 08B26-S2A-100A Plain washer Template CD
INSTALLATION INSTRUCTIONS
 INSTALLATION INSTRUCTIONS Accessory Application Publications No. AII 27336 ODYSSEY Issue Date SEP 2004 PARTS LIST 15 Black wire ties Backup Sensor Attachment Kit P/N 08V67-SHJ-100A Backup sensor control
INSTALLATION INSTRUCTIONS
 INSTALLATION INSTRUCTIONS Accessory Application Publications No. BII 37518 2008 RDX Issue Date JUL 2007 PARTS LIST 10 Plain washers, 12 mm Trailer Hitch Kit P/N 08L92-STK-200 Trailer hitch 6 Lock washers,
INSTALLATION INSTRUCTIONS
 INSTALLATION INSTRUCTIONS Accessory P/N 08U89-TK6-111 Application 2012 FIT Publications No. AII 45981 Issue Date AUG 2011 PARTS LIST Armrest console Armrest cover Bolt cover Floor bracket Washer bolt,
INSTALLATION INSTRUCTIONS
 INSTALLATION INSTRUCTIONS Accessory Application Publications No. AII 33373 ATTACHMENT KIT (TRUNK MOUNT) 2007 S2000 Issue Date AUG 2006 PARTS LIST Plain washer CD Changer Attachment Kit: P/N 08B26-S2A-100A
PRELIMINARY INSTALLATION INSTRUCTIONS. PARTS LIST Security System Kit (sold separately) P/N 08E51-EP4-101
 P/N 08E51-EP4-101") INSTALLATION INSTRUCTIONS Accessory Application Publications No. All 30510 (LX) 2006 PILOT Issue Date SEP 2005 PARTS LIST Security System Kit (sold separately) P/N 08E51-EP4-101 Security system control
INSTALLATION INSTRUCTIONS Accessory Application Publications No. All 30510 (LX) 2006 PILOT Issue Date SEP 2005 PARTS LIST Security System Kit (sold separately) P/N 08E51-EP4-101 Security system control
INSTALLATION INSTRUCTIONS
 INSTALLATION INSTRUCTIONS Accessory Application Publications No. AII 40454 XM SATELLITE RADIO 2009 S2000 Issue Date AUG 2008 PARTS LIST Template XM Radio Unit Kit (sold separately): P/N 08A53-S2A-101 XM
INSTALLATION INSTRUCTIONS
 INSTALLATION INSTRUCTIONS Honda Dealer: Please give a copy of these instructions to your customer. PARTS LIST (15) (8) (12) (14) (13) (10) (11) (18) (17) (1) Accessory Application Publications No. TRX500FA/FGA
INSTALLATION INSTRUCTIONS
 INSTALLATION INSTRUCTIONS Accessory Application 2012 CIVIC 4-DOOR Publications No. AII 45625-46263 Issue Date MAY 2011 PARTS LIST Trunk spoiler Left trunk spring (marked yellow) Template 4 Clip grommets
INSTALLATION INSTRUCTIONS
 INSTALLATION INSTRUCTIONS Accessory Application Publications No. BII 39890 2009 MDX Issue Date JULY 2008 PARTS LIST Backup Sensor Attachment Kit P/N 08V67-STX-200A Self-tapping screw, 5 x 16 mm 12 Wire
INSTALLATION INSTRUCTIONS
 INSTALLATION INSTRUCTIONS Accessory Application 2010 RDX Publications No. BII 41807 Issue Date JULY 2009 PARTS LIST 2 Bolts, 12 x 40 mm Trailer Hitch Kit P/N 08L92-STK-200A Trailer hitch Hitch pin Ball
INSTALLATION INSTRUCTIONS
 INSTALLATION INSTRUCTIONS Accessory Application Publications No. SYSTEM 2005 ACCORD All 27511 (DX, LX) 2-AND 4-DOOR Issue Date AUG 2004 PARTS LIST Security System Attachment (LX): P/N 08E55-SDA-100A Unit
INSTALLATION INSTRUCTIONS
 INSTALLATION INSTRUCTIONS Accessory TRAILER HITCH Application 2014 ODYSSEY Publications No. AII 49544 Issue Date JUNE 2013 PARTS LIST Bumper edge trim Trailer Hitch Kit P/N 08L92-TK8-100 Trailer hitch
INSTALLATION INSTRUCTIONS
 INSTALLATION INSTRUCTIONS Accessory Application Publications No. AII 38137-38714 Accessory HandsFreeLink 2008 ODYSSEY Issue Date JAN 2008 PARTS LIST Attachment Kit P/N 08E02-SHJ-100B trim Fuse label Fuse
INSTALLATION INSTRUCTIONS
 INSTALLATION INSTRUCTIONS Accessory Application Publications No. AII 25876 2004 PILOT (LX only) Issue Date AUG 2003 The subwoofer cannot be installed on a vehicle equipped with a navigation unit. Subwoofer
INSTALLATION INSTRUCTIONS
 INSTALLATION INSTRUCTIONS Accessory S P/N 08E10-T2A-100A Application 2013 ACCORD 4-DOOR Publications No. AII 13002 Issue Date SEP 2012 PARTS LIST 2 Self-tapping screws, 5 x 16 mm bracket 2 Self-tapping
Toyota Prius Interior Light Upgrade
 Toyota Prius 2012- Interior Light Upgrade Part Number 00016-00095 Accesory Code: IL2 Conflicts Kit Contents Item # Quantity Reqd. Description 1 1 Y Adapter 2 1 Wire harness 3 1 Hardware Kit 4 2 White Light
INSTALLATION INSTRUCTIONS
 INSTALLATION INSTRUCTIONS Accessory LOWER P/N 08P46-SZA-100A Application 2011 PILOT Publications No. AII 43325-45001 Issue Date SEP 2010 PARTS LIST Rear lower trim 2 Washer-nuts 2 Special bolts TOOLS AND
INSTALLATION INSTRUCTIONS
 INSTALLATION INSTRUCTIONS Accessory Application Publications No. Bll 30250 UNDER SPOILER 2006 RSX Issue Date JULY 2005 PARTS LIST Rear under spoiler 5 Stepped bolts 2 Bolts 7 Flange nuts, 6 mm 3 Square
INSTALLATION INSTRUCTIONS
 INSTALLATION INSTRUCTIONS Accessory S Application 2010 ODYSSEY Publications No. AII 41818 Issue Date JUNE 2009 PARTS LIST Right center sensor clip (Black) Backup Sensor Attachment Kit P/N 08V67-SHJ-101C
INSTALLATION INSTRUCTIONS
 INSTALLATION INSTRUCTIONS Accessory (WITH TEMPLATE) Application 2010 TL Publications No. BII 42533-44799 Issue Date AUG 2010 PARTS LIST Right rear under spoiler 4 Self-tapping screws 10 Seals Left rear
INSTALLATION INSTRUCTIONS
 INSTALLATION INSTRUCTIONS Accessory Application 2011 RDX Publications No. BII 43544 Issue Date JULY 2010 PARTS LIST 2 Bolts, 12 x 40 mm Trailer Hitch Kit P/N 08L92-STK-200A Trailer hitch Hitch pin Hitch
INSTALLATION INSTRUCTIONS
 INSTALLATION INSTRUCTIONS Accessory Application 2015 CR-Z Publications No. VERSION 1 Issue Date SEP 2014 PARTS LIST Armrest console Armrest bracket 2 Collars 4 Washer-bolts 2 Caps TOOLS AND SUPPLIES REQUIRED
TOYOTA YARIS HATCHBACK INTERIOR LIGHT UPGRADE Preparation
 Preparation Part Number PTS21-52062-08 NOTE: Part number of this accessory may not be the same as the part number show Kit Contents Item # Quantity Reqd. Description 1 1 12 Light Guide 2 1 7 Light Guide
INSTALLATION INSTRUCTIONS
 INSTALLATION INSTRUCTIONS Accessory P/N 08E10-TA0-110A Application 2012 ACCORD 2- AND 4-DOOR Publications No. AII 46501 Issue Date AUG 2011 PARTS LIST Ambient Light Kit Fuse label 2 Ambient lights Washer
INSTALLATION INSTRUCTIONS
 INSTALLATION INSTRUCTIONS Accessory TRAILER HITCH Application 201 CR-V Publications No. Issue Date PARTS LIST Trailer Hitch Kit P/N 08L92-T0A-100 Hex nut, 12 mm Trailer hitch Hitch pin Hitch pin clip Ball
INSTALLATION INSTRUCTIONS
 INSTALLATION INSTRUCTIONS Accessory Application Publications No. All 12035 SYSTEM 2012 RIDGELINE Issue Date NOV 2011 PARTS LIST Security System Attachment Kit: P/N 08E55-SJC-101 Flange bolt Unit bracket
INSTALLATION INSTRUCTIONS
 INSTALLATION INSTRUCTIONS Accessory S P/N 08E10-TK6-100 Application 2013 FIT Publications No. AII 13198 Issue Date JULY 2012 PARTS LIST Ambient light kit 2 Ambient lights 6 Wire ties Fuse label 2 Grommets
SCION FR-S FOG LIGHTS
 Part #: PT413-18130 Conflicts: Lowering Springs PTR07-18130-LL (California only) Kit Contents: For Anniversary Edition, Monogram & RS 2.0 vehicles, additional parts need to be ordered (PT413-18130-LL)
INSTALLATION INSTRUCTIONS
 INSTALLATION INSTRUCTIONS Accessory Application Publications No. AII 44415 2011 CIVIC 4-DOOR Issue Date AUG 2010 PARTS LIST Trunk spoiler 2 Cap nuts 2 Screws Left trunk spring (marked yellow) Right trunk
INSTALLATION INSTRUCTIONS
 INSTALLATION INSTRUCTIONS Accessory TRAILER HITCH Application 2011 ODYSSEY Publications No. AII 43937 Issue Date SEP 2010 PARTS LIST Trailer Hitch Kit P/N 08L92-TK8-100 Trailer Hitch Harness Kit P/N 08L91-TK8-100
 INSTALLATION INSTRUCTIONS Accessory Application Publications No. 2009 CIVIC HYBRID All 40191 Issue Date AUG 2008 PARTS LIST Rear under spoiler 2 Step bolts 4 Self-tapping screws TOOLS REQUIRED Phillips
INSTALLATION INSTRUCTIONS
 INSTALLATION INSTRUCTIONS Accessory TRAILER HITCH Application 2012 CR-V Publications No. AII 12095 Issue Date DEC 2011 PARTS LIST Trailer Hitch Kit P/N 08L92-T0A-100 Hex nut, 12 mm Trailer hitch Hitch
INSTALLATION INSTRUCTIONS
 INSTALLATION INSTRUCTIONS Accessory Application Publications No. SPOILER (DECK LID) ACCORD 4-DOOR AII 24063 Issue Date AUG 2002 PARTS LIST Trunk spoiler Right trunk spring (marked green) Left trunk spring
INSTALLATION INSTRUCTIONS
 INSTALLATION INSTRUCTIONS Accessory BACKUP S Application 2012 ODYSSEY Publications No. AII 46724 Issue Date SEP 2011 PARTS LIST Backup Sensor Attachment Kit P/N 08V67-TK8-100A Right center sensor clip
INSTALLATION INSTRUCTIONS
 INSTALLATION INSTRUCTIONS Accessory P/N 08L92-TX4-200 Application 2013 RDX Publications No. BII 13467 Issue Date MAR 2012 PARTS LIST 4 Nuts, Trailer hitch 10 Plain washers, Ball mount 6 Spring washers,
INSTALLATION INSTRUCTIONS
 INSTALLATION INSTRUCTIONS Accessory HITCH Application 2009 CR-V Publications No. AII 40373 Issue Date AUG 2008 PARTS LIST Plain washer, 12 mm Trailer Hitch Kit P/N 08L92-SWA-100 Trailer hitch 6 Spring
INSTALLATION INSTRUCTIONS
 INSTALLATION INSTRUCTIONS Accessory Application Publications No. SPOILER (LOW) 2011 CIVIC 4-DOOR All 44416 Issue Date AUG 2010 PARTS LIST Trunk spoiler Right trunk spring (marked red) Left trunk spring
 INSTALLATION INSTRUCTIONS Accessory ACCESSORY HANDSFREELINK Application 2010 CR-V Publications No. AII 42587 Issue Date AUG 2009 PARTS LIST HFL Attachment Kit P/N 08E02-SWA-130 (Ivory) P/N 08E02-SWA-170
LGT-312L E-Z-Go TXT Light Bar Bumper Kit Installation Instructions
 LGT-312L E-Z-Go TXT 2014+ Light Bar Bumper Kit Installation Instructions Caution: Please read through the instructions carefully. Before starting this project, remove the system s positive and negative
INSTALLATION INSTRUCTIONS
 INSTALLATION INSTRUCTIONS Accessory Application Publications No. AII 24307 SYSTEM 2003 ELEMENT Issue Date DEC 2002 NOTE: An optional keyless entry system (sold seperately) must be installed before you
INSTALLATION INSTRUCTIONS
 INSTALLATION INSTRUCTIONS Accessory Application Publications No. All 30482 S 2006 PILOT Issue Date P/N 08F23-S9V-100A SEP 2005 PARTS LIST Left front trim piece Right front trim piece Left rear trim piece
PRELIMINARY INSTALLATION INSTRUCTIONS. PARTS LIST Left front trim piece
 INSTALLATION INSTRUCTIONS Accessory Application Publications No. All 30482 S 2006 PILOT Issue Date P/N 08F23-S9V-100A SEP 2005 PARTS LIST Left front trim piece Right front trim piece Left rear trim piece
INSTALLATION INSTRUCTIONS
 INSTALLATION INSTRUCTIONS Accessory USB ADAPTER Application 2014 INSIGHT Publications No. AII 50655 Issue Date OCT 2013 PARTS LIST USB Adapter Attachment Kit P/N 08B28-TM8-100A 6 mm Flange nut Control
INSTALLATION INSTRUCTIONS
 INSTALLATION INSTRUCTIONS Accessory Application Publications No. AII 26042-26353 XM INTERFACE ODYSSEY EXCEPT EX-L WITH NAVI/RES Issue Date FEB 2004 PARTS LIST 8 Wire ties XM Radio Attachment P/N 08B15-S0X-100
INSTALLATION INSTRUCTIONS
 INSTALLATION INSTRUCTIONS Accessory TRAILER HITCH Application 2012 ODYSSEY Publications No. AII 46755 Issue Date SEP 2011 PARTS LIST Trailer Hitch Kit P/N 08L92-TK8-100 Trailer Hitch Harness Kit P/N 08L91-TK8-100
INSTALLATION INSTRUCTIONS
 INSTALLATION INSTRUCTIONS Accessory Application Publications No. SPOILER (LOW) ACCORD 4-DOOR AII 30276 Issue Date AUG 2005 PARTS LIST Trunk spoiler Right trunk spring (marked green) Left trunk spring (marked
INSTALLATION INSTRUCTIONS
 INSTALLATION INSTRUCTIONS Accessory S P/N 08L02-SZA-100A Application 2012 PILOT Publications No. AII 46396 Issue Date AUG 2011 PARTS LIST Left roof rail Right roof rail Left front roof rail cover TOOLS
PD15-UL-M KIT INSTRUCTIONS
 PD5-UL-M KIT INSTRUCTIONS The Command Access PD5-UL-M-KIT is a field-installable motorized latchpullback kit for the Jackson 85/95 & AHT 8/9 series devices. A. B. C. D. E. F. G. H. I. KIT INCLUDES TOOLS
INSTALLATION INSTRUCTIONS
 INSTALLATION INSTRUCTIONS Accessory Application Publications No. CIVIC All 30175-31616 2 AND 4-DOOR P/N 08E10-SNA-100 Issue Date DEC 2005 NOTE: The interior illumination lights cannot be installed on 2-door
INSTALLATION INSTRUCTIONS
 INSTALLATION INSTRUCTIONS Accessory Application Publications No. BII 33322-36889 UNDER 2007 TL Issue Date MAY 2007 PARTS LIST Front under spoiler Left bracket (Marked L ) Right bracket (Marked R ) 8 Self-tapping
INSTALLATION INSTRUCTIONS
 INSTALLATION INSTRUCTIONS Accessory Application Publications No. AII 24664-25319 SYSTEM 2003 CR-V Issue Date MAY 2003 PARTS LIST Security System (sold separately) P/N 08E51-EP4-100 Security System Attachment
INSTALLATION INSTRUCTIONS
 INSTALLATION INSTRUCTIONS Accessory TRAILER HITCH Application 2011 ODYSSEY Publications No. AII 43937 Issue Date SEP 2010 PARTS LIST Trailer Hitch Kit P/N 08L92-TK8-100 Trailer Hitch Harness Kit P/N 08L91-TK8-100
INSTALLATION INSTRUCTIONS
 INSTALLATION INSTRUCTIONS Accessory Application Publications No. SPOILER (LOW) CIVIC 4-DOOR All 30833 Issue Date SEP 2005 PARTS LIST Trunk spoiler Right trunk spring (marked red) Left trunk spring (marked
INSTALLATION INSTRUCTIONS
 INSTALLATION INSTRUCTIONS Accessory HITCH Application 2012 CROSSTOUR Publications No. AII 46198 Issue Date JULY 2011 PARTS LIST Trailer Hitch Kit P/N 08L92-TP6-101 Upper spacer A (5 mm) (Some are not used.)
Flue Space Installation Instructions
 Flue Space Installation Instructions Required Tools 1. 2. 4. 3. 3a. 5. 6. 8. 7. 9a. 7a. 9b. 7b. 9c. KEY 1. Philips Screw Driver 2. Crescent Wrench 3. 3/8 Socket Wrench a. 7/16 Socket (~11 mm) 4. 2 Ladders
 INSTALLATION INSTRUCTIONS Accessory Application Publications No. 2010 CIVIC All 42479 2- AND 4-DOOR P/N 08E10-SNA-110 Issue Date AUG 2009 NOTE: The interior illumination lights cannot be installed on 2-door
INSTALLATION INSTRUCTIONS
 INSTALLATION INSTRUCTIONS Accessory Application Publications No. SPOILER (LOW) 2005 ACCORD 4-DOOR AII 27503 Issue Date AUG 2004 PARTS LIST Trunk spoiler Right trunk spring (marked green) Left trunk spring
M-9603-FST FOCUS ST COLD AIR INTAKE KIT INSTALLATION INSTRUCTIONS
 M-9603-FST Please visit www.fordracingparts.com for the most current instruction information.!!! PLEASE READ ALL OF THE FOLLOWING INSTRUCTIONS CAREFULLY PRIOR TO INSTALLATION. AT ANY TIME YOU DO NOT UNDERSTAND
INSTALLATION INSTRUCTIONS
 INSTALLATION INSTRUCTIONS Accessory Application Publications No. 2006 ACCORD AII 30277-31251 4-DOOR SPOILER (WING) P/N 08F12-SDA-100 Issue Date AUG 2005 PARTS LIST Trunk spoiler Right trunk spring (marked
INSTALLATION INSTRUCTIONS
 INSTALLATION INSTRUCTIONS Accessory S Application 2011 PILOT Publications No. AII 43298 Issue Date MARCH 2010 PARTS LIST Back-up Sensor Attachment Kit P/N 08V67-SZA-100A Back-up sensor harness Fuse label
INSTALLATION INSTRUCTIONS
 INSTALLATION INSTRUCTIONS Accessory SIDE S P/N 08F04-SZT-1T0 Application 2011 CR-Z Publications No. AII 43563 Issue Date AUG 2010 PARTS LIST Left side under spoiler Illustration of the Side Spoilers Installed
 INSTALLATION INSTRUCTIONS Accessory ACCESSORY HANDSFREELINK (WITH MOON) Application 2009 PILOT Publications No. AII 39492 Issue Date MAY 2008 PARTS LIST HFL Attachment Kit 2 Washer screws, 4 x 12 mm HFL
INSTALLATION INSTRUCTIONS
 INSTALLATION INSTRUCTIONS Accessory Application Publications No. AII 25877 PILOT Issue Date AUG 2003 Optional ATF and power steering coolers are required when installing the trailer hitch. 2 Spacers PARTS
INSTALLATION INSTRUCTIONS
 INSTALLATION INSTRUCTIONS Accessory Application 2008 ACCORD 2-DOOR Publications No. AII 37561-38377 Issue Date NOV 2007 PARTS LIST Control unit bracket (L4) Back-up Sensor Attachment Kit P/N 08V67-TE0-100A
TOYOTA RAV TRAILER WIRE HARNESS Preparation
 Preparation Part Number: PU322-42013-UW Kit Contents Item # Qty Description 1 1 Trailer Module Harness 2 1 Trailer 4-Flat Harness 3 1 Trailer Power Wire Harness 4 1 Mounting Bracket, 4-Flat 5 2 Screw #10-24
Lower Radiator Grill Debris Shield
 P/N S297-200-GT & 200-CS 2010-12 Lower Radiator Grill Debris Shield Thank you for your purchase of SilverHorse Racing products. Please read all directions before beginning the installation. A factory shop
INSTALLATION INSTRUCTIONS
 INSTALLATION INSTRUCTIONS Accessory Application Publications No. AII 23086 SYSTEM CR-V Issue Date NOV 2001 PARTS LIST Security System P/N 08E51-EP4-100 Security System Attachment P/N 08E55-S9A-100 Security
Conf licts Note: TOYOTA Tacoma 2016 LED Illumination Package (Interior and Exterior) Part Number: Accessory Code: LL1000.
 Part Number: Accessory Code: LL1000.") TOYOTA Tacoma 2016 LED Illumination Package (Interior and Exterior) Part Number: 00016-00069 Accessory Code: LL1000 Conf licts Note: Color Applicability/Trim Level Kit Contents Item # Quantity R eqd. Description
TOYOTA Tacoma 2016 LED Illumination Package (Interior and Exterior) Part Number: 00016-00069 Accessory Code: LL1000 Conf licts Note: Color Applicability/Trim Level Kit Contents Item # Quantity R eqd. Description
INSTALLATION INSTRUCTIONS
 INSTALLATION INSTRUCTIONS Accessory S Application 2013 ACCORD 4-DOOR Publications No. AII 13026 Issue Date AUG 2012 PARTS LIST Aluminum tape Backup Sensors Attachment Kit P/N 08V67-T2A-100A Control unit
Optimax Pro Retrofit Instructions
 Copyright 2011 by ALL rights reserved. Information in this document is subject to change without notice. Companies, names and data used in examples herein are fictitious unless otherwise noted. No part
INSTALLATION INSTRUCTIONS
 INSTALLATION INSTRUCTIONS Accessory Application Publications No. AII 24637 INSIGHT Issue Date OCT 2002 PARTS LIST Security System: P/N 08E51-S84-100 Attachment Kit: P/N 08E55-S3Y-100 Security system harness
LEXUS CT 200h 2011 TVIP V2 PREPARATION
 PREPARATION Part #: PT398-76110 Conflicts: Kit Contents GBS ECU V2 Harness GBS ECU Bracket Nut Microphone Foam Tape Wire Tie x1 x1 x1 x1 x1 x2 x15 08190-0C820 08192-6C820 Window Label Owner s Guide PT398-60084
Adjustable Light Kits E-Z-Go TXT All Models Installation Instructions
 Adjustable Light Kits E-Z-Go TXT All Models 1996-2013 Installation Instructions Caution: Please read through the instructions carefully. Before starting this project, remove the system s positive and negative
INSTALLATION INSTRUCTIONS
 INSTALLATION INSTRUCTIONS PARTS LIST Accessory Application Publications No. MII 13038 GL1800 P/N 08E75-MCA-100K Issue Date November 2009 Honda Dealer: Please give a copy of these instructions to your customer.
INSTALLATION INSTRUCTIONS
 INSTALLATION INSTRUCTIONS Accessory Application Publications No. AII 30518 KIT 2006 PILOT Issue Date NOV 2005 NOTE: Accessory ATF and power steering coolers are required when installing the trailer hitch.
Rear Vision System Liftgate Emblem Camera for Aftermarket Display Ford Flex (Kit part number )
") Rear Vision System Liftgate Emblem Camera for Aftermarket Display 2009-2012 Ford Flex (Kit part number 1008-6509) Kit Contents: Liftgate Emblem Mount with Camera Chassis Harness with RCA (Note: In some
Rear Vision System Liftgate Emblem Camera for Aftermarket Display 2009-2012 Ford Flex (Kit part number 1008-6509) Kit Contents: Liftgate Emblem Mount with Camera Chassis Harness with RCA (Note: In some
INSTALLATION INSTRUCTIONS
 INSTALLATION INSTRUCTIONS Accessory P/N 08F02-T0A-100 Application 2015 CR-V Publications No. VERSION 1 Issue Date SEP 2014 PARTS LIST 3 Adhesive sealing washers Tailgate spoiler 2 Hook and loop fasteners
LGT-306L / LB Club Car Precedent LED Light Bar Bumper Kit Installation Instructions
 LGT-306L / LB Club Car Precedent LED Light Bar Bumper Kit Installation Instructions Caution: Please read through the instructions carefully. Before starting this project, remove the system s positive and
INSTALLATION INSTRUCTIONS
 INSTALLATION INSTRUCTIONS Accessory BACKUP S Application 2014 CR-V Publications No. AII 49959 Issue Date JULY 2013 PARTS LIST Right corner sensor clip (Black) Backup Sensor Attachment Kit P/N 08V67-T0A-100
CP2000 Ballast - Replacing Thyristor Instruction Sheet
 CP2000 Ballast - Replacing Thyristor Instruction Sheet INTRODUCTION These instructions are for the CP2000 Ballast and explain how to: replace the existing 80 Amp Thyristor with a new 100 Amp Thyristor
Instructions for 2-row monitoring only
 Installation Instructions for CaseIH cotton picker models: Instructions for 2-row monitoring only CAUTION: Ensure the model numbers shown above correspond to the machine model. If you receive the incorrect
INSTALLATION INSTRUCTIONS
 INSTALLATION INSTRUCTIONS [1] Description: Tow Hitch Wire Harness Kit [2] Application: Nissan Rogue Note: Tow Harness application is limited to specific vehicle option packages that include tow harness
1. Front Fascia Removal 1.1 Remove the 6 plastic clips that secure the upper valance, then remove. 1.2 Remove 6 upper bolts that hold the grille and f
 STRUT 2015 GMC Denali Collection Installation Manual " 1. Front Fascia Removal 1.1 Remove the 6 plastic clips that secure the upper valance, then remove. 1.2 Remove 6 upper bolts that hold the grille and
INSTALLATION INSTRUCTIONS
 INSTALLATION INSTRUCTIONS Accessory Application Publications No. AII 27367 HITCH 2005 ODYSSEY Issue Date DEC 2004 NOTE: An optional heavy-duty power steering cooler, ATF cooler and air duct are required
Instructions for 2-row monitoring only
 Installation Instructions for CaseIH cotton picker models: Instructions for 2-row monitoring only Ensure the model numbers shown above correspond to the machine model. If you receive the incorrect installation
OPTIMAX RADIANT FIELD RETROFIT INSTRUCTIONS
 OPTIMAX RADIANT FIELD RETROFIT INSTRUCTIONS 99-24283-I001 Table of Contents 1. 24V LED Approved Drivers 5 1.1. 24V LED Driver (60-19910-0002).. 5 2. Optimax Radiant 24V LED Lighting. 6 2.1. OP30 6 2.2.
Product Drive Cameron Park, CA PH: PRO LAUNCH INSTALLATION INSTRUCTIONS
 12-228 4130 Product Drive Cameron Park, CA 95682 PH: 1.530.642.9488 VIEW INSTALLATION VIDEO AT www.worksconnection.com/prolaunch/ 12-228 PRO LAUNCH INSTALLATION INSTRUCTIONS We at Works Connection Inc.
INSTALLATION INSTRUCTIONS
 INSTALLATION INSTRUCTIONS Accessory Application Publications No. UNDER 2007 CIVIC SI All 33529 Issue Date AUG 2006 PARTS LIST Rear under spoiler Clip Rubber washer 6 Flange bolts 6 Flange nuts TOOLS REQUIRED
INSTALLATION INSTRUCTIONS
 INSTALLATION INSTRUCTIONS Accessory REAR SPOILER Application 2011 CR-Z MUGEN Publications No. AII 45919 Issue Date APRIL 2011 PARTS LIST Right wing bracket Rear wing Left wing bracket Right wing base Right
SCION xb OVERHEAD CONSOLE Preparation. Part Number:
 SCION xb 2008 - OVERHEAD CONSOLE Preparation Part Number: 08253-12800 Kit Contents Item # Quantity Reqd. Description 1 1 Overhead Console 2 1 Bracket 3 1 Plastic cover 4 1 Photo Mount Sheet 5 1 Installation
INSTALLATION INSTRUCTIONS
 INSTALLATION INSTRUCTIONS Accessory Application 2011 CIVIC 4-DOOR Si Publications No. AII 44423 Issue Date AUG 2010 PARTS LIST Template Front under spoiler TOOLS AND SUPPLIES REQUIRED 4 Self-tapping screws
INSTALLATION INSTRUCTIONS
 144F TABLE OF CONTENTS GENERAL... 2 SPECIFICATIONS... 2 PACKAGE CONTENTS... 2 PACKAGE CONTENTS: ACCESSORIES... 3 REQUIRED TOOLS... 3 ADD-ON COMPONENTS... 3 CABINET MOUNTING WALL MOUNT BRACKET ATTACHMENT...
Lexus ES Fine Mesh and Adaptive Cruise Control Fine Mesh Grilles Upper and Lower Replacements
 IMPORTANT: PLEASE KEEP THIS INSTRUCTION MANUAL FOR FUTURE REFERENCE! 2013-15 Lexus ES Fine Mesh and Adaptive Cruise Control Fine Mesh Grilles Upper and Lower Replacements Part #1372-0102-13 / Black Ice
INSTALLATION INSTRUCTIONS
 INSTALLATION INSTRUCTIONS Accessory Application 2011 CR-V Publications No. AII 44647 Issue Date AUG 2010 PARTS LIST Trailer Hitch Kit P/N 08L92-SWA-101 Trailer Hitch Harness Kit P/N 08L91-SWA-100 Trailer
INSTALLATION INSTRUCTIONS
 INSTALLATION INSTRUCTIONS Accessory Application Publications No. Bll 37371 SPOILER 2008 TL Issue Date JUN 2007 PARTS LIST Trunk spoiler Left trunk spring (marked yellow) Template A TOOLS AND SUPPLIES REQUIRED