Installation Instructions
|
|
|
- Magnus Snow
- 6 years ago
- Views:
Transcription
1 Installation Instructions 4 PIN COIL OVER PLUG AEM EMS WITH CDI AND NO IGNITOR 2009 ATDSM

2 2 These instructions detail how to install a coil over plug (COP) setup on Mitsubishi Eclipses, Eagle Talons, and Plymouth Lasers. An AEM EMS was used, so the factory ignitor/transistor unit was not needed. These instructions will show where to connect the factory ignitor if using a different engine management system. WARNING: ATDSM, nor any person affiliated with ATDSM, holds responsibility for any bodily injury or damage to your vehicle that may be caused by following these instructions. If you are uncomfortable with this installation, please have a local certified automotive repair shop perform all of the following work. Components used in this example: AEM EMS ( ) MSD DIS-2 Digital (6211) 300M Coils with 4G63 Coil Plate MSD 8-pin Deutsch Connector (8185) WeatherPack 4-pin Connector 14 Gauge Wire
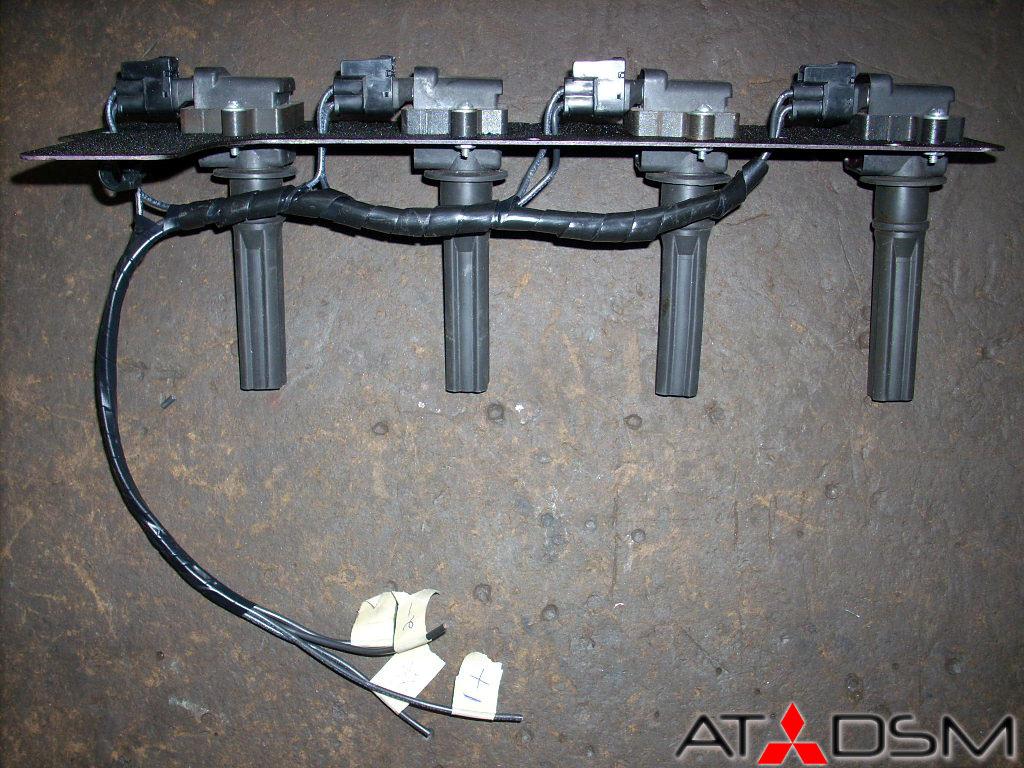
3 3 Installation: Wire the Coils: 1. Most COP setups available for the DSM come pre-wired with a 3-pin connector. Gains can be seen by rewiring the coils with a 4 pin connector to use both discharge channels of 2-channel capacitor discharge ignition (CDI) unit. 2. Pull the existing wiring from the coils, and save the plugs. Be sure to save the plug. You can use any coil you like, but the 300M coils are the most popular, followed by the 2.7L Intrepid coils, and the GSXR 750 coil sticks. Be sure the coils being used are installed on the plate being used before proceeding to the next step. 3. Label a wire 1+, and wire it to (+) input of coil 1. This is the top pin on the 300M coil. 4. Route another wire from the ( ) output (bottom pin) of coil 1 to the (+) input of coil Label a wire from the ( ) output of coil 4 as wire Do the same thing for coils 2 and 3. Label the wire feeding coil 2 (+) as wire 2+, and the wire returning from coil 3 as wire 2-. Do not label the wire connecting coil 2 (-) to coil 3 (+). 7. Pin one side of the 4-pin WeatherPack connector with these wires. Be sure to keep the naming labels on each wire. 8. Wrap the wires with electrical tape and wire loom. Any unwanted electrical discharge will cause ignition break-up at high rpms and boost.

4 4

5 5 Wire CDI to vehicle: 1. It is easiest to make a harness for the ignition box on a workbench, and then install everything at once. We will start by just pinning the receiving harness if one isn t provided. I decided to do my own anyways so I could use 14 gauge wire instead of the usual 16 or 18 gauge. 2. Wire coil trigger 1 of the ignition box to coil1 of the EMS (pin 54 on 1300 box, and pin 10 on the 1310 box.) If you are still using the stock ECU, or your EMS does not have transistors (see Setting up the EMS:), you will need to wire it to the transistor unit. If this is the case, wire it to the wire labeled OC1 on the ignitor. 3. Wire coil trigger 2 of the ignition box to coil2 of the EMS (pin 55 on 1300 box, and pin 23 on the 1310 box.) If you are still using the stock ECU, or your EMS does not have transistors (see Setting up the EMS:), you will need to wire it to the transistor unit. If this is the case, wire it to the wire labeled OC2 on the ignitor. 4. Wire coil 1 (+) of the CDI to the wire on your COP setup you labeled 1+. Wire coil 1 ( ) of the CDI to the wire on the COP setup you labeled Do the same for coil 2 (+) and coil 2 (-), with their respective wires on the COP assembly. 6. Install the power and ground wires, and wrap the harness with wire loom.

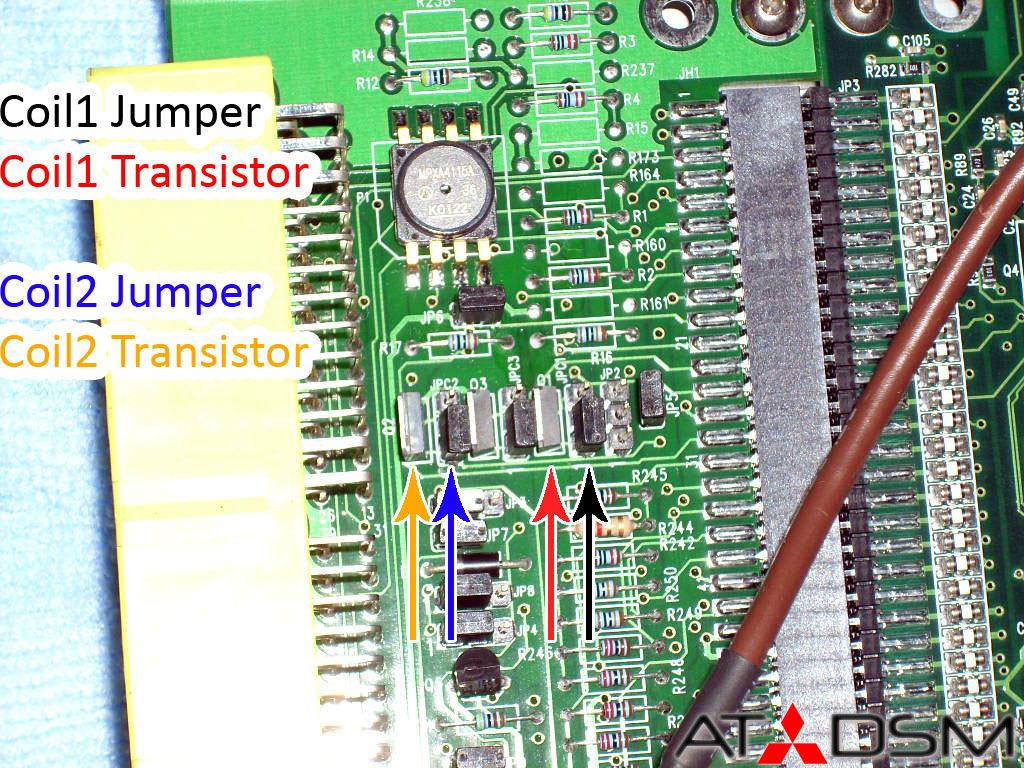
6 6 Setting up the EMS: 1. This information only pertains to running the AEM EMS. Even if you are still using the ignitor, you will still need to have the EMS drive the tach unless you are using a tach adapter. I recommend AEM driving it since it is easy, and free. Also, there will be no discrepencies with your tune, and you won t get a dropped rpm signal everytime you hit the rev limiter / 2-step. If you are still using the stock ignitor, you will need to cut the white wire coming out of it. You don t want conflicting signals. 2. Go to Setup -> <<Advanced Setup>> -> Tach/Speedo Control -> Options Tach/Speedo. From there set up your options as shown in the pictures below. The tach is already wired to the EMS, so no additional wiring needs to be done. Also, set your coil dwell wizard to All CDI. 3. Next you need to move the jumpers in your EMS so it can properly fire your CDI without the stock ignitor / transistor unit. NOTE: OPENING YOUR EMS WILL VOID THE WARRANTY. DO SO AT YOUR OWN RISK. 4. The jumpers that need to be moved are JPC1 and JPC2, and are circled in red in the top picture on the next page. They are set in the 1-2 position (bottom and middle pins), and will need to be switched to the 2-3 position (middle and top pins.) Refer to the picture on the bottom of the next page to be sure your particular EMS has the transistors required to properly drive the CDI. If those are just empty spaces on your board, you MUST use the factory ignitor, WITHOUT MOVING THE JUMPERS.

7 7
8 8 Finishing up: 1. Button up the EMS, and solder the two CDI triggers to the harness. 2. Start with a spark plug gap of and adjust accordinly as need. 3. Put a small amount of dielectric grease around the ceramic of each spark plug. This is crucial for a COP setup, especially one with a CDI since the stronger current can arc easier. 4. Enjoy your new ignition setup proven to keep up on 1,000+ hp 4G63 s.
9 9 NOTES
MSD 6AL Ignition Module w/ Rev Control - Installation Instructions
 MSD 6AL Ignition Module w/ Rev Control - Installation Instructions The below installation instructions work for the following products: MSD 6AL Ignition Module w/ Rev Control Please read through the instructions
Instruction Manual P/N B Series COP Conversion Kit
 Instruction Manual P/N 30-2860 B Series COP Conversion Kit KIT CONTENTS 1 x 35-2840 IGNITER W/ BRACKET 1 x 30-3255 HONDA EPM 4 x 30-2850 COIL 1 x 35-3860 B SERIES COP HARNESS 1 x 35-3861 EPM HARNESS 2
Installation Instructions
 Installation Instructions 8 Channel C 2 D Ignition System PN 30-2800 4 Channel C 2 D Ignition System PN 30-2801 WARNING: This installation is not for the electrically challenged! Use this ignition with
Asynchronous Restriking CDI 2 channel
 Asynchronous Restriking CDI 2 channel Parts List ARC-2 module Decals Power Cable Fuse Specifications Operating Voltage: 8-20V Operating Current: Max Operating RPM: Ambient Temp range: Ignition inputs:
Replacement Tach Board Manual
 Replacement Tach Board Manual 67-74 Dodge and Plymouth Cars that use electronics Internal to the tachometer. Real Time Engineering 19352 Hilton Rd. Springdale, AR 72764 (479) 756-3917 fax Rev8 www.rt-eng.com
for EVO/2G DSM crank angle sensor Version 1.4
 for EVO/2G DSM crank angle sensor Version 1.4 Thank you for purchasing a triggerdisc! Your package should include a disc and two small shims. These instructions will cover the installation of the disc
E-STREET 2 EFI IGNITION CONTROL KIT Part #3674, 3675, 3676, 3679, 3680 INSTALLATION INSTRUCTIONS
 E-STREET 2 EFI IGNITION CONTROL KIT Part #3674, 3675, 3676, 3679, 3680 INSTALLATION INSTRUCTIONS PLEASE study these instructions carefully before beginning this installation. Most installations can be
Mallory HyFire Electronic Ignition Control
 Mallory HyFire Electronic Ignition Control PN 690 Parts Included: 1 - Ignition 1 - Harness, Mag Pickup 1-18" Ground Wire 1-100V/1A Diode 4 - Mounting Screws WARNING: During installation, disconnect the
4. Remove distributor hold-down. Lift the distributor upwards and remove.
 Holley Sniper EFI HyperSpark Distributors are designed to plug and play with Sniper EFI systems. This design includes a single Hall Effect sensor providing crankshaft speed to the ECU. The precision machined
2012 SLK V6 (M276 Engine) Spark Plug Replacement
 Spark Plug Replacement") 2012 SLK 350 3.5 V6 (M276 Engine) Spark Plug Replacement Proceed at your own risk. I read the Mercedes repair documents pertaining to changing the R172 SLK M276 V6 engine s spark plugs that I could find
2012 SLK 350 3.5 V6 (M276 Engine) Spark Plug Replacement Proceed at your own risk. I read the Mercedes repair documents pertaining to changing the R172 SLK M276 V6 engine s spark plugs that I could find
M-TUNED COOLANT RE-ROUTE KIT
 M-TUNED COOLANT RE-ROUTE KIT Part # MC-RR-216, MC-RR-218 Applications: 90-93 Miata 1.6L B6 94-97 Miata 1.8L BP More detailed instructions: http://www.etdracing.com/m-tuned/reroute.pdf 1) Disconnect Negative
Installation Tips for your Crimestopper/ProStart Remote Start system (add-on for GM vehicles) v1.02 updated 1/16/2013
 v1.02 updated 1/16/2013") Installation Tips for your Crimestopper/ProStart Remote Start system (add-on for GM vehicles) v1.02 updated 1/16/2013 Thank you for purchasing your remote start from MyPushcart.com - an industry leader
Installation Tips for your Crimestopper/ProStart Remote Start system (add-on for GM vehicles) v1.02 updated 1/16/2013 Thank you for purchasing your remote start from MyPushcart.com - an industry leader
MSD DIS-2 Plus Ignition PN MSD DIS-4 Plus Ignition PN 62152
 MSD DIS-2 Plus Ignition PN 62112 MSD DIS-4 Plus Ignition PN 62152 ONLINE PRODUCT REGISTRATION: Register your MSD product online. Registering your product will help if there is ever a warranty issue with
Core Harness System Crank/Cam Adapter Harness FAST Dual Sync Distrubutor 35" STOP!
 Instruction Manual 30-3805-20 Core Harness System Crank/Cam Adapter Harness FAST Dual Sync Distrubutor 35" STOP! THIS PRODUCT HAS LEGAL RESTRICTIONS. READ THIS BEFORE INSTALLING/USING! THIS PRODUCT MAY
MAX-FIRE AND E-FIRE ELECTRONIC DISTRIBUTORS
 INSTALLATION INSTRUCTIONS MAX-FIRE AND E-FIRE ELECTRONIC DISTRIBUTORS NOTE: This product is applicable to pre-1966 California and pre-1968 federally certified passenger cars. It is also applicable to non-emission
ACCEL SUPER BOX P/N 61212
 FRM 34395 INSTALLATION INSTRUCTIONS ACCEL SUPER BOX P/N 61212 PARTS INCLUDED: (x1) Ignition (x1) 18 Ground Wire (x4) Mounting Screws (x1) Harness (x1) 100V/1A Diode WARNING! During installation, disconnect
72 Mustang Mach 1 tachometer cluster and gauge conversion
 72 Mustang Mach 1 tachometer cluster and gauge conversion Dated: 02-17-2009 (drafted by a Chevy person working on his first Ford -not good-) Revised: 11-05-2010 The following information pertains to how
Installation Tips Crimestopper/ProStart Remote Start system + PLJX + DLRM + SPDT (for GM vehicles) T0760 v1.1 updated 2/5/14
 T0760 v1.1 updated 2/5/14") Installation Tips Crimestopper/ProStart Remote Start system + PLJX + DLRM + SPDT (for GM vehicles) T0760 v1.1 updated 2/5/14 Thank you for purchasing your remote start from MyPushcart.com - an industry
Installation Tips Crimestopper/ProStart Remote Start system + PLJX + DLRM + SPDT (for GM vehicles) T0760 v1.1 updated 2/5/14 Thank you for purchasing your remote start from MyPushcart.com - an industry
Timing Input Adapter User Manual
 Timing Input Adapter User Manual 30-3805-05 2 AEM Infinity Harness Manuals Introduction Several universal wiring harness options are available for Infinity products. They range in complexity from simple
Installation Instructions for: EMS P/N and U Honda S2000
 Installation Instructions for: EMS P/N 30-1052 and 30-1052U 00-04 Honda S2000! WARNING: This installation is not for the tuning novice nor the PC illiterate! Use this system with EXTREME caution! The AEM
1CH Ignition Adapter Harness User Manual
 CH Ignition Adapter Harness User Manual 30-3805-02 2 AEM Infinity Harness Manuals Introduction Several universal wiring harness options are available for Infinity products. They range in complexity from
Mallory HyFire Electronic Ignition Control
 Mallory HyFire Electronic Ignition Control PN 690 Parts Included: 1 - Ignition 1 - Harness, Mag Pickup 1-18" Ground Wire 1-100V/1A Diode 4 - Mounting Screws WARNING: During installation, disconnect the
(905)
") (905)953-9260 Marc@M-Tuned.com Coolant Reroute Kit *Professional Installation Recommended but not required 1) Disconnect Negative Terminal from Battery in trunk. 2) Drain Coolant from your cooling system.
(905)953-9260 Marc@M-Tuned.com Coolant Reroute Kit *Professional Installation Recommended but not required 1) Disconnect Negative Terminal from Battery in trunk. 2) Drain Coolant from your cooling system.
Triumph Street Triple VSM Grip Heater Install
 Triumph Street Triple VSM Grip Heater Install Introduction: With winter fast approaching and with painful memories of last winter riding with the club it was time to do something about getting some grip
V8 Gen. V Ford Mustang 2010 Update
 V8 Gen. V Ford Mustang 2010 Update There were several updates to the Ford Mustang in the 2010 model year. This document outlines the differences between the installation steps necessary for the 2010 Mustang
Installation Tips for your Crimestopper/ProStart Remote Start system (for GM vehicles) v1.01 updated 2/27/2012
 v1.01 updated 2/27/2012") Installation Tips for your Crimestopper/ProStart Remote Start system (for GM vehicles) v1.01 updated 2/27/2012 Thank you for purchasing your remote start from MyPushcart.com - an industry leader in providing
Installation Tips for your Crimestopper/ProStart Remote Start system (for GM vehicles) v1.01 updated 2/27/2012 Thank you for purchasing your remote start from MyPushcart.com - an industry leader in providing
Installation Instructions for: EMS P/N Eclipse Turbo, Talon Tsi, Laser RS Galant VR4
 Installation Instructions for: EMS P/N 30-6300 1990-1994 Eclipse Turbo, Talon Tsi, Laser RS Galant VR4 Thank you for purchasing an AEM Engine Management System. The AEM Engine Management System (EMS) is
Installation Instructions for: EMS P/N Eclipse Turbo, Talon Tsi, Laser RS Galant VR4
 Installation Instructions for: EMS P/N 30-6300 1990-1994 Eclipse Turbo, Talon Tsi, Laser RS Galant VR4! WARNING: This installation is not for the tuning novice nor the PC illiterate! Use this system with
INSTRUCTIONS. #82028 Diesel Nitrous System. Thank you for choosing ZEX products; we are proud to be your manufacturer of choice.
 1 INSTRUCTIONS #82028 Diesel Nitrous System Thank you for choosing ZEX products; we are proud to be your manufacturer of choice. Why our nitrous system is better: 2 Performance enthusiasts know the potential
w.get2itparts.com Viper 90R-4 Dies After Shifting Or Indicator Lights Blink SCL /24/2005
 10/24/2005 Viper 90R-4 Dies After Shifting Or Indicator Problem: Unit will not shift into gear or engine dies when shifting into gear. (1) i. Turn on the ignition switch. ii. Set selector switch to neutral
Rostra Electronic Cruise Control Install On a Stratoliner or Roadliner
 Rostra Electronic Cruise Control Install On a Stratoliner or Roadliner MATERIALS LIST: 1 - Rostra Part # 250-1223 (www.brandondist.com/products/cruise1223.htm) 1 - Signal Splitter part # 250-4369 1 - Engagement
Installation Guide. Thank you for the purchase of our product. You have just unleashed infinite control, power and ability into your hands.
 Installation Guide Thank you for the purchase of our product. You have just unleashed infinite control, power and ability into your hands. This product is for race use only by experienced engine tuners.
PLATINUM. Sport Haltech 13B Terminated Engine Harness QUICK START GUIDE
 PLATINUM Sport 1000 Haltech 13B Terminated Engine Harness QUICK START GUIDE HALTECH HEAD OFFICE: PH: +612 9729 0999 FAX: +612 9729 0900 EMAIL: sales@haltech.com HALTECH US OFFICE: EMAIL: usa@haltech.com
Street Fire CDI PN 5520
 Street Fire CDI ONLINE PRODUCT REGISTRATION: Register your MSD product online and you ll be entered in our monthly 8.5mm Super Conductor Spark Plug Wire give-away! Registering your product will help if
Diag. Code 14, 15 Ignition Signal Circuit
 TR26 EINE TROUBLESHOOTI Diag. Code 14, 15 Ignition Signal Circuit CIRCUIT DESCRIPTION The ECU determines the ignition timing, turns on Tr1 at a predetermined angle ( CA) before the desired ignition timing
SAISBM V36W Installation Instructions
 The Original Secondary Air Injection System Bypass Kit SAISBM V36W Installation Instructions All Applicable Toyota/Lexus Vehicles Introduction: The Secondary Air Injection System (SAIS) bypass module is
Installation Instructions for: EMS P/N Toyota Supra
 Installation Instructions for: EMS P/N 30-1130 1989-1992 Toyota Supra! WARNING: This installation is not for the tuning novice nor the PC illiterate! Use this system with EXTREME caution! The AEM EMS System
2 Wire PW Idle Adapter User Manual
 2 Wire PW Idle Adapter User Manual 30-3805-08 2 AEM Infinity Harness Manuals Introduction Several universal wiring harness options are available for Infinity products. They range in complexity from simple
M-Tuned reroute kit XX
 M-Tuned reroute kit 14-161XX Manufactured and designed by: *Professional Installation Recommended but not required 1) Disconnect the negative terminal from the battery in the trunk. 2) Drain the coolant
EFI HARNESS KIT , & Kit Contents: Power Harness : All Kits
 EFI HARNESS KIT 558-500, 558-501 & 558-502 Kit Contents: Main Harness 558-102: Kits 558-500 558-103: Kits 558-501 & 502 Power Harness 558-308: All Kits Injector Harness 558-200: Kits 558-500 & 502 558-201:
MFI Pro - Instructional Manual (Toyota 1uzfe) Version 06.01
 Version 06.01") Tel: 011 3971953 - Fax: 011 3978197 - info@gotech.co.za www.got e ch.c o.za MFI Pro - Instructional Manual (Toyota 1uzfe) Version 06.01 Index: Introduction 1 Before You Begin 1 Basic Tools Required 2 Basic
Tel: 011 3971953 - Fax: 011 3978197 - info@gotech.co.za www.got e ch.c o.za MFI Pro - Instructional Manual (Toyota 1uzfe) Version 06.01 Index: Introduction 1 Before You Begin 1 Basic Tools Required 2 Basic
INSTALLATION INSTRUCTIONS for. FC 2000 Series
 INSTALLATION INSTRUCTIONS for Fire Control (FC) Ignition System FC 2000 Series Owners Manual Introduction...2 Specifications...2 Coil Compatibilities...2 Wire Functions...2 Connections...3-6 Connections
Accel 300+ Ignition Control System (84-95) - Installation Instructions
 - Installation Instructions") Accel 300+ Ignition Control System (84-95) - Installation Instructions The below installation instructions work for the following products: Accel 300+ Ignition Control System (84-95) Please read through
Accel 300+ Ignition Control System (84-95) - Installation Instructions The below installation instructions work for the following products: Accel 300+ Ignition Control System (84-95) Please read through
Connecting the rear fog light on the A4 Jetta, while keeping the 5 Light Mod
 Connecting the rear fog light on the A4 Jetta, while keeping the 5 Light Mod DISCLAIMER: I'm human and make mistakes. If you spot one in this how to, tell me and I'll fix it This was done on my 99.5 Jetta.
Installation Instructions for: EMS P/N Toyota Supra
 Installation Instructions for: EMS P/N 30-1110 1987-1988 Toyota Supra! WARNING: This installation is not for the tuning novice nor the PC illiterate! Use this system with EXTREME caution! The AEM EMS System
RAM Rail Mount Kit RAM 201UD 5 Arm RAM 2461U Base RAM 235U Base, Double U-Bolt
 Note: Indented items indicate parts included in an assembly listed above. Part Name/Description Part Number Quantity Direct Command Kit 4100514 1 Installation Instructions 2005690 1 CAN Y-Splice 4000137
SCHNITZ. Racing DRY , Dry NOS System
 Table of Contents SCHNITZ DRY-3008-2, Dry System 1.0 General Safety Precautions Page 1 2.0 Important Notice Page 2 3.0 Warranty Page 2 4.0 Items Included in Kit Page 2 5.0 Power Commander Tuning Tips Page
AccuSpark. Fitting and Information Guide For. Modules Distributors coils Tools. Modern Ignition for Classic cars
 AccuSpark Modern Ignition for Classic cars Fitting and Information Guide For Modules Distributors coils Tools www.accuspark.co.uk 1 Before fitting AccuSpark Distributors AccuSpark electronic ignition kit.
GT-R Alpha 10/12 Turbo Kit
 GT-R Alpha 10/12 Turbo Kit Instructions V6 The goal of AMS is to provide the highest quality, best performing products available. By utilizing research and development, and rigorous testing programs AMS
MSD Circle Track Ignition PN 6427
 MSD Circle Track Ignition PN 6427 ONLINE PRODUCT REGISTRATION: Register your MSD product online. Registering your product will help if there is ever a warranty issue with your product and helps the MSD
For all Ram x4 Trucks, and all Ram x4 trucks.
 Dodge Off Road, LLC Specializing in Dodge Ram Solid-Axle 4x4 Suspension and Steering for Off Road Applications 855.9009.DOR sales@dodgeoffroad.com dodgeoffroad.com DODGE OFF ROAD 5 th GEN STEERING KIT
Current parts on a ROTAX 125 MAX DD2 evo
 Current parts on a ROTAX 125 MAX DD2 evo No. Part. No. Name Qty. USAGE for rework? 1 660 575 Pressure Line 220 mm 1 YES 2 666 816 Electronic Box DD2 1 YES 3 660 825 Ignition Coil 1 YES 4 664 630 Solenoid
Fitting instructions for the Petrol power amplifier
 Wayside Garage Holt Road, Horsford Norwich Norfolk NR10 3EE Tel Int. + 44 (0)1603 891209 Fax 890330 Web Site www.v8engines.com VAT NO: 373 2330 72 Partners C T Crane & R.P.I. International Ltd Fitting
BMW 2002 M42 Swap Notes-THIS IS NOT FINISHED
 BMW 2002 M42 Swap Notes-THIS IS NOT FINISHED This document is to help those that want to install an m42 into a BMW 2002. It is based around an e30 engine, trans, and wiring. You can use the e36 block/head/wiring
CPi. CoiL PACK IGNiTioN FOR AViATiON. For 4,6 and 8 cylinder 4 stroke applications. Please read the entire manual before beginning installation.
 1 CPi CoiL PACK IGNiTioN FOR AViATiON Coil pack (4 cylinder) Coil pack (6 cylinder) For 4,6 and 8 cylinder 4 stroke applications. Please read the entire manual before beginning installation. Software version
Megasquirt II with V3.0 PCB Stock Rotary CAS Setting up your 2 rotor engine to use a stock unmodified Mazda Crank Angle Sensor with Megasquirt
 Megasquirt II with V3.0 PCB Stock Rotary CAS Last Updated: 2/November/2007 Setting up your 2 rotor engine to use a stock unmodified Mazda Crank Angle Sensor with Megasquirt Read through all of the steps
750 Paso Wiring Upgrade
 750 Paso Wiring Upgrade Supplies required: 2 Bosch 30A/12V Relays # #0 332 209 150 (with mounting tab) 1 30 Amp fuse holder 1 10 Amp fuse holder 12 inches of brown 12 gauge wire 60 inches of red 14 gauge
GM Stepper Idle Adapter User Manual
 GM Stepper Idle Adapter User Manual 30-3805-07 THIS PRODUCT IS LEGAL IN CALIFORNIA FOR RACING VEHICLES ONLY AND SHOULD NEVER BE USED ON PUBLIC HIGHWAYS. AEM Performance Electronics AEM Performance Electronics,
Shotgun Double Barrel HPFP install guide
 Shotgun Double Barrel HPFP install guide Thank you for your purchase of the VTT Shotgun Double Barrel HPFP upgrade! First thing to do when you open your box is to make sure all parts are in their respective
EM-5 F Aviation Ignition System Installation and Basic Tuning. Oct. 1/17
 EM-5 F Aviation Ignition System Installation and Basic Tuning. Oct. 1/17 Disclaimer These products do not conform to any recognized set of standards or certifications for aviation applications. This ECU
4 Cylinder coil pack 6 Cylinder coil pack. Hall sensor
 1 EM-4 F Supplement installation manual software version 17. Sept 17, 2009 For 4 and 6 cylinder 4 stroke applications. Please read the entire manual before beginning installation. 4 Cylinder coil pack
The BTP Miata ECU ReFlash. Installation and Operations Manual Applicable to all 1999 to 2005 Miatas. Revised Rev 1.1
 The BTP Miata ECU ReFlash Installation and Operations Manual Applicable to all 1999 to 2005 Miatas Revised 1-9-18 Rev 1.1 1 Thank you for purchasing the Miata ECU ReFlash. We regard your installation as
2005+ Mustang Trunk Lid Release and Trunk Lights Installation
 There is no warranty expressed or implied by this document, you follow these instructions at your own risk. These instructions worked for me, but your experience may vary. The final product of these instructions
Viper 90R Dies After Shifting
 3/9/2005 Problem: Unit will not shift into gear or engine dies when shifting into gear. (1) i. Turn on the ignition switch. ii. Set selector switch to neutral (N) position. iii. Set stop switch to O position.
Tip: LED Lighting for the 4367 SBB Euro City Set, 4366 and 4368 Cars Date: , Corrections Modified , Photos
 Hi All, I have had the 4367 SBB Euro City set with extra cars 4366 and 4368 since 1998, apart from a test run on the layout they have stayed in storage ever since. I decided to change some rolling stock
Nissan GTR Alpha Fuel System
 Nissan GTR Alpha Fuel System Instructions V5 The goal of AMS is to provide the highest quality, best performing products available. By utilizing research and development, and rigorous testing programs
Boost by Smith s Dual Purpose Shift Light
 Boost by Smith s Dual Purpose Shift Light Greg Smith SMITHABUSA greg@boostbysmith.com 517.743.3666 ****WARNING**** This Dual-Purpose Launch-Shift Light can cause damage to both you and your motorcycle
84-86 Ford SVO Mustang AC Installation Guide
 84-86 Ford SVO Mustang AC Installation Guide This installation guide is for the AC installation kit from Late Model Restoration. The Vendor is Hose Wizards that manufactures this great kit that provides
Installation Tips for your Excalibur Remote Start (for Honda and Acura Vehicles) rev 11/28/2012
 rev 11/28/2012") Installation Tips for your Excalibur Remote Start (for Honda and Acura Vehicles) rev 11/28/2012 Thank you for purchasing your remote start from MyPushcart.com - an industry leader in providing remote starts
Installation Tips for your Excalibur Remote Start (for Honda and Acura Vehicles) rev 11/28/2012 Thank you for purchasing your remote start from MyPushcart.com - an industry leader in providing remote starts
SPEED SHIFT/TWO-STEP MODULE INSTALLATION MANUAL
 SPEED SHIFT/TWO-STEP MODULE INSTALLATION MANUAL ALTHOUGH THIS PRODUCT HAS BEEN THOROUGHLY TESTED KPIERSON TECHNOLOGIES ASSUMES NO RESPONSIBILITY FOR ANY DAMAGE THAT MAY RESULT BY THE INSTALLATION OF THIS
WOT Box Installation Instructions VW / Audi
 Connector Pinout Pin Color AWG Name WOT Box Installation Instructions VW / Audi Description 1 Yellow 18 RPM Connect to Fuel Injector Drive Signal or Ignition Control Signal (varies by car model) 2 Black
Wiring Diagram 7 Amp 2 Step (7642MC) Ignition Box - No Booster ENGINE BLOCK LOWER LIMIT ARMING WIRE ORANGE GREEN BLACK DISTRIBUTOR LOOM (PRE-MADE)
 Ignition Box - No Booster ENGINE BLOCK LOWER LIMIT ARMING WIRE ORANGE GREEN BLACK DISTRIBUTOR LOOM (PRE-MADE)") Wiring Diagram 7 Amp 2 Step (7642MC) Ignition Box - No Booster IGNITION SWITCH 7 AMP 2 STEP TO TACH 7642MC LOWER LIMIT ARMING WIRE WHITE ENGINE BLOCK DISTRIBUTOR LOOM (PRE-MADE) DISTRIBUTOR COIL BATTERY
Wiring Diagram 7 Amp 2 Step (7642MC) Ignition Box - No Booster IGNITION SWITCH 7 AMP 2 STEP TO TACH 7642MC LOWER LIMIT ARMING WIRE WHITE ENGINE BLOCK DISTRIBUTOR LOOM (PRE-MADE) DISTRIBUTOR COIL BATTERY
Wiring Harness 1. Remove left hand footwell trim panel from driver s footwell. Typically secured by several Philips head screws.
 Installation There are four segments to the installation; wiring harness, EDIS and Megajolt, coil pack, and Timing wheel and VR sensor. If the car needs to be driven, install everything except the coil
Feature Description. Version History
 TA2 Malfunction Indicator Lamp (MIL) and Engine Protection Document Number: FD-0007 Author: J. Goodloe Version: 03 Publish Date: 2016-03-18 Feature Description Version History Version Date Modified Sections
Installation Tips For Crimestopper RS7 + Passlock-sl2(4) + DLRM + SPDT
 + DLRM + SPDT") TIP SHEET T3628 Installation Tips For Crimestopper RS7 + Passlock-sl2(4) + DLRM + SPDT For Chevrolet: Astro 1998-2005, Avalanche 2002, Blazer 1998-2005, Cavalier 2000-2003, Express Van 1998-2005, S10 Pickup
TIP SHEET T3628 Installation Tips For Crimestopper RS7 + Passlock-sl2(4) + DLRM + SPDT For Chevrolet: Astro 1998-2005, Avalanche 2002, Blazer 1998-2005, Cavalier 2000-2003, Express Van 1998-2005, S10 Pickup
Raxiom Factory GPS Rear Back-up Camera Kit (07-17 Wrangler)
") Raxiom Factory GPS Rear Back-up Camera Kit (07-17 Wrangler) Installation Time: 2.5-3Hrs Tools Required: 7mm Socket & Driver 10mm Socket 10mm Open end wrench Knife / Razor blade Zip-ties Wire Cutters Needle
Raxiom Factory GPS Rear Back-up Camera Kit (07-17 Wrangler) Installation Time: 2.5-3Hrs Tools Required: 7mm Socket & Driver 10mm Socket 10mm Open end wrench Knife / Razor blade Zip-ties Wire Cutters Needle
Replacing stock Ducati relays with solid state type
 Replacing stock Ducati 748-916-996 relays with solid state type Ducati stock relays are basically just the ordinary automotive type in a waterproof housing. They suffer from wear & tear as they contain
PLEASE READ ALL DIRECTIONS BEFORE STARTING INSTALLATION
 2001-2003 Suzuki GSXR600 2000-2003 Suzuki GSXR750 2001-2002 Suzuki GSXR1000 Installation Instructions PARTS LIST 1 Ignition Module 1 CD-ROM 1 Installation Guide 2 Velcro 1 Alcohol swab 1 CAN cable 1 CAN
Canems Engine Management Solutions. +44 (0) Scotter Road Scunthorpe DN15 7EH UK
 Scotter Road Scunthorpe DN15 7EH UK") DRH Performance ECU Porsche 911 3.2 DIS ignition conversion kit Kit Contents A) 4 x M6x50 bolts and spring washers B) 1 x Magnecor 8mm silicone HT lead set C) 1 x ECU update CD-ROM (upgrades only) D) 1
DRH Performance ECU Porsche 911 3.2 DIS ignition conversion kit Kit Contents A) 4 x M6x50 bolts and spring washers B) 1 x Magnecor 8mm silicone HT lead set C) 1 x ECU update CD-ROM (upgrades only) D) 1
Ford EV6 Injector Adapter Harness User Manual
 Ford EV6 Injector Adapter Harness User Manual 30-3805- THIS PRODUCT IS LEGAL IN CALIFORNIA FOR RACING VEHICLES ONLY AND SHOULD NEVER BE USED ON PUBLIC HIGHWAYS. AEM Performance Electronics AEM Performance
Installation Tips for your Remote Start/Keyless Entry (for Ford Vehicles) v3.3 Updated 1/13/2013
 v3.3 Updated 1/13/2013") Installation Tips for your Remote Start/Keyless Entry (for Ford Vehicles) v3.3 Updated 1/13/2013 Thank you for purchasing your remote start from MyPushcart.com - an industry leader in providing remote
Installation Tips for your Remote Start/Keyless Entry (for Ford Vehicles) v3.3 Updated 1/13/2013 Thank you for purchasing your remote start from MyPushcart.com - an industry leader in providing remote
MSD 7AL-2 Plus Ignition PN 7222
 MSD 7AL-2 Plus Ignition PN 7222 Note: Solid Core spark plug wires cannot be used with an MSD Ignition. Note: An MSD cannot be used on vehicles with CD ignitions or distributorless ignition systems. Parts
WARNING! DIGITAL TUNING, INC. TAKES NO RESPONSIBILITY FOR DAMAGE TO ECU OR CAR DUE TO IMPROPER INSTALLATION OR MISUSE OF PRODUCT.
 digital tuning Rtek7 ECU Upgrade for S5 Turbo II WARNING! DIGITAL TUNING, INC. TAKES NO RESPONSIBILITY FOR DAMAGE TO ECU OR CAR DUE TO IMPROPER INSTALLATION OR MISUSE OF PRODUCT. IT IS YOUR RESPONSIBILITY
Fuel Delivery Requirements
 held Controller the Go EFI System creates a base fuel MAP to get the engine running. Then the self tuning programming will fine tune the MAP to produce optimum power and performance. Through the use of
MSD Digital 6M-3L Marine Ignition PN 6564
 MSD Digital 6M-3L Marine Ignition PN 6564 ONLINE PRODUCT REGISTRATION: Register your MSD product online. Registering your product will help if there is ever a warranty issue with your product and helps
PLEASE READ ALL DIRECTIONS BEFORE STARTING INSTALLATION
 PARTS LIST 2010-2014 BMW S1000RR Installation Instructions 1 Power Commander 1 USB Cable 1 Installation Guide 2 Power Commander Decals 2 Dynojet Decals 2 Velcro strips 1 Alcohol swab 2 Posi-taps THE IGNITION
SATURN SKY 2006 AND UP
 SATURN SKY 2006 AND UP THIS KIT INCLUDES: 16 M8-1.25X30MM BOLTS WITH WASHERS 2 SHOULDER BOLTS WITH RIGHT AND LEFT HINGE ASSEMBLY 2 SHOCKS 550 PSI WASHERS 2 PINS TOOLS REQUIRED FOR INSTALLATION: AIR RACHET,
Tailgate Light Bar Installation by Flopster Feb 2015
 Tailgate Light Bar Installation by Flopster843 23 Feb 2015 If you ever looked at the rear of a 3rd generation Dodge Ram dually pickup truck, you'll notice that there is a light bar with 3 red marker lights
Stratified Aux fuel system ecoboost 2.0
 Stratified Aux fuel system ecoboost 2.0 Additional Fuel Injection System Installation and User Guide Stratified Aux Fuel System Installation and User Guide -1-0204-0021.1 Thank you and congratulations
GTR 12 INJECTOR CONVERSION INSTALL GUIDE
 07/28/17 GTR 12 INJECTOR CONVERSION INSTALL GUIDE INTRODUCTION Welcome to the Install Guide for Visconti Tuning s Plug & Play GTR 12 Injector Conversion Kit. Your Conversion Kit should contain all of the
Installation Tips for your Remote Start system (for RS4LX>GMBP for GM vehicles)
") Installation Tips for your Remote Start system (for RS4LX>GMBP for GM vehicles) Thank you for purchasing your remote start from MyPushcart.com - an industry leader in providing remote starts to doit-yourself
Installation Tips for your Remote Start system (for RS4LX>GMBP for GM vehicles) Thank you for purchasing your remote start from MyPushcart.com - an industry leader in providing remote starts to doit-yourself
ATASA 5 th. ATASA 5 TH Study Guide Chapter 27 Pages Ignition Systems 68 Points. Please Read the Summary
 ATASA 5 TH Study Guide Chapter 27 Pages 810 835 68 Points Please Read the Summary Before We Begin Keeping in mind the Career Cluster of Transportation, Distribution & Logistics Ask yourself: What careers
Please read ALL directions before starting installation
 Parts List 2009 Victory Vision I n s t a l l a t i o n I n s t r u c t i o n s 1 Power Commander 1 USB Cable 1 CD-ROM 1 Installation Guide 2 Power Commander Decals 2 Dynojet Decals 2 Velcro 1 Alcohol swab
GM Throttle Body Adapter Harness User Manual
 GM Throttle Body Adapter Harness User Manual 30-3809-01 THIS PRODUCT IS LEGAL IN CALIFORNIA FOR RACING VEHICLES ONLY AND SHOULD NEVER BE USED ON PUBLIC HIGHWAYS. AEM Performance Electronics AEM Performance
GM Injector Adapter Harness User Manual
 GM Injector dapter Harness User Manual 30 3805 00 2 EM Infinity Harness Manuals Introduction Several universal wiring harness options are available for Infinity products. They range in complexity from
PLEASE READ ALL DIRECTIONS BEFORE STARTING INSTALLATION
 2002-2007 Suzuki Hayabusa Installation Instructions PARTS LIST 1 Ignition Module 1 Installation Guide 2 Velcro strips 1 Alcohol swab 1 CAN link cable 1 USB cable 1 Posi-tap THE VEHICLE S IGNITION MUST
Shotgun Single Barrel HPFP install guide
 Shotgun Single Barrel HPFP install guide Thank you for your purchase of the VTT Shotgun Single Barrel HPFP upgrade! First thing to do when you open your box is to make sure all parts are in their respective
Remote Start Kit for GM Installation RS1/3/4/7 + ADS-DL Tip Sheet
 Remote Start Kit for GM Installation RS1/3/4/7 + ADS-DL Tip Sheet rev 1.4 12/16/2013 Thank you for purchasing your remote start from MyPushcart.com - an industry leader in providing remote starts to do-it-yourself
PLEASE READ ALL DIRECTIONS BEFORE STARTING INSTALLATION
 PARTS LIST FUEL AND IGNITION 2017-2018 Husqvarna 701SM Installation Instructions 1 Power Commander 1 USB Cable 1 Installation Guide 2 Power Commander Decals 2 Dynojet Decals 2 Velcro strips 1 Alcohol swab
BSR Magic Box Digital ignition control for 4, 6, or 8 cylinder engines
 BSR BSR Magic Box Digital ignition control for 4, 6, or 8 cylinder engines Features Digital Advance The main feature of the Magic Box is the digital advance that replaces conventional weights and springs.